 Before You Begin
This 30-minute tutorial shows you how to create a HCM Spreadsheet Data Loader (HSDL) template to bulk load element entries for a specific element.
Background
HCM Spreadsheet Data Loader is a tool that enables you to create use-case specific bulk data loading spreadsheets for business users to use.
In this tutorial, you will:
- Create a spreadsheet template to bulk-load element entries.
- Configure the template attributes.
- Validate and test the template.
- Simplify the spreadsheet.
- Assign the job roles that will have access to use the spreadsheet and activate it.
Tutorial Scenario
In this tutorial, you'll create a template to bulk-load Overtime element entries. For the purposes of the tutorial, the Overtime element has three input values: Hours, Multiple and Periodicity. However, you can use the steps in this tutorial to create an element entry spreadsheet for any element.
What Do You Need?
- A Windows machine with the Desktop Integrator installed. Downloaded this from the Tools menu in the application. Desktop Integrator is not available on the Mac operating system.
- Access to the Spreadsheet Templates task in order to create and maintain spreadsheet templates.
Follow the steps in the Securing the Spreadsheet Templates Task topic within the Configure HCM Spreadsheet Data Loader Security tutorial, to configure a role with the access to create spreadsheet templates for the Worker business object.
Note: Custom job roles should be configured to provide access to HCM Spreadsheet Data Loader functionality.
 Create the Spreadsheet Template
In this step, you'll create a spreadsheet template and select the attributes that are required to create new element entries.
- On the home page, click My Client Groups > Data Exchange.
- On the Data Exchange page, select Spreadsheet Templates.
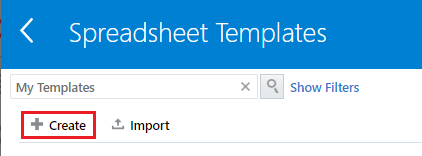
- Click Create to open the Create Template dialog box.
- Specify the template name, code, the object the template is for (in this case Element Entry) and optionally provide a description. Leave the Supported Action as 'Create and Update'.
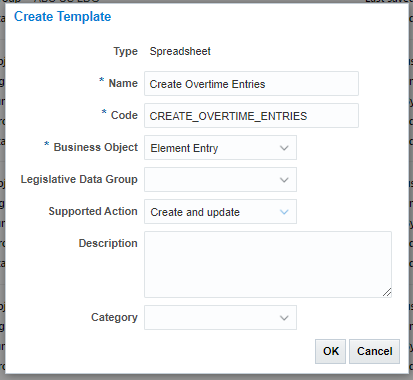
Click OK. You'll be navigated to the Define tab.
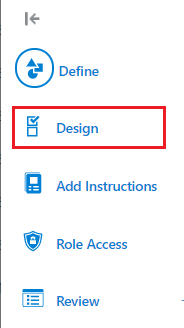
- Click Design.
- Select the Element Name attribute in the Available Attributes panel and add it to the Selected Attributes panel.
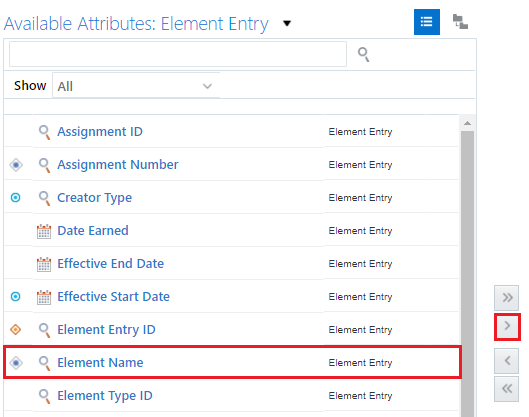
You'll be asked which key type you want to use to identify the element entries in the spreadsheet.

Select User Key and click OK.
Other mandatory attributes are automatically added to the list of selected attributes.
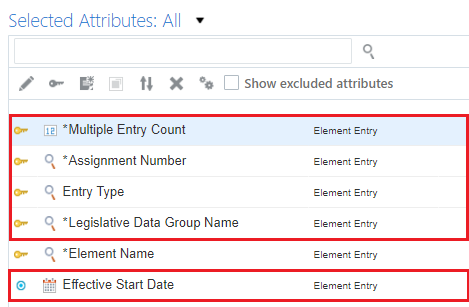
Note: The key icon prefixes all attributes that uniquely identify a record in the spreadsheet.
The magnifying glass icon indicates that the attribute provides a list of values in the spreadsheet.
- Drag the Creator Type attribute from the Available Attributes panel and drop it in the Selected Attributes panel.

This attribute is required for new element entries. The template now includes the attributes required to specify the element the entry is for.
- Click on the choice list next to the Available Attributes header and select Element Entry Value.

The element entry value attributes can now be seen in the Available Attributes panel.
- Add the Input Value Name and Entry Value attributes to the list of selected attributes.

- Optionally, check the Show excluded attributes checkbox.
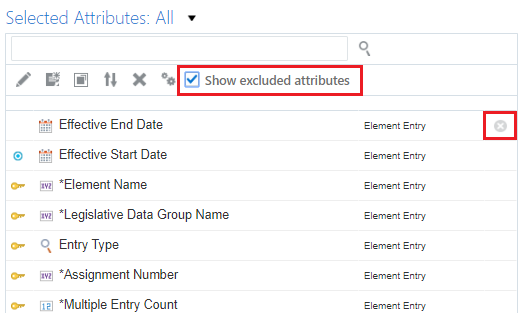
Often when you add attributes to the template, other mandatory attributes are added but defaulted and hidden. An icon to the right of the attribute name identifies attributes in the template definition that won't be seen in the spreadsheet.
- Save the template.

Next, you'll configure the template attributes.
 Configure the Template Attributes
Once the template is tested, most of the defaulted attributes are hidden from the spreadsheet. In this step, you'll configure the default values but not hide the attributes, until you have successfully uploaded an Overtime element entry using the spreadsheet.
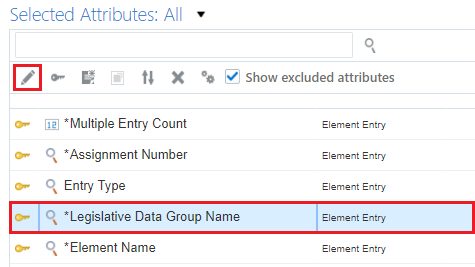
- In the Selected Attributes panel, select the Legislative Data Group attribute. Click the Edit icon on the panel toolbar.
- Define a default for the Legislative Data Group attribute by selecting the Value radio button, selecting a type of Constant value and specifying the name of the legislative data group for the element. In this example 'Vision Corporation US LDG'.
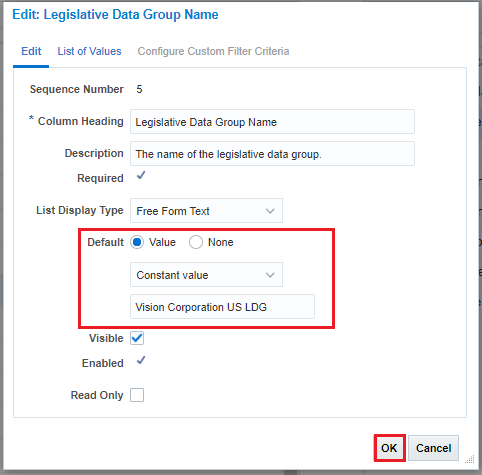
Click OK.
- Edit the Element Name attribute to define a default constant value of the element name as defined in the Elements task, in this example 'Overtime'.
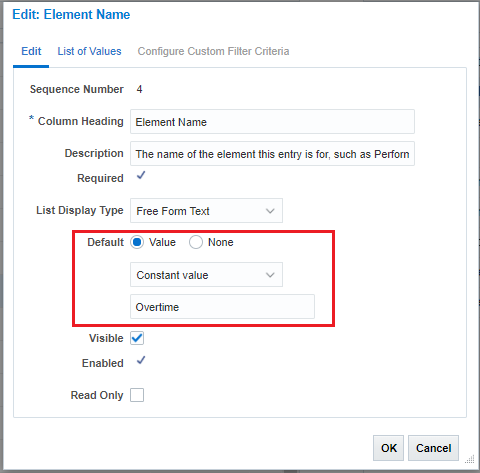
Click OK.
- Repeat the steps above to define constant default values for the following attributes:
Attribute Name Default Value Entry Type E Creator Type H Multiple Entry Count 1
- Edit the Effective Start Date attribute and make it required. Click OK.
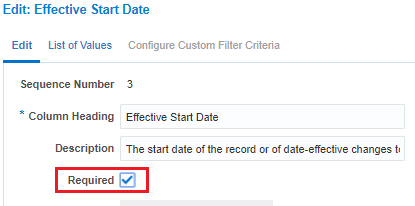
Note: The Effective Start Date is always required when creating new records.
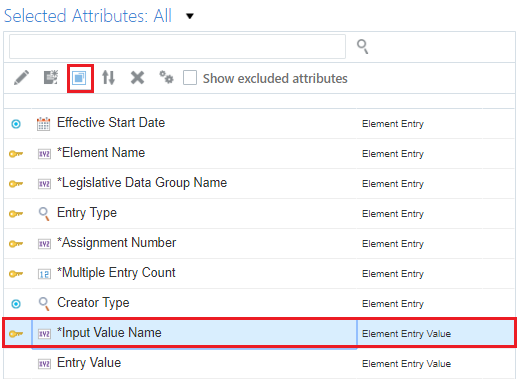
- When your element definition has more than one input value, you'll need to duplicate the element entry value attributes. Select the Input Value Name attribute and click the Duplicate button in the Selected Attributes panel toolbar.
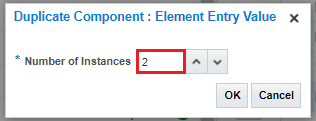
- The Overtime element used in this tutorial has three input values, so you would need to create two duplicates. Specify a value of 2 and click OK.
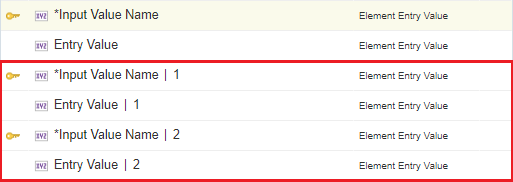
You'll see that a sequence number is appended to the duplicate attribute names, to make each name unique in the Selected Attributes panel:
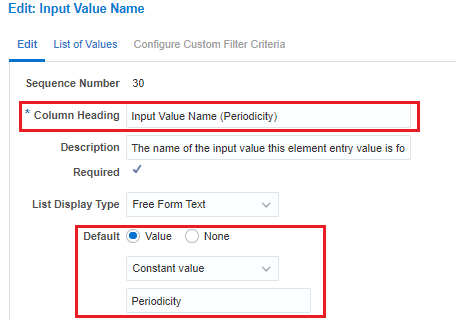
- Edit the original Input Value Name attribute, the one without a sequence number. Change the Column Heading to identify which input value this is for. In this example, Hours.
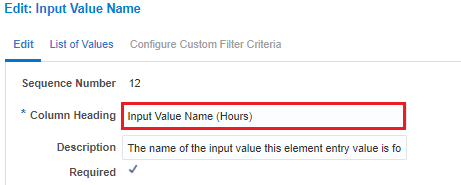
Note: The 'Input Value Name' attributes will be hidden before activating the spreadsheet, so this column header will not be seen in the final spreadsheet. The purpose of changing the header now is to be able to identify it in the Selected Attributes panel.
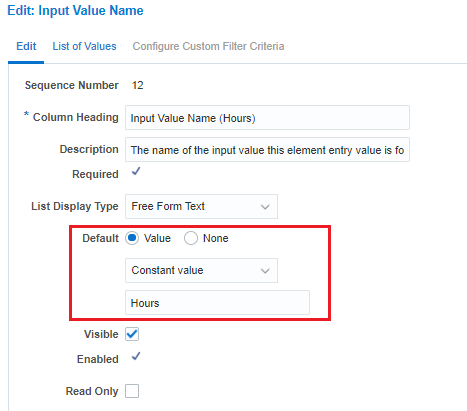
- Define a constant default value. Specify the name of the first input value defined on the element definition. In this example, Hours.
Click OK.
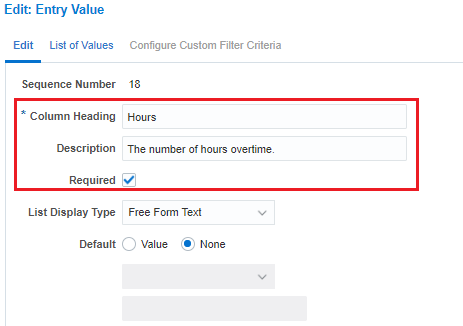
- Edit the original Entry Value attribute to:
- Update the Column Heading with the input value name, Hours.
- Optionally update the Description. The description is displayed in the spreadsheet when hovering over the column heading and is used to provide guidance on what values to supply.
- Check the Required checkbox to ensure a value is provided in the spreadsheet.
Click OK.
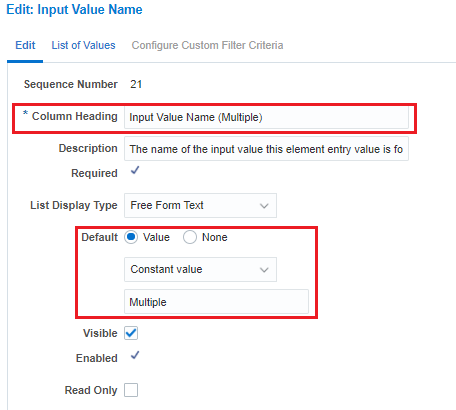
- Edit the second Input Value Name attribute (with sequence 1) to:
- Change the Column Heading to identify the input value.
- Specify a constant default value of the name of the second input value of the element, in this example, Multiple.
Click OK.
- Edit the second Entry Value attribute name:
- Update the Column Heading with the input value name, Multiple.
- Update the Description, to explain to the end user how to entry valid values for the input value.
- Check the Required checkbox.
- Optionally define a default value, such as 1.5 if overtime is usually paid at time and half.
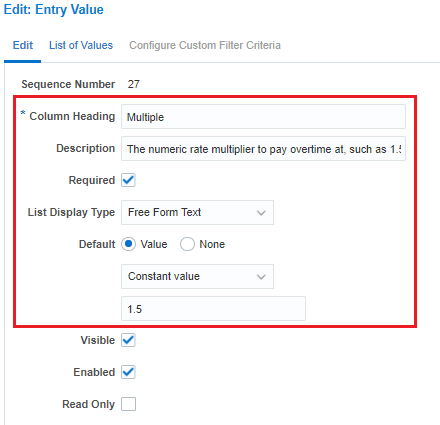
Click OK.
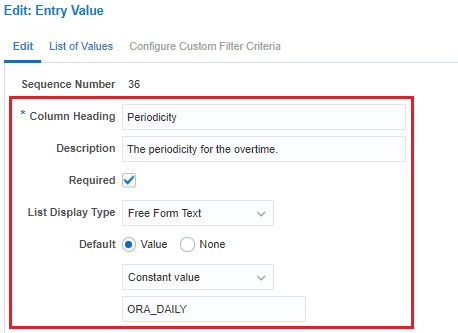
- Edit the third Input Value Name attribute using the steps above to configure this input value for Periodicity.
- Using the steps above, configure the last Entry Value attribute for the input value 'Periodicity', defining a default ORA_DAILY.
Tip: The Extending List of Values validation in HCM Spreadsheet Data Loader Spreadsheets tutorial explains how to configure a Lookup validated list of values for this attribute.
- Save the template, it is now time to test the attribute configuration works.
 Validate and Test the Template
You should be test the template configuration before simplifying and activating it.
- Click Validate to validate the template configuration.

You should not see any errors.

If you do see errors, revisit the steps above.
- Click Preview to generate a spreadsheet for the configured template. This downloads the GenericHdlSpreasdheet.xlsx file. Open it.
- Click Yes when you're prompted to log in.

Login with your application user and password. The spreadsheet is generated with each of the Selected Attributes in the template seen as a column in the spreadsheet.
- To be able to upload data with the spreadsheet you must first create a data set. Click Create Data Set on the Spreadsheet Loader toolbar.

Click OK on any dialog pages displayed.

Note: A data set is created with a defaulted name, you can override this if you want.
- Double click in any of the cells in the first row under the column headings to initiate the row.

The attributes with defaults defined should display values in the initiated row. The attributes configured as mandatory that don't have a value will be surrounded by a red box.
Note: The value displayed may not be the same as the value defaulted in the template. When an attribute is lookup validated, you must supply the lookup code as the default in the template. The lookup meaning is displayed in the spreadsheet.
See the Extending List of Values validation in HCM Spreadsheet Data Loader Spreadsheets tutorial for the different ways in which a spreadsheet column can provide lists of values.
- Enter valid data for each of the empty cells in the row.
Columns with the [..] symbol after the name provide a searchable list of values. Double click the cell you want to provide a value for to open the LOV window.
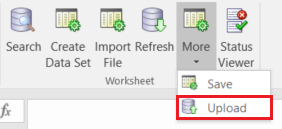
- In the Spreadsheet Loader toolbar, click More > Upload.
Click OK on any dialog pages displayed.
- Click Refresh regularly to refresh the spreadsheet row status.

The Upload Progress will change status until processing completes with a Success status.

- Use the Element Entries task to ensure the Overtime element entry was successfully created.
 Simplify the Template
Now that the spreadsheet is known to work you should hide attributes that the user does not need to update.
- If you have closed your template, you need to reopen it:
- From the home page, click My Client Groups > Data Exchange.
- Click Spreadsheet Templates.
- Search for your template and click the template name.
- Click Define.
- In the Selected Attributes panel, edit the Legislative Data Group attribute. Uncheck the Visible checkbox.

Click OK.
- Repeat for the following attributes:
- Element Name
- Entry Type
- Creator Type
- Multiple Entry Count
- All 3 occurrences of Input Value Name
You'll now see only the attributes that the user needs to supply in the spreadsheet.
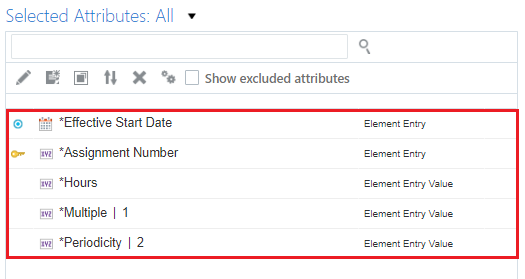
- Click the Reorder icon on the Selected Attributes panel toolbar.

The Reorder Attributes dialog allows you to define the order in which the columns are displayed in the spreadsheet.
- Select the Assignment Number attribute and use the buttons to move it to the top of the list.
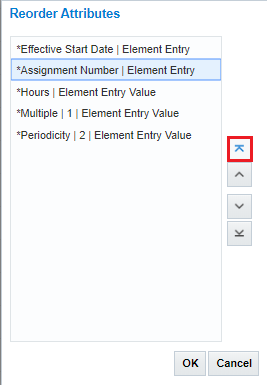
Click OK when the attributes are in an order that is logical for data entry.
- Save the template and click Preview. Your generated spreadsheet will be much simpler.
 Assign Roles and Activate Template
In this step, you'll edit the spreadsheet template to assign which job roles can use it.
- Use the Spreadsheet Templates task to edit your template.
- Click Define.
- Under the Template Security section, confirm the Upload Data As value is 'Session user' and the Assign Roles to Template value is 'Enabled'.

Note: The ability to load data as the session user is specific to each object. If the only option available is Elevated User, then data security for that object is not yet available for HSDL.
When the template is configured to upload data as the elevated user, no data security is applied and you can't assign roles to the template.
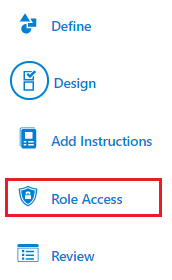
- Click Role Access.
- On the Permitted Data Set Operations table, click the Create icon.

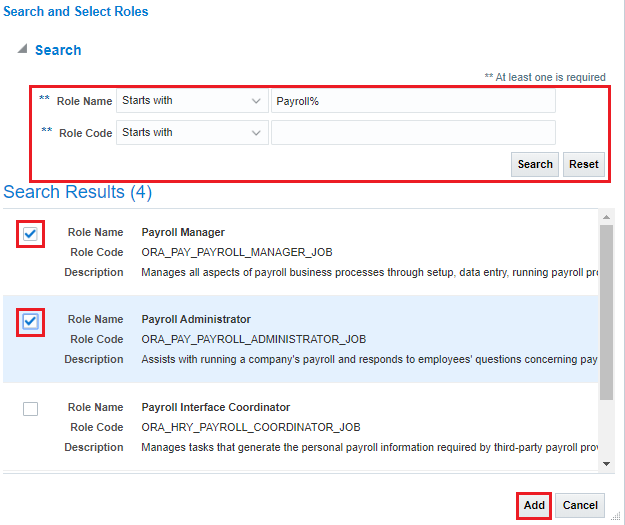
- Search for and select the job roles that can use spreadsheets generated from this template, to bulk load Overtime element entries. Click Add.
- Specify which actions each assigned role can perform on data sets created within the generated spreadsheet. For example, can users with the job role create data sets, save changes to data sets, upload data sets and can they view all data sets, or just those they have created themselves?

Here the Payroll Administrator can create, save and upload data sets but only see and act on data sets they have created. Whereas, the Payroll Manager can also view and act on any data set, created by any user, with this template.
- Navigate to the Define page and update the template Status to Active. Save your changes.

The spreadsheet will now be available to all users with any of the roles assigned to the template.
- You should now re-test your spreadsheet, logging in with a user that has a job role which has data set permissions for the template.
- When entering data in the spreadsheet, ensure that any searchable lists of values list only the records the user has the access to work with. For example, does the Assignment Number list of values only list those assignment numbers the user can create element entries for?
- When uploading spreadsheet rows, ensure that the user can only create records for the people they have the data security to maintain.
 Next Tutorial
Extending List of Values validation in HCM Spreadsheet Data Loader Spreadsheets
 Creating a HCM Spreadsheet Data Loader Template for Loading Element Entries