Before You Begin
Purpose
This tutorial demonstrates a change request process for a new financial account using conditional workflow in Oracle Data Relationship Governance.
Time to Complete
Approximately 30 min.
Background
The lifecycle of a request is determined by its workflow model. The workflow model controls the stages of workflow, the tasks which can be performed, and the users who can participate in the request. During its lifecycle, a request must go through at least two workflow stages (Submit and Commit) but, depending on the model, it may need to go through additional approval or enrichment stages before it can be committed.
Scenario
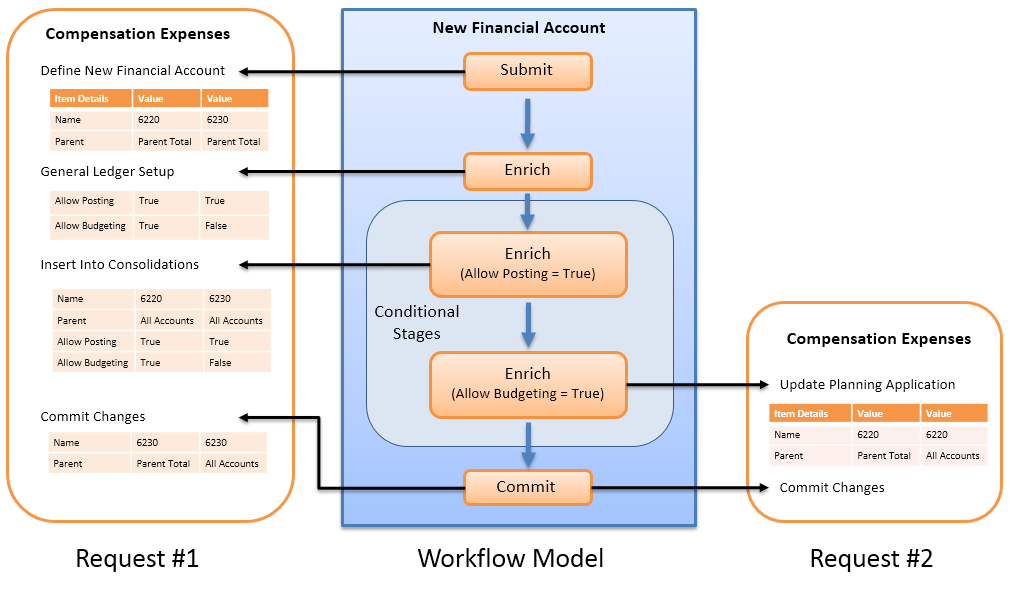
In this tutorial, you process the Compensation Expenses change request to add two financial accounts (6220 and 6230) into two hierarchies (Parent Total and All Accounts). As the first enrichment user, you set property values (Allow Posting and Allow Budgeting) that control whether the request enters or skips later workflow stages. The request enters the Insert Into Consolidation stage based on the property criteria (Allow Posting = True) and you add new request items to insert the financial accounts into an alternate hierarchy (All Accounts). The next workflow stage uses a conditional action to split the request items into separate requests where one request enters the Update Planning Application stage based on the property criteria (Allow Budgeting = True) and the other skips the stage. Finally, as the committing user, you individually approve the separate requests to commit all of the changes to the target version.
What Do You Need?
Before starting this tutorial, you should:
- Have access to or have installed Oracle Data Relationship Management 11.1.2.4.311.
- Have access to or have installed the COAMGMT Data Relationship Management application. You can download the application here and use these instructions to install and configure the application.
- Have built workflow tasks and a workflow model by completing the Building A Workflow Model With Conditional Stages tutorial.
- Have created a change request and loaded request items by completing the Loading Request Items from a Source File tutorial.
Enriching the Compensation Expenses Request
In this section, as the first enrichment user you review the request items and set values for the Allow Posting and Allow Budgeting properties that are used by later workflow stages to control whether the request enters or skips those stages.
-
Launch Data Relationship Management Web Client.
The logon page for Oracle Data Relationship Management is displayed.

-
Log on to the COAMGMT application as user cgreen with a password of Welcome!.
The Worklist page is displayed and the Compensation Expenses request is assigned to the user.

-
Double-click the request to open it on a different tab, then click the Claim icon (
 ) to claim the request.
The request is claimed and now editable.

-
The default value for the Allow Posting and Allow Budgeting properties is True. Keep these values as True for the first request item (6220). For the second item (6230), set the Allow Budgeting property to False. The values of these properties will control which workflow stages the request must go through in order to be committed to the version.

-
Click the Approve icon (
 ) to save the changes and approve the request for the stage.
-
Log out as user cgreen.
Entering a Stage Using Property Criteria
The request entered the "Insert into Consolidations" stage because it met the stage condition (the property criteria) Allow Posting = True, and the request was assigned to users in that stage.
-
Log on to the COAMGMT application as user jcooper with a password of Welcome!.
The Worklist page is displayed and the Compensation Expenses request is assigned to the user.

-
Double-click the request to open it on a different tab, then click the Claim icon (
) to claim the request.The request is claimed and now editable.

-
Click the Add Items icon (
 ) to add new request items to insert the new financial accounts into the All Accounts hierarchy, an alternate hierarchy used for consolidation and budgeting purposes.
The Add Items dialog box is displayed. In the Task drop-down list, the active task for the stage, Insert Financial Account, is pre-selected.

In the Hierarchy drop-down list, select Parent Total, click the Items tab, and select the two accounts from the previous request items to insert them into the alternative hierarchy. Click the Select button (
 ) to move the available items to the Selected list.
-
Click OK.
The two new request items are added to the request.

-
Click the ellipsis button (
 ) on the Parent Node property to choose a parent in the All Accounts hierarchy. Search for account 6000 and select it.
-
Click OK.

-
Repeat steps 6 and 7 to set the same value for the Parent Node property for the other request item.

Splitting Request Items into a Separate Request
-
Click the Approve icon (
) to save the changes and approve the request for the stage. Note that the request which previously had 4 request items now only has two request items. The two request items where Allow Budgeting = True were split to a new request which entered the stage for further enrichment by users of that stage. The Split icon ( ) identifies the stage with the split.
-
Select the Activity tab to view request activity. Note that two of the request items were split out into a new request as a result of the stage condition and action configured for the Update Planning Application stage.

-
Log out as user jcooper.
-
Log on to the COAMGMT application as user wfaulk with a password of Welcome!.
The Worklist page is displayed with a list of requests that are assigned to the user for the Updating Planning Application stage. This request was automatically created by the Split condition (Allow Posting = True) configured for the stage and request items that met the criteria were moved to this request.

-
Double-click the request to open it on a different tab, then click the Claim icon (
) to claim the request.The request is claimed and now editable.

-
Click the Approve icon (
) to save the changes and approve the request for the stage. The request proceeds to the Commit Financial Account stage.

-
Log out as user wfaulk.
Enforcing Separation of Duties
-
Log on to the COAMGMT application as user cgreen with a password of Welcome!.
The Worklist page is displayed and the Compensation Expenses requests are assigned to the user for the Commit Financial Account stage.

-
Select the first request and click the Open button (
 ) in the preview section of the request.
The request is displayed on a new tab. Note that despite the request was assigned to cgreen, the Claim button (
) is not available to the user. This restriction is enforced by the Separation of Duties option configured for the Commit Financial Account stage. A different user for the workflow stage must claim and approve the request.
-
Select the Participants tab to view the request participants.
Note that user Christy Green previously participated in the General Ledger Setup stage. This user is a member of two user groups, one which is configured with the General Ledger Setup stage and the other which is configured with the Commit Financial Account stage.

-
Log out as user cgreen.
Committing Split Requests
The original request items were split into two separate requests based on the property criteria (Allow Budgeting = True0 and the conditional action in the previous stage of the workflow. Hence, as the committing user, you individually approve the separate requests to commit all of the changes to the target version.
-
Log on to the COAMGMT application as user jstein with a password of Welcome! and click Worklist on the Home tab.
The Worklist page is displayed and the Compensation Expenses requests are assigned to the user for the Commit Financial Account stage.

-
Double-click the request to open it on a different tab, then click the Claim icon (
) to claim the request.The request is claimed and now editable.

-
Click the Approve icon (
) to commit the request to the target version.
-
Close the Compensation Expenses tab.
The Worklist page is displayed.

-
Repeat steps 2 and 3 above to claim and approve the other Compensation Expenses request.

Verifying Changes in the Target Hierarchies
-
Close the Compensation Expenses tab, click Browse on the Home tab, and select the Vision Jan 2013 version.

-
Expand the Account hierarchy group and double-click Parent Total.
The Parent Total hierarchy is open on a new tab.

-
Expand the 6000 node.
The new financial accounts 6220 and 6230 have been added to the hierarchy.

-
Close the Parent Total - Vision Jan 2013 tab, and from the Home tab open the All Accounts hierarchy.
The Worklist page is displayed.

-
Search for the node 6220.
The new financial accounts have been added to the hierarchy.

-
Log out as user jstein.