Creating and Using Contexts and Dependency Injection (CDI) Events
Overview
- Java Platform, Standard Edition (Java SE) 7 (Java SE 7u11
recommended)
- NetBeans 7.x IDE Java EE version (NetBeans 7.2 recommended)
- GlassFish 3.1.2 or Oracle WebLogic Server 12c
- Have some experience with writing and deploying Java EE
applications.
- Have installed and started NetBeans 7.2 Java EE edition.
- Have unzipped the AuctionWatcher.zip file.
- Have opened the AuctionWatcher project in NetBeans.
- (Optional) Have installed WebLogic Server 12c. See
the resources section for more information on installing
WebLogic Server and adding it to NetBeans.
Purpose
This tutorial covers creating and using events with Contexts and Dependency Injection (CDI).
Time to Complete
Approximately 45 minutes
Introduction
Events are an important part of the JavaBeans model. You have
probably used events in Abstract Windowing Toolkit (AWT) and
Swing applications by registering a listener on a component.
When you click the component (like a button), an event is fired
and handled by the registered listener.
Contexts and Dependency Injection (CDI) was introduced with Java Platform, Enterprise Edition (Java EE) 6 as JSR-299. The Contexts part of CDI allows beans to share and participate in the life cycle of another bean, while the Dependency Injection part of CDI allows beans to get a reference to an instance of another bean simply by injecting it. CDI power is the ability to loosely-couple classes by removing the instantiation process and simultaneously enforcing strong-type checking. CDI provides an @Inject annotation to create a reference to another bean (avoiding the older context lookup process). CDI enforces typing by eliminating string-based lookup so that the compiler can detect errors. CDI works very well with integrated development environments (IDE's).
The CDI event model allows beans to send events to one another
without a compile-time dependency, and beans may create their
own event payloads - a class that contains information pertinent
to the event. Using CDI events, one bean can define the event,
another can fire the event and a third can handle the event. And
unlike with other event models, you can add listeners
(observers) without registering them as listeners.
Scenario
In this tutorial, you will look at part of an auction application from the course entitled Java EE 6: Build Database Applications with JPA. In this application, you use the first view page to register watchers (people interested in being notified of any changes in an item for auction.) In this tutorial, you add watchers as simple strings to a List object (they could be e-mail addresses or instant messaging ids in production). The watchers could also be added as a part of the overall application (as is the case in the Auction Application in the course).

In the item bid window, when a bid is placed on the item for auction, the watchers should be notified of the new bid and the time when the bid was placed.

This scenario illustrates an Observer design pattern, where
watchers are the observers that self-register their interest in
the notification of events.
Software Requirements
The following is a list of hardware and software requirements:
Prerequisites
Before starting this tutorial, you should:
Creating the Event Class
An event can be as simple as a String, in which case you do not need to create an event class. However, when you want to pass more than just a String to an listener, you create a simple Plain Old Java Object (POJO) to contain the event information (payload).
Right-click Source Packages and select New >
Java Package.

Enter event as the package name and click Finish.

Right-click the new package and select New > Java
Class.

Enter AuctionEvent as the class name and click Finish.

Add fields to the AuctionEvent class to hold the String description of the auction, the current item price as a float, a Date timeStamp, and a List of String watchers:
private String
auctionDescription;
private float price;
private Date timeStamp;
private List<String> notifyList;
Add the following import statements at the top of the
class:
import java.util.Date;
import java.util.List;
Add a no-arg constructor to the class. Right-click below
the fields and select Insert Code (or press
Alt-Insert). Then select Constructor from the Generate
dialog box:

Leave the fields unselected to create a no-arg constructor
and click Generate.

Note: You can also select the fields if you want to create a constructor that takes arguments.
Use the same code generating technique to add a getter and setter for each of the fields.
a. Press Alt + Insert and select Getter and Setter from the Generate dialog box.
b. Select the AuctionEvent class name to select all fields and click Generate.

Save the file.
Creating an Event Qualifier
Although CDI qualifiers are not required with CDI Events, for this tutorial, you create a qualifier to identify a particular type of Auction Event (Bid). As you will see later, with a qualifier you can narrow down which method receives an event.
Create another package under the event package to hold qualifiers.
a. Right-click on the event package and select New > Java Package.
b. Enter qualifier as the package name and click Finish.

Create a CDI Qualifier in the qualifier package.
a. Right-click on the qualifier package and select New > Other.
b. Select Contexts and Dependency Injection from Categories and Qualifier Type from File Types.
c. Click Next.

Enter Bid as the qualifier class name and click Finish.

A CDI qualifier is automatically generated:
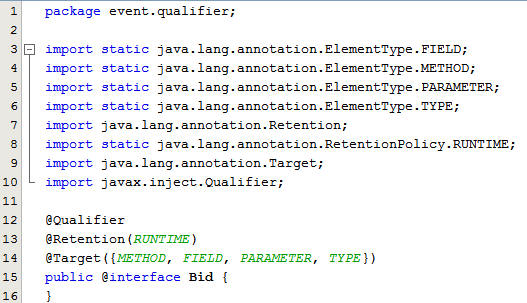
A qualifier creates a type that can be added as an
annotation to a bean to narrow down the definition of
the bean type. When a bean does not have a qualifier,
CDI applies @Default. You can apply the @Bid qualifier
to a method, a field, a parameter or another type.
Creating an Event Handler
The Event Handler class can be any Java class that contains a
method you wish the event to invoke and pass the AuctionEvent
object to.
Create another package to hold observers.
a. Right-click on Source Packages and select New > Java Package.
b. Enter observer as the package name and click Finish.
Add a POJO called WatcherEventHandler to the
observer package.

Perform the following actions:
a. Add a no-arg constructor to the class.
b. Add a method called notifyWatchers that takes an AuctionEvent event as a parameter.
c. In the parameter list add the CDI @Observes annotation and the qualifier you created, @Bid.
public WatcherEventHandler() {
}
public void notifyWatchers (@Observes
@Bid AuctionEvent event) {
System.out.println("In notifyWatchers");
for (String s :
event.getNotifyList()) {
System.out.println("Notifying watcher: " + s + " of bid on
auction: "
+ event.getAuctionDescription()
+ " price changed to: $" + event.getPrice()
+ " at: " + event.getTimeStamp());
}
}
The annotations placed on the method parameter indicate that this method will be invoked when an AuctionEvent that is qualified with @Bid is fired. You could call this method in your application directly, but using the @Observes annotation allows you to decouple the event handler from your code. The notifyWatchers method writes a message to each of the watchers in the notifyList field of the event. The message indicates the current price of the item up for auction and the date and time the bid was placed.
Press Ctrl + Shift + I to fix any missing import
statements then save the file.
Adding Code to the JSF Bean to Fire the Event
In the JSF bean, AuctionBean, you add code to fire an event
when a new bid is placed on the auction item.
Add an injected instance of a javax.enterprise.event.Event object of type AuctionEvent, qualified by @Bid:
@Inject @Bid
private Event<AuctionEvent>
bidEvent;
Note: Because this is a CDI Event injection, ignore
the NetBeans warning about an unsatisfied dependency. You
can click the warning to see the CDI event symbol.

Open the AuctionBean in the jsf package and locate the placeBid
method.

Note: The line numbers in your code may not match
exactly.
Add the following code below the JSFMessage.addInfoMessage line:
AuctionEvent eventPayload = new AuctionEvent();
eventPayload.setNotifyList(watchers);
eventPayload.setAuctionDescription(description);
eventPayload.setPrice(currPrice);
eventPayload.setTimeStamp(new Date());
bidEvent.fire(eventPayload);
This code creates an AuctionEvent payload from the current
list of watchers, the item description, the current price of
the item, and the current time. It then fires an event with
the AuctionEvent object as its event payload. Only observers
of the @Bid AuctionEvent event type will receive this event.
Save the file.
Running andTesting the AuctionWatcher Application
Deploy the application to the server (GlassFish Server
3.1.2 by default.)

In a browser, open the application by entering the URL: localhost:8080/AuctionWatcher to open the application.
Perform the following actions:
a. Add a watcher (for example, Tom) and click Add Watcher.
b. Add more watchers (for example, Matt and Cindy) and click Add Watcher after each name.
c. Click Go To Item.
You can click the Remove link next to the name of a watcher
to remove the watcher.

On the Item view page, click the Bid button to
place a bid on this item.

In the console window for GlassFish Server, the event fired was observed by the notifyWatchers method, which iterated through the list of watchers and printed a notice for each watcher:

Each time a new bid is placed on the item, the watchers are notified. You can also use this method to send a text message or an e-mail to each watcher.
Firing an Event from a CDI Interceptor
The central theme for Contexts and Dependency Injection is
loose coupling. Modifying your JavaServer Faces (JSF) placeBid
method to fire an event is not the best way to decouple your
code from the event mechanism.And, as you saw in the Creating
and using CDI Interceptors OBE, the better approach is to
fire the event from an interceptor.
Remove or comment out the code in the placeBid method of the AuctionBean class:

Tip: A quick way to comment out several lines of code is by selecting the lines and pressing Ctrl + Shift + C.
Open the NotifyInterceptor class and add an injection for the Event and for the AuctionBean.
You need to inject a reference to the AuctionBean to access the properties of the bean for the event.
@Inject @Bid
private Event<AuctionEvent>
bidEvent;
@Inject
private AuctionBean bean;
Modify the notifyEvent method to fire an event if the bid is valid (greater than the minimum bid amount). Add this code after the context.proceed line of code:
if (bean.getBid() > bean.getMinBid()) {
AuctionEvent eventPayload = new AuctionEvent();
eventPayload.setNotifyList(bean.getWatchers());
eventPayload.setAuctionDescription(bean.getDescription());
eventPayload.setPrice(bean.getCurrPrice());
eventPayload.setTimeStamp(new Date());
bidEvent.fire(eventPayload);
}
Fix any missing imports and save the file.
Add an @Notify annotation to the placeBid method
for the interceptor:

NetBeans indicates that the method is now an intercepted method.
Add an <interceptors> element to the
beans.xml file with the fully qualified name of the
interceptor class:

The interceptor is turned on.
Save the file to automatically deploy the application to the server.
Testing the AuctionWatcher Application with the
Interceptor
In a browser, open the application again by entering the
URL: localhost:8080/AuctionWatcher and enter the
names of some watchers:
Go to the Item view page and click the Bid button to place a bid:
In the console window for GlassFish Server, notice that the interceptor was called and fired the event to notify the watchers:

This approach is a better way to decouple the event notification code from the business logic. With this approach, you can centralize the code that fires events and avoid duplication of code in your business logic.
Summary
- Create an CDI event.
- Create an CDI qualifier to apply a specific type to the event.
- Fire an event directly in your code.
- Use an interceptor to further decouple your code from the
event code.
- Creating
and Using CDI Interceptors: This OBE covers how to
create and apply CDI interceptors.
- Installing, Configuring, and Testing WebLogic Server 12c Developer Zip Distribution in NetBeans: This OBE covers how to install the Oracle WebLogic Server 12c (12.1.1) developer instance on Windows and configure it as a Java EE Application Server in NetBeans.
- Developing Applications with Java EE 6 on WebLogic Server 12c: This course covers the breadth of Java EE technologies that are part of the Java 6 Web Profile.
- Developing Web Applications using JSF Technologies: This course covers JavaServer Faces, the server-side component framework designed to simplify the development of user interfaces for Java EE applications.
- Building
Database Driven Applications with JPA: This course
covers the standard Java object-relational-mapping technology,
Java Persistence API.
- The Java EE 6 Tutorial: The tutorial is an excellent source of information about the technologies included in Java EE 6, including Contexts and Dependency Injection.
- JSR-299:
Contexts and Dependency Injection for the Java EE Platform:
The official specification for CDI
- To learn more about Java EE, visit other OBE tutorials in
the Oracle
Learning Library.
- Lead Curriculum Developer: Tom McGinn
In this tutorial, you learned how to:
Resources
The application in this tutorial uses JSF Facelets and managed
beans. o learn more about these technologies see the following
resources: