Creating a Simple Java Message Service (JMS) Producer with NetBeans
and GlassFish
Overview
- Download and install Java JDK 7 from this link.
- Download and install NetBeans IDE 7.1.2 Java EE version
which includes GlassFish 3.1.2 (Java EE download bundle) from
this link.
During installation, be sure to check the box to install Glassfish. JUnit is an optional installation and not required for this tutorial.
- Have the software installed as listed under Software
Requirements.
- Start the NetBeans IDE.
- Download and unzip the MDBExample.zip
file that contains a NetBeans project you need to complete
this tutorial.
Note: It is recommended that the location where you unzip the NetBeans projects does not contain spaces or non-alphanumeric characters.
Purpose
This tutorial demonstrates how to use the JMS API to create a
simple message producer using GlassFish 3.1.2 and NetBeans 7.
Time to Complete
Approximately 45 minutes.
Introduction
Messaging is a method of communicating between software components or applications. Messaging allows loosely-coupled communication between distributed applications. Message clients can send and receive messages by connecting to a messaging agent that facilitates message receipt and delivery. Clients need not know anything about other clients that will consume or produce messages. A message client only needs to know the format of the message to send and the destination. Thus messaging differs from other tightly coupled technologies, such as Remote Method Invocation (RMI), which require an application to know a remote applications methods.
The Java Message Service API was designed by Sun Microsystems
and several other companies to address the need to connect
intra-company applications through enterprise messaging
products, sometimes referred to as Message Oriented Middleware
(MOM). JMS provides a way for Java applications to access
messaging systems. JMS is a set of interfaces and associated
semantics that defines how a JMS client access the facilities of
messaging implementation. In this regard JMS is very much like
JDBC.
Messaging systems are peer-to-peer facilities, allowing clients
to send and receive messages from any other client. Some
messaging systems can also broadcast messages to many
destinations, and clients subscribe to a specific channel or
topic to receive messages from that are broadcast. JMS is
implemented to support both models, depending upon the
implementation of the JMS provider. The figure below illustrates
the participating components of a Java Message Service
implementation.
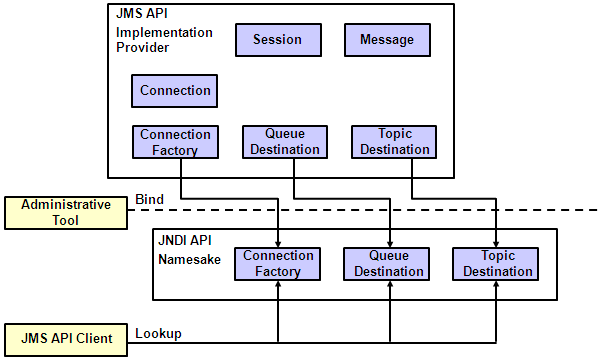
The JMS API Messaging System Participants
A JMS technology provider (JMS provider) is a messaging system that provides an implementation of the JMS API. For an application server to support JMS technology, you must place the administered objects (connection factories, queue destinations, and topic destinations) in the JNDI technology namespace of the application server. Typically, you would use the administrative tool supplied by the application server to perform this task. However, in this tutorial, you will use the capabilities built into NetBeans to define and create the administered objects.
Specifically, you will define a Queue Destination and
Connection Factory in NetBeans. After deploying the application
once, you can use a feature in NetBeans to generate the code
that uses the Connection Factory you specified to generate a
Connection object. With the Connection object, the generated
code creates a Session object, which is used to create a
MessageProducer object to send the string entered on JSF page to
the queue as a Message object.
Software Requirements
The following software is required to complete this tutorial in
Windows platform. You must install the software
in the given order.
Prerequisites
Before starting this tutorial, you should:
Create a NetBeans Web Application Project
NetBeans provides a number of different project options. In this tutorial, you will create a Web Application project and use the JSF framework.
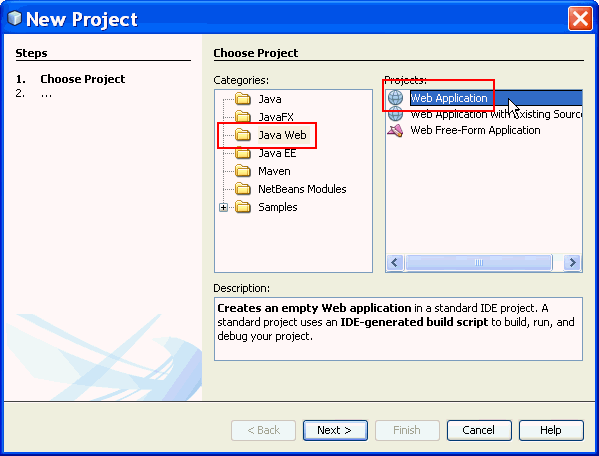
Create a New Web Application Project.
Select File -> New Project.
From the New Project dialog, select Java Web as the Category and Web Application as the Project. Click Next.
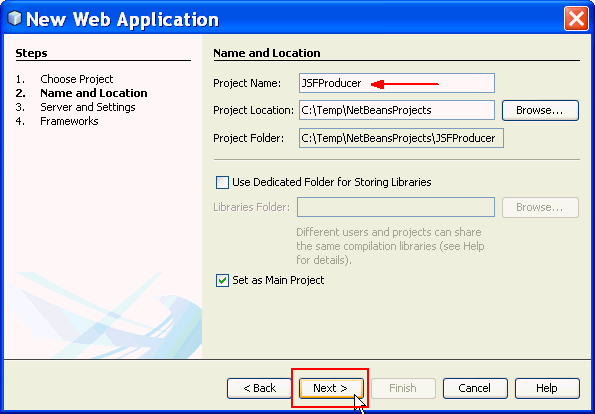
Enter JSFProducer as the Project Name.
Your project location can be anywhere you want.
Click Next.
Select Enable Contexts and Dependency Injection. Click Next.
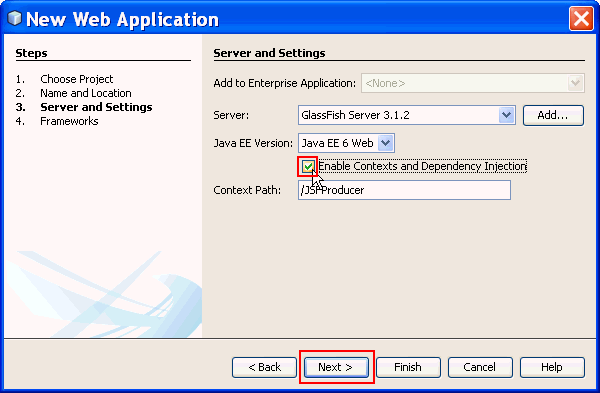
Select JavaServer Faces as your framework. Click Finish.
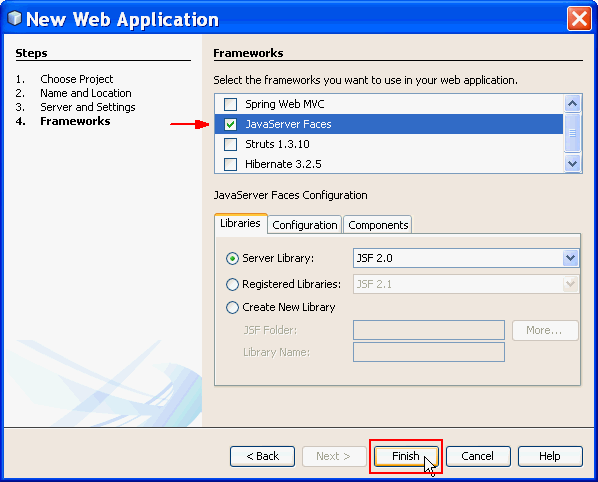
NetBeans has created a simple JSF-based Web Application for you, including a simple index.xhtml JSF Facelet.
Create a JMS Producer Managed Bean
In this topic, you will create a managed bean for the JSF Facelet.
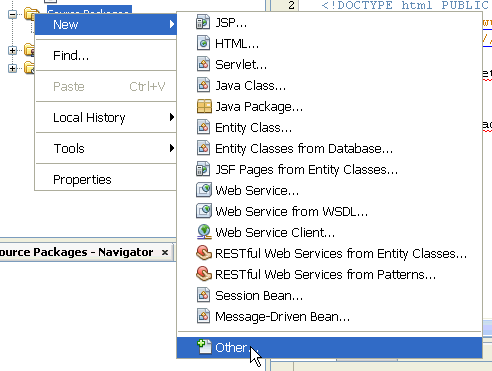
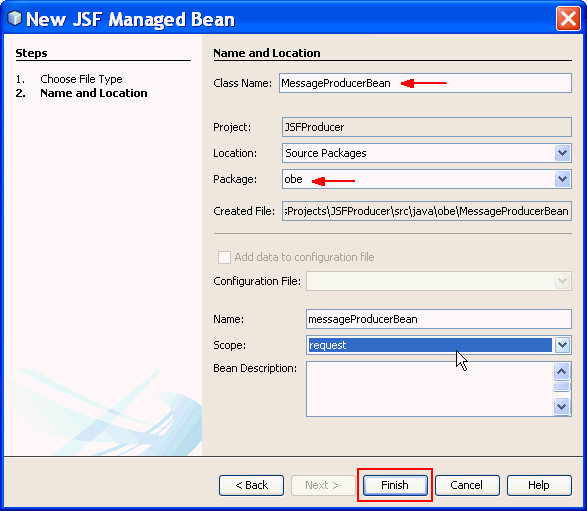
Create a new JSF Managed Bean.
Expand the Project you created. Right-click on Source packages and select New -> Other.
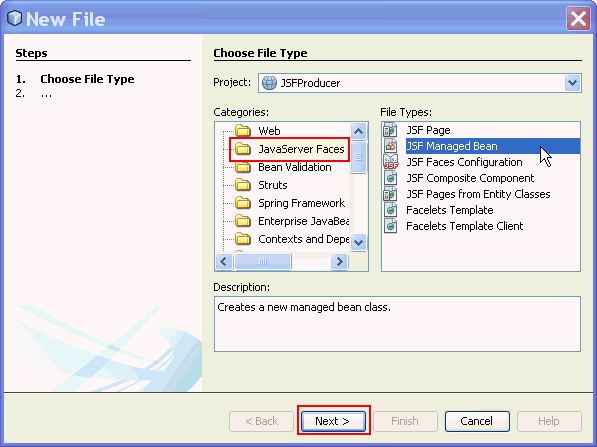
Choose JavaServer Faces from Categories and JSF
Managed Bean from File Types. Click Next.
Enter MessageProducerBean as the Class Name.
Enter obe as the Package name.
Select request as the Bean scope.
Click Finish.
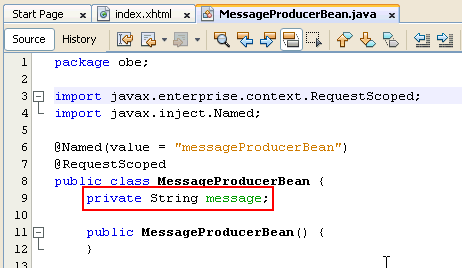
Implement the JSF managed bean with a String message field
Add a String message field to the managed bean.
private String message;
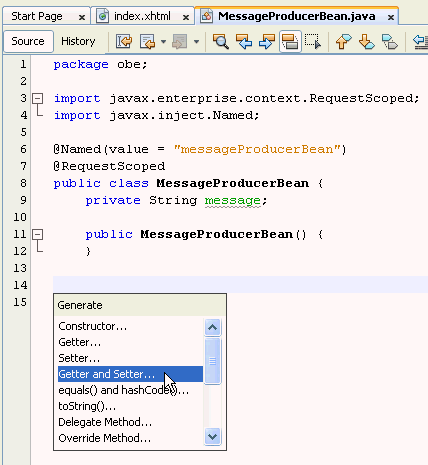
Use the NetBeans Insert Code feature to add a getter and setter for the field. Click in the MessageProducerBean file just above the last closing brace and press the Alt-Insert key, and select Getter and Setter from the Generate list.
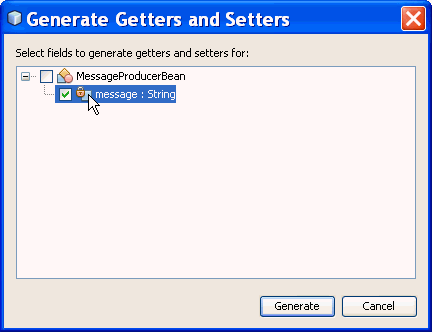
Choose the message field. Click Generate.
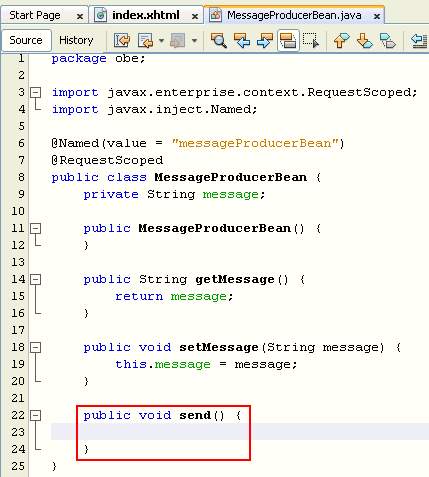
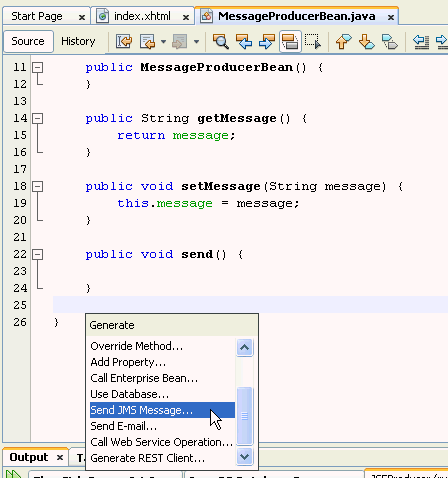
Add an empty send() method with a void
return type (you will fill this method in later) below
the getter and setter.
Save the file.
Implement the JSF page
Add components to the JSF page to write to the message field in the managed bean.
Expand the Web Pages folder and open the index.xhtml file. Add the following markup to the page replacing the Hello from Facelets string:
JMS Message Producer
<h:form>
<h:outputLabel value="Message: "
for="message"/>
<h:inputText id="message"
value="#{messageProducerBean.message}"/>
<h:commandButton value="Send Message"
action="#{messageProducerBean.send}"/>
<h:messages globalOnly="true"/>
</h:form>
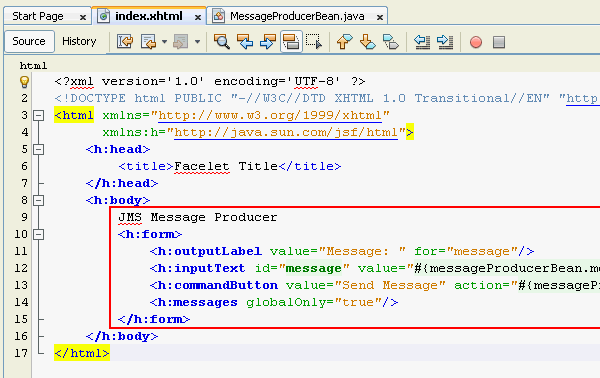
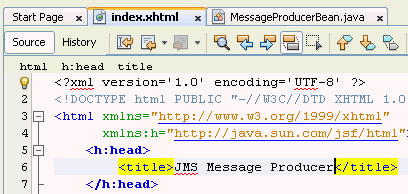
Change the title of the JSF page to JMS Message Producer. Save the file.
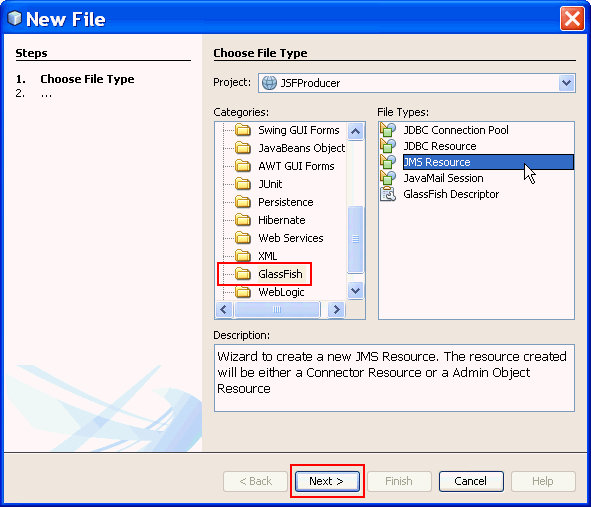
Add a message queue and connection factory to your
project.
Add a JMS queue Admin Object Resource.
Right-click on the project and select New ->
Other.
Choose GlassFish from Categories and JMS
Resource from File Types.
Click Next.
Accept the default JNDI name, jms/myQueue and
the default Admin Object Resource. Click Next.
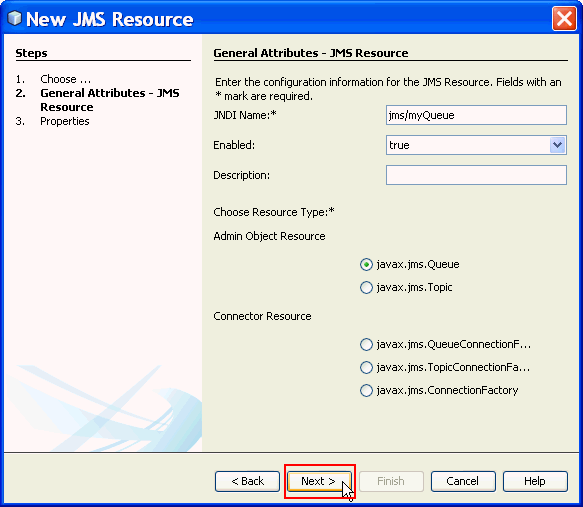
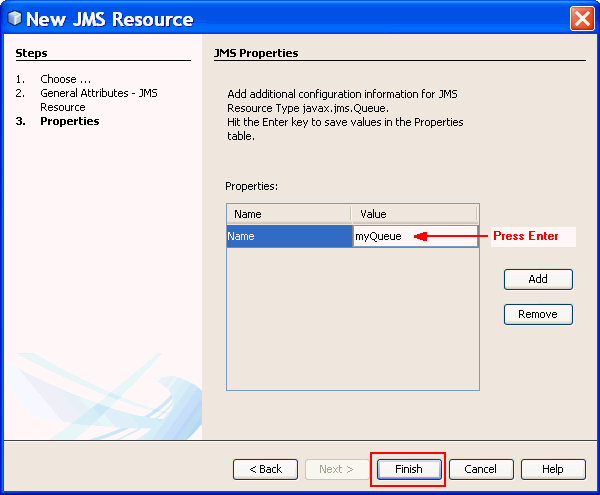
On the JMS Properties screen, enter myQueue
in the value field and press the Enter key.
Click Finish.
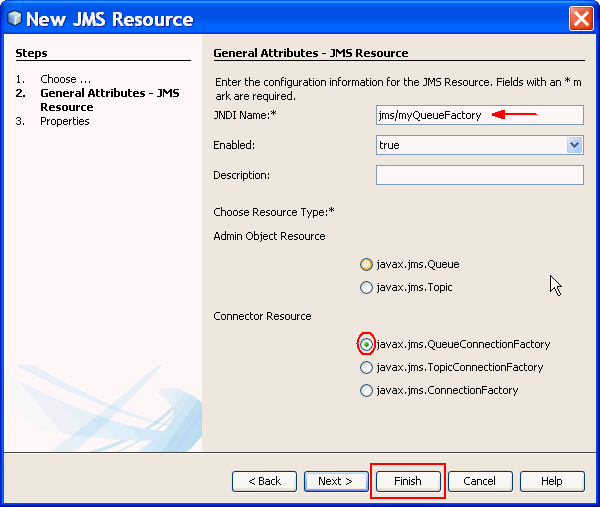
Add a JMS Queue Connector Resource
Right-click on the project and select New ->
Other.
Choose GlassFish from Categories and JMS
Resource from File Types.
Click Next.
Enter jms/myQueueFactory as the JNDI Name.
Select javax.jms.QueueConnectionFactory as the
Connector Resource.
Click Finish.
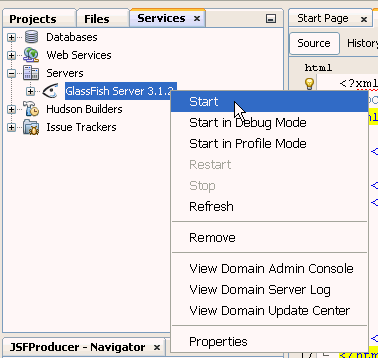
Start Glassfish Application Server and Deploy the
application.
Open the Services tab (Windows -> Services) and
expand Servers.
Right-click on GlassFish Server 3.1.2 and
select Start.
Note: If your instance of GlassFish already has a
green triangle beside the fish icon, the server is already
started and the Start command will be greyed out.
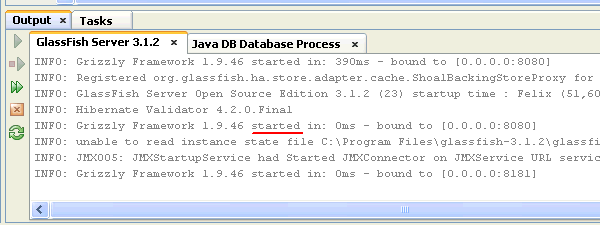
In the Output Window, you should see the GlassFish Server
3.1.2 console indicating GlassFish started.
Note: Java DB Database also starts automatically.
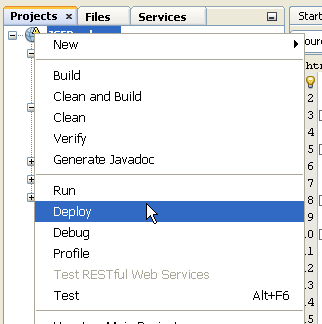
Select the Projects tab to open it.
Right-click the JSFProducer project and
select Deploy.
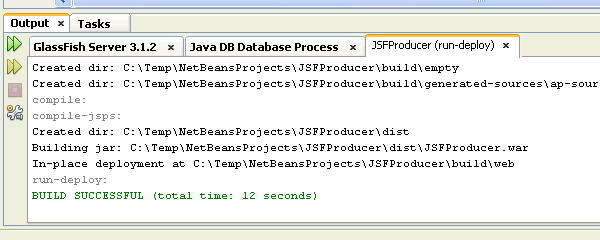
In the Output Window, you will see a message that the project JSFProducer built successfully.
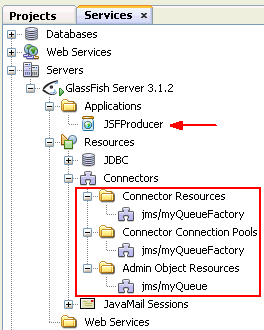
Open the Services tab. Right-click on the
Applications folder and select Refresh to see that
the the JSFProducer application is deployed.
Expand the Resources folder, and then expand the Connectors
folder.
Right-click on Admin Object Resources and
select Refresh.
Do the same with the Connector Resources and Connector
Connection Pools folders.
You will see that GlassFish has deployed your application, JSFProducer,
created a Admin Object Resource, jms/myQueue, and a
Connector Resource object, jms/myQueueFactory.
Generate the JMS code in the ManagedBean.
Open the MessageProducerBean class in the Editor
and click in the bottom of the file, just before the closing
curly brace.
Press Alt-Insert to open the NetBeans Code Generator
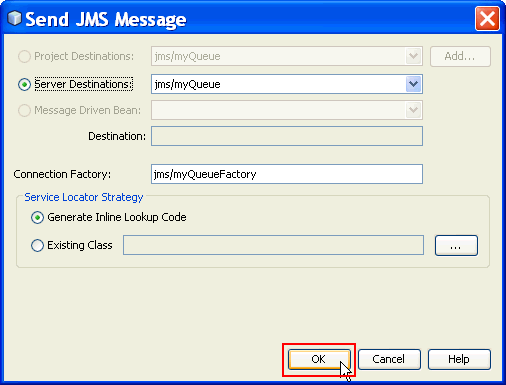
feature and select Send JMS Message...
By default, NetBeans will choose your Admin Resource Object
(jms/myQueue) as the Server Destination and jms/myQueueFactory
as the Connection factory. Click OK.
Scroll to the top of the file to see that NetBeans has
added the proper resource declarations to your code for the
Queue and ConnectionFactory instances.

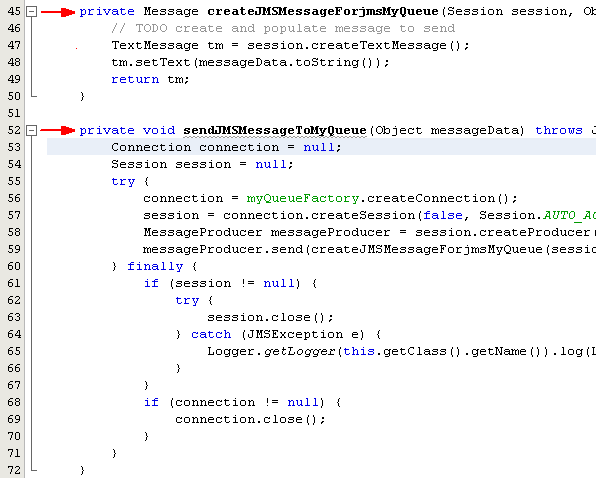
Scroll down again and you will see that NetBeans has also
added two private methods.
The createJMSMessageForjmsMyQueue method creates and
returns an instance of a TextMessage objects.
The sendJMSMessageToMyQueue creates a Connection
using the ConnectionFactory, creates a Session
from the connection, and a MessageProducer from the
session.
The MessageProducer sends the string message (passed
into the method as messageData) to the JMS queue
destination.
Note: the line numbers in your editor may be
different.
Modify your send method to call the generated code.
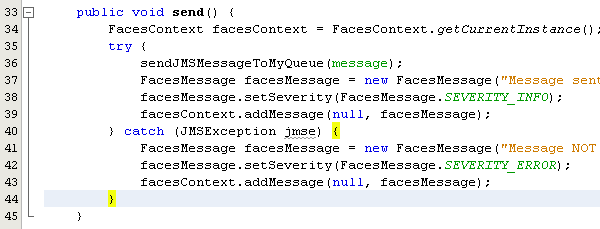
Add the following code to the send() method.
FacesContext facesContext =
FacesContext.getCurrentInstance();
try {
sendJMSMessageToMyQueue(message);
FacesMessage facesMessage = new
FacesMessage("Message sent: " + message);
facesMessage.setSeverity(FacesMessage.SEVERITY_INFO);
facesContext.addMessage(null,
facesMessage);
} catch (JMSException jmse) {
FacesMessage facesMessage = new
FacesMessage("Message NOT sent: " + message);
facesMessage.setSeverity(FacesMessage.SEVERITY_ERROR);
facesContext.addMessage(null,
facesMessage);
}
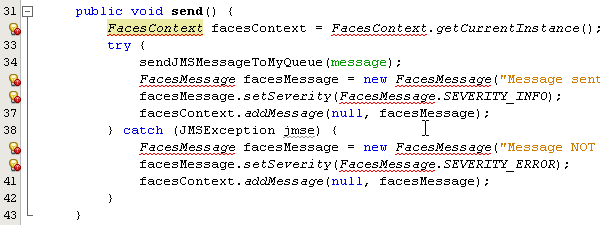
The send() method will attempt to send the String message
to the JMS queue destination you added to the project.
If the message is sent properly, a FacesMessage is
added to the FacesContext instance that represents the
current view page. The FacesMessage will be displayed
to the browser client when the page is rendered.
Fix the missing imports (Ctrl-Shift-I) and save the file.
In the Output Window, in the GlassFish Server 3.1.2 tab,
you will see that the application deployed successfully,
however, the following warnings appear.
Note: The contents of the message between the square
braces may be different in your environment.
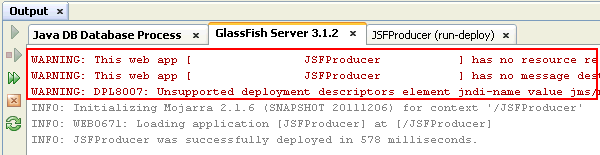
These warnings are a result of NetBeans attempting to create portable JNDI lookup references for the queue and connection factory you created. Because this example uses a non-portable mappedName lookup for the JMS resources, you can ignore the warnings, or remove the lines shown below from the glassfish-web.xml file.

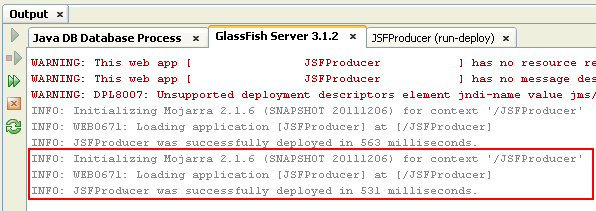
After removing the lines, save the file and GlassFish automatically redeploys the JSFProducer application, without any warnings.
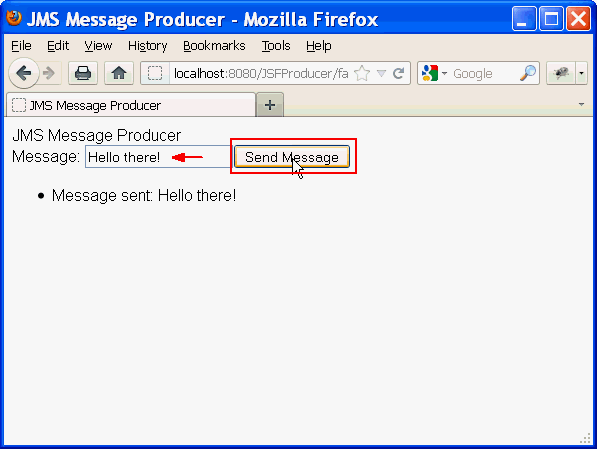
Test the application.
Open a browser and enter the following URL:
http://localhost:8080/JSFProducer/
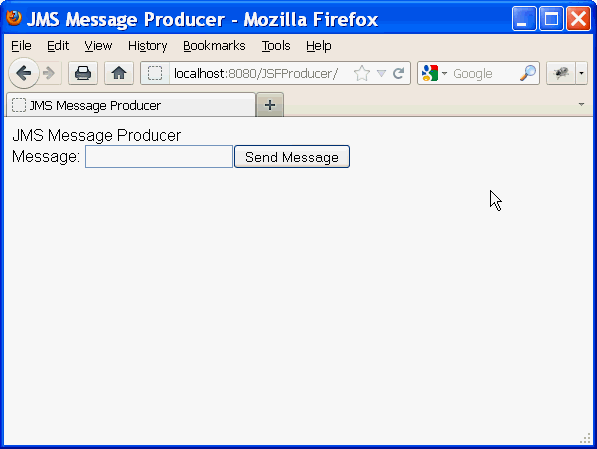
Try typing in some text and click the Send Message
button.
You should see that your messages were successfully sent.
For example:
Looking at Message Queue statistics
Although you cannot see the content of the messages on the server, you can determine how many messages have been sent to a destination (and are not yet picked up.)
Using the command line
Open a command window. (Start->Run->cmd).
Type the following command:
"C:\Program Files\glassfish-3.1.2\mq\bin\imqcmd" list dst
Enter admin as the username and admin as the password.
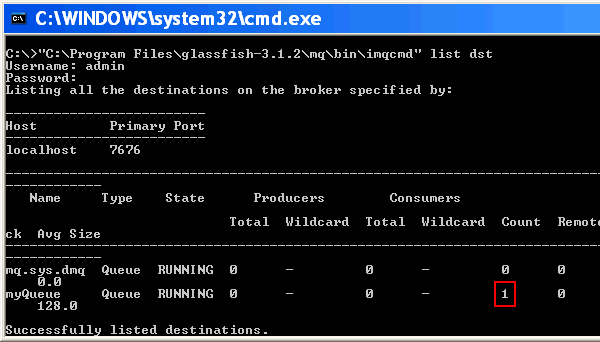
There is one message in myQueue.
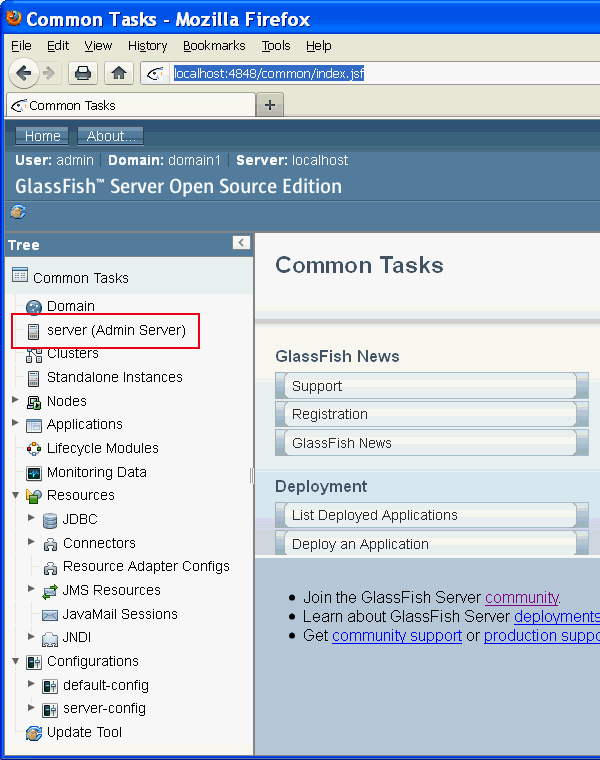
Using the admin console
In a browser, start the GlassFish Admin Console
by typing the following URL:
http://localhost:4848/common/index.jsf
From the left panel, click on server
(Admin Server).
Select the JMS Physical Destinations tab.
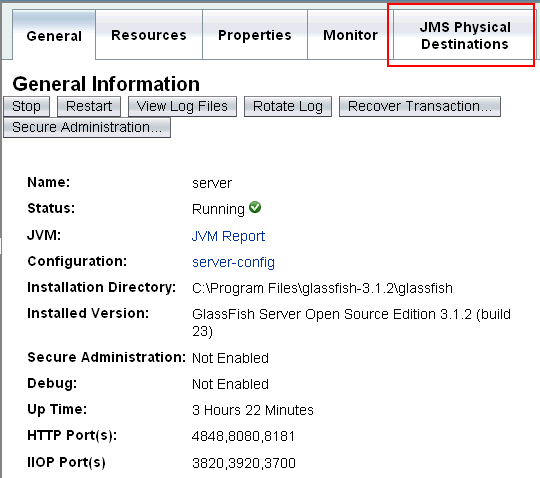
Click on View for myQueue.
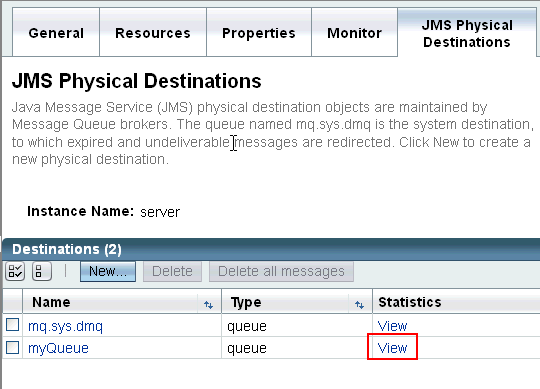
Scroll down until you see the Number of Messages statistic.
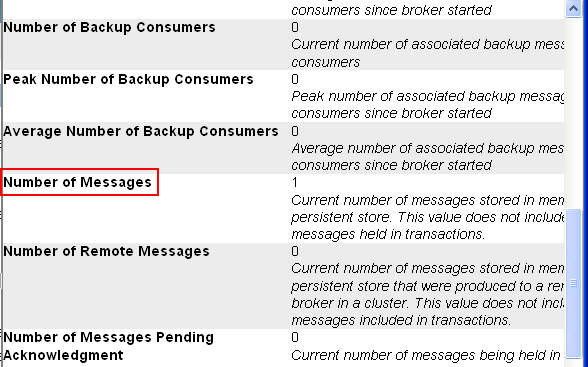
This shows that there is one message in myQueue.
Reading the messages on the queue
A simple Message-Driven Bean (MDB) NetBeans project has been included in this tutorial to allow you to "see" the messages in the queue. In another OBE, you will explore more advanced application of MDBs, including how to take messages from the queue and store them for another application.
Unzip the MDBExample.zip project into directory and open the project in NetBeans.
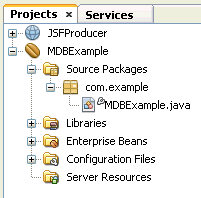
Open the MDBExample.java file and review the code.
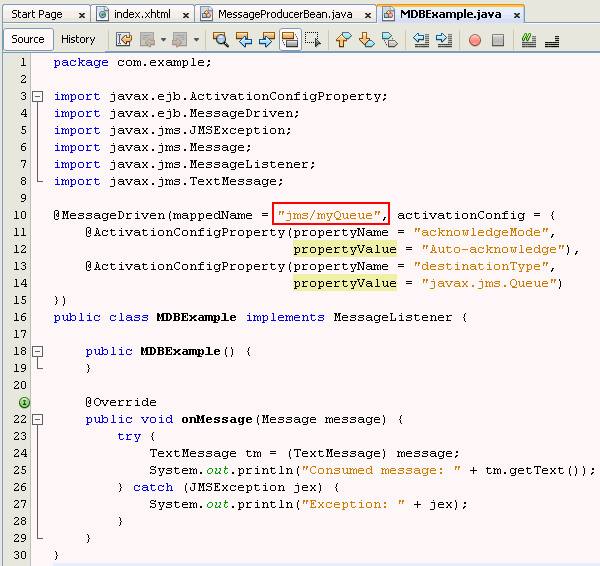
This code uses a Message Driven Bean (MDB) to register a
listener in the application server for messages on the Queue
with the JNDI name, "jms/myQueue". A Message Driven
Bean is deployed to the application server and instantiated
by the container. Once the bean is deployed, it will
continue to "listen" for messages on the destination queue
specified.
When a message is sent to the queue, the container invokes
the onMessage method, which casts the Message object
to a TextMessage object (the type you put on the
queue). With the getText() method, you print
the message to the console.
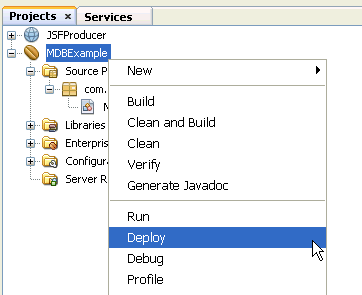
Right-click on the MDBExample project and select Deploy to deploy the MDB to GlassFish.
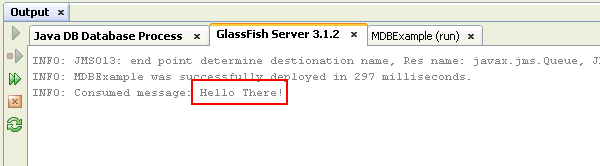
In the Output window, click on the GlassFish Server 3.1.2 tab (the system console) and you should see the message(s) you typed in the JSF window appear.
Success!
Summary
- The Java EE 6 Tutorial: Java Message Service
Concepts
- Java Message Service Documentation
- Developing Java EE 6 Applications for the
Java EE 6 Platform
- To learn more about using the Java Message Service in Java
EE applications, refer to additional OBEs in the Oracle Learning Library.
- Lead Curriculum Developer: Tom McGinn
- Other Contributors: Matt Heimer
In this tutorial, you created a JMS Producer application. The
application uses a JSF page to create a string message and a
managed bean to put the string onto a JMS Message Queue.
Resources
Credits
To help navigate this Oracle by Example, note the following:
- Hiding Header Buttons:
- Click the Title to hide the buttons in the header. To show the buttons again, simply click the Title again.
- Topic List Button:
- A list of all the topics. Click one of the topics to navigate to that section.
- Expand/Collapse All Topics:
- To show/hide all the detail for all the sections. By default, all topics are collapsed
- Show/Hide All Images:
- To show/hide all the screenshots. By default, all images are displayed.
- Print:
- To print the content. The content currently displayed or hidden will be printed.
To navigate to a particular section in this tutorial, select the topic from the list.