Java Platform, Enterprise Edition 7:
Using the File Upload Component in JSF 2.2
Overview
- Create a Java Platform, Enterprise Edition 7 (Java EE
7) web application and add the following components to it: a
JSF page,
FileUpload.xhtml, with a file upload component; and a Contexts and Dependency Injection (CDI) bean,FileUploadBean - Develop a validator,
FileValidator, to validate the contents of the file - Add the validator to
FileUpload.xhtmlto examine the contents of the uploaded file - Deploy the project to the GlassFish server and use two sample input files to verify it
- Download and install the latest JDK from this link (Java SE 7u21 recommended).
- Download and install NetBeans 7.3.1 with Java EE, which includes GlassFish 4 (Java EE download bundle) from this link. During installation, be sure to select the check-box to install GlassFish. JUnit is an optional installation and is not required for this tutorial.
- Have installed the required software.
- Ensure that NetBeans is running.
- Download and unzip the
SampleFiles.zip, which contains two sample input files to upload.
Purpose
This tutorial covers how to use the file upload component
introduced in JavaServer Faces 2.2 (JSF 2.2). It also
demonstrates validation with the file upload component.
Time to Complete
Approximately 45 minutes
Introduction
The JSF 2.2 specification features a file upload component, h:inputFile,
which is based on Java Servlet 3.0 multipart support. The file
upload component can have converters and validators. JSF
2.2 also supports uploading files via AJAX; you can
combine h:inputFile with f:ajax.
In this tutorial, you perform the following:
Hardware and Software Requirements
The following is a list of hardware and software requirements:
Prerequisites
Before starting this tutorial, you should:
Creating a Web Application
In this section, you create a Java EE 7 web application in the NetBeans IDE.
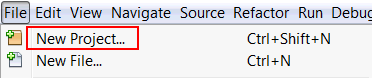
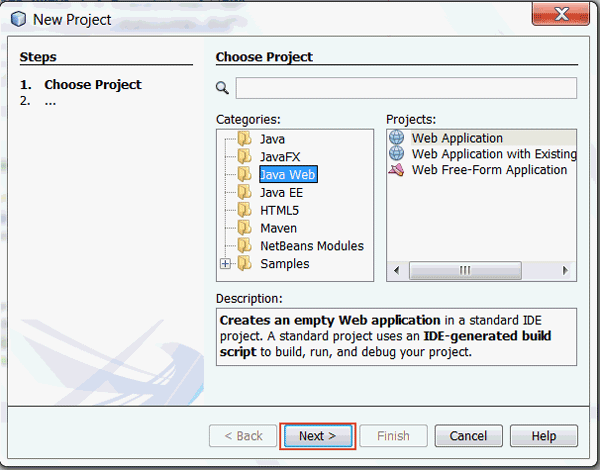
In the New Project dialog box, perform the following steps:
b. Select Web Application from Projects.
c. Click Next.
In the Name and Location dialog box, enter FileUpload
as the file name and click Next.

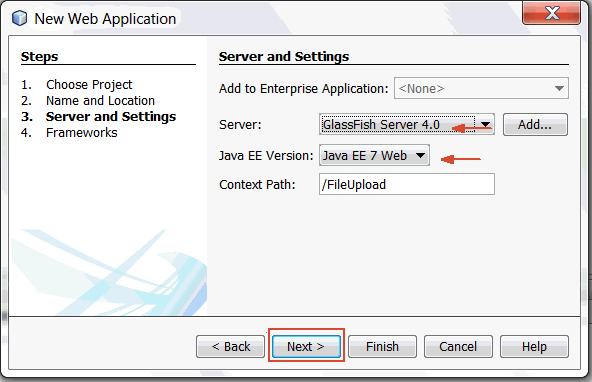
In the Server and Settings dialog box, perform the following steps:
a. Select GlassFish Server 4.0 from the
Server list.
b. Select Java EE 7 Web from the
Java EE Version list.
c. Click Next.
In
the Frameworks dialog box, select JavaServer
Faces and click Finish.
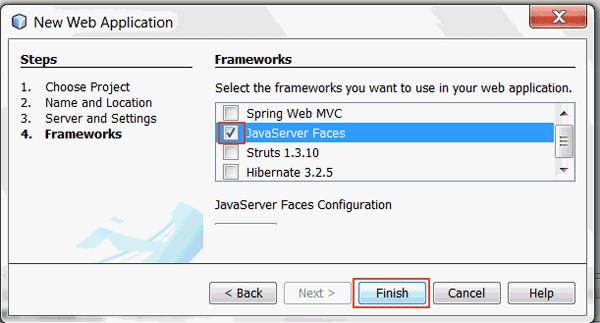
A Java 7 web application project is created.
Developing a JSF page
In this section, you create a JSF Page, FileUpload.xhtml.
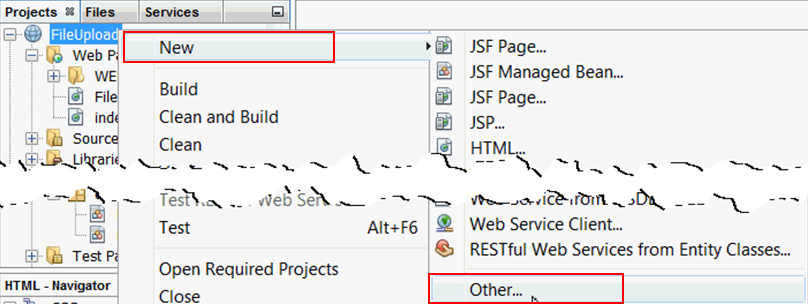
Right-click the FileUpload project and select New > Other.
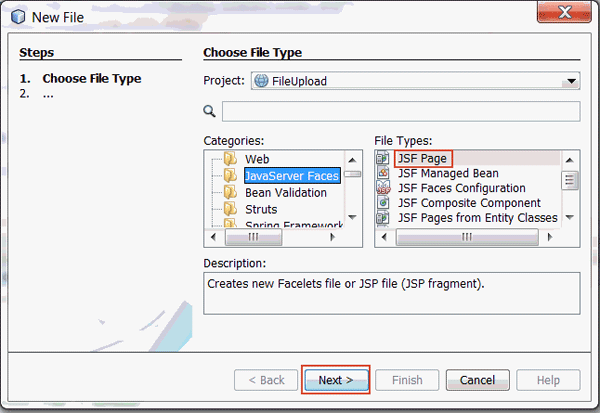
In the New File dialog box, perform the following
steps:
a. Select JavaServer Faces from Categories.
b. Select JSF Page from File Types.
c. Click Next.
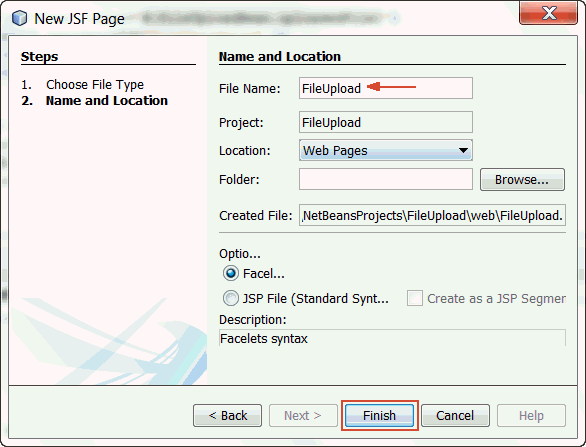
a. Enter FileUpload as the file name.
b. Click Finish.
Modifying the JSF Page to Include the File Upload
Component
In this section, you modify FileUpload.xhtml
to
include the file upload component.
Add an h:form element within the h:body
section of the page.
a. Delete any default text generated automatically by the
IDE within the h:body section.
b. Add the following code to the h:body
section:
<h:form id="form" enctype="multipart/form-data"
                      prependId="false">

                       </h:form>
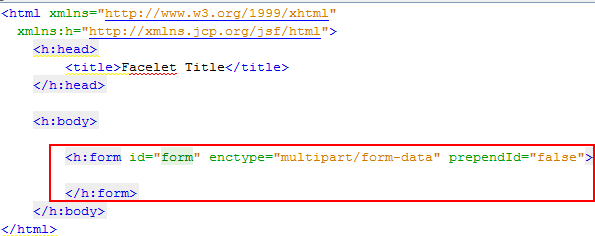
The encoding of the h:form must be set
to multipart/form-data in the enctype
attribute.
Add the h:inputFile element
within the h:form element.
<p><h:inputFile id="file"
                      value="#{fileUploadBean.uploadedFile}">

                           </h:inputFile>

                            </p>

                           <br/>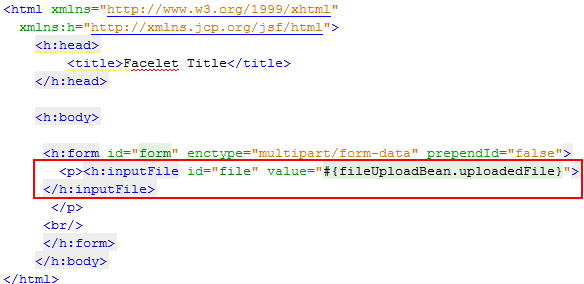
The value attribute of the file
upload component is bound to the upLoadedFile
property of the CDI bean, fileUploadBean.
The upLoadedFile property is of the
type javax.http.servlet.Part.
Add a command button, Upload, to h:form.
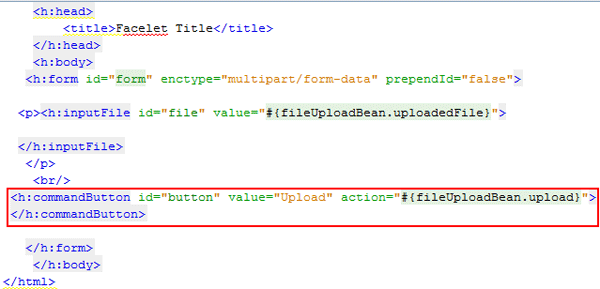
The command button references an action
method, upload, defined in fileUploadBean,
which processes the uploaded file.
To display the contents of the uploaded
file, add the following code to h:form
below the command button:
<p id="textOutput">Text:
                      #{fileUploadBean.text}</p>

Developing a CDI Bean
In this section, you develop a CDI bean, FileUploadBean,
in the NetBeans IDE.
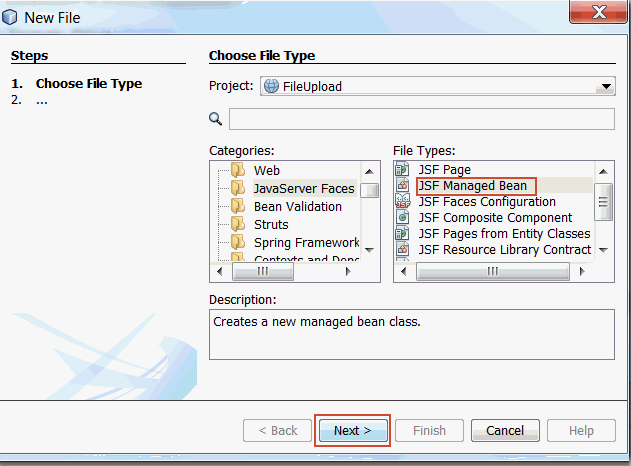
In
the Projects window, right-click FileUpload
and
select New
> Other.
In the New File dialog box, perform the following steps:
b. Select JSF Managed Bean from File Types.
c. Click Next.
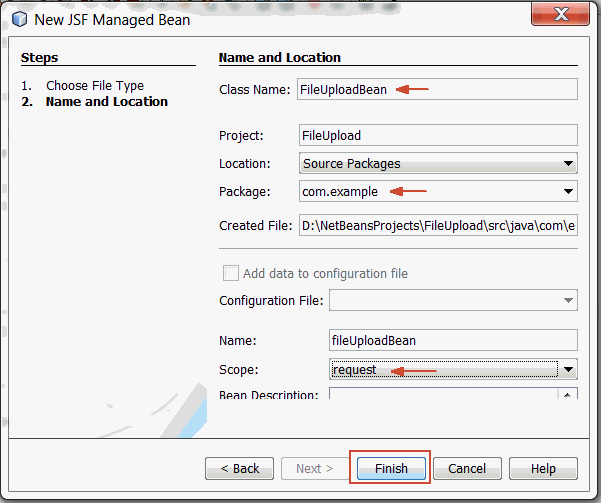
In the Name and Location dialog box, perform the following steps:
a. Enter FileUploadBean as the class name.b. Enter
com.example as the package name.c. Select request
as the scope.d. Click Finish.
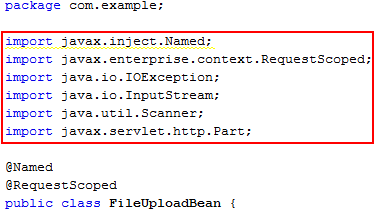
Import the following packages:
 import java.io.IOException;

                     import java.io.InputStream;

                     import java.util.Scanner;

                     import javax.servlet.http.Part;
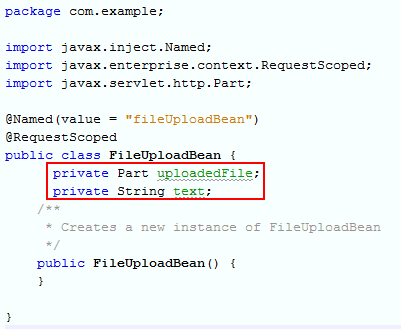
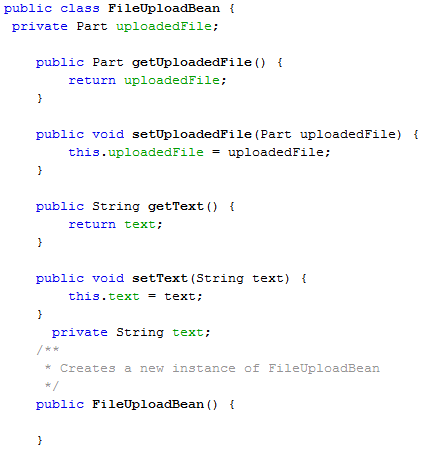
Declare the following two fields at the beginning of
the class:
private Part uploadedFile;

                      private String text;
To generate the getter and setter methods to the two
fields, perform the following steps:
a. Right-click in the editor and select Insert Code.
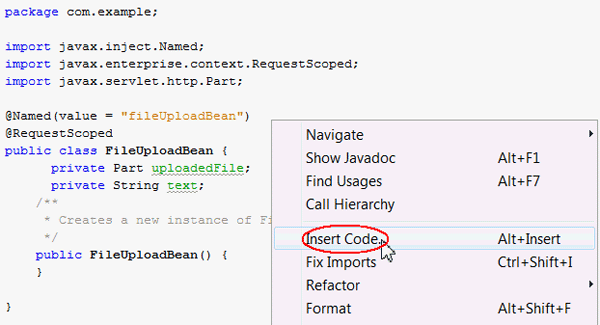
b. Select Getter and Setter.
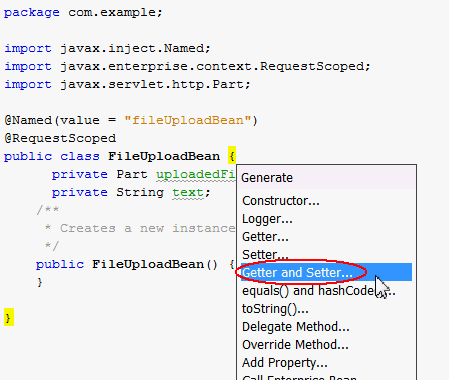
c. In the Generate Getters and Setters dialog box, select FileUploadBean and click Generate.

Implement the upload() method.
public void upload() {


                              if (null !=
                      uploadedFile) {


                      try {


                      InputStream is = uploadedFile.getInputStream();


                      text = new Scanner(is).useDelimiter("\\A").next();


                      } catch (IOException ex) {


                      }

                              }

                          }
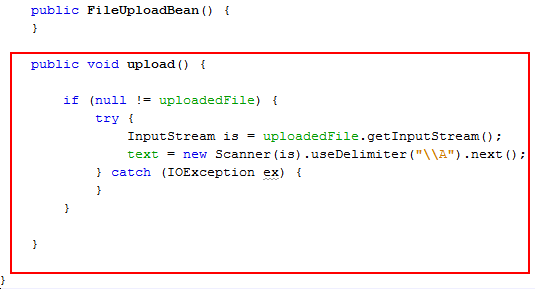
The upload() method reads the content of the
file from inputstream and stores it in the text
string.
Verifying the File Upload Component in the JSF Page
In this section, you deploy and run the project.
Modify web.xml to set the
welcome file of the project to FileUpload.xhtml
instead of index.html.
a. Expand the FileUpload project in the
Projects window.
b. Expand Configuration Files and double-click web.xml
to open it in the editor.
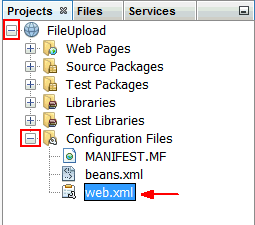
<welcome-file>
element to faces/FileUpload.xhtml.
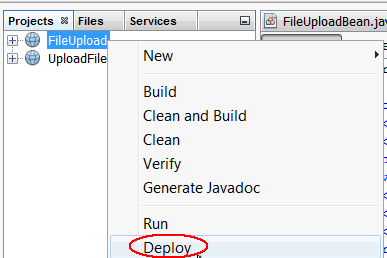
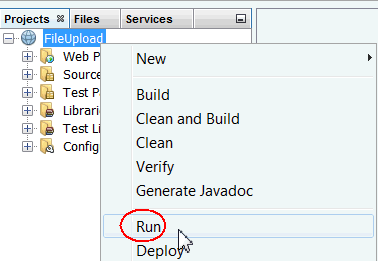
In the Projects window, right-click FileUpload and
select Deploy.
In the Projects window, right-click FileUpload and select Run.
The application appears in the browser.
Perform the following steps:
b. Browse to the location where you saved the two sample input files specified in the Prerequisites section.
c. Select the
inputFileSuccess.txt file.d. Click Upload.
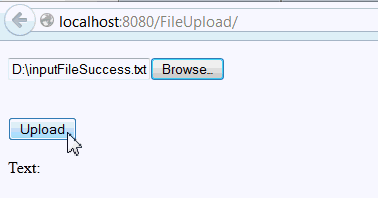
The contents of the inputFileSuccess.txt file
are displayed.
Perform the following actions:
FileUpload project. The
application appears in the browser.b. Click Browse.
c. Browse to the location where you saved the two sample input files specified in the Prerequisite section.
d. Select the
inputFileFailure.txt file.e. Click Upload.
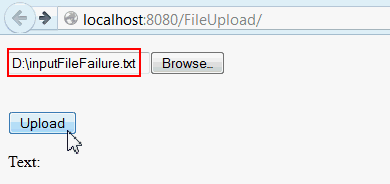
The contents of the inputFileFilure.txt file
are displayed because validation was not added to the file
component.
Developing a Validator Class
In this section, you develop a validator class,
FileValidator, in the NetBeans IDE.
Right-click the FileUpload project and select New > Other.
In the New File dialog box, perform the following steps:
b. Select Java Class from the File Types list.
c. Click Next.

In the Name and Location dialog box, perform the following
steps:
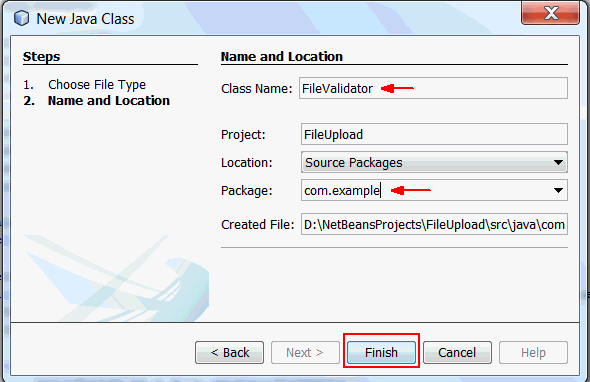
FileValidator as the class name.b. Enter
com.example as the package name.c. Click Finish.
Perform the following steps
to edit FileValidator.java.
                    import java.io.InputStream;

                    import java.util.Scanner;

                    import javax.faces.application.FacesMessage;

                    import javax.faces.component.UIComponent;

                    import javax.faces.context.FacesContext;

                    import
                    javax.faces.validator.*;

import javax.servlet.http.Part;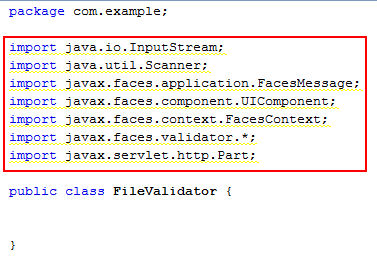
b. Add the @FacesValidator
annotation.
@FacesValidator(value="FileValidator")
c. Modify the class to implement the Validator
interface.
public class FileValidator implements
Validator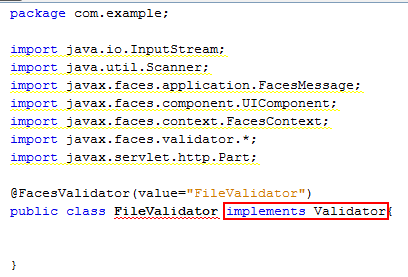
Note: Ignore the error after completing this step.
validate
method to the class.
                   @Override

                      public void validate(FacesContext context,
                  UIComponent component, Object value) throws ValidatorException
                  {

                          Part file = (Part)
                  value;

                          String text = "";


                          try {


                  InputStream is = file.getInputStream();


                  text = new Scanner(is).useDelimiter("\\A").next();


                  // Do not accept an upload unless it contains the string


                  // JSR-344

                          } catch (Exception
                  ex) {


                  throw new ValidatorException(new FacesMessage("Invalid file"),
                  ex);

                          }

                          if
                  (!text.contains("JSR-344")) {


                  throw new ValidatorException(new FacesMessage("Invalid
                  file.  File must contain special string"));

                          }


                      }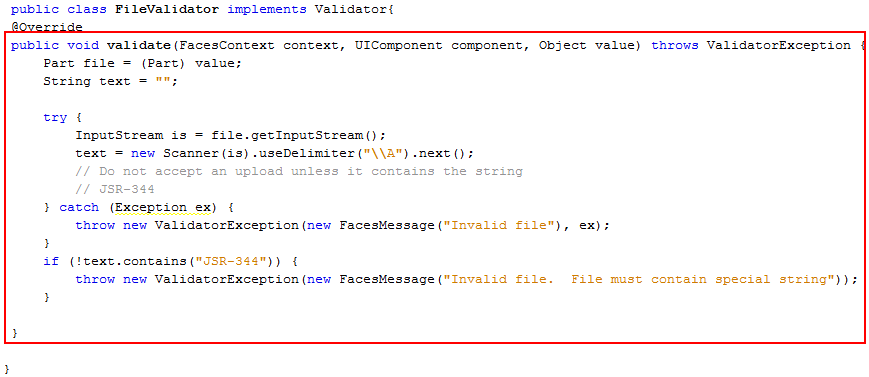
You perform the validation in the validate
method of the FileValidator class.
The validate method examines the contents of the
file, searching for the JSR 344 string.
You can also validate the file contents based on file size and
file type.
Adding a Validator to the File Upload Component in the JSF
Page
In this section, you add a validator to the file upload
component by changing FileUpload.xhtml.
FileUpload.xhtml
to open it in the code editor, and then attach the validator
by adding the following code to h:inputFile.<f:validator validatorId="FileValidator"/>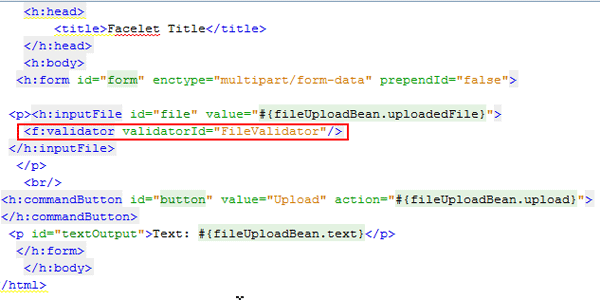
Add the following code to h:form to
display the messages generated by the validator:
  <p><h:messages
                    id="messages"/></p>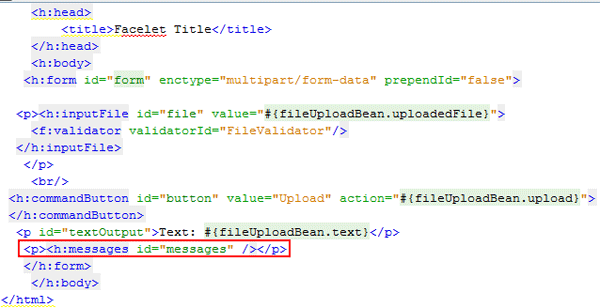
Verifying the File Upload Component with the Validator in
the JSF Page
In this section, you verify the file upload component with the
validator attached. You do that by deploying and running the
project and testing it with the two sample input files.
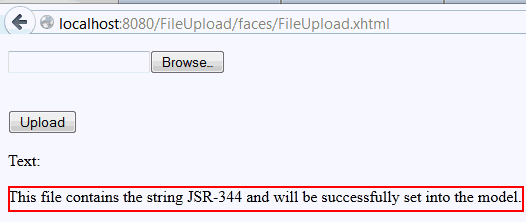
To test with the inputFileSuccess.txt file,
perform the following steps:
FileUpload project. The
application appears in the browser.b. Click Browse.
c. Browse to the location where you saved the two sample input files specified in the Prerequisites section.
d. Select the
inputFileSuccess.txt file.e. Click Upload.
Because the inputFileSuccess.txt contains
the JSR-344 string, the contents of the file
are displayed.
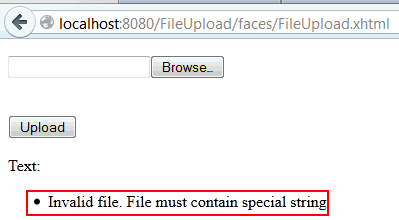
To test with the inputFileFailure.txt
file, perform the following steps:
FileUpload project. The
application appears in the browser.b. Click Browse.
c. Browse to the location where you saved the two sample input files specified in the Prerequisites section.
d. Select the
inputFileFailure.txt file.e. Click Upload.
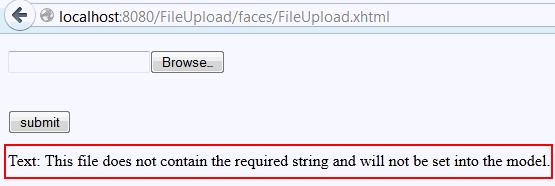
Because the inputFileFailure.txt file does
not contain the JSR-344 string, a validation
error is displayed.
Summary
- Create a Java EE 7 web application
- Create a file upload component by using the JSF 2.2
specification
- Add validation to the file upload component
In this tutorial, you learned how to:
- JSF 2.2 Specification
- Java EE 7 Tutorial
- Uploading Files with Java Servlet Technology
- Contexts
and Dependency Injection for the Java EE Platform
- To learn more about Java Platform, Enterprise Edition, refer to additional OBEs in the Oracle Learning Library.
- Curriculum Developer: Anjana Shenoy
- Reviewer: Tom McGinn
- Editor: Susan Moxley
Resources
Credits
To help navigate this Oracle by Example, note the following:
- Hiding Header Buttons:
- Click the Title to hide the buttons in the header. To show the buttons again, simply click the Title again.
- Topic List Button:
- A list of all the topics. Click one of the topics to navigate to that section.
- Expand/Collapse All Topics:
- To show/hide all the detail for all the sections. By default, all topics are collapsed
- Show/Hide All Images:
- To show/hide all the screenshots. By default, all images are displayed.
- Print:
- To print the content. The content currently displayed or hidden will be printed.
To navigate to a particular section in this tutorial, select the topic from the list.