

This document will continue to evolve as existing sections change and new information is added. All updates appear in the following table:
| Date | Feature | Notes |
|---|---|---|
| 19 SEP 2018 | Post-Upgrade Considerations | Updated document. Revised Post-Upgrade Considerations information. |
| 15 AUG 2018 | JET Responsive Transaction UI | Updated document. Revised feature information. |
| 03 AUG 2018 | Created initial document. |
This guide outlines the information you need to know about new or improved functionality in Oracle CPQ Cloud Release 18C and describes any tasks you might need to perform for the update. Each section includes a brief description of the feature, the steps you need to take to enable or begin using the feature, any tips or considerations that you should keep in mind, and the resources available to help you.
Security & New Features
We would like to remind you if your system has modified security structures you may need to advise your security administrator of new features you would like to implement.
Give Us Feedback
We welcome your comments and suggestions to improve the content. Please send us your feedback at cpqcloud_documentation_us_grp@oracle.com.
| Action Required to Enable Feature |
||||
|---|---|---|---|---|
| Feature |
Automatically Available |
End User Action Required |
Administrator Action Required |
Oracle Service Request Required |
 |
||||
|
||||
|
||||
|
||||
|
||||
|
||||
|
||||
|
||||
|
||||
|
||||
|
||||
Oracle Configure, Price, and Quote (CPQ) Cloud enables companies to streamline the entire opportunity-to-quote-to-order process, including product selection, configuration, pricing, quoting, ordering, and approval workflows. CPQ Cloud provides a flexible, scalable, enterprise-ready solution ideal for companies of all sizes that sell products and services across direct, indirect, and e-commerce sales channels.
Leverage the rich interface and interactive capabilities available in CPQ Cloud to provide an intuitive selling experience using JET Responsive Transaction User Interface (UI) available in the 18C release. Access CPQ with assistive technologies to enable users of all abilities.
CPQ Cloud Release 18C introduces the JavaScript Extension Toolkit (JET) Responsive Transaction UI. JET leverages popular open-source technologies and features a rich set of modern UI components with built-in accessibility and mobile support. The responsive design presents a system of layouts that can flow vertically to fit within different browser display widths, allowing users to view and edit Transactions across multiple device types using the same Transaction layout.
In CPQ Cloud Release 18C, the JET upgrade provides the following enhancements and functionality:
- The new JET Responsive Transaction UI supports the most vital functionality of the legacy UI and the previous Responsive Transaction UI.
- Streamlined filtering allows users to display the desired content within the Line Item Grid.
- Inline highlighting provides immediate feedback for invalid data entries.
- A single JET-specific CSS file reduces complexity and provides a customized, seamless aesthetic for the JET Responsive Transaction UI and future JET UI enhancements.
- New display options for Panel Tabs, Boolean attributes, and Numeric attributes.
- Keyboard access support allows users to navigate through the Transaction Line Items and editable fields using keyboard only controls.
- Release 18C also extends CPQ Cloud's extensive REST API library to support the following JET Responsive Transaction UI functions: Pricebooks, Transaction-level Back navigation, Calculate Price, Export Attachments for integrations, Auto-fill, and Re-sequencing.
IMPORTANT: In order to use the JET Responsive Transaction UI, refer to the Enable the JET Responsive Layout topic to apply it to a specific Commerce process.
SUPPORT FOR PREVIOUS FUNCTIONALITY
The new JET Responsive Transaction UI supports the most vital functionality of the legacy UI and the previous Responsive Transaction UI.
- Fully Responsive UI: Content will flow to fit the user's display, allowing users to view and edit Transactions across multiple device types using the same Transaction layout.
- Improved Scrolling behavior: Transaction header and toolbar remain "sticky" at the top of the screen while the user scrolls vertically through page content. Line Item Table column headers and toolbar also remain "sticky" as the user scrolls through the line items.
- Click-to-Edit Behavior: Click directly on an editable field in a line item to modify its value.
- Line Item Toolbar: This toolbar contains integrated buttons that allow users to add, reconfigure, copy, quick-add, and remove line items from the Line Item Grid. Additional text-only buttons can also be placed here.
- View Menu: This menu allows users to hide and show columns in the Line Item Grid.
- Column Sorting: Sort columns by clicking the ascending or descending arrows in the column header.
- Column Resizing: Resize columns by clicking and dragging the edge of the column header.
- Freeze Columns: Keep selected columns in place while horizontally scrolling through the columns to the right. The Freeze button is located on the Line Item Toolbar.
- Filter Line Items: Simplified filter allows user to filter line items that match entered text. Filter icon in the Line Item toolbar toggles the filter field display.
- Hierarchical Display: View the hierarchical relationship between models and parts in the Line Item Grid and click to expand or collapse parent lines.
- Subscription Ordering: Use Subscription Ordering interaction to create a quote with one or more Asset Line Items.
- Secure text: Capture and mask sensitive data with secure attributes.
- Copy Line Items: Create a new Line Item(s) by copying an existing Transaction Line or Lines.
- Deal Management: Display Deal Negotiation features such as Price Score metrics and Price Comparison scatterplots.
- Integration support: Users can create or open JET Transactions from within Oracle Engagement Cloud and Salesforce.
TRANSACTION UI DISPLAY ENHANCEMENTS
The JET Responsive Layout provides the following display enhancements:
- Tabs can be displayed horizontally or vertically
- Boolean attributes can be displayed as a switch
- Numeric attributes can be displayed as a number spinbox
Vertical Tabs for Transaction UI Panels
In CPQ Cloud, administrators can use tab components to show different groups of content within the Transaction UI. CPQ Cloud Release 18C allows administrators to display vertical tabs for the JET Responsive Transaction UI. Vertical tabs are arranged on the left side of a panel instead of on the top in a horizontal space.
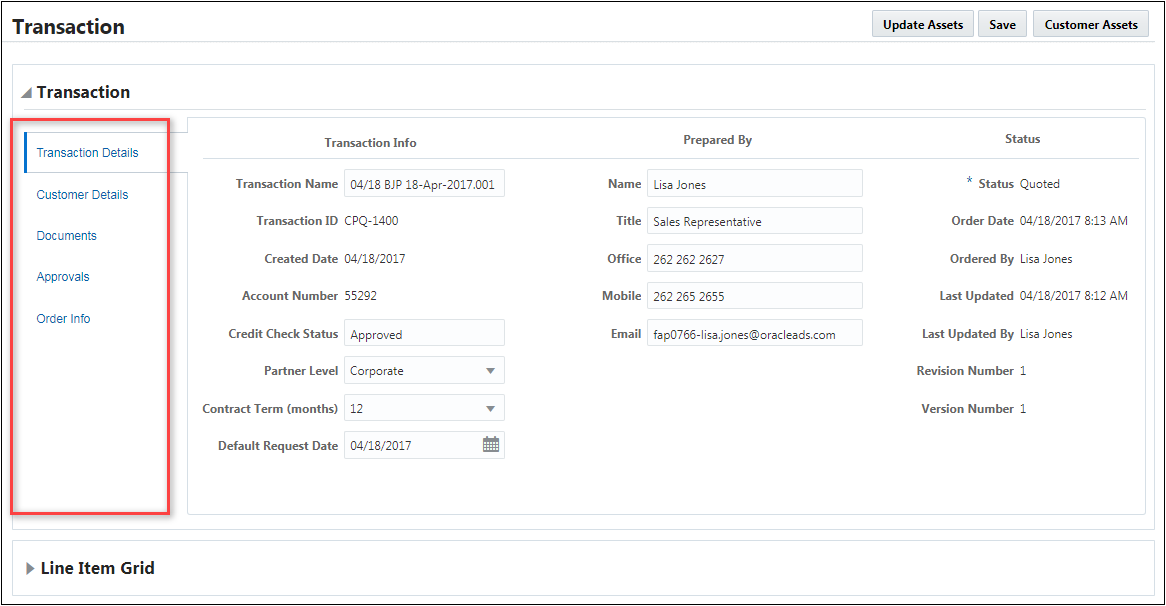
Transaction UI with Vertical Tabs
JET Responsive Layout Tab Display
CPQ Cloud Release 18C provides support for vertical panel tabs when the JET Responsive Transaction UI is enabled. Administrators can now select Horizontal or Vertical from the Tab Display drop-down in the Panel dialog.
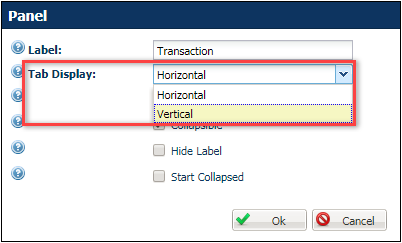
JET Responsive Layout Panel Dialog
Switch Display for Boolean Attributes
CPQ Cloud Release 18C allows administrators to display "Switch" selectors for Boolean attributes displayed on the JET Responsive Transaction UI. In the following image, the Tax Exempt attribute is set to display a Switch selector.
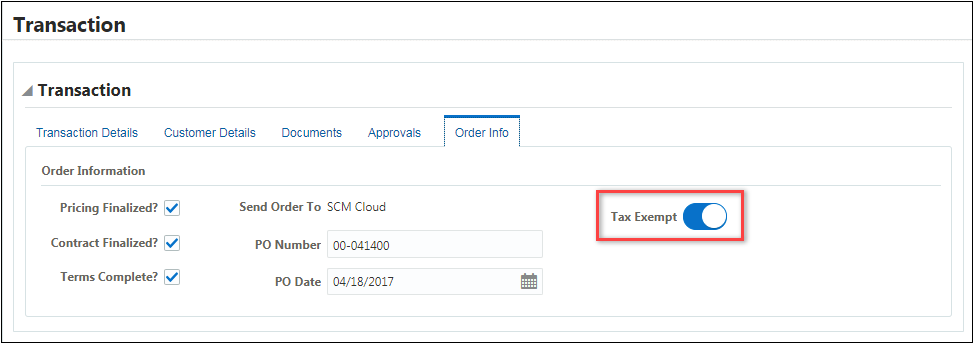
JET Responsive Transaction UI with Switch Selector
JET Responsive Layout Boolean Attributes Display Type
CPQ Cloud Release 18C provides support for checkbox and switch selectors for Boolean attributes when the JET Responsive Transaction UI is enabled. Administrators can now select Checkbox or Switch from the Display Type drop-down in the Boolean attribute dialog.
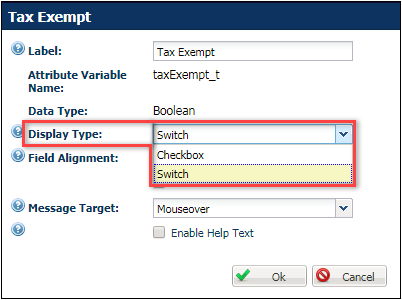
JET Responsive Layout Boolean Attribute Dialog
Number Spinbox Display for Numeric Attributes
CPQ Cloud Release 18C allows administrators to display "Number Spinbox" selectors for Numeric attributes displayed on the JET Responsive Transaction UI. In the following image, the Contract Term attribute is set to display a Number Spinbox selector.
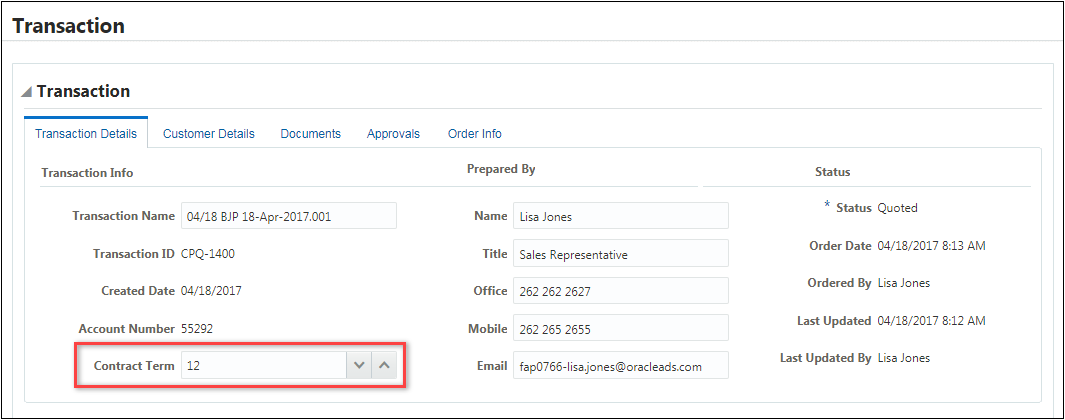
JET Responsive Transaction UI with Number Spinbox Selector
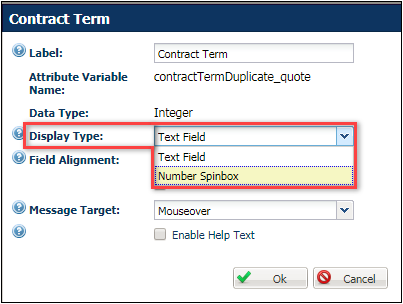
JET Responsive Layout Numeric Attribute Display Type
CPQ Cloud Release 18C provides support for text field and number spinbox display options for Numeric attributes when the JET Responsive Transaction UI is enabled. Administrators can now select Text Field or Number Spinbox from the Display Type drop-down in the Numeric attribute dialog.
JET Responsive Layout Numeric Attribute Dialog
KEYBOARD ACCESS
The JET Responsive Transaction UI provides support for keyboard access to Transaction and Line Item Grid components. Users can now navigate through the Transaction and Line Items and edit fields using keyboard only controls. For keyboard navigation and editing instructions, refer to the JET Responsive Layout topic in the CPQ Cloud Administration Online Help.
ENABLE THE JET RESPONSIVE LAYOUT
Administrators have the option of enabling the new JET Responsive layout while maintaining the existing Legacy Desktop layout and assigning user access to the layouts based on user type and user group. With both layouts enabled, existing customers can make the transition to the JET Responsive layout at their own pace.
For example: Before enabling the JET Responsive layout for an entire sales team, customers may decide to gradually transition the sales team and initially enable the JET Responsive layout for select sales users and sales managers in limited scenarios, such as when reviewing and approving quotes.
IMPORTANT: Beginning in CPQ Cloud Release 18C, the JET Transaction UI is disabled by default.
IMPORTANT: When customers currently using the Alta Transaction UI upgrade to Release 18C, the Alta Transaction UI will be upgraded to the JET Responsive layout and the JET Transaction UI is enabled.
Complete the following steps to apply the JET Responsive layout to a specific Commerce process:
- Navigate to the Admin Home page.
- Under Commerce and Documents, click Process Definition.The Processes page opens.
- Click the name of the Commerce process for which you are enabling the JET Responsive layout. The Process Administration page opens.
- To enable the JET Responsive layout for some users and the existing Legacy Desktop layout for other users, select both the Legacy Desktop checkbox and the JET Responsive checkbox.
-or-
To enable the JET Responsive layout for all users, select the JET Responsive checkbox and unselect the Legacy Desktop checkbox.
- Use the Order Priority fields to define the priority of each layout. Sales users with access to multiple layouts can view the layouts based on the defined priority.
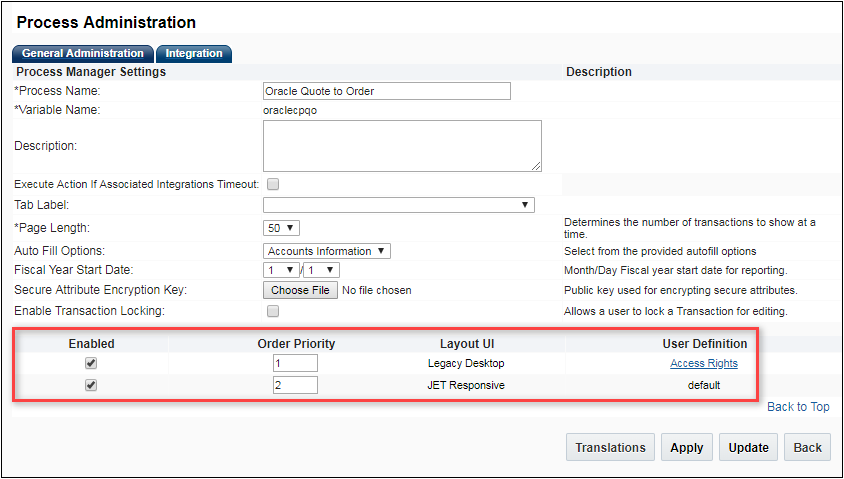
Process Administration Page
IMPORTANT: The Legacy Desktop layout is the default layout for existing Commerce processes, which means the layout displays for users or groups not assigned access to any other assigned UI.
IMPORTANT: The enabled layout with the highest priority is the default layout. Administrators cannot define access rights for the default layout or disable the default layout.
IMPORTANT: The Priority field is editable and accepts integer values.
- Click Apply. A confirmation message displays, asking for confirmation that you want to enable the JET Responsive layout.
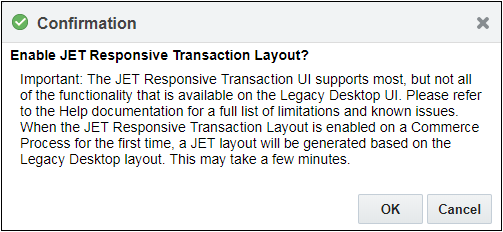
Confirmation Message for Enabling the JET Responsive Layout
IMPORTANT: For a list of Oracle JET UI limitations, refer to JET Responsive Transaction UI Limitations topic.
- Click OK. After enabling the JET Responsive layout, an Access Rights link displays next to the JET Responsive option on the Process Administration page.
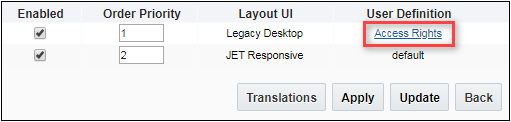
Access Rights Link on Process Administration Page
IMPORTANT: The Access Rights link is only available for enabled layouts and is not available for default layouts.
- Click the Access Rights link to open the Process Administration Access Editor, which lists all available user types and user groups.
- Specify the user types and user groups who can access the Priority 1 layout. Only the users of the type or groups assigned to the Show column will view this layout. All others will view the Default layout.

Process Administration Access Editor
- Click Apply or Update to apply the changes made in the Process Administration Access Editor.
JET RESPONSIVE TRANSACTION UI LIMITATIONS
The following list provides descriptions of limitations and known issues present in the JET Responsive Transaction UI in CPQ Cloud as of Release 18C.

IMPORTANT: Custom JavaScript is compatible with the JET Responsive Transaction UI; however, admin users may need to resolve conflicts when first implementing the JET Responsive Transaction UI.
IMPORTANT: The JET Responsive Transaction UI Line Item Grid includes native support for hierarchical display of models with System Configuration and BOM. As a result, the read-only BOM table (ROBOM) is not needed and should not be used in the implementation. If it is used, it may cause CSS conflicts with the JET Responsive Transaction UI.
IMPORTANT: The default recommended page size for the Line Item Grid is 500 items per page. If you require more items per page, you must open a Service Request (SR) on My Oracle Support to have the maximum number increased.
REST API UPDATES TO SUPPORT THE JET RESPONSIVE TRANSACTION UI
In Release 18C, CPQ Cloud introduces the following REST APIs to support the JET Responsive Transaction UI:
- Get Pricebooks
- Get a Pricebook
- Navigate Back from Transaction
- Calculate Transaction Line Price
- Export Attachment from Transaction
- Export Attachment from Transaction Line
- Auto-fill
- Re-sequence Transaction Lines using Interact
Get Pricebooks REST API
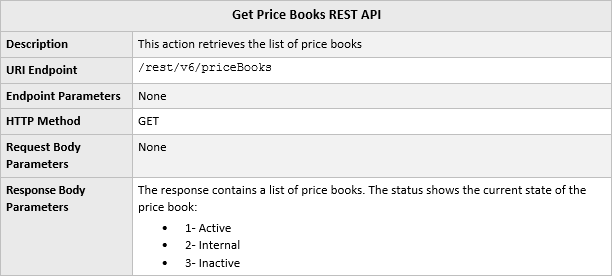
URI Endpoint Sample

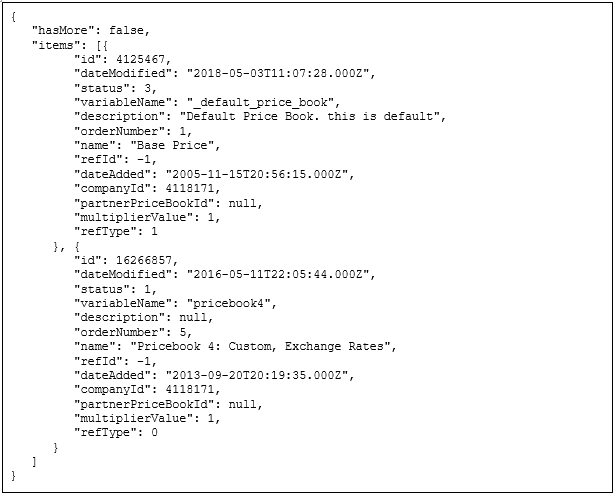
Sample Response
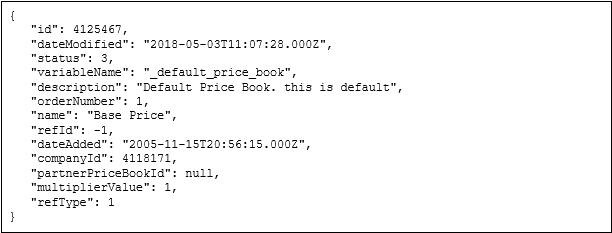
Get a Pricebook REST API
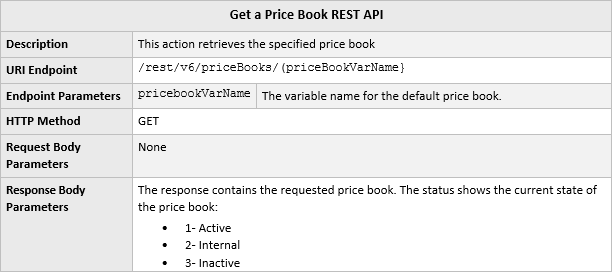
URI Endpoint Sample

Sample Response
Navigate Back from Transaction REST API

URI Endpoint Sample

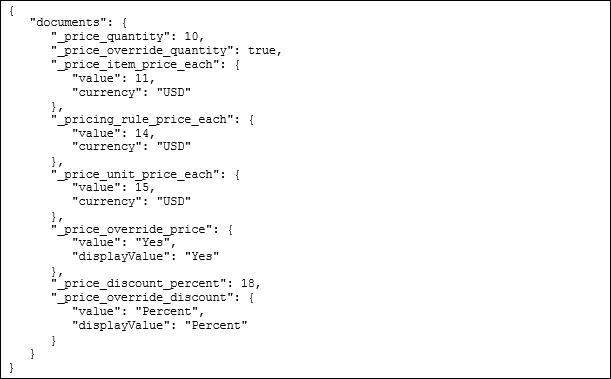
Calculate Transaction Line Price REST API
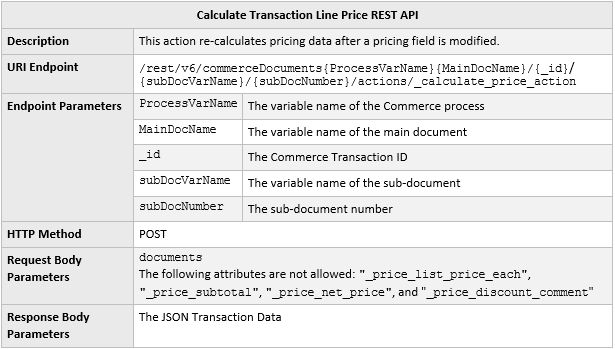
URI Endpoint Sample

Sample Request
IMPORTANT: The Override Price attribute should be set to Yes to allow overrides when invoking the REST to perform recalculation.
IMPORTANT: If Override Price is set to No and there are new price values, the values will be reset to the original values and returned via the REST API. There will be no warning or error message when new values are provided for recalculation.
IMPORTANT: The recalculated values returned via the REST API are not saved in the database until a modify type action is invoked.
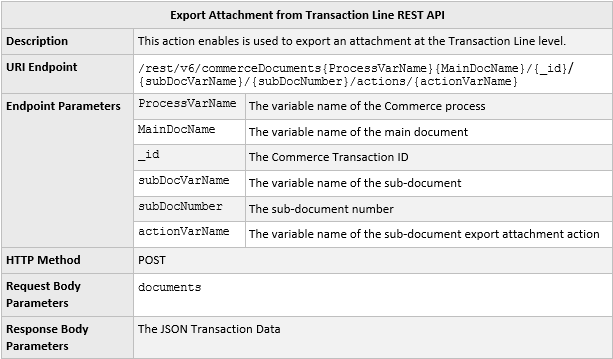
Export Attachment from Transaction REST API
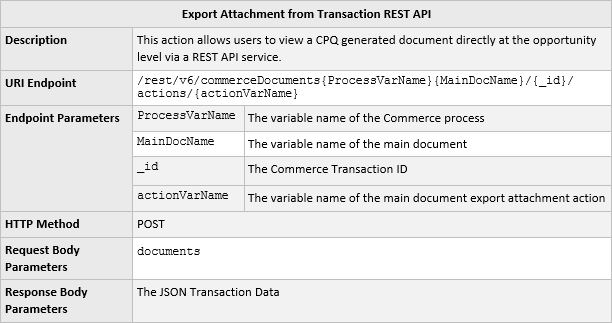
URI Endpoint Sample

Sample Request
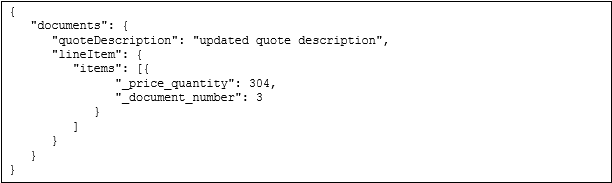
Export Attachment from Transaction Line REST API
URI Endpoint Sample

Sample Request

Auto-fill REST API
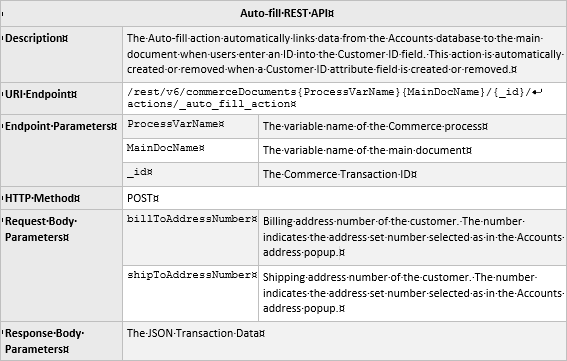
URI Endpoint Sample

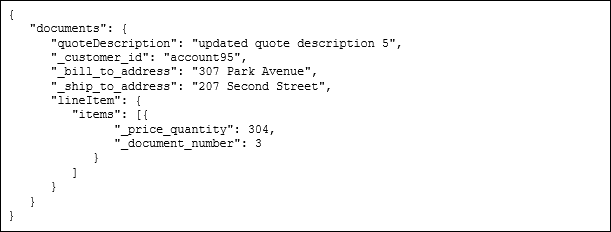
Sample Request
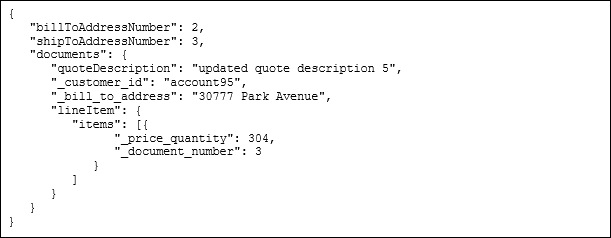
Sample Response
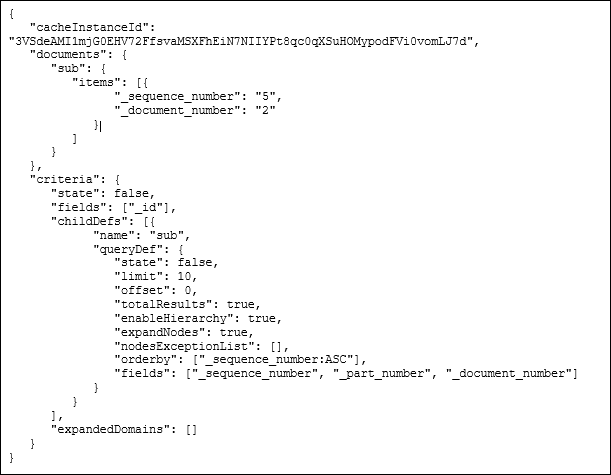
Re-sequence via Interact REST API
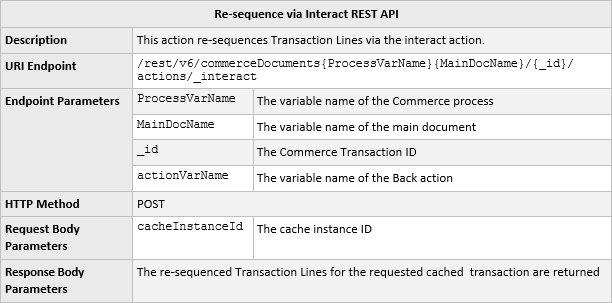
URI Endpoint Sample

Sample Request
Steps to Enable
For instructions on how to enable this feature, refer to the Enable the JET Responsive Layout topic in this document.
Tips And Considerations
Consider the following tips when using the Release 18C JET Responsive Transaction UI enhancements:
- Beginning in CPQ Cloud Release 18C, the JET Transaction UI is disabled by default.
- When customers currently using the Alta Transaction UI upgrade to Release 18C, the Alta Transaction UI is upgraded to the JET Responsive layout and the JET Transaction UI is enabled.
- For a list of Oracle JET UI limitations, refer to the JET Responsive Layout topic in the CPQ Cloud Administration Online Help.
- The JET CSS fully supports custom CSS classes. The JET CSS file located in the main Stylesheet manager applies to all JET UI pages. Legacy CSS files will not affect the JET UI.
- Line Item Grid – Quick key actions take place in a pop-up dialog, and not inside of the Line Item table as with legacy UI.
Key Resources
Refer to CPQ Cloud Administration Online Help for additional information.
CPQ Cloud is committed to making our product accessible, which includes supporting the use of assistive technology such as screen readers and screen magnifiers. CPQ Cloud Release 18C improves keyboard navigation, tab and button highlight focus, and screen reader support for Configuration pages/screens. Users can now access dynamic menus and image menus with the keyboard.
Steps to Enable
Accessibility enhancements are automatically available on CPQ Cloud 18C sites.
Cater to the need by large, complex enterprises for a robust, integrated, and performant platform using the following CPQ Cloud 18C features and enhancements:
- Administrator Access Control Enhancements
- BOM Mapping Enhancements
- Commerce Cloud Integration Enhancements
Administrator Access Control Enhancements
CPQ Cloud is commonly administered by teams of individuals who are often a composite of different skill sets. Using the Administrator Access Control feature introduced in CPQ Cloud Release 18B, companies can delegate and restrict access to certain areas of CPQ Cloud. This prevents unauthorized users from introducing unintentional errors, clarifies areas of responsibility, and protects sensitive or proprietary information.
CPQ Cloud Release 18C allows administrators to:
- Assign the Access Administrator permission independent of the User Administrator permission.
- Grant proxy login permission independent of the User Administrator permission, using a new Allow Proxy Login permission on the User Administration page.
- Update the Access Administrator permissions using SOAP or bulk data services.
ASSIGN ACCESS ADMINISTRATOR PRIVILEGES TO FULLACCESS USERS
In Release 18C, CPQ Cloud removes the requirement to assign User Administrators privileges to Access Administrators, which allows customers to minimize the number of User Administrators. When the Enable Administrator Groups setting on the General Site Options page is set to Yes, an Access Administrator checkbox displays as a Permissions property on the User Administration and My Profile pages. Only Access Administrators can create and edit Administrator groups. This checkbox is always checked for the Host Company SuperUser and defaults to unchecked for all FullAccess users. When Administrator Groups are first enabled, the SuperUser must assign Access Administrator permissions to other FullAccess users.
To assign Access Administrator privileges to FullAccess users, perform the following steps:
- Open the Admin Home page.
- Under Users, select Internal Users. The User Administration List page opens.
- Click the user login link for the FullAccess user you want to make an Access Administrator. The User Administration page opens.
- Select the Access Administrator checkbox.

User Administration Page - Access Administrator Privileges
-
Click Apply.
IMPORTANT: Users must be logged in as a SuperUser or a FullAccess user with Access Administrator permissions in order to change the Access Administrator permission for other users.
GRANT ALLOW PROXY LOGIN PRIVILEGES TO FULLACCESS USERS
Proxy login allows administrators to log in as another user to verify changes to their setup or isolate issues reported by users. When the Enable Administrator Groups setting on the General Site Options page is set to Yes, an Allow Proxy Login checkbox displays as a Permissions property on the User Administration and My Profile pages.
To grant Allow Proxy Login privileges to FullAccess users, perform the following steps:
- Open the Admin Home page.
- Under Users, select Internal Users. The User Administration List page opens.
- Click the user login link for the FullAccess user you want to make an Access Administrator. The User Administration page opens.
- Select the Allow Proxy Login checkbox.
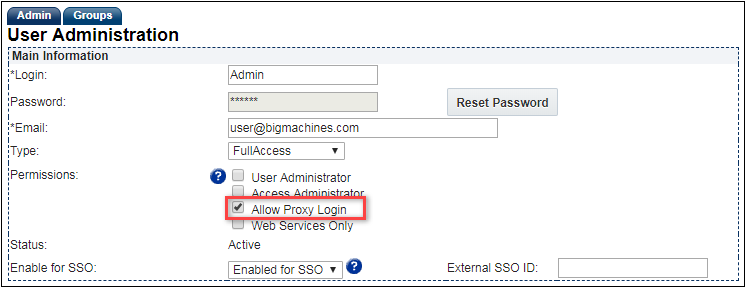
User Administration Page - Allow Proxy Login Privileges
- Click Apply.
IMPORTANT: Users must be logged in as a SuperUser or a FullAccess user with Access Administrator permissions to change the Allow Proxy Login permission.
UPDATE USER PERMISSIONS USING SOAP WEB SERVICES
Administrators can use a SOAP API call to grant proxy login permissions using addUsers and updateUsers APIs. For example: administrators set the <bm:proxy_perm> property value to "1" to assign Allow Proxy Login privileges and "0" to remove privileges.
Input

Response

UPDATE ALLOW PROXY LOGIN PERMISSIONS USING BULK DATA SERVICES
Administrators can use Bulk Data Services to update proxy login permissions in bulk. Proxy login permissions are updated using the User "proxy_perm" field.
For more information on bulk services, refer to the Bulk Downloads and Bulk Uploads topics in the CPQ Cloud Administration Online Help.
Steps to Enable
Access Administrator and Allow Proxy Login options are only available when the Administrator Groups are enabled. For instructions to enable Administrator Groups for your site, refer to the CPQ Cloud Administration Online Help - Administrator Access Control topic.
Tips And Considerations
Consider the following tips when using the Administrator Access Control enhancements:
- Only Access Administrators can create and edit Administrator groups.
- Access Administrator permissions are always enabled for the Host Company SuperUser and permissions are initially disabled for all FullAccess users. When Administrator Groups are first enabled, the SuperUser must assign Access Administrator permissions to other FullAccess users.
- Users must be logged in as a SuperUser or a FullAccess user with Access Administrator permissions to grant and revoke Access Administrator privileges for other FullAccess users.
Key Resources
Refer to CPQ Cloud Administration Online Help for additional information.
The Bill of Materials (BOM) Mapping feature allows administrators to import multi-level BOM product structures for use in CPQ Configuration, Commerce Transactions, and downstream integration of orders to an Enterprise Resource Planning (ERP) system. CPQ Cloud Release 18C provides a new Configurable Price item that allows customers to define BOM prices, which can be different from the Parts database prices. This feature allows customers to deliver price incentives for items included within defined BOM structures.
This topic describes BOM Pricing Behavior, Configuration Pricing, Commerce Pricing, and the following pricing enhancements that are available in CPQ Cloud Release 18C:
- Define BOM Prices within the BOM Item Definition table and associate BOM prices to Configuration attribute values using BOM Mapping.
- View BOM Prices on the BOM Item Tree Administration and BOM Item Administration pages.
- Use the new "configurablePrice" item to reference BOM Prices in the following:
- Advanced BML within BOM Mapping Configuration rules
- getbom, savebom, convertbomtoflat, and convertbomtohier BML functions
- Display BOM Prices for Commerce Transactions and Transaction Line Items.
BOM PRICING BEHAVIOR
Several BOM Mapping values and prices are impacted by the BOM Pricing enhancement. The following section provides BOM Price use cases and describes pricing behavior for the following items:
- Configuration - the price value for the BOM item in the Configuration Bill of Materials
- BOM Instance - the "configurablePrice" attribute in the BOM Instance JSON
- Commerce - the Configurable Price value, List Price value, and the "_is_bom_price" attribute
- Sales BOM - the "configurablePrice" attribute retrieved using the BML getBOM function
- Manufacturing BOM - the "configurablePrice" attribute retrieved using the BML getBOM function
The following table lists the BOM Item Definition BOM Price with example price values. The pricing results are displayed for Configuration, BOM Instance, Commerce, Sales BOM, and Manufacturing BOM items.
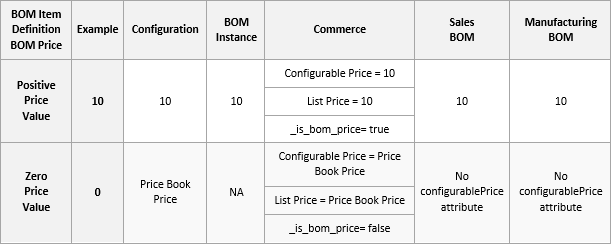
IMPORTANT: Negative BOM item pricing is currently not supported and should not be used.
IMPORTANT: When an Advanced BOM Mapping Rule returns a BOM Instance with a zero price, Configuration displays "0" upon request and Commerce Configurable Price displays "0" with _is_bom_price=true.
IMPORTANT: When an Advanced BOM Mapping Rule returns a BOM Instance without a configurablePrice attribute, the parts pricing takes effect with _is_bom_price=false.
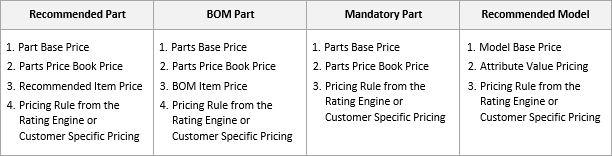
ADDITIONAL BOM PRICING SCENARIOS
In addition to the use case inputs, BOM Mapping status and BOM Mapping Configuration Rules will also impact BOM pricing. The following scenarios describe pricing behavior.
Scenario 1 - In the BOM Item Definition, a BOM item can have the Included In Base Price set to Y. When this happens, the price of the BOM item is regarded as already included in the Configuration model base price, and will not be considered when the total price is calculated.
IMPORTANT: When Included In Base Price is set to Y, Pricing Rules and the BOM Item Price are ignored and the Commerce List Price and Unit Price values are set to "0.00".
Scenario 2 - The BOM Item Definition BOM Price column is NOT mapped and a BOM Mapping Configuration Table Based Rule is defined. If BOM Item Definition BOM Price column is not mapped, the "configurablePrice" attribute will not exist. The BOM Mapping Rules cannot return "configurablePrice", so the Parts database price is used.

COMMERCE PRICING
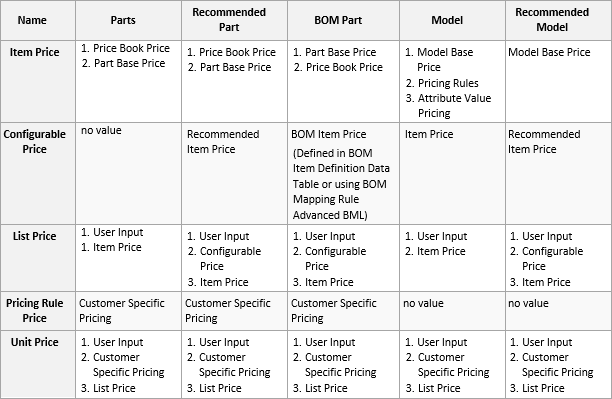
There are five price columns displayed for items for Commerce. The following table lists the pricing items that are evaluated to determine price values for the following items:
- Item Price (variable name _price_item_price_each)
- Configurable Price (variable name _price_configurable_price)
- List Price (variable name _price_list_price_each)
- Pricing Rule Price (variable name _pricing_rule_price_each )
- Unit Price (variable name _price_unit_price_each )
IMPORTANT: The user input is evaluated first for List Price and Unit Price only when the Commerce Line-level "_price_override_price" attribute is set to "true".
IMPORTANT: When a BOM item Included In Base Price is set to Y, Configurable Price, Pricing Rule Price, and Item Price values are ignored. The List Price, Unit Price and Sub-total values will be "0".
CONFIGURATION PRICING
There is one price column displayed for items in Configuration. The following table lists the pricing items that are evaluated to determine the Configuration price value.
CONFIGURABLE PRICE ITEM
CPQ Cloud Release 18C introduces a new "configurablePrice" item to reference BOM Prices. The "configurablePrice" item is available for Advanced BML within BOM Mapping Configuration rules and the following BML functions: getbom, savebom, convertbomtoflat , and convertbomtohier. The following examples show the "configurablePrice" item behavior for several BOM Pricing use cases.
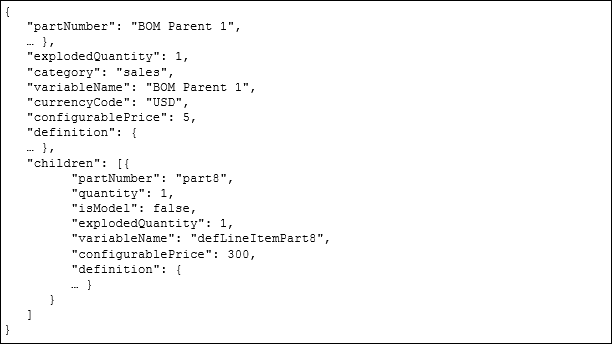
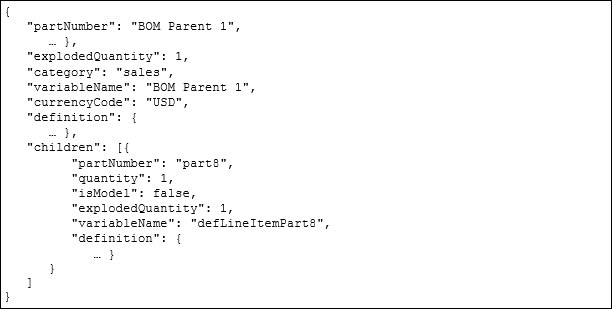
Positive Price Value Example
In the following example, a positive price value is provided in the BOM Item Definition Data Table.
Zero Price Value Example
In the following example, a zero "0" price value is provided in the BOM Item Definition Data Table, which indicates that there is no BOM pricing override and the parts pricing will take effect. The "configurablePrice" node is absent in the configuration BOM instance.

Unmapped BOM Price Column Example
In the following example, the BOM Price column from the BOM Item Definition Data Table is not mapped.
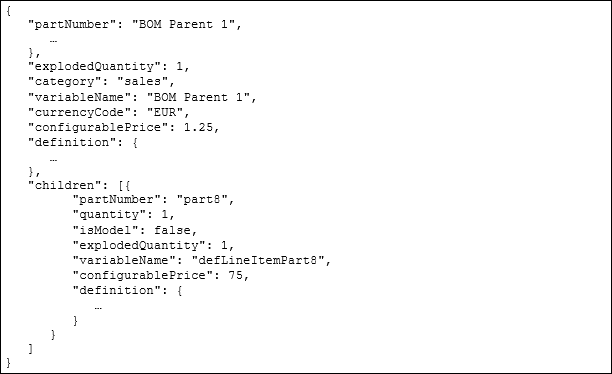
User-Defined Currency Example
In the following example, the User-defined currency is different from the Site Base currency.
DEFINE BOM PRICES
In CPQ Cloud Release 18C, administrators can use the new BOM Price column in the BOM Item Definition table to associate BOM prices to Configuration attribute values using BOM Mapping. The BOM Price column is a float type item and is optional. To use the new BOM Price, administrators add a Price item to the BOM Item Definition Data Table schema, and then add BOM prices to the BOM Item Definition Data Table. BOM prices can also be uploaded using Data Table Import and Bulk Upload.
Administrators navigate to BOM > BOM Tables > BOM Item Definition to map the BOM prices from the BOM Item Definition Data Table to Configuration attribute values.The following image displays the BOM Price row on the Edit BOM Table Definition page.
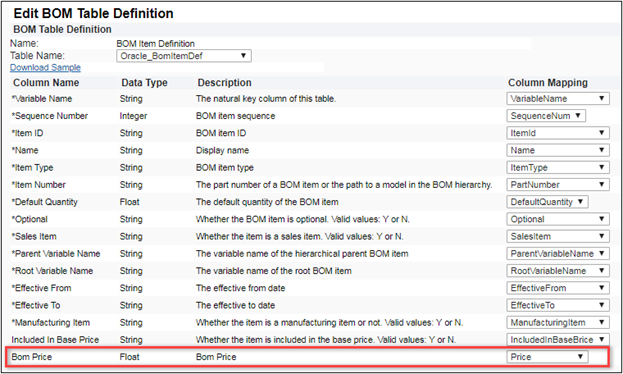
Edit BOM Table Definition Page
VIEW BOM PRICE ON BOM ADMINISTRATION PAGES
Administrators can view the BOM Price item on the BOM administration pages. Administrators navigate to BOM > BOM Root Items, then select the Variable Name for the applicable BOM Root Item to view the BOM Item Tree Administration page. The BOM Price column displays the BOM prices for the selected BOM Root Item.
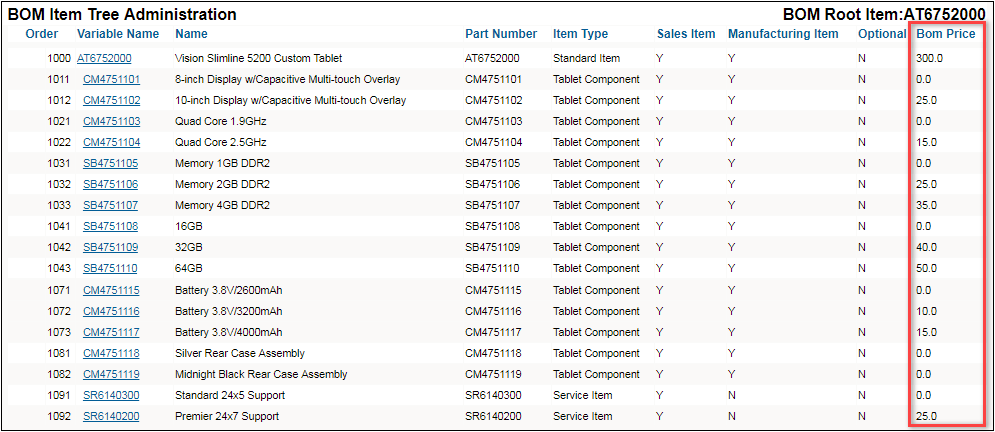
BOM Item Tree Administration Page
Administrators select the Variable Name for the applicable BOM Item to view the BOM Item Administration page. The BOM Price row displays the BOM price for the selected item.
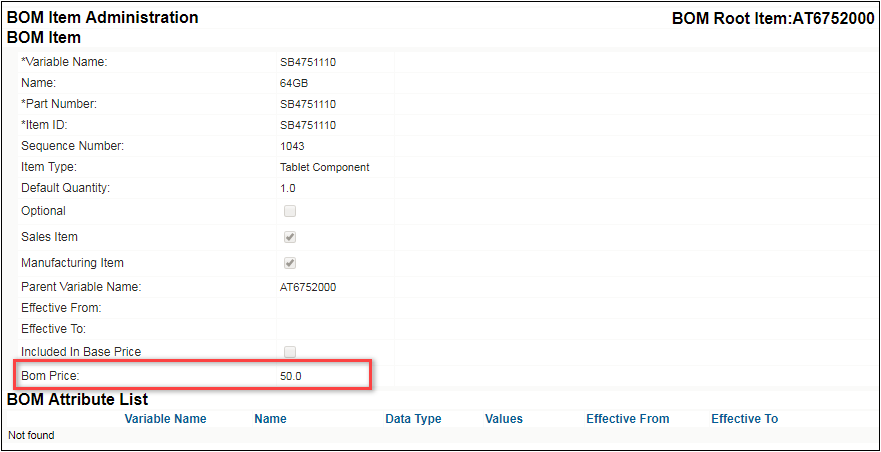
BOM Item Administration Page
IMPORTANT: Setting the BOM Item Definition Data Table BOM Price to "0.0" indicates there is no BOM pricing override and the parts pricing will take effect.
IMPORTANT: If a zero BOM item price value is required, define an Advanced BML BOM Mapping Rule and return the Configurable Price to "0". If Included In Base Price is set to Y, the Commerce List Price will be set to "0.0".
Steps to Enable
BOM Mapping enhancements are automatically available on all CPQ Cloud 18C sites.
Key Resources
Refer to CPQ Cloud Administration Online Help for additional information.
Commerce Cloud Integration Enhancements
Self-service users in Commerce Cloud can configure complex products for purchase in Commerce Cloud using the CPQ Cloud Configurator. They can also request a CPQ Cloud quote, thereby initiating a CPQ Cloud Transaction that a sales specialist can modify, reconfigure, or discount. CPQ Cloud Release 18C supports the use of Oracle Commerce Cloud with Subscription Ordering and System Configuration.
The following enhancements are available in Release 18C:
- Create an “Authentication Certificate” integration type in the Integration Center
- Use an updated Add to Cart payload containing Subscription Ordering line level action codes and System Configuration systems
- Experience usability improvements with eCommerce Interaction enhancements
CREATE AN AUTHENTICATION CERTIFICATE INTEGRATION TYPE
CPQ Cloud Release 18C provides an “Authentication Certificate” integration type in the Integration Center to support access token-based authentication. This integration type allows Commerce Cloud self-service users to securely access CPQ Cloud to modify or reconfigure a Subscription Ordering asset-based Configuration without a CPQ Cloud user session.
When administrators create a new integration of type “Authentication Certificate”, they provide a name and variable name for the authentication certificate and upload the Oracle Commerce Cloud authentication certificate. A temporary session is created for the Commerce Cloud self-service user, allowing the user to access the Model Configuration page via an iFrame within Commerce Cloud to modify or reconfigure a specific asset.
To create an Authentication Certificate integration, perform the following steps:
- Open the Admin Home page.
- Select Integration Center under Integration Platform. The Integration Center opens.
- Click Create Integration.
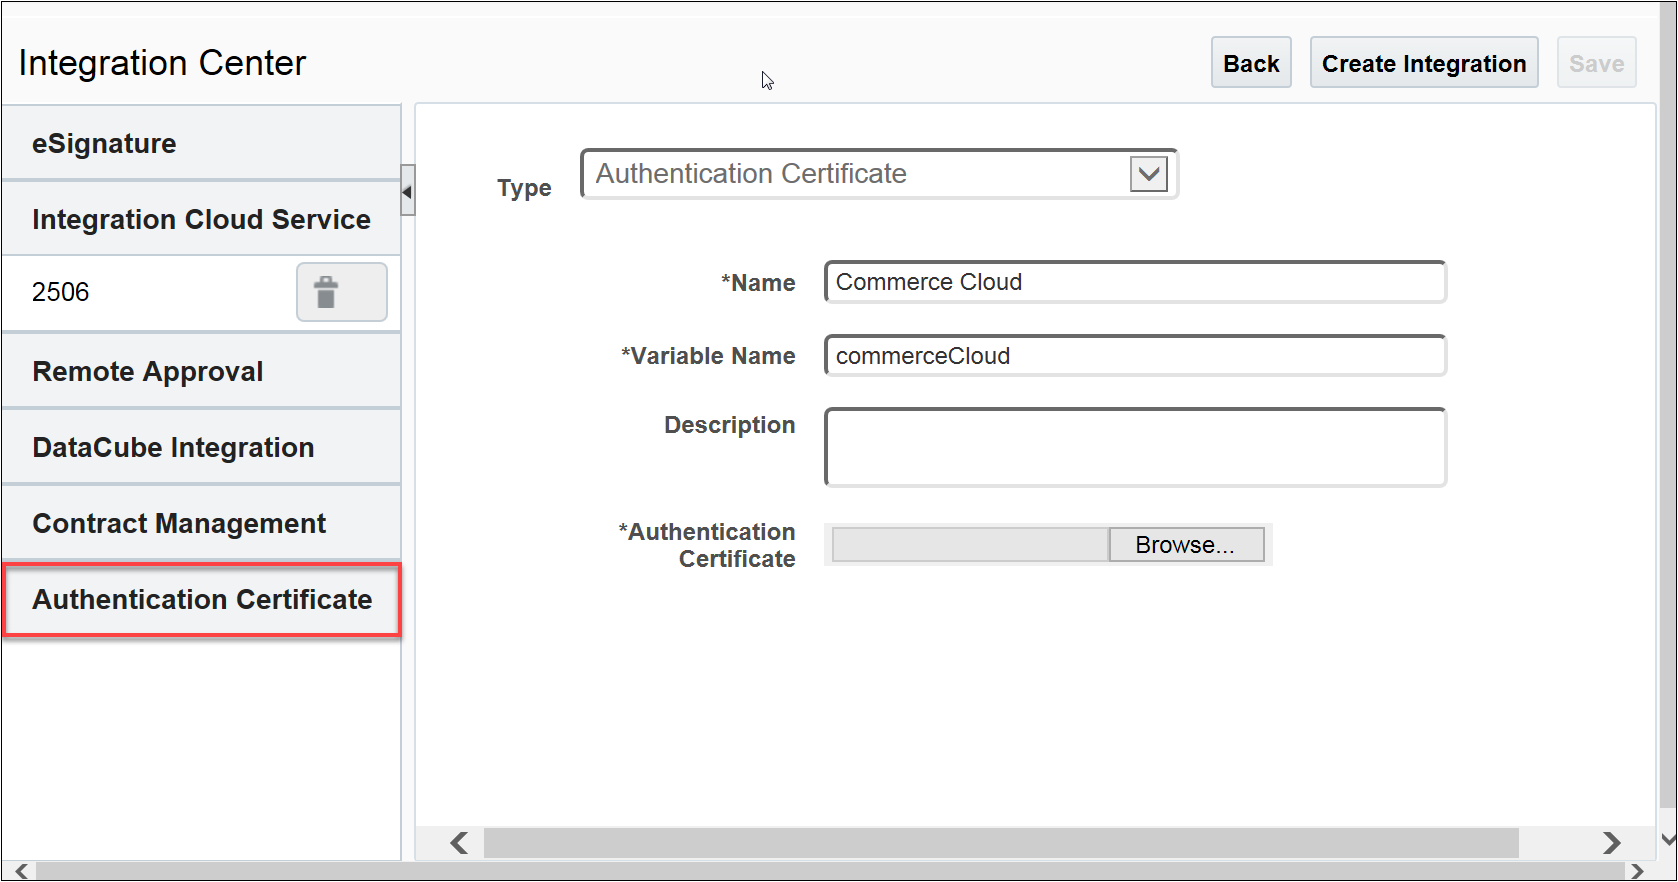
- From the Type drop-down, select Authentication Certificate.

Authentication Certificate Option in Integration Center
- In the Name field, enter a name that describes the authentication certificate. For example: Commerce Cloud
- The Variable Name field auto-populates upon clicking in or tabbing to the field.
- (Optional) In the Description field, enter a description of the authentication certificate.
- Click Browse next to the Authentication Certificate label.
- Select the Oracle Commerce Cloud authentication certificate and click Open.
- Click Save. The Authentication Certificate integration appears in the left pane of the Integration Center.
Authentication Certificate Integration in Integration Center
IMPORTANT: The Save button is disabled upon successfully saving the integration. If changes are made after the save is performed, the button is enabled.
IMPORTANT: Administrators can modify the name of the integration but not the variable name. They can also replace the authentication certificate but cannot remove it.
IMPORTANT: A single CPQ Cloud site can have any number of Authentication Certificate integrations. There is no limit.
USE AN UPDATED ADD TO CART PAYLOAD CONTAINING SUBSCRIPTION ORDERING LINE LEVEL ACTION CODES AND SYSTEM CONFIGURATION SYSTEMS
Subscription Ordering line level action codes and system configuration systems are now available in the Add to Cart payload. The line level action codes allow Commerce Cloud self-service users to perform a Modify action to update an asset and send the associated Add, Update, or Delete action to Commerce Cloud. Commerce Cloud self-service users can also add tiered systems with models and child models to the Commerce Cloud shopping cart.
Every model in CPQ Cloud corresponds to a product in Oracle Commerce Cloud. To configure a model or child model, Commerce Cloud self-service users can securely access the CPQ Cloud Model Configuration page via an iFrame that displays within Commerce Cloud. Using the system navigation panel available in CPQ Cloud Release 18C (a System Configuration enhancement), Commerce Cloud self-service users can view the hierarchy and state of each model in a system. They can then choose a system model or child model to configure and use the Add to Cart action to update the Commerce Cloud shopping cart with the system model or child model. The ability to reconfigure tiered systems is also supported.
EXPERIENCE USABILITY IMPROVEMENTS WITH ECOMMERCE INTERACTION ENHANCEMENTS
CPQ Cloud customers have the option of paying for our service based on the number of licenses available for the site or the number of ECommerce Interactions, which refers to the number of times the CPQ Cloud Model Configuration page is accessed from Commerce Cloud. The Oracle Commerce Cloud enhancements introduced in CPQ Cloud Release 18B support scenarios where customers pay for our service based on the number of Ecommerce Interactions. In Release 18C, additional eCommerce Interaction enhancements are available.
Text and Display Updates
The ECommerce Interaction text on the User Administration List page and the Company Administration List page was updated for improved clarity and consistency. The updated text is shown in the below screenshot. In Release 18B, “Remaining Monthly Allotment” was “Monthly Allotment” and “Using” was “Used”.
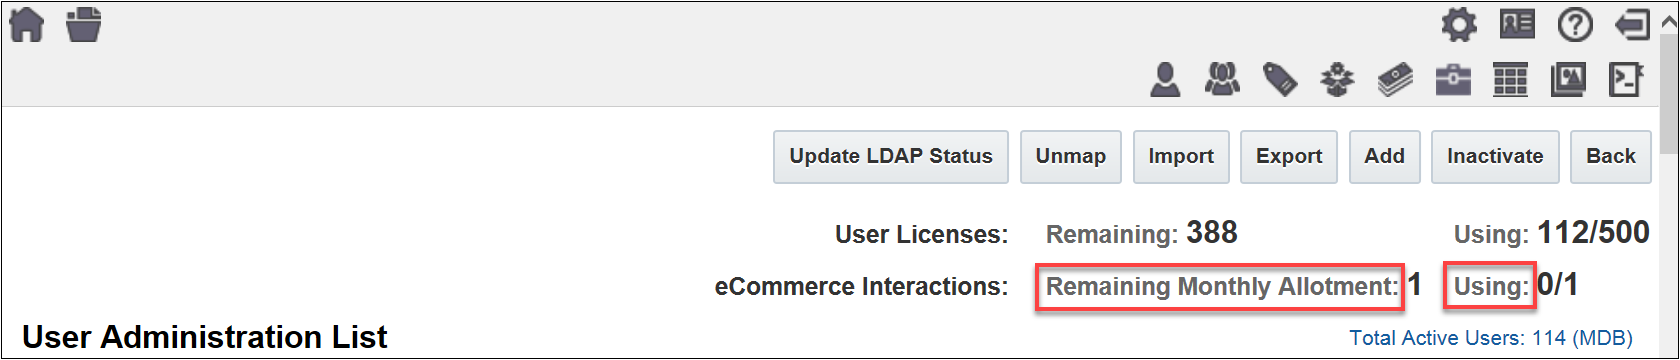
ECommerce Interactions – Release 18C
In Release 18B, ECommerce Interactions displayed as Monthly Allotment: 0 and Used: 0/0 for those customers not paying for or using ECommerce Interactions.

ECommerce Interactions – Release 18B
In Release 18C, ECommerce Interactions no longer display on the User Administration List page when the information is not applicable, meaning customers do not pay for or use ECommerce Interactions.
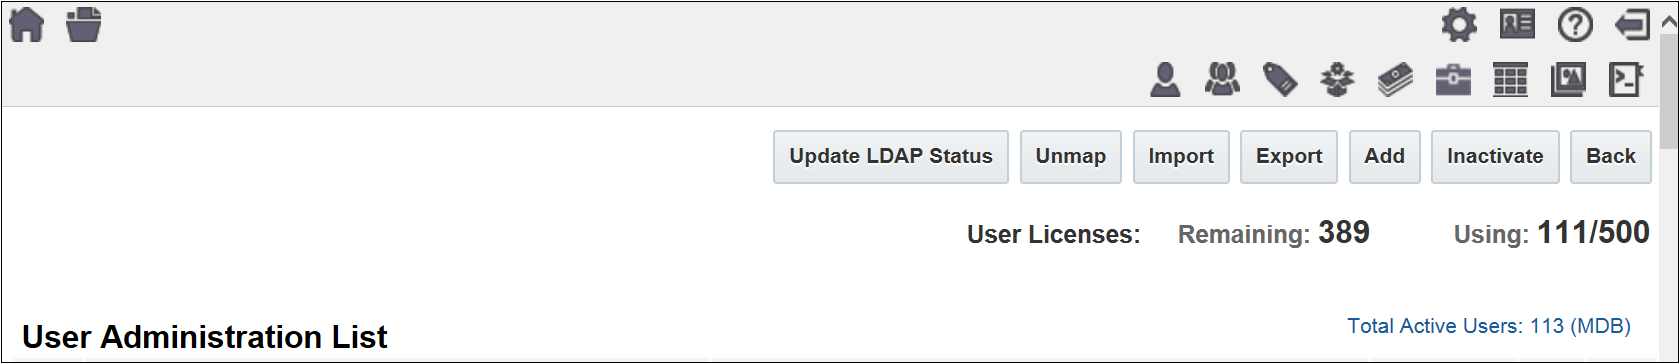
ECommerce Interactions – Release 18C
Email Notifications
When the number of eCommerce interactions performed on the CPQ Cloud site in the current month exceeds the maximum limit allowed, an email notification is sent to the email address specified in the Host Company Info page.
To access the Host Company Info page, perform the following steps:
- Open the Admin Home page.
- Select Host Company under General. The Host Company Info page opens.
Steps to Enable
Refer to the Integrating Oracle Commerce Cloud Service and CPQ Cloud Service Implementation Guide
Key Resources
Refer to CPQ Cloud Administration Online Help for additional information.
Pioneer the next generation selling platform using the System Configuration Release 18C enhancements.
System Configuration Enhancements
System Configuration refers to the manner in which customers use CPQ Cloud to configure and bundle the product or set of products they wish to sell using a group of related models that together define an entire system. A system is a hierarchical arrangement of connected configurable models with a system root model containing all of the other models.
As part of continuing improvements to System Configuration, the following enhancements are available in Release 18C:
- Enable a system navigation panel
- Use the system navigation panel to view the hierarchy and state of each model in a system
- Access incomplete system configurations
- Define a model path for a BOM item
- Use System Configuration in conjunction with Oracle Commerce Cloud
ENABLE A SYSTEM NAVIGATION PANEL
CPQ Cloud Release 18C supports the display of a system navigation panel to show the hierarchy and state of models in a system while configuring the system. If the Display System Navigation Panel configuration setting on the Configuration Options page is set to Yes, the system navigation panel always displays on the Model Configuration page whenever a BOM Mapping Rule is present on a model.
To enable the system navigation panel, perform the following steps:
- Open the Admin Home page.
- Select Configuration Settings under Products. The Configuration Options page opens.
- Set the Display System Navigation Panel option to Yes.
- Click Apply.

Display System Navigation Panel Option
USE THE SYSTEM NAVIGATION PANEL TO VIEW THE HIERARCHY AND STATE OF EACH MODEL IN A SYSTEM
The system navigation panel contains model and part icons to show the hierarchy of a system and error and warning icons to identify models requiring user action. When in a multi-node flow, the system navigation panel is visible, but the children of the multi-node model do not show until the end node.
Warning State
When users click a model in the system navigation panel while their current model is incomplete, a warning icon displays next to the model to call attention to an incomplete configuration. An incomplete configuration is a multi-node configuration flow that has not yet advanced to the end node. When initially configuring a model or reconfiguring a model, the warning icon displays to indicate the configuration is incomplete. A warning icon will also display next to a model when users are reconfiguring the model and Reverse Attribute Mapping is attempting to set a configuration attribute to two or more different values.
In the below example, a warning icon displays next to the model at the start node. The folder icons represent models and the page icons represent parts.
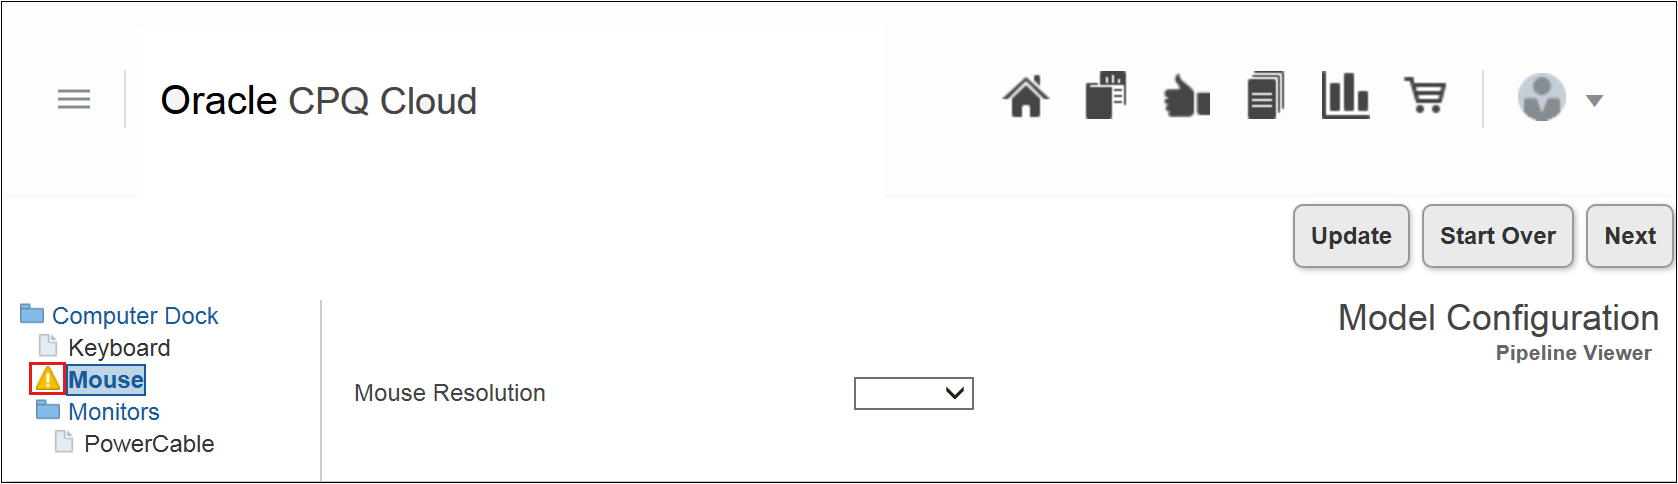
System Navigation Panel – Warning Icon
IMPORTANT: If multiple system models are configured and a warning icon displays next to one of the models, a CSS style named “config-incomplete” is given to the system navigation panel link. This allows administrators to use CSS to adjust how affected models are displayed.
Error State
An icon representing an error state displays next to a model to indicate the presence of invalid data, constrained values, blank required attributes, or invalid mandatory parts or models added by a Recommended Item rule. When a model is in an error state, users must correct the associated error.
In the below example, an active constraint is applied to the model and prevents the user from selecting a value. To correct the error, the user can select a value unaffected by the constraint from the associated drop-down and click Update.
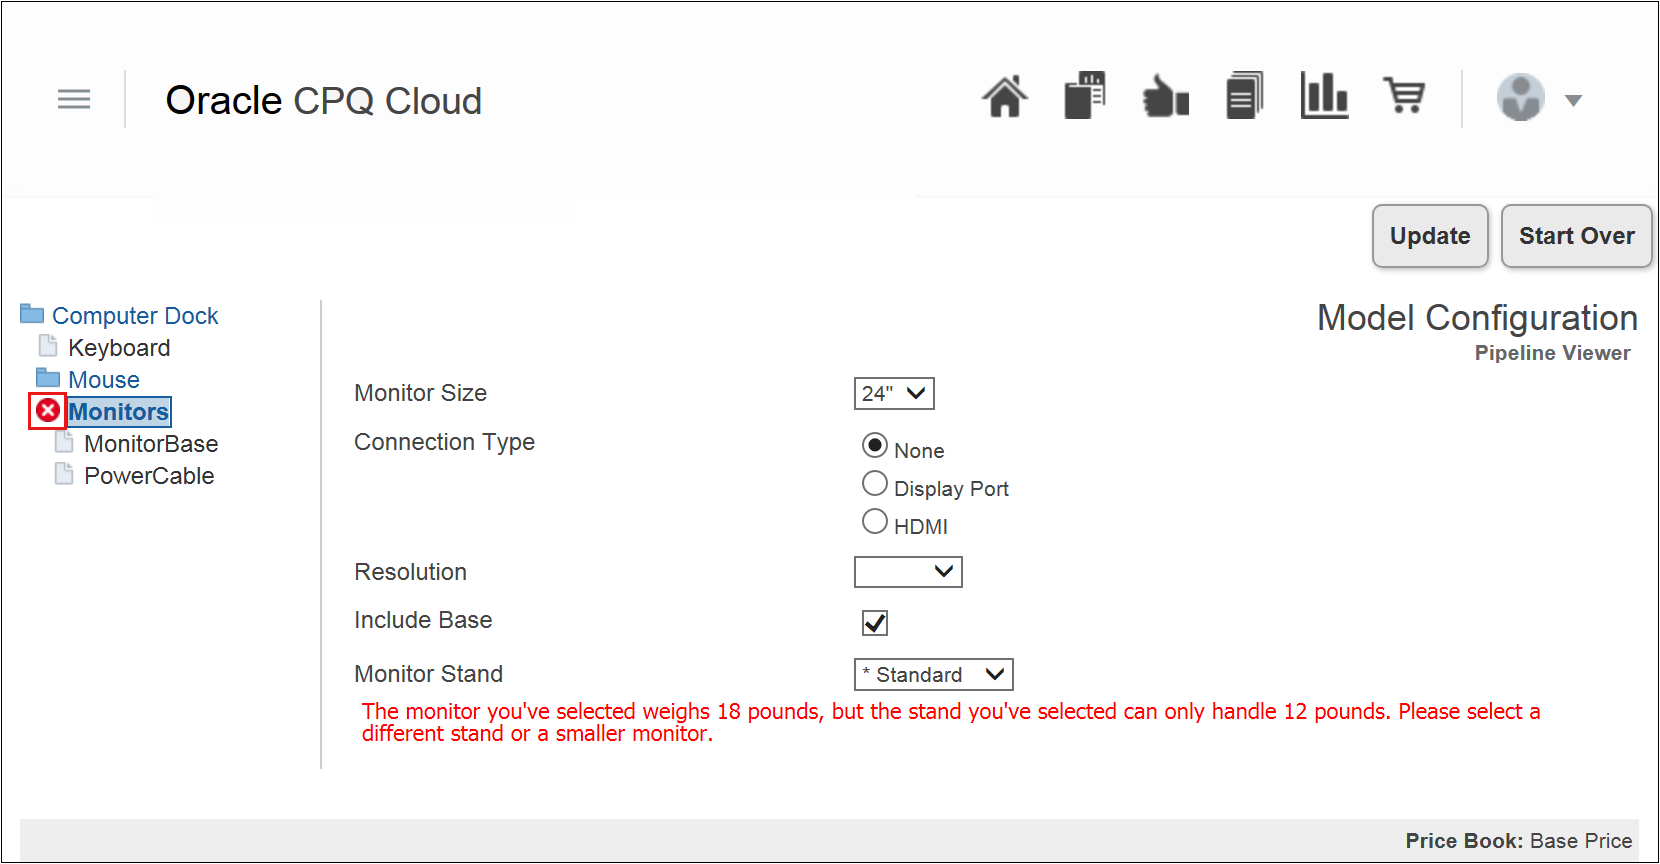
System Navigation Panel – Error Icon
IMPORTANT: Price Books can only be selected on the root model. All sub-models will show the selection made in the root in read-only mode.
IMPORTANT: If multiple system models are configured and one of the models contains an error (such as an active constraint), a CSS style named “config-contains-error” is given to the system navigation panel link. This allows administrators to use CSS to adjust how affected models are displayed.
ACCESS INCOMPLETE SYSTEM CONFIGURATIONS
Users can now access incomplete system configurations from the existing Pending Configurations page. An incomplete system configuration is the result of configuring a system in the Model Configuration page and navigating away from the page. An incomplete system configuration can also occur when users are configuring a system and are accidentally logged out of their session or lose a network connection. When any of these scenarios occur, the entire system is saved as a draft on the Pending Configurations page.
To enable the Pending Configuration page, perform the following steps:
- Open the Admin Home page.
- Select Configuration Settings under Products. The Configuration Options page opens.
- Set the Enable auto save of Pending Configurations option to Yes.
- Click Apply.
Access Incomplete System Configurations from the Pending Configurations Page
Users can resume work on incomplete systems and models they have created by clicking Pending Configurations from the top of the CPQ Cloud workspace. In the below example, Alta Navigation is enabled. Users can access their incomplete configurations by clicking the Pending Configurations icon (outlined in red) from the list of global links.

Pending Configurations Icon and List of Pending Configurations
IMPORTANT: The name of a system is always the root model’s name, regardless of the model the user was configuring when they navigated away.
IMPORTANT: There can only be one instance of a particular system per user. If users start configuring the same system again, or reconfigure the same system from Commerce, the current pending configuration is replaced.
IMPORTANT: The deployment of a product family will remove all pending configurations that contain any model from that product family.
IMPORTANT: When the Add from Catalog action is performed in Commerce, users can add systems saved to the Pending Configurations page to the current Transaction.
Resume Work on Incomplete Configurations
Users can resume work on an incomplete configuration by clicking on a model name from the list of pending configurations. The Model Configuration page then opens, allowing the user to continue working on the configuration.
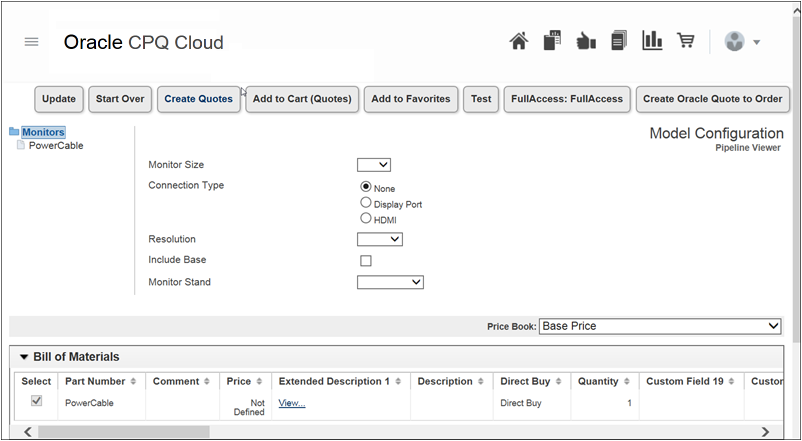
Model Configuration Page
IMPORTANT: Upon opening a pending system configuration, the last system model the administrator was working on displays in the Model Configuration page.
IMPORTANT: If a pending configuration is created while reconfiguring or adding from catalog, the Transaction is also associated with the pending configuration and loaded into memory.
IMPORTANT: When pending configurations is enabled and the system navigation panel is also enabled, users do not need to click Update to save the values entered when they navigate between models.
IMPORTANT: When pending configurations is enabled, rules are not invoked when users navigate away from a model. They are invoked when users navigate back to the model or they save the data. Since rules are not immediately invoked, an invalid configuration could appear as though it is configured correctly. Users can either click Update to validate their selections or wait until the rules invoke to see errors.
IMPORTANT: When pending configurations is not enabled, users should always perform an Update (either manual or via auto-update) before navigating to a different model. If a change is made and an Update is not performed before navigating to a different model, the final pending changes are lost.
IMPORTANT: If a BOM Mapping Rule changes, the system structure is updated upon opening the pending configuration. For example: New models and parts are added to the hierarchy, items that no longer exist are removed from the hierarchy, and items and parts that do not change remain unchanged in the hierarchy. If the model a user was configuring is removed from the system definition, its parent configuration flow is loaded.
DEFINE A MODEL PATH FOR A BOM ITEM
As in prior releases, the BOM Item Definition table stores the BOM hierarchical relationships used in the fulfillment system along with item variable references that link child items to parent items. The table also stores fulfillment system IDs, default quantities, and BOM item effective dates for the fulfillment BOM.
In CPQ Cloud Release 18C, a ModelPath column is also available in the BOM Item Definition table. This is an optional column that allows administrators to define the path to a model for a BOM item. The model at the path specified is added to the BOM hierarchy, allowing users to configure or reconfigure the model from the system navigation panel. When entering a value in the ModelPath column, administrators must use the following format:
productFamilyVariableName:productLineVariableName:modelVariableName.
IMPORTANT: CPQ Cloud does not support the entry of a model path in both the PartNumber column and the ModelPath column. Enter a model path in only one of the columns.
IMPORTANT: When a part number is entered in the PartNumber column and a model path is entered in the ModelPath column, the item is treated as a model that users can navigate to and configure from the system navigation panel.
IMPORTANT: In future releases, administrators will be required to enter a part in the PartNumber column and a model path in the ModelPath column to use System Configuration and Subscription Ordering on the same CPQ Cloud site.
IMPORTANT: When a path is entered in the PartNumber column but not in the ModelPath column, CPQ Cloud functions as in prior releases and creates a child model at the path specified.
USE SYSTEM CONFIGURATION IN CONJUNCTION WITH ORACLE COMMERCE CLOUD
CPQ Cloud Release 18C supports systems in CPQ Cloud APIs that are used in Commerce Cloud.
Add System Data to the Integration Action BML
Commerce Cloud self-service users can securely access the CPQ Cloud Model Configuration page via an iFrame that displays within Oracle Commerce Cloud. Using the system navigation panel, they can choose a system model or child model to configure. When the configuration is complete and Commerce Cloud self-service users click the integration action (i.e. Add to Cart), the return payload sent to Oracle Commerce Cloud now includes the systems included in the configuration.
To support this functionality, system information is now included in the configXML payload available in the BML when the integration action is performed. While the configXML is available in the Pipeline Viewer, it does not contain the same information as the integration action.
To add system data to the integration action BML, perform the following steps:
- Open the Admin Home page.
- Select General Site Options under General. The Options – General page opens.
- Set the Enable BML print logging option to Yes.
- Click Apply.
- Place the following line in the BML for the integration action:
print(configXML);
- Run the Integration action from the CPQ Cloud Model Configuration page.
- Check the log. The configXML payload displays and includes system information.
IMPORTANT: Setting the Enable BML print logging option to Yes will put all print statements in the log, which can hurt performance.
Request for Quote Flow
The Oracle Commerce Cloud Request for Quote flow works with Release 18B and Release 18C configurations. For example: Any model from Release 18B will continue to work when creating a new Transaction. Any models created in Release 18C are also fully functional. Any system containing more than one model will create a new Transaction, but only the root model’s configuration is available in the new Transaction. For additional information about the Request for Quote Flow, refer to the Integrating Oracle Commerce Cloud Service and CPQ Cloud Service Implementation Guide.
IMPORTANT: SOAP requests for the getConfigurations API now include “systemInfo”, which is presented in a manner similar to Add To Cart but requires an input parameter (similar to parameters for including BOM Mapping, attributes, and recommended items).
Steps to Enable
Enable the system navigation panel and the pending configuration enhancements from the CPQ Cloud Configuration Options page.
IMPORTANT: System Configuration does not work with un-deployed models. If deployment is disabled on any configuration families or across your CPQ Cloud organization, System Configuration and the system navigation panel will not work. Customers must open a Service Request (SR) on My Oracle Support to resolve this.
Tips And Considerations
Consider the following tips when using the CPQ Cloud 18C System Configuration enhancements:
- When working with a system containing Recommended Item rules on a site where the system navigation panel is enabled, the Retain Selection of Optional Items on Reconfigure option on the Configure Options page must be set to Yes to reconfigure and re-invoke a system without navigating to every model. Without doing this, all recommended items from models that were not visited on reconfigure are lost.
- When working with models added by an array condition in a system's parent, using the "-" and "+" icons to add to or remove array elements will lose configurations or confuse configurations.
- To shrink the array size, change the number in the array controller.
- To remove a specific model in an array, change the condition to “false” instead of removing the index.
- To prevent users from removing an index from an array with the "-" icon:
- Move the array controller to a different tab or node
- Make the array controller a Single Select Menu
- Have the array controller control more than one array set
- When a warning displays on the page as a result of BOM Attribute Mapping attempting to write conflicting values to the same configuration attribute, the warning remains on the page until the user acknowledges the warning by performing an update. At this time, the value of the configuration attributes revert to their values when originally invoked. The warning shows the different values attempting to be set. The user is then responsible for populating the correct value before invoking.
- In Release 18B, certain conditions would break a system, such as a root adding parent models based on an array and those parent models adding children via an array. To add this functionality to system configurations and use it with system Transactions created in Release 18B and prior, customers must open and reconfigure each legacy system.
- Oracle does not recommend using multi-node model configurations in a system where that model has, or could have, child models.
Key Resources
Refer to the Integrating Oracle Commerce Cloud Service and CPQ Cloud Service Implementation Guide and the CPQ Cloud Administration Online Help for additional information.
Customer Requested Enhancements
The CPQ Cloud Release 18C introduces the following enhancements to improve performance and simplify CPQ Cloud integrations.
- Overcrowded Mode Enhancement
- Data Table Enhancement
- Commerce Process Enhancement
- Migration Process Enhancements
- Timer Enhancement
Overcrowded mode allows for environments to continue running during extremely high loads. During Overcrowded mode, the timeout of idle sessions is reduced and the CPQ Cloud site temporarily prevents users, integrations, and BML URL access functions from creating new sessions to ensure active users can complete their Transactions.
In CPQ Cloud Release 18C, a banner message displays when a site is experiencing an extremely high load. Administrators enable/disable the Overcrowded Mode banner display from the General Site Options on the Admin Home page.
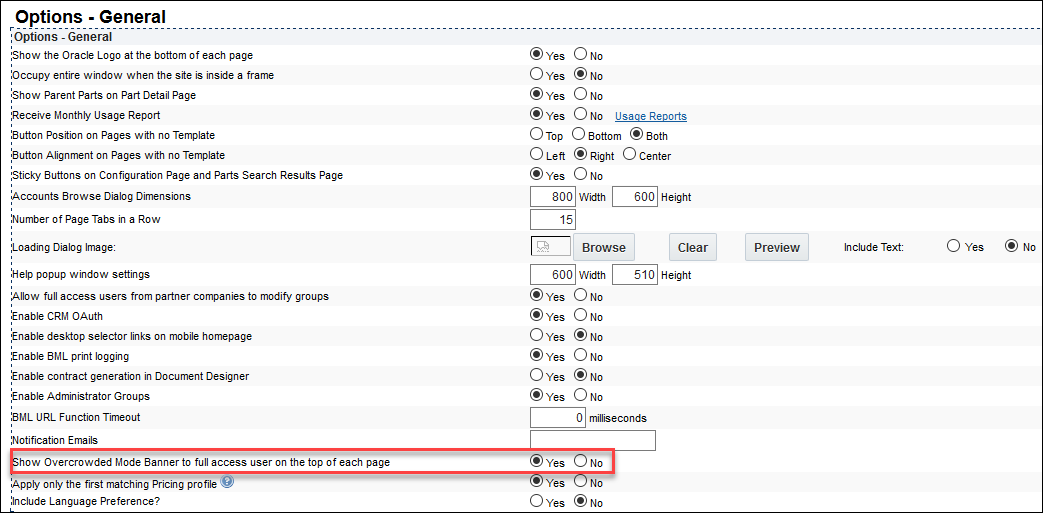
Overcrowded Mode Banner Option
When enabled, the banner displays at the top of each page for FullAccess users with the following text: The environment is currently experiencing extremely high loads, otherwise known as "Overcrowded Mode". The CPQ site will temporarily prevent users, integrations, and BML URL functions from creating new sessions. During this restriction period, the timeout of idle sessions is reduced to ensure active users can complete their Transactions. Administrators should delay scheduled events such as deployments, migrations, and bulk operations to improve system performance.

Overcrowded Mode Banner
Steps to Enable
This Overcrowded Mode enhancement is automatically available on CPQ Cloud 18C sites.
Tips And Considerations
While the environment is in Overcrowded Mode, intensive operations such as deployments, migrations, and bulk operations should not be performed.
Key Resources
Refer to CPQ Cloud Administration Online Help for additional information.
In CPQ Cloud Release 18C, administrators are warned when deploying a Data Table without an index and with a large number of records. The warning displays if the Data Table contains 1,000,000 or more records. This alert reminds administrators that deploying a large table without an index or indexes can be a performance intensive operation.
This warning is provided during deployment, migration, and when processing web services calls for the Data Table. CPQ Cloud recommends that all large tables include indexes for better performance during processing.
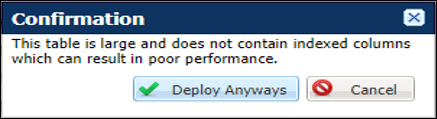
Data Table Index Warning
IMPORTANT: Contact My Oracle Support to open a Service Request to to disable this warning for all users of the CPQ site.
Steps to Enable
This Data Table enhancement is automatically available on CPQ Cloud 18C sites.
Tips And Considerations
To improve performance, large Data Tables should always be indexed.
Key Resources
Refer to CPQ Cloud Administration Online Help for additional information.
In CPQ Cloud Release 18C, administrators can delete a Commerce process and all of the Commerce data and Transactions associated with the process.
To delete a Commerce process, complete the following steps:
- Open the Admin Home page.
- Under Commerce and Documents, select Process Definition. The Processes page displays.
- Select Deployment Center drop down and click List for the Commerce process you want to delete.
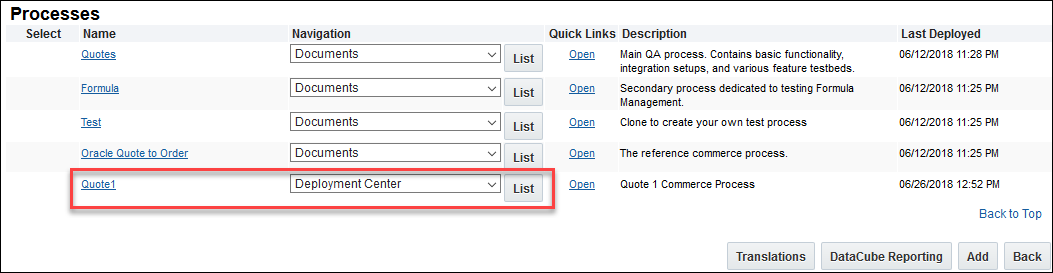
Processes - Deployment Center
- Select Delete Process from the Deployment Center page for the Commerce process.
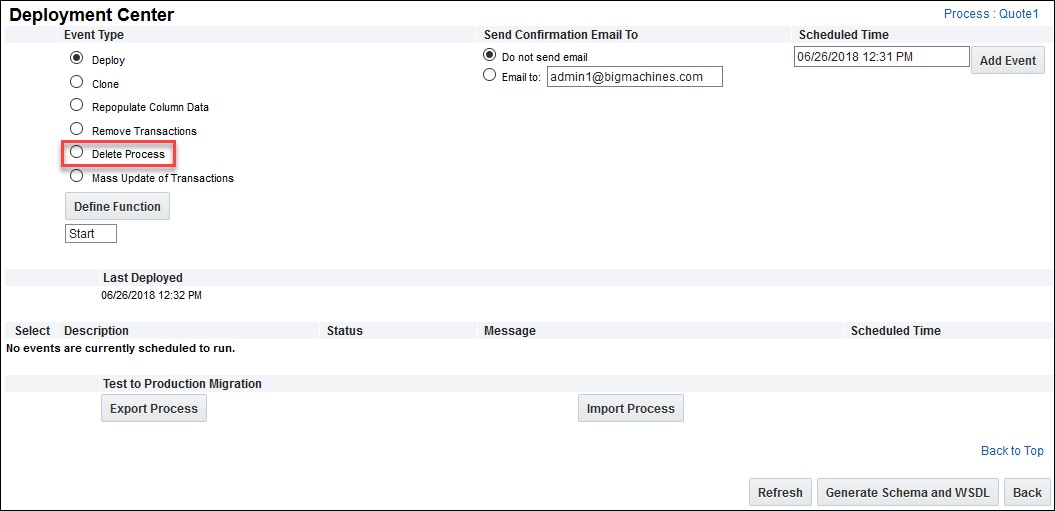
Delete Commerce Process
- A confirmation of delete message displays indicating that the process and all related data and transactions will be deleted. Click OK to proceed with the deletion or Cancel to not perform the delete action.
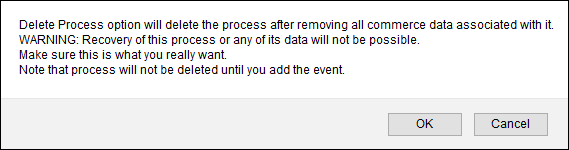
Delete Commerce Process Warning Message
IMPORTANT: Recovery of the Commerce process and its associated data is not possible. Make sure you want to move forward with the delete option before you click OK.
- Enter the date and time to schedule the delete event and click Add Event. The Commerce Process delete action is scheduled to delete.
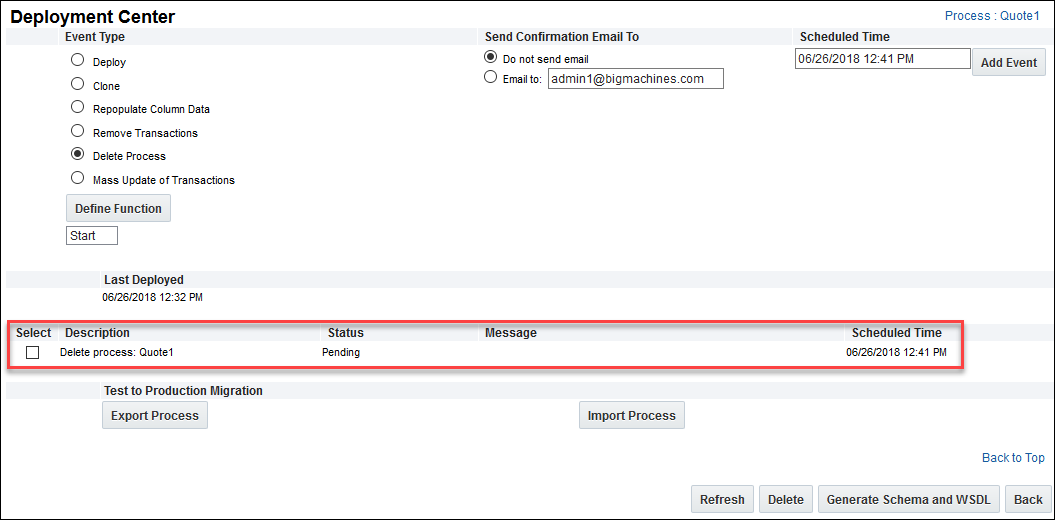
Schedule Commerce Process Delete Event
Steps to Enable
This Commerce Process enhancement is automatically available on CPQ Cloud 18C sites.
Tips And Considerations
Deleting a Commerce process will permanently delete the process and all of its transactions.
Key Resources
Refer to CPQ Cloud Administration Online Help for additional information.
Migration Process Enhancements
In CPQ Cloud Release 18C, we have included enhancements for improved stability when performing migrations.
Steps to Enable
Migration Process enhancements are automatically available on CPQ Cloud 18C sites.
Key Resources
Refer to CPQ Cloud Administration Online Help for additional information.
As in prior releases, administrators can schedule CPQ Cloud to automatically perform Commerce actions using Timers set up on Modify type Commerce actions. Based on a defined duration of time, a Timer triggers when the elapsed time exceeds the specified duration. Timers are managed within individual workflow steps, and administrators can only associate one Timer with a workflow step.
There were instances where Timers triggered at the incorrect time when the Timer queue was large. As a performance improvement to address these challenges, the Timer framework is enhanced in Release 18C to support multi-threading. When this enhancement is enabled, Oracle administrators can view the Timer queue and kill a Timer thread from the queue.
Steps to Enable
Open a Service Request (SR) on My Oracle Support to enable multi-threading for Timer tasks.
Key Resources
Refer to CPQ Cloud Administration Online Help for additional information.
KNOWN FUNCTIONALITY
When customers currently using the Alta Transaction UI upgrade to Release 18C, the JET Responsive Transaction UI is enabled.
MIGRATION
When migrating from one site to another using the Migration Center, both sites must use the same major release. Content may only be migrated across minor releases within the same major release. Migration across major releases cannot occur.
"Major release" = A major product release, e.g. Release 18BC
"Minor release" = A release update, e.g. Release 18C Update 1
RESOLVED KNOWN ISSUES
For information on bugs fixed in Release 18C, refer to the CPQ Cloud 18B Resolved Known Issues document available on My Oracle Support and the CPQ Cloud Online Help.
TRANSLATION
For some system-defined messages and components, strings were removed and others added in CPQ Cloud 18C. If you have created your own implementation-specific translations of system-defined strings, some of these strings may no longer appear. Other strings may appear in English. The strings appearing in English are new and require translation.
Most of these messages and components are on the Administration side of CPQ Cloud, but you should review both your end user and administration pages before deploying your updated installation to confirm that all strings appear in the desired language.
TRANSLATION STATUS
CPQ Cloud supports the consumption of both single and multi-byte character sets. Submit a service request on My Oracle Support to enable your site for a new language.
For the following languages, a translation of the CPQ Cloud user interface is available for both the platform and the reference application:
- Chinese (Simplified) [China]
- Chinese (Traditional) [Taiwan]
- Czech [Czech Republic]
- Danish [Denmark]
- Dutch [Netherlands]
- English
- Finnish [Finland]
- French
- French [Canada]
- German
- Hungarian [Hungary]
- Italian
- Japanese [Japan]
- Korean [South Korea]
- Norwegian (Bokmål) [Norway]
- Polish [Poland]
- Portuguese [Brazil]
- Romanian [Romania]
- Russian [Russia]
- Spanish (Worldwide)
- Swedish [Sweden]
- Turkish [Turkey]
Upgrade and test all test instances on Oracle CPQ Cloud 18C before upgrading to production.
BROWSER SUPPORT
CPQ Cloud supports all browser versions that meet the criteria of the Oracle Software Web Browser Support Policy.
Supported Browsers
Windows
- Major releases of Google Chrome upon general browser availability and until Google no longer supports the version
- Major releases of Mozilla Firefox upon general browser availability and until Mozilla no longer supports the version
- Major releases of Internet Explorer/Microsoft Edge within nine months of general browser availability and until Microsoft no longer supports the version
Mac OS X
- Major releases of Google Chrome upon general browser availability and until Google no longer supports the browser version
- Major releases of Mozilla Firefox upon general browser availability and until Mozilla no longer supports the version
- Major releases of Safari within nine months of general browser availability and until Apple no longer supports the version
iOS
- Major releases of Safari within nine months of general browser availability, and until Apple no longer supports the browser version
If you experience issues using a supported browser version, open a ticket on My Oracle Support to resolve the issue. If an issue arises when using a supported browser, use a certified browser version until the delivery of a fix. Certified browsers are selected based on current market share and thoroughly tested to work with the current version's standard functionality.
Certified Browsers
Windows
- Google Chrome 67.x
- Mozilla Firefox 61.x
- Internet Explorer 11.x
IMPORTANT: Compatibility issues with the selected browsers may exist when sites contain additional JavaScript, alternate CSS, or other custom functionality. Customizations may require add-on work. Contact My Oracle Support to determine the availability of workarounds and minor fixes.
SALESFORCE INTEGRATION SUPPORT
Oracle officially supports the Summer 18 update of the Oracle Adapter for Salesforce Lightning (the Salesforce Adapter) and version 7.2 of the Oracle CPQ Commerce Integration (the Managed Package). CPQ Cloud customers currently integrated to Salesforce via Managed Package version 4 and below will need to upgrade to a current version of the Managed Package. Managed Package versions 5 and above are expected to continue to function; however, Oracle will not address new issues that arise. We strongly encourage customers to upgrade to a supported version.
TRAINING
Please refer to the release documentation for all versions between your current version and the version to which you are upgrading to see all new functionality, resolved known issues, and functional known issues.
Refer to the CPQ Cloud Online Help to become familiar with the new features introduced in Oracle CPQ Cloud 18C. For additional help, see My Oracle Support.
Verify any information not explicitly mentioned in this document as supported by the software against the product help for Oracle CPQ Cloud 18C or the Oracle CPQ Cloud Consulting team.
ADDITIONAL INFORMATION
For more information on Oracle CPQ Cloud, visit the Oracle CPQ Cloud documentation site.
DISCLAIMER
The details in this document are provided for high-level informational purposes only and are not intended to function as a specification or to replace the Online Help. Upgrading to a subsequent release may require the re-deployment of Commerce Processes, Configuration, or global function settings. Modifications to integration XSL files or APIs may also be required.
---

Copyright © 2018, Oracle and/or its affiliates. All rights reserved.
This document is provided for information purposes only, and the contents hereof are subject to change without notice.This document is not warranted to be error-free, nor subject to any other warranties or conditions, whether expressed orally or implied in law, including implied warranties and conditions of merchantability or fitness for a particular purpose. We specifically disclaim any liability with respect to this document, and no contractual obligations are formed either directly or indirectly by this document. This document may not be reproduced or transmitted in any form or by any means, electronic or mechanical, for any purpose, without our prior written permission.
Oracle and Java are registered trademarks of Oracle and/or its affiliates. Other names may be trademarks of their respective owners.
Intel and Intel Xeon are trademarks or registered trademarks of Intel Corporation.All SPARC trademarks are used under license and are trademarks or registered trademarks of SPARC International, Inc. AMD, Opteron, the AMD logo, and the AMD Opteron logo are trademarks or registered trademarks of Advanced Micro Devices. UNIX is a registered trademark of The Open Group.
