
- Revision History
- Overview
- Feature Summary
- BML
- Commerce
- Configuration
- Data Tables
- JET User Interface
-
-
-
- Jet Configuration and Transaction UI HTML Help Messages
- Enable AJAX for Configuration Rules with Array Attribute Inputs
- Export JET Transaction UI Line Item Grid to .XLSX File Format
- Default Array Column Width for JET Configuration UI
- JET Transaction UI Error Message Enhancements
- Managed Viewed Columns for JET Transaction UI Tables
-
-
- Web Services
- Pre-Upgrade Considerations
- Post-Upgrade Considerations
This document will continue to evolve as existing sections change and new information is added. All updates appear in the following table:
| Date | Feature | Notes |
|---|---|---|
| 21 FEB 2020 | Transaction Array Support for Commerce Hiding Rules | Updated document. Revised feature information. |
| 21 FEB 2020 | Export JET Transaction UI Line Item Grid to .XLSX File Format | Updated document. Revised feature information. |
| 11 FEB 2020 | Created initial document. |
Oracle Configure, Price, and Quote (CPQ) Cloud enables companies to streamline the entire opportunity-to-quote-to-order process, including product selection, configuration, pricing, quoting, ordering, and approval workflows. CPQ Cloud provides a flexible, scalable, enterprise-ready solution ideal for companies of all sizes that sell products and services across direct, indirect, and e-commerce sales channels.
This guide outlines the information you need to know about new or improved functionality in Oracle CPQ 20A and describes any tasks you might need to perform for the update. Each section includes a brief description of the feature, the steps you need to take to enable or begin using the feature, any tips or considerations that you should keep in mind, and the resources available to help you.
KEY RESOURCES
Refer to CPQ Cloud Administration Online Help for detailed descriptions and instructions.
SECURITY & NEW FEATURES
We would like to remind you if your system has modified security structures you may need to advise your security administrator of new features you would like to implement.
GIVE US FEEDBACK
We welcome your comments and suggestions to improve the content. Please send us your feedback at cpqcloud_documentation_us_grp@oracle.com.
Column Definitions:
Features Delivered Enabled
Report = New or modified, Oracle-delivered, ready to run reports.
UI or Process-Based: Small Scale = These UI or process-based features are typically comprised of minor field, validation, or program changes. Therefore, the potential impact to users is minimal.
UI or Process-Based: Larger Scale* = These UI or process-based features have more complex designs. Therefore, the potential impact to users is higher.
Features Delivered Disabled = Action is needed BEFORE these features can be used by END USERS. These features are delivered disabled and you choose if and when to enable them. For example, a) new or expanded BI subject areas need to first be incorporated into reports, b) Integration is required to utilize new web services, or c) features must be assigned to user roles before they can be accessed.
| Ready for Use by End Users Reports plus Small Scale UI or Process-Based new features will have minimal user impact after an update. Therefore, customer acceptance testing should focus on the Larger Scale UI or Process-Based* new features. |
Action is Needed BEFORE Use by End Users Not disruptive as action is required to make these features ready to use. As you selectively choose to leverage, you set your test and roll out timing. |
|||||
|---|---|---|---|---|---|---|
| Feature |
Report |
UI or |
UI or |
|
||
Support Insert, Delete, Update, and Modify BMQL Functions for Live Data Tables |
||||||
Enable AJAX for Configuration Rules with Array Attribute Inputs |
||||||
Export JET Transaction UI Line Item Grid to .XLSX File Format |
||||||
The following BML features and enhancements are available in Oracle CPQ 20A:
- BML Compiler Optimization
- Set Attribute Value BML Function
- Support Insert, Delete, Update, and Modify BMQL Functions for Live Data Tables
The Oracle CPQ 20A BML script compiler is enhanced to utilize StringBuilders in the background to optimize string building during the internal processing of BML functions.
Steps to Enable
You don't need to do anything to enable this feature.
Tips And Considerations
If you want to disable the BML complier optimization enhancement, submit a Service Request (SR) on My Oracle Support.
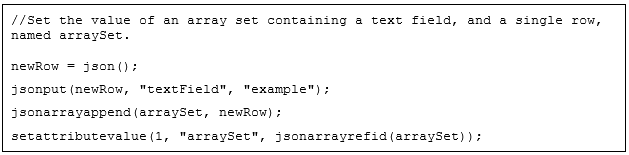
Set Attribute Value BML Function
A new BML function, setattributevalue, is available to set a Commerce attribute value on a Main document or Sub-document. This function can be used in place of adding to the return string of a Modify function. The setattributevalue function is supported for the following:
- Advanced Default (Main document Commerce attributes)
- Advanced Default - Before Formulas (Sub-document Commerce attributes)
- Advanced Default - After Formulas (Sub-document Commerce attributes)
- Advanced Modify - Before Formulas ( Main document Commerce Modify actions)
- Advanced Modify - After Formulas (Main document Commerce Modify actions)
- Advanced Modify - Before Formulas (Sub-document Commerce Modify actions)
- Advanced Modify - After Formulas (Sub-document Commerce Modify actions)
- Commerce BML Libraries (Function Category = Others)
IMPORTANT: This function is used to set Commerce attributes only.
BML Syntax:

Parameters:

Example:
Steps to Enable
You don't need to do anything to enable this feature.
Tips And Considerations
- The setattributevalue call is supported within the BML Library only if it is referenced from an Advanced Modify or Advanced Default function.
- If there is a conflict between the setattributevalue and the return string, the return string overwrites the setattributevalue response.
- Updated attribute values set using the setattributevalue function are available immediately when referencing that attribute in the current BML execution context.
Key Resources
Refer to the Oracle CPQ Administration Online Help for details about using the BML Function Editor.
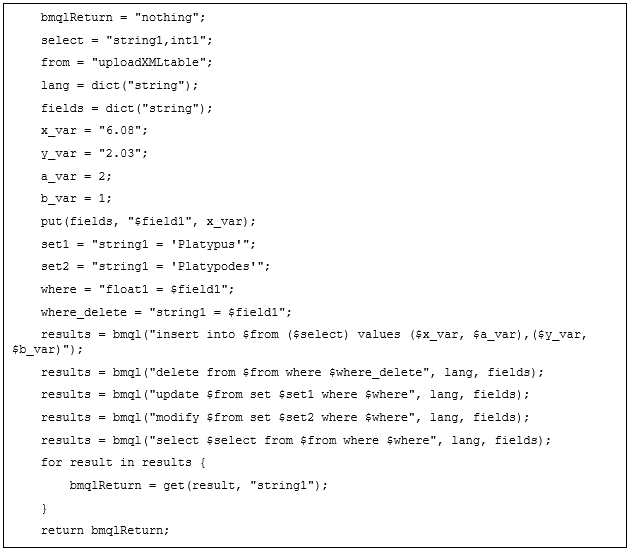
Support Insert, Delete, Update, and Modify BMQL Functions for Live Data Tables
Currently, modifying Live Data Tables is accomplished using UI, Web Services, or Bulk Upload. In 20A, BMQL functions are supported to insert, delete, update, and modify Live Data Tables. When storing Transaction-related data within a Live Data Table is required as part of a business process, using BMQL functions to update Live Data Tables is recommended over using Web Services. Since the action is performed on a Live Data Table, there is no need to deploy the table after modification is complete.
You can access the BMQL functions from the BML Function Wizard. Refer to the Oracle CPQ Administration Online Help for more information.
Insert BMQL Function
The INSERT statement is used to add a new record into a Live Data Table.
Syntax:
RecordSet bmql(String sqlQuery [, String Dictionary contextOverride, String Dictionary fieldMap])
Example:
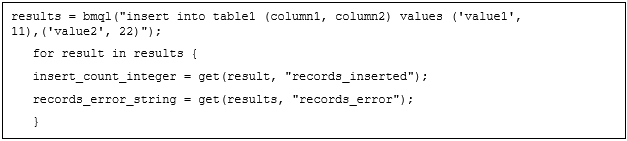
For INSERT statements, results is a record set with one integer entry that indicates the number of rows added. This is usually the same as the number of records in the VALUES part of the BMQL statement, but sometimes a row may fail due to duplicate natural key entries. When this occurs, a records_error entry is added, showing the first record that blocks the insertion as a JSON string.
The INTO keyword is followed by the name of the Live Data Table and then a list of columns in parentheses and without quotes. These are the columns which the values statement will populate.
The VALUES keyword prefixes a list of records to be inserted. Each record is bracketed by parentheses and contains a list of values to be inserted. The values must be given in the same order as the columns. String values must be in single quotes.
Delete BMQL Function
The DELETE statement is used to delete existing rows or columns into a Live Data Table.
Syntax:
RecordSet bmql(String sqlQuery [, String Dictionary contextOverride, String Dictionary fieldMap])
Example:

For DELETE statements, results is a records set with one integer entry that indicates the number of rows deleted.
The FROM keyword specifies the object to retrieve the data from.
IMPORTANT: Executing a DELETE statement without a WHERE clause will clear all of the data in the Live Data Table.
Update BMQL Function
The UPDATE statement is used to update an existing record in a Live Data Table.
Syntax:
RecordSet bmql(String sqlQuery [, String Dictionary contextOverride, String Dictionary fieldMap])
Example:
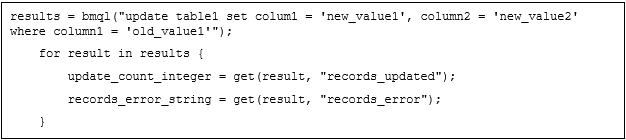
For UPDATE statements, results is a record set with one integer entry showing the number of rows modified. A records_error entry is added when the query is valid but the Live Data Table state blocks the update.
The SET keyword is used to change field values in the Live Data Table. The format is the name of the column followed by the "=" operator and then the value to be set. For example, string1 = 'ABC-112A'.
IMPORTANT: Executing a UPDATE statement without a WHERE clause will update all of the data in the Live Data Table.
Modify BMQL Function
The MODIFY statement is used to modify an existing record or create a new record in a Live Data Table.
Syntax:
RecordSet bmql(String sqlQuery [, String Dictionary contextOverride, String Dictionary fieldMap])
Example:
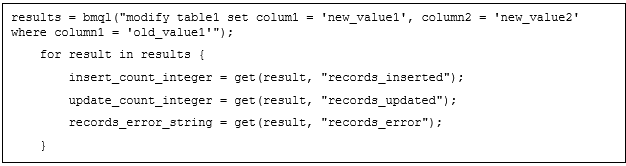
For MODIFY statements, results is a record set with two integer entries, one with the number of rows modified and one with the number of rows added. A records_error entry is added when the query is valid but the Live Data Table state blocks the update.
The SET keyword is used to change field values in the Live Data Table. The format is the name of the column followed by the "=" operator and then the value to be set. For example, string1 = 'ABC-112A'.
IMPORTANT: Executing a MODIFY statement without a WHERE clause will modify all of the data in the Live Data Table.
Dynamic Variables
In Oracle CPQ 20A, the Live Data Table INSERT, DELETE, MODIFY, and UPDATE BMQL statements can be used in dynamic BMQL scripts. BMQL allows the use of dynamic variables for column names, Data Table names, and WHERE clauses. Using direct variable substitution, called dynamic variables, makes it simpler to write BML queries that change based on user input, without having to write a unique clause in the query for every possible permutation of inputs.
Variables in the SELECT, FROM, VALUES, and WHERE clause are able to be used with $var syntax. Alternatively the entire WHERE clause can be a string variable, as can the list of columns to be updated in an INTO statement. If there are variables within the WHERE clause variable, you must define these variables in a string Dictionary and pass them as a third parameter. In this case you must also define a second parameter.
The following example includes dynamic variables for Live Data Table insert, delete, modify, and update.
Example:
Steps to Enable
You don't need to do anything to enable this feature.
Tips And Considerations
- The INSERT, DELETE, UPDATE, and MODIFY BMQL functions only work with Live Data Tables.
- BMQL is case-sensitive. Be aware of this when selecting your rows, columns, fields, and values.
The following Commerce features and enhancements are available in Oracle CPQ 20A:
- Commerce Filter Rule for Line Item Grid Items
- Run Commerce Rules in Parallel
- Transaction Array Support for Commerce Hiding Rules
- Transaction Opens in a New Tab from Commerce Search
Commerce Filter Rule for Line Item Grid Items
Oracle CPQ 20A introduces a new Commerce filter-type rule to exclude irrelevant Line Item Grid items. Administrators can define Commerce Filter rules that use Commerce attributes for simple or Advanced BML conditions to filter out items that are not relevant to the current user.
Administrators can add a sub-document Filter rule to exclude irrelevant items for sales users. For example, the Line Item Grid in the Transaction UI shows all the BOM items as a result of the BOM Mapping Rules. A subset of the BOM items in this list, though useful for downstream fulfillment systems, are considered internal to the customer and not relevant for the sales users.
Steps to Enable
Complete the following steps to define a Commerce Filter rule for the transaction line items.
- Navigate to the Rule Editor page for the applicable Commerce sub-document.
Admin > Commerce and Documents > Process Definition > Documents > Rules
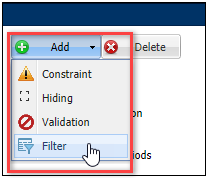
- Select Filter from the Add drop-down menu.
- Enter the rule Properties.
- Name - Enter the name of the rule in this section. This is a required field.
- Variable Name - The Variable Name field populates automatically. Variable names can only contain alpha-numeric characters and underscores. The entry can be changed before saving, but after saving the value is read-only. This is a required field.
- Description - Enter a description, if desired.
- Status - Determine the status of the rule:
- Active - The rule is fired when the condition is met.
- Inactive - The rule is not fired even if the condition is met. Inactive rules are displayed in italics in the rules list in the left panel.
- Define the rule Condition.
- Select the Condition Type.
- Select an attribute from the drop-down menu.
- Select an Operator and enter the Value to filter.
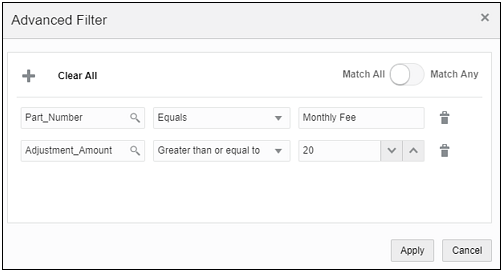
For example, the following filter will hide all "Internal" type parts from the Line Item Grid.

- Click Save.
After the Filter rule is saved and deployed, all "Internal" type parts are excluded from the Line item Grid.
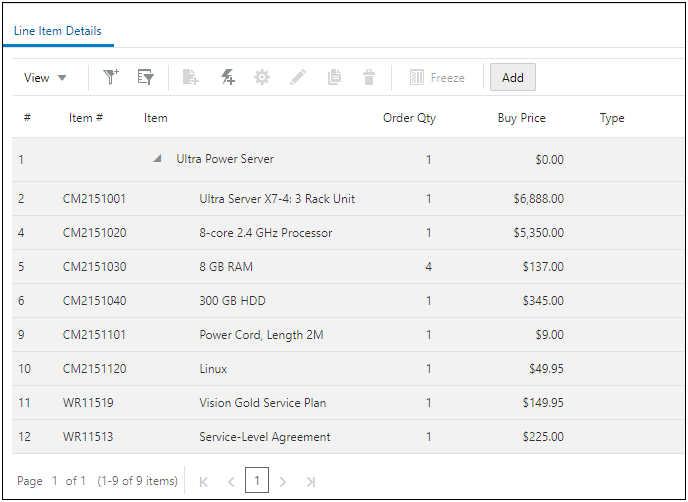
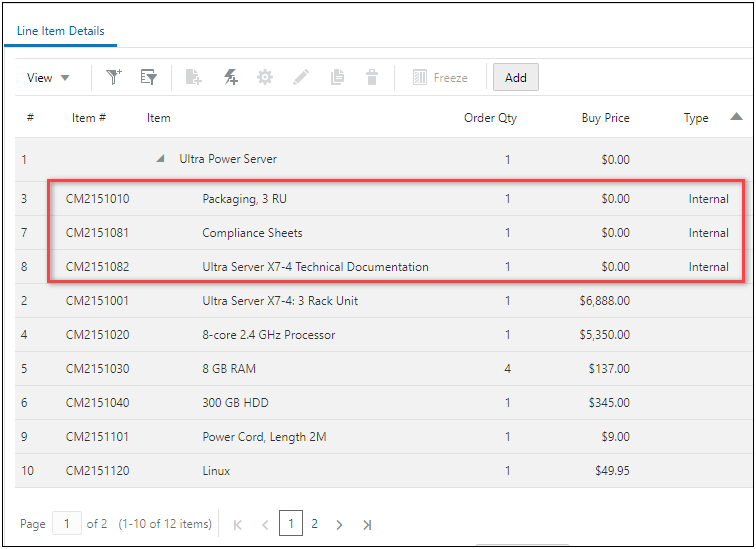
Enable Parent Filtering and Rolling Up Children
Oracle CPQ 20A adds a new Commerce option to promote child items up a level when their parent item is hidden by a Commerce Filter rule. If the "Filter Rule – Enable parent filtering and rolling up children" option is set to "Yes" child items will be promoted when their parent is hidden. If this option is set to "No" the child items will not be promoted when their parent is hidden. The default setting is "No".
The following diagram provides an example of the Commerce Filter Rule setting.
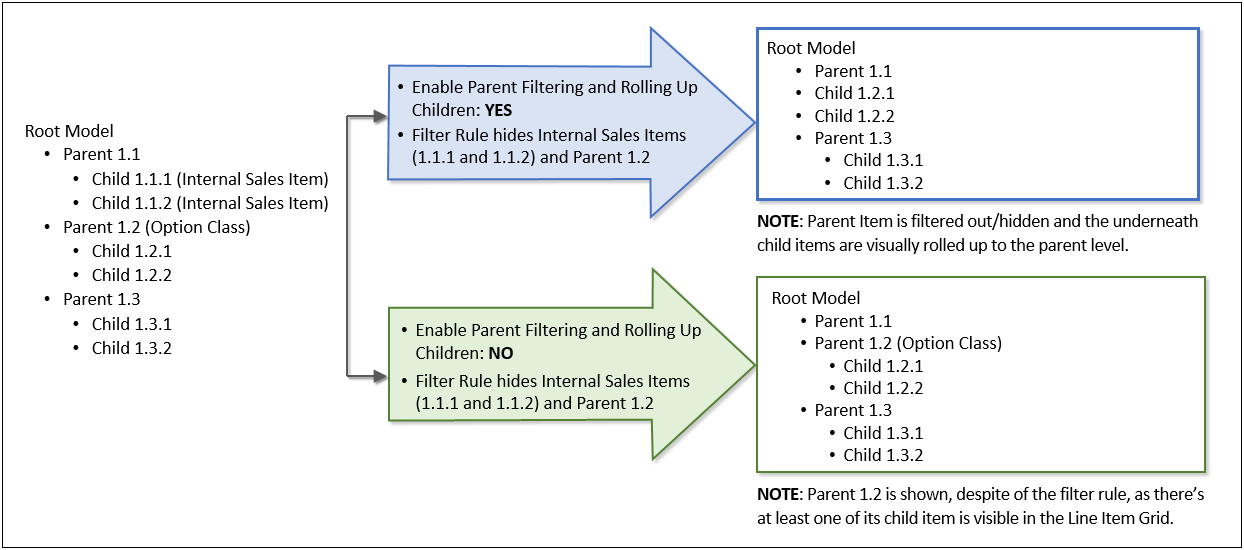
Example of Commerce Filter Rule Setting Behavior
Complete the following steps to enable parent filtering and rolling up children.
- Navigate to the Commerce Options page.
Admin Home > Commerce and Documents > Commerce Settings
- Set the Filter Rule – Enable parent filtering and rolling up children option to Yes.
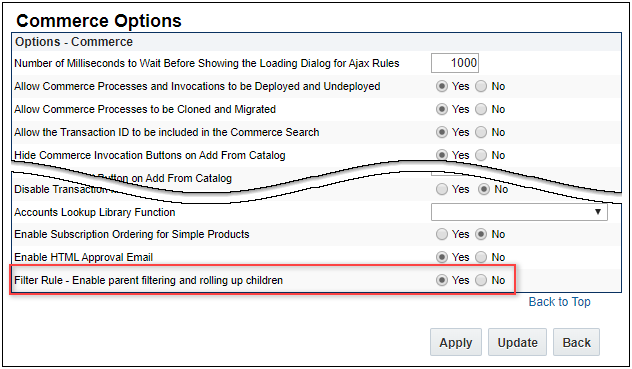
- Click Update to save your changes and return to the previous page.
Tips And Considerations
To prevent inaccessible line items administrators should avoid using modifiable attributes in filter rule conditions that can directly affect line item visibility.
Run Commerce Rules in Parallel
The internal handling of Commerce rules is enhanced to include more systematic parallel processing of the rules in order to improve end user response time.
Steps to Enable
You don't need to do anything to enable this feature.
Tips And Considerations
If you want to disable this feature, submit a Service Request (SR) on My Oracle Support.
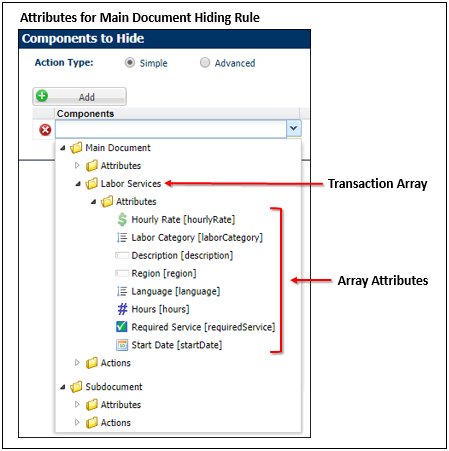
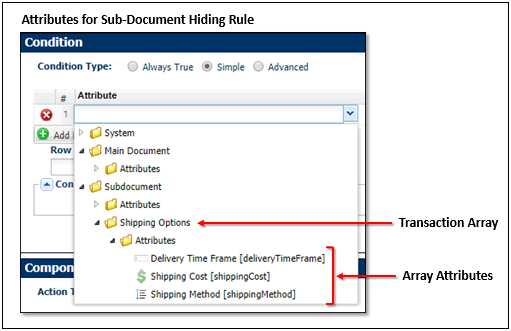
Transaction Array Support for Commerce Hiding Rules
Beginning in Oracle CPQ 20A, administrators can use transaction array set attributes in the Commerce Hiding Rules. Array attributes can be used in both simple and advanced modes for the condition and for the components-to-hide sections of the hiding rules. Transaction array hiding behaviors are similar to Configuration array set behaviors.
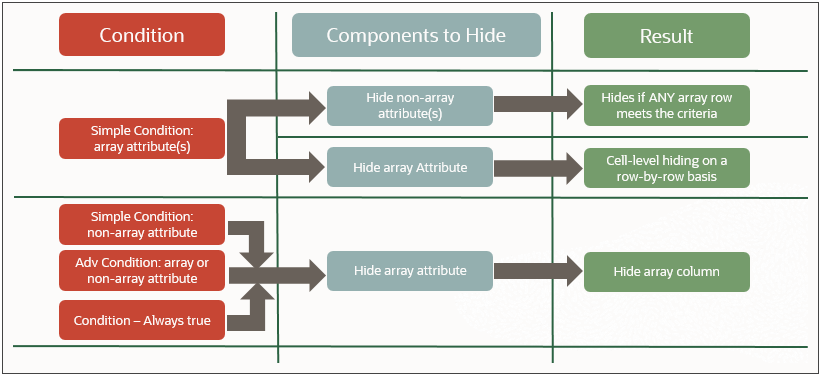
Transaction array attribute hiding behaviors are as follows:
- If an array attribute is used as a simple condition and the components to hide only uses document attributes, the result is that the document attributes are hidden if any array row meets the condition.
- If an array attribute is used as a simple condition and the components to hide also use array attributes, the result is cell-level hiding as determined on a row-by-row basis.
- If a simple condition exists without referencing an array attribute and the components to hide uses array attributes, the result is that the entire array column is hidden.
- If an advanced condition is used either with or without array attributes and the components to hide uses array attributes, the result is that the entire array column is hidden.
- If a condition is "Always True" and the components to hide uses array attributes, the result is that the entire array column is hidden.
Steps to Enable
Complete the following steps to use a transaction array set attribute in a Commerce Hiding rule.
- Navigate to the Rules List page.
Admin > Commerce and Documents > Process Definition > Documents > Rules
-
Select Hiding from the Add drop-down to create a new Hiding rule.
-
Enter the rule Properties.
-
Name - Enter the name of the rule in this section. This is a required field.
-
Variable Name - The Variable Name field populates automatically. Variable names can only contain alpha-numeric characters and underscores. The entry can be changed before saving, but after saving the value is read-only. This is a required field.
-
Description - Enter a description, if desired.
-
Status - Determine the status of the rule:
- Active - The rule is fired when the condition is met.
- Inactive - The rule is not fired even if the condition is met. Inactive rules are displayed in italics in the rules list in the left panel.
- Define the rule Condition.
-
Select the Condition Type.
-
Select an attribute from the drop-down menu.
-
Select an Operator and enter the Value to filter.
When you are creating a main document Hiding rule, you can select main document transaction array attributes for rule conditions.
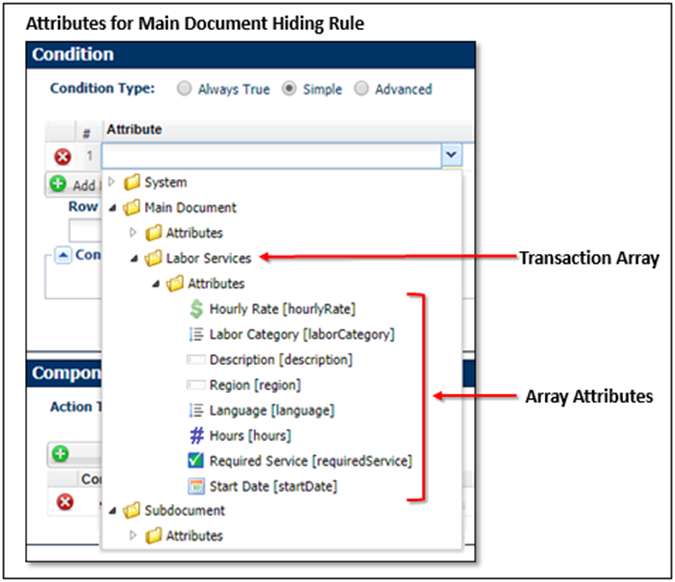
When you are creating a sub-document Hiding rule, you can select sub-document transaction array attributes for rule conditions.

- Define the rule Condition.
-
Select the Condition Type.
-
Select an attribute from the drop-down menu.
When you are creating a main document Hiding rule, you can hide main document transaction array attributes.
When you are creating a sub-document Hiding rule, you can hide sub-document transaction array attributes.
- Click Save.
Tips And Considerations
-
One or multiple transaction array attributes within the same transaction array set can be used in a hiding rule condition. However, different transaction array sets cannot be referred to in that same condition or component to hide. When a transaction array attribute does not meet the supported transaction array hiding rule conditions, the attribute is not available for selection within the UI.
-
When a transaction array attribute is referenced in a hiding rule, a related rules link is displayed on the Attribute Array Set Editor page in the Array Attribute List - Related Rules column. Administrators can view the List of Related Rules and access associated hiding rules.
-
In advanced BML, only the transaction array set is available for selection. Administrators can access the transaction array attribute from BML functions. Refer to Commerce > Commerce Attributes & Arrays > Array Sets > BML Support article within the Oracle CPQ Administration Online Help for more information.
-
When a transaction array attribute is used in a simple condition, the array attribute will trigger auto update. However, if an array set is used in an advanced BML condition, the administrator must explicitly mark the array attributes that are required to trigger auto update within the Array Attribute Administration page.
-
When the State object is requested in Commerce interact and action REST APIs, the response will reflect the hidden state of transaction array attributes when a hiding rule executes.
-
Administrators can migrate Commerce hiding rules that affect transaction arrays as granular items or as part of the migration for an entire Commerce process. The Migration Center reflects changes made to hiding rules and allows administrators to migrate the changes between sites.
Transaction Opens in a New Tab from Commerce Search
Navigation to a Transaction from Commerce Search is improved. A new General Site Option setting, Open transactions in a new tab from Commerce Search, is introduced in 20A.
This setting determines the behavior for opening Transactions from the search page, as follows:
- When set to No (default) the legacy behavior is retained and the Transaction opens in the existing parent window.
- When set to Yes, the Transaction opens in a new tab and focus moves to the new tab. Opening multiple Transactions from the Commerce Search page will result in each Transaction opening in a new tab.
Steps to Enable
To open Transactions in a new tab from Commerce Search, complete the following steps:
-
Navigate to the General Site Options page.
Admin Home > General > General Site Options
- Set the Open transactions in a new tab from Commerce Search option to Yes.

- Click Update to save your changes and return to the previous page.
Tips And Considerations
Note that in the case of iFramed CRM integration, opening a new tab occupies the full window and you will lose the parent CRM window.
The following Configuration enhancements are available in Oracle CPQ 20A:
- Configuration Administrator-Defined Filters
- Signed Punch-In Configurable Attributes
Configuration Administrator-Defined Filters
Oracle CPQ 20A introduces administrator defined display filters for the Bill of Materials and Recommended Item lists. When enabled, administrators can use parts and product attributes to define filter conditions to display only relevant items.
When the Configuration Filter is enabled, administrators can add a filter to the Recommended Items page template to exclude irrelevant items for sales users. For example, the Bill of Materials list in Configurator UI shows all the BOM items as a result of the BOM Mapping Rules. A subset of the BOM items in this list, though useful for downstream fulfillment systems, are considered internal to the customer and not relevant for the sales users.

Steps to Enable
Complete the following steps to define a display filter for the Bill of Materials and Recommended Item lists.
-
Navigate to the Admin page.
-
Select Page Templates in the Styles and Templates section.
-
Select Templates for the Recommended Items Page.
-
Scroll to the bottom of the page and click Add Row.
-
Define the filter criteria for the items to exclude from the display list.
For example, "Part: Type = Internal" will hide all "Internal" type parts from the Bill of Materials and Recommended Item lists.
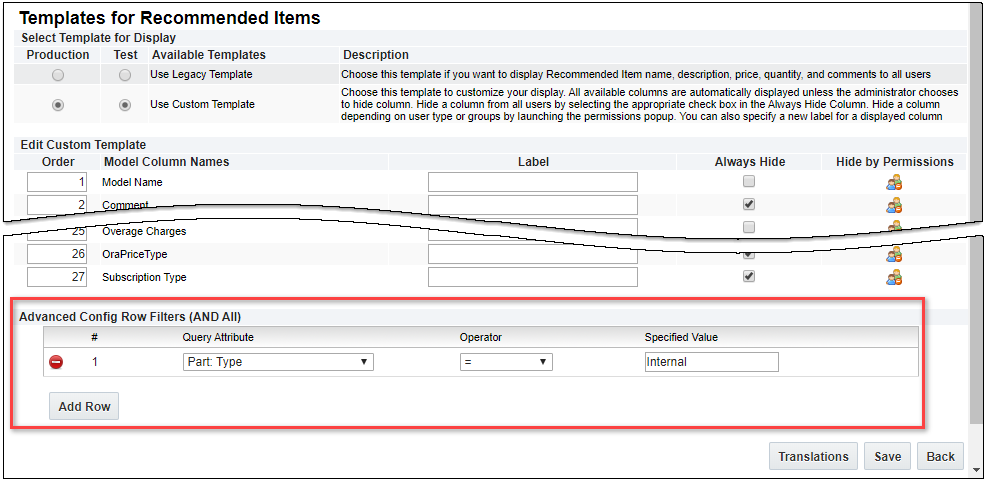
- Click Save.
After the Advanced Configuration Row Filters are defined and the Recommended Items page template is saved, all "Internal" type parts are excluded from the Bill of Materials and Recommended Item lists.
Signed Punch-In Configurable Attributes
In Oracle CPQ 19D, signed punch-in configurable attributes were introduced for use in the CPQ Pricing Engine. This provided secure configurable attributes for punch-in whose values cannot be changed. An example pricing scenario is wanting to determine a customer's pricing level based on the value of a configurable attribute for Account ID. In this case, you would want the Account ID attribute value to be secure so it cannot be manipulated during the punch-in to obtain a better pricing level.
In 20A, the signed punch-in configurable attribute values are available in ConfigXML and the Pipeline Viewer. This allows access to the signed punch-in configurable attributes values via BML to include them in the punch-in payload response.
Steps to Enable
You don't need to do anything to enable this feature.
The following Data Table feature is available in Oracle CPQ 20A.
Oracle CPQ 20A updates the Data Table administration UI to JET to provide a better administration experience and a foundation to build additional Data Table functionality.
The following functionality is available in Oracle CPQ 20A.
Data Table Side Navigation Panel
The Data Table side navigation panel displays folders and tables in a hierarchical structure. The navigation panel toolbar provides additional menu items, simple and advanced filtering, and action icons for folder and table maintenance functions. The JET data table UI utilizes the full browser page and administrators can close the side navigation panel to allow a larger table editing space. Status icons displayed next to data tables indicate live and undeployed data tables.
- Data tables that have not been deployed are preceded by a blue status icon.
- Live data tables, which immediately reflect saved changes without deploying, are preceded by a green status icon.
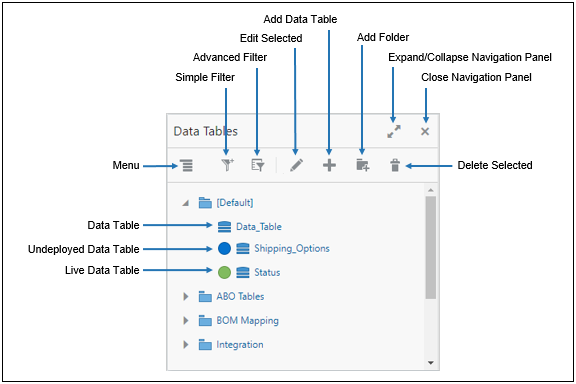
The drop-down menu provides access to import data tables, select/deselect all tables, expand/collapse all tables, and see the Status Log. The export, deploy, and clear data options are available when data tables are selected.

IMPORTANT: You must use the drop-down menu to perform export, deploy, or clear data actions for multiple tables. When you select multiple tables and perform an action from the right-click menu, the operation will only be performed on the single table highlighted with dotted lines.
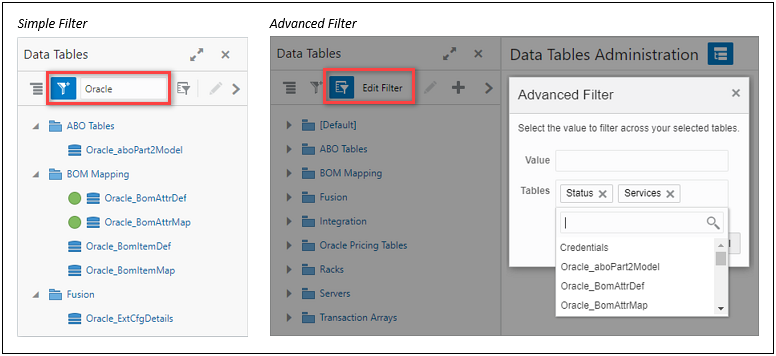
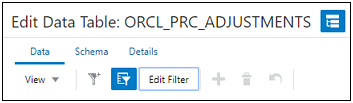
The simple filter searches the data table names and filters the list of tables using the provided text. The advanced filter, which behaves the same as the Legacy filter, searches the contents of the specified tables and filters the list of tables. If tables are not specified in the Advanced Filter, all data tables are searched. After an Advanced Filter is applied, click "Edit Filter" to modify the search criteria.
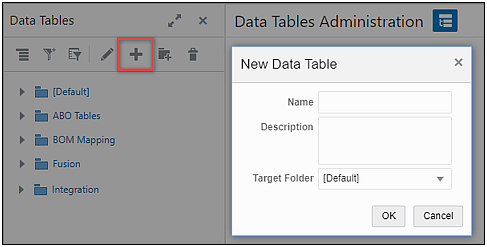
To add a new data table click the "Add Data Table" icon, and then provide the name, description, and select the target folder.
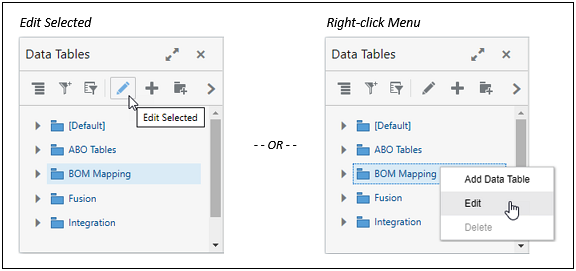
Administrators can use either of the following methods to open a data table:
- Select the data table and then click the "Edit" icon, or
- Right-click on the data table and the select "Edit" from the pop-up menu.
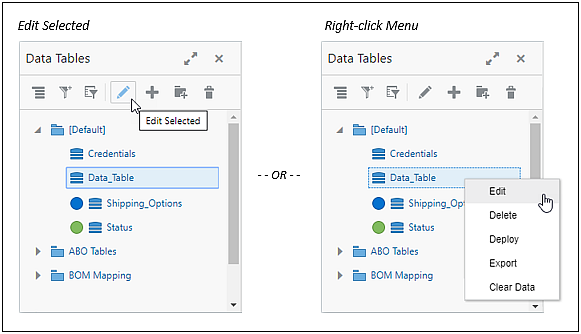
IMPORTANT: The JET UI does not support the double-click action to open a data table.
To add a new folder click the "Add Folder" icon, and then provide the name and variable name.
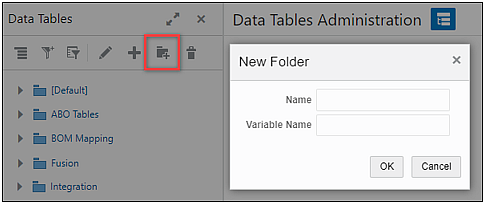
Administrators can use either of the following methods to edit a data table folder:
- Select the data table folder and then click the "Edit" icon, or
- Right-click on the data table folder and the select "Edit" from the pop-up menu.
IMPORTANT: The folder name is the only property that can be modified.
Data Table Data Tab
The Data tab displays the data content of the table that is currently being edited. The Data tab is the default tab, as it is in Legacy. Administrators can view and modify the table data on the Data tab. The JET UI provides several usability enhancements for data tables:
- The navigation panel can be collapsed to provide a larger viewing area for the data table.
- Administrators can sort by columns by clicking on the column header
- Column resize allows users to enter a precise column width.
Table Toolbar
The table toolbar provides quick access to view options, filtering, add, delete, and undo actions. The simple and advanced filters in combination with the column and pagination view options improve the user experience especially for data tables containing a large number of columns and/or lines. Additionally, the undo icon now allows administrators to undo all unsaved changes for the selected row.
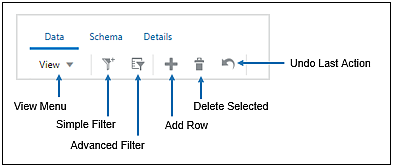
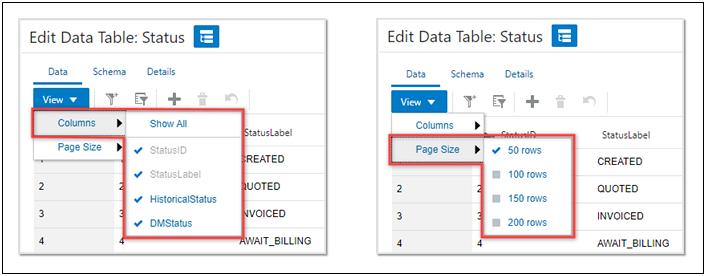
View Menu
The View menu provides options to show/hide columns and set the number of rows displayed per page.
Simple Filter
To use the simple filter click on table toolbar Simple Filter icon, type the desired keyword or phrase, and then press <Enter> or <Return>.

If the keyword is present in any column, the resulting lines are returned. To deactivate the filter, click on the Simple Filter icon. 
Advanced Filters
To use the advanced filter click on the table toolbar Advanced Filter icon.

The Advanced Filter dialog opens. Define the filter criteria. In the first column, select the desired column names. In the second column, select the applicable operator. In the third column, define the search criteria. Select "Match Any" or "Match All". Click Apply to filter results.
If the keyword is present in any column, the resulting lines are returned. To refine the advanced filter, click Edit Filter. To deactivate the filter, click on the Advanced Filter icon.
Data Table Schema Tab
The Schema tab defines the columns and data types that make up the data table. This tab supports add and delete actions as well as index, key, and validation functions. It also provides access to Foreign Key and Relationship management.

The JET column view and filters are also available on the schema tab. The Schema tab also provides an undo icon which allows administrators to undo the most recent unsaved action.
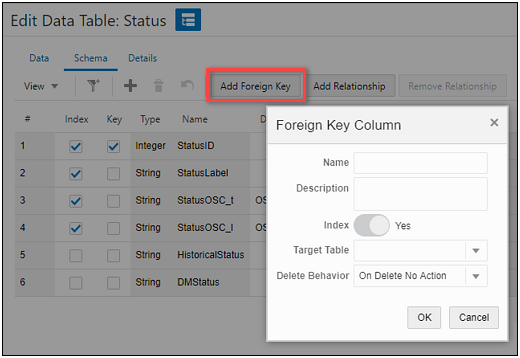
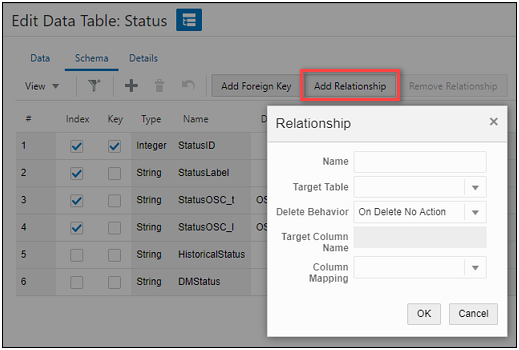
Foreign Keys define a relationship between multiple data tables, ensuring data integrity and consistency.
-
To add a Foreign Key column, click "Add Foreign Key" and define the name, description, target table, and delete behavior.
-
To convert an existing column to a Foreign Key column, click "Relationship" and define the name, target table, delete behavior, target column name, and column mapping.
-
To remove a Foreign Key relationship, select a column with a relationship and click "Remove Relationship".
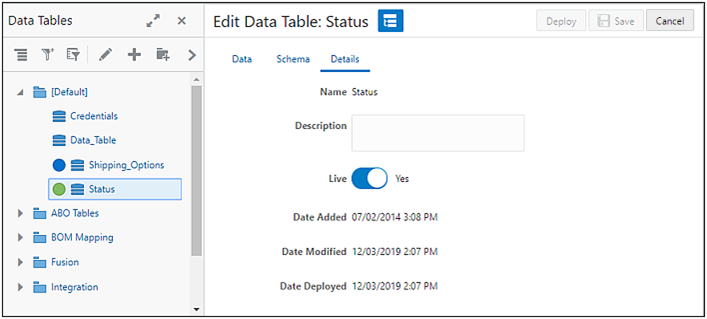
Data Table Details Tab
The new Details tab shows the date when the table was added, last modified and deployed. It provides the "Live" Data Table option, and allows administrators to add a description for the table.
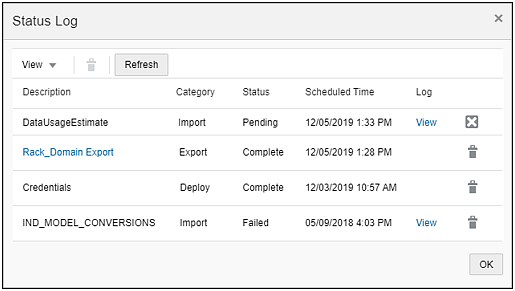
Data Table Status Logs
In JET, administrators access the Status from the navigation panel toolbar menu. The status logs show status information for imports, exports, and deployments. It also provides links to error logs and export files, and allows cancellation of pending and in progress imports. The status log toolbar provides column view, delete, and refresh functions. Administrators can multi-select and delete multiple log items.
Data Table Import and Export
Administrators can access Import and Export functions from the navigation panel toolbar menu. They can also access the Export function by right-clicking on a data table. The Import UI provides the same functionality as legacy. It also allows administrators to drag and drop files for import. During import, a progress bar displays at the top of the Import UI.
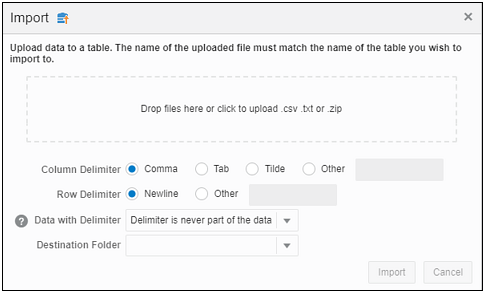
For exports, an Export Status dialog appears to show the export progress. When the export is complete, administrators can download the exported file using the link from the Exports Status dialog or the Status Log.

Steps to Enable
You don't need to do anything to enable this feature.
Introduced in Oracle CPQ 18C, the JET UI provides a modernized and responsive user experience. The responsive design provides layouts that can flow vertically to fit within different browser display widths and features a rich set of modern UI components with built-in accessibility and mobile support.
The following JET UI enhancements are available in Oracle CPQ 20A:
- JET Configuration and Transaction UI HTML Help Messages
- Enable AJAX for Configuration Rules with Array Attribute Inputs
- Export JET Transaction UI Line Item Grid to .XLSX File Format
- Default Array Column Width for JET Configuration UI
- JET Transaction UI Error Message Enhancements
- Manage Viewed Columns for JET Transaction UI Tables
Jet Configuration and Transaction UI HTML Help Messages
Beginning in 20A, help messages can display Rich Text, links, and HTML content on the JET Configuration and Transaction UIs. The help icon will display plain text content in a tooltip format if there is no Rich text or HTML content present in that help icon's content.
For example, when HTML/Rich Text content is present, the user is prompted by a tooltip to click the icon which opens a dialog box containing the help information. The dialog box is automatically sized based on the content and browser size. The user can resize, move and close the dialog as desired.
Steps to Enable
You don't need to do anything to enable this feature.
Tips And Considerations
Refer to the Configuration Attribute Help Icons topic in CPQ Cloud Administration Online Help for detailed help icon information and instructions.
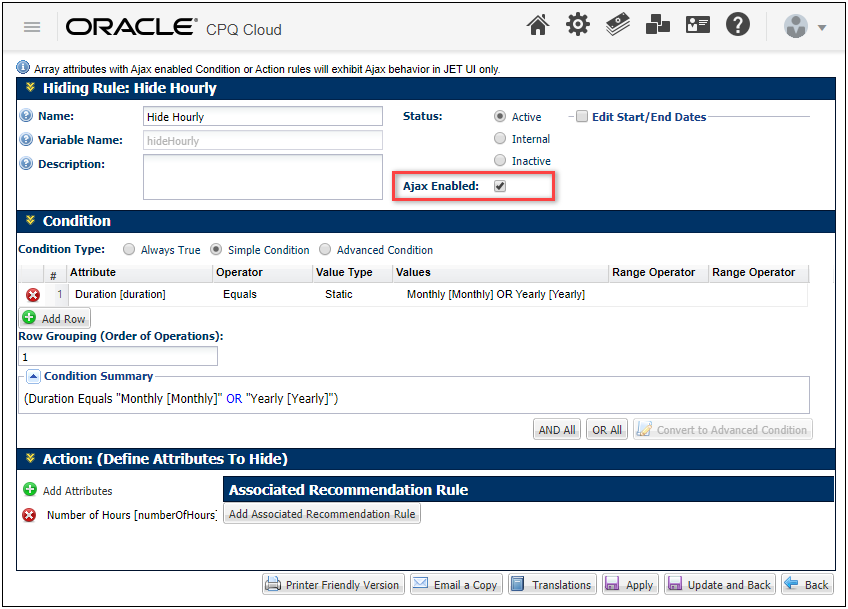
Enable AJAX for Configuration Rules with Array Attribute Inputs
Beginning in Oracle CPQ 20A, administrators can enable AJAX for Configuration Constraint and Hiding rules that have array attributes for rule conditions or actions. Previously, Configuration rules with array attribute inputs were only evaluated if the attributes were set to auto update or if a user clicked the update action. With AJAX enabled, the rules are evaluated and the action is performed instantly when a user changes any rule input.
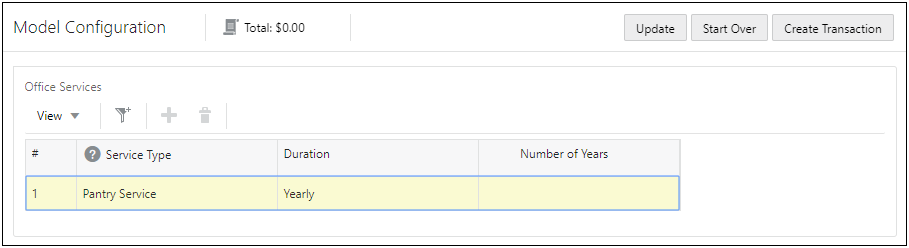
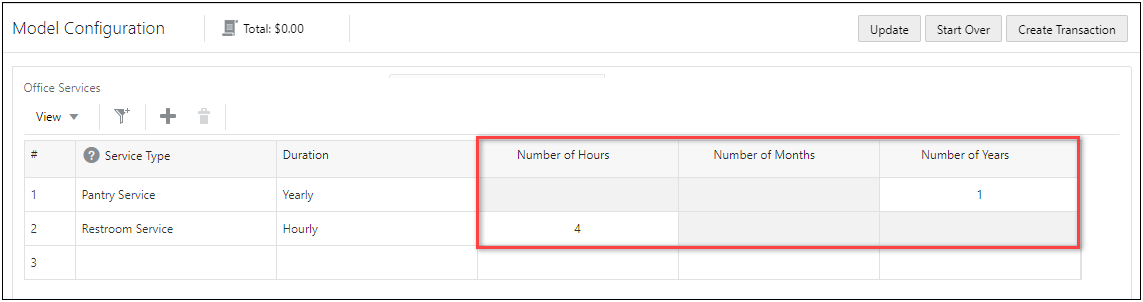
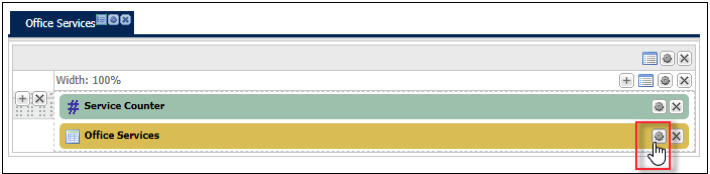
In the following example the administrator set up a rule to hide the Number of Hours, Number of Months, or Number of Years columns when the user selects array attribute item.

For example, when the user selects the "Yearly" Duration item the Number of Hours and Number of Months columns are hidden.
If multiple Duration items are added to the array items hidden items for associated lines are highlighted in gray and are not editable. For example, the Number of Hours and Number of Months cells for the row with a Yearly duration are gray and the Number of Months and Number of Years cells for the row with an Hourly duration are gray.
Steps to Enable
Complete the following steps to enable AJAX for a Configuration Constraint and Hiding rule that has array attributes for rule conditions or actions.
-
Navigate to the Admin page.
-
Select Catalog Definition in the Products section.
-
Navigate to the applicable Product Family, Product Line, or Model.
-
Select the applicable rule type:
- Constraints
- Hiding Attributes
-
Select the applicable rule, or click Add to add the new rule.
When adding a new rule, refer to the Configuration Rules topic in CPQ Cloud Administration Online Help for detailed instructions.
-
Select the Ajax Enabled checkbox to enable AJAX functionality for JET Configuration UIs.
-
Click Apply or Update and Back to save your changes.
Export JET Transaction UI Line Item Grid to .XLSX File Format
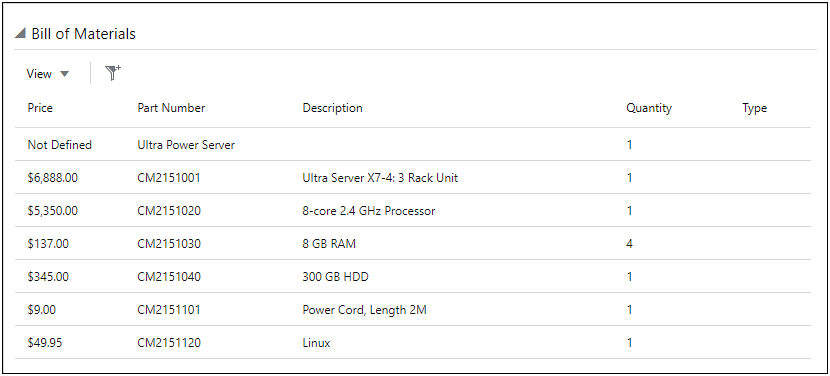
Oracle CPQ 20A provides the ability to export Line Item Grid data to a Microsoft Excel (.XLSX) file on an end user's local computer. End users can export the current Transaction's line item information to run formulas and calculations on the Transaction data quickly and easily.
IMPORTANT: This feature is only available with JET Transaction UI.
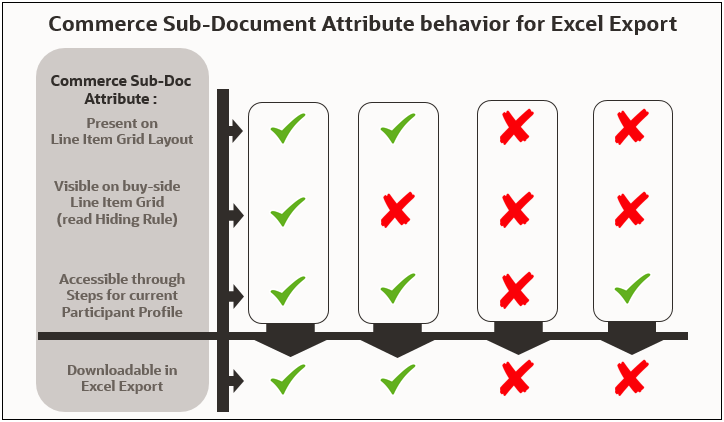
Upon executing the Export action, users can download the Transaction Line Items with all the attributes currently accessible to them. The export includes all their viewable information from the Line Item Grid as determined by their user profile settings. If a Line Item Grid column is hidden from the end user by a Commerce hiding rule or a Line Item Grid view filter, that data is exported.
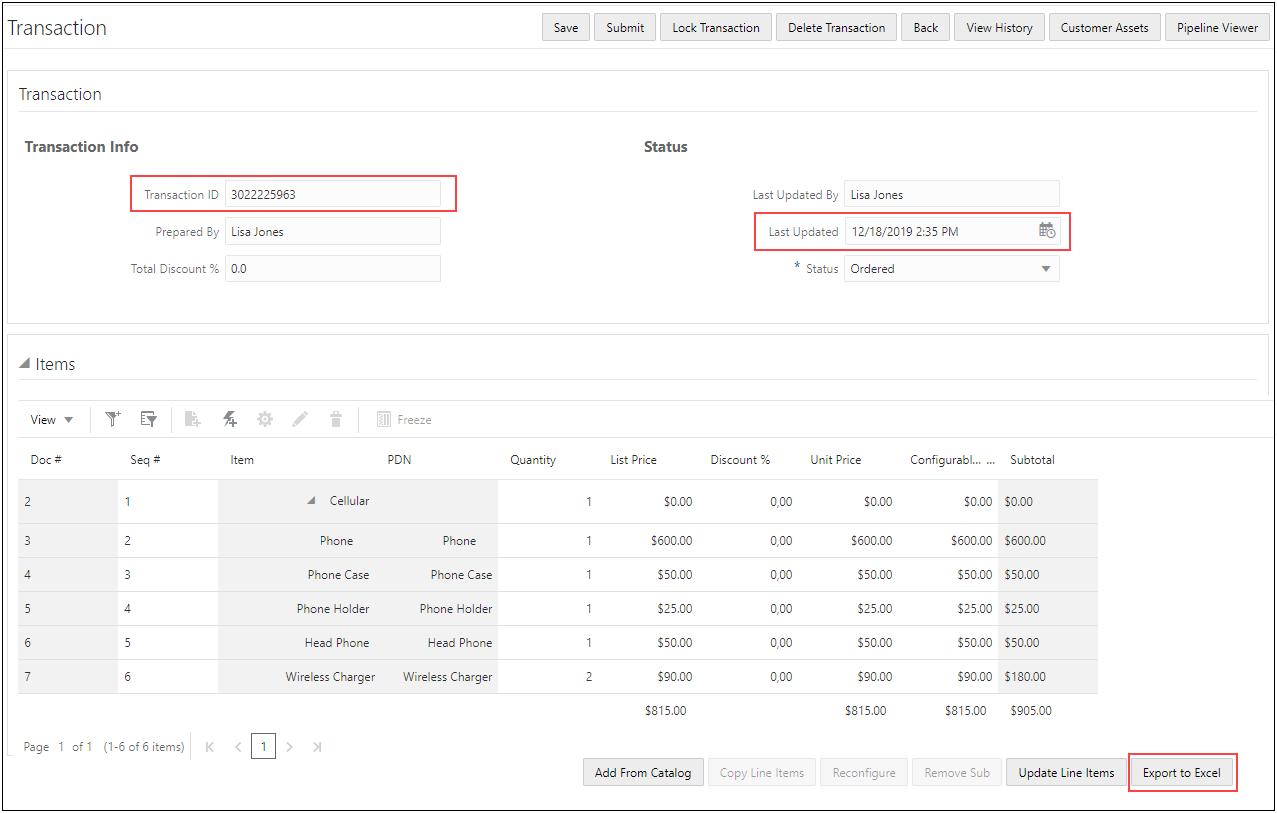
Sample Transaction Line Item Grid
IMPORTANT: Depending on the user's browser settings, the .xlsx file is either directly downloaded to the user's local computer or a download prompt is displayed.
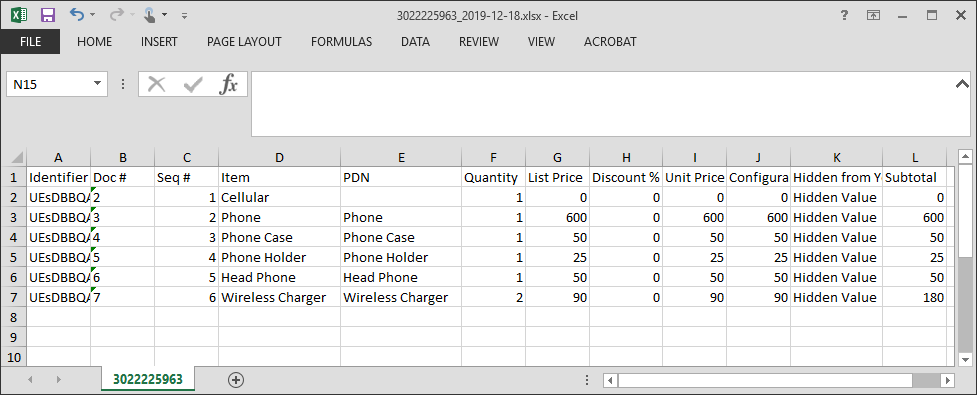
Sample Exported Excel File
The exported Excel filename includes the Transaction ID (bs_id) and date of the export request. For example, 3022225963_2019-12-18.xlsx. Within the .xlsx file, the Excel sheet is given the Transaction ID (bs_id).
The first row of the Excel sheet is a header row that provides the Line Item Grid column labels. Each subsequent row corresponds to a specific line item and the cells in the row contain the values for the labeled columns.
The first column of the Excel sheet is an "Identifier" column. This column provides encoded hierarchical information regarding Model and part relationships for the line items. This information is for internal use and should not be modified.
In the above example, column K is labeled "Hidden From You" with the row values showing "Hidden Value" to indicate this type of hidden data. However, if the end user's participant profile hides an attribute for the current step they are on, that information is not exported
Steps to Enable
Administrator must create an Export Line Items Commerce action to facilitate exporting line item information from the current Transaction. Refer to the Oracle CPQ Administration Online Help for instructions and video for adding a new Commerce action.
Once the Export Line Items action is created, administrators must add this action to an Action Bar in the JET Transaction Layout for end customer access. Refer to Oracle CPQ Administration Online Help for details on adding an action to the JET layout.
Tips And Considerations
- Export uses the current user's language when exporting.
- Currency attributes are treated as float attributes types.
IMPORTANT: Care should be taken by the end user when exporting a Transaction's Line Item Grid while the Transaction is in active Collaborative Quoting mode. The .xlsx file is a snapshot of the Line Item Grid taken when the Export Line Items action is invoked. Changes to the Line Item Grid by a collaborator can make the export file information out of date.
Default Array Column Width for JET Configuration UI
Oracle CPQ 20A allows administrators to set default horizontal and vertical array column widths for the JET Configuration UI. In prior releases array columns were set to a default of 200px wide. Users will still be able to resize column widths as desired.
Steps to Enable
Complete the following steps to set default horizontal and vertical array column widths for the JET Configuration UI.
- Navigate to the Admin page.
- Select Catalog Definition in the Products section.
- Navigate to the applicable Product Family, Product Line, or Model.
- Select Configuration Flows and then click List.
- Select the applicable Configuration Flow.
- Select Desktop from the Layout drop-down menu.
- Click on the Edit icon for the applicable array attribute.
-
Set the column width to the desired value.
- For the Vertical display type the column width is set using the label width value for each array attribute.
- For the Horizontal display type the column widths are set using Label and Value widths for the first array attribute.
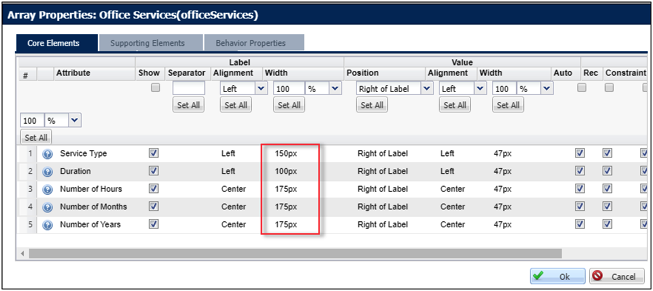
- Click OK to save the Array Properties.
- Click Save.
JET Transaction UI Error Message Enhancements
Oracle CPQ 20A provides several error message enhancements for the JET Transaction UI. Similar to the JET Configuration UI, the JET Transaction UI errors will now display inline and in a collapsible sticky header bar Error Panel. The Error Panel provides a consistent look and feel and improves usability.
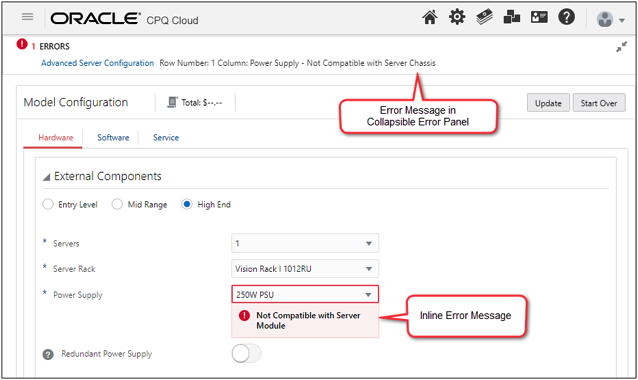
Steps to Enable
You don't need to do anything to enable this feature.
Managed Viewed Columns for JET Transaction UI Tables
Oracle CPQ 20A provides a new Manage Columns dialog for JET Transaction UI tables, such as the Line Item Grid and Transaction Arrays. Previously, users could only show or hide columns one column at a time, which was very time-consuming for tables with a large number of columns. The Manage Columns dialog allows users to quickly hide or show multiple columns.
Users select Manage Columns from the View menu to select columns for the JET Transaction UI table.

To show columns, use the shuttle controls to move columns from the Hidden list to the Shown list.
To hide columns, use the shuttle controls to move columns from the Shown list to the Hidden list.

Steps to Enable
You don't need to do anything to enable this feature.
Tips And Considerations
Required attributes are indicated with an asterisk (*) in the Hidden and Shown lists.
The following Web Services feature is available in Oracle CPQ 20A.
Sales User Access to Buy-Side Get Metadata REST APIs
Oracle CPQ 20A allows sales users access to Get REST APIs which provide Commerce and Configuration buy-side metadata information. Sales users include Sales Agents, Channel Agents, Restricted Access users, and Guest users.
The buy-side metadata includes the commerce and configuration metadata necessary to develop a User Interface—be that a traditional web UI or digital assistant UI. This feature allows sales users to view the following information:
- Layout details
- Translated labels
- Action and attribute types
- Attribute input parameters (for example, menu entries, text length, date range, etc.)
- Display properties (for example, radio buttons, switches, checkbox, etc.)
Sales Agents, Channel Agents, Restricted Access, and Guest users (if enabled on the site) are granted access to the following Get Configuration REST APIs:
Configuration Layout
- Get Product Family Layout
- Get Product Line Layout
- Get Model Layout
Configuration Process Invocation
- Get Process Invocations on All Pages
- Get Process Invocations for a Specific Page
- Get Process Invocation Actions for a Specific Page
- Get Process Invocation Action for a Specific Page
Configuration Product Family Integration
- Get Product Family Integration Metadata
- Get Product Family Integrations Metadata
Configuration Metadata
- Get Product Families Metadata
- Get Product Family Metadata
- Get Product Lines Metadata
- Get Product Line Metadata
- Get Models Metadata
- Get Model Metadata
Configuration Attributes Metadata
- Get Product Family Attributes Metadata
- Get Product Family Attribute Metadata
- Get Product Line Attributes Metadata
- Get Product Line Attribute Metadata
- Get Model Attributes Metadata
- Get Model Attribute Metadata
Configuration Array Sets Metadata
- Get Product Family Array Sets Metadata
- Get Product Family Array Set Metadata
- Get Product Line Array Sets Metadata
- Get Product Line Array Set Metadata
- Get Model Array Sets Metadata
- Get Model Array Set Metadata
Configuration Array Set Attributes Metadata
- Get Product Family Array Set Attributes Metadata
- Get Product Family Array Set Attribute Metadata
- Get Product Line Array Set Attributes Metadata
- Get Product Line Array Set Attribute Metadata
- Get Model Array Set Attributes Metadata
- Get Model Array Set Attribute Metadata
Configuration Attribute Menu Items Metadata
- Get Product Family Attribute Menu Items Metadata
- Get Product Family Attribute Menu Item Metadata
- Get Product Line Attribute Menu Items Metadata
- Get Product Line Attribute Menu Item Metadata
- Get Model Attribute Menu Items Metadata
- Get Model Attribute Menu Item Metadata
Configuration Array Set Attribute Menu Items Metadata
- Get Product Family Array Set Attribute Menu Items Metadata
- Get Product Family Array Set Attribute Menu Item Metadata
- Get Product Line Array Set Attribute Menu Items Metadata
- Get Product Line Array Set Attribute Menu Item Metadata
- Get Model Array Set Attribute Menu Items Metadata
- Get Model Array Set Attribute Menu Item Metadata
Configuration Items Metadata
- Get Recommended Items Metadata
Sales Agents, Channel Agents, and Restricted Access users are granted access to the following Get Commerce REST APIs. Guest Users are not allowed access to the Commerce REST API information.
Commerce Layout
- Get Commerce Document Layout
Commerce Metadata
- Get Commerce Documents Metadata
- Get Commerce Document Metadata
- Get Commerce Actions Metadata
- Get Commerce Action Metadata
- Get Commerce Array Sets Metadata
- Get Commerce Array Set Metadata
- Get Commerce Array Attributes Metadata
- Get Commerce Array Attribute Metadata
- Get Commerce Attributes Metadata
- Get Commerce Attribute Metadata
- Get Commerce Menu Items Metadata
- Get Commerce Menu Item Metadata
- Get Commerce Action Translations
- Get Commerce Action Translation
- Get Commerce Attribute Translations
- Get Commerce Attribute Translation
- Get Commerce Menu Item Translations
- Get Commerce Menu Item Translation
Steps to Enable
To enable this feature you need to log a Service Request (SR).
IMPORTANT: This feature should only be enabled if there is a specific need to expose the metadata (i.e. digital assistant). If Guest access is permitted for the site and this feature is enabled, Configuration Metadata REST API information is exposed to the public internet.
Tips And Considerations
This feature does not change the accessibility of administrator-only metadata. Sales users are not able to access the metadata REST API information for the following:
- Data Tables
- BML
- Rules
- Formulas
Modifications to Known Functionality
The following modifications to known functionality are available in 20A:
- The Configuration Bulk Add to Transaction version 9 REST API is updated to support the legacyMode request body parameter. This boolean parameter determines the API execution behavior. When true, the API honors CPQ legacy Configuration Layout Flow behavior, with the relevant attribute values to be overridden as defined in the current CPQ legacy Configuration Layout Flow. When false, the API does NOT honor CPQ legacy Configuration Layout Flow and the API will invoke all attributes and rules that are available for the specified model. The default value is 'false'. Refer to the Oracle CPQ Administration Online Help for further details.
- If "Execute Action If Associated Integrations Timeout" is selected for the Reconfigure Inbound Action, an integration timeout warning should be provided when you enter commerce; however, this warning is not displaying in Oracle CPQ 20A. As a workaround, we recommend you not select "Execute Action If Associated Integrations Timeout" for this action. By doing this, the Reconfigure Inbound Action will fail if integration has timed out.
- In an Oracle CPQ and Oracle CX Sales integration, formerly called Oracle Sales/Engagement Cloud, you may receive an error message when selecting quotes on the Quotes and Orders page. If you click OK on the message, you can open the quote.
- Although the default was changed to Antenna House in a prior release, Oracle CPQ 20A supports both Antenna House and Apache FOP for XSL/XML formatting. However beginning in Oracle CPQ 20B, we will not be supporting Apache FOP. We recommend you plan for this transition.
Custom JavaScript
If customers have added custom JavaScript that leverages the Document Object Model structure or specific elements, classes or IDs, this customization should be thoroughly tested and may require refactoring. For more information about custom JavaScript, go to Style & Templates > JET JavaScript Customization in the Oracle CPQ Administration Online Help.
Migration
When migrating directly from a source site or to a destination site using the Migration Center, both sites must use the same major update. The migration of content can only occur across minor updates within the same major update.
- “Major update” = Update 20A
- “Minor update” = Update 20A Patch 1
For Oracle CPQ 20A, migration packages from 19A and forward can be uploaded to the latest site version.
Resolved Known Issues
For information on bugs fixed in Update 20A, refer to the Oracle CPQ 20A Resolved Known Issues document available on My Oracle Support and the Oracle CPQ Administration Online Help.
Translation
For some system-defined messages and components, strings were removed and others added in Oracle CPQ 20A. If you have created your own implementation-specific translations of system-defined strings, some of these strings may no longer appear. Other strings may appear in English. The strings appearing in English are new and require translation.
Most of these messages and components are on the Administration side of Oracle CPQ, but you should review both your end user and administration pages before deploying your updated installation to confirm that all strings appear in the desired language.
Translation Status
Oracle CPQ supports the consumption of both single and multi-byte character sets. Submit a service request on My Oracle Support to enable your site for a new language.
For the following languages, a translation of the Oracle CPQ user interface is available for both the platform and the reference application:
- Chinese (Simplified) [China]
- Chinese (Traditional) [Taiwan]
- Czech [Czech Republic]
- Danish [Denmark]
- Dutch [Netherlands]
- English
- Finnish [Finland]
- French
- French [Canada]
- German
- Hungarian [Hungary]
- Italian
- Japanese [Japan]
- Korean [South Korea]
- Norwegian (Bokmål) [Norway]
- Polish [Poland]
- Portuguese [Brazil]
- Romanian [Romania]
- Russian [Russia]
- Spanish (Worldwide)
- Swedish [Sweden]
- Turkish [Turkey]
Upgrade and test all test instances on Oracle CPQ 20A before upgrading to production.
Browser Support
CPQ Cloud supports all browser versions that meet the criteria of the Oracle Software Web Browser Support Policy.
If you experience issues using a supported browser version, open a ticket on My Oracle Support to resolve the issue. If an issue arises when using a supported browser, use a certified browser version until the delivery of a fix. Certified browsers are selected based on current market share and thoroughly tested to work with the current version's standard functionality.
Certified Browsers
Windows
- Google Chrome 79.x
- Mozilla Firefox 71.x
- Internet Explorer 11.x
IMPORTANT: Compatibility issues with the selected browsers may exist when sites contain additional JavaScript, alternate CSS, or other custom functionality. Customizations may require add-on work. Contact My Oracle Support to determine the availability of workarounds and minor fixes.
Salesforce Integration Support
Oracle officially supports version 8.1 and version 8.2 of the Oracle CPQ Connector for Salesforce. We also continue to support version 7.2 of the legacy Oracle CPQ Commerce Integration.
IMPORTANT:
- With the Spring 20 release, Salesforce is automatically enabling the new Salesforce Mobile App for all customers. There are potential compatibility issues between the new Salesforce Mobile App and the Oracle CPQ Mobile experience and at this time it is not supported. Users can continue to access Oracle CPQ from within Salesforce via mobile browsers.
- Previous versions of these packages are expected to continue to function; however Oracle will not address new issues that arise. We strongly encourage customers to upgrade to the latest supported version.
Training
Please refer to the release documentation for all versions between your current version and the version to which you are upgrading to see all new functionality, resolved known issues, and functional known issues.
Refer to the Oracle CPQ Administration Online Help to become familiar with the new features introduced in Oracle CPQ 20A. For additional help, see My Oracle Support.
Verify any information not explicitly mentioned in this document as supported by the software against the product help for Oracle CPQ 20A or the Oracle CPQ Consulting team.
Additional Information
For more information on Oracle CPQ, visit the Oracle CPQ Cloud documentation site.
Disclaimer
The details in this document are provided for high-level informational purposes only and are not intended to function as a specification or to replace the Online Help. Upgrading to a subsequent release may require the re-deployment of Commerce Processes, Configuration, or global function settings. Modifications to integration XSL files or APIs may also be required.