
- Revision History
- Overview
- Feature Summary
- Configure, Price, Quote
-
- Administration
- Asset-Based Ordering
- Data Tables
- Integration
-
- Improved Configuration of Oracle Identity and Access Management
- Preview REST Import and Export Data and Mapping for Commerce Integrations
- Salesforce: Configure New Oracle CPQ User Login Format
- Salesforce: Edit Oracle CPQ User Login
- Salesforce: Mark as Active Bypasses Opportunity Access Control
- Support for Oracle Integration 3
-
- User Management
- Web Services
- IMPORTANT Actions and Considerations
This document will continue to evolve as existing sections change and new information is added. All updates appear in the following table:
| Date | Product | Feature | Notes |
|---|---|---|---|
| 28 SEP 2022 | Created initial document. |
Oracle Configure, Price, and Quote (CPQ) enables companies to streamline the entire opportunity-to-quote to-order process, including product selection, configuration, pricing, quoting, ordering, and approval workflows. Oracle CPQ provides a flexible, scalable, enterprise-ready solution ideal for companies of all sizes that sell products and services across direct, indirect, and e-commerce sales channels.
This guide outlines the information you need to know about new or improved functionality in Oracle CPQ 22D.
Security and New Features
We would like to remind you that if your system has modified security structures, you may need to advise your security administrator of new features you would like to implement.
 HAVE AN IDEA?
We’re here and we’re listening. If you have a suggestion on how to make our cloud services even better then go ahead and tell us. There are several ways to submit your ideas, for example, through the Ideas Lab on Oracle Customer Connect. Wherever you see this icon after the feature name it means we delivered one of your ideas.
GIVE US FEEDBACK
We welcome your comments and suggestions to improve the content. Please send us your feedback at cpqcloud_documentation_us_grp@oracle.com.
DISCLAIMER
The information contained in this document may include statements about Oracle’s product development plans. Many factors can materially affect Oracle’s product development plans and the nature and timing of future product releases. Accordingly, this Information is provided to you solely for information only, is not a commitment to deliver any material, code, or functionality, and should not be relied upon in making purchasing decisions. The development, release, and timing of any features or functionality described remains at the sole discretion of Oracle.
This information may not be incorporated into any contractual agreement with Oracle or its subsidiaries or affiliates. Oracle specifically disclaims any liability with respect to this information. Refer to the Legal Notices and Terms of Use for further information.
Column Definitions:
Report = New or modified, Oracle-delivered, ready to run reports.
UI or Process-Based: Small Scale = These UI or process-based features are typically comprised of minor field, validation, or program changes. Therefore, the potential impact to users is minimal.
UI or Process-Based: Larger Scale* = These UI or process-based features have more complex designs. Therefore, the potential impact to users is higher.
Features Delivered Disabled = Action is needed BEFORE these features can be used by END USERS. These features are delivered disabled and you choose if and when to enable them. For example, a) new or expanded BI subject areas need to first be incorporated into reports, b) Integration is required to utilize new web services, or c) features must be assigned to user roles before they can be accessed.
| Ready for Use by End Users Reports plus Small Scale UI or Process-Based new features will have minimal user impact after an update. Therefore, customer acceptance testing should focus on the Larger Scale UI or Process-Based* new features. |
Customer Must Take Action before Use by End Users Not disruptive as action is required to make these features ready to use. As you selectively choose to leverage, you set your test and roll out timing. |
|||||
|---|---|---|---|---|---|---|
| Feature |
Report |
UI or |
UI or |
|
||
Adopt Oracle CX Sales Custom Attribute Variable Name Conventions |
||||||
Improved Configuration of Oracle Identity and Access Management |
||||||
Preview REST Import and Export Data and Mapping for Commerce Integrations |
||||||
Salesforce: Mark as Active Bypasses Opportunity Access Control |
||||||
Allow Partner Organization Users to Authenticate with OAuth Provider for CPQ REST APIs |
||||||
The following Administration feature is available in Oracle CPQ 22D.
Beginning in Oracle CPQ 22D, an external email server that meets our supported TLS protocol standards can be set up for outgoing email. The following emails are supported by external email services within Oracle CPQ:
- New User Creation Email
- Partner Organization Creation Email
- Forgot Password Email
- Update Favorites List
- Bulk Upload Email
- Scheduled Data Table Export Email
- Commerce Process Reporting Scheduled Email
- Broadcast Email
- Commerce Step Transition Email
All other outgoing emails other than those listed above will go through the Oracle CPQ email server.
Oracle OSSA TLS Compliance
Oracle CPQ requires external email servers to be compliant with the following OSSA TLS standards.
- Supported SMTP protocols: SMTPS, SMTP + mandatory STARTTLS
- Supported Certificates: EC, RSA, DSS
- Supported Authentication: LOGIN
- TLS Protocols Supported: TLS 1.3, TLS 1.2
TLS 1.3 Ciphersuites:
- TLS_AES_128_GCM_SHA256
- TLS_AES_256_GCM_SHA384
TLS 1.2 EC Ciphersuites:
- TLS_ECDHE_ECDSA_WITH_AES_256_GCM_SHA384
- TLS_ECDHE_ECDSA_WITH_AES_128_GCM_SHA256
TLS 1.2 RSA Ciphersuites:
- TLS_ECDHE_RSA_WITH_AES_128_GCM_SHA256
- TLS_ECDHE_RSA_WITH_AES_256_GCM_SHA384
- TLS_DHE_RSA_WITH_AES_128_GCM_SHA256
- TLS_DHE_RSA_WITH_AES_256_GCM_SHA384
TLS 1.2 DSS Ciphersuites:
- TLS_DHE_DSS_WITH_AES_256_GCM_SHA384
- TLS_DHE_DSS_WITH_AES_128_GCM_SHA256
IMPORTANT:
- As a best practice, we recommend using SMTPS protocol. When using the SMTP protocol, STARTTLS is mandatory for communication encryption. If the server declines TLS encryption, we will immediately close the connection and no mail will be sent.
- Oracle CPQ assumes that certificates are properly signed with Certificate Authority (CA) and kept up to date. Oracle CPQ performs extra checks per RFC 2595 (Section 2.4. Server Identity Check) to avoid security issues.
- Only LOGIN authentication is supported per RFC 2554.
- Oracle CPQ currently supports TLS 1.2 and 1.3. TLS 1.2 support will be removed at a future date, currently January 2024.
Steps to Enable
To enable this feature you need to log a Service Request (SR).
The following Asset-Based Ordering (ABO) feature is available in Oracle CPQ 22D.
Adopt Oracle CX Sales Custom Attribute Variable Name Conventions
Beginning in Oracle CPQ 22D, CPQ will adopt a new naming convention for asset custom attribute variable names. When administrators create new asset custom attributes, a "_c" suffix will be appended to the variable name. This update only effects new custom attributes for assets. There is no change to existing asset custom attributes.
The new naming convention for ABO custom attribute variable names provides more consistency for ABO integrations with Oracle CX Sales.
Steps to Enable
You don't need to do anything to enable this feature.
The following Data Table feature is available in Oracle CPQ 22D.
Define Data Table User Access Rights Based on Groups
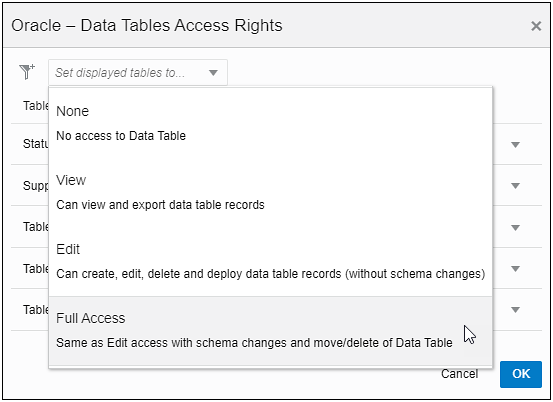
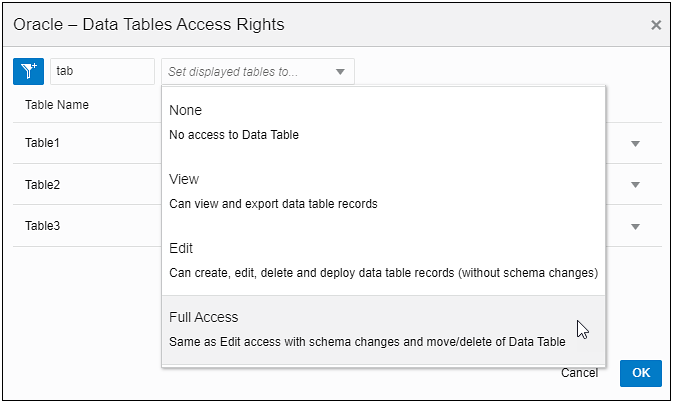
Previously, administrator groups could only grant or remove access for data table folders. Beginning in Oracle CPQ 22D, CPQ expands the administrator group functionality to provide administrator group access rights at the data table level. In addition to providing access at the data table level, administrators can now employ administrator groups to assign View, Edit, and Full Access permissions. The following administrator group access levels are now available for data tables:
- No Access: Members of this group have no access to the data table.
- When a new administrator group is added, the group is assigned No Access to all existing data tables.
- View Access: Members of this group are only able to view the contents of the table.
- They don't have the ability to edit, delete, or deploy the data table.
- They can export data records, but can't import data records or make any changes to the schema.
- Edit Access: Members of this group can view, add rows, and edit the contents of the data table.
- They can add new rows to the data table and modify content.
- They can deploy the data table changes.
- They can import new rows if there are no schema changes
- They can't modify data table schema or delete an existing data table.
- Full Access: Members can read, edit, and delete existing records and data tables. They can also make changes to the data table schema.
- They can add new rows into the data table.
- They can view, modify, and delete records of an existing data table.
- They can make changes to the data table schema.
- They can deploy the data table changes, including data table schema changes.
- They can import new rows, including row with schema changes.
- They can delete existing data tables.
- This is the default access level when assigning access rights to an existing administrator group.
Group Administration Data Table Access Rights
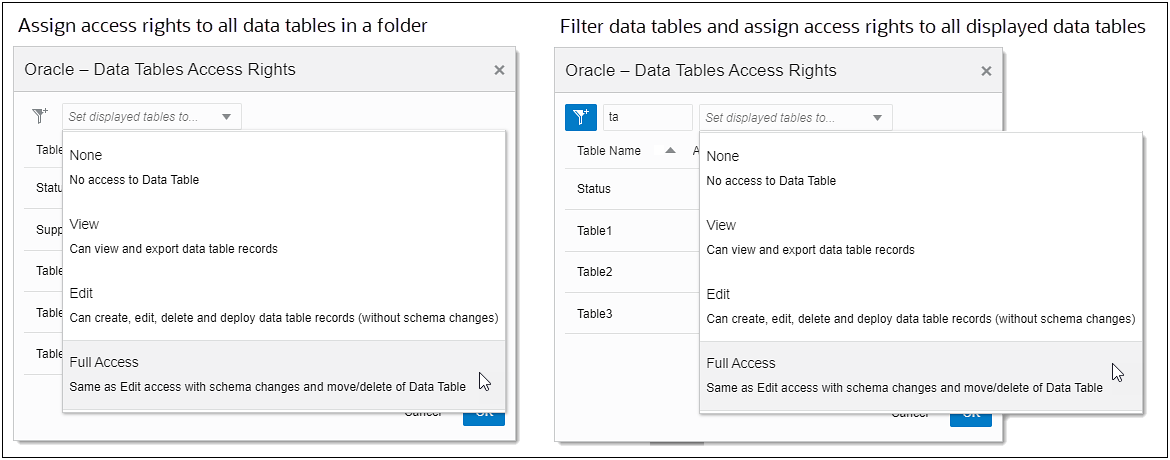
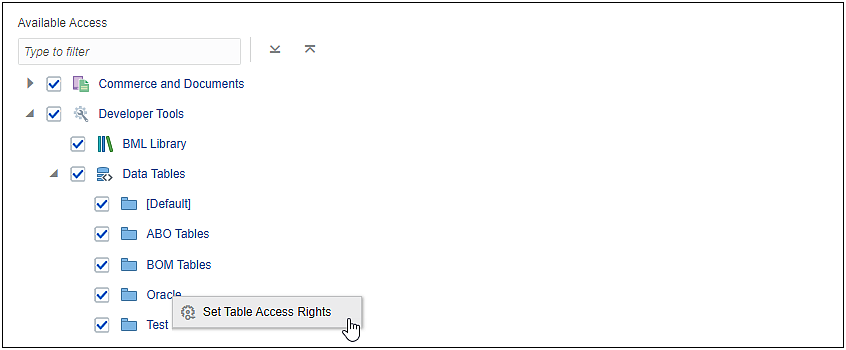
Administrators can now assign access from the Group Administration page. The administrator right-clicks on the parent data table folder and then clicks Set Table Access Rights.

Administrators can assign access for a specific data table by selecting the desired access level from the Access drop-down.
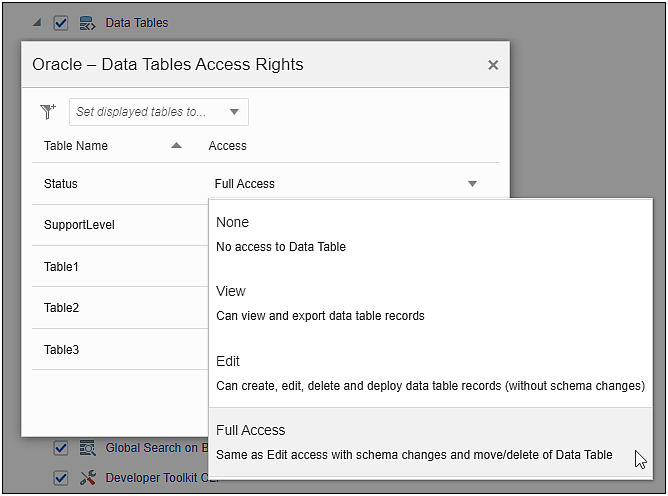
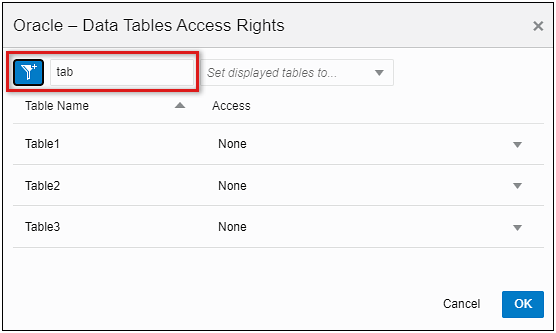
Administrators can also assign access rights for all data tables within a folder by selecting the applicable access level for the folder. Additionally, they can apply a filter and then assign the applicable access level to the filtered list of data tables.
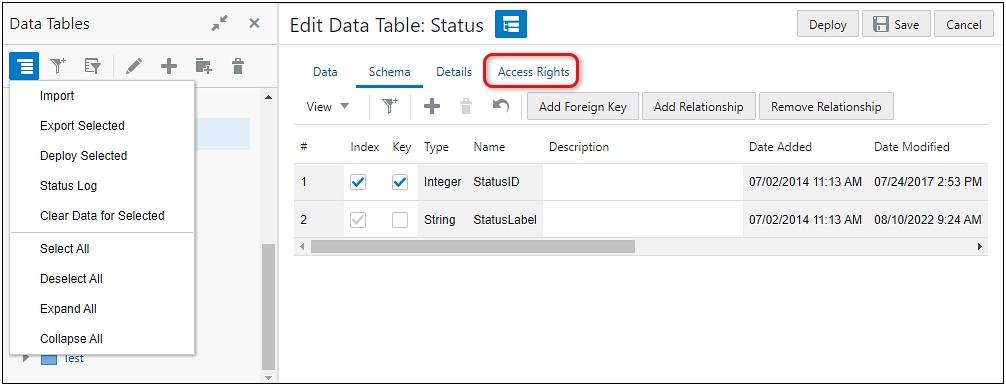
New Data Table Access Rights Tab
The new data table Access Rights tab allows administrators to assign administrator group data table access rights directly from the data table user interface.

Data Table User Interface with Access Rights Applied
View Access Rights
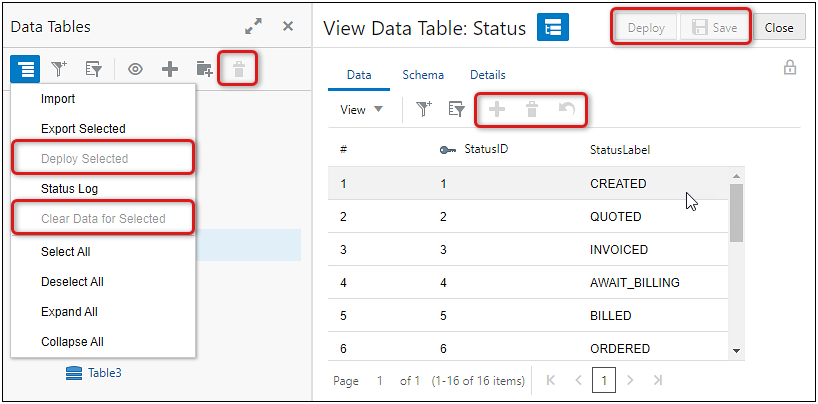
When access rights are applied to an administrator group, unavailable actions will be grayed out for members of the group. The following image shows the data table user interface for View Access group members. A new View icon is displayed when the user only has view access. The edit, delete, and deploy actions for the data table are not accessible.
IMPORTANT: Even though the Import action is shown as an available action, group members with View Access will not be able to import data tables.
Edit Access Rights
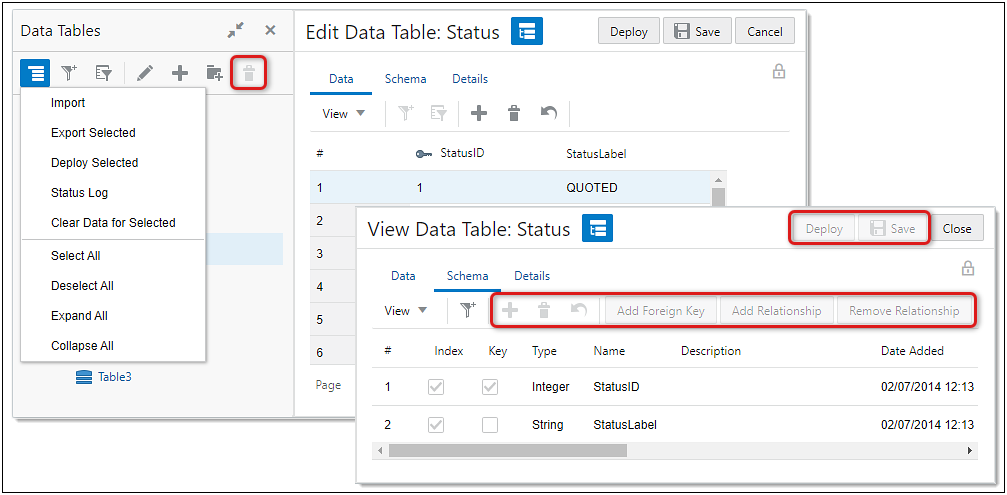
Group members with Edit Access have more actions available, but are not able to delete tables or make schema changes. The following image shows the Data and Schema tabs for Edit Access group members.
Full Access Rights
All actions are available for group members with Full Access. The Access Rights tab is displayed for group members that have Group Administration privileges. If the user does not have Access Administrator privileges, they will only be able to view access rights. The following image shows the Schema tab for Full Access group members.
Customers can use administrator groups to provide or remove access to individual data tables. They can also assign view, edit, or full access levels.
Steps to Enable
Assign Administrator Group Data Table Access Rights
Perform the following steps to assign administrator group data table access rights.
-
Navigate to the Admin Home page.
-
Click on Groups under Users.
-
Click on the applicable administrator type group.
-
Scroll down to the Available Access section, expand Developer Tools, and then expand Data Tables.
-
Right-click on the applicable data table, and then click Set Table Access Rights.
-
Perform the following sub-steps to assign access for a specific data table:
-
Select the desired access level from the Access drop-down.
-

-
-
Click OK.
-
-
Perform the following sub-steps to assign access rights for all data tables within a folder:
-
Select the applicable access level for all data tables within the folder.
-
-
-
Click OK.
-
-
Perform the following sub-steps to assign the applicable access level to the filtered list of data tables:
-
Click the filter icon and enter the desired criteria.
-
-
-
Select the applicable access level for the filtered list of data tables.
-
-
-
Click OK.
-
-
Click Save at the top of the Group Administration page.
Assign Data Table Access Rights
Administrators with Full Access rights can perform the following steps to assign administrator group data table access rights from the data table user interface.
-
Navigate to the Admin Home page.
-
Click on Data Tables under Developer Tools.
-
Open the applicable data table folder.
-
Open the applicable Data Table.
- Double-click on the data table,
- Select the data table and then click the "Edit" icon, or
- Right-click on the data table and the select "Edit" from the pop-up menu.
-
Click the Access Rights tab.
-
Select the applicable administrator group from the Add a Group drop-down.
Note: The access level will default to Full Access.
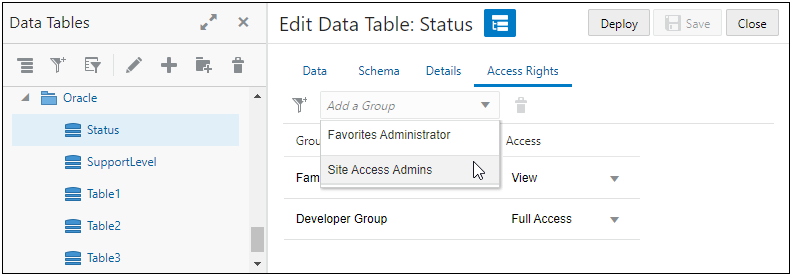
-
To change the access level for an administrator group, click on the Access drop-down for the applicable group, and then select the desired access level.

-
Click Save.
Tips And Considerations
- When assigning or modifying data table access rights for an administrator group, changes must be saved but the affected data table does not need to be deployed.
- Deleting a group from the Access Rights tab in the data table UI does not remove access to the data table folder. To remove access to a data table folder, you must go to Group Administration UI.
- Users can also navigate to a table item in the tree via the keyboard, and then pressing SHIFT+F10 to see the Set Table Access Rights option.
The following Integration features are available in Oracle CPQ 22D.
Improved Configuration of Oracle Identity and Access Management
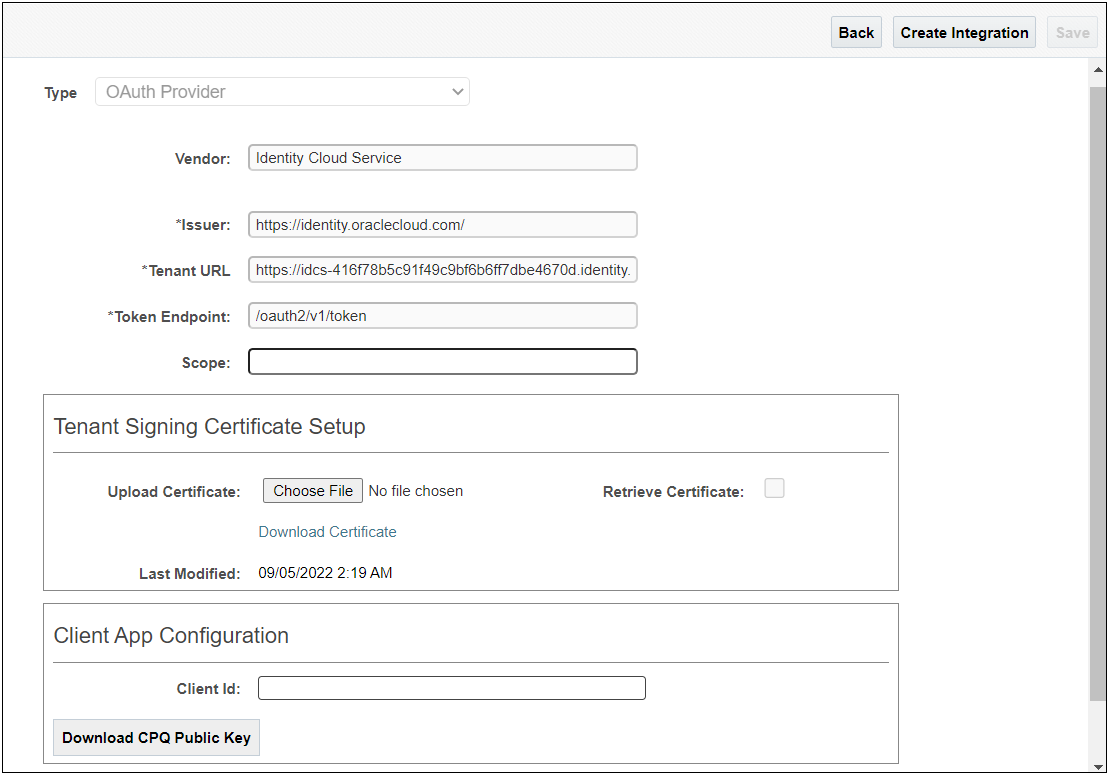
Oracle CPQ 22D includes enhancements to the Integration Center for easier configuration of Oracle Identity and Access Management (IAM), formerly called Identity Cloud, as an OAuth Provider.
This feature allows administrators to directly upload the Oracle IAM certificate to the Setup page.
Steps to Enable
Customers must open a Service Request (SR) on My Oracle Support to enable the "OAuth Provider" integration type in the Oracle CPQ Integration Center. When the integration type is enabled, administrators can use the Integration Center to create an OAuth Provider integration for CPQ. The OAuth Provider integration authenticates inbound and outbound REST communications with CPQ. Oracle CPQ customers should only enable this integration type when they want another OAuth provider, such as Oracle IAM, to authenticate REST API calls with CPQ.
To set up Oracle IAM as an OAuth Provider, administrators can perform the following:
- Navigate to the Admin Home page.
- Click Integration Center in the Integration Platform section. The Integration Center opens.
- Click Create Integration.
- Select OAuth Provider from the Type drop-down. The Vendor field defaults to the name of the OAuth Provider. This is a read-only field.
- Enter the valid OAuth issuer name in the Issuer field. This field validates the access token obtained is issued by the correct provider.
The OAuth Issuer for Oracle IAM is: https://identity.oraclecloud.com/
- Enter the base URL of the OAuth Provider in the Tenant URL field.
- Enter the token endpoint used for obtaining the OAuth token in the Token Endpoint field.
The Token Endpoint for Oracle IAM is: /oauth2/v1/token
- (Optional) Enter the scope used for accessing the public key of the OAuth Provider in the Scope field.
The Scope for Oracle IAM is: urn:opc:idm:__myscopes
Tenant Signing Certificate Set Up
The public certificate validates the access token during inbound REST API calls. The public certificate is obtained from the OAuth server using OAuth client credentials.
- Choose one of the following methods to set up the certificate:
- Click Choose File next to Upload Certificate to browse to the certificate file then Click Save to save the file.
- Click the Retrieve Certificate checkbox to retrieve the certificate details. The following fields are required by the system to retrieve the certificate, enter the following:
- JWKS Endpoint – the endpoint of the OAuth server to which the client connects to obtain the public key. The JWKS endpoint for Oracle IAM is: /admin/vi/SigningCert/jwk
- JWKS Authorized Client ID – the client ID of any trusted client registered with the OAuth Provider.
- JWKS Authorized Client Secret – the client secret of any trusted client registered with the OAuth Provider.
IMPORTANT: The Last Modified field indicates the last time the certificate information was entered or updated. This can help administrators track and troubleshoot certification information.
Client App Configuration
Use this section to configure Oracle CPQ outbound REST API calls.
- Enter the Client ID of the Oracle CPQ application registered with the OAuth Provider in the Client Id field.
- Click Download Oracle CPQ Public Key to obtain the self-signed certificate, which is used to register the Oracle CPQ as a client in the OAuth Provider.
- Click Save.
Tips And Considerations
- Following the initial certificate set up, Oracle CPQ 22D allows administrators to download the last uploaded certificate. The Download Certificate link displays in the User Interface when available.
- For existing OAuth Provider integrations where the public key was set up, upon upgrade to Oracle CPQ 22D, the Retrieve Certificate checkbox will be selected and the details will be auto-filled for the JWKS Endpoint, JWKS Authorized Client ID, JWKS Authorized Client Secret, and Last Modified fields.
- For standard compliance, the naming of fields from previous Oracle CPQ versions to Oracle CPQ 22D has changed. The functionality of the field remains the same between the versions.
| Oracle CPQ 22C FIeld Name | Oracle CPQ 22D Field Name |
|---|---|
| Resource Endpoint | JWKS Endpoint |
| Client Id | JWKS Authorized Client ID |
| Client Secret | JWKS Authorized Client Secret |
Preview REST Import and Export Data and Mapping for Commerce Integrations
Administrators are able to view request and response payloads for Commerce REST integrations via the Edit Integration page, as follows:
- The REST – Import integration will include a response preview link.
- The REST – Export integration will provide a link to preview the request and separate links to preview response payloads.
- The REST – Export Lines integrations will provide a link to preview all request and response payloads.
This feature aids setting up and troubleshooting integrations by easily accessing attribute mapping information.
The REST Import and Export preview links function similar to the existing SOAP preview links in Oracle CPQ. The following example shows a Commerce REST – Export integration with the preview links on the Edit Integration page.
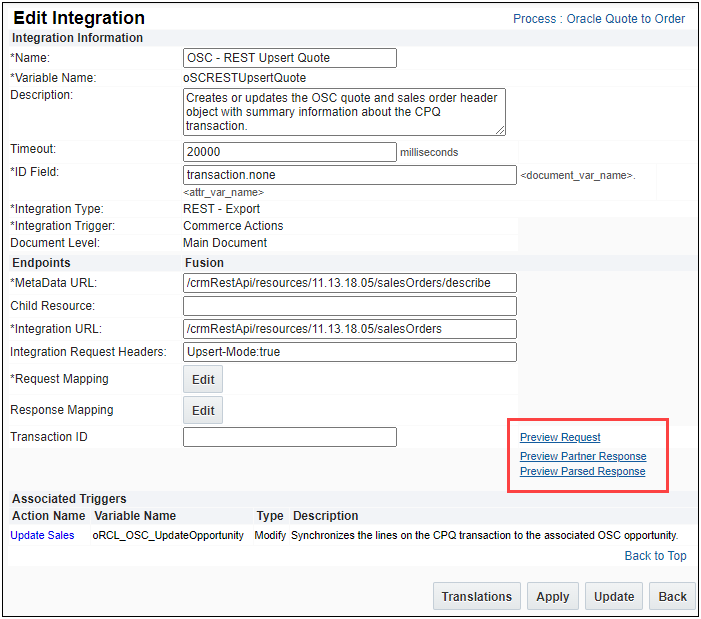
Commerce REST – Export Preview Link Example
Steps to Enable
To locate the REST Import or Export preview links:
- Click Admin to go to the Admin Home page.
- Click Process Definition in the Commerce and Documents section. The Processes page opens.
- For the Commerce Process, choose Integrations in the Navigation drop-down and click List. The Integrations page opens.
- Click the name of the integration you want to preview. The Edit Integration page opens.
- If not already entered, enter access Attribute Mapping for REST type integrations, click Edit for the applicable mapping.
- To preview the integration, enter a Transaction ID and click a Preview link. The following example shows a REST – Import integration.

Tips And Considerations
As with SOAP integrations, the preview for REST integrations require a populated integration key as follows:
- The REST – Import integration requires a valid Opportunity Number (opportunityNumber_t) field to be populated.
- The REST – Export integration requires a valid Opportunity Id (opportunityID_t) field to be populated.
- The REST – Export Lines integration requires a valid OSC Transaction ID (oRCL_OSC_TransactionID_t) field to be populated. This value corresponds to OrderHeaderId from the preview response of the REST – Export integration.
Key Resources
Refer to Commerce Integrations in the Oracle CPQ Administration Online Help for instruction for adding, editing, or previewing a Commerce REST integration type.
Salesforce: Configure New Oracle CPQ User Login Format
Oracle CPQ Connector for Salesforce Managed Package v8.5 allows administrators to define a configurable Oracle CPQ user account login format when provisioning new users in Oracle CPQ. This feature helps in maintaining consistent Username information between Salesforce and Oracle CPQ.
Oracle CPQ User Login Patterns
Administrators have the ability in Salesforce to select a common user account login pattern. This information is used to generate the Username field for each user.
Oracle CPQ Login format supports three standard user account login patterns, as follows:
- Salesforce Username Prefix (default) equals the Salesforce Username field which precedes the '@' character
- Salesforce Username – equals an exact match of the Salesforce Username field, including the '@' character
- Email Address – the exact match of the Salesforce user's email address
IMPORTANT:
- Username Logins must adhere to the Oracle CPQ Login Guidelines. An error message displays when a Username Login is not permitted. Refer to Host Company Login (Username) Guidelines within the Setting up Users in Oracle CPQ Administration Online Help for detailed information.
- Duplicate Username Login values are not allowed within the same Oracle CPQ site and same partner organization.
- You may receive errors if you choose the Salesforce Email Address login pattern and your Oracle CPQ site is configured to enforce that all active user email addresses are unique. Refer to Unique Email Address Validation within the Setting up Users in Oracle CPQ Administration Online Help.
Steps to Enable
IMPORTANT: Your site must be running Salesforce Managed Package v8.5 or later to use this feature. Salesforce Managed Package v8.5 is certified to work with Oracle CPQ Update 22D.
To update the Oracle CPQ Login format, administrations can perform the following steps:
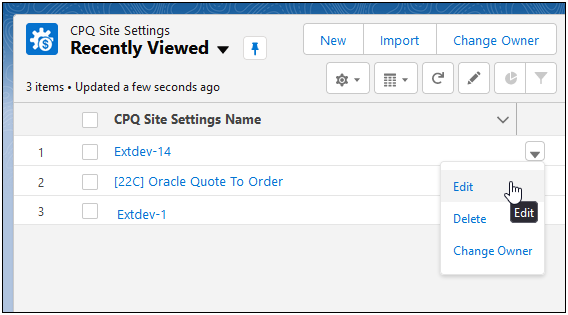
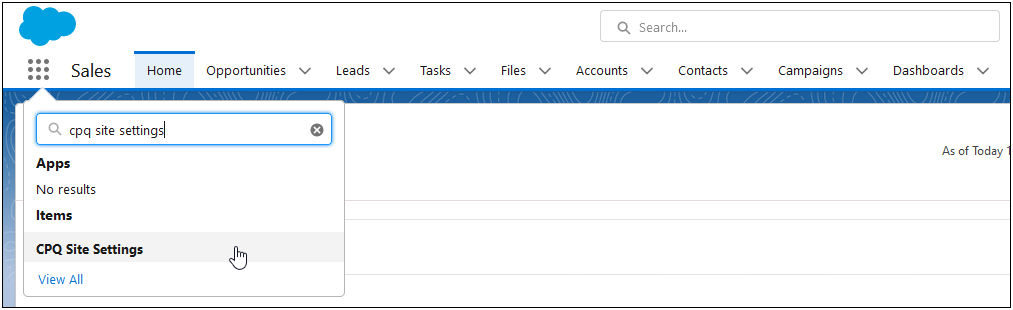
- In Salesforce using the App Launcher, navigate to the CPQ Site Settings object by entering CPQ Site Settings in the keyword search.
- Click CPQ Site Settings to view a list of the CPQ connections.

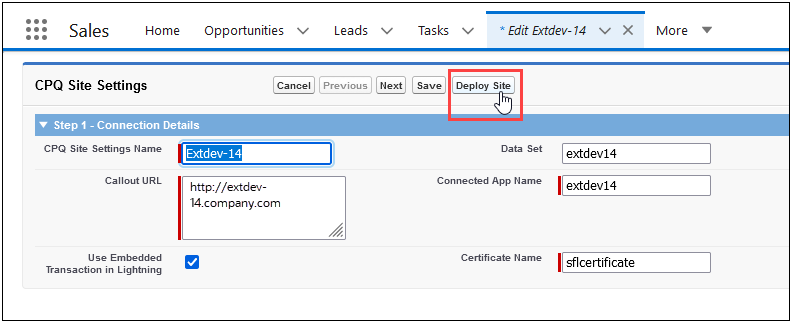
- Click Edit from the drop-down for a connection. The CPQ Site Settings page opens.

IMPORTANT: The CPQ Site Settings were originally entered during the Oracle CPQ Salesforce Connector install and set up. Refer to Oracle CPQ Connector for Salesforce Installation and Setup Guide for instructions.
- Click Next twice to move to the CPQ Site Settings Step 3 – Adapter Settings page.
- Select the desired Login format from the User Account Pattern drop-down.
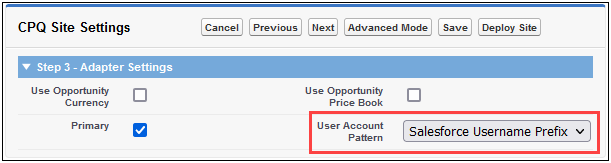
- Click Save.
- Click Deploy Site. The User Account Pattern selection is saved for the connection.
Tips And Considerations
The Oracle CPQ User Account Pattern applies only during the initial creation of an Oracle user record. Once the user account is created, changing the User Account Pattern field will not update the Oracle CPQ Cloud Login for pre-existing CPQ users. Only administrators can manually update a user's Oracle CPQ Cloud Login.
Salesforce: Edit Oracle CPQ User Login
Beginning in Oracle CPQ Connector for Salesforce Managed Package v8.5, administrators are able to manually override the default CPQ user login for an existing Salesforce user when creating a new CPQ user. In addition, administrators can remap an Oracle CPQ user record to a different CPQ user when one was created in error.
This feature allows administrators to manually override the default Oracle CPQ User Login when necessary.
Steps to Enable
IMPORTANT: Your site must be running Salesforce Managed Package v8.5 or later to use this feature. Salesforce Managed Package v8.5 is certified to work with Oracle CPQ Update 22D.
Once the site has the prerequisite Oracle CPQ and Managed Package running, an administrator is able to perform the following to enable this feature for all users:
IMPORTANT: The following steps to redeploy the site are required after any migration package upgrade. They are not specific to this one feature but are required as a post-upgrade operation.
- In Salesforce using the App Launcher, navigate to the CPQ Site Settings object by entering CPQ Site Settings in the keyword search.
- Click CPQ Site Settings to view a list of the CPQ connections.

- Click Edit from the drop-down for a connection. The CPQ Site Settings page opens.
IMPORTANT: The CPQ Site Settings were originally entered during the Oracle CPQ Salesforce Connector install and set up. Refer to Oracle CPQ Connector for Salesforce Installation and Setup Guide for instructions.
- Click Deploy Site.

- Repeat steps 3 and 4 for all CPQ connections. Once all CPQ connections are re-deployed as part of the managed package, this feature is available to administrators.
To enter a new or edit an existing Oracle CPQ user login record in Salesforce, administrators can perform the following:
- In Salesforce using the App Launcher, navigate to the Users object by entering Users in the keyword search.
- Click Users to view the Setup Users page.
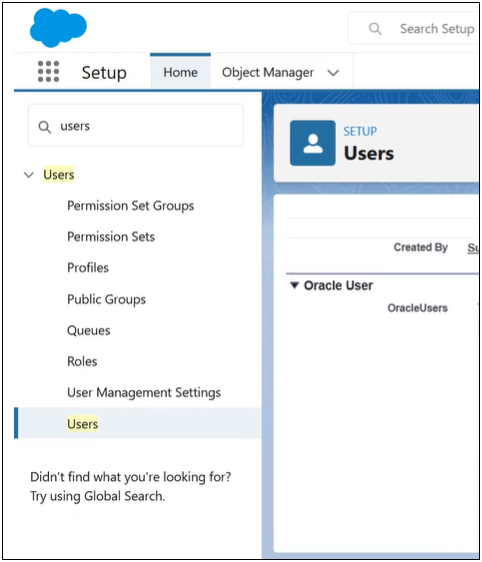
- Scroll to the Oracle User section to find the Oracle CPQ Cloud Login field.
IMPORTANT: This Oracle CPQ Cloud Login field is only editable by administrators with proper permissions.
- Click Edit to modify the user preferences.
- Modify the Oracle CPQ Cloud Login.
IMPORTANT: In order to prevent error, DO NOT modify other user preference settings when modifying the Oracle CPQ Cloud Login. Instead, save the Oracle CPQ Cloud Login then return to the User Profile and modify other user preferences.
- Verify Link to CPQ User is selected.
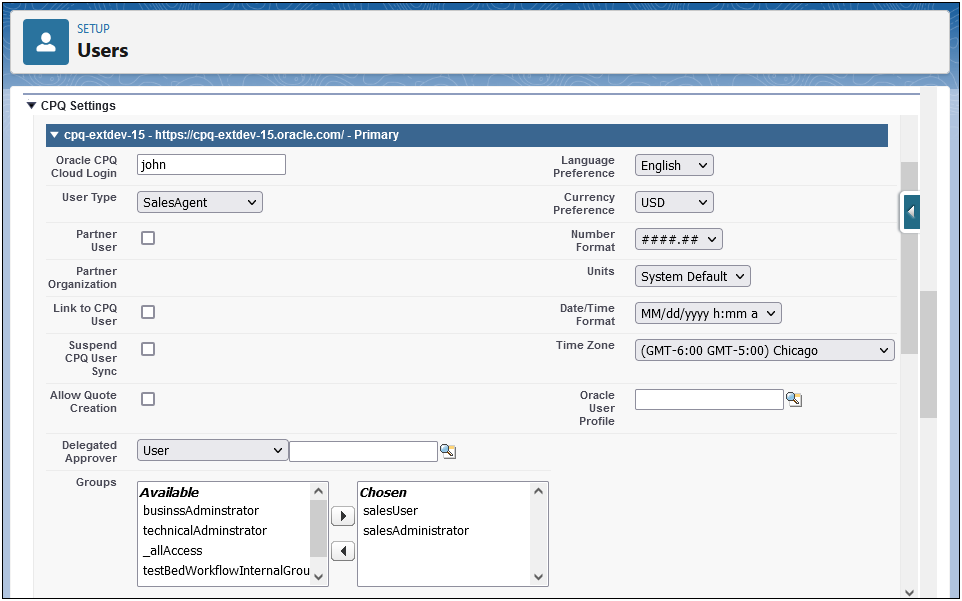
- Click Save to save the login information. The user preference settings will be synced to the My Profile page in Oracle CPQ.
Tips And Considerations
Within Salesforce, administrators can manually update the Oracle CPQ Username for a given Salesforce user. The User Sync operation attempts to update the username in CPQ to match the Oracle CPQ Cloud Login field, if applicable. If not applicable, a new CPQ user that matches the Oracle CPQ Cloud Login field will be created.
Salesforce: Mark as Active Bypasses Opportunity Access Control
Beginning in Oracle CPQ Connector for Salesforce Managed Package v8.5, any user who has permissions to the Oracle Quote will also be able to sync an Oracle Quote to the Opportunity & Opportunity Products, regardless if the user has write access to the Opportunity or Opportunity Products. This feature makes it easier to share and keep the information in active Quotes and the associated Opportunities synchronized without the additional burden of changing a sales user's access permission level.
Use Case Example
John, a sales user, is assigned read-only permission for Opportunities but has edit permission to Quotes in Oracle CPQ. David, an Opportunity owner wants John's input on the line items and therefore shares his Opportunity with John. David creates the Opportunity information.

John opens David's Opportunity and within the Opportunity he is able to select and open the associated Quote.

John modifies the Quote, saves the changes, and returns to the Opportunity. John then selects the Quote and clicks the Mark as Active button.

John's changes to the Line Items are synchronized with the Opportunity Line items.

Steps to Enable
IMPORTANT: Your site must be running Salesforce Managed Package v8.5 or later to use this feature. Salesforce Managed Package v8.5 is certified to work with Oracle CPQ Update 22D.
Once the site has the prerequisite Oracle CPQ and Managed Package running, an administrator is able to perform the following to enable this feature for all users:
IMPORTANT: The following steps to redeploy the site are required after any migration package upgrade. They are not specific to this one feature but are required as a post-upgrade operation.
- In Salesforce using the App Launcher, navigate to the CPQ Site Settings object by entering CPQ Site Settings in the keyword search.
- Click CPQ Site Settings to view a list of the CPQ connections.
- Click Edit from the drop-down for a connection. The CPQ Site Settings page opens.

IMPORTANT: The CPQ Site Settings were originally entered during the Oracle CPQ Salesforce Connector install and set up. Refer to Oracle CPQ Connector for Salesforce Installation and Setup Guide for instructions.
- Click Deploy Site.
- Repeat steps 3 and 4 for all CPQ connections. Once all CPQ connections are re-deployed as part of the managed package, this feature is available to administrators.
Support for Oracle Integration 3
Oracle Integration Cloud (OIC) provides a standard Oracle solution for general integration needs. By using the power of OIC, system integrators can manage Oracle CPQ integrations using a robust toolset. OIC enables Oracle CPQ to connect to back office systems, on premise environments, and other products in a consistent, enhanced manner.
OIC is releasing a new Adapter framework referred to as Oracle Integration 3. To accommodate the OIC Generation 3 release, Oracle CPQ and the Oracle CPQ Adapter for OIC are being updated to support both the existing Generation 2 and the new Generation 3 platforms.
Steps to Enable
Setting up the Oracle CPQ to OIC integration includes the following high-level steps. When setting up OIC Gen3 instead of Gen2, the first two high-level steps are different. Detailed instructions for those procedures are provided below as well.
Step 1: Establish a connection from Oracle CPQ to OIC (see procedure below for OIC Gen3)
Step 2: Create a Commerce Integration for OIC (see procedure below for OIC Gen3)
Step 3: Tie an Integration to Commerce Actions
Step 4: Deploy Commerce
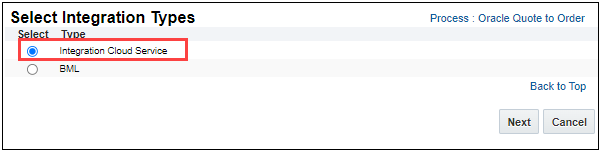
(Step 1) To set up a connection from Oracle CPQ to OIC with Gen3 framework, perform the following steps:
- Click Integration Center under Integration Platform on the Admin Home page.
- Click Create Integration.
- Select Integration Cloud Service from the Type drop-down.
- Select Gen3 from the Generation drop-down.
- Enter a Name and Variable Name for the integration.
- Enter a Description for the integration.
- Enter your OIC Username and Password.
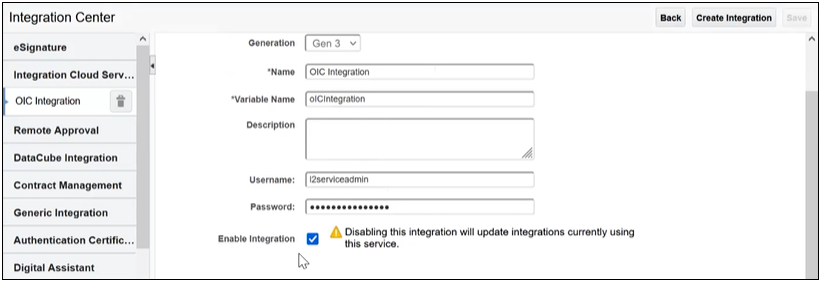
- Enable the integration by checking Enable Integration.
- Click Save.
(Step 2) To use this OIC integration, you must create an Integration on an existing process within Oracle CPQ. The following steps walk through setting up a Commerce Process integration with OIC Gen3:
- Click Process Definition in the Commerce and Documents section of the Admin Home page.
- For the Commerce process, choose Integrations in the Navigation drop-down and click List. The Integrations page displays.

- Click Add on the Integrations page.

- Select Integration Cloud Service and click Next. The Edit Integration dialog box appears.
- Enter a Name and Variable Name.
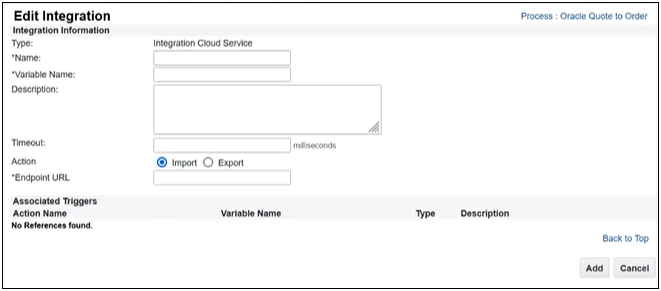
- (Optional) Enter a Description.
- (Optional) Enter a Timeout value.
- Select an Action, either Import or Export.
- Type a valid integration URL in the Endpoint URL field.
IMPORTANT: This endpoint URL is available from the Run details tab of the integration deployed on the OIC Gen3 environment. This integration should have Oracle CPQ Adapter as a trigger node. For more information about the Oracle CPQ Adapter refer to Using the Oracle CPQ Adapter with Oracle Integration.
- Click Add. The OIC Gen3 integration will now appear on the Integrations page for this process.
Once you have the Oracle CPQ to OIC connection and a process integration set up, you can associate the integration to a CPQ Commerce Action and add it to a layout (Step 3), and deploy the changes in Oracle CPQ (Step 4). Refer to the Oracle Integration Cloud (OIC) topic in the Oracle CPQ Administration Online Help for detailed steps.
Key Resources
- For more information about the OIC Gen3 platform features, refer to Oracle Integration Cloud Service.
- For more information about the Oracle CPQ Adapter refer to Using the Oracle CPQ Adapter with Oracle Integration.
- For more information about Oracle CPQ platform and OIC Integration set up, refer to the Oracle Integration Cloud topic in the Oracle CPQ Administration Online Help.
The following User Management feature is available in Oracle CPQ 22D.
Allow Partner Organization Users to Authenticate with OAuth Provider for CPQ REST APIs
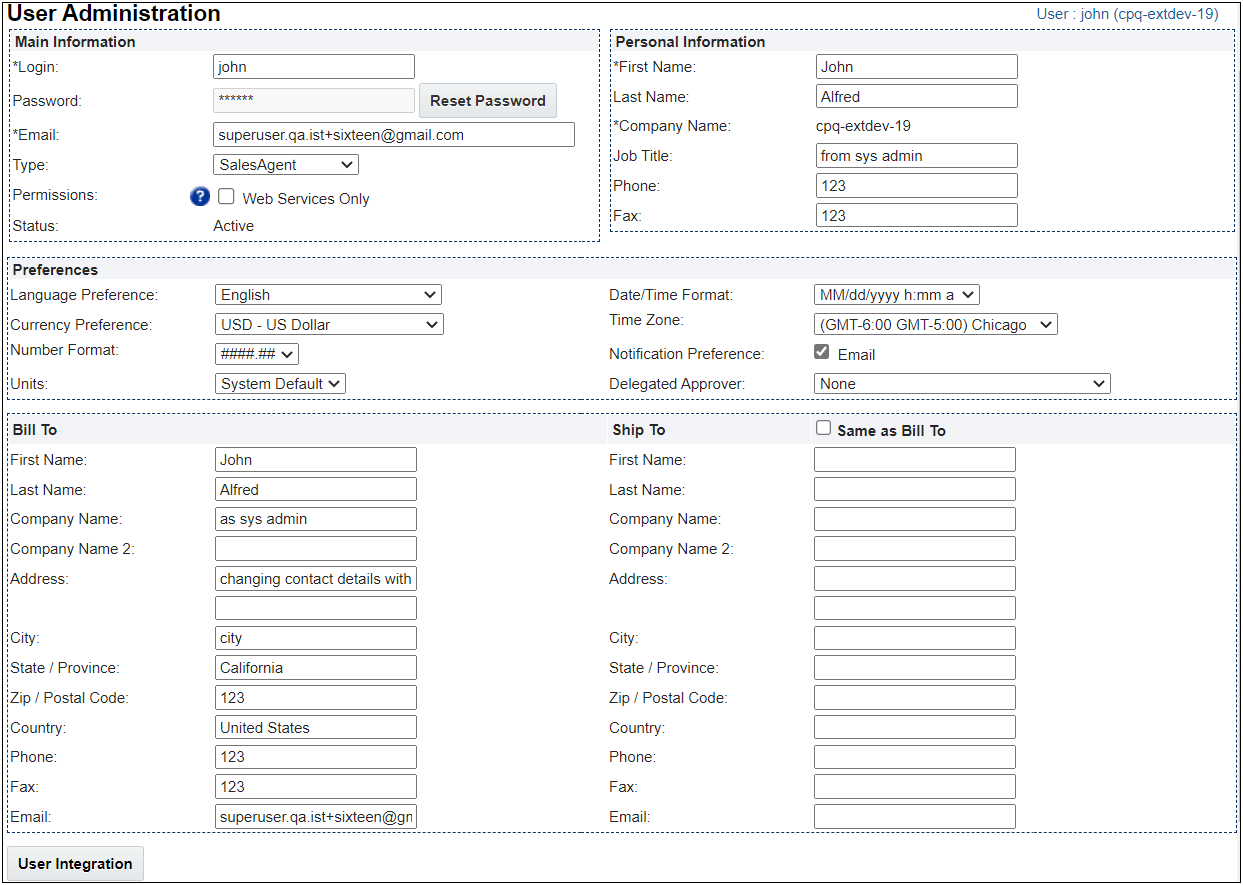
When an external OAuth Provider is configured in Oracle CPQ's Integration Center, the OAuth Provider can be used to authenticate Partner Organization users for inbound CPQ REST API calls. Beginning in Oracle CPQ 22D, Partner Organization and Host Company users register their logins for external OAuth via the User Integration page.
This feature allows partner organization users to use OAuth to access information in Oracle CPQ from external systems such as customer portals.
Steps to Enable
Register a User Login for External OAuth
To register a user login for external OAuth, perform the following steps:
-
Navigate to User Integration page.
-
As a user, click the My Profile icon in the Navigation menu to open the My Profile page then click User Integration at the bottom of the page.
-

IMPORTANT: The My Profile > User Integration path is only available for editing the user's external login if there is a CRM integration or the current user is an administrator with appropriate user administration permissions.
-
-
As an administrator, click Internal Users from the Admin Home page. Click on the user login link to open the User Administration page then click User Integration at the bottom of the page.
-
-
Enter valid login in the Login field.
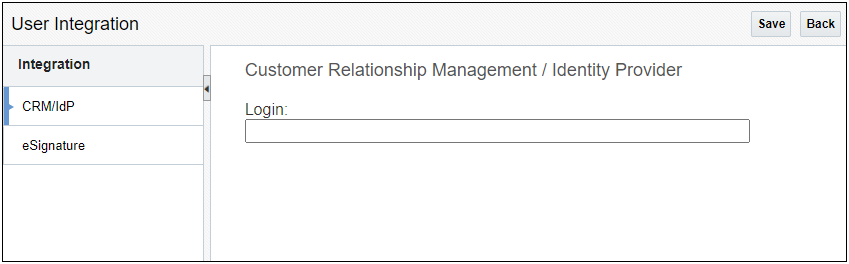
IMPORTANT: If the site is integrated with a CRM partner (i.e. Salesforce, MS Dynamics, or CX Sales) where both inbound and outbound integration is required, a required Password field displays in the Customer Relationship Management / Identity Provider panel.
-
Click Save.
-
Click Back to return to the previous page.
Tips And Considerations
-
The Oracle CPQ site must have the OAuth Provider integration set up prior to registering user logins for external OAuth. Refer to OAuth Provider Integration topic in the Oracle CPQ Administration Online Help for more information.
-
Beginning in Oracle CPQ 22D, users that were previously provisioned in CPQ by IDCS itself will have the login field of the CRM/IdP tab automatically populated with the IDCS login. Users created in CPQ by other means (e.g. created manually in CPQ or via CPQ bulk upload functionality) need to have their IDCS login explicitly entered into the login field on the CRM/IdP tab of the CPQ user, as described in Register a User Login for External OAuth.
The following Web Service features are available in Oracle CPQ 22D.
Oracle CPQ 22D introduces new REST APIs to enable creation of BOM item definition and BOM item mapping Data Table entries via REST services.
BOM Item Definitions
Get All BOM Item Definitions
Use this endpoint to retrieve a list of BOM item definitions.
- Endpoint: /bomItemSetups
- Method: GET
Get a BOM Item Definition
Use this endpoint to retrieve the specified BOM item definition.
- Endpoint: /bomItemSetups/{bomItemVarName}
- Method: GET
Get All BOM Item Child Definitions for a Parent BOM Item
Use this endpoint to retrieve a list of BOM item child definitions for the specified parent BOM item.
- Endpoint: /bomItemSetups/{bomItemVarName}/children
- Method: GET
Get a BOM Item Child Definition for a Parent BOM Item
Use this endpoint to retrieve the specified BOM item child definition for a parent BOM item.
- Endpoint: /bomItemSetups/{bomItemVarName}/children/{childVarName}
- Method: GET
Create a BOM Item Definition
Use this endpoint to create a BOM item definition.
- Endpoint: /bomItemSetups
- Method: POST
Delete a BOM Item Definition
Use this endpoint to delete the specified BOM item definition.
- Endpoint: /bomItemSetups/{bomItemVarName}
- Method: DELETE
Update a BOM Item Definition
Use this endpoint to update the specified BOM item definition.
- Endpoint: /bomItemSetups/{bomItemVarName}
- Method: PUT
BOM Item Mappings
Get All BOM Item Mappings for a Parent BOM Item
Use this endpoint to retrieve a list of BOM item mappings for a parent BOM item.
- Endpoint: /bomItemSetups/{bomItemVarName}/bomItemMappings
- Method: GET
Get a BOM Item Mapping for a Parent BOM Item
Use this endpoint to retrieve BOM item mappings for a parent BOM item.
- Endpoint: /bomItemSetups/{bomItemVarName}/bomItemMappings/{bomItemMapVarName}
- Method: GET
Create a BOM Item Mapping for a Parent BOM Item
Use this endpoint to create a BOM item mapping for a parent BOM item.
- Endpoint: /bomItemSetups/{bomItemVarName}/bomItemMappings
- Method: POST
Delete a BOM Item Mapping for a Parent BOM Item
Use this endpoint to delete a BOM item mapping for a parent BOM item.
- Endpoint: /bomItemSetups/{bomItemVarName}/bomItemMappings /{bomItemMapVarName}
- Method: DELETE
Update a BOM Item Mapping for a Parent BOM Item
Use this endpoint to update a BOM item mapping for a parent BOM item.
- Endpoint: /bomItemSetups/{bomItemVarName}/bomItemMappings/{bomItemMapVarName}
- Method: PUT
BOM Item Tree
Get a BOM Item Tree and BOM Item Mappings
Use this endpoint to retrieve the hierarchical BOM structure and BOM item mappings for the specified root BOM item.
- Endpoint: /bomItemSetups/{bomItemVarName}/actions/getBomItemTree
- Method: POST
Create a BOM Item Tree and BOM Item Mappings
Use this endpoint to create a hierarchical BOM structure and BOM item.
- Endpoint: /bomItemSetups/actions/createBomItemTree
- Method: POST
Update a BOM Item Tree and BOM Item Mappings
Use this endpoint to update the hierarchical BOM structure and BOM item mappings for the specified root BOM item.
- Endpoint: /bomItemSetups/{bomItemVarName}/actions/updatetBomItemTree
- Method: POST
Customers can use BOM Mapping REST APIs to create BOM Item Definition and BOM Item Mapping Data Table entries via REST services.
Steps to Enable
Review the REST service definition in the REST API guides, available from the Oracle Help Center > your apps service area of interest > REST API. If you're new to Oracle's REST services you may want to begin with the Quick Start section.
Oracle CPQ 22D introduces new Certificates REST APIs to get certificate details using REST API services. Refer to the Certificate REST API topic in Oracle CPQ Administration Online Help or REST API Services for Oracle CPQ in the Oracle Help Center for additional information and examples.
Get List of All Certificates
Use this endpoint to get a list of all certificates for a site.
- Endpoint: /rest/v14/certificates/
- Method: GET
Get a Certificate
Use this endpoint to get details for a specific certificate.
- Endpoint: /rest/v14/certificates/{name}
- Method: GET
The Certificate REST API automates retrieving the necessary certificate information when setting up Oracle Identity and Access Management (IAM) as an OAuth Provider.
Steps to Enable
Review the REST service definition in the REST API guides, available from the Oracle Help Center > your apps service area of interest > REST API. If you're new to Oracle's REST services you may want to begin with the Quick Start section.
Integration Vendors REST APIs for OAuth Integration
Oracle CPQ 22D introduces Integration Vendors REST APIs to get OAuth integration information, create a new OAuth integration, and delete or update an existing OAuth integration in the Integration Center. The following web services are now available:
Get List of Integrations
Use this endpoint to get a list of integrations from the Integration Center.
- Endpoint: /rest/v14/integrationVendors
- Method: GET
Get an Integration
Use this endpoint to get details about a specific integration.
- Endpoint: /rest/v14/integrationVendors/{id}
- Method: GET
Create an Integration
Use this endpoint to create an integration.
- Endpoint: /rest/v14/integrationVendors
- Method: POST
Delete an Integration
Use this endpoint to delete an integration.
- Endpoint: /rest/v14/integrationVendors/{id}
- Method: DELETE
Update an Integration
Use this endpoint to update an existing integration.
- Endpoint: /rest/v14/integrationVendors/{id}
- Method: PATCH
The Integration Vendors Rest APIs are used to automate OAuth integrations.
Steps to Enable
Review the REST service definition in the REST API guides, available from the Oracle Help Center > your apps service area of interest > REST API. If you're new to Oracle's REST services you may want to begin with the Quick Start section.
IMPORTANT Actions and Considerations
PRE-UPGRADE CONSIDERATIONS
Modifications to Known Functionality
Before upgrading to Oracle CPQ 22D, we recommend you review the modifications to known functionality and plan accordingly.
| Oracle CPQ Feature |
Description |
| Oracle CPQ REST API | The following REST APIs will respond with 404 instead of 500 when an invalid number is used as the key of the resource:
JET Transaction UI will have a change in behavior when the current user doesn’t have access. For example, when a user doesn’t have access to a quote (a participant profile is not given access to a Document in Commerce Steps Admin), the user will be navigated to Access Denied page. |
| Supported Fonts |
In Oracle CPQ Update 22C, we changed the supported fonts available for use with Oracle CPQ. Customers need to review their existing document template font selections and determine the best course of action for their implementations. This change impacts several areas of Oracle CPQ including Document Designer, Email Designer, Document Engine, and Rich Text Editor (RTE). In effort to minimize the impact of the font changes, Oracle CPQ has determined substitute fonts which closely resemble the now unsupported font selections. The Supported Fonts topic provides the complete list of supported fonts and the options available to you to address this change. The following resources are available regarding the supported fonts:
|
| jQuery Upgrade |
jQuery is a fast and concise JavaScript Library that simplifies HTML document traversing, event handling, animating, and Ajax interactions for rapid web development. Oracle CPQ 22C and later supports jQuery 3.6.0. Customers with an older version of jQuery and with JavaScript customizations will need to thoroughly test the customizations. |
| Parts |
Undeployed part custom field changes will be deployed when a site is upgraded to Oracle CPQ 22D. |
Planned Changes to Supported Features
To continually improve our application, Oracle CPQ routinely evaluates product capabilities to identify older features that should be replaced with improved functionality. Supporting outdated features adversely impacts the value that we bring to our customers. This announcement provides information to CPQ administrators and IT professionals to prepare for future updates, including the uptake of provided alternative functionalities. The table below includes planned feature deprecations and their removal release schedule.
What does this mean?
“Deprecated” means the feature is planned for removal in a future Oracle CPQ Update (see End of Life column in the table below). The feature will continue to function for existing users until that time but will not be further enhanced or documented. After removal, the feature will no longer be supported or function.
| Oracle CPQ Feature |
Deprecation Announced |
End of Life and Removal |
Description |
| Legacy Global Functions |
21C |
24A |
In earlier versions of Oracle CPQ the Legacy Global Functions, also known as Jython scripts, allowed customers to write custom python scripts to use with BML for various types of processing. Due to poor performance, Oracle CPQ ended support for these scripts several years ago. If your Oracle CPQ implementation uses this functionality, we recommend administrators migrate to standard supported functionality (e.g., Util BML Libraries, Commerce BML Libraries, and BMQL). To verify if you have Legacy Global Functions enabled in your environment, follow the steps below:
|
| Legacy Commerce UI |
21C |
24A |
In Oracle CPQ 21C, we announced the deprecation of Legacy Commerce Transaction UI. The end of life and removal of this functionality is Oracle CPQ 24A. We introduced JET Responsive UI for Commerce in Oracle CPQ 18C, and after years of evolution and production experience, our customers are experiencing the benefits of the new JET Responsive UI for both Commerce and Configuration. The majority of Oracle CPQ customers have successfully made the complete transition to the JET UI. Moving forward, we are focusing our development efforts on enhancing the JET Responsive UI to improve the overall user experience. We’re announcing these changes to give our customers early visibility and the opportunity to prepare for this update. If your Oracle CPQ implementation still uses Legacy Commerce UI, we encourage you to start preparing for the transition to the JET UI. For more information on enabling JET Commerce UI, visit the Oracle CPQ Administration Online Help JET Transaction UI topic or watch the CPQ JET UI: Best Practices and Customization Video. |
| Legacy Configuration UI |
21C |
24A |
In Oracle CPQ 21C, we announced the deprecation of Legacy Configuration UI. The end of life and removal of this functionality is Oracle CPQ 24A. We introduced JET Responsive UI for Configuration in Oracle CPQ 19B, and after years of evolution and production experience, our customers are experiencing the benefits of the new JET Responsive UI for both Commerce and Configuration. The majority of Oracle CPQ customers have successfully made the complete transition to the JET UI. Moving forward, we are focusing our development efforts on enhancing the JET Responsive UI to improve the overall user experience. We’re announcing these changes to give our customers early visibility and the opportunity to prepare for this update. If your Oracle CPQ implementation still uses Legacy Configuration UI, we encourage you to start preparing for the transition to the JET UI. For more information on enabling JET Configuration UI, visit the Oracle CPQ Administration Online Help JET Configuration UI topic or watch the CPQ JET UI: Best Practices and Customization Video. |
| Legacy Commerce and Configuration Mobile Layouts |
21C |
24A |
In Oracle CPQ 21C, we announced the deprecation of Legacy Commerce and Configuration Mobile Layouts. The end of life and removal of this functionality is Oracle CPQ 24A. Legacy Mobile Layouts were built to provide an adaptive experience for quoting and configuring on mobile devices. The JET Responsive UI provides a clean, streamlined user experience that is fully responsive across desktop, tablet, and phone devices, eliminating the need for the administration of separate UI Layouts for desktop and mobile users. If your Oracle CPQ implementation has legacy mobile layouts enabled, we advise you to make a transition to JET Responsive UI to provide an optimal experience for your end users. For more information on enabling the JET UI responsive experience, refer to the Oracle CPQ Administration Online Help. We’re announcing these changes to give our customers early visibility and the opportunity to prepare for this update. If your Oracle CPQ implementation still uses Legacy Configuration UI, we encourage you to start preparing for the transition to the JET UI. For more information on enabling JET Configuration UI, visit the Oracle CPQ Administration Online Help JET Responsive UI topic. |
| Legacy Rich Text Editor |
21C |
24A |
In Oracle CPQ 21C, we are announced the deprecation of the Legacy Rich Text Editor. The end of life and removal of this functionality is Oracle CPQ 24A. Oracle CPQ occasionally disables old areas of the product that have been replaced by newer and improved versions. As previously announced in CPQ 20C, we introduced a new inline editor for rich-text editable attributes (RTE). The new JET editor includes more text formatting options than the legacy editor. Features include undo/redo, images, links, table tools, and functions with the browser's native spell-check. We are also working on adding user-specific template support to the new editor before retiring the legacy editor from the product. |
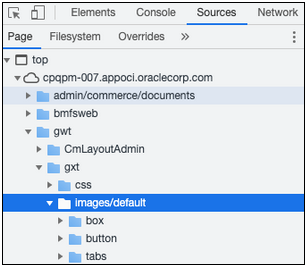
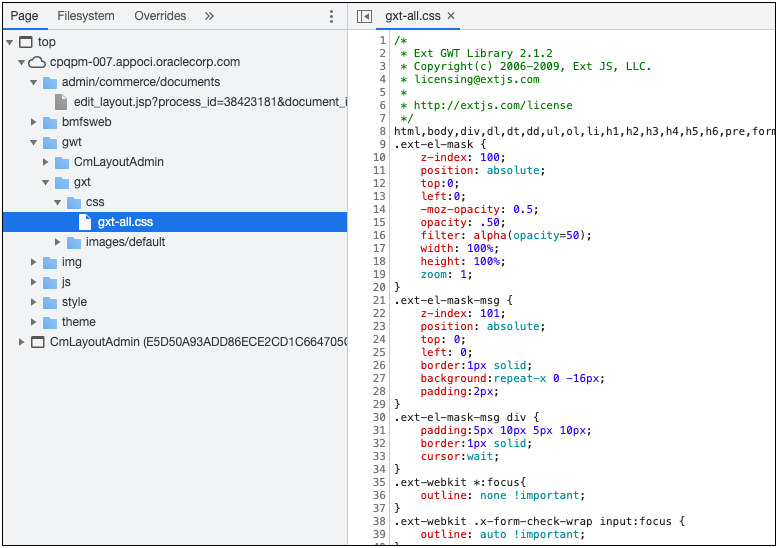
| GXT Customer Images and CSS References |
21C |
24A |
GXT is a Java framework for building web application pages. Oracle CPQ used this framework for its internal implementation and did not expose this for customer use. We are eliminating this framework from our product. If you are referencing images or CSS provided by this framework, we strongly recommend you to remove those references from your implementation. The end of life and removal of this functionality is Oracle CPQ 24A. GXT Images/Icons References The images used by this framework are likely found under the folder path: "/gwt/gxt/images/default/" Refer to the example below. If you are referencing any image from this folder, remove those references and use the File Manager to manage your customized images.
GXT CSS References The CSS file used by this framework are likely found under this folder path: "/gwt/gxt/css/gxt-all.css". Refer to the example below. If you have customized the above CSS file or referencing any CSS classes from this file, remove those customizations and use Stylesheet Manager to manage your customized CSS.
IMPORTANT: Depending on your specific implementation, the folder may not be exactly in the same path as referenced above. Review the folders to find the images/default folder and gxt-all.css file. |
Custom Javascript and CSS
While Oracle CPQ does not endorse or guarantee the use of JavaScript customizations, we recognize that some customers have extended the Oracle CPQ. Customizations may conflict with new Oracle CPQ platform features, data may be corrupted or lost, maintenance and support may be difficult, cross-browser support must be verified, performance may be impaired, and testing is required for each upgrade. Customers should consider carefully the relative benefits of JavaScript customizations in light of the associated risks.
Customers are recommended to utilize the CPQJS APIs instead of manipulating the Document Object Model (DOM) structure or specific elements, classes or IDs.
If customers have added custom JavaScript that leverages the Document Object Model (DOM) structure or specific elements, classes or IDs, this customization should be thoroughly tested and may require refactoring.
Oracle CPQ 22A and later supports JET v10.0.0. Please note the following:
- Select One component (<oj-select-one>) is deprecated and has been replaced with Select Single (<oj-select-single>). Single Select Menu (SSM) attributes are impacted by this change.
-
JET widget CSS applies to elements with class that starts with '.oj'. Oracle JET reserves this as a namespace. As such all customized elements that include '.oj' should be reviewed, tested, and refactored. Going forward no customized elements should include '.oj' in order to prevent future issues.
Oracle CPQ 22C upgraded jQuery to 3.6.0. Customers using earlier versions of jQuery need to upgrade and test their JavaScript customizations.
Refer to the following resources for more information:
- Oracle CPQ Administration Online Help > Style & Templates > JavaScript Customizations for JET UIs
- Oracle CPQ JET Configuration and Transaction UI: Refactoring Existing JavaScript Customizations (Doc ID 2490016.1)
- JavaScript Extension Toolkit and JET v10.0.0 Release Notes
Migration
When using Import From Source or Connect To Destination to migrate content, both sites must use the same major update. The migration of content can only occur across minor updates within the same major update.
- "Major update" = Update 22D
- "Minor update" = Update 22D Patch 1
When using Migration Packages, content from 19A and forward can be uploaded to the latest site version.
Resolved Known Issues
For information on bugs fixed in Update 22D, refer to the Oracle CPQ 22D Resolved Known Issues document available on My Oracle Support and the Oracle CPQ Administration Online Help.
Translation
For some system-defined messages and components, strings were removed and others added in Oracle CPQ 22D. If you have created your own implementation-specific translations of system-defined strings, some of these strings may no longer appear. Other strings may appear in English. The strings appearing in English are new and require translation.
Most of these messages and components are on the Administration side of Oracle CPQ, but you should review both your end user and administration pages before deploying your updated installation to confirm that all strings appear in the desired language.
Translation Status
Oracle CPQ supports the consumption of both single and multi-byte character sets. Submit a service request on My Oracle Support to enable your site for a new language.
For the following languages, a translation of the Oracle CPQ user interface is available for both the platform and the reference application:
- Chinese (Simplified) [China]
- Chinese (Traditional) [Taiwan]
- Czech [Czech Republic]
- Danish [Denmark]
- Dutch [Netherlands]
- English
- Finnish [Finland]
- French
- French [Canada]
- German
- Hungarian [Hungary]
- Italian
- Japanese [Japan]
- Korean [South Korea]
- Norwegian (Bokmål) [Norway]
- Polish [Poland]
- Portuguese [Brazil]
- Romanian [Romania]
- Russian [Russia]
- Spanish (Worldwide)
- Swedish [Sweden]
- Turkish [Turkey]
POST-UPGRADE CONSIDERATIONS
Upgrade and test all test instances on Oracle CPQ 22D before upgrading to production.
Customer Upgrade Testing
Customers should actively test new versions applied to non-production environments before a scheduled production upgrade. At minimum, customers should test the lifecycle of a transaction, with the typical actions that sales users perform. These may include but are not limited to: start transaction, new configuration, reconfigure existing configuration, parts search, discounting, printing, revisions, and approvals. Integration points should also be tested. Reviewing the What's New is highly recommended as this practice may indicate additional focus areas for testing.
Customers should also test any customizations made on the environment, especially JavaScript and unsupported integrations. Note that custom JavaScript is the most frequent cause of post-upgrade issues. Custom JavaScript and unsupported integrations are not supported by Oracle Support or Development. In particular, note that an upgrade may introduce changes to the DOM, which could impact use of customer JavaScript and CSS.
While Oracle CPQ does not endorse or guarantee the use of JavaScript customizations, we recognize that some customers have extended Oracle CPQ to support critical use cases. JavaScript API ("CPQJS") includes methods for accessing attributes, actions, and other elements on the JET Configuration and JET Transaction UIs. Customers should consider carefully the relative benefits of JavaScript customizations in light of the associated risks. Customizations may conflict with new Oracle CPQ platform features, data may be corrupted or lost, maintenance and support may be difficult, cross-browser support must be verified, performance may be impaired, and testing is required for each upgrade.
Oracle CPQ does extensive testing as part of the release cycle. Therefore your testing plan efforts should focus on testing customer-specific use cases rather than general tasks such as adding a configuration attribute.
Issues after Upgrade
If a customer experiences issues after the upgrade, there are two different processes depending on if the upgrade is a non-production or production upgrade.
Issues after Non-Production Upgrade
- Log a Service Request (SR) through My Oracle Support.
- The Service Request will be picked up by Customer Support, and assigned to the Point of Contact (POC).
- The Service Request is worked as a standard Customer Support Service Request.
NOTE: In some instances the customer administrator may resolve issues without opening a Customer Support Service Request.
Issues after Production Upgrade
- In most cases, production upgrades go smoothly and the Upgrade Service Request is closed once the upgrade completes.
- The customer is instructed to open a "Severity 1" Service Request in the event that there is a critical issue after the production upgrade that was not identified after the non-production upgrade. Critical issues after upgrade would be considered production site down, 100% of users cannot quote, or other revenue impacting business critical issues.
- Once the "Severity 1" Service Request is created, the on-call team is notified.
- On-call team member(s) will work the Service Request towards resolution.
- On-call team member will then reach out to Oracle Upgrade Specialist who performed the post upgrade validation if needed.
Browser Support
Oracle CPQ supports all browser versions that meet the criteria of the Oracle Software Web Browser Support Policy.
If you experience issues using a supported browser version, open a ticket on My Oracle Support to resolve the issue. If an issue arises when using a supported browser, use a certified browser version until a fix is delivered. Certified browsers are selected based on current market share and are thoroughly tested to work with the current version’s standard functionality.
Certified Browsers
Windows
- Google Chrome 103.x
- Mozilla Firefox 103.x
- Microsoft Edge 103.x
Mobile Devices
- Apple iPad iOS 15.x, Safari browser
- Apple iPhone iOS 15.x, Safari browser
IMPORTANT: Compatibility issues with the selected browsers may exist when sites are created with additional JavaScript, alternate CSS, or other custom functionality. Customizations may require add-on work. Contact My Oracle Support to determine the availability of workarounds and minor fixes.
Salesforce Integration Support
Oracle officially supports version 8.x of the Oracle CPQ Connector for Salesforce.
Training
Please refer to the release documentation for all versions between your current version and the version to which you are upgrading to see all new functionality, resolved known issues, and functional known issues.
Refer to the Oracle CPQ Administration Online Help to become familiar with the new features introduced in Oracle CPQ 22D. For additional help, see My Oracle Support.
Verify any information not explicitly mentioned in this document as supported by the software against the product help for Oracle CPQ 22D.
Additional Information
For more information on Oracle CPQ, visit the Oracle CPQ documentation site.
Disclaimer
The details in this document are provided for high-level informational purposes only and are not intended to function as a specification or to replace the Online Help. Upgrading to a subsequent release may require the re-deployment of Commerce Processes, Configuration, or global function settings. Modifications to integration XSL files or APIs may also be required.