
- Revision History
- Overview
- Feature Summary
- Field Service
-
- Administration
- APIs
- Core Application
-
- Define Position in Route for Repeating, Mass, and Default Shift Activities
- Landing Page Improvements
- Modern Redwood Style for Core Application
- Omit Move Reasons for Specified User Types
- Show Notification when Assigning a Large Number of Activities
- User Properties Available within Forms
- View Online or Offline Status for Users on Manage Page
- Allow Offline Synchronization and Update Activities Overnight
-
- Collaboration
- Integration
- Android and iOS Applications
- Reporting
- IMPORTANT Actions and Considerations
This document will continue to evolve as existing sections change and new information is added. All updates appear in the following table:
| Date | Product | Feature | Notes |
|---|---|---|---|
| 27 MAY 2022 | Integration | Enable Service Logistics From Oracle Field Service |
Updated document. Revised feature information. |
| 22 APR 2022 | Created initial document. |
This guide outlines the information you need to know about new and improved functionality in Oracle Field Service Update 22B. Each section includes a brief description of the feature, the steps you need to take to enable or begin using the feature, any tips or considerations that you should keep in mind, and the resources available to help you. For a listing of browsers supported by Oracle Field Service, log in to our support site and access Answer ID 8415.
Oracle Field Service Best Practices Guide: Please be sure to download our Oracle Field Service Best Practices Guide found on the Oracle Service Cloud Support Portal Answer ID 8215 (requires a login). This book contains many helpful hints and suggestions to help you improve and get the full benefit from your Oracle Field Service subscription.
 HAVE AN IDEA?
We’re here and we’re listening. If you have a suggestion on how to make our cloud services even better then go ahead and tell us. There are several ways to submit your ideas, for example, through the Ideas Lab on Oracle Customer Connect. Wherever you see this icon after the feature name it means we delivered one of your ideas.
GIVE US FEEDBACK
We welcome your comments and suggestions to improve the content. Please send us your feedback at oracle_fusion_applications_help_ww_grp@oracle.com.
DISCLAIMER
The information contained in this document may include statements about Oracle’s product development plans. Many factors can materially affect Oracle’s product development plans and the nature and timing of future product releases. Accordingly, this Information is provided to you solely for information only, is not a commitment to deliver any material, code, or functionality, and should not be relied upon in making purchasing decisions. The development, release, and timing of any features or functionality described remains at the sole discretion of Oracle.
This information may not be incorporated into any contractual agreement with Oracle or its subsidiaries or affiliates. Oracle specifically disclaims any liability with respect to this information. Refer to the Legal Notices and Terms of Use for further information.
Column Definitions:
Report = New or modified, Oracle-delivered, ready to run reports.
UI or Process-Based: Small Scale = These UI or process-based features are typically comprised of minor field, validation, or program changes. Therefore, the potential impact to users is minimal.
UI or Process-Based: Larger Scale* = These UI or process-based features have more complex designs. Therefore, the potential impact to users is higher.
Features Delivered Disabled = Action is needed BEFORE these features can be used by END USERS. These features are delivered disabled and you choose if and when to enable them. For example, a) new or expanded BI subject areas need to first be incorporated into reports, b) Integration is required to utilize new web services, or c) features must be assigned to user roles before they can be accessed.
Improvements for Login Policies: Redwood Theme, Security, SSO Configuration
This 22B feature provides a set of significant improvements for the visualization and configuration of Login policies. These include:
- The Login Policies configuration screen uses the Redwood design style for visual conformity with other screens.
- Default values and extra validation rules improve the configuration of security parameters.
- A new approach that allows the specification of exact URLs for redirects to identity providers extends the configuration of SSO authentication.
Redwood look and feel
The Login policies and Add/modify configuration screens now apply the Redwood approach, which aligns their look and feel with other applications within the Fusion applications.
The Login policies screen now displays a cards view layout, while the Add/Modify policy screen is displayed as a form. Both screens are optimized for mobile viewing and touch screen interactions.
This image shows the Login Policies page with the cards view layout:

Login Policies Page
This image shows the Add Policy page, which is displayed as a form:

Add Policy Page
Default settings for security parameters
When adding a new policy, the application applies the following default settings for security parameters:
- Max login attempts - 5
- Login block time - 5
- Max sessions - 3 (This value is calculated based on the maximum number of monitors that can be physically used by dispatchers.)
- Relogin timeout - 480 (This value equals the duration of a standard working day.)
- User inactivity timeout - 240 (This value equals half of a standard 8-hour-workday.)
Additionally, new validation rules have been introduced to prevent users from leaving important security parameters empty. When adding new login policies or modifying the existing ones, the application prompts users to populate empty security parameters, and it prevents them from saving the configuration if the necessary security parameter fields are empty.
Also, the User activity relogin time setting has been renamed as User inactivity timeout, which shows the most commonly used name of this parameter.
New capabilities for configuration of SSO policies
When configuring SAML or OpenID login policies, users are now required to select a URL of their environment that Oracle Field Service will use for redirects to their identity provider. With this change, the application ensures that the correct URL is always used for redirects, regardless of the environment address chosen by a user when starting authentication. In other words, the application tries to handle a full set of requests from all available domain addresses of the environment, doing everything possible for a successful SSO authentication.
Domains for production environments
Each production environment might be supplied with several URLs depending on the provided alternate name and domain zones. These domains are always constructed from two parts:
- either instance name (mentioned as the instance_name parameter in the example below) or an alternate name
- domain zones available for an environment
The standard set of addresses for any environment is described below:
- https://{instance_name}.fs.ocs.oraclecloud.com
- https://{alternate_name}.fs.ocs.oraclecloud.com
For legacy instances created before June 2021, domains are also registered within the etadirect.com zone.
- https://{instance_name}.etadirect.com
- https://{alternate_name}.etadirect.com
NOTE: Check the instance provisioning date in the Cloud portal to find out what domain zones can be used to access the instance.
Domains for non-production test environments
The rules for provisioning end points for test environments are almost the same as for production instances.
The only difference is that for test environments, the application automatically adds .test suffix right after the name. This logic is applied to easily distinguish production and test environments. The example of an end point for a test environment is https://{instance_name}.test.fs.ocs.oraclecloud.com.
How it works for authentication (example)
Assume that your identity provider is configured to accept requests from the acme.fs.ocs.oraclecloud.com address to perform SAML authentication. Also assume that there is a user that uses ofsc-1e800d.fs.ocs.oraclecloud.com, which is another valid address of your instance.
When this user tries to sign in to the instance, the application will replace ofsc-1e800d.fs.ocs.oraclecloud.com with acme.fs.ocs.oraclecloud.com in the request to the Identity provider, which should let this user authenticate to the environment.
How it works for configuration
Configure a SAML policy
- Create a new SAML login policy and click Download in the OFS metadata field. The application shows the screen that allows you to choose the domain for your instance that should be used for authentication.
- Click Download again and the OFS metadata file for the chosen domain is saved in your folder for downloads. The address you have selected is displayed under the OFS domain field. This image shows the Select domain and download metadata dialog box:

Select Domain and Download Metadata Dialog Box
The application also allows you to select another URL for configured policies. Here the application shows a warning message that changing a domain might prevent logging in for users of this login policy. This image shows the warning message:

Warning Message
Also remember that the selected domain must be registered in your IdP in order to establish authentication to Oracle Field Service. Otherwise, SAML authentication won't work.
Configuring OpenID policy
Create a new OpenID login policy and click the Select linkback URL button. Then the application works similar to the procedure described earlier. The screen to select or change the linkback URL appears, and the selected address is shown under the OFS Linkback field.
This image shows the Select linkback URL dialog box:

Select Linkback URL Dialog Box
This image shows the warning that is displayed while changing the linkback URL:

Warning Message on Change Linkback URL Dialog Box
Remember to register this URL in your Identity provider to let authentication requests come through.
This feature includes multiple benefits. The Redwood design style provides a consistent user experience across the product. New validation rules help you improve the security settings. This feature also streamlines the integration with identity providers if you want to use SSO authentication.
Steps to Enable
You don't need to do anything to enable this feature.
Key Resources
Update Start Time and End Time of Technician's Arrival Interval
Starting with Update 22B, you can update the values of the activity fields 'Time Delivered Start' and 'Time Delivered End' via the Core REST API, using the activity attributes timeDeliveredStart and timeDeliveredEnd respectively.
These activity attributes contain the technician's arrival interval as it was communicated to the customer.
The routing optimization engine uses these values to reduce changes to arrival time, so it is important to keep them actual.
Previously, those attributes could only be set by using Message Scenarios, and the Core API only provided read-only access to that information.
These Core REST API functions have been enhanced to allow the modifications to the 'Time Delivered' values:
- Create an activity (POST /rest/ofscCore/v1/activities)
- Update an activity (PATCH /rest/ofscCore/v1/activities/{activityId})
- Bulk update activities (POST /rest/ofscCore/v1/activities/custom-actions/bulkUpdate)
The feature doesn't require any additional configuration; any external system that has access to create / update activities via the OFS Core RESTAPI will have the ability to set or modify the 'Time Delivered' values.
This feature improves customer satisfaction as it reduces the chances of any changes to the arrival time of the technician, which was communicated to the customer. The routing optimization engine tries to keep the commitments, including the time communicated to the customer, which ensures that changes to the arrival time of the technician are less likely.
Steps to Enable
Review the REST service definition in the REST API guides, available from the Oracle Help Center > your apps service area of interest > REST API. If you're new to Oracle's REST services you may want to begin with the Quick Start section.
Key Resources
Define Position in Route for Repeating, Mass, and Default Shift Activities
In the earlier Oracle Field Service versions, repeating, mass, and shift-default activities were only able to be ordered based on the selected Time Slot/Service Window through the Add Activity and Edit Activity screens.
With Update 22B, now those types of activities have the option of being ordered based on the user-selected value in the Position in Route field on the Add Activity and Edit Activity screens.
This feature is automatically available for all customers. During the upgrade to Oracle Field Service 22B, all existing repeating, mass, and shift-default activities with a not empty Time Slot/Service Window get automatically updated to be compatible with this new logic.
HOW THIS FEATURE WORKS?
If the Position in Route field is either absent or has Read/Only access on the Add Activity and Edit Activity screens, then the repeating, mass, and shift default activity is ordered based on the selected Time Slot or Service Window. (This is the same behavior as in previous versions.)
If the Position in Route field is present on the Add Activity and Edit Activity screens with Read/Write access, then the activity is ordered based on the selected option for the Position in Route field.
This image shows the Position in Route field for a repeating activity:

Position in Route Field For a Repeating Activity
This feature eliminates the need for Dispatchers and Schedulers to update individual mass, repeating, and default shift activities manually as ordered.
Steps to Enable
You don't need to do anything to enable this feature.
Key Resources
Starting with Update 22B, the My Route page supports the Redwood style and contains these usability improvements:
- Idle time is displayed as a separate tile.
- The Call icon displays the phone number.
- The Navigate icon displays the activity address. This image shows the Navigate icon:

Navigate Icon
- The Calendar is unified with other pages of Oracle Field Service. As in earlier versions, the calendar highlights On-call shifts with a corresponding icon and days with assigned activities with a dot.
- The screen supports the Number of future days to view in My Route and Activity List screens option that is configured on the Configuration >> Display page. Dates later then configured are not available for selection in the Calendar.
- The Deactivate Route tile shows the end of shift details. This image shows the Deactivate Route tile:

Deactivate Route Tile
This feature helps users have a seamless user experience across Oracle Fusion products.
Steps to Enable
You don't need to do anything to enable this feature.
Key Resources
Modern Redwood Style for Core Application
With Update 22B, the updated Redwood theme provides Oracle Field Service with a refreshing color palette and a distinct and modern look and feel that is aligned with other Oracle CX products. For existing customers, Oracle Field Service is visualized as a part of a holistic cloud suite representing a unified visual, user experience, and navigation patterns.
OVERVIEW
Redwood is an Oracle initiative designed to ensure that all Oracle applications have a consistent user experience. It is designed with the users in mind, making it easier for them to navigate different applications and screens. Oracle Field Service strategy is to continue making usability enhancements based on Redwood guidelines. Update 22B includes multiple enhancements for the common elements such as headers, forms and its layouts, dialog boxes, buttons, and notifications.
WHAT'S NEW
Default Redwood theme updates
- The Header color contains a dark global header and white page header by default. The stripe color has the same color as all other CX products.
- The Background color for full and fixed-width layouts has a textured background.
- The Submit button has a black color.
Custom theme updates
After the upgrade, any existing custom themes will be updated according to the configured colors:
- The Header color applies to the global header and stripe.
- The Background color applies to screens with full and fixed width layouts, instead of the default textured background.
- The Submit button color applies to all the call to action buttons.
This image shows the Activity List page in a custom theme:

Activity List Page
HEADER REDESIGN
- The global header is available on all the screens through the desktop and mobile devices.
- The messages for Offline and Offline. Sync required are moved to the global header.
- The layout of the page header is updated and contains:
- A Back button that is always at the top (except for mobile devices), showing the name of the previously visited screen.
- The title of the screen contains the name of the screen and description for the selected object on the screen (for example, Resource/Bucket).
- The set of toolbar items depend on each individual flow on the screen.
- The date picker is unified throughout the screens, even for My Route and Activity List.
- While scrolling, the the global header with page header is fixed for edge-to-edge screens; for fixed-width screens, only the global header remains on the screen.
EXAMPLE OF HEADERS
Desktop view with edge-to-edge layout:

Desktop View With Edge-to-Edge Layout
Desktop view with fixed-width layout:

Desktop View With Fixed-Width Layout
Mobile view with edge-to-edge layout:

Mobile View With Edge-to-Edge Layout
Mobile view with fixed-width layout:

Mobile View With Fixed-Width Layout
Date Editor Unification
The date editor is unified throughout all screens, even for My Route and Activity List.
This image shows the date editor on the My Route page:

Date Editor on My Route Page
This image shows the date editor on the Manage page:

Date Editor on Manage Page
This image shows the date editor on the Activity List page:

Date Editor on Activity List Page
DIALOG BOX REDESIGN
Here are the changes:
- A stripe has been added to the dialog box.
- The following components were moved to the dialog boxes and have evolved with new aesthetics and functionality:
- Save draft/Your changes were not submitted
- Data synchronization is required panel
- Your session timed out panel
This image shows the stripe on a dialog box:

Stripe on a Dialog Box
This image shows the Save Draft dialog box:

Save Draft Dialog Box
This image shows the Your session has timed out dialog box:

Your Session Has Timed Out Dialog Box
VISUALIZATION CHANGES TO FIELDS WITHIN FORMS AND CONTEXT LAYOUTS
The visualization of fields and properties as they are displayed on forms and context layouts configured on the Visual Form Editor has been changed as follows:
- The label inside position is applied for text inputs and text areas, integers, and combo boxes.
This image shows the label inside position for a text box:

Text Box
This image shows the label inside position for a choice list:

Choice List
This image shows the label inside position to enter integers:

Integer Field
- The label top position is applied for all other components except checkboxes. These are some examples of such fields and properties.
This image shows the label inside position for the Duration field:

Duration Field
This image shows the label inside position for the Signature field:

Signature Field
This image shows the label inside position for the Add Image button:

Add Image Button
- The visualization of mandatory fields has been changed from the asterisk along a field name to a Required text mark below the field.
This image shows a Required field:

Required Field
Here is an example of how a holistic form is now displayed to end users:

Holistic Form Example
FORMS: FIXED-WIDTH LAYOUT AND RESPONSIVENESS
Here are the steps:
- The application applies the fixed width layout to forms and screens based on context layouts configured on the Visual Form Editor. This means that the width of the content part is dynamically calculated based on a maximum number of vertical columns configured for a certain form or screen. Here, the application tries to allocate enough space to display all of the content that potentially can be shown, considering the size of a screen or browser window.
Take a look at the example below:
There is a two-column form, where the visibility of the second column is dependent on the value of the first field on the form. Unless this field is empty, there is free space reserved for the second column. This image shows a form where the first field is not yet filled and there is empty space reserved for the second column:

Fixed-Width Layout For Forms
But when this field is populated, the second column gets displayed and fits within the space. This image shows a form where two columns are displayed based on the value in the first field of the first column:

Form With Two Columns
- For large, multi-column forms, it is now possible to scroll left-right using either a mouse on desktops and/or fingers on touch devices. This will allow you to navigate to the columns that are not actually displayed upfront.
- In the portrait view of mobile devices (599 px width and less), the application rearranges columns vertically one by one. You can scroll up/down to navigate to the sections that are not visible on the screen.
CHANGES FOR CONFIGURATION SCREENS
Here are the steps:
- These screens are redesigned to apply the Redwood concept:
- Properties, Add/Modify property
- Time slots, Add/Modify time slot
- Resource types, Add/Modify resource type
- Themes, Add/Modify themes
- The visual style of the Visual Form Editor is also changed to inherit the look and feel of the Redwood approach.
The Redwood design style ensures that Oracle Field Service has a consistent user experience with Oracle applications and makes it easier for users to navigate different applications and their pages.
Steps to Enable
You don't need to do anything to enable this feature.
Key Resources
Omit Move Reasons for Specified User Types
Starting with Update 22B, Oracle Field Service provides the ability to allow certain user types to avoid having to select Move Reasons when moving activities manually. You can select these user types in the Excluded User Types field in the Assignment Assistant section on the Business Rules page. Selected users can neither see nor select move reasons when moving activities with the Assignment Assistant.
This image shows the Assignment Assistant section on the Business Rules page:

Business Rules Page
This feature reduces the time taken for certain users to move activities and eliminates the need to train them about Move Reasons.
Steps to Enable
- Click Configuration --> Business Rules.
- Scroll down to Assignment Assistant and click the pencil icon in the Move Reasons are not applicable for selected User Types field.
- Select the user types for which the manual move reasons are not applicable and click Add.
- Click OK on the Select User Types dialog box.
- Click Save on the Business Rules page.
Key Resources
Show Notification when Assigning a Large Number of Activities
Starting with Update 22B, a warning is displayed when activities with a total duration of more than 12 hours are assigned to a single field resource's route. Travel time of activities is not considered.
The warning appears when the activities are moved using any of these methods:
- Using drag-and-drop from the List View
- Using the lasso tool on the Dispatch Map
No warning appears when you assign activities to a bucket or a technician's non-scheduled pool. This image shows the confirmation dialog box:

Warning Message
If you try to move more than 200 activities, then only the duration of the first 200 is displayed in the warning message.
This feature helps Dispatchers and Schedulers avoid assigning a large number of activities to a resource accidentally.
Steps to Enable
You don't need to do anything to enable this feature.
Key Resources
User Properties Available within Forms
Starting with Update 22B, it is now possible to use the 'user' entity custom properties within forms.
More specifically:
- User properties can be configured within forms as read-only, read/write, or mandatory, and they can also be used within visibility conditions, formulas, default values, and validation rules.
- End users can view and modify the values of user properties within forms.
- Values of user properties are visible when viewing the submitted forms on the 'Forms History' page.
- Values of user properties become available through the 'formSubmitted' events of the Events API.
With this change, you can use the data associated with actual individuals within your business flows. These two use cases are examples of how it can be implemented:
- Assume a scenario where technicians must provide some kind of a certificate to enter an activity site. For example, proof of COVID vaccination or certification to work with high-voltage equipment. Users would have to attach these certificates to a certain form as the first step of a workflow, before they are allowed to continue work on the activity.
- Another use case might require sending a 'confirmation email' to users when they submit a certain form. For example:
- During the course of performing an activity, a field resource sells some additional services.
- The field resource collects all the information using an 'Upsell' form and submits it, confirming the deal. The form would contain a 'user email' custom property.
- Your backend application retrieves the information from the 'formSubmitted' event.
- The backend application then sends the confirmation email to this user, reaffirming that they have been granted some bonus for this deal.
This feature helps users use the data associated with actual individuals within their business flows. For example, technicians can attach a COVID certificate as part of the workflow.
Steps to Enable
You don't need to do anything to enable this feature.
Key Resources
View Online or Offline Status for Users on Manage Page
In Collaboration, there is an indicator to show whether a user is either offline or online and able to respond to your messages. Starting with Update 22B, the same status indicator is available within the Manage screen, right next to the user avatars. This provides an intuitive and easy way to check the availability of the user to chat with other group members. Managers and/or dispatchers can also take appropriate actions based on this indicator, one example being the need for immediate activity assignment where the dispatcher/manager can make a decision whether to initiate a Collaboration chat or not by considering the availability of the team members. This image shows the Manage page some resource in online and some in offline status:

Manage Page Showing Resources in Online/Offline Status
- A green solid circle appears next to the avatar on the Manage screen if the user is Online.
- A yellow solid circle appears next to the avatar on the Manage screen if the user is Offline.
The status icon is visible only to users that have the Collaboration permission enabled for their user type.
This feature provides an intuitive and easy way to check the availability of the user to chat with other group members.
Steps to Enable
You don't need to do anything to enable this feature.
Key Resources
Allow Offline Synchronization and Update Activities Overnight
This new feature addresses the case when a technician forgets to synchronize activities before going offline on a Friday. This feature allows you to set Oracle Field Service to process the past day's activities updates after going online on Monday
This feature provides the new Allow offline sync and update activities after overnight within the following amount of hours field that allows the processing of offline Mobility synchronizations (Android, iOS and Web applications) and updates to activities in the past through Mobility and the REST API Update an activity method within the specified number of hours.
HOW TO USE?
After updating to Oracle Field Service 22B, you can navigate to the Business Rules screen and enter the amount of hours you want to set in the Allow offline sync and update activities after overnight within the following amount of hours box. After that amount of time passes, updates are not allowed.
ORACLE FIELD SERVICE CORE APPLICATION
Oracle Field Service Core Application offline data is synchronized within the number of hours specified in the Allow offline sync and update activities after overnight within the following amount of hours box.
You can update past activities if they are within the number of hours specified in the Allow offline sync and update activities after overnight within the following amount of hours box. Activity status change is not allowed.
OUTBOUND MESSAGES
Outbound messages in the past are blocked except for scenarios that use the 'Service request is created' launch condition.
REST API
You can update activities in the past by using REST API Update an activity within the number of hours specified in the Allow offline sync and update activities after overnight within the following amount of hours box.
EVENTS API
Updates to activities in the past can be returned by the Events API.
This feature addresses the case when a technician forgets to synchronize activities before going offline on a Friday. This feature allows you to set Oracle Field Service to process the past day's activities updates after going online on Monday.
Steps to Enable
Follow these steps:
- Click Configuration, Business Rules.
- In the Business Rules page, enter a value in the Allow offline sync and update activities after overnight within the following amount of hours box under Overnight work.
This image shows the Business Rules Page General settings:

Business Rules Page
By default, the field is set to 0 hours, indicating that updates in the past are not allowed. The feature is enabled when you set the number of hours and submit the change. The maximum value for this field is 999 hours (~ 41 days).
The number of hours are counted after the value of the Overnight work field. If the Overnight work field is set to 5 hours and Allow offline sync and update activities after overnight within the following amount of hours field is set to 6 hours then updates in the past are allowed up until 11 hours (5+6) after midnight in the time zone specified in the Overnight work field.
Key Resources
User Interface and User Experience Improvements in Field Collaboration
Starting with Update 22B, the user interface and user experience interactions in field collaboration are enhanced to improve the overall user experience while using the application.
Here are the key improvements:
- When you click the Collaboration icon
 from the header, Collaboration is opened as a single panel by default. It displays the list of your active, helpdesk, and historical chats. This image shows the Collaboration icon in the Dispatch Console header:

Collaboration Window Showing Dispatch Console Window
This image shows the Collaboration window that shows the Chats, Helpdesk, and History tabs on a large screen device:

Collaboration Window on Large Screen Devices
This image shows the Collaboration window on a small screen device:

Collaboration Window on Small Screen Devices
- The start chat icon
 is available on the Collaboration header to start a new conversation with another user.
- When Collaboration is opened, the Collaboration icon on the header is not visible. You can close the window by clicking the close icon in the window header.
- You can expand the Collaboration window by dragging the Collaboration panel and adjusting the size of the Collaboration window so that it fits into two panes that display a list of chats and the details of the selected chat. This image shows an expanded Collaboration window:

Expanded Collaboration Window
NOTE: On devices with displays in the range of 700 px to 1024 px, Collaboration always appears as two panes across the entire screen. And in devices that are smaller than 700 px, it is shown in a single pane. This image shows the Collaboration window displayed in a single pane:

Collaboration Window Displayed in a Single Pane
- You can now select and copy the Collaboration user name from the Collaboration header. This image shows the user name selected on the Collaboration window:

Collaboration Window Showing User Name
This feature improves the Collaboration user interface based on Redwood style, to give you a better user experience while interacting with the Collaboration module.
Steps to Enable
You don't need to do anything to enable this feature.
Key Resources
Enable Service Logistics From Oracle Field Service
The Oracle Service Logistics Cloud to Oracle Field Service OIC recipe enables you to synchronize field service technicians, their stock locations and corresponding inventory balances from Service Inventory and Logistics Management with Oracle Field Service. You can use this recipe in these ways:
- Synchronize technician inventory and parts catalog data from Oracle Service Logistics Cloud to Oracle Field Service.
- Allow technicians to order parts that are required for an activity from Oracle Service Logistics Cloud.
- Order parts to replenish their trunk stock.
- Transfer a debrief transaction to Service Logistics and manage charges and estimates upon completion of an activity. This can further generate a customer invoice for billing, adjust inventory balances, update a customer's asset configuration, and capture costs of service.
To enable Service Logistics from Field Service, you must configure these profile options in Fusion application:
- INV_DEFAULT_ORG
- RCL_DEF_PARENT_RESOURCE
You can see more details about the recipe here. Starting with Update 22B release, you can now connect Oracle Service Logistics Cloud natively to Oracle Field Service with minimal configuration. The B2B application configuration has been enhanced to incorporate the service logistics-related configurations.
CONNECT TO SERVICE LOGISTICS FROM ORACLE B2B APPLICATION
The Oracle B2B and Service Logistics Integration application type can be used to connect Service Logistics to Oracle Field Service with the Oracle B2B Application.
After providing the B2B Service endpoint details, you can click the Connect with Service Logistics check box to enable the service logistics connectivity.
This image shows the Add Application dialog box: .

Add Application Dialog Box:
Additionally, you need to provide an integration user password. An integration user is a must-have prerequisite setup configuration for accessing B2B and Service Logistics APIs from Oracle Integration (OIC). When you create a new Oracle B2B and Service Logistics Integration application, the integration users SERVICE_APP_ICS and SERVICE_LOG_ID are created within Fusion to access the Oracle B2B Service and Oracle Service Logistics API from Oracle Integration.
INTEGRATION STATUS
Once the configurations are successful, you can click into the card to see the status of the integrations. The status for Oracle Service Logistics has been added on the details page. This image shows the details page:
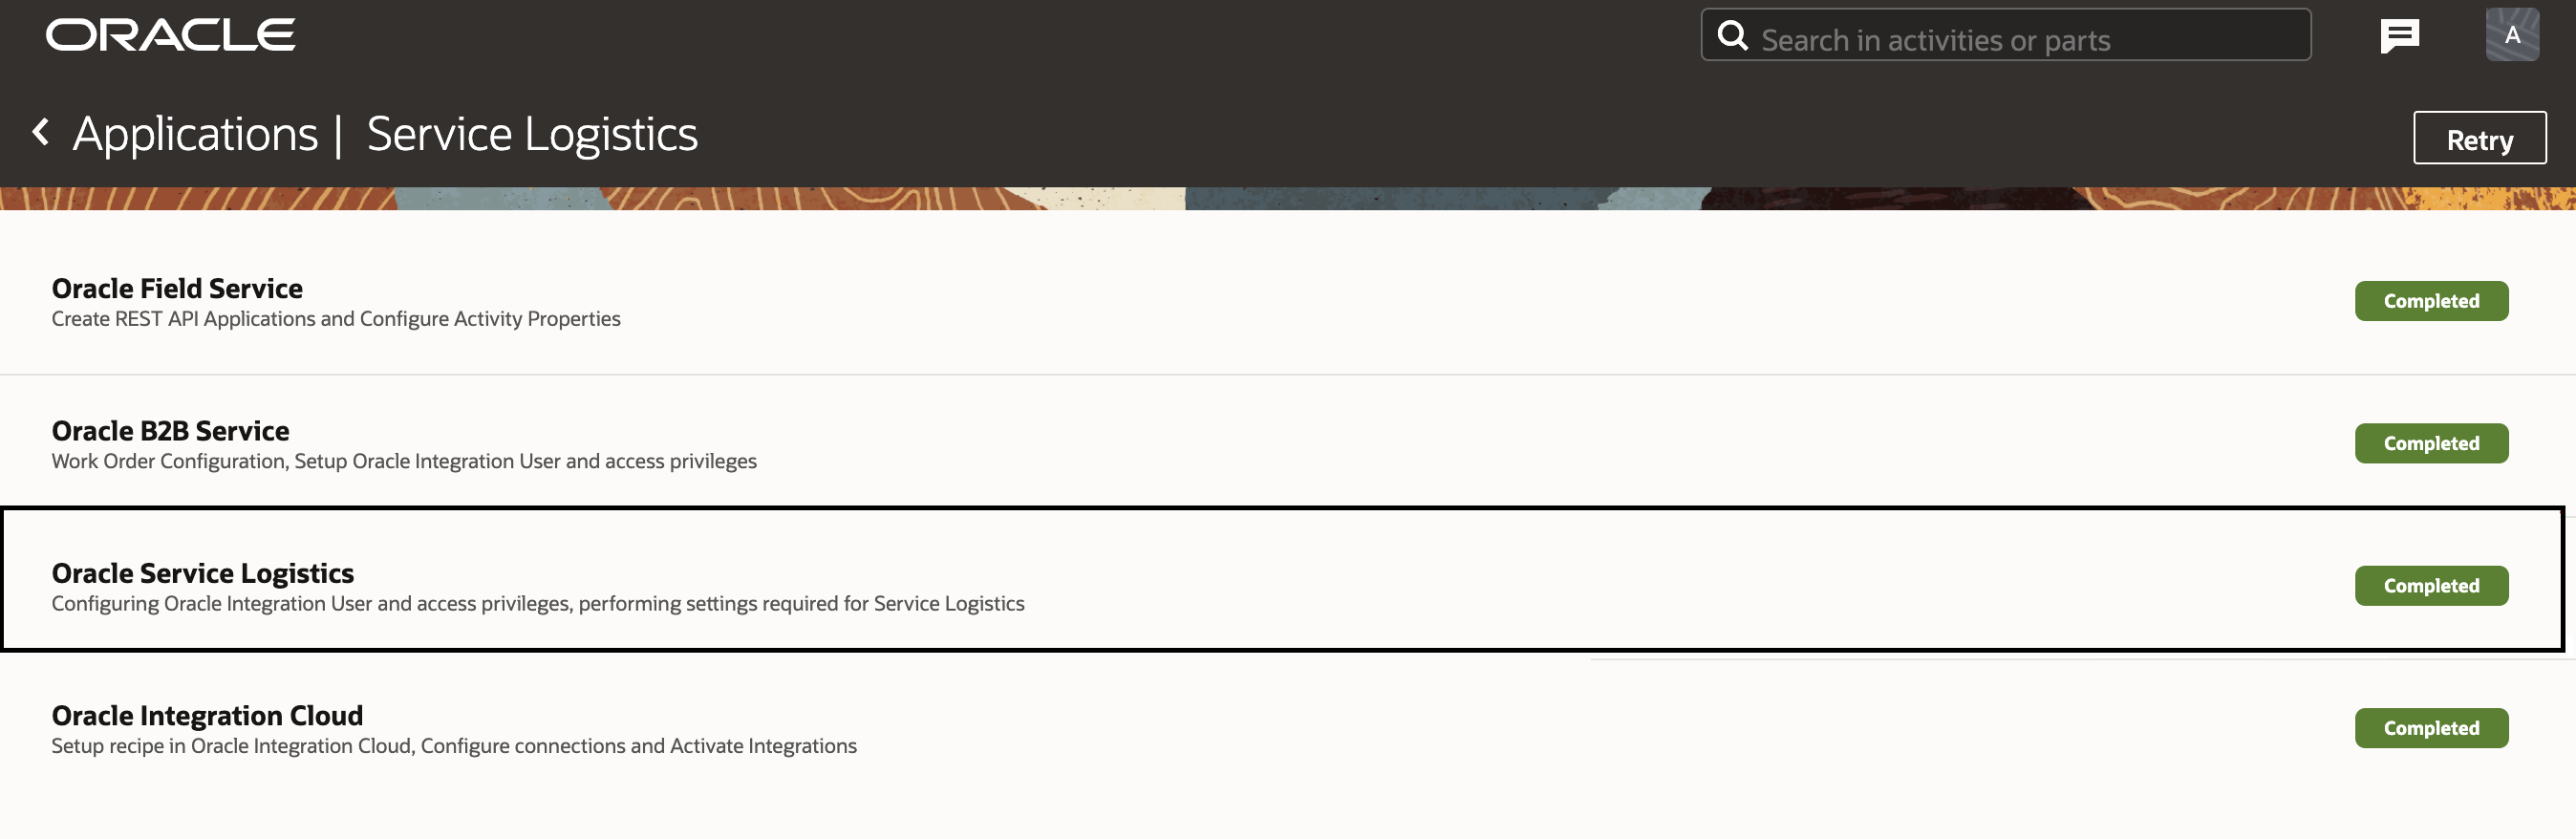
Applications Page Showing Details of Oracle Service Logistics
Also, at that point, the Oracle Service Logistics Cloud to Oracle Field Service Cloud OIC recipe will become active and the data flow between Oracle Field Service and Oracle Service Logistics Cloud will start according to the configurations in Oracle Integration. The application status in Oracle Field Service becomes active, along with date and time of activation.
This image shows the application status:

Application Status
You can now connect Oracle Service Logistics Cloud natively to Oracle Field Service with minimal configuration. The B2B application configuration has been enhanced to incorporate the service logistics-related configurations as well.
Steps to Enable
The Oracle Service Logistics Cloud to Oracle Field Service Cloud OIC recipe enables you to synchronize field service technicians, their stock locations and corresponding inventory balances from Service Inventory and Logistics Management with Oracle Field Service. With this recipe, it is possible to:
- Synchronize technician inventory and parts catalog data from Oracle Service Logistics Cloud to Oracle Field Service.
- Allow technicians to order parts that are required for an activity from Oracle Service Logistics Cloud.
- Order parts to replenish their trunk stock.
- Transfer a debrief transaction to Service Logistics and manage charges and estimates upon completion of an activity. This can further generate a customer invoice for billing, adjust inventory balances, update a customer's asset configuration, and capture costs of service.
Key Resources
User Experience Improvements in Applications Page Based on Redwood Theme
With Oracle Field Service Update 22B, the user interface and user experience style of the Applications page has been improved to conform to the Redwood style.

Applications Page
This feature includes these improvements in the Applications page:
- This feature displays the Application type with the application name on the application card, which lets you to identify the type of the application quickly. As the Daily Extract is a predefined application in the Applications page, it does not have a separate application type description on the card.
- The application cards are updated with current status messages and icons.
IMPROVEMENTS ON THE KNOWLEDGE CARD APPLICATION
After Oracle Knowledge is configured for user types, the Knowledge application card displays the number of users and user types for which the Knowledge context is configured.

Knowledge Card Showing Details
You can select the options menu and choose to Modify or Delete the application card.

Knowledge Card Showing Options Menu
When the Knowledge context is not configured for any user types, the card displays a warning message:

Warning Message
The page style for the REST/SOAP Application details has been improved to conform to the Redwood standard.

REST/SOAP Application Card Details
This feature provides improvements to the Applications page based on redwood style to offer better user experience when interacting with the collaboration module.
Steps to Enable
You don't need to do anything to enable this feature.
Key Resources
Use HCM as a Native Application in Oracle Field Service
Starting with Update 22B, you can add Oracle Human Capital Management Cloud (HCM) as a native application in Oracle Field Service (OFS) and thereby, updating employee details from Oracle HCM Cloud within Oracle Field Service automatically. The application uses Oracle Integration to extract and update the data between the two applications. Once the HCM application is added in Oracle Field Service, the application activates the Oracle HCM - Oracle Field Service recipe within Oracle Integration automatically.
You can configure Oracle HCM Application using Applications on the Configuration page. Follow these steps:
- Navigate to Configuration, Applications.
- In the Applications page, click Add Application on the header. The Add Application dialog box is displayed.
- Select Oracle HCM as the Application Type. This image shows the Application Type drop-down list in the Add Application dialog box.

Add Application Dialog Box With Available Application Types
- Configure the end point details of Oracle HCM to create the new application.
This table lists the fields in the Add Application dialog box and their descriptions:
| Field |
Description |
| Application Name | The name of the application to be displayed on the application page |
| URL | URL of the Oracle HCM endpoints |
| User Name | Oracle HCM user name for accessing HCM Cloud |
| Password | Password of the Oracle HCM user |
- Do one of the following:
- Check the Use B2B Service Application check box if you want to reuse a previously-configured B2B Service application.
This image shows the Add Application dialog box for existing endpoint configuration.

Add Application Dialog Box Allowing Existing Endpoint Configuration
-
If you have a different endpoint configuration for HCM, you can provide the details such as URL, User Name and Password, and add this as a new application.
This image shows the Add Application dialog box allowing new endpoint configuration.

Add Application Dialog Box Allowing New Endpoint Configuration
- Select a value from the Integration Channel drop-down list to specify the OIC channel.
- Check the connectivity using the test connection button and make sure that the end points configured are valid.
If the endpoints are incorrect, the 'Host unreachable'. Please check credentials warning message is displayed.
This image displays the warning message:

Warning Message
If the endpoints are correct then the status appears as 'Pending' and the 'Mapping Parameters are not configured' message is displayed.
This image displays the Pending status and warning message for Oracle HCM:

Pending Status and Warning Message
Once the application is created, you can map Oracle Field Service and Oracle HCM Cloud entities that have similar functional roles. For example, a 'Business unit' in Oracle HCM Cloud can be considered as an 'Organization unit' in Oracle Field Service, as both are designed to manage the resource reporting structure.
ORACLE FIELD SERVICE ORGANIZATION UNIT - HCM BUSINESS UNIT MAPPING
You can select the field service Organization Unit type, based on the organization units that are created in Oracle Field Service. Business Units are values populated from HCM, and you can choose multiple business units from HCM. Based on the selection, Organization Units with same name are created in Oracle Field Service. Also employees mapped under these business units in HCM is updated under the corresponding Organization Units in Oracle Field Service.
This image displays the Applications page showing OFS Organization Unit - HCM Business Unit Mapping:

Applications Page Showing OFS Organization Unit - HCM Business Unit Mapping
RESOURCE - JOB MAPPING
The Resource Job Mapping table enables you to associates values of the Oracle HCM job codes with Oracle Field Service resource types and you types.
This image displays the Resource - Job Mapping on the Applications page:

Applications Page Showing Resource - Job Mapping
WORK - SCHEDULES MAPPING
This configuration enables you to map HCM work schedules with Oracle Field Service work schedules. In cases where there's a work schedule present in HCM that's not mapped to an Oracle Field Service work schedule, the Default Work Schedule is used as the work schedule for the employee.
This image displays the Work Schedules Mapping on the Applications page:

Applications Page Showing Work Schedules Mapping
Once all of the required mappings are configured, you can submit the configuration. The system starts setting up all of the initial configurations in Oracle Field Service, Oracle HCM and Oracle Integration automatically and activates the 'Oracle HCM - Oracle Field Service' recipe. At that point, the data flow between the two applications becomes active. You can also view the status of each stage of the integration.
- This image displays the in progress status of a mapping on the Applications page:

In Progress Status
- This image displays the pending status of a mapping on the Applications page:

Completed Status
You may receive messages about potential failures.
This image displays the potential failure message:

Potential Failure Message
Once all of the steps are completed, the application status changes to Active with the date and time of activation.
This image displays Active Status for an application:

Active Status
This feature offers these key capabilities without any other setup configuration:
- Bulk-extract the field technician employee details from Oracle HCM Cloud to Oracle Field Service.
- Extract employee work schedule details from Oracle HCM Cloud and update them in Oracle Field Service.
- Create a resource in Oracle Field Service when a new employee is created within Oracle HCM Cloud.
- Update a resource in Oracle Field Service when existing employee details are updated within Oracle HCM Cloud.
- Inactivate a resource in Oracle Field Service when an employee is deleted within Oracle HCM Cloud.
- Retrieve employee login details from Oracle HCM Cloud and update the details in Oracle Field Service. The integration returns only the login name; it does not return the password associated with the login name.
Steps to Enable
You can configure Oracle HCM Application using Applications on the Configuration page.
Key Resources
Prompt Mobile Application Users to Provide Rating and Feedback
Starting with Update 22B, Oracle Field Service seeks users' feedback on the installed application. The feedback helps in knowing their perceptions and determining how we can further improve the mobile application. This feature provides these benefits:
- Helps Oracle Field Service to gather information about what a user truly appreciates about our mobile application
- Informs Oracle Field Service about the user's pain points that Oracle Field Service may address in the future.
The feature manifests as a banner displayed on either the My Route screen or the Activity List screen. The banner appears only after using a particular version of the mobile application for seven days. The banner is either displayed at the end of the day when users are deactivating their route or displayed when the system observes that a user has some idle time. If a user doesn't interact with the banner, it automatically disappears at the end of the day (when there is a date change for the user). The banner reappears after seven days and this can happen a maximum of ten times. Once the user has interacted with the banner, it does not appear again.
On the banner, the users can respond whether they like (by clicking the thumbs up button ) or do not like (by clicking on the thumbs down button ) the mobile application.
This image displays the banner on Route showing thumbs up and thumbs down button in mobile devices:

This image displays the banner on Activity List showing thumbs up and thumbs down button in mobile devices:

This image displays the banner on Route showing thumbs up and thumbs down button in large screen devices:

This image displays the banner on Activity List showing thumbs up and thumbs down button in large screen devices:

Notification messages are displayed:
- When using Android or iOS applications, if a user 'likes' our app, they see a prompt message to rate our app in the relevant app stores.
- If the users like the app and access Oracle Field Service through a browser, they see a prompt message to provide us with additional feedback.
- If the users do not like the app, they see a prompt message to provide us feedback regarding what we can improve within it.
This feature includes these benefits:
- Helps us to gather information about what a user truly appreciates about our mobile application
- Informs us about the user's pain points that we need to address in the future.
The user experience gaps gathered as a result from this feature will be analyzed so that we can provide our end users with the best possible user experience.
Steps to Enable
Within Oracle Field Service, you can enable this feature by these steps:
- Navigate to Configuration, User Types.
- In the User Types page, check the Allow user feedback box.
Only the users for whom the feature is enabled will be able to see the feedback banner. For the rest of the users, there will be no change to the appearance of the application.
Key Resources
Prompt Mobile Application Users to Upgrade a Previous Version
A number of Oracle Field Service mobile application (iOS, Android) users may be using older versions, which are generally less stable and contain fewer features. This feature prompts such users to update to the latest version of the installed application.
Oracle Field Service identifies the version of the installed application when the user has successfully logged in. Then it compares the user's version to the latest version available in the respective app stores. If the user's version of the mobile application is one of the six most recent major versions, the user does not see any change in behavior and can continue to use the application. However, for versions older than that, the application displays a message that blocks the use of the application unless and until they update it to the latest version.
ANDROID/iOS APP ON MOBILE DEVICES
Here are images from Android/ iOS app on mobile devices:

Android/ iOS App on Mobile Devices:
ANDROID/iOS APP ON TABLETS AND IPADS
Here are images from Android/ iOS app on tablets and iPADs:

Android/ iOS app on tablets and iPADs
This feature allows you to best utilize the latest improvements made to the mobile application by upgrading to the latest version.
Steps to Enable
You don't need to do anything to enable this feature.
Key Resources
Standard Reports for Tracking Native Application Versions
Oracle Field Service mobile application has provided many exciting features and performance enhancements to improve the user experience with different updates of the application. It is important that you update the version of the mobile application, as it is relevant and useful. Starting with Update 22B, you can identify users who use older versions of the mobile application through the new standard reports that you can add to a dashboard. With these standard reports, you have better visibility about the devices and versions of the Oracle Field Service mobile applications used by your mobile workers:
- Mobile App Usage by Versions report
- Usage of the Mobile app old versions report
MOBILE APP USAGE BY VERSIONS REPORT
A new report, Mobile App Usage by Versions is available on the Dashboards page. The chart shows the percentage of users using each version of the Android or iOS apps based on logins for the last seven days.
This image shows the Mobile App Usage by Versions chart;:

Dashboards Page Showing Mobile App Usage by Versions Chart
The chart shows the percentage of users that logged into Oracle Field Service through browsers within the last seven days. The application treats the same user that logged in through different applications as different users and track them separately within the chart. You can filter the chart using the resource or date filters available on the View filters section. If you want to keep the chart fixed for a specific resource type, you can configure that from the Settings page of the chart.
This image shows the Mobile App Usage by Versions chart options:

Mobile App Usage by Versions Chart Options
For a selected bucket, the chart displays information for all direct and indirect children of the bucket, If single resources are selected, the chart shows that user’s information.The chart shows the past seven days data from the selected date.
Navigate to Configuration, Dashboards, Available Reports. Administrators can control the availability of this chart for a user type by enabling the chart from the user type's available reports list.
This image shows the Available Reports pane:

Available Reports Pane
USAGE OF THE MOBILE APP OLDER VERSIONS REPORT
A new report Usage of the Mobile app old versions is available through the Dashboards page. This report helps you to identify those users that are still using older versions of the Android or iOS mobile applications.
This image shows the Usage of the Mobile app old versions report on the Dashboards page:

Dashboards Page Showing Usage of the Mobile App Old Versions Report
This image shows the Usage of the Mobile App Old Versions report

Usage of the Mobile App Old Versions Report
This report provides information about who is using older versions of the Android or iOS applications with their last login times. The data is based on user logins within the last seven days. The application treats the same user that logged in through different applications as different users and tracks them separately within the report. You can filter the chart using the resource or date filters. For a selected bucket, the report displays information for all direct and indirect children of the bucket. You can also print, print all, and export the report.
Navigate to Configuration, Dashboards, Available Reports to open this report. Administrators can control the availability of this report for a user type by configuring it for the appropriate user types.
These new reports enable you to identify the overall mobile application usage and users that are still on the older versions. It is always recommended that you download the latest versions of the Oracle Field Service Mobile apps, so that they can enjoy the design improvements and new features, along with a better user experience.
The benefits of this feature include improved user experience with different updates of the mobile application and better visibility about the devices and versions of the mobile application used by your mobile workers:
Steps to Enable
You don't need to do anything to enable this feature.
Key Resources
IMPORTANT Actions and Considerations
Removal of Daily Extract: Property Files Export
To simplify and decrease the daily extract creation time, the Daily Extract file properties extract is announced as deprecated. This deprecation announcement was already made in the Oracle Field Service 22A Release Notes, and the plan is to remove the file properties extract in the Oracle Field Service Update 22D.
Starting with Update 22B, the Daily Extract continues to support the file properties extract, but a new notice about the deprecation is visible in cases where the configured Daily Extracts contains the Property File Fields extract.
This image displays the Property File Fields extract deprecation notice:

Property File Fields Extract Deprecation Notice
If you are using this extract file, we recommend that you switch your integrations to use REST API Get a file property method to obtain the files.
Steps to Enable
You don't need to do anything to enable this feature.