
- Revision History
- Overview
- Feature Summary
- Transportation and Global Trade Management
-
- Transportation and Global Trade Platform
- Oracle Transportation Management (Base)
- Order Management
-
- Order Release Constraints Ocean Sail Dates and Voyage ID
- Pack with Group
- Ready To Ship Action On Large A Number Of Order Base Lines
- Multi-Select View Related Order Releases Action on Buy Shipments
- Include TiHi THUs on Packaged Item in THU Profile
- Property to Turn Off Logic Setting Order Release Item Out of Date Status
- Property to Turn Off Logic Setting Order Release Known Shipper Value from Order Base
- Add Ship Unit Content to Order Movement XML
- Equipment Reference Units
- Rating And Rate Service
- Booking And Tendering
-
- Spot Tender Planner View Screen
- Saved Query for Service Providers with Spot Bid Tenders
- Spot Tender Bid Response Proposed Pickup Time
- Require New Spot Bid to Be Greater Than the Existing Bid
- Spot Tender Decline Option for Service Providers
- Spot Bid and Broadcast Tender - Turnoff Withdraw Tender Emails for No Bid
- Selected Shipment Remark Qualifier for Tender Communication
- Logistics Machine Learning
- Transportation Operational Planning
-
- Remnant Order Routing
- Define Location Activity Time by Service Provider(s) and Equipment Group(s)
- Maximum Distance Between Stops Enhancement
- Cluster Merge Enhancement
- Load Configuration 3D Pattern - Active Inactive Check Box
- User Defined Patterns - Consider Full Equipment User Defined Pattern First
- Additional Constraints Considered in Edit Load Config
-
- Freight Payment, Billing, and Claims
- Oracle Fleet Management
- Logistics Digital Assistant
- Global Trade Management (Base)
- Trade Agreements
-
- New Fields Available on Item Qualification
- Rules of Origin Formulae Added to Trade Agreement
- Item Value Lookup During Trade Agreement Qualification
- Origin Lookup During Trade Agreement Qualification
- Qualify for Trade Agreement Action on Item
- Qualify for Trade Agreement Action on Item Origin
- Qualify for Trade Agreement Action on Trade Item Structure
- Qualify for Trade Agreement in Process Management
- Enhancements to View Qualification Report
- Support for Wholly Obtained Items in Qualification Process
- Support for Additional Rules of Origin Rule Types
-
- Trade Compliance
This document will continue to evolve as existing sections change and new information is added. All updates appear in the following table:
| Date | Product | Feature | Notes |
|---|---|---|---|
| 09 JUN 2023 | Transportation and Global Trade Platform | Optional Feature - Apply Sender Policy Framework (SPF) Checks to Outbound Email |
Removed feature. |
| 25 MAR 2022 | Transportation and Global Trade | Optional Feature - Use Download Link for REST Document Content | Updated document. Revised opt in information. |
| 25 MAR 2022 | Transportation and Global Trade | Optional Feature - UI Refresh - Landing Page, Springboard, Application Shell and Navigator |
Updated document. Revised opt in information. |
| 04 FEB 2022 | Transportation and Global Trade Platform | Optional Feature - Limit Simultaneous SQL Execution | Updated document. Delivered feature in update 21C. |
| 04 FEB 2022 | Transportation and Global Trade Platform | Optional Feature - Limit CSV Export Memory | Updated document. Delivered feature in update 21C. |
| 17 DEC 2021 | Transportation and Global Trade | Optional Feature - UI Refresh - Landing Page, Springboard, Application Shell and Navigator |
Updated document. Revised opt in information. |
| 07 OCT 2021 | Oracle Transportation Management Base | Optional Feature - UI Refresh - Landing Page, Springboard, Application Shell and Navigator | Updated document. Revised feature information. |
| 09 JUL 2021 | Oracle Transportation Management Base | Equipment Reference Unit Rounding Threshold and Rounding Grouping Level | Updated document. Revised feature information. |
| 18 JUN 2021 | Created initial document. |
This guide outlines the information you need to know about new or improved functionality in Oracle Transportation & Global Trade Management Cloud Update 21C. Each section includes a brief description of the feature, the steps you need to take to enable or begin using the feature, any tips or considerations that you should keep in mind, and the resources available to help you.
GIVE US FEEDBACK
We welcome your comments and suggestions to improve the content. Please send us your feedback to otm-doc_us@oracle.com. Please indicate you are inquiring or providing feedback regarding the Oracle Transportation & Global Trade Management What’s New in Update 21C.
Column Definitions:
Report = New or modified, Oracle-delivered, ready to run reports.
UI or Process-Based: Small Scale = These UI or process-based features are typically comprised of minor field, validation, or program changes. Therefore, the potential impact to users is minimal.
UI or Process-Based: Larger Scale* = These UI or process-based features have more complex designs. Therefore, the potential impact to users is higher.
Features Delivered Disabled = Action is needed BEFORE these features can be used by END USERS. These features are delivered disabled and you choose if and when to enable them. For example, a) new or expanded BI subject areas need to first be incorporated into reports, b) Integration is required to utilize new web services, or c) features must be assigned to user roles before they can be accessed.
Transportation and Global Trade Management
Transportation and Global Trade Platform
Optional Feature - UI Refresh - Landing Page, Springboard, Application Shell and Navigator
This feature provides you with a set of UI improvements that are focused on modernizing the look and feel of the UI and improving your navigation through the application. Changes include a new default theme, and improvements to the Landing Page, Springboard, Application Shell, Navigator and Search. This feature is delivered as an optional feature (JET APPLICATION SHELL), with the Opt In value set to TRUE/ON to encourage you to become familiar with the new user experience.
SPRINGBOARD

Springboard
The most immediate change that you will notice is that the default theme for the Springboard has been set to the more modern and stylish Redwood theme, this change provides a vast improvement over the light blue cloud theme provided in early versions.
The Springboard navigation has been improved and now follows a menu based navigation approach, which is similar to approach provided in the Navigator.
In the example below - you will notice when you click on a Springboard Folder (in this case the Financial folder), you now go directly to a menu view where all the folders and links are provided directly vs the folder view provided previously.

New Springboard Navigation
Selecting the Financials folder on the Springboard brings up the following menu options under the Financials folder.

New Springboard Navigation - Financials Menu
Within the menu, folders that contain additional levels are identified with an arrow, clicking on the arrow expands the menu. Clicking on an opened arrow will collapse the expanded menu.

New Springboard Navigation - Financials Menu - Expand Sections
To close the expanded Springboard menu option, you click on the opposing arrows in the upper right corner.

Close Expanded Springboard Menu Option
NAVIGATOR
The Navigator has also been improved in a number of ways.
Expanding and collapsing your menu options is now handled with the arrow/triangle icon.

Navigator Default Settings
In the example below, the Purchase Order section under Order Management has been expanded.

Navigator Expand Menu Option
The new Navigator also provides options for you to Expand All options, Collapse All options or Reset the Navigator view back to the default layout.
In the example below, the Expand All view is shown.

Expand All Menu Options
In the example below, the Collapse All option is shown.

Collapse All Menu Options
In the example below, the Reset option is shown.

Reset the Menu
SEARCH - RECENTLY VIEWED
Search has also been improved and now captures, for your current user session, all of your Recently Viewed Springboard/menu selections. The Recently Viewed list will capture all of your recently viewed activity, most recently viewed first, and will revert to a normal search as you type into the Search window. If your daily usage of the application involves moving between a set of managers, you will find this Recently Viewed feature to be a major time saver.

Search - Recently Viewed
This feature improves user navigation allow for faster access to all areas of the product.
Steps to Enable
You don't need to do anything to enable this feature.
Tips And Considerations
NOTE: If a menu includes External Links, those links will now open in a New Window when selected in the Navigator, Springboard, and Global Search. In previous versions, external links opened in the same window, now, for security reasons, the external links open in a New Window.
UI Configuration Parameter Retain New Line Format
This feature adds a new parameter - RETAIN NEW LINE FORMAT IN GRID TEXT BOXES - to the UI Configuration Logic Configuration that when set to TRUE will retain your new line formatting when the text is saved to the grid. The parameter value is set to FALSE by default to retain the existing behavior.
The RETAIN NEW LINE FORMAT IN GRID TEXT BOXES parameters is available under the newly added MANAGER LAYOUT section of the UI Configuration Logic Configuration.

RETAIN NEW LINE FORMAT IN GRID TEXT BOXES = FALSE Retains Current Behavior
Below is an example with the Default/existing behavior. You enter a multi-line remark in the edit box, when you save the remark to the grid the new line formatting is not retained and the result is a single line remark saved to the grid.

Existing Behavior Example

One Line Result - New Line Format Not Retained
In the example below, the new behavior is demonstrated. With the parameter - RETAIN NEW LINE FORMAT IN GRID TEXT BOXES - set to TRUE the new line formatting will be retained when the text is saved in the grid.

UI Logic Configuration - Parameter Set to TRUE

Enter Text with New Line Formatting

Text Is Saved in Grid with New Line Formatting
For text that is saved to simple grids and viewed in the edit manager view, this feature provides improved formatting and readability by following the new line formatting that you entered/intended.
Steps to Enable
To take advantage of this new behavior, the RETAIN NEW LINE FORMAT IN GRID TEXT BOXES parameter in your UI Configuration Logic Configuration (set via User Preference or the Default set for the domain) will need to be set to TRUE.
Tips And Considerations
The new line formatting is honored in the Edit Manager Layout, the View Manager Layout will still show the grid entry without the new line formatting. Also - this enhancement applies to simple grids only - like Refnum and Remark, where the grids are editable within the grid. It does not apply to second page grids - grids that open a new page for edit rather than being editable in the grid.

New Line Format Not Honored In View Manager Layout
Screen Set Results Configuration Improvements
This feature provides you with two usability improvements related to setting up your screen set results. When you specify a label name for a column, the original column name is now being retained so that the original field mapping is apparent and now, when you define a pseudo field, the qualifier used for the pseudo field definition is provided so you understand how the pseudo field was defined and the qualifier that was used.
In the example below, labels have been provided for many of the columns (Label ID), note that the original column names in the Column field are still available so the understanding/mapping to the actual column being labeled is retained.

Original Column Names Retained
In the example below, for comparison purposes - you will notice that the label entered in the Label ID column is copied to the column name - so information about the original column being labeled is lost.

Original Behavior - Column Names Set to Label Names
In the example, below a Reference Number Pseudo field is being defined. The Reference Number Qualifier that will be used in this example is Division. After the value is set, both the field used Refnum Value and the Qualifier used - in this case Division - are provided so that you understand how the Pseudo field has been configured.

Pseudo Field Qualifier Information Provided
By comparison, in previous version of OTM - the same Pseudo field setup provide little information about the field and qualifier selected for configuring the Pseudo field.

Pseudo Field Setup in Early Versions
These finder result configuration changes will remove any confusion you may have regarding the columns and qualifier values used in configuring your finder results.
Steps to Enable
You don't need to do anything to enable this feature.
Configurable Results Pop-Up for Custom Action
This feature provides you with the ability to configure the Result Message Text pop-up that is displayed when running a custom action to something that is more meaningful and more directly related to the action being performed. This feature also allows you to set an Auto Close Result Message Timer for the Result Message Text pop-up which, when configured, will eliminate the need for the user to manually close the message pop-up display.
In the example below, both the Result Message Text pop-up and the Auto Close Result Message Time have been configured. When this action (CZ_TEST_ACTION) is run against the order release the configured message will be displayed in the Result Message Text pop-up and the pop-up will automatically close after 5 seconds.

Action Configured with Result Message Text and Auto Close Result Message Timer

Configured Pop-Up - Message Closes After 5 Seconds
The example below shows the current/default behavior. The message provided is generic and is not related to the defined action, and the user is required to minimize the pop-up dialog box.

Default Behavior
Allows you to provide more meaningful messages to your users when running customer actions. This feature also allows the pop-up message provided to be closed automatically, removing the need for the user to take action/minimize the dialog box.
Steps to Enable
To take advantage of this feature you will need to modify (or create) Actions in the Actions Manager (Configuration and Administration > User Configuration > Actions Manager) that contain:
- A meaningful Result Message Text
- An Auto Close Result Message Timer time amount (must be greater than 0)
This feature provides you with a new Bulk Query that you can use in a two-step process to extract a large number of resources in order to feed external reporting tools and/or analytics tools.
With the two-step approach, you will first run a Bulk Query to return a list of PKs that you are interested in retrieving. In the second step, you use the returned list of PKs to perform a detailed resource retrieval for all the PKs returned in the Bulk Query from step 1. Your retrieval process for pulling over the details, should be developed in a way that minimizes the overhead required to run the process i.e., navigate through the list of PKs one at a time vs attempting to extract everything all at once.
Usage:
- Perform bulk query to return a collection of PKs - this will be a new custom action - custom-actions/bulkQueries/{resource name} - return an array of. PKs
- Resource retrieval for a collection of PK values - the "q" string contained in the Advanced Query message body will use a new "in" clause that can be used to query for batches of the PKs returned in a prior Bulk Query.

Bulk Query Example
Provides you with an improved process for identifying and then retrieving larges amount of data using REST.
Steps to Enable
Review the REST service definition in the REST API guides to leverage (available from the Oracle Help Center > your apps service area of interest > APIs & Schema). If you are new to Oracle's REST services you may want to begin with the Quick Start section.
The feature extends the resource querying capabilities for the REST API so that your saved queries will now be able to support 'bind parameters' so that the saved query can now be more of a template query which can be executed with different parameter values substituted within it. For example, abstract queries like "retrieve all order releases with a source location of X" or "retrieve all shipments with a total weight greater than Y", are valid for different values of X and Y for different executions.
For more information regarding the advanced query capabilities provided with the REST APL, please review the REST API for Transportation and Global Trade Management Cloud documentation found on https://docs.oracle.com/en/cloud/saas/transportation/21c/otmra/index.html.
Highlights:
- New property. Prior to this feature the only accepted property in the Query Definition was the "q" query string, now - to support specifying a Saved Query GID which is used to retrieve the resources (for custom-actions/queries) or primary keys (for custom-actions/bulkQueries) - the "copiedFrom" property is now accepted.
- Positional Bind Parameters - For example, "SELECT LOCATION_GID FROM LOCATION WHERE LOCATION_NAME LIKE ? AND DOMAIN_NAME = ?". Allows the query to be executed for different combinations of input parameter values. Bind parameters used in this way are positional so that when substituting values into the template for execution, the number and the position of parameter values are significant; there must be the same number of values as bind markers (the ?) and the first value will be substituted for the first marker, the second value for the second marker and so on.
- Named Bind Parameters - The REST API also supports Saved Queries which specify bind parameters by name. This supports the extra capability to substitute the same named value in multiple places. The named parameters must be a colon - ':' - followed immediately by a lower case alphabetic character and then one or more 'word' characters (lower and upper case alphanumeric and underscore). "SELECT LOCATION_GID FROM LOCATION WHERE LOCATION_NAME LIKE :locName AND DOMAIN_NAME = :domain".
This feature expands and simplifies the query options provided by the REST API.
Steps to Enable
Review the REST service definition in the REST API guides to leverage (available from the Oracle Help Center > your apps service area of interest > APIs & Schema). If you are new to Oracle's REST services you may want to begin with the Quick Start section.
Insert Date and Update Date Provided for Child Resources
This feature provides visibility to the insert date and update date fields for the child resources. Previously, insert date and update date were only provided for root resources, this enhancement, by default, will provide the insert data and update date for child resources as well.
This feature provides you with the ability to query for your child resources based on a specific update or insert date; this will allow you to be more specific when using REST for data extraction purposes.
Steps to Enable
Review the REST service definition in the REST API guides to leverage (available from the Oracle Help Center > your apps service area of interest > APIs & Schema). If you are new to Oracle's REST services you may want to begin with the Quick Start section.
Tips And Considerations
The insert date and update date are now provided by default for child resources. If, for some reason, you need to disable this output, the property glog.fusion.cil.config.childFP when set to false will revert the behavior back to only providing insert date and update date for the root resources.
New/Modified Resources - External System and Order Movement
This feature extends the REST Resources to include the External System. This addition allows you to Get, Post and Update the External System. You will find this enhancement useful in situations where you wish to create/update information about an External System. For example, complementary software providers who require that an external system be setup as part of their on-boarding process will find the REST option easier to manage than having customers manually creating the required external system information.
This feature also expands the operations available for the Order Movement to include Create and Update
Extends the available REST services to better support additional integration scenarios.
Steps to Enable
Review the REST service definition in the REST API guides to leverage (available from the Oracle Help Center > your apps service area of interest > APIs & Schema). If you are new to Oracle's REST services you may want to begin with the Quick Start section.
Tips And Considerations
Note that the External System Password is not available for Get, Post and Update operations.
This feature provides you with an improvement to the "upload" action allowing you to load document content into an existing (previously created) document that does not contain content.
Usage Example:
$ curl -u RESTAPI.ADMIN:CHANGEME -H "Content-Type: image/png" "http://slc17qyj.us.oracle.com:8080/logisticsRestApi/resources/v2/custom-actions/upload/documents/RESTAPI.MTH-DOC-002/contents" --data-binary @google.png
- The Content-Type must match the content of the data being uploaded - in this case it is a PNG image file called "google.png".
- The current File Content Analyzer and Virus Scan logic is enforced with all uploaded content.
- The content can only be uploaded to a pre-existing "documents" resource e.g. in the above example the Document GID of RESTAPI.MTH-DOC-002 must exist.
This feature addresses some limitations in the REST API related to document content upload and download.
Steps to Enable
Review the REST service definition in the REST API guides to leverage (available from the Oracle Help Center > your apps service area of interest > APIs & Schema). If you are new to Oracle's REST services you may want to begin with the Quick Start section.
Tips And Considerations
- The Content-Type must match the content of the data being uploaded.
- The content can only be uploaded to a pre-existing "documents" resource.
Key Resources
- More information about this feature is available in the docs.oracle.com API guide.
Optional Feature - Use Download Link for REST Document Content
This feature, when enabled, will show a link to the document content download action in the standard links collection rather than within the current content child resource. When disabled, the current behavior will continue.
Provides access to the download action within the standard links collection, which is more intuitive and consistent.
Steps to Enable
You don't need to do anything to enable this feature.
Tips And Considerations
- To change the Opt In state for this feature:
- Go to the Optional Feature UI - Configuration and Administration > Property Management > Optional Features.
NOTE: Only the DBA.ADMIN user can access and use the Optional Features page.
- Select the USE DOWNLOAD LINK FOR REST DOCUMENT CONTENT Optional Feature.
- Run the desired Action Opt Out or Opt In.
Upload Action Extended to Handle Multiple Documents in a Single Action
This feature enhances the Upload Document action so that you can now select multiple documents to upload in a single upload request.
In the example below, there are four documents to be uploaded against the shipment. All four documents can now be selected and uploaded in a single upload document request.

Upload Action

Multiple Documents Selected for Upload

Selected Documents Ready for Upload

Result - Four Documents Uploaded
This enhancement simplifies the steps required to upload multiple documents.
Steps to Enable
You don't need to do anything to enable this feature.
Oracle Business Intelligence Enterprise Edition (OBIEE) to Oracle Analytics Server (OAS) Upgrade
This feature upgrades the infrastructure used to provide analytics and reporting in OTM and GTM from OBIEE to the latest release of Oracle Analytics Server, or OAS. OAS provides the opportunity, in future releases, to take advantage of the many new features and capabilities provided by this platform.

OAS Main Dash Board - New Look and Feel
DEPRECATED KPI WATCHLIST
Oracle Analytics Server no longer supports KPI Watchlists, which were supported previously with OBIEE. All of the Public Dashboards have been updated to use Gauges as a replacement for the deprecated KPI Watchlist functionality. If you have any custom dashboards that use KPI Watchlists, these dashboards will need to be updated with an alternative/supported approach. As noted, the KPI Watchlists used in all the Public Dashboards have been replaced with Gauges - which is our suggested replacement.
In the example below, for the Main Dashboard, you can see the deprecated KPI Watchlist versus the new Gauge approach used with OAS.

Deprecated KPI Watchlist OBIEE

New Gauge Implementation of KPI Watchlist
.
The upgrade to OAS provides you with excellent data discovery capabilities and a roadmap of future opportunities provided with OAS including Data Visualization, Data enrichment, Machine Learning in Data Flows and many others.
Steps to Enable
You don't need to do anything to enable this feature.
Tips And Considerations
- KPI and KPI Watch List capabilities that were available in OBIEE are not supported in OAS. For your custom dashboards, you will need to replace your existing KPI Indicators (status icons that represent the performance status of a KPI based on threshold values) with Gauges.
- You can refer to this document for details on replacing your KPI Indicators:
- Doc ID: Oracle Transportation and Global Trade Intelligence Cloud Key Performance Indicators (KPI) Replacement Guide (Doc ID 2784313.1).
- All the KPI/KPI Watchlists in the Public dashboard reports have been replaced by new dashboard reports.
- Dashboards and dashboard reports are not translated in OAS.
Key Resources
- You can refer to this document for OAS 5.9 feature availability and comparison with OBIEE 12.2.1.4: https://docs.oracle.com/en/middleware/bi/analytics-server/whats-different-oas/index.html#OASWD-GUID-C907A4B0-FAFD-4F54-905C-D6FCA519C262
Subject Area-Specific Dashboards and New Dashboard Links
This feature allows you to add subject area specific Dashboard links to your OTM menu. To demonstrate this new capability, a set of subject area specific Dashboards has been provided. The new Public Dashboards include:
- Financials Dashboard,
- Shipment Dashboard,
- Planning Dashboard,
- Logistics Network Modeling Dashboard,
- Fleet Dashboard,
- Machine Learning Dashboard,
- Customs Dashboard,
- Transactions Dashboard.
The new Public Dashboards are available within the associated subject area Springboard and Navigator menus. For example, the Financials Dashboard is provided as a link under the Financials menu.

Financials Dashboard Menu Link

Financials Dashboard

Shipment Dashboard

Planning Dashboard

Logistics Network Modeling Dashboard

Fleet Dashboard

Logistics Machine Learning Dashboard
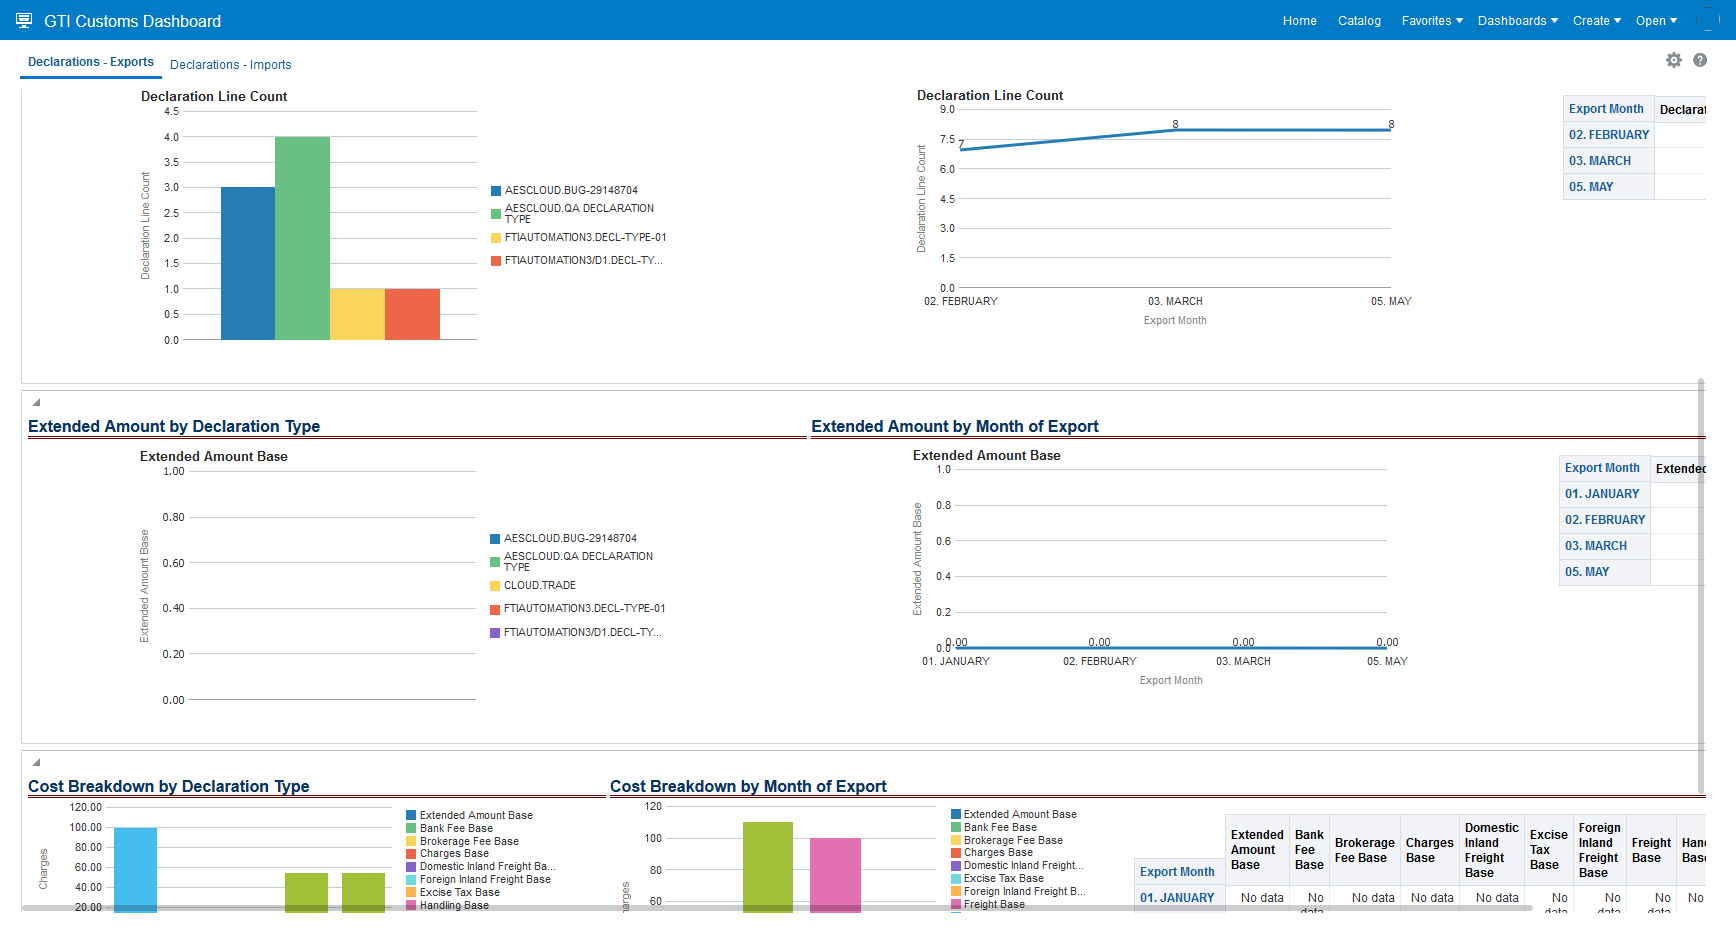
GTI Customs Dashboard
This feature provides the option to have many Dashboard specific links on your menus, providing easy access to subject area specific information.
Steps to Enable
The Public Dashboards do not require any setup.
You can add your own Dashboard links to your menu by going to Configuration and Administration > User Configuration > Menu Manager.
New/Edit Menu Element - Link
- Enter a name for the Dashboard link in the Text box. This name appears on the menu.
- Dashboard: Select the Dashboard you want to link to.

Add a Dashboard Link
The Metric Notification Profile feature allows you to configure who is notified and the information provided when certain metrics are reached. The feature provides you with options for the log files and the performance metric types to include in the notification.
Navigate to Configuration and Administration > Power Data > Diagnostics > Metric Notification Profile

Metric Notification Profile
In example below, the Metric Notification Profile has been configured to include diagnostic logs, a JRA recording and Heap Dumps. The Attach Performance Diagnostics selection of "Standard" will include most all configuration and performance collectors. You can send the notification via a contact in the system - in this example OTM Support, or to an ad-hoc email address - in this example OTM Tech. The email generated by the system includes an attachment along with a unique file name that you can share with Oracle to help diagnose issues.

Metrics Notification Profile
If you select the "Non-Standard" option for Attach Performance Diagnostics, you can then select the Performance Collection Types you want collected.

Metrics Notification Profile - Attached Performance Diagnostics - Non-Standard
NOTIFY
You can generate the Metric Notification for your Metric Notification Profile by selecting the desired profile(s) and running the Metric Notification Generation action Notify. When you run the Notify action, all contacts and email addresses defined for the selected metric notification profile(s) will receive a communication containing the diagnostics defined within the profile.
This page is accessed via Configuration and Administration > Power Data > Diagnostics > Metric Notification Profile > Notify.

Generate Metric Notification - Run Action
Enter a Reason for generating the notification, the reason appears in the Threshold field of the email generated by the action and click submit.

Generate Metric Notification - Reason
Provides you with the tools required to better monitor and support the overall performance of your OTM/GTM instance.
Steps to Enable
You don't need to do anything to enable this feature.
Tips And Considerations
The Consolidation Interval field is not used in 21C.

Consolidated Interval Field
Optional Feature - Use Direct SQL for Audit Trail Cleanup
This Optional Feature, when enabled, uses a direct SQL approach for cleaning up audit details when the Audit Trail cleanup process is run. When disabled, the existing EJB bean remove method is used to delete the audit details - this method is a slower less efficient method since the EJB approach loads the records and then deletes it. The SQL approach provides the same functionality, but runs much faster.
The Opt In/Opt Out capability for this feature expires with the 22B update.
When enabled, the direct SQL option provides you with a much faster method for managing the Audit Trail cleanup process.
Steps to Enable
You don't need to do anything to enable this feature.
Tips And Considerations
- While the manager for these features refers to them as "optional" - each of these features will become mandatory when the Optional Until update is released. The optional aspect of these features refers to the period of time where there is an opportunity to Opt In/Opt Out of enabling the feature. During this "optional" period - the time between when the feature is released and the release prior to the Optional Until release - the request/desire/intention is for you to enable the feature(s) for testing purposes so that the transition to mandatory, as of the Optional Until release, is uneventful.
If you wish to change the Opt In state for this feature:
- Go to the Optional Feature UI - Configuration and Administration > Property Management > Optional Features.
NOTE: Only the DBA.ADMIN user can access and use the Optional Features page.
- Select the USE DIRECT SQL FOR AUDIT CLEANUP Optional Feature.
- Run the desired Action Opt Out or Opt In.
Optional Feature - Limit Simultaneous SQL Execution
When this Optional Feature is enabled, users are limited to the total number of simultaneous queries, the number of simultaneous queries for a particular user session, and the total number of cells returned by a query.
The Opt In/Opt Out capability for this feature expires with the 22C update.
When enabled, the Limit Simultaneous SQL Execution protects the performance of the system by limiting the SQL execution initiated by a single user.
Steps to Enable
You don't need to do anything to enable this feature.
Tips And Considerations
- While the manager for these features refers to them as "optional" - each of these features will become mandatory when the Optional Until update is released. The optional aspect of these features refers to the period of time where there is an opportunity to Opt In/Opt Out of enabling the feature. During this "optional" period - the time between when the feature is released and the release prior to the Optional Until release - the request/desire/intention is for you to enable the feature(s) for testing purposes so that the transition to mandatory, as of the Optional Until release, is uneventful.
If you wish to change the Opt In state for this feature:
- Go to the Optional Feature UI - Configuration and Administration > Property Management > Optional Features.
NOTE: Only the DBA.ADMIN user can access and use the Optional Features page.
- Select the LIMIT SIMULTANEOUS SQL EXECUTION Optional Feature.
- Run the desired Action Opt Out or Opt In.
Optional Feature - Limit CSV Export Memory
This Optional Feature, when enabled, will stop repeated calls from a single user to CSV Export before the first export call completes.
The Opt In/Opt Out capability for this feature expires with the 22C update.
When enabled, the Limit CSV Export Memory protects the performance of the system by limiting the simultaneous CSV exports initiated by a single user.
Steps to Enable
You don't need to do anything to enable this feature.
Tips And Considerations
- While the manager for these features refers to them as "optional" - each of these features will become mandatory when the Optional Until update is released. The optional aspect of these features refers to the period of time where there is an opportunity to Opt In/Opt Out of enabling the feature. During this "optional" period - the time between when the feature is released and the release prior to the Optional Until release - the request/desire/intention is for you to enable the feature(s) for testing purposes so that the transition to mandatory, as of the Optional Until release, is uneventful.
If you wish to change the Opt In state for this feature:
- Go to the Optional Feature UI - Configuration and Administration > Property Management > Optional Features.
NOTE: Only the DBA.ADMIN user can access and use the Optional Features page.
- Select the LIMIT CSV EXPORT MEMORY Optional Feature.
- Run the desired Action Opt Out or Opt In.
Oracle Transportation Management (Base)
Order Release Constraints Ocean Sail Dates and Voyage ID
This feature allows you to specify, on your order release, the Early Sail Date, Late Sail Date or Voyage ID that should be considered on the primary leg/ocean leg when the order is planned.
The Order Release Constraints Tab now supports the ability for you to constrain - for the primary leg/ocean leg portion of a route, the voyage schedule(s) that will be considered in planning. You can constrain the voyage schedules by date - Early Sail Date, Late Sail Date - or you can specify a specific Voyage ID you want the order to use.

Sail Dates and Voyage ID New Order Release Constraints
In the example below, the order release is planned without any constraints and is scheduled to ship on the earliest available voyage schedule - in this case the voyage sailing on May 10, 2021.

No Sail Date Constraints
In the example below, the order release is now constrained so that it must ship on a voyage that leaves no earlier than June 8, 2021. This is accomplished by specifying the Early Sail Date as shown below.

Early Sail Date Constraint
The planning result - given the Early Sail Date constraint of June 8, 2021 - is below. The earliest voyage after the Early Sail Date specified on the order is for June 14th, and this is now the assigned voyage.

Early Sail Date Constraint Solution
In the example below a specific voyage - Voyage ID USNYCTOBEANR_OC_2021WK28 - which departs from USNYC on July 12th, is assigned to the order release.

Voyage ID Constraint
The planning result - given the specified Voyage ID - provides the expected result below - the planned ocean shipment is using the Voyage ID specified on the order USNYCTOBEANR_OC_2021WK28.

Voyage ID Constraint Solution
In the example below - the order has a specified pickup window - in this scenario the order must be picked up between May 10th and May 14th - but the order cannot be schedule on an export vessel voyage any earlier than June 15, 2021.

Order Pickup Date Constraint

Early Sail Date Constraint
The planning result - given the pickup date constraint on the order to pick up between May 10th and May 14th coupled with the Early Sail Date constraint of June 15th provides the desired result. The drayage shipment supports the pickup activity meeting the pickup requirements - between May 10th and May 14th, and the ocean shipment is assigned to a voyage that sails after the Early Sail Date of June 15th.

Order Pickup Date Requirements and Early Sail Date Solution
In the example below, three orders are picked up on three different weeks in June (June 14, 21, 28) - these orders are all assigned to the same Voyage ID that sails on July 26th. OTM plans the pickups across the three weeks, and consolidates the containers into a single ocean shipment that has been planned using the specified Voyage ID on the three orders.

Order Pickup Dates Across Weeks - Same Voyage ID
In the scenario below - the orders are booked into an available FCL Consol shipments using the action Build Buy Shipment On Primary Leg Show Consol Options.
For more information on the setup and usage of FCL Consol shipments see the OCEAN FCL CONSOL ENHANCEMENT from the 20C What's New.
In this setup, there are three available Consol Shipments. The first two consol shipments are voyage specific consols with sail dates of June 7th and July 12th, while the third consol shipment is date range specific consol sailing on August 2nd.

Available Consol Shipments
Setting the Early and Late Sail Dates on the order and/or specifying the specific Voyage ID provides you with the ability to guide/limit the set of consol shipments considered when planning your order releases.
In the example below the order Early Sail Date is set to July 1st - which reduces the FCL Consols considered/available to the two Consols available after that date.

FCL Consol Shipments Available Constrained by Early Sail Date
In the example below, the order is constrained to a specific Voyage ID - and only the FCL Consol shipment assigned to that voyage is presented as an option.

FCL Consol Shipments Available Constrained by Voyage ID
SNRO-OCEAN
When you run SNRO-Ocean against orders that contain a Sail Date or Voyage constraint - the options provided will be constrained by the constraints that are on the order release.
CUTOFF TIMES AND ARBITRARIES
For scenarios where your setup involves cutoff times and/or inland arbitraries - the sail date constraint is correctly honored considering the voyage sail date. In both the cutoff time and inland arbitrary case, the ocean shipment's start time will be earlier than the sail date/time to accommodate the cutoff time requirement and/or an inland arbitrary pickup requirement, in this case OTM will correctly honor the voyage sail date constraint versus just considering the ocean shipment's start time..
Allows you to guide the selection of viable ocean voyages for your order releases by either specifying a specific Voyage ID to use or guiding the voyage selection based on a desired/required Early Sale Date and/or Late Sail Date range.
Steps to Enable
You don't need to do anything to enable this feature.
Tips And Considerations
In scenarios where your order planning window is wide open i.e., no order dates for Early Pickup Date or Late Delivery Date are specified, there is a possibility that your order planning window time span will be greater than the 30 day default value set for the ORDER MANAGEMENT parameter ORDER WINDOW TIME SPAN.
For example - if you're planning an order today, with an the early sail date that's 35 days from now and is to be assigned to a voyage that's has a 12 day transit time, then this order would require an ORDER WINDOW TIME SPAN value of at least 47 days.
If you have scenarios where you do not specify the Early Pickup Date and Late Pickup Date on your orders and your orders have requirements for sailing dates that are more than 30 days out, we recommend setting the ORDER WINDOW TIME SPAN to a value greater than the default, but as small as necessary to work for your situation.
Note that if your orders have the Early Pickup Date and Late Delivery Date specified then the ORDER WINDOW TIME SPAN parameter does not come into play.
This feature allows you to identify a Pack With Group on your order lines so that packing - using AutoCalc - can be guided by the Pack With Group values you specify.
By specifying a Pack With Group on your order lines, you can guide OTM's ship unit packing logic to follow external packing requirements. For example - in a Ready To Ship scenario where multiple lines are released from multiple POs onto a single order release - you may wish to keep the lines from the different POs segregated versus having OTM pack the multiple lines together on a single ship unit. In another situation - where OTM only has visibility to the linehaul portion of a two leg delivery operation - OTM's packing options from the origin to your cross dock location, while desirable for the linehaul portion of the journey, maybe overly aggressive if the operation is not interested in breaking down pallets at the cross dock for the final cross dock to the customer destination(s) portion of the journey. In this scenario, you can use the Pack With Group to pack your ship units considering the downstream customer delivery requirements versus packing the ship units just considering the source to destination (cross dock in this case) option.
In the example below - the order release contains three lines with the same packaged item coming from two different purchase orders. When no Pack With Group on the order lines, OTM places the three order lines into one ship unit. If the desired solution is to have a separate ship unit for each of the purchase orders related to the order lines, then specifying a Pack With Group for the POs involved will provide the desired packing result where the lines are packed separately by PO.
Below is the ship unit packing solution when no Pack With Group information is specified on the order lines. In this case, OTM generates one ship unit for the three order lines.

No Pack with Group Specified One Ship Unit Three Lines
In the example below, a Pack With Group has been provided for each of the order lines. When the Generate Ship Units action is run against this order the ship unit packing is now done considering the Pack With Group values entered on the order lines. In this case, two groups are created one for Pack With Group PO1 with two order lines and another for Pack With Group PO2 with one order line.
Pack with Group Specified Two Ship Units Packing by Pack with Group

Pack with Group Specified Two Ship Units Packing by Pack with Group
By default, the Pack With Group will be considered in the repacking done by planning. There are some situations where you may want to ignore the Pack With Group when repacking the shipment ship unit. In this case, you can control whether the Pack With Group is considered - or not - by setting the logic configuration parameter REPACK SSU IGNORE PACK WITH GROUP. The default value is FALSE, meaning that by default the Pack With Group information will be considered. When this parameter is set to TRUE, the Pack With Group will be ignored during the shipment Ship Unit Repacking. The logic here is that you may wish to be more aggressive during the shipment ship unit repacking than order ship unit building by consolidating partials with different pack with groups into the same shipment ship unit.

Repack SSU Ignore Pack with Group Parameter
Provides you with additional control over how the ship unit packing is done in OTM to satisfy your operational requirements.
Steps to Enable
To use this feature you will need to :
- Create an order release where the Order Configuration is Auto Calc
- Enter the desired Pack With Group information on your order release lines
- Generate the ship units for the order release - either automatically or via the Generate Ship Units action
Ready To Ship Action On Large A Number Of Order Base Lines
This feature allows you to configure OTM so that your Ready To Ship scenarios that involve a large number of lines can be processed. Specifically, this feature provides you with the ability to avoid the overhead and performance hit associated with attempting to populate the order base line grid and the release instructions with 100s of order line details in scenarios where the goal is to release the remaining quantity for the lines, and perhaps, add some remarks or reference numbers.
By configuring the two properties (below), you can suppress the line details displayed whenever the number of order base lines exceeds the value you set in the (new) maximum number of lines to display property.
Properties:
- The property glog.webserver.rts.hideOBLinesOnMaxCount turns on the functionality. The default value is false, when the property is true the new functionality will be applicable.
- The property glog.webserver.rts.maxNumberOfOBLinesToDisplay sets the maximum number of lines that will be displayed in the order base line grid and the release instructions.
Given the two properties set as glog.webserver.rts.hideOBLinesOnMaxCount=true and glog.webserver.rts.maxNumberOfOBLinesToDisplay=100. When the Ready To Ship action is run against an order base with more than 100 order base lines, the order base lines grid and the release instruction will not be displayed in UI. With this setup, there is no option provided to change the individual lines - the remaining count, source_location, dest_location,dates - will be defaulted in backend. This setup assumes - when the order base line count is greater than 100 - that releasing all the remaining amounts is the desired outcome. You will still be able to enter the order release reference number and remarks as part of the releasing process.
Different Options:
- Property glog.webserver.rts.hideOBLinesOnMaxCount=false - Current behavior, any value of order base lines will be to be displayed - subject to the challenges related to attempting to display more than 999 lines.
- Property glog.webserver.rts.hideOBLinesOnMaxCount=true and property glog.webserver.rts.maxNumberOfOBLinesToDisplay=100 and the number of order base lines selected is less than 100, the order base line will be displayed.
-
Property glog.webserver.rts.hideOBLinesOnMaxCount=true and property glog.webserver.rts.maxNumberOfOBLinesToDisplay=100 and the number of order base lines selected is greater than 100, the order base line will be not be displayed and the assumption is that the user wants to release the remaining amounts.
Provides you with an option for processing more than 999 order base lines as part of you Ready To Ship process.
Steps to Enable
Set the two properties as desired for your implementation.
- The property glog.webserver.rts.hideOBLinesOnMaxCount turns on the functionality. The default value is false, when the property is true the new functionality will be applicable.
- The property glog.webserver.rts.maxNumberOfOBLinesToDisplay sets the maximum number of lines that will be displayed in the order base line grid and the release instructions.
Tips And Considerations
Attempting to run the Ready To Ship action on more than 999 order base lines will cause the system to error out.
Multi-Select View Related Order Releases Action on Buy Shipments
With this feature you now have the ability to easily find all the order releases related to a set of shipments. This is made possible by a new multi-select Shipment View Action - View Related Order Releases, that allows you to select multiple Buy Shipments and then run the View Related Order Releases action to see all the order releases related to the selected set of Buy Shipments. The order release finder result that is returned by this action provides you will all the normal Order Release actions, so you are able to move orders, unschedule orders etc.
To use the feature - simply select one or more Buy Shipments that you are interested in and run the Shipment View Action - View Related Order Releases.

Select a Set of Buy Shipments
Then run the action - Shipment Management > Shipment Management > Buy Shipments > Actions.> Shipment Management > View > Related Order Releases.

Run Action - View Related Order Releases
The result from the action is an Order Release Finder Result with the set or Order Releases from the select set of buy shipments. Since this is a Finder Result - you have the option to configure the results so that the columns included and the order of the columns support your requirements.

View Related Order Releases - Order Release Finder Result
Provides the planner with an easy way to view all the related order release for a set of Buy Shipments.
Steps to Enable
You don't need to do anything to enable this feature.
Include TiHi THUs on Packaged Item in THU Profile
This feature provides you with a new parameter that will allow OTM to Include the TiHi THUs On Packaged Item In the THU Profile. When the property is set to TRUE, OTM will dynamically include the TiHi THUs in the THU profile when building ship units.
The new parameter is found in Shipment Management > Power Data > General > Logic Configuration>logic configuration type of SUBLD LOGIC PARAMETER. The parameter INCLUDE TIHI THUS ON PACKAGE ITEM IN THU PROFILE has a default value of FALSE - for backward compatibility. To take advantage of this new capability the parameter value should be set to TRUE.

INCLUDE TIHI THUS ON PACKAGE ITEM IN THU PROFILE Parameter
In the example below, with INCLUDE TIHI THUS ON PACKAGE ITEM IN THU PROFILE set to TRUE – the TiHi THUs included with the THU Profile will be used.


Union of the TiHi Transportation Handling Unit(s) and THU Profile Will be Used
This feature eliminates the requirement to update the THU profile on your Package Item to include the THU specified on the information defined in your TiHi data. With this parameter set to TRUE - OTM will accept the information provided on the TiHi as valid without forcing you to update the THU profile on the Packaged Item related to the TiHi.
Steps to Enable
You don't need to do anything to enable this feature.
Property to Turn Off Logic Setting Order Release Item Out of Date Status
This feature provides you with a new parameter that you can use to turn off (or on) the Order Release Item Out Of Date Status check which involves checking the effective/expiration date of the item on your order line against your order's early pickup date. When the new property glog.order.newOrderReleaseLine.checkItemEffectiveDates is On (the check is off by default), a check is done to determine if the order release early pickup date is outside of the item's effective/expiration date, if it is outside the range then the order planning status type of PLANNING will be set to the status value of ITEM OUT OF DATE.
In the setup below, if the property glog.order.newOrderReleaseLine.checkItemEffectiveDates were On, the Order Release's PLANNING status value would be set to ITEM OUT OF DATE, since the Early Pickup Date on the order June 8th 2021, is outside of the Effective/Expiration date range on the Item - March 1st to May 31st.

Item with Effective/Expiration Set

Order Release with Early Pickup Date Outside of Item Effective/Expiration Range
Provides the option to turn-off unnecessary effective date checking logic, which provides the opportunity to improve performance.
Steps to Enable
You don't need to do anything to enable this feature.
Property to Turn Off Logic Setting Order Release Known Shipper Value from Order Base
This feature provides you with a new property, glog.order.setIsKnownShipperFromOrderBase that allows you to turn off the logic that sets the Known Shipper value on your Order Release from the Order Base.
The Known Shipper/Unknown Shipper settings are used inside the planning logic to identify the Air Schedules that can be used in planning - Known Shippers are assumed to be those shippers who have provided the appropriate paperwork so that both Cargo Only Flights and mixed Cargo and Passenger Flights are allowed. Unknown Shippers will only be scheduled on Cargo Only Flights.
If you do not plan with Air Schedules - you can turn off the process that sets the Known Shipper from the Order Base.
For backward compatibility the glog.order.setIsKnownShipperFromOrderBase property is set to TRUE by default.
We recommend setting the property value to FALSE in all implementations where this logic is unnecessary.

Air Schedule - Cargo Only (Checked) or Passenger and Cargo Flight (Unchecked)

Known Shipper Flag on Order Base - Checked = Known Shipper Unchecked - UnKnown Shipper
This feature provides you with the opportunity to, potentially, improve system performance, by skipping an unnecessary Known Shipper override.
Steps to Enable
To enable this new behavior you will need to set the property glog.order.setIsKnownShipperFromOrderBase to false.
Navigate to Configuration and Administration > Property Management > Property Sets.
NOTE: Only the DBA.ADMIN user can access and use the Property Sets page.
Tips And Considerations
We encourage setting the property glog.order.setIsKnownShipperFromOrderBase to FALSE if this check is not part of your process.
Add Ship Unit Content to Order Movement XML
This feature provides the option to include the Ship Unit Content (Line) data to the Order Movement outbound XML when your Out XML profile includes the required Xpath.
Xpath: OrderMovement/OrderMovementD/ShipUnit/ShipUnitContent/*
Provides access to the Ship Unit Content within the Order Movement outbound XML.
Steps to Enable
If you wanted to include the non-required element of Ship Unit Content for your Order Movements, you would enter "OrderMovement/OrderMovementD/ShipUnit/ShipUnitContent/*" in the Included Xpath field.
This page is accessed via Business Process Automation > Power Data > Integration > Out XML Profiles.
NOTE: Some understanding of the Oracle Transportation Management XML schema is required to effectively use this functionality.
Equipment Reference Unit Rounding Threshold and Rounding Grouping Level
This feature provides you with the ability to configure your Equipment Reference Units (ERUs) so that fractional ERU amounts are rounded up or down according to your ERU usage requirements. The Rounding Threshold value on the ERU allows you to set the decimal value that will be used to determine if the ERU count will be rounded up or rounded down. The Rounding Grouping Level allows you to determine which grouping level will be evaluated - either Order, Location or Order Plan To.

ERU Rounding Threshold and Rounding Grouping Level
The Rounding Threshold value - practically speaking - a value > 0 but < 1, is interpreted such that any fractional value for a grouped ERU total that is less than or equal to the threshold value will be rounded down, any fractional value greater than the threshold value will be rounded up.
Assuming a Rounding Threshold of .2, the table below shows the different rounding results to expect.
| Cumulative ERU Value | Rounded ERU Value |
|---|---|
| 10.1 | 10 |
| 12.2 | 12 |
| 14.3 | 15 |
| 15.9 | 16 |
The Rounding Grouping Levels - Order, Location or Order Plan To - provide you with different options for grouping and totaling the ERU values that will then be used for rounding.

ERU Rounding Grouping Levels
When you select the Rounding Group Level of Order, each order is a group - so rounding is evaluated at the stop level on an order-by-order basis. Using the Order Rounding Group Level, the ERU values on the order lines for each order are summed and then the ERU value is rounded up or down depending. This setup is intended to support the scenario where you want to receive, manage and calculate pallet spaces at the order level. In the example below, the result is two ship units (rounded up to 34, in this case) for the stop.
| Order ID | Source | Destination | ERU Value | Rounded ERU Value |
|---|---|---|---|---|
| Order ABC | DC1 | 1001 | 10.4 | 11 |
| Order XYZ | DC1 | 1001 | 22.5 | 23 |
| ERU Rounded by Order | 32.9 | 34 |
When you select the Rounding Group Level of Location, the grouping is defined by the ERU Grouping value entered on your locations. The location ERU Grouping value comes from the Order Ship To Location. The ERU Grouping on your Location(s) provides you with additional flexibility for defining how OTM calculates the number of ERUs (pallets/pallet spaces) going to a location or location grouping.

Rounding Group Level - Location ERU Group
The two examples below - the mall delivery case and the cross dock case - are two examples where the Location Rounding Grouping Level option and the ERU Grouping value could be used.
Case 1 – The mall delivery case – in this case the goal is to have the ERU calculation done at a higher level than the actual order plan to location - the goal is to have the ERU calculation done considering all the locations having the same ERU Grouping ID. In the example below, all the locations have the same Location Group ID - Mall 1 - the ERU calculation and rounding will be done for the total for all the locations with the same ERU Group ID. In this case, the total across all the locations with the Mall 1 ERU Grouping ID = 6.2 and with a Rounding Threshold of .2 this value will be rounded down to 6 ERUs/pallet spaces. Had the calculation been done on an order-by-order basis the number of ERUs would have been calculated as 8 ERUs/pallet spaces.

Location Rounding Grouping Level - Mall Delivery Case
Case 2 – Cross dock case – in this case you want the grouping for ERU calculation to be done by the looking at the order ship to location ERU Group ID to determine how to build the ERUs/pallet spaces. In this scenario - where an intermediate point/cross dock is involved - the requirement is to calculate ERUs assuming the intermediate will not break apart the ERUs/pallets. In this case, Location ERU Grouping ID can be set to the location id - with this setup OTM will look to the order ship to location ERU Grouping to determine how to build pallets, and this calculation will be used even for the pickup to the cross dock portion of the solution as well as the cross dock to order ship to location.

Location Rounding Grouping Level - Cross Dock Case
With this setup, each ship to or plan to is evaluated to determine the ERUs/pallet spaces. A shipment with 10 stops all with a value of.3 ERUs will be rounded up so that each stop consumes a full pallet space in the truck.
If an order comes in with the plan to set to an intermediate point (like a cross dock) with a different ship to location. When rounding to the order plan to location OTM will group all orders going to this location on the shipment together to build pallet spaces. In the example where there is a pickup and drop off at intermediate point 1 and another drop off at intermediate point 2 – all the orders going to intermediate point 1 can be considered together and all the orders to intermediate point 2 can be considered together when counting full pallet spaces
You will find this feature to be extremely beneficial for calculating the correct number of pallets and pallet spaces required in implementations where ERUs are used to model pallets and pallet spaces.
Steps to Enable
To take advantage of this feature - you will need to either create or modify your existing ERU configurations and provide the desired values for:
- The Rounding Threshold (between 0 and 1). Values less or equal to the threshold will be rounded down.
- Rounding Grouping Level either Order, Location or Plan To.
Tips And Considerations
NOTE: ERU rounding is not implemented for Consol Shipment (Ocean FCL).
Enhanced and Extended Set of Flex Field Related Rate Basis Items
This feature provides you with an enhanced and extended set of Flex Field related Rate Basis Items (RBIs) that you can use in defining your Flex Field related rates. Where an older "equivalent" Flex Field RBI exists (from the 6.4.2 release), we recommend that you move from the older 6.4.2 version of the Flex Field RBI to the new and improved version.
In the example below - note that the new approach for defining the Flex Field RBIs have both the Qualifier (User Defined Attribute) and the Value defined together on a single line. This new formulation provides a clear association of the condition, attribute and value.

RBI Flex Field Example Order String Flex Field
Below is the list of new Flex Field RBIs provided in 21C. Note the addition of new RBIs for Line Item, Order Line Item and Ship Unit Line Item.
| New 21C Flex Field RBIs | Type | Description | |
|---|---|---|---|
| Line Item String Flex Field | Specifies the Rate Basis Item corresponding to line item string flex field. The value provided in the flex filed is considered as string. | ||
| Line Item String Flex Field as Distance | Specifies the Rate Basis Item corresponding to line item string flex field as distance. The value provided in the flex filed is considered as distance. | ||
| Line Item String Flex Field as Duration | Specifies the Rate Basis Item corresponding to line item string flex field as duration. The value provided in the flex filed is considered as duration. | ||
| Line Item String Flex Field as Currency | Specifies the Rate Basis Item corresponding to line item string flex field as currency. The value provided in the flex filed is considered as currency. | ||
| Line Item String Flex Field as a Number | Specifies the Rate Basis Item corresponding to line item string flex field as number. | ||
| Line Item String Flex Field as Weight | Specifies the Rate Basis Item corresponding to line item string flex field as weight. The value provided in the flex filed is considered as weight. | ||
| Line Item String Flex Field as Volume | Specifies the Rate Basis Item corresponding to line item string flex field as volume. The value provided in the flex filed is considered as volume. | ||
| Line Item String Flex Field as Date | Specifies the Rate Basis Item corresponding to line item string flex field as date. The value provided in the flex filed is considered as date. | ||
| Line Item Number Flex Field | Specifies the Rate Basis Item corresponding to line item number flex field. | ||
| Line Item Number Flex Field as Distance | Specifies the Rate Basis Item corresponding to line item number flex field as distance. The value provided in the flex filed is considered as distance. | ||
| Line Item Number Flex Field as Duration | Specifies the Rate Basis Item corresponding to line item number flex field as duration. The value provided in the flex filed is considered as duration. | ||
| Line Item Number Flex Field as Currency | Specifies the Rate Basis Item corresponding to line item number flex field as currency. The value provided in the flex filed is considered as currency. | ||
| Line Item Number Flex Field as Weight | Specifies the Rate Basis Item corresponding to line item number flex field as distance. The value provided in the flex filed is considered as distance. | ||
| Line Item Number Flex Field as Volume | Specifies the Rate Basis Item corresponding to line item number flex field as volume. The value provided in the flex filed is considered as volume. | ||
| Line Item Date Flex Field | Specifies the Rate Basis Item corresponding to line item date flex field. The value provided in the flex filed is considered as date. | ||
| Order Currency Flex Field | Both | Specifies the Rate Basis Item corresponding to order currency flex field. The value provided in the flex filed is considered as currency. | |
| Order Date Flex Field | Conditional | Specifies the Rate Basis Item corresponding to order date flex field. | |
| Order Line Item String Flex Field | Both | Specifies the Rate Basis Item corresponding to order line item string flex field. The value provided in the flex filed is considered as string. | |
| Order Line Item String Flex Field as Distance | Both | Specifies the Rate Basis Item corresponding to order line item string flex field as distance. The value provided in the flex filed is considered as distance. | |
| Order Line Item String Flex Field as Duration | Both | Specifies the Rate Basis Item corresponding to order line item string flex field as duration. The value provided in the flex filed is considered as duration. | |
| Order Line Item String Flex Field as Currency | Both | Specifies the Rate Basis Item corresponding to order line item string flex field as currency. The value provided in the flex filed is considered as currency. | |
| Order Line Item String Flex Field as a Number | Both | Specifies the Rate Basis Item corresponding to order line item string flex field as number. The value provided in the flex filed is considered as number. | |
| Order Line Item String Flex Field as Weight | Both | Specifies the Rate Basis Item corresponding to order line item string flex field as weight. The value provided in the flex filed is considered as weight. | |
| Order Line Item String Flex Field as Volume | Both | Specifies the Rate Basis Item corresponding to order line item string flex field as volume. The value provided in the flex filed is considered as volume. | |
| Order Line Item String Flex Field as Date | Both | Specifies the Rate Basis Item corresponding to order line item string flex field as date. The value provided in the flex filed is considered as date. | |
| Order Line Item Number Flex Field | Both | Specifies the Rate Basis Item corresponding to order line item string flex field as date. The value provided in the flex filed is considered as date. | |
| Order Line Item Number Flex Field as Distance | Both | Specifies the Rate Basis Item corresponding to order line item number flex field as distance. The value provided in the flex filed is considered as distance. | |
| Order Line Item Number Flex Field Duration | Both | Specifies the Rate Basis Item corresponding to order line item number flex field as duration. The value provided in the flex filed is considered as duration. | |
| Order Line Item Number Flex Field as Currency | Both | Specifies the Rate Basis Item corresponding to order line item number flex field as currency. The value provided in the flex filed is considered as currency. | |
| Order Line Item Number Flex Field as Weight | Both | Specifies the Rate Basis Item corresponding to order line item number flex field as weight. The value provided in the flex filed is considered as weight. | |
| Order Line Item Number Flex Field as Volume | Both | Specifies the Rate Basis Item corresponding to order line item number flex field as volume. The value provided in the flex filed is considered as volume. | |
| Order Line Item Date Flex Field | Both | Specifies the Rate Basis Item corresponding to order line item date flex field. The value provided in the flex filed is considered as date | |
| Order Number Flex Field | Both | Specifies the Rate Basis Item corresponding to order number flex field. | |
| Order Number Flex Field as Currency | Both | Specifies the Rate Basis Item corresponding to order number flex field as currency. The value provided in the flex filed is considered as currency. You must make sure that the number flex field value is provided along with the unit of currency such as EUR, USD, etc. otherwise the default unit is considered. | |
| Order Number Flex Field as Duration | Both | Specifies the Rate Basis Item corresponding to order number flex field as duration. The value provided in the flex filed is considered as duration. You must make sure that the number flex field value is provided along with the unit of duration such as D/H/M otherwise the default unit is considered. | |
| Order Number Flex Field as Volume | Both | Specifies the Rate Basis Item corresponding to order number flex field as volume. The value provided in the flex filed is considered as volume. You must make sure that the number flex field value is provided along with the unit of volume such as GAL, CAN GAL, etc. otherwise the default unit is considered. | |
| Order Number Flex Field as Weight | Both | Specifies the Rate Basis Item corresponding to order number flex field as weight. The value provided in the flex filed is considered as weight. You must make sure that the number flex field value is provided along with the unit of weight such as LB, KG, etc. otherwise the default unit is considered. | |
| Order String Flex Field | Both | Specifies the Rate Basis Item corresponding to order string flex field. The value provided in the flex filed is considered as string. | |
| Order String Flex Field as Currency | Both | Specifies the Rate Basis Item corresponding to order string flex field as currency. The value provided in the flex filed is considered as currency. You must make sure that the string flex field value is provided along with the unit of currency such as EUR, USD, etc. otherwise the default unit is considered. | |
| Order String Flex Field as Date | Conditional | Specifies the Rate Basis Item corresponding to order string flex field as date. The value provided in the flex filed is considered as date. When you select this RBI, a Qualifier drop-down list will be available. | |
| Order String Flex Field as Distance | Both | Specifies the Rate Basis Item corresponding to order string flex field as distance. The value provided in the flex filed is considered as distance. You must make sure that the string flex field is provided along with the unit of distance such as MI, KM, etc. otherwise the default unit is considered. | |
| Order String Flex Field as Duration | Both | Specifies the Rate Basis Item corresponding to order number flex field as duration. The value provided in the flex filed is considered as duration. You must make sure that the number flex field value is provided along with the unit of duration such as D/H/M otherwise the default unit is considered. | |
| Order String Flex Field as Volume | Both | Specifies the Rate Basis Item corresponding to order string flex field as volume. The value provided in the flex filed is considered as volume. You must make sure that the string flex field value is provided along with the unit of volume such as GAL, CAN GAL, etc. otherwise the default unit is considered. | |
| Order String Flex Field as Weight | Both | Specifies the Rate Basis Item corresponding to order string flex field as weight. The value provided in the flex filed is considered as weight. You must make sure that the string flex field value is provided along with the unit of weight such as LB, KG, etc. otherwise the default unit is considered. | |
| Shipment Currency Flex Field | Both | Specifies the Rate Basis Item corresponding to shipment currency flex field. | |
| Shipment Date Flex Field | Conditional | Specifies the Rate Basis Item corresponding to shipment date flex field. | |
| Shipment Number Flex Field | Both | Specifies the Rate Basis Item corresponding to shipment string flex field as date. The value provided in the flex field is considered as date. | |
| Shipment Number Flex Field as Currency | Both | Specifies the Rate Basis Item corresponding to shipment number flex field as currency. The value provided in the flex field is considered as currency. Make sure that you provide the number flex field value along with the unit of currency such as EUR, USD, etc. otherwise the default unit is considered. | |
| Shipment Number Flex Field as Distance | Both | Specifies the Rate Basis Item corresponding to shipment number flex field as distance. The value provided in the flex field is considered as distance. Make sure that you provide the number flex field value along with the unit of distance such as MI, KM, etc. otherwise the default unit is considered. | |
| Shipment Number Flex Field as Duration | Both | Specifies the Rate Basis Item corresponding to shipment number flex field as duration. The value provided in the flex field is considered as duration. Make sure that you provide the number flex field value along with the unit of duration such as D/H/M otherwise the default unit is considered. | |
| Shipment Number Flex Field as Volume | Both | Specifies the Rate Basis Item corresponding to shipment number flex field as volume. The value provided in the flex field is considered as volume. Make sure that you provide the number flex field value along with the unit of volume such as GAL, CAN GAL, etc. otherwise the default unit is considered. | |
| Shipment Number Flex Field as Weight | Both | Specifies the Rate Basis Item corresponding to shipment number flex field as weight. The value provided in the flex field is considered as weight. Make sure that you provide the number flex field value along with the unit of weight such as LB, KG, etc. otherwise the default unit is considered. | |
| Shipment Stop Date Flex Field | Conditional | Specifies the Rate Basis Item corresponding to shipment stop date flex field. | |
| Ship Unit Line Item String Flex Field | Specifies the Rate Basis Item corresponding to ship unit line item string flex field. The value provided in the flex filed is considered as string. | ||
| Ship Unit Line Item String Flex Field as Distance | Specifies the Rate Basis Item corresponding to ship unit line item string flex field as distance. The value provided in the flex filed is considered as distance. | ||
| Ship Unit Line Item String Flex Field as Duration | Specifies the Rate Basis Item corresponding to ship unit line item string flex field as duration. The value provided in the flex filed is considered as duration. | ||
| Ship Unit Line Item String Flex Field as Currency | Specifies the Rate Basis Item corresponding to ship unit line item string flex field as currency. The value provided in the flex filed is considered as currency. | ||
| Ship Unit Line Item String Flex Field as a Number | Specifies the Rate Basis Item corresponding to ship unit line item string flex field as number. The value provided in the flex filed is considered as number. | ||
| Ship Unit Line Item String Flex Field as Weight | Specifies the Rate Basis Item corresponding to ship unit line item string flex field as weight. The value provided in the flex filed is considered as weight. | ||
| Ship Unit Line Item String Flex Field as Volume | Specifies the Rate Basis Item corresponding to ship unit line item string flex field as volume. The value provided in the flex filed is considered as volume. | ||
| Ship Unit Line Item String Flex Field as Date | Specifies the Rate Basis Item corresponding to ship unit line item string flex field as date. The value provided in the flex filed is considered as date. | ||
| Ship Unit Line Item Number Flex Field | Specifies the Rate Basis Item corresponding to ship unit line item number flex field. | ||
| Ship Unit Line Item Number Flex Field as Distance | Specifies the Rate Basis Item corresponding to ship unit line item number flex field as distance. The value provided in the flex filed is considered as distance. | ||
| Ship Unit Line Item Number Flex Field as Duration | Specifies the Rate Basis Item corresponding to ship unit line item number flex field as duration. The value provided in the flex filed is considered as duration. | ||
| Ship Unit Line Item Number Flex Field as Currency | Specifies the Rate Basis Item corresponding to ship unit line item number flex field as currency. The value provided in the flex filed is considered as currency. | ||
| Ship Unit Line Item Number Flex Field as Weight | Specifies the Rate Basis Item corresponding to ship unit line item number flex field as weight. The value provided in the flex filed is considered as weight. | ||
| Ship Unit Line Item Number Flex Field as Volume | Specifies the Rate Basis Item corresponding to ship unit line item number flex field as volume. The value provided in the flex filed is considered as volume. | ||
| Ship Unit Line Item Date Flex Field | Specifies the Rate Basis Item corresponding to ship unit line item date flex field.. The value provided in the flex filed is considered as date. | ||
| Shipment Stop Number Flex Field | Both | Specifies the Rate Basis Item corresponding to shipment stop number flex field. | |
| Shipment Stop Number Flex Field as Currency | Both | Specifies the Rate Basis Item corresponding to shipment stop number flex field as currency. You must make sure that the number flex field value is provided along with the unit of currency such as EUR, USD, etc. otherwise the default unit is considered. | |
| Shipment Stop Number Flex Field as Distance | Both | Specifies the Rate Basis Item corresponding to shipment stop number flex field as distance. You must make sure that the number flex field value is provided along with the unit of distance such as MI, KM, etc. otherwise the default unit is considered. | |
| Shipment Stop Number Flex Field as Duration | Both | Specifies the Rate Basis Item corresponding to shipment stop number flex field as duration. You must make sure that the number flex field value is provided along with the unit of duration such as D/H/M otherwise the default unit is considered. | |
| Shipment Stop Number Flex Field as Volume | Both | Specifies the Rate Basis Item corresponding to shipment stop number flex field as volume. You must make sure that the number flex field value is provided along with the unit of volume such as GAL, CAN GAL, etc. otherwise the default unit is considered. | |
| Shipment Stop Number Flex Field as Weight | Both | Specifies the Rate Basis Item corresponding to shipment stop number flex field as currency. You must make sure that the number flex field value is provided along with the unit of weight such as LB, KG, etc. otherwise the default unit is considered. | |
| Shipment Stop String Flex Field | Both | Specifies the Rate Basis Item corresponding to shipment stop string flex field. | |
| Shipment Stop String Flex Field as Currency | Both | Specifies the Rate Basis Item corresponding to shipment stop string flex field as currency. Make sure that you provide the string flex field value along with the unit of currency such as EUR, USD, etc. otherwise the default unit is considered. | |
| Shipment Stop String Flex Field as Date | Conditional | Specifies the Rate Basis Item corresponding to shipment stop string flex field as date. | |
| Shipment Stop String Flex Field as Distance | Both | Specifies the Rate Basis Item corresponding to shipment stop number flex field as distance. You must make sure that the number flex field value is provided along with the unit of distance such as MI, KM, etc. otherwise the default unit is considered. | |
| Shipment Stop String Flex Field as Duration | Both | Specifies the Rate Basis Item corresponding to shipment stop number flex field as duration. You must make sure that the number flex field value is provided along with the unit of duration such as D/H/M otherwise the default unit is considered. | |
| Shipment Stop String Flex Field as a Number | Both | Specifies the Rate Basis Item corresponding to shipment stop string flex field as a number. | |
| Shipment Stop String Flex Field as Volume | Both | Specifies the Rate Basis Item corresponding to shipment stop string flex field as weight. Make sure that you provide the string flex field value along with the unit of volume such as GAL, CAN GAL, etc. otherwise the default unit is considered. | |
| Shipment String Flex Field | Both | Specifies the Rate Basis Item corresponding to shipment string flex field as weight. The value provided in the flex field is considered as weight. Make sure that you provide the string flex field value along with the unit of weight such as LB, KG, etc. otherwise the default unit is considered. | |
| Shipment String Flex Field as Currency | Both | Specifies the Rate Basis Item corresponding to shipment string flex field. The value provided in the field is considered as a string. When you select this RBI, a Qualifier drop-down list will be available. | |
| Shipment String Flex Field as Date | Both | Specifies the Rate Basis Item corresponding to shipment string flex field as currency. The value provided in the flex field is considered as currency. Make sure that you provide the string flex field value along with the unit of currency such as EUR, USD, etc. otherwise the default unit is considered. | |
| Shipment String Flex Field as Distance | Conditional | Specifies the Rate Basis Item corresponding to shipment string flex field as date. The value provided in the flex field is considered as date. | |
| Shipment String Flex Field as Duration | Both | Specifies the Rate Basis Item corresponding to shipment string flex field as distance. The value provided in the flex field is considered as distance. Make sure that you provide the string flex field value along with the unit of distance such as MI, KM, etc. otherwise the default unit is considered. | |
| Shipment String Flex Field as Number | Both | Specifies the Rate Basis Item corresponding to shipment string flex field as duration. The value provided in the flex field is considered as duration. Make sure that you provide the string flex field value along with the unit of duration such as D/H/M otherwise the default unit is considered. | |
| Shipment String Flex Field as Volume | Both | Specifies the Rate Basis Item corresponding to shipment string flex field as number. The value provided in the flex field is considered as number. | |
| Shipment String Flex Field as Weight | Both | Specifies the Rate Basis Item corresponding to shipment string flex field as volume. The value provided in the flex field is considered as volume. Make sure that you provide the string flex field value along with the unit of volume such as GAL, CAN GAL, etc. otherwise the default unit is considered. | |
| Ship Unit Line Item String Flex Field | Specifies the Rate Basis Item corresponding to ship unit line item string flex field. The value provided in the flex filed is considered as string. | ||
| Shipment Stop String Flex Field as Weight | Both | Specifies the Rate Basis Item corresponding to shipment stop string flex field as weight. Make sure that you provide the string flex field value along with the unit of weight such as LB, KG, etc. otherwise the default unit is considered. |
New 21C Flex Field RBIs
Below is the list of original 6.4.2 Flex Field RBIs - we recommend that you move from the original Flex Field RBI to the new 21C version of the equivalent Flex Field RBI.
| Original RBI From 6.4.2 | Move To New 21C RBI | Type | Description |
|---|---|---|---|
| Order Currency Flex Field Value | Order Currency Flex Field | Both | Specifies the Rate Basis Item corresponding to order currency flex field. The value provided in the flex filed is considered as currency. |
| Order Date Flex Field | Conditional | Specifies the Rate Basis Item corresponding to order date flex field. | |
| Order Number Flex Field Value | Order Number Flex Field | Both | Specifies the Rate Basis Item corresponding to order number flex field. |
| Order Number Flex Field Value as Currency | Order Number Flex Field as Currency | Both | Specifies the Rate Basis Item corresponding to order number flex field as currency. The value provided in the flex filed is considered as currency. You must make sure that the number flex field value is provided along with the unit of currency such as EUR, USD, etc. otherwise the default unit is considered. |
| Order Number Flex Field Value as Duration | Order Number Flex Field as Duration | Both | Specifies the Rate Basis Item corresponding to order number flex field as duration. The value provided in the flex filed is considered as duration. You must make sure that the number flex field value is provided along with the unit of duration such as D/H/M otherwise the default unit is considered. |
| Order Number Flex Field Value as Volume | Order Number Flex Field as Volume | Both | Specifies the Rate Basis Item corresponding to order number flex field as volume. The value provided in the flex filed is considered as volume. You must make sure that the number flex field value is provided along with the unit of volume such as GAL, CAN GAL, etc. otherwise the default unit is considered. |
| Order Number Flex Field Value as Weight | Order Number Flex Field as Weight | Both | Specifies the Rate Basis Item corresponding to order number flex field as weight. The value provided in the flex filed is considered as weight. You must make sure that the number flex field value is provided along with the unit of weight such as LB, KG, etc. otherwise the default unit is considered. |
| Order String Flex Field Value | Order String Flex Field | Both | Specifies the Rate Basis Item corresponding to order string flex field. The value provided in the flex filed is considered as string. |
| Order String Flex Field Value as Currency | Order String Flex Field as Currency | Both | Specifies the Rate Basis Item corresponding to order string flex field as currency. The value provided in the flex filed is considered as currency. You must make sure that the string flex field value is provided along with the unit of currency such as EUR, USD, etc. otherwise the default unit is considered. |
| Order String Flex Field Value as Date | Order String Flex Field as Date | Conditional | Specifies the Rate Basis Item corresponding to order string flex field as date. The value provided in the flex filed is considered as date. When you select this RBI, a Qualifier drop-down list will be available. |
| Order String Flex Field Value as Distance | Order String Flex Field as Distance | Both | Specifies the Rate Basis Item corresponding to order string flex field as distance. The value provided in the flex filed is considered as distance. You must make sure that the string flex field is provided along with the unit of distance such as MI, KM, etc. otherwise the default unit is considered. |
| Order String Flex Field Value as Duration | Order String Flex Field as Duration | Both | Specifies the Rate Basis Item corresponding to order number flex field as duration. The value provided in the flex filed is considered as duration. You must make sure that the number flex field value is provided along with the unit of duration such as D/H/M otherwise the default unit is considered. |
| Order String Flex Field Value as Volume | Order String Flex Field as Volume | Both | Specifies the Rate Basis Item corresponding to order string flex field as volume. The value provided in the flex filed is considered as volume. You must make sure that the string flex field value is provided along with the unit of volume such as GAL, CAN GAL, etc. otherwise the default unit is considered. |
| Order String Flex Field Value as Weight | Order String Flex Field as Weight | Both | Specifies the Rate Basis Item corresponding to order string flex field as weight. The value provided in the flex filed is considered as weight. You must make sure that the string flex field value is provided along with the unit of weight such as LB, KG, etc. otherwise the default unit is considered. |
| Shipment Currency Flex Field value | Shipment Currency Flex Field | Both | Specifies the Rate Basis Item corresponding to shipment currency flex field. |
| Shipment Date Flex Field value | Shipment Date Flex Field | Conditional | Specifies the Rate Basis Item corresponding to shipment date flex field. |
| Shipment Number Flex Field Value | Shipment Number Flex Field | Both | Specifies the Rate Basis Item corresponding to shipment string flex field as date. The value provided in the flex field is considered as date. |
| Shipment Number Flex Field Value as Currency | Shipment Number Flex Field as Currency | Both | Specifies the Rate Basis Item corresponding to shipment number flex field as currency. The value provided in the flex field is considered as currency. Make sure that you provide the number flex field value along with the unit of currency such as EUR, USD, etc. otherwise the default unit is considered. |
| Shipment Number Flex Field Value as Distance | Shipment Number Flex Field as Distance | Both | Specifies the Rate Basis Item corresponding to shipment number flex field as distance. The value provided in the flex field is considered as distance. Make sure that you provide the number flex field value along with the unit of distance such as MI, KM, etc. otherwise the default unit is considered. |
| Shipment Number Flex Field Value as Duration | Shipment Number Flex Field as Duration | Both | Specifies the Rate Basis Item corresponding to shipment number flex field as duration. The value provided in the flex field is considered as duration. Make sure that you provide the number flex field value along with the unit of duration such as D/H/M otherwise the default unit is considered. |
| Shipment Number Flex Field Value as Volume | Shipment Number Flex Field as Volume | Both | Specifies the Rate Basis Item corresponding to shipment number flex field as volume. The value provided in the flex field is considered as volume. Make sure that you provide the number flex field value along with the unit of volume such as GAL, CAN GAL, etc. otherwise the default unit is considered. |
| Shipment Number Flex Field Value as Weight | Shipment Number Flex Field as Weight | Both | Specifies the Rate Basis Item corresponding to shipment number flex field as weight. The value provided in the flex field is considered as weight. Make sure that you provide the number flex field value along with the unit of weight such as LB, KG, etc. otherwise the default unit is considered. |
| Shipment Stop Date Flex Field Value | Shipment Stop Date Flex Field | Conditional | Specifies the Rate Basis Item corresponding to shipment stop date flex field. |
| Shipment Stop Number Flex Field Value | Shipment Stop Number Flex Field | Both | Specifies the Rate Basis Item corresponding to shipment stop number flex field. |
| Shipment Stop Number Flex Field Value as Currency | Shipment Stop Number Flex Field as Currency | Both | Specifies the Rate Basis Item corresponding to shipment stop number flex field as currency. You must make sure that the number flex field value is provided along with the unit of currency such as EUR, USD, etc. otherwise the default unit is considered. |
| Shipment Stop Number Flex Field Value as Distance | Shipment Stop Number Flex Field as Distance | Both | Specifies the Rate Basis Item corresponding to shipment stop number flex field as distance. You must make sure that the number flex field value is provided along with the unit of distance such as MI, KM, etc. otherwise the default unit is considered. |
| Shipment Stop Number Flex Field Value as Duration | Shipment Stop Number Flex Field as Duration | Both | Specifies the Rate Basis Item corresponding to shipment stop number flex field as duration. You must make sure that the number flex field value is provided along with the unit of duration such as D/H/M otherwise the default unit is considered. |
| Shipment Stop Number Flex Field Value as Volume | Shipment Stop Number Flex Field as Volume | Both | Specifies the Rate Basis Item corresponding to shipment stop number flex field as volume. You must make sure that the number flex field value is provided along with the unit of volume such as GAL, CAN GAL, etc. otherwise the default unit is considered. |
| Shipment Stop Number Flex Field Value as Weight | Shipment Stop Number Flex Field as Weight | Both | Specifies the Rate Basis Item corresponding to shipment stop number flex field as currency. You must make sure that the number flex field value is provided along with the unit of weight such as LB, KG, etc. otherwise the default unit is considered. |
| Shipment Stop String Flex Field Value | Shipment Stop String Flex Field | Both | Specifies the Rate Basis Item corresponding to shipment stop string flex field. |
| Shipment Stop String Flex Field Value as Currency | Shipment Stop String Flex Field as Currency | Both | Specifies the Rate Basis Item corresponding to shipment stop string flex field as currency. Make sure that you provide the string flex field value along with the unit of currency such as EUR, USD, etc. otherwise the default unit is considered. |
| Shipment Stop String Flex Field Value as Date | Shipment Stop String Flex Field as Date | Conditional | Specifies the Rate Basis Item corresponding to shipment stop string flex field as date. |
| Shipment Stop String Flex Field Value as Distance | Shipment Stop String Flex Field as Distance | Both | Specifies the Rate Basis Item corresponding to shipment stop number flex field as distance. You must make sure that the number flex field value is provided along with the unit of distance such as MI, KM, etc. otherwise the default unit is considered. |
| Shipment Stop String Flex Field Value as Duration | Shipment Stop String Flex Field as Duration | Both | Specifies the Rate Basis Item corresponding to shipment stop number flex field as duration. You must make sure that the number flex field value is provided along with the unit of duration such as D/H/M otherwise the default unit is considered. |
| Shipment Stop String Flex Field Value as a Number | Shipment Stop String Flex Field as a Number | Both | Specifies the Rate Basis Item corresponding to shipment stop string flex field as a number. |
| Shipment Stop String Flex Field Value as Volume | Shipment Stop String Flex Field as Volume | Both | Specifies the Rate Basis Item corresponding to shipment stop string flex field as weight. Make sure that you provide the string flex field value along with the unit of volume such as GAL, CAN GAL, etc. otherwise the default unit is considered. |
| Shipment String Flex Field Value | Shipment String Flex Field | Both | Specifies the Rate Basis Item corresponding to shipment string flex field as weight. The value provided in the flex field is considered as weight. Make sure that you provide the string flex field value along with the unit of weight such as LB, KG, etc. otherwise the default unit is considered. |
| Shipment String Flex Field Value as Currency | Shipment String Flex Field as Currency | Both | Specifies the Rate Basis Item corresponding to shipment string flex field. The value provided in the field is considered as a string. When you select this RBI, a Qualifier drop-down list will be available. |
| Shipment String Flex Field Value as Date | Shipment String Flex Field as Date | Both | Specifies the Rate Basis Item corresponding to shipment string flex field as currency. The value provided in the flex field is considered as currency. Make sure that you provide the string flex field value along with the unit of currency such as EUR, USD, etc. otherwise the default unit is considered. |
| Shipment String Flex Field Value as Distance | Shipment String Flex Field as Distance | Conditional | Specifies the Rate Basis Item corresponding to shipment string flex field as date. The value provided in the flex field is considered as date. |
| Shipment String Flex Field Value as Duration | Shipment String Flex Field as Duration | Both | Specifies the Rate Basis Item corresponding to shipment string flex field as distance. The value provided in the flex field is considered as distance. Make sure that you provide the string flex field value along with the unit of distance such as MI, KM, etc. otherwise the default unit is considered. |
| Shipment String Flex Field Value as Number | Shipment String Flex Field as Number | Both | Specifies the Rate Basis Item corresponding to shipment string flex field as duration. The value provided in the flex field is considered as duration. Make sure that you provide the string flex field value along with the unit of duration such as D/H/M otherwise the default unit is considered. |
| Shipment String Flex Field Value as Volume | Shipment String Flex Field as Volume | Both | Specifies the Rate Basis Item corresponding to shipment string flex field as number. The value provided in the flex field is considered as number. |
| Shipment String Flex Field Value as Weight | Shipment String Flex Field as Weight | Both | Specifies the Rate Basis Item corresponding to shipment string flex field as volume. The value provided in the flex field is considered as volume. Make sure that you provide the string flex field value along with the unit of volume such as GAL, CAN GAL, etc. otherwise the default unit is considered. |
| Shipment Stop String Flex Field Value as Weight | Shipment Stop String Flex Field as Weight | Both | Specifies the Rate Basis Item corresponding to shipment stop string flex field as weight. Make sure that you provide the string flex field value along with the unit of weight such as LB, KG, etc. otherwise the default unit is considered. |
This feature extends the list of Flex Field related RBIs you can use to define your Flex Field related rates to include options for Line Item, Order Line Item and Ship Unit Line Item. This feature also enhances the Flex Field related RBIs so that the conditions on the flex attributes are verified against the attribute specified in the condition, which was not the case in the early implementation.
Steps to Enable
You don't need to do anything to enable this feature.
Tips And Considerations
NOTE: The recommendation to move to the new 21C version of the Flex Field RBIs is to support scenarios where you need to define multiple conditions using multiple attributes. With the original 6.4.2 set of Flex Field RBIs, where you define the qualifier and then the value on separate rows on the rate, if a rate setup involves multiple conditions and attributes, the rating engine evaluates this setup as a single condition that is verified against each/all the flex attributes on the object. In this setup, the rate will fail since the one condition cannot be validated correctly against all the attributes on the object. The new 21C RBIs, supports multiple conditions and attributes by verifying the attribute specified in the condition.
In the example below, the desire is for the rate to apply if both of the conditions are met - i.e., where the Order Flex Field Qualifier User Defined Attribute 1 has a value of RATE ISSUE and where Order Flex Field Qualifier User Defined Attribute 2 has a value of RATE ISSUE2. When this rate is evaluated, both of the conditions will be checked on each flex attribute present on the object and the rate will fail even if the specified flex fields and values are available on the object.

Original Flex Field RBI Setup Multiple Conditions and Attributes
HERE Speed Profile Type Parameter
This feature provides you with the option of selecting which HERE Technology Speed Profile setting to use when calculating transit times - either Default or Fast. The additional option of Fast uses the default speed profile for cars when calculating transit time and assumes a faster average speed on the route than truck/the Default. The faster transit time provided by the Fast option - in some scenarios - will allow more stops to be added to your shipments for the day and as such can provide you with improved solution quality.

External Distance Engine HERE Speed Profile Parameter Option
In many areas of the world, the option to simulate higher speeds results in better solution quality allowing for more stops to be added to a shipment resulting in fewer shipments planned and more stops completed in a day. Setting the speed profile parameter to Fast instructs HERE to calculate transit times using their default speed profile for car. The speed profile for car uses a faster speed on the route to calculate transit time than what is used by the default truck speeds option.
Steps to Enable
If you wish to utilize the Fast Speed Profile Type then you will need to go to your HERE External Distance Engine setup and select the Speed Profile Type Parameter from the Parameter dropdown and set the Value to Fast. No changes are required to continue to have HERE calculate the transit time using their default/truck speed profile.
Tips And Considerations
For more information about the SpeedProfileType please see the HERE Routing API.
Spot Tender Planner View Screen
This feature provides you with a new screenset (SPOT_BID) that provides you with an easy way to query for and view all your in-process spot bid transactions. The Spot Bid Tender Response planner view is available via Shipment Management > Spot Bid Tender and allows you to query for and view your spot bid tender transactions directly without having to drill into each tender transaction using the Online Booking/Tendering screen. The Spot Bid Tender is also available as a new workbench table object that you can use to configure a Workbench that allows you to quickly review all of your outstanding spot bid tender transactions on a shipment-by-shipment basis. The 'Award Bid' function is now available as an action on the newly created Spot Tender Planner View Screen. As a menu action, you can decide to include or not include the action on a per screen set basis and you can configure the action to support action checks that can be run prior to awarding a bid.
The Spot Bid Tender Response Finder provides you with all the fields you need to query for your outstanding shipment spot bid tender transactions.

Spot Bid Tender Response - Finder
The Spot Bid Tender Response screen, below, provides you with a quick summary of all your outstanding spot bid tender transactions. You can config the finder results screenset to allow for edits directly within the finder result screen and you have the ability to select and run the Award Bid action directly from this view. The Spot Bid Tender Response also provides access to both the Spot Rate Adjustment and the Spot Rate Adjusted Cost for a bid, as well as providing all the other information about each of the outstanding bids in an easy to read row column format. As noted, "Award Bid" is now available as an action on the newly created Spot Tender Planner View Screen.

Spot Bid Tender Response
You can edit a specific spot bid tender transaction to enter a New Bid, enter a Remark or run the Award Bid action. .

Spot Bid Tender Response - Edit
Access to the Spot Bid Tender screen is also provided as a SmartLink from the Buy Shipment. The spot bid tender information is retained after award and i_transaction purge.

Buy Shipment Spot Bid Tender SmartLink
Spot Adjusted cost stored on tender collab table
On the tender collab table new database fields have been added to store the calculated spot adjusted cost. The spot adjusted costs is calculated as (spot bid cost) x (service provider spot rate adjustment factor) and is stored on the tender collab table. This field can be added to the planner tender response screen.
Below are a few examples of a Workbench configured to show you your shipments with spot bid tenders. The Workbench below is comprised of a Shipment table and a detailed Spot Bid Tender table linked to the Shipment table. This Workbench setup will allow you to easily review, by shipment, all of your outstanding spot tender transactions.
In the example below, some of the service providers have provided bids against the spot bid tender. With this view, you can quickly understand the service providers that have responded and those that haven't, the current bids available for a shipment, the spot rate adjusted cost, the remaining response time for the spot bid and other information.

Workbench - Shipment and Spot Tender Response Table with Bids
This feature provides the planner with direct access to the outstanding spot bids for a shipment as well as extending and improving the information provided for in-process spot bids.
Steps to Enable
The Spot Bid Tender Response planner view is available out of the box via Shipment Management > Spot Bid Tender.
For the Workbench view shown above, you will need to configure a two table Workbench with Shipments and Spot Bid Tender.
- Create a panel that is configured to provide your spot bid shipments:
- Component Type = Table
- Object Type = Buy Shipment
- Select your screen set of choice
- Provide the appropriate Saved Search to bring in your Spot Tendered shipment.
- Create a second panel for the Spot Bid Tender transactions
- Component Type = Table
- Object Type = Spot Bid Tender
- Select your screen set of choice
- Select the Detail table check box
- Select the SPOT TENDERS FOR SHIPMENTS PUBLIC saved search
Tips And Considerations
The Award Bid action on the Spot Bid screen set operates in the same way as it does when run from the Online Booking and Tendering screen.
- The Award Bid action only works on ONE record at a time.
- The shipment status must be valid for the action to run.
- The New Bid amount field on the input screen is not mandatory.
- The audit action id for this action is: AWARD BID. This will allow you to set up action checks for the action.

Award Bid Action Input Screen
Saved Query for Service Providers with Spot Bid Tenders
This feature adds a saved query option to the options already available to you for identifying the set of service providers that you want to include in a a spot bid tender. When the saved query options is included in the spot bid tender process, the service providers returned by the saved query will be displayed in the Other Service Providers section of the spot bid screen. You have the option to take the default - where all of the service providers returned by the saved query will be included or you can selectively include or exclude service providers in the returned list.

Spot Bid Tender Action Input Screen
In the example below, the spot bid saved query My Spot Tender ServiceProvs has been entered.

Spot Bid Tender Action Input Screen with Saved Query
When the Saved Query ID is saved the query populates the Other Service Providers section of the spot bid screen with the results of the query.

Spot Bid Tender Action Input Screen with Saved Query Result
Like the Lane Service Providers list, you have the option to select/deselect all the Other Service Providers returned or you can individually select/deselect the service providers you want to include.

Spot Bid Tender Action Input Screen Deselect All Other Service Providers

Spot Bid Tender Action Input Screen Deselect Some Other Service Providers
This feature provides you an easy to configure and flexible approach for identifying the service providers to include in your spot bid tenders.
Steps to Enable
You don't need to do anything to enable this feature.
Spot Tender Bid Response Proposed Pickup Time
This feature enhances the information provided by the service provider - in a spot bid tender scenario, to include - as part of the service provider's spot bid response, a proposed pickup time. The planner has the option, as part of the spot bid awarding process, to update the shipment start time with the winning service provider's proposed pickup time.
In the example below, the service provider submits a bid for a shipment - in this bid they also propose a pickup time for the shipment.

Pickup Date with Bid Response
As part of the award action, the proposed bid amount and the service provider's proposed pickup date and time are visible to the planner. The planner has the option to Update The Shipment Start Time to the proposed Pick Time provided by the service provider as part of their bid by selecting the Update The Shipment Start Time flag.

Planner Award Bid with Shipment Pickup Time
Below is the shipment 06388 - updated with the new start time provided by the service provider as part of their spot bid response and accepted by the planner as part of the spot bid award action.

Updated Shipment Start Time
Below is the stop level view related to the option to Update Shipment Start Time. Note that the pickup stop Arrival Time has been updated and this is now a Fixed Arrival Time.

Stop 1 Estimated Arrival Time Updated and Fixed Arrival Checked
Extends the dialog, as part of a spot bid process, to allow for the service provider to propose a pickup date/time, which, if acceptable, could lead to a lower/more competitive bid from that service provider.
Steps to Enable
The property glog.webserver.opentender.remarkQualForPickupDate must be set with the Shipment Remark Qualifier you would like to use for capturing the service provider's proposed pickup time if you intend to view the proposed information, and optionally, use that information to update your shipment start time.

Property Setup for Remark Qualifier Proposed Pickup Time
The value set in the Property is the label for the date time that will be used if the planner selects the Update Shipment Start Time. .

Property Usage - Sets Label for Update Shipment Start Time Value
Tips And Considerations
NOTE: This feature will be replaced by the SPOT BID TENDER - OPTIONAL BIDS feature, targeted for delivery in the 22A Update.
Require New Spot Bid to Be Greater Than the Existing Bid
This feature allows you to configure your Spot Bid Tender process so that Service Providers, who change their original Spot Bid, are forced to only submit an updated bid that is greater than their existing/current bid. This new capability eliminates the opportunity for Service Providers to submit a slightly lower bid in the last seconds of the open bid in an attempt to undercut the other Service Providers.
In the example below, the property glog.webserver.opentender.validateLastBid is set to true. The Service Provider submits their first bid for $250 and then attempts to submit a subsequent bid for $249, the lower bid of $249 is not accepted and the validation error message is displayed.

Initial Bid of $250

Warning Message for Lower Subsequent Bid
This feature helps eliminate the opportunity for Service Providers to game the Spot Bid Tender process by submitting last second bids that are only a few pennies lower than the lowest bid.
Steps to Enable
To enable this new behavior you will need to set the property glog.webserver.opentender.validateLastBid =true
Navigate to Configuration and Administration > Property Management > Property Sets.
NOTE: Only the DBA.ADMIN user can access and use the Property Sets page.
glog.webserver.opentender.validateLastBid =false
- Default setting. Existing behavior - entered bid values are not validated against the previous values.
glog.webserver.opentender.validateLastBid =true
- When the property is set to true the service provider's new bids will be validated against the previous bid value and the value entered for the new bid must be greater than the last bid. If the new bid is less than the previous bid an alert will be provided and the new bid will not be accepted.
Tips And Considerations
If the currency of last bid is different from the newly entered bid, the higher than previous alert/validation will not be provided, and the bid submission will error out and will not be accepted.
Spot Tender Decline Option for Service Providers
This feature provides you with the option to allow your Service Providers to Decline an Open Spot Bid even if they have already submitted a Bid. When your Service Provider Declines an Open Spot Bid Tender, even if their Bid is the lowest Bid when the Bid times out, they will not be chosen. To handle situations where the Service Provider selected the Decline option by accident, or you were able to negotiate for the Service Provider to accept the shipment after they Declined, the option to explicitly award the Bid to a Service Provider who Declines is still available.
The property glog.webserver.opentender.optOutBiddingOptionDefault is provided to control whether you allow your Service Providers to have the option to Decline Open Spot Tenders within the Online Booking/Tendering screen.
- glog.webserver.opentender.optOutBiddingOptionDefault = false is the default value - This is the current behavior - the option to Decline is not provided.
- glog.webserver.opentender.optOutBiddingOptionDefault = true the new option - Setting the property to true will provide the option for the Service Provider to Decline an Open Spot Tender - even after they have submitted a bid.
In the example below, the glog.webserver.opentender.optOutBiddingOptionDefault = true and the Decline option is provided for the Service Provider within the Online Booking/Tendering screen.

Online Booking/Tendering - Decline Option
This feature, allows you to provide the option for your Service Providers to opt out/decline to participate in an Open Spot Bid Tender.
Steps to Enable
To enable this new behavior you will need to set the property glog.webserver.opentender.optOutBiddingOptionDefault = true
Navigate to Configuration and Administration > Property Management > Property Sets.
NOTE: Only the DBA.ADMIN user can access and use the Property Sets page.
Spot Bid and Broadcast Tender - Turnoff Withdraw Tender Emails for No Bid
This feature provides you with the option to limit the timeout and withdraw tender email notification sent to your service providers to include only those service providers who submitted a bid.
The property glog.tender.notifyNonBidServprov.turnOff is provided to control the notification for open tenders (Spot Bid Tender and Broadcast Tender) in the case (common case) where the service providers invited to participate in an open tender do not submit a bid.
- glog.tender.notifyNonBidServprov.turnOff =false the default value - This is the current behavior - all service providers are notified - with or without bids provided.
-
glog.tender.notifyNonBidServprov.turnOff =true the new option - Setting the property to true will limit the notifications to only those service providers who participated in the tender by providing a bid.
In the example below, the shipment 06592 was Spot Bid Tendered to five service providers and then withdrawn. The property glog.tender.notifyNonBidServprov.turnOff was set to false so all the service providers where notified of the withdraw..

Withdraw Email to All Service Providers - glog.tender.notifyNonBidServprov.turnOff =false
In the second example, the same shipment and set of service providers received the Spot Bid Tender, but in this case only Carrier04 provided a bid. With the property glog.tender.notifyNonBidServprov.turnOff set to true, only Carrier04 (the service provider with a bid) received an email notification.

Carrier04 with Bid

Only One Email Sent on Withdraw with glog.tender.notifyNonBidServprov.turnOff =true
This feature will reduce the resources required to generate and transmit unnecessary emails and this feature will also reduce the volume of nuisance emails received by your service providers.
Steps to Enable
To change the property and take advantage of the new behavior, you will need to change the property glog.tender.notifyNonBidServprov.turnOff from the default value of false to true.
Property set changes are made following this navigation path Configuration and Administration > Property Management > Property Sets.
NOTE: Only the DBA.ADMIN user can access and use the Property Sets page.
Tips And Considerations
Recap of Spot Tender – Service Provider Emails
- Tender the shipment:
- All service providers receive emails.(subject to notification method)
- Can set to manual notification for some service providers
- When the service provider bids
- Acknowledge the bid
- glog.tender.openTender.acknowledgeBid (default is true)
- When the service providers bids and they are the selected a winner.
- Bid losers are notified -it can be stopped using property: glog.tender.notifySpotBidLosers (default=true)
- New Property glog.tender.notifyNonBidServprov.turnOff Turn off if the service provider did not participate in bidding process.
- When timed out all service providers receive notification.
- All notification glog.tender.notifyServprovUponOpenTenderTimeOut (default=true, it notify)
- glog.tender.notifyNonBidServprov.turnOff Turns off for non-participants
Selected Shipment Remark Qualifier for Tender Communication
This feature allows you to configure a shipment remark qualifier that will be used to display that remark qualifier's value on your service provider's Online Booking/Tendering response screen. This feature provides you with an easy way to communicate important information to your service providers.
The configured remark qualifier value will be displayed in the Online Booking/Tendering screen for all tender types - Ordinary, Broadcast Tender and Spot Bid.
In the example below - the shipment has a number of Shipment Remarks assigned. The Remark Qualifier that has been configured to be displayed for the Service Providers on the Online Booking/Tendering screen is the IMPORTANT_REMARK qualifier.

Shipment with Remark Qualifiers and Values - Edit Screen - Available on View and Edit

Ordinary Tender (Tender and Step Tender) Configured Remark Display - Edit Screen - Available on View and Edit

Broadcast Tender Configured Remark Display - Edit Screen - Available on View and Edit

Spot Bid Configured Shipment Remark Display
This feature improves your ability to share critical information with your service providers as part of the tendering/booking process.
Steps to Enable
To enable the feature the property glog.tender.remarkDisplayQual must be set the desired Shipment Remark Qualifier. You will need DBA.ADMIN access to set this property.
- Goto the appropriate Property Set for your implementation.
- Select the sequence for the property glog.tender.remarkDisplayQual or add a new sequence number.
- Select Set for the Instruction.
- Enter glog.tender.remarkDisplayQual for the Key.
- Enter the Shipment Remark Qualifier you want to display on the Online Booking/Tendering screens - in this example - "OOTB.IMPORTANT_REMARK".
- Provide a description and save the entry.
- Save the change to the Property Set by selecting Finished.

Example Setup
Tips And Considerations
It is suggested that the selected Shipment Remark Qualifier be a Shipment Remark Qualifier that is unique. If the same Shipment Remark Qualifier is duplicated only one of the remark values will be displayed.
Logistics Machine Learning Enhancements
This feature provide you with the next phase in the evolution of OTM's Machine Learning capabilities. The enhancements provided by this feature include the following:
- Outlier Scaling - new Machine Leaning logic configuration option that is used as input for outlier pruning inside of IoT. Within IoT, the Interquartile Range (IQR) is used to detect outliers in data, the Outlier Scaling value is used by IoT to influence the identification of outliers.
- Machine Learning Scenario Filtering improvements for Shipments and Outliers
- Perform Predication action available as an Agent Action
- Load Post Training Data into Analytics - Post Prediction Analysis has been added to Transportation Intelligence so you can review the model generated predictions using TI capabilities
PROJECT OUTLIER SCALING
The Outlier Scaling value is used during training in IoT to determine the outlier shipments based on the interquartile (IQR) range - outliers identified are removed from the training set. The Default value is 1 - our analysis shows values between .8 and 1.2 work best.

Machine Learning Logic Configuration - Outlier Scaling Factor
MACHINE LEARNING SCENARIO FILTERING ENHANCEMENT
In previous releases, the Machine Learning Scenario Filtering (Shipment Filters and Outlier Filters) was limited to either one Shipment Filter or one Outlier Filter, but not both. Now, you have the ability to have both Shipment Filters and Outlier Filters and you can define multiple filters for both your Shipment Filters and your Outlier Filters.

Scenario Filters Shipment And Outlier
The interpretation of the filters defined above is SHP_FILTER01 OR SHP_FILTER02 AND NOT OUT_FILTER01 OR OUT_FILTER02. When defining the Filters - the column level filter criteria uses an AND operator, the operator between the defined filters is an OR operator. Shipment Filters include data, and the Outlier Filters exclude data.
PERFORM PREDICATION AGENT ACTION
In previous releases, you initiated the Perform Prediction Action by running the action in the UI against a set of selected buy shipments or via Process Management - Logistics Machine Learning > Process Management > Perform Prediction. You can now run the Perform Predication Action as an Agent Action. The Shipment Agent Action - Perform Prediction will run the Preform Prediction Action and will updated the last shipment stop /delivery shipment stop with the predictions provided by the Machine Learning Scenario ID specified. The additional ability to trigger the Perform Predication Action using an automation agents allows you to easily update the predictions provided for a shipment throughout the shipment's life cycle.

Perform Prediction Agent Action
As a reminder - you will need to train the model for the Machine Learning Scenario ID that you specify in the Agent Action.
Machine Learning Scenario Model Training Steps:
- Create a Machine Learning Project
- Load the Machine Learning Project Data into Analytics (OTM to Analytics)
- Perform Pre-training Analytics and analysis with the Logistics Machine Learning Subject Area
- Export the Machine Learning Project to the Machine Learning Service (Analytics to Object Store then IoT IA ingests from Object Store)
- Define the data to train - setup Machine Learning Scenario(s)
- Load Shipment Data into Analytics - which provides visibility by project by scenario to the number of records selected and loaded
- Perform Training on the selected Machine Learning Scenarios
- View Training Results - Review Feature Importance Summary from training
- Perform Post Training Analytics
In the example below - the predicted arrival time, and the predicted arrival range - low and high values are available for consideration at the stop level.
Note that Machine Learning updates the last delivery stop on a shipment - intermediate stops in a multi-stop shipment, depot stops and other/"O" stops are not updated.

Shipment Stop Level Predicted Arrival, Predicted Arrival Low/High Values - Finder Results

Shipment Stop Level Predicted Arrival, Predicted Low/High Values - Finder

Shipment Stop Level Predicted Arrival, Predicted Low/High Values - Manager
LOAD POST TRAINING DATA INTO ANALYTICS
You now have the option to load post training data into analytics to gain better insights into the data used by the model.

Load Post Training Data into Analytics Action
The ability to automate the prediction process and persist the ML model predictions directly against your operational shipments allows for the predictions to be considered in your day-to-day operational decision making process.
Steps to Enable
You don't need to do anything to enable this feature.
Transportation Operational Planning
This feature provides you with the ability for OTM to plan the partial/remnant portion of an order independently from the full truck/container portion of that same order. Without this feature, the Network Routing logic does not split an order along different routes, so every order is routed along one and only one route.
In the example below, the new Remnant logic allows the four orders for 1.25 containers worth of freight to be routed along two different paths. The full container portions is routed directly from the various sources to the POL, while the .25 Remnants are routed along a different network path going via a cross dock point for consolidation and then from the cross dock the consolidated load is sent direct to the POL.

Remnant Example
This feature provides solution quality improvement opportunities in situations where the best routing solution for your orders involves shipping the full container portion your order along one route, and then having the remainder - or Remnant portion of that same order - planned independent along its own best route.
Steps to Enable
These Network Routing logic parameters have been added to configure this feature:
- PERFORM ORDER REMNANT ROUTING: This parameter must be set to true to turn on the order remnant routing logic in network routing. By default, this logic is turned off. Use this logic in certain planning scenarios to split orders along different routes to save cost.
- DESIRED EQUIPMENT UTILIZATION PERCENTAGE: This parameter specifies the desired minimum equipment utilization for full containers in order remnant routing. This parameter works only when PERFORM ORDER REMNANT ROUTING is set to true. By default, the parameter DESIRED EQUIPMENT UTILIZATION PERCENTAGE is set to 80%. If the equipment utilization is equal or more than this value in at least one metric (for example, weight, volume, or ERU), the order remnant routing logic will determine the packed equipment as fully utilized.
Define Location Activity Time by Service Provider(s) and Equipment Group(s)
This feature extends the options available for defining your Location Activity Times to include a Service Provider Profile and an Equipment Group Profile. These new options are in addition to the previously available options of Special Service, Flex Commodity Profile and Transport Handling Unit Profile.

Activity Time Definition - Equipment Group Profile and Service Provider Profile
By adding the Service Provider Profile to the Activity Time Definition you are now able to configure different activity times for your fleet service providers versus your common carrier service providers. The addition of the Equipment Group Profile allows you to define different activity times for your over the road truck equipment groups versus your international ocean containers.
Steps to Enable
You don't need to do anything to enable this feature.
Tips And Considerations
This feature extends the options available to you for defining your Location Activity Times to include a Service Provider Profile and an Equipment Group Profile.
Maximum Distance Between Stops Enhancement
This feature extends OTM's multi-stop planning capabilities to better support scenarios where you wish to limit the time and distance traveled between delivery stops and backhaul pickup stops, but you do not wish to have the same distance and time limitation applied to the linehaul portion of your multi-stop shipment.
In the example below, this feature provides the option for you to:
- Configure the maximum distance allowed between any two consecutive stops - in this example, the delivery and pickup stops in the circle. In this example, the desire is to have these stops be no greater than 25 miles apart.
- Have the maximum distance between stops constraint ignored for the linehaul portion of the shipment - in this case the distance from the Source to the first stop 60 Miles away (Stop 1), and the distance from stop number six (the backhaul pickup) 65 miles away.

Multi-Stop Example
Provides you more control and options for how your multi-stop shipments are clustered.
Steps to Enable
Configuring the desired behavior is handled by setting two new Multistop Logic Configuration parameters.
Navigate to Shipment Management > Power Data > General > Logic Configuration and edit your Multistop Logic Configuration.
Within your Multistop Logic Configuration you will configure these two parameters:
- IGNORE PROXIMITY CHECKS FOR RETURN TO SOURCE = TRUE. Setting this parameter to TRUE allows OTM to plan a multi-stop shipment without performing the distance/time checks every time the shipment departs or returns to the start location.
- MULTISTOP MAX DISTANCE BETWEEN STOPS = set to the desired maximum distance (25 miles in the example above) you wish to allow between any two consecutive stops.
NOTE: MULTISTOP MAX DISTANCE BETWEEN STOPS only works when IGNORE PROXIMITY CHECKS FOR RETURN TO SOURCE = TRUE.

Multistop Logic Configuration Parameters
Tips And Considerations
The new parameter MULTISTOP MAX DISTANCE BETWEEN STOPS works with the existing parameters MULTISTOP MAX DISTANCE BETWEEN PICKUPS and MULTISTOP MAX DISTANCE BETWEEN DELIVERIES. The most constrained parameter/value will apply.
This feature provides you with an additional set of parameters that you can use to understand and tune the solution generated by the Cluster Merge algorithm. The new Multistop Cluster Merge parameters MULTISTOP DISTANCE METRIC THRESHOLD and MULTISTOP CLUSTER MERGE MIP GENERAL PENALTY provide you with the ability to now control/influence the size and number of clusters generated and considered by the algorithm. The parameter MULTISTOP USE SAVINGS MERGE AFTER CLUSTER MERGE allows you to decide what happens after the clusters are formed - one of the options for this parameter provides you visibility into the Cluster Merge process itself, so that the intermediate steps involved in cluster creation can inform your tuning of the various Cluster Merge parameters.
New Cluster Merge Parameters:
MULTISTOP CLUSTER MERGE MIP GENERAL PENALTY -This parameter defines the penalty of creating an additional cluster within the cluster assignment MIP. A larger penalty will create fewer and larger clusters. A smaller penalty will create more and smaller clusters. The default value is 5 (the value should be greater than zero).
MULTISTOP DISTANCE METRIC THRESHOLD - This parameter sets up the distance metric threshold (radius) for each cluster. When the distance metric between a shipment and the center of a cluster is greater than the metric threshold, OTM will not assign the shipment to that cluster. The default value is 1.
MULTISTOP USE SAVINGS MERGE AFTER CLUSTER MERGE - This parameter provides you with four options:
- 0.Only use cluster merge, which is the default
- 1.Parameter tuning, which is provided to allow you to see the intermediate results of cluster merge, to help guide you in the setting and tuning of the other cluster merge parameters
- 2.Use sequential saving after cluster merge - option is provided in case - based on the settings and parameters provided for Cluster Merge a cluster fails to merge - using sequential savings after cluster merger allows for the cluster not merged to be reconsidered for consolidation.
- 3.Use concurrent saving after cluster merge - similar to option 2. option 3. provides an option after the cluster merge is complete to merge clusters.

Cluster Merge Parameters
Provides you with additional tuning options for the Multistop Cluster Merge algorithm.
Steps to Enable
You don't need to do anything to enable this feature.
Tips And Considerations
Some tips on tuning:
- Set the parameter MULTISTOP USE SAVINGS MERGE AFTER CLUSTER MERGE to 2 - use concurrent saving after cluster merge, divides the multi-stop shipment building process into two parts: the cluster merge process and savings merge process.
- In order to observe the intermediate result of clustering merge you need to set the parameter MULTISTOP USE SAVINGS MERGE AFTER CLUSTER MERGE to 1.Parameter tuning. This opiton allows you to focus on the MULTISTOP DISTANCE METRIC THRESHOLD, MULTISTOP CLUSTER MERGE MIP GENERAL PENALTY and similarity metric weights.
- When the business scenario is complicated and involves locations with tight time window constraints, and the solution will involve a multi-segment multi-stop shipment, the suggested approach is to use cluster merge to build multiple small clusters, then use savings merge to assemble them into a long multi-stop shipments. To setup this approach, the value of MULTISTOP DISTANCE METRIC THRESHOLD and MULTISTOP CLUSTER MERGE MIP GENERAL PENALTY should be set relatively small, i.e. MULTISTOP DISTANCE METRIC THRESHOLD to be 0.3 and MULTISTOP CLUSTER MERGE MIP GENERAL PENALTY to be 0.5.
- When the business scenario is relatively simple, namely, it is single pick up with multiple drop offs or multiple pick ups with one delivery and time windows are wide open, the suggested approach is to use cluster merge to build large clusters and then use savings merge to insert the remaining left over direct shipments into those large multi-stop shipments. To setup this approach, the value of MULTISTOP DISTANCE METRIC THRESHOLD and MULTISTOP CLUSTER MERGE MIP GENERAL PENALTY should be set relatively big, i.e. MULTISTOP DISTANCE METRIC THRESHOLD to be 0.5 and MULTISTOP CLUSTER MERGE MIP GENERAL PENALTY to be 10.
NOTE: Minimizing the number of containers is not a general objective of this approach - the goal is generate nice geographically clustered shipments.
Load Configuration 3D Pattern - Active Inactive Check Box
This feature provides you with an Active check box on your Load Configuration 3D Patterns that allows you to set your Load Configuration 3D Patterns to an Active or Inactive state. The Active/Inactive check box is set to Inactive (unchecked) by default - so to activate your newly created Load Configuration 3D Patterns you will need to check the Active check box.

Load Configuration 3D Pattern Active Check Box
This feature provides you with a way to control the Load Configuration 3D Patterns that are considered (active) when you run a bulk plan.
Steps to Enable
You don't need to do anything to enable this feature.
User Defined Patterns - Consider Full Equipment User Defined Pattern First
This feature provides you with the option to favor your Full User Defined Pattern Types to fill a container over other User Defined Patterns (Full Mixed and Row) that may provide a slightly higher utilization, but require the mixing of items inside the container.
When the logic parameter under CONTAINER OPTIMIZATION - PATTERN BASED PACKING - USE FULL USER DEFINED PATTERNS is set to TRUE the hierarchy of containers built will be:
- Full homogenous containers
- Full mixed container (Pattern Types - Full and Row)
- Less than full containers
.
Use Full User Defined Pattern First Parameter
In the example below - the order being planned requires multiple containers.
Below is the result with USE FULL USER DEFINED PATTERNS FIRST= FALSE - the old/default behavior. In this case, OTM creates four shipments - three full 40 Foot High Cube containers and one mixed container using a 20 Foot Container.

USE FULL USER DEFINED PATTERNS FIRST = FALSE
Below is the solution for the same order as above, but in this case the USE FULL USER DEFINED PATTERNS = TRUE, the new behavior. In this case, OTM generates five shipments with four full containers (three 40 Foot High Cube and one 40 Foot Standard) and then one mixed 20 Foot container.

USE FULL USER DEFINED PATTERNS FIRST = TRUE
This change allows you to factor in the real-world cost and effort associated with loading a slightly better utilized full piece of equipment with a mix of items, that requires more attention, time and energy from the loader compared to a potentially less fully utilized piece of equipment that is loaded with a single homogenous item, which requires less attention, time and energy to load.
Steps to Enable
Logic configuration container optimization parameters are accessed via the Logic Configuration page if you select a logic configuration type of Container Optimization.
The parameter - CONTAINER OPTIMIZATION - PATTERN BASED PACKING - USE FULL USER DEFINED PATTERNS needs to be set to TRUE to use this feature. By default, the MIP logic selects the most efficient (maximizing utilization) between relevant Full and Row user-defined patterns (UDP) while packing containers.
Additional Constraints Considered in Edit Load Config
This feature adds three additional constraints that will be considered when you use the Edit Load Config tool to edit your 3D Load Configuration solutions. The additional constraint checks include:
- No Loading Split Items Below check,
- Number Than One Item Directly Below A Split Item check,
- Overhang check,
- Maximum Top Weight Load Bearing check.
In the example below, an attempt is made to move an item on top of a split item - when this is attempted the constraint check fails and the message indicates that the No Loading Split Items Below check has failed.

Attempted Move of Item on Top of Split Item

No Loading Split Items Below Check Failed Message
In the example below - the number of items directly below a split item check is triggered by the attempted move of a split item.

Attempted Move Where More Than One Item is Directly Below a Split Item

More Than One Item Directly Below a Split Item Check Failed Message
In the example below, the Max Ratio of Unsupported Area percentage (which is entered in your Load Configuration Setup ) is checked. The percentage entered represents the percentage of the area for an item that does not need to be supported by an item below it - the allowable percentage of overhang. This check makes sure that the unsupported area involved in the move is not more than what is defined by the Max Ratio Of Unsupported Area percentage.

Attempted Move with Overhang

Overhang Check Failed Message
In the example below - the Maximum Top Weight Load Bearing check is triggered as part of the move into the position below.

Maximum Top Weight Load Bearing Move

Maximum Top Weight Load Bearing Move Failed Message
In the example below - the same item is successfully moved to a position where the constraint does not fail.

Maximum Top Weight Load Bearing Okay
This feature improves the quality of the changes made within the Edit Load Config tool by honoring additional constraint checks to insure changes made/proposed are feasible and desirable.
Steps to Enable
You don't need to do anything to enable this feature.
Freight Payment, Billing, and Claims
Shipment Group Invoice Financials Processing - Auto-Pay and Match-Pay
This feature extends OTM's Financials capabilities to support both auto-pay and match-pay invoice processing for Shipment Groups. With this feature, you can generate an invoice for a shipment group, match invoices to a shipment group, tolerate and approve invoices.
AUTO-PAY EXAMPLE - OCEAN
In this example, an Ocean Shipment booking with five containers and one secondary charge shipment at the shipment group level will be used to demonstrate the auto-pay steps. The total charges to be settled are 30, 570.

Financial View of the Shipment Group Charges

Shipment Management > Group Management > Shipment Group > Actions> Financials > Create Invoice
The Create Invoice action will require the input of the Invoice/Bill Rule ID to use. In this case, a very basic rule - SHIPGROUP is being used.

Create Invoice Action Input

Invoice/Bill Rule Used
The result - with this setup - is two invoices generated. One invoice for the Ocean Carrier2 for the ocean related charges (29,875 USD) and a secondary shipment charge invoice (695 USD) for the LSP Services service provider for their charges.

Invoices Generated
Below is the view for the Ocean Invoice, note the additional matching criteria for shipment group - Matched Shipment Group. In this case, the five shipments in the group have only a base charge and those charges are mapped as Invoice Line Items as shown.

Ocean Carrier2 Invoice
Below is the second invoice generated for the LSP Services service provider.

Secondary Charge Invoice
The Invoice Line Items tab shows you the details of LSP Services charges - there is a base charge and two accessorial charges one for a document prep charge and one for a security charge.

LSP Services Secondary Charge Invoice Line Item Details
Once the invoices are generated from the shipment group, the standard invoice approval and vouchering processes are executed to complete the processing.
MATCH-PAY EXAMPLE - OCEAN
The Ocean example below demonstrates how the new capabilities can be used for a match-pay scenario where the Shipment Group is used to represent the booking with the ocean carrier. In this case, a shipment group was built with a set of shipments with one container per shipment. Each shipment holds the per container charges for the ocean shipment, there is also a secondary charge added at the shipment group level covering administrative charges related to the booking. The ocean carriers sends an invoice for the booking with references at both the booking/shipment group level as well as the individual shipment/container level for the shipments in the shipment group. The received invoice is matched, tolerated, approved and vouchered.
Below is the shipment group used for the ocean booking and execution activities. The key to the match-pay scenario is the reference numbers used for matching and the match rule. In this example, the Master Bill Of Lading was used for matching the incoming invoice to the appropriate shipment group.

Match-Pay Example Shipment Group
Below is the Match Rule used in this scenario. Note that the Match Rule Outcome now supports Shipment Group and the match criteria is looking for an exact match on service provider and the master bill of lading.

Match Rule
Matching can be accomplished with the various matching actions AutoMatch Invoices, Find Valid Match, Manual Match. In this example, the Manual Match option was selected. Note that the Match Type of Shipment Group has been added to the Match Type options for the Manual Match option.

Financials > Payment Invoice Management > Payment Invoice > Actions > Financials > Matching > Manual Match Invoices
The result is a successful match/no error match.

Match Manual Action Result
Once the Invoice has been matched, then the standard Invoice processes for payment apply - Tolerate, Approve, Voucher, Pay.
SHIP_GROUP_PAYMENT STATUS VALUES
- SHIP_GROUP_PAYMENT_NEW (initial status)
- SHIP_GROUP_PAYMENT_UNMATCHED
- SHIP_GROUP_PAYMENT_MATCHED
- SHIP_GROUP_PAYMENT_APPROVED
- SHIP_GROUP_PAYMENT_REJECTED
- SHIP_GROUP_PAYMENT_VOUCHERED
- SHIP_GROUP_PAYMENT_ALLOCATED
This feature simplifies/enables the payment process (match-pay or auto-pay) for the activities you model using shipment groups.
Steps to Enable
You don't need to do anything to enable this feature.
Recharge Processing Using UI Actions
This feature provides you with the option to execute your Recharge Process using UI actions. Two new manager layout configurable Voucher UI actions, Determine Recharge and Perform Recharge have been provided that allow for the Recharge Process to be accomplished directly from the within the UI. The UI actions, Determine Recharge and Perform Recharge are equivalent to the available Voucher agent actions Determine Recharge - Voucher and Perform Recharge - Voucher. The new manager layout configurable UI actions provide you with the option to implement the Recharge Process as a user initiated process that has been configured to meet the requirements of your implementation.
On the Voucher the UI actions involved in Recharge are grouped together under Manage Voucher - Allocate Voucher (existing action) and the new Recharge UI actions - Determine Recharge and Perform Recharge.

Financials > Payment Invoice Management > Voucher > Actions > Financials > Manage Vouchers
Determine Recharge is used to determine if any order releases related to the selected voucher should be recharged. Like the equivalent agent action, running the action requires you to specify the requires recharge criteria.

Determine Recharge - Action Input - Can Be Configured/Defaulted Via Manager Layout
The Perform Recharge action retrieves the list of order releases that require recharge, for each order release identified a sell shipment is created to support the recharging process.

Perform Recharge - Action Input
Provides the option for implementing the Recharge Process as a user initiated UI based process.
Steps to Enable
You don't need to do anything to enable this feature.
Attribute Fields Added to Allocation Details for Order Release, Order Release Line and Order Base Line
This feature extends the information you can provide in your XML allocation details and REST JSON allocation to include additional Attribute Fields. Specifically, the ALLOCATION_ORDER_RELEASE_D, ALLOCATION_OR_LINE_D, and ALLOCATION_OB_LINE_D tables have been enhanced to include the standard set of Attribute Fields.
Attribute Fields Added to the ALLOCATION_ORDER_RELEASE_D, ALLOCATION_OR_LINE_D, and ALLOCATION_OB_LINE_D tables include:
- 20 Varchar2 fields
- 20 Date fields
- 20 Number fields
- 3 Currency fields

Attributes Added to Outbound XML Allocation Details for Order Release, Order Release Line and Order Base Line

Attributes Added to REST Allocation Details for Order Release, Order Release Line and Order Base Line
You can use the attribute fields to store and transmit - using the allocation API - the additional external information that your downstream financial systems may require.
Provides you with the option to include additional information within the XML or REST allocation API that may be required to support downstream system processing.
Steps to Enable
You don't need to do anything to enable this feature.
Tips And Considerations
The expectation here is that you will set the required fields based on your own requirements - either directly via SQl or via some PaaS extension.
Work Assignment - Out and Back Pair Building Resource Count Enhancement
This feature provides you with an enhancement to the Work Assignment resource scheduler logic that allows the logic to better identify and pair together - into a Work Assignment during planning - pairs of additional shipments that provide a desirable out and back combination. This type of pairing opportunity is common in regional dray operations, where there are, typically, many inbound and outbound shipment pairing opportunities
The example below demonstrates the benefits of this enhancement. In this example, four shipments are considered for planning into a Work Assignment.

Four Shipments Evaluated
With the Pairwise Consolidation option turned off, the Work Assignment logic, after assign the initial two shipments (Shipment 1 and Shipment 2), will evaluate the additional shipments to add to the Work Assignment and will do so looking at one shipment at a time. In this example, Shipment 1 and Shipment 2 are added to the Work Assignment to start - then Shipment 3 is evaluated. Note that by assigning Shipment 3, some empty distance and time are required to return to the Source Depot.

One Shipment At A Time - Evaluate Shipment 3
In this example, the Work Assignment is complete when Shipment 3 is added since there is no more time available to add any additional shipments - Shipment 4 in this case.

Completed Work Assignment Without Pairwise
With the Pairwise Consolidation option turned on, instead of just evaluating one shipment at a time, the Work Assignment logic will now look for good pairs of shipments to add to the Work Assignment. In this case, Shipment 3 and Shipment 4 represent an excellent pair of shipments to consider for adding to the work assignment.

Pairwise Consolidation Considering Shipments 3 And Shipment 4
The Work Assignment - now when complete/full - is able to handle all four shipments since the Pairwise Consolidation logic, by pairing together and evaluating Shipment 3 with Shipment 4 together, essentially eliminated most all of the empty distance and time associated with the original solution above where Shipment 3 was evaluated by itself.

Pairwise Consolidation With All Four Shipments Included In The Work Assignment4
This feature will improve the solution quality of your work assignments by looking for options, during work assignment planning, to add a pair of complementary shipments (out and back) to the work assignment versus looking to add one shipment at a time.
Steps to Enable
Two new parameters have been added to the RESOURCE SCHEDULER Logic Config parameter set to enable and tune the new planning logic.
The parameter RS PAIRWISE CONSOLIDATION is used to turn on the new logic. The parameter is set to FALSE/off by default to retain the existing behavior. When the parameter is set to TRUE the resource scheduling logic is given the option to add shipment pairs to the work assignment string, instead of adding individual shipments.
The parameter RS PAIRWISE RESOURCE MULTIPLIER is used to artificially increase the resources availability for the first pass (pairing pass) in the two pass process used to create work assignments when using the pairwise consolidation option. The default value is 1.0 - which artificially adds one additional resource for the pairing pass.

Pairwise Parameters
Tips And Considerations
We recommend that you set the RS PAIRWISE RESOURCE MULTIPLIER parameter value to the largest number of out and back shipment pairs that can be assigned to any one work assignment if you only want out and back pairs considered in your work assignments.
Logistic Digital Assistant Enhancements
This feature provides you with several improvements to the Logistics Digital Assistant. The OTM user's language preference is now used and supported within the Logistics Digital Assistant dialog flow. Several improvements have been made to the dialog flow itself to improve the user interaction with the bot. For example, the timestamp has been removed from the dialog bubbles to improve the conversational flow and an intermediate summary has been provided between the location list and the transactional details allowing for a more natural transition from the high level summary to the low level details. AutoComplete is now supported with the Logistics Digital Assistant and is controlled by a new Digital Assistant Logic Configuration option.

Digital Assistant Logic Configuration Autocomplete - Default = True
In addition, the Logistics Digital Assistant has been enhanced to support document attachments. Attachments added through the Logistics Digital Assistant are uploaded to the ODA platform.
Non-english speaking users can now interact with the Logistics Digital Assistant based on their user preference language, In addition, the dialog flow has been improved to support a more natural and conversational interaction between the user and the bot - providing both the user and the bot with a more satisfying and enjoyable user experience.
Steps to Enable
You don't need to do anything to enable this feature.
Global Trade Management (Base)
Enhancements to Item Classification Audit Trail
When you audit item classification data, GTM includes more details in the audit trail. If the item classification data is updated through any of these mechanisms, the audit trail will be populated accordingly:
- Adding, modifying or deleting product classification data from the Item > Trade Details tab
- Adding, modifying or deleting product classification data from the Item Classifications menu object
- Triggering item actions through the UI including:
- Apply Item Template (also available as an agent action)
- Apply Product Classification Template (also available as an agent action)
- Approve or Decline Product Classification
- Assign Item Classification
- Classify Item
- Update Product Classification
- Adding, modifying or deleting classification data via Item integration
Regardless of how you update your item classification data, if you have configured audit trail to audit item classification data, the follow information is audited:
- Product Classification Type and Code
- Classification User and Date
- Product Classification Status
- Product Classification Notes
- Binding Ruling data including Number, Effective Date and Expiration Date
- Tariff Rules of Interpretation
- Customs Description
When you use audit trail, you can see more details about the item classification data that was changed, which user made the change, and when the data was changed.
Steps to Enable
You don't need to do anything to enable this feature.
Tips And Considerations
If you want to audit your item classification data, make sure you have the existing audit functionality configured.
Key Resources
- For more information on configuring audit trail, please see the Audit Trail topic in help.
Flex Field Attributes Added to Trade Item Structure and Trade Item Structure Component
New flex field attributes have been added to the Trade Item Structure and Trade Item Structure Component which enable you to take advantage of pseudo-fields in manager layouts and grid-flattening in screensets. This enables you to view and edit data that is in a grid directly on the screen as a specific field. These enhancements enable you to use attribute fields including:
- ATTRIBUTE1 to ATTRIBUTE20
- ATTRIBUTE_DATE1 to ATTRIBUTE_DATE20
- ATTRIBUTE_NUMBER1 to ATTRIBUTE_NUMBER20
You are able to identify and show data that is important to your business in a specific field on the trade item structure and trade item structure component.
Steps to Enable
You don't need to do anything to enable this feature.
Tips And Considerations
You can configure the user interface using manager layout and screen sets to customize the fields you display.
Key Resources
- For more information on integration, please see the ‘Oracle Transportation and Global Trade Management Cloud Integration Guide’.
Improve Unit of Measure Support for Certain Types
To better support the declaration creation and customs filing processes, this enhancement enables you to use new Units of Measure Types including Quantity, Area, and Length and use them throughout GTM. Specifically, there is a new Unit of Measure Type = Quantity. When you go to the Unit Of Measure menu object, you will see "Quantity" in the drop-down list for Type.

You can now also use units of measures of Type Area and Length while transferring data from transaction to declaration and assigning licenses to transaction lines.

To better support the declaration creation and customs filing processes, this enhancement enables you to use new Units of Measure Types including Quantity, Area, and Length and use them throughout GTM.
Steps to Enable
You don't need to do anything to enable this feature.
Improvements to Stylesheet for Email Notification
Email notification stylesheet for "Ad Hoc Notify Contact" in GTM TRANSACTION agent has been enhanced. You can now see transaction details in the preview pane of the email.

Improved Stylesheet Email Notification
With this enhancement, you do not need to open the email to see the transaction details. You are now able to read these details in the preview pane.
Steps to Enable
You don't need to do anything to enable this feature.
XML Integration and REST API for Trade Item Values
The Item XML integration and Item REST API resource have been updated to include Trade Value Sets and corresponding Trade Values. On the Trade Values tab of the Item, you can specify sets of trade values. These trade value sets contain values or costs and are grouped based on various criteria including inventory organization, partner or partner site.
You are able to easily integrate trade value data between GTM and other systems using the XML integration or REST API.
Steps to Enable
You don't need to do anything to enable this feature.
Tips And Considerations
You can use flex field attributes on the Trade Value tab of the Item to model trade value sets at the serial number or lot number level.
Key Resources
- For more information on integration, please see the ‘Oracle Transportation and Global Trade Management Cloud Integration Guide’.
- For more information on the REST API for Transportation and Global Trade Management Cloud, please refer to docs.oracle.com.
Trade Agreements and other supporting information enables you to proactively leverage the trade agreements your business can take advantage of to reduce duties and taxes. There are many Trade Agreements in effect globally, each with different parameters but all following a similar structure.
To be able to take advantage of the duties and taxes associated with a Trade Agreement, companies must:
- Follow Rules of Origin to qualify goods for participation in a specific program
- Produce Certificates of Origin and provide them to your customers
- Collect Certificates of Origin from your suppliers and stored them for future use
- Declare the intent to use a trade agreement during the import entry process and send the appropriate certificates of origin to the local customs agency
In GTM, users can take advantage of the Trade Agreement capability including:
- Download and store duties, taxes, trade programs and other information from third party data content providers
- Manage trade agreement information
- Perform trade agreement eligibility screening and qualification on your items
- Create a campaign which enables you to solicit qualification data, documents and other information from suppliers to support the use of trade programs
- Suppliers and other users can respond to a campaign they have received
New Fields Available on Item Qualification
New fields have been added to the item qualification which provide you additional details about the qualification of the associated trade item structure for a trade agreement. Specifically, the following fields are now available:
- Country of Import - indicates the country of import for a particular item qualification record.
- Minimum Operations Met - a Yes/No flag indicating if the minimum operations required for trade agreement qualification were met.
- Wholly Obtained - a Yes/No flag indicating if the item is wholly obtained within the country/region associated with the trade agreement. This field is populated based on the item and/or item origin associated with the item qualification. For example, is the finished good grown, harvested or born in the country of origin?
- Rules of Origin Attribute - to fully qualify an item for a trade agreement, you may need to select an item attribute when you are running the Qualify for Trade Agreement action. For example, if a Suffix exists, you need to select the one that is appropriate based on your finished good and other information.
- Conditions - to fully qualify an item for a trade agreement, you may need to indicate if a condition is met or not. Based on your finished good and other information, GTM displays applicable conditions. You can select Yes to indicate if the condition is met.
When you trigger the Qualify for Trade Agreement action, you can:
- Specify the country of import.
- Indicate if the Minimum Operations Requirements are Met. If minimum operations are not met, GTM will save the item qualification but the Status is set to NOT QUALIFIED.
- See if any item attributes appear based on the trade item structure and other information you specify on the action. If so, select the one that is appropriate for your business.
- See if any conditions appear based on the finished good and other information you specify on the action. If so, select the one that is appropriate for your business.
Once you click OK, GTM runs the action and copies the values to the item qualification.

If you specify this information when you trigger the Qualify for Trade Agreement action, this information is copied to the item qualification so that you can see the decisions made at the time of qualification.
Steps to Enable
You don't need to do anything to enable this feature.
Tips And Considerations
The Qualify for Trade Agreement action can be triggered from the Item Qualification, Item Origin, Item or Trade Item Structure. For more information, please see the corresponding topics in this document.
Rules of Origin Formulae Added to Trade Agreement
Updates have been made to better support rules of origin formula information related to a trade agreement. The changes are:
- A Rules of Origin Formulae grid has been added which identifies all the rules of origin rule types and their corresponding formula for a particular trade agreement. The grid displays the Rules of Origin Rule Type ID, Formula ID, and Formula.
- Since de minimis information has been moved into the Rules of Origin Formulae grid, the De Minimis Formula field previously available has been removed. De Minimis Formulae should be entered into the Rules of Origin Formulae grid.

Remember that certain data on the trade agreement such as trade agreement type, trade agreement name information, dates and partner countries/regions can be downloaded from your third-party content provider. To take advantage of trade agreement qualification, you need to supplement this data with information regarding applicable regional content methods and formulae.
By adding the Rules of Origin Formulae grid, you can see all the applicable rules of origin formulae plus the formula details for a particular trade agreement.
Steps to Enable
You don't need to do anything to enable this feature.
Tips And Considerations
- GTM ships with sample formula expressions for various rules of origin formulae. You can use these formulae to see how they should be modeled. For certain trade agreements, these formula expressions can be assigned to trade agreements and used as is.
- Calculations based on value in the trade transaction and trade transaction line are not currently supported in GTM.
Key Resources
- Please contact your third-party content provider if you want to add trade agreements or other data to your subscription.
Item Value Lookup During Trade Agreement Qualification
To support manufacturers who produce the same item in multiple locations, the trade agreement qualification process has been improved to handle multi-sourcing of finished goods as well as components. If you have value/cost data that varies across your inventory organizations where you produce the finished goods or based on variations in where the components are produced, GTM can correctly identify which trade value to use in the qualification engine. You can configure trade value data on the trade item structure, trade item structure component or on the associated items. When GTM performs trade agreement qualification, it can determine the appropriate trade values based on inventory organization, partner, partner site or other information and use it in the calculations to determine if the finished good qualifies for a trade agreement. To configure value lookup in GTM, you can:
- Configure value data on the trade item structure or associated item for values/costs related to the finished good
- Configure value data on the trade item structure components or associated items for values/costs related to the components
- Configure quantity data on the trade item structure components
- Define constraint sets telling GTM the data to compare on the trade item structure/components and trade values
- Add the constraint set to a logic configuration
CONFIGURE THE VALUE DATA AND CONSTRAINT SET FOR THE FINISHED GOOD
GTM can support finished goods that are produced in a single location or in multiple locations. Depending on your scenario and the source of your value/cost data, you can configure value lookup for your trade item structure in a few different places:
- Trade Item Structure > Values grid
- Item > Trade Values tab
You can define a constraint set which contains the rules that GTM uses to determine the values related to the finished good. The constraint set tells GTM which data on the trade item structure to compare to the trade value tab on the associated item to determine the value to use for the finished good during qualification. For example, if you manufacture the finished good in three different facilities, you may have overhead that varies depending on the manufacturing plant used. You can add the inventory organization where you manufacture the finished good to the trade item structure. You can then add the overhead for each manufacturing plant as a value on the associated item in the trade values tab. When GTM performs qualification, it first looks to see if the values are on the trade item structure and uses those values. If not, GTM compares the inventory organization on the the trade item structure to all the trade values on the associated item to determine which to use.
You can define constraint sets to do this comparison based on inventory organization, partner or partner site. In addition, if you have a scenario where your values/costs may vary based on lot number or serial number, you can use flex field attributes to model this information and use it in the constraint set to determine which trade values apply. When GTM performs the value lookup, it will perform the lookup from the most detailed constraint to least detailed constraint. Specifically, GTM will process based on the following priority:
- Serial Number (if configured using flex field attributes)
- Lot Number (if configured using flex field attributes)
- Partner Site
- Partner
- Inventory Organization
NOTE: For ease of setup, GTM ships with an out of the box constraint set which can perform value lookup for the finished good based on inventory organization, partner, and partner site.

CONFIGURE THE VALUE DATA AND CONSTRAINT SET FOR THE COMPONENTS
GTM can support components that are produced in a single location or in multiple locations. Depending on your scenario and the source of your value/cost data, you can configure value lookup for your trade item structure components in a few different places:
- Trade Item Structure Component > Values grid
- Item > Trade Values tab
You can define a constraint set which contains the rules that GTM uses to determine the values related to the components. The constraint set tells GTM which data on the trade item structure component to compare to the trade value tab on the associated item to determine the value to use for the components during qualification. For example, if you source the components from both a partner and an inventory organization, you probably have material costs, material overhead, and other costs that vary depending on the manufacturing plant and partner used. You can add the inventory organization, partner or partner site where you source the components to each of the trade item structure components. You can then add the value details on the associated items in the trade values tab. When GTM performs qualification, it first looks to see if the values are on the trade item structure components and uses those values. If not, GTM compares the inventory organization, partner or partner site on the the trade item structure components to all the trade values on the associated items to determine which to use.
You can define constraint sets to do this comparison based on inventory organization, partner or partner site. In addition, if you have a scenario where your values may vary based on lot number or serial number, you can use flex field attributes to model this information and use it in the comparison to determine which trade values apply. When GTM performs the value lookup, it will perform the lookup from the most detailed constraint to least detailed constraint. Specifically, GTM will process based on the following priority:
- Serial Number (if configured using flex field attributes)
- Lot Number (if configured using flex field attributes)
- Partner Site
- Partner
- Inventory Organization
NOTE: For ease of setup, GTM ships with an out of the box constraint set which can perform value lookup for the components based on inventory organization, partner, and partner site.

CONFIGURE THE QUANTITY FOR THE COMPONENTS
As part of the qualification process, the quantity of each component in the finished good is needed. The quantity is used in the component level calculations and is specified in the Trade Item Structure Component > Quantity grid. For example, if your finished good is a television, you may have 4 audio speakers that are used in the manufacturing. This information must be specified so that GTM can perform the proper calculations during qualification.

ADD CONSTRAINT SETS TO LOGIC CONFIGURATION
Once you configure your constraint sets, you can add them to the generic Logic Configuration for use during trade agreement qualification. The generic Logic Configuration defines various parameters including the constraint sets to be used for value lookup in the qualification process.
NOTE: For ease of setup, GTM ships with an out of the box logic configuration with two value lookup constraint sets defined: one for the trade item structure and one for trade item structure components.
PERFORMING TRADE AGREEMENT QUALIFICATION
Once you have configured GTM, value lookup for the trade item structure and each of its components will be performed as part of the trade agreement qualification process. The qualification logic will lookup the values in following order of priority:
- Uses the values defined directly on the trade item structure and trade item structure component
- Reviews the trade values on the associated items and determines the trade value to use based on the criteria defined in the constraint sets
The qualify for trade agreement process enables you to see if a finished good qualifies for a trade agreement and can take advantage of a reduced duty rate. By adding trade value lookup capability, GTM can better support manufacturers which multi-source finished goods and components.
Steps to Enable
You don't need to do anything to enable this feature.
Tips And Considerations
- GTM ships with constraint sets and logic configuration which you can use for value lookup. If you do not need to support value lookup by serial number or lot number, no changes are needed to these objects. The following objects ship with GTM:
- Constraint Set = TRADE_VALUE_ITEM_STR_MATCH and TRADE_VALUE_ITEM_STR_COMPONENT_MATCH
- Logic Configuration = GTM LOGIC CONFIGURATION DEFAULT
- If you do need to set up GTM to support value lookup based on serial number and lot number, you will:
- Add the flex field attributes to the manager layouts for the trade item structure and/or trade item structure component and the Item > Trade Values tab.
- Create a constraint set so that GTM knows which flex field attribute you are using for serial number and/or lot number. (It is recommended that you do not change the constraint set that ships with GTM.)
Key Resources
- For more information on trade agreement qualification, please refer to the GTM How To/Configuration topic in Help called Trade Agreement Qualification.
- Once a user preference is created, you need to assign it to an entire domain, a specific user, or a specific user level. For more information on configuring a user in GTM, please refer to the 'User Preferences' topic and the 'User Preference Access' topic in help.
Origin Lookup During Trade Agreement Qualification
To support manufacturers who produce the same item in multiple locations, the trade agreement qualification process has been improved to handle multi-sourcing of components. GTM can correctly identify the appropriate country of origin for a component from the inventory organization, partner, or partner site identified on the trade item structure. You can configure origin data on the trade item structure component or on the underlying item. When GTM performs trade agreement qualification, it can determine the appropriate country of origin for the component and use it to determine if the finished good qualifies for a trade agreement. To configure origin lookup in GTM, you can:
- Configure origin data on the trade item structure or associated item
- Define a constraint set telling GTM the data to compare on the trade item structure component and origins
- Add the constraint set to a logic configuration
CONFIGURE ORIGIN DATA
GTM can support items that are produced in a single location or items that are produced in multiple locations. Depending on your scenario and the source of your origin data, you can configure origin for your trade item structure components in a few different places:
- Trade Item Structure Component > Country of Origin
- Item > Item Origin (within the item associated with the trade item structure component and can be used if you produce the component in multiple locations)
- Item > Default Country of Origin (within the item associated with the trade item structure component)
DEFINE CONSTRAINT SET
You can define a constraint set which contains the rules that GTM uses to determine the origin of a component. The constraint set tells GTM which data on the trade item structure component to compare to the configured origin data to determine origin. For example, if you source the component from a specific partner, you can add that partner to the trade item structure component and to the appropriate item origin on the associated item. When GTM performs qualification, it compares the partner on the the trade item structure component to all the item origins on the associated item to determine which to use.
You can define constraint sets to do this comparison based on inventory organization, partner or partner site. In addition, if you have a scenario where your origin may vary based on lot number or serial number, you can use flex field attributes to model this information and use it in the comparison to determine origin. When GTM performs the origin lookup, it will perform the lookup from the most detailed constraint to least detailed constraint. Specifically, GTM will process based on the following priority:
- Serial Number (if configured using flex field attributes)
- Lot Number (if configured using flex field attributes)
- Partner Site
- Partner
- Inventory Organization
NOTE: For ease of setup, GTM ships with an out of the box constraint set which can perform origin lookup based on inventory organization, partner, and partner site.

ADD CONSTRAINT SET TO LOGIC CONFIGURATION
Once you configure your constraint set, you can add it to the generic Logic Configuration for use during trade agreement qualification. The generic Logic Configuration defines various parameters including the constraint sets to be used for lookup in the qualification process.
NOTE: For ease of setup, GTM ships with an out of the box logic configuration with the origin lookup constraint sets defined.

PERFORMING TRADE AGREEMENT QUALIFICATION
Once you have configured GTM, origin lookup for each of the trade item structure components will be performed as part of the trade agreement qualification. The qualification logic will lookup the origin in following order of priority:
- Uses the default Country of Origin specified on the trade item structure component
- Reviews the item origins on the associated item and uses the appropriate item origin
- Uses the Default Country of Origin on the associated item
The qualify for trade agreement process enables you to see if a finished good qualifies for a trade agreement and can take advantage of a reduced duty rate. By adding origin lookup capability, GTM can better support manufacturers which multi-source components.
Steps to Enable
You don't need to do anything to enable this feature.
Tips And Considerations
- GTM ships with a constraint set and logic configuration which you can use for origin lookup. If you do not need to support origin lookup by serial number or lot number, no changes are needed to these objects. The following objects ship with GTM:
- Constraint Set = ITEM_ORIGIN_ITEM_STR_COMPONENT_MATCH
- Logic Configuration = GTM LOGIC CONFIGURATION DEFAULT
- If you do need to set up GTM to support origin lookup based on serial number and lot number, you will:
- Add the flex field attributes to the manager layouts for the trade item structure component and the item origin.
- Create a constraint set so that GTM knows which flex field attribute you are using for serial number and/or lot number. (It is recommended that you do not change the constraint set that ships with GTM.)
Key Resources
- For more information on trade agreement qualification, please refer to the GTM How To/Configuration topic in Help called Trade Agreement Qualification.
- Once a user preference is created, you need to assign it to an entire domain, a specific user, or a specific user level. For more information on configuring a user in GTM, please refer to the 'User Preferences' topic and the 'User Preference Access' topic in help.
Qualify for Trade Agreement Action on Item
A new Qualify for Trade Agreement action has been added to enable you to qualify an item for a trade agreement. If multiple item origins for an item exist within the trade agreement region/countries, all of the item origins will be analyzed for qualification. When you run the action for an Item, you can specify:
- Trade Agreement - Enter the trade agreement for which you are qualifying a finished good. This is a required field.
- Country of Import - Enter the country of import. This is a required field.
- Product Classification Type - If applicable, enter the product classification type.
- Producer - If applicable, enter the producer of the goods.
- Effective Date - If applicable, enter the effective date for the qualification. If you do not enter an effective date, GTM will default to the current date.
- Expiration Date - If applicable, enter the expiration date for the qualification.
- Item Attribute - If applicable, GTM will display the item attributes including Suffix. Select the one that applies based on your finished good.
- Minimum Operations Requirements Met - Mark the checkbox if the finished good meets the minimum operation requirements. If items have not met the minimum operation requirements, GTM will mark the item as not qualified.
- Conditions - If applicable, GTM will display any conditions that are available. Select Yes to indicate if the condition has been met.

Once you click ‘Qualify’, GTM runs qualification for the selected item. An item qualification record is created indicating if your item qualifies for a trade agreement. In addition, information entered on the action is copied to the item qualification record. The Status field is set to ‘QUALIFIED’ and the Qualified field is set to ‘YES’.
The qualify for trade agreement process enables you to see if a finished good qualifies for a trade agreement and can take advantage of a reduced duty rate.
Steps to Enable
You don't need to do anything to enable this feature.
Tips And Considerations
If the associated item does not have the harmonized tariff product classification type and code specified for the country of import, GTM will use the first 6 digits of another harmonized tariff product classification code to perform qualification.
Key Resources
- For more information on trade agreement qualification, please refer to the GTM How To/Configuration topic in Help called Trade Agreement Qualification.
Qualify for Trade Agreement Action on Item Origin
A new Qualify for Trade Agreement action has been added to enable you to qualify an item origin for a trade agreement. When you run the action for an item origin, GTM automatically populates the country of origin if the item origin includes this information. In addition, you can specify:
- Trade Agreement - Enter the trade agreement for which you are qualifying a finished good. This is a required field.
- Country of Import - Enter the country of import. This is a required field.
- Product Classification Type - If applicable, enter the product classification type.
- Producer - If applicable, enter the producer of the goods.
- Effective Date - If applicable, enter the effective date for the qualification. If you do not enter an effective date, GTM will use the current date.
- Expiration Date - If applicable, enter the expiration date for the qualification.
- Item Attribute - If applicable, GTM will display the item attributes including Suffix. Select the one that applies based on your finished good.
- Minimum Operations Requirements Met - Mark the checkbox if the finished good meets the minimum operation requirements. If items have not met the minimum operation requirements, GTM will mark the item as not qualified.
- Conditions - If applicable, GTM will display any conditions that are available. Select Yes to indicate if the condition has been met.

Once you click ‘Qualify’, GTM runs qualification for the selected item origin. An item qualification record is created indicating if your item origin qualifies for a trade agreement. In addition, information entered on the action is copied to the item qualification record. The Status field is set to ‘QUALIFIED’ and the Qualified field is set to ‘YES’.
The qualify for trade agreement process enables you to see if a finished good qualifies for a trade agreement and can take advantage of a reduced duty rate.
Steps to Enable
You don't need to do anything to enable this feature.
Tips And Considerations
If the associated item does not have the harmonized tariff product classification type and code specified for the country of import, GTM will use the first 6 digits of another harmonized tariff product classification code to perform qualification.
Key Resources
- For more information on trade agreement qualification, please refer to the GTM How To/Configuration topic in Help called Trade Agreement Qualification.
Qualify for Trade Agreement Action on Trade Item Structure
A new Qualify for Trade Agreement action has been added to enable you to qualify the trade item structure for a trade agreement. When you run the action for a Trade Item Structure, you can specify:
- Item Origin - Select the item origin you want to qualify. If a trade item structure is associated with multiple item origins, you will see all the item origins available for qualification. This is a required field.
- Country of Origin - Enter the country of origin. If the item origin specifies the country of origin, this field will populate automatically when the item origin is selected. This is a required field.
- Trade Agreement - Enter the trade agreement for which you are qualifying a finished good. This is a required field.
- Country of Import - Enter the country of import. This is a required field.
- Product Classification Type - If applicable, enter the product classification type.
- Producer - If applicable, enter the producer of the goods.
- Effective Date - If applicable, enter the effective date for the qualification. If you do not enter an effective date, GTM will use the current date.
- Expiration Date - If applicable, enter the expiration date for the qualification.
- Item Attribute - If applicable, GTM will display the item attributes including Suffix. Select the one that applies based on your finished good.
- Minimum Operations Requirements Met - Mark the checkbox if the finished good meets the minimum operation requirements. If items have not met the minimum operation requirements, GTM will mark the item as not qualified.
- Conditions - If applicable, GTM will display any conditions that are available. Select Yes to indicate if the condition has been met.

Once you click ‘Qualify’, GTM runs qualification for the selected trade item structure. An item qualification record is created indicating if your trade item structure qualifies for a trade agreement. In addition, information entered on the action is copied to the item qualification record. The Status field is set to ‘QUALIFIED’ and the Qualified field is set to ‘YES’.
The qualify for trade agreement process enables you to see if a finished good qualifies for a trade agreement and can take advantage of a reduced duty rate.
Steps to Enable
You don't need to do anything to enable this feature.
Tips And Considerations
If the associated item does not have the harmonized tariff product classification type and code specified for the country of import, GTM will use the first 6 digits of another harmonized tariff product classification code to perform qualification.
Key Resources
- For more information on trade agreement qualification, please refer to the GTM How To/Configuration topic in Help called Trade Agreement Qualification.
Qualify for Trade Agreement in Process Management
A Qualify Items option has been added in Master Data > Process Management to enable you to qualify multiple items for trade agreements as a bulk process. You can specify:
- Based on Item - Select the saved query that contains the items you want to qualify. This is a required field.
- Trade Agreement - Enter the trade agreement for which you are qualifying a finished good. This is a required field.
- Country of Import - Enter the country of import. This is a required field.
- Product Classification Type - If applicable, enter the product classification type.
- Producer - If applicable, enter the producer of the goods.
- Effective Date - If applicable, enter the effective date for the qualification. If you do not enter an effective date, GTM will use the current date.
- Expiration Date - If applicable, enter the expiration date for the qualification.
- Minimum Operation Requirements Met? - Mark the checkbox to indicate the items have met the minimum operation requirements. If items have not met the minimum operation requirements, GTM will mark the items as not qualified.

You may also want to specify:
- The user role that will be used to perform the process.
- Select Execute, Publish, or Schedule to determine when the process will be executed. By default, the process will be executed when you click Submit.
Once you click ‘Submit’, GTM runs qualification for the selected items. If your items can be fully qualified, an item qualification record is created for each item origin and includes details about the qualification. In addition, information entered on the action is copied to the item qualification. If the item is fully qualified, the Status field is set to ‘QUALIFIED’ and the Qualified field is set to ‘YES’.
NOTE: In some instances, GTM may not be able to fully qualify an item since you may need to provide additional information as required by the trade agreement including Suffix and Conditions. You can use the manual Qualify for Trade Agreement action available in the item, trade item structure, item origin or item qualification.
The qualify for trade agreement process enables you to see if a finished good qualifies for a trade agreement and can take advantage of a reduced duty rate. By using this process, you can qualify many items at one time for a trade agreement as a bulk process. You can also run this process during off-peak hours.
Steps to Enable
You don't need to do anything to enable this feature.
Tips And Considerations
- If the associated item does not have the harmonized tariff product classification type and code specified for the country of import, GTM will use the the first 6 digits of another harmonized tariff product classification code to perform qualification.
- In some cases, GTM may not be able to determine if an item fully qualifies for a trade agreement. For example, there are instances where you need to select which Rules of Origin Attribute applies or a specific Condition that applies. In these cases, GTM will not create an item qualification record for the item. You can use the manual Qualify for Trade Agreement actions that are available on the Item, Item Origin, Item Qualification or Trade Item Structure for qualification.
Key Resources
- For more information on trade agreement qualification, please refer to the GTM How To/Configuration topic in Help called Trade Agreement Qualification.
Enhancements to View Qualification Report
A BI Publisher report has been introduced which enables you to see details about the trade agreement qualification performed including country of origin, country of import, trade agreement, inventory organization, item information and whether the finished good qualfies for the trade agreement. Also included are details about each of the components in the trade item structure.


This report is available by clicking the View Qualification Report button which you can access from:
- Item Qualification
- Item > Trade Details tab - In the Trade Programs tab, click the pencil icon to the right of the appropriate trade program.
- Action Results page for Qualify for Trade Agreement Action results page across Item Qualification, Item Origin, Item and Trade Item Structure
As part of the configuration for this report, some details need to be configured in the trade agreement so that GTM knows which formulas to use for calculations and the heading to use in certain columns. Depending on the trade agreement, the formulas and heading may vary. In the Trade Agreements > Reference Numbers grid, you need to specify the following Reference Number Qualifiers with corresponding Reference Numbers:
- RVC METHOD1-COMPONENT EXTENDED VALUE FORMULA - identifies the formula to use for component level calculations. For example, to calculate the net cost of the components, the Reference Number for this qualifier is the dependent formula called MATERIAL NET COST.
- RVC METHOD1-EXTENDED VALUE FORMULA - identifies the formula to use for the sum of components. For example, to calculate the net cost of the finished good including components, the Reference Number for this qualifier is the dependent formula called NET COST.
- RVC METHOD1-NAME - identifies the name of the columns that identify the value and the percentage. For the last two columns on the right of the Item Structure Component Analysis section of the report, the Reference Number for this qualifier is NET COST.

The qualify for trade agreement process enables you to see if a finished good qualifies for a trade agreement and can take advantage of a reduced duty rate.
Steps to Enable
You don't need to do anything to enable this feature.
Key Resources
- For more information on trade agreement qualification, please refer to the GTM How To/Configuration topic in Help called Trade Agreement Qualification.
Support for Wholly Obtained Items in Qualification Process
To support the trade agreement qualification process, a new Wholly Obtained flag has been added to indicate if a item is wholly obtained in the country of origin. Wholly obtained goods are goods that are grown, harvested or born within a country of origin. The finished good as well as individual components can wholly obtained. This field is modeled as a Yes/No flag on the following objects:
- Item - indicate if the item you procure or manufacture is wholly obtained.
- Item Origin - indicate if the item you procure or manufacture is wholly obtained at the inventory organization, partner, or partner site level.

During the trade agreement qualification process, GTM will determine if the finished good is wholly obtained and set the flag accordingly. GTM analyzes all the components of a finished good. If they are all marked as Wholly Obtained = YES and the country of origin for all components are within the member countries/regions of a trade agreement, the Wholly Obtained flag on the finished good is set to YES. In addition, the Wholly Obtained flag on the associated item qualification record created is also set to Yes.
By enabling you to flag whether a finished good or individual component is wholly obtained, GTM is able to properly calculate if a finished good qualifies for a trade agreement and can take advantage of a reduced duty rate.
Steps to Enable
You don't need to do anything to enable this feature.
Key Resources
- For more information on trade agreement qualification, please refer to the GTM How To/Configuration topic in Help called Trade Agreement Qualification.
Support for Additional Rules of Origin Rule Types
To better support users of trade agreements and broaden the applicability of the rules of origin qualification engine, a number or new rules of origin rule types are now supported:
- No Tariff Shift - checks that the value of components that do not undergo tariff shift are below a particular threshold.
- Conditions - additional input is required from the user. For example, you may need to confirm that a certain type of operation is performed on the product.
- 50/50 - requires that the value of non-originating materials is less than the value of originating materials.
- Wholly Obtained - not a rule type per se but enables GTM to qualify a wholly obtained finished good without performing a product-specific rule evaluation. A wholly obtained finished good should include all components that are wholly obtained as well as originate from the partner countries/regions in the trade agreement.
These new Rules of Origin Rule Types have been added to the existing rule types including:
- HS exclusion
- HS inclusion
- Tariff shift at the chapter, heading, subheading and item levels
- Regional value content methods based on net cost, transaction value (on the item), build up and build down
- Third content check and/or de minimis

By supporting the full list of rules of origin rule types, GTM can better support your requirements to determine if your finished good qualifies for a trade agreement and can take advantage of a reduced duty rate.
Steps to Enable
You don't need to do anything to enable this feature.
Key Resources
- For more information on trade agreement qualification, please refer to the GTM How To/Configuration topic in Help called Trade Agreement Qualification.
Automatically Populate Value Note When a Value is System Calculated
When a value is automatically calculated by GTM using a formula expression, the value note in the Values grid can automatically be populated.
To setup this capability, you need to create a formula expression. Navigate to Master Data > Power Data > Configurations > Formula Expressions. When you create a formula expression and include a description, the description will be used to automatically populate the value note field on the trade transaction, trade transaction line, declaration or declaration line.

Continue with the existing configuration to use formula expressions to assign values including the value note. Once configured, you can assign a value using the Execute Compliance Rules web action or agent action. Or, you can do so using the Execute Policy web action or agent action. When a compliance rule is triggered to calculate and assign a value to a business object, the Description from the Formula Expression specified in the compliance rule is copied to the Value Note field in the Values grid.

This enhancement enables you to see the description of a system calculated value from the formula expression used. You can see this information in the values grid on the trade transaction, trade transaction line, declaration or declaration line.
Steps to Enable
You don't need to do anything to enable this feature.
Search Trade Transactions and Declarations Based on Location Information
You can search trade transactions, trade transaction lines, declarations and declarations lines by city, province, postal code and country.
On the trade transaction finder and declaration finder, the following fields have been added:
- On the Involved Party tab, you can search based on involved party:
- City- #1
- Province- #1
- Postal Code- #1
- Country- #1
- City- #2
- Province- #2
- Postal Code- #2
- Country- #2
- On the Involved Party tab, you can search based on location:
- City
- Province
- Postal Code
- Country
- On the Line Involved Party tab, you can search based on involved party:
- City- #1
- Province- #1
- Postal Code- #1
- Country- #1
- City- #2
- Province- #2
- Postal Code- #2
- Country- #2
On the trade transaction line finder and declaration line finder, the following fields have been added:
- On the Involved Party tab, you can search based on involved party:
- City- #1
- Province- #1
- Postal Code- #1
- Country- #1
- City- #2
- Province- #2
- Postal Code- #2
- Country- #2

This enhancement gives you more flexibility when searching across your transactional data.
Steps to Enable
You don't need to do anything to enable this feature.
Tips And Considerations
If you want to display city, province, postal code and country on your finder results, you can use screen sets to customize the fields you display.
Key Resources
- Please refer to the OTM How To/Configuration Topic called ‘Configuring the User Interface’ for more information on customizing the fields you display.