

This document will continue to evolve as existing sections change and new information is added. All updates appear below:
| Date |
What's Changed |
Notes |
|---|---|---|
| 20 FEB 2018 |
Added information about Extract Assets Reporting Data process |
|
| 01 MAR 2017 |
Uploaded new Customer Hierarchy image. |
|
| 17 JAN 2017 |
Initial Document Creation |
This guide outlines the information you need to know about new or improved functionality in Oracle Financials Cloud Release 12 and describes any tasks you might need to perform for the update. Each section includes a brief description of the feature, the steps you need to take to enable or begin using the feature, any tips or considerations that you should keep in mind, and the resources available to help you.
We would like to remind you if your system has modified security structures you may need to advise your security administrator of new features you would like to use.
We welcome your comments and suggestions to improve the content. Please send us your feedback at oracle_fusion_applications_help_ww_grp@oracle.com
This section gives you information to help you plan, deploy and validate your upgrade to this release.
For Oracle ERP Cloud, we have published Oracle ERP Cloud: Performing Your Release 12 Upgrade on My Oracle Support.
This document includes a list of all Pre- and Post-Upgrade steps for ERP.
We frequently update this document so don’t forget to check back and get the latest information before you start your upgrade.
Some of the new Release 12 features are automatically available to users after the upgrade and some require action from the user, the application implementation administrator, or Oracle.
The table below offers a quick view of the actions required to enable each of the Release 12 features in Oracle Financials Cloud.
| Action Required to Enable Feature |
|||||||
|---|---|---|---|---|---|---|---|
| Feature |
Automatically Available |
End User Action Required |
Administrator Action Required |
Oracle Service Request Required |
|||
| User Experience |
|||||||
|
|
|||||||
|
|
|||||||
| Applications Security |
|||||||
|
|
|||||||
|
|
|||||||
|
|
|||||||
|
|
|||||||
|
|
|||||||
|
|
|||||||
|
|
|||||||
|
|
|||||||
|
|
|||||||
|
|
|||||||
|
|
|||||||
|
|
|||||||
|
|
|||||||
|
|
|||||||
|
|
|||||||
|
|
|||||||
|
|
|||||||
|
|
|||||||
| Advanced Collections |
|||||||
|
|
|||||||
|
|
|||||||
| Assets |
|||||||
|
|
|||||||
| Expenses |
|||||||
|
|
|||||||
| Payments |
|||||||
|
|
|||||||
| Receivables |
|||||||
|
|
|
||||||
|
|
|||||||
|
|
|||||||
| Bank Account Transfer Information for Completed Transactions |
|
||||||
| Transactional Business Intelligence (OTBI) |
|||||||
| Improved Payables and Receivables Reconciliation Drilldown Scalability |
|
||||||
|
|
|||||||
|
|
|||||||
|
|
|||||||
|
|
|||||||
|
|
|||||||
|
|
|||||||
|
|
|||||||
|
|
|||||||
|
|
|||||||
|
|
|||||||
|
|
|||||||
| Financials for Latin America |
|||||||
|
|
|||||||
|
|
|||||||
|
|
|||||||
|
|
|||||||
|
|
|||||||

Common Technologies and User Experience
This section gives an overview of common features available in Release 12. These are the overall investments in technology and user experience that Oracle has focused on in this release.
In Release 12 we have modernized and simplified the user experience with
- a new look and feel to setup pages to provide a clear layout.
- new Ribbon icons for ADFdi spreadsheets.
The new look and feel of the transaction pages (introduced in Release 11) is expanded to include all setup pages in Oracle Financials Cloud in Release 12. All pages throughout the application now have a consistent style.
Some fields, buttons and regions have been moved on the page in order to provide a more effective and accessible work area on any device.
A new set of icons with a simplified appearance has been introduced, allowing you to access functions and perform actions on the page.

STEPS TO ENABLE
No steps are necessary to enable this feature.
TIPS AND CONSIDERATIONS
- The Release 12 function icons are grey. Enabled icons are dark grey, disabled icons are light grey.
- Hover over an icon to see a tooltip describing the icon.
In ADFdi spreadsheets, certain buttons are changed to Ribbon icons to group together actions in one place.

STEPS TO ENABLE
No steps are necessary to enable this feature.
Oracle Fusion Applications Security provides a single console where IT Security Managers and Administrators can perform various functions including user lifecycle management, role definition, security policy management(both functional and data), role hierarchy maintenance, username and password policy administration, and certificate management. The console also enables users to simulate the effect of security changes, to run security reports, and download a connector for integration with Microsoft Active Directory.
In Release 12, Oracle Fusion Applications Security offers several new capabilities that offer customers the following benefits:
- A Simplified User Experience for the IT Security Manager - Prior to Release 12, security administration functions were distributed across Oracle Identity Management (OIM) and Authorization Policy Manager (APM). In Release 12, these functions are delivered through a single interface – the Security Console. OIM and APM are no longer available in R12.
- Easy Integration with Identity and Access Management (IDM/IAM) Systems –New capabilities to synchronize user account information with Identity and Access Management (IDM/IAM) systems. This synchronization enables the delivery of a Single Sign-On experience through these systems.
- Upgrade-Safe Reference Role Model - Starting from Release 12, pre-defined roles that are shipped with Oracle Applications Security will be locked down. Customers will not be able to modify the functional and data security policies that are associated with these roles. They can, however, add new data security policies to these pre-defined roles. In addition, privileges and resources are protected. Users cannot create or modify these artifacts
- Enhanced Self-Service Capabilities - Administrators are able to manage the entire user lifecycle. They can customize how notifications are generated and sent for various user lifecycle events including user account creation, and password management.

For Microsoft Active Directory (AD) and Oracle Identity Management (OIM), customers can download and install connectors that will automatically synchronize user account information between Oracle Fusion Applications and these IDM systems. As in R11, customers must continue to log a Service Request (SR) to set up federated Single Sign-On (SSO) between these systems. Once the federation is enabled, the connectors will synchronize information.
Release 12 also delivers a REST API based on the SCIM (System for Cross-Domain Identity Management) standard. Customers can use this API to create user accounts, modify user attributes (e.g. email), enable/disable users, and fetch user account and role information.
Locking down these security artifacts enables safe upgrades to pre-defined roles, since the possibility of conflict with customer introduced changes to these roles is now eliminated. This, in turn enables customers to safely adopt new enhancements that may be delivered with pre-defined roles in future releases. As in R11, customers can make copies of pre-defined roles and freely customize these copies.
Please refer to the Upgrading Applications Security in Oracle ERP Cloud for any steps that may be required to prepare for and adopt this feature.
Administrators can also tailor username and password generation by choosing from a list of shipped policies.
Please refer to the Upgrading Applications Security in Oracle ERP Cloud for any steps that may be required to prepare for and adopt this feature.
A new data security model was introduced in Release 11 that only applied to new Oracle ERP Cloud customers. In Release 12 all users will now be assigned to the appropriate data sets using the new Manage Data Access for Users page, without the need for assigning data roles generated from data role templates. Since data roles are no longer used, they will no longer be automatically generated upon the creation of a new data security element, such as a new business unit, a new ledger, etc.
While customers who started using Oracle ERP Cloud in Release 11 have been introduced to this new model, customers who were using Oracle ERP Cloud prior to Release 11 have continued to use the data role based data security in Release 11. In Release 12, the usage of generated data roles for data security will be discontinued, and customers who are using the data role based model will be upgraded to use the new user-role-data assignment model.
To access the Manage Data Access for Users page, you must navigate to Setup and Maintenance > Manage Data Access for Users task.

Manage Data Access for Users Page
This new feature is available to all products in Oracle ERP Cloud, including Financials, Procurement, Project Portfolio Management, Supply Chain Management, and Incentive Compensation. Specifically, this new feature is available to the following reference job roles:
| Reference Job Role |
Assignable Data Security Context |
|---|---|
| Accounts Payable Manager |
Business Unit |
| Accounts Payable Specialist |
Business Unit |
| Accounts Payable Supervisor |
Business Unit |
| Accounts Receivable Manager |
Business Unit, Reference Data Set |
| Accounts Receivable Specialist |
Business Unit, Reference Data Set |
| Advanced Procurement Requester |
Business Unit |
| Advanced Revenue Analyst |
Ledger |
| Advanced Revenue Manager |
Ledger |
| Asset Accountant |
Fixed Asset Book |
| Asset Accounting Manager |
Fixed Asset Book |
| Budget Analyst |
Control Budget |
| Budget Manager |
Control Budget |
| Collections Agent |
Business Unit |
| Collections Manager |
Business Unit |
| Corporate Card Administrator |
Business Unit |
| Cost Accountant |
Business Unit, Cost Organization, Reference Data Set |
| Expense Auditor |
Business Unit |
| Expense Manager |
Business Unit |
| Financial Analyst |
Data Access Set |
| Financial Application Administrator |
Business Unit, Reference Data Set |
| General Accountant |
Data Access Set |
| General Accounting Manager |
Data Access Set |
| Grants Accountant |
Business Unit |
| Grants Administrator |
Business Unit |
| Incentive Compensation Analyst |
Business Unit |
| Incentive Compensation Application Administrator |
Business Unit |
| Incentive Compensation Manager |
Business Unit |
| Incentive Compensation Plan Administrator |
Business Unit |
| Internal Auditor |
Business Unit, Inventory Organization |
| Inventory Manager |
Inventory Organization |
| Order Administrator |
Reference Data Set |
| Order Manager |
Business Unit |
| Procurement Preparer |
Business Unit |
| Procurement Requester |
Business Unit |
| Project Accountant |
Business Unit |
| Project Administrator |
Business Unit, Project Organization |
| Project Billing Specialist |
Business Unit |
| Project Creator |
Business Unit |
| Purchase Analysis |
Business Unit |
| Receiving Agent |
Inventory Organization |
| Shipping Agent |
Inventory Organization |
| Shipping Manager |
Inventory Organization |
| Supply Chain Application Administrator |
Cost Organization, Inventory Organization, Manufacturing Plant, Reference Data Set |
| Tax Accountant |
Business Unit |
| Tax Administrator |
Business Unit |
| Tax Manager |
Business Unit |
| Tax Specialist |
Business Unit |
| Warehouse Manager |
Inventory Organization |
| Warehouse Operator |
Inventory Organization |
STEPS TO ENABLE
There are no steps needed to enable this feature.
TIPS AND CONSIDERATIONS
As data assignments are specific to a role, a user must first be assigned to a role before data assignments can be created in the Manage Data Access for Users page. When selecting a role, the selection is limited to the roles that are currently assigned to the selected user.
Only data roles generated from seeded data role templates will be upgraded, as the user-role-data assignment records require associated data security policies against the roles in order to drive data security, and the required data security policies will only be present against the corresponding seeded roles. Instructions to manually upgrade custom data roles will be provided in a separate upgrade document.
KEY RESOURCES
You can now create and manage implementation user accounts within Oracle Fusion Applications Security. You can assign roles to these user accounts using the following navigation: Tools > Security Console > User tab. You can also search, retrieve, and manage user accounts automatically created for employees, contingent workers, supplier contacts, or partner contacts.

Search User Accounts Page

Add User Account Page
Steps to Enable
There are no steps necessary to enable this feature.
Role Information
The following function security privileges are required for this feature.
| Privilege Name and Code |
Job Role Name and Code |
|---|---|
| Create User Account ASE_CREATE_USER_ACCOUNT_PRIV |
IT Security Manager ORA_FND_IT_SECURITY_MANAGER_JOB |
| Delete User Account ASE_DELETE_USER_ACCOUNT_PRIV |
IT Security Manager ORA_FND_IT_SECURITY_MANAGER_JOB |
| Edit User Account ASE_EDIT_USER_ACCOUNT_PRIV |
IT Security Manager ORA_FND_IT_SECURITY_MANAGER_JOB |
| View User Account ASE_VIEW_USER_ACCOUNT_PRIV |
IT Security Manager ORA_FND_IT_SECURITY_MANAGER_JOB |
Key Resources
For more information on the Security Console, go to the Help Center for the following guide:
- Security Oracle HCM Cloud
Administrator Password Management
As an administrator, you can manage passwords of other users using the Security Console. You can auto-generate or manually enter a password for a user account. You can also define password lifecycle and complexity policies. Passwords will be automatically validated against these policies.

Administrator’s Reset Password Page
Steps to Enable
There are no steps necessary to enable this feature.
Key Resources
For more information on the Security Console, go to the Help Center for the following guide:
- Security Oracle HCM Cloud
User Password Management (Self-Service)
You can now manage your own user account password using the Security Console. The password will be automatically validated against the defined password lifecycle and complexity policies.

Self-Service Password Reset Page
Steps to Enable
There are no steps necessary to enable this feature.
As an administrator, you can now lock user accounts. If you lock a user account, you will be temporarily preventing the user from logging in with that user account. You can also unlock a locked user account.

Lock User Account in Edit User Account Page
Steps to Enable
There are no steps necessary to enable this feature.
You can now view only certain components of a role in the graphic visualizer. You can view only the privileges, aggregate privileges or roles assigned to a role. You can also view the graph in full screen mode and pan over a specific region in the graph.
For complex roles, these features enable you to reduce the amount of information visualized and to focus on the area within the role hierarchy that requires your attention.

View Only the Privileges for a Role

View Only the Inherited Roles for a Role

Pan and View Top Left Region of the Graph
Steps to Enable
There are no steps necessary to enable this feature.
You can now view role hierarchies in a tabular view. You can switch between the graphic visualizer view and the tabular view. You can also export the date displayed in the tabular view.

Tabular View of Direct and Indirectly Inherited Roles for a Role

Tabular View of Direct and Indirectly Assigned Privileges for a Role

Tabular View of Direct and Indirectly Assigned Users for a Role

Export of Direct and Indirectly Inherited Privileges for a Role
Steps to Enable
There are no steps necessary to enable this feature.
Search in Role Hierarchy Visualization
You can now search and quickly locate security artifacts (nodes) in the role hierarchy visualization. You can search for privileges, roles or users in the visualization.

Search in Role Hierarchy Graph
Steps to Enable
There are no steps necessary to enable this feature.
You can now define the user name generation rules used to auto-generate the user name in Oracle Fusion Applications Security. User name generation rules can be based on the user’s first and last names, e-mail or person number. You can also choose to use a system generated user name if the rule fails to generate a user name.

User Name Generation Rules Region in the Administration Page
Steps to Enable
There are no steps necessary to enable this feature.
Tips and Considerations
If your company submitted a service request for Oracle to set up a custom username generation rule, review the Validate User Lifecycle Settings topic in the Upgrade Guide for Oracle ERP Cloud Security.
You can now define policies for password management. These policies can define the duration for various password lifecycle events like password expiration and password warning generation. You can also set the complexity of generated passwords by choosing from a pre-defined list of rules.

Password Policy Region in the Administration Page
Steps to Enable
There are no steps necessary to enable this feature.
Tips and Considerations
If your company submitted a service request for Oracle to set up a custom password policy, review the Validate User Lifecycle Settings topic in the Upgrade Guide for Oracle ERP Cloud Security.
Role Information
The following function security privilege is required for this feature:
| Privilege Name and Code |
Job Role Name and Code |
|---|---|
| Run Password Expiry Job ASE_PASSWORD_EXPIRY_ESS_JOB_PRIV |
IT Security Manager ORA_FND_IT_SECURITY_MANAGER_JOB |
You can now define custom notification templates for user account life cycle events. You can also use pre-defined notification templates.
These templates will be used to generate notifications for events like user account created, user password reset and user password expiry warning.

Notification Templates Region in the Administration Page

Edit Notification Template Page
Steps to Enable
There are no steps necessary to enable this feature.
Tips and Considerations
If your company submitted a service request for Oracle to set up a custom notification template, review the Validate User Lifecycle Settings topic in the Upgrade Guide for Oracle ERP Cloud Security.
Upgrade-Safe Management of Factory Shipped Roles
You can now identify a predefined (factory shipped) Oracle role when viewing the role. Predefined Oracle roles are locked and you cannot customize the Oracle delivered functional and data security policies associated with these roles. You can, however, add data security policies to these roles.
Predefined Oracle roles are displayed in a different color in the graph visualizer.

Predefined Role Indicator in the Edit Role Page

Predefined Role Indicator in the Role Hierarchy Graph
Steps to Enable
There are no steps necessary to enable this feature.
Bridge for Microsoft Active Directory
Simplify Single Sign-On with Microsoft Active Directory by downloading and installing the Active Directory Bridge from the Security Console. Automatically synchronize user account information between Oracle Fusion Applications Security and Microsoft Active Directory.

Active Directory Bridge Base Configuration Page

Active Directory Bridge User Attribute Mappings Page

Active Directory Bridge Synchronization Status Page
Steps to Enable
There are no steps necessary to enable this feature.
User Password Changes Audit Report
You can now generate a report that lists password changes made by users. The report can be generated for changes made by specific users or for all changes made during a specific period.

User Password Changes Audit Report Process Details Page
Steps to Enable
There are no steps necessary to enable this feature.
Role Information
The following function security privilege is required for this feature:
| Privilege Name and Code |
Job Role Name and Code |
|---|---|
| Run User Password Changes Audit Report ASE_USER_PASSWORD_CHANGES_AUDIT_REPORT_PRIV |
IT Security Manager ORA_FND_IT_SECURITY_MANAGER_JOB |
There are no steps necessary to enable this feature.
Integrate Custom Identity Management Solution
You can now optionally Integrate with your Identity Management solution for user and role management using industry standard System for Cross-domain Identity Management (SCIM) REST APIs and ATOM feeds.
Steps to Enable
There are no steps necessary to enable this feature.
The password reset flow has been changed in Release 12. A notification email will be sent to the user who requests a password reset. The user will be required to click on this link, within a specific period of time, to change the password. This replaces the previous flow where users were required to answer a series of challenge questions to reset the password.

Email Notification to Reset Password

User Reset Password Page
Steps to Enable
There are no steps necessary to enable this feature.
The unified security administrator interface, combined with the ability to safely upgrade the reference security implementation will result in the following changes in functionality in the Security Console.
- All User Account information including password changes and lock/unlock status are managed in the security console.
- Roles are now managed directly in the Security Console and are no longer managed within Oracle Identity Manager or Authorization Policy Manager.
- Users can view, create or modify roles without first selecting an application.
- Users cannot create or modify privileges. They can continue to grant privileges to roles
- Users cannot create or modify resources.
- Users cannot grant resources directly to role. Resources are now only granted to privileges.
Steps to Enable
There are no steps necessary to enable this feature.
New Function Security Privileges for Applications Security
This section provides product-specific information that you need when implementing new Release 12 features in your existing roles.
If you are not using the predefined reference roles, then you need to add the function security privilege to relevant custom job roles.
This table identifies the required function security privilege and the predefined role that automatically inherits the privileges during the upgrade.
| Privilege Name and Code |
Job Role Name |
|---|---|
| Create User Account ASE_CREATE_USER_ACCOUNT_PRIV |
IT Security Manager |
| Delete User Account ASE_DELETE_USER_ACCOUNT_PRIV |
IT Security Manager |
| Edit User Account ASE_EDIT_USER_ACCOUNT_PRIV |
IT Security Manager |
| View User Account ASE_VIEW_USER_ACCOUNT_PRIV |
IT Security Manager |
| Enable Database Resource Management ASE_ENABLE_DATABASE_RESOURCE_MGMT_PRIV |
IT Security Manager |
| Run Password Expiry Job ASE_PASSWORD_EXPIRY_ESS_JOB_PRIV |
IT Security Manager |
| Run User Password Changes Audit Report ASE_USER_PASSWORD_CHANGES_AUDIT_REPORT_PRIV |
IT Security Manager |
Financials Data Extract - Outbound Integration
The Financials Data Extract gives businesses the capability to extract complete or incremental financials data from the Oracle ERP Cloud to seamlessly integrate with on-premise, legacy, or other cloud systems. Business users can launch the outbound extract process from either
- the Oracle ERP Cloud Scheduled Processes page or
- automatically by using the ERP Integration Service.
The following table outlines the key primary financials data extracts available:
| Application |
Data Extract |
| Payables |
Payables Transactions Extract |
| Payables |
Payments Extract |
| Receivables |
Receivables Transactions Extract |
| Receivables |
Receivables Adjustments Extract |
| Receivables |
Receipts Analysis Extract |
| Receivables |
Receivables Billing History Extract |
| General Ledger |
Journals Extract |
| General Ledger |
Trial Balance Extract |
| Tax |
Financial Tax Extract |
Partner Transaction Tax Integrations with Oracle ERP Cloud
Oracle ERP Cloud integration with comprehensive transaction tax management solutions provided by tax partners is currently available for tax content, tax calculation and determination, and tax reporting. Customers can elect to leverage these partner transaction tax solutions independently or together in unison, depending upon the different transaction tax needs sought across unique market segments and industries.
The following summary outlines the key benefits in adopting partner transaction tax management solutions:

Oracle Planning and Budgeting Integration
Oracle Planning and Budgeting Cloud Service enables organizations of all sizes to quickly adopt world-class planning and budgeting applications, driving world-class functionality beyond finance across the enterprise, with flexible deployment options and virtually no learning curve. Integration of Planning and Budgeting with General Ledger allows users to take advantage of a joint offering which provides best in class functionality for both budgeting and accounting.
The integration between Planning and Budgeting and the General Ledger keeps budget and actual amounts synchronized for financial reporting and analysis. You can use a seamless method to integrate Oracle Financials Cloud general ledger data with the Oracle Enterprise Performance Management Cloud if you use Oracle ERP Cloud Release 11 or higher. This updated integration allows you to simply pick the desired source ledger from the Oracle Financials Cloud general ledger, set up a few simple mappings and then push a button to pull the data into the EPM Cloud applications. This integration can be run manually, or scheduled for a specific time, and does not require manual steps in the Oracle Financials Cloud or the EPM Cloud services.
Oracle Financials Cloud offers an integrated financial management suite that is designed to automate, streamline, and manage financial processes end-to-end. It simplifies controls, increases productivity, and improves business decisions through a broad suite of capabilities around general ledger, accounts payable, accounts receivable, fixed assets, expenses, collections, and cash management, as well as centralized accounting, tax, payment, and intercompany engines.
Advanced Collections provides a comprehensive solution to manage day-to-day collection operations. Automation capabilities for the collection process enables collection agents to focus on work assigned to them and follow up on tasks. A collections agent can review customer information, record promises, submit payments, and request adjustments or disputes. The strategy management solution automatically identifies and applies a list of tasks that can be both automated and manual to improve the collection experience for both customers and collections agents. Smart processes run in the background, providing accurate and up-to-date information to the collector.
Use the new Collections work area to gain comprehensive control of your assigned delinquent customers and collections tasks. Efficiently prioritize work with at-a-glance reviews of current collections data, conveniently summarized into four infotiles. The summary information on each infotile appears in the corresponding detail table for your review. Take immediate action on pending items in the detail tables, or drill down to individual pages for more complex activities.
- Access the work area by clicking the Collections icon on the springboard.
- Use the four infotiles on the Collections work area to view each detailed table.
- Use the Delinquent Customer infotile to review your delinquent customers. The detail table displays the customer, number of delinquencies, work status, work status date, customer score, and assigned strategy.
- After drilling in to delinquent customer details, use the Customer Hierarchy to navigate to individual customer accounts and bill-to-sites.
- Use the Promises infotile to review detailed information on all collectible promises and the subset of promises that have been broken. The detail table displays information about delinquent customers, account transactions, promised amount, promised date, and status.
- Use the Strategy Tasks infotile to review information on all your manual strategy tasks. Complete, cancel and reassign strategy tasks directly in this work area.
- Use the Activities infotile to manually review activities. You can update the activities in this work area.

Advanced Collections springboard

Delinquent Customers Infotile and Delinquent Customer list

Customer Hierarchy

Promises Infotile and Promise details

Strategy Tasks infotile and assigned Strategy Task details

Activities infotile
Steps to Enable
There are no steps needed to enable the feature.
The Advanced Collections Case Folder enables transactions to be grouped and collections activities to be performed against the entire group at one time. Once the transactions are grouped in a Case Folder, it is no longer necessary to drill into individual transactions to understand the effectiveness of collection efforts. Using the case number, use the new Case Folder page to manage and take actions against the set of transactions. This will increase collections efficiency, save time and effort for customers that have a large number of similar invoices that can be grouped into a Case Folder.
- Create a Case Folder by selecting multiple transactions and using the Actions menu > Create Case Folder.
- Manage the Case Folder in the new page. Perform collections activities against the entire set of transactions.
- Add or remove transactions from the Case Folder using the Select and Add icons in the Case Folder page.


Steps to Enable
There are no steps needed to enable the feature.
Assets simplifies fixed asset accounting tasks and automates asset management. Use Assets as a unified source of asset data from both Oracle Applications Cloud and external feeder systems to provide visibility into worldwide assets. Standard management tasks, such as asset additions, asset transfers, disposals, reclassifications, financial adjustments, and legacy data conversions can be streamlined with automated business flows. Standard accounting, operational, and registry reports are available for ease of reconciliation and analysis.
Stay in total control of assets by tracking asset sources. Track new asset additions or adjustments by source, including the related invoice details for any period range.
The following screen captures illustrate the feature and its benefits.

Track asset costs by sources

Track cost changes to existing assets by their sources
Comply with US Inland Revenue Property Tax Sections 1245 and 1250. Track amounts for sale held longer than the capital gain thresholds. The new Sales or Exchanges of Property Report expedites Form 4797 Inland Revenue compliance.
No steps are necessary to enable this feature.
- Set up capitalization thresholds for your category book defaults to ensure ease of property tax reporting.
- Oracle® Fusion Applications Financials Implementation Guide, Release 12.
With the addition of per diem policies, claim per diem, which are predetermined travel expense amounts, based on a set of criteria. Setup per diem policies to reimburse meals, accommodations, and incidental expenses to ensure compliance with local regulations.
When per diem policies are enabled, the application automatically calculates the per diem amount based on the trip details entered in the expense report. Managers and auditors can review the per diem details in the expense report approval notifications.
Per diem policies provide a broad set of configurable criteria to support global per diem requirements. Define the rules governing per diem reimbursement and the applicable rates in a per diem policy. The following options are available:
- Rate Calculation Method
- Rate Currency
- Rate Includes
- Rate Determinants
- Rate Rules
Specify the calculation method for per diem rates by selecting one of the following options:
Daily Rate: A fixed day or night rate with or without deductions.
Sum of Separate Rates: A sum of rates for meals, accommodations, and/or incidentals.
Daily Time Range Rates: Rate varies depending on the duration of each day of the trip, such as midnight to midnight.
Sum of Separate Time Range Rates: A sum of rates for meals, accommodations, and/or incidentals. The rate varies based on the duration of the trip.
Define the per diem rates in a single currency or by location currencies. For example, you can define the per diem rate as 150 USD in Los Angeles and 200 USD in London. Alternately, define them in the location currency as 150 USD in Los Angeles and 150 GBP in London.
Define the rates included in the total per diem amount and the deductions that can be applied if free meals or free accommodation are applicable. When deductions are enabled for a policy, free meals and accommodation must be indicated in expense reports.
Use this option if the rate varies by additional factors, such as location or role.
Use this option if the per diem rates vary by departure and arrival time, same day travel, long-term travel, or weekend and holiday travel. Additionally, specify per diem eligibility criteria.

Rate Determinants and Rate Rules

Deductions and First and Last Day Rules
After defining per diem reimbursement rules, define the rates. Complex per diem policies can be created using a spreadsheet. When a per diem policy is enabled, the application automatically calculates the rates based on the trip details.

Per Diem Expense in Expense Entry

Per Diem Details in Expense Entry
Steps to Enable
To enable policies, complete the following tasks, which are accessible from the Define Expense Policies and Rules task list:
- Manage Policies by Expense Category: Define per diem policies and activate them for use. You can also assign a single policy to multiple expense types when applicable.
- Manage Expense Report Templates: Define expense types and assign policies.
Oracle Payments provides a highly configurable and robust engine to disburse and receive payments. Oracle Payments is a fundamental part of the Oracle Applications architecture and is integrated with multiple products that require support for payment processing. As the central payment engine, Oracle Payments processes invoice payments from Oracle Payables and settlements against credit cards and bank accounts from Oracle Receivables. Oracle Payments provides the infrastructure needed to connect these applications and others with third-party payment systems and financial institutions.
The payment approval feature enables payments to be sent to approvers for review before final payments are made to suppliers. Approvers can approve or reject payment process requests from e-mails or payment approval worklist notifications. Payment approval allows management to control payments by prioritizing available funds to use them effectively.
Steps to Enable
- To enable payment approvals, navigate to: Setup and Maintenance > Search: Manage Disbursement System Options > Manage Disbursement System Options page.
- Select the Enable payment approval option.

Enable Payment Approval Option on Manage Disbursement System Options
TIPS AND CONSIDERATIONS
- When the payment approval option is enabled on the Manage Disbursement System Options page, only payment process requests initiated from Oracle Payables are routed for approval.
- To configure payment approval rules, perform the following steps:
- Navigate to: Setup and Maintenance > Search: Define Approval Management for Financials.
- Click on the Manage Task Configurations for Financials link.
- On the BPM Worklist page, click the Edit icon.
- Click the PaymentApproval (11.1.12.0.0) task.
- Select the Assignees section.
- Configure a payment approval rule to meet your business requirement.
- The payment process request is a straight through process and user intervention is not required unless payments need to be reviewed and stopped.
- When a payment process request is submitted with the payment approval option enabled, the payment approval process is automatically triggered after the payment process request reaches the Review Proposed Payments stage.
- Navigate to: Overview page > Tasks icon > Manage Payment Process Requests link > Manage Payment Process Requests page. After the payment approval process is triggered, the status of the payment process request is set to Payments Approval Initiated.
- After the payment approval process is initiated for a payment process request, approvers receive e-mails, as well as payment approval worklist notifications.
- Approvers can only approve or reject an entire payment file within a payment process request and not individual payments within a payment file.
- When the payment approval process is in progress, modifications to a payment process request are only allowed by active approvers.
- Approvers can remove payments from the payment process request and approve it.
- Approve or Reject actions are enabled only for active approvers of the payment process request. These actions are not available to other nonapprovers.
- The Withdraw Approval action is enabled only when the payment process request status is Payments Approval Initiated. This action is performed by the submitter or approver of the payment process request.
- If required, any user can select the Terminate Payment Process action.
- When approvers receive payment approval workflow notification by e-mail, they can conveniently approve or reject a payment process request by e-mail.
Use Setup and Maintenance to navigate to the Business Process Management (BPM) Worklist application.


Payment Approval Task in Business Process Management Worklist
Sample Business Use Case:
Your business wants to route all payments that are more than 5,000 USD to approvers. Associate the pay group called “Morethan5k” with invoices greater than 5,000 USD.
The following rule routes all payments to the user “finuser2” when a payment process request process invoices with pay group equal to “Morethan5K”.

Configuration of Payment Approval Rule Based on Pay Group

Payment Process Request in Payments Approval Initiated Status

Payment Approval Worklist Notification
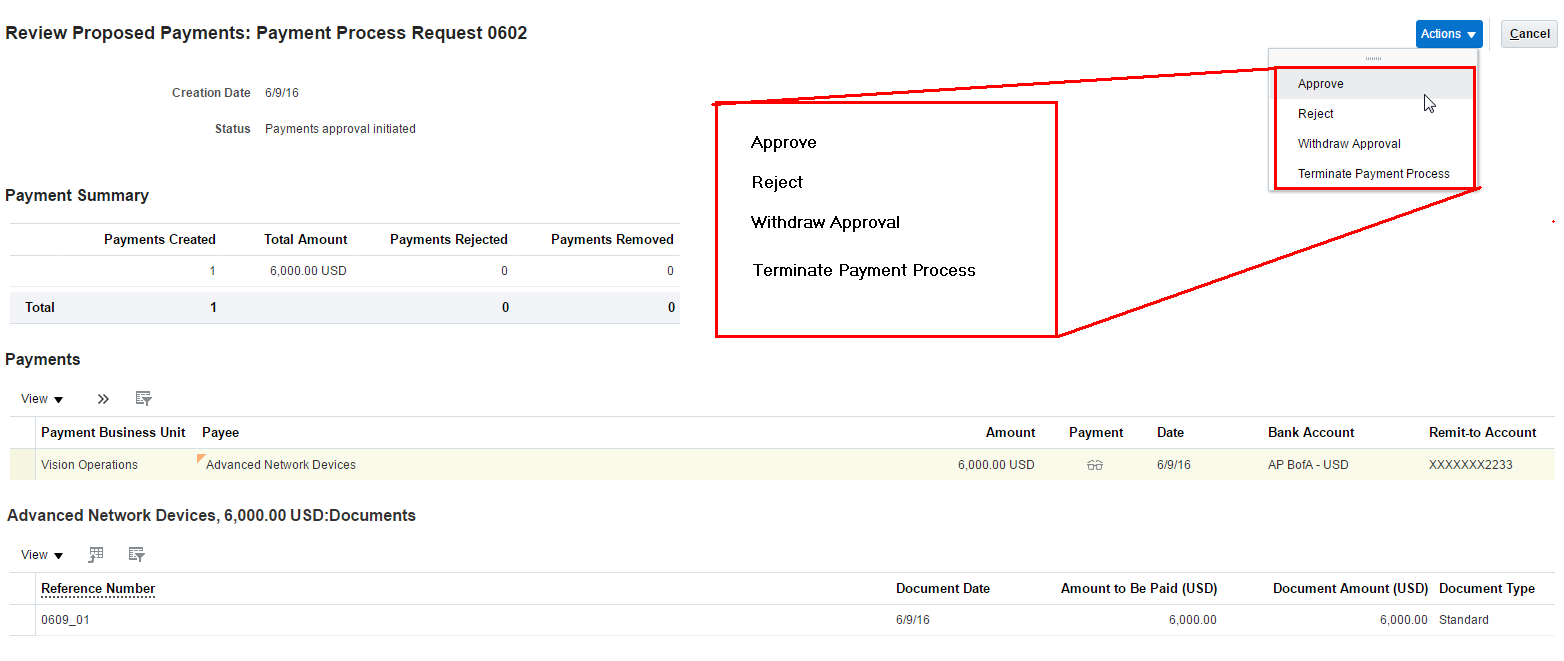
Payment Approval Selections on Actions Menu

Removal of Payments from a Payment Process Request in the Payments Approval Initiated Status

Approve or Reject Actions Available for a Payment Process Request in the Payments Approval Initiated Status
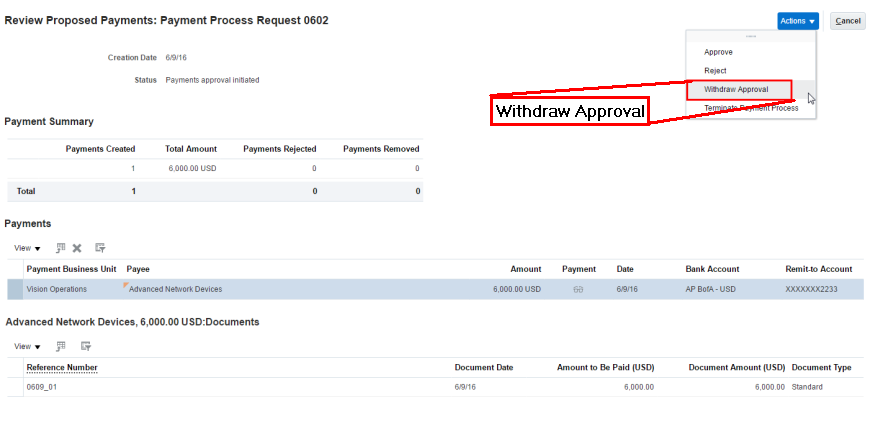
Withdraw Approval Action Available for the Payment Process Request in Payments Approval Initiated Status

Terminate Payment Process Action for a Payment Process Request in the Payments Approval Initiated Status

Receivables provides a comprehensive solution for running day-to-day accounts receivable operations. It includes services for customer billing and payment activities, revenue recognition and adjustments, reviewing receivable balances, and reconciliation to the general ledger. Receivables provides SmartReceipts, an automated cash application solution that is unique in the industry. Role-based work areas for Billing and Accounts Receivable provide vivid, real-time displays of transaction and customer account information. You can actively monitor all of your receivables events and drill down to details using the sophisticated and easy-to-use reporting tools
Recurring Billing captures customer bill plan information with recurring billing details and automatically generates recurring transactions at periodic intervals based on the plan. You can modify bill plan attributes for future transactions and review bill plan historical changes. After generating the transactions, you can review them.
- Launch the Manage Recurring Bill Plans page from the Billing work area.
- Query and review bill plans in the Manage Recurring Bill Plans page.
- From the Manage Recurring Bill Plans page, click on the plus (+) icon to open the Create Recurring Bill Plan page. Use this page to create a new bill plan that captures customer details: Currency, Customer Account/Site, Payment Terms, Billing Frequency, Transaction Date, and Item or Memo Line information.
- Use the Generate Recurring Billing Data process to generate transaction lines in the interface table for recurring bill plans. The process selects active bill plans according to the system date and other selection criteria and generates transaction interface lines for the applicable customers. After running this program, run the Import AutoInvoice program to import the transactions into Receivables.
- Review the transactions generated from the recurring bill plan. Go to the Manage Recurring Bill Plans page, search for a bill plan, and click on the Review Transactions button.
- From the Manage Recurring Bill Plans page, you can also review and edit a bill plan. Use the Edit Recurring Bill Plan page to inactivate the plan, or to modify details of the plan according to the contract terms negotiated with your customer. You can change the conversion rate information, contract end date, customer bill-to and ship-to information, payment terms, receipt method, quantity and price, and add or delete bill plan lines.
- Use the Manage Recurring Bill Plans page to select a bill plan to copy, or to review the bill plan history.


Steps to Enable
To use the Recurring Billing feature, select “Enable recurring billing” for the applicable business unit in the Billing and Revenue tab of the Receivables System Options page.
Use the Review Installments window to update the installments of a completed transaction. You can update the unpaid portion of installments and add or delete installments.
You can update the original amount of an installment with Open status (Balance Due > 0). You can reduce the installment amount as far as the unpaid portion of the instalment, or increase the amount. You can add or delete installments provided the total of all installment amounts after any modification is equal to the transaction entered amount. The first installment, and installments that are paid, credited, adjusted, or disputed cannot be deleted.
To update installments, open the transaction in the Review Transaction page. Select Review Installments from the Actions menu to open the Review Installments window.

Steps to Enable
- Enable Installment Update by setting the "AR: Update Due Date" profile option to Yes.
- To allow updates to installments on printed transactions, enable the "Allow change to printed transactions" option for the applicable business unit in the Billing and Revenue tab of the Receivables System Options page.
ADFdi Ribbon Tab Button Changes
In ADFdi spreadsheets in Release 12, certain buttons were changed to Ribbon icons to group together actions in one place. These changes apply to Manage AutoInvoice Lines, Create Receipt Batch, Edit Receipt Remittance Batch, and Manage Lockbox Transmission.
For each spreadsheet, use the Ribbon icons in place of the buttons to perform actions as indicated in the tables below.
- Manage Autoinvoice lines
| Release 11 |
Release 12 (Manage AutoInvoice Lines Tab) |
| Search button |
Search icon |
| Save button |
Upload icon |
| Save and Submit AutoInvoice button |
Submit icon |
Autoinvoice Upload Spreadsheet
- Create Receipt Batch
| Release 11 |
Release 12 (Create Receipt Batch Tab) |
| Upload button |
Upload icon |
| Clear All button |
Button removed: the Clear All Data icon is available |

Create Receipt Batch Spreadsheet
- Edit Receipt Remittance Batch
| Release 11 |
Release 12 (Receipt Remittance References Tab) |
| Upload button |
Upload icon |
| Search button |
Search icon |
| Clear All button |
Button removed: the Clear All Data icon is available |

Edit Receipt Remittance Batch Spreadsheet
- Manage Lockbox Transmission
| Release 11 (Lockbox Errors Tab) |
Release 12 (Lockbox Errors Tab) |
|---|---|
| Submit Validation and Post button |
Submit and Post icon |
| Submit Lockbox Validation button |
Button removed |
| Save button |
Upload icon |
| Search button |
Search icon |
| Reset button |
Button removed |

Manage Lockbox Transmission Spreadsheet
Bank Account Transfer Information for Completed Transactions
For manually created transactions, you can provide the bank account transfer receipt method and the associated payment instrument on the Review Transaction page once you complete the transaction, instead of the Create or Edit Transaction Page. Enter the bank account transfer receipt method and the associated payment instrument on the Payment tab of the Review Transaction page.

Steps to Enable
There are no steps needed to enable this feature.
Transactional Business Intelligence (OTBI)
Oracle Transactional Business Intelligence (OTBI) is a real time, self-service reporting solution for all Oracle Financials Cloud users to create ad-hoc reports and perform analysis to improve decision-making. Queries and reports are executed in real-time against the transactions.
Improved Payables and Receivables Reconciliation Drilldown Scalability
New tables improve the performance of drilling from GL reconciliation differences to Payables and Receivables activities. A single action link quickly displays the transactions that are the source of the difference. This prevents data mismatch between accounting summaries and difference drilldowns.


- Subledger Accounting - Payables Summary Reconciliation Real Time
- Payables to Ledger Reconciliation Report Dashboard
- Invoices Differences Detail
- Payments Differences Detail
- Prepayments Application Differences Detail
- Subledger Accounting - Receivable Summary Reconciliation Real Time
- Receivable to Ledger Reconciliation Report Dashboard
- Invoices Differences Detail
- Adjustment Differences Detail
- Bills Receivable Difference
- Bill Receivable Application Difference
- Applied Receipts Difference Detail
- Unapplied and Unidentified Differences Detail
The Payables Reconciliation Difference Details sub-folder contains information about Payables reconciliation differences to General Ledger. Run the Prepare Payables to General Ledger Reconciliation process to update Payables reconciliation details.

Action links for differences have been consolidated into a single action link to drill to:

The Receivables Reconciliation Difference Details sub-folder contains information about Receivables reconciliation differences to General Ledger. Run the Prepare Receivables to General Ledger Reconciliation process to update Receivables reconciliation details.

Action links for differences have been consolidated into a single action link to drill to:

Usability Improvements for Assets
Assets subject areas for depreciation and asset transactions have been redesigned to better support the creation of asset reports. Asset analysis functionality has been consolidated into two subject areas.
The following subject areas are no longer available for building new ad hoc reports. Existing reports created in earlier releases that use these subject areas will not be affected.
- Fixed Assets - Asset Assignments Real Time
- Fixed Assets - Asset Balances Real Time
- Fixed Assets - Asset Financial Information Real Time
- Fixed Assets - Asset Retirements and Reinstatements Real Time
- Fixed Assets - Asset Source Lines Real Time
- Fixed Assets - Asset Transfer Real Time
The two remaining two subject areas now contain all functionality for asset reporting and analysis.
- Fixed Assets – Asset Depreciation Real Time
- Comprehensive Asset Depreciation subject area better supports Asset reporting.
- Summarization improves performance.
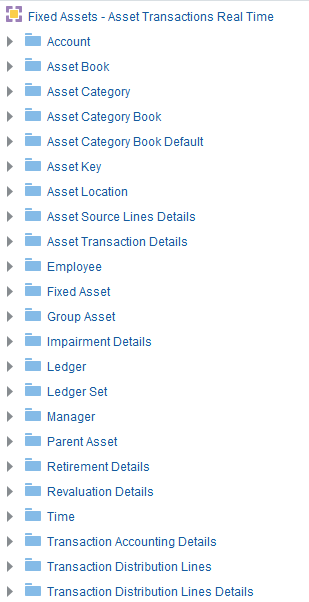
- Fixed Assets – Asset Transactions Real Time
- Asset Transactions subject area enables detailed reporting of any type of transaction, or major metrics (e.g. cost) can be aggregated to see the net impact over an asset's life.
- Summarization improves performance

Tips and Considerations
- The Extract Assets Reporting Data must be run before running any reports on the Assets subject areas. This process extracts transaction, depreciation, and other data to be used for reporting purposes.
- To initiate the data for reporting, the process must be run at least once with no period and the "ALL" mode.
- After the initial load, the process runs automatically after depreciation or a mass transaction job to load incremental data, and there is no need to re-submit this process manually. However, you can manually submit the process if needed.
Steps to Enable
- Configure the Lookup code
Click on the Setup and Maintenance task from your Navigator

- Search for the Manage Fixed Assets Lookups Task
- Click on the Manage Fixed Assets Lookups and Search for lookup type ORA_FA_EXTRACT_MODE.
- Configure the options to meet your business needs.

Choose your option from one of the following:
- ALL – Creates the initial baseline for Asset Reporting (must always be enabled and run just once manually, this ensures the reporting data is captured automatically for that book).
- Depreciation – Runs Extract Assets Reporting Data automatically after the Calculate Depreciation process only
- Transactions – Runs Extract Assets Reporting Data automatically after Post Mass Additions, Post Mass Transfers, Post Mass Fixed Assets Financial Transactions, Post Mass Retirements, and Periodic Mass Copy only
Note that the Extract Assets Reporting Data process works out the active open period for your book when it is submitted automatically by its parent process.
Usability Improvements for General Ledger
General Ledger subject areas have been modified for ease of access and use.
- General Ledger – Balances Real Time
- General Ledger – Journals Real Time
- General Ledger – Transactional Balances Real Time
The dimension subfolders, such as Amount Type, Currency, and Currency Type, have been un-nested for easier access.

The Dimension folder has been reorganized to more easily identify dimensional attributes.
‘Balancing Segment Value’ has been removed from the Journal Header folder.

The dimension subfolders, such as Currency, Currency Type, and Scenario, have been un-nested for easier access.

Receivables Descriptive Flexfields
Descriptive flexfields have been added to the following Receivables subject areas to expand the available transaction data for reporting.
| Subject Areas |
Descriptive Flexfields |
| Receivables - Customer Real Time |
AR_CUSTOMER_PROFILE_AMOUNTS_HZ |
| AR_CUSTOMER_PROFILES_HZ |
|
| AR_CUSTOMER_PROFILE_CLASSES_HZ |
|
| Receivables - Standard Receipts Application Details Real Time |
AR_BATCHES |
| Receivables - Miscellaneous Receipts Real Time |
AR_BATCHES |
General Ledger Descriptive Flexfields
Descriptive flexfields have been added to the following General Ledger subject areas to expand the available transaction data for reporting.
| Subject Areas |
Descriptive Flexfields |
| General Ledger - Journals Real Time |
GL_CAPTURED_INFO |
| General Ledger - Journals Real Time |
GL_ENCUMB_TYPES |
| General Ledger - Transactional Balances Real Time |
|
| Subledger Accounting - Journals Real Time |
Global descriptive flexfields have been added to the subject areas for Payables, Receivables and General Ledger to support reporting on country-specific information.
| Subject Areas |
Descriptive Flexfields |
| Payables |
JG_AP_CHECKS |
| JG_AP_INVOICE_LINES |
|
| JG_AP_INVOICES |
|
| JG_AP_PAYMENT_SCHEDULES |
|
| JGxAPInvoiceDistributions |
|
| JG_CE_BANK_ACCOUNTS |
|
| Receivables |
JG_AR_CASH_RECEIPTS |
| JG_AR_PAYMENT_SCHEDULES |
|
| JG_AR_RECEIPT_CLASSES |
|
| JG_AR_RECEIVABLE_APPLICATIONS |
|
| JG_RA_CUSTOMER_TRX_LINES |
|
| General Ledger |
JG_GL_JE_HEADERS |
| JG_GL_JE_LINES |
|
| JGxGLPeriods |
Expenses Descriptive Flexfields
Expenses Descriptive Flexfields are now available in the Expense Transactions subject area, to expand the available transaction data for reporting.
| Subject Area |
Descriptive Flexfields |
| Expenses - Expense Transactions Real Time |
EXM_EXPENSES |
Auditing requirements are better supported by the addition of tracking columns in reporting. Reports can now include information about when transactions were created and modified and by whom.
Creation Date, Created By, Last Updated Date, and Last Updated By columns are now available in the following subject areas:
| Payables |
Receivables |
| Budgetary Control |
Cash Management |
| Intercompany |
Subledger Accounting |
| Common Dimensions (Ledger, Ledger Set, Legal Entity) |


Locating a field no longer requires you to navigate through the entire subject area. You can perform a search and directly add the search result to the report.


In earlier releases, new columns created while building a report were available only in the report that was created. Users can now save a column with a formula and reuse the formula column in other reports or analysis by dragging and dropping it from the Catalog pane.
Tips and Considerations
- Save the column to the Subject Area Contents folder.
- Reuse the column by selecting it from the Catalog pane.


New report print options improve formatting and readability of report information for greater control over the presentation of reports.
- Set page orientation for PDF and PPT
- Include charts, images, and formatting
- Set header and footer
- Control fixed column width

OTBI graphs can now be viewed in web browsers that do not support Flash Player. The OTBI default graph style has been changed from Flash to HTML5.

Regional and Country-Specific Features
Oracle Financials Cloud provides features that integrate with your procure-to-pay and order-to-cash business flows for regional and country-specific statutory and business requirements.
Financials for Latin America supports country-specific features and functions for the Latin America region. Oracle Financials Cloud Release 12 includes country-specific features for Mexico.
Country-Specific Features for Mexico
New government regulations in Mexico require companies to electronically submit accounting information in a standard chart of accounts format to the Tax Administration Services (SAT) internet portal through a registered e-mail account.
Oracle Financials Cloud Release 12 includes enhancements to Financials for Latin America for the following reports:
- Chart of Accounts for Mexico Report
- Journals for Mexico Report
The following new reports are also available:
- Trial Balance Report for Mexico
- Auxiliary Report for Mexico
Use the Chart of Accounts for Mexico to define a chart of accounts in the format specified by the fiscal authority. Associate the accounts to your company chart of accounts in order to generate your accounting information in the specified format. Schedule the Chart of Accounts for Mexico process to extract accounting information in the format specified by the fiscal authority.
The Chart of Accounts for Mexico report displays all the mapped accounts of your company and the corresponding SAT accounts in XML format.
Complete the following set up before you run the Chart of Accounts for Mexico report:
- Set up the Taxpayer Identification Registry (RFC) for your company
- Define a value set and values for the company segment
- Define a value set and values for the account segment
- Define the contra account for Mexico
- Define a value set and values for the contra account segment
- Define the chart of accounts
- Define the chart of accounts mapping
- Verify that the natural accounts appear at the correct level in the account hierarchy. You can perform row and column flattening.
Steps to Enable
Perform the following steps to provide access to the Chart of Accounts for Mexico:
- Sign in as IT_SECURITY_MANAGER
- Click the Navigator menu and then click Security Console.
- Enter Generate Chart of Accounts for Mexico Electronic Accounting in the Search field.
- Click Search. The Generate Chart of Accounts for Mexico Electronic Accounting page appears.
- Click the Edit Role button.
- Click Users and then click Add Users.
Any users assigned the Generate Chart of Accounts for Mexico Electronic Accounting role will be able to run the report.
Key Resources
For more information on how to create the report, see:
- Oracle Fusion Help Portal (https://fusionhelp.oracle.com/helpPortal)
- Using Analytics and Reports for Financial Cloud (http://docs.oracle.com/cloud/latest/financialscs_gs/docs.htm)
Extract accounting information for transactions posted in different subledgers in the format specified by the fiscal authority using the Journals for Mexico report.
The Journals for Mexico report collects information on all transactions that are accounted and posted in different subledgers. The report also captures information related to electronic invoices generated for sales or received from suppliers for purchases. When entering and posting transactions in Payables and Receivables, you must update the global descriptive flexfields.
Steps to Enable
Perform the following steps to provide access to the Journals for Mexico Report:
- Sign in as IT_SECURITY_MANAGER
- Click the Navigator menu and then click Security Console.
- Enter Generate Journal Entries for Mexico Electronic Accounting in the Search field.
- Click Search. The Generate Journal Entries for Mexico Electronic Accounting page appears.
- Click the Edit Role button.
- Click Users and then click Add Users.
Any user assigned the Generate Journal Entries for Mexico Electronic Accounting role will be able to run the report.
Key Resources
For more information on how to create the report, see:
- Oracle Fusion Help Portal (https://fusionhelp.oracle.com/helpPortal)
- Using Analytics and Reports for Financial Cloud (http://docs.oracle.com/cloud/latest/financialscs_gs/docs.htm)
Trial Balance Report for Mexico
Analyze and verify your accounting information using Oracle Hyperion Financial Reporting Studio to generate the Trial Balance Report for Mexico. You can modify the report based on requirements from the federal government.
The trial balance report is an XML file that includes a summary of the initial balances, the sum of total transactions for the period, and the final balances for each account that you report in the Chart of Accounts XML file. The accounts related to assets, liabilities, equity, and results of operations (revenues, costs and expenses) are all included.
Key Resources
For more information on how to create the report and convert the report into an XML format, see:
- Oracle Fusion Help Portal (https://fusionhelp.oracle.com/helpPortal)
- Using Analytics and Reports for Financial Cloud (http://docs.oracle.com/cloud/latest/financialscs_gs/docs.htm)
Generate the Auxiliary Report for Mexico using Oracle Transactional Business Intelligence (OTBI). This report extracts the accounting details of transactions and journals posted during the period in the format specified by the fiscal authorities. You can re-configure the report to align with changing requirements from the federal government. The Auxiliary Report for Mexico provides an in-depth analysis of all accounting entries for a given account in a given period. The report displays beginning and ending balance, as well as the daily journal entries posted to that account during the period.
After generating the report, convert the report to an XML format so that it is ready to upload to the Tax Administration Services (SAT) website.
Key Resources
For more information on how to create the report and convert the report into an XML format, see:
- Oracle Fusion Help Portal (https://fusionhelp.oracle.com/helpPortal)
- Using Analytics and Reports for Financial Cloud (http://docs.oracle.com/cloud/latest/financialscs_gs/docs.htm)
Electronic Invoicing Compliance
Comply with electronic invoicing requirements for Mexico using Oracle Business Intelligence capabilities that:
- allow your fiscal implementation partners to define reports that extract information in the required format for submission to fiscal authorities. The report extract includes all information needed to submit reports and the report formats may be modified as needed to meet the current or future reporting requirements of the federal government.
- provides a web service to automatically record approved invoice numbers in the global descriptive flexfield of any receivable transaction in order to maintain the association required for reporting.
---

Copyright © 2017, Oracle and/or its affiliates. All rights reserved.
This document is provided for information purposes only, and the contents hereof are subject to change without notice. This document is not warranted to be error-free, nor subject to any other warranties or conditions, whether expressed orally or implied in law, including implied warranties and conditions of merchantability or fitness for a particular purpose. We specifically disclaim any liability with respect to this document, and no contractual obligations are formed either directly or indirectly by this document. This document may not be reproduced or transmitted in any form or by any means, electronic or mechanical, for any purpose, without our prior written permission.
Oracle and Java are registered trademarks of Oracle and/or its affiliates. Other names may be trademarks of their respective owners.
Intel and Intel Xeon are trademarks or registered trademarks of Intel Corporation. All SPARC trademarks are used under license and are trademarks or registered trademarks of SPARC International, Inc. AMD, Opteron, the AMD logo, and the AMD Opteron logo are trademarks or registered trademarks of Advanced Micro Devices. UNIX is a registered trademark of The Open Group.
12.15