

This document will continue to evolve as existing sections change and new information is added. All updates appear in the following table:
The new functionality referenced in this document may not be immediately available to you if your organization has chosen not to receive optional monthly updates. Rest assured you will receive the new functionality in the next quarterly update which is required and cumulative. Quarterly updates are applied in February, May, August, and November. As a one-off exception the February 2017 Quarterly update will be applied in March 2017.
.
| Date |
Feature |
Notes |
|---|---|---|
| 02 FEB 2018 |
Oracle HCM Security: Regenerate Multiple HCM Data Roles |
Updated document. Added new feature delivered in update 11 the November quarterly. |
| 05 JAN 2018 |
Oracle HCM Data Loader: User Deletion with HCM Data Loader |
Delivered new feature in update 13 (January), which will also be included in the February Quarterly update. |
| 03 NOV 2017 |
Oracle HCM Data Loader: Ability to Load Multiple Owners for an External Bank Account |
Updated document. Added feature delivered in update 10 (October). |
| The following features are included in the August Quarterly update. |
||
| 07 JUL 2017 |
Oracle HCM Security: Manage Role Mappings Search Results Enhancement |
Delivered new feature in update 7 (July), which will also be included in the August quarterly update. |
| 07 JUL 2017 |
Oracle HCM Data Loader: Automatic Calculation of the Optimal Load Group Size |
Delivered new feature in update 7 (July), which will also be included in the August quarterly update. |
| 07 JUL 2017 |
Oracle HCM Security: User Accounts No Longer Created Automatically for Users Loaded in Bulk |
Removed feature. |
| The following features are included in the May Quarterly update. |
||
| 02 JUN 2017 |
Oracle HCM Common Features: Initiate Tasks Quickly From The Quick Actions Page |
Updated document. Revised feature delivery from March to May. |
| 05 MAY 2017 |
Oracle HCM Data Loader: New Tasks to Access HCM Spreadsheet |
Delivered new feature in the May quarterly update. |
| 05 MAY 2017 |
Oracle HCM Data Loader: Value Set Validation Supported for Spreadsheet Columns |
Delivered new feature in the May quarterly update. |
| 05 MAY 2017 |
Oracle HCM Data Loader: Additional Options for Specifying Default Values |
Delivered new feature in the May quarterly update. |
| 05 MAY 2017 |
Oracle HCM Data Loader: Updating First Start Date and Last End Date |
Delivered new feature in the May quarterly update. |
| 05 MAY 2017 |
Oracle HCM Data Loader: Loading Translation Data with the Base Object |
Delivered new feature in the May quarterly update. |
| 05 MAY 2017 |
Oracle HCM Data Loader: Ability to Bulk Load Bank, Bank Branch, and External Bank Account |
Delivered new feature in the May quarterly update. |
| 05 MAY 2017 |
Oracle HCM Extracts: Capture Required Delivery Options |
Delivered new feature in the May quarterly update. |
| 05 MAY 2017 |
Oracle HCM Extracts: Manage Changes Only Extracts Efficiently |
Delivered new feature in the May quarterly update. |
| 05 MAY 2017 |
Oracle HCM Extracts: Display Hidden Parameters Easily |
Delivered new feature in the May quarterly update. |
| 05 MAY 2017 |
Oracle HCM Extracts: Improve Performance and Use Less storage by Running Baseline Extract |
Delivered new feature in the May quarterly update. |
| 05 MAY 2017 |
Oracle HCM Extracts: Improve Performance and Use Less Storage by Deleting Archives |
Delivered new feature in the May quarterly update. |
| The following features were included in the March Quarterly update. |
||
| 07 APR 2017 |
Oracle HCM Common Features: Initiate Tasks Quickly From The Quick Actions Page |
Delivered new feature in the March quarterly update. |
| 07 APR 2017 |
Oracle HCM Extracts: Use WebCenter Content Delivery Option |
Delivered new feature in the March quarterly update. |
| 17 MAR 2017 |
Oracle HCM Data Loader: Automated Post-Load Processing for Worker |
Delivered new feature in the March quarterly update. |
| The following features were delivered via monthly updates. |
||
| 14 FEB 2017 |
Oracle HCM Data Loader: New Source Key Object to Enable Update of Source Keys |
Delivered new feature in update 1 (February) which will also be included in the March quarterly update. |
| 14 FEB 2017 |
Oracle HCM Data Loader: Job Family Code Attribute Added to the Job Family Object |
Delivered new feature in update 1 (February) which will also be included in the March quarterly update. |
| 14 FEB 2017 |
Oracle HCM Common Features: Deep Links |
Delivered new feature in update 1 (February) which will also be included in the March quarterly update. |
| 14 FEB 2017 |
Oracle HCM Security: Include Related Contacts Option No Longer on Person Security Profiles |
Updated document. Added feature to the base release. |
| 17 JAN 2017 |
Created initial document. |
|
This guide outlines the information you need to know about new or improved functionality in Oracle HCM Cloud Release 12. Each section includes a brief description of the feature, the steps you need to take to enable or begin using the feature, any tips or considerations that you should keep in mind, and the resources available to help you.
Oracle HCM Cloud release documents are delivered in five functional groupings:
Suggested Reading for all HCM Products:
- HCM Cloud Common Features (This document pertains to all HCM applications. It is the base human resource information for all products and HCM Tools.)
- Global Human Resources Cloud (Global Human Resources contains the base application in which other application use for common data such as workforce structures and person information. Regardless of what products you have implemented you may want to see the new features for Global Human Resources that could impact your products.)
NOTE: Not all Global Human Resource features are available for Talent and Compensation products.
Optional Reading for HCM Products (Depending on what products are in your cloud service):
- Talent Management Cloud (All Talent applications)
- Workforce Rewards Cloud (Compensation, Benefits, Payroll and Global Payroll Interface)
- Workforce Management Cloud (Absence Management and Time and Labor)
Additional Optional Reading:
- Common Technologies and User Experience (This documents the common features across all Cloud applications and is not specific to HCM)
NOTE: All of these documents can be found on the Oracle Help Center at: https://cloud.oracle.com/saasreadiness/hcm under Human Capital Management Release Readiness.
We welcome your comments and suggestions to improve the content. Please send us your feedback at oracle_fusion_applications_help_ww_grp@oracle.com. Indicate you are inquiring or providing feedback regarding the Global HR Cloud What’s New for Release 12 in the body or title of the email.
Some of the new Release 12 features are automatically available to users after the upgrade and some require action from the user, the company administrator, or Oracle. The table below offers a quick view of the actions required to enable each of the Release 12 features.

Oracle Fusion Applications Security provides a single console where IT Security Managers and Administrators can perform various functions including user lifecycle management, role definition, security policy management(both functional and data), role hierarchy maintenance, username and password policy administration, and certificate management. The console also enables users to simulate the effect of security changes, to run security reports, and download a connector for integration with Microsoft Active Directory.
In Release 12, Oracle Fusion Applications Security offers several new capabilities that offer customers the following benefits:
- A Simplified User Experience for the IT Security Manager - Prior to Release 12, security administration functions were distributed across Oracle Identity Management (OIM) and Authorization Policy Manager (APM). In Release 12, these functions are delivered through a single interface – the Security Console. OIM and APM are no longer available in R12.
- Easy Integration with Identity and Access Management (IDM/IAM) Systems –New capabilities to synchronize user account information with Identity and Access Management (IDM/IAM) systems. This synchronization enables the delivery of a Single Sign-On experience through these systems.

For Microsoft Active Directory (AD) and Oracle Identity Management (OIM), customers can download and install connectors that will automatically synchronize user account information between Oracle Fusion Applications and these IDM systems. As in R11, customers must continue to log a Service Request (SR) to set up federated Single Sign-On (SSO) between these systems. Once the federation is enabled, the connectors will synchronize information.
Release 12 also delivers a REST API based on the SCIM (System for Cross-Domain Identity Management) standard. Customers can use this API to create user accounts, modify user attributes (e.g. email), enable/disable users, and fetch user account and role information.
- Upgrade-Safe Reference Role Model - Starting from Release 12, pre-defined roles that are shipped with Oracle Applications Security will be locked down. Customers will not be able to modify the functional and data security policies that are associated with these roles. They can, however, add new data security policies to these pre-defined roles. In addition, privileges and resources are protected. Users cannot create or modify these artifacts
Locking down these security artifacts enables safe upgrades to pre-defined roles, since the possibility of conflict with customer introduced changes to these roles is now eliminated. This, in turn enables customers to safely adopt new enhancements that may be delivered with pre-defined roles in future releases. As in R11, customers can make copies of pre-defined roles and freely customize these copies.
Please refer to your R12 Security Upgrade guide for any steps that may be required to prepare for and adopt this feature.
- Enhanced Self-Service Capabilities - Administrators are able to manage the entire user lifecycle. They can customize how notifications are generated and sent for various user lifecycle events including user account creation, and password management.
Administrators can also tailor username and password generation by choosing from a list of shipped policies.
Please refer to your R12 Security Upgrade guide for any steps that may be required to prepare for and adopt this feature.
You can now create and manage implementation user accounts within Oracle Fusion Applications Security. You can assign roles to these user accounts using the following navigation: Tools > Security Console > User tab. You can also search, retrieve, and manage user accounts automatically created for employees, contingent workers, supplier contacts, or partner contacts
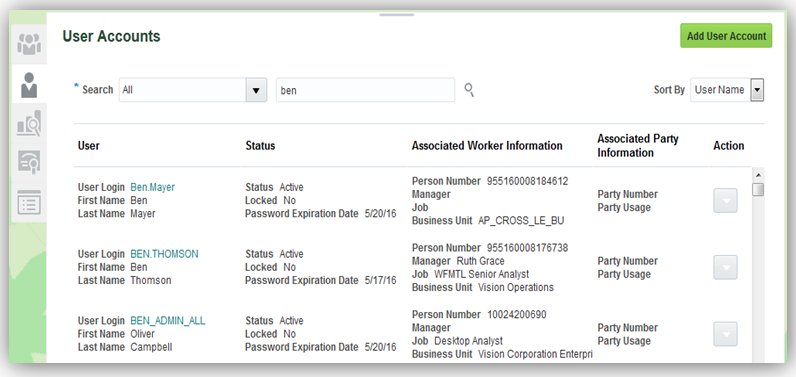
Search User Accounts Page
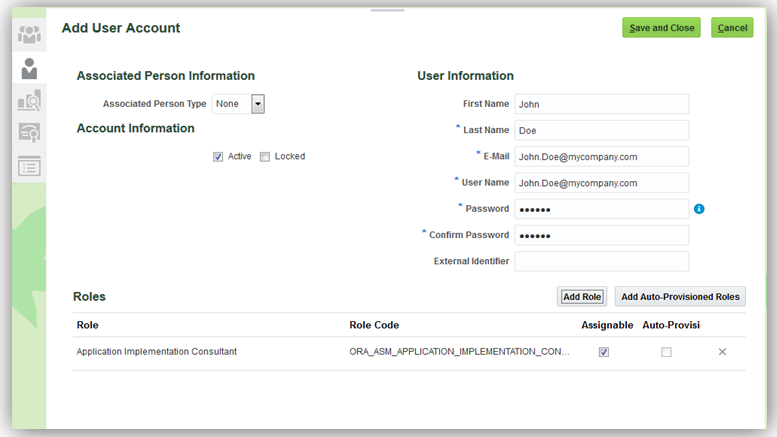
Add User Account Page
Steps to Enable
There are no steps necessary to enable this feature.
Role Information
The following function security privileges are required for this feature.
| Privilege Name and Code |
Job Role Name and Code |
|---|---|
| Create User Account ASE_CREATE_USER_ACCOUNT_PRIV |
IT Security Manager ORA_FND_IT_SECURITY_MANAGER_JOB |
| Delete User Account ASE_DELETE_USER_ACCOUNT_PRIV |
IT Security Manager ORA_FND_IT_SECURITY_MANAGER_JOB |
| Edit User Account ASE_EDIT_USER_ACCOUNT_PRIV |
IT Security Manager ORA_FND_IT_SECURITY_MANAGER_JOB |
| View User Account ASE_VIEW_USER_ACCOUNT_PRIV |
IT Security Manager ORA_FND_IT_SECURITY_MANAGER_JOB |
Key Resources
For more information on the Security Console, go to the Help Center for the following guide:
- Securing Oracle HCM Cloud
Securing Oracle HCM Cloud Administrator Password Management
As an administrator, you can manage passwords of other users using the Security Console. You can auto-generate or manually enter a password for a user account. You can also define password lifecycle and complexity policies. Passwords will be automatically validated against these policies.
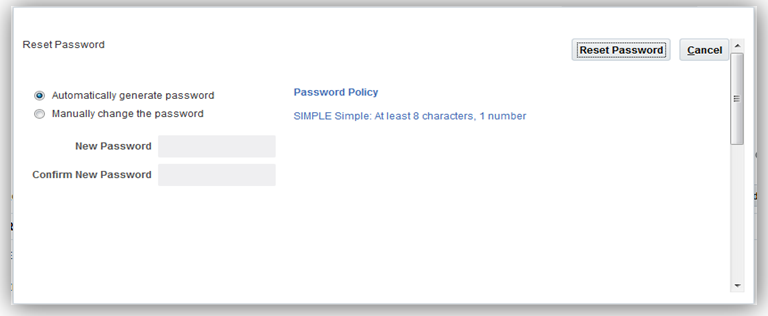
Administrator’s Reset Password Page
Steps to Enable
There are no steps necessary to enable this feature.
Key Resources
For more information on the Security Console, go to the Help Center for the following guide:
- Securing Oracle HCM Cloud
User Password Management (Self-Service)
You can now manage your own user account password using the Security Console. The password will be automatically validated against the defined password lifecycle and complexity policies.
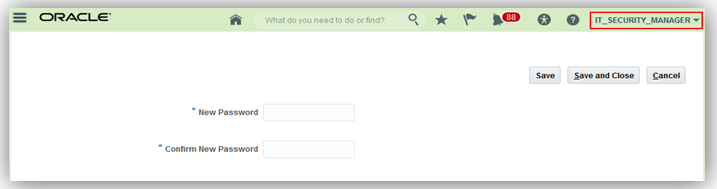
Self-Service Password Reset Page
Steps to Enable
There are no steps necessary to enable this feature.
As an administrator, you can now lock user accounts. If you lock a user account, you will be temporarily preventing the user from logging in with that user account. You can also unlock a locked user account.
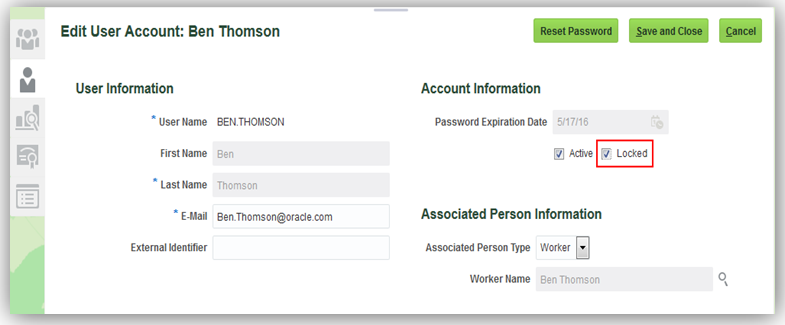
Lock User Account in Edit User Account Page
Steps to Enable
There are no steps necessary to enable this feature.
You can now view only certain components of a role in the graphic visualizer. You can view only the privileges, aggregate privileges or roles assigned to a role. You can also view the graph in full screen mode and pan over a specific region in the graph.
For complex roles, these features enable you to reduce the amount of information visualized and to focus on the area within the role hierarchy that requires your attention.

View Only the Privileges for a Role

View Only the Inherited Roles for a Role

Pan and View Top Left Region of the Graph
Steps to Enable
There are no steps necessary to enable this feature.
You can now view role hierarchies in a tabular view. You can switch between the graphic visualizer view and the tabular view. You can also export the data displayed in the tabular view.
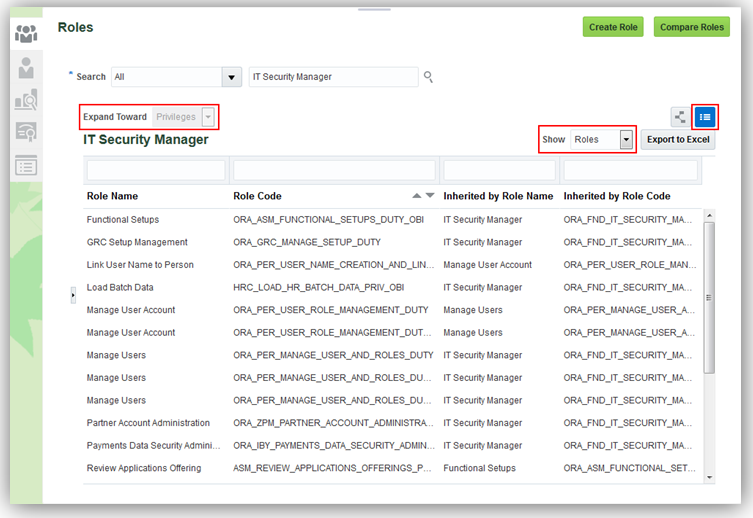
Tabular View of Direct and Indirectly Inherited Roles for a Role

Tabular View of Direct and Indirectly Assigned Privileges for a Role

Tabular View of Direct and Indirectly Assigned Users for a Role
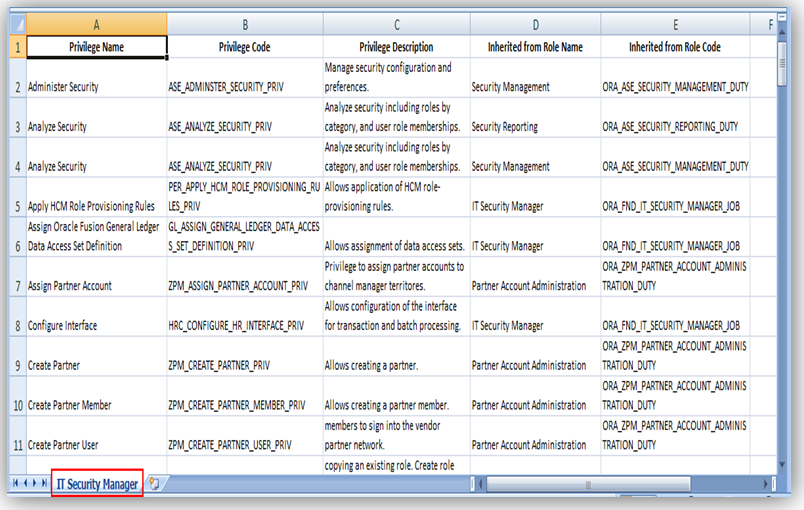
Export of Direct and Indirectly Inherited Privileges for a Role
Steps to Enable
There are no steps necessary to enable this feature.
Search in Role Hierarchy Visualization
You can now search and quickly locate security artifacts (nodes) in the role hierarchy visualization. You can search for privileges, roles or users in the visualization.
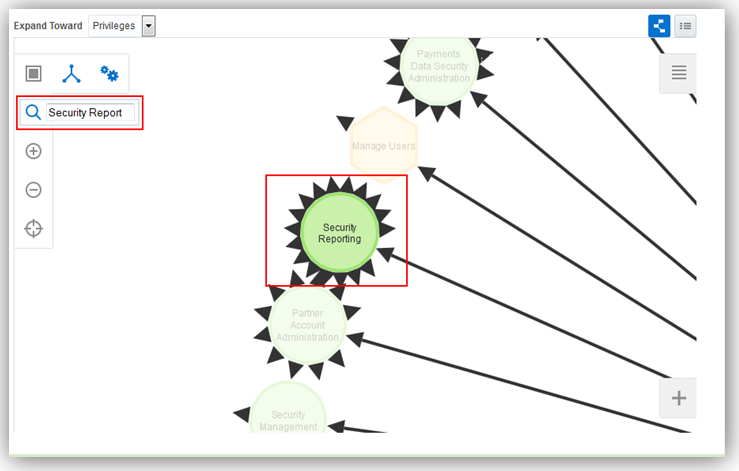
Search in Role Hierarchy Graph
Steps to Enable
There are no steps necessary to enable this feature.
You can now define the user name generation rules used to auto-generate the user name in Oracle Fusion Applications Security. User name generation rules can be based on the user’s first and last names, e-mail or person number. You can also choose to use a system generated user name if the rule fails to generate a user name.
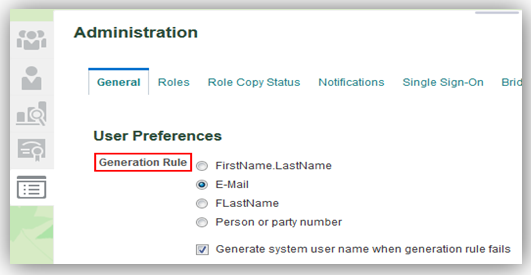
User Name Generation Rules Region in the Administration Page
Steps to Enable
There are no steps necessary to enable this feature.
Tips and Considerations
If your company submitted a service request for Oracle to set up a custom username generation rule, review the Validate User Lifecycle Settings topic in Upgrading Applications Security in Oracle HCM Cloud.
You can now define policies for password management. These policies can define the duration for various password lifecycle events like password expiration and password warning generation. You can also set the complexity of generated passwords by choosing from a pre-defined list of rules.
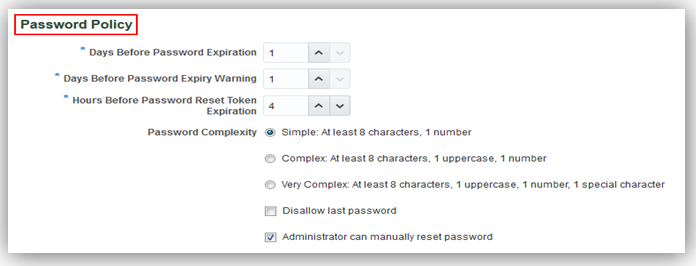
Password Policy Region in the Administration Page
Steps to Enable
There are no steps necessary to enable this feature.
Tips and Considerations
If your company submitted a service request for Oracle to set up a custom password policy, review the Validate User Lifecycle Settings topic in Upgrading Applications Security in Oracle HCM Cloud.
Role Information
The following function security privilege is required for this feature:
| Privilege Name and Code |
Job Role Name and Code |
|---|---|
| Run Password Expiry Job ASE_PASSWORD_EXPIRY_ESS_JOB_PRIV |
IT Security Manager ORA_FND_IT_SECURITY_MANAGER_JOB |
You can now define custom notification templates for user account life cycle events. You can also use pre-defined notification templates.
These templates will be used to generate notifications for events like user account created, user password reset and user password expiry warning.
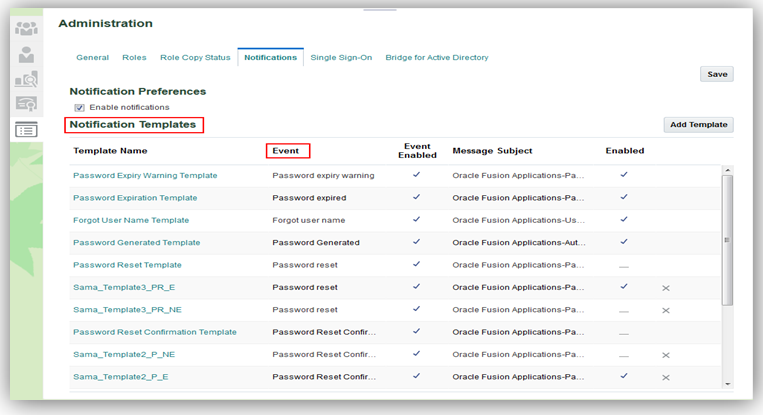
Notification Templates Region in the Administration Page
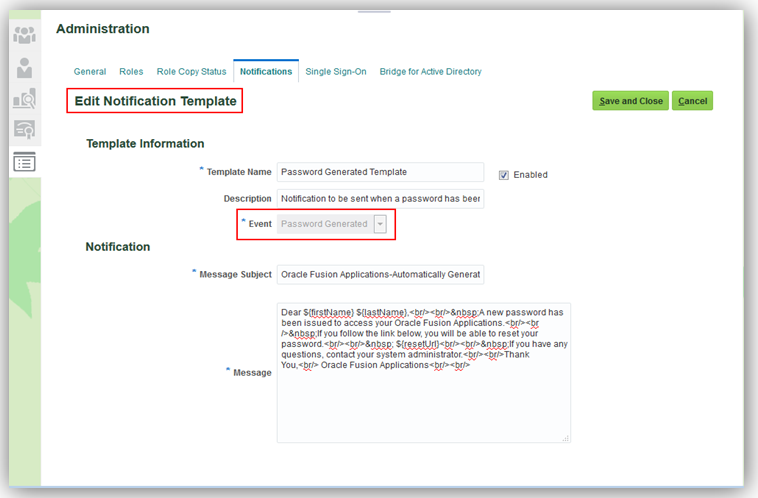
Edit Notification Template Page
Steps to Enable
There are no steps necessary to enable this feature.
Tips and Considerations
If your company submitted a service request for Oracle to set up a custom notification template, review the Validate User Lifecycle Settings topic in Upgrading Applications Security in Oracle HCM Cloud.
Upgrade-Safe Management of Factory Shipped Roles
You can now identify a predefined (factory shipped) Oracle role when viewing the role. Predefined Oracle roles are locked and you cannot customize the Oracle delivered functional and data security policies associated with these roles. You can, however, add data security policies to these roles.
Predefined Oracle roles are displayed in a different color in the graph visualizer.
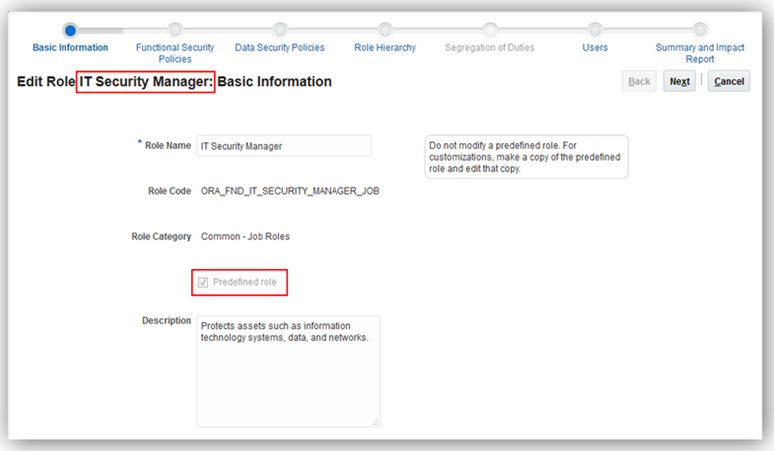
Predefined Role Indicator in the Edit Role Page

Predefined Role Indicator in the Role Hierarchy Graph
Steps to Enable
There are no steps necessary to enable this feature.
Bridge for Microsoft Active Directory
Simplify Single Sign-On with Microsoft Active Directory by downloading and installing the Active Directory Bridge from the Security Console. Automatically synchronize user account information between Oracle Fusion Applications Security and Microsoft Active Directory.
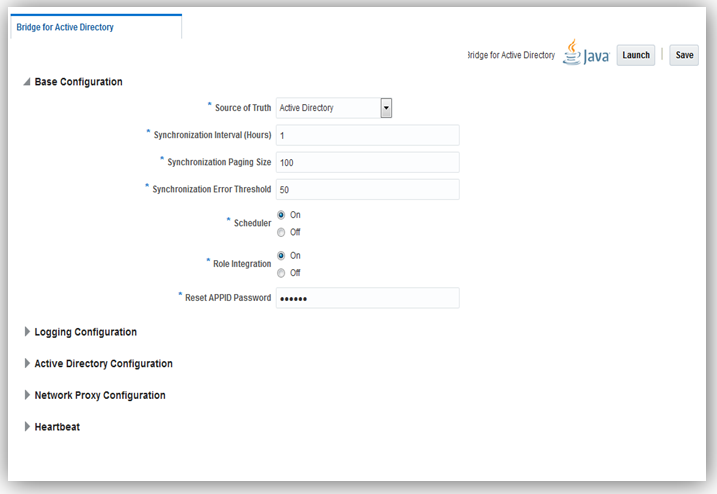
Active Directory Bridge Base Configuration Page

Active Directory Bridge User Attribute Mappings Page
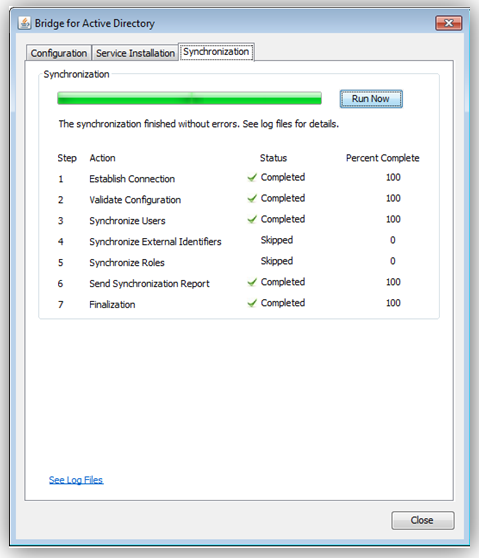
Active Directory Bridge Synchronization Status Page
Steps to Enable
There are no steps necessary to enable this feature.
User Password Changes Audit Report
You can now generate a report that lists password changes made by users. The report can be generated for changes made by specific users or for all changes made during a specific period.
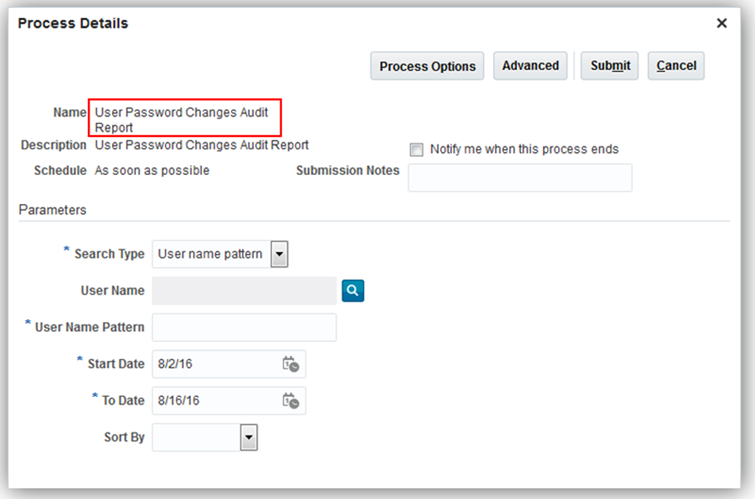
User Password Changes Audit Report Process Details Page
Steps to Enable
There are no steps necessary to enable this feature.
Role Information
The following function security privilege is required for this feature:
| Privilege Name and Code |
Job Role Name and Code |
|---|---|
| Run User Password Changes Audit Report ASE_USER_PASSWORD_CHANGES_AUDIT_REPORT_PRIV |
IT Security Manager ORA_FND_IT_SECURITY_MANAGER_JOB |
Integrate with Identity and Access Management Solutions
You can now optionally Integrate with your Identity Management solution for user and role management using industry standard System for Cross-domain Identity Management (SCIM) REST APIs and ATOM feeds.
Steps to Enable
There are no steps necessary to enable this feature.
The password reset flow has been changed in Release 12. A notification email will be sent to the user who requests a password reset. The user will be required to click on this link, within a specific period of time, to change the password. This replaces the previous flow where users were required to answer a series of challenge questions to reset the password.
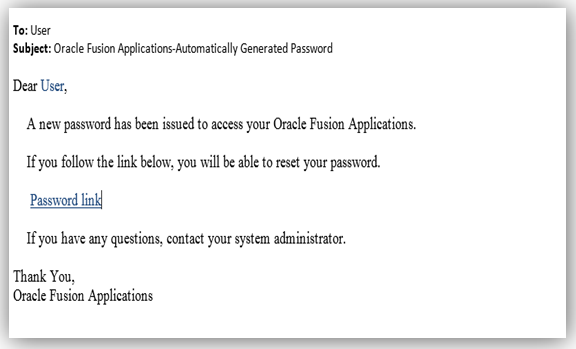
Email Notification to Reset Password
User Reset Password Page
Steps to Enable
There are no steps necessary to enable this feature.
The unified security administrator interface, combined with the ability to safely upgrade the reference security implementation will result in the following changes in functionality in the Security Console.
- IT Security Managers manage all User Account information including password changes and lock/unlock status are managed in the security console.
- IT Security Managers manage roles directly in the Security Console. They no longer use Oracle Identity Manager or Authorization Policy Manager.
- IT Security Managers can view, create or modify roles without first selecting an application.
- IT Security Managers cannot create or modify privileges. They can continue to grant privileges to roles
- IT Security Managers cannot create or modify resources.
- IT Security Managers cannot grant resources directly to role. Resources are now only granted to privileges.
Steps to Enable
There are no steps necessary to enable this feature.
New Function Security Privileges for Applications Security
This section provides product-specific information that you need when implementing new Release 12 features in your existing roles.
If you are not using the predefined reference roles, then you need to add the function security privilege to relevant custom job roles.
This table identifies the required function security privilege and the predefined role that automatically inherits the privileges during the upgrade.
| Privilege Name and Code |
Job Role Name |
|---|---|
| Create User Account ASE_CREATE_USER_ACCOUNT_PRIV |
IT Security Manager |
| Delete User Account ASE_DELETE_USER_ACCOUNT_PRIV |
IT Security Manager |
| Edit User Account ASE_EDIT_USER_ACCOUNT_PRIV |
IT Security Manager |
| View User Account ASE_VIEW_USER_ACCOUNT_PRIV |
IT Security Manager |
| Enable Database Resource Management ASE_ENABLE_DATABASE_RESOURCE_MGMT_PRIV |
IT Security Manager |
| Run Password Expiry Job ASE_PASSWORD_EXPIRY_ESS_JOB_PRIV |
IT Security Manager |
| Run User Password Changes Audit Report ASE_USER_PASSWORD_CHANGES_AUDIT_REPORT_PRIV |
IT Security Manager |
Release 12 includes enhancements to person security profiles, new-person task flows, role mappings, the Retrieve Latest LDAP Changes process, predefined job and abstract roles, and security setup.
Person Security Profiles Support Areas of Responsibility
Prior to Release 12 you could secure access to person records based on areas of responsibility, but you had to provide custom SQL, which could be complex. Nonetheless, as security performance is enhanced when person records are secured by area of responsibility, this approach was always encouraged.
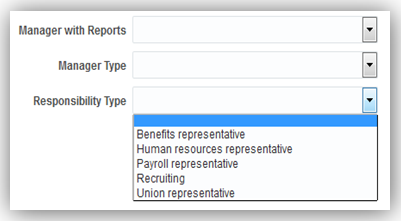
In Release 12, you no longer have to provide custom SQL to secure person records by area of responsibility. The person security profile pages have been completely redesigned to incorporate a new Area of Responsibility section where you select the responsibility type, a single responsibility scope, and the workers to whom it applies. If a person becomes responsible for workers in a different instance of the same scope (for example, a different department), then you need only to update that person’s area of responsibility. The person security profile remains valid without update. You can also create a single HCM data role to include a person security profile of this type and assign it to multiple representatives.
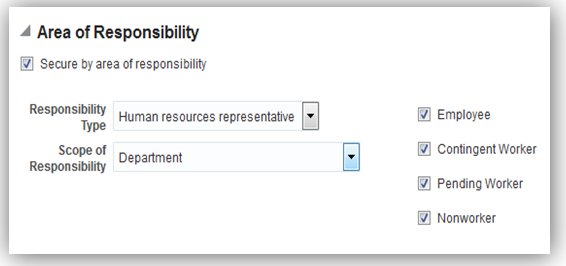
Area of Responsibility Section on the Create Person Security Profile Page
The Basic Details section of the Create Person Security Profile and Edit Person Security Profile pages now includes a Description field where you can provide a description of the security profile.

Description Field in the Basic Details Section of the Create Person Security Profile Page
Creating a person security profile is now a two-step process. Once you have defined your security criteria, you click Next to open the Create Person Security Profile: Preview page. You can review the automatically generated SQL predicate for your security criteria on the SQL Predicate tab on this page.

SQL Predicate Generated Automatically
You can also test the access provided by the security profile before you save it. On the Person Access Preview tab of the Create Person Security Profile: Preview page, you can select a user and click Preview to see the number of person records that this security profile allows the user to access. You also see the name and type of the user’s areas of responsibility, if any.
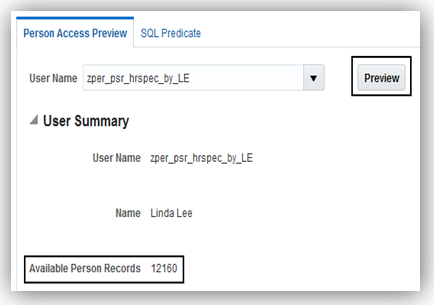
Person Access Preview Tab on the Create Person Security Profile: Preview Page
You can then identify individual person records to which the security profile provides access by searching for them. The search is based on criteria such as department and location and is performed within the set of person records that was returned by the Preview action.
For example:
- The person security profile secures access by area of responsibility, the responsibility type is Human Resources Representative, and the scope is Department.
- The selected user has the Human Resources Representative responsibility for the Sales department.
In this case, the search on the Person Access Preview tab is performed within person records in the Sales department.
Note that the results from the Person Access Preview are based on the current person security profile only. Users may have many roles that provide access to other person records.
Steps to Enable
There are no steps necessary to enable this feature.
Existing person security profiles are unaffected by these enhancements. Customers upgrading to Release 12 continue to see all sections of the person security profile pages, plus the new Area of Responsibility section. If upgrading customers select the Area of Responsibility section in an existing person security profile, then the Manager Hierarchy, Person Types, Workforce Structures, and Global Name Range sections become unavailable. These criteria are incompatible with securing by area of responsibility.
Customers who are new in Release 12 see the new person security profile pages only, which include the Basic Details, Area of Responsibility, Manager Hierarchy, and Custom Criteria sections.
HCM Data Roles Support Areas of Responsibility
When you create person security profiles in HCM data roles, you can now secure access to person records using areas of responsibility. The Person and Public Person sections of the Create Data Role: Security Criteria and Assign Data Role: Security Criteria pages now include the option to secure access by area of responsibility.

Person Section of the Create Data Role: Security Criteria Page
The Assign Security Profile to Role: Person Security Profile page includes the Area of Responsibility section if it was selected on the Create Data Role: Security Criteria page.
There are no steps necessary to enable this feature.
Existing HCM data roles are unaffected by these enhancements. Customers upgrading to Release 12 continue to see all options on the security criteria pages, plus the new Secure by Area of Responsibility option, when managing existing HCM data roles. If upgrading customers select the Area of Responsibility option in an existing data role, then other security criteria, apart from Secure by Custom Criteria, become unavailable. The removed criteria, such as Secure by Manager Hierarchy, are incompatible with securing by area of responsibility.
Customers who are new in Release 12 see the Secure by Area of Responsibility, Secure by Manager Hierarchy, and Secure by Custom Criteria options only.
Role Provisioning Supports Areas of Responsibility
Role mappings now include a Responsibility Type option in the Conditions section. You can set this option to provision roles based on a user’s assigned areas of responsibility.
Responsibility Type Option in the Conditions Section of the Create Role Mapping Page
There are no steps necessary to enable this feature.
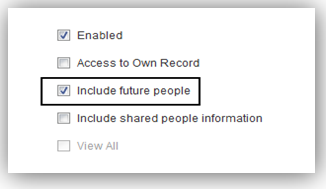
Access to Future-Dated Person Records
When you create a person security profile, you can now allow access to future-dated person records by selecting the option to include future people. This option is deselected by default. If you select the option when creating or editing new person security profiles, then users can access all person records that satisfy the security criteria, including any that are future dated. If you leave the option deselected, then users cannot access person records with future start dates that otherwise satisfy the security criteria.
Existing person security profiles are unaffected by this option.
Include Future People Option on the Create Person Security Profile Page
There are no steps necessary to enable this feature.
Include Related Contacts Option No Longer on Person Security Profiles
The Include Related Contacts option is no longer needed and is removed from the person security profile pages for new person security profiles. In existing person security profiles, the option continues to appear only if it is currently selected.
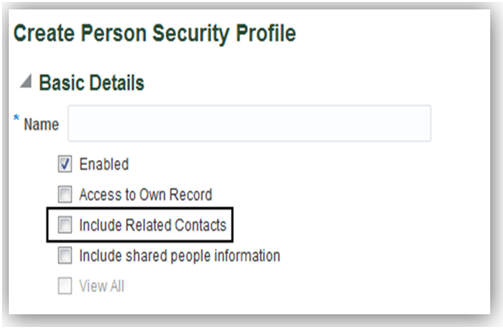
Include Related Contacts Option in Release 11
Users who can view a worker in the Manage Person work area and access the Contacts tab can see the worker’s contacts, provided that the contacts are not also workers. If a contact is a worker, then access to the contact’s details is secured by person security profile.
Personally identifiable information (PII), such as phones and e-mails, is not visible unless the user inherits the Manage Contact Person PII aggregate privilege.
There are no steps necessary to enable this feature.
New Location for Roles Information in New-Hire Task Flows
When you perform any of the new-hire task flows, such as Hire an Employee or Add a Contingent worker, you will see that the Roles page has been removed. Instead, role information for new person records now appears in the Role Requests section on the Compensation and Other Information page. The role information itself is unchanged; only the location is different.
The following screen capture shows the Role Requests section on the Compensation and Other Information page in the streamlined new-hire task flows.
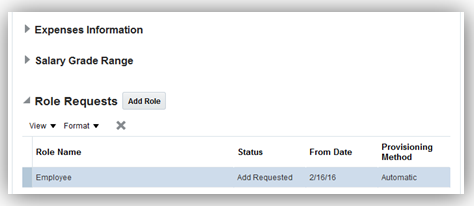
Role Requests Section on the Compensation and Other Information Page
There are no steps necessary to enable this feature.
Provision Roles Automatically to Oracle Service Cloud External Contacts
Role mappings now include a Contact Role attribute so that Oracle Sales Cloud customers can provision roles automatically to Oracle Service Cloud external contacts. Oracle HCM Cloud customers can ignore this attribute. It has no effect on role provisioning for Oracle HCM Cloud users.
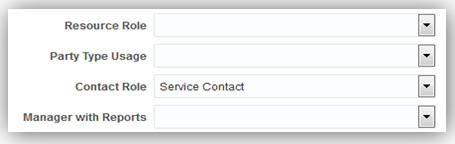
Contact Role Attribute in the Conditions Section of the Create Role Mapping Page
Steps to Enable
There are no steps necessary to enable this feature.
Reduced Frequency for the Retrieve Latest LDAP Changes Process
Until this release, the recommendation was to schedule Retrieve Latest LDAP Changes to run daily. From Release 12, you no longer need to run the process regularly. The new recommendation is to run the process if you become aware of data integrity issues, for example. Otherwise, the process is not required. You still need to schedule Send Pending LDAP Requests to run regularly, preferably daily, to process future-dated employment transactions, such as new hires.
There are no steps necessary to enable this feature.
Redundant Privileges Removed from Predefined Job and Abstract Roles
In this release, we have tidied the role definitions of the Human Resource Specialist and Line Manager predefined roles. Both roles inherited the Copy Personal Data to LDAP and Send User Name Request to LDAP privileges directly. They also inherited them indirectly from the Manage User Account and Link User Name to Person aggregate privileges. The directly inherited versions of the privileges are therefore redundant and have been removed in Release 12. The function access of the Human Resource Specialist and Line Manager roles is unaffected by these changes.
There are no steps necessary to enable this feature.
User and Role Provisioning Options Moved to the Security Console
You now specify the default format of user names for the enterprise by setting User Preferences on the General tab of the Security Console Administration tab. The Default User Name Format option has been removed from the User and Role Provisioning Information section of the Manage Enterprise HCM Information page.
The default user name format is now the worker’s work e-mail. Before Release 12, the default format was as specified in Oracle Identity Management. In addition, two formats that were previously available in Oracle Identity Management can now be selected on the Security Console. The formats are FirstName.LastName and FLastName (the initial of the first name concatenated with the last name).You can also specify that a system user name is to be generated if the selected generation rule fails.
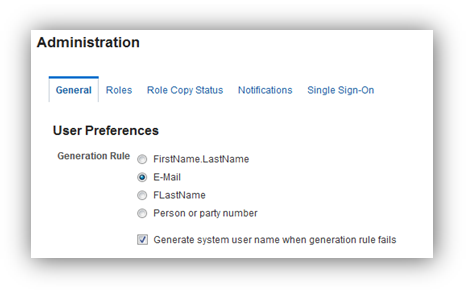
User Preferences Information on the Administration Tab of the Security Console
You now control the mailing of sign-in details to users by setting Notification Preferences on the Notifications tab of the Security Console Administration tab. The Send User Name and Password option has been removed from the User and Role Provisioning Information section of the Manage Enterprise HCM Information page.
You manage notifications using notification templates. The New Account Template and the New Account Manager Template are two of several predefined templates for notifying users of events related to their accounts. The New Account Template controls notifications sent to users themselves, and the New Account Manager Template controls notifications sent to their managers. Notifications in general are enabled by default.

Notification Preferences Information on the Administration Tab of the Security Console
Although you can edit the text in predefined templates, your text will be overwritten on upgrade. Therefore, you are recommended to create custom templates for events related to new accounts if the predefined text is not suitable.
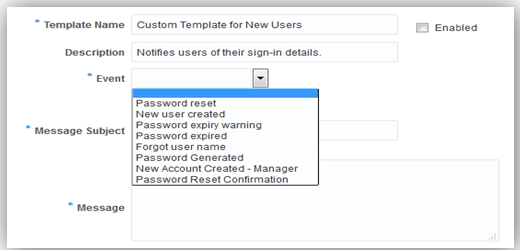
Add Notification Template Page on the Security Console
You can disable individual templates as necessary. For example, you may want to disable some templates while loading person records in bulk to control when new users receive their sign-in details.
Steps to Enable
There are no steps necessary to enable this feature.
Tips and Considerations
If you are upgrading from a previous release, then we have migrated the current setting of the Send User Name and Password enterprise option. If Send User Name and Password was set to Yes, then the New Account Template and its associated event are automatically enabled. Otherwise, they are automatically disabled. Review these settings and change them if appropriate.
Default User Notification Preferences Managed on the Security Console
The User Notification Preferences section of the Create User page includes an option to send users their user names and passwords. You select this option if you want the new user to be sent his or her user name and password when the user account is created.
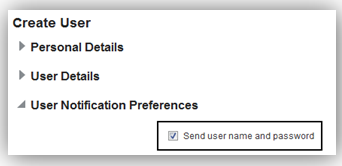
User Notification Preferences on the Create User Page
From Release 12, the availability of this option is controlled by settings on the Security Console. If notifications are enabled on the Security Console and enabled notification templates exist for at least one of the New User Created and New Account Created - Manager event types, then the Send user name and password option is enabled. If notifications are disabled on the Security Console, then the option is disabled and cannot be selected.
There are no steps necessary to enable this feature.
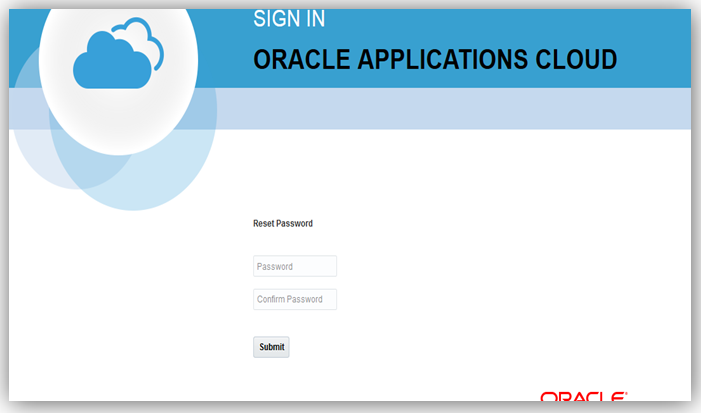
Reset Password Link Replaces Generated Temporary Passwords
When a user account is created or a password reset is requested, the user must sign in and set a new password. From this release, the notification e-mail contains a Reset Password link so that the user can access that function directly. Temporary passwords are no longer generated.
There are no steps necessary to enable this feature.
Changed Behavior of the Credentials Sent Indicator
A user credentials e-mail is typically sent for new users and contains the user name and a reset password link. A user credentials e-mail can be sent once only for any user. When the e-mail is sent, the Credentials Sent indicator is set automatically.
From this release, the Credentials Sent indicator is set when an attempt is made to send the user credentials e-mail for a user, regardless of whether the mail is successfully sent or received. If an attempt is made to send the e-mail at a time when notifications are disabled on the Security Console or no notification template is available for the event, then the Credentials Sent indicator is still set. This situation may occur when Send Pending LDAP Requests processes requests for future-dated user accounts. Therefore, you must ensure that notifications are enabled and notification templates are available when user accounts are likely to be created if you want user credentials e-mails to be sent.
There are no steps necessary to enable this feature.
Alternate Contact E-Mail Address No Longer on the User Interface
The alternate contact e-mail address is an enterprise-wide address to which all sign-in details for new user accounts can be sent. In Release 12, the Alternate Contact E-Mail Address option is no longer in the User and Role Provisioning Information section of the Manage Enterprise HCM Information page.
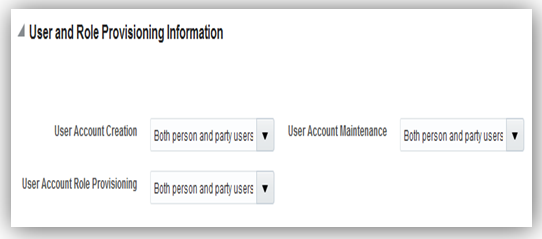
User and Role Provisioning Information on the Manage Enterprise HCM Information Page
The Default User Name Format and Send User Name and Password options have also been removed. From Release 12, you manage those two settings on the Security Console.
There are no steps necessary to enable this feature.
Manage Role Mappings Search Results Enhancement
When you search for a role mapping on the Manage Role Mappings page, the Search Results section now lists all results. Before this enhancement, up to 16 results were displayed. If the search returned more than 16 results, then only the first 16 were displayed.

Search Results Section on the Manage Role Mappings Page
Steps to Enable
There are no steps necessary to enable this feature.
Regenerate Multiple HCM Data Roles
You must regenerate an HCM data role if changes are made to the role hierarchy of its inherited job role. Regenerating a role updates its data security policies to reflect the latest role hierarchy. If you fail to do this, then users may not have the required data access. For example, if you remove an aggregate privilege from a custom job role, then you must regenerate any data role that inherits that job role. Similarly, if a predefined role is updated to support new functionality, then you must regenerate any associated data roles when you upgrade. This requirement applies also to any changed abstract role, whether custom or predefined, that has directly assigned security profiles.
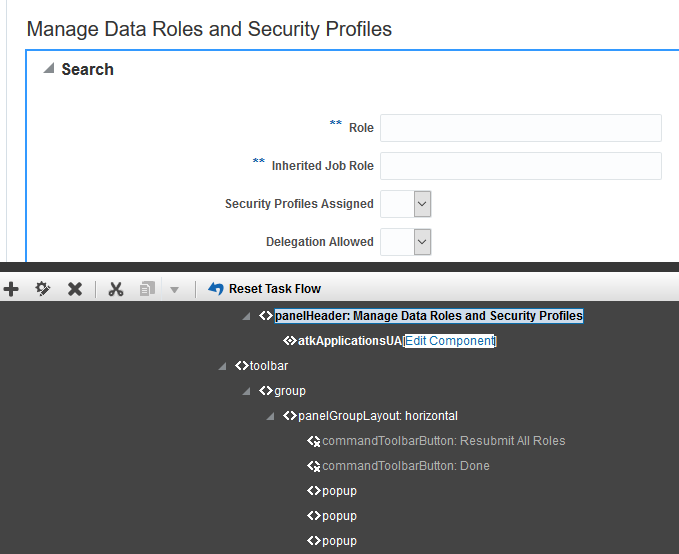
Until now, you could regenerate data and abstract roles individually by editing them on the Manage Data Roles and Security Profiles page. From this upgrade, you can regenerate data and abstract roles in bulk using the Process Grants Regeneration process. To run this process, you click the Resubmit All Roles button on the Manage Data Roles and Security Profiles page.
Resubmit All Roles on the Manage Data Roles and Security Profiles Page
NOTE: The Resubmit All Roles button does not appear by default. You must configure the page to add the button.
When you click Resubmit All Roles:
- The Process Flow page opens. Click the Process Grants Regeneration process name on that page to open the Schedule: Process Grants Regeneration page.
- In the Process Flow field, you can supply any value that helps you to identify this run of the process. For example, enter Regenerate All Human Resource Specialist Data Roles.
- In the Mode field, identify the roles to regenerate. Using this process, you can regenerate:
- Any data role that inherits a specified job role directly. For example, you can regenerate any data role that inherits the Human Resource Specialist role directly.
- A specified data role.
- A specified abstract role.
- All roles with assigned security profiles.
- If you are regenerating a named role, then identify it in the Role field.
- Select a Run value and click Submit.
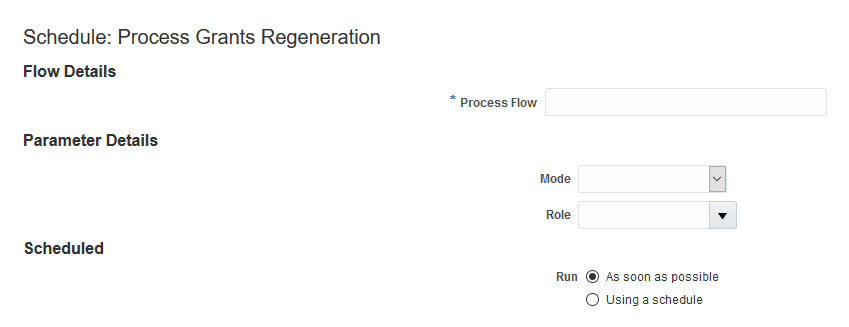
Schedule Process Grants Regeneration Page
On the Process Flow page, the processing information refreshes automatically while the process is running. When the process completes, the Process Flow page shows the name that you specified for this run. The Process Results section of the page lists all roles that were processed and indicates whether the regeneration succeeded.
For enterprises with many data roles, this process is a major enhancement. It enables you to both perform the regeneration task efficiently and be sure that all data roles requiring regeneration are identified. The post-upgrade task of regenerating updated, predefined roles is also now much easier to complete. For example, if the predefined Benefits Specialist job role is updated in an upgrade, then you can easily regenerate any data role that inherits that job role.
Steps to Enable
You enable users to run the Process Grants Regeneration process by adding the Resubmit All Roles button to the Manage Data Roles and Security Profiles page. Follow these steps:
- Sign in with these roles or privileges
- IT Security Manager
- Application Implementation Consultant or Human Capital Management Application Administrator.
- Create and activate a sandbox.
- In the Navigator, select Workforce Structures.
- In the Tasks panel tab of the Workforce Structures work area, select the Manage Data Roles and Security Profiles task. (Do not select this task in the Setup and Maintenance work area. You must select it in the Workforce Structures work area.)
- In the Settings and Actions menu in the global header, select Customize Pages... to open the Page Composer.
- In the Customize Pages dialog box, select the Site layer and click OK.
- From the View menu in the Page Composer, select Source. This option opens a source-code section at the bottom of the page.
- Expand the source-code section to show more of the content.
- Move the cursor to the Manage Data Roles and Security Profiles page header and left-click. In the warning about editing a shared component, click Edit. (You are not editing the page header, but this approach provides a quick way to find the Resubmit All Roles button in the source code.)
- The toolbar component that contains the Resubmit All Roles button opens in the source-code section.
- In the source-code section, right-click the commandToolbarButton: Resubmit All Roles entry and click Show Component. The Resubmit All Roles button now appears on the Manage Data Roles and Security Profiles page.
- Close the Page Composer.
- Select the sandbox, click More, and publish your changes.
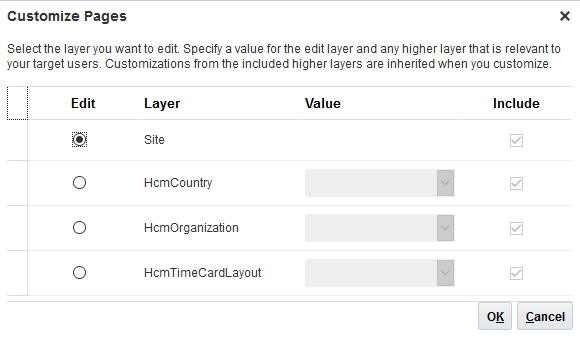
Customize Pages Dialog Box
The Source-Code Section Containing the Resubmit All Roles Button
Resubmit All Roles on the Manage Data Roles and Security Profiles Page
The Resubmit All Roles button is now available to all users of the Manage Data Roles and Security Profiles page to regenerate data and abstract roles.
Tips and Considerations
You can continue to regenerate data and abstract roles individually by editing them on the Manage Data Roles and Security Profiles page. Alternatively, you can use the Process Grants Regeneration process to regenerate one or more roles.
If you regenerate all roles, then the secured access for all roles is recalculated and the secured access of all users is refreshed. If you made changes to a role hierarchy previously but did not regenerate the role, then any associated changes in access will take effect when the regeneration of all roles completes.
Key Resources
For more information, go to Applications Help for the following topics:
- Regenerating Roles: Explained
- Enabling the Grants Regeneration Process: Procedure
- Regenerating Multiple Data and Abstract Roles: Procedure
For some Release 12 functions, new aggregate privileges, function security privileges, and transaction analysis duty roles have been added to predefined roles, such as Employee and Human Resource Specialist.
If you are not using the predefined roles, then you need to add the new security privileges to your custom roles. Details of this step are provided for each function.
If you are using the predefined roles and plan to use the new functions, then you must regenerate the relevant predefined roles to update their data security policies. You need to perform this step for:
- Predefined abstract roles, such as Employee and Line Manager, to which aggregate privileges have been added.
- HCM data roles that include job roles to which aggregate privileges have been added.
- Any job roles to which aggregate privileges have been added and to which HCM security profiles are assigned directly. You do not need to regenerate job roles to which HCM security profiles have not been assigned.
Key Resources
For instructions on regenerating roles, see the Securing Oracle HCM Cloud guide on the Oracle Help Center.
HCM Data Loader provides a flexible and efficient method of bulk loading business object data for data-migration and on-going incremental updates to Oracle Human Capital Management Cloud. Release 12 includes enhancements to monitoring of data loads and support for loading data from spreadsheets.
Estimated Time to Complete Load
When loading data using HCM Data Loader, you can now monitor the progress of the load for each business object. In the Details section of the Import and Load Data page, you see a status icon in the Loaded (Progress) column for the selected business object. When you click the icon, a dialog box opens containing summary data for the load.
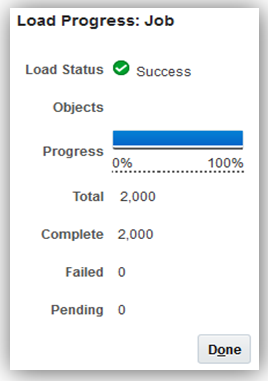
The Load Progress Dialog Box
For in-progress loads, this dialog box shows both the percentage and the number of objects already processed and the estimated time for the load to complete. The information in the dialog box for in-progress loads is refreshed automatically every 15 seconds.
There are no steps necessary to enable this feature.
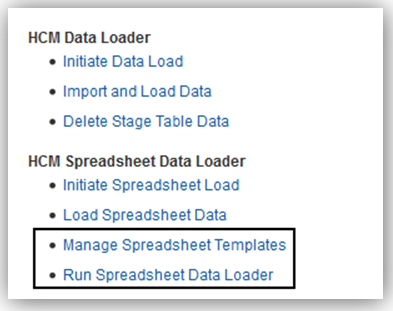
HCM Spreadsheet Data Loader now enables you to define a template to suit your business case for loading specific business objects, such as jobs or workers. You can specify the column order for ease of data entry, configure column prompts, specify default values, and configure the display type for lists of values. Business users can now generate spreadsheets from templates with the required set of attributes for a selected object.
To access spreadsheet-template-creation tasks, you use the Initiate Spreadsheet Load task in the Data Exchange work area. You can also use the Initiate HCM Spreadsheet Load task in the Setup and Maintenance work area. Both tasks open the Manage Spreadsheet Templates page.
To perform data upload tasks, you use the Load Spreadsheet Data task in the Data Exchange work area. HCM Spreadsheet Data Loader uses HCM Data Loader to perform the data upload.
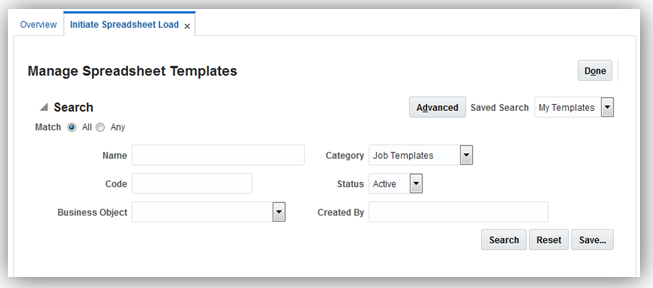
Manage Spreadsheet Templates Page
On the Manage Spreadsheet Templates page, you can:
- Search for existing spreadsheet templates to copy or edit.
- Create new spreadsheet templates.
- Import and export spreadsheet templates.
When you create a new spreadsheet template, the Create Template dialog box opens.
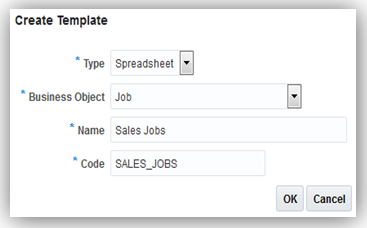
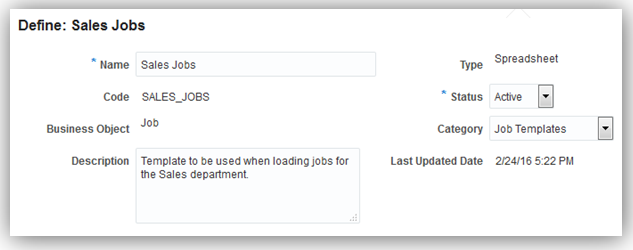
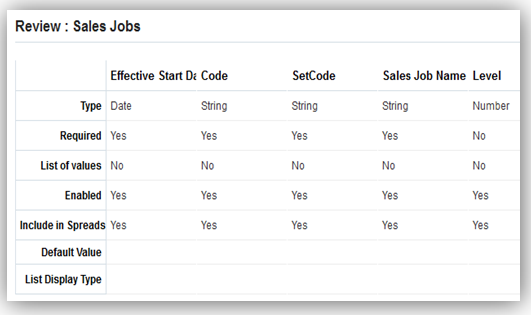
You specify name and code values for the template. When you click OK in this dialog box, the Manage Template Definition page opens. Manage Template Definition is a three-step process:
- Define
- Design
- Review
Manage Template Definition: Define Page
Some of the information on this page is prefilled from the Create Template dialog box. On the Define page, you can:
- Select a locally defined category (for example, to group templates for easy retrieval).
- Provide a description of the template.
- Set the status of the template. Draft templates are not available to business users and are not accessible from the Load Spreadsheet Data task in the Data Exchange work area. The template status must be Active before the spreadsheet is accessible from the Load Spreadsheet Data task.
In the Design step, you select the business-object attributes to include in your template from a list of all available attributes.
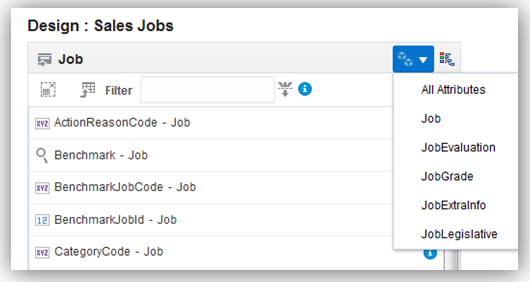
Available Attributes Section of the Design Page
You can:
- Search for individual attributes or display those for a specific component of the object.
- Click on the Information icon for an attribute to see its type and length, its user key name, and whether it is required.
- Display the attributes in a tree structure so that the object hierarchy is clear.
You select each attribute that you want to include in your template and move it to the Selected Attributes section. When you move the first attribute, other attributes that are always required move automatically to the Selected Attributes section. Attributes that are required conditionally or only for new objects are not moved automatically. You must move those attributes explicitly if you plan to use them. Icons identify all required attributes.
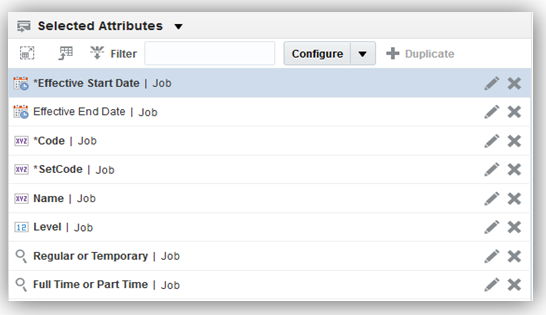
Selected Attributes Section of the Design Page
You can:
- Specify the order of the attributes in spreadsheets generated from the template.
- Edit the information that will appear in the spreadsheet for individual attributes. You can change the column heading, make optional attributes required, specify a default value, and provide a description to appear as help text in the spreadsheet.
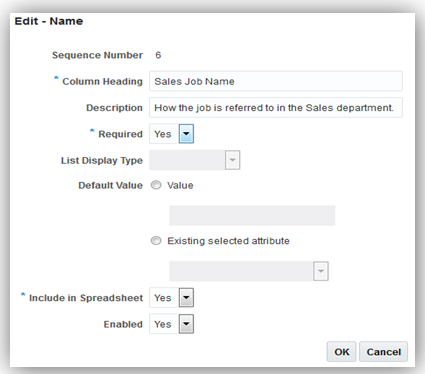
Edit Selected Attribute Dialog Box
You can also edit all attributes at once by selecting the Configure - Advanced action.
Once you have selected the attributes for your business case, arranged them in the appropriate order, and edited them as required, you can review the template.
Manage Template Definition: Review Page
As the template designer, you can generate a test spreadsheet from this template by clicking the Open button on this page. The saved template can be reused and edited as required.
Business users perform the Load Spreadsheet Data task in the Data Exchange work area to search for active spreadsheet templates.

Load Spreadsheet Data Page
Business users select a template in the search results to generate a spreadsheet.
Columns from the Generated Spreadsheet
Users enter data in the generated spreadsheet and upload it from the spreadsheet by clicking the Upload button on the Spreadsheet Loader tab toolbar.
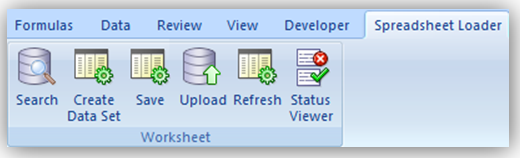
Spreadsheet Loader Toolbar
The actions on the Spreadsheet Loader tab enable you to:
- Search for an existing data set. You can retrieve all records from the data set or only those that failed to load. You can add records to the data set and edit those that failed to load.
- Create a new data set to load. Any records in the spreadsheet belong to this data set. A name is generated automatically, but you can overwrite the generated name.
- Upload data from the spreadsheet to Oracle HCM Cloud.
- Refresh the spreadsheet to review the current status of each line after an upload.
- View current messages for the spreadsheet in the Status Viewer. Messages also appear on the Messages worksheet of the spreadsheet.
When you upload data from a spreadsheet, any objects that are imported successfully to the stage tables are loaded automatically to the application tables. Errors from both the import and load stages are reported in the spreadsheet when you click Refresh. After correcting any errors, you click Upload again to import the corrected data to the existing data set.
Steps to Enable
There are no steps necessary to enable this feature.
HCM Data Loader support for spreadsheets is available by default to new customers in Release 12.
For customers who are upgrading from an earlier release, the availability of HCM Data Loader spreadsheet support depends on the setting of the HCM Data Loader Scope configuration parameter.
- To enable access to HCM Data Loader spreadsheet support, the HCM Data Loader Scope parameter must be set to Full. The default setting of the HCM Data Loader Scope parameter for new customers has been Full since Release 10.
- For customers who upgraded from Release 9 to Release 10, HCM Data Loader Scope is set to Limited by default. This setting prevents access to the new HCM spreadsheet data loading solution but enables access to its predecessor function. When HCM Data Loader Scope is set to Limited, the Initiate Spreadsheet Load and Initiate HCM Spreadsheet Load tasks open the Initiate Spreadsheet Load page, which provides a static list of predefined spreadsheets.
IMPORTANT: Once you set HCM Data Loader Scope to Full, you cannot set it back to Limited. When HCM Data Loader Scope is set to Full, you can use neither HCM File-Based Loader nor the static spreadsheet templates in HCM Spreadsheet Data Loader.
All users must set up desktop integration for Microsoft Excel to use HCM Data Loader spreadsheets.
For more information about the HCM Data Loader Scope parameter and how to set up desktop integration for Microsoft Excel, see the Integrating with Oracle HCM Cloud Release 12 guide in the Oracle Help Center at http://docs.oracle.com/
New Source Key Object to Enable Update of Source Keys
A new Source Key object is available with HCM Data Loader. Use this object to update existing source key values, including default source keys. In the SourceKey.dat file, you supply just a reference to the record that you want to update and the new source key value.
Steps to Enable
There are no steps necessary to enable this feature.
Tips and Considerations
You can generate a template for the new Source Key business object and review its attributes on the Initiate Data Load page in the Data Exchange work area.
Job Family Code Attribute Added to the Job Family Object
The Job Family object has been enhanced to include a new JobFamilyCode attribute, which allows you to supply a code to identify your job family uniquely. You can use the job family code to identify the job family when maintaining it. As the JobFamilyCode attribute is not translatable, it remains the same for all translations of the job family name. If you do not supply a job family code, then a unique code is generated automatically.
Steps to Enable
There are no steps necessary to enable this feature.
Tips and Considerations
You can review the structure of the Job Family business object, including the new JobFamilyCode attribute, on the Initiate Data Load page in the Data Exchange work area.
Automated Post-Load Processing for Worker
When you load worker data using HCM Data Loader, the process HCM Data Loader Worker Post Processing is initiated automatically to submit these processes:
- Refresh Manager Hierarchy
- Update Person Search Keywords
You no longer have to run these processes in the Scheduled Processes work area. You can disable this automatic post-load processing. To disable all automatic post-load processing, include the following SET command at the top of the Worker.dat file:
- SET INVOKE_POST_PROCESS N
To disable an individual process, you include the SET DISABLE_POST_PROCESS_TASKS command with the process name. This table shows the SET command to disable each process.
| Process to Disable |
SET Command |
| Refresh Manager Hierarchy |
SET DISABLE_POST_PROCESS_TASKS RefreshManagerHierarchy |
| Update Person Search Keywords |
SET DISABLE_POST_PROCESS_TASKS UpdatePersonSearchKeywords |
Steps to Enable
There are no steps necessary to enable this feature.
Key Resources
For more information, go to Applications Help for the following topic:
- Processes to Run After Loading Data: Explained
Ability to Bulk Load Bank, Bank Branch, and External Bank Account
You can now load banks, bank branches, and external bank accounts using HCM Data Loader. A bank is a financial institution that can have multiple branches. External bank accounts are associated with bank branches. Bank, bank branch, and external bank account are business objects whose details are stored in non-HCM tables. However, you can create and inactivate them using HCM Data Loader.
Steps to Enable
There are no steps necessary to enable this feature.
Key Resources
For more information, go to Applications Help for the following topics:
- Loading Banks: Explained
- Loading Bank Branches: Explained
- Loading External Bank Accounts: Explained
Automatic Calculation of the Optimal Load Group Size
When you load business objects using HCM Data Loader, the load-group size is the number of business objects processed as a single unit of work on a single thread. Until now, you specified a default load-group size for the enterprise on the Configure HCM Data Loader page.

Load Group Size on the Configure HCM Data Loader Page
You could also override the enterprise load-group size on the Schedule Request page for individual import and load requests.
To reduce the elapsed time for a load to complete, the objects to be processed must be distributed evenly among the available threads. From this update, you no longer need to set the Load Group Size parameter in an attempt to achieve this even distribution. The optimal load-group size can now be calculated automatically based on the number of objects to process and the available concurrent threads. To enable automatic calculation of the load-group size, you set the Enable Load Group Size Calculation parameter to Yes on the Configure HCM Data Loader page.
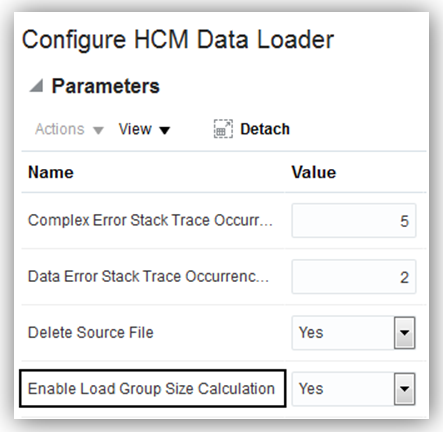
Enable Load Group Size Calculation on the Configure HCM Data Loader Page
When Enable Load Group Size Calculation is set to Yes, the size of the load group is calculated automatically and the Load Group Size parameter does not appear on the Schedule Request page. The default Load Group Size value is ignored. Otherwise, Load Group Size continues to appear on the Schedule Request page. You can still specify a LoadGroupSize parameter on the importAndLoadData web service. In this case, any value that you supply is used.
Steps to Enable
There are no steps necessary to enable this feature.
Tips and Considerations
You are recommended always to allow the load-group size to be calculated automatically.
Ability to Load Multiple Owners for an External Bank Account
You can now define multiple owners for an external bank account that you create and manage using HCM Data Loader. One of the account owners must be the primary owner. You set the PrimaryFlag attribute of the relevant External Bank Account Owner component to identify the primary owner.
Steps to Enable
There are no steps necessary to enable this feature.
Key Resources
For more information, go to Applications Help for the following topic:
- Loading External Bank Accounts: Explained
User Deletion with HCM Data Loader
For worker records that you load using HCM Data Loader, you can create user accounts in bulk. On occasion, you may want to delete those accounts. For example, you may have created them by mistake or created their user names in the wrong format. You can now delete user accounts using HCM Data Loader by including a DELETE instruction in the User.dat file for each user account to be deleted. For example:
METADATA|User|PersonNumber
DELETE|User|9835460
The DELETE instruction is processed when you next run the Send Pending LDAP Requests process. You can delete user accounts in both test and production environments. Accounts to be deleted can be in any status.
Steps to Enable
There are no steps necessary to enable this feature.
TIPS AND CONSIDERATIONS
- The User and Role Provisioning options have no effect on user-account deletion. For example, deletion requests cannot be suppressed.
- The user is deleted from both the LDAP directory and the PER_USERS, PER_USER_ROLES, and PER_USER_HISTORY records. Therefore, you can reuse the user name. You can recreate the user account on the Security Console, using the Manager Users task, or by loading the User object.
HCM Spreadsheet Data Loader provides a flexible and efficient method of bulk loading business object data for data-migration and on-going incremental updates to Oracle Human Capital Management Cloud.
New Tasks to Access HCM Spreadsheet Data Loader
Two new tasks have been added to the Data Exchange work area for users of HCM Spreadsheet Data Loader. The new tasks are:
- Manage Spreadsheet Templates. Use this task to design, create, and maintain spreadsheet templates from which you can generate spreadsheets for bulk data entry.
- Run Spreadsheet Data Loader. Use this task to generate spreadsheets for bulk data entry from the available spreadsheet templates.
New Tasks in the Data Exchange Work Area
Role Information
New function security privileges secure the new tasks. This table identifies the function security privilege that secures each of the new tasks.
| Task |
Function Security Privilege |
| Manage Spreadsheet Templates |
Manage HCM Spreadsheet Data Loader Templates |
| Run Spreadsheet Data Loader |
Load Data Using HCM Spreadsheet Data Loader |
Both function security privileges are granted to the predefined Human Capital Management Integration Specialist job role. If you are not using the predefined Human Capital Management Integration Specialist job role, then you need to add these function security privileges to a custom role to use the new tasks. For information about adding function security privileges to custom roles, see the topic Editing Custom Job or Abstract Roles: Procedure in Applications Help.
Tips and COnsiderations
Manage Spreadsheet Templates and Run Spreadsheet Data Loader are available only if the HCM Data Loader Scope parameter is set to Full. If HCM Data Loader Scope is set to Limited in your environment, then the existing tasks remain available. The existing tasks are:
- Initiate Spreadsheet Load
- Load Spreadsheet Data
Steps to Enable
There are no steps necessary to enable this feature.
Value Set Validation Supported for Spreadsheet Columns
When designing a spreadsheet template to be used for bulk data loading, you can now configure a list of validation values based on a custom value set. You create the value set on the Manage Value Sets page. The validation type of the value set can be:
- Independent
- Subset
- Dependent
- Table
On the Design page of Manage Spreadsheet Templates, click the Advanced Options for Attribute Definition icon. Set the List Type to Value Set and enter the value set name in the List View Object field for relevant attributes. Additional configuration is required for dependent and table-validated value sets.
Steps to Enable
There are no steps necessary to enable this feature.
Additional Options for Specifying Default Values
When you design a spreadsheet template for bulk data loading, you can specify default values for some attributes. Your options for specifying default values are enhanced in this release.
For date attributes, the following options for specifying default values are now available:
| Option |
Description |
| Specified date |
Using the date picker, select a specific, constant date |
| Load date |
Use the date when the spreadsheet row is loaded |
| Existing selected attribute |
Identify another date attribute to supply the default value |
| Use expression |
Specify a groovy expression to derive the default value |
For attributes other than dates, the following options for specifying default values are available:
| Option |
Description |
| Constant value |
Specify a constant value |
| Existing selected attribute |
Identify another attribute to supply the default value |
| Use expression |
Specify a groovy expression to derive the default value |
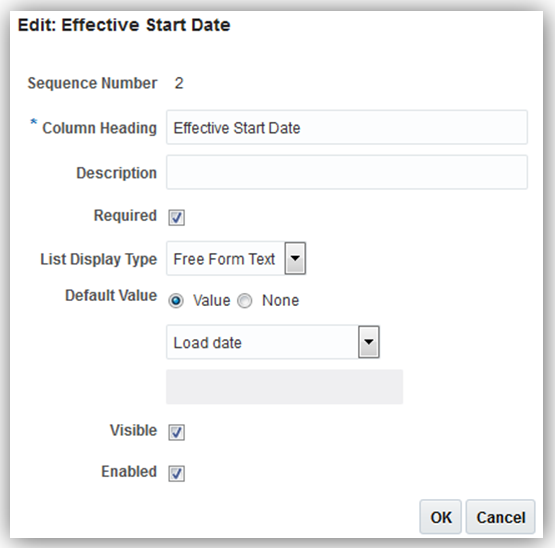
To set the default value of a date attribute to the load date, you select the attribute in the Selected Attributes section of the Design page of Manage Spreadsheet Templates and click Edit. In the Edit dialog box, set Default Value to Value and select Load date from the choice list.
Setting the Default Date Value to the Load Date
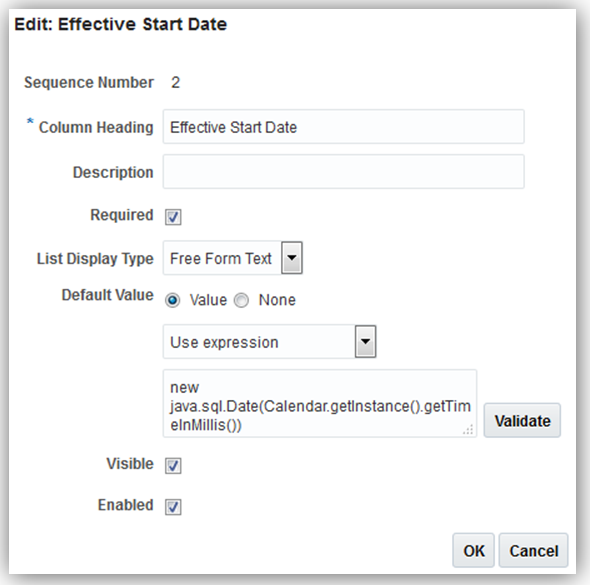
To specify a groovy expression to derive a default value, you select the attribute in the Selected Attributes section of the Design page and click Edit. In the Edit dialog box, set Default Value to Value and select Use expression from the choice list. Enter the expression in the text area and click Validate to ensure your expression is valid.
Specifying an Expression to Derive a Default Value
Steps to Enable
There are no steps necessary to enable this feature.
Updating First Start Date and Last End Date
You can now change the first start date and last end date of an object when providing bulk updates using HCM Spreadsheet Data Loader, provided that the object supports the change.
Two new attributes, Replace First Effective Start Date and Replace Last Effective End Date, have been added to the list of available attributes on the Design page of Manage Spreadsheet Templates. If you include these attributes in your spreadsheet template, then the spreadsheet user can indicate that the first start date or last end date is to be changed. For example, to end an element entry the spreadsheet user would specify the end date in the Effective End Date column and enter Y in the Replace Last Effective End Date column.

New Attributes on the Design Page of Manage Spreadsheet Templates
Steps to Enable
There are no steps necessary to enable this feature.
Loading Translation Data with the Base Object
When selecting attributes to be included in a spreadsheet template, you can now include attributes from any associated translation objects. The spreadsheet generated from the template can be used to maintain translation data along with the base-object information.
Steps to Enable
There are no steps necessary to enable this feature.
This section covers features used across all HCM Applications.
You can now use deep links to open pages without navigating through the menu structure. This capability is most useful if you have corporate internal portals and you want to enable direct navigation from the portals into the Fusion HCM Application for your employees. For example, you can enable direct navigation to Payslips, Personal Information, Absence Entry, Directory search, My Team page, and other pages.
To view a complete list of the available Deep Links, use the HCM Deep Link task in the navigator. The list of deep links that appear in the page is based on your functional and data security.
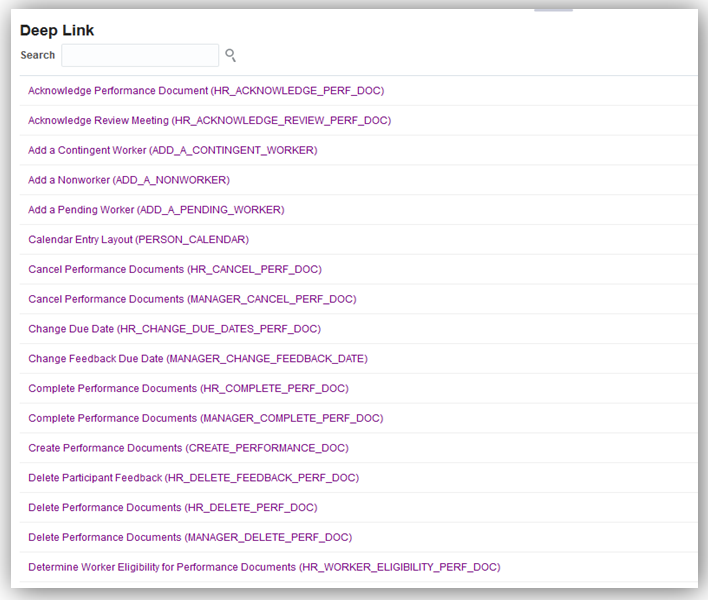
As an application implementation consultant, HR specialist, or line manager, you can copy a deep link and paste it in another application.
Steps to Enable
There are no steps necessary to enable this feature.
Initiate Tasks Quickly From The Quick Actions Page
You can quickly access different tasks from the Quick Actions page, which is available for the predefined employee and contingent worker roles. You can view and access actions available to you according to all your roles (for example, employee, line manager, and human resource specialist). This means that if you are an employee and an HR specialist the quick actions will include actions for both roles. This feature eliminates the need for you to be familiar with the work area organization and searching for tasks.

Click on an Action to Open the Page for that Task
Steps to Enable
There are no steps necessary to enable this feature.
Role Information
You must have the Access Quick Actions (PER_ACCESS_QUICK_ACTIONS) privilege that can be added to any custom role to access this page.
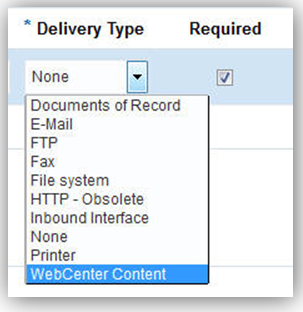
Use WebCenter Content Delivery Option
Use the updated delivery option name of WebCenter Content which replaces the HCM Connect delivery option to create extracts with encrypted or non-encrypted data and transmit them to Oracle WebCenter Content.
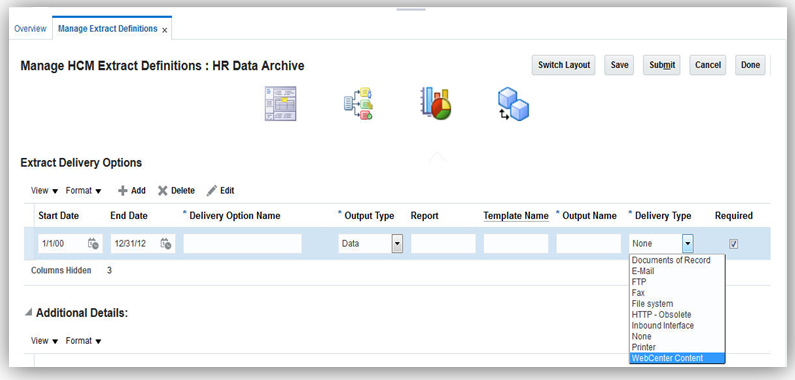
Extract Delivery Options
The following screen capture illustrates the Delivery Type field with the WebCenter Content option highlighted.
Delivery Type field on the Extract Delivery Options
Steps to Enable
There are no steps necessary to enable this feature.
Capture Required Delivery Options
Use the Required option to specify which delivery options you need to run successfully in order for the extract run to succeed. For example, use the Required option for critical delivery options such as payroll bursting. If this delivery option fails, then the extract run will also fail because it is dependent on the delivery option completing successfully.
With this new feature, you also have the flexibility of setting delivery options as not required. For example, uncheck the Required option for a delivery option such as an email notification to yourself. If this delivery option fails, then the extract run will complete successfully because it is not dependent on the delivery option. So if a delivery option is not critical to the successful completion of the extract run, then you have the option to mark it as not required.
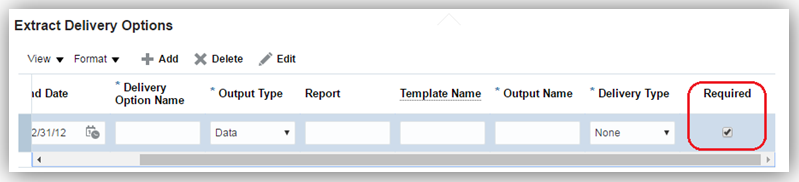
Extract Delivery Options Region on the Deliver Page
Steps to Enable
There are no steps necessary to enable this feature.
Manage Changes Only Extracts Efficiently
Use the Include Changes from Last Successful Run option to help you manage your changes only extracts in a more efficient way. You can select this option to exclude the extract runs that did not complete successfully when you ran a changes only extract. Leave the option unchecked if you want the application to include the archives from extract runs that completed successfully and those that completed unsuccessfully when you run a changes only extract. This new feature is selected by default.
You can continue to manage unsuccessful runs by manually rolling back using the Payroll Roll Back Process if you do not use this feature.
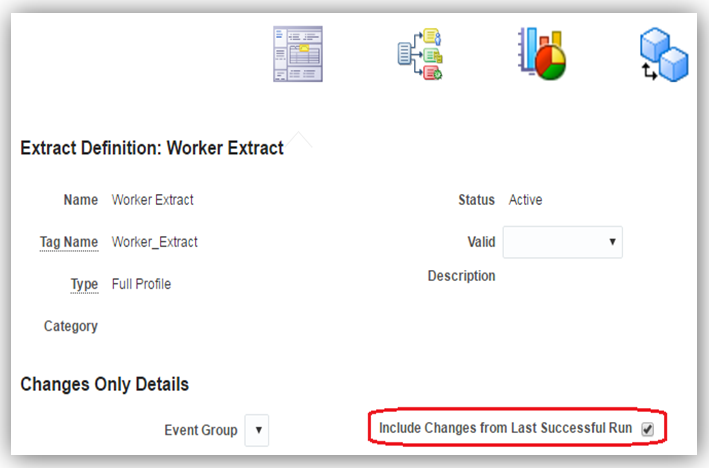
Manage Extract Definition Page with the New Include Changes from Last Successful Run Option Selected
Steps to Enable
There are no steps necessary to enable this feature.
Display Hidden Parameters Easily
Use the new option on the Parameters region to display the parameters that are automatically hidden. The Show hidden parameters option is unchecked by default, therefore the parameter list includes only those extracts with the Display set to Yes and Mandatory.

Parameters Region on the Manage Extract Definition
Steps to Enable
There are no steps necessary to enable this feature.
Improve Performance and Use Less Storage by Running Baseline Extract
Improve the performance of your extract runs by using the new Baseline Only parameter. Use this parameter in your extract to create a baseline for which you can run all subsequent changes only extracts against. The baseline only parameter saves time when you run the extract because it does not generate an XML file and it does not deliver any output. It creates a full extract in less time and uses less storage in your application.
Use this feature by selecting the Show hidden parameters option, and setting the Display column to Yes or Mandatory for the Baseline Only parameter.
Use the Baseline Only field when submitting a baseline extract, and if the changes only parameter is set to mandatory, then use the All Attributes option.
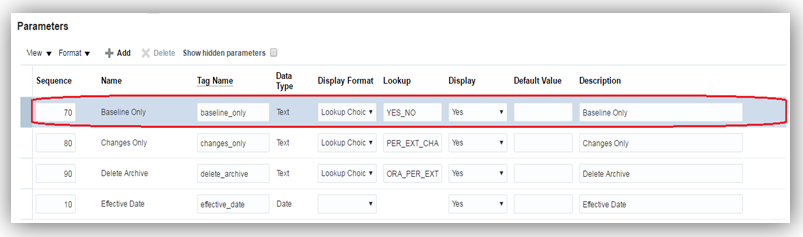
Manage HCM Definition with the Baseline Only Parameter Highlighted
Steps to Enable
There are no steps necessary to enable this feature.
Improve Performance and Use Less Storage by Deleting Archives
Free up storage space in your application and improve performance by using the new Delete Archive parameter. Use this parameter when you create a full extract of data, and not for changes only extract. When you run the extract the application generates the XML and archive and delivers the output to the destination. After the application delivers the output, for example, to WebCenter Content, you have the option to discard the archive data and XML files, therefore reducing storage consumption by deleting these extract archives.
Use this feature by selecting the Show hidden parameters option, and setting the Display column to Yes or Mandatory for the Delete Archive parameter.
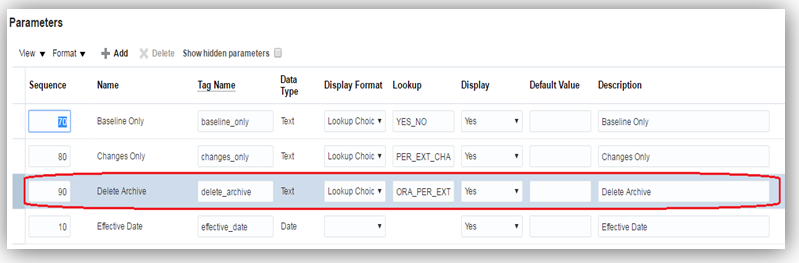
Manage HCM Definition with the Delete Archive Parameter Highlighted
With this feature, you have the flexibility to choose whether you discard all the data an extract generates, for example, use the Delete archive information and generated XML option to remove all unnecessary data. Or you can choose the Delete archive information only option to remove the archive data and retain the generated XML data. You may want to keep the XML data for reporting purposes or for future references.
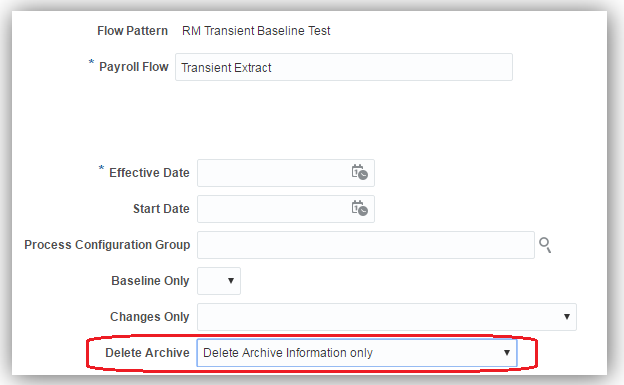
Submit a Process or Report Page with the Delete Archive Field Highlighted
Steps to Enable
There are no steps necessary to enable this feature.
Oracle Transactional Business Intelligence
Oracle Fusion Transactional Business Intelligence is a real time, self service reporting solution offered to all Oracle® Fusion application users to create ad hoc reports and analyze them for daily decision-making. Oracle Transactional Business Intelligence provides human resources managers and specialists, business executives, and line managers the critical workforce information to analyze workforce costs, staffing, compensation, performance management, talent management, succession planning, and employee benefits.
OBIEE Answers Enhancements: Subject Area Search
You can search in the subject area pane in OBIEE Answers. To use Search, click the Search icon on top of the pane, enter the text you are seeking, and click the search icon next to the text you entered.
The folders and columns matching the search word in the selected subject area are displayed.
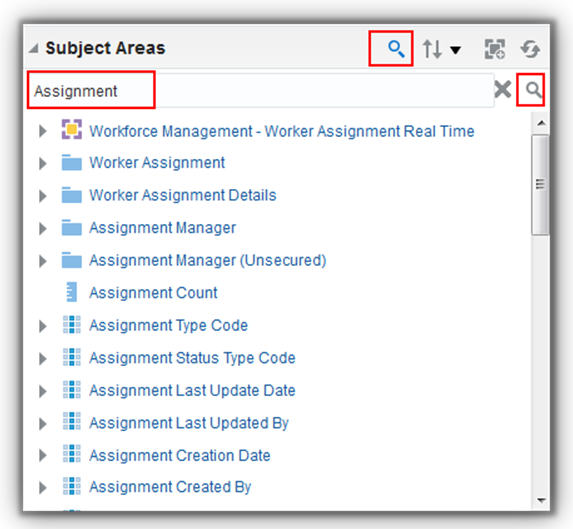
OTBIEE Answers Subject Areas Search Feature
Steps to Enable
There are no steps needed to enable the feature.
tips and considerations
Wildcards can be used in the search.
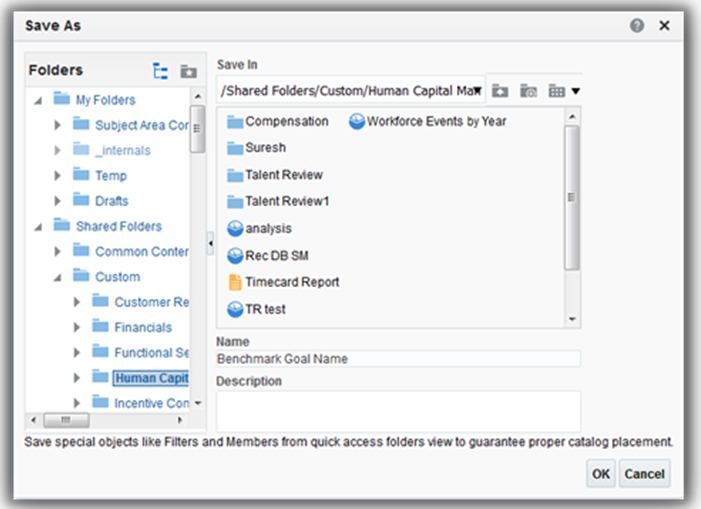
OBIEE Answers Enhancements: Save a Column
You can save a column to the catalog for reuse in other analyses. Save the column to the Subject Area Contents folder.
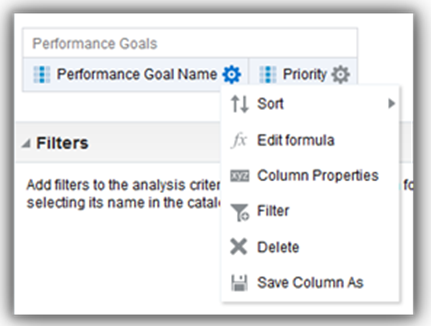
Save Column as Option
Steps to Enable
There are no steps necessary for this feature.
tips and considerations
You can also save a column with a formula and reuse the formula column in other analyses by dragging and dropping it from the Catalog pane.
---

Copyright © 2017, 2018, Oracle and/or its affiliates. All rights reserved.
This document is provided for information purposes only, and the contents hereof are subject to change without notice. This document is not warranted to be error-free, nor subject to any other warranties or conditions, whether expressed orally or implied in law, including implied warranties and conditions of merchantability or fitness for a particular purpose. We specifically disclaim any liability with respect to this document, and no contractual obligations are formed either directly or indirectly by this document. This document may not be reproduced or transmitted in any form or by any means, electronic or mechanical, for any purpose, without our prior written permission.
Oracle and Java are registered trademarks of Oracle and/or its affiliates. Other names may be trademarks of their respective owners.
Intel and Intel Xeon are trademarks or registered trademarks of Intel Corporation. All SPARC trademarks are used under license and are trademarks or registered trademarks of SPARC International, Inc. AMD, Opteron, the AMD logo, and the AMD Opteron logo are trademarks or registered trademarks of Advanced Micro Devices. UNIX is a registered trademark of The Open Group.
12.14