
- Revision History
- Overview
- Optional Uptake of New Features (Opt In)
- Update Tasks
- Feature Summary
- CX Foundation
- Core Sales Force Automation
- Sales Performance Management
- Sales Analytics
- B2B Service
-
- Service Request Management
-
- Support Contact Merge for Service Requests and Dependent Objects
- Support Account Merge for Service Requests and Dependent Objects
- Present Read-Only Service Request Pages More Easily
- Display Customer Communications in a Service Request as a Flat Structure
- Import, Export, and Compare Service Categories Between Environments Using Functional Setup Manager
- Connect Opportunities to Cases Using REST API
- Use Customer-Defined User to Execute Commands from a Collaboration Network
-
- Knowledge Management
- Field Service Integration
- Service Request Management
- Import and Export and REST APIs
-
-
-
- Navigation Disabled to CX Sales File-Based Data Import and Export
- Export Your Attachments
- Use Templates for Hierarchical Imports
- Manage Generic Source System Object Using REST APIs
- Import Service Contract Objects Using Import Management
- Use More Attributes in Account, Contact, and Household REST APIs
- Use Additional Attributes in Contact Points, Additional Identifier, and Additional Names Child Objects
- Use Organization REST Resource to Manage Generic Organization Data
- Use Import and Export Management to Create, Update, Delete, and Export the Customer Hub Person Entity
- Provide Support for Importing Additional Attributes Using the Hub Organization Import Object
- Use Person REST Resource to Manage Generic Person Data
- View Participant Summarized Earnings Using REST API
- Support Bulk Estimated Compensation REST Service
-
-
- Security
- Application Composer
- Simplified Setup
- IMPORTANT Actions and Considerations
This document will continue to evolve as existing sections change and new information is added. All updates appear in the following table:
| Date | Product | Feature | Notes |
|---|---|---|---|
| 26 FEB 2021 | Import and Export and REST APIs |
Use Additional Attributes in Contact Points, Additional Identifier, and Additional Names Child Objects | Revised feature information. |
| 29 JAN 2021 |
Sales Analytics |
View Sign-In Time with User Adoption Reporting | Revised feature information. |
| 29 JAN 2021 |
Sales Analytics |
View User Adoption Reports in CX Sales | Revised feature information. |
| 29 JAN 2021 | Sales Analytics | View Click Activity in Click History Reporting | Revised feature information. |
| 25 NOV 2020 |
Security | Use System Access Groups and Predefined Rules to Manage User Access to Account and Contact Data |
Revised feature information. |
| 25 NOV 2020 | Knowledge Management | Use the Search Analysis Subject Area to Report on Knowledge Management User Search Activity |
Revised feature information. |
| 25 NOV 2020 |
Customer Data Management | Provide Support for Importing Additional Attributes Using the Hub Organization Import Object |
Revised feature information. |
| 25 NOV 2020 | IMPORTANT Actions and Considerations | Added information about Workspace being the default configuration starting in update 20D. | |
| 30 OCT 2020 | CX Sales Mobile | Enable Custom Filters and Sort Options in the Pickers Using Workspace Saved Searches |
Delivered feature in Update 20D. |
| 25 SEP 2020 |
Intelligent Advisor |
Test Case Execution Statistics | Delivered feature in Update 20D. |
| 25 SEP 2020 |
Intelligent Advisor |
Rule Execution Profiling Report | Delivered feature in Update 20D. |
| 25 SEP 2020 |
Intelligent Advisor |
Discard Invalid Data When Interview Loads | Delivered feature in Update 20D. |
| 25 SEP 2020 |
Intelligent Advisor |
CX Sales and B2B Service Connections Automatically Uptake New Features | Delivered feature in Update 20D. |
| 25 SEP 2020 |
Intelligent Advisor |
Branch Repository Projects | Delivered feature in Update 20D. |
| 25 SEP 2020 |
Intelligent Advisor |
Auto-Fill Input Purpose | Delivered feature in Update 20D. |
| 18 SEP 2020 | Created initial document. |
This guide outlines the information you need to know about new or improved functionality in this update.
GIVE US FEEDBACK
We welcome your comments and suggestions to improve the content. Please send us your feedback at oracle_fusion_applications_help_ww_grp@oracle.com.
Optional Uptake of New Features (Opt In)
Oracle Cloud Applications delivers new updates every quarter. This means every three months you'll receive new functionality to help you efficiently and effectively manage your business. Some features are delivered Enabled meaning they are immediately available to end users. Other features are delivered Disabled meaning you have to take action to make available. Features delivered Disabled can be activated for end users by stepping through the following instructions using the following privileges:
- Review Applications Offering (ASM_REVIEW_APPLICATIONS_OFFERINGS_PRIV)
- Configure Oracle Fusion Applications Offering (ASM_CONFIGURE_OFFERING_PRIV)
Here’s how you opt in to new features:
- Click Navigator > My Enterprise > New Features.
- On the Features Overview page, select your offering to review new features specific to it. Or, you can leave the default selection All Enabled Offerings to review new features for all offerings.
- On the New Features tab, review the new features and check the opt-in status of the feature in the Enabled column. If a feature has already been enabled, you will see a check mark. Otherwise, you will see an icon to enable the feature.
- Click the icon in the Enabled column and complete the steps to enable the feature.
For more information and detailed instructions on opting in to new features for your offering, see Offering Configuration.
Opt In Expiration
Occasionally, features delivered Disabled via Opt In may be enabled automatically in a future update. This is known as an Opt In Expiration. If your cloud service has any Opt In Expirations you will see a related tab in this document. Click on that tab to see when the feature was originally delivered Disabled, and when the Opt In will expire, potentially automatically enabling the feature. You can also click here to see features with Opt In Expirations across all Oracle Cloud Applications.
This section gives you information to help you plan, deploy, and validate your update. We make frequent additions to this document, so don’t forget to check back and get the latest information before your update starts.
Use the following resources to prepare for, deploy, and validate your update:
-
Read Prepare for your Quarterly Update (Doc ID 2445338.1) on My Oracle Support to learn how to prepare for and validate your quarterly update.
-
Publish or delete any in-progress sandboxes. Read the Overview of Sandboxes topic in the Configuring and Extending Applications guide for more information.
-
Review the latest Known Issues and Update Documents for this release (Doc ID 1603154.1) on My Oracle Support.
-
Review Oracle CX Sales and B2B Service: Removed Features (Doc ID 2530879.1) on My Oracle Support.
-
Review the IMPORTANT Actions and Considerations in this document, to see what additional actions you may need to take after your update.
Column Definitions:
Report = New or modified, Oracle-delivered, ready to run reports.
UI or Process-Based: Small Scale = These UI or process-based features are typically comprised of minor field, validation, or program changes. Therefore, the potential impact to users is minimal.
UI or Process-Based: Larger Scale* = These UI or process-based features have more complex designs. Therefore, the potential impact to users is higher.
Features Delivered Disabled = Action is needed BEFORE these features can be used by END USERS. These features are delivered disabled and you choose if and when to enable them. For example, a) new or expanded BI subject areas need to first be incorporated into reports, b) Integration is required to utilize new web services, or c) features must be assigned to user roles before they can be accessed.
Address Cleansing Now Supports Multi-Select
Select multiple address cleansing results and collectively accept or reject them at once. Currently, as a data steward, you have to select each address cleansing result within a batch individually and click the Accept or Reject button. You can now use the multi-select check boxes to select more than one address cleansing result at a time.
This enhancement provides a fast and efficient way for data stewards to quickly dispose of cleansed address results.
Steps to Enable
You don't need to do anything to enable this feature.
Key Resources
See the Cleanse Addresses chapters in these guides:
Role Information
- Data Steward
About Adaptive Search and Workspace
- Adaptive Search is a high-performance search engine that provides keyword searching and enhanced filtering capabilities.
- Workspace is the UI built on top of this search engine. It's a unified work area that lets users perform searches and filtering and look at the results from supported objects.
You can enable new actionable infolets, called Workspace infolets, to provide salespeople with many of the features they use in Workspace, such as quick actions and configurable filters. For example, from within the My Accounts Workspace infolet, salespeople can take notes, log calls, schedule appointments, and even create opportunities for a specific account in the list. They can also create new accounts directly from the infolet. Salespeople can personalize the information in each infolet: they can specify their own filter criteria and decide how they want the infolet information to display. You can display saved searches from any object available in Workspace, including custom objects.
The application includes 10 Workspace infolets: six are preconfigured to display key sales information for accounts, contacts, leads, opportunities, tasks, and appointments, and four are left blank.
Affer you enable them, Workspace infolets replace the existing actionable infolets.
Watch a Demo
With the new Workspace infolets, salespeople get the same infolet overviews of all their important accounts, contacts, leads, opportunities, tasks, and appointments, while retaining the Workspace user experience.
Steps to Enable
Here's how to enable Workspace infolets:
- From Setup and Maintenance, navigate to the Manage Administrator Profile Values task.
- Search for profile option code, ZCA_ENABLE_ADAPTIVE_INFOLETS.
- Change the default value of No to Yes.
- Click Save and Close.
After you make these changes, only the Workspace infolets are displayed in the Sales Analytics tab, and the standard sales actionable infolets are hidden.
Tips And Considerations
Adaptive Search and Workspace must be enabled.
Oracle provides these predefined Workspace infolets:
- My Accounts
- My Appointments
- My Contacts
- My Leads
- My Opportunities
- My Tasks
Key Resources
See this content:
- Watch the Workspace Infolets Demo
- Workspace and Adaptive Search chapter in the Getting Started with Your Sales Implementation guide
- Adaptive Search and Workspace and Workspace Infolets chapters in the Implementing Sales guide
Role Information
- Sales Administrator
Configure Additional Workspace Infolets
The application includes four blank Workspace infolets that you can configure to display any combination of saved searches from Workspace. For example, if you created a project custom object to track projects involving multiple customers, you could configure one of the blank infolets as My Projects to track the accounts and the tasks involved.
Watch a Demo
You can create custom Workspace infolets to display information on any of the objects, or combination of objects, available in Workspace, including assets, service requests, and custom objects.
Steps to Enable
When you enable Workspace infolets, the four blank infolets display automatically in the Infolet Repository. Each has the same title: Additional Actionable Infolet.
You must create the saved searches you want to use as filters in the infolets in Worksplace and then use the Configure and Edit Title and Views actions on the infolets to configure it. To configure the Workspace infolets for the sales organization as a whole or for individual roles, you must work within a sandbox and Page Composer.
Key Resources
See this content:
- Watch Workspace Infolets Demo
- Workspace and Adaptive Search chapter in the Getting Started with Your Sales Implementation guide
- Adaptive Search and Workspace and Workspace Infolets chapter in the Implementing Sales guide
- Workspace Infolets chapter in the Using Sales guide
Role Information
- Sales Administrator
Enhance Configuration for Global Search Powered by Adaptive Search
You can easily choose which search attributes you want to display in global search results from a defined list of search attributes.
This enhanced feature improves and speeds up the search attributes entry requirements for global search powered by Adaptive Search.
Steps to Enable
You don't need to do anything to enable this feature.
Tips And Considerations
Adaptive Search and Workspace must be implemented.
Key Resources
See the Adaptive Search and Workspace chapter in the Implementing Sales guide.
Role Information
- Sales Administrator
Use Adaptive Search to Access Campaign Records
You can view Campaigns synchronized from Oracle Eloqua in the Workspace UI, and you can define your own preferred default saved searches. You can also add campaign members, such as contacts and leads, to your campaigns using the Add Contacts and Add Leads actions.
This feature makes it possible for you to work with campaigns within a single, unified work area, and provides you quick access to campaigns.
Steps to Enable
Use these high-level steps to enable the campaigns business object:
- Sign in to the application as a sales administrator or a setup user.
- Go to the Configure Adaptive Search task in Setup and Maintenance.
- In the Setup tab, select the Campaign object.
- Click Publish.
Tips And Considerations
If you want to make changes to the default set of attributes for campaigns, you can change them from the Advanced tab of the Configure Adaptive Search page.
Key Resources
See this content:
- Adaptive Search and Workspace chapter in the Implementing Sales guide
- Workspace and Campaigns chapters in the Using Sales guide
Role Information
Users need to have the View Marketing Integration Campaigns functional security privilege in order to view campaigns in Workspace. By default, this privilege is included in the supplied roles for Sales Administrator, Sales Representative, and Sales Manager.
Show Time-Bound Relevant Items to Salespeople with User Context
Sales users now see the most relevant items in their searches when they use smart lists in Workspace. Also, when you create your own applications that use the user context functionality, the intelligent search groups all critical items that are time-bound and require the attention of salespeople. For example, if an activity (appointment or task) has an upcoming due date, the application shows that item as more relevant to the user. Appointments due in five days, for example, get a higher score than appointments further out, and the application bumps the appointment score up as the due date gets closer.
Time-bound relevance is critical for the next phase of User Context. This feature addresses enhancements to continue to improve the User Context API and deliver an enhanced user experience for our current-generation and next-generation Sales users (for example, those on Digital Sales, Service, etc.). Making sure objects that have “something you need to do” (action, due date, etc.) attached to them are factored into the context score. The time frame of those “things you need to do” is also accounted for (something due in two days is more contextually relevant than something due in 15 days).
For our Sales users, knowing what they need to work on is relevant to them and helps them prioritize their day and focus their time and energy. They need an actionable view that groups all the critical items, that are time-bound, and that require their attention. We are using User Context to show the relevant items that match a predefined search criteria.
Steps to Enable
You don't need to do anything to enable this feature.
Key Resources
See the User Relevant Items task in the REST API for CX Sales and B2B Service guide.
Use AI Lead Score to Prioritize Your Sales Leads
You can use Oracle Adaptive Intelligent (AI) lead score to indicate lead conversion probability, that is, the probability of a sales lead being turned into an opportunity. Lead scores are numeric values typically ranging from 1 to 100, in which a high value represents a high conversion probability.
Utilizing Oracle Adaptive Intelligent Apps for Sales, the AI Lead Score lets you use your time productively by prioritizing and focusing on those leads that are more likely to get converted to opportunities.
Steps to Enable
- Subscribe to Oracle Adaptive Intelligent Apps for Customer Experience.
- Set the AI Update Who Columns Threshold (ORA_ZCA_AI_UPDATE_WHO_THRESHOLD) profile option to specify the percentage threshold value that tracks the AI Lead Score field for leads. The profile option is set to 5 percent by default.
- Add the AI Lead Score field on the Leads landing page and detail page layouts as needed, using Application Composer.
Tips And Considerations
You can change the threshold default value from 5 to a percentage threshold value that suits your business requirements. For example, you can specify that if the lead score increases by more than 10 percentage points, then alert your salespeople, so that they can focus on those leads that are more likely to get converted.
Key Resources
- See the Leads chapter in the Implementing Sales guide.
Role Information
- Sales Administrator
Quotes created from opportunities can have multiple quote line items. CX Sales now stores quote line items so that salespeople can search them; this complements the quote header information that’s already stored and is searchable in the sales application. In Workspace, salespeople can now search for specific products in a quote and view all quotes that contain the specific products found in the search. Also, salespeople can select a specific quote and view details of the quote in Oracle Configure, Price, and Quote (Oracle CPQ).
Earlier, salespeople could search and view only quote header-level information within CX Sales. This enhancement gives a deeper search into the products that make up a quote, so that salespeople can quickly find and view details of products in quotes.
Steps to Enable
You don't need to do anything to enable this feature.
Tips And Considerations
We assume you have implemented Adaptive Search and Workspace and enabled the Quote object.
Key Resources
See this content:
- Adaptive Search and Workspace chapter in the Implementing Sales guide
- Quotes chapter in the Using Sales guide
Role Information
- Sales Administrator
- Sales Representative
- Sales Manager
Manage Sales Object Notifications for Assignment Batch Processing
You can decide who gets notified and for which sales objects during batch assignment. Instead of suppressing all assignment processing events, you can have notifications sent to the owner of a selected assignment sales object or other appropriate recipients.
You can turn on or off the profile option that controls this feature at the product level. For example, you might want to send notifications for all opportunity batch assignment jobs, but want to hide all notifications for batch account assignment jobs.
Steps to Enable
Set the profile option, Suppress Events for Assignment Processing in Batch Mode (ORA_MOW_ASGN_SUPRESS_EDN_EVENTS), to No at both the site and product levels for your selected Sales objects. The default value is Yes, which hides all batch assignment process notifications.
Tips And Considerations
Notifications can't be suppressed if the assignment is processed using the Run Assignment option from the UI.
Key Resources
See the Work Assignment chapter in the Implementing Sales guide.
Role Information
- Sales Administrator
Configure Contract Profile Options Using Setup and Maintenance Task
The Manage Contract Profile Options task groups the profile options that are required for service contracts. Here are the profile options you can configure using this task:
- RCS_DEFAULT_UOM_CLASS_CODE_FOR_SVC_DURATION
- OKC_USAGE_CHARGE_IDENTIFIER
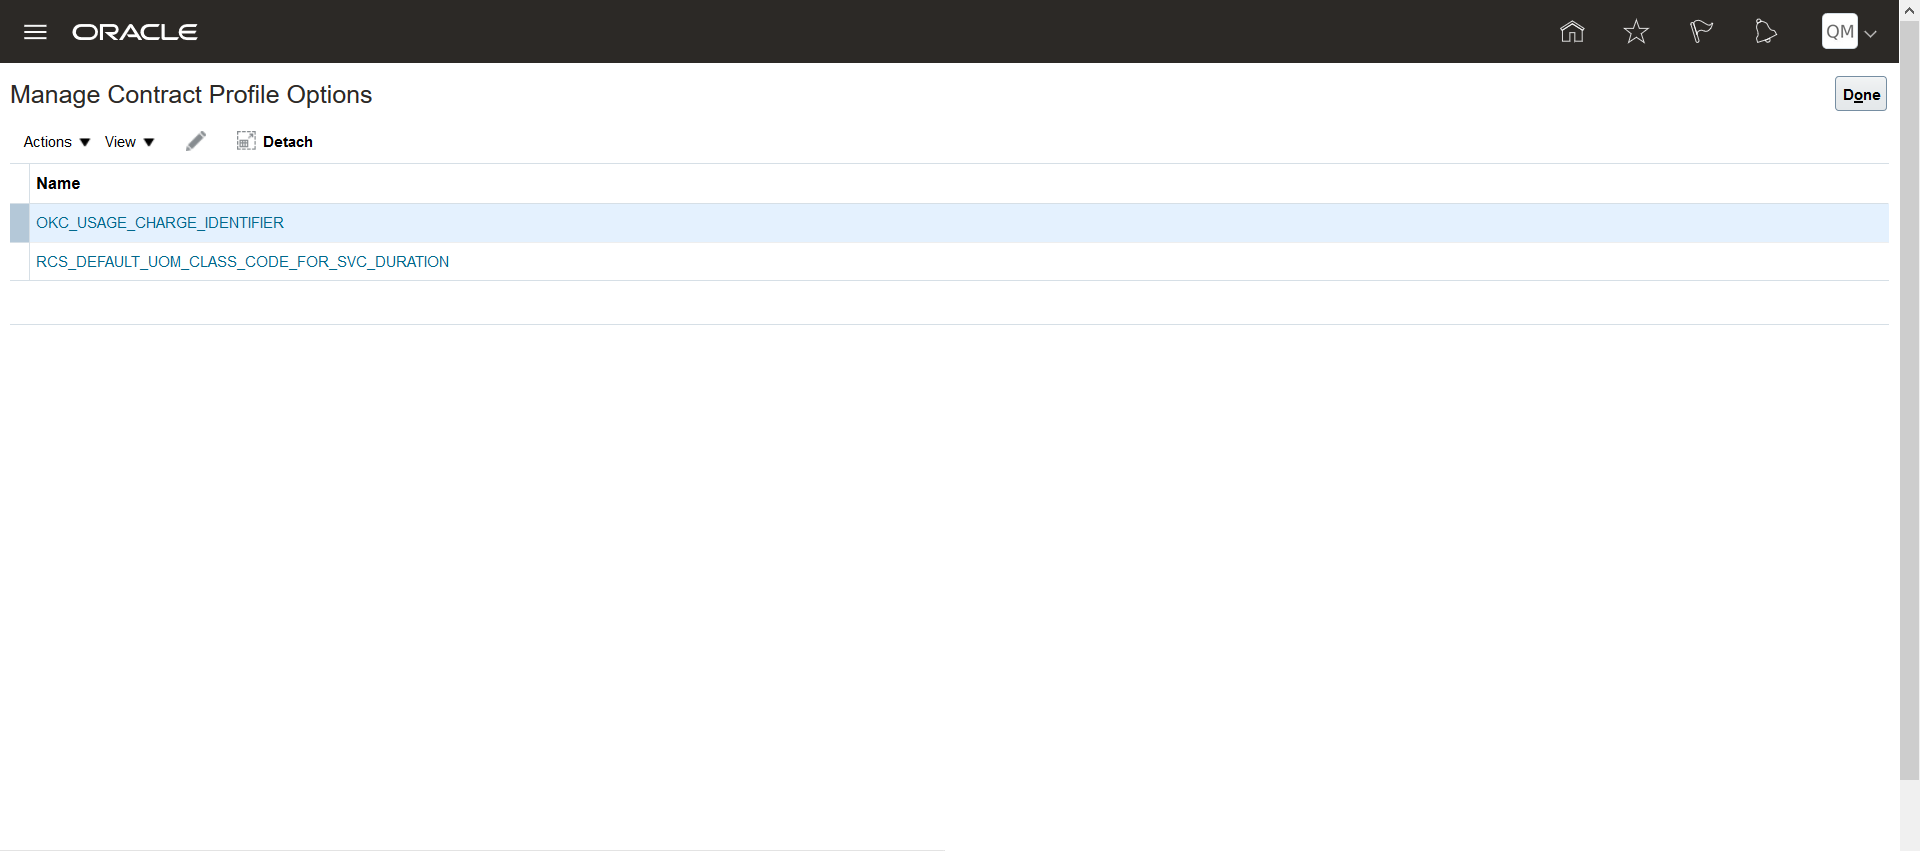
Manage Contract Profile Options
This feature makes access to the profile options easier.
Steps to Enable
Here are the steps to access the Manage Contract Profile Options task:
- Sign in as a user with access to the setup areas.
- Navigate to Setup and Maintenance work area.
- Open the Tasks side panel and click Search.
- Search and select the Manage Contract Profile Options task.
- Select a profile option you want edit.
You must set the RCS_DEFAULT_UOM_CLASS_CODE_FOR_SVC_DURATION profile option to convert the service duration and period between different time units using the Manage Contract Time Unit Mappings task.
Key Resources
See the Service Contracts Setup Checklist chapter in the Implementing Enterprise Contracts guide.
Role Information
- Setup user
Search Contracts with Oracle Search Extension Framework
The Search Contracts by Text feature uses Oracle Search Extension Framework to provide a powerful search tool that combines a text string with contract metadata to search contracts and their attached documents. You can use a text phrase, contract attributes, or a combination of both to search contracts and their attached documents. The text you enter is searched across contract number, contract name, party names, contract owner names, version description, description, contract type name, business unit name, and the name, title, description, and contents of attached documents.
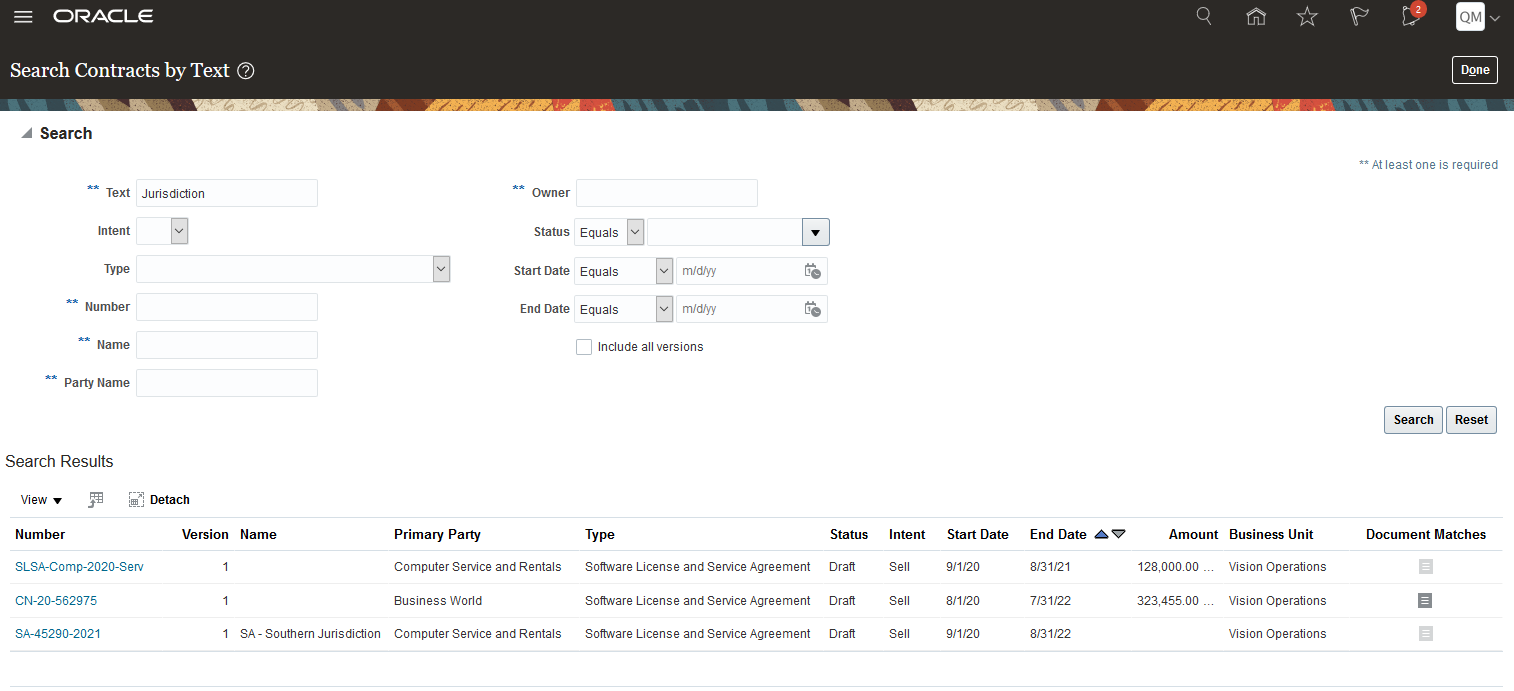
Search Contracts by Text
You can incorporate special characters and terms in the Text field to control how your text string is applied during the search:
- Wildcards (* and ?)
- Exact match ("")
- Boolean operator (AND and OR)
- Include/exclude operator (+ and -)
- Fuzzy search (~)
- Search based on a field (<FieldName>: <query>)
Once the search results are returned, you can use Document Matches to open the attached documents that contain your search term.
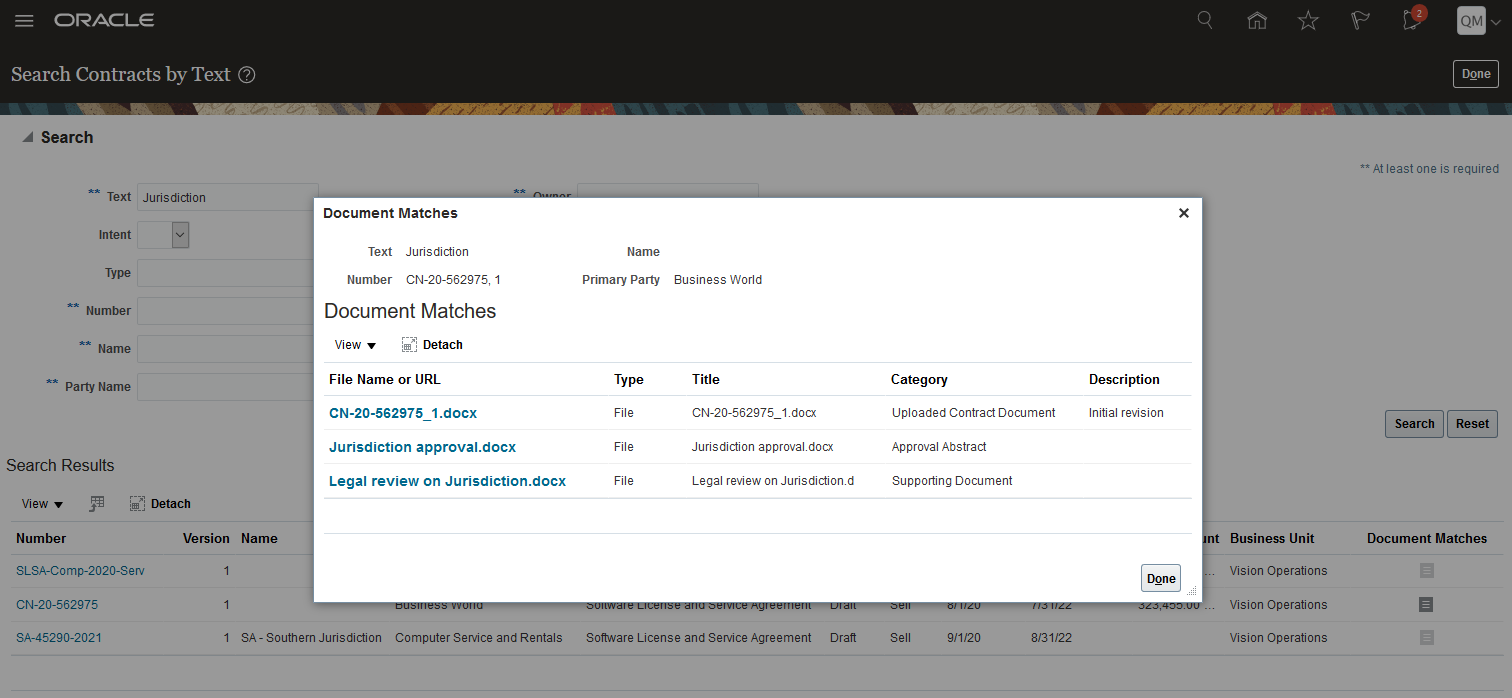
Document Matches
You can search across your contracts faster and in greater depth with this feature. The data used in the search is up-to-date, so contracts that have only just been created are also included.
Steps to Enable
Use the Opt In UI to enable this feature. For instructions, refer to the Optional Uptake of New Features section of this document.
Offering: Enterprise Contracts
Using the Manage Administrator Profile Values task in Setup and Maintenance, set these profile options:
- Enable/Disable Search Ext Framework: Must be set to Yes for this feature to use the Search Extension Framework
- Enable Search Attachments: Must be set to Yes to search across attached documents
Assign this security privilege to users who need to use this feature:
- Search Contracts
Configure the attachment search using the Manage Global Search Configurations task:
- Navigate to the Setup and Maintenance work area.
- Search and select the Manage Global Search Configurations task.
- Select Configure Attachment Search
- Add one or more new rows to enable search across your file types.
- To enable the same preference for all file types:
- Add one row using a wildcard format as */*.
- Select the index name fa-crm-contract.
- Set Enable File Search to Yes.
- Set Enable Content Search to Yes. If set to No, the content is excluded and only the file metadata such as the file name is included in the search.
- Set the Maximum File Size and Maximum Content Size:
- The file size is the size of the attachment on the system. Files that are greater than the maximum size aren't loaded and only the file metadata such as the file name is included in the search.
- The content size is the number of bytes of data taken from the file and added to the business object index to be included in the search. Maximum Content Size is always less than Maximum File Size as it's the content that remains after removing file formatting and metadata.
- Alternatively, you can select the Create from Sample button to choose how to search for different file content types.
| Index Name | Content Type | Enable File Search | Enable Content Search | Maximum File Size | Maximum Content Size |
|---|---|---|---|---|---|
| fa-crm-contract | */* |
Yes | Yes | 50MB | 10MB |
Example of Configuration for Attachment Search
In the above example, files with a file size up to 50 MB are included in the search. The application loads the first 10 MB of these files into the business object index to be searched, but excludes any data after 10 MB.
Using the Scheduled Processes task in Tools, run these processes at least once, in this sequence, to include existing contracts data into the search:
- ESS job to create index definition and perform initial ingest to OSCS: This process ensures that all existing contracts data is included before you start using this feature. To ingest all contracts data, enter the index name fa-crm-contract for the parameter Index Name to Reingest. Leaving the index name parameter blank creates and ingests data for all indices.
- Ingest attachments to OSCS: This process ensures that the content of the attached contract documents is included in the search.
We recommend you run these scheduled processes at least daily, in this sequence, using the Scheduled Processes task in Tools:
- ESS job to run Bulk ingest to OSCS
- Ingest attachments to OSCS
Tips And Considerations
Most contracts are included in the search immediately. For example, once created, attributes of a contract are included immediately in the Search Contracts by Text feature.
You must run ESS job to run Bulk ingest to OSCS and Ingest attachments to OSCS scheduled processes for the contracts to be searched accurately with up to date data in these situations:
- Import contracts
- Approve or Reject
- Purge
- Renew
- Assign Contract Owner
Key Resources
See the Using Customer Contracts guide and the setup topics in the Implementing Enterprise Contracts guide for the Search Contracts by Text feature.
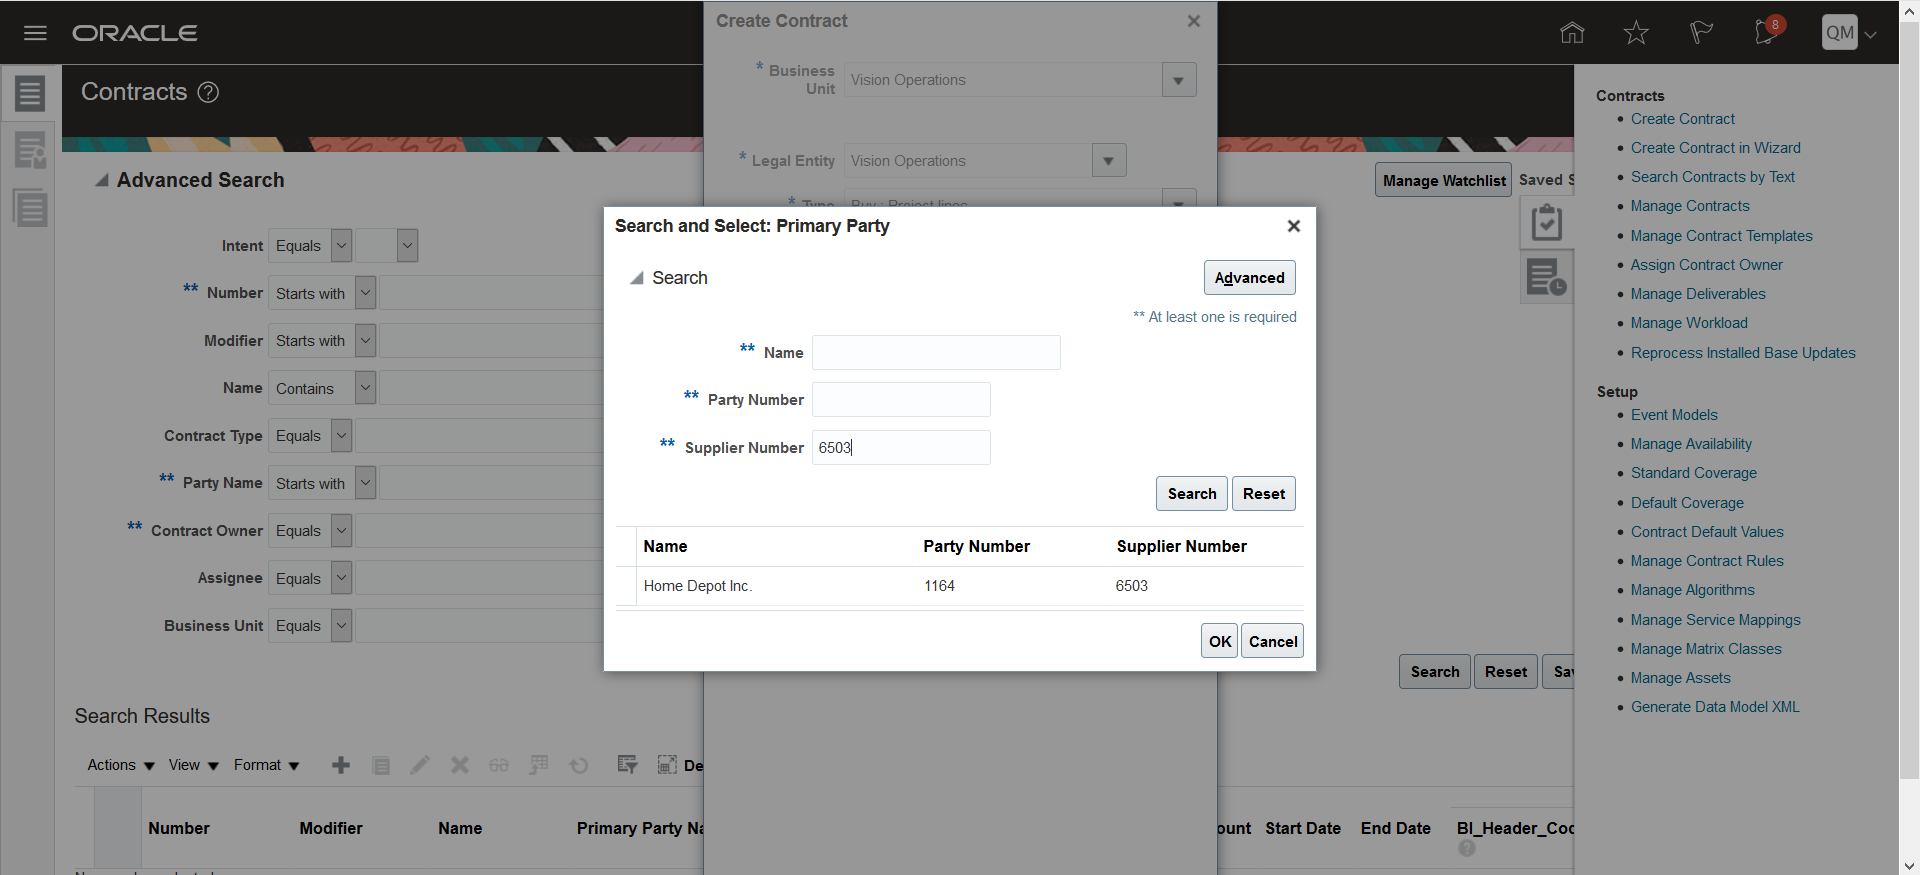
Search Primary Party Using Additional Filters
You can use additional filters to search for a primary party from the Create Contract page. Here's how you can use these additional search filters:
- Use Supplier Number to search for a supplier party.
- Use Employee Number and Email Address to search for an employee party.
Supplier Number Filter
For a buy intent contract, you can search for a party using a supplier number as an additional filter.
Supplier Number Filter
Employee Number and Email Address Filters
For an employee contract, you can search for a party using an employee number and email address as additional filters.
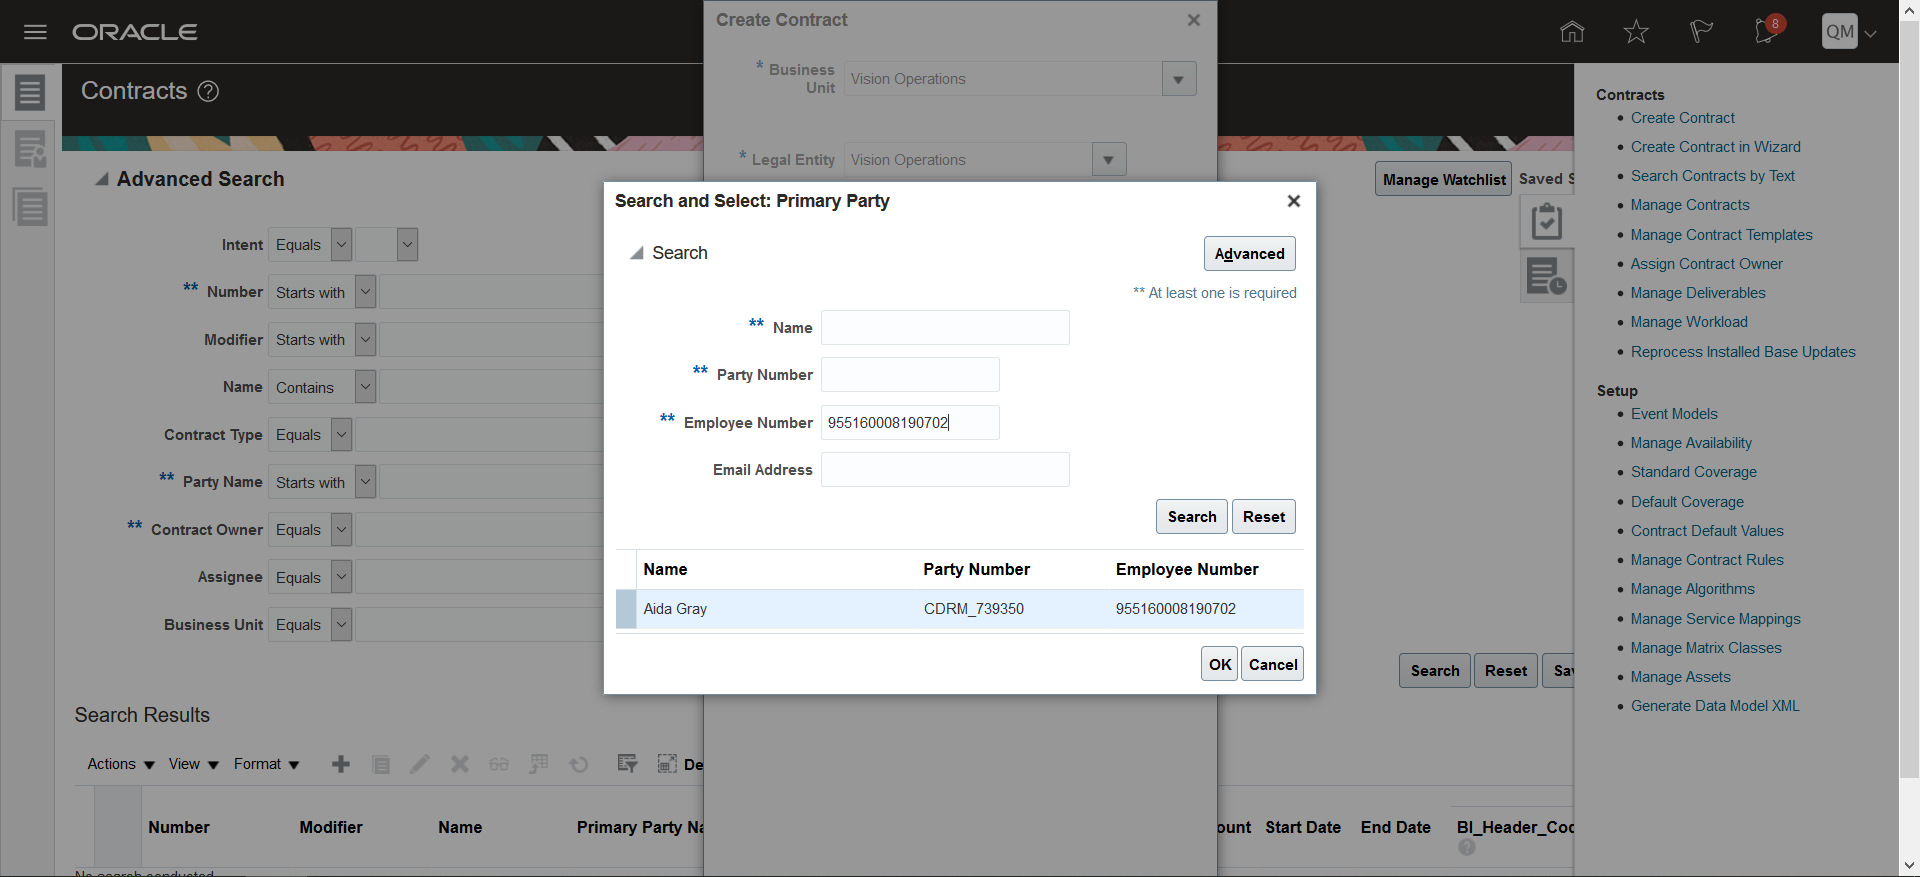
Employee Number Filter
This feature makes primary party selection easier with the help of additional filters.
Steps to Enable
You don't need to do anything to enable this feature.
Partner Relationship Management
Access Partner Contacts Automatically if Partner Access Already Exists Through Access Groups
If you have secured partners using access groups, then that same access automatically includes the partner contacts that belong to the partner. This means that all members of an access group with access to a specific partner can automatically access that partner's contacts.
After you have secured partner records with access groups, you don't need to define any additional security for partner contacts.
Steps to Enable
After you have defined partner security using access groups, run the Perform Object Sharing Rule Assignment Processing scheduled process from the Scheduled Processes UI. Use the selections shown here:
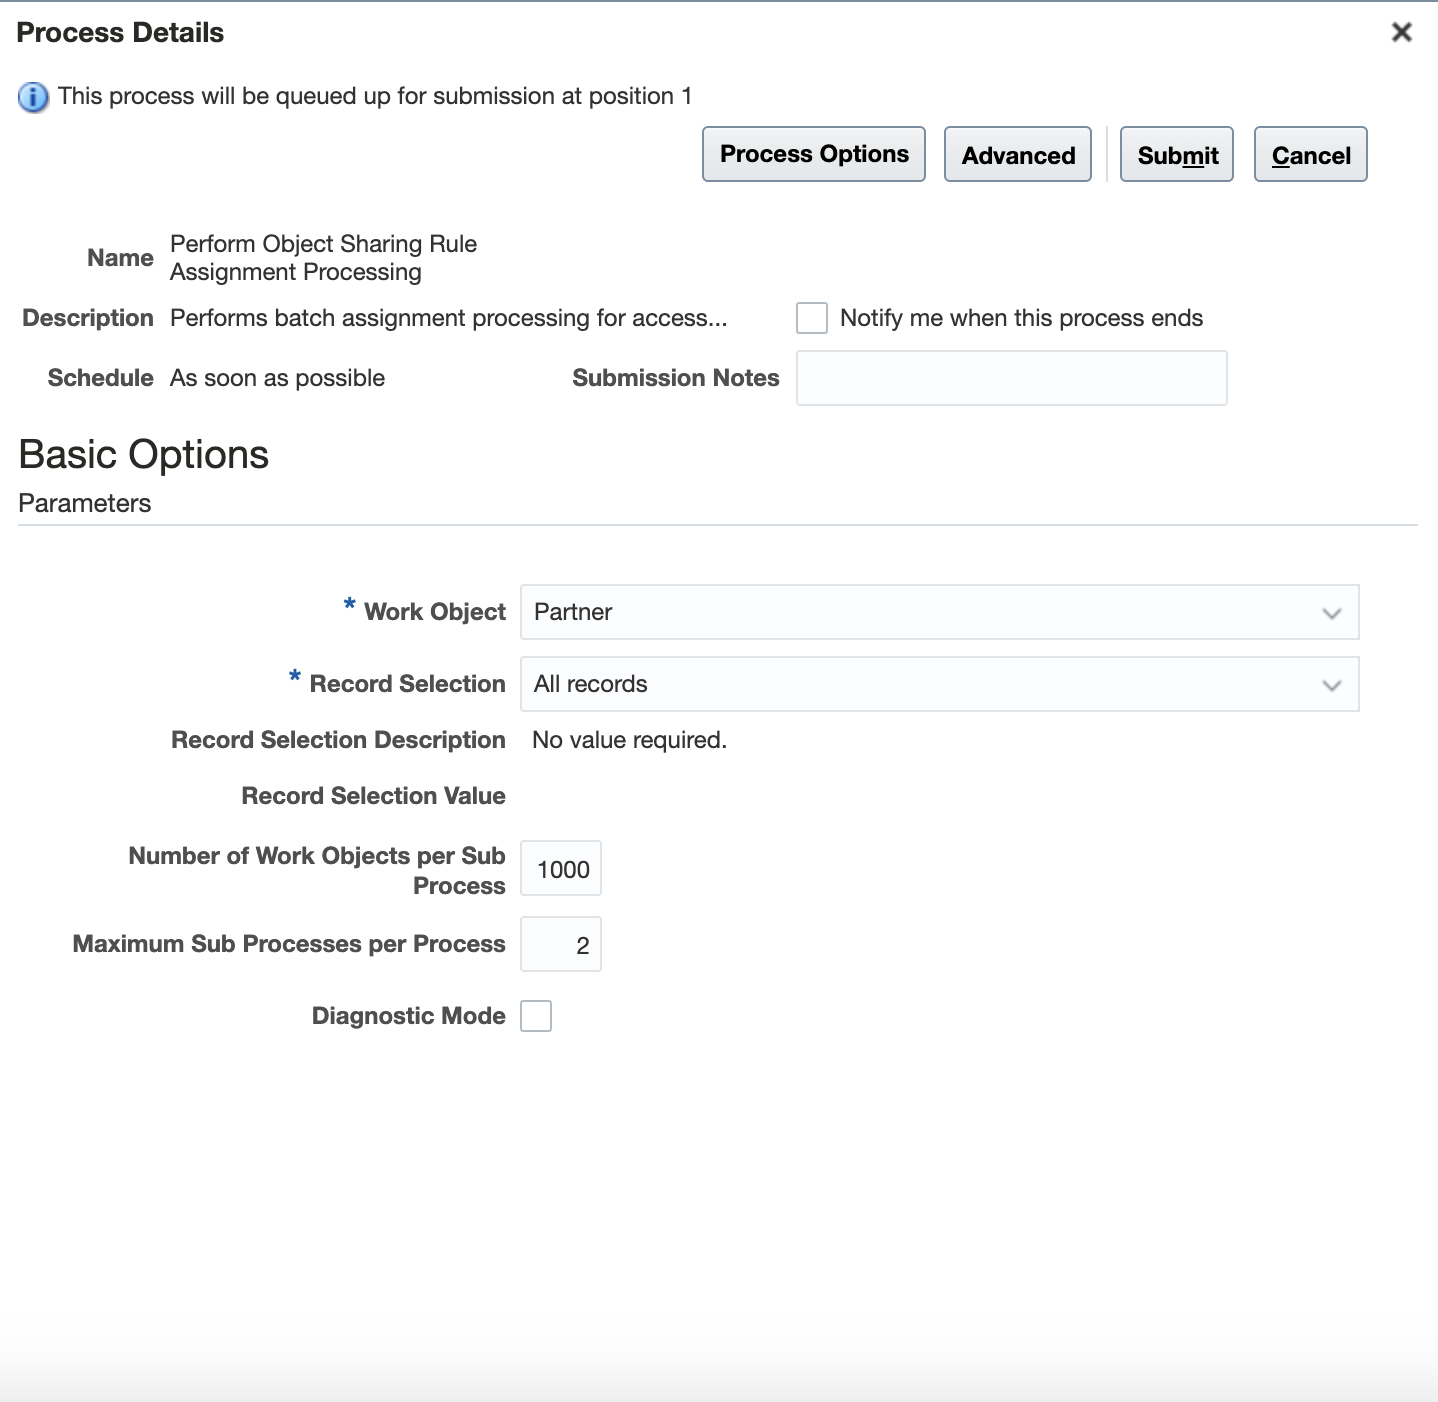
Perform Object Sharing Rule Assignment Processing
Key Resources
See this content:
- Partner Relationship Management chapter in the Getting Started with Your Partner Relationship Management Implementation guide
- Access Groups chapter in the Securing CX Sales and B2B Service guide.
Role Information
- Setup user
Provide Access to Related Objects of Partner, MDF Budget, and MDF Request Using Access Groups
Extend the access defined for an object to a related object by creating access extension rules. Access extension rules let you reuse existing rules to provide access to related objects, which greatly simplifies the security configuration. For example, if you have secured access to an object, such as Partner, using access groups, then you can create an access extension rule to extend the access defined for the Partner object to a related object, such as Deal Registration. All members of an access group who can access the Partner data then have the same access to Deal Registration data. Using access extension rules, you can extend partner security to these related objects: Lead, Opportunity, Deal Registration, Program Enrollment, Activity, Marketing Development Fund (MDF) Budget, MDF Request, and MDF Claim. You can extend the security defined on MDF Budget and MDF Requests to related objects, as well.
Access extension rules simplify the process of securing related objects for a given object.
Steps to Enable
Set up access groups for partner users.
Key Resources
See this content:
- Partner Relationship Management chapter in the Getting Started with Your Partner Relationship Management Implementation guide.
- Access Groups chapter in the Securing CX Sales and B2B Service guide.
Role Information
- Setup user
Navigate Detail Pages Quickly and Use Dynamic Tabs in Workspace
Users can click the Previous and Next buttons on record detail pages to navigate through their partner, partner contact, and deal registration records in Workspace. This new navigation significantly reduces the time spent going back and forth between edit and list pages. In addition, users can access partner and partner contact data within dynamic tabs, if you enable them in Workspace.
Users can access top-level dynamic tabs that support nested dynamic tabs, letting them act on multiple records simultaneously.
Steps to Enable
Enable Adaptive Search and Workspace and set up dynamic tabs for Workspace.
Tips And Considerations
NOTE: If you're using dynamic tabs, then record-level navigation isn't possible. This means that the Previous and Next buttons on record details pages won't be available to use to navigate lists in Workspace.
Key Resources
See this content:
- Workspace and Adaptive Search chapter in the Getting Started with Your Sales Implementation guide
- Adaptive Search and Workspace chapter in the Implementing Sales guide
Role Information
- Sales Administrator
Export the List of Registered Users
As an administrator, you can export the list of users registered to participate in the sync process. This lets you determine whether the users who have been provisioned to use the add-in are actually registered to use the add-in.
This feature lets administrators more easily track the users that are using the add-in. The data includes which users are experiencing sync errors.
Steps to Enable
You don't need to do anything to enable this feature.
Key Resources
See the Microsoft 365 chapter in the Implementing Sales guide.
Role Information
- Sales Administrator
Get Auto-Suggestions on Opportunity and Lead Fields
When your users share an email or a meeting through the advanced share mode from the add-in, they can use the auto-suggested values for Opportunities and Leads fields.
Watch a Demo
Automatic suggestions improve the usability of the add-in by reducing the steps need to associate meetings and emails to opportunities and leads.
Steps to Enable
You don't need to do anything to enable this feature.
Key Resources
- Watch the Opportunities and Leads Auto Suggestions Demo
- See the Microsoft 365 chapter in the Using Sales guide.
Role Information
- Sales Representative
- Sales Manager
Add-In Captures Interactions for User Context Smart Lists
The Office 365 add-in now communicates with User Context APIs to capture a user's most recently touched records.
This feature helps update and maintain User Context smart lists so that users get the most relevant records when being presented smart lists.
Steps to Enable
You don't need to do anything to enable this feature.
Key Resources
See the Microsoft 365 chapter in the Using Sales guide.
See More Information About Matched Text When Searching in Choice List Fields
When searching for values in choice list fields that have Adaptive Search enabled, search results now have an icon indicating the matched text.
When users perform searches that are integrated with Adaptive Search, the search results return records matched against multiple different attributes of records. This feature lets sales reps better understand why records are returned as part of the search results.
Steps to Enable
You don't need to do anything to enable this feature.
Key Resources
See the Microsoft 365 chapter in the Using Sales guide.
Role Information
- Sales Representative
- Sales Manager
CX Sales and B2B Service Connections Automatically Uptake New Features
In new Intelligent Advisor Hubs, CX Sales and B2B Service connections will automatically use the latest available web service connector available.
For those using a CX Sales and B2B Service connection, this will mean that they can immediately uptake the latest connector features.
Steps to Enable
You don't need to do anything to enable this feature.
Tips And Considerations
In existing Intelligent Advisor Hubs, to ensure that CX Sales and B2B Service connections automatically uptake the latest connector features going forward, the Hub Administrator needs to:
- Get Oracle Support to change the connector version used by the CX Sales and B2B Service connection, and
- Delete the existing CX Sales and B2B Service connection and replace it with a new CX Sales and B2B Service connection.
Key Resources
See the topic, Connect to CX Sales and B2B Service, in the Implement Intelligent Advisor guide.
Role Information
- Hub Administrators
Intelligent Advisor interview input fields can now be tagged with an auto-fill input purpose so that browsers can use stored data, such as the person's name and email address, to pre-populate information in an interview. The stored data in the browser may come from previously entered values or from pre-configured values (for example, in Google Chrome, the data stored in the user's Auto-fill settings).
This automated assistance reduces end-user typing and enables Intelligent Advisor interviews to be Web Content Accessibility Guidelines (WCAG) 2.1 compliant.
Steps to Enable
You don't need to do anything to enable this feature.
Tips And Considerations
The auto fill input purpose is specified under Properties for the input control on the Interview tab in Policy Modeling.
If using an interview extension to custom render an input control, you can use the getAutoComplete() method to return the auto fill input purpose.
Key Resources
See the topic, Use stored browser data to auto fill an input, in the Use Intelligent Advisor guide.
Role Information
- Interview designer
Rule Execution Profiling Report
Rule authors can now run batches of data through their rules and get a report that shows where time is spent processing the request.
For customers performing high-volume batch processing through Intelligent Advisor headless decision services, a key consideration is optimizing the overall throughput time it takes to process the thousands or even millions of cases they process on a daily or weekly basis. This report allows rule authors to run batches of test data through their rules, while they are under development, to identity where most time is being spent. This information will enable them to decide whether alternate data structures or decisioning approaches might yield better batch processing throughput.
Steps to Enable
You don't need to do anything to enable this feature.
Tips And Considerations
The report is in CSV format so that you can use standard tools like Microsoft Excel to compare timing results to identify where performance changes between versions.
The same performance analysis is generated when you run the test cases in Policy Modeling, so even without a sample batch request, an idea of overall performance can be gained.
Key Resources
See the topic, Find opportunities for performance improvements in rules, in the Use Intelligent Advisor guide.
Role Information
Rule authors
Test Case Execution Statistics
When using Intelligent Advisor rules, test case execution statistics now allow the user to see how long is being spent running test cases through each rule in the Policy Modeling project. When all the test cases are run in a Policy Modeling project, two reports, in CSV format, are now automatically generated:
- A test case log file - this records the time taken to run each test case
- A test performance file - this records the time spent testing each individual rule.
Comparing the information in these reports across versions allows early detection of project changes that may have inadvertently caused slowdowns in overall performance. Test coverage can also be improved by filling gaps where reports show rules are not currently being tested.
Steps to Enable
You don't need to do anything to enable this feature.
Tips And Considerations
A new log file is created each time the test cases are run allowing you to compare the difference between two runs.
Key Resources
See the topic, View test case execution statistics, in the Use Intelligent Advisor guide.
Role Information
- Policy testers
Discard Invalid Data When Interview Loads
When an Intelligent Advisor interview starts, if there's any invalid mapped-in data, the default behavior is for an error to be logged in the Hub and for the interview to be prevented from proceeding. (Invalid data could be, for example, a value which isn't in the known value list, or a number outside of the specified minimum/maximum range, or a string that doesn't match the regular expression constraints in the policy model.) Similarly, any load-after-submit data that is invalid will prevent the interview from continuing.
However, an interview designer may wish for an interview that contains invalid data to instead drop the invalid data (leaving those attributes unknown) and start/continue the interview. A warning will be logged in the application log but no error will be logged in the Hub. This also applies to data that is seeded from a URL.
This enables advice experiences to be more resilient by tolerating mismatches between application metadata (such as a list of valid options) and existing system data.
Steps to Enable
You don't need to do anything to enable this feature.
Tips And Considerations
To enable invalid loaded data to be discarded when an interview starts, the interview designer selects this option in the Mapping Settings for the Policy Modeling project.
Key Resources
See the topic, Discard invalid data when an interview loads, in the Use Intelligent Advisor guide.
Role Information
Interview designers
Intelligent Advisor project authors can now branch a project in Intelligent Advisor Hub to create a separate project version that can be worked on independently. A link is automatically created in each branched project that takes the user directly back to the version the project was branched from.
This functionality allows ongoing development to continue in one version of the project while another version is being finalized for release. The links between project versions enables authors to understand the lineage of projects to ease future change tracking and troubleshooting.
Steps to Enable
You don't need to do anything to enable this feature.
Tips And Considerations
You can branch the project from the latest version (default behavior), or select a different version of the project to branch.
Key Resources
See the topic, Branch a project in a repository, in the Use Intelligent Advisor guide.
Role Information
- Project authors
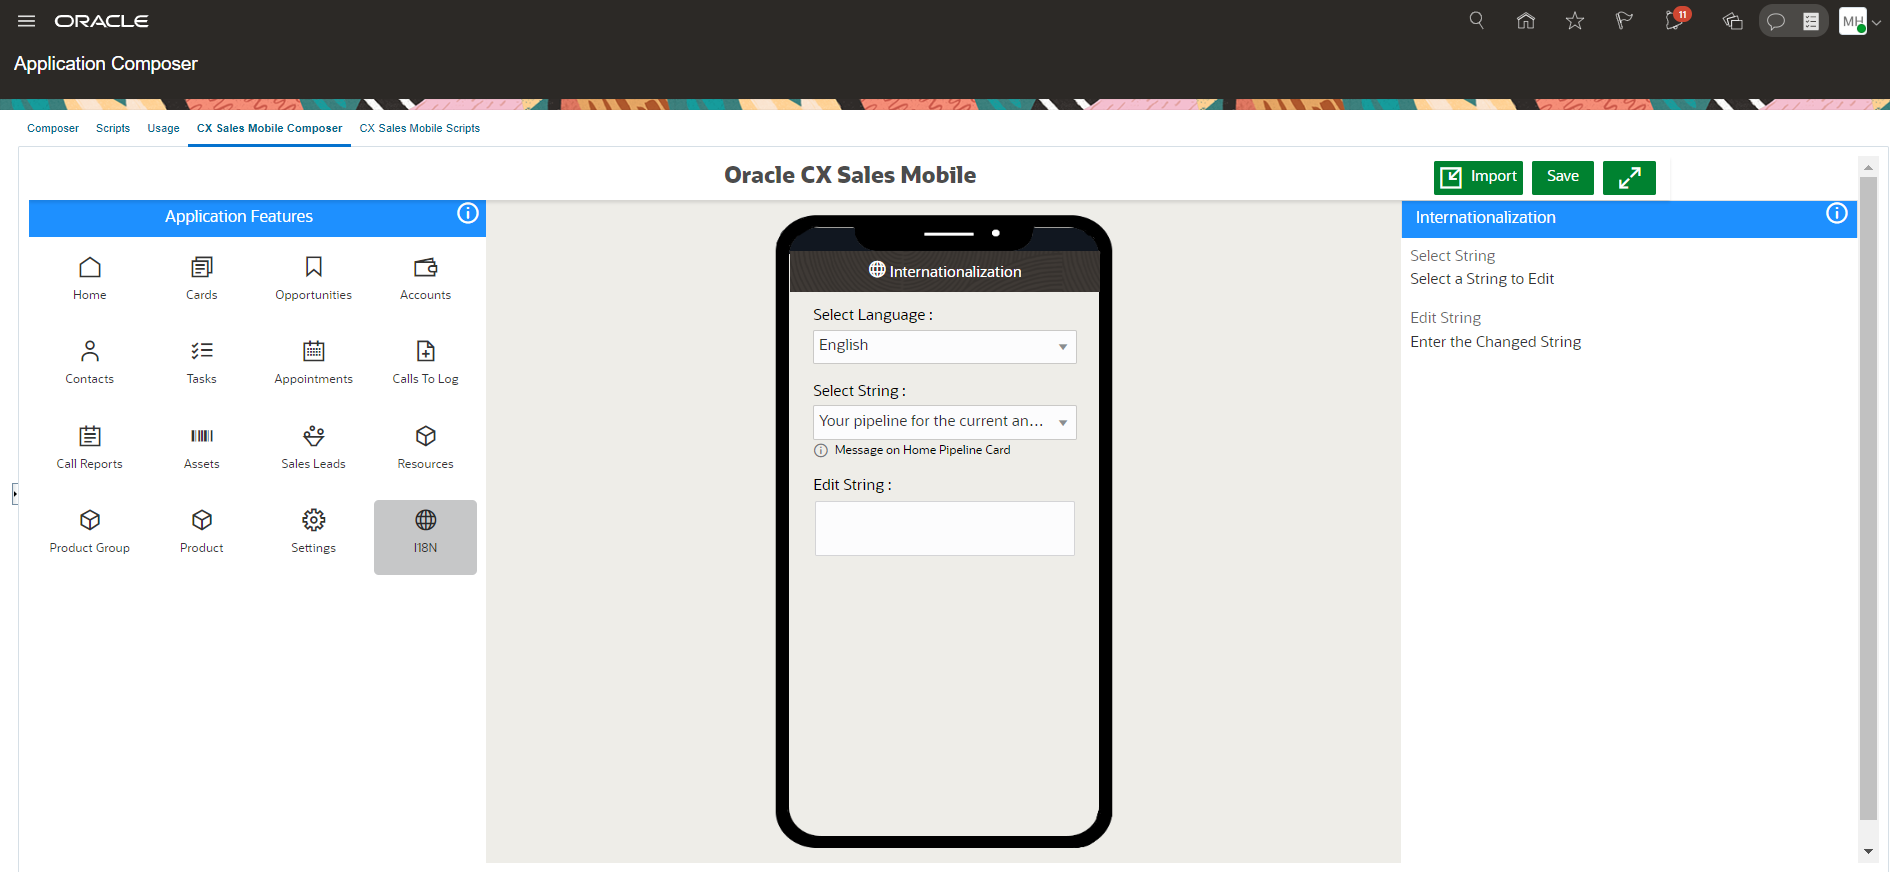
Rename Child Objects and Strings in the App
Change the names of child objects and strings on the home page, such page headers, section headers, actions, and titles, to suit your business requirements.
The ability to change the strings displayed in the CX Sales Mobile app makes the app better suit your business needs and brings consistency for users who use both the web and mobile apps.
Steps to Enable
Leverage Application Composer to expose and adjust page layout and attributes. To learn more about extending your application using Application Composer, visit Oracle Help Center > your apps service area of interest > Books > Configuration and Extension.
- Inside a sandbox, navigate to Mobile Application Setup.
- Click CX Sales Mobile Composer.
- Click on i8N and select a string to change.
Key Resources
See the Mobile Applications chapter in the Implementing Sales guide.
Role Information
- Sales Administrator
- Customer Relationship Management Application Administrator
Configure the home page cards by adding or removing the sales representative's pipeline, tasks, and appointments from it.
You can reorder the pipeline, task, and appointment sections in the home page and also assign custom sales representative roles to home cards.
Steps to Enable
Leverage Application Composer to expose and adjust page layout and attributes. To learn more about extending your application using Application Composer, visit Oracle Help Center > your apps service area of interest > Books > Configuration and Extension.
- Inside a sandbox, navigate to Mobile Application Setup in Application Composer.
- Click CX Sales Mobile Composer.
- Click Cards in the navigation panel.
- Start with cloning a layout to reorder or enable/disable cards.
- Also, select one or more role to which the homepage card layout applies.

Key Resources
See the Mobile Applications chapter in the Implementing Sales guide.
Role Information
- Sales Administrator
- Customer Relationship Management Application Administrator
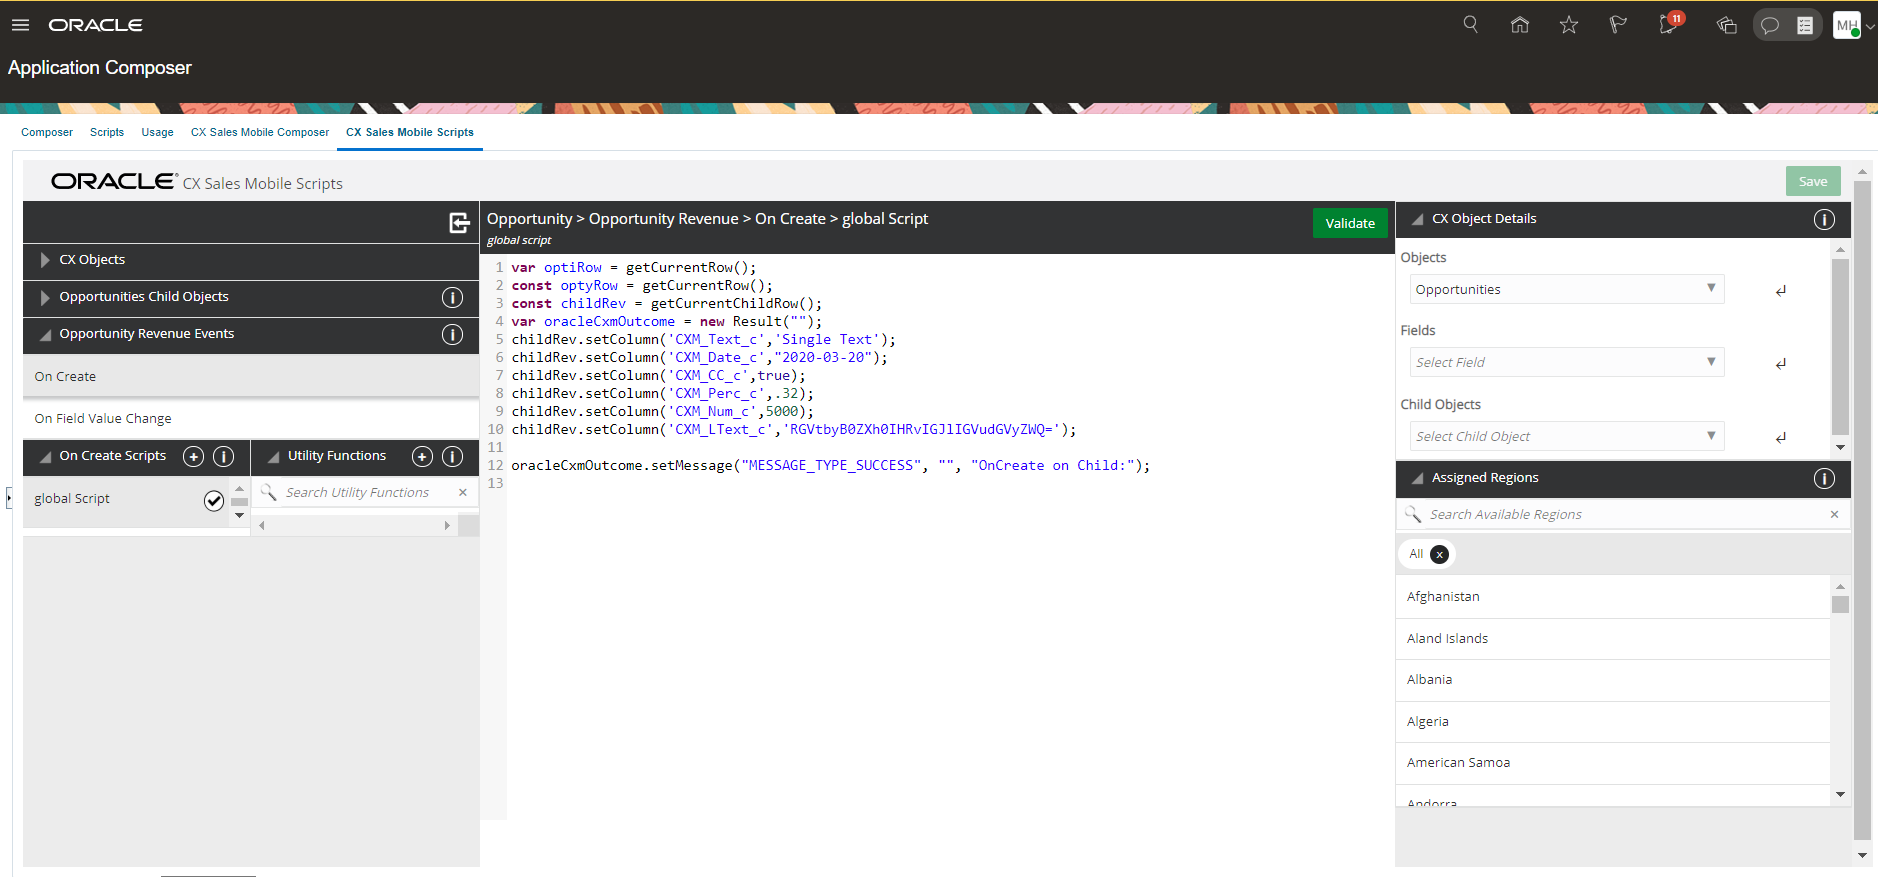
Create Custom Scripts for Child Objects
Create custom scripts that enforce custom validations and business logic for child objects, as well as for top-level parent objects. With this feature, you can default child object field values based on the parent object fields. You can also create custom validation rules, for example, making child object fields mandatory, read-only, or visible when certain conditions are met.
Custom scripts on child objects provide additional benefits of enforcing custom validation and/or custom business logic on child objects, ensuring a better user experience for users, as well as ensuring validated data before saving in CX Sales.
Steps to Enable
Leverage Application Composer to expose and adjust page layout and attributes. To learn more about extending your application using Application Composer, visit Oracle Help Center > your apps service area of interest > Books > Configuration and Extension.
- Inside a sandbox, navigate to Mobile Application Setup in Application Composer.
- Click CX Sales Mobile Scripts.
- Select a parent object, for example, select Opportunity.
- Select the child object where you want to use the script.
- Select an event to author a script on.
- Click plus icon to create a new script.
- Use the editor to write the script on the child object.
Key Resources
See the Mobile Applications chapter in the Implementing Sales guide.
Role Information
- Sales Administrator
- Customer Relationship Management Application Administrator
Enable Custom Filters and Sort Options in the Pickers Using Workspace Saved Searches
Use your Workspace saved searches as filters in the pickers of standard and custom Workspace enabled objects. This will enable users to have the same tailored experience for searching, sorting, and viewing list results for the pickers as they have with the corresponding object list pages. Users get a further personalized picker experience with their last used saved search, or picker sort option, retained for subsequent use. In addition, records related to the parent record that a user selects are displayed in pickers. For example, the opportunity picker shows related opportunities for the account selected for a new task.
Some key benefits include:
- Apply custom filtering through saved searches, for example, search and pick from My Primary Accounts
- The default list of values shown in pickers is personalized based on the usage pattern for different users, for example, smart list or My Primary accounts
- Consistent experience across lists and pickers
Steps to Enable
You don't need to do anything to enable this feature.
Search for Territories by Team Member in Workspace
Add the Territories predefined business object in Workspace during setup. This lets sales teams search and access territories directly from Workspace, instead of navigating to the Territories work area to search for territories by team members and territory details.
Watch a Demo
Additionally, when editing territories, sales teams can easily navigate within a list of territories.
Steps to Enable
-
Sign into the application as the sales administrator or a setup user and navigate to Setup and Maintenance.
-
Go to the Configure Adaptive Search task.
-
In the Setup tab, select the Territory object.
NOTE: If you want to make changes to the default set of attributes for Territories, you can change them from the Advanced subtab.
-
Click Publish.
After you publish, territories are available in Adaptive Search and Workspace.
Key Resources
- Watch the Search for Territories by Team Member in Workspace Demo
- See the Adaptive Search and Workspace chapter in the Implementing Sales guide.
Role Information
Sales Administrator
Run Calculation with Intelligent Batching
Run Calculation without having to set the number of calculation batches in the business unit parameters.
For optimal performance, each calculation run batches records intelligently for that specific run.
Steps to Enable
You don't need to do anything to enable this feature.
Key Resources
See the Calculation Processing chapter in the Using Incentive Compensation guide.
Role Information
- Incentive Compensation Analyst
- Incentive Compensation Manager
Run Crediting, Rollup, and Classification in Implicitly Determined Mode
Run the Crediting, Rollup, and Classification processes without having to select whether to run them in total or incremental mode.
The processes determine implicitly which mode is most efficient.
Steps to Enable
You don't need to do anything to enable this feature.
Key Resources
See the Calculation Processing chapter in the Using Incentive Compensation guide.
Role Information
- Incentive Compensation Analyst
- Incentive Compensation Manager
Improve Deploy Incentive Plans Performance with Participant Batching
The Deploy Incentive Plans process intelligently divides jobs into smaller batches that run in parallel, to increase performance.
This feature improves performance when you're deploying new plans or making changes to existing compensation plans.
Steps to Enable
You don't need to do anything to enable this feature.
Key Resources
See the Participant Assignments chapter in the Using Incentive Compensation guide.
View Full Qualifying Criteria of a Credit or Classification Rule
For a credit or classification rule, view the full qualifying criteria, including the ones the rule inherits. Do this in one click using the View Full Qualifying Criteria icon, instead of viewing the qualifying criteria tabs of each parent rule in the hierarchy individually.
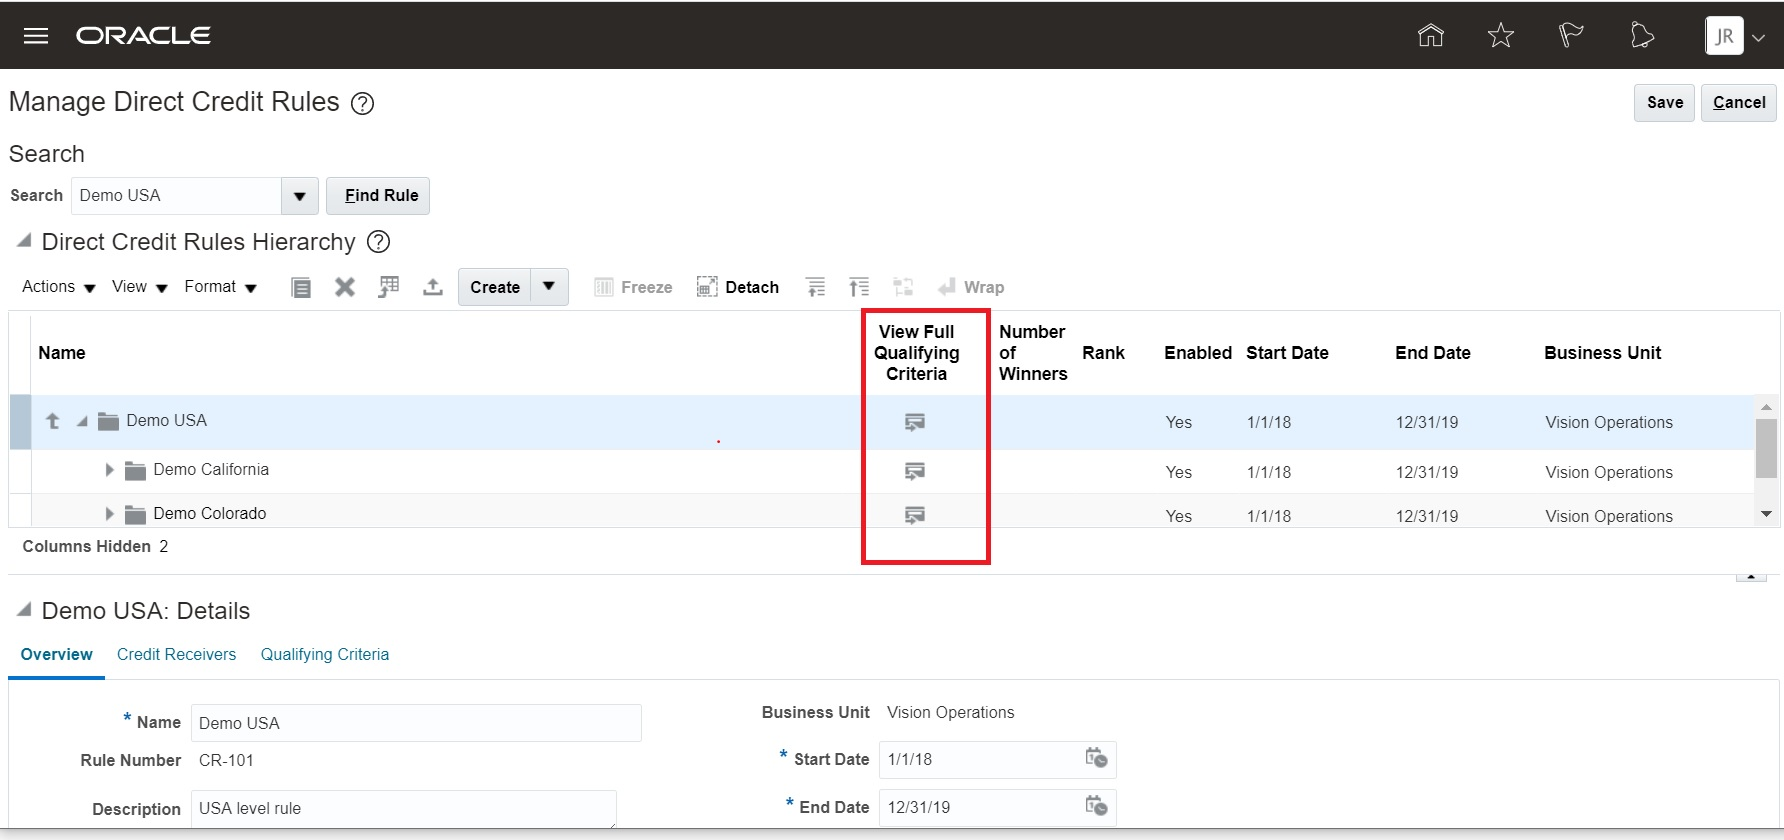
Manage Direct Credit Rules
Watch a Demo
Troubleshoot assignment of rules easily by viewing the full qualifying criteria of any rule with just a single click.
Steps to Enable
You don't need to do anything to enable this feature.
Key Resources
- Watch View Full Qualifying Criteria of a Credit or Classification Rule Demo
- See the Credit, Rollup, Classification, and Assignment Rules chapter in the Using Incentive Compensation guide.
Role Information
- Incentive Compensation Analyst and Incentive Compensation Manager for direct credit rules
- Incentive Compensation Plan Administrator for classification rules
Control Payments from Prior Years
Control whether prior year payments show up in a current year payment batch by setting the parameter, Pay Prior Years Payments. Set it to No Prior Years if you don't want to include payments due or to be recovered from any prior years. Set it to All Prior Years if you want to include payments due or to be recovered from any prior years. Set it to One Prior Year if you want to include payments due or to be recovered from only one year prior to the current payment batch year.
This feature lets you control prior year earnings from showing up in current year payment batches.
Steps to Enable
You don't need to do anything to enable this feature.
Tips And Considerations
This parameter is only visible in the Manage Parameters screen if you have set the parameter, Reset Balances, to Yes.
Key Resources
See the Business Unit Configuration chapter in the Implementing Incentive Compensation guide.
Role Information
- Incentive Compensation Administrator to set the parameter at the business unit level
- Incentive Compensation Analyst or Manager to create payment batches
View Sign-In Time with User Adoption Reporting
You can now report on sign-in times of users with a new field in the Sales - CRM Resource System Usage and the User System Resource subject areas.
The ability to report on sign-in times provides a more comprehensive insight into sign-in behavior and can be used to find region-based and hourly sign-in patterns.
Steps to Enable
If you haven't already enabled adoption and usage tracking, to get started, you first need to do some setup steps:
- Confirm adoption and usage tracking is enabled for the application.
- Ensure that users have the FBI_USER_SYSTEM_USAGE_TRANSACTION_ANALYSIS_DUTY duty role.
See the documentation resources below for more information.
Key Resources
See the Set Up Adoption and Usage Tracking topic in the Application Adoption and Usage Reporting chapter in the Creating and Administering Analytics guide.
User Adoption reporting uses scheduled processes to manage and update information. For that information, see the ESS Scheduled Processes for Analytics chapter in the Creating and Administering Analytics guide.
Also see the applicable subject areas in the Subject Areas for Transactional Business Intelligence in Sales and B2B Service guide.
View User Adoption Reports in CX Sales
Explore user adoption information directly in your CX Sales application with a series of new visualizations in the new Application Usage Insights area, accessed directly from the home page. In Application Usage Insights, you can view details about logins, sessions, user clicks, and object activity.
This information gives an overview of application usage, helps spot gaps between expected and actual uptake of the application to enforce sales processes, and helps inform the administration of the application.
Steps to Enable
If you haven't already enabled adoption and usage tracking, to get started, you first need to do some setup steps:
- Confirm adoption and usage tracking is enabled for the application.
- Ensure that users have the FBI_USER_SYSTEM_USAGE_TRANSACTION_ANALYSIS_DUTY duty role.
See the documentation resources below for more information.
Tips And Considerations
Users need the ORA_ZCA_VIEW_APPLICATION_USAGE_INSIGHTS_UI privilege to access the Application Usage Insights area. Adding this privilege to the user's role enables the Application Usage Insights icon on the home page.
Application Usage Insights requires you to run some scheduled processes. Visit the documentation listed below to learn more about the processes needed for Application Usage Insights.
Key Resources
See the Subject Areas for Adoption and Usage Reporting topic in the Application Adoption and Usage Reporting chapter in the Creating and Administering Analytics guide.
User Adoption reporting uses scheduled processes to manage and update information. For that information, see the ESS Scheduled Processes for Analytics chapter in the Creating and Administering Analytics guide.
Also see the applicable subject areas in the Subject Areas for Transactional Business Intelligence in Sales and B2B Service guide:
- Sales - CRM Resource System Usage: This subject area supports reporting on the interaction with the application by the user.
- Sales - CRM Object Activity: This subject area supports reporting on object activity metrics, such as number of records created and number of records updated.
- User System Usage: This subject area supports reporting on whether a user was active or not for a particular day, and what channel they used, and when they were active.
Role Information
The Sales Administrator, Sales Manager, Sales VP, and Customer Relationship Management Application Administrator roles have the ORA_ZCA_VIEW_APPLICATION_USAGE_INSIGHTS_UI privilege, which is required to access the Application Usage Insights area.
View Click Activity in Click History Reporting
The CRM - CRM Click History subject area gives you insight into how your team is using your sales application based on user clicks. This subject area reveals which parts of the application are popular and unpopular and where users are going in the application. You can report on click time, click performance, and user information, including region and resource hierarchy.
This subject area gives you a comprehensive view of user clicks for the web channel and helps you make sure your users are getting the most from your sales application.
Steps to Enable
Leverage new subject area(s) by adding to existing reports or using in new reports. For details about creating and editing reports, see the Creating and Administering Analytics and Reports book (available from the Oracle Help Center > your apps service area of interest > Books > Administration).
Tips And Considerations
Some areas in this subject area contain similarly named fields which end with the word "Code". These fields contain language-independent representations of the field value, which can be used to filter, sort, or display in analyses and dashboards.
Key Resources
See the Adoption and Usage Reporting Metrics topic in the Application Adoption and Usage Reporting chapter in the Creating and Administering Analytics guide.
User Adoption reporting uses scheduled processes to manage and update information. For that information, see the ESS Scheduled Processes for Analytics chapter in the Creating and Administering Analytics guide.
Also see the applicable subject areas in the Subject Areas for Transactional Business Intelligence in Sales and B2B Service guide.
Report on Incentive Compensation Participant Assignment Rules
You can now use the Incentive Compensation Rules Real Time subject area to create reports for participant assignment rules.
These reports can be very useful to administrators and analysts when reviewing and maintaining participant assignment rules setups.
Steps to Enable
You don't need to do anything to enable this feature.
Key Resources
See these guides:
- Creating and Administering Analytics
- Subject Areas for Transactional Business Intelligence in CX Sales and B2B Service
Role Information
- Incentive Compensation Analyst
- Incentive Compensation Manager
- Incentive Compensation Administrator
Products in inactive status are now included in reports containing information the inactive products are related to, such as Opportunity Revenue.
Exposing the name of inactive products in reporting ensures consistent reporting for both active and inactive products, and ensures that all expected information is contained on the report. Showing inactive products also decouples the association of the report from the active or inactive status of the product.
Steps to Enable
You don't need to do anything to enable this feature.
Tips And Considerations
Any report that includes product information won't change, even if a subset of products in the report have been made inactive. In prior releases, information associated with products that were made inactive were dropped from the report. Sales data extracts using the Business Intelligence Cloud Connector (BICC) now also include inactive product information.
Key Resources
See these guides:
- Creating and Administering Analytics
- Subject Areas for Transactional Business Intelligence in CX Sales and B2B Service
Role Information
- Sales Administrator and Sales Analyst roles can configure the reports.
- Sales Representative and Sales Manager roles can view the reports.
Support Contact Merge for Service Requests and Dependent Objects
When two contact records are merged, the application associates these objects from the merged contact to the remaining contact:
- Service requests
- Interactions
- Service request messages
- Self-service users
- Roles
All service records are now visible under the single merged contact.
Steps to Enable
You don't need to do anything to enable this feature.
Key Resources
See the Profile Options, Lookups, and Scheduled Processes for Service Requests chapter in the Implementing B2B Service guide, and the Service Requests chapter in the Using B2B Service guide.
Support Account Merge for Service Requests and Dependent Objects
When two account records are merged, the application associates these objects from the merged account to the remaining account:
- Service requests
- Interactions
- Self-service users
- Roles
All service records are now visible under the single merged account.
Steps to Enable
You don't need to do anything to enable this feature.
Key Resources
See the Profile Options, Lookups, and Scheduled Processes for Service Requests chapter in the Implementing B2B Service guide, and the Service Requests chapter in the Using B2B Service guide.
Role Information
- Service Administrators
Present Read-Only Service Request Pages More Easily
This feature makes it easier for you to set up a role that has read-only access to a service request (SR). After you remove the Edit Service Request privilege from a user's role, the user won't be able to edit these elements of the service request page:
- SR header fields
- SR contacts
- SR team members
- Actions on the SR header
In previous releases, the Edit Service Request privilege only prevented the editing of SR header fields. Additional configuration was required to restrict changes to the other elements listed above.

Service Request View for a User Without the Edit Service Request Privilege
This feature simplifies the configuration steps needed to display read-only service request pages for certain roles.
Steps to Enable
Make the feature accessible by assigning or updating privileges and/or job roles. Details are provided in the Role section below.
To create a role with read-only access to a service request:
- Sign into the application as an administrator.
- Navigate to the Security Console.
- Copy a service duty role, such as Service Request Troubleshooter. When copying the role, select the Copy top role option.
- Remove the Edit Service Request privilege from the copied role.
- Copy a service job role, such as Customer Service Representative. When copying the role, select the Copy top role option.
- Delete the Service Request Troubleshooter child role from the copied job role.
- Associate the copied version of the service request troubleshooter duty role to the copied job role.
- Associate the copied job role with the users who need read-only access to service requests.
- Make sure that the users don't have other roles that give them the Edit Service Request privilege.
NOTE: In these steps, we use the Service Request Troubleshooter Duty role and Customer Service Representative as examples. You can copy any of the service job/duty role combinations to create a read-only version of that role.
Tips And Considerations
Some Service Request features continue to be independently controlled by separate privileges. These include editing service request messages, as well as actions on related objects like Work Order, Action Plans, and Parts Orders.
Key Resources
See the Extend B2B Service chapter in the Implementing B2B Service guide.
Role Information
Service Administrators can set up users for read-only access to service requests.
Display Customer Communications in a Service Request as a Flat Structure
Show the customer messages on a service request (SR) as a flat structure, rather than in a hierarchy. Using a profile option, you can set the UI to always display SR messages as a flat structure, in reverse chronological order, without showing the message hierarchy.
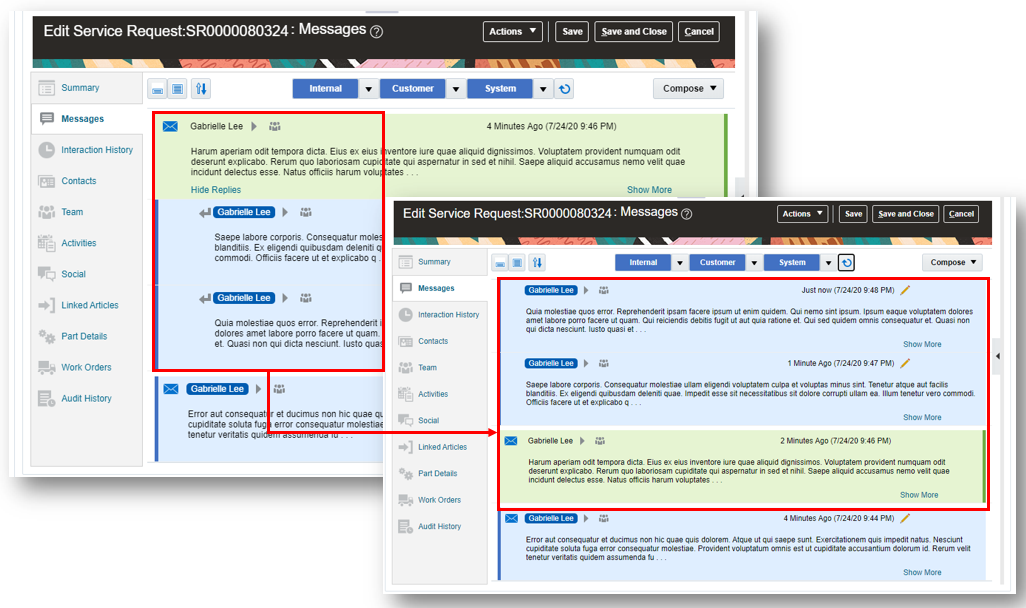
Service Request Messages in Hierarchical and Flat Structure
The agents will see the latest communication messages at the top of the message list.
Steps to Enable
- Navigate to the task, Manage Administrator Profile Values, in Setup and Maintenance.
- Search for the profile option code, SVC_HIDE_HIERARCHY_FOR_CUST_ENTRY_AND_RESPONSE.
- Change the profile option value from No to Yes.
Key Resources
See the Profile Options, Lookups, and Scheduled Processes for Service Requests chapter in the Using B2B Service guide.
Role Information
Application Administrators can set the profile option to enable this feature.
Import, Export, and Compare Service Categories Between Environments Using Functional Setup Manager
Let your users import, export, and compare service categories between environments using Functional Setup Manager. This enables your users to create or update setup service category data in bulk as well as compare differences between two environments. For example, the user wants to import service category data into a production environment that has been exported from a test environment after making changes to the setup data. Before the user imports the data, the user can compare the exported data of the test environment with the existing production data, and preview how the setup data in production will change after the data is imported.
Any implementation of Oracle Applications Cloud usually requires migrating setup data from one environment to another at various points in the subscription lifecycle. For example, a subscribed offering is typically set up in the test environment first, and is moved to the production environment only after proper testing and verification. Setup export and import processes help you migrate setup data from test to production.
Steps to Enable
You don't need to do anything to enable this feature.
Key Resources
See the Import and Export chapter in the Implementing B2B Service guide.
Role Information
You need the Application Implementation Consultant role (ORA_ASM_APPLICATION_IMPLEMENTATION_CONSULTANT_JOB) to export, import, and compare setup data.
Connect Opportunities to Cases Using REST API
Opportunities can now be connected to Cases.
This expanded model of connectivity lets you support mixed service and sales use cases in your CX Sales and B2B Service implementations.
Steps to Enable
Review the REST service definition in the REST API guides, available from the Oracle Help Center > your apps service area of interest > REST API. If you're new to Oracle's REST services you may want to begin with the Quick Start section.
Role Information
- Application Administrators
Use Customer-Defined User to Execute Commands from a Collaboration Network
This feature lets you define the user credentials for executing the Oracle CX Sales and B2B Service REST API commands from a collaboration network, such as Slack, instead of using a predefined App ID user.
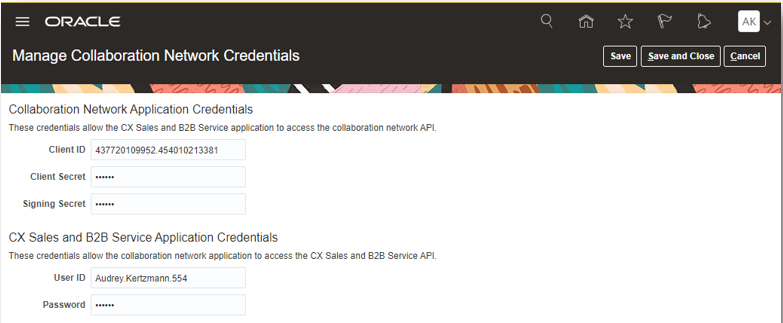
Setting Up the CX Sales and B2B Service Application Credentials
Rather than using a predefined Application ID user with many privileges, this feature lets you use a user that only has the required privileges to execute the actions from a collaboration network like Slack.
Steps to Enable
- Navigate to the Manage Collaboration Network Credentials task in Setup and Maintenance.
- Enter the appropriate user ID and password in the CX Sales and B2B Service Application Credentials section.
Key Resources
See the Slack Channels chapter in the Implementing B2B Service guide.
Role Information
Application Administrators can enable this feature.
Use the Search Analysis Subject Area to Report on Knowledge Management User Search Activity
Knowledge managers can use the Article Search Historical search analysis subject area to report on users' questions and search terms to better understand how customers are finding knowledge base content. You can view search queries in normalized format, as well as volume-related information.
Watch a Demo.
Insight into which questions users are asking the most lets knowledge managers understand which content their knowledge base needs to support.
Steps to Enable
Leverage new subject area(s) by adding to existing reports or using in new reports. For details about creating and editing reports, see the Creating and Administering Analytics and Reports book (available from the Oracle Help Center > your apps service area of interest > Books > Administration).
You don't need to do anything to enable this feature. The Search Analysis subject area is available for all knowledge analytics users.
Tips And Considerations
In this first release, we have only exposed the normalized questions and tokens. We will provide the full questions in an upcoming release.
Key Resources
Role Information
All Knowledge Analytics users can use this feature.
The Work Order object now supports associating attachments through the standard attachment framework. Users can use the standard page layouts to associate documents to a work order. The public REST API for work orders also supports attachment association. New functional privileges are supplied, to control the permissions to associate and remove attachments. The prebuilt existing integration flows to the Oracle Field Service application don’t automatically transmit work order attachments, but the solution also includes a new flow that can be downloaded, that supports attachments from Oracle Field Service syncing to the work order in B2B Service.
Customers often need the ability to attach supporting documentation and pictures to a work order to provide additional details to ensure technicians are prepared for the work that needs to be performed.Technicians also need the ability to attach images of the asset they worked on or pictures to prove they arrived to perform the work when no one is available to give them access. This feature supports these requirements and updates the OIC flows so any attachments added by a technician in Oracle Field Service will automatically synchronize and the attachment will be available on the work order in B2B Service if the agent needs to answer questions from their customer.
Steps to Enable
Leverage Application Composer to expose and adjust page layout and attributes. To learn more about extending your application using Application Composer, visit Oracle Help Center > your apps service area of interest > Books > Configuration and Extension.
The new attachment field for the Work Order object opens the attachment UI. You use Application Composer to add the new field to a work order layout:
- Ensure you're working in an active sandbox.
- Navigate to Application Composer and access the work order object.
- In layouts, create a new custom layout and add the attachment field.
- Save and close the layout.
- Publish the sandbox.
To receive attachments for an Oracle Field Service activity, follow the steps in the setup guide, which includes:
- Add custom properties to the Oracle Field Service activity.
- Download the new Oracle Integration Cloud (OIC) attachment flow.
- Import and activate the new OIC attachment flow.
Tips And Considerations
The current release only supports synchronizing attachments from Oracle Field Service to Oracle B2B Service.
Key Resources
For details about how to configure the field service integration in B2B Service to Oracle Field Service, see the Integrating B2B Service with Field Service guide.
Flexible Configuration of Field Service Work Order Work Zones
In prior releases of the work order integration with Oracle Field Service, the work order area, which maps to a bucket-type resource in Oracle Field Service, is retrieved based only on postal code. This required limiting the work zone key in Oracle Field Service to only postal code. This enhancement removes this limitation and provides full support for the work zone key in Oracle Field Service, which can be based on one or more activity properties.
This enhancement also removes the requirement for capacity management and quota-based booking, and now utilizes the find matching resource REST service which is available in both professional and enterprise editions of Oracle Field Service.
Steps to Enable
The steps to enable the new work order area configuration are slightly different if you have already enabled and are using the integration to Oracle Field Service for retrieving the work order area prior to the Update 20D release of Oracle B2B Service. To configure the work order work zones in B2B Service:
- In Setup and Maintenance, select the Service offering.
- Select the Work Order functional area.
- Select the Manage Service to Oracle Field Service Integration task.
- Select the action or icon to edit the integration configuration.
- Customers who have enabled the integration prior to Update 20D, under Bucket Resource Retrieval, change the selection from Postal Code to Enhanced Configuration.
- Customers who have not enabled the integration prior to Update 20D, select Bucket Resource Retrieval.
- Select Verify Connection", and after the connection is verified as successful, the Work Order Area Retrieval tab appears below the Configure the connection to Oracle Field Service section.
- Set the fitness formula values as appropriate, based on the Oracle Field Service setup.
- In the Work Zone Definition section, select the Retrieve Work Zone Key action to retrieve the work zone definition from Oracle Field Service.
- For each Field Service Work Zone Key retrieved, select the corresponding Work Order Field.
- Select Enable work order area retrieval in field service work order create page to enable the automatic work order area retrieval when creating a work order.
Tips And Considerations
The postal-code-based retrieval released prior to Update 20D requires Oracle Field Service capacity management, and quotas must be set up for each bucket-type resource. The new enhanced configuration utilizes the Oracle Field Service find matching resource API and doesn't require Oracle Field Service capacity management. So, customers who are licensed for Oracle Field Service professional edition can now take advantage of the automatic population of the work order area when creating an integrated work order.
Key Resources
For details about how to configure the field service integration of B2B Service to Oracle Field Service, see the Integrating B2B Service with Field Service guide.
Import and Export and REST APIs
Navigation Disabled to CX Sales File-Based Data Import and Export
The File-Based Data Import and Export has been discontinued for CX Sales and B2B Service users starting in this update, Update 20D. Oracle recommends that you move to the Import and Export Management framework.
The new framework provides UIs and APIs that are easier to use, a back-end engine with enhanced performance, and additional client-side management utilities. This makes the process of defining, executing, and monitoring the import and export jobs of all sizes much simpler, and enables administrators to spend less time managing flat-file data exchanges. Transitioning to the new framework will help you gain familiarity with it and integrate your custom imports, exports, and business processes into the new framework.
Steps to Enable
You don't need to do anything to enable this feature.
Key Resources
See the Transition from File-Based Data Import and Export to Import and Export Management chapter in the Understanding Import and Export Management for CX Sales and B2B Service guide.
You can now export attachments related to import objects. For example, if you have imported attachments related to account or contact objects using Import Management, you can export them using Export Management. This is a two-step process:
- Export the attachment information, along with the object data records, by submitting the export job.
- Use the export command in the External Data Loader Client command-line tool to download the attachment files from the content management server to your local directory.
This feature is useful in common scenarios where you want to export volumes of file attachments from CX Sales to use for external integrations. Periodically, you may also want to delete old attachments.
Steps to Enable
You don't need to do anything to enable this feature.
Key Resources
See the Export Your Data chapter in the Understanding Import and Export Management for CX Sales and B2B Service guide.
Use Templates for Hierarchical Imports
You can now create and save an object hierarchy as a template. You can reuse this template when you perform hierarchical imports.
Here are the key points:
- The Import Management framework supports the capability to create reusable templates when customers perform hierarchical imports.
- Users can now select and save a hierarchy of objects as a template and can import an entire hierarchical group of objects as a single logical unit.
- Customers and partners can create import templates that can then be migrated across pods and environments.
- Systems integrators can create a set of templates that can then be downloaded and reused at multiple customer sites.
Steps to Enable
You don't need to do anything to enable this feature.
Key Resources
See the Get Started with Import chapter in the Understanding Import and Export Management for CX Sales and B2B Service guide.
Manage Generic Source System Object Using REST APIs
You can use REST APIs to create, update, delete, and get the new Generic Source System object. The Generic Source System object identifies the information cross-referenced to existing source systems and base tables, including the source of the data and its date parameters, status, and Source System IDs. Essentially, the Generic Source System object maintains cross references between various external source systems and the base master system.
This feature gives you full support of source system identifiers and makes it easier to maintain source cross references.
Steps to Enable
Review the REST service definition in the REST API guides, available from the Oracle Help Center > your apps service area of interest > REST API. If you're new to Oracle's REST services you may want to begin with the Quick Start section.
Tips And Considerations
A known issue exists with the Upsert API. If you have trouble in your environment with this API, use the Patch API instead.
Key Resources
See the Source System References task in the REST API for CX Sales and B2B Service guide.
Role Information
Customer administration and development roles have access to use these REST APIs, as needed, for customer integrations.
Import Service Contract Objects Using Import Management
You can use Import Management from the Tools work area to import service contract objects into Enterprise Contracts. Here's the list of objects you can import using Import Management:
- Contract Header
- Contract Header Descriptive Flexfield
- Contract Party
- Contract Party Descriptive Flexfield
- Contract Party Contact
- Contract Party Contact Descriptive Flexfield
- Contract Sales Credit
- Contract Line
- Contract Line Descriptive Flexfield
- Contract Line Sales Credit
- Contract Covered Assets
- Contract Charges
- Contract Charge Components
- Contract Bill Lines
- Contract Manual Adjustments
- Contract Pricing Terms
- Contract Related Document
- Contract Attachments
You can also create, update, or delete these attributes using import.
This feature lets you transfer service contracts from an external application to Oracle Enterprise Contracts.
Steps to Enable
You don't need to do anything to enable this feature.
Tips And Considerations
Oracle is introducing the Import Management and Export Management framework to provide enhanced usability, reliability, and performance. The existing File-Based Data Import framework is planned to be decommissioned in Update 20D. Therefore, you must transition to the new framework.
Key Resources
See the Import Your Data chapter in the Understanding Import and Export Management for CX Sales and B2B Service guide.
Use More Attributes in Account, Contact, and Household REST APIs
Use more attributes in the address and relationship child objects of Account, Contact, and Household REST APIs. These attributes are available in import and export management as well. There's a new child under Address as Address Locale to provide transliterated address fields in the local language.
Here are the new attributes:
- Address
- DoNotValidateFlag
- DunsNumberC
- PartySiteName
- Address Locale (new child object)
- Transliterated Address Attributes (18)
- TransliterationLanguage
- SiteSourceSystem (Address Source System)
- SiteSourceSystemReferenceValue (Address Source System Reference Value)
- Address Number
- Location ID
- Relationship
- PrimaryCustomerFlag
- PreferredContactFlag
Steps to Enable
You don't need to do anything to enable this feature.
Key Resources
See the Accounts, Contacts, and Households task in the REST API for CX Sales and B2B Service guide.
Use Additional Attributes in Contact Points, Additional Identifier, and Additional Names Child Objects
Use additional attributes in the contact points, additional identifier, and additional names child objects. These additional attributes are available both in Standard Import and REST APIs. These child objects are used by the Account, Contact, and Household objects.
The new attributes are:
- Contact Point
- PhonePurpose
- WebPurpose
- SocialNetworkPurpose
- Additional Names
- Description
- AcademicTitle
- TransliterationLanguage
- Title
- PreferredFlag
- Additional Identifier
- StateProvince
- Additional Names also has been added as child of the Household REST API.
Steps to Enable
Review the REST service definition in the REST API guides, available from the Oracle Help Center > your apps service area of interest > REST API. If you're new to Oracle's REST services you may want to begin with the Quick Start section.
- Ensure you're not in a sandbox.
- Navigate to Tools > Application Composer > Import and Export.
- Click Generate to generate import and export artifacts.
Key Resources
See the Contact Points task in the REST API for CX Sales and B2B Service guide.
Use Organization REST Resource to Manage Generic Organization Data
Use the REST resource based on the generic Organization object to manage organization data.
This feature provides functionality in the new Import and Export Management framework that used to exist in the File-Based Import framework.
Steps to Enable
You don't need to do anything to enable this feature.
Tips And Considerations
- Plan to use the generic hubOrganization for import and integration to external systems when the organization being referenced is not a sales-related organization. For example, the organization could be from a financial system, an HR system, a partner organization, or a marketing organization.
- You need an active license for Oracle Customer Data Management.
Key Resources
See the Organizations task in the REST API for CX Sales and B2B Service guide.
Role Information
Users with the Data Steward and CRM Administrator roles have authority to execute import activity and web service REST APIs for the generic hubOrganization object.
Use Import and Export Management to Create, Update, Delete, and Export the Customer Hub Person Entity
Create, update, delete, and export comprehensive person profiles that are used as the common basis for many types of person entities, such as contacts.
With this enhancement, you can use a single import or export format to manage the generic person profile information shared by multiple person object types.
Steps to Enable
You don't need to do anything to enable this feature.
Key Resources
See the Import Your Data chapter in the Understanding Import and Export Management for CX Sales and B2B Service guide.
Role Information
- CRM Administrators
- Data Stewards
These roles have import authority and can access this new HubPerson Entity through standard Import Management processes.
Provide Support for Importing Additional Attributes Using the Hub Organization Import Object
Additional attributes are now available in the field definition of the Hub Organization import object to help integrate it with geography name referencing. The newly added fields are:
- ThirdPartyFlag
- ValidatedFlag
- CleanlinessScore
- CompletenessScore
- DataConfidenceScore
- DatafoxCompanyId
- DuplicateIndicator
- DuplicateScore
- EnquiryDuns
- EnrichmentScore
- LastScoreUpdateDate
- RecencyScore
- ValidityScore
This feature provides consistency and full functionality, with appropriate field support and integrations.
Steps to Enable
You don't need to do anything to enable this feature.
Key Resources
See the Import Your Data chapter in the Understanding Import and Export Management for CX Sales and B2B Service guide.
Role Information
Roles that have access to APIs or have access to the HubOrganization import object have the new fields available.
Use Person REST Resource to Manage Generic Person Data
Use the REST resource based on the generic person object to manage person data. You can also use this resource to import person data through the import REST APIs.
This feature provides functionality in the new Import and Export Management framework that used to exist in the File-Based Import framework.
Steps to Enable
You don't need to do anything to enable this feature.
Tips And Considerations
- The hubPerson is a generic object that allows a multitude of external systems to import person based data into Customer Hub. All create, update, delete APIs are available for processing data. With this feature customers can move to standard import processing and move away from classic import.
- You need to have a license for Oracle Customer Data Management to use this feature.
Key Resources
See the Person task in the REST API for CX Sales and B2B Service guide.
Role Information
Data Stewards and CRM Administrators have the authority to access the import facility and all REST APIs for this hubPerson object.
View Participant Summarized Earnings Using REST API
Use the Incentive Compensation Summarized Earnings REST resource to view your summarized earnings. Participants and participant managers can use this resource to view their summarized earnings. As a manager, you can also use this resource to review summarized earnings for participants in your management hierarchy.
This REST resource can be useful to provide earnings visibility through additional channels other than traditional reporting. This resource can be used for a variety of use cases, including Oracle Digital Assistant chatbots, Oracle Visual Builder applications, or integrating information with other programs.
Steps to Enable
Review the REST service definition in the REST API guides, available from the Oracle Help Center > your apps service area of interest > REST API. If you're new to Oracle's REST services you may want to begin with the Quick Start section.
Key Resources
See the Incentive Compensation Summarized Earnings task in the REST API for CX Sales and B2B Service guide.
Role Information
- Incentive Compensation Participants
- Incentive Compensation Participant Managers
Support Bulk Estimated Compensation REST Service
The Estimated Compensation REST API now supports an asynchronous mode that launches a background job to process bulk records in one simulation and also aggregates the earnings across many records for a single simulation.
This feature lets you calculate estimations for deals by running estimated compensation asynchronously in bulk mode as a scheduled process, instead of doing it real-time.
Steps to Enable
Review the REST service definition in the REST API guides, available from the Oracle Help Center > your apps service area of interest > REST API. If you're new to Oracle's REST services you may want to begin with the Quick Start section.
Key Resources
See the Compensation Plans task in the REST API for CX Sales and B2B Service guide.
Use System Access Groups and Predefined Rules to Manage User Access to Account and Contact Data
You can use system access groups and predefined rules to support team-, territory-, and management-hierarchy-based access to account and contact data for your users. System access groups provide an alternative way to manage a user's access to account and contact data. There is a system access group to correspond to each of the standard job roles Oracle provides, and predefined object sharing rules assigned to each group provide the same access to account and contact data provided by the standard job roles.
You can also create access extension rules to extend the access provided by the predefined rules to related objects. The predefined object sharing rules associated with each system group are inactive by default.
Steps to Enable
System groups are active by default, but the predefined rules are inactive by default, so you must activate the rules before you can use them. The association between system groups and predefined rules is also disabled by default. So for each system group, you must also enable the predefined rules you want to apply to the group. Perform these steps:
- Navigate to the Access Groups page in the Sales and Service Access Management work area.
- From the List menu, select System Groups - Role to display all system access groups.
- Click the name of a system access group whose rules you want to enable.
- Click the Object Sharing Rules subtab. The predefined rules associated with the access group as part of the default security configuration have a Lock icon and the Predefined check box is selected.
- To enable each of the rules associated with this system group as part of the default security configuration, select the Enable check box for each rule.
- Click Save.
- Activate each of the predefined rules you enabled:
- Click the rule name link in the Name field.
- On the Edit Object Sharing Rule page, click the Active check box.
- From the Actions menu, click Save and Publish.
- Click Save and Close.
- On the Edit Access Group page, click Save and Close.
- Run the Perform Object Sharing Rule Assignment Processing scheduled process to ensure that the access group sharing rules for each object are assigned properly.
Key Resources
See the Access Groups chapter in the Securing CX Sales and B2B Service guide.
Role Information
- Setup user
You can export access group rules to a CSV file, allowing you to review and analyze the rules. You can export object sharing rules and group membership rules.
This feature lets you evaluate and filter the rule data offline.
Steps to Enable
You don't need to do anything to enable this feature.
Key Resources
See the Access Groups chapter in the Securing CX Sales and B2B Service guide.
Role Information
- Sales Administrator
Eliminate Generate Artifacts Step When Publishing Sandbox
You no longer need to manually generate artifacts to publish custom objects and attributes. After your customizations, when you publish the sandbox, the application automatically generates import and export artifacts.
Here are the key points:
- This enhancement makes the customization process simpler and faster.
- Users don't need to perform any manual steps to generate import and export artifacts.
- Generation of import and export artifacts is transparent to users.
- The application automatically generates artifacts as part of publishing sandboxes.
Steps to Enable
You don't need to do anything to enable this feature.
Key Resources
See the Import Custom Objects chapter in the Understanding Import and Export Management for CX Sales and B2B Service guide.
Quick Import Macros Enhance Validation for Standard and Custom Attributes
The import macros now automatically validate entries in both standard and custom fields for data type, character limit, and format mask. For example, the macro responds with an error when you enter more than the permitted 20 characters in the Stock Symbol field.
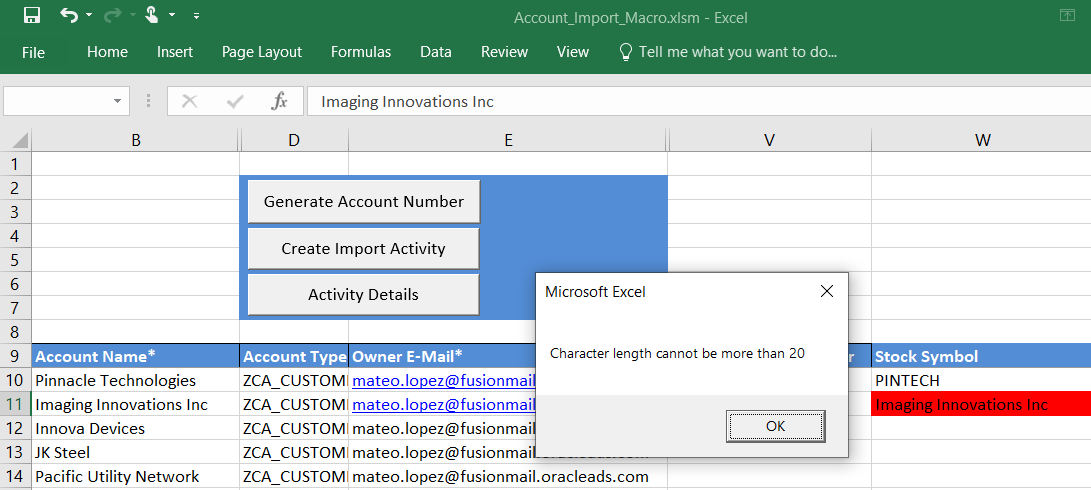
Quick Import Macro - Built-In Validation for Additional Attributes
Extended validation support eliminates common mistakes for faster data import and enhances the import experience.
Steps to Enable
Run the import macros per the instructions in the documentation. Ensure that the ucm.jar file is in the same folder as your Excel macro.
Tips And Considerations
The macro pulls in validations from the application when you fetch attributes from the server.
Key Resources
See the relevant chapters in the Getting Started with Your Sales Implementation guide.
Role Information
- Setup user
- Sales Administrator
Support for Inside Sales Role-Provisioning Rules
The application now creates additional role-provisioning rules for the Inside Sales Representative and Inside Sales Manager resource roles when you use Setup Assistant for your initial setup, or when you use the Create Company Information quick setup page in the Sales offering's Company Profile functional area. Role-provisioning rules automatically provision users with the security roles they need to do their jobs.
The automatic creation of the role-provisioning rules eliminates the manual setup of inside sales user role mappings.
Steps to Enable
For CRM-only implementations, the role-provisioning rules are created automatically when you set up the company information using the Setup Assistant or the Create Company Information quick setup page. This is a required step after enabling the Sales offering.
NOTE: You can only complete this setup once in a starter environment.
- Sign in to the application as a setup user.
- Go to the Setup and Maintenance work area and select the Sales offering.
- Select the Company Profile functional area.
- Click Quick Setup (gear icon) to go to the Create Company Information page.
- Enter the following information:
- Company Name
- Country (select from the list of values)
- Address Line 1
- Click Submit. A scheduled process is submitted and the job details are displayed.
- This action will automatically:
- Create the enterprise structure, including the legal entity, legal address and a business unit.
- Convert the initial user to a business user.
- Create the role provisioning rules for all predefined resource roles, including the inside sales roles, Inside Sales Representative and Inside Sales Manager.
- You can verify the role mappings from the Manage HCM Role Provisioning Rules task.
For cross-pillar deployments where you're using the setup provided by HCM to create the enterprise structure, you must create the role provisioning rules manually by doing these steps:
- From the Users and Security functional area in the Sales offering, launch the Manage HCM Role Provisioning Rules task.
- Enter the Inside Sales Manager as the Mapping Name.
- In the Conditions section, choose Active as the HR Assignment Status and Inside Sales Manager as the Resource Role.
- In the Associated Roles section, add the Inside Sales Manager application job role and the Resource job role.
- Save your changes.
- Repeat for all the other CRM resource roles.
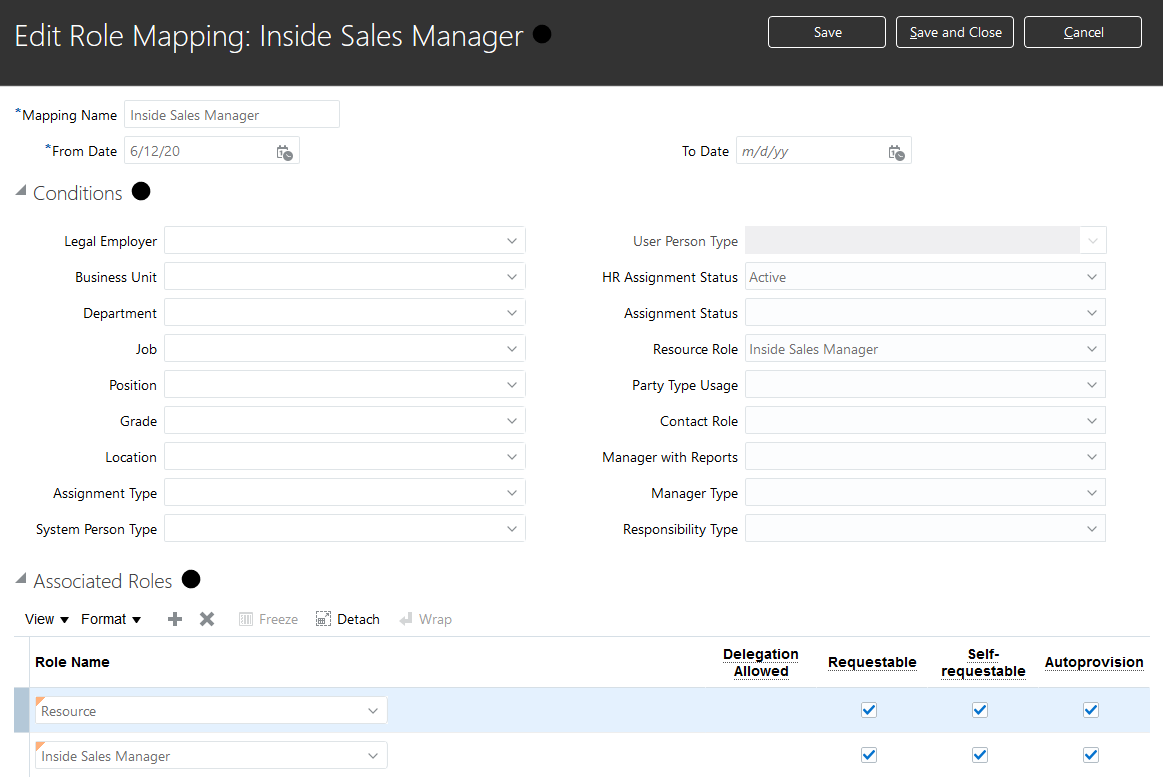
Inside Sales Manager Role Mapping
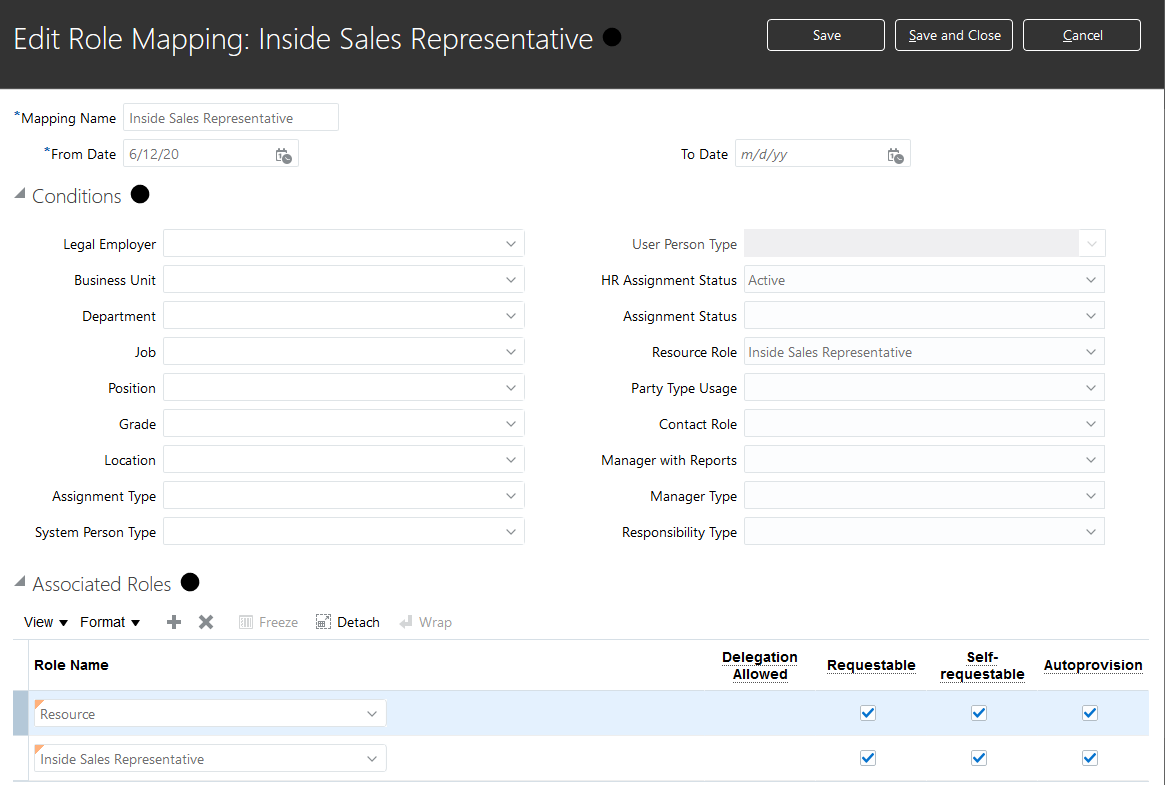
Inside Sales Representative Role Mapping
Key Resources
For information on running the Setup Assistant, see the Getting Started with Your Sales Implementation guide. For role setup information, see the Securing CX Sales and B2B Service guide.
Role Information
- Setup user
IMPORTANT Actions and Considerations
Take Advantage of Superior Performance of Global Search Powered by Adaptive Search
Oracle is switching global search to use Global Search Powered by Adaptive Search. All customers are required to make the switch in Update 21A. In the current release, Oracle is providing a new global search configuration that permits you to take advantage of the superior performance of the new technology right away.
Key Resources
New customers should see the "Workspace and Adaptive Search" chapter in the Getting Started with Your Sales Implementation guide.
Existing customers should refer to the "Search" chapter in the Implementing Sales guide.
Impact of Adobe Flash Player Desupport on Object Workflow Business Processes
Adobe has announced that they will no longer support Flash Player after December 31, 2020, and all supported browsers for CX Sales will disable the Flash Player by that date. As a result, the Oracle Business Process Management (BPM) component in Application Composer will fail to render, preventing you from creating and updating object workflow approval flows. Existing approval flows aren't impacted, however, and will continue to work as designed.
Oracle expects to release an alternative BPM Composer with Update 21B. This new BPM Composer will also be available as an exception update to address the issue in updates 20D and 21A by the end of January 2021. (Target updates and dates are subject to change.)
Steps to Enable
The desupport of Flash Player will happen automatically on December 31, 2020. After this date, you won't be able to create and update approval flows in Application Composer, on the Business Processes page.
Currently deployed approval flows will not be impacted and will continue to process transactions as designed.
Key Resources
Refer to the Adobe Flash Player End of Life announcement for more information. Oracle will provide additional notifications regarding timing and availability of the new BPM Composer.
If you have an urgent requirement to create and update object workflow approval flows before the replacement feature is available, please undertake these changes prior to your browser no longer supporting Flash Player. If changes are needed after Flash Player is no longer supported by your browser, and before the replacement feature is available, please contact Oracle Support for assistance.
POST-UPDATE TASKS
Update Application Composer Customization to the Latest Enhanced Behavior
During your upgrade, most existing customizations made in Application Composer are automatically updated to the latest enhanced behavior in the new release. However, there are a few exceptions that require you to manually initiate the upgrade script for each of those customizations.
NOTE: Some upgrade tasks will not be removed from this page even after the upgrade is completed, as they are re-runnable for certain feature enhancements that are expected in future releases.
Steps to Enable
You must sign in as a user with an administrator role to perform these steps.
IMPORTANT: Do not perform these steps when there are pending changes in an active sandbox. Be sure to save and publish sandboxes with any changes you want to keep before proceeding, and delete any sandboxes that you do not intend to publish.
- Sign into the application.
- From the Navigator, select Sandboxes (under Configuration).
- Create a new sandbox and set it as the active sandbox. The current active sandbox displays at the top of the application.

- Go to: Navigator > Application Composer (under Configuration).
- From the Application drop-down list, select the first application whose metadata you want to upgrade, such as Common or Sales.
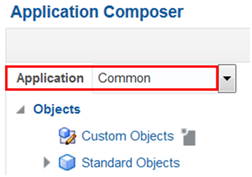
NOTE: You need to upgrade the existing customization metadata for each application separately.
- From the navigation tree on the left, under Common Setup, click Metadata Manager.
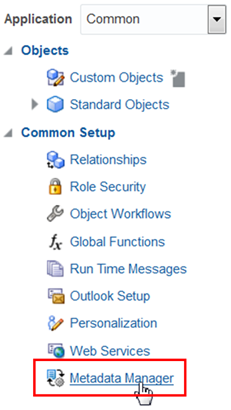
- Click Metadata Upgrade.
- By default, the list displays the "Not Started" upgrade items that you need to manually upgrade. Highlight the first row in the list, and then click the Upgrade button.

- Click OK in the confirmation dialog box. This process may take a couple of minutes. When the upgrade is done, the dialog box will close and the Upgrade Completed column will be checked.

- Repeat steps 7-8 for each row in the list.
- Repeat steps 4-8 for each application in the Application drop-down list in Application Composer.
- Publish the sandbox.
After the processes have completed, the application is ready to use.
Key Resources
Read Prepare for Your Quarterly Update (Doc ID 2445338.1) on My Oracle Support to learn how to prepare for and validate your quarterly update