
- Revision History
- Overview
- Update Tasks
- Optional Uptake of New Features (Opt In)
- Feature Summary
- Engagement-Pre 21D
- CX Foundation
- Customer Data Management
- Sales Force Automation
-
- Workspace and Adaptive Search
- Sales Data Insights
- Leads
- Opportunities
- Sales Catalog
- Quotes and Orders
- User Context
- Sales Assistant
- Intelligent Advisor
-
- Intelligent Advisor Connector Performance Enhancement for Contact and Opportunity
- Authorization Headers on Interview Extension Data Connection Requests
- Enhanced Intelligent Advisor Integration with Oracle Digital Assistant
- Share Rates and Rules Across Projects Via Independent Decision Services
- Enhanced Configurability Using Interview Extensions
-
- Enterprise Contracts
- Sales for Microsoft 365
- CX Sales Mobile
- Partner Relationship Management
- Sales Performance Management
- Sales Analytics
-
-
-
- View Team and Individual User Adoption Metrics in Application Usage Insights
- View Channel Usage and Expanded Record Metrics in Application Usage Insights
- Use Business Intelligence Cloud Connector View Objects for Incentive Compensation, Performance, and Earnings Reporting
- View Accurate Usage Time in User Adoption
- View Reporting Performance in User Adoption Reporting
-
-
- B2B Service
-
- Service Request Management
-
- Define Data Security Policies Based on Access Groups
- Permit SR Contacts that are not Related to the Primary SR Account
- Follow Service Requests to Receive Notifications
- Run Processes Through Action Plans
- Add All Contacts and Team Members to the SR Message Recipients
- View Images and Logos Inline in Inbound Emails
- Override Coverage Time Zone on a Milestone Using the Time Zone of the Assigned To Resource
-
- Knowledge Management
- Digital Customer Service
- Field Service Integration
- Service Request Management
- Import and Export and REST APIs
-
-
-
- Verify Email and Phone Data Using REST APIs
- Verify Email IDs and Phone Numbers Using a REST API
- Get the Top-Level Account Using a REST API
- Support Customer Contact Profile in Import and Export Management
- Import Contract Header and Line Translations
- Improve Performance in High-Volume Import for Accounts, Contacts, and Households
- Use Customer Contact Profile with a REST Resource
- View Participant Summarized Credits Using a REST API
- Report on Latest Estimated Compensation by User-Defined Simulation Name
- View Participant Summarized Team Credits Using a REST API
- Use REST API to View Participant Summarized Earnings Per Interval
- Update Currency Conversion Rates using File Based Import
-
-
- Application Composer
- Security
- IMPORTANT Actions and Considerations
This document will continue to evolve as existing sections change and new information is added. All updates appear in the following table:
| Date | Product | Feature | Notes |
|---|---|---|---|
| 23 JUNE 2021 |
Opportunities | Updated document. Revised feature information. |
|
| 23 JUNE 2021 |
Leads | Updated document. Revised feature information. |
|
| 23 JUNE 2021 | Incentive Compensation | Updated document. Revised feature information. |
|
| 28 MAY 2021 |
Quotes and Orders | Updated document. Revised feature information. |
|
| 28 MAY 2021 |
Sales Catalog | Updated document. Revised feature information. |
|
| 28 MAY 2021 |
CX Sales Mobile | Configure the Appointments List Page and Add Custom Fields in All List Pages |
Delivered new features in update 21B. |
| 28 MAY 2021 |
CX Foundation | Configure Address, Email, and Phone Verification Services Using a Quick Setup Page |
Updated document. Revised feature information. |
| 28 MAY 2021 |
CX Foundation |
See Immediately Whether Email and Phone Numbers are Valid for Accounts and Contacts |
Updated document. Revised feature information. |
| 28 MAY 2021 |
Territory Management | Updated document. Revised feature information. |
|
| 28 MAY 2021 | User Context | Updated document. Revised feature information. |
|
| 30 APRIL 2021 |
Digital Customer Service | Collect Additional Contact Information during Self-Service Registration |
Updated document. Revised feature information. |
| 30 APRIL 2021 |
Service Request Management | Updated document. Revised feature information. |
|
| 30 APRIL 2021 |
Quotes and Orders | Make Quotes Active in Sales without Navigating to Oracle CPQ |
Updated document. Revised feature information. |
| 30 APRIL 2021 |
Sales Analytics | Updated document. Revised feature information. |
|
| 30 APRIL 2021 | CX Sales Mobile | Use a New OnEdit Script Event, Add a Scanned Serial Number to a Custom Field, and Conditionally Show or Hide Actions | Updated document. Revised feature information. |
| 26 MAR 2021 | Security | Use System Access Groups with an Expanded Set of Predefined Rules | Updated document. Revised feature information. |
| 26 MAR 2021 |
Enable Reporting for Sales Product Information Master |
Removed feature from Update 21B. |
|
| 19 MAR 2021 |
Created initial document. |
This guide outlines the information you need to know about new or improved functionality in this update.
GIVE US FEEDBACK
We welcome your comments and suggestions to improve the content. Please send us your feedback at oracle_fusion_applications_help_ww_grp@oracle.com.
This section gives you information to help you plan, deploy, and validate your update. We make frequent additions to this document, so don’t forget to check back and get the latest information before your update starts.
Use the following resources to prepare for, deploy, and validate your update:
-
Read Prepare for your Quarterly Update (Doc ID 2445338.1) on My Oracle Support to learn how to prepare for and validate your quarterly update.
-
Publish or delete any in-progress sandboxes. Read the Overview of Sandboxes topic in the Configuring and Extending Applications guide for more information.
-
Review the latest Known Issues and Update Documents for this release (Doc ID 1603154.1) on My Oracle Support.
-
Review Oracle CX Sales and B2B Service: Removed Features (Doc ID 2530879.1) on My Oracle Support.
-
Review the IMPORTANT Actions and Considerations in this document, to see what additional actions you may need to take after your update.
Optional Uptake of New Features (Opt In)
Oracle Cloud Applications delivers new updates every quarter. This means every three months you'll receive new functionality to help you efficiently and effectively manage your business. Some features are delivered Enabled meaning they are immediately available to end users. Other features are delivered Disabled meaning you have to take action to make available. Features delivered Disabled can be activated for end users by stepping through the following instructions using the following privileges:
- Review Applications Offering (ASM_REVIEW_APPLICATIONS_OFFERINGS_PRIV)
- Configure Oracle Fusion Applications Offering (ASM_CONFIGURE_OFFERING_PRIV)
Here’s how you opt in to new features:
- Click Navigator > My Enterprise > New Features.
- On the Features Overview page, select your offering to review new features specific to it. Or, you can leave the default selection All Enabled Offerings to review new features for all offerings.
- On the New Features tab, review the new features and check the opt-in status of the feature in the Enabled column. If a feature has already been enabled, you will see a check mark. Otherwise, you will see an icon to enable the feature.
- Click the icon in the Enabled column and complete the steps to enable the feature.
For more information and detailed instructions on opting in to new features for your offering, see Offering Configuration.
OPT IN EXPIRATION
Occasionally, features delivered Disabled via Opt In may be enabled automatically in a future update. This is known as an Opt In Expiration. If your cloud service has any Opt In Expirations you will see a related tab in this document. Click on that tab to see when the feature was originally delivered Disabled, and when the Opt In will expire, potentially automatically enabling the feature. You can also click here to see features with Opt In Expirations across all Oracle Cloud Applications.
Column Definitions:
Features Delivered Enabled
Report = New or modified, Oracle-delivered, ready to run reports.
UI or Process-Based: Small Scale = These UI or process-based features are typically comprised of minor field, validation, or program changes. Therefore, the potential impact to users is minimal.
UI or Process-Based: Larger Scale* = These UI or process-based features have more complex designs. Therefore, the potential impact to users is higher.
Features Delivered Disabled = Action is needed BEFORE these features can be used by END USERS. These features are delivered disabled and you choose if and when to enable them. For example, a) new or expanded BI subject areas need to first be incorporated into reports, b) Integration is required to utilize new web services, or c) features must be assigned to user roles before they can be accessed.
Accounts, Contacts, and Households
See Immediately Whether Email and Phone Numbers are Valid for Accounts and Contacts
Salespeople can now verify emails and phone numbers and see immediately if they're valid or not. On the account and contact pages, salespeople know immediately whether an email or phone number has been verified and the date it was last verified.
Email verification lets salespeople verify global email addresses in the applications. The verification status signifies:
- Valid: The email address was successfully verified.
- Partially-Valid: The email domain was valid, but the email account could not be verified.
- Invalid: The email address was not successfully verified.
- The verification request timed out before it could be completed.
Phone verification lets salespeople verify global phone numbers in the applications. The verification status signifies:
- Valid: The phone number was successfully verified.
- Invalid: The phone number was not successfully verified.
- The verification request timed out before it could be completed.
Invalid and partially-valid verifications show the date of the most recent verification.
Email addresses and phone numbers are entered when accounts and contacts are created. However, users may mistype the data or enter incorrect information, resulting in invalid data being entered into the system. With this new feature, emails and phone numbers are guaranteed to be verified. In addition, users can verify existing contacts and accounts to ensure email and phone numbers are still valid.
Steps to Enable
Use the Opt In UI to enable this feature. For instructions, refer to the Optional Uptake of New Features section of this document.
Offering: Sales
See the expanded setup steps in the next feature in this document, Configure Address, Email, and Phone Verification Services Using a Quick Setup Page.
Tips And Considerations
The email and phone verification services are available to customers who have purchased a new license for the Oracle Address, Email, and Phone Verification service starting in 2021. Existing customers who purchased the Address Verification Cloud Service can access the email and phone verification features after following the Opt In steps to enable the feature.
Key Resources
See this content:
- "Account Data Enrichment and Verification" chapter in the Getting Started with Your Sales Implementation guide.
- "Data Enrichment" section in the "Accounts and Contacts" chapter in the Implementing Sales guide.
-
Using Oracle Address, Email, and Phone Verification guide if you're a new customer using the Oracle Address, Email, and Phone Verification services.
Role Information
Access this feature using these predefined roles:
- Sales Administrator
- Sales VP
- Sales Manager
- Sales Representative
No new functional privileges are introduced for this feature.
Configure Address, Email, and Phone Verification Services Using a Quick Setup Page
Use the new Configure Verification Services quick setup page to enable Address, Email, and Phone Verification services. The Address Verification Service is enabled by default.
Note that you can access Email Verification and Phone Verification only if you have already purchased Address Verification.
When configuring this feature, you can set a verification threshold value to tell the application how many days to wait before showing the phone and email address verification status in the UI. For example, say a salesperson is working in Sales and you have set the verification threshold at 60. In this case, 60 days after the last valid verification was run, the UI shows:
- Verification status
- Verification date
- A Re-verify icon
- An Overwrite icon
Salespeople may want to overwrite the verification status if they know that a partially-valid email address is valid or if they know that a phone number is invalid.
Use the new quick setup page to configure all three verification services: Address, Email, and Phone.
Steps to Enable
To enable the verification service:
- Sign in as a sales administrator.
- In Setup and Maintenance, navigate to:
- Offering: Sales
- Functional Area: Data Quality Verification Services
- Quick Setup (under the Settings icon)
- On the Configure Verification Services page, select Email and Phone to enable email and phone verification.
- Specify the number of days before users see the Valid verification status. (Invalid or Partially-Valid verification statuses are shown immediately.)
For example, if a salesperson is working in Sales and you set the threshold to 60, then 60 days after the last valid verification was run, the UI renders, along with the email address and phone number, the Verification Status, Verification Date, a Re-verify icon, and an Overwrite icon on the Contact and Account Profile pages.
NOTE: If you want the status to show immediately in the UI, then set the threshold value to 0.
- Save your updates.
Tips And Considerations
Setting up this feature using the Quick Setup page is the equivalent of setting these profile options:
- Email Verification Service Enabled (ORA_ZCH_EMAIL_VERIFICATION)
- Phone Verification Service Enabled (ORA_ZCH_PHONE_VERIFICATION)
- Email Verification Service Enabled (ORA_ZCH_EMAIL_VERIFICATION)
- Phone and Email Status Validity (ORA_ZCH_PHONE_EMAIL_STATUS_VALIDITY)
Set the profile options using the Manage Administrator Profile Values task.
Key Resources
See this content:
-
"Account Data Enrichment and Verification" chapter in the Getting Started with Your Sales Implementation guide.
-
"Data Enrichment" section in the "Accounts and Contacts" chapter in the Implementing Sales guide.
-
Using Oracle Address, Email, and Phone Verification guide if you're a new customer using the Oracle Address, Email, and Phone Verification services.
Role Information
Access this feature using these predefined roles:
- Sales Administrator
- Sales VP
- Sales Manager
- Sales Representative
No new functional privileges are introduced for this feature.
Support Merge Requests for Account and Contact Records in Workspace
You can select similar account or contact records and submit a request to merge them as one account or contact record in Workspace. Consolidating and merging similar records helps ensure data integrity so that clean customer data is available to users.
Because multiple salespeople can create and update the same accounts and contacts, it's possible to have duplicate records in the application. You can create a merge request when you have duplicate records pointing to the same customer and you want to consolidate those records into one. Merging and resolving duplicate records ensures that clean customer data is available.
Steps to Enable
To enable the merge request action for the Account and Contact objects, set the profile option, Merge Request Enabled, to Yes.
Here are the steps:
- Sign in as a sales administrator.
- In Setup and Maintenance, navigate to:
- Offering: Sales
- Functional Area: Sales Foundation
- Task: Manage Administrator Profile Values
- Search for the profile option, Merge Request Enabled (ZCA_MERGE_REQUEST).
- Set the profile option to Yes.
- Click Save and Close.
Key Resources
- See the "Adaptive Search and Workspace" chapter in the Implementing Sales guide.
Role Information
- Sales Administrator
- Sales Representative
- Sales Manager
Manage Employee Resource Skills and Qualification Details
View and manage skill and qualification details of employee resources in the Resource Directory and in the Manage Resources task. The Skills tab content is now in two separate tabs: Skills and Qualifications. These tabs are hidden by default. You can display the tabs using a new profile option.
This feature lets users better manage information by segregating it across two tabs instead of just one. Also, this feature helps avoid cluttering of information that's not frequently used.
Steps to Enable
Use the Opt In UI to enable this feature. For instructions, refer to the Optional Uptake of New Features section of this document.
Offering: Sales
To set the profile option:
- Sign in as a sales administrator.
- In Setup and Maintenance, navigate to:
- Offering: Sales
- Functional Area: Sales Foundation
- Task: Manage Administrator Profile Values
- Search for the profile option, Skills Section in Resource Detail Page Enabled (ORA_HZ_RES_ENABLE_SKILLS).
- Set the profile option to Yes.
Key Resources
- See the "Sales Resources" chapter in the Implementing Sales guide.
Role Information
Sales Administrator
Validate Customer Data Management Setup
Validate that Customer Data Management configurations are consistent and complete. You can run the setup validation process to validate the setup options you selected in the Duplicate Resolution Options tab to ensure that they are logically consistent. You can then review the Rule Name and Recommendation columns for potential issues with the configurations, and view their resolutions.
Reduce implementation time and reduce unnecessary support engagements by providing programmatic analysis of the configuration. This feature helps ensure that dependent setups are properly executed and make logical sense as a whole.
Steps to Enable
Validate the Customer Data Management setup using the Validate Setup tab available in the Manage Customer Data Management Options task.
Tips And Considerations
Validate the Customer Data Management setup using the Validate Setup tab available in the Manage Customer Data Management Options task. Navigate to the screen in Setup and Maintenance work area using the following:
- Offering: Customer Data Management
- Functional Area: Customer Hub
- Task: Manage Customer Data Management Options
Key Resources
- See the "Duplicate Resolution Setup" chapter in the Implementing Customer Data Management for CX Sales and B2B Service guide.
Role Information
- Sales Administrator
- Master Data Management Application Administrator
- Application Implementation Consultant
Specify the Processing Option for Duplicate Resolution Requests
Control whether duplicate resolution requests created using the Create Resolution Request task are automatically processed or require a final data steward review before processing.
Duplicate resolution requests that were created using the Create Resolution Request task have an option to allow automatic processing or to require data steward review. This makes the feature consistent and also gives you the flexibility to choose the mode of processing.
Steps to Enable
You don't need to do anything to enable this feature.
Tips And Considerations
You specify this option in the Manage Customer Data Management Options page. In the Duplicate Resolution Control section, select Allow Processing Without Approval or Process Subject to Approval for the Data Steward Merge Handling configuration.
Key Resources
- See the "Duplicate Resolution Setup" chapter in the Implementing Customer Data Management for CX Sales and B2B Service guide.
Role Information
- Sales Administrator
- Master Data Management Application Administrator
- Application Implementation Consultant
View Search Results in Groups in Workspace
Workspace supports the display of search results in groups based on specific fields on the object or related objects. Users get an overview of the number of records in each Grouped By grouping, and they can search and filter records within these groupings. Users can also view aggregates such as count, average, and sum of values on the records of each group.
This feature helps users view data in a more understandable and relevant way, For example, salespeople can view opportunities in various stages of the pipeline. In addition, salespeople can view data aggregates for each group, such as grouping opportunities by month and viewing the total revenue in each month.
Steps to Enable
This feature is disabled by default. To enable this feature:
- Sign in to the application as a sales administrator or a setup user.
- In the Setup and Maintenance work area, open the Configure Adaptive Search task.
- On the Configure Adaptive Search page, click the Parameters tab.
- Click Edit to enable edit mode on the page.
- Update the value Enable Group By in Workspace to Y.
- Click Save.
Key Resources
- See the "Adaptive Search and Workspace" chapter in the Implementing Sales guide and the "Workspace" chapter in the Using Sales guide.
Role Information
- Sales Administrator
- Sales Manager
- Sales Representative
View Account Engagement Level from Sales Data Insights
Sales representatives, managers, and leaders can view an objective understanding of the engagement level of accounts based on detailed analysis of account interaction and historical exchanges.
Sales representatives, managers, and leaders can view an objective understanding of the engagement level of accounts based on detailed analysis of account interaction and historical exchanges. They can view at a glance which accounts have high, moderate, or low engagement and this helps them plan and prioritize the next set of actions. Knowing which accounts to target for the next sales outreach allows them to create more leads and increase the pipeline.
Steps to Enable
Use the Opt In UI to enable this feature. For instructions, refer to the Optional Uptake of New Features section of this document.
Offering: Sales No Longer Optional From: Update 22B
Tips And Considerations
Before you opt-in to this feature, you must:
- Navigate to My Enterprise > Enterprise.
- Click the Manage Promotion Code link.
- Click Enter Promotion Code. To get a promo code, read the post on Sales Insights Early Adopter access in the Sales forum on Oracle Customer Connect or raise a service request on My Oracle Support.
- Enter the promotion code for this feature. A new entry called Sales Insights will be added.
- Click Done.
After you're done with the above steps, then:
- Navigate to Setup and Maintenance by clicking the Setup and Maintenance link under your user name in the global header.
- Select the Sales Offering.
- Click Change Feature Opt-In.
- For the Sales root node, click the edit icon.
- Find the feature, Sales Insights, and select the Enable check box.
- Click Done.
Next, you must schedule Sales Insights data processes. The instructions to schedule the jobs are here: Submit Processes.
Once you have reviewed the steps, you can proceed with scheduling these Sales Insights processing jobs to run on a periodic basis:
| Step | Job Name |
Recommended Frequency |
| 1 |
Generate Sales Insight Metrics |
Once a week |
| 2 |
Generate Sales Insight Facts |
Once a week |
| 3 |
Purge Redundant Sales Insight Facts |
Once a month |
Ensure that you have performed the steps to display the Sales Insights section using Application Composer. See the section "Enable Sales Insights for Custom Layouts" here.
NOTE: If you enable this feature for Accounts, then the Sales Insights feature is automatically enabled for Leads and Opportunities.
Key Resources
- For information on using Sales Insights, see the "Sales Insights" chapter in the Using Sales guide.
- For setup information, see the "Sales Insights" chapter in the Implementing Sales guide.
Role Information
- Sales Administrator
Optimize Lead Nurturing Through Sales Data Insights on Leads
You can improve your sales effectiveness by receiving key data insights on lead tracking activities. Using data analytics and mining, this feature seeks any discrepancies in activities based on historical data to deliver key insights on leads to optimize the nurturing process.
Key sales metrics are readily available to salespeople to help them focus on those lead records that need attention.
Steps to Enable
Use the Opt In UI to enable this feature. For instructions, refer to the Optional Uptake of New Features section of this document.
Offering: Sales No Longer Optional From: Update 22B
Tips And Considerations
Before you opt-in to this feature, you must:
- Navigate to My Enterprise > Enterprise.
- Click the Manage Promotion Code link.
- Click Enter Promotion Code. To get a promo code, read the post on Sales Insights Early Adopter access in the Sales forum on Oracle Customer Connect or raise a service request on My Oracle Support.
- Enter the promotion code for this feature. A new entry called Sales Insights will be added.
- Click Done.
After you're done with the above steps, then:
- Navigate to Setup and Maintenance by clicking the Setup and Maintenance link under your user name in the global header.
- Select the Sales Offering.
- Click Change Feature Opt-In.
- For the Sales root node, click the edit icon.
- Find the feature, Sales Insights, and select the Enable check box.
- Click Done.
Next, you must schedule Sales Insights data processes. The instructions to schedule the jobs are here: Submit Processes.
Once you have reviewed the steps, you can proceed with scheduling these Sales Insights processing jobs to run on a periodic basis:
| Step | Job Name |
Recommended Frequency |
| 1 |
Generate Sales Insight Metrics |
Once a week |
| 2 |
Generate Sales Insight Facts |
Once a week |
| 3 |
Generate Sales Insight Facts Using Signals |
Daily |
| 4 |
Purge Redundant Sales Insight Facts |
Once a month |
Ensure that you have performed the steps to display the Sales Insights section using Application Composer. See the section "Enable Sales Insights for Custom Layouts" here.
NOTE: If you enable this feature for Leads, then the Sales Insights feature is automatically enabled for Accounts and Opportunities.
Key Resources
- For information on using Sales Insights, see the "Sales Insights" chapter in the Using Sales guide.
- For setup information, see the "Sales Insights" chapter in the Implementing Sales guide.
Role Information
- System Administrator
- Sales Representative
Optimize Deal Execution Through Sales Data Insights on Opportunities
You can improve your sales effectiveness by receiving key data insights on opportunity activities. Using data analytics and mining, this feature seeks any discrepancies in activities based on historical data to deliver key insights to optimize your sales pipeline.
Key sales metrics are readily available to salespeople to help them focus on those opportunity records that need attention.
Steps to Enable
Use the Opt In UI to enable this feature. For instructions, refer to the Optional Uptake of New Features section of this document.
Offering: Sales No Longer Optional From: Update 22B
Tips And Considerations
Before you opt-in to this feature, you must:
- Navigate to My Enterprise > Enterprise.
- Click the Manage Promotion Code link.
- Click Enter Promotion Code. To get a promo code, read the post on Sales Insights Early Adopter access in the Sales forum on Oracle Customer Connect or raise a service request on My Oracle Support.
- Enter the promotion code for this feature. A new entry called Sales Insights will be added.
- Click Done.
After you're done with the above steps, then:
- Navigate to Setup and Maintenance by clicking the Setup and Maintenance link under your user name in the global header.
- Select the Sales Offering.
- Click Change Feature Opt-In.
- For the Sales root node, click the edit icon.
- Find the feature, Sales Insights, and select the Enable check box.
- Click Done.
Next, you must schedule Sales Insights data processes. The instructions to schedule the jobs are here: Submit Processes.
Once you have reviewed the steps, you can proceed with scheduling these Sales Insights processing jobs to run on a periodic basis:
| Step | Job Name |
Recommended Frequency |
| 1 |
Generate Sales Insight Metrics |
Once a week |
| 2 |
Generate Sales Insight Facts |
Once a week |
| 3 |
Generate Sales Insight Facts Using Signals |
Daily |
| 4 |
Purge Redundant Sales Insight Facts |
Once month |
Ensure that you have performed the steps to display the Sales Insights section using Application Composer. See the section "Enable Sales Insights for Custom Layouts" here.
NOTE: If you enable this feature for Opportunities, then the Sales Insights feature is automatically enabled for Accounts and Leads.
Key Resources
- For information on using Sales Insights, see the "Sales Insights" chapter in the Using Sales guide.
- For setup information, see the "Sales Insights" chapter in the Implementing Sales guide.
Role Information
- Sales Administrator
You can use the Delete action from the Workspace UI for leads. This action lets your sales teams delete irrelevant or old leads from the sales application.
Users can quickly discard leads that they no longer need directly from the Workspace Leads page.
Steps to Enable
You don't need to do anything to enable this feature.
Tips And Considerations
To disable or remove this action:
- In Application Composer, click Smart Actions, available under Common Setup.
- Find the action you want to disable (in this case Delete, under Leads), and click the Enabled check box to clear the check box.
Key Resources
- For information on using Workspace, see the "Workspace" chapter in the Using Sales guide.
- For setup information, see the "Adaptive Search and Workspace" chapter in the Implementing Sales guide.
Role Information
- Sales Administrator
- Sales Representative
- Sales Manager
Extend Search Region and Results for Leads
You can extend the search and select dialog layout for leads in your sales application. For example, use Application Composer to modify and set custom values to suit your requirements for the search parameters in the lead extensible reusable region.
This feature lets users find and select leads faster by using the most relevant fields when they search.
Steps to Enable
Leverage Application Composer to expose and adjust page layout and attributes. To learn more about extending your application using Application Composer, visit Oracle Help Center > your apps service area of interest > Books > Configuration and Extension.
Use these steps to extend the search region and results for your leads search:
- Ensure you're working in an active sandbox.
- Navigate to Configuration > Application Composer.
- Navigate to the Sales Lead > Application Pages > Reusable Regions section.
- In the Search Region, select the fields to appear in the search region.
- In the Search Results, select the fields to appear for the search results.
- Publish the sandbox according to your company's business requirements.
Tips And Considerations
Key Resources
- See the "Extend Leads and Campaigns" chapter in the Implementing Sales guide.
Role Information
- Sales Administrator
Redirect Users to Opportunity Page After Lead Conversion
Let your users choose whether they want to be redirected to the opportunity page after the successful conversion of a lead. This reduces the time spent going back and forth between opportunity and lead edit and list pages.
This feature reduces the time spent going to the Opportunities tab on the Lead details page and finding the right opportunity to open.
Steps to Enable
Leverage Application Composer to expose and adjust page layout and attributes. To learn more about extending your application using Application Composer, visit Oracle Help Center > your apps service area of interest > Books > Configuration and Extension.
Tips And Considerations
Use these steps to add the Redirect to Opportunity After Conversion check box:
- Ensure you're working in an active sandbox.
- Navigate to Configuration > Application Composer.
- Navigate to the Sales Lead > Application Pages > Lead Convert Page Layouts section.
- Duplicate the standard layout to create a new layout to edit.
- Click the Edit icon next to Lead Convert Page Layout.
- From the Configure Detail Form region, move the Redirect to Opportunity After Conversion field from the Available Fields area to the Selected Fields area.
- Publish the sandbox according to your company's business requirements.
Key Resources
- See the "Extend Leads and Campaigns" chapter in the Implementing Sales guide.
Role Information
- Sales Administrator
Extend Search Region and Results for Opportunities
You can extend the search and select dialog layout for opportunities in your sales application. For example, use Application Composer to modify and set custom values to suit your requirements for the search parameters in the opportunity extensible reusable region.
This feature lets users find and select opportunities faster by using the most relevant fields when searching.
Steps to Enable
Leverage Application Composer to expose and adjust page layout and attributes. To learn more about extending your application using Application Composer, visit Oracle Help Center > your apps service area of interest > Books > Configuration and Extension.
Use these steps to extend the search region and results for opportunity search:
- Ensure you're working in an active sandbox.
- Navigate to Configuration > Application Composer.
- Navigate to the Opportunity > Application Pages > Reusable Regions section.
- From the Search region, select the fields to appear in the search region.
- From the Search Results, select the fields to appear for the search results.
- Publish the sandbox according to your company's business requirements.
Key Resources
- See the "Extend Opportunities and Related Objects" chapter in the Implementing Sales guide.
Role Information
- Sales Administrator
Delete Opportunities from Workspace
You can use the Delete action from the Workspace UI for opportunities. This action lets your sales teams delete irrelevant or old opportunities from the sales application.
Users can quickly discard any irrelevant opportunities directly from the Workspace Opportunities UI.
Steps to Enable
You don't need to do anything to enable this feature.
Tips And Considerations
To disable or remove this action:
- In Application Composer, click Smart Actions, available under Common Setup.
- Find the action you want to disable (in this case Delete, under Opportunity), and click the Enabled check box to clear the check box.
Key Resources
- For information on using Workspace, see the "Workspace" chapter in the Using Sales guide.
- For setup information, see the "Adaptive Search and Workspace" chapter in the Implementing Sales guide.
Role Information
- Sales Administrator
- Sales Representative
- Sales Manager
Present Standalone Products for Pricing
You're no longer tied to the sales catalog product hierarchy when pricing products. You can configure pricing for standalone products in price books and then present these products in the catalog.
This functionality is supported in all interfaces, including in the UI, in REST APIs and in Import Management.
This feature lets Sales Administrators add prices for standalone products within a price book and lets users view these prices. By removing the need for products to be part of a product group hierarchy to configure and view pricing, you get greater application flexibility and easier configuration.
Steps to Enable
To set up default pricing for standalone products, which are products that are not part of a product group hierarchy:
- Add the standalone product in the Products page.
- Add default pricing to the product by either:
- Adding the product to a Price List with its default pricing; or
- Using the Configure Default Pricing Directly in the Product UI feature, add default pricing for the product in the Edit Product page.
- You don't need to go to the Manage Products Groups page to associate the product with a product group hierarchy in order to establish default pricing for it.
Key Resources
- See the "Products" chapter in the Implementing Sales guide.
Configure Default Pricing Directly in the Products UI
Default pricing for a product is now configurable directly in the Edit Product page. You're no longer required to navigate to a separate pricing administration page to configure default pricing. In addition to configuring default pricing in the Edit Product page, you can also use this feature in REST APIs and in Import and Export Management.
This feature enables an admin to configure both a product and its default pricing within a single view, therefore minimizing the need to navigate to a separate pricing view to configure default pricing. A unified UI for product and default pricing configuration means faster and more efficient product administration.
Steps to Enable
Enable the Default Pricing region in the Edit Product page using Application Composer:
- Ensure you're working in an active sandbox.
- Navigate to Configuration > Application Composer.
- Navigate to the Product object > Pages.
- Navigate to the Details Page Layout and create a new, custom layout.
- In the Products Details page layout, click Show in the Edit Default Pricing region.
- Publish the sandbox according to your company's business practices.
- Navigate to Edit Products in Sales > Products. The Default Pricing region should appear in the Edit Product UI.
Key Resources
- See the "Products" chapter in the Implementing Sales guide.
Support for Custom Inventory Item Status Codes
The application now supports custom Inventory Item Status Codes. Products are no longer required to have an Inventory Item Status Code of Active to be viewable and selectable in the sales application. Beginning with this release, for a product to be visible in the product catalog, it must only be marked as Eligible to Sell or Eligible to Service. The value of its Inventory Item Status Code is no longer a factor in determining if the product is visible. Previously, for the product to be visible, its Inventory Item Status Code had to equal Active and it had to be marked as Eligible to Sell or Eligible to Service.
This change applies to these flows:
- Add product to product catalog
- Add product to price book
- Add product to a transaction (for example, add a product to an opportunity or lead using the standard list of values or by browsing the catalog)
- Select product using custom product dynamic choice list
Customers can now use any value for Inventory Item Status Code applicable to their deployment, including custom values, and still see the product in their Oracle Sales deployment. As long as the product is marked as Eligible to Sell or Eligible to Service, it will be visible in Oracle Sales. This feature especially benefits customers using custom values for Inventory Item Status Code.
Steps to Enable
You don't need to do anything to enable this feature.
Tips And Considerations
To hide a product from being visible in the product catalog, unset its Eligible to Sell and Eligible to Service values.
Key Resources
- See the "Products" chapter in the Implementing Sales guide.
Role Information
- Sales Administrator
Make Quotes Active in Sales without Navigating to Oracle CPQ
Now salespeople can quickly make quotes active in sales without needing to navigate out to Oracle Configure, Price, and Quote (Oracle CPQ).
Salespeople can quickly update any quote from the Quotes and Orders tab of an opportunity and view the change to the revenue lines without navigation to Oracle CPQ when there is no change required to a quote. The active quote information is synchronized to the opportunity revenue lines and the pipeline forecast is updated.
Steps to Enable
Salespeople can activate a quote in the sales application only if you enable this profile option: Reconcile Revenue Lines from Quote Lines Enabled (ORA_MOO_REVN_RECONCILE_FROM_SO). Here are the steps to enable it:
- Navigate to Setup and Maintenance.
- Search for the task, Manage Administrator Profile Values.
- Click Manage Administrator Profile Values.
- Search for the profile option code, ORA_MOO_REVN_RECONCILE_FROM_SO. The default value is No.
- Change the profile option value of the Site field to Yes and save your changes.
- Sign in again for the changes to take effect. Salespeople can now change the status of a quote on the Quote and Orders tab of an opportunity.
Tips And Considerations
Understand the difference between roots and parts in Oracle CPQ as this impacts the revenue line synchronization behavior.
At the beginning of the implementation, between CX Sales and Oracle CPQ, you need to decide whether the revenue line synchronization from Oracle CPQ should be at the root level or the part level for roll up and display in opportunity revenue lines. The revenue line information is used for pipeline forecasting. The setup can be completed in the Manage Oracle CX Sales to Oracle CPQ Cloud Integration setup page.
Remember that the historical data will be lost if you change the part level to root level or vice versa after completing the setup. So before you set up, learn more about the two levels from the Oracle CPQ documentation, referred to in the Key Resources section.
Key Resources
- For more information on root and part levels, refer to these topics in the Oracle CPQ Administration Online Help.
- BOM Root Items Administration List Page
- BOM Item Tree Administration Page
- BOM Item Mapping Administration Pages
- For more information on integrating Oracle Sales and Oracle CPQ, see the Integrating CX Sales with Oracle CPQ guide.
Role Information
- Sales Administrator
Reconcile Revenue Lines from Quote Lines
When salespeople update a quote line for an active quote, the application automatically updates the opportunity revenue lines associated with that quote.
Salespeople can view the changes made on an active quote reflected on the opportunity revenue line immediately. This is especially useful when they have to activate previous quotes for customer negotiation and approval, without making any changes to the quote details. They don't have to navigate to Oracle CPQ either.
Steps to Enable
To reconcile the revenue lines from the quote lines and to show the price type on the revenue lines, you need to set these two profile options to Yes:
- Reconcile Revenue Lines from Quote Lines Enabled (ORA_MOO_REVN_RECONCILE_FROM_SO)
- Display Price Type on the Recurring Schedule page (ORA_MOO_REVN_RECUR_PRICETYPE).
Here are the steps to enable them:
- Navigate to Setup and Maintenance.
- Open the Search page and search for the task, Manage Administrator Profile Values.
- Click Manage Administrator Profile Values.
- On the page, search for the profile option code, ORA_MOO_REVN_RECONCILE_FROM_SO. The default value is No.
- Change the profile value of the Site level to Yes and save the changes.
- To display the price type on revenue lines, search for the profile option code, ORA_MOO_REVN_RECUR_PRICETYPE. The default value is No.
- Change the profile value of the Site level to Yes and save the changes.
- Sign in again for the changes to take effect.
Tips And Considerations
At the start of the implementation, between Oracle Sales and Oracle CPQ, decide whether the revenue line synchronization from Oracle CPQ should be at the root level or the part level for rollup and display in the opportunity revenue line. The revenue line information is used for pipeline forecasting.
Use the Manage Oracle CX Sales to Oracle CPQ Cloud Integration setup page to complete the setup and also map the fields of Oracle CPQ and CX Sales.
Remember that the historical data will be lost if you change the part level to root level or vice versa after completing the setup. So before you set up, learn more about the two levels from the Oracle CPQ documentation, referred to in the Key Resources section.
Key Resources
For more information on root and part levels, refer to these topics in the Oracle CPQ Administration Online Help:
- BOM Root Items Administration List Page
- BOM Item Tree Administration Page
- BOM Item Mapping Administration Pages
For more information on integrating Oracle Sales and Oracle CPQ, see the Integrating CX Sales with Oracle CPQ guide.
Role Information
- Sales Administrator
Search on More Quote and Revenue Attributes
Salespeople can now search on additional quote and revenue attributes, including:
- Recurring revenue
- Non-recurring revenue
- Usage revenue
These new attributes and more are available in the quote, quote line, and revenue line tables. You can also add these attributes to Workspace search.
Salespeople can add these predefined attributes: Nonrecurring Revenue, Recurring Revenue, Usage Revenue, and Price Type for opportunity revenue lines. Once you expose these attributes through Application Composer, they can be added to Workspace and salespeople can search these attributes using the standard search and filter capabilities of Workspace.
Steps to Enable
- Use Application Composer to expose the attributes.
- Add attributes to Workspace using the Configure Adaptive Search task in Setup and Maintenance.
Key Resources
- For information about how to use Application Composer, see the Configuring Applications Using Application Composer guide.
- For more information about Workspace setup, see the "Adaptive Search and Workspace" chapter in the Implementing Sales guide.
Role Information
- Sales Administrator
Resets the relevancy feed for Workspace users, using Smart List saved searches. Smart Lists are powered by User Context and are Intelligent lists that Oracle CX Sales generates for you on your behalf. These lists are created automatically based on your past and recent touches/actions in the system with relation to Accounts, Activities, Contacts, Leads, Opportunities, Partners, Products, Product Groups etc.
You can run the Age User Context Relevancy Feed scheduled process for a set of users and purge their user context data. Currently, you can run the job for a maximum of 10 users.
You can reset the relevancy feed for your Sales users at the end of a fiscal year and or sales cycle.
Steps to Enable
- Navigate to Tools > Scheduled Processes.
- Search for and run the Age User Context Relevancy Feed process.
When you run the scheduled process, you can enter a comma-separated list of users for whom you want to reset the relevancy feed.
Key Resources
- See the "Sales and B2B Service Scheduled Processes" chapter in the Understanding Scheduled Processes guide.
Role Information
- Sales Administrator
- Channel Administrator
- CRM Applications Administrator
- Partner Administrator
Use Auto-Updated User Context Relevancy Feed
Smart Lists Are Available to Users Without Any Setup
You can use smart lists without any additional setup. You no longer have to set profile options and run any processes to make Smart Lists available and the User Context Relevancy feed is auto-updated through scheduled ESS jobs.
Administrators no longer need to manually set profile options and run scheduled processes. The relevant items in Workspace Smart List saved searches are now auto-generated.
Steps to Enable
You don't need to do anything to enable this feature.
Tips And Considerations
The following scheduled processes required for Smart Lists are enabled with Workspace and are set by default:
- The Generate Relevancy Feed scheduled process specifies how often you want to run the process that identifies relevant data and refreshes smart lists: The scheduled process frequency is set to 3 hours.
- The Age User Context Relevancy Feed specifies how often to run the process that identifies aged data and removes it from smart lists. The goal is to remove items that are unchanged and no longer relevant. The scheduled process frequency is set to once daily.
Recommended Relevancy Score Calculation Settings – Set by Default
The recommended profile option settings for Smart Lists are already set in the application as default values and shipped with the product.
NOTE: These default settings overwrite your current settings. But, you can modify them if you need to.
The ZCA_UC_FEED_TIMEFRAME profile option is set to 1. Smart lists display a maximum of 50 relevant records per business object. If your users process large amounts of data, limit the time period used to identify relevant data to 1 day. Data is renewed every day to keep it relevant.
The ZCA_UC_MAX_USERS_IN_CHILD_JOB profile option is set to 20. Optimize performance by limiting the user records processed in a batch to 20. It improves processing so that users get relevant results faster and with greater efficiency.
Excluding Users from Relevancy Score Calculations
Relevancy feeds and scores influence a sales person’s user context and smart lists. It's possible that not all your users are salespeople and don't require relevancy score calculations to be run. To exclude users from score calculations, see the "Exclude Specific Users from Score Calculations" topic in the "Generate Relevancy and Age User Context Feeds for Workspace Smart Lists" section in the Implementing Sales guide.
Key Resources
- See the "Sales and B2B Service Scheduled Processes" chapter in the Understanding Scheduled Processes guide.
- Feature Kit on Smart Lists: https://cloudcustomerconnect.oracle.com/posts/1d8cf51d8f
Role Information
You can update the process schedule to suit your requirements. Ensure that you have one of the following roles required to configure and manage smart lists:
- Sales Administrator
- Channel Administrator
- CRM Applications Administrator
- Partner Administrator
Update Synonyms in Sales Assistant Common Configurations Tool
Use the new Oracle Sales Assistant Common Configurations tool to define and save synonyms for the Sales Assistant skill without having to manually change them in Oracle Digital Assistant. When adding custom fields or objects in the CX Sales Mobile and Microsoft Teams composers for the Sales Assistant, you need to update dynamic entities in the Sales Assistant skill so that the Sales Assistant is aware of the fields or objects and their synonyms.
NOTE: Oracle Sales Assistant Setup for Microsoft Teams is available only to an initial set of early adopters. If you're interested in becoming an early adopter, apply for access on the Sales Assistant forum on Oracle Cloud Customer Connect.
In the past, you had to make these changes in Oracle Digital Assistant itself, but now you can do them directly in the configuration tool. The configuration tool is available under Oracle Sales Assistant Setup in Application Composer.
Steps to Enable
Oracle Sales Assistant Setup for Microsoft Teams is available only to an initial set of early adopters. If you're interested in becoming an early adopter, apply for access on the Sales Assistant forum on Oracle Cloud Customer Connect.
Tips And Considerations
With the Sales Assistant Common Configurations tool, you can only configure the Sales skill from the skill store that matches your current Oracle Sales release. For example, let's say the skill you want to modify with a new synonym for a field or an object is from a previous Oracle Sales release. If you want to make changes to that skill using the Sales Assistant Common Configurations tool, then you must re-base it to the latest base version of the Sales skill from the skill store that matches the current Oracle Sales release. In addition, you must re-route the channel to the new re-based skill so that users can start using it and perform Reset sessions in the channel UI.
Role Information
- Sales Administrator
Intelligent Advisor Connector Performance Enhancement for Contact and Opportunity
The Intelligent Advisor connector has an enhanced performance option when mapping to the Contact and Opportunity objects.
Enabling this feature may improve speed when loading and saving interview data.
Steps to Enable
Use the Opt In UI to enable this feature. For instructions, refer to the Optional Uptake of New Features section of this document.
Offering: Multiple Offerings
You may need to change existing mappings in Policy Modeling after enabling this feature in your site profile options.
Authorization Headers on Interview Extension Data Connection Requests
In 21A monthly update 2, system integrators can now set Authorization headers on interview extension data connection requests.
This allows an existing user token known in the client to be passed through to a back-end API.
Steps to Enable
You don't need to do anything to enable this feature.
Tips And Considerations
To pass an Authorization header via the headers property in your fetch request, you need to leave the Use HTTP basic authentication check box unselected in your interview extension connection.
Key Resources
Role Information
- System Integrator
Enhanced Intelligent Advisor Integration with Oracle Digital Assistant
In 21A monthly update 2, the System.IntelligentAdvisor component in Digital Assistant has numerous enhancements.
The following features are now supported:
- Attachments on web channels
- Reference tags in explanations
- Display of images in toggle buttons in rich UI channels (except for Slack)
- Sliders in text channels
- Display values that don't match option values
Steps to Enable
You don't need to do anything to enable this feature.
Tips And Considerations
Integrating your skill with an Intelligent Advisor interview is a three-step process.
- Add an Intelligent Advisor service integration.
- (Optional but highly recommended) Create a "conversational" variation of the interview.
- Add a System.IntelligentAdvisor component to your skill's dialog flow.
Key Resources
- Integrate with Oracle Digital Assistant in the Intelligent Advisor Documentation Library
- Intelligent Advisor in the Using Oracle Digital Assistant guide
Role Information
- System Integrator
Share Rates and Rules Across Projects Via Independent Decision Services
References to Intelligent Advisor decision services can now be added from any Policy Modeling project to calculate certain data values. The decision service is called both when debugging and after the project is deployed.
This functionality allows business users to define shared lookup tables and rules in decision service projects for reuse in different Policy Modeling projects, without needing a desktop application install. The shared data and logic can then be instantly updated for multiple projects without redeploying them from Policy Modeling. Because decision services have clearly defined contracts, and those contracts can be made read-only to rule authors, the ability to allow non-experts to update reference data held in decision services is made a more reliable process. Runtime caching of rule results ensures high performance, particularly for projects with large volumes of reference data rules.
Steps to Enable
You don't need to do anything to enable this feature.
Tips And Considerations
A decision service reference is defined in Policy Modeling and is used to link a decision service to a Policy Modeling project. Authoring a reference involves mapping Policy Modeling attributes to the decision service inputs and outputs.
A Policy Modeling project using references can be tested in the usual ways using the Debugger and test cases, and the decision services will be invoked as required.
Key Resources
Role Information
- Hub Author - Creates the decision service in Intelligent Advisor Hub
- Manager - Deploys the decision service project
- Policy Modeling Author - Creates the project in Policy Modeling referencing the decision service
Enhanced Configurability Using Interview Extensions
Intelligent Advisor’s existing suite of interview extensions has been further extended to include progressive reveal of questions and custom event handling.
These features enable users to further tailor the look and feel to match their organization's brand, and confidently embed Intelligent Advisor interviews in larger experiences.
Steps to Enable
You don't need to do anything to enable this feature.
Tips And Considerations
The new customVisibility interview extension makes it possible to selectively hide interview controls. This is primarily intended for creating progressive reveal interviews, but potentially has other use cases. The new getValueText control object method returns the natural language text value for input controls. For example, you could use it to display the value text on the screen after a question has been answered.
An interview extension can also now send a custom event, and a customer using the JavaScript interview embedding API can receive these custom events and handle them as required in the interview.
Key Resources
For more information on hiding interview controls using interview extensions, see:
- customVisibility extension
- control object: kind, getLabelId() and getValueText()
- interview object: getControls()
For more information on triggering custom events in related applications, see:
- interview object: sendCustomEvent(event)
- JavaScript object parameters: onCustomEvent(event)
Role Information
- Interview designer
Improve Terms Library Search for Clauses and Rules
SEARCH CLAUSES
You can add these columns to your search results to filter the clauses on the Clauses page:
- Row - Displays the sequence number for the search results.
- Display Title - Displays the optional title defined in the Terms Library for a clause.
The Export to Excel action is available from the search results table to export your clauses for offline analysis.
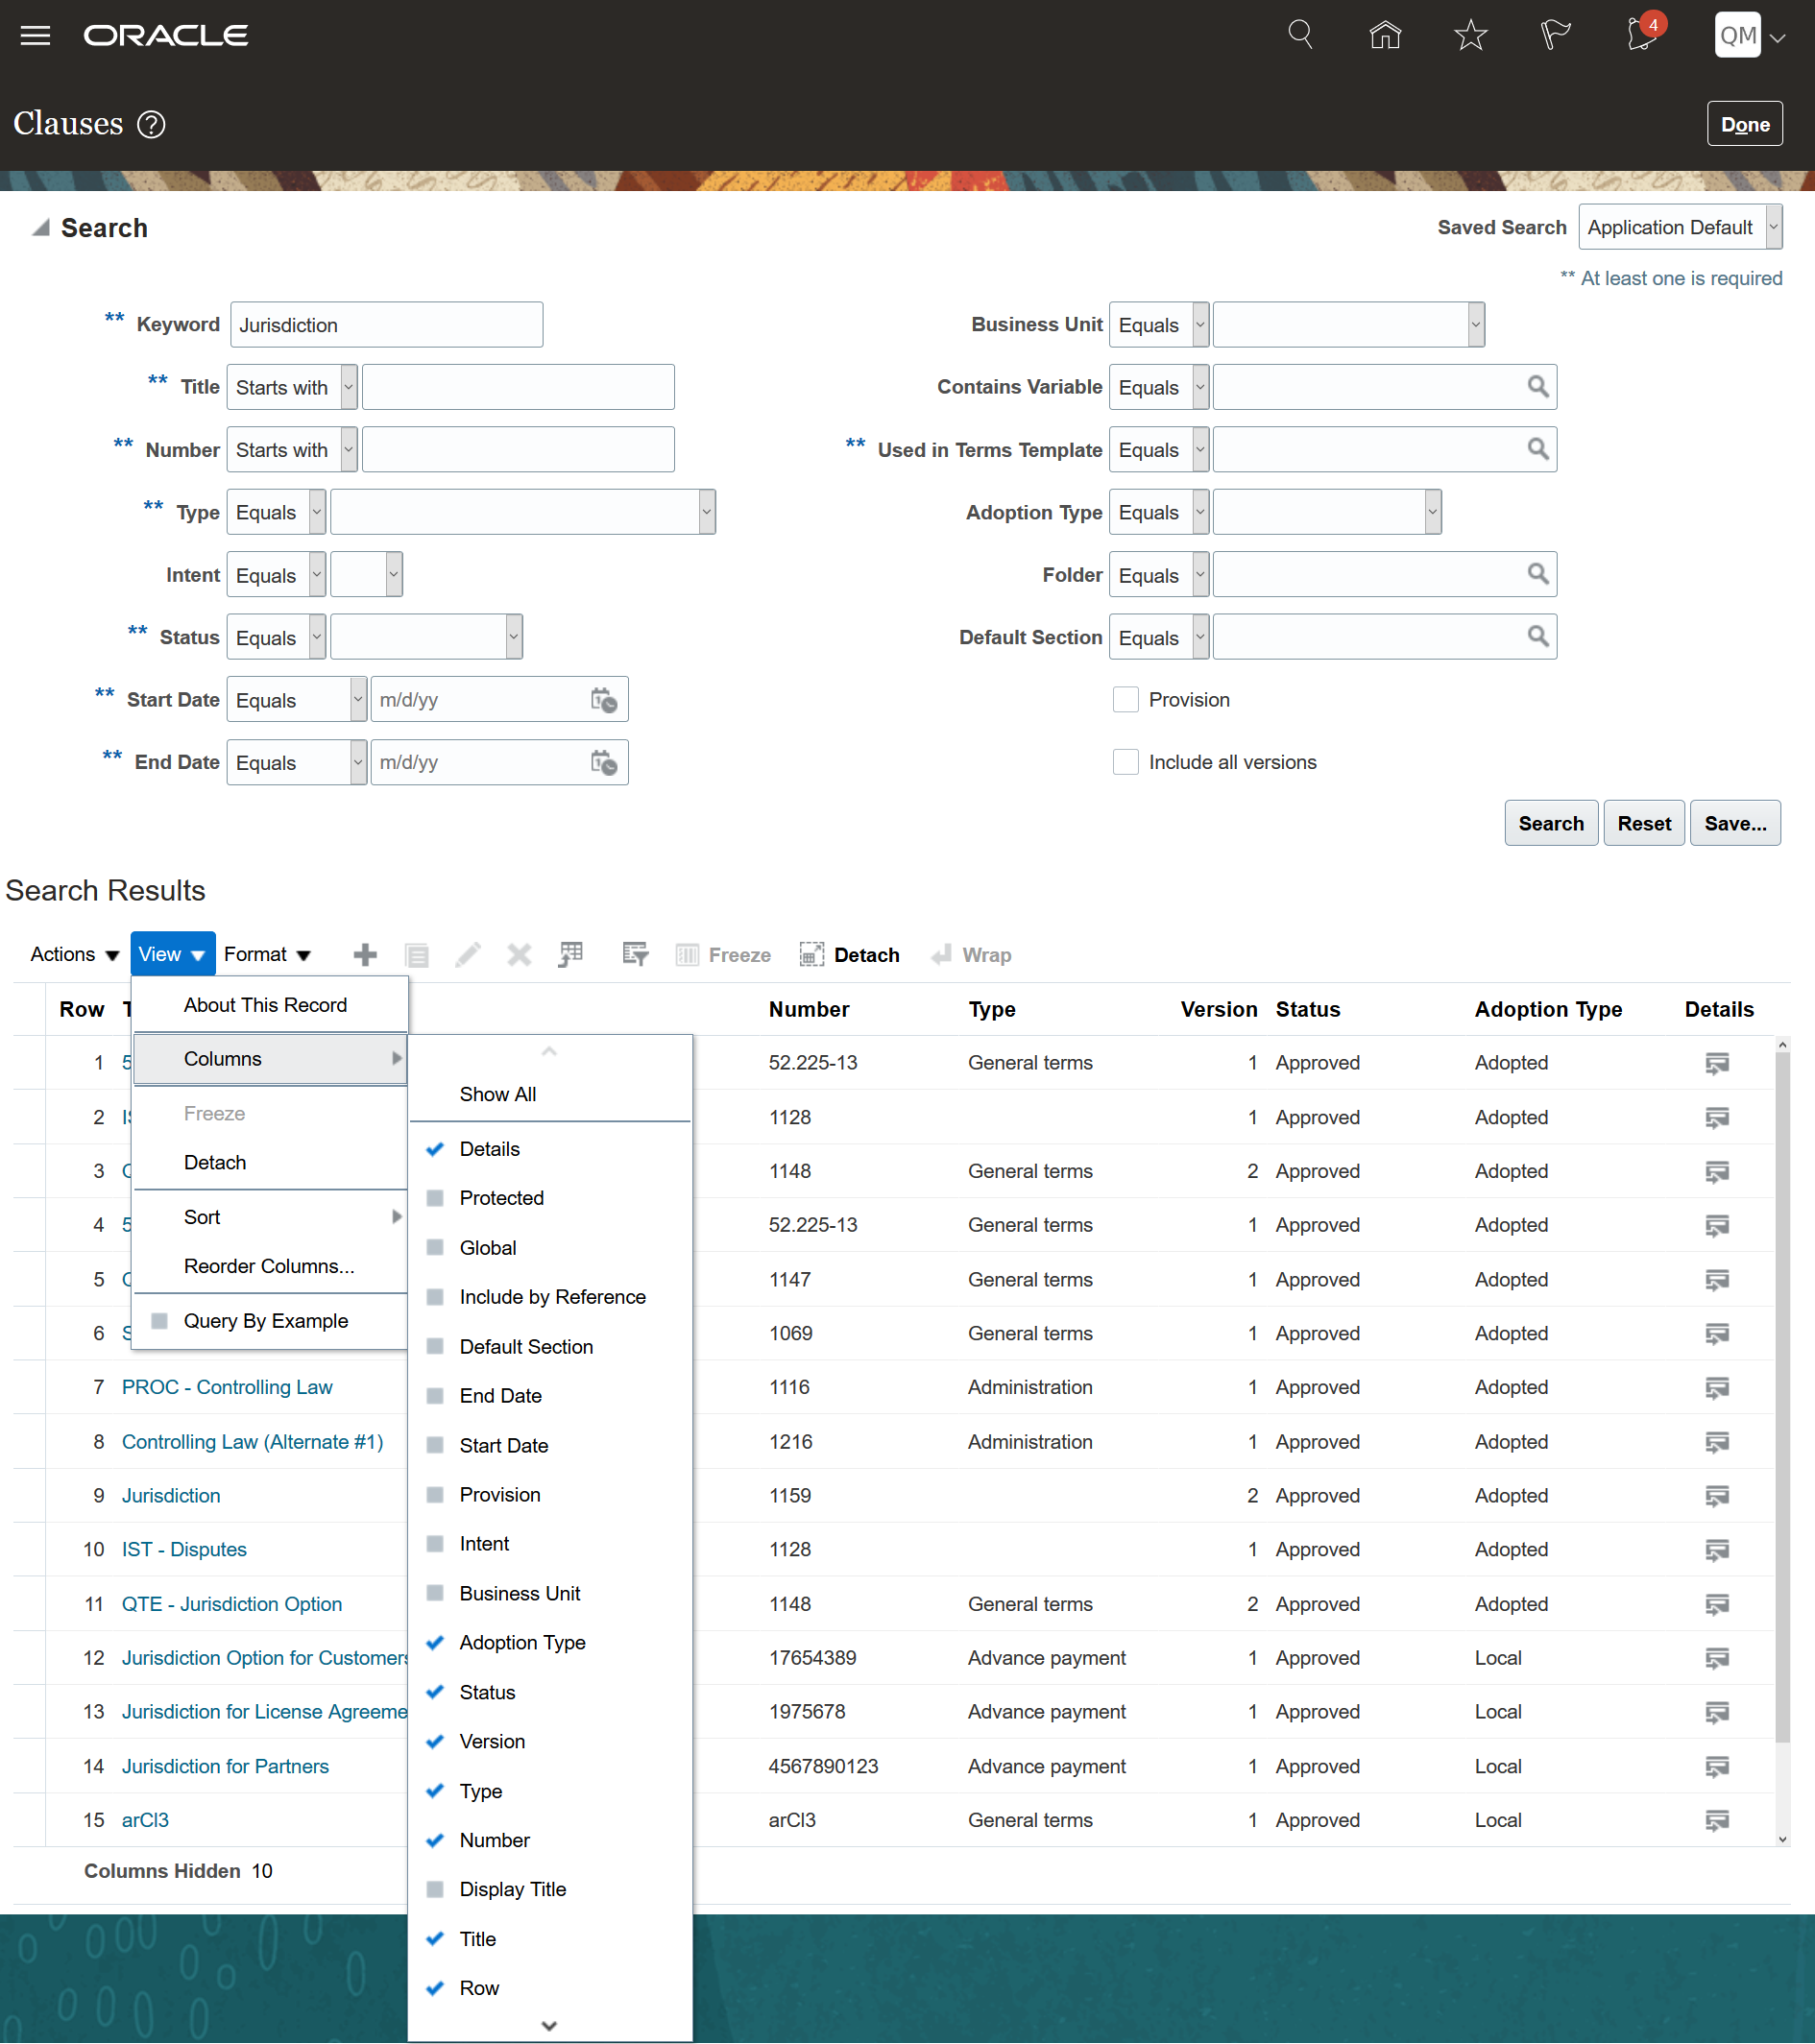
Search Clauses
SEARCH RULES
You can add these columns to your search results to filter the rules in the Rules page:
- Row - Displays the sequence number for the search results.
- Business Unit - Displays the business unit assigned to the rule in the Terms Library.
When you search for rules using the Used in Terms Template or Contains Clause field, the values you can select in either of these fields are limited based on the value you've selected in the Business Unit field.
The Export to Excel action is available from the search results table, to export your rules for offline analysis.
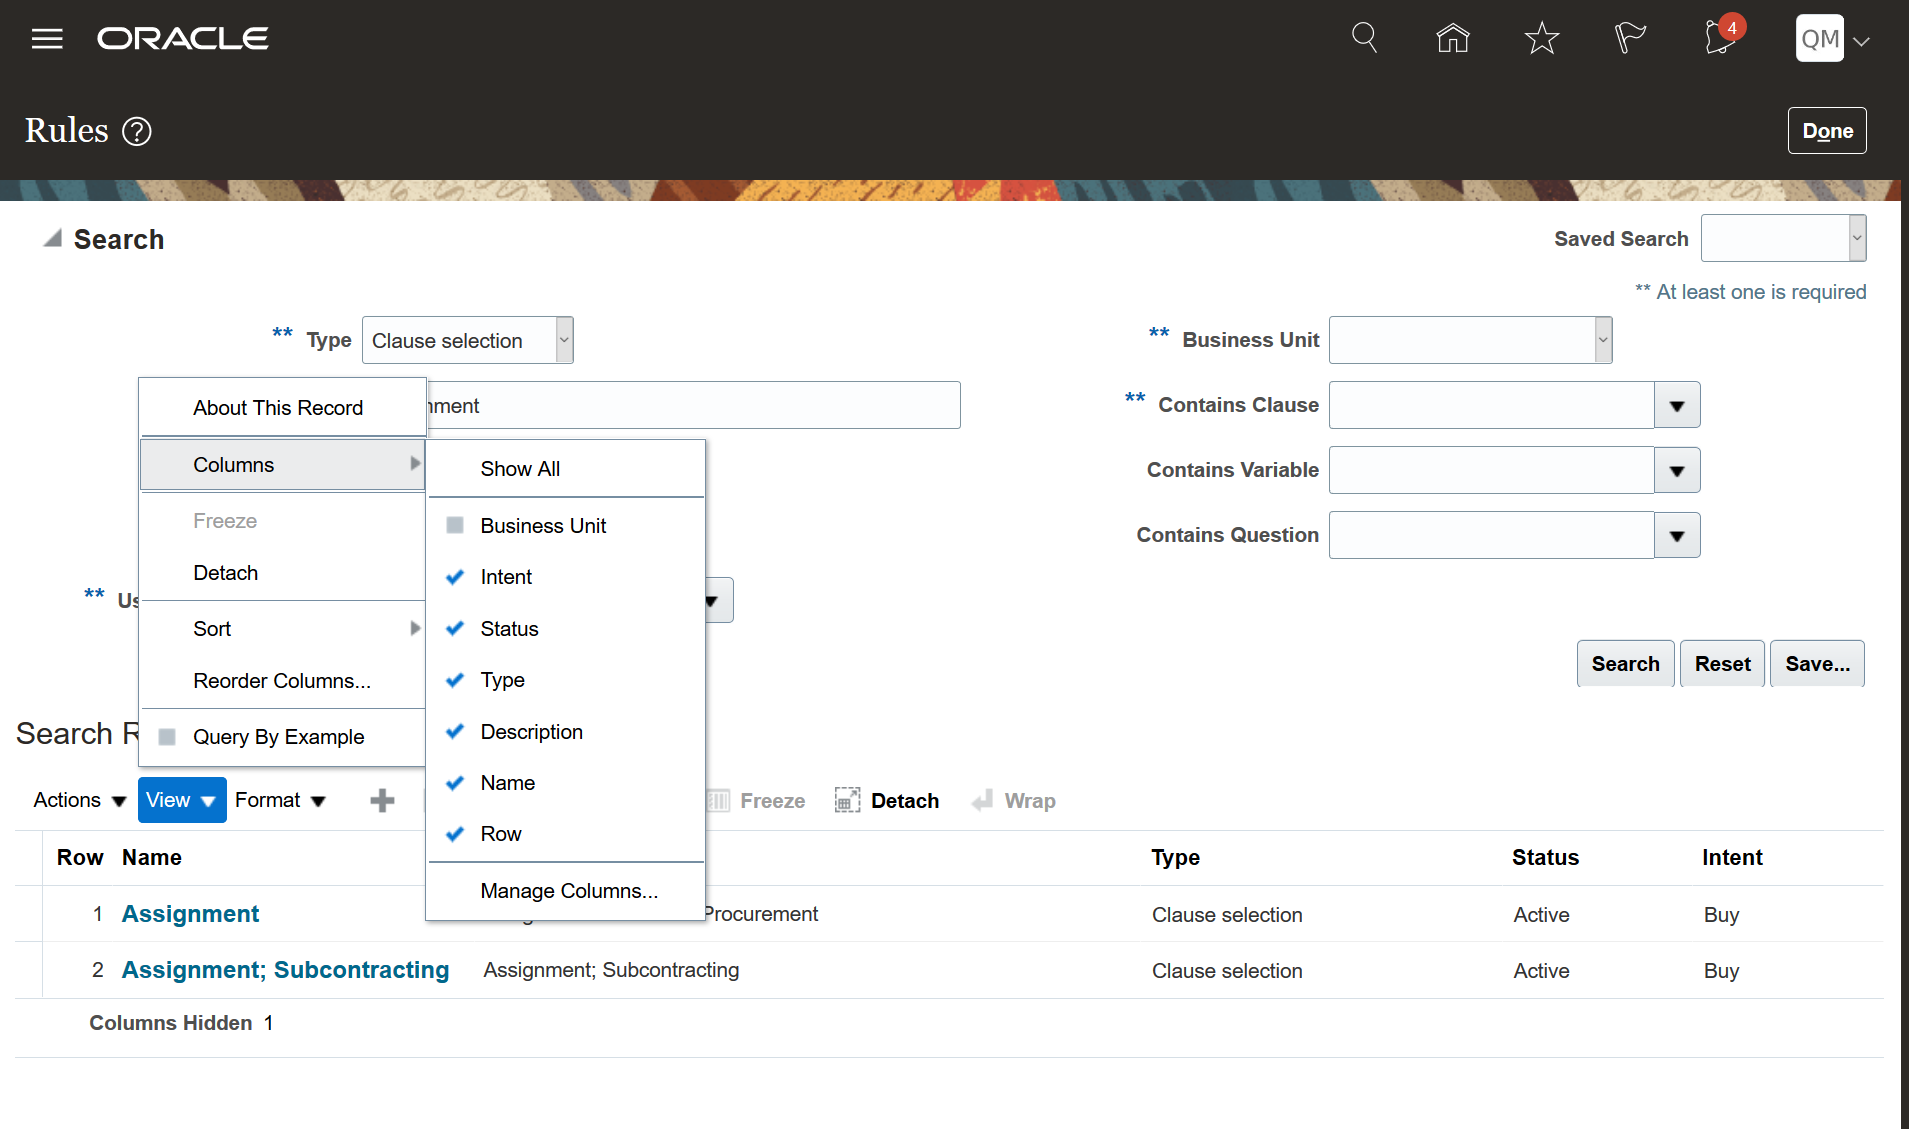
Search Rules
The usability improvements to the Terms Library Search Clauses and Search Rules pages help you find the clauses and rules that you need to review or modify.
Steps to Enable
You don't need to do anything to enable this feature.
Key Resources
- See the Using Customer Contracts guide.
Use Cross-References Between Nonstandard Clauses
You can define cross-references in the contract terms to refer to other clauses in the document from another clause. You can now set up these cross-references between nonstandard clauses, in addition to standard clauses defined in the Terms Library. References are often applicable when the legal language in a clause refers to terms described in another clause from the same document. When you update a contract document by either moving a clause or inserting a new clause, the application automatically updates the cross-reference used in the clause text.
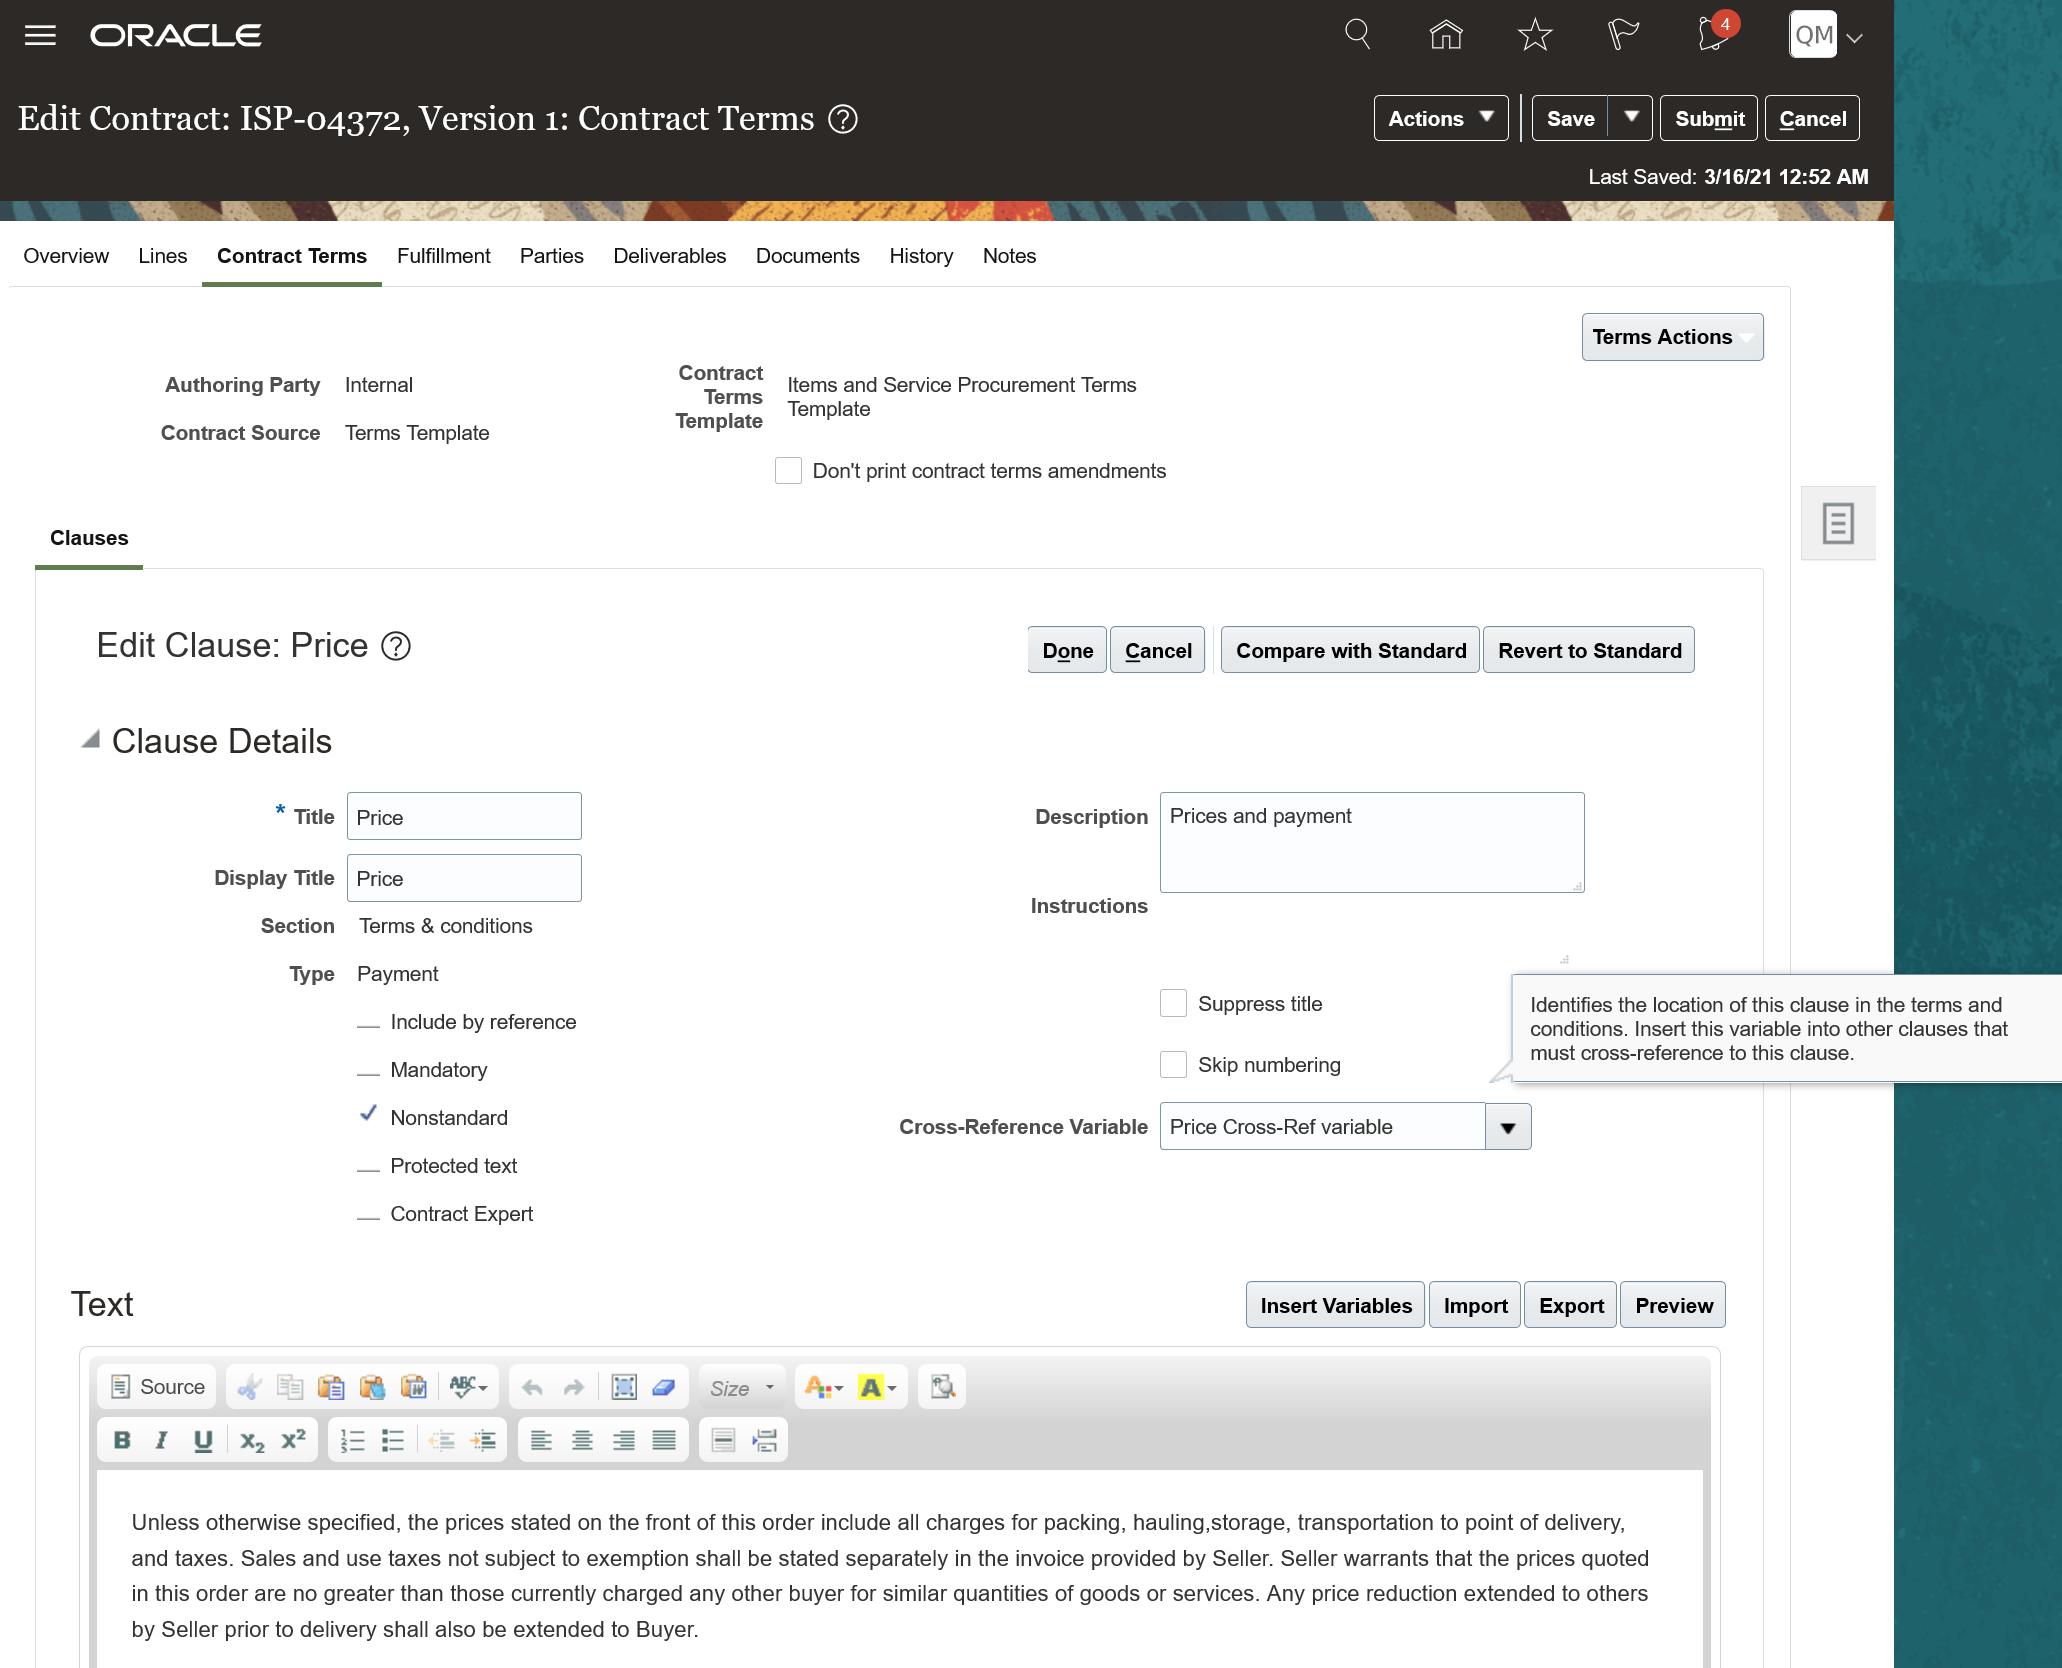
Cross-Reference in Edit Clause
Cross-references in contract terms and conditions make it easier for readers to find supporting information between clauses in the contract.
Steps to Enable
To add cross-references to clause text:
- Create variables for any references you'd like to set up. Variables you want to use in cross-references must be defined with a Java string source and the system method name Get clause cross-reference.
- Create or edit the nonstandard clause you want to point to in your cross-reference and add the cross-reference variable to the clause. This provides the anchor point for the clause.
- Update any clauses where you want to add the reference and insert the cross-reference variable into the clause text. The variable resolves to indicate the numbered position of the referenced clause in the contract terms.
Tips And Considerations
- Adding a prefix when naming your cross-reference variables can help you identify variables that are used to support cross-references from other types of variables.
- For cross-references to point to an identifiable location in your contract terms, for example, 'Refer to clause 2.1', you need to ensure you're using concatenation in your numbering scheme definition. Without concatenation, the cross-reference variable resolves without any context, for example ,'...refer to 1' instead of '...refer to 2.1'.
Key Resources
- See the "Set Up Contract Terms and Clause Library Configurations” chapter in the Using Customer Contracts guide.
View HTML Source of Clause Text
You can view the HTML source for clauses in the Terms Library that aren't in an editable state, using the View Source action from the Edit Clause page.
The View Source action is displayed when viewing Terms Library clauses in the these states:
- Approved
- Pending approval
- Expired
- On hold
- Draft status where the clause text was imported from a Word XML document
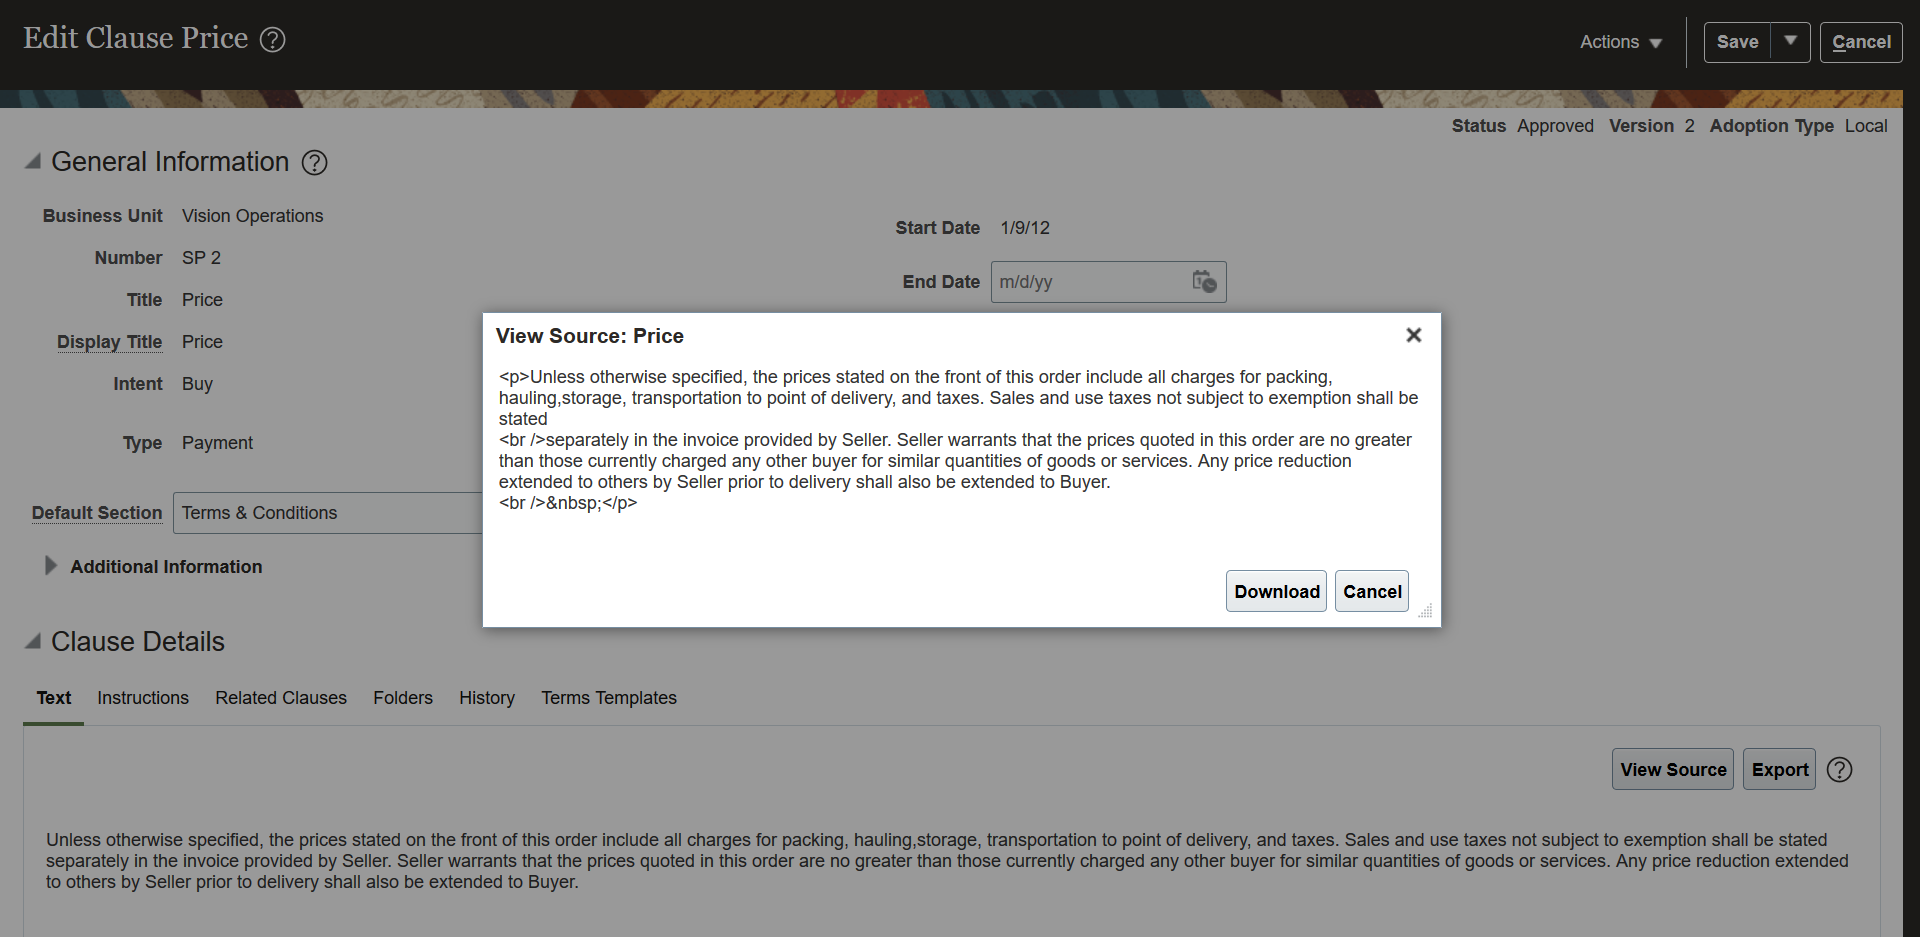
View Source from Edit Clause
You can download the source as an HTML file for offline analysis. The file is named based on the clause title.
You can use the View Source action in the application editor on draft clauses, but you can't open the editor for clauses that are in non-editable states, such as approved clauses. When clauses don't print as expected, this feature lets you view the HTML source to see if there's a problem, without having to first create a new version of the clause to make it editable in the application. For example, where clauses are adopted or localized, this feature can help you isolate the source of the problem, without having to first amend a clause that you may not actually need to change.
Steps to Enable
You don't need to do anything to enable this feature.
Key Resources
- See the “Author Contract Terms” chapter in the Using Customer Contracts guide.
Role Information
- Business Practices Director
Use Clause Number in Keyword Search
When adding a clause to a contract or a terms template, you can search based on a keyword. The Keyword search attribute now considers the Clause Number assigned to the clause in the Terms Library.
Here's the full set of fields that are searched based on the text you enter as the keyword:
- Clause Number
- Clause Title
- Display Title
- Description
- Text
- Instructions
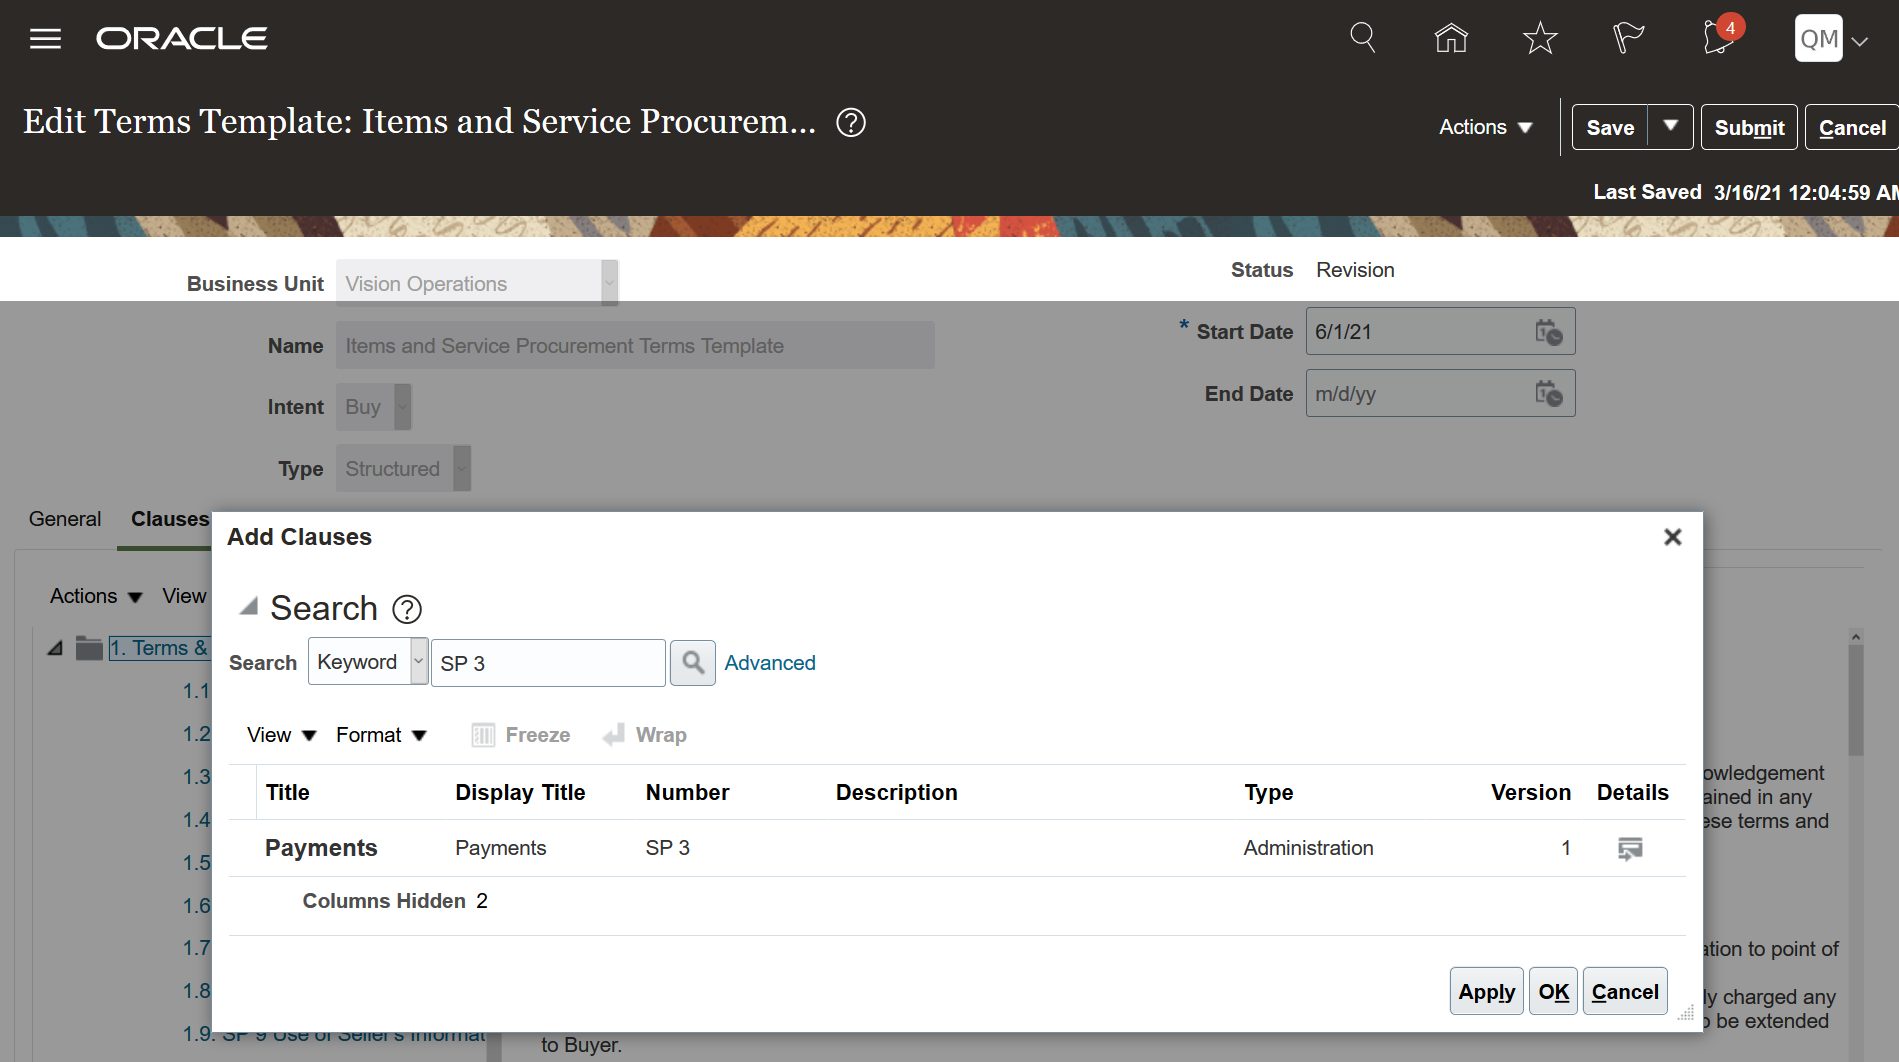
Using Clause Number in Add Clause Keyword Search
Using the View menu from the search results, you can add Number as a column so that you can confirm your clause selection before you add it to your contract or terms template.
Clause numbers in the Terms Library can be manually assigned or automatically generated. Where they are manually assigned, there may be some meaning behind the numbering structure, for example, where you have assigned certain prefixes or segments within the number to categorize or group clauses together. Adding the clause number to the keyword search makes it easier to find the clause you need to add.
Steps to Enable
You don't need to do anything to enable this feature.
Tips And Considerations
Keep in mind that the text you enter as the keyword is searched across several attributes, so the results returned could include clauses that match across other attributes, not necessarily the clause number.
Key Resources
- See the "Set Up Contract Terms and Clause Library Configurations” chapter in the Using Customer Contracts guide.
Author Contract Terms with Microsoft Word 2019
You can use Microsoft Word 2019 to manage your contract terms. You can download your contract, make changes, use the Oracle Contracts add-in, and upload it back to the application in the same way as other supported versions of Word.
Microsoft Word is frequently used as a native authoring tool by contract authors and legal teams.
Steps to Enable
You don't need to do anything to enable this feature.
Show Matched Content in Search Contracts by Text Page
When searching for text in the Search Contracts by Text page, in the search results, you can see a list of contracts that contain the search term, either within the contract attributes or within documents attached to the contract. From the Matched Content icon in the search results, you can open the Matched Content window to see snippets of content that contain the search term within the document. The search term is highlighted in each snippet.
In the search results page, if the Number or Name columns contain the text that you entered as your search term, that text is highlighted in bold in your search results.
The Document Matches column contains two icons:
- The first icon takes you to a list of documents attached to the contract that's returned in the search results.
- The second icon takes you directly to a window that displays snippets of text from the primary contract document that's associated with that contract.
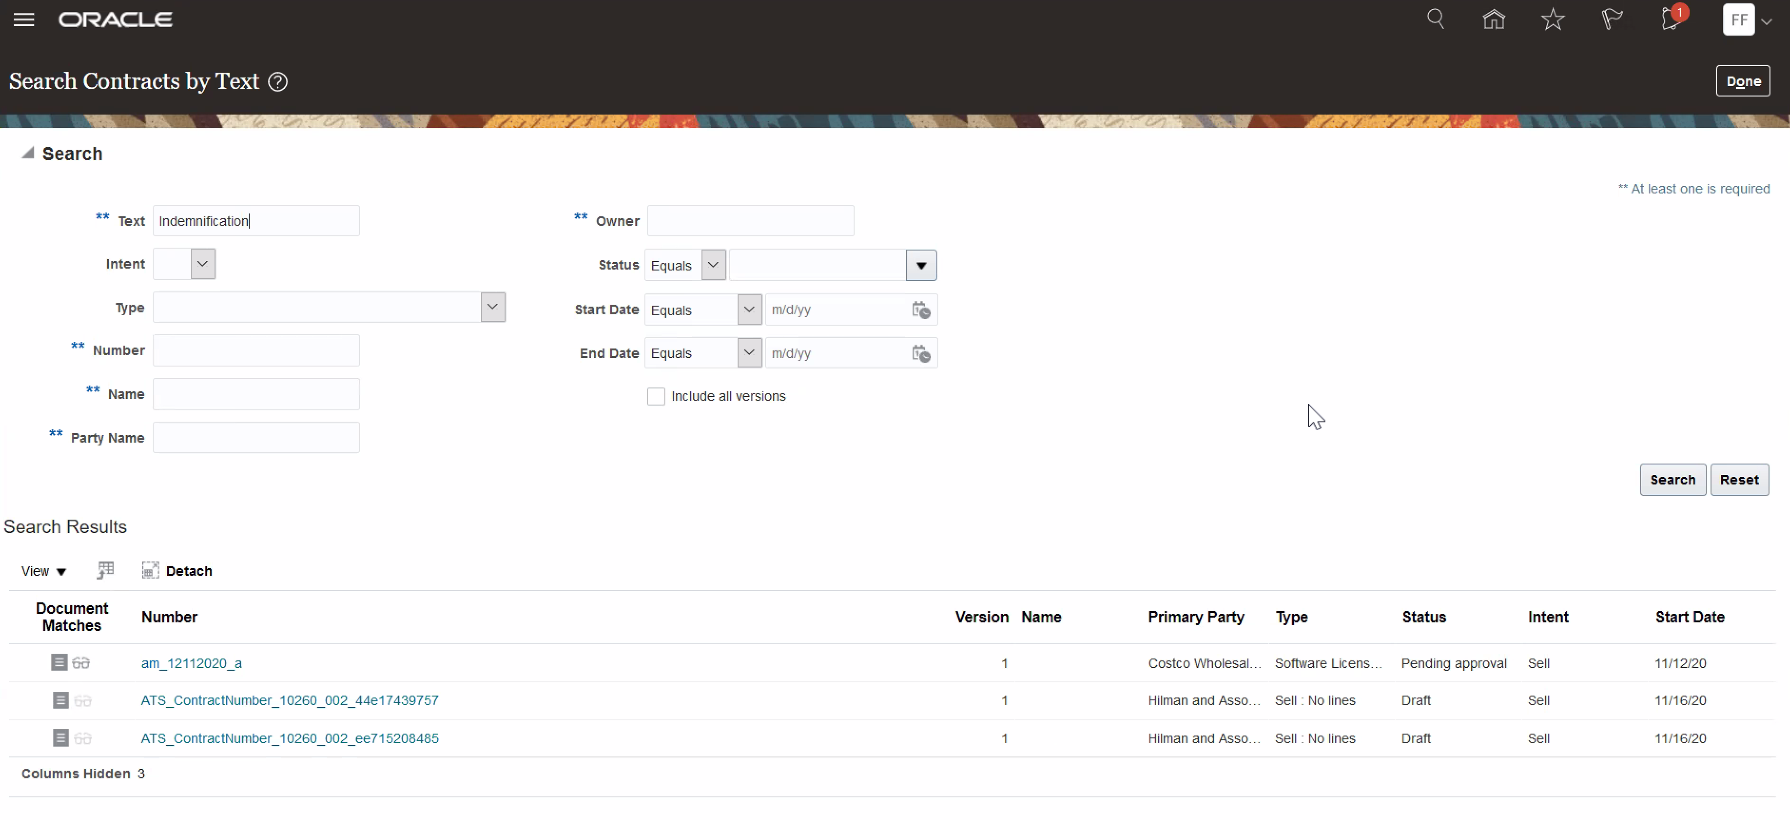
Search Contracts by Text Search Results
Click the Document Matches icon to open the window that lists the document attachments where the text is found. Only documents containing the text string are returned in the results.
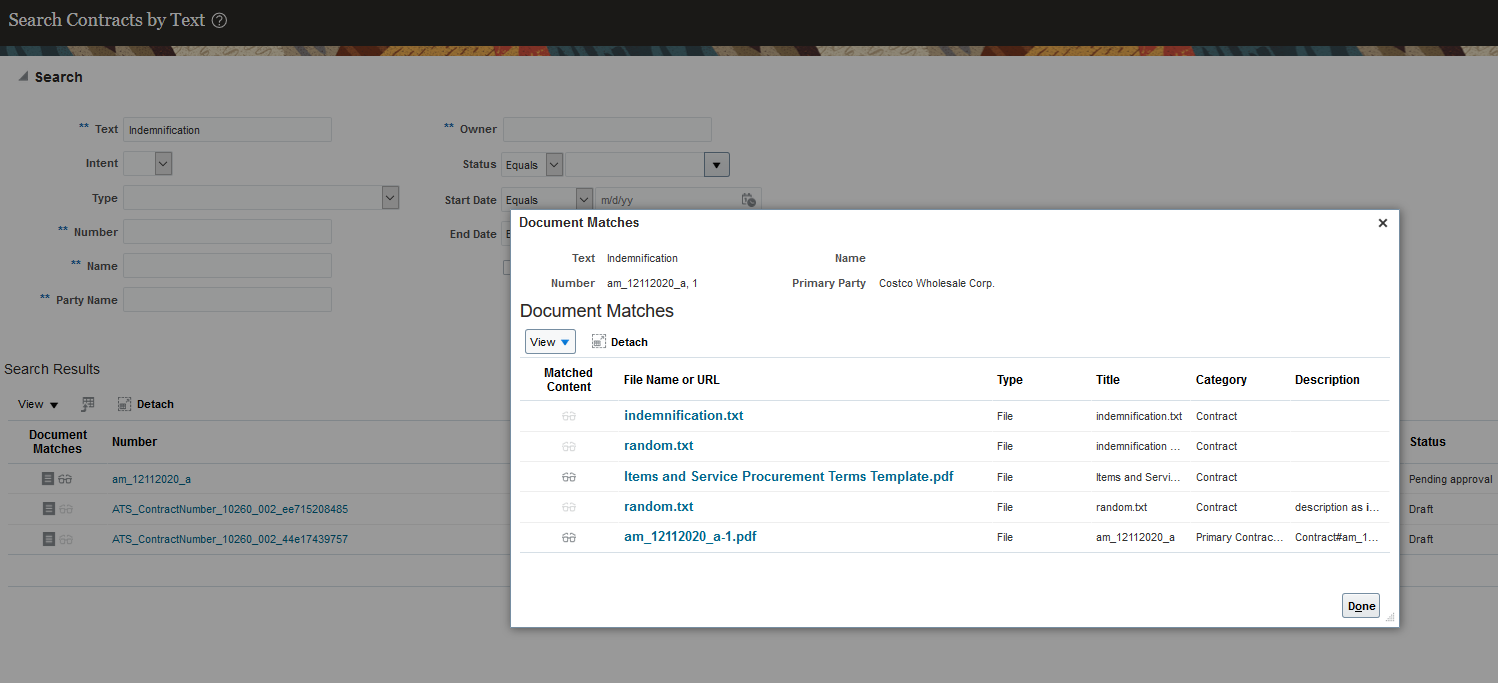
Document Matches in Search Results
In the Document Matches window, the Matched Content column contains the Matched Content icon. This icon only appears if the content within the document contains the search term. If there's no matching content found in one of the contract's documents, the Matched Content icon is displayed, but it's disabled.
Click the Matched Content icon to open the Matched Content window. In this window, you can see snippets of content contained in the primary contract document associated with the contract selected in the search results.
The search terms itself is highlighted in each snippet.
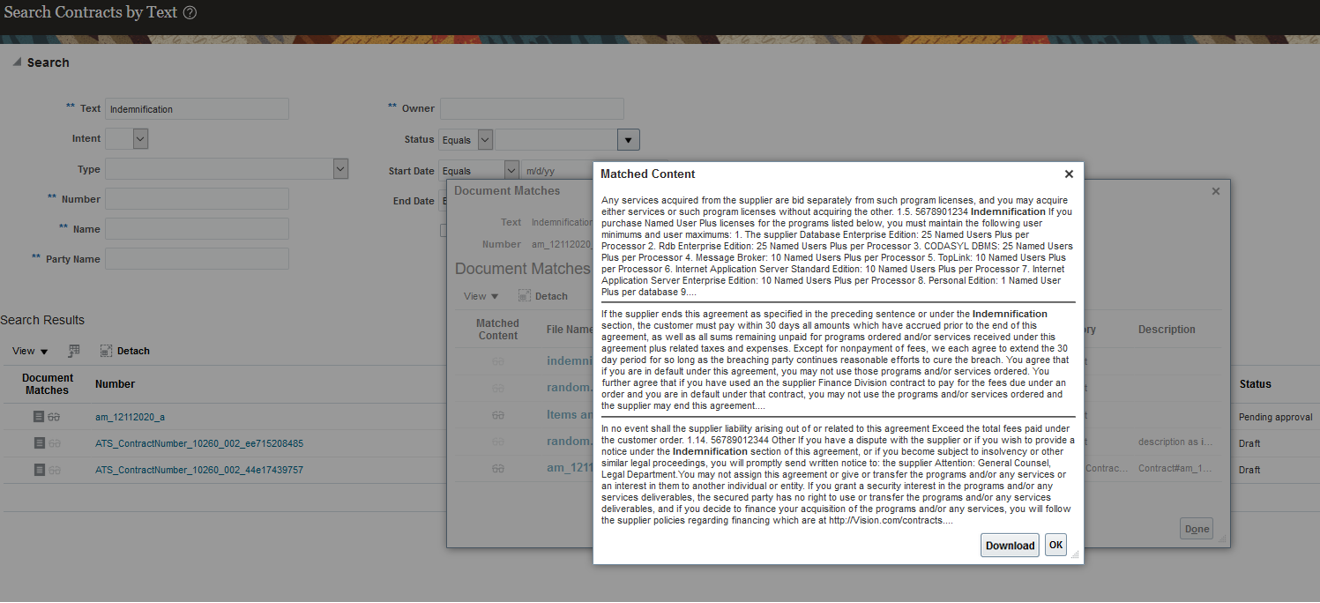
Matched Content Window Showing Snippets with Highlighted Text
After you have decided that the document in the Matched Content window is the one you're interested in, you can open or download the document directly by clicking the Download button. To see where the search term shows up in that document, open the document itself and search for the term.
This feature makes it easier to see a snippet from the document to get some context around where that search term was found within the document.
Steps to Enable
You don't need to do anything to enable this feature.
Key Resources
- See the ”Create Customer Contracts” chapter in the Using Customer Contracts guide.
Allow Users to Navigate to the Home Page Using a Home Icon
Using the new Home icon, users can go directly to the Home page. This is especially helpful when they have navigated deeper into the other pages from home, from where, they could go back to only one previous page at a time, before.
This feature provides users with more efficient navigation back to the home page, allowing better usability with fewer clicks.
Steps to Enable
You don't need to do anything to enable this feature.
Key Resources
- See the "Microsoft 365" chapter in the Using Sales guide.
Allow Users to Perform a Multi-Keyword Adaptive Search
Allow users to use multi-keyword adaptive search in the search facilities of the list pages.
This feature provides users with a more powerful search experience consistent with what they experience within the dynamic choice lists in the other pages within the add-in. The search facility will search keywords against multiple different attributes and return results based on relevance.
Steps to Enable
You don't need to do anything to enable this feature.
Key Resources
- See the "Microsoft 365" chapter in the Using Sales guide.
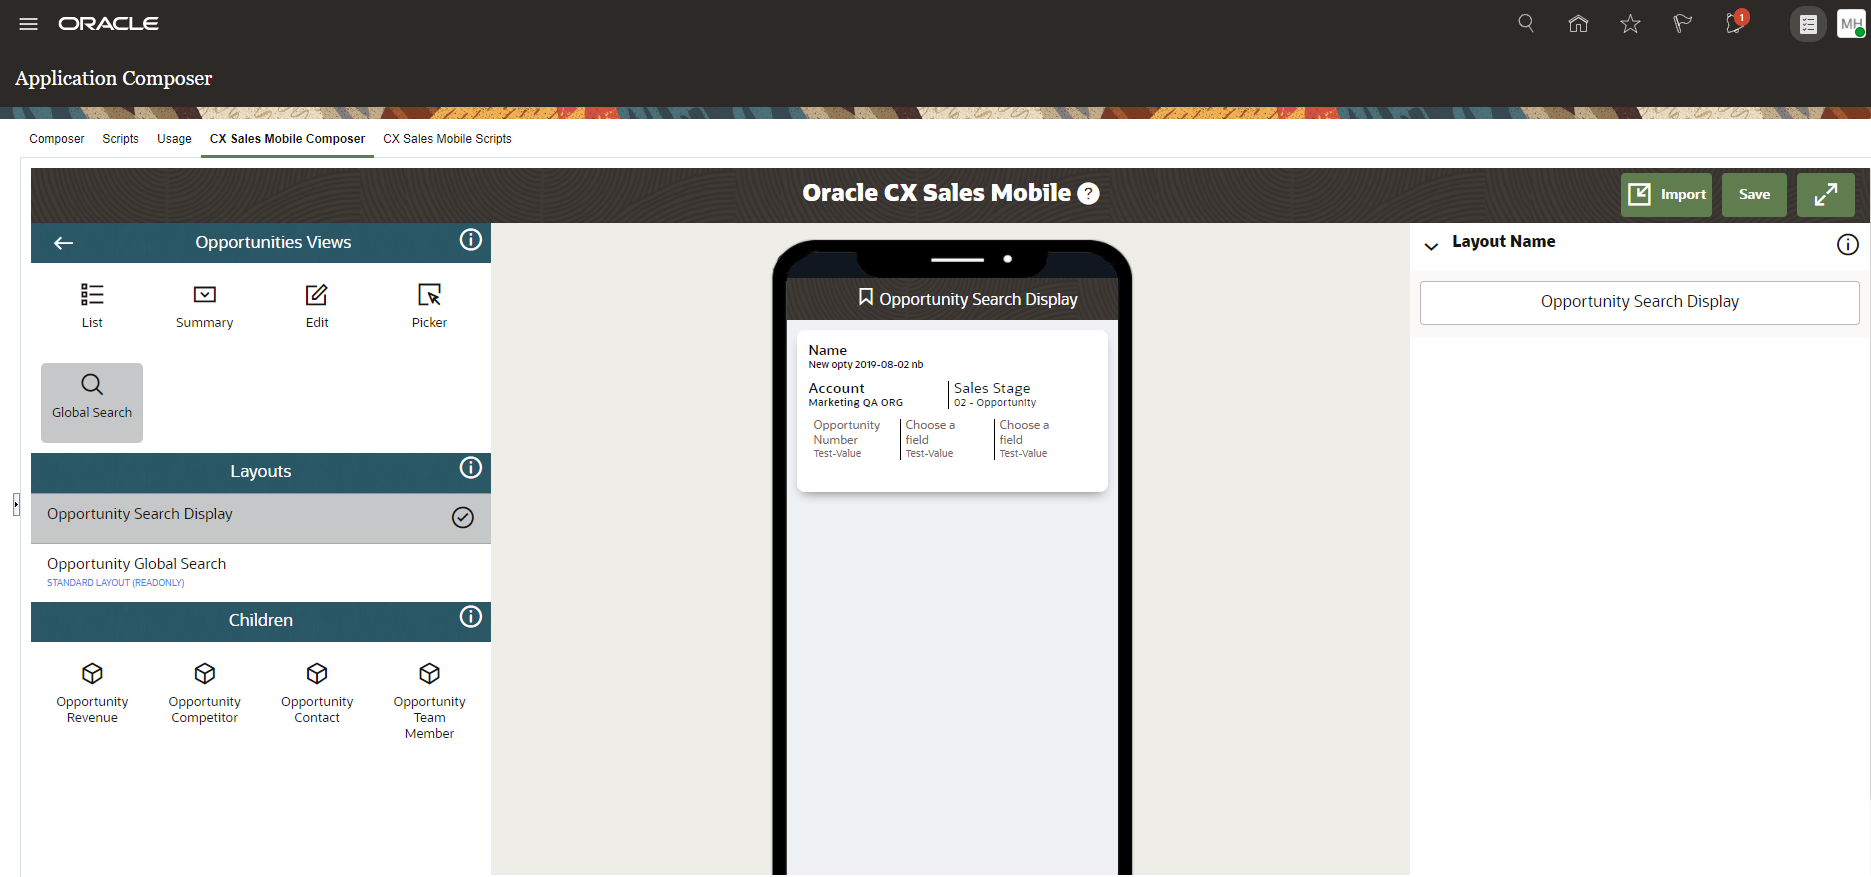
Configure the Global Search Results Display
Configure the global search results display format for each sales object enabled in CX Sales Mobile. Add or remove standard or custom fields to configure the global search results display.
With configurable global search results, users see most important information as part of search results helping them find information more easily and quikcly.
Steps to Enable
Leverage Application Composer to expose and adjust page layout and attributes. To learn more about extending your application using Application Composer, visit Oracle Help Center > your apps service area of interest > Books > Configuration and Extension.
- Navigate to CX Sales Mobile Composer.
- Click on the object whose display you would like to customize.
- Click on Global Search.
- Clone the default layout and customize the search display by adding or removing fields.
NOTE: The search display can have maximum of six fields.
Role Information
- Sales Administrator
- CRM Application Implementation Administrator
Use a New OnEdit Script Event, Add a Scanned Serial Number to a Custom Field, and Conditionally Show or Hide Actions
This feature includes several new enhancements that you can use when you're creating scripts. You can create a script using the new OnEdit event, so that the script is used, for example, when a user edits a record. You can also create a script that adds a scanned serial number to a custom field when users scan a bar code using their phone's camera.
Also, you can set a condition for a record action so that you can conditionally show or hide actions.
Steps to Enable
Leverage Application Composer to expose and adjust page layout and attributes. To learn more about extending your application using Application Composer, visit Oracle Help Center > your apps service area of interest > Books > Configuration and Extension.
- For the On Edit script event enhancement, see the "Configure the App with Custom Scripts" topic.
- For the Add a Scanned Serial Number to a Custom Field enhancement, see the "Row Class Methods in the Library of System Functions for Custom Scripts" topic.
- For the Conditionally Show or Hide Actions enhancement, see the "Add Criteria to Actions in List and Summary Page Layouts".
Role Information
- Sales Administrator
Support Partner Relationship Management
Channel managers and other Partner Management users can now leverage the CX Sales Mobile app to manage and grow channel sales efficiently. Channel managers can also manage partners, partner contacts, and other related information on-the-go.
You can also restrict features in the main menu based on roles to meet business needs.

Partner Management in CX Sales Mobile
Watch a demo.
With CX Sales Mobile for PRM:
- Partner Users can effectively manage and improve channel sales on-the-go.
- Channel Managers can track the overall channel sales and also manage partner, partner contacts, and related information easily.
- Role-based restriction of features lets businesses control the access of functionalities across different user segments.
Steps to Enable
You don't need to do anything to enable this feature.
Tips And Considerations
- If you have configured custom channel manager roles, you need to configure the restriction of Partner functionality from the mobile menu using CX Sales Mobile Application Composer.
-
If you need the partner field to be available in other object layouts (for example, in the Opportunity list or Leads summary pages), you can add them to your layouts and assign the layouts to the required channel manager roles.
Key Resources
- Watch the Support for Partner Relationship Management demo.
- See the "CX Sales Mobile" section in the "Mobile Applications" chapter in the Implementing Sales guide.
Role Information
- CX Sales Mobile for Partner Relationship Management is available by default for users with these roles:
- Partner Sales Representative
- Partner Sales Manager
- Partner Administrator
- Channel Account Manager
- Channel Sales Manager
- Channel Operations Manager
- Partner and Partner Contact Management is available by default for users with these roles:
- Channel Account Manager
- Channel Sales Manager
- Channel Operations Manager
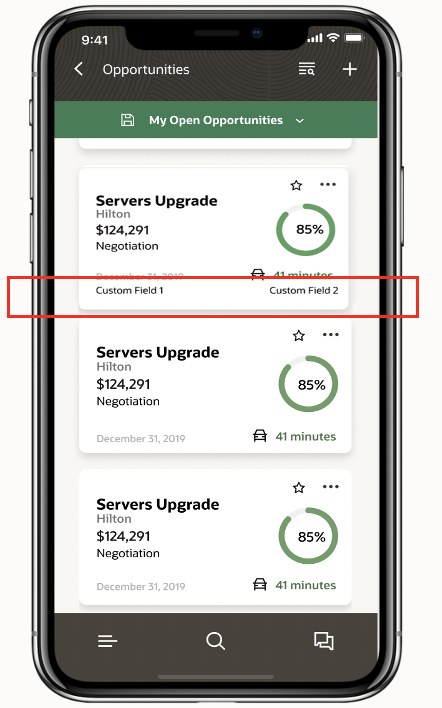
Configure the Appointments List Page and Add Custom Fields in All List Pages
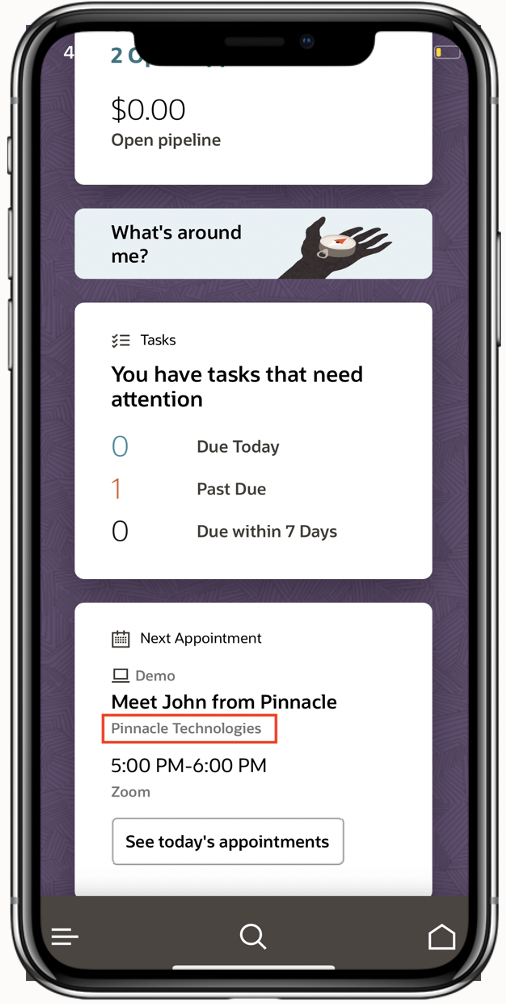
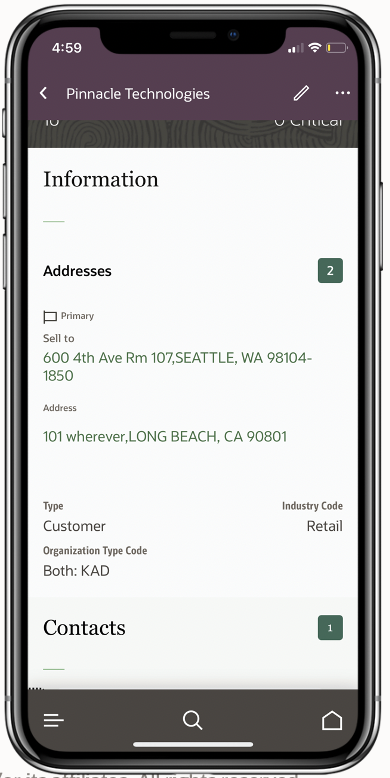
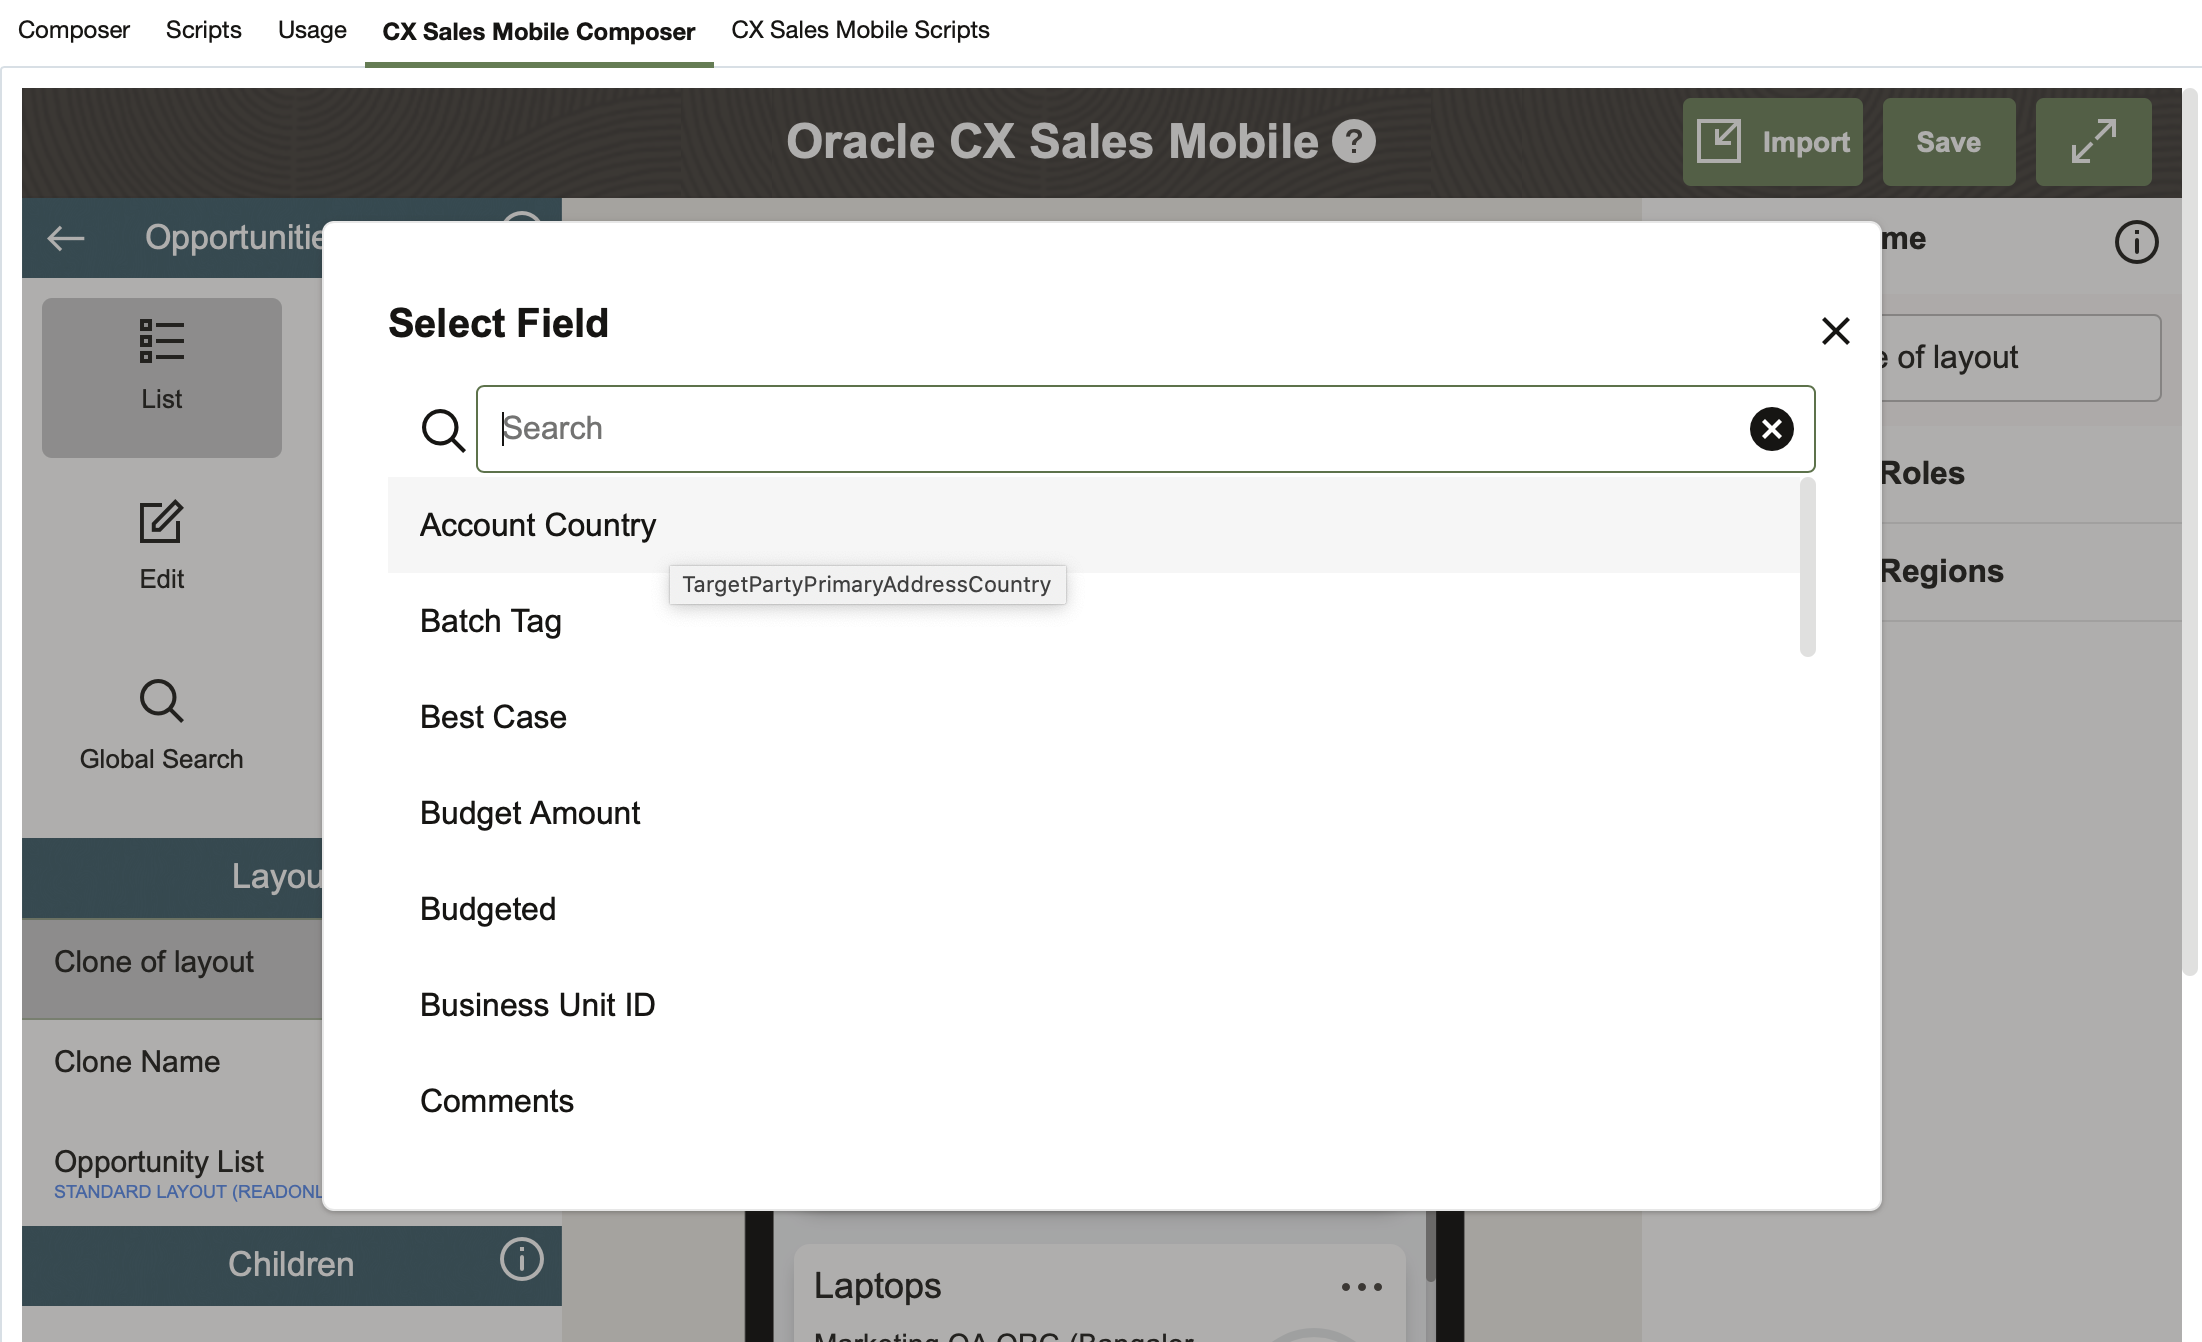
Show, hide, or add fields on the Appointments list page. In addition to adding predefined fields, you can now add up to two custom fields to the list pages of any standard object. Other enhancements to appointments include account names being displayed on the home page cards and the ability to hide the status button in the Appointments summary page. Plus, you can now remove the options to edit and add addresses in the account and contact summary pages.
This feature lets you add two new fields to each card in all list layouts. For example, sales administrators can add two more fields to each card in the list pages.
On the home page card, end users can now see the account name for their next upcoming appointment.
Using Application Composer, sales administrators can hide the appointment response button, for example, Accept, Tentative, or Reject.

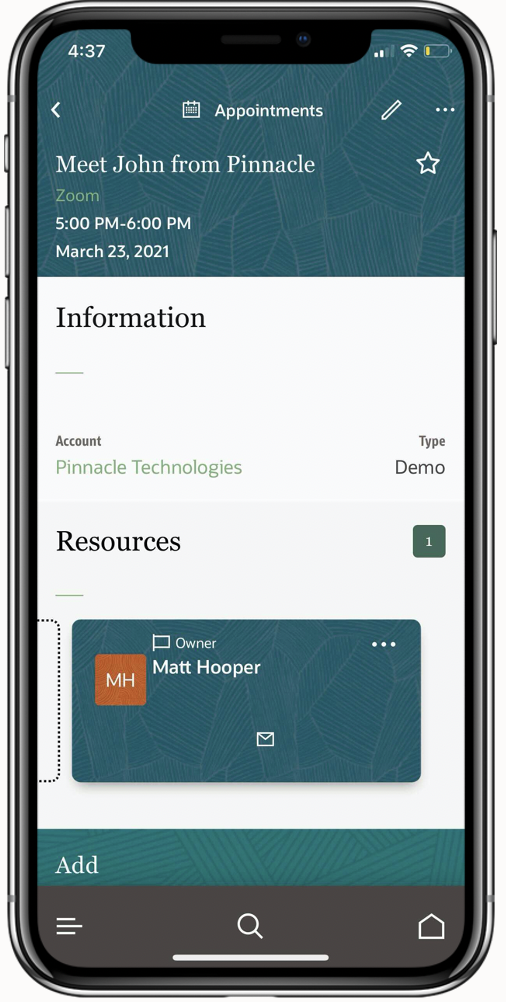
Administrators also can disable or enable additional options on addresses, accounts, and opportunities.

Steps to Enable
Leverage Application Composer to expose and adjust page layout and attributes. To learn more about extending your application using Application Composer, visit Oracle Help Center > your apps service area of interest > Books > Configuration and Extension.
Customize a Card
- In Application Composer, navigate to Mobile Application Setup.
- In the CX Sales Mobile Composer tab, find the standard object whose card you want to customize.

- Select the object.
- Select List from the panel that shows the available layouts.
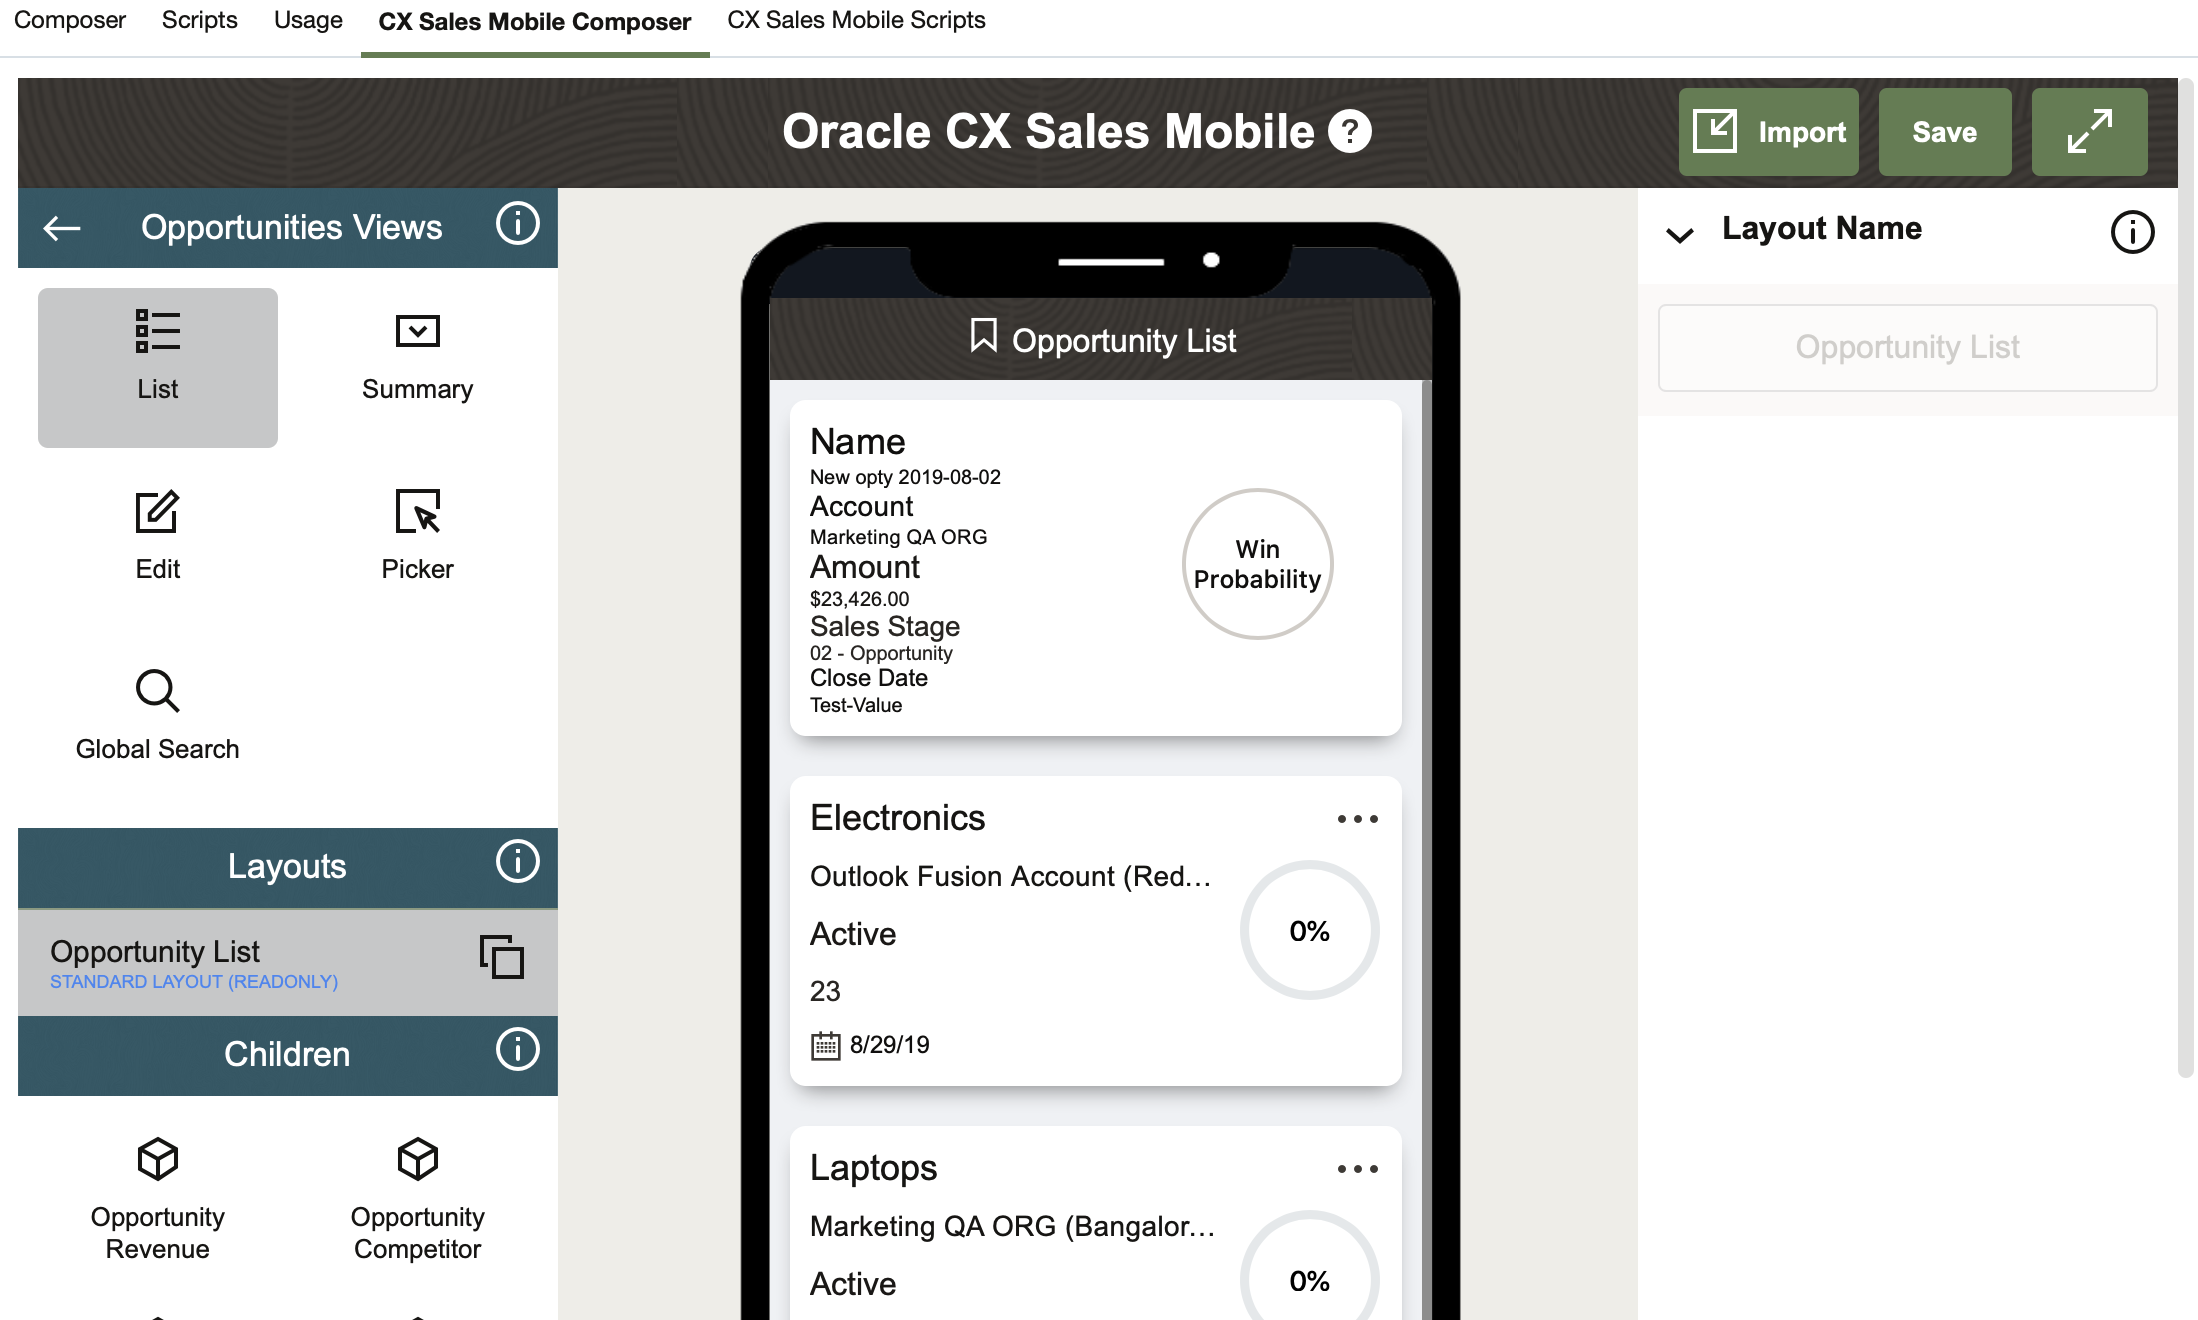
- Clone the layout by tapping on the copy icon next to the name of the layout (for example, Opportunity List, as shown in the previous screenshot).
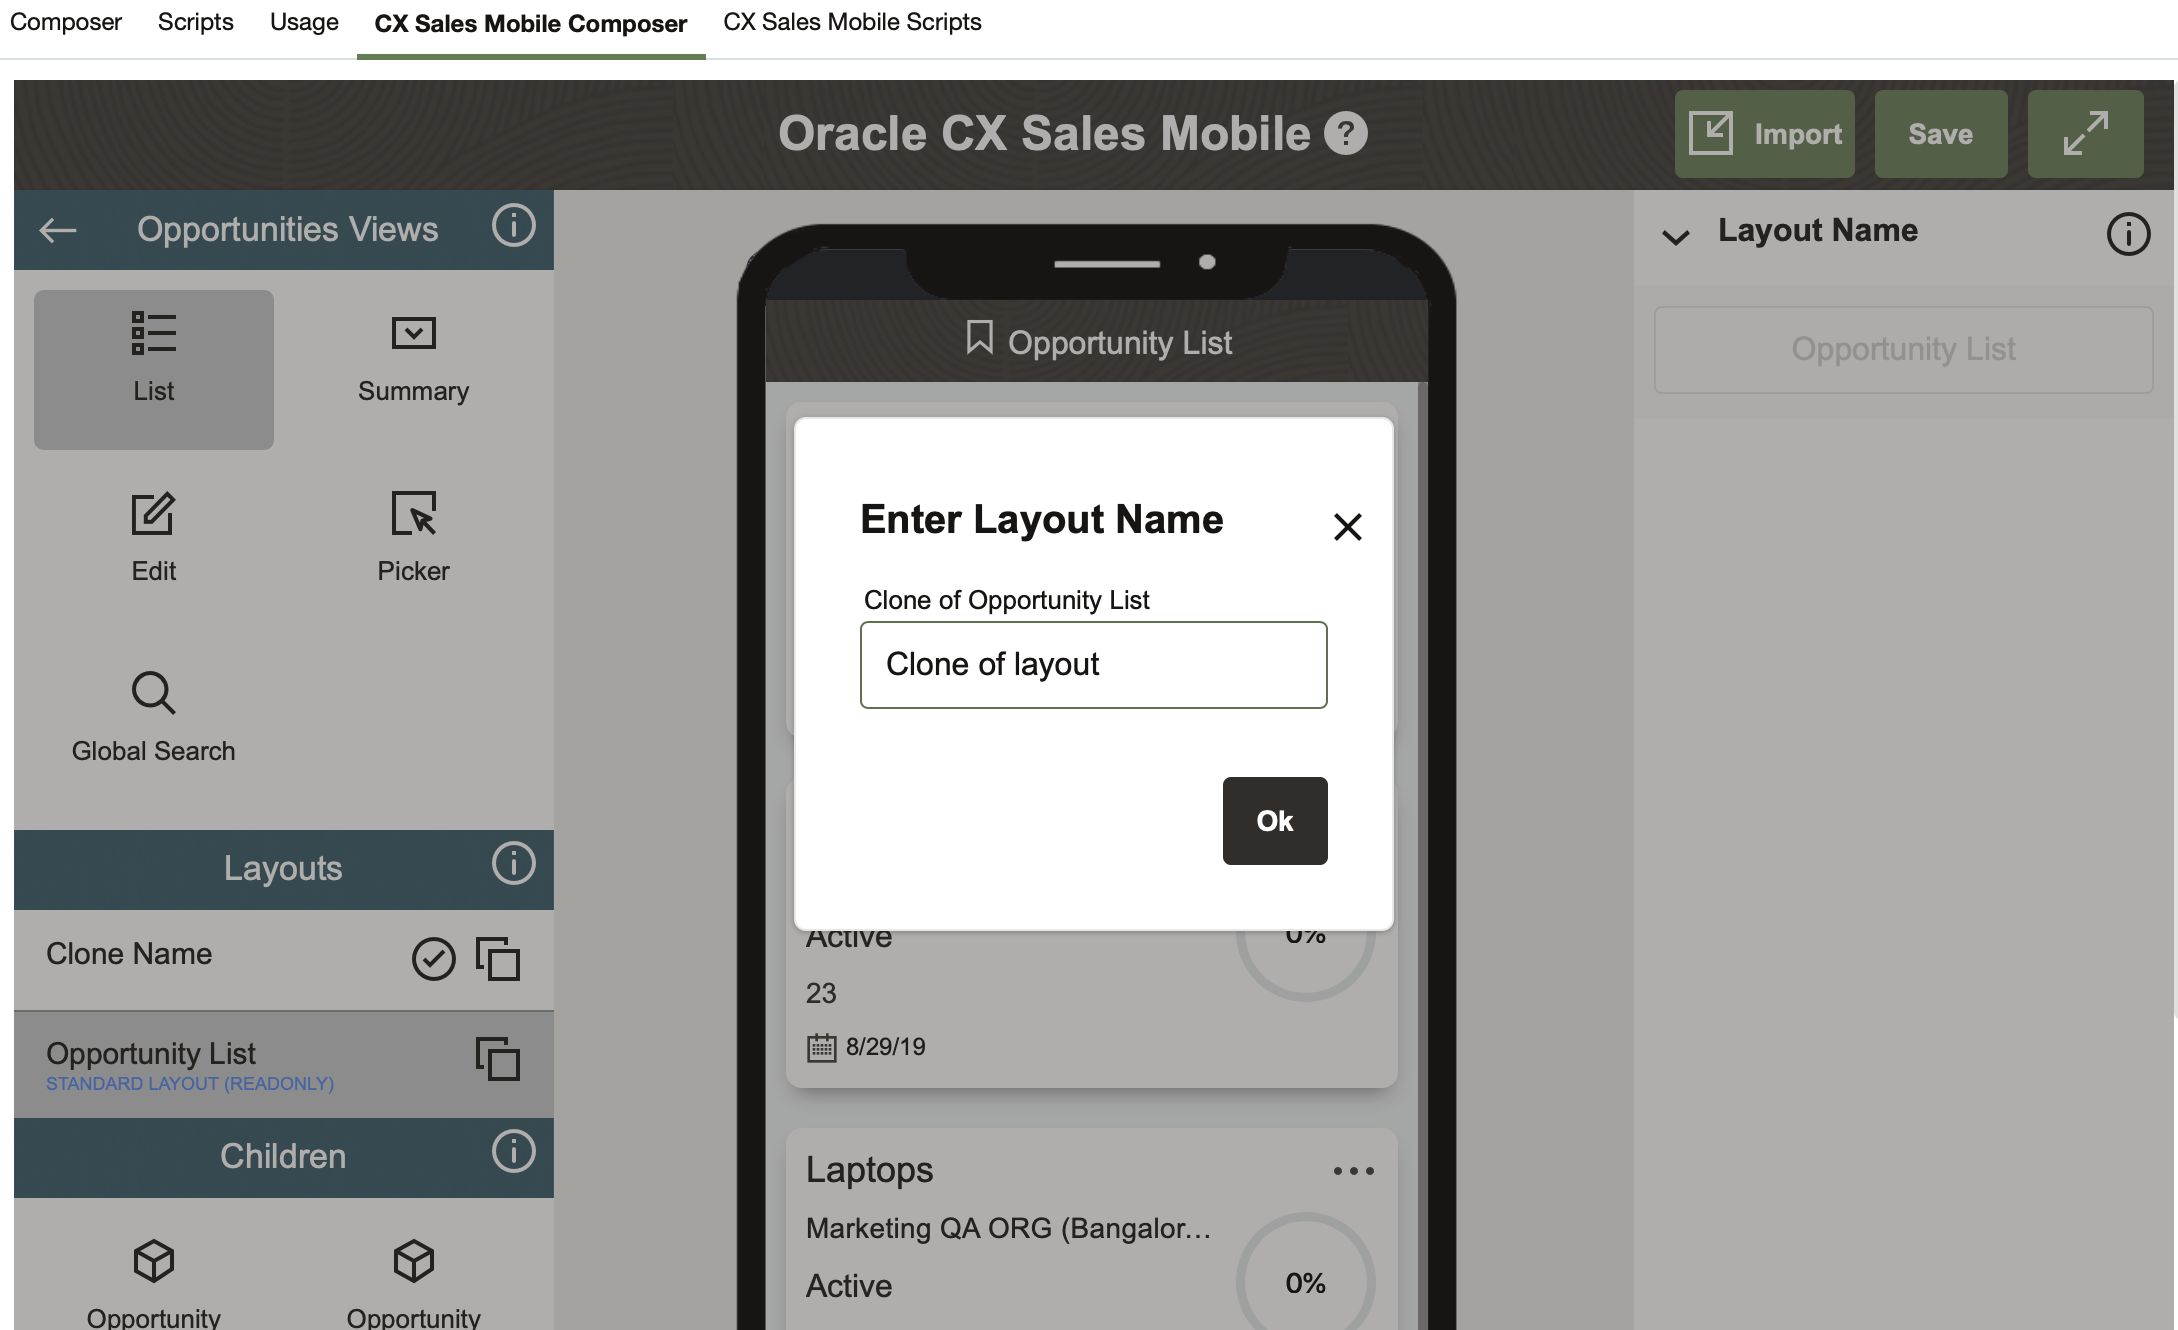
- In the cloned layout, you see two additional fields that you can customize:
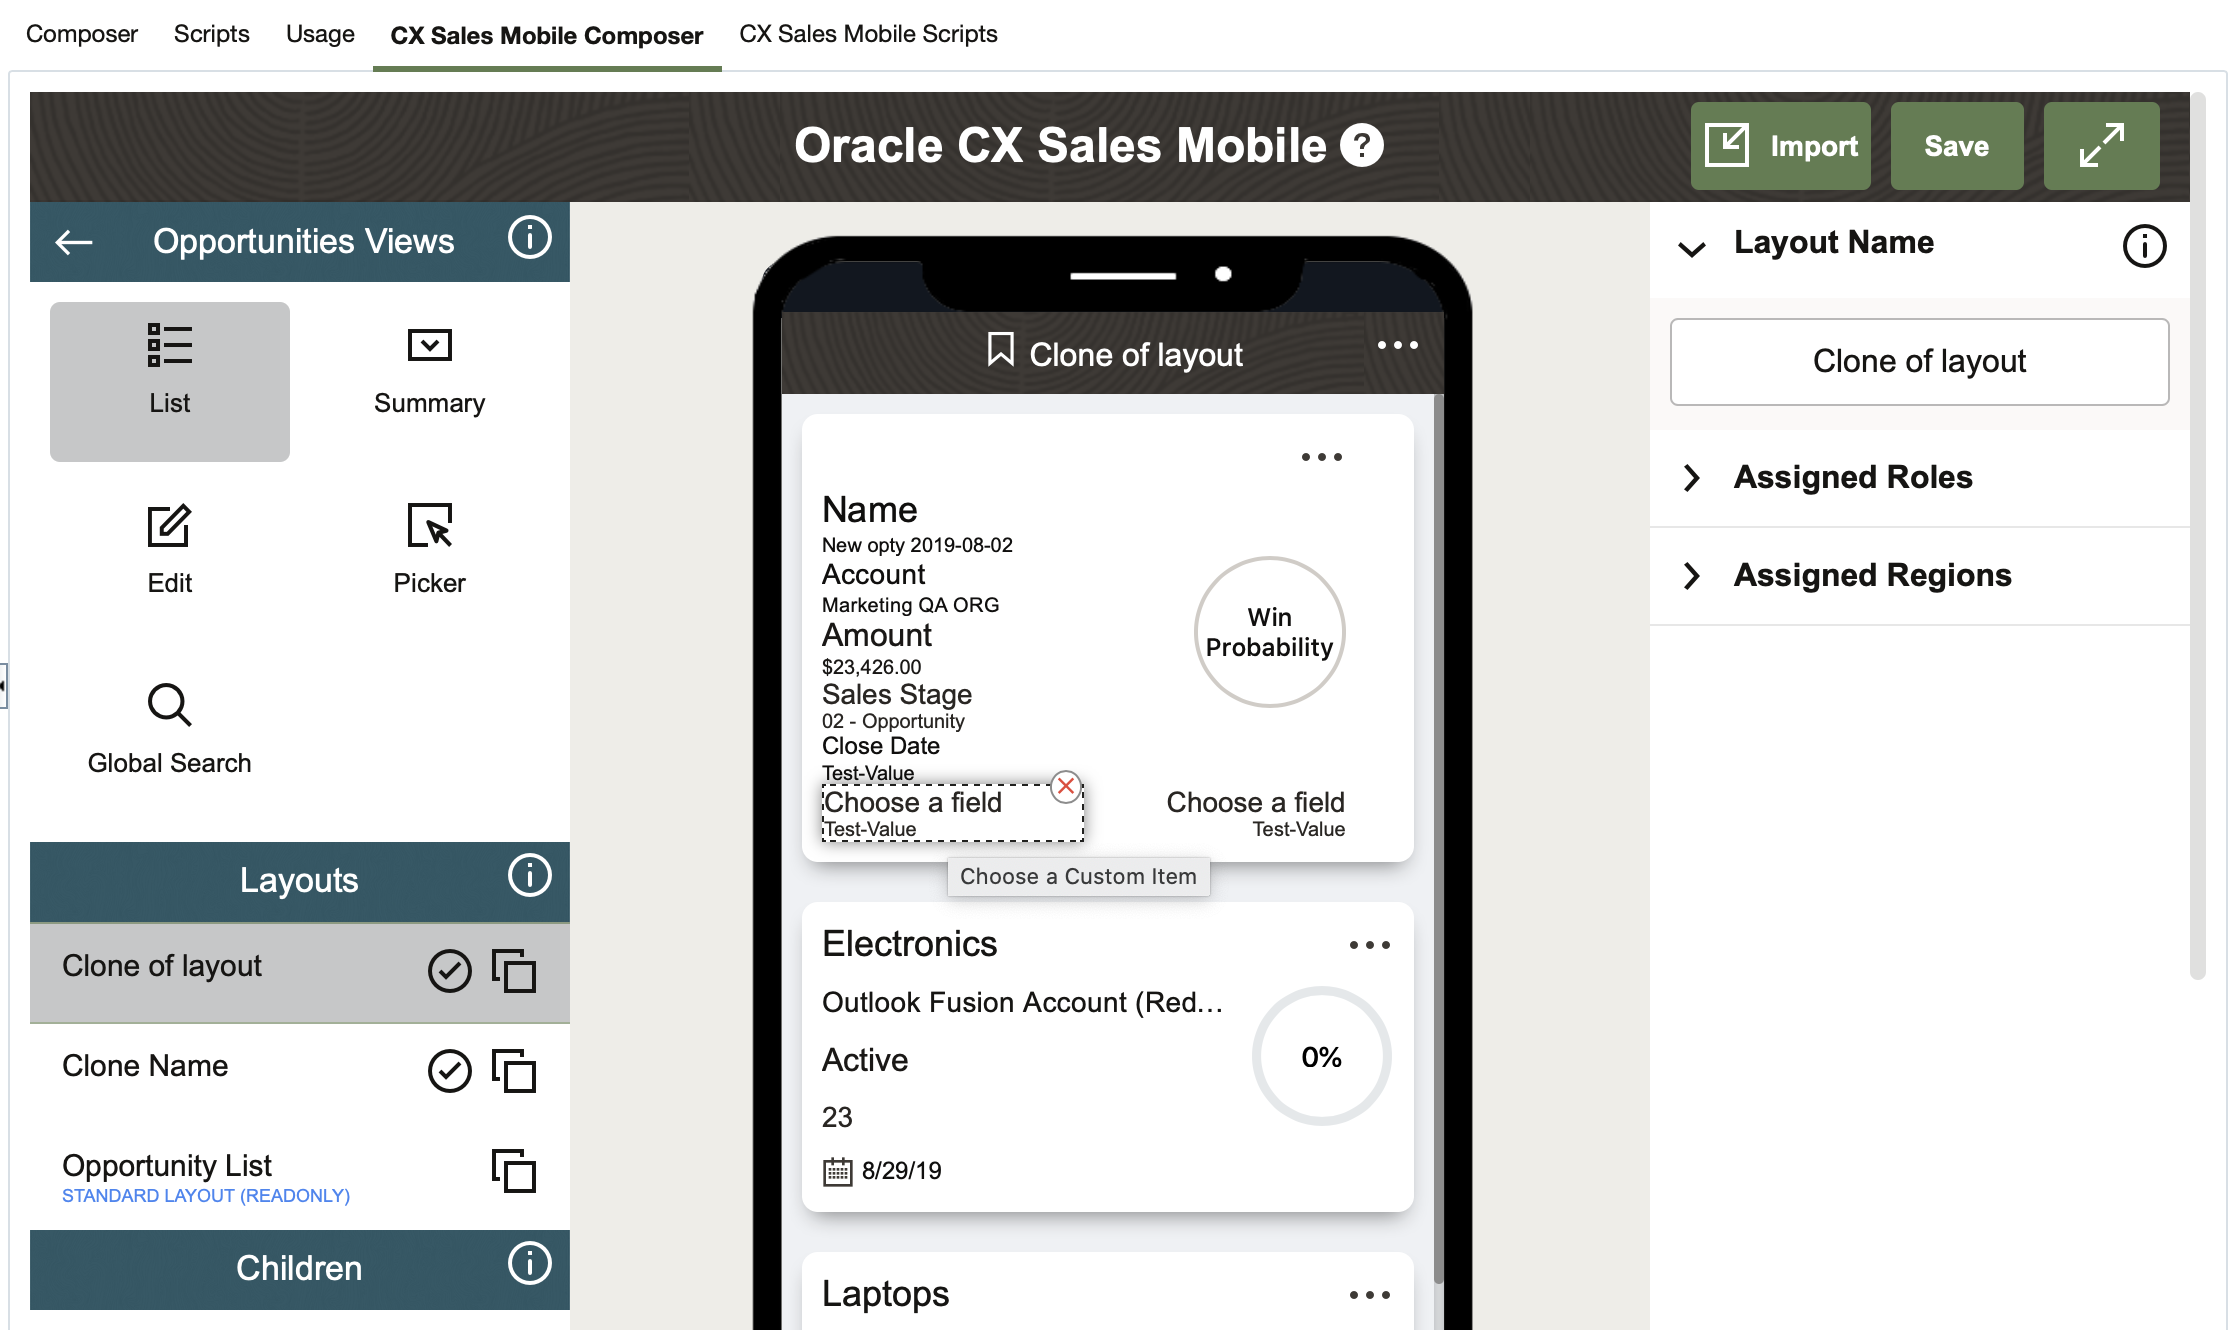
- Click on each of either one, or both, of these additional fields to customize them
- Click Save.
The card for the chosen list layout is now customized and shows the additional fields.
You don't need to do anything to display the name of the account for the next upcoming appointment on the homepage.
Enable or Disable the Appointment Status Button
- In Application Composer, navigate to Mobile Application Setup.
- In the CX Sales Mobile Composer tab, tap on Appointments.
- Tap on Summary to bring up the Appointment Summary Layout.
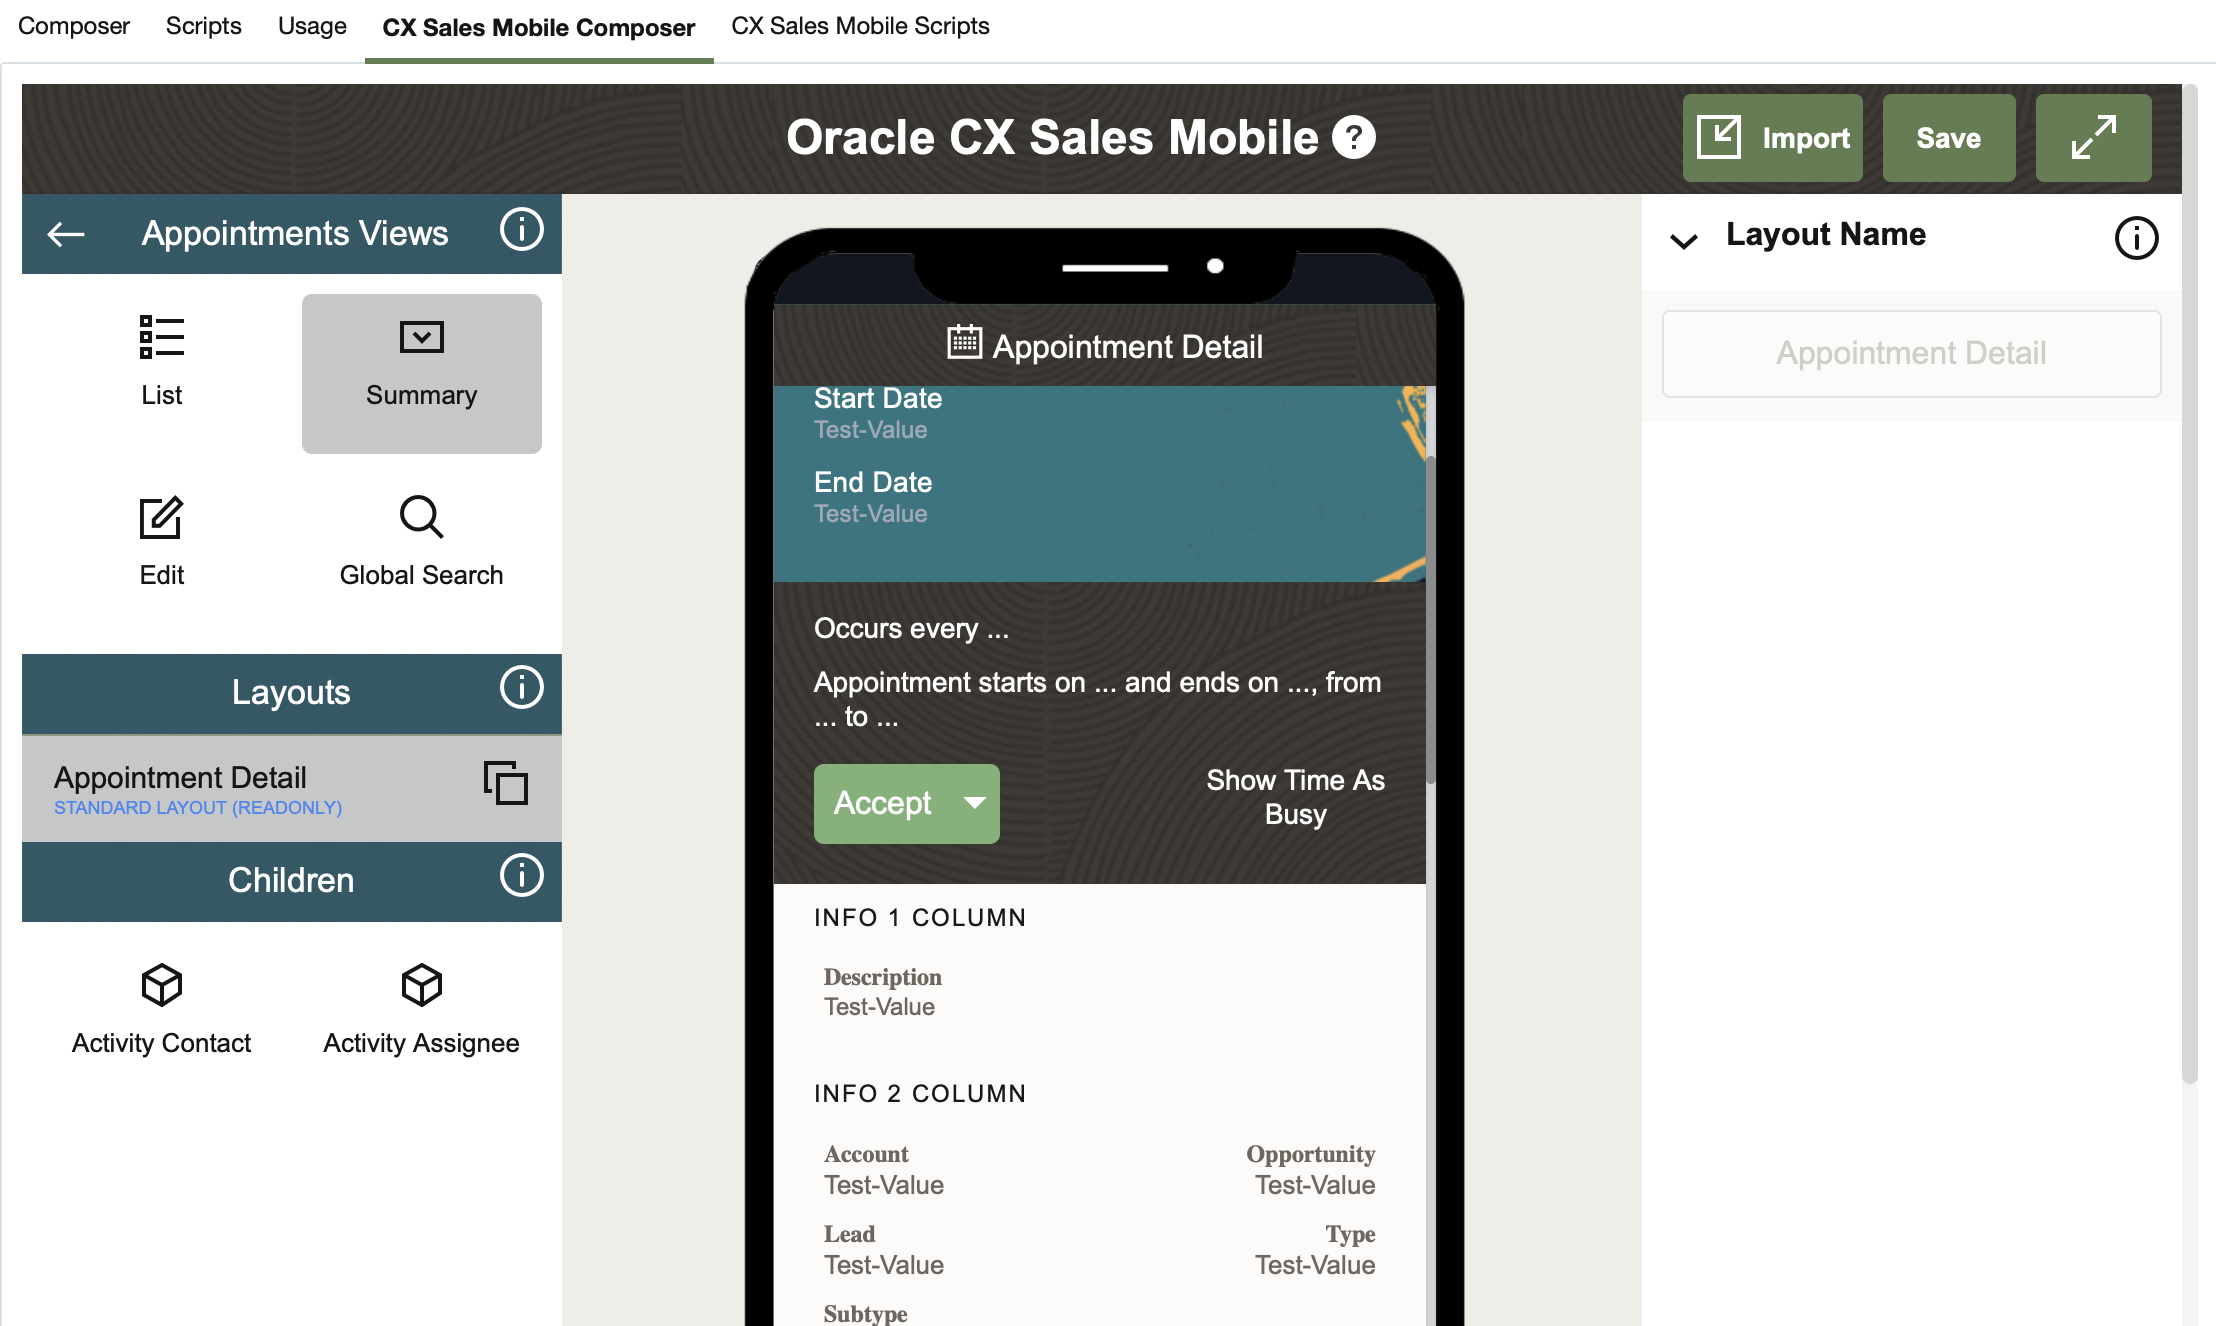
- Clone the layout by tapping on the copy icon next to the name of the layout (for example, Appointment Detail in the previous screenshot).

- After you have cloned the layout, the area containing the status button becomes customizable. You can now remove it by tapping on the eye icon. It's enabled by default.

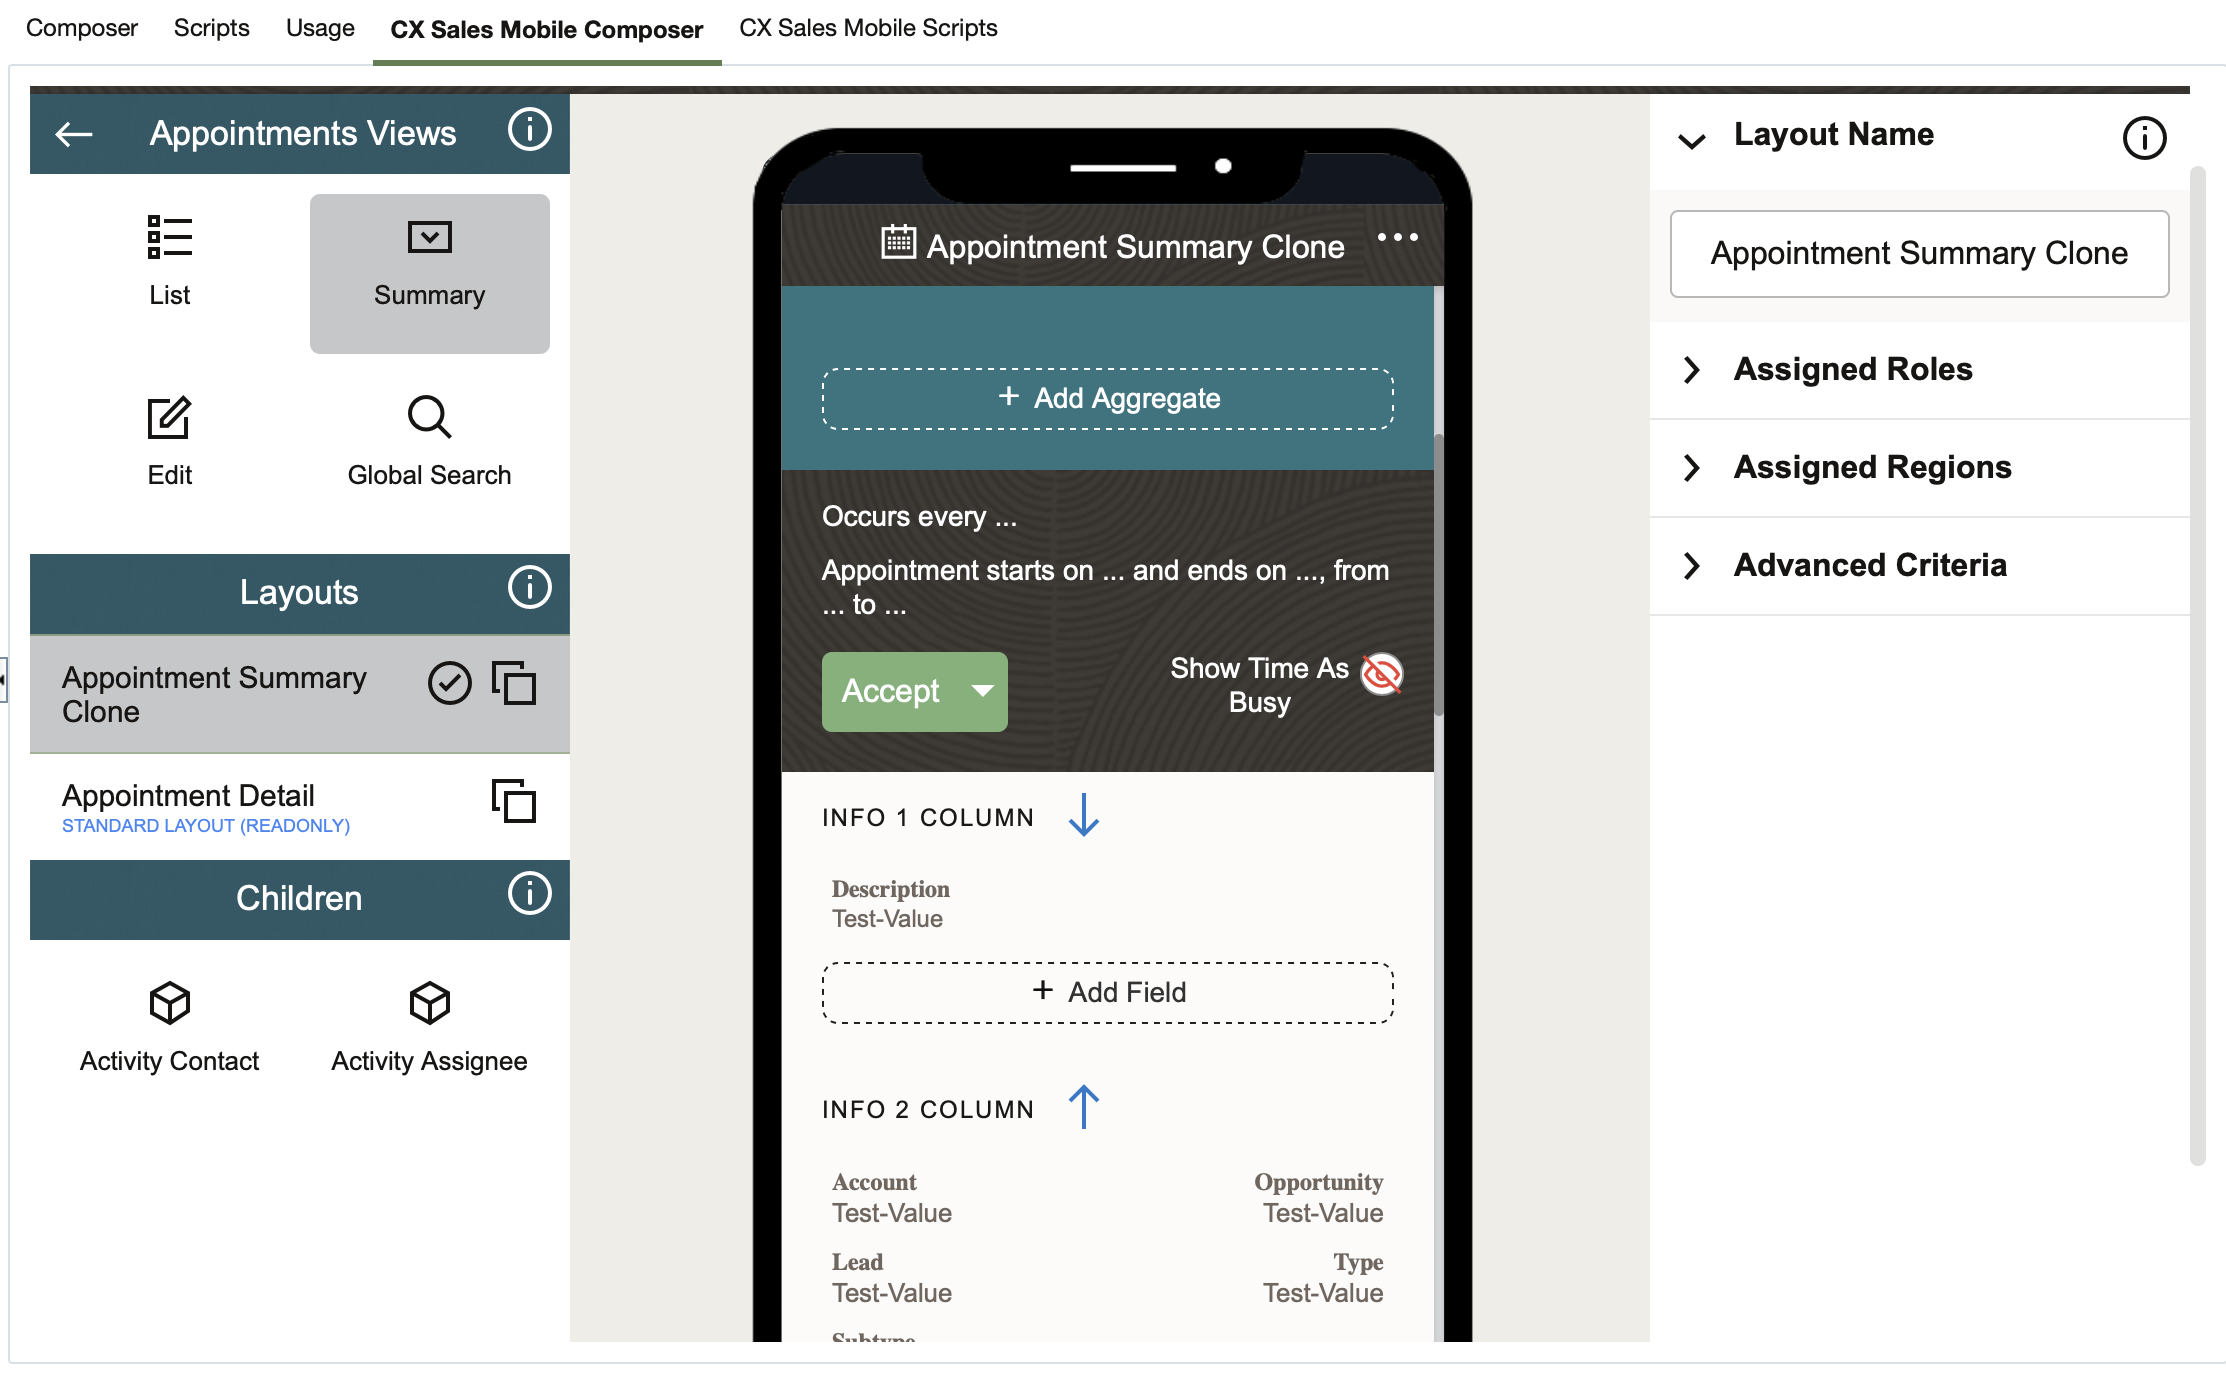
- Click Save. The appointment status button no longer shows up in the appointment summary pages on the mobile app.
Disable or Enable Options for Addresses on Accounts and Contacts
- In Application Composer, navigate to Mobile Application Setup.
- On the CX Sales Mobile tab, click either Accounts or Contacts from the Application Features panel.
- Click Address in the Children section:

- In the layout that shows Address (screenshot below), clone the address layout by tapping the copy icon.
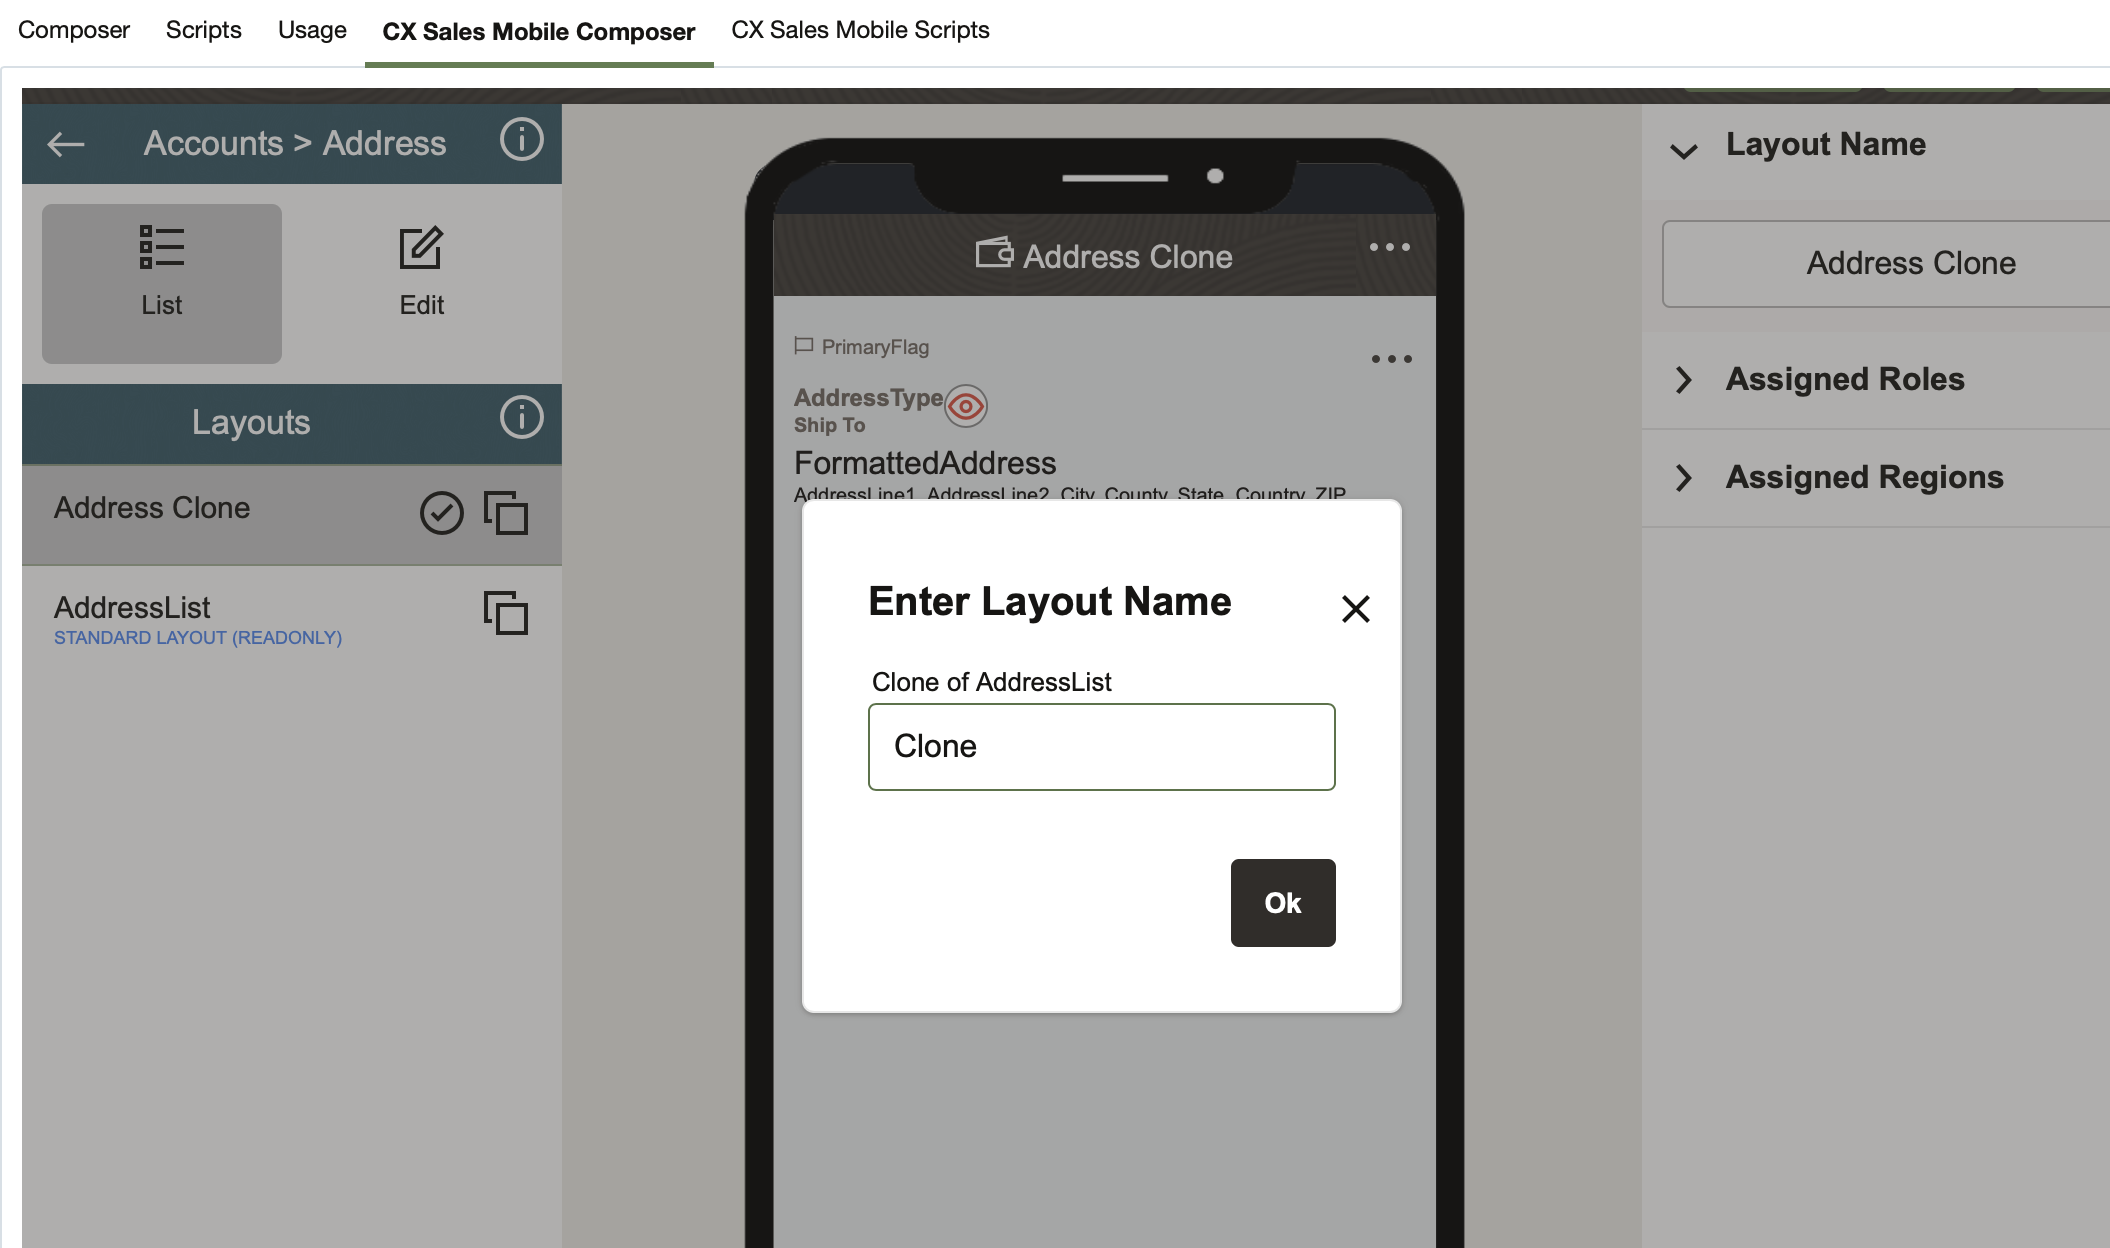
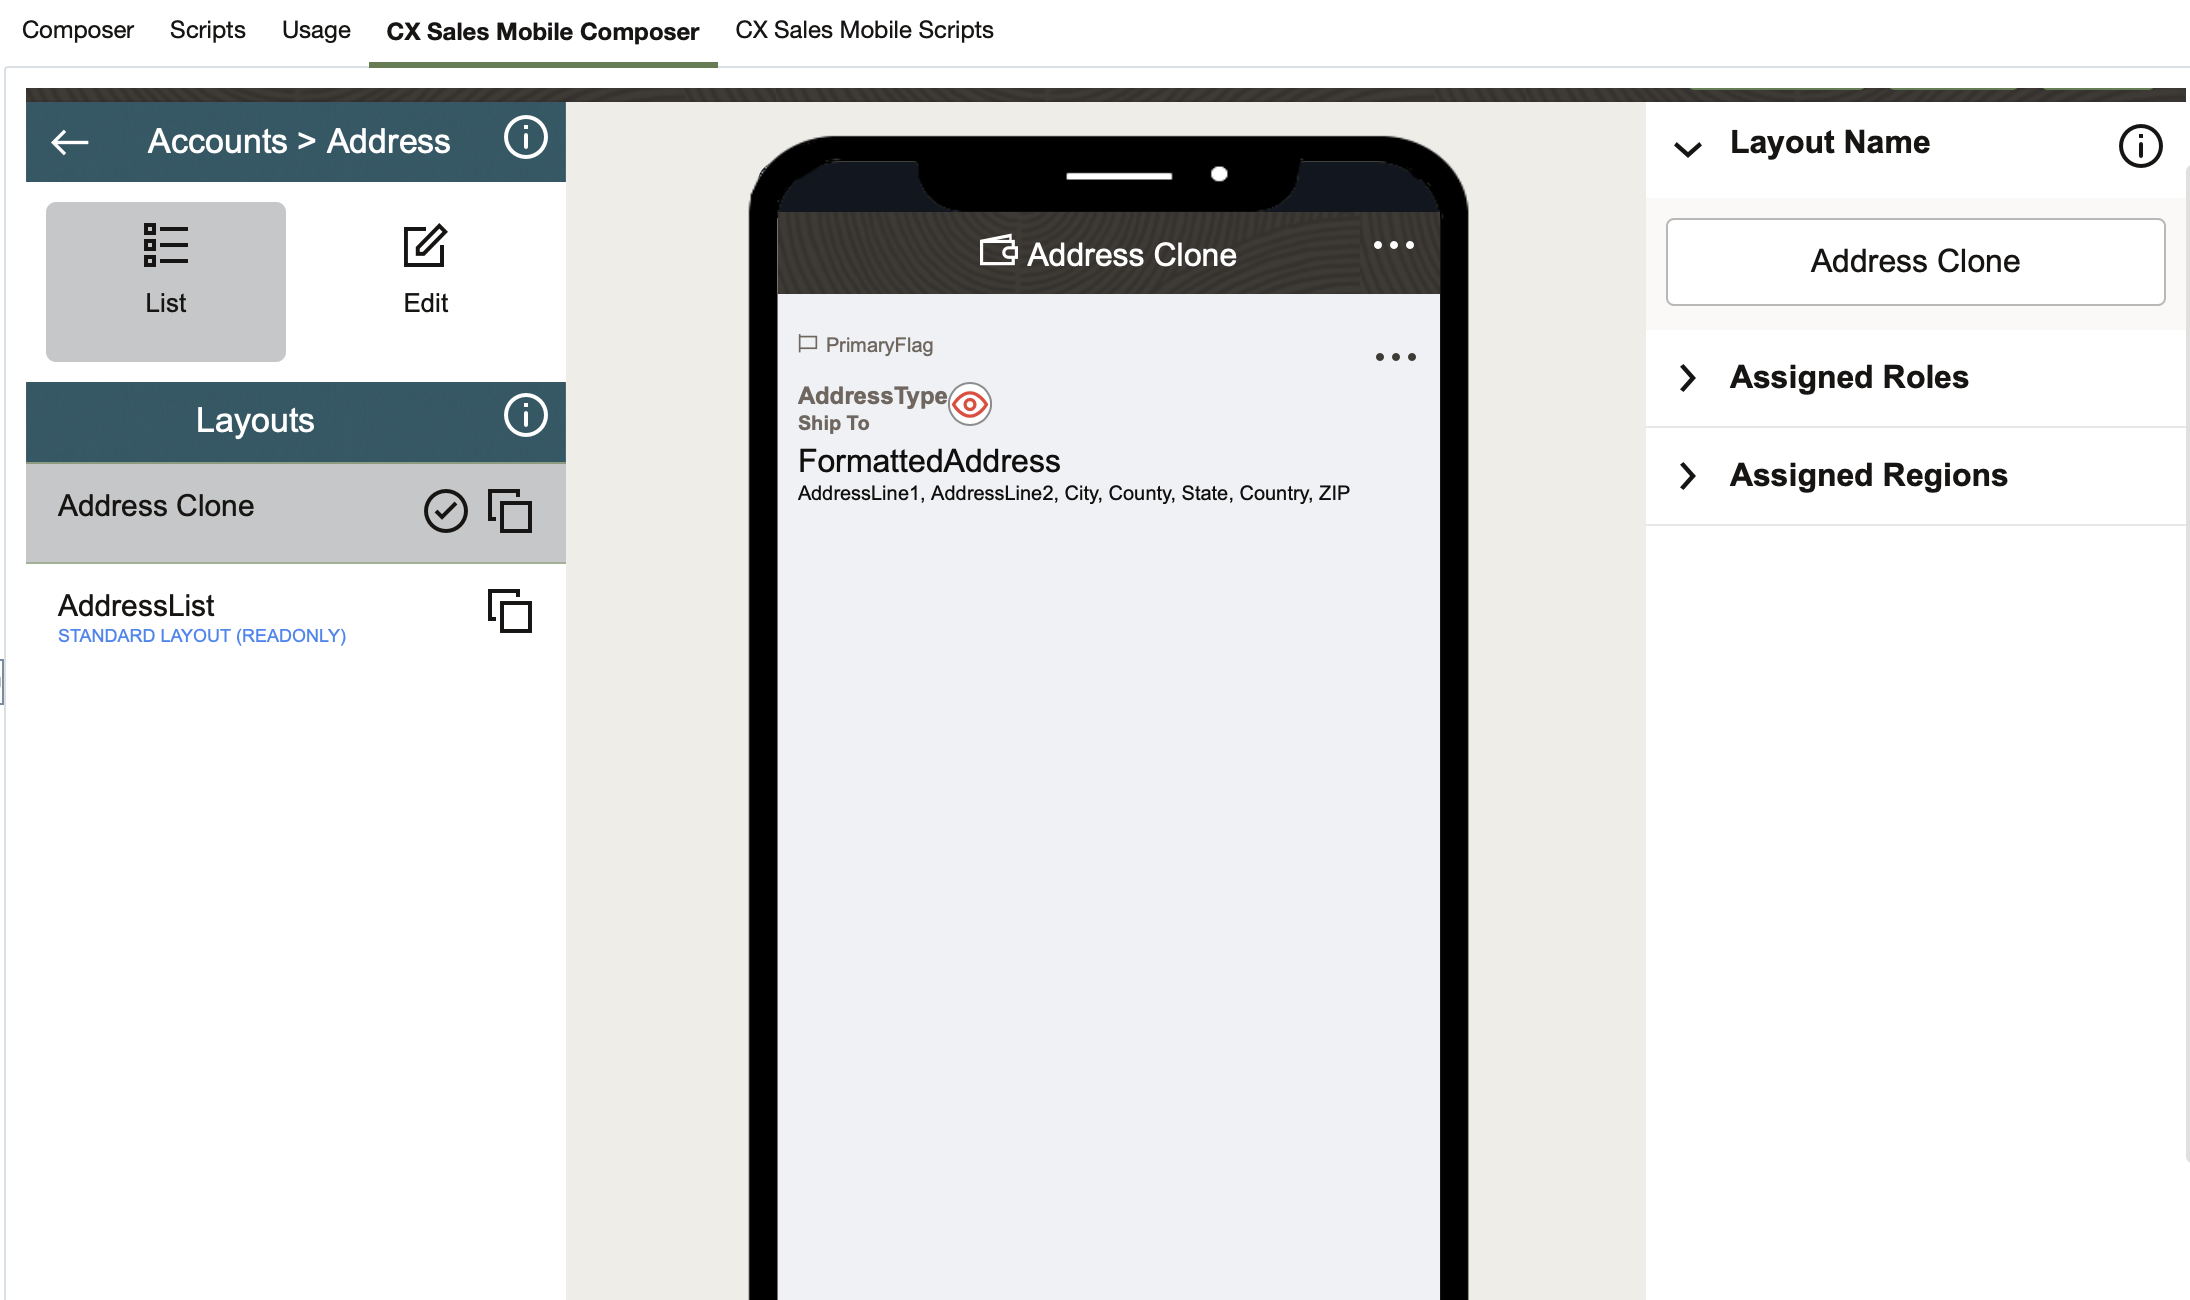
- Tap on either of the ellipses (...) icons to expand the list of options. You can disable or enable these options. They're enabled by default.

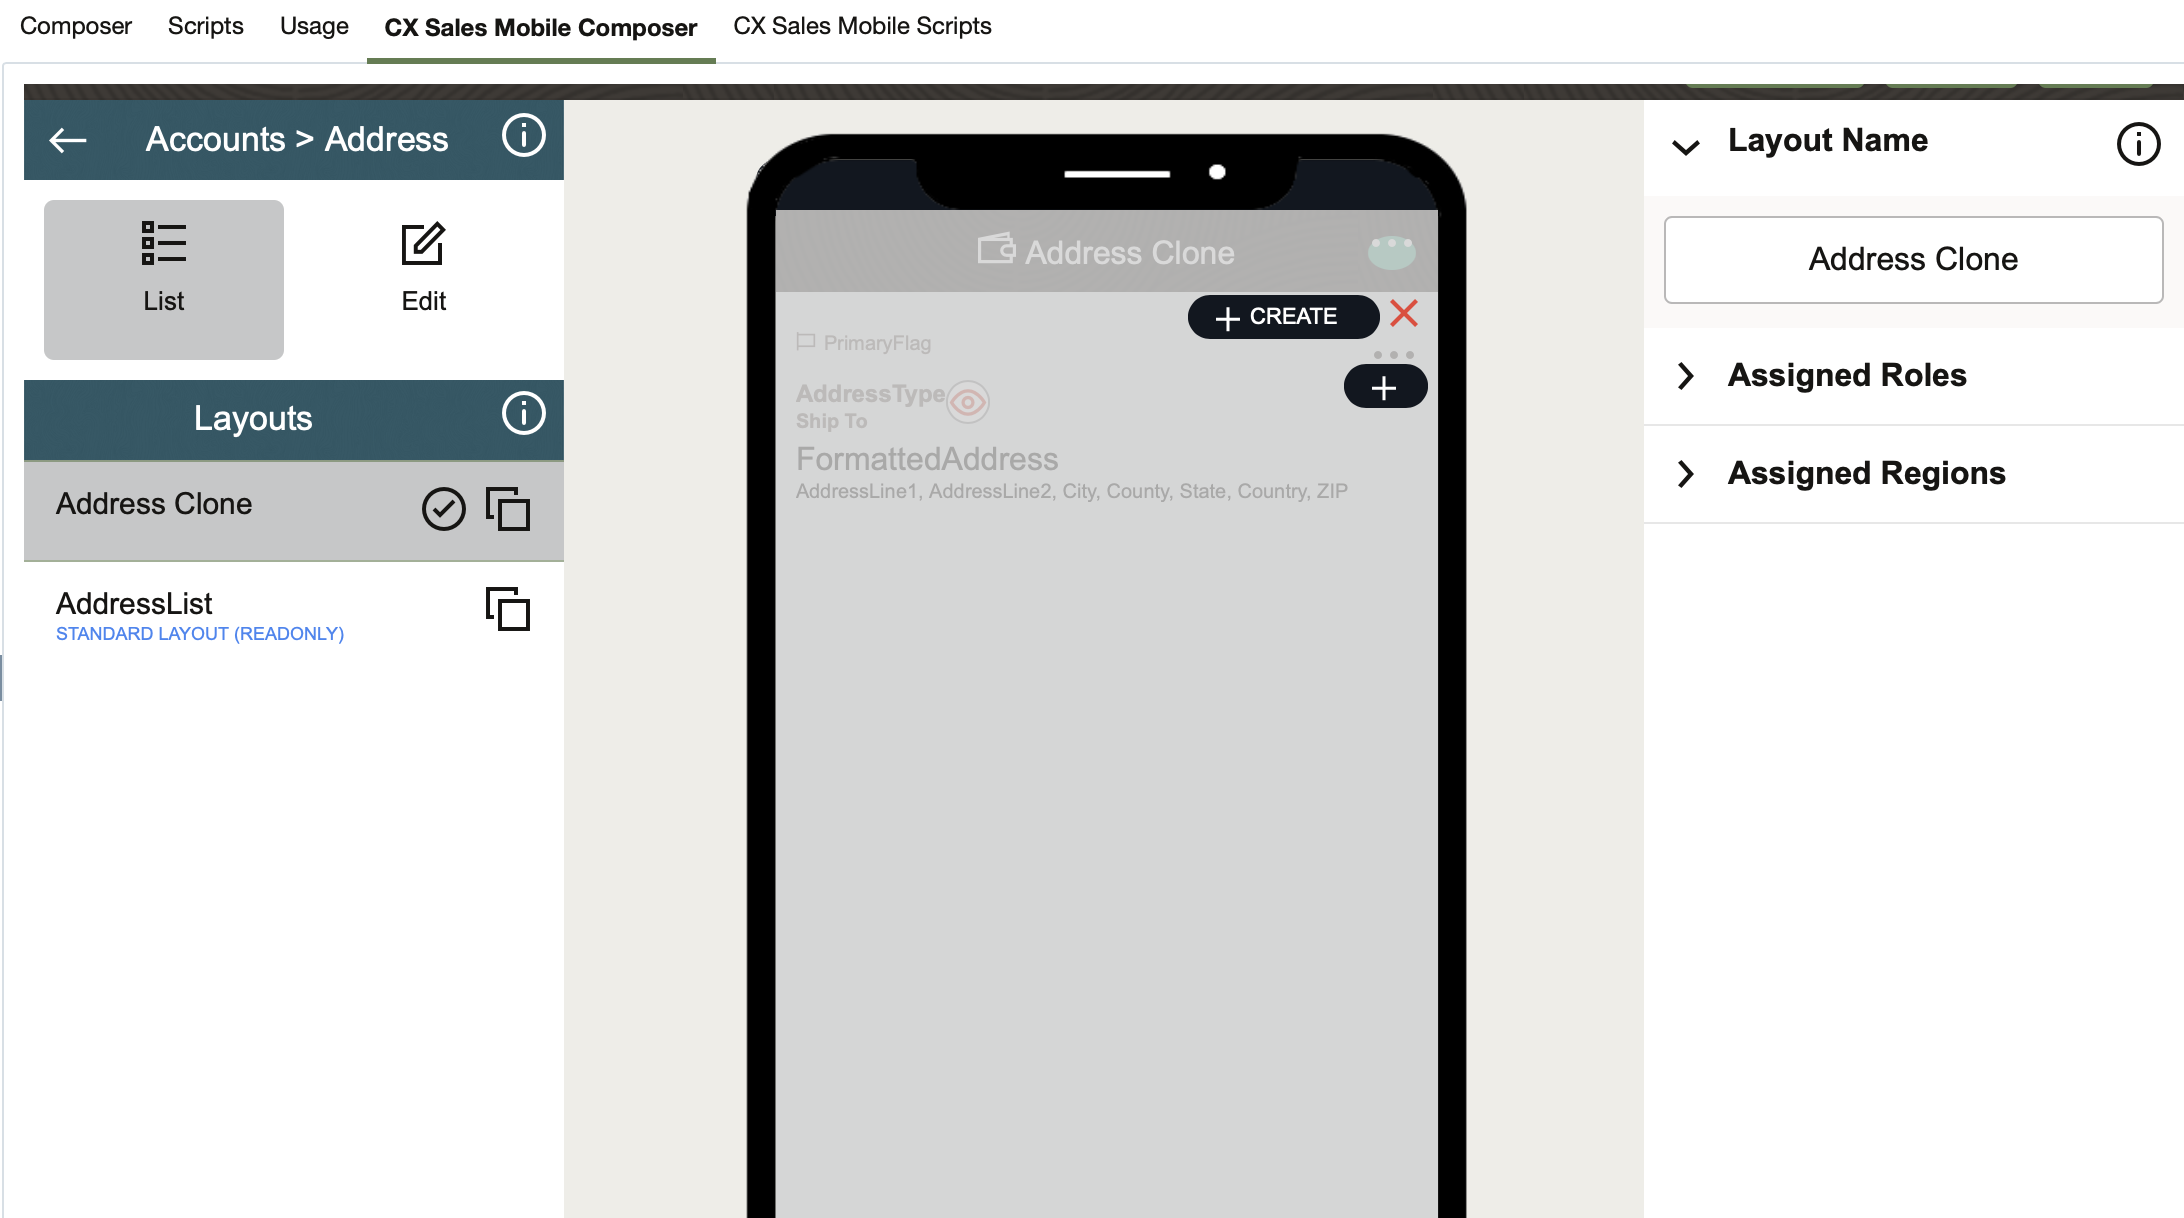
The options you configured display on Accounts and Contacts summary pages on the mobile app.
Partner Relationship Management
Modify the Assigned Role for the First Partner Contact of a Partner
You can now assign either a predefined or custom role to the first partner contact of a partner, and you can later modify that role, as well. You can also specify the role during the partner contact creation using REST APIs and Import Management.
The first partner contact for a partner can be assigned a role according to your business requirements.
Steps to Enable
You don't need to do anything to enable this feature.
Key Resources
- See the "Partner Relationship Management" chapter in the Getting Started with Your Partner Relationship Management Implementation guide.
Role Information
- Channel Operations Manager
- Channel Sales Manager
- Channel Account Manager
- Partner Sales Administrator
Use Improved Incentive Selection Rules and Participant Goals UIs
You can now manage your incentive selection rules more easily with the enhanced user interface. You can filter and sort based on attributes to quickly navigate through large rule sets. Guard rails have also been added to help you identify when you may be creating rules conditions that may not return results. You will be able to identify how your rules are being configured with a new column to indicate if your rule will be treated as an "AND" or an "OR" condition. Warnings will also be displayed for certain scenarios that may result in creation of invalid rules.
MANAGE PARTICIPANT GOALS
When managing goals in the participant screen, you can view the plan assignment effective dates, in addition to the measure effective dates. This lets you sort and filter based on the dates that a participant is assigned to a specific compensation plan. The Assignment Start Date and Assignment End Date columns will represent the participant's plan assignment.
The Start Date and End Date columns have been renamed to Measure Start Date and Measure End Date to more clearly indicate their use. These columns represent the effective date range that the performance measure is used in the compensation plan.
This feature provides easier administration and preventative guard rails.
Steps to Enable
You don't need to do anything to enable this feature.
Key Resources
See these topics in the "Configuration for a Business Unit" chapter in the Implementing Incentive Compensation guide:
- Participant Selection Rules for Importing Participants
- Selection Rules for Importing Orders
- Selection Rules for Importing Invoices
Role Information
- Incentive Compensation Analyst
- Incentive Compensation Administrator
Use Predefined Ranking Function to Calculate Incentives
Use the predefined ranking function to calculate incentives based on ranking. Use the predefined ranking function to easily build expressions that can rank input or output attributes of a plan component or performance measure. You can do ranking within a plan or a plan component, or across plans or plan components.

This feature means easier plan configuration, since you can directly use the ranking function instead of having to build a user-defined query.
Steps to Enable
You don't need to do anything to enable this feature.
Tips And Considerations
The measure or component being ranked needs to have a component calculation phase of Phase 1. The measure or component which does the ranking and uses the predefined ranking function needs to have a component calculation phase of Phase 2. This way ranking is done only after all the participants have been calculated in Phase1 for the metric being ranked.
Key Resources
- See the "Expressions" chapter in the Using Incentive Compensation guide.
Role Information
- Incentive Compensation Plan Administrator
Use Proportionally Split Rate Tables with a Threshold First Tier
Set the first tier of a rate table to be a threshold tier, where the rate isn't proportionally split, while still having the rate proportionally split in the rest of the tiers. Use this split option when the commission rate is assigned only above a certain attainment threshold and then proportionally split after the threshold.

Example: The following rate table has a minimum threshold of 25%.
- Any attainment below 25% pays 0.
- At 25%, the rate is 3%.
- Between 25% and 100%, the rate proportionally increases by 0.08% for every 1% attainment increase.
- Between 100% and 200%, the rate proportionally increases by 0.12% for every 1% attainment increase.
- The maximum rate applicable is capped at 200% attainment.

Scenario 1: If attainment is 24%, the rate = 0 since 24% is less than the threshold of 25% and the first tier is not proportionally split.
Scenario 2: If attainment is 60%,
- then rate = 3% for the first 25% attainment
- and rate = (60-25)*0.08 = 2.8% for the next 35% attainment since the rate is split proportionally
Watch a demo.
Easily configure plans when you have a proportionally split rate, but only above a certain threshold.
Steps to Enable
You don't need to do anything to enable this feature.
Tips And Considerations
Key Resources
- See the "Rate Table" chapter in the Using Incentive Compensation guide.
Role Information
- Incentive Compensation Plan Administrator
Control Paysheet Visibility for Analysts
Control visibility of paysheets for analysts based on a parameter setting. You can control who can see and perform tasks for paysheets using the Analyst Paysheet Visibility parameter.

Analyst Paysheet Visibility Setting
If the Analyst Paysheet Visibility value is set to Use Analyst Security, visibility to a participant's paysheet in the Manage Paysheet screen will be based on the Analyst Security.
Example: The analyst security is set to By Participant and the Analyst Paysheet Visibility value is set to Use Analyst Security. Analyst A1 is assigned to Participant P1, while Analyst A2 is assigned to Participant P2. When Analyst A1 logs in, the paysheet for Participant P2 isn't visible at all to A1. Similarly, when Analyst A2 logs in, the paysheet for Participant P1 isn't visible at all to A2. On the other hand, if the Analyst Paysheet Visibility value is set to All Paysheets, Analyst A1 can view the paysheet summary for Participant P2 even if he can't view the paysheet details. Similarly, Analyst A2 can view the paysheet summary for Participant P1 even if she can't view the paysheet details.
Control who can view and access payment data of a participant, thereby providing better data security.
Steps to Enable
If you want to continue the existing behavior regarding visibility of paysheets, no action is needed.
- However, if you want to control visibility of paysheets based on analyst security, navigate to Manage Parameters in Setup and Maintenance.
- Change the value of Analyst Paysheet Visibility to Use Analyst Security.
- Save your changes.
Tips And Considerations
- This setting only affects visibility of paysheets for users with the Incentive Compensation Analyst role.
- If Analyst Paysheet Visibility is set to Use Analyst Security, analysts may not be able to see certain paysheets within a payment batch if they don't have access to those participants. This means they won't be able to view the status of those paysheets when they are trying to pay a payment batch.
Key Resources
- See the "Configuration for a Business Unit" chapter in the Implementing Incentive Compensation guide.
Role Information
- Incentive Compensation Administrator
View Payment Amount in Participant's Home Currency in Paysheet Screens
View the payment amount in the participant's home currency in the Paysheet screens. Analysts can easily see how much a participant will get paid in the participant's home currency as well as the processing currency from the same screen.

Analysts can see the participant's payment amount in the participant's home currency right in the Paysheet screen, without having to run a separate report.
Watch a demo.
Steps to Enable
You don't need to do anything to enable this feature.
Key Resources
- Watch the Payment Amount in Home Currency demo.
- See the "Payment Processing" chapter in the Using Incentive Compensation guide.
Role Information
- Incentive Compensation Analyst
- Incentive Compensation Manager
Improve Performance of Inheritance Territory Recipient Processing
Inheritance territories enable simpler territory management for shadow or overlay sales organizations. They allow overlay territories to easily follow the prime territory at no administration cost. When source territories are updated, a process updates the recipient territories. Now there is a faster option to update active recipient territories without using proposals.
When scheduling the Update Inheritance Recipients process, the process parameter, Maximum Number of Territories in Proposal, is now set to 0.
Steps to Enable
You don't need to do anything to enable this feature.
Tips And Considerations
Any custom validations, triggers or workflows defined for the Sales Territory object in Application Composer will no longer be performed as a result of territory changes made using the Update Inheritance Recipients process.
The original processing behavior is used when the Update Inheritance Recipients process is submitted from the Territories UI (Actions > Inherit > Update Recipients option).
Key Resources
- See the "Territories" chapter in the Implementing Sales guide.
Role Information
Sales Administrator
Enable Nested Tabs for Territories in Workspace
You can enable nested tabs for territories in Workspace. This enhancement to territories in Workspace now allows nested tab support, letting sales operations to not only easily find territories, but also view and manage multiple territories at the same time.
Watch a demo.
This feature improves the territory management experience for the sales operations team when resolving territory gaps and overlap issues.
Steps to Enable
Make the feature accessible by assigning or updating privileges and/or job roles. Details are provided in the Role section below.
in addition to adjusting a job role, you need to enable the nested tab feature, which isn't enabled by default.
Here's how:
- Navigate to the Setup and Maintenance task, Manage Administrator Profile Values.
- Search for the profile option, Workspace Dynamic and Nested Tabs Enabled (ZCA_ENABLE_WORKSPACE_DYNAMIC_TABS), and enter a profile option value of Y.
- Also, add the Open Objects in Dynamic Tabs (SVC_OPEN_OBJECTS_IN_DTNT_PRIV) privilege to the Sales Administrator or equivalent administrator role.
Tips And Considerations
When using nested tabs, Next and Previous buttons aren't available in the Edit Territory pages.
Key Resources
- Watch the Nested Tabs in Territories Workspace demo.
- See the "Territories" chapter in the Implementing Sales guide.
Role Information
- Sales Administrator
View Team and Individual User Adoption Metrics in Application Usage Insights
You can now view details of team and individual usage in Application Usage Insights. These insights let you better understand how users are using solution-based, individual, and team metrics.
This feature lets Sales Managers and others view the usage of the solution by both individuals and teams. These details shed light on usage patterns and are key to understanding and improving user adoption of Sales.
Steps to Enable
You don't need to do anything to enable this feature.
Tips And Considerations
Beginning in Update 21B, Application Usage Insights shows data for users and their teams based on their organization hierarchy. If users aren't part of an organization hierarchy, the application doesn't return any data. To give visibility to users, you need to add them to a hierarchy or grant them the ORA_ZCA_VIEW_APPLICATION_USAGE_INSIGHTS_ORG privilege.
The ORA_ZCA_VIEW_APPLICATION_USAGE_INSIGHTS_ORG privilege lets users view data for the entire organization. Grant the privilege to any user who needs to see Application Usage Insights data for the whole organization.
View Channel Usage and Expanded Record Metrics in Application Usage Insights
You can now find more comprehensive user adoption information in Application Usage Insights, including broader coverage of record usage, such as record creation and updates. Insights for channel usage is also included. The channel refers to how users access the solution, such as the web, Microsoft 365, or mobile.
Understand object and channel usage of individuals, teams, and the organization to spot trends, better understand overall User Adoption of the solution, and proactively react if these trends are not meeting expectations.
Steps to Enable
You don't need to do anything to enable this feature.
Use Business Intelligence Cloud Connector View Objects for Incentive Compensation, Performance, and Earnings Reporting
The new Business Intelligence Cloud Connector view objects lets you extract data for:
- Earnings
- Earnings History
- Compensation Plans
- Performance Measures
- Plan Components
- Periods
- Participants
- Participant Compensation Plans
- Participant Plan Components
- High-volume data extraction.
- Extracting data for use in data warehouses or other tools
This feature lets you report on Incentive Compensation performance and earnings.
Steps to Enable
You don't need to do anything to enable this feature.
Key Resources
View Accurate Usage Time in User Adoption
The Sales - CRM Resource System Usage subject area now contains a new metric called Active Time in Web. The Active Time in Web metric is calculated from click activity and provides an accurate measurement of individual, team, and organization CRM usage time of the web channel. This new metric complements other dimensions of User Adoption reporting by giving a measurement of actual application use.
Gain new insights in User Adoption reporting by leveraging the new Active Time in Web metric. The new Active Time in Web metric provides a key measure for individual, team, and organization system usage based on user clicks.
Steps to Enable
You don't need to do anything to enable this feature.
View Reporting Performance in User Adoption Reporting
The new CRM - CRM Reporting Performance subject area shows the performance of reports and subject areas in Oracle Transactional Business Intelligence (OBTI) in CRM. The subject area exposes metrics around subject areas, analyses, and dashboards, including execution time. These metrics enable reporting on details such as the fastest or slowest subject areas and reports. The metrics in the new subject area provide insights to help determine which reports should be prioritized for development.
The new CRM - CRM Reporting Performance subject area allows you to see the performance of subject areas and reports in OBTI in CRM.
These insights help you prioritize development and maintenance so slower, less-performant reports and subject areas can be addressed and improved.
Steps to Enable
You don't need to do anything to enable this feature.
Define Data Security Policies Based on Access Groups
You can define access-group-based data security policies on service requests. You can also define additional data security policies based on access groups. The predefined data security policies will continue to be available.
Access groups are an alternative way of granting data permissions to users as compared to the SQL-based data security policies. Instead of creating security policies using SQL, you can use object-sharing rules in Sales and Service Access Management UI to define your visibility criteria.
Steps to Enable
You don't need to do anything to enable this feature.
Tips And Considerations
Customers wanting to create new data security policies can follow the access group documentation setup data security policies. If you are replacing existing SQL based data security policies with access groups then remember to end date your SQL based data security policies.
Key Resources
- See the "Users and Security" chapter in the Implementing B2B Service guide.
Role Information
Customer Relationship Management Application Administrator or Sales Administrator
Permit SR Contacts that are not Related to the Primary SR Account
Remove the built-in validation that requires the SR account and SR primary contact to be interrelated. Permit the primary and secondary contacts on an SR to belong to multiple accounts, or contacts with no account, or both.
This option can help accommodate service situations such as when a single SR involves contacts from multiple subsidiaries of a parent company.
Steps to Enable
- Users are able to add any contact to the SR, once the following profile option is set to Yes:
- ORA_SVC_ALLOW_ANY_CONTACT_ON_SR
- By default, SR contacts not associated with the SR account don’t have access to the SR from Digital Customer Service.
- If you want these external contacts to have access to the SR from Digital Customer Service, you can set the ORA_SVC_DEF_ACCESS_FOR_3RD_PARTY_CONTACTS profile option to Regular Access.
Key Resources
- See the "Profile Options, Lookups, and Scheduled Processes for Service Requests" chapter in the Implementing B2B Service guide.
Role Information
Customer Relationship Management Application Administrator or Sales Administrator
Follow Service Requests to Receive Notifications
Internal users can choose to follow specific Service Requests using an action on the SR details page. The follow feature is helpful for users who want to receive updates about a specific Service Request, such as an executive or sales representative who wants to monitor the progress of a certain issue for a customer. The follower will receive all the notifications for the Service Request object that are designated for delivery to followers. If the follower decides he or she no longer wants to receive notifications for a particular SR, the user can un-follow the SR record. To define these type of notifications, authors of Notification Preference rules can select Follower as a type of recipient for a service request notification. Note that to receive the notification, followers must be set up as Resources.
This feature lets any user who has the permissions to view a service request to follow that record for the purpose of receiving notifications.
Steps to Enable
Make the feature accessible by assigning or updating privileges and/or job roles. Details are provided in the Role section below.
This feature will require that the following profile option be set to Yes to enable for the site: ORA_ENABLE_FOLLOW_NOTIFICATIONS.
For a user to be able to follow a service request, they must have the following permission: Get_SR_Follow_Notifications.
The following are the ready-to-use duty roles that the new privilege has been added to:
- Troubleshooter
- Power User
- Contributor
- Channel User
For the follow functionality to be seen by users - at least one notification trigger must be enabled for follow. If no notification triggers are enabled for follow, then the users will not see this as an option.
Key Resources
- See the "Configure Notifications" chapter in the Implementing B2B Service guide.
Role Information
This feature is available to users who have the correct privileges applied.
Run Processes Through Action Plans
Developers and integrators now have a simple mechanism to create and register Process Automation processes within Action Plans.
Agents can make use of these advanced processes for automation, system integration, and user workflows.
Steps to Enable
Before you begin configuring this feature:
- To use Oracle Process Automation in Actions and Plans in Oracle B2B Sales and Service 21.04, you must purchase SKU (B93302).
- Oracle Process Automation is automatically provisioned to:
- Existing B2B Sales and Service customers who have a hybridized Oracle Digital Assistant instance.
- All new B2B Sales and Service customers who get a hybridized Oracle Digital Assistant instance.
To configure this feature:
- Configure Oracle Identity Cloud Service:
- Enable user and role synchronization if it's not already enabled. Refer to the Administering Oracle Identity Cloud Service guide for information regarding user and role synchronization.
- Assign required roles: <Your ODA Service Instance IDCS App>, Application Roles, Assign Groups. This is required to provide the access to Process Automation designer, workspace and REST APIs.
- ServiceAdministrator: assign to groups Sales Administrator, Case Manager, Human Resource Help Desk Manager, and Internal Help Desk Manager.
- ServiceDeveloper: assign to groups Customer Service Representative, Case Worker, Human Resource Help Desk Agent, and Internal Help Desk Agent.
- Configure Oracle Process Automation in Oracle Digital Assistant (ODA):
- Go to the ODA Administrative console and Enable Process Automation from the administrative UI.
- Configure Oracle B2B Sales and Service:
- Enable the Manage Processes in Action Plans feature. In Setup and Maintenance go to the following: Service > Change Feature Opt In > Action Plans and click on the Edit icon for Features.
- Configure authentication from B2B Sales and Service to your Process Automation instance: In Setup and Maintenance go to the following: Service > Action Plans > All Tasks > Manage Process Integration for Action Plans. Be sure to provide a user who has the Process Application Administrator role in Process Automation.
- Optionally, export and import your Action and Plan configurations from your test environment to your production environment:
- For export and import of Actions and Plans, refer to the "Import Your Data" chapter of Understanding Import and Export Management for CX Sales and B2B Service.
- For export and import of Process Automation processes, refer to the Process Automation documentation.
- Ensure all B2B Sales and Service users of your process-based Actions and Plans have:
- The SVC_ACTION_PLAN_PROCESS_PRIV privilege provisioned in B2B Sales and Service.
- The required permissions to view and edit their processes in Process Automation.
Now you can define your processes and build them into your Actions and Plans.
- Refer to the Process Automation Administration and User Guides for help creating processes.
- Refer to the "Set Up Action Plans" chapter in the Implementing B2B Service guide for help configuring processes into your Actions and Plans.
Tips And Considerations
A subscription to Oracle Process Automation is required in order to take advantage of this feature.
Key Resources
- See the "Set Up Action Plans" chapter in the Implementing B2B Service guide.
Role Information
B2B Service Administrator, Process Automation Administrator
Add All Contacts and Team Members to the SR Message Recipients
Use the Add Contacts and Team action to reply to all the contacts and resources of the service request when you compose a response to a Service Request message. This action is visible to you only if you have the Compose Response privilege.
When responding to the customer, if you want to include all the contacts and team members of the service request, this is available as a single click action.
Steps to Enable
To use this feature, you must allow customers to send service request messages to any email recipients. They can do that by setting the SVC_ENABLE_ADDITIONAL_EMAIL_RECIPIENTS profile option to Y.
Key Resources
- See the "Service Requests" chapter in the Using B2B Service guide.
View Images and Logos Inline in Inbound Emails
View images and logos inline within the body of the service request message, while not capturing inline images as regular service request attachments. This lets you view only regular attachments and not see redundant images such as logos and inline images in the SR Attachments section.
This limits the list of attachments you see on the service request to the actual attachments, such as documents that were attached to inbound emails. Inline images that are less meaningful to the content of the service issue, such as logos in the sender's signature, aren’t included in the service request attachments.
Steps to Enable
You must set the following profile options to Yes:
- ORA_SVC_ENABLE_INBOUND_INLINE_ATTACHMENT_CATEGORY
- SVC_INBOUND_ENABLE_INLINE_ATTACHMENTS
Key Resources
- See the "Email Channels" chapter in the Implementing B2B Service guide.
Role Information
Customer Relationship Management Application Administrator or Service Administrator
Override Coverage Time Zone on a Milestone Using the Time Zone of the Assigned To Resource
Set an override on the milestone configuration that calculates the milestone due date based on the time zone of the agent assigned to the SR. If there is no assigned agent, or no time zone is specified, the time zone specified in the coverage line is used.
Companies with service agents supporting customers across many time zones may use this feature to ensure the due date falls within working hours of the resource to whom the SR is assigned. This makes it easier to assign milestone due dates to global resources and avoids setting up multiple coverages, calendars, and Groovy script to support this scenario.
Steps to Enable
- In the Setup and Maintenance work area, go to the following:
- Offering: Service
- Functional Area: Service Entitlements
- Task: Manage Service Milestone Configuration
- Select the milestone you'd like to use the time zone override.
- Set the Time Zone Override Source field to "Owner".
Key Resources
- See the "Service Entitlements" chapter in the Implementing B2B Service guide.
Role Information
Administrators with access to Setup and Maintenance can set this override for a milestone configuration.
Filter Knowledge Management Analytics Reports by Department
Knowledge managers and analysts can filter reports in the knowledge management analytics dashboards by department. Organizations that have implemented knowledge management for multiple departments can filter reports to display data only for the department that they are interested in. Department filtering is also available in all knowledge management subject areas and any reports created from them.
Organizations that have implemented knowledge management for multiple departments can filter reports to display data only for the department that they are interested in. Department filtering is also available in all knowledge management subject areas and any custom reports created from them.
Steps to Enable
You don't need to do anything to enable this feature.
Tips And Considerations
Department filtering is key to separating content developed for different parts of the business as often each department will operate in isolation from other departments. This is particularly important when it comes to identifying the most popular search terms.
Key Resources
- See the "Analyze Knowledge" chapter in the Administering Knowledge Management guide.
Role Information
All Knowledge Analytics users can use this feature.
Include Full Question Text in Knowledge Management Search Analysis
You can access the full text of users' questions, in addition to the normalized question, using the Knowledge Management Article Search Historical subject area. You can also use a new search analysis dashboard to quickly view aggregated information about Knowledge Management search queries.
This feature is a new addition to the Knowledge Management - Article Search Historical subject area intended to allow knowledge users insights into how their content is being searched for. In addition to the already available normalized question, this feature allows the full question text to be seen allowing greater depth of understanding. Users can easily see common questions and frequent terms and determine actions to take to improve their customers knowledge experience. These can include the creation of new content or the addition of new concepts into the knowledge dictionary.
Steps to Enable
Leverage new subject area(s) by adding to existing reports or using in new reports. For details about creating and editing reports, see the Creating and Administering Analytics and Reports book (available from the Oracle Help Center > your apps service area of interest > Books > Administration).
Key Resources
- See the "Analyze Knowledge" chapter in the Administering Knowledge Management guide and the "Subject Areas" chapter in the Subject Areas for Transactional Business Intelligence in CX Sales and B2B Service guide.
Role Information
Users with the Knowledge Analytics Duty Role can use Knowledge Analytics.
NOTE: Digital Customer Service is on a monthly release cadence. This feature was released in the January 2021 release.
Authenticated self-service users can reschedule an existing work order appointment at their own convenience without having to contact an agent. This reduces the number of customer support calls and service requests.

Reschedule Work Order
Allowing authenticated self-service users to reschedule their own work order appointments reduces the number of customer support calls and service requests.
Steps to Enable
You don't need to do anything to enable this feature.
Tips And Considerations
Proxy user configuration data is cached for a duration specified by the SVC_CSS_PUDS_CACHE_DURATION profile option.
If this value is changed then the cache is cleared. For changes made using this UI to be read immediately, the value of SVC_CSS_PUDS_CACHE_DURATION profile must be altered. The recommended action is to add or subtract 1 minute from the existing value.
Key Resources
- See the "Components" chapter in the Implementing Digital Customer Service guide.
Role Information
This feature is available to Digital Customer Service end-users. Digital Customer Service end-users must have the Customer Self-Service User role.
Offer Chat Only When Agents Are Available
NOTE: Digital Customer Service is on a monthly release cadence. This feature was released in the January 2021 release.
You can now make chat available to self-service users only when an agent is available to accept the request.
This feature boosts customer satisfaction because self-service users won't be kept waiting for an agent to accept their chat when no agents are available.
Steps to Enable
- Set SVC_CHAT_INLAYS_ACCESS_ENABLED profile option to Yes.
- Set the default value of the DCS chatPollingEnabled application variable to true.
Key Resources
- See the Integrate Chat in Your Digital Customer Service Application topic in the "Additional Feature Configuration" chapter of the Implementing Digital Customer Service guide.
Role Information
This feature is available to Digital Customer Service end-users. Digital Customer Service end-users must have the Customer Self-Service User role.
Allow Resources with Contact Usage to Become Customer Self-Service Users
You can now enable resources with Contact usage to register as self-service users. You can do this using either the self-service application or a REST API.
This feature allows resources who have been given the Contact usage to see knowledge articles, create service requests on their own behalf, and use other functionality in the self-service portal.
Steps to Enable
Employees who are resources in B2B Service can be granted self-service access using the selfRegistrations REST resource provided they have been given the Contact usage.
The Trading Community Party Information Service can be used to grant the Contact usage to resources.
Tips And Considerations
While in the customer self-service portal, a resource may see additional knowledge articles, but there is no special treatment in the UI for the way objects are displayed.
Key Resources
- See the "Users and Accounts" chapter in the Implementing Digital Customer Service guide.
Role Information
This feature is available to Digital Customer Service end-users. Digital Customer Service end-users must have the Customer Self-Service User role.
Collect Additional Contact Information during Self-Service Registration
You now have the option to include more attributes in a self-service user registration form. Using Application Composer, you can configure the Contact object using an expanded group of default attributes and you have the option of creating your own custom attributes.
This feature gives you more flexibility to add the attributes you need to fit your business needs.
Steps to Enable
You don't need to do anything to enable this feature.
Key Resources
-
See the topic on configuring the self-service registration object in the "Additional Feature Configuration" chapter in Implementing Digital Customer Service.
Role Information
This feature is available to Digital Customer Service end-users. Digital Customer Service end-users must have the Customer Self-Service User role.
Service Logistics - Support for Adding Oracle Field Service Follow Up Activities
The Service Logistics integration was released in 19.01, this feature is to extend the overall solution with support for creating a work order automatically based on creation of follow Up activity in Oracle Field Service. Technicians performing work may determine additional parts are required. This feature works along with the new Order Parts functionality in Oracle Field Service that allows a technician to schedule a follow up activity and order parts that are associated to the activity. A corresponding work order is then created in B2B Service with the part orders and associated to the same account, contact and service request from the original work order.
Technicians need the ability to order parts and schedule follow up activities while working on a field service activity. This new follow up activity needs to be available in B2B Service so the agent can view the additional required work and answer customer questions.
Steps to Enable
Your Administrator must enable this functionality in both Oracle Field Service and Oracle Integration Cloud through the following steps:
- Complete the setup in Oracle Field Service to configure the follow up activity
- Download and import our 21B Oracle Integration Cloud PAR file for the integration between B2B Service and Oracle Field Service which contains the new integration flow for creating a new work order when a follow up activity is created in Oracle Field Service
Key Resources
- See the "Oracle B2B Service Configuration" chapter in Integrating B2B Service with Field Service.
Role Information
The following roles are required to enable:
- Oracle Field Service Administrator to configure this functionality which allows a technician to create a follow up activity based on an existing activity that has a corresponding work order in B2B Service
- Oracle Integration Cloud Administrator to download and import the new OIC flows for 21B that contains a new integration flow for creating the new work order in B2B Service
Use Service Work Order Support for Find My Technician
The Work Order now supports the find my technician functionality in Oracle Field Service. A new field has been added to the work order object to store the URL passed from Oracle Field Service through the pre-built OIC flow. The URL opens a page from Oracle Field Service that tracks technicians when they are in route to the customer location.
Allows agents and customers to view the following:
- When the technician is assigned, the technician name, picture, and an updated estimated arrival time window.
- When the technician has left the previous site and is on the way, an updated arrive time and can follow them real-time on a map as they are traveling.
- When the technician as arrived, confirmation the technician has arrived.
- When the work is complete, the ability for the customer to rate the service performed.

Example Find My Technician Flow
Steps to Enable
Your Administrator must enable this functionality in both Oracle Field Service and B2B Service through the following steps:
- Complete the setup in Oracle Field Service to enable "Where's My Technician"
- Download and import the B2B Service 21B Oracle Integration Cloud flow which has the Oracle Field Service URL field mapped to the new work order field in B2B Service or update the existing flows by mapping the Oracle Field Service URL field mapped to the new work order field in B2B Service
- Add the new field to the work order UI to display the URL through App Composer
Tips And Considerations
The "Where's My Technician" functionality in Oracle Field Service is required so this functionality is only designed to work with work orders that are synced to Oracle Field Service.
Key Resources
- See the "Oracle B2B Service Configuration" chapter in Integrating B2B Service with Field Service.
Role Information
The following roles are required to enable:
- Oracle Field Service Administrator to enable this functionality which generates the unique url for each activity that provides access to this view
- B2B Administrator to add the new field to the agents work order detail page which opens a new browser tab to view
- Oracle Integration Cloud Administrator to either download and import the new OIC flows for 21B or add the field mapping to their current flow synchronizing activity updates from Oracle Field Service to B2B Service to populate this work order field when the url is added
- Digital Customer Service (self service), Administrator to download the new reference app which contains this functionality or configure into their existing self service solution to allow customers to view this detail while viewing the work order
Import and Export and REST APIs
Verify Email and Phone Data Using REST APIs
Manage verified email and phone data for accounts and contacts in REST. These additional fields are now available under the Contact Point child in the Account, Contact, Household REST service:
- Verification Status: Status code to set or retrieve the verified result for the contact point. Valid values are validated based on a lookup type that has values like Valid, Invalid, Partially valid (only for Email).
- Verification Date: Date when contact point information was last verified.
This feature helps you ensure that your accounts and contacts have correct contact information.
Steps to Enable
Review the REST service definition in the REST API guides, available from the Oracle Help Center > your apps service area of interest > REST API. If you're new to Oracle's REST services you may want to begin with the Quick Start section.
Key Resources
- See the REST API for CX Sales and B2B Service guide.
Verify Email IDs and Phone Numbers Using a REST API
Verify email IDs and phone numbers using the Email and Phone Verification Service REST resources. You can use the resource to verify all phone numbers and email IDs. For example, you can verify emails and validate phone numbers of your prospects to ensure that you can communicate efficiently with your customers at each stage of the sales or marketing process.
For example, you can verify emails and validate phone numbers of your prospects to ensure that you can communicate efficiently with your customers at each stage of the sales or marketing process.
Steps to Enable
Review the REST service definition in the REST API guides, available from the Oracle Help Center > your apps service area of interest > REST API. If you're new to Oracle's REST services you may want to begin with the Quick Start section.
Key Resources
- See the REST API for CX Sales and B2B Service guide.
Get the Top-Level Account Using a REST API
Use the Account REST API to get the top-level account for any account. You can get the top-level account from the Ultimate Parent attribute for an account.
These three attributes are available:
- Ultimate Parent
- Ultimate Parent Registry ID
- Ultimate Parent ID
Steps to Enable
Review the REST service definition in the REST API guides, available from the Oracle Help Center > your apps service area of interest > REST API. If you're new to Oracle's REST services you may want to begin with the Quick Start section.
Review the REST service definition in the REST API guides, available from the Oracle Help Center > your apps service area of interest > REST API. If you're new to Oracle's REST services you may want to begin with the Quick Start section.
Key Resources
- See the REST API for Oracle Sales and B2B Service guide.
Role Information
- Sales setup user
- Sales Administrator
Support Customer Contact Profile in Import and Export Management
You can now access the Customer Contact Profile in Import Management using the Account Contact object. This is similar to the Contacts tab in the Account details page. You can also access any custom fields defined on the Contact object in Application Composer through the Account Contact object in Import and Export Management. The Account Contact object is also exposed as child of the Account object in REST APIs.
The Account Contact object in Import and Export Management can be used to manage the Customer Contact Profile available in Application Composer.
Steps to Enable
You don't need to do anything to enable this feature.
Key Resources
Import Contract Header and Line Translations
You can use Import Management from the Tools work area to import the contract translations objects into Enterprise Contracts. Here's the list of objects you can import:
- Contract Header Translation
- Contract Line Translation
You can also update the attributes of these translation objects using import.
This feature lets you transfer contract header and line translations from an external application to Enterprise Contracts.
Steps to Enable
You don't need to do anything to enable this feature.
Key Resources
- See the "Import Your Data" chapter in the Understanding Import and Export Management for CX Sales and B2B Service guide.
Improve Performance in High-Volume Import for Accounts, Contacts, and Households
Use a new profile option, Import Processing for Multiple Address Types Enabled (ORA_HZ_IMPORT_MULTI_ADDRESS_TYPE), to improve import performance. By default, this profile option is set to Yes, meaning you can enter multiple address types during high-volume import of Account, Contact, and Household objects. This is the existing behavior. You can disable this profile option to improve the import performance. When you set this profile option to No, you can enter only a single address type. However, this improves the import performance.
You can set a profile option to improve import performance.
Steps to Enable
You don't need to do anything to enable this feature.
Tips And Considerations
If you disable the profile option, you won't be able to enter multiple addresses in the same line.
Role Information
- Sales Administrator
Use Customer Contact Profile with a REST Resource
Use the Customer Contact Profile with the Account REST API, through the Account Contact child object. The resource now includes custom fields defined on the Customer Contact object in Application Composer, which is exposed as the Account Contact child to the Account object in REST. The Account Contact object is also made available in Import and Export Management.
The Account Contact child to the Account object in REST can be used to manage the Customer Contact profile available in Application Composer.
Steps to Enable
Review the REST service definition in the REST API guides, available from the Oracle Help Center > your apps service area of interest > REST API. If you're new to Oracle's REST services you may want to begin with the Quick Start section.
Key Resources
- See the REST API for CX Sales and B2B Service guide.
View Participant Summarized Credits Using a REST API
Use the Incentive Compensation Summarized Credits REST API to show summarized credits for participants. This resource lets you store summarized credit amounts for a participant within the interval selected under the calendar period type.
You can use this REST resource to provide credits visibility through additional channels other than traditional reporting. You can also use this resource for a variety of use cases, including Oracle Digital Assistant chatbots, Oracle Visual Builder applications, or integrating information with other programs.
Steps to Enable
Review the REST service definition in the REST API guides, available from the Oracle Help Center > your apps service area of interest > REST API. If you're new to Oracle's REST services you may want to begin with the Quick Start section.
Key Resources
- See the "Incentive Compensation Summarized Credits" task in the REST API for CX Sales and B2B Service guide.
Role Information
- Incentive Compensation Participants
- Incentive Compensation Participant Managers
Report on Latest Estimated Compensation by User-Defined Simulation Name
Pass a user-defined simulation name while calling the estimated compensation REST API to easily identify your simulation. If the simulation name already exists, the REST API will mark the current simulation as latest and all the older ones as older simulations, so that reports can easily identify the latest simulation results.
Easily report on the latest estimation for a deal.
Steps to Enable
Review the REST service definition in the REST API guides, available from the Oracle Help Center > your apps service area of interest > REST API. If you're new to Oracle's REST services you may want to begin with the Quick Start section.
Key Resources
- See the REST API for CX Sales and B2B Service guide.
Role Information
- Incentive Compensation Analyst
- Incentive Compensation Manager
View Participant Summarized Team Credits Using a REST API
Use the Incentive Compensation Summarized Team Credits REST resource to view the summarized credit amount for the first level directs under a participant manager within the interval selected under the calendar period type.
You can use this REST resource to provide summarized credits visibility through additional channels other than traditional reporting. You can also use this resource for a variety of use cases, including Oracle Digital Assistant chatbots, Oracle Visual Builder applications, or integrating information with other programs.
Steps to Enable
Review the REST service definition in the REST API guides, available from the Oracle Help Center > your apps service area of interest > REST API. If you're new to Oracle's REST services you may want to begin with the Quick Start section.
Key Resources
- See the "Incentive Compensation Summarized Team Credits" task in the REST API for CX Sales and B2B Service guide.
Role Information
- Incentive Compensation Participant Managers
Use REST API to View Participant Summarized Earnings Per Interval
You can use the Incentive Compensation Summarized Earnings Per Interval REST resource to show summarized earnings per interval for participants. The interval corresponds to the calendar period type provided at the business unit level.
You can use this resource to provide earnings visibility through additional channels other than traditional reporting. You can also use it for a variety of use cases, including Oracle Digital Assistant chatbots, Oracle Visual Builder applications, or integrating information with other programs.
Steps to Enable
Review the REST service definition in the REST API guides, available from the Oracle Help Center > your apps service area of interest > REST API. If you're new to Oracle's REST services you may want to begin with the Quick Start section.
Key Resources
- See the "Incentive Compensation Summarized Credits" task in the REST API for CX Sales and B2B Service guide.
Role Information
- Incentive Compensation Participants
- Incentive Compensation Participant Managers
Update Currency Conversion Rates using File Based Import
You can now easily update existing currency conversion rates using Oracle Universal Content Manager (UCM) file-based import. You can make your changes in the template and use the Update Rate column to indicate that you want to update an existing conversion rate. Once your conversion rates are ready, you can simply import the file.
Watch a Demo
- Easier administration of currency conversion rates
- Ability to import updates or make corrections to existing conversion rates
Steps to Enable
You don't need to do anything to enable this feature.
Tips And Considerations
- You will need to download the updated file template with the Update Rate column to use this feature.
- Make certain not to mix new and updated rates in the same import. Only one mode can be supported in a single import file.
- When updating existing rates that have already been used in processing, you will need to reprocess in order for the updated conversion rates to be reflected for those records.
Key Resources
- Watch Update Currency Conversion Rates using File Based Import Demo.
- "Import Currency Conversion Rates" topic in the "Currency Conversion Rates" chapter in the Using Incentive Compensation guide.
- "Updated Template File for Importing Currency Conversion Rates" topic in the "Incentive Compensation" chapter in the File-Based Data Import for CX Sales and B2B Service guide.
Role Information
- Incentive Compensation Administrator
Duplicate Predefined Smart Actions
Create custom smart actions quickly and easily by copying predefined actions and then modifying them. Note that you can’t modify predefined actions directly. You can modify custom actions directly, or you can copy them to create new custom actions. Once you copy an action, you can update different attributes, such as the name, application, condition, and roles.

Duplicate Smart Action
This feature lets you modify predefined actions.
Steps to Enable
Leverage Application Composer to expose and adjust page layout and attributes. To learn more about extending your application using Application Composer, visit Oracle Help Center > your apps service area of interest > Books > Configuration and Extension.
To copy a smart action:
- Ensure that you're working in an active sandbox.
- In Application Composer, navigate to Common Setup > Smart Actions.
- Find the action that you want to copy and click the Duplicate icon.
- Save your changes.
Key Resources
- See the "Add Objects and Fields" chapter in the Configuring Applications Using Application Composer guide.
Sort Relevant Smart Actions Using Frequency of Use and Object Context
The most relevant smart actions are now automatically sorted by predefined rules when displayed in Workspace. For example, depending on an object's current state, the most frequently used actions are automatically boosted to the top of the list. This applies to both custom and standard actions.
Users get to see the most often used actions first.
Steps to Enable
Leverage Application Composer to expose and adjust page layout and attributes. To learn more about extending your application using Application Composer, visit Oracle Help Center > your apps service area of interest > Books > Configuration and Extension.
You don't need to do anything to enable this feature.
Key Resources
- See the "Add Objects and Fields" chapter in the Configuring Applications Using Application Composer guide.
Include Intersection Object Changes in Audit History
When setting up your audit policies, you can now include the intersection objects that are automatically created when you create many-to-many relationships in Application Composer. This means that the Audit History work area includes changes made to intersection object fields.
Customers can now enable audit history for the intersection objects created in many-to-many relationships.
Steps to Enable
Implement application change auditing according to the steps in the Implementing Sales guide (see Key Resources, in the next section).
Key Resources
- See the "Application Change Auditing" chapter in the Implementing Sales guide.
Role Information
- Setup user
- Sales Administrator
Access Opportunities and Leads Secured Using Access Groups in Near Real-Time
You can access opportunity and lead records that are secured using access groups in near real-time. When an opportunity or lead is created, when a user is added to or removed from an opportunity or lead team, or when the owner of an opportunity or lead is changed, the user can access the new records immediately. You no longer have to run the Perform Object Sharing Rule Assignment Processing scheduled process before users get access to the opportunity or lead records in these cases.
Users have quicker access to opportunity and lead records.
Steps to Enable
To implement near real-time access for opportunity and lead records, you must enable the Signals functionality by setting the profile option, Common CRM Signals Active (ORA_ZCA_ENABLE_SIGNALS), to Yes. By default, Signals functionality is disabled. Here are the steps to use:
- From Setup and Maintenance, navigate to the Manage Administrator Profile Values task.
- Search for the profile option name Common CRM Signals Active.
- Change the default value of the profile option from No to Yes.
- Click Save and Close.
Key Resources
- See the "Access Groups" chapter in the Securing CX Sales and B2B Service guide.
Use Access Groups with an Expanded Set of Sales Objects
Use access groups to provide sales resources with access to an expanded set of sales object data. The additional objects supported are:
- Duplicate Identification Batch
- Goal
- Goal Participant
- Activity Assignee
- Service Request
This update includes increased support for access groups across key objects.
Steps to Enable
You don't need to do anything to enable this feature.
Key Resources
- See the "Access Groups" chapter in the Securing CX Sales and B2B Service guide.
Use System Access Groups with an Expanded Set of Predefined Rules
You can use system access groups and predefined rules to configure access to object data for your users. System groups provide an alternative method of managing a user's access to data. There is a system access group to correspond to each of the standard job roles Oracle provides. Predefined object sharing rules assigned to each group provide the same access to data provided by the standard job roles and associated data security policies. With this update, predefined rules are now available for these objects:
- Asset
- Activity
- Activity Assignee
- Duplicate Identification Batch
- Duplicate Resolution Request
- Quote
- Territory Forecast
- Custom objects
You can use access groups to configure both your custom and predefined rules for custom objects.
Steps to Enable
Here are the steps to enable a predefined rule for a system access group:
- On the Access Groups page in the Sales and Service Access Management work area, select the Object Sharing Rules tab.
- Select the object for which you want to use predefined rules from the Object list.
- Select the object sharing rule you want to use.
- To activate the rule, select the Active check box.
- In the Action: Assign Access Group area, select the Enable check box for each access group you want to assign the rule to.
- Click Save and Close from the Actions menu.
- On the Object Sharing Rules page, select the Publish Rules option from the Actions menu.
- Run the Perform Object Sharing Rule Assignment Processing scheduled process to ensure that the access group sharing rules for the object are assigned properly.
Key Resources
- See the "Access Groups" chapter in the Securing CX Sales and B2B Service guide.
Role Information
- IT Security Manager
- Sales Administrator
IMPORTANT Actions and Considerations
PREVIOUS TERRITORY OWNERS CAN ONLY ACCESS ACTIVE AND MOST RECENT FORECASTS
Beginning in Update 21B, previous territory owners can access only the active forecast and the one just prior to it. Prior to Update 21B, when a territory owner changed, the previous owner could access all active and past forecasts.
There's no change for new owners, who have access to all forecasts.
_________________________________________________________________________________
DEPRECATE TERRITORY PROPOSAL ASSOCIATION WITH QUOTA PLANS
Quota Plans Can Only Be Synchronized with an Active Territory Hierarchy
Sales managers or administrators frequently make changes to active territories directly. These changes can also be done using territory proposals
Currently, when a user has associated a draft proposal with a Quota Plan, the changes done to the territories as part of the draft proposal are also applied to the Quota Plan.
Beginning in Update 21C, quota plans can only be synchronized with an active territory hierarchy.
Prior to Update 21C, quota plans could be synchronized with both active and draft proposal territory hierarchies.
Territory proposal association with quota plans is being deprecated.
_________________________________________________________________________________
FUNCTIONAL PRIVILEGES FOR MDF REQUEST
Prior to Update 21B, a user’s update access to approval-related and budget attributes in MDF Request was granted through data security policies. However, starting with Update 21B, this access is granted through functional privileges. Thus, you need to explicitly assign the privileges shown in the following table to your applicable custom roles, so that users can update approval-related and budget attributes after the upgrade to Update 21B.
You can find more information about adding privileges to roles in the Securing Sales and B2B Service guide.
| Privilege | Impact | Predefined Roles That Are Assigned the Privilege |
|---|---|---|
| Title: Update Marketing Fund Request Approval Details Technical Name: MKT_UPDATE_MARKETING_FUND_REQUEST_APPROVAL_DETAILS_PRIV |
Lets users update these approval details on MDF Request:
|
Meant for channel users. These predefined roles are already assigned this privilege:
|
| Title: Update Marketing Fund Request Budget Details Technical Name: MKT_UPDATE_MARKETING_FUND_REQUEST_BUDGET_DETAILS_PRIV |
Lets users update the Budget details on an MDF Request in Draft, Returned or Withdrawn status. |
The predefined role, Channel Account Manager, is already assigned this privilege. |
NOTE: If you don't add these privileges after upgrading to Update 21B, users who previously had update access to approval-related and budget attributes will no longer have access.
_________________________________________________________________________________
NEW BPM COMPOSER NOW AVAILABLE TO CREATE AND UPDATE OBJECT WORKFLOW BUSINESS PROCESSES
A new version of the Oracle Business Process Management (BPM) Composer that avoids Adobe Flash usage is now available in Application Composer. Use the new BPM Composer to create and update approval flows used in object workflows.
You don't need to do anything to enable the BPM Composer. It's automatically available in Application Composer, on the Business Processes page.
For more information, see the "Configure Business Processes for Object Workflows" topic in the Configuring Applications Using Application Composer guide. _________________________________________________________________________________
POST-UPDATE TASKS
UPDATE APPLICATION COMPOSER CUSTOMIZATION TO THE LATEST ENHANCED BEHAVIOR
During your upgrade, most existing customizations made in Application Composer are automatically updated to the latest enhanced behavior in the new release. However, there are a few exceptions that require you to manually initiate the upgrade script for each of those customizations.
NOTE: Some upgrade tasks will not be removed from this page even after the upgrade is completed, as they are re-runnable for certain feature enhancements that are expected in future releases.
STEPS TO ENABLE
You must sign in as a user with an administrator role to perform these steps.
IMPORTANT: Do not perform these steps when there are pending changes in an active sandbox. Be sure to save and publish sandboxes with any changes you want to keep before proceeding, and delete any sandboxes that you do not intend to publish.
- Sign into the application.
- From the Navigator, select Sandboxes (under Configuration).
- Create a new sandbox and set it as the active sandbox. The current active sandbox displays at the top of the application.
- Go to: Navigator > Application Composer (under Configuration).
- From the Application drop-down list, select the first application whose metadata you want to upgrade, such as Common or Sales.
- From the navigation tree on the left, under Common Setup, click Metadata Manager.
NOTE: You need to upgrade the existing customization metadata for each application separately.
- Click Metadata Upgrade.
- By default, the list displays the Not Started upgrade items that you need to manually upgrade. Highlight the first row in the list, and then click the Upgrade button.
- Click OK in the confirmation dialog box. This process may take a couple of minutes. When the upgrade is done, the dialog box closes and the Upgrade Completed column shows an indicator.
- Repeat steps 7-8 for each row in the list.
- Repeat steps 4-8 for each application in the Application drop-down list in Application Composer.
- Publish the sandbox.
After the processes have completed, the application is ready to use.
KEY RESOURCES
- Read Prepare for Your Quarterly Update (Doc ID 2445338.1) on My Oracle Support to learn how to prepare for and validate your quarterly update.