
- Revision History
- Overview
- Optional Uptake of New Features (Opt In)
- Feature Summary
- Common Technology and User Experience
- Financials
-
- Assets
- Budgetary Control
- Cash Management
- Expenses
- General Ledger
- Payables
- Receivables
- Revenue Management
- Subledger Accounting
- Tax
- Transactional Business Intelligence for Financials
-
- Add Non-Qualified Segments to Oracle Transactional Business Intelligence Fixed Assets Subject Areas
- Cross-Pillar Reporting Between Receivables and Projects
- Enhancements to Cash Management Subject Areas
- Enhancements to Revenue Management Subject Areas
- Expose Descriptive Flexfields on Key Flexfields for OTBI Financials Non-Essbase Subject Areas
- Payables Invoices Holds Information Reorganized in the Oracle Transactional Business Intelligence Subject Areas
-
This document will continue to evolve as existing sections change and new information is added. All updates appear in the following table:
| Date | Feature | Notes |
|---|---|---|
| 28 FEB 2020 | Expenses: Usability Enhancements for Expenses | Updated document. Revised Opt-In Expiry date. |
| 30 AUG 2019 | Transactional Business Intelligence for Financials: Expose Descriptive Flexfields on Key Flexfields for OTBI Financials Non-Essbase Subject Areas |
Updated document. Added detailed steps to enable. |
| 04 JUN 2019 | Transactional Business Intelligence for Financials: Payables Invoices Holds Information Reorganized in the Oracle Transactional Business Intelligence Subject Areas |
Updated document. Revised feature information. |
| 26 APR 2019 | Receivables: Create Detailed Receivables Distributions | Updated document. Delivered feature in update 19B. |
| 22 MAR 2019 | Created initial document. |
This guide outlines the information you need to know about new or improved functionality in this update, and describes any tasks you might need to perform for the update. Each section includes a brief description of the feature, the steps you need to take to enable or begin using the feature, any tips or considerations that you should keep in mind, and the resources available to help you.
Join Oracle Cloud Customer Connect
Please take a moment to join the Cloud Customer Connect forums for Financials Cloud. Oracle Cloud Customer Connect is a community gathering place for members to interact and collaborate on common goals and objectives. This is where you will find the latest release information, upcoming events, or answers to use-case questions. Joining takes just a few minutes. Join now!
https://cloud.oracle.com/community
Give Us Feedback
We welcome your comments and suggestions to improve the content. Please send us your feedback at oracle_fusion_applications_help_ww_grp@oracle.com
Optional Uptake of New Features (Opt In)
We continue to add many new features to the Oracle Cloud Applications, and for some features, you can take advantage of new functionality at a pace that suits you by “opting in” to the feature when you’re ready. You can opt in to a feature in two ways: by using the New Features work area, or by using the Setup and Maintenance work area.
To opt in using the New Features work area:
- Click the Navigator, and then click New Features (under the My Enterprise heading).
- On the New Features page, select the offering that includes new features you’d like to review.
- Click Opt-In for any feature that you want to opt-in to.
- On the Edit Features page, select the Enable option for the feature, and then click Done.
To opt in using the Setup and Maintenance work area:
- Click the Navigator, and then click Setup and Maintenance.
- On the Setup page, select your offering, and then click Change Feature Opt-In.
- On the Opt In page, click the Edit Features icon.
- On the Edit Features page, select the Enable option for any feature you want to opt-in to. If the Enable column includes an Edit icon instead of a check box, then click the icon, select your feature options, and click Save and Close.
- Click Done.
OPT IN EXPIRATION
Some features include an opt-in expiration update, after which they are no longer optional. If you have not opted in to the feature by the expiration update, it will automatically be enabled for you in that update.
Click here to review details of all Oracle Applications Cloud features with an upcoming opt in expiration update.
Column Definitions:
Report = New or modified, Oracle-delivered, ready to run reports.
UI or Process-Based: Small Scale = These UI or process-based features are typically comprised of minor field, validation, or program changes. Therefore, the potential impact to users is minimal.
UI or Process-Based: Larger Scale* = These UI or process-based features have more complex designs. Therefore, the potential impact to users is higher.
Features Delivered Disabled = Action is needed BEFORE these features can be used by END USERS. These features are delivered disabled and you choose if and when to enable them. For example, a) new or expanded BI subject areas need to first be incorporated into reports, b) Integration is required to utilize new web services, or c) features must be assigned to user roles before they can be accessed.
Common Technology and User Experience
Simple confirmation popups will now auto dismiss after a short delay of 2 seconds, streamlining business process flows by removing the need to click the "OK" button to dismiss the popup. This will improve usability and enhance performance for simple interactions in Oracle Financials Cloud.

Auto Dismiss Popup Example for Expense Reports
Steps to Enable
You don't need to do anything to enable this feature.
Performance Enhancement in General Accounting Dashboard and Intercompany Work Area
To ensure the dashboard and work area render faster, transaction counts are no longer displayed.
Steps to Enable
You don't need to do anything to enable this feature.
Simplified Workflow Rules Configuration
- The Generate Rule File button is now located on the Instructions sheet of all templates for each workflow.

Instructions Sheet
-
You can now create workflow rules for Payables Invoice Request approvals using the Invoice Request Approval Rules sheet. This sheet is available in all Payables Invoice Approval templates.

Invoice Request Approval Rules Sheet in the Payables Invoice Approval Rules Template
- An additional sample template ‘Invoice Approval Sample template 3’ is now available for the Payables Invoice Approval workflow on the Manage Workflow Rules in Spreadsheet page.
Steps to Enable
You don't need to do anything to enable this feature.
Tips And Considerations
- You can now use the Invoice Request Approval Rules sheet to create approvals rules for Payables Invoice Requests. This sheet is available in all Payables Invoice Approval workflow templates.
- The Generate Rule File button creates a rule file for all the rules in the template. For example, for Payables Invoice Approval rule templates, a rule file is generated for rules in the Invoice Requests Approval and Invoice Approval Rules sheet when you click Generate Rule File.
- Every successful rule upload using the spreadsheet template overrides all the existing rules for the workflow. In case you do not enter rules in any of the sheets within a template, then no rules will be created for that stage and any existing BPM rules for that stage will be cleared out.
Key Resources
For an overview of the Simplified Workflow Rules Configuration feature, refer to the Manage Workflow Rules Using a Spreadsheet topic on the Oracle Help Center.
Role Information
No new role access is needed to use this feature.
Use the Currency Rates REST API resource to retrieve currency rates and dates for which rates are available for a source and target currency combination.
Steps to Enable
Review the REST service definition in the REST API guides to leverage (available from the Oracle Help Center > your apps service area of interest > REST API) . If you are new to Oracle's REST services you may want to begin with the Quick Start section.
Key Resources
For an overview of REST APIs and the technical details, see the REST API for Oracle Financials Cloud guide in the Oracle Help Center.
REST APIs for External Bank Accounts
Use the External Payee, External Bank Account and Payment Instrument Assignment REST API resources to manage details about external bank accounts. You can:
- Create and manage external payees for suppliers.
- Retrieve external payee information.
- Create and manage external bank accounts.
- Create and manage external bank account owners.
- Retrieve external bank account and account owner information.
- Create and manage assignments of external bank accounts to external payees or external payers.
- Retrieve payment instrument assignment information.
Steps to Enable
Review the REST service definition in the REST API guides to leverage (available from the Oracle Help Center > your apps service area of interest > REST API) . If you are new to Oracle's REST services you may want to begin with the Quick Start section.
Key Resources
For an overview of REST APIs and the technical details, see the REST API for Oracle Financials Cloud guide in the Oracle Help Center.
Use the Journals REST API resource to manage journals. You can:
- Retrieve journals.
- Update the batch completion status.
- Delete the batch.
Steps to Enable
Review the REST service definition in the REST API guides to leverage (available from the Oracle Help Center > your apps service area of interest > REST API) . If you are new to Oracle's REST services you may want to begin with the Quick Start section.
Key Resources
For an overview of REST APIs and the technical details, see the REST API for Oracle Financials Cloud guide in the Oracle Help Center.
You can now use the Ledger Balances REST API resource to retrieve general ledger balances for accounts at a summary level.
Steps to Enable
Review the REST service definition in the REST API guides to leverage (available from the Oracle Help Center > your apps service area of interest > REST API) . If you are new to Oracle's REST services you may want to begin with the Quick Start section.
Key Resources
For an overview of REST APIs and the technical details, see the REST API for Oracle Financials Cloud guide in the Oracle Help Center.
REST APIs to Manage Country Specific UI Rules for Simplified Bank Accounts
Use the Bank Account User Rules REST API resource to manage country-specific bank, branch, and bank account-related attributes to be displayed on the simplified bank account UI. You can:
- Retrieve, create, and modify UI rules.
- Update labels.
Steps to Enable
Review the REST service definition in the REST API guides to leverage (available from the Oracle Help Center > your apps service area of interest > REST API) . If you are new to Oracle's REST services you may want to begin with the Quick Start section.
Tips And Considerations
To change labels on the simplified bank account UI, you must create the label in the lookup code ORA_EXTERNAL_ACCOUNT_LABELS under Cash Management lookups.
Key Resources
For an overview of REST APIs and the technical details, see the REST API for Oracle Financials Cloud guide in the Oracle Help Center.
Use the Payables Payments REST API resource to capture additional information for your payments against Payables invoices. You can:
- View, create, and update descriptive flexfields to capture additional information for a payment.
- View, create, and update global descriptive flexfields to capture additional localization information for a payment.
Steps to Enable
Review the REST service definition in the REST API guides to leverage (available from the Oracle Help Center > your apps service area of interest > REST API) . If you are new to Oracle's REST services you may want to begin with the Quick Start section.
Tips And Considerations
You can also build integrations to:
- Retrieve payment and paid invoice information.
- Import paid invoices after your Oracle Financials Cloud upgrade.
- Void a payment.
NOTE: Manual payments are the payments created outside of Payables and then recorded in Payables. You can create a manual payment using the Create Payments page by selecting the payment type Manual.
Key Resources
For an overview of REST APIs and the technical details, see the REST API for Oracle Financials Cloud guide in the Oracle Help Center.
REST APIs for Salesperson Reference Account
Use the Salesperson Reference Account REST API resource to create, find, and delete reference accounts for a salesperson. You can:
- Create a reference account for a salesperson.
- Delete a reference account belonging to a salesperson.
- Find reference account details for a salesperson.
- Get reference accounts belonging to a salesperson.
Steps to Enable
Review the REST service definition in the REST API guides to leverage (available from the Oracle Help Center > your apps service area of interest > REST API) . If you are new to Oracle's REST services you may want to begin with the Quick Start section.
Key Resources
For an overview of REST APIs and the technical details, see the REST API for Oracle Financials Cloud guide in the Oracle Help Center.
REST APIS for Supplier Invoices
Use the Invoices and Invoice Holds REST API resources to manage details about supplier invoices. You can:
- Create and manage cross-currency, multi-period accounting related supplier invoices.
- Capture additional localizations information for the invoice header, lines, distributions, and installments using global descriptive flexfields.
- Capture tax determinants such as intended use, transaction business category for tax calculation purposes.
Steps to Enable
Review the REST service definition in the REST API guides to leverage (available from the Oracle Help Center > your apps service area of interest > REST API) . If you are new to Oracle's REST services you may want to begin with the Quick Start section.
Tips And Considerations
Additionally, you can build integrations based on your PaaS application requirements such as retainage, reverse factoring arrangements, or placing invoices on hold.
NOTE:
- If you are creating invoices for Americas localizations, then you will have to pass the values for global descriptive flexfields, as currently the values do not default for this region.
- If you are updating an invoice, then you can only update certain attributes and the update applies only to those attributes. Related fields do not automatically get populated. For example, when you update the invoice date in the Create or Edit Invoice pages, related fields, such as the terms date or due date, may be autopopulated based on the invoice date you enter. Using REST API, the invoice date is updated, but the related fields are not autopopulated. Before updating a key attribute, consider the impact on the related attributes.
Key Resources
For an overview of REST APIs and the technical details, see the REST API for Oracle Financials Cloud guide in the Oracle Help Center.
Investment Allowance Deductions as Bonus Depreciation
Expedite your investment allowance deductions for property, plant, and equipment investment costs. Claim your investment allowance deduction as bonus depreciation in the period of acquisition. Calculate your standard depreciation from the net amount.
The following screenshots illustrates the feature and its benefits:
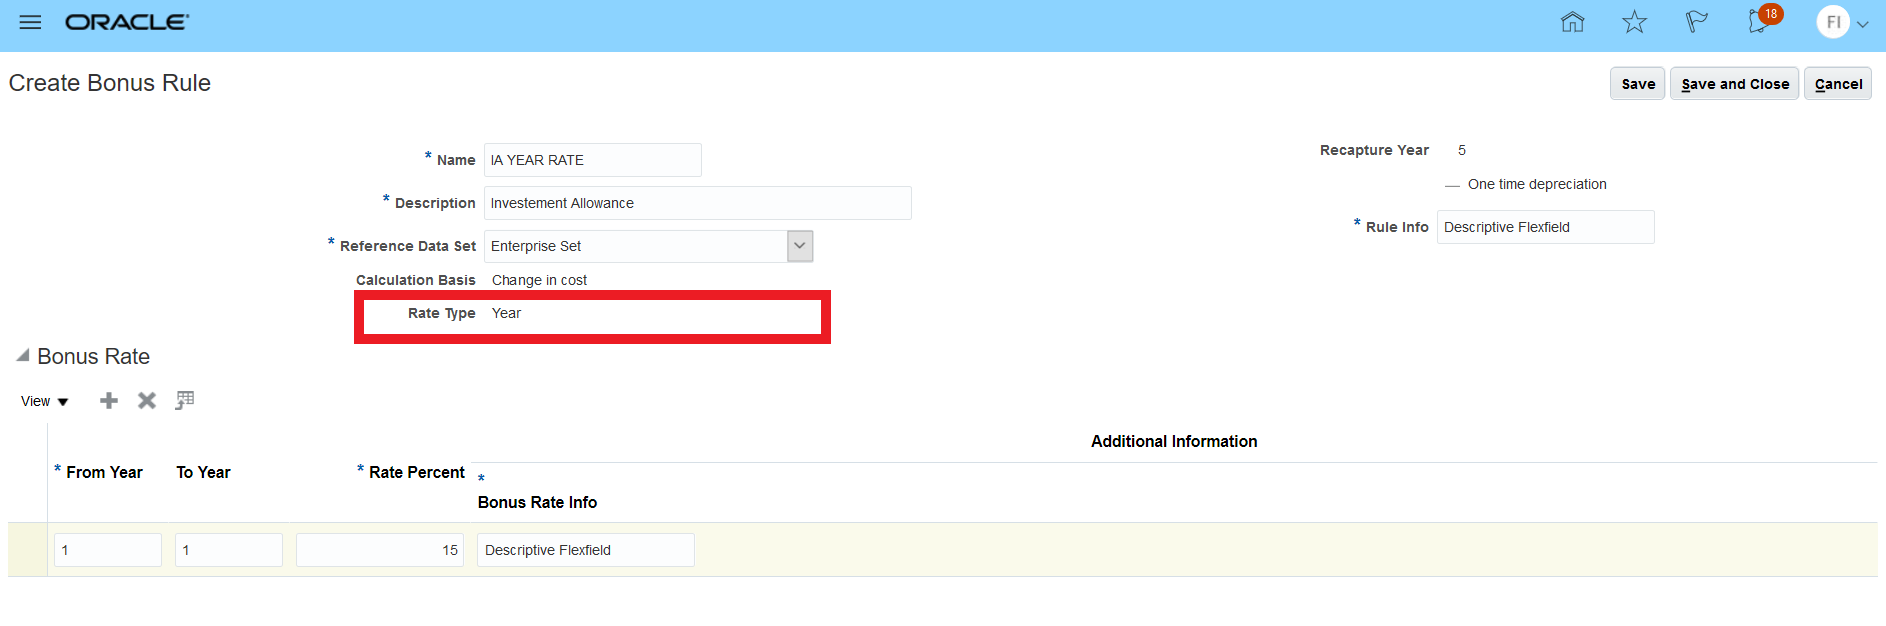
Specify Your One-Time Bonus Depreciation Period Over the Entire Fiscal Year Along with its Recapture Duration in Years
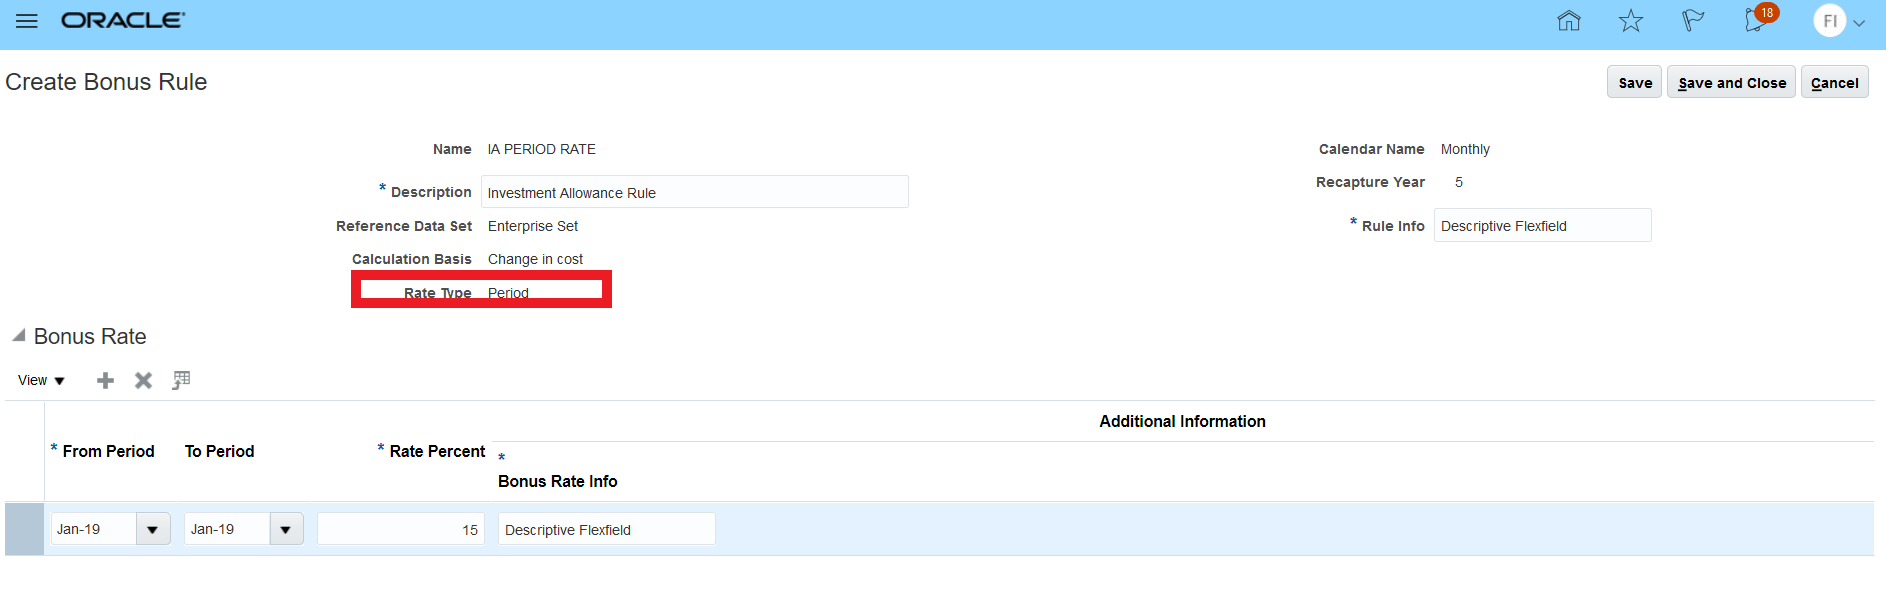
Allocate Your Entire Bonus Depreciation to the Current Open Period and Recapture it Within the Specified 5 Year Duration
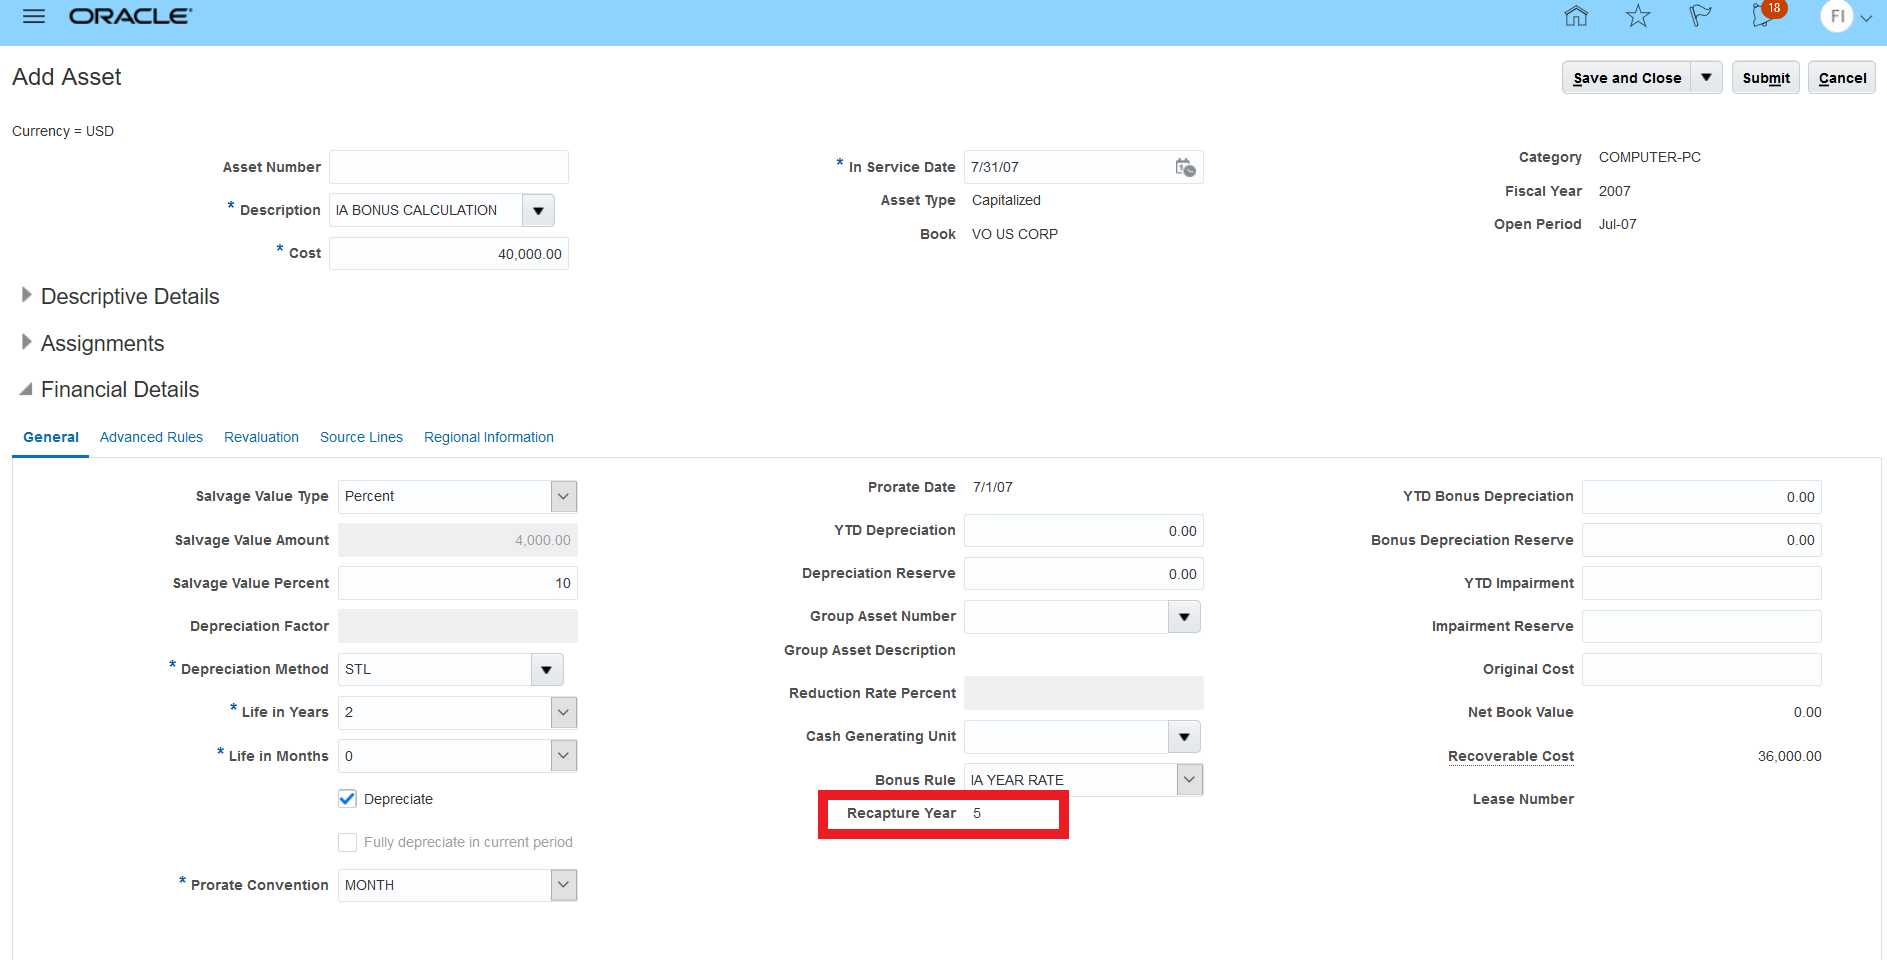
Automatically Recapture Your Bonus Depreciation If the Asset is Fully Retired Before the Specified Duration in Years
Specify the new optional non-sale gain account in your Manage Asset books to recapture your investment allowance or bonus depreciation as required by the accounting standards. Set up the recapture year accounting rule default for the category book from the Manage Categories page.
Steps to Enable
Use the Opt In UI to enable this feature. For instructions, refer to the Optional Uptake of New Features section of this document.
Offering: Financials
Tips And Considerations
Specify the new optional non-sale gain account in your Manage Asset books to recapture your investment allowance or bonus depreciation as required by the accounting standards. Set up the recapture year accounting rule default for the category book from the Manage Categories page.
Role Information
The Asset Accounting Manager and Asset Accountant job roles are automatically updated.
Budgetary Control Spend Authorizations
You can enable Budgetary Control for spend authorization to reserve funds for anticipated employee expenses.
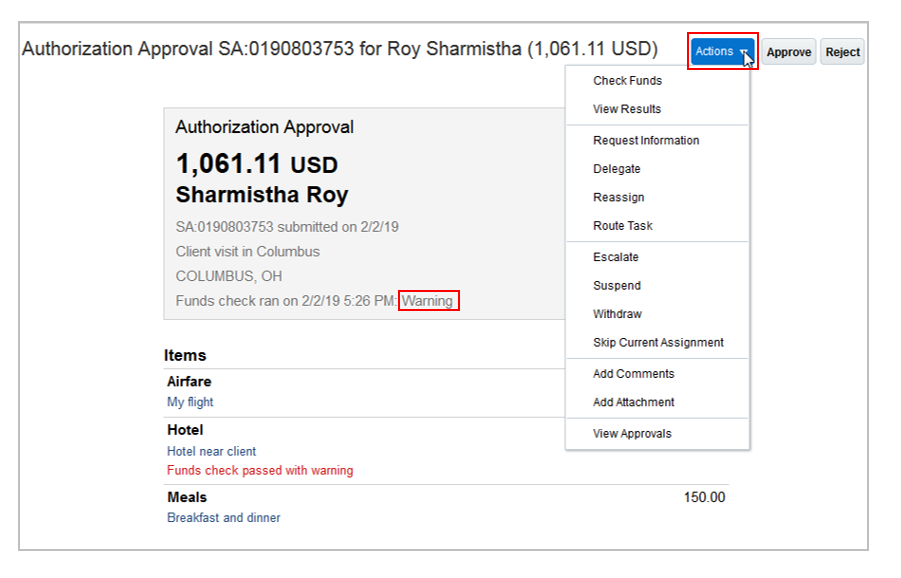
CHECK AND VIEW FUNDS
The approver can check funds and view the impact of anticipated employee expenses on the budget, during the approval process.
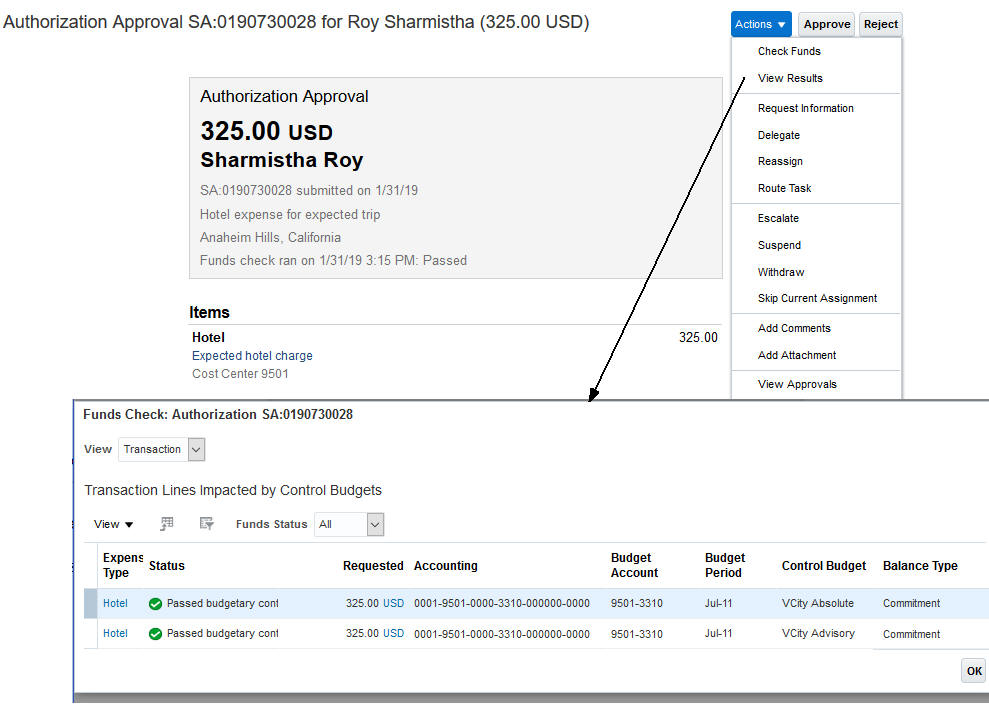
Approval of a Spend Authorization
REJECT INSUFFICIENT FUNDS
When the approver submits the authorization for approval, budgetary control validation is performed. If budgetary control validation fails, the authorization is automatically rejected and returned to the employee for further action.
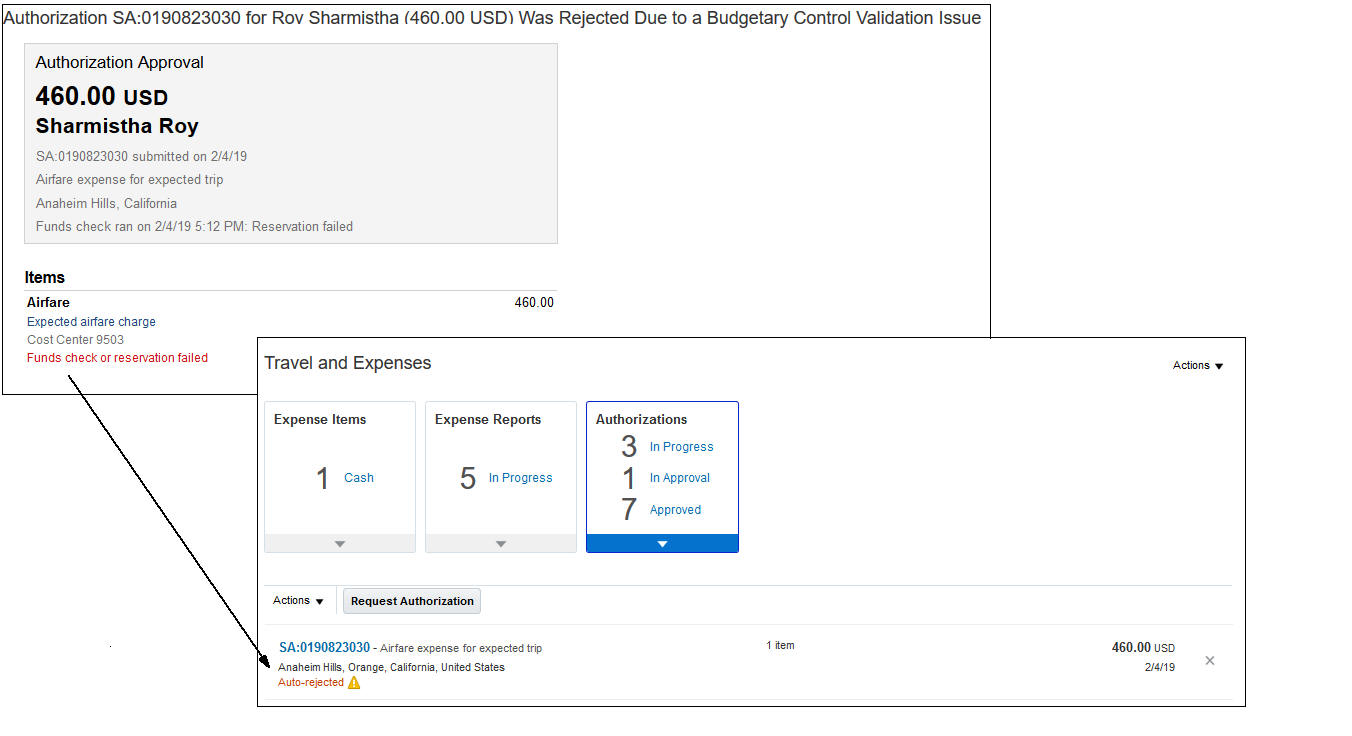
Reject Authorization When Budgetary Control Failure
RESERVE FUNDS FOR ANTICIPATED EMPLOYEE EXPENSES
When the approver submits the authorization for approval and budgetary control validation passes, the spend authorization amount is reserved. If the approver manually rejects the authorization, the amount is not reserved and the authorization is returned to the employee for further action.
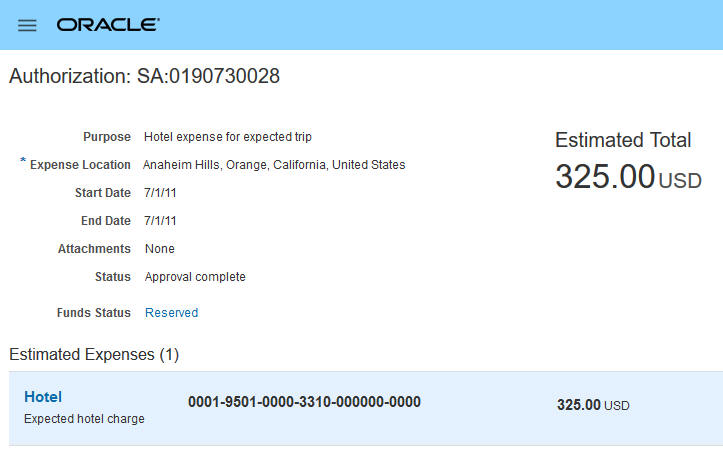
Reserved Spend Authorization
REIMBURSEMENT OF EMPLOYEE EXPENSES
After incurring the business expense, the employee creates an expense report and associates it with a spend authorization. The payment of the expense report reclassifies the consumption from anticipated to actual expense.

Budgetary Control Analysis Report
INQUIRY AND REPORTING OF BUDGET IMPACT FOR EMPLOYEE EXPENSES
All existing budgetary control and analysis reporting supports anticipated and paid employee expenses.
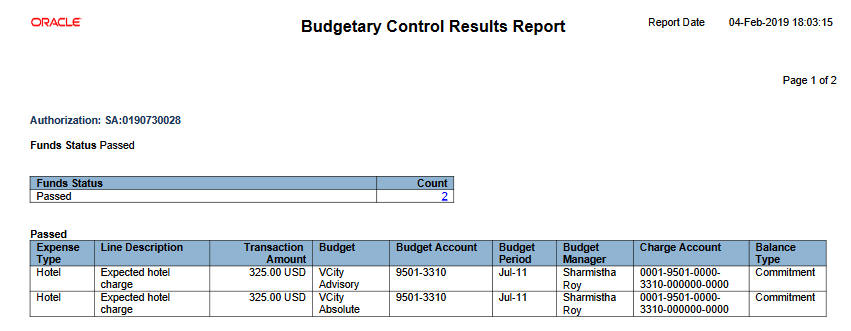
Budgetary Control Results by Transaction Report
Steps to Enable
OVERVIEW OF SETUP
- Enable the Request Spend Authorization with Budgetary Control feature found under the Financials offering.
- Enable spend authorizations for budgetary control in Manage Budgetary Control.
- Set up spend authorizations in Manage Cash Advance and Authorization policies. Refer to the Steps to Enable section for the Spend Authorization with Budgetary Control feature in this What's New document.
MANAGE BUDGETARY CONTROL
- Enable budgetary control for the expense management business function and the spend authorization transaction type.
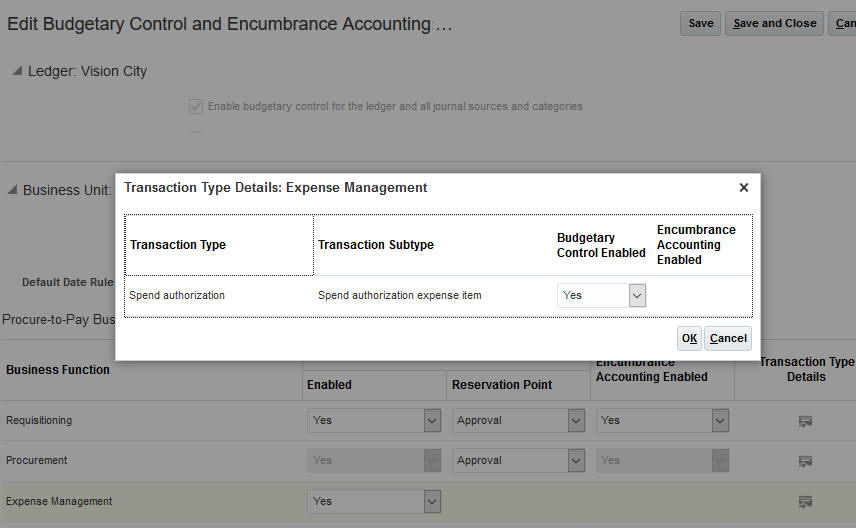
Edit Budgetary Control and Encumbrance Accounting for Expense Management Business Function
- Enable budgetary control spend authorization payment request transaction subtype for the payables invoicing business function.
NOTE: If you do not enable the spend authorization payment request transaction subtype, the spend authorization will not be converted to an expense.
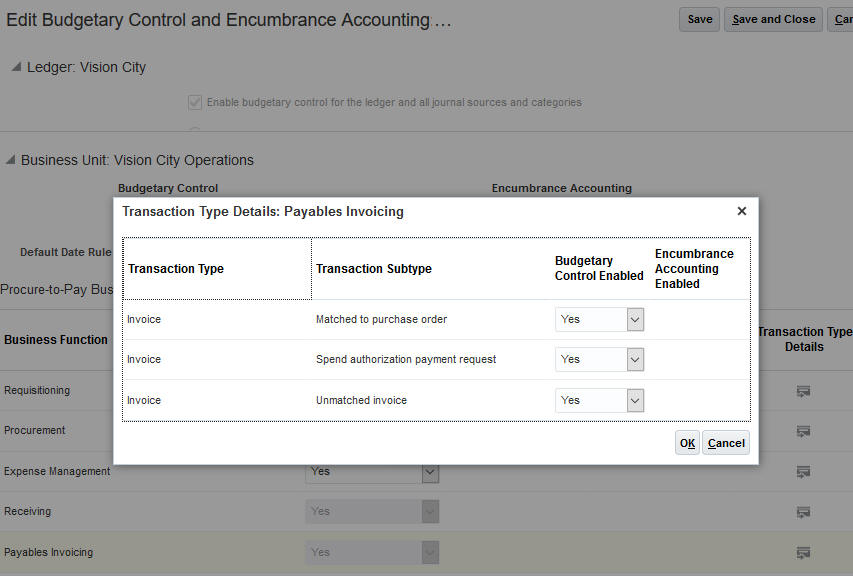
Edit Budgetary Control and Encumbrance Accounting for Payables Invoicing Spend Authorization Subtype
Tips And Considerations
- If Budgetary Control is already enabled then:
-
Spend authorization is disabled by default. You must enable spend authorization and payment request transaction types. Note: If you do not enable the spend authorization payment request transaction subtype, the spend authorization will not be converted to an expense.
-
Rebuild budgetary control cube. The cube must be rebuilt to allow for this new transaction type balance to be stored. Run the Create Budgetary Control Balances Cube process. See support note Maintaining Budgetary Control Cubes (Doc ID 2136813.1) for more information.
-
-
There is no accounting when spend authorizations are approved. Accounting is created for payment requests related to the anticipated employee expense.
- Project control budgets are not impacted and burdening is not calculated.
Key Resources
For more information, refer to the following topics in Oracle Applications online help:
- Spend Authorizations: Explained
- Setting Up Spend Authorizations: Points to Consider
- Quick Reference for Oracle Fusion Budgetary Control Documentations support note document ID 2195106.1
- Spend Authorization with Budgetary Control in the What's New Document
Role Information
- Roles needed for setup of Budgetary Control and Expense Management
- Budget Manager
- Expense Manager
- Roles needed for approving spend authorization in Expense Management
- Expense Manager
- Roles needed for Inquiry and Reporting Budget Impact
- Budget Manager
Carry Forward Purchase Order Budgetary Control Balances Enhancement
You can have greater flexibility and control over the purchase order and budget balances being carried forward from year to year. There are two new parameters and one relabeled parameter for this program.
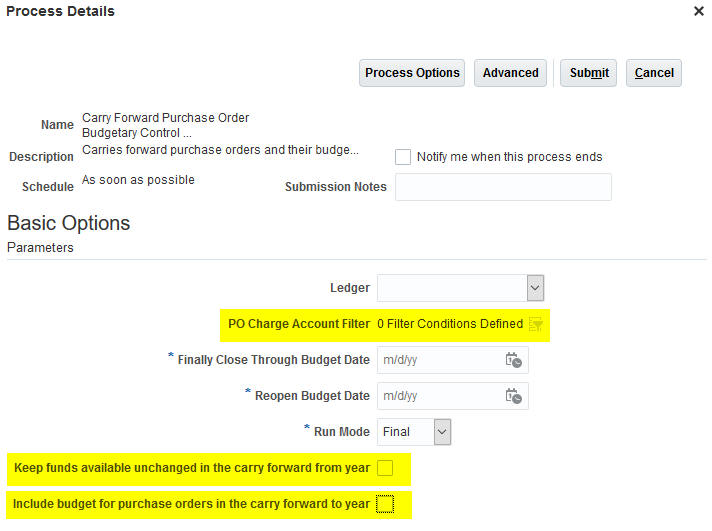
Carry Forward Purchase Order Budgetary Control Balances Process
- PO Charge Account Filter
Use this new parameter to select which purchase orders you want to carry forward by charge account. This also gives you the flexibility to manage the budget options differently for groupings of purchase orders by specifying conditions on any of the accounting flexfield segments. Add chart of accounting flexfield segment, condition and value to meet your specific carry forward business requirements. If you don't add any filters, all purchase orders that meet the other parameter criteria will be selected.
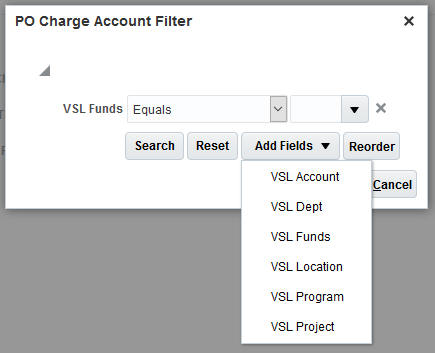
PO Charge Account Filter
- Keep funds available unchanged in the carry forward from year
This is a new parameter. It is available when the Run Mode is Final. Finally closing a purchase order will increase funds available, which allows other transactions to consume these funds. Select this parameter to indicate that a budget adjustment be made to reduce funds available by same amount. This will keep funds available unchanged in the carry forward from year.
- Include budget for purchase orders in the carry forward to year
This parameter has been renamed but there is no change in functionality. This parameter was previously labeled Include Budget for Purchase Orders Carried Forward. If you select this parameter, the budget will be created for the purchase order obligation amount in the budget period of the specified Reopen Budget Date parameter.
Steps to Enable
You don't need to do anything to enable this feature.
Tips And Considerations
There is no setup required for these new parameters.
-
When the Keep funds available unchanged in the carry forward from year parameter is selected, the budget will be reduced in the budget period associated with the Finally Close Through Budget Date parameter.
- If you use the PO Charge Account Filter, you may have to submit the Carry Forward Purchase Order Budgetary Control Balances process multiple times to achieve the desired results.
For example, you have fund values defined as A through Z. Your requirements are:
- fund values A through D and funds values L through S should carry forward the obligation as well as the budget amounts
- fund values E through K and fund values T through Z should carry forward only the obligation
- all fund values should keep funds available unchanged in the carry forward from year.
To carry forward these results, the process must be submitted four times using the following PO Charge Account Filter and parameter values:
| PO Charge Account Filter Fund Values |
Keep funds available unchanged in the carry forward from year |
Include budget for purchase orders in the carry forward to year |
| Between A and D |
Yes |
Yes |
| Between L and S |
Yes |
Yes |
| Between E and K |
Yes |
No |
| Between T and Z |
Yes |
No |
Key Resources
Refer to support note, Oracle ERP Cloud Budgetary Control Carry Forward Release 10, Release 11 and Release 13 (Doc ID 2208855.1) for the Budgetary Control Carry Forward white paper.
Role Information
Budget manager role is needed to run the Carry Forward Purchase Order Budgetary Control Balances process.
Bank Statement Reconciliation of Rejected Lines
Use the Bank statement reconciliation of rejected lines feature to manually unreconcile any individual payment or receipt from the reconciled transactions group based on the rejection information received from banks.
Steps to Enable
Use the Opt In UI to enable this feature. For instructions, refer to the Optional Uptake of New Features section of this document.
Offering: Financials
Tips And Considerations
- In the reconciled tab of the manual reconciliation page, identify the reconciled transaction group that you want to adjust. Select the individual line you want to unreconcile from the group, and use the new action 'Unreconcile Transaction' from the Actions menu.
- The reconciliation group will be balanced by creating an external transaction of the same amount, with the origin ‘Reversal Reconciliation’.
- The external cash transaction will be created in the reconciled status with the accounting option unselected.
The external cash reference will be populated according to the system transaction reference.
Key Resources
For more information on Bank Statement and Reconciliation solution, refer to Oracle Financials Cloud Using Payables Invoice to Pay, or Oracle Financials Cloud Using Receivables Credit to Cash.
Manual Reconciliation Enhancements
The Manual Reconciliation page has been enhanced to improve user experience. You can now add additional columns, including the Transaction Number, to the system transactions table results.
Steps to Enable
You don't need to do anything to enable this feature.
Key Resources
For more information on Manage Bank Statements and Reconciliation, refer to Oracle Financials Cloud Using Payables Invoice to Pay, or Oracle Financials Cloud Using Receivables Credit to Cash on the Oracle Help Center.
Role Information
- No new role access is needed to use this feature.
- The Manual Reconciliation page is controlled by the existing privileges.
Spend Authorization with Budgetary Control
You can now reserve funds when you submit a spend authorization for anticipated expenses. When spend authorization is enabled for your business unit, control budgets are associated with each expense type that you want to reserve funds for. When you submit a spend authorization, the application automatically checks whether sufficient funds are available and rejects the spend authorization if there are insufficient funds.
The application sends a spend authorization approval request to the approver when there are sufficient funds. You and the approvers have full visibility into the funds status. Before approving, approvers can check funds to review funds availability.
Approval Notification
If there are multiple approvers, the application checks for sufficient funds before sending the approval request to each approver. Funds are reserved only on final approval and if sufficient funds are available. Rejected spend authorizations are returned to you for further action.
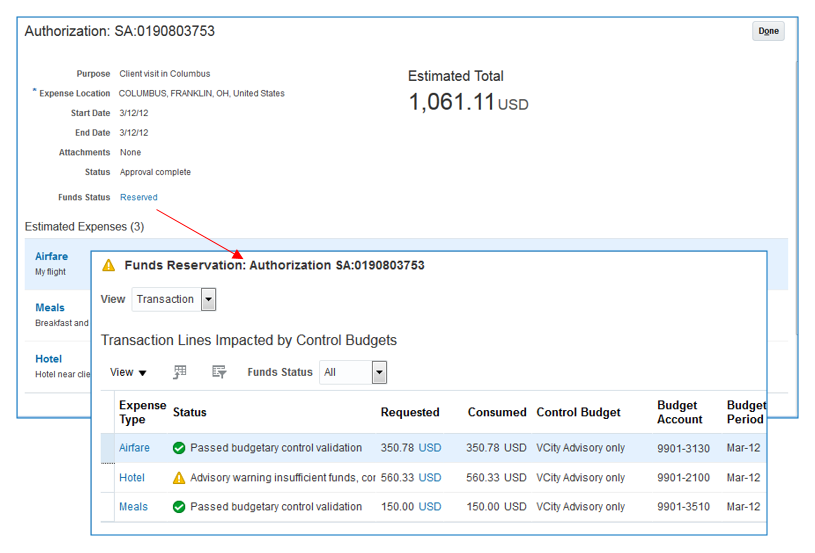
Overall Funds Reservation Status and Funds Availability for Estimated Expenses
When a spend authorization is approved, it is available for use against actual expenses. You assign an approved authorization to each expense in your expense report. The application alerts you when the expense account is different from the authorization account. The application prevents you from submitting the expense report if the report total exceeds the reserved funds. Approvers can review the authorization associated with the actual expense when they approve expense reports.
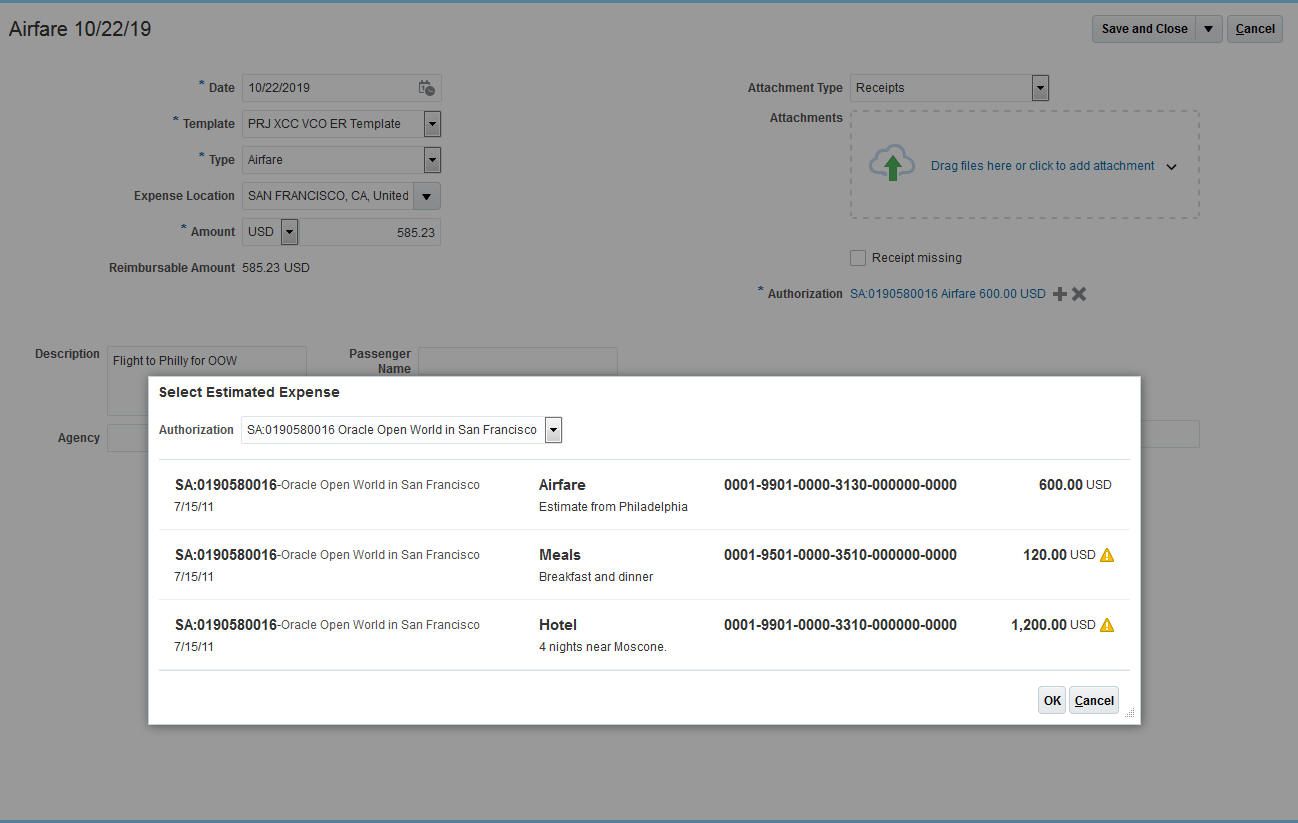
Selection of Authorization in Expense Reports
When you enable spend authorization with budgetary control, the application creates a payments request and liquidates the reservation when validating the payment request. You can review the funds details for the payment request in the Manage Invoices page.
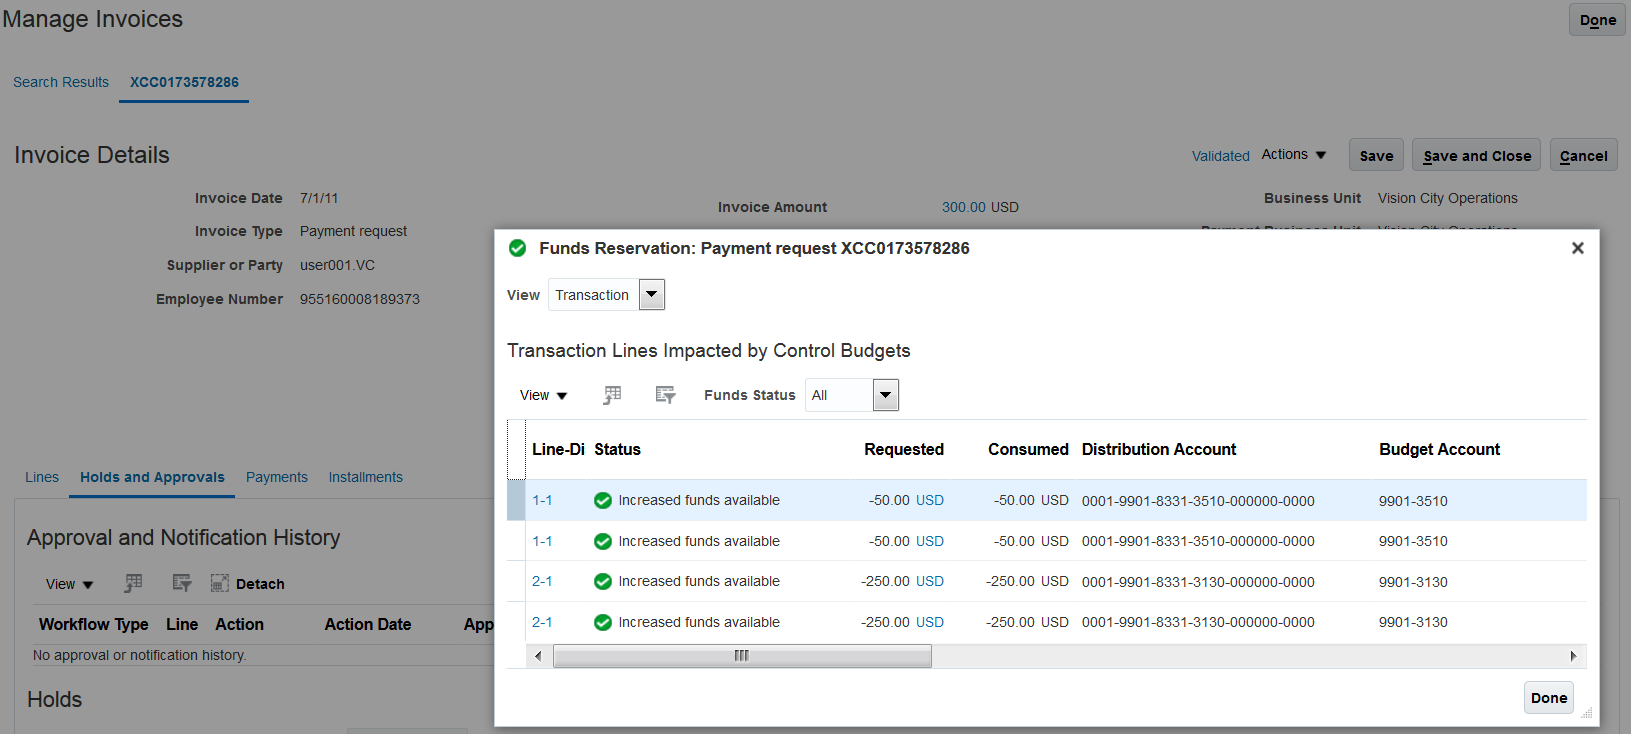
Funds Details in Manage Invoices
Budgetary control actions to check and reserve raw cost amounts are not supported for project-related spend authorizations when the project is enabled for budgetary control and the project has a top resource control budget. Similarly, burden amount for project-related spend authorizations are not reserved. Burden amount is reserved only when the invoice is created for the expense report related to the spend authorization.
Steps to Enable
Use the Opt In UI to enable this feature. For instructions, refer to the Optional Uptake of New Features section of this document.
Offering: Financials
SETUP TASKS
You must perform the following two setup tasks to enable budgetary control for spend authorization:
- Enable spend authorization for budgetary control on the Manage Budgetary Control page. Refer to the Steps to Enable section for the Budgetary Control Spend Authorizations feature in the What's New document.
- Set up spend authorizations on the Manage Cash Advance and Authorization Policies page.
SETTING UP SPEND AUTHORIZATIONS IN MANAGE CASH ADVANCE AND AUTHORIZATION POLICIES
- In the Setup and Maintenance work area, navigate to the Manage Cash Advance and Authorization Policies task.
- To enable spend authorization for the company, select Yes from the Enable Authorizations choice list in the All Business Units section. Steps 2 through 5 are optional steps and are used only for defaulting the values for specific business units. Business unit-level setup is required to enable spend authorization.
- Select Lines Only from the Attach Authorization choice list.
- Select Required from the Behavior choice list.
- In the Budgetary Control section, select the Reserve Funds value from the Funds Application choice list. To only check funds, select the Check Funds value from the Funds Application choice list.
- To enable spend authorizations for a specific business unit, select the Create icon in the Specific Business Units section.
- In the Create Business Unit-Specific Cash Advance Policies dialog box, select the applicable business unit from the Business Unit choice list.
- On the Authorizations tab, select the applicable values for the Enable Authorizations, Attach Authorization, and Behavior choice lists. To use the settings applicable to all business units, select the Use setup from all business units option.
- In the Budgetary Control section, select the Reserve Funds value from the Funds Application choice list. To only check funds, select the Check Funds value from the Funds Application choice list.
- When the selection is Check Funds, select Yes from the Display Warning to User choice list to display funds check warning to employees. Select No to hide funds check warning to employees.
- Click Save and Close.
Key Resources
- For more information about spend authorizations with budgetary control, refer to the following topics in Oracle Applications online help:
- Spend Authorizations: Explained
- Setting Up Spend Authorizations: Points to Consider
- Expense Reporting and Budgetary Control: How They Work Together
- Quick Reference for Oracle Fusion Budgetary Control Documentation support note document ID 2195106.1
- Budgetary Control Spend Authorizations in What's New Document
- Watch Request Spend Authorization With Budgetary Control Readiness Training
Role Information
To enable spend authorizations in Budgetary Control, you must have the following role:
- Budget Manager
To enable spend authorizations in Expenses, you must have one of the the following roles:
- Expense Manager
- Application Implementation Consultant
- Financials Administrator
Usability Enhancements for Expenses
To enable you to quickly submit and approve expenses, we have made several improvements to the expense entry and approval pages. You can now modify selected expense details right from the work area and the expense report page, which eliminates the need to drill down to the details, especially for corporate card charges.
- Editable Expenses List
From the Expenses work area, you can now easily perform the following tasks:
- Select multiple expense by selecting applicable check boxes
- Delete multiple expense items simultaneously by selecting applicable check boxes
- Modify expense type and description
- Attach receipts
- Sort expenses by location and description
From the Create Expense Report page, you can perform the following tasks:
- Modify expense type and description
- Attach receipts
- Sort expenses by location and description
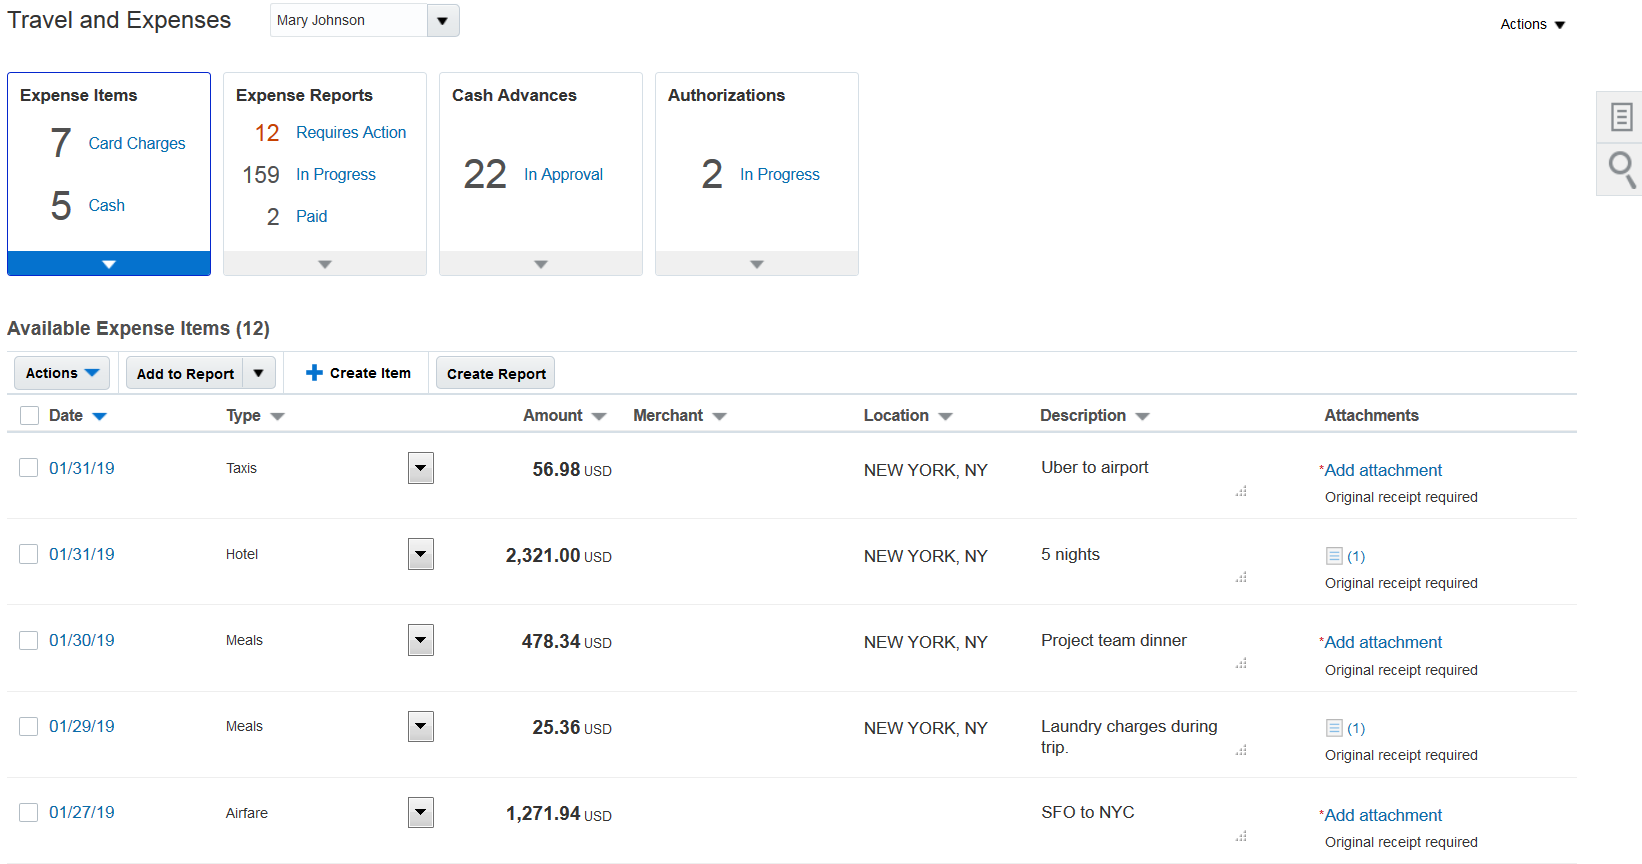
Editable Work Area
- Single Page Expense Entry
You can enter complete details of an expense, including itemization and attendees, in a single page, which provides full visibility into the expense details at once. Additionally, the following capabilities are now available.
- Support for addition and subtraction operations in the Amount and the Daily Amount fields in itemization, so you can calculate totals within the field.
- Drag and drop receipt images

Single Page Expense Entry
- Enhanced Expense Report Approval Notification Emails
Expenses lets you choose from two types of predefined expense report approval notification emails, such as email approval notification with fixed layout and configurable notifications. The redesigned email approval notification with fixed layout provides better usability and enables you to quickly spot high value expenses. Enhancements to notification emails include the following:
- Airline expenses are displayed as a separate section.
- Expenses are ordered by absolute amount in descending order, date in ascending order, and expense type in ascending order.
- Amount is displayed in the approver's currency.
- Details such as merchant, description, violations, justification, project information, and cost center are displayed when applicable.
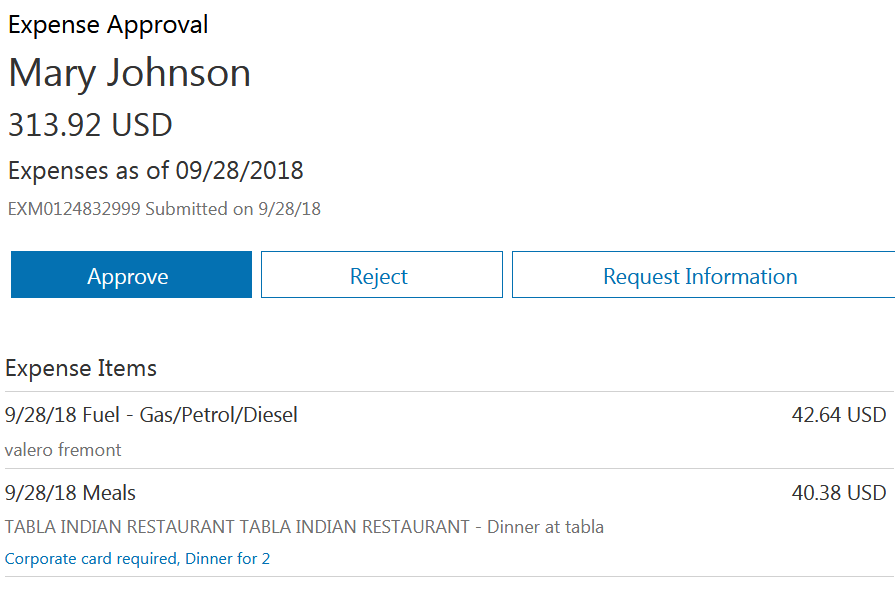
Enhanced Approval Notification
Steps to Enable
Use the Opt In UI to enable this feature. For instructions, refer to the Optional Uptake of New Features section of this document.
Offering: Financials No Longer Optional From: Update 20C
Key Resources
For more information about the usability enhancements, refer to the following topic in Oracle Applications online help:
- Setting Up and Using HTML Email Approval Notifications: Procedure
Role Information
To enable Usability Enhancements for Expenses, you must have the Application Implementation Consultant role. When enabled, users with the Employee role can access the features.
Multiple Segment Tracking for Revaluation Gain or Loss
You can now track revaluation gain or loss using multiple segments in your chart of accounts.
Steps to Enable
Use the Opt In UI to enable this feature. For instructions, refer to the Optional Uptake of New Features section of this document.
Offering: Financials
Functional Area: General Ledger
Feature: Multiple Segment Tracking for Revaluation Gain/Loss
OVERVIEW OF SETUP
- Edit the required key flexfield structure and assign the segment label Revaluation Gain/Loss Tracking Segment to the segments you would like to use for revaluation gain/loss tracking. Deploy the General Ledger Accounting flexfield after you have saved your changes.
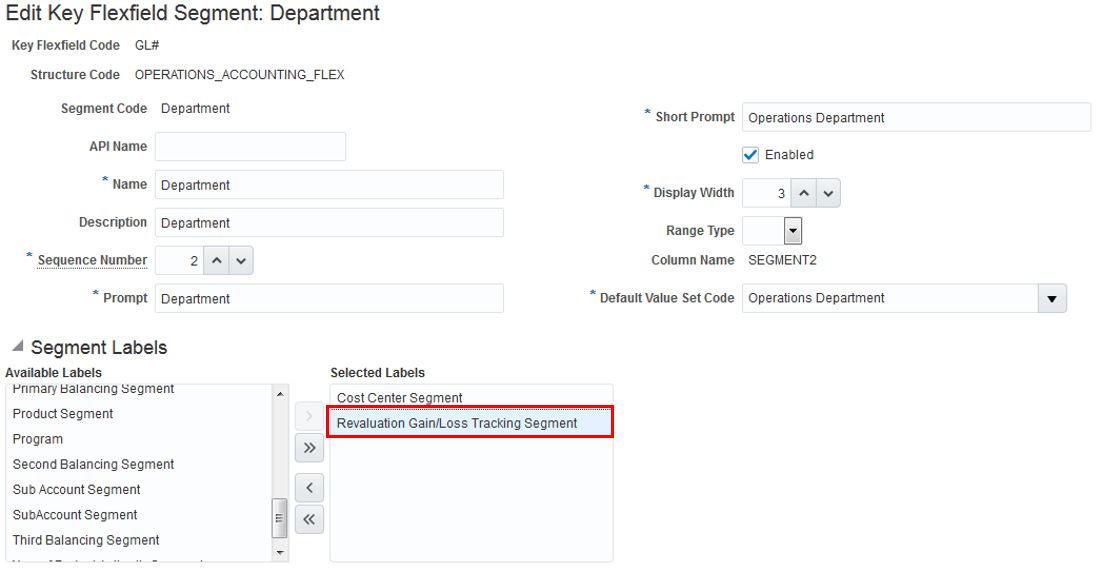
Assign Segment Label
- Enable option Track Revaluation Gain or Loss by Multiple Segments for the desired ledger in the Specify Ledger Options page.
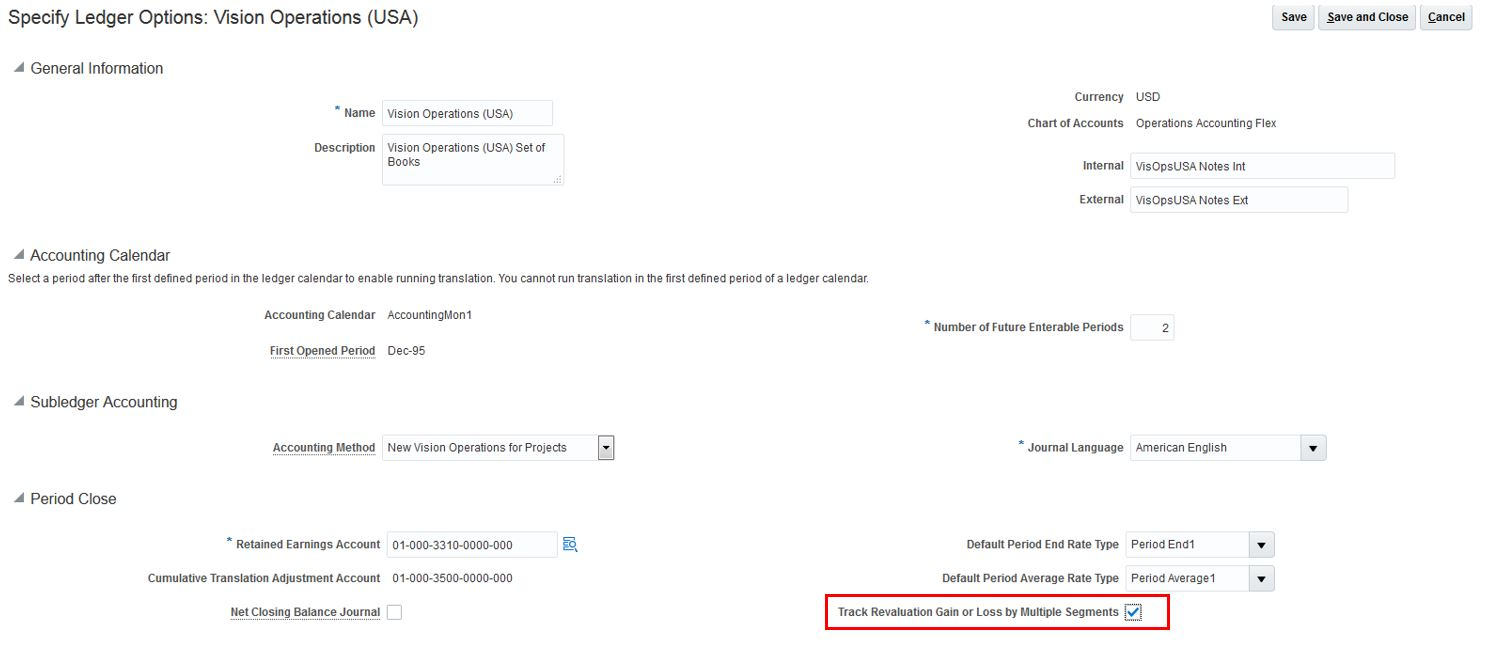
Enable Option for Ledger
Tips And Considerations
- You can now optionally track revaluation gain or loss for up to 5 distinct segments in your chart of accounts structure, including your balancing segments.
- Balancing, Natural Account and Intercompany segments should not be qualified as a revaluation gain/loss tracking segment.
- If you have 1 balancing segment in your chart of accounts, you can qualify 4 additional segments that are not the Natural Account or Intercompany segment, as a revaluation gain or loss tracking segment. If you have 2 balancing segments, then 3 additional segments can be qualified as tracking segments, or if you have 3 balancing segments, then 2 additional segments can be qualified.
Key Resources
- For more information about defining and generating revaluations, refer to the Oracle Financials Cloud Using General Ledger guide in the Oracle Help Center.
Role Information
No additional roles are required to work on this feature.
Performance Enhancements in General Accounting Dashboard and Journals Work Area
To ensure the dashboard and work area render faster, the following changes have been made:
-
Transaction counts are no longer displayed in the Journals section.
-
Approval-related Approve and Reject buttons will always display in the Journals section, regardless of whether the user is the approver. If the user cannot approve or reject the transaction, an appropriate message will be displayed.
Steps to Enable
You don't need to do anything to enable this feature.
You can now provide batch level reversal information to reverse all reversible journals within a batch.
Steps to Enable
You don't need to do anything to enable this feature.
Tips And Considerations
The feature is automatically available as part of General Ledger journal processing.
- You can use the batch reversal feature in the Edit Journal and Manage Journal pages.
- You can now optionally provide batch level reversal information and have this applied automatically to all unreversed journals within the batch.
- If you do not provide this, only those journals in the batch that already have reversal information at the journal level will be reversed.
- The batch level reversal information provided will override what is specified at the journal level for unreversed journals when the batch reversal is submitted.
- In the Manage Journals page, you can select multiple journal batches for the Reverse Batch action to process all unreversed journals of the selected batches that already have reversal information.
- Display the Reversal Status, Reversal Period and Reversible Detail columns in the Manage Journals page to get more insights about reversing the journal or journal batch.
Key Resources
For more information about reversing journals, refer to the Oracle Financials Cloud Using General Ledger guide in the Oracle Help Center (http://docs.oracle.com).
Role Information
The General Accounting Manager and General Accountant can reverse journals and journal batches, and perform other journal processing actions like entering and posting journals.
Single Request Submission for Streamlined Journal Batch Reversal Processing
For journal batch reversal processing, separate reversal requests were previously launched for each journal in the batch that was submitted for reversal. This has now been streamlined with only a single reversal request being launched for the whole batch. Individual reversal batches will continue to be generated for each journal in the batch that is reversed.
Steps to Enable
You don't need to do anything to enable this feature.
Change First Open Period for Payables
You can now change the first Payables period if it was originally set after the first General Ledger period. For example – if the first General Ledger period was set as 01-JAN-2019 and the first Payables period is set as 01-MAR-2019 – you can now move the first payables period to 01-JAN-2019. Previously, this was not possible. You can use the below task to change the first Payables period.
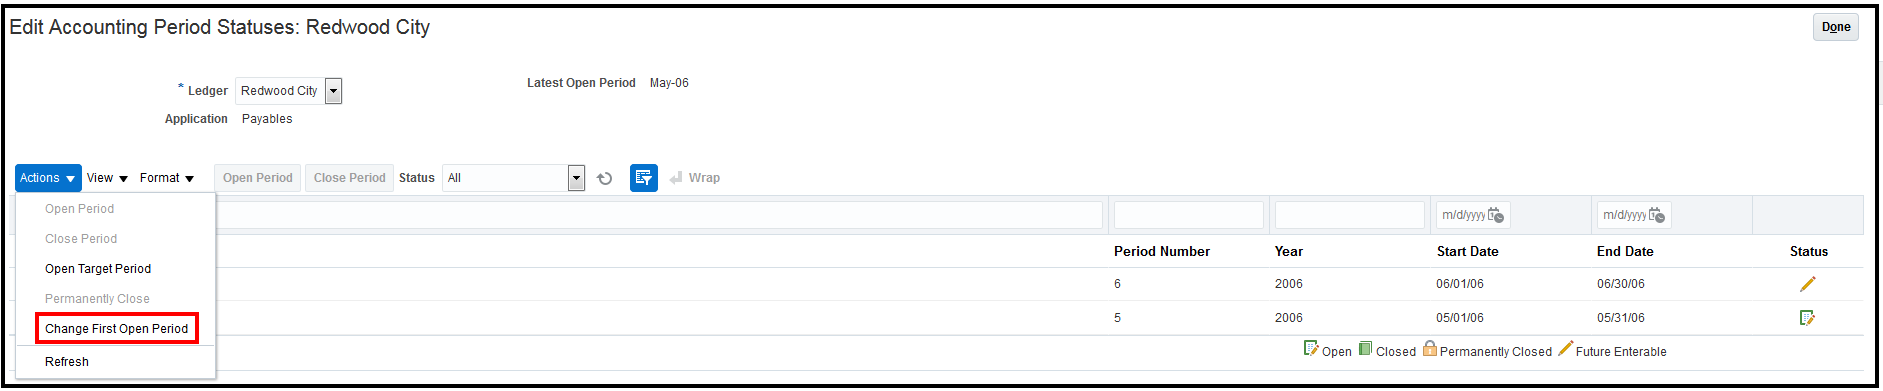
Change First Payables Period
Steps to Enable
You don't need to do anything to enable this feature.
Tips And Considerations
This option will be enabled only if the first Payables period was originally set after the first period of General Ledger. If General Ledger first period and Payables first period are the same then this option is not visible.
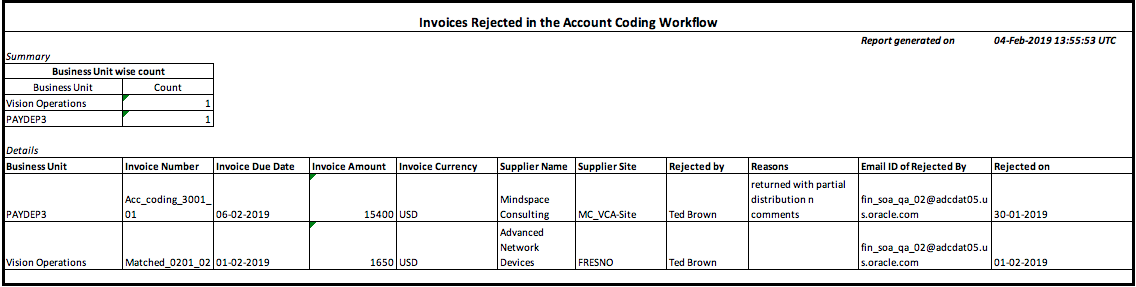
Payables Workflow Transaction Listing Report
Use the Payables Workflow Transaction Listing Report to view transactions that are pending and rejected in the Invoice Account Coding workflow. Pending transaction report allows users to view the list of invoices that are pending with the users for entering accounting information. The rejected transactions report allows users to view list of invoices that are rejected by the users and reason for rejection.
Pending Transaction Report
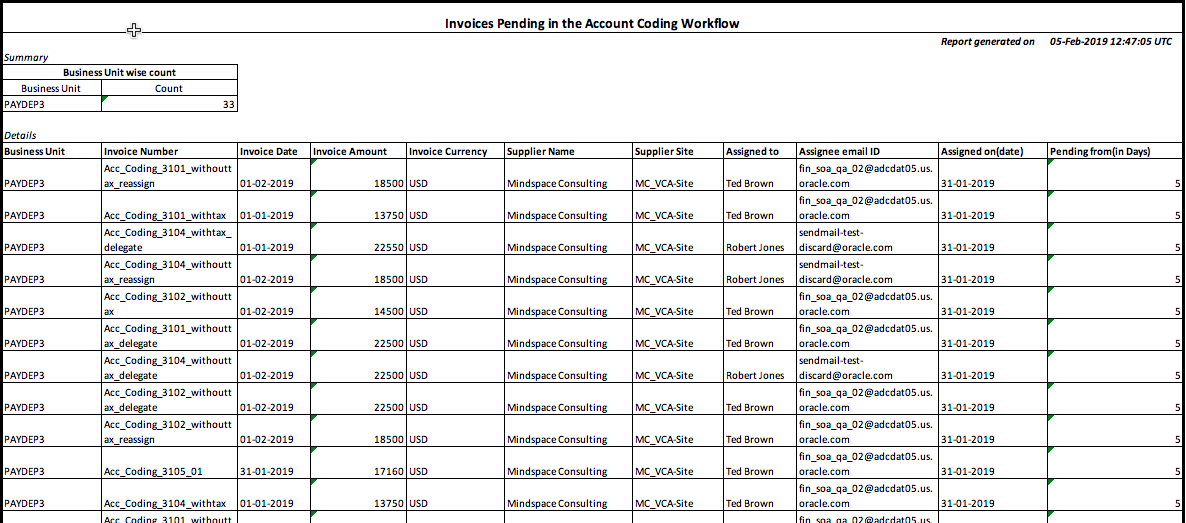
Rejected Transaction Report
Steps to Enable
You don't need to do anything to enable this feature.
Tips And Considerations
- Navigate to Schedule Processes page
- Click on Schedule New Process
- Search and Select Payables Workflow Transaction listing
- Submit Report
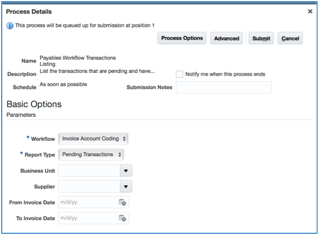
Screenshot: Payables Workflow Transaction Listing
Role Information
This feature is available to users having the Initiate Payables Invoice Approval Task Flow privilege.
Supplier Portal Invoice Enhancement Phase Two
The Supplier Portal Invoicing Enhancement Phase Two brings in a new set of features which are explained below.
- Enhanced Supplier Portal UI: The UI has been enhanced for better usability by re-arranging the fields that allow for quicker data entry. Now the Freight and Miscellaneous lines are created in the section where the item lines are created.
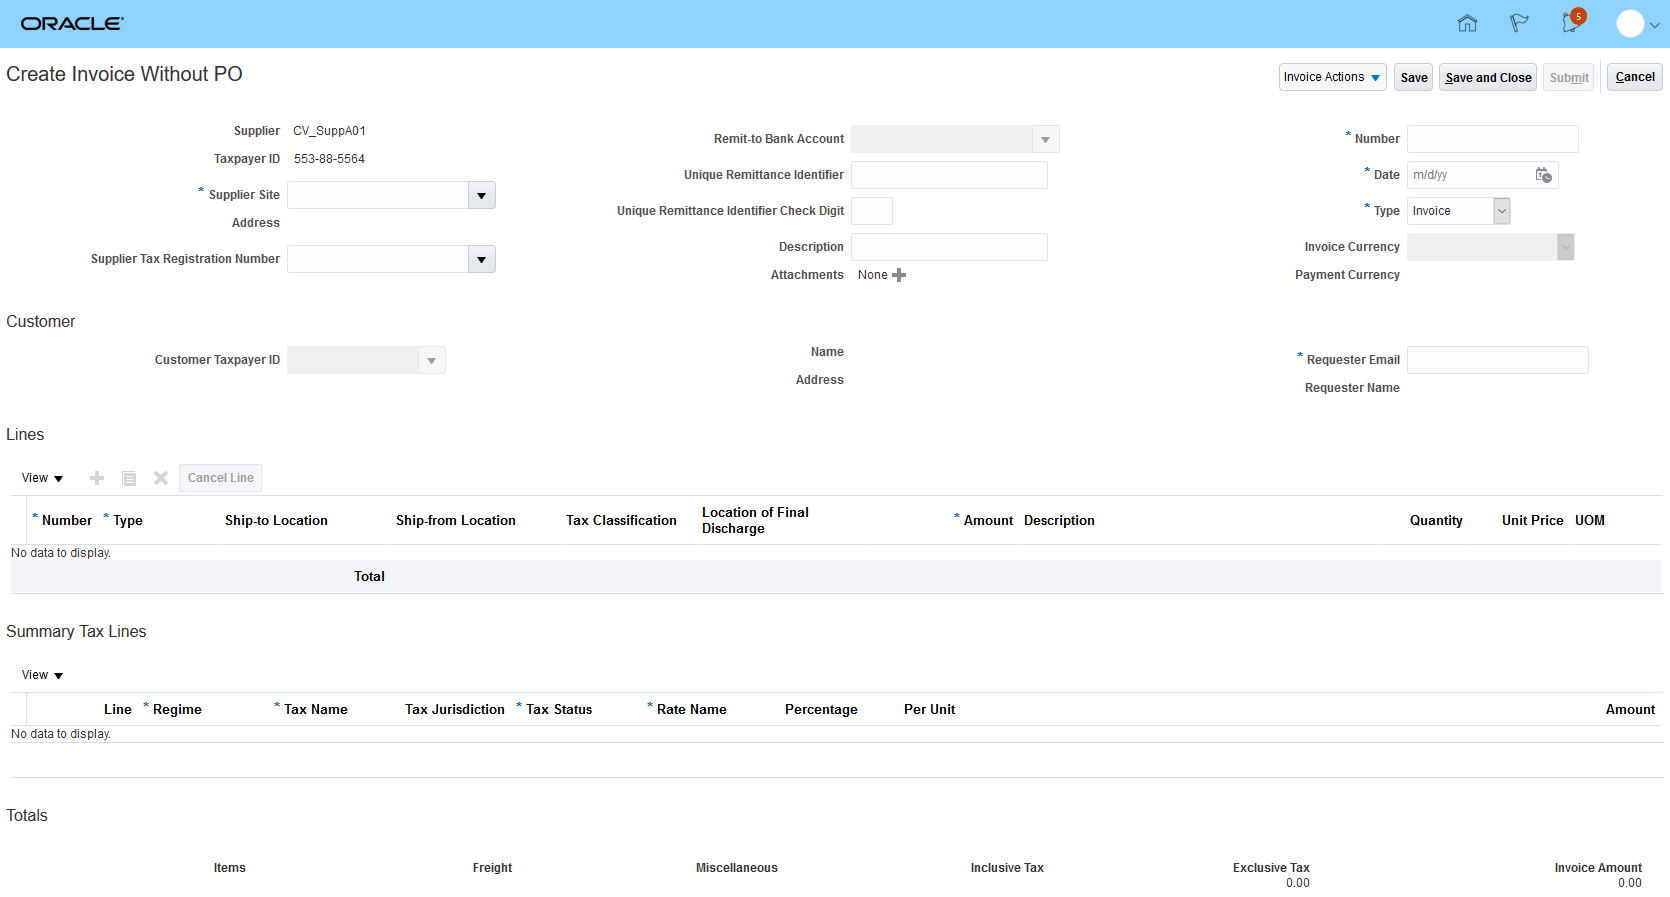
Create Invoice Without Purchase Order
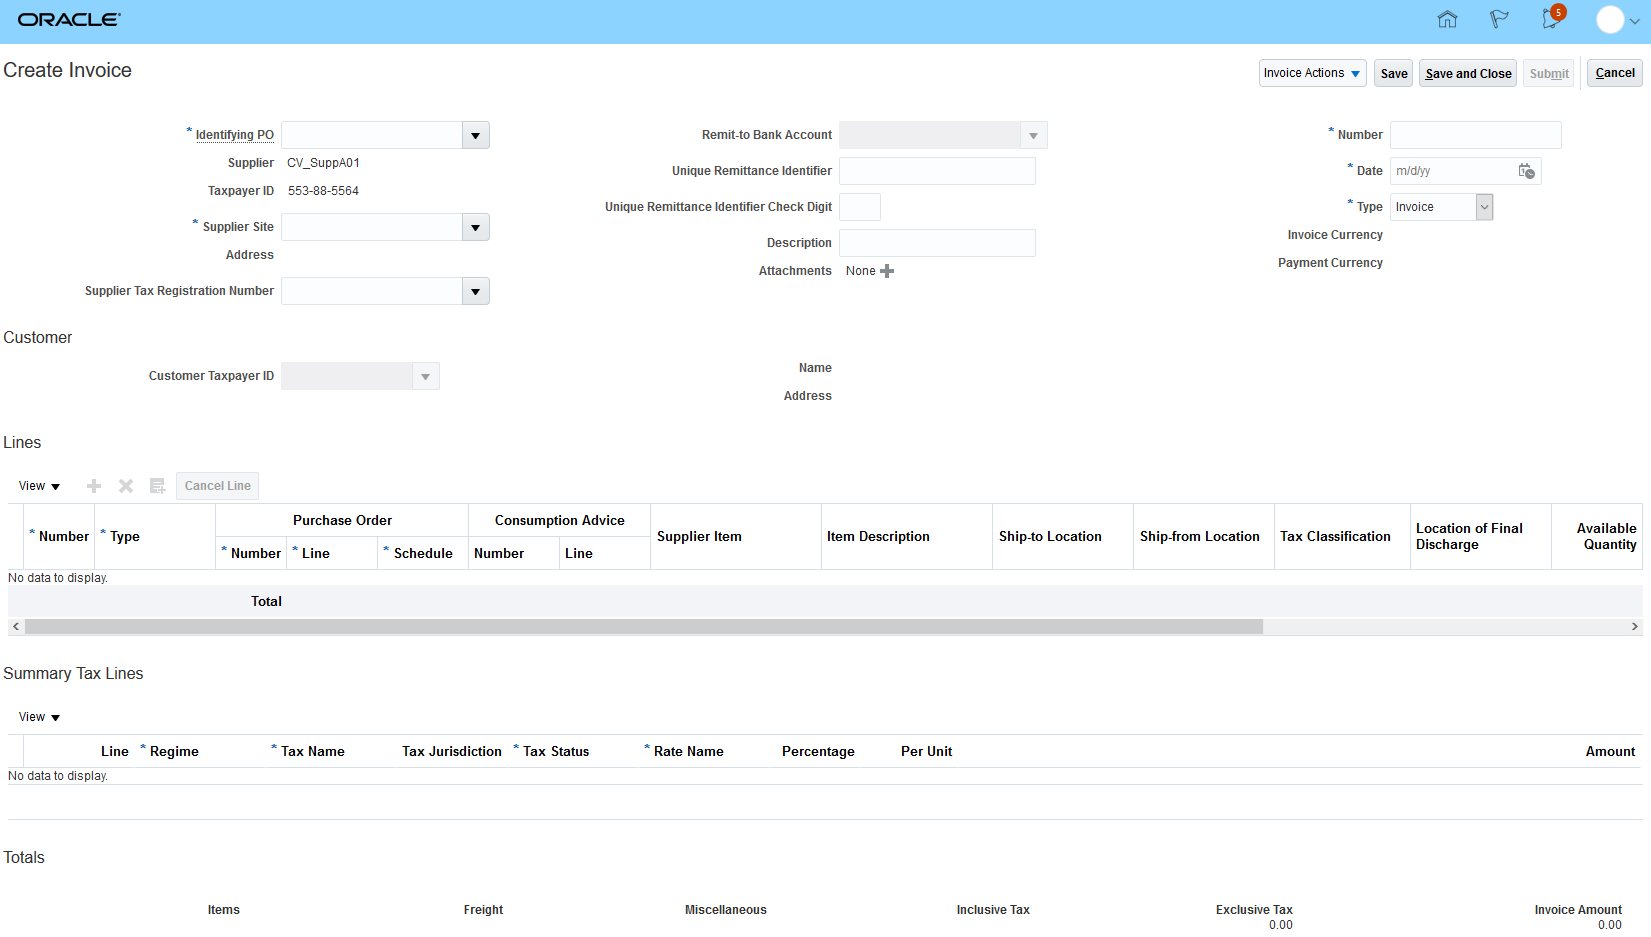
Create Invoice with Purchase Order

Freight and Miscellaneous Lines Along with Item Lines
- New tax driver on invoice lines: Suppliers can now apply different taxes for every invoice line by providing a Tax Classification Code. The tax driver can be provided for all invoice line types (Item, Freight and Miscellaneous).
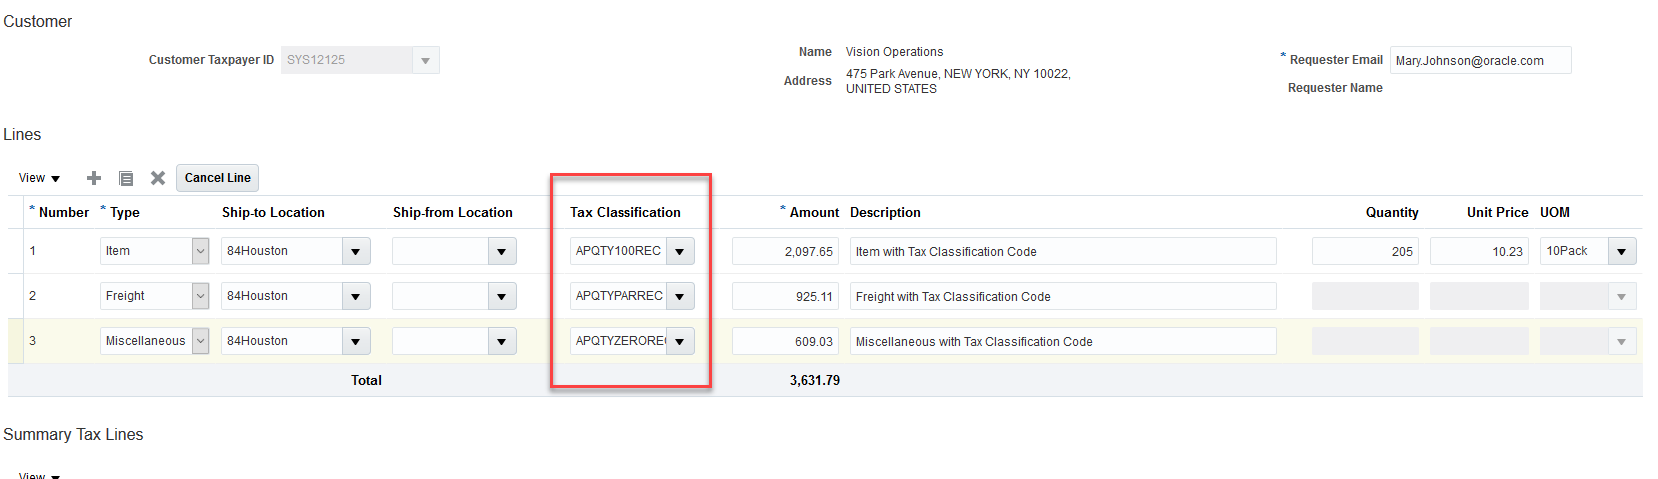
Tax Classification Code on Invoice Lines
- Edit Rejected Invoices: Supplier users can now edit and resubmit invoices that are rejected from the approval users during the invoice request approval process. The supplier users will see the invoice status as rejected and when accessed the invoice will be opened in the Edit mode. After making necessary changes, based on the rejection comments from approval users, the supplier can resubmit the modified invoice. Users can recognize the invoices with Invoice Type as "Standard Invoice Request" and the status as "Rejected".
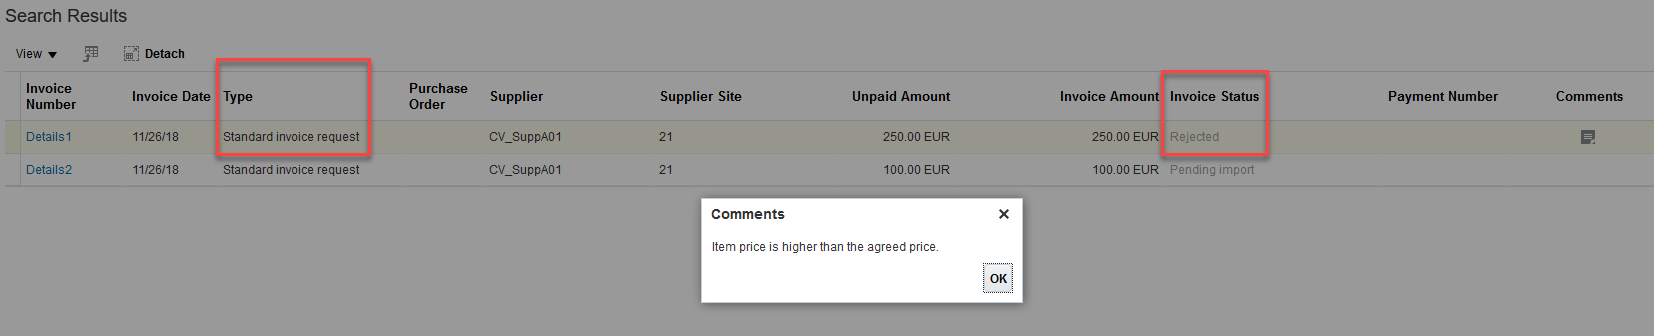
Rejected Invoice
- Approval actions for Payables user: When the approval for the Standard Invoice Request (Supplier Portal Invoices) is in progress, the Payables users can now perform actions similar to what they can do during the standard invoice approval process. The actions allowed on Standard Invoice Request are: Withdraw, Resubmit and Force Approve.
- Withdraw: Payables user can withdraw the invoice request workflow on unmatched supplier portal invoices when the approval is still in process. On withdrawal of approval the approval status will be stamped as "Withdrawn" and the supplier will see the invoice status as "Pending Import".
- Resubmit: The Resubmit action is only allowed for invoice request that was withdrawn or rejected. The Resubmit action is allowed only in the online mode.
- Force Approve: Payables user will be able to Force Approve an invoice request workflow when the approval is still in process, rejected or is withdrawn. On Force Approval, the status will be visible to suppliers as "In Process". Force Approval is a secured action and the user would need the security privilege "Force Approve Payables Invoice" to perform the action.
- Cancel Standard Invoice Request: Payables users can now cancel supplier portal invoices when the invoice request approval is in progress. On Cancellation of the Standard Invoice Request
- The invoice status will be updated as "Canceled". The invoice amount will be marked as zero and the taxes will be reversed.
- The supplier user will see the status as "Canceled".
- Invoice request approval process will be automatically withdrawn.
Steps to Enable
Use the Opt In UI to enable this feature. For instructions, refer to the Optional Uptake of New Features section of this document.
Offering: Financials
Feature: Supplier Portal Invoicing Enhancement
Tips And Considerations
Consider the following when working with invoices from the Supplier Portal:
- When the Invoice Request Approval process is rejected by the users, only the supplier users will be able to edit the invoice from the supplier portal and submit the invoice. Payables users will not be able to edit them.
- When Invoice Request Approval process is rejected by the system, only the Payables users will be able to resubmit them. Supplier users will not be able to edit and resubmit them from the supplier portal.
- Resubmission of system rejected invoices can be done only in the online mode. Resubmission is not supported through the program "Initiate Invoice Approval Workflow".
- Force Approval is a secured action and Payables user would need the security privilege "Force Approve Payables Invoice" to perform the action.
Role Information
No additional roles are required to work on this feature.
Customer and Supplier Balance Netting
Manage Netting Settlements in a Spreadsheet
Use the Manage Netting Settlements in a Spreadsheet feature to process settlements that are in progress.
Settlements that are in Selected or Selected, no transactions status can be downloaded to a spreadsheet and processed as follows:
- Selected: You can review, delete, or mark them to be settled.
- Selected, no transactions: You can delete them from the spreadsheet.
The spreadsheet lets you delete or settle a netting settlement. After all changes are complete, you can save and submit the settlements for processing.
Watch a Demo
Steps to Enable
You don't need to do anything to enable this feature.
Tips And Considerations
Refer to the Customer and Supplier Balance Netting Topical Essay for detailed implementation guidance: https://cloud.oracle.com/opc/saas/datasheets/netting-topical-essay.pdf
Use the Manage Netting Settlements page to search for the types of settlements that you wish to process. For example :
- Settlements that belong to a Legal Entity
- Settlements that are in Selected or Selected, no transaction status
- Settlements that have the same Settlement Name
Key Resources
- Customer and Supplier Balance Netting Topical Essay: https://cloud.oracle.com/opc/saas/datasheets/netting-topical-essay.pdf
- Watch Manage Netting Settlements in a Spreadsheet Readiness Training
Role Information
- The Manage Netting Settlements in a Spreadsheet is automatically made available to you if you have already completed the Netting Security Setup Steps.
- Details of the setup can be found here: https://cloud.oracle.com/opc/saas/datasheets/loc-sec-topical-essay.pdf
Manage Customer Data Import in Receivables
You can now manage the import of customer data into Receivables using the Manage Data Import task.
The Manage Data Import task is available from the Receivables Billing work area.
NOTE: The Data Import task previously available in the application navigator under Customer Data Management is now obsolete.
Steps to Enable
You don't need to do anything to enable this feature.
Tips And Considerations
If a user has saved the previous navigation to the Data Import Task in Favorites and Recent Items, then these need to be redefined to the new navigation.
Role Information
Receivables Manager and Receivables Specialist roles already have access to the two duty roles that secure the Manage Data Import task in Receivables: Trading Community Import Batch Management Duty and Trading Community Import Process Management Duty.
Create Detailed Receivables Distributions
The Create Detailed Receivables Distributions feature provides the capability to split consolidated Receivables and Cash distributions in proportion to the balancing segments used for accounting a transaction. Having detailed distributions provides better visibility into operations at the segment level, where a segment may represent a fund, a product, or a line of business.
At this time, this feature is intended only for the public sector industry.
NOTE: The predefined options and setup data for the Detailed Distributions feature are labeled as Multifund Accounting. These are synonymous terms.
Example

Steps to Enable
Use the Opt In UI to enable this feature. For instructions, refer to the Optional Uptake of New Features section of this document.
Offering: Financials
Enabling detailed distributions for Receivables is a three-step process.
- Enable the Feature Opt-in.
- Enable it for a business unit (and ledger) in Receivables System Options.
- Create a Subledger Accounting Method (SLAM) and associate it with the ledger.
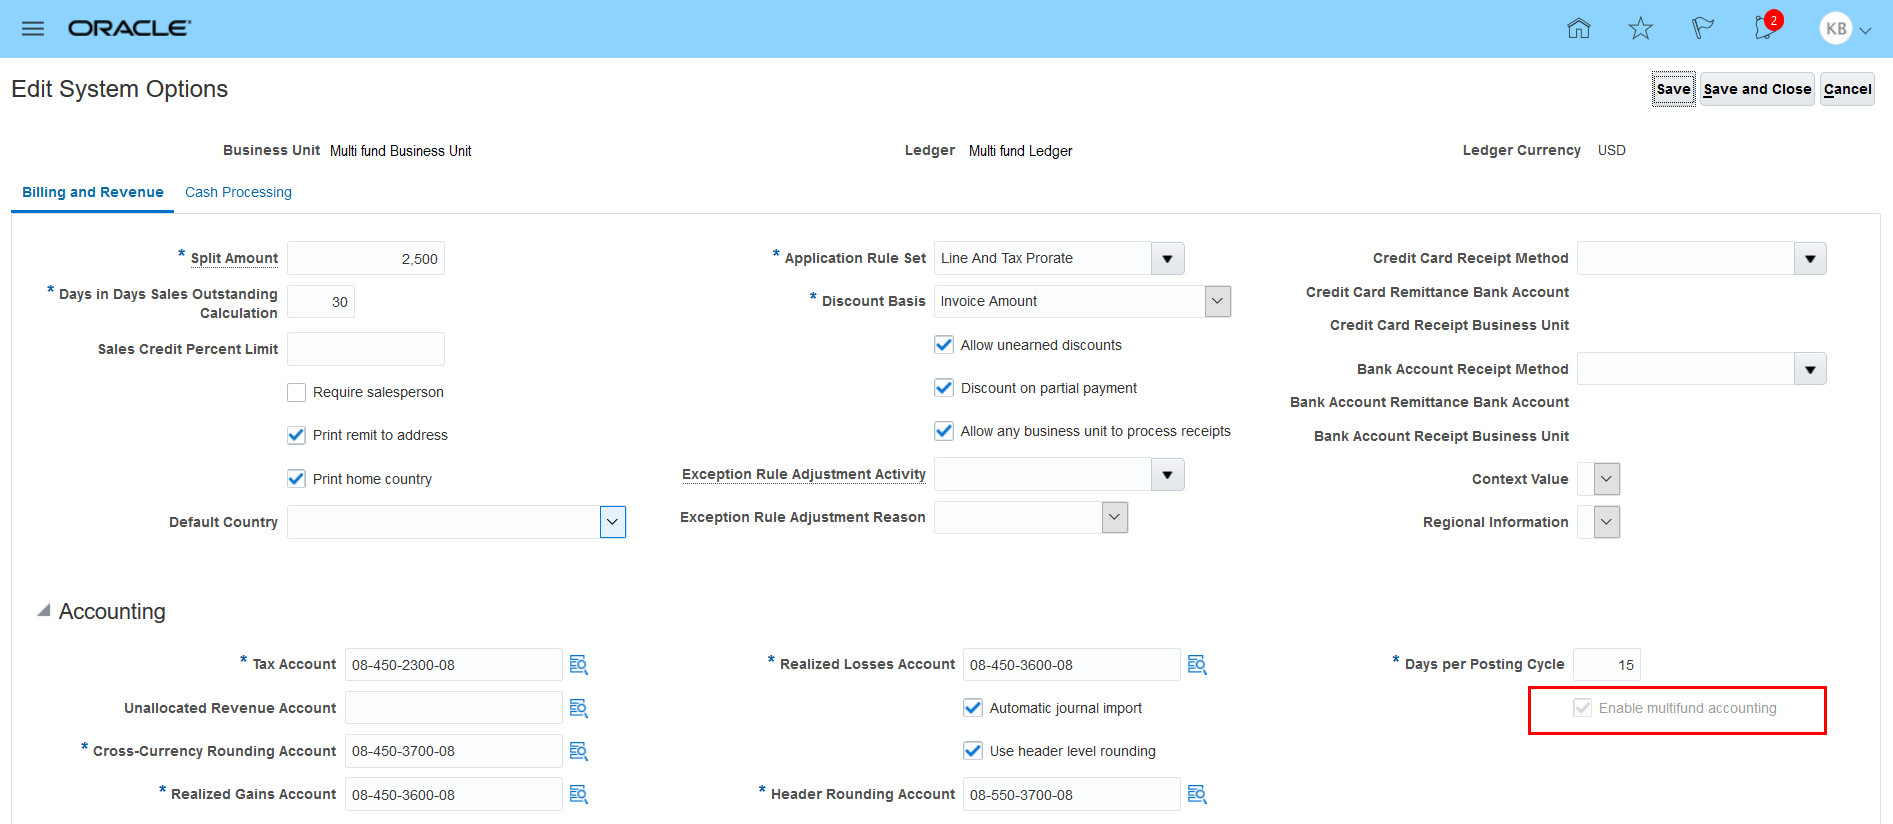
RECEIVABLES SYSTEM OPTIONS
- Click the Navigator, and then Setup and Maintenance.
- Search for the task ‘Manage Receivables System Options’.
- From this page, search for the business unit that requires the detailed distributions feature.
- From the ‘Edit System Options’ page, enable the option ‘Enable multifund accounting’.
On enabling this option for a business unit, the detailed distributions feature becomes automatically applicable to all other business units that share the same Ledger.
This selection cannot be reverted once enabled. Because of this, a warning message is displayed before confirming the selection. Choose ‘Yes’ to continue.
SUBLEDGER ACCOUNTING METHOD
Create a Subledger Accounting Method for supporting the creation of detailed distributions and associate it with the Ledger:
- Click the Navigator, and then Setup and Maintenance.
- From the Task Pane (right side of the page) select the task ‘Manage Implementation Projects’.
- Using the reference of an Implementation Project, search for the task ‘Manage Accounting Methods’ from the Receivables configuration.
- Search for the predefined Accounting Method ‘Standard Accrual’ and duplicate it.
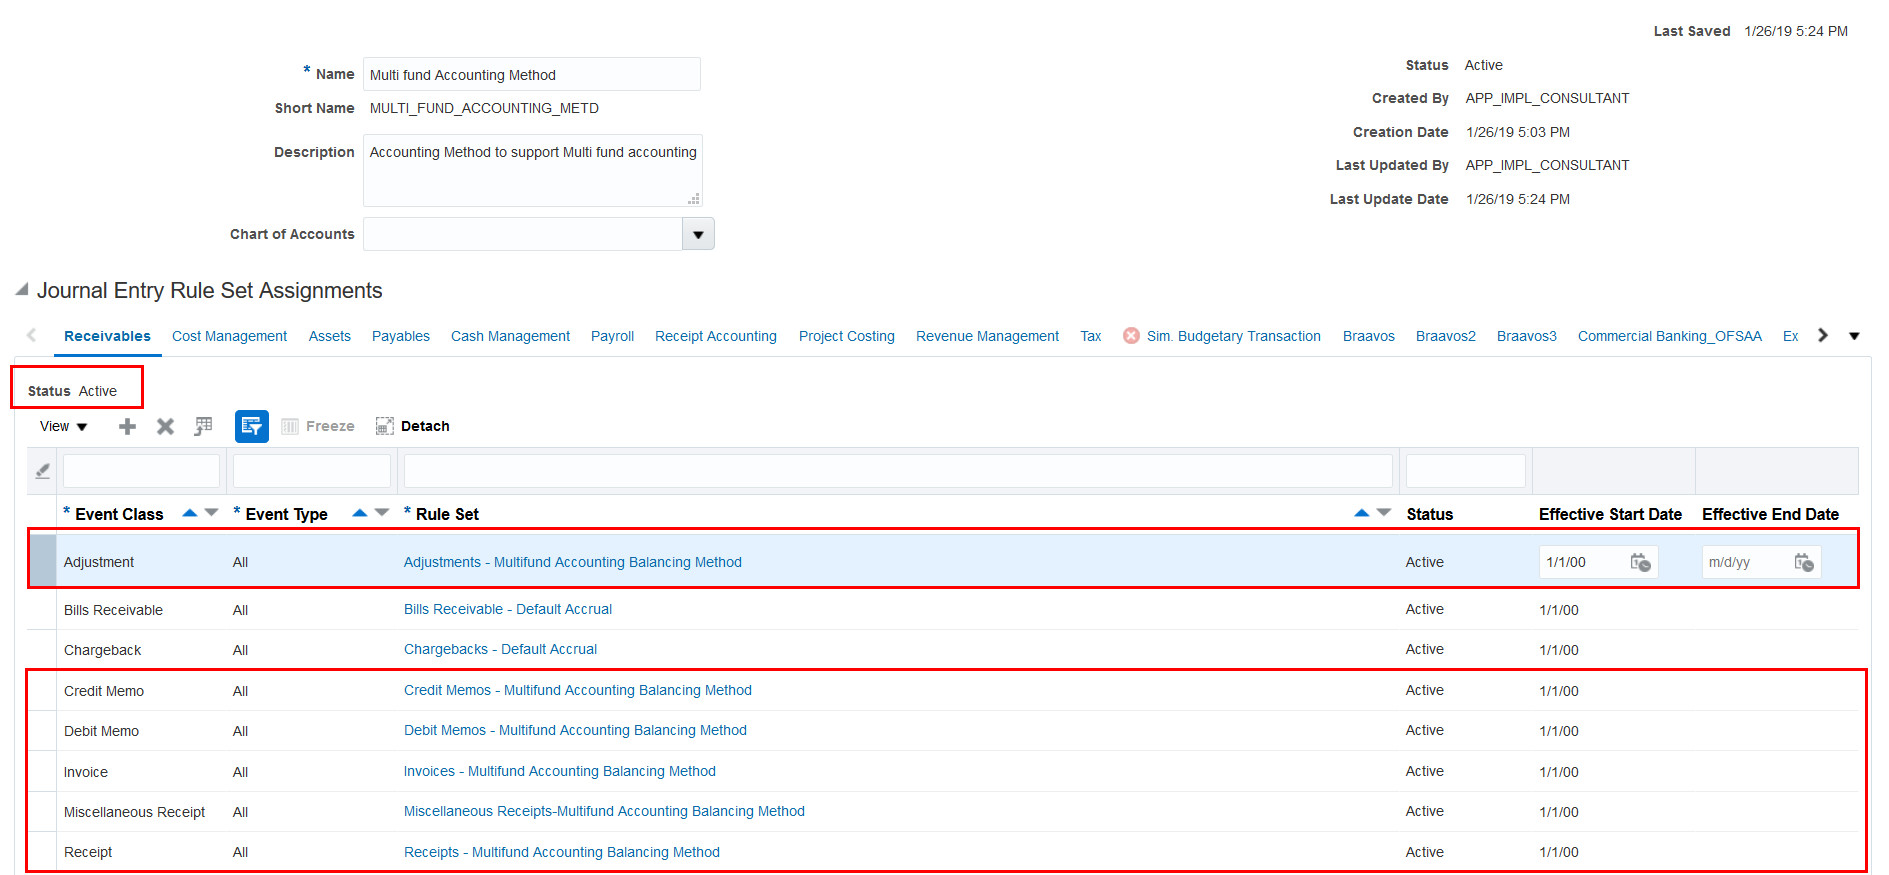
- In the section for Journal Entry Rule Set Assignments for Receivables, delete the existing rule sets for Adjustment, Debit Memo, Credit Memo, Invoice, Miscellaneous Receipt and Receipt.
- Re-create these records using the following predefined Rule Sets for Multifund Accounting:
- Adjustment: 'Adjustments - Multifund Accounting Balancing Method'
- Debit Memo: 'Debit Memos - Multifund Accounting Balancing Method'
- Credit Memo: 'Credit Memos - Multifund Accounting Balancing Method'
- Invoice: 'Invoices - Multifund Accounting Balancing Method'
- Miscellaneous Receipt: 'Miscellaneous Receipts - Multifund Accounting Balancing Method'
- Receipt: 'Receipts - Multifund Accounting Balancing Method'
- Activate the Accounting Method from Menu Actions > Change Status
The predefined Journal Entry Rule Sets associated with the Accounting Method will have the default status as ‘Incomplete’. On activating the Accounting Method (as stated in step-7), the corresponding Journal Entry Rule Sets will also receive the status ‘Active’.

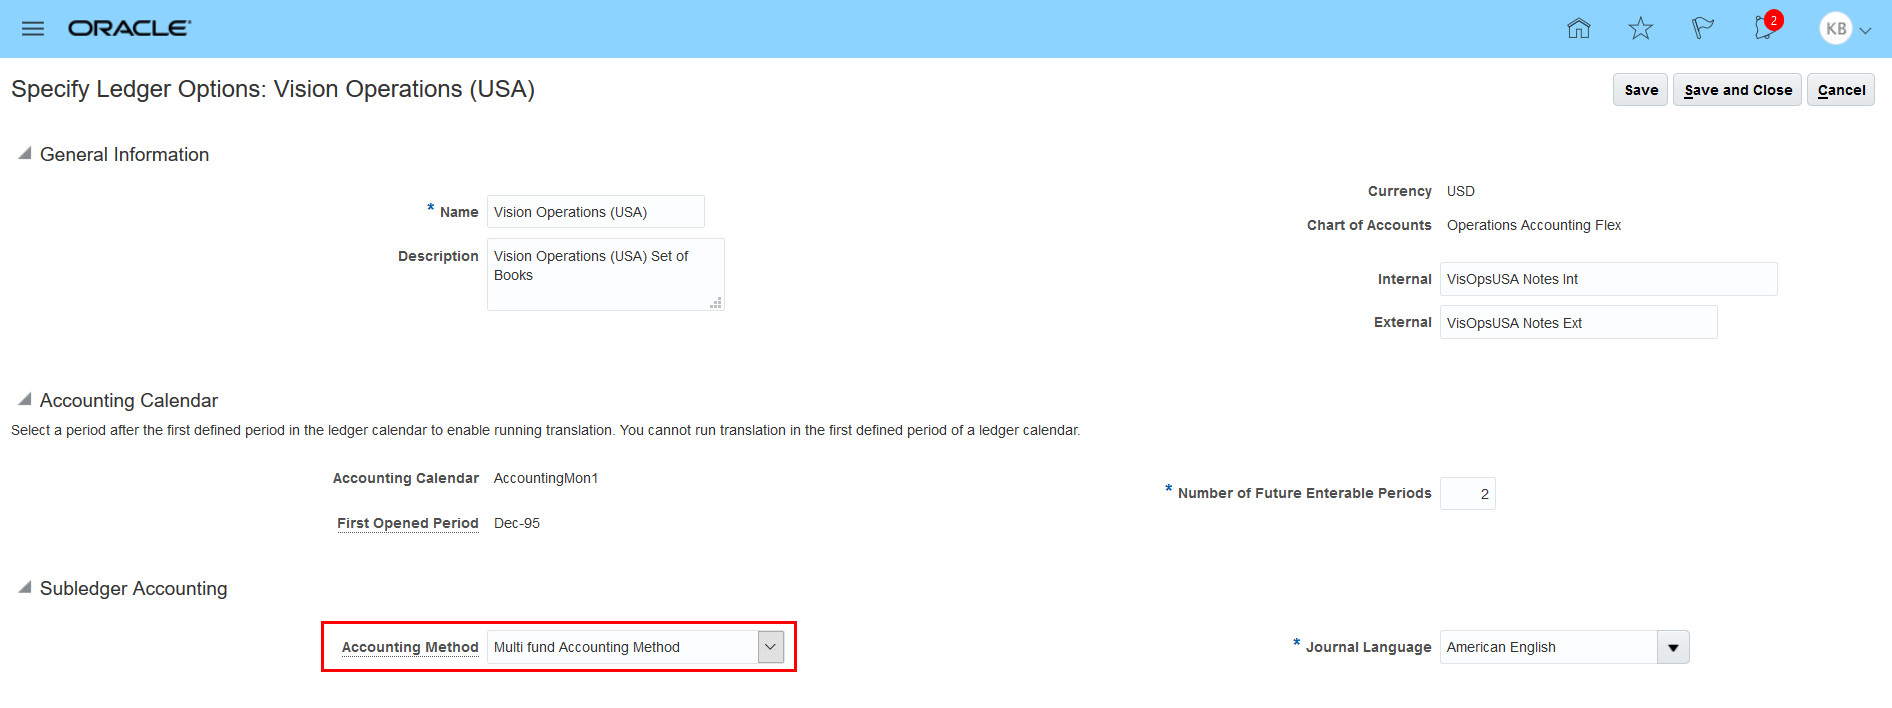
Associate this custom Accounting Method to the Ledger:
- Using the reference of an Implementation Project, search for the task ‘Specify Ledger Options’.
- Access the task using the scope of the Ledger for which Multifund Accounting is enabled (through the corresponding business unit).
- For this ledger, select the custom Accounting Method created for Multifund Accounting, in the section for Subledger Accounting.
Tips And Considerations
- On enabling Multifund Accounting for a business unit within Receivables System Options, it becomes automatically applicable to all the business units associated with the same ledger. If any business unit associated with this ledger does not require multifund accounting, then it should be de-linked from that ledger.
- Multifund Accounting can be enabled only when there are no transactions for the business units associated with the ledger. In addition, this choice cannot be reverted once selected. Therefore, the decision to implement Multifund Accounting should be a part of your overall implementation considerations, after analyzing all of your business requirements.
- Multifund Accounting setup should be enabled before migrating the transactions from the legacy system to Oracle Financials Cloud.
- All legacy transactions should be migrated as open balances (for each invoice line) using either an FBDI template or REST service, and they should be posted to General Ledger. The option 'General Ledger Journal Entry Summarization' on the Accounting Options Page should be set as 'Summarize by General Ledger Date' to have all the migrated Invoices posted to a single Journal. This Journal can be manually reversed so that it does not contradict with the open balances migration done through the General Ledger process. It also avoids unwanted entries for Revenue/Freight/Taxes in the current period.
Role Information
There are no changes to the job roles or any other existing privileges for using the detailed distributions feature. Also, the process to account and view the distributions within the Subledger and General Ledger remains the same.
Customer and Supplier Balance Netting
Manage Netting Settlements in a Spreadsheet
Use the Manage Netting Settlements in a Spreadsheet feature to process settlements that are in progress.
Settlements that are in Selected or Selected, no transactions status can be downloaded to a spreadsheet and processed as follows:
- Selected: You can review, delete, or mark them to be settled.
- Selected, no transactions: You can delete them from the spreadsheet.
The spreadsheet lets you delete or settle a netting settlement. After all changes are complete, you can save and submit the settlements for processing.
Watch a Demo
Steps to Enable
You don't need to do anything to enable this feature.
Tips And Considerations
Refer to the Customer and Supplier Balance Netting Topical Essay for detailed implementation guidance: https://cloud.oracle.com/opc/saas/datasheets/netting-topical-essay.pdf
Use the Manage Netting Settlements page to search for the types of settlements that you wish to process. For example :
- Settlements that belong to a Legal Entity
- Settlements that are in Selected or Selected, no transaction status
- Settlements that have the same Settlement Name
Key Resources
- Customer and Supplier Balance Netting Topical Essay: https://cloud.oracle.com/opc/saas/datasheets/netting-topical-essay.pdf
- Watch Manage Netting Settlements in a Spreadsheet Readiness Training
Role Information
- The Manage Netting Settlements in a Spreadsheet is automatically made available to you if you have already completed the Netting Security Setup Steps.
- Details of the setup can be found here: https://cloud.oracle.com/opc/saas/datasheets/loc-sec-topical-essay.pdf
Enhanced Handling of Invalid Contract Lines
You can now specify how invalid source document lines are handled during the accounting contract creation process.
- The Reject line option ignores the invalid source document lines and creates the contract with only the valid source document lines.
- The Reject contract option suspends the contract creation until all of the source document lines are valid.
Invalid source document lines are lines that have failed the Revenue Management data validation process.
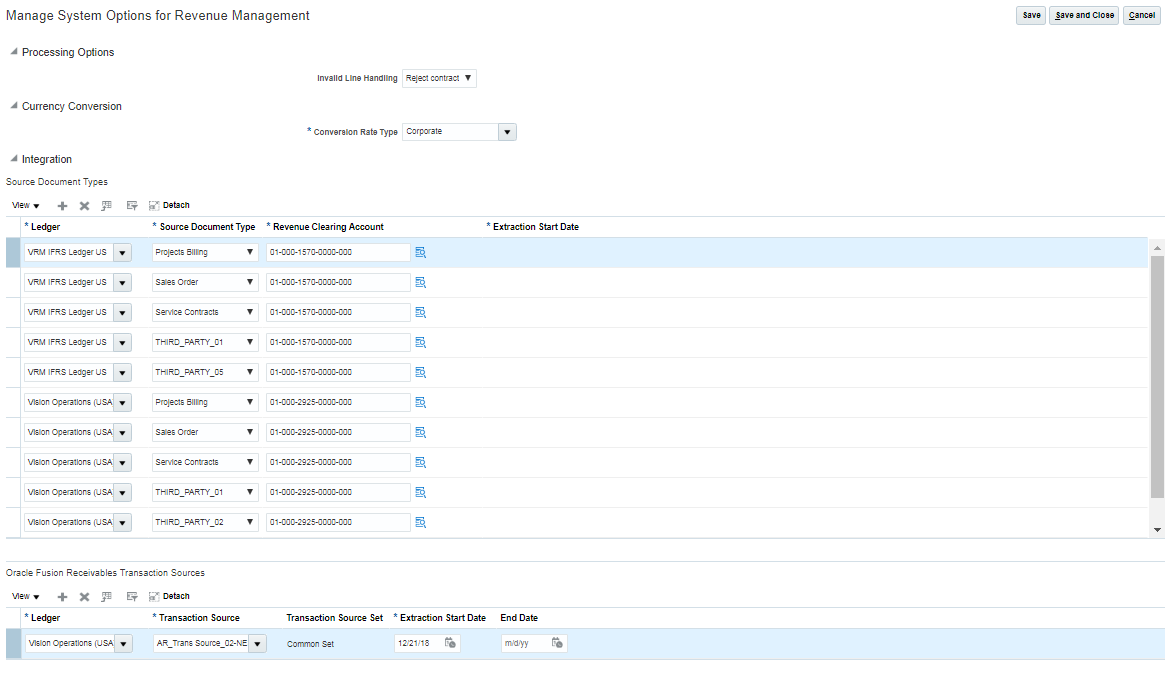
Manage System Options for Revenue Management
MANAGE SYSTEM OPTIONS FOR REVENUE MANGAGEMENT – INVALID LINE HANDLING
There are two values for the Invalid Line Handling option:
- Reject line
- Reject contract
When the Invalid Line Handling option is set to Reject contract:
- The contract creation process is suspended for source documents with invalid source document lines until all of the invalid source document lines are corrected and error free.
- The valid and invalid source document lines are displayed in the Correct Source Document Line Error worksheet.
- The valid source document’s lines are assigned a Related Line Error indicating that the line is valid but not processed due to associated source document lines that contain data errors.
- Once the invalid source document lines are corrected, a contract is created that includes all of the now valid source document lines.
When the Invalid Line Handling option is set to Reject line or Blank:
- The contract creation process is executed for all valid source document lines, regardless of whether there are related contract lines in error status.
- Only the invalid source document lines are displayed in the Correct Source Document Line Error worksheet.
- Once the related invalid source document lines are corrected, the corrected lines are added to a new contract if the existing contract is frozen.
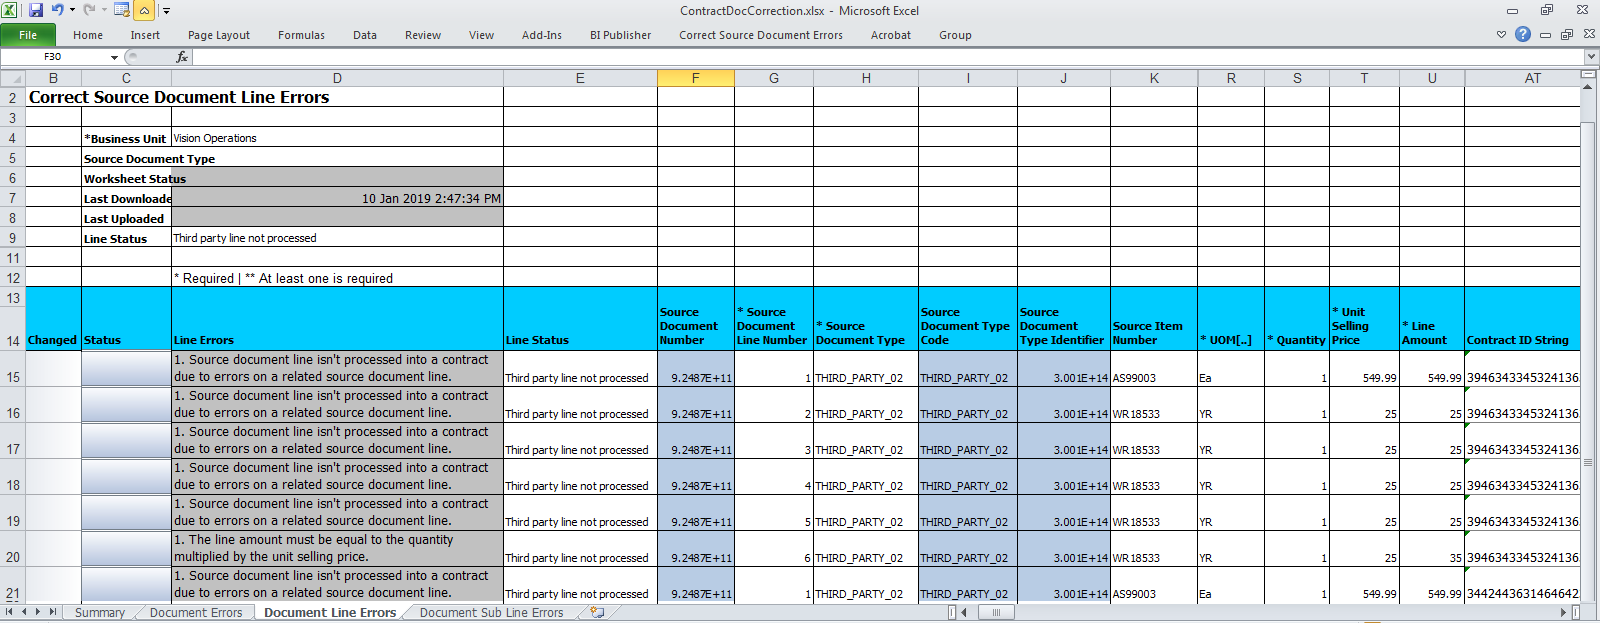
ContractDocCorrection.xls
CORRECT CONTRACT DOCUMENT ERRORS IN SPREADSHEET
When the Invalid Line Handling option is set to Reject contract:
- The valid and invalid source document lines are displayed in the Document Line Error tab of the Correct Contract Document Errors worksheet.
- When the source document line cannot be assigned a Contract ID String, the line is displayed with a Contract ID String error.
- The valid source document lines are assigned a Related Line Error indicating that the line is valid but not processed due to associated source document lines that contain data errors.
- You can change the Data Transformation Status from Unprocessed to Purge or Reject so that the invalid line can be excluded and processing can continue.
- Use the worksheet to correct and reprocess the invalid source document lines.
- When you upload your updates in the worksheet, the Validate Customer Contract Data process is executed and the lines are reprocessed.
When the Invalid Line Handling option is set to Reject line or Blank:
- Only the invalid source document lines are displayed in the Document Line Error tab of the Correct Contract Document Errors worksheet.
- You can change the Data Transformation Status from Unprocessed to Purge or Reject so that the invalid line can be excluded and processing can continue.
- Use the worksheet to correct and reprocess the invalid source document lines.
Steps to Enable
You don't need to do anything to enable this feature.
Tips And Considerations
When using the Invalid Line Handling feature:
- The Invalid Line Handling option can be modified. The default value is Blank.
- Profile option changes takes effect from the time the changes are saved, and are applied to all processing from that point forward.
- Profile option changes are not retrospectively applied.
- Contracts are identified and assigned unique Contract ID Strings by the Validate Customer Contract Source Data process.
- When lines are reprocessed, the latest active contract identification rules are applied when determining the Contract ID String for the line.
- If the source document line status is Unprocessed and the Contract ID String is not blank, the Contract ID String is updated with the new value and the source document line status is set based on the source document line status of the revised Contract ID String.
- If the Contract ID String is blank for a line, the line is tagged as Unprocessed and assigned a Contract ID String error.
- You can correct invalid or missing Contract ID Strings using the spreadsheet.
- You can change the Data Transformation Status from Unprocessed to Purge or Reject so that the invalid line can be excluded and processing can continue.
- After lines are reprocessed, invalid lines with a status of Purge are deleted from the table and lines with a status of Reject are ignored.
- After you save and upload the worksheet, corrections to the line and all other lines with the same Contract ID string value are reevaluated and processed.
- When Invalid Line Handling option is changed from Reject line to Reject contract:
- New logic will be applied from that point forward.
- Changes apply only to new lines and unprocessed lines, once they are corrected.
- Lines are eligible for further contract creation processing only when all of the lines with the same Contract ID String are in a status of Processed.
- Source document lines in a status of Processed that have the same Contract ID String will be processed.
- When the Invalid Line Handling option is changed from Reject contract to Reject line:
- Changes apply only to new and corrected lines.
- After lines are reprocessed, any line with the same Contract ID String in a status of Processed is converted to a contract, regardless of whether there are other lines with the same Contract ID String in a status of Unprocessed.
- Use caution when assigning invalid source document lines a status of Purge on the Correct Contract Document Errors spreadsheet. When the lines are reprocessed, they are deleted from the table and are unavailable for future processing unless they are reloaded as new lines.
Role Information
No new role access is needed to use this feature.
Upload Mappings of Subledger Accounting Mapping Set Rules Using FBDI
You can import high volume mappings using the subledger accounting file-based data import mappings spreadsheet template.
To do this, you must use the Create Mapping Set page to create a mapping set rule definition with corresponding input sources and output types before adding the mappings using the subledger accounting mapping import template.
Add the mappings by completing and uploading the spreadsheet template with the following steps:
- Download the Subledger Accounting Mapping (XlaImportMappings) spreadsheet template from File-Based Data Import for Oracle Financials Cloud guide.
- Enter the mapping information in the Mappings worksheet. There are examples provided. For examples, using the account combination or segment value as the output for the mappings.

Subledger Accounting Mappings Import Spreadsheet Template
- After you finish preparing the mapping data in the spreadsheet template, click the Validate button to validate date format, line numbers, required fields, and default mapping. Correct any error reported.
- You can save the original XlaImportMappingsTemplate with any name.
- Next, click the Generate CSV File button in the Instructions and CSV Generation worksheet tab. The Process generates both a CSV file and ZIP file.
- Review the generated XlaImportMappingsTemplate.csv that is appended as a worksheet in the same spreadsheet. It must have the same number of mapping lines that exist in the Mappings worksheet.
- The next step is to load the generated .ZIP file to the interface and application database tables.
- Navigate to the Scheduled Processes workarea.
- Select the Load Interface File for Import process.
- Select the Import Accounting Setup process.
- Upload the XlaImportMappingsTemplate.zip data file and upload it.
Steps to Enable
You don't need to do anything to enable this feature.
Tips And Considerations
- Use this FBDI spreadsheet solution to upload high volume mappings that have more than 2,000 lines - for mapping set rules. Use the existing mappings import feature or enter mappings using the user interface for low volume mappings.
- Review the log and output files of the Load File to Interface child process for information about the data that caused the failure.
- Review the log and output files of the Import Accounting Setup process for information about errors from validations performed by the application. For example, duplication of mappings.
Key Resources
- For more information on using the Subledger Accounting Mapping template, refer to Oracle Financials Cloud Implementing Subledger Accounting or Oracle Financials Cloud Using Subledger Accounting on the Oracle Help Center.
- Implementing Subledger Accounting: Subledger Accounting Mappings Import: How Data Is Processed
Watch Import Mappings Using File Based Data Import Readiness Training
Role Information
Shipped job role:
- Application Implementation Consultant
NOTE: When defining a new user-defined job role, it must contain the following:
- The privileges to manage mapping sets:
- Manage Subledger Mapping Sets
- Manage Subledger Mapping Set Value
- A duty role to load interface file for import:
- FSCM Load Interface Administration
Compound Tax on the Assessable Value
Use this feature to define the taxable basis for a tax by compounding taxes based on the assessable value. The feature is applicable to all taxes in the world.
Steps to Enable
Use the Opt In UI to enable this feature. For instructions, refer to the Optional Uptake of New Features section of this document.
Offering: Financials
Tax Registration Number Validation for 5 New Countries (Colombia, Ecuador, Mexico, Peru, and Taiwan)
Oracle Tax provides the infrastructure to capture, maintain, and validate the information for enterprise, suppliers, customers and other parties in the Manage Legal Reporting Unit Registrations and the Manage Tax Registrations of Legal Reporting Unit Tax Profile, Third-Party Tax Profiles and Third-Party Site Tax Profiles.
The different types of validations for the tax registrations and taxpayer identifiers issued by the federal revenue bureau, fiscal authorities and government agencies of the countries Columbia, Ecuador, Mexico, Peru and Taiwan are as follows:
- Colombia’s Party Tax Registration Number Validation:
Colombian entities (companies or persons in the public and private sector) have a tax identification number, known as the Numero de Identificacion Tributaria “NIT”.
For first parties, NIT is defined as Legal Reporting Unit Registrations during Manage Legal Reporting Unit Registrations task.
For customers, suppliers and other third parties, NIT is defined as Tax Registration Number / Taxpayer Identifier Number at Manage Tax Registrations of Third-Party Tax Profiles and Third-Party Site Tax Profiles. This information is validated for uniqueness, format, and check digit requirements.
This validation check does not apply to Foreign Entity third parties. Each foreign entity has its own country-specific tax registration number standard, which can include alphanumeric characters.
Validation details are as follows:
- Validation Type - ORA_CO_NIT
Description - Colombia NIT
No of Digits - <=20
Format - Only Numeric Characters are allowed
Check Digit - Yes (Last Digit)
Check Digit Validation - 11- Modulo 11 (Each number of the NIT multiplied starting from right to left, with a sequence starting from 2, then 3, and so on until 7, if there are additional numbers, then that start with 2 again). If the result is over 0 and less than 10, that is the verifying number we are looking for. If the result is 11, then the VD is 0 or if it is 10, the verifying digit is 1
Example TRN No.:
Good: 412615336
Bad: AR1234567 (Invalid Format – Only Numbers allowed)
- Validation Type - ORA_CO_NIT:FOREIGN
Description - Foreign Business Unit Entity for Colombia with Foreign Origin
No of Digits - <=20
Format - No Restriction on the characters
Check Digit - No
Check Digit Validation - No Check Digit Validation
Example TRN No.:
Good: AR1234567
- Ecuador’s Party Tax Registration Number Validation:
The Registro Unico de Contribuyentes “RUC” is the unique code used to identify an entity for taxation purposes. Validation of the “RUC” is critical to ensure the third party transaction will be valid when doing the Transactional Amendment for the Ecuadorian Government (Monthly legal reports). This information is validated for uniqueness, format, and check digit requirements.
Validation details are as follows:
- Validation Type - ORA_EC_RUC:COMPANY
Description - Ecuador RUC validation for Companies
No of Digits - 13
Format - Only Numeric Characters are allowed
- The 3rd digit from left to right is “6” or “9” depending on the type of entity and the three last digits on the right are 001, 002, 003 de-pending upon the number of additional establishments of the same third party.
- The two first positions indicate the province where it was expedited, therefore could not be over 22 or less than 1.
- Last three digits could not be 000 private or 0000 for public persons or institutions, as they should have one establishment at least.
Check Digit -
- When the 3rd position is 9, then Check Digit is 10th Digit;
- When the 3rd position is 6, then Check Digit is 9th Digit
Check Digit Validation -
- When the 3rd position is 9 (the verifying digit is in position 10 in this case)
- Existing coefficients: 4.3.2.7.6.5.4.3.2
- When the 3rd position is 6 (the verifying digit is in position 9 in this case)
- Existing coefficients: 3.2.7.6.5.4.3.2
NOTE: when the reminder is 0, then the verifying digit is 0 (zero)
Example TRN No.:
Good: 1790085783001
1760001040001
Bad: AR1234567 (Invalid Format – Only Numbers allowed)
5790185783001 (Invalid Check Digit)
4750185783001 (3rd digit from left has to be 6 or 9)
- Validation Type - ORA_EC_RUC:INDIVIDUAL
Description - Ecuador RUC validation for Individual Persons
No of Digits - 13
Format - Only Numeric Characters are allowed
- The last 3 digits of the RUC represents the number of locations: 001, 002, 003, etc. for this person where the two first digits are the province where it was expedited: will be numbers between 1 and 22 only. Therefore, the last 3 digits will never be 000 as there is at least one existing location.
Check Digit - 10th Digit
Check Digit Validation -
- The DNI is validated as per the “Module 10”, where the first 9 digits are the DNI itself while the 10th digit is the verifying number.
- The used coefficients for the validation are: 2,1,2,1,2,1,2,1,2 (if the remainder is 0, then the verifier digit is 0)
Example TRN No.:
Good: 1790085783001
1760001040001
Bad: AR1234567 (Invalid Format – Only Numbers allowed)
1710034062 ((Invalid Format – to short)
- Validation Type - ORA_EC_RUC:FOREIGN
Description - Foreign Business Unit Entity for Ecuador with Foreign Origin
No of Digits - <=20
Format - No Restriction on the characteres
Check Digit - No
Check Digit Validation - No Check Digit Validation
Example TRN No.:
Good: RT1234567#4
- Mexico’s Party Tax Registration Number Validation:
Registration Number with Mexico’s State Administration of Tax (SAT) has to be validated for accuracy. This Tax Registration Number in Mexico is known as “RFC” - “Registration of Federal Contributors” (registered at federal level), and attached to the legal entity, used by Companies and individuals acting as a business.
Validation is for the format structure of the Tax Registration Number (not the data within the structure). For persons who provide services other than those of official professional activity (not Doctors, Consultants, Lawyers etc.), the identifying number for tax purposes at federal level would be “CURP”. CURP is the National identifier for all Mexican citizens - “Key Unique to Register Population”. This information is validated for uniqueness, format, and check digit requirements.
This validation check does not apply to Foreign Entity third parties. Each foreign entity has its own country-specific tax registration number standard, which can include alphanumeric characters.
Validation details are as follows:
- Validation Type - ORA_MX_RFC:COMPANY
Description - Mexico RFC Validation for Companies
No of Digits - 12
Format - Only letters and numbers are allowed. No special characters.
- Segment 1: Three letters for a short company name. These letters are assigned by SAT at company creation time.
- Segment 2: Six numbers for company creation date; yymmdd
- Segment 3: Last three digits called “Homoclave”; it could contain letters and numbers. This segment provides uniqueness to Tax Registration Number.
Check Digit - No
Check Digit Validation - No Check Digit Validation
Example TRN No.:
Good: OME910101TA3
Bad: AR12%$34567 (Invalid Format – Only letters and Numbers allowed)
OME910231TA3 ((Invalid Format – date yymmdd format is invalid)
- Validation Type - ORA_MX_RFC:INDIVIDUAL
Description - Mexico RFC Validation for Professional Individuals
No of Digits - 13
Format - Only letters and numbers are allowed. No special characters.
- Segment 1: Four letters for Name and last names: First two letters of last name, first letter of second last name and first letter of name
- Segment 2: Six numbers for date of birth, yymmdd
- Segment 3: Last three digits called “Homoclave”; it could contain letters and numbers. Like in the case of companies, this segment provides uniqueness to Tax Registration Number.
Check Digit - No
Check Digit Validation - No Check Digit Validation
Example TRN No.:
Good: BOSF740624T74
Bad: AR45%$34567 (Invalid Format – Only letters and Numbers allowed)
BOSF740631T74 ((Invalid Format – date yymmdd format is invalid)
- Validation Type - ORA_MX_RFC:SAT
Description - Mexico RFC Validation for SAT
No of Digits - <=20
Format - No Restriction on the characteres
Check Digit - No
Check Digit Validation - No Check Digit Validation
Example TRN No.:
Good: 34DF1234567#4
- Validation Type - ORA_MX_RFC:CURP
Description - Mexico RFC Validation for CURP
No of Digits - 18
Format - Only letters and numbers are allowed. No special characters.
- Segment 1: Four letters for Name and last names: First two letters of last name, first letter of second last name and first letter of name
- Segment 2: Six numbers for date of birth, yymmdd
- Segment 3: One letter to specify gender; H = Male, M = Female
- Segment 4: Two letters for the Geographical State of birth inside Mexico
- Segment 5: One letter, first internal consonant from the first of the two last names
- Segment 6: One letter, first internal consonant from the second of the two last names
- Segment 7: One letter, first internal consonant from the first name
- Segment 8: One digit, 0-9 for dates of birth up to the year 1999, and A-Z for dates of birth from the year 2000 forward
- Segment 9: One digit to avoid duplications
Check Digit - No
Check Digit Validation - No Check Digit Validation
Example TRN No.:
Good: BOSF740824HJCNVB09
Bad: A#$5df%$34567 (Invalid Format – Only letters and Numbers allowed)
BOSF740630AJCNVB09 ((Invalid Format – 11th digit has to be H or M)
- Validation Type - ORA_MX_RFC:FOREIGN
Description - Foreign Business Unit Entity for Mexico with Foreign Origin
No of Digits - <=20
Format - No Restriction on the characteres
Check Digit - No
Check Digit Validation - No Check Digit Validation
Example TRN No.:
Good: 3GRDF1234567#4
- Peru’s Party Tax Registration Number Validation:
The Registro Unico de Contribuyentes “RUC” is the 11-digit unique code used to identify a legal entity for VAT taxation purposes (federal level): • Companies (public or private) • Individuals (regular person)
- This validation check does not apply to Foreign Entity third parties. Each foreign entity has its own country-specific tax registration number standard, which can include alphanumeric characters.
Peru's Tax Registration Number and the Taxpayer Identification Number are validated for uniqueness, format, and check digit requirements.
Validation details are as follows:
- Validation Type - ORA_PE_RUC
Description - Peru RUC Validation for Company, Regular Person, and Foreigner
No of Digits - 11
Format - Only Numeric Characters are allowed
- The first 2 digits of the 11-digit RUC determines the type of entity
- First 2 digits is “10”, the entity is a regular person
- First 2 digits is “20”, it entity is a company
- First 2 digit is “16”, it used to be a valid number, but no longer used
- First 2 digit is “17”, it is either an old RUC from 1993-2000 OR the entity is a foreigner/others
- The next 8 are considered the Documento Nacional de Identidad “DNI” (identity number)
Check Digit - 11th digit (Last digit)
Check Digit Validation -
- The RUC is validated using the “Module 11” rule.
- Each number of the RUC is multiplied starting from left to right with 5, 4, 3, 2, 7, 6, 5, 4, 3, 2.
- Then sum all the results
- The result has to be divided by 11 (the name of the Module)
- After the division is made, the remaining is subtracted by 11 (11-remaining of the division)
- If the result is over 0 and less than 10, that is the verifying number we are looking for
- If the result is 0 or 10, the verifying digit is 1
Example TRN No.:
Good: 20503644968
Bad: ARF%34567 (Invalid Format – Only Numbers allowed)
20503644961 ((Invalid Format – Check Digit)
- Taiwan's Party Tax Registration Number Validation:
There is an algorithm from the Ministry of Economic Affairs to verify that the corporate Business Administration Number “BAN” is a valid number. Legal Entity, company sites and individuals have a “BAN” number: Corporate entity “BAN” is validated by ERP system for uniqueness, format, and check digit requirements.
Validation details are as follows:
- Validation Type - ORA_TW_BAN:COMPANY
Description - Taiwan Business Administration Number Structure Validation for Company
No of Digits - 8
Format - Only Numeric Characters are allowed
- The whole number is validated in 2 steps.
- Step1: Each digit number multiple by a constant {1,2,1,2,1,2,4,1}
- Step2: Result should be true where if Sum( a1 ~ a8) divide by 10 and remainder is 0.
Check Digit - No
Check Digit Validation - No Check Digit Validation
Example TRN No.:
Good: 35701598
Bad: ARF$34567 (Invalid Format – Only Numbers allowed)
39292217 ((Invalid Format – remainder is non 0)
- Validation Type - ORA_TW_BAN:INDIVIDUAL
Description - Taiwan Business Administration Number Structure Validation for Individual
No of Digits - 9
Format - First letter is always an alphabet. Others are all numeric Characters.
- The whole number is validated in 2 steps.
- Step1: Each digit number multiple by a constant {1,2,1,2,1,2,4,1}
- Step2: Result should be true where if Sum( a1 ~ a8) divide by 10 and remainder is 0.
Check Digit - No
Check Digit Validation - No Check Digit Validation
Example TRN No.:
Good: A35701598
Bad: AR945$34567 (Invalid Format – Only Numbers allowed)
A39292217 ((Invalid Format – remainder is non 0)
Steps to Enable
You don't need to do anything to enable this feature.
Transactional Business Intelligence for Financials
Add Non-Qualified Segments to Oracle Transactional Business Intelligence Fixed Assets Subject Areas
Oracle Transactional Business Intelligence Fixed Assets - Asset Depreciation Real Time and Fixed Assets - Asset Transactions Real Time subject areas now support non-qualified segments, in addition to the qualified General Ledger segments Balancing Segment, Natural Account and Cost Center.
The non-qualified segments have been made available under the 'Depreciation Accounting Details' folder, in both subject areas Fixed Assets - Asset Depreciation Real Time and Fixed Assets - Asset Transactions Real Time. You need to run BI Extender in order to see these fields in the folder.
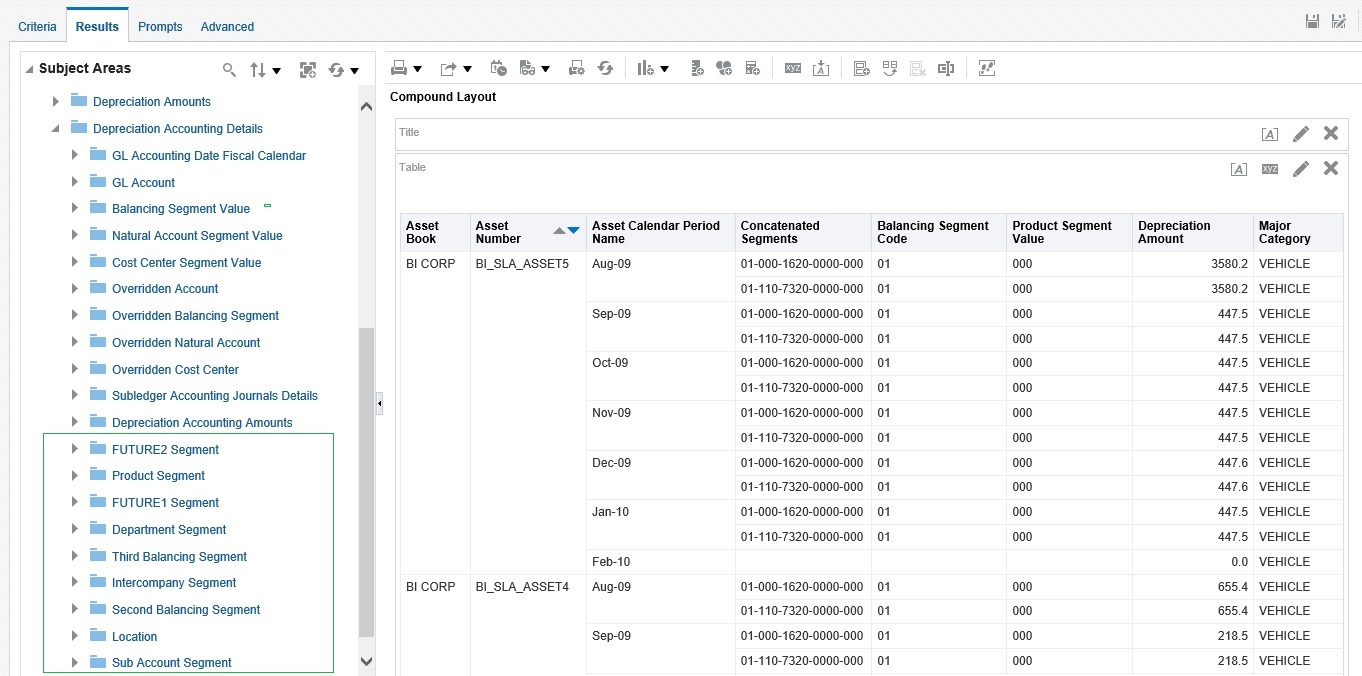
Non-Qualified Segments
Steps to Enable
For details about administering, creating and editing reports, see the books available from the Oracle Help Center > your apps service area of interest > Books > Administration or User sections.
Cross-Pillar Reporting Between Receivables and Projects
The Oracle Transactional Business Intelligence Receivables - Transactions Real Time subject area has been enhanced to include additional subfolder named Project, under the Transaction Line Details folder. Subfolders and columns have been added to enable cross-pillar reporting between AR and Projects.
- Project classification
- Project codes
- Project date attributes
- Project indicator attributes
- Project record information
- Project type attributes.
Steps to Enable
For details about administering, creating and editing reports, see the books available from the Oracle Help Center > your apps service area of interest > Books > Administration or User sections.
Enhancements to Cash Management Subject Areas
The accounting information for external cash transactions is now available for reporting. Oracle Transactional Business Intelligence Cash Management - External Cash Transactions Real Time subject area has a folder addition:
- External Transaction Accounting, with its subfolders:
- GL accounting date
- GL accounting date fiscal calendar
- GL account
- Balancing segment
- Natural account
- Cost center
- GL overridden account
- Overridden balancing segment
- Overridden natural account
- Overridden cost center
- Subledger accounting journal details
- External transaction accounting
Steps to Enable
For details about administering, creating and editing reports, see the books available from the Oracle Help Center > your apps service area of interest > Books > Administration or User sections.
Enhancements to Revenue Management Subject Areas
OTBI Revenue Management - Customer Contracts Real Time subject area has been enhanced to include attributes in support of reporting activity for automatic renewal of revenue contracts and suspension and re-instatement of satisfaction events for period-based revenue contracts. New attributes were made to the following folders and subfolders:
- Promised Details
- Promised Detail Line Amounts new column addition to source Recurring amount;
- Promise Detail Lines new columns additions: recurring indicator, recurring frequency, recurring pattern code, termination date;
- Promised Detail Source Document new subfolder Source document subline and attributes: document subline type, data transformation status, satisfaction measurement date, satisfaction event quantity, satisfaction event percent, period action code, period action event date, previous document sub line id;
- new column additions were made to Source Document Line and Source Document Reference: recurring indicator, recurring frequency, recurring pattern code, termination date, recurring line copy number, recurring amount, revised recurring indicator, revised recurring frequency, revised recurring pattern code, revised termination date, revised rule end date, revised rule start date, revised accounting rule identifier, revised recurring amount
- Satisfaction column additions to Satisfaction Event Details subfolder: period action code, period action event date, previous document subline id, latest period action code, total reversal days, latest reversal days;
Steps to Enable
For details about administering, creating and editing reports, see the books available from the Oracle Help Center > your apps service area of interest > Books > Administration or User sections.
Expose Descriptive Flexfields on Key Flexfields for OTBI Financials Non-Essbase Subject Areas
The Oracle Transactional Business Intelligence Financials non-Essbase subject areas have been enhanced to include descriptive flexfields information for key flexfields. Exposure in the Essbase subject area General Ledger - Balances Real Time will come in a future release.
To expose the descriptive flexfields information in Oracle Transactional Business Intelligence Financials non-Essbase subject areas, you need to run BI Extender.
Steps to Enable
- Edit descriptive flexfield FND_VS_VALUES_B and add your segments. Please note that this descriptive flexfield supports only context sensitive segments. The context code should be exactly the same as the value set code used for your key flexfield segments.
- Deploy the descriptive flexfield.
- Deploy each key flexfield using the same value sets you created descriptive flexfield segments for in step 1.
- Run Import Oracle Fusion Data Extensions for Transactional Business Intelligence.
For details about administering, creating and editing reports, see the books available from the Oracle Help Center > your apps service area of interest > Books > Administration or User sections.
Role Information
You don't need any new role or privilege access to use this feature.
Payables Invoices Holds Information Reorganized in the Oracle Transactional Business Intelligence Subject Areas
Oracle Transactional Business Intelligence Payables Invoices - Transactions Real Time subject area has been enhanced to include attributes that help you report on invoice holds. Prior to this enhancement, invoice hold attributes were available in Payables Invoices - Holds Real Time subject area. You can now report invoice amounts on hold without having to create a cross-subject area report.
Hold information is now available at both invoice header and invoice line level in the Payables Invoices - Transactions Real Time subject area. Hold related attributes were added to two new subfolders in this subject area as follows:
- The Invoice Details folder has a new subfolder named 'Invoice Hold Information'. This sub-folder contains the following attributes for invoice header holds: hold identifier, hold date, hold release date, hold name, hold description, hold reason, held by, released by, hold details, hold release name, hold release description, release reason, invoice hold workflow status, invoice hold receipt number, hold creation date, hold created by, hold last updated date, hold last updated by;
- The Invoice Lines folder has a new sub-folder named 'Invoice Line Details - Hold Information'. This sub-folder contains the following attributes for invoice line level holds: line hold identifier, line hold date, line hold release date, line hold name, line hold description, line hold reason, line held by, line released by, line hold details, line hold release name, line hold release description, line release reason, line invoice hold workflow status, line invoice hold receipt number, line hold creation date, line hold created by, line hold last updated date, line hold last updated by;
- Additional measures are added to the Invoice Amounts and Invoice Line Amounts folders, for hold counts: line hold count, released line hold count, total number of holds, total number of active holds.
As part of this change, the Payables Invoices – Holds Real time subject area is no longer available to create any new ad hoc reports. Any existing reports that use the Payables Invoices – Holds Real time subject area will continue to work as is. However, if you want to make any changes to an existing report that uses the Payables Invoices - Holds Real time subject area, then you must recreate the report afresh and use the newly added attributes from the Payables Invoices – Transactions Real Time subject area.
Steps to Enable
Leverage new subject area(s) by adding to existing reports or using in new reports. For details about creating and editing reports, see the Creating and Administering Analytics and Reports book (available from the Oracle Help Center > your apps service area of interest > Books > Administration).
Tips And Considerations
- The hold attributes that were available in the Invoice Hold Details folder of the Payables Invoices – Holds Real time subject area are now available in the Invoice Hold Information and Invoice Lines – Hold Information folders.
- To identify the line number of the line on hold, use the ‘Line Number’ attribute from the Invoice Lines – General Information. This attribute should be used in replacement of the ‘Line Held’ attribute that was available in the ‘Invoice Hold Details folder in the Payables Invoices – Holds Real time subject area.
- To identify only those invoice transaction headers or lines on hold, you need to add a filter to the report on one of the hold attributes, for example: Hold Identifier is not null or Line Hold Identifier is not null.
- To identify those invoices for which header holds are released, add a filter like Hold Release Date is not null or Released Header Hold Count > 0. Similarly, to identify those invoice lines for which holds have been released, add a filter like Line Hold Release Date is not null or Released Line Hold Count > 0.
Role Information
No new role access is needed to use this feature.