
- Revision History
- Overview
- Feature Summary
- Optional Uptake of New Features (Opt-In)
- Common Technology and User Experience
- Financials
- Regional and Country-Specific Features
This document will continue to evolve as existing sections change and new information is added. All updates appear in the following table:
| Date | Feature | Notes |
|---|---|---|
| 02 FEB 2021 | Actionable Cards for Expense Reports | Updated document. Changed Opt-In Expiry Date. |
| 29 MAY 2020 | Process Lockbox Customer Payments Using Zengin Format for Japan |
Updated document. Corrected Tips & Considerations for Lockbox Bank File. |
| 15 MAY 2020 | Maintain Account Hierarchy Levels for Budgetary Control Reporting Using File-Based Data Import | Updated document. Corrected Tips & Considerations information. |
| 24 APR 2020 | Opt In Changes in This Update | Updated document. Added new section highlighting changes to Opt In status. |
| 24 APR 2020 | Integrate Document Printing and Delivery for Portugal | Updated document. Added information about Oracle ERP Cloud certification for Portugal. |
| 15 APR 2020 | Create Expense Items from Email Receipts |
Feature not available in update 20B. |
| 06 MAR 2020 | Created initial document. |
This guide outlines the information you need to know about new or improved functionality in this update, and describes any tasks you might need to perform for the update. Each section includes a brief description of the feature, the steps you need to take to enable or begin using the feature, any tips or considerations that you should keep in mind, and the resources available to help you.
Join Oracle Cloud Customer Connect
Please take a moment to join the Cloud Customer Connect forums for Financials Cloud. Oracle Cloud Customer Connect is a community gathering place for members to interact and collaborate on common goals and objectives. This is where you will find the latest release information, upcoming events, or answers to use-case questions. Joining takes just a few minutes. Join now!
https://cloud.oracle.com/community
Security and New Features
The Role section of each feature identifies the security privilege and job role required to use the feature. If feature setup is required, then the Application Implementation Consultant job role is required to perform the setup, unless otherwise indicated. (If a feature doesn't include a Role section, then no security changes are required to use the feature.)
If you have created job roles, then you can use this information to add new privileges to those roles as needed.
Give Us Feedback
We welcome your comments and suggestions to improve the content. Please send us your feedback at oracle_fusion_applications_help_ww_grp@oracle.com.
Column Definitions:
Features Delivered Enabled
Report = New or modified, Oracle-delivered, ready to run reports.
UI or Process-Based: Small Scale = These UI or process-based features are typically comprised of minor field, validation, or program changes. Therefore, the potential impact to users is minimal.
UI or Process-Based: Larger Scale* = These UI or process-based features have more complex designs. Therefore, the potential impact to users is higher.
Features Delivered Disabled = Action is needed BEFORE these features can be used by END USERS. These features are delivered disabled and you choose if and when to enable them. For example, a) new or expanded BI subject areas need to first be incorporated into reports, b) Integration is required to utilize new web services, or c) features must be assigned to user roles before they can be accessed.
Optional Uptake of New Features (Opt-In)
Oracle Cloud Applications delivers new updates every quarter. This means every three months you'll receive new functionality to help you efficiently and effectively manage your business. Some features are delivered Enabled meaning they are immediately available to end users. Other features are delivered Disabled meaning you have to take action to make available. Features delivered Disabled can be activated for end users by stepping through the following instructions:
Access the Opt In page from the New Features Work Area
- Click the Navigator, and then click New Features (under the My Enterprise heading)
- On the New Features page, select the offering that includes new features you’d like to review
- Click Go to Opt In for any feature you want to opt in
- On the Edit Features page, select the Enable option for the feature, and then click Done
Opt In Expiration
Occasionally, features delivered Disabled via Opt In may be enabled automatically in a future update. This is known as an Opt In Expiration. If your cloud service has any Opt In Expirations in this release, you will see a related tab in this document. Click on that tab to see when the feature was originally delivered Disabled, and when the Opt In will expire, potentially automatically enabling the feature. You can also click here to see features with current Opt In Expirations across all Oracle Cloud Applications. Beyond the current release, the Financials forums on Cloud Customer Connect have details of Opt In Expirations upcoming in future releases.
The default opt in settings are changing for some features. Click on the feature name to get more information.
Previously these features were delivered Disabled for end users, and could be activated using the Opt In page. Beginning in Update 20B, these features are automatically enabled for both new and existing customers. However, both new and existing customers can still choose to opt out.
If you already enabled these features using the Opt In page, there is no change.
Derive Bank Account Number from IBAN
This is an existing feature, originally available in Update 18C. There are no changes to the feature content, but the Opt In status for this feature is changing. This feature is now enabled by default for all customers.
For countries where the IBAN is used according to SWIFT (Society for Worldwide Interbank Financial Telecommunication) guidelines, you can now create an external bank account by entering only the IBAN instead of both the bank account number and the IBAN. When you save the external bank account, the bank account number will automatically be derived from the IBAN according to the structure prescribed by SWIFT and populates the Account Number field.
For additional details about this feature, please see:
Steps to Enable
Use the Opt In UI to enable this feature. For instructions, refer to the Optional Uptake of New Features section of this document.
Offering: Financials
Tips And Considerations
This feature is enabled by default, but you can still disable the feature if required by following these steps:
- Click the Navigator, and then click Setup and Maintenance
- On the Setup page, select Financials.
- Click Change Feature Selection for Payments.
- On the Edit Features: Payments page, deselect the Enable icon for Derive Bank Account Number from IBAN feature.
- Click Done button on Edit Features
Retrieve Funds Capture Acknowledgment Files Using a Wildcard Search
This is an existing feature, originally available in Update 19C. There are no changes to the feature content, but the Opt In status for this feature is changing. This feature is now enabled by default for all customers.
This feature allows retrieving multiple funds capture acknowledgment files at the same time using a wildcard search.
For additional details about this feature, please see:
Steps to Enable
Use the Opt In UI to enable this feature. For instructions, refer to the Optional Uptake of New Features section of this document.
Offering: Financials
Tips And Considerations
This feature is enabled by default, but you can still disable the feature if required by following these steps:
- Click the Navigator, and then click Setup and Maintenance
- On the Setup page, select Financials, and then click Change Feature Opt In
- On the Opt In page, click the Edit Features icon for Payments
- On the Edit Features page, select the Disable option for “Retrieve Funds Capture Acknowledgment Files Using a Wildcard Search”.
- Click Done.
Common Technology and User Experience
Configure Workflow Rules Using Additional Project Attributes
Use project-related attributes to configure workflow rules, modify notification assignees, and set conditional routing for notifications. These attributes let you route invoice approval notifications to project team members, project task manager, and the hierarchy of the project task manager.
Here’s a list of project-related attributes that workflow administrators can use to configure invoice approval workflow rules:
Project Task:
- Task Name
- Task Number
- Task Organization
- Task Manager
- Project ID
- Project Name
- Project Number
- Carrying Out Organization ID
- Project Organization Name
- Project Unit Name
- Project Type ID
- Project Type Name
- Business Unit Name
- Legal Entity Name
- Work Type Name
- Project Currency Code
- Project Ledger Currency
- Sponsored Flag
- Project Classification
- Project Team Member
- Task Descriptive Flexfields
- Project Descriptive Flexfields
Project Classification:
- Project ID
- Project Class Category
- Project Class Code
- Class Code Percentage
Project Team Member:
- Project ID
- Project Party ID
- Team Member Role Name
- Team Member Email Address
- Team Member User Name
- Team Member Start Date
- Team Member End Date
- Projects Track Time
Steps to Enable
You don't need to do anything to enable this feature.
Tips And Considerations
Click Start Synchronization on the BPM Rules Configuration page to synchronize project-related descriptive flexfield information with the BPM workflow configuration. This operation lets you configure workflow rules using project and task descriptive flexfield details
Role Information
- Financial Application Administrator
Configurable Intercompany Workflow Notifications
Use enhanced workflow notifications for intercompany transaction approval. You can use Oracle Business Intelligence Publisher templates to generate email and in-application notifications. Modify templates to meet business requirements and policies. Choose from a comprehensive list of attributes to modify the notifications according to your requirements. You can change both layout and content – add images, change colors and styling, add or remove attributes or modify text.
You can use and configure the Oracle Business Intelligence Publisher templates to generate the in-app and email notifications. You can also modify the predefined template to display information based on your business requirements and policies. Choose from a comprehensive list of attributes to modify the notifications according to your requirements. You can change both layout and content – add images, change colors and styling, add or remove attributes or modify text.
Steps to Enable
Use the Opt In UI to enable this feature. For instructions, refer to the Optional Uptake of New Features section of this document.
Offering: Financials No Longer Optional From: Update 20D
The Configurable Intercompany Workflow Notifications don't require any setup and are ready to use as delivered.
The configurable notifications contain all the information that's currently available in the classic notifications. If required, you can modify the notifications to display information as per your business requirements.
Offering: Financials
No Longer Optional From: 11.13.20.10.0
Default Behavior
- The feature is enabled by default for all customers in 20D. Even if you have opted out of the feature in prior updates, you will find the feature enabled by default for you in 20D.
- You still have the option to opt-out of using this feature in update 20D. However, considering that the opt-in for this feature will expire in update 21A, we strongly recommend that you plan for the uptake of this feature.
If you wish to opt-out of using the feature, follow these steps:
- Click the Navigator, and then click New Features (under the My Enterprise heading)
- On the Features Overview page, go to the Available Features tab.
- Select the Configurable Intercompany Workflow Notifications feature and click on the Enabled icon.
- On the Edit Features page, deselect the Enable option for the feature or child features required and then click Done.
Tips And Considerations
- The feature is enabled by default for all customers in update 20D. Even if you have opted out of the feature in prior updates, you will now find the feature enabled by default.
- You still have the option to opt-out of using this feature in 20D. However, we strongly recommend that you plan for the uptake of this feature.
- The templates used to generate workflow notifications are located in the Reports and Analytics work area under the Shared Folders > Financials > Workflow Notifications folders in the Oracle Business Intelligence catalog.
- A single template is used to generate both the email and in-app notifications for a particular workflow. If you have chosen to use configurable notifications for both in-app and email notifications for a workflow, any modifications that you make to the predefined template will be reflected in both types of notifications.
Key Resources
- Overview of Financials Configurable Workflow Notifications in the Implementing Common Features and Project Portfolio Management guide on the Oracle Help Center.
Preview Intercompany Accounts Before Approving the Transaction
Preview intercompany accounts in approval notifications and transaction pages for transaction types that require manual approval. Approvers can validate the intercompany receivables account generated for the provider and the intercompany payables account generated for the receiver before deciding to approve or reject the transaction.
Steps to Enable
Use the Opt In UI to enable this feature. For instructions, refer to the Optional Uptake of New Features section of this document.
Offering: Financials No Longer Optional From: Update 20D
Retrieve Customers, Customer Accounts, and Customer Sites Using a REST Service
Retrieve customers, customer accounts, and customer sites using the Receivables Inquire Customer Accounts and Sites REST Service.
You can:
-
Retrieve list of customers, customer accounts, and customer site details
Steps to Enable
Review the REST service definition in the REST API guides, available from the Oracle Help Center > your apps service area of interest > REST API. If you're new to Oracle's REST services you may want to begin with the Quick Start section.
This feature is automatically opted in through the release update. To configure the feature, you must add the new privilege for the required duty roles accessing the services.
Key Resources
For an overview of REST APIs and the technical details, see the REST API for Oracle Financials Cloud guide in the Oracle Help Center (http://docs.oracle.com).
Role Information
A new privilege is available in the context of the customers, customer accounts, and customer site details and needs to be added for the required duty roles based on the authorizations given to specific users:
- Allows the user to view customer, customer account, and customer site information (AR_VIEW_CUSTOMERS_PRIV)
Create Party Tax Profile Using a REST Service
Create party tax profiles for suppliers, supplier sites, customers, and customer sites using the Create Party Tax Profile REST Service.
Use the POST operation of the REST service to create party tax profiles.
Steps to Enable
Review the REST service definition in the REST API guides, available from the Oracle Help Center > Financials > REST API. If you're new to Oracle's REST services, you may want to begin with the Quick Start section.
Key Resources
For an overview of REST APIs and the technical details, see the REST API for Oracle Financials Cloud guide in the Oracle Help Center.
Capture Notes for Collections Strategy Tasks
Create and view notes associated with Collections strategy tasks. This improves collectors' productivity when processing strategy tasks.
You can determine whether a note is created for a strategy task based on the icons displayed in the Notes column of the Strategy Task Details table. Notes for a strategy task have the same look and feel as the notes at the transaction, account, and site level.

When a note is created for a strategy task, the page displays a Notes Exist icon. Click this icon to view existing notes and to create additional notes.
If a strategy task does not have a note, use the plus icon to create a note.  Click this icon to create a note.
Steps to Enable
To enable this feature, perform the following steps:
- Click Navigator > Setup and Maintenance > Manage Standard Lookups.
- Define the lookup code with below details:
Lookup type: IEX_FEATURES
Lookup code: IEX_STRATEGY_TASK_NOTES
Tips And Considerations
- Enable this feature if you have a business need to create standard notes for collections strategy tasks.
Employ Query By Example in Collector Searches on the Manage Resources Page
Query By Example is available on the Manage Resources page, providing enhanced collector search capability.
The Query By Example icon appears in both the Collectors section and Customers section of the Manage Resources page:
- In the Collectors section, use Query By Example to search on collector names and other details, including total delinquencies, delinquencies, and average delinquencies.
- In the Customers section, use Query By Example to search on customer names and other details, including total delinquencies, delinquencies, and total amount due.
You can search and select collectors from the Reassign Customer and Reassign Collector windows. The drop-down list in the Collector To field in these windows is enhanced to include the most recent collectors searched and the Search link for searching the complete list of collectors.
Steps to Enable
You don't need to do anything to enable this feature.
Maintain Account Hierarchy Levels for Budgetary Control Reporting Using File-Based Data Import
Assign tree labels to segment values in the Segment Values and Hierarchy File-Based Data Import. Application administrators can label segment values to indicate at which hierarchy level to enforce budgetary controls. This eliminates the need to create the tree labels separately using the application page.
Steps to Enable
You don't need to do anything to enable this feature.
Tips And Considerations
-
Download an updated Import Segment Values and Hierarchies template from the File-Based Data Import for Financials guide.
- To assign a new or an existing label in the Manage Account Hierarchy Labels page, use the Label Short Name column of the Import Segment Values and Hierarchies template.
Manage Account Hierarchy Labels
- To remove existing labels assigned to a segment value, enter $null$ in the Label Short Name column.
- For more information on advance hierarchy structures, see the instructions in the Rapid Implementation for General Ledger spreadsheet.
Key Resources
- To download the template, go to the Import Segment Values and Hierarchies section in the Oracle Financials Cloud File-Base Data Import for Financials.
- To download the Rapid Implementation for General Ledger spreadsheet, use the setup task Create Chart of Accounts, Ledger, Legal Entities, and Business Units in Spreadsheet.
Role Information
You need one of these roles to maintain account hierarchies using the Import Segment Values and Hierarchies template:
- Financial Application Administrator
- Financial Integration Specialist
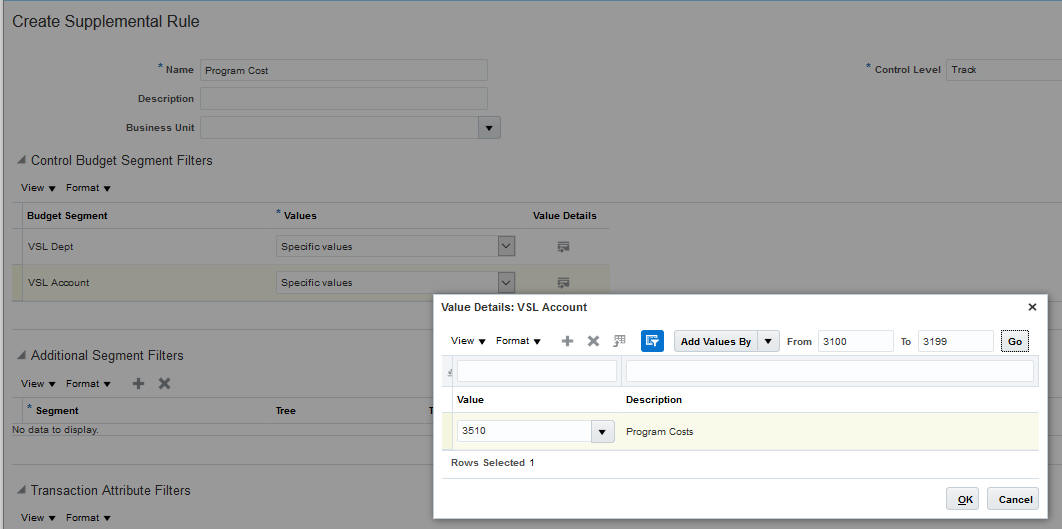
Populate Control Budget Supplemental Segment Values by Range or Parent Value
Budget managers can quickly enter segment values for control budget supplemental rules using a range of values or a parent value. Use the Add Values By button to enter segment values for control budget segments at the detailed and parent value level. Use the Add Values By button to enter segment values for additional segment filters at the detailed value level.
Create Supplemental Rules
Steps to Enable
You don't need to do anything to enable this feature.
Tips And Considerations
It is recommended that you enter ranges that contain less than a few hundred valid values. If you enter a large range, it impacts the search performance. For example, to create a supplemental rule for departments that work on capital projects having thousands of department values, enter smaller ranges to fill in the values incrementally.
Key Resources
Refer to the Oracle ERP Cloud Budgetary Control and Encumbrance Accounting Implementation Guide for more information on control budgets and supplemental rules.
Role Information
You need the budget manager role to access the Manage Control Budget page.
Synchronize Expense Budget Balances Across Budgetary Control and General Ledger Using File-Based Data Import
Create and synchronize expense budget balances in primary ledgers for both budgetary control validation and for General Ledger reporting and inquiry using single period file-based data import. You can prepare and load the expense budget data file once and then simultaneously update the budget balances in both Budgetary Control and General Ledger. You can also continue to load budget into Budgetary Control and General Ledger separately.
Steps to Enable
You don't need to do anything to enable this feature.
Tips And Considerations
Download the updated Budgetary Control Budget Import template from the File-Based Data Import for Financials guide and follow the updated instructions to use the Import Budget to Budgetary Control and General Ledger process.
This feature will be incrementally enhanced in future releases. 20B Update has these restrictions:
- Budget currency must be the same as the ledger currency.
- Control budget calendar must be the same as the accounting calendar.
- Budget is for expense accounts only.
- Control budget must contain all segments of the chart of accounts.
- Budget must be at detailed account values.
- Budget amounts can only be overwritten. Incremental mode is not supported.
- Budgets cannot be loaded into adjustment periods.
Review the full list of restrictions in the Overview section in the Instructions worksheet of the updated Budgetary Control Budget Import template.
You can continue to use the current methods to load budgets separately. The Budgetary Control Budget Import template has additional instructions but no new columns. You can use existing sheets without any change.
| Template | Process | Result |
|---|---|---|
| Budgetary Control Budget Import Template | (New) Import Budget to Budgetary Control and General Ledger | Load budget into Budgetary Control and General Ledger simultaneously. |
| Budgetary Control Budget Import Template | Import Budget Amounts | Load budgets into Budgetary Control. |
| General Ledger Budget Balance Import Template | Validate and Upload Budgets | Load budgets into General Ledger. |
Key Resources
For more information on loading budgets into Budgetary Control and General Ledger, see these resources:
- To retrieve the template: File-Based Data Import for Oracle Financials Cloud Budgetary Control Budget Import
- Budgetary Control Budget Import template: Instructions worksheet
Role Information
To run the Import Budget for Budgetary Control and General Ledger process, the user must have one of these roles:
- Budget Manager
- General Accounting Manager
- General Accountant
Drill Down to Bank Statement or External Transaction from OTBI
Drill down from Oracle Transactional Business Intelligence (OTBI) reports to Bank Statement or External Transaction. Add an action link on a column, such as Statement or Transaction number, to enable the drill down using a deep link. A deep link is a URL to open a page without navigating through the application menu structure. Team members can easily navigate back and forth from the analysis to the application to review details.
Links can be configured in the ad hoc Cash Management OTBI reports to drill down to the following pages:
- View External Transaction
- Edit External Transaction
- View Bank Statement
- Edit Bank Statement
Steps to Enable
You don't need to do anything to enable this feature.
Role Information
You don't need any new role or privilege to set up and use this feature.
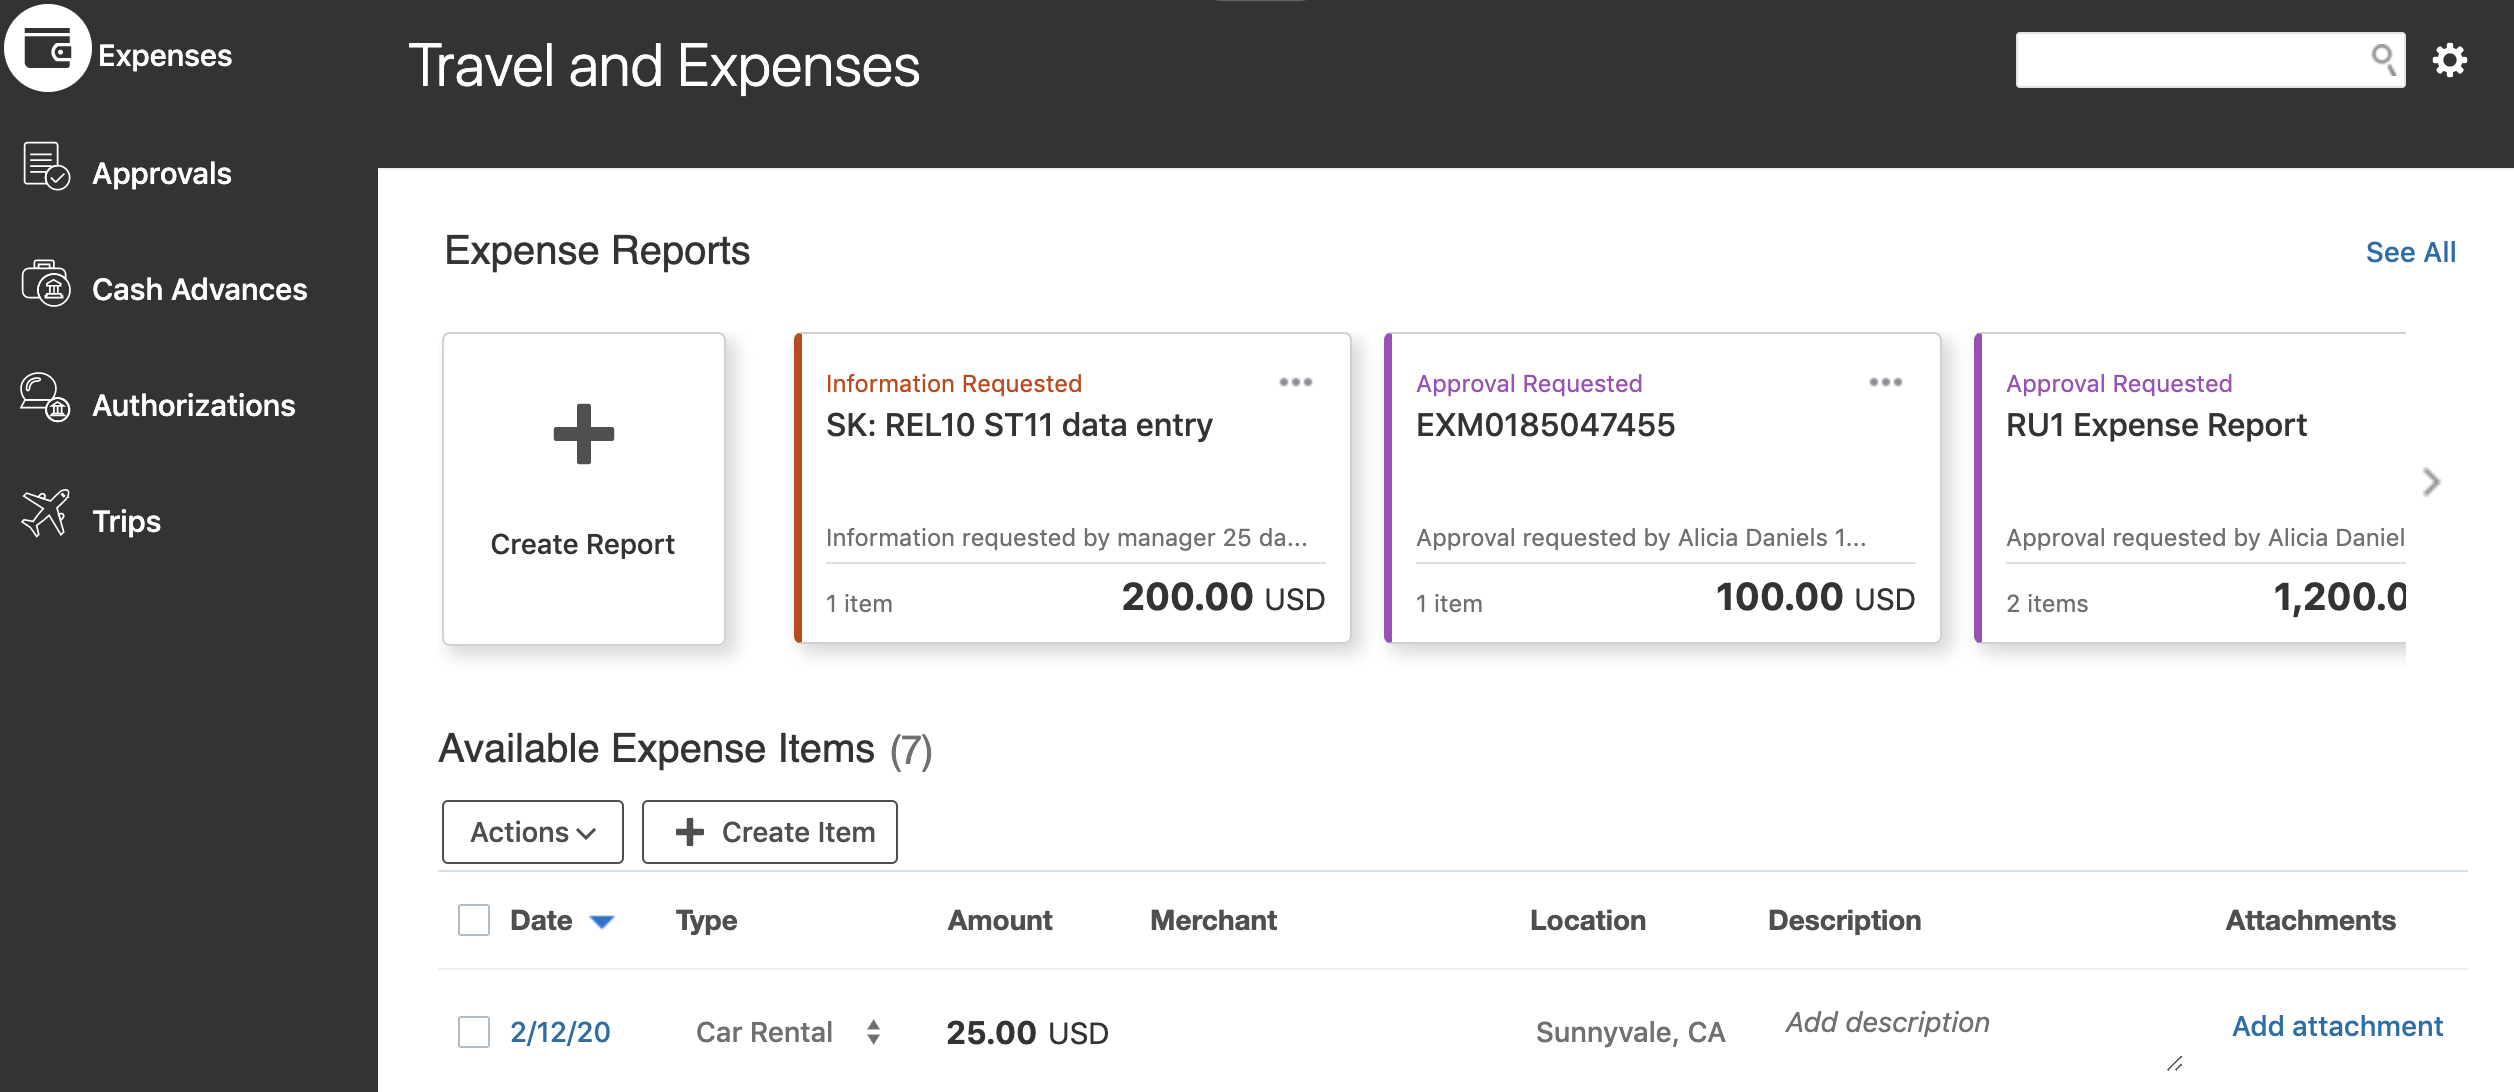
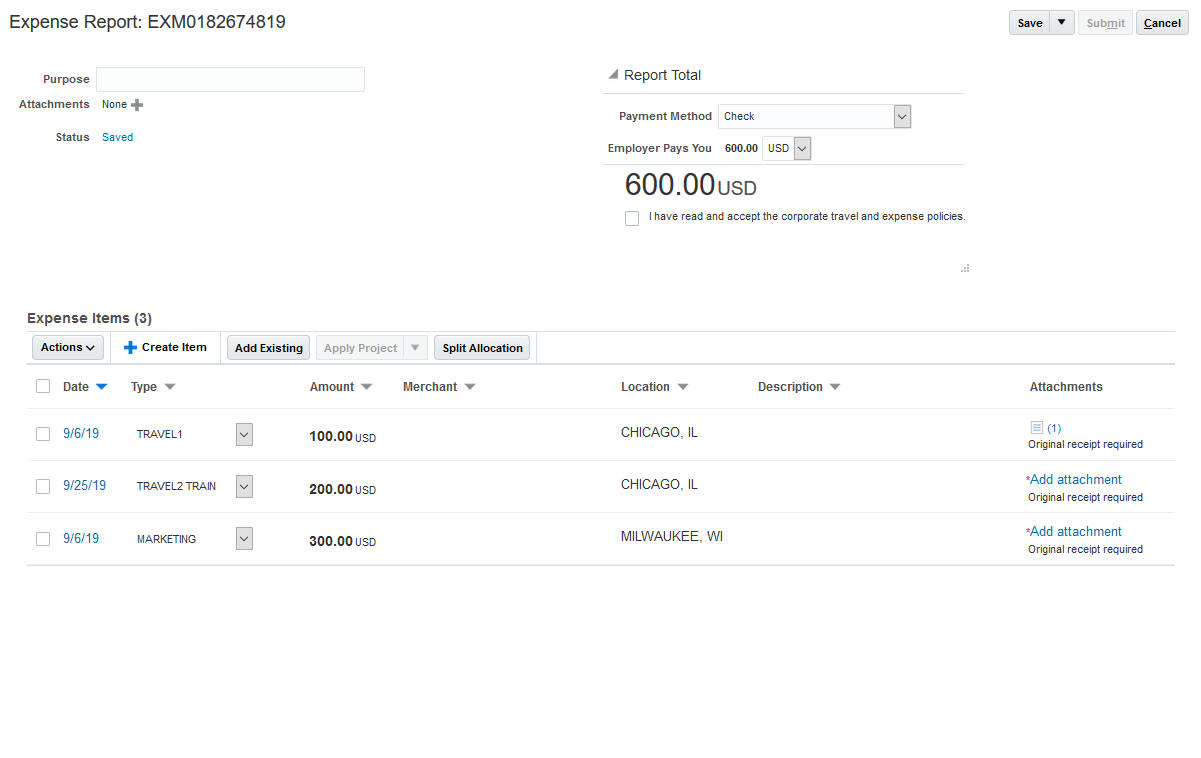
Actionable Cards for Expense Reports
Easily find expenses and expense reports that require your action from the list of reports presented in a carousel display in the Expenses work area.
Each report that is in progress or requires action is presented as a card in the Expenses work area. The Expenses work area displays a maximum of 25 cards in the carousel display. The Create Report card is always the first card in the carousel display. All other cards are organized by their statuses. Cards that require an action are displayed first, followed by the cards that are in progress, in approval, and paid. Each card displays the expense report status, report purpose, report number when purpose is not available, and report amount. Reports that are pending approval display the approver information. You can take actions, such as Withdraw, Resubmit, Duplicate, Delete, and Print, directly from the card. The Show All link navigates you to the Manage Expense Reports page where you can search for additional reports.
Additionally, the tiles that earlier displayed the counts for cash advances, spend authorizations, and approvals are now replaced by the navigation bar on the left side of the Expenses work area. The search field on the top right corner of the work area enables you to search for expenses and expense reports. You can access tasks, such as Advanced Search, Manage Bank Accounts, and Manage Delegates, from the Settings icon in the top right hand corner of the Expenses work area.
Actionable Cards in Expenses Work Area
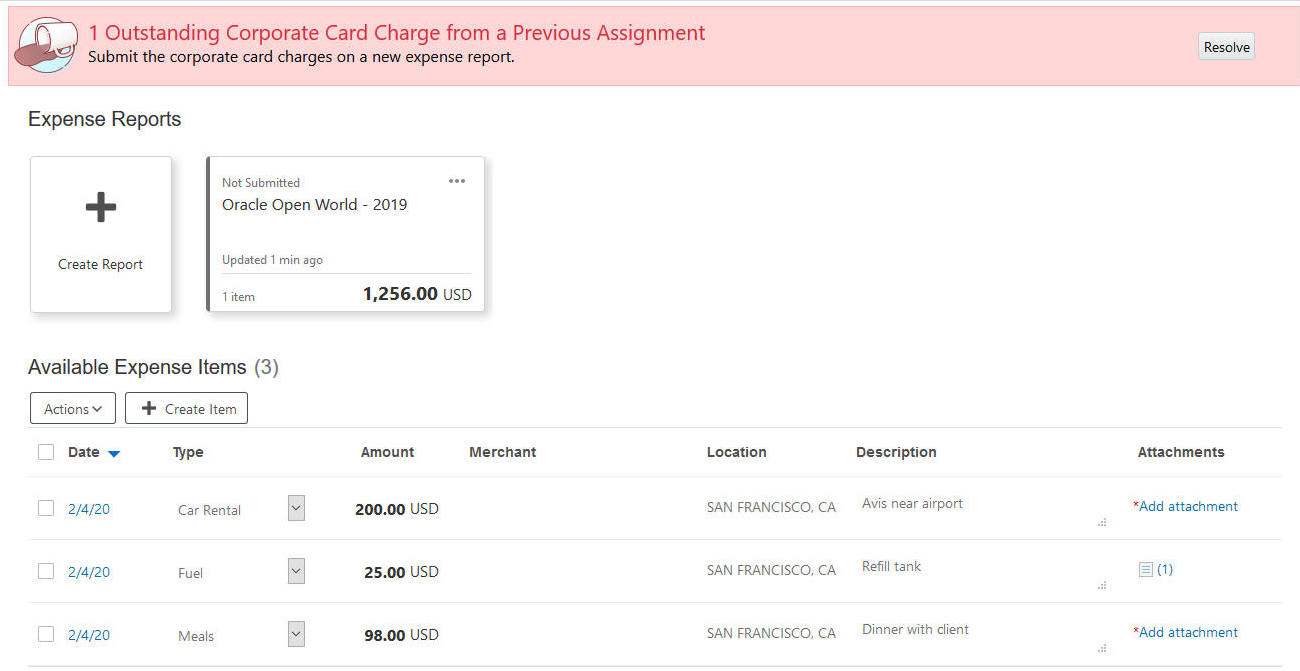
The Expenses work area now highlights the corporate card charges from a previous assignment. When you navigate to the Expenses work area, a banner appears in the work area if you have outstanding corporate card charges from a previous assignment. To add these charges to a report and submit them, navigate to the Manage Expense Reports page by clicking the Resolve button in the banner.
Expenses Work Area with Outstanding Transactions Banner
Steps to Enable
Use the Opt In UI to enable this feature. For instructions, refer to the Optional Uptake of New Features section of this document.
Offering: Financials No Longer Optional From: Update 21A
Role Information
To enable Actionable Cards for Expense Reports, you must have the Application Implementation Consultant role. When enabled, users with the Employee role can use the feature.
Enable Maps with Oracle Maps Cloud Service
Calculate trip distance in mileage expense entry using Oracle Maps Cloud Service. Expense managers can configure preferred locations to allow employees to easily select destinations in Oracle Maps. Additionally, employees can enter the commute distance, which is deducted from the total distance to derive trip distance eligible for mileage reimbursement.
When Oracle Maps Cloud Service is enabled for your business unit, the application displays the Use Map button to navigate to Oracle Maps when you select a mileage expense type. On the Oracle Maps page, you can enter start location, subsequent stops, and the end location. The Location drop-down displays both preferred locations and the recently used locations. Your company can set up its own preferred locations.
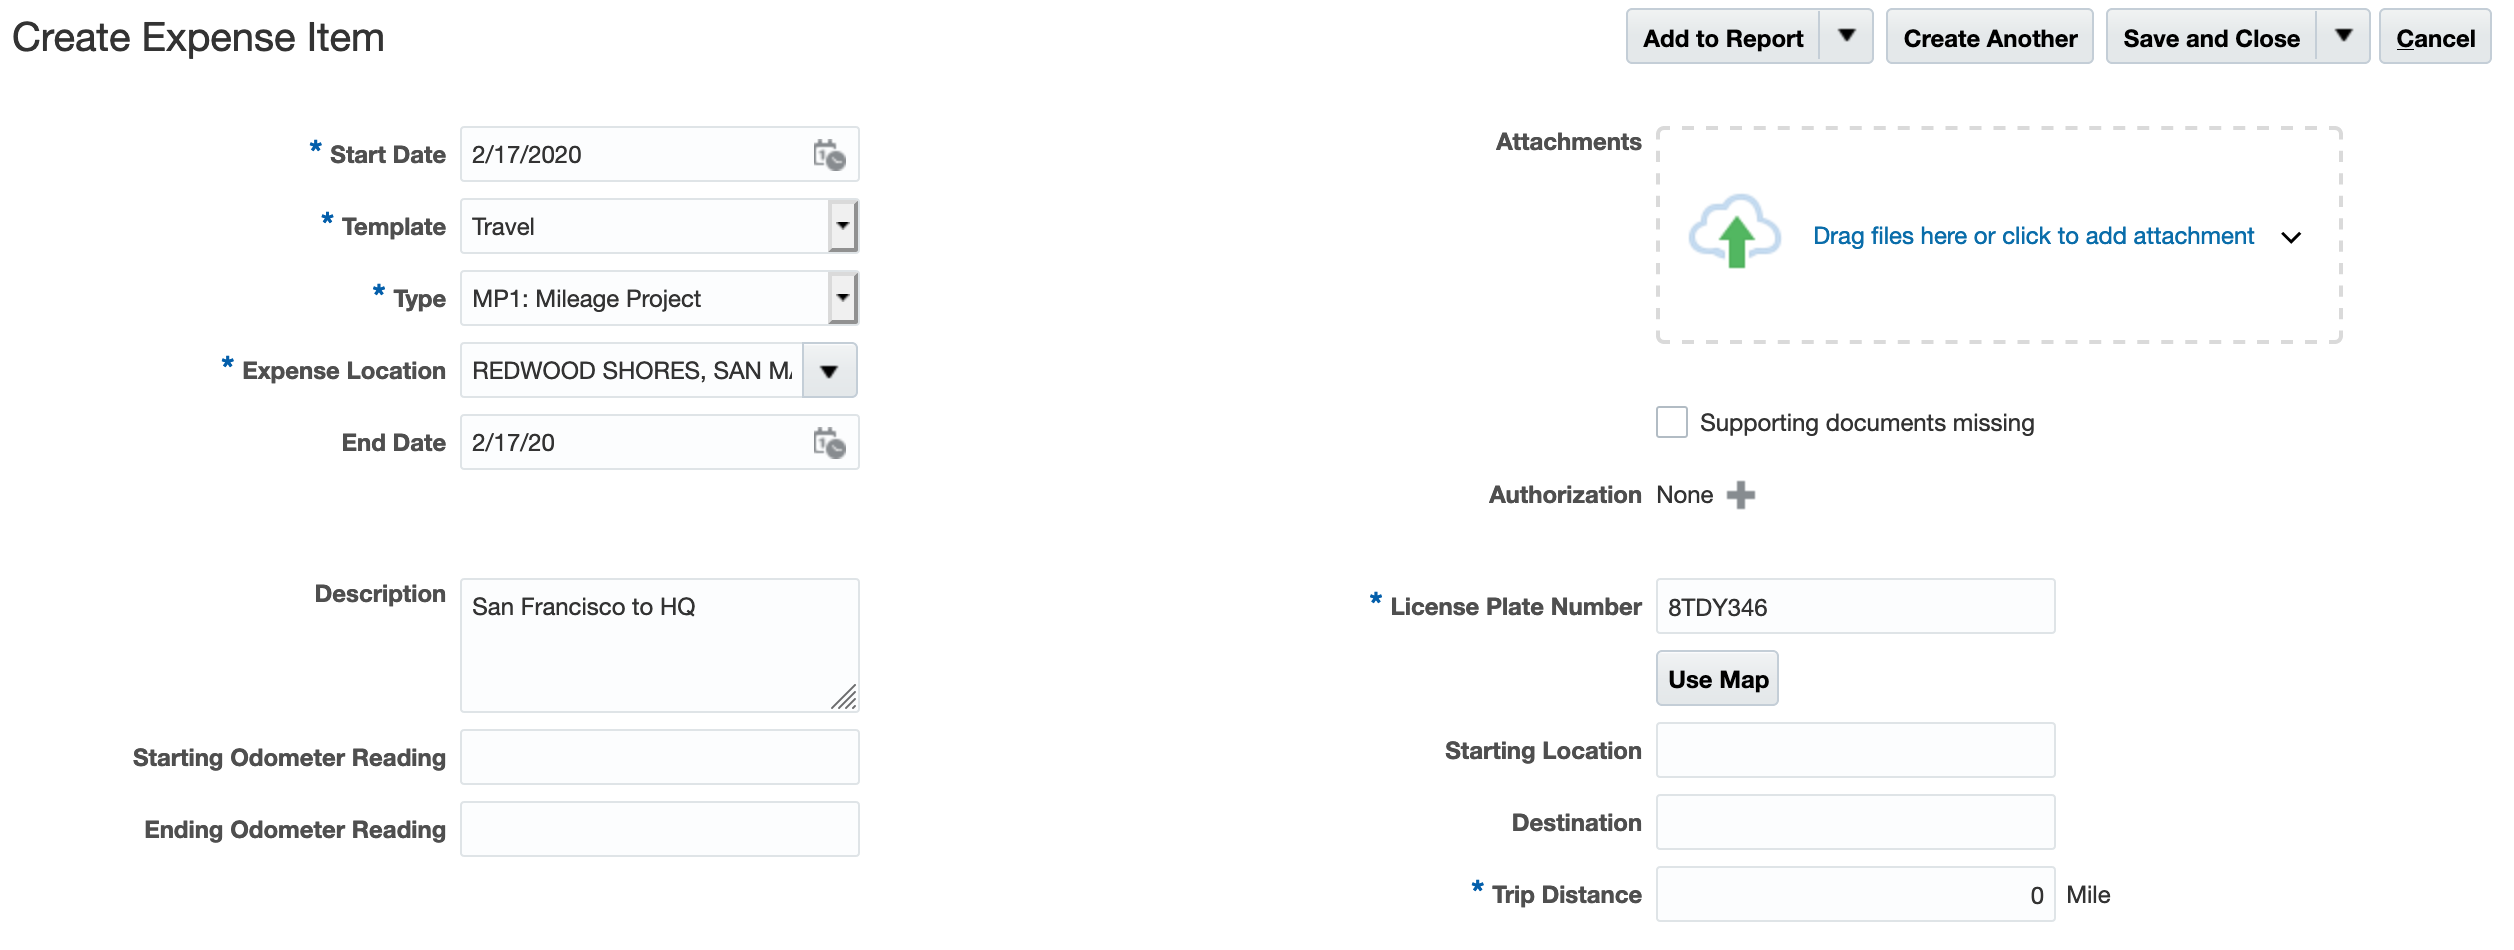
Accessing Maps from the Create Expense Item Page
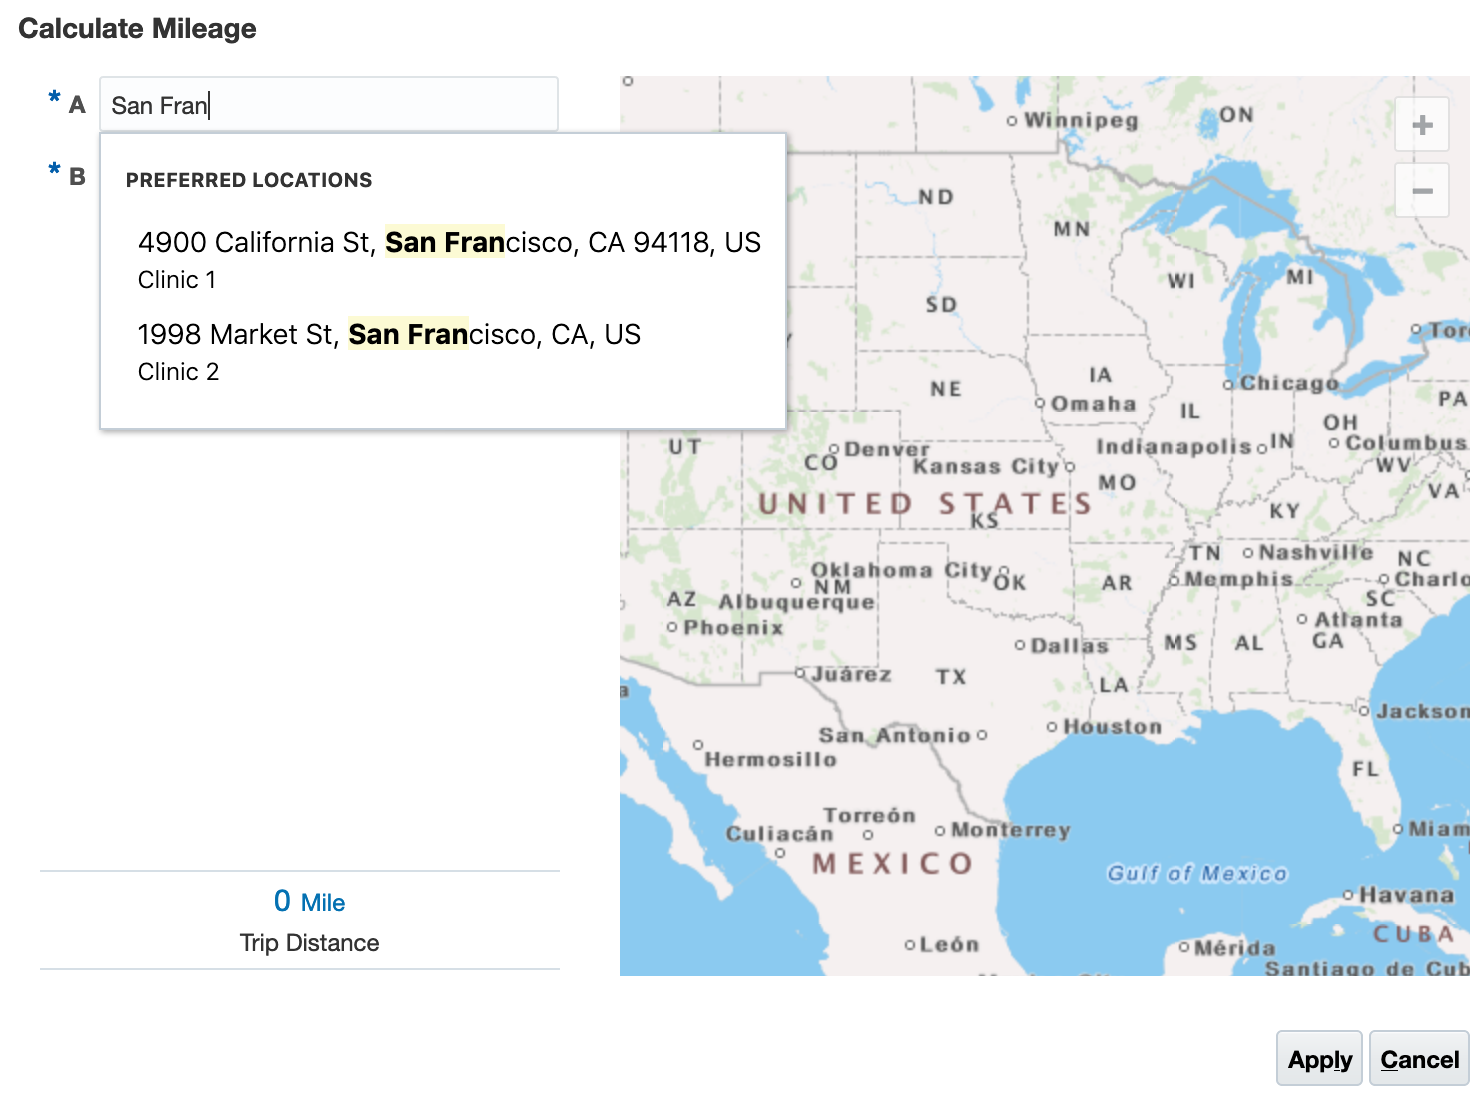
Preferred Lists
If your company requires you to deduct commute mileage, the Deduct commute distance check box is displayed and the distance between your home and office is automatically populated if it exists in your profile. You can change the commute distance when applicable.
When you submit your expense report, a snapshot of your Oracle Maps with the route is attached to the expense report as a supporting document. The map doesn’t display actual addresses. The map attachment is also visible to expense report approvers and auditors.
Steps to Enable
To enable Oracle Maps, perform the following steps.
- From the Setup and Maintenance work area, navigate to the Manage Expenses System Options page.
- Set the Enable Oracle Maps choice list to Yes.
You can set this option at the implementation level on the Manage Expenses System Options page, which applies to all business units. Alternatively, you can specify exceptions for specific business units on the Create System Options:Specific Business Unit dialog box.
To enable commute mileage in mileage expense entry, perform the following steps:
- From the Setup and Maintenance work area, navigate to the Manage Policies by Expense Category page.
- Select the Mileage option from the Create Policy button choice list.
- In the Mileage Eligibility Section on the Create Mileage Policy page, select the Enable commute mileage deduction check box.
- Select the Optional radio button if you don't need to deduct commute mileage always. Select the Required per day radio button if it is mandatory to deduct commute mileage from your mileage expenses. Employees must enter commute mileage if you set the value to Required per day.
To setup preferred locations, perform the following steps:
- From the Setup and Maintenance work area, navigate to the Manage Standard Lookups page.
- Search for the lookup type ORA_EXM_MILEAGE_LOCATIONS.
- In the Lookup Codes section, select the Create icon to create lookup codes. Each lookup code is a preferred location. In the Meaning field enter the short name of the preferred location and in the Description field enter the location address. The address must be a valid physical address, so that the map can calculate the distance correctly.
- Click Save and Close.
Key Resources
Role Information
To enable the Oracle Maps and a mileage policy with commute deduction, you need one of these roles:
- Expense Manager
- Application Implementation Consultant
- Financials Administrator
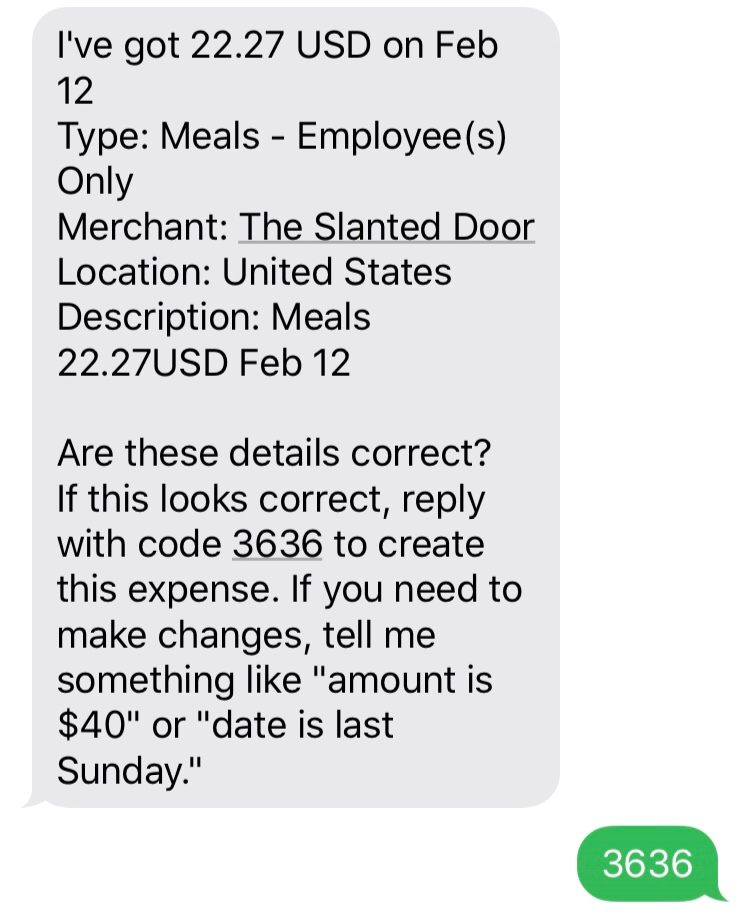
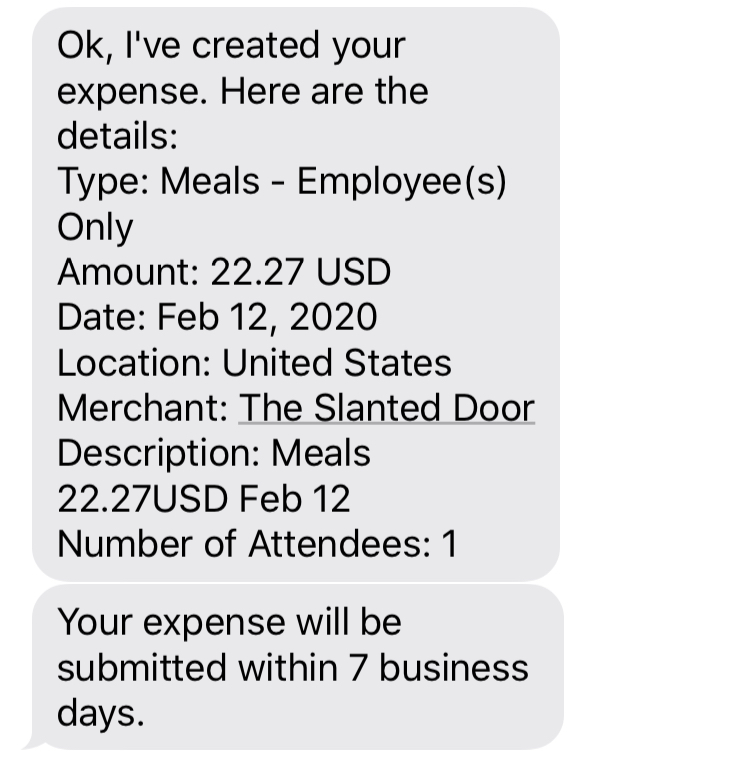
Create expense items automatically by texting receipt images to the Expenses Digital Assistant. The Digital Assistant either provides immediate confirmation that the expense item is created or asks for specific guidance to complete the expense item. Expense items are automatically matched to corporate card charges when applicable. If configured, the application automatically submits expenses for approval.
When you use the Digital Assistant, you can create expenses using conversational phrases, such as "meal 30$ today" or "create a taxi expense". The Digital Assistant asks you for additional information based on your company’s policies.
You can also create an expense by uploading a receipt. The Digital Assistant extracts the information from the receipt and presents it to you for verification. You can modify the expense details using phrases, such as “change amount to 20$” or “date is 02/14/2020”. After verification, you can complete the expense creation by providing a security code provided by the Digital Assistant.
If you are a corporate card user, the Expenses application waits for the corporate card charge for 5 days and tries to match the expense created from the Digital Assistant to a corporate card charge. Your company can enable automatic submission of expense items created from the Digital Assistant.
Expenses Digital Assistant is currently supported on SMS (text messaging) channel.

Creating Expense Using SMS Channel
To use this feature, you must purchase the Oracle Digital Assistant for Fusion Enterprise Resource Planning Self Service Cloud Service - Hosted Named User SKU with part number B91448.
Steps to Enable
To enable Expenses Digital Assistant, perform the following setup:
- Identify Digital Assistant administrators and assign them respective roles. Refer to the Digital Assistant User Roles section of the Configure Digital Assistant chapter in the Getting Started with Digital Assistant guide.
- Log in as ODA Service Administrator, select the latest version of the FADigital Assistant, and train the Digital Assistant. Refer to the Access and Setup Digital Assistant section of the Configure Digital Assistant chapter in the Getting Started with Digital Assistant guide.
- Setup a Twilio account and obtain a phone number for texting. The phone number must support MMS (Multimedia Messaging Service) to send receipt images.
- Connect the Twilio account to the Expenses Digital Assistant. Refer to the following sections in the Getting Started with Digital Assistant guide:
- Before you Start section in the Get Started chapter
- Access and Set Up Digital Assistant section in the Configure Digital Assistant chapter
- Schedule and run the Synchronize Financials Objects for Database Search process. This process creates a repository of merchants used by the employees to aid in expense type derivation.
Key Resources
For more information about setting up Digital Assistant, refer to the Getting Started with Digital Assistant guide.
Role Information
To assign Digital Assistant administrator roles, you must have the Identity Domain Administrator role. To configure Digital Assistant, you must have the ODA Service Administrator role. To schedule and run the Synchronize Financials Objects for Database Search process, you must have the Financial Application Administrator role. When enabled, employees with Expense Entry role can create expenses through the Digital Assistant.
Request Cash Advances on Behalf of Other Employees
Delegates can request cash advances for authorized employees. When a delegate requests cash advances, the advances either proceed to final verification by employees or directly to approval based on the approval rules. Employees and their delegates are notified when approval is complete.
When cash advance is enabled and the owner has granted delegate access, the delegate can submit cash advances. The delegate can manage cash advances and search for cash advances from the Expenses work area.
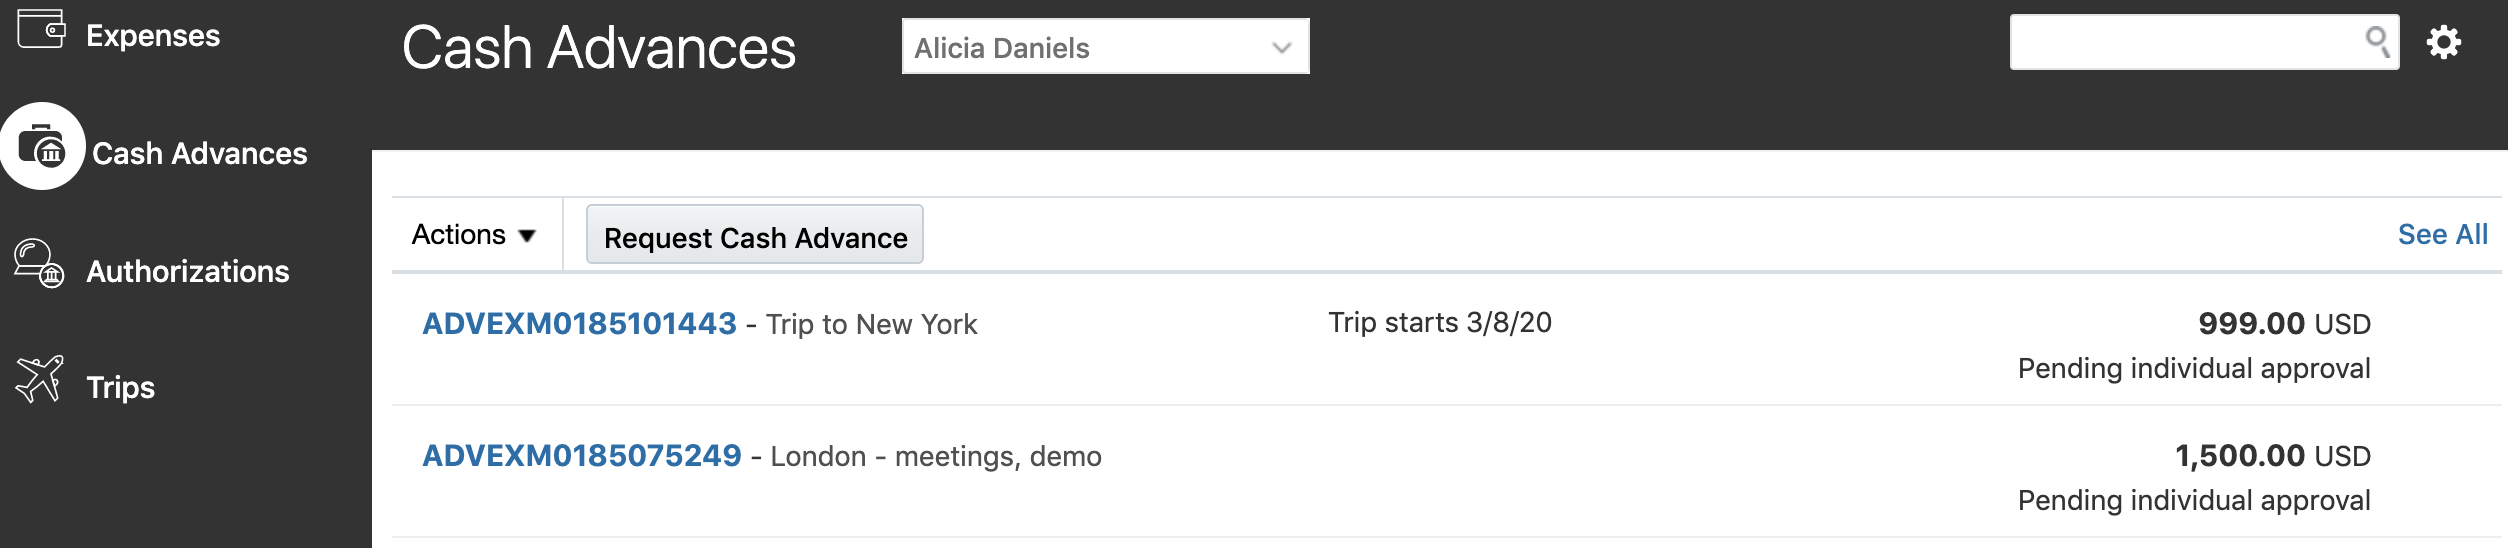
Cash Advance Delegate's View
Steps to Enable
To use this feature, perform the following tasks:
SETUP TASK
- Set the Enable Advances option on the Manage Cash Advance and Authorization Policies page to Yes for the specific business unit or customer site.
- Modify your cash advance approval rule based on the scenario:
| Scenario | Required Configuration |
|---|---|
| Your company is implementing Expenses now and requires the employees to verify cash advances submitted by their delegates. |
Activate the pre-configured rule, CashAdvanceDelegateApprovalStage, in the BPM Worklist to route cash advances to the employees for verification. |
| Your company has already implemented Expenses and the company requires the employees to verify cash advances submitted by their delegates. |
Modify the FinExmCashAdvanceApproval task in the BPM Worklist and add a new participant to route the cash advance to the owner. If you use the supervisory hierarchy for approval, you must modify the existing cash advance rule to start from the cash advance owner's manager. |
| Your company is already using cash advances and you use the supervisory hierarchy for approval. |
Modify the existing cash advance rule to start from the cash advance owner's manager. |
Key Resources
For more information about delegated cash advance approvals, refer to the following topics in Oracle Applications online help:
- How to Setup Approval Rules for Delegated Cash Advances
Role Information
To enable cash advances, you must have the Application Implementation Consultant role. When enabled, users with the Employee role can use the features.
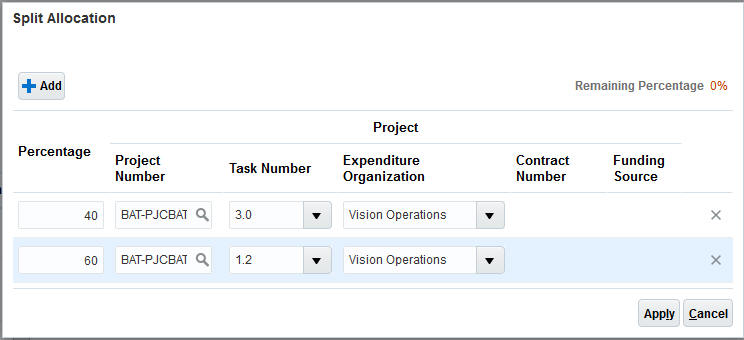
Split Expense Reports Across Projects and Accounts
Split all expense items in an expense report across multiple projects or general ledger accounts by entering the split percentage at the expense report header. Expense report approvers and auditors can review the distributions for accuracy.
You can allocate charges to specific accounts or projects only if you are authorized to do so. When your company allows you to allocate a single expense across multiple accounts or projects, you see the Split Allocation button on the Create Expense Report page. Selecting the button opens the Split Allocation dialog.
Split Allocation Button on The Create Expense Report Page
The expense is allocated 100% to your default expense account, if you are authorized to charge to other accounts and you have no prior expenses and your company has not enabled defaulting values from previous expenses. You can add one or more accounts and specify the percentage of allocation. If your company has enabled defaulting values from previous expenses, the expense account is defaulted to the last used account.
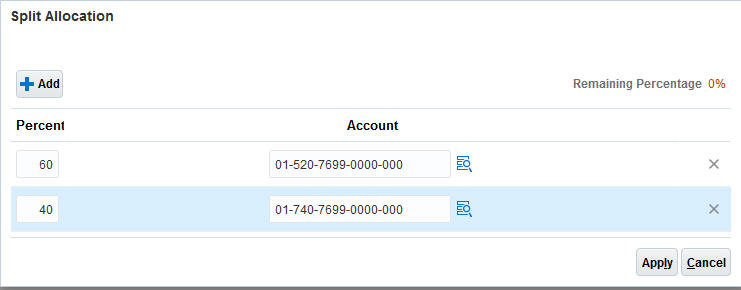
Splitting Across Accounts
Your expense is not allocated to any projects in the Split Allocation dialog if you are authorized to charge to projects and you have no prior expenses and your company has not enabled defaulting values from previous expenses. If your company has enabled defaulting values from previous expenses, the last used project is already selected in the Split Allocation dialog.
Splitting Across Projects
If a user is authorized to charge to both projects and accounts, the Split Allocation button choice list provides two options: By account and By project. Additionally, users can associate a spend authorization to the split expense amounts.
Managers and auditors can review the split details in the expense approval notification and the Audit Expense Report page respectively. The approval notification to managers summarizes the split allocation at the top of the notification. The Audit Expense Report page displays the split allocation for each expense.
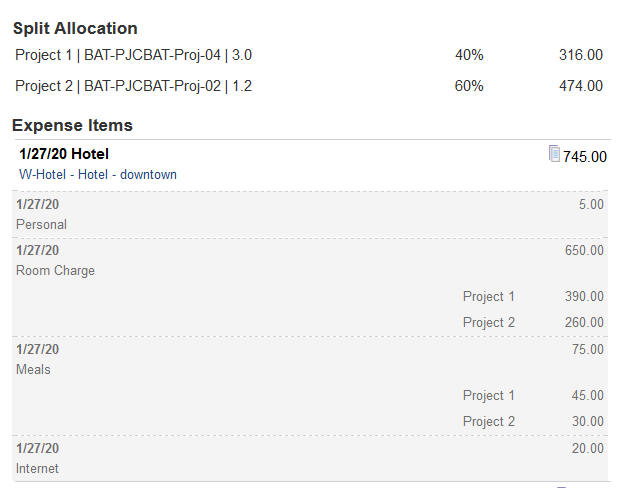
Approver's View of Split Allocation
Steps to Enable
To enable splitting expenses in expense entry, perform the following steps:
- From the Setup and Maintenance work area, navigate to the Manage Expenses System Options page.
- Set the Enable Split Allocations option on the Manage Expenses System Options page to Yes at the specific business unit level or at the site level.
Key Resources
Role Information
To enable splitting expenses across projects and accounts, you must have the Application Implementation Consultant role. When enabled, users with the Override Expense Account Allocation privilege or the Allocate Project Expense privilege can use the features.
Transfer Income Statement and Balance Sheet Account Balances to Different Closing Accounts
Select account ranges to close income statement account balances to different retained earnings accounts using the Create Income Statement Closing Journals process; or select account ranges to close balance sheet account balances to different closing accounts using the Create Balance Sheet Closing Journals process. This provides more detailed tracking and reporting on closing activities related to the income statement and the balance sheet accounts.
Business Benefits
- Have more visibility into the year-end closing activities for both income statement and balance sheet accounts.
- Have tighter control over the choice of which closing account you want to use to close one or more account balances.
- Help comply with any specific business or legal requirements.
Steps to Enable
You don't need to do anything to enable this feature.
Tips And Considerations
- Use the Account Filter parameter on the Closing Journals process submission pages to specify subsets of source accounts to close into a specific closing account.
- Use the following operators in the account filter: Equals, Between, and Is a Last Descendant Of. The last descendant operator references the account hierarchy associated with the segments of the chart of accounts instance within the context of the selected ledger or ledger set.
Key Resources
Related Help:
- Period Close chapter in the Implementing Enterprise Structures and General Ledger guide
- Accounting Period Close chapter in the Using General Ledger guide
Role Information
You don't need any new role or privilege access to use this feature.
Joint Venture Management gives companies, who are the managing partners in a joint venture, the ability to manage the costs and revenue related to a joint venture and distribute those amounts to the joint venture partners according to the ownership percentage as defined in the joint operating agreement. This product provides touchless processing for joint venture accounting processes that are typically performed manually throughout the month. The automation of the joint venture flow helps the Joint Venture Accounting Manager and Joint Venture Accountant to stay on top of any issues or trends related to a joint venture to ensure:
- Minimized time to close the financial books.
- Accurate calculation of distributed amounts to joint venture partners.
- Ability to quickly research and resolve any questions or disputes brought up by joint venture partners related to their distributions.
This feature provides rich and easy-to-use joint venture management capabilities in the following areas:
- Single, consolidated place to identify all joint venture partners
- Comprehensive joint venture definitions
- Rules to identify distributable transactions
- Touchless processing of joint venture related transactions
- Traceability of joint venture partner distribution amounts to original transactions
1. SINGLE, CONSOLIDATED PLACE TO IDENTIFY ALL JOINT VENTURE PARTNERS
CREATING AND MANAGING INVOICING PARTNERS
Before specifying a joint venture definition and identifying related stakeholders, you will need to create Invoicing Partners.
The purpose of an Invoicing Partner is to give you the ability to specify both payable (supplier) and receivable (customer) entities related to a joint venture partner. This way, you can reference an Invoicing Partner without having to be concerned about whether the interaction with the Invoicing Partner will be a payable or a receivable. And each Invoicing Partner can be used as a stakeholder in one or more joint ventures. Only those customers and suppliers identified as Invoicing Partners can be designated as a stakeholder on any joint venture. And, with the use of alerts, you will know if any Invoicing Partner is missing needed information. This reduces the risk of accidentally using a customer or supplier on a joint venture that is not really a joint venture partner.
Follow these steps to create and maintain Invoicing Partners:
- Navigate to the Setup and Maintenance work area.
- Search for the Financials setup and select the Joint Venture Management functional area in the list of functional areas that appear.
- In the task list on the right you will find a link “Manage Invoicing Partners”.
From this page, you will be able to create and manage all Invoicing Partners.
On the Invoicing Partner page, you will see a list of all Invoicing Partners.
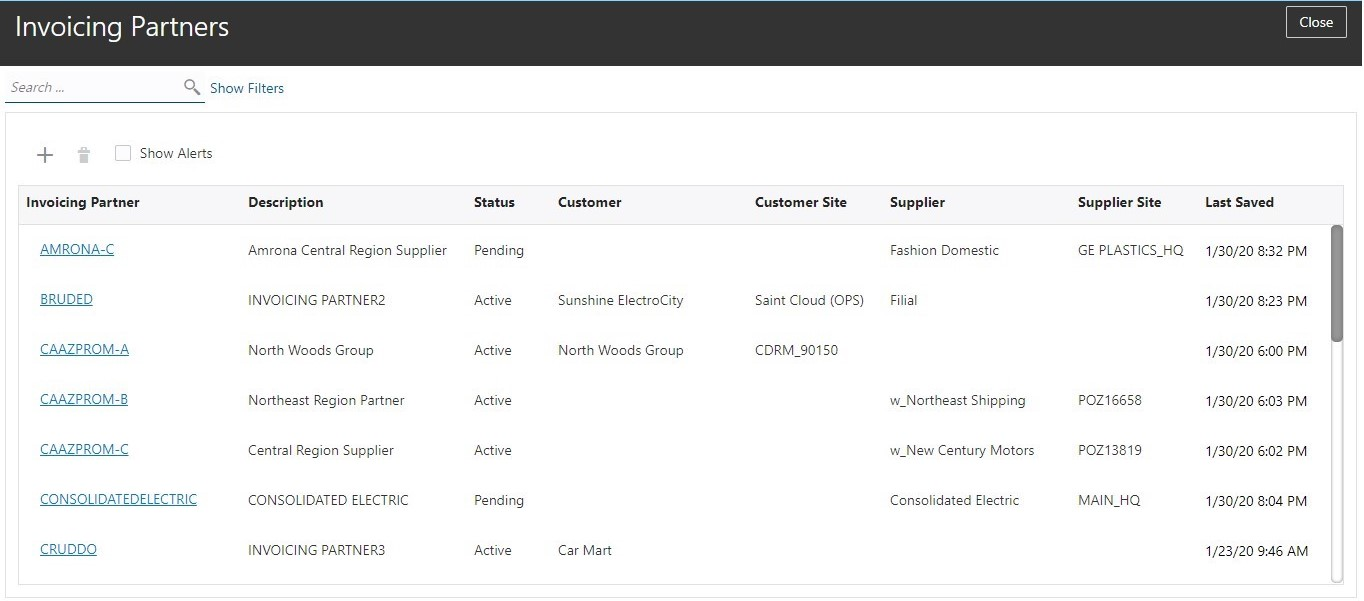
To add a new invoicing partner, simply click the “+” symbol.

Enter the information in the page and click “Save”
2. COMPREHENSIVE JOINT VENTURE DEFINITIONS
Joint venture definitions provide a way to associate the essential Oracle Financials Cloud information to a joint venture in order to identify transaction amounts and calculate the distribution amounts for joint venture partners. This information for each joint venture includes: Business Unit, Cost Centers, Stakeholders, and Ownership Definitions. Joint venture definitions provides one place to define all that you need to process related transactions. And, with the use of alerts, you will know if any joint venture definition is missing needed information, saving you time.
You can create and manage joint venture definitions with the Manage Joint Venture Definitions page.
Follow these steps to create and manage joint venture definitions:
- Navigate to the Setup and Maintenance work area.
- Search for the Financials setup and select the Joint Venture Management functional area in the list of functional areas that appear.
- In the task list on the right you will find a link “Manage Joint Venture Definitions”.
From this page, you will be able to create and manage all aspects related to a joint venture.
On the Joint Ventures page, you will see a list of all joint ventures.
This page gives you the ability to easily manage all your joint venture definitions including filtering and searching for specific joint ventures by a number of different attributes including searching for joint venture definitions that do not have their definitions completed.
To add a joint venture, simply click the “+” symbol.
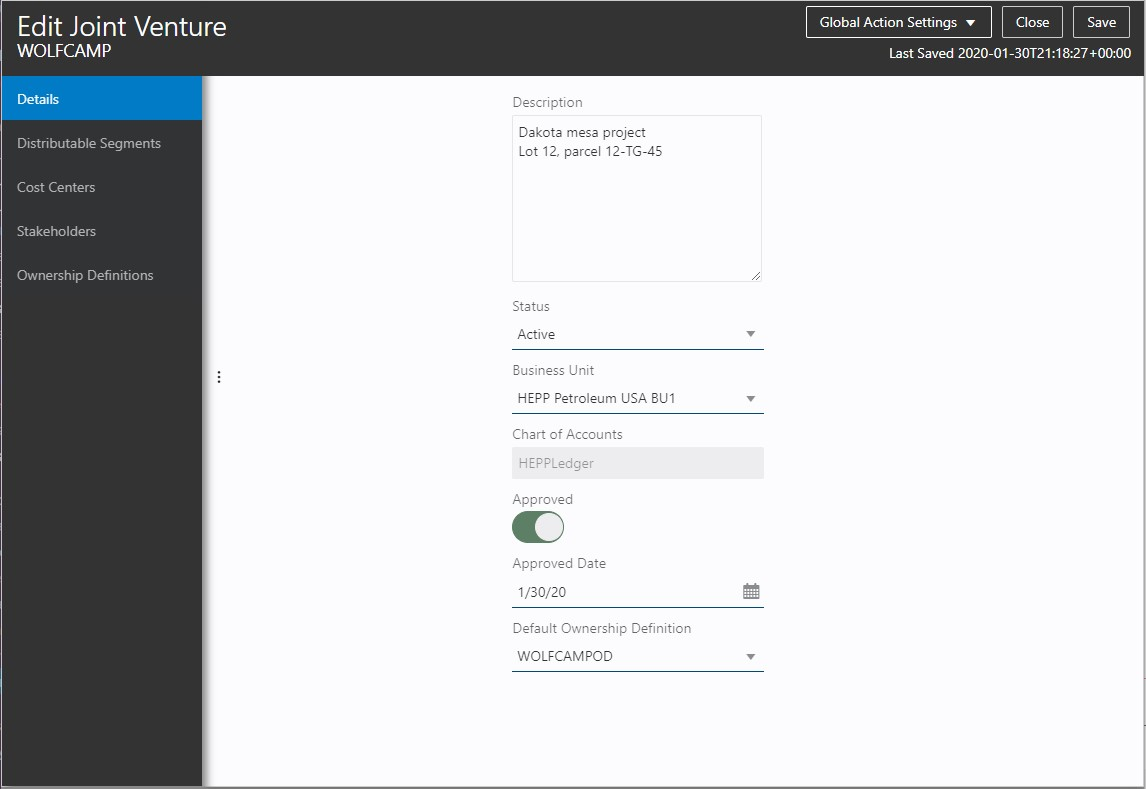
Enter the information in the page and click “Save”.
After you save the Details of the joint venture, you can now enter the remaining information related to the joint venture.
Click on Cost Center from the left side of the page to identify one or more cost centers related to the joint venture. A cost center is related to the segment with the cost center segment label.
Click on the “+” symbol to associate a cost center to the joint venture.
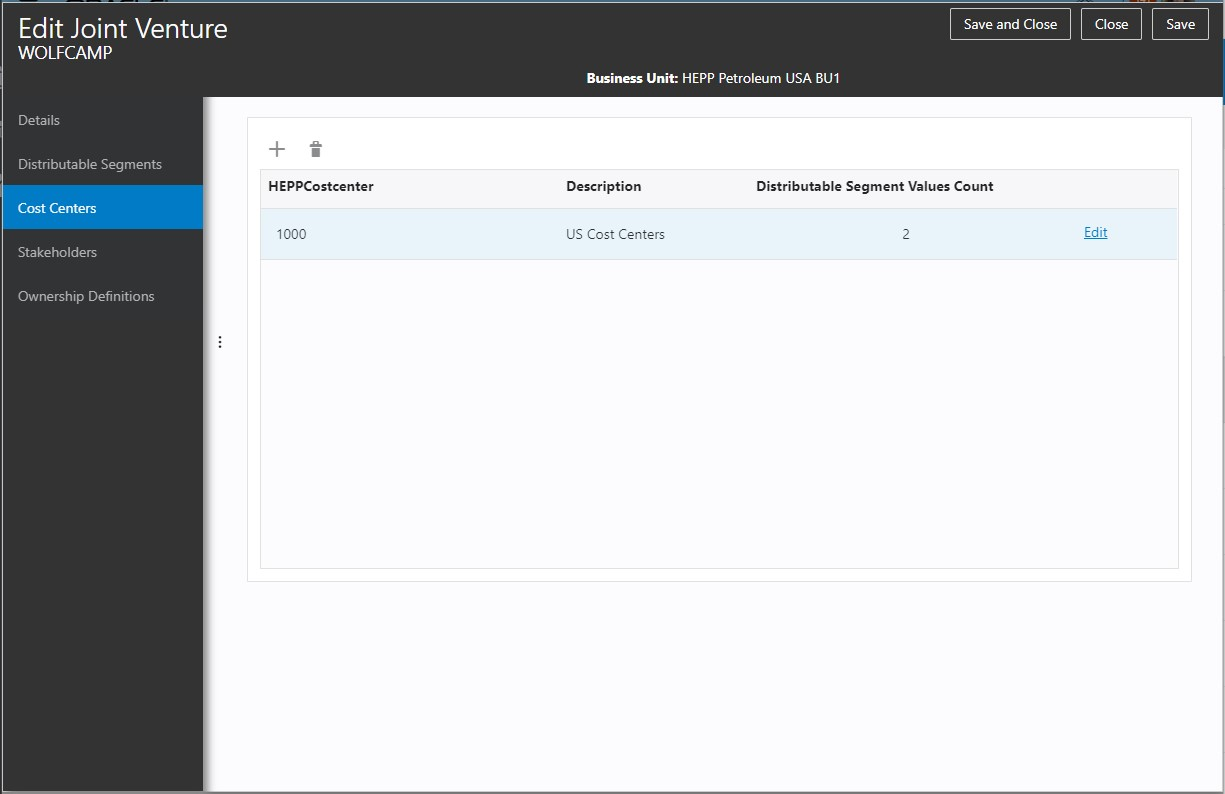
Enter the information in the page and click “Save”.
Next, click on Stakeholders from the left side of the page to identify one or more stakeholders related to the joint venture.
Stakeholders can be internal to the managing partner or can be external to the managing partner.
Stakeholders can share in costs and/or revenue related to a joint venture. Stakeholders may also be related to a joint venture for informational purposes only (also known as a memo partner).
Click on the “+” symbol to add a stakeholder.
Enter the information in the page and click “Save”.
Finally, click on the Ownership Definition from the left side of the page to define one or more ownership definitions. Ownership definitions are date effective and they represent the partner split (represented as a percentage) agreed upon.
Click on the “+” to add an ownership definition.
Once you have done that, you can click on the “+” icon in the lower part of the page to associate one or more stakeholders to the ownership definition.
Enter the information in the page and click “Save”.
3. RULES TO IDENTIFY DISTRIBUTABLE TRANSACTIONS
For each joint venture, you can identify the segments and segment values in your chart of accounts that relate to the transactions that will be invoiced to the joint venture partners. This provides a set of rules that will be used to identify related transactions from Subledger Accounting and the General Ledger for joint venture processing.
Follow these steps to indicate which segments in your chart of accounts will be used in the rules for the segment values:
- Navigate to the Setup and Maintenance work area.
- Search for the Financials setup and select the Joint Venture Management functional area in the list of functional areas that appear.
- In the task list on the right you will find a link “Manage Joint Venture Definitions”.
On the Joint Ventures page, you will see a list of all joint ventures. From here, select the desired joint venture.
Once in the Edit Joint Venture page, click on Distributable Segments from the left side of the page.
You will see all the segments related to your chart of accounts. In this page, you will select which segments you want to use in the rules to specify which accounts are distributable to your partners.
You will see one segment that is automatically selected. This segment is related to the segment where the label for that segment is for the cost center. The name of the segment may be different. In the example below, the segment that has the cost center label is named “Department”.
Enter the information in the page and click “Save”.
Once you have the segments identified, you can identify the cost centers and related segment values for the joint venture.
In the Edit Joint Venture page, select Cost Centers from the left side of the page. Here you have already specified the cost centers and this is where you will also specify the segment values related to the distributable transactions for the joint venture.

Click on the edit link on the right side of the page.
To add a set of segment values click on the “+” symbol.
Enter the information in the page and click “Save”.
4. TOUCHLESS PROCESSING OF JOINT VENTURE RELATED TRANSACTIONS
Based on the rules that identify distributable transactions, you can now automatically identify joint venture transactions from Subledger Accounting and the General Ledger and automatically calculate each partner’s share for each transaction based on the date-effective Ownership Definition specified for a joint venture.
Run the Identify Joint Venture Transactions process on distributable joint venture transactions that have not yet been processed by Joint Venture Management. Run the Create Joint Venture Distributions process to calculate each partner's share of the transaction. You can run these processes as often as you like.
5. TRACEABILITY OF JOINT VENTURE PARTNER DISTRIBUTION AMOUNTS
You now have the ability to review and update the identified joint venture transactions and distribution amounts related to a joint venture. Key information related to the original transactions is included with the identified joint venture transactions and distribution amounts to give you the information you need validate and trace back to the financial information without having to navigate to a different place. This key information includes chart of account segment values that were charged, original transaction amount, and currency. Additional joint venture information also helps you validate and trace back to the joint operating agreement without having to navigate to a different place. This key information includes the ownership percentage definition used to calculate the partner split, each partner's percentage share of the transactoin, and the calculated partner's distribution amount.
Follow these steps to view and review joint venture transactions:
- Navigate to the Home screen.
- Search for the Joint Venture icon and select it
- Select Transactions
Enter a joint venture at the top of the page.
Follow these steps to view and review joint venture distributions:
- Navigate to the Home screen.
- Search for the Joint Venture icon and select it
- Select Distributions
Here you will see a page with the distributions for all joint ventures for all partners.
Watch a Demo
Steps to Enable
Use the Opt In UI to enable this feature. For instructions, refer to the Optional Uptake of New Features section of this document.
Offering: Financials
Additional steps to set up this feature are detailed within each of the Joint Venture Management areas in the Description and Value section.
Watch a Setup Demo
Key Resources
- For more information on the Joint Venture Management solution, refer to Oracle Joint Venture Management Cloud implementation guide.
Role Information
To implement this feature, you will need the role ORA_JV_JOINT_VENTURE_APPLICATION_ADMINISTRATOR that has the following privileges: JV_MANAGE_JOINT_VENTURE_INVOICE_PARTNER_LIST_PRIV and JV_MANAGE_JOINT_VENTURE_DEFINITION_PRIV.
To use various parts of this feature there are two other roles and related privileges:
- ORA_JV_JOINT_VENTURE_ACCOUNTANT with privileges JV_MANAGE_JOINT_VENTURE_DEFINITION_PRIV, JV_DISTRIBUTE_JOINT_VENTURE_TRANSACTIONS_PRIV, and JV_REVIEW_AND_EDIT_JOINT_VENTURE_TRANSACTIONS_PRIV
- ORA_JV_JOINT_VENTURE_ACCOUNTING_MANAGER with privilege JV_MANAGE_JOINT_VENTURE_DEFINITION_PRIV
Settle Customer Receipts Using External Applications
Perform credit card and bank account settlements with payment systems using external applications when creating customer receipts. The option to use external applications for settlements provides flexibility to meet bank-specific, region-specific, or regulatory compliance requirements.
A new option ‘Use for external settlement’ is provided on the Funds Capture Process Profile. After enabling this option, when a receipt is remitted in Receivables, the settlement transaction is directly created with the status ‘Succeeded,’ instead of intermediary statuses such as ‘Pending in open batch’ or ‘Submitted’. You don't need to submit the Create Settlement Batches or Submit Offline Transactions processes to transmit settlement data with the payment system. The 'Use for external settlement' option also prevents authorization with the payment system and creates an authorization transaction with the status ‘Succeeded.'

Steps to Enable
This feature is available by default.
Additional setup is required to configure this feature. Follow these steps:
- In the Setup and Maintenance work area, navigate to Manage Funds Capture Process Profile.
- Search and select your existing Funds Capture Process Profile and click the Edit icon.
- On the Edit Funds Capture Process Profile page, enable the option ‘Use for external settlement’.
- Click Save and Close.
Tips And Considerations
You should only enable this feature under these conditions:
- External system is used for generating and transmitting authorization and settlement messages with the payment system.
- Payments is not integrated with payment system to perform authorization and settlement.
Specify URL Attachments When Creating Supplier Invoices Using a Spreadsheet
Specify URL attachments when creating supplier invoices using Create Invoice Spreadsheet. Previously, invoices created through spreadsheet required manual editing of each invoice to add URL attachments. Users could not provide the attachments of type URL when creating invoices from the spreadsheet.
Steps to Enable
You don't need to do anything to enable this feature.
Tips And Considerations
The URL attachments to an invoice appear in the hidden column BT. You must unhide the column to use it.
Retain Receipt Method and Payment Instrument on Complete Transactions
The receipt method and payment instrument are retained if a completed transaction needs to be set to incomplete.
Steps to Enable
You don't need to do anything to enable this feature.
Role Information
You don't need any new role or privilege access to use this feature.
Support Receivables Detailed Distributions for Invoices with Rules
Create detailed distributions on invoices associated with revenue scheduling rules, and on all subsequent activities created on such invoices. This feature applies to customers who set up and use Multifund Accounting.
Steps to Enable
The feature is enabled by default. To use this feature, you must modify the Subledger Accounting Method associated with the Ledger enabled for multifund accounting according to the steps indicated below.
- Create a new Journal Line Rule for the 'Invoice' event class and associate it with the Journal Entry Rule Set.
- Create a new Journal Line Rule for the 'Debit Memo' event class and associate it with the Journal Entry Rule Set.
- Modify the conditions within the Journal Line Rule 'Receipt Application to Multifund Transaction Receivable' used for the 'Receipt' event class
1. NEW JOURNAL LINE RULE FOR 'INVOICE' EVENT CLASS:
(a) Navigation: Task > Manage Journal Line Rules
Search for the Journal Line Rule ‘Multifund Invoice Receivable’. Duplicate it.

Add the below conditions:
("Transaction Invoicing Rule" Is not null) 'And' ( "Transaction Distribution Account Class" = TAX 'Or' "Transaction Distribution Account Class" = FREIGHT 'Or' "Transaction Distribution Account Class" = ROUND 'Or' "Transaction Distribution Account Class" = CHARGES 'Or' "Transaction Distribution Account Class" = DEFERRED_TAX 'Or' ( "Transaction Distribution Account Class" = UNBILL 'And' "Receivables Offset Indicator" = Y ) 'Or' ( "Transaction Distribution Account Class" = UNEARN 'And' "Receivables Offset Indicator" = Y ) )
(b) Navigation: Task > Manage Subledger Journal Entry Rule Sets
Search for the Journal Entry Rule Set ‘Invoices – Multifund Accounting Balancing Method’. Duplicate it (as modifications can't be done on the predefined rule sets). Add the new Rule to the list with the Account Combination Rule as ‘Multifund Transaction Default Receivables GL Account’ and mark ‘Copy’ against Primary, Secondary and Third Balancing Segments.
2. NEW JOURNAL LINE RULE FOR 'DEBIT MEMO' EVENT CLASS:
Repeat the same process as narrated in the above section for 'Invoice' event Class.
3. MODIFIED JOURNAL LINE RULE FOR 'RECEIPT' EVENT CLASS:
(a) Navigation: Task > Manage Journal Line Rules
Search for the predefined Journal Line Rule ‘Receipt Application to Multifund Transaction Receivable’ and duplicate it (as modifications can't be done on the predefined rules)
In the Journal Line Rule Conditions, add the details 'Or' "Transaction Distribution Account Class" = UNEARN 'Or' "Transaction Distribution Account Class" = UNBILL, as referred below.
(b) Navigation: Task > Manage Subledger Journal Entry Rule Sets
Search for the Journal Entry Rule Set ‘Receipts – Multifund Accounting Balancing Method’. Duplicate it (as modifications can't be done on the predefined rule sets).

Add the modified Rule after deleting the existing one.
(c) Navigation: Task > Manage Accounting Methods
Search for the Accounting Method associated with the Ledger for which this add-on feature is required. Add the modified rule sets for Invoice, Debit Memo and Receipt after appropriately end-dating or deleting the existing rules and activate it.
Tips And Considerations
- Insert the conditions within the Journal Line Rules by selecting them from the menu list. Do not copy-paste them from a word pad or any other document.
- When an invoice uses the In Advance invoicing rule, ensure that the Balancing Segment Value is the same for both the Unearned Revenue and Revenue accounts across periods. Use the same approach for the Unbilled Receivables and Revenue accounts for invoices that use the In Arrears invoicing rule. Note: You must use this model whether the balancing segment is manually overridden on an invoice in the Review Distributions window or overridden through the Segment Rules in the Subledger Accounting Setup. Otherwise Intracompany and Intercompany balancing entries will get generated.
Key Resources
Role Information
You don't need any new role or privilege access to use this feature
Set Completion Status for All Journals in One Go and Pick Accounting Period While Importing Subledger Journals
Use the enhanced Create Subledger Journals ADFdi spreadsheet to define Completion Status across all journals, pick an Accounting Period and search for Journal Category.
You can set completion status for all subledger journals concurrently by selecting a status from the Completion Status list in the header section of the Subledger Journal Entry ADFdi spreadsheet. All journals entered in the template are imported with the selected Completion Status.
The spreadsheet now lets you enter subledger journals in adjusting periods, even if you have multiple adjusting periods defined for the same date range.
Enter the accounting period value directly in the Accounting Period column. Alternately, double-click an Accounting Period cell to open a dialog box. In the dialog box, you can search and select the relevant accounting period.

Similarly, you can also search and select a journal category.

Steps to Enable
You don't need to do anything to enable this feature.
Tips And Considerations
NOTE: You must download the latest ADFdi spreadsheet template using the Create Subledger Journals in Spreadsheet task.
Highlight Configuration Elements That Aren't Optimized
Display a message on the Manage Taxes page highlighting configuration elements that aren't optimized.
For example, ERP Cloud now prevents you from enabling more than 25 taxes for a country because that adversely impacts the tax calculation performance. A message alert is displayed when the system encounters an unusually large number of taxes.
Steps to Enable
You don't need to do anything to enable this feature.
Tips And Considerations
You can deactivate this feature by creating a lookup. Here’s how you create it:
- Go to Navigator > Setup and Maintenance > Manage Standard Lookups.
- Click New to create a new lookup type. Enter ZX_OPTIN_OPTIONS in the Lookup Type field.
- In the Lookup Codes section, click New to create a new lookup code. Enter ALLOW_NON_OPTIMUM_TAXES in the Lookup Code field.
Leverage Online Help During Tax Configuration and Tax Line Review
ERP Cloud now provides enhanced online help on the Oracle Tax setup pages. The new help text gives you information about the impact of enabling certain options on these setup pages.
This table lists out the fields that are covered by the enhancement:
| Field | Application Page |
|---|---|
| Apply single rate on total taxable basis |
Manage Taxes |
| Geography Type |
Manage Taxes |
| Override Geography Type |
Manage Taxes |
| Set as offset tax |
Manage Taxes |
| Tax Classification Code Set Assignments |
Manage Tax Rates and Tax Recovery Rates |
| Party Name |
Manage Party Tax Profiles |
| Party Site Number |
Manage Party Tax Profiles |
You can also read more information about the tax lines in the Taxes region of the Payables Create and Edit Invoice pages.
For some tax setups, the tax line details on the Payables Create and Edit Invoice page are read-only. In such cases, you can see the exact detail from the tax setup.
Here’s an example of read-only details:
For Example:
| Read-only tax detail on the Payables Create and Edit Invoice page |
Flag at the tax setup | Application Page |
|---|---|---|
| Whole tax line is non-editable | Allow override of calculated tax lines | Configuration Owner Tax Options or at Tax setup. |
| Rate name and rate are non-editable | Allow tax rate override | Tax Status |
| Rate is non-editable | Allow ad hoc tax rate | Tax Rate |
These tax lines are read-only: Offset Tax line, Canceled Tax Line, Reference documents attached to a tax line
Steps to Enable
You don't need to do anything to enable this feature.
Report Taxable Amount Based on Ledger Accounted Amounts in Tax Reporting
Optionally use the accounted taxable amount in Tax reports instead of the tax repository taxable amount, when there is no complex taxable basis definition such as compound Tax. The Tax reports will now show the accounted amount as the taxable amount. For cases where the taxable basis definition is complex, such as compound tax, prior tax or assessable value, the reports will show the taxable amount from the tax repository.
Steps to Enable
Create and enable the lookup type ZX_TRL_ACTG_AMT_SOURCE with the lookup code ZX_TRL_STANDARD_TB_AMT.
- To configure the lookup use these steps:
- Go to Navigator > Setup and Maintenance > Tasks panel tab > Search.Search for Manage Standard Lookups.
- Select Manage Standard Lookups from the results.
- On the Manage Standard Lookups page, click + to define a new lookup type "ZX_TRL_ACTG_AMT_SOURCE".
- Click Save.
- Click + in the Lookup Codes section to define a new lookup code "ZX_TRL_STANDARD_TB_AMT".
- Click Save and Close.
Transactional Business Intelligence for Financials
Use Additional Attributes in Receivables Subject Areas
New subfolders and corresponding reporting attributes were added to the Receivables - Customer Account Site Tax Profile Real Time subject area:
- under folder Customer Accounts, new subfolder, Customer Account Profile, with new attributes for account profile class
- under folder Customer Accounts, new subfolder, Customer Account Contacts, with new attributes for account contacts
- under folder Customer Account Site, new subfolder, Customer Site Profile, with new attributes for site profile class
- under folder Customer Account Site, new subfolder Customer Site Contacts, with new attributes for customer site contacts
New subfolders and corresponding reporting attributes were added to the Receivables - Bills Receivable Real Time subject area:
- under folder Drawee Account, new subfolder, Drawee Account Profile, with new attributes for account profile class
- under folder Drawee Account, new subfolder, Drawee Account Contacts, with new attributes for account contacts
- under folder Drawee Site, new subfolder, Drawee Site Profile, with new attributes for site profile class
- under folder Drawee Site, new subfolder Drawee Site Contacts, with new attributes for customer site contacts
New subfolders and corresponding reporting attributes were added to the following OTBI Receivables subject areas:
- Receivables - Transactions Real Time
- Receivables - Adjustments Real Time
- Receivables - Credit Memo Applications Real Time
- Receivables - Credit Memo Requests Real Time
- Receivables - Payment Schedules Real Time
- Receivables - Revenue Adjustments Real Time
- under folder Bill-to Customer Account, new subfolder, Bill-to Customer Profile, with new attributes for customer account profile class
- under folder Bill-to Customer Account, new subfolder, Bill-to Customer Contacts, with new attributes for customer account contacts
- under folder Bill-to Customer Site, new subfolder, Bill-to Customer Site Profile, with new attributes for customer site profile class
- under folder Bill-to Customer Site, new subfolder, Bill-to Customer Site Contacts, with new attributes for customer site contacts
New subfolders and corresponding reporting attributes were added to the following OTBI Receivables subject areas:
- Receivables - Standard Receipts Applications Real Time
- Receivables - Receipts Details Real Time
- Receivables - Receipt Conversion Rate Real Time
- Receivables - Miscellaneous Receipts Real Time
- under folder Paying Customer Account, new subfolder, Paying Customer Account Profile, with new attributes for customer account profile class
- under folder Paying Customer Accounts, new subfolder, Paying Customer Contacts, with new attributes for customer account contacts
- under folder Paying Customer Site, new subfolder, Paying Customer Site Profile, with new attributes for customer site profile class
- under folder Paying Customer Site, new subfolder, Paying Customer Site Contacts, with new attributes for customer site contacts
Steps to Enable
Leverage new subject area(s) by adding to existing reports or using in new reports. For details about creating and editing reports, see the Creating and Administering Analytics and Reports book (available from the Oracle Help Center > your apps service area of interest > Books > Administration).
Role Information
No new role access is needed to use this feature.
Regional and Country-Specific Features
Allow Multiple Bank Return Codes for Brazil
Allow processing of multiple bank return codes in Collection Documents for Brazil, if your bank uses more than one bank occurrence code for the same electronic payment or collection return event.
These are the fields that identify the bank return event:
- Collection Document Update Codes: bank occurrence codes defined by each bank
- Standard Update Types: system representation of the bank occurrence codes
If your bank uses multiple bank occurrence codes for the same electronic payment return event, associate the specific bank occurrence code with the corresponding system occurrence code of Payables bank return. Similarly, you can associate the specific bank occurrence code with the corresponding system occurrence code of Receivables bank returns. This way, you can capture, store and visualize exactly the bank occurrence codes sent by your bank.
Steps to Enable
You don't need to do anything to enable this feature.
Key Resources
For further information about Payables Collection Documents and Bank Collection Remittance features, refer to Quick Reference for Oracle ERP Cloud Documentation for Brazil (Doc ID 2329725.1) in My Oracle Support.
Conditional Validation of State Inscription During Fiscal Document Generation Process for Brazil
The Fiscal Document Generation process for Brazil validates the state inscriptions for customers based on the State Inscription classification previously configured for the ship-to party site. This allows generation of fiscal documents for customers and ship-to party sites who are not required to have a state inscription.
Steps to Enable
You don't need to do anything to enable this feature.
Tips And Considerations
You must perform additional setup steps to enable the Fiscal Document Generation process in these cases:
- When the ship-to site doesn’t have a State Inscription number and you don’t want the fiscal document validation to fail.
- When you want to inform the State Inscription classification of the ship-to parties through the corresponding field in the fiscal document output file.
Here’s what you do in these scenarios:
For Shipping and Receivables Flows:
- Go to Navigator > Setup and Maintenance > Manage Customers.
- In the Sites section, select the ship-to site.
- Select Tax Profile > Tax Reporting Codes > Tax Reporting Type Code and set its value as State Inscription Classification.
- Enter one of these values in the Tax Reporting Code field:
- ICMS Taxpayer
- ICMS Taxpayer Exempt from State Inscription
- Non-ICMS Taxpayer
For Internal Material Transfer Flows:
- Go to Navigator > Setup and Maintenance > Manage Party Tax Profiles.
- Search for Legal Reporting Unit Tax Profiles.
- Select the ship-to Legal Reporting Unit.
- In the Tax Reporting Codes tab, select State Inscription Classification in the Tax Reporting Type Code field.
- Enter one of these values in the Tax Reporting Code field:
- ICMS Taxpayer
- ICMS Taxpayer Exempt from State Inscription
- Non-ICMS Taxpayer
FISCAL DOCUMENT OUTPUT FILE
The tax reporting code of the ship-to party site is now extracted in the output file of Send Fiscal Document to Tax Authority process.
Here’s the new element added to the output file:
| Field | Description | Parent | Type | Cardinality | Size |
|---|---|---|---|---|---|
| SHIP_TO_PARTY_SITE_IE_CLASS | State Inscription classification code of the Ship-To Party Site | A1 | CHAR | 0-1 | 30 |
FISCAL PARTNER VALIDATIONS
The fiscal document validation doesn’t happen when your ship-to site has a State Inscription, but no tax reporting type assigned to it. In this case, the fiscal partner should validate and log an error, if required.
Here are some other cases where fiscal document validation doesn’t take place:
| Condition | Solution |
|---|---|
| SHIP_TO_PARTY_SITE_IE_CLASS field is null, but the tax authority requires the ship-to State Inscription classification. | Partner should raise a validation error and return it to the Import Fiscal Document Approval Information process. |
| SHIP_TO_PARTY_SITE_IE_CLASS field has ICMS_TAXPAYER_EXEMPT_IE, but the SHIP_TO_PARTY_SITE_IE field is not null. | Partner should raise a validation error and return it to the Import Fiscal Document Approval Information process. |
FISCAL PARTNER PROCESSING
Partner must convert the tax reporting code into the corresponding numeric code expected by the tax authority, while creating the fiscal document XML file:
| Tax Reporting Code | Ship-to State Inscription classification |
|---|---|
| ICMS_TAXPAYER | 1 |
| ICMS_TAXPAYER_EXEMPT_IE | 2 |
| ICMS_NON_TAXPAYER | 9 |
Key Resources
For further information about Brazil Fiscal Document feature, refer to Order to Cash for Brazil (Doc ID 2335507.1) in My Oracle Support.
Extract Purchase Register and Complete Input Tax Recovery As per the Revised GST Reporting Structure for India
Extract the purchase register from Payables Cloud and match the supplier data to the Annexure-2 supplier data of the revised GST reporting structure for India. Upload the output file generated by the matching process to complete the input tax recovery process.
Annexure-2 determines the input tax to be credited to the taxpayers’ accounts. As per the proposed procedure, tax payers are eligible for claiming input tax credit only if the inward supply is declared by the supplier in their Annexure-1. Based on supply information uploaded by the suppliers, GSTN generates Annexure-2 for every GST registered entities.
Taxpayers can match records of inward supplies autopopulated in Annexure-2 with their inward supplies. In order to use the GSTN offline utility for processing the matching of inward supplies with records of inward supplies autopopulated based on supplier declaration; taxpayers must maintain their purchase register in a prescribed template.
India Outbound Process: ERP Cloud provides a scheduled process for the India Outbound processes to extract Purchase Register related data and generates CSV files with all the required data points as per the prescribed format provided by GSTN for Inward and Outward reports. The csv files are placed into UCM folder for the users to download directly and use the same file to create the Purchase Register Report in the GSTN provided format.
The same process can be leveraged for the Annexure-1 as well where users can use it to retrieve the outward supplies tax and integrate the outward supplies tax to GSTN system.
India Inbound Process: ERP Cloud facilitates an end-to-end utility where users are able to import the GST Annexure-2 (Action) file into ERP based on a centrally provided web service, which in turn, invokes the Recovery Recognition process for India for the uploaded invoices through the Annexure-2 Action file and creates accounting of the provisional or interim recoverable tax in Payables Invoices.
The feature enables you to:
-
Run the India Outbound process for Purchase Register which extracts the optimum dataset required for GSTN prescribed Purchase Register report from Payables modules and enable users to match it with Supplier declared autodrafted Annexure-2 report.
-
Leverage the Global Tax Reporting Ledger (TRL) to create the India GST Inward supply Repository to create the Purchase Register report in the GSTN prescribed format.
-
Effectively handle any Error, if notified by GST portal upon uploading Purchase Register report to the offline utility.
-
Run the India Inbound process for Annexure-2 which enables users to account the input tax credit recovery and reconciliation of tax accounting in ERP Ledger with the Credit Ledger of the Recipient in the GSTN portal.
Steps to Enable
To enable this feature, associate the Taxes defined in the Setup and Maintenance work area into India Taxes Types so that these taxes are separated out from the Non GST taxes and relevant information against each tax type can be extracted while filing the monthly GST reports.
- Application Implementation Consultant. role/privilege is required to do the setup.
- In the Setup and Maintenance work area, go to the Manage Taxes task:
Offering: Financials Functional area: Transaction Tax: Manage Taxes
- Search for the required Transaction tax.
- Go to Tax Reporting Codes and Click on Add Row.
- Enter any of the following values to classify the Tax
- Click Save and Close.
To apply this feature:
- In the Setup and Maintenance work area, use the Manage Taxes task.
Offering: Financials Functional area: Transaction Tax: Manage Taxes
- Search for the required transaction tax.
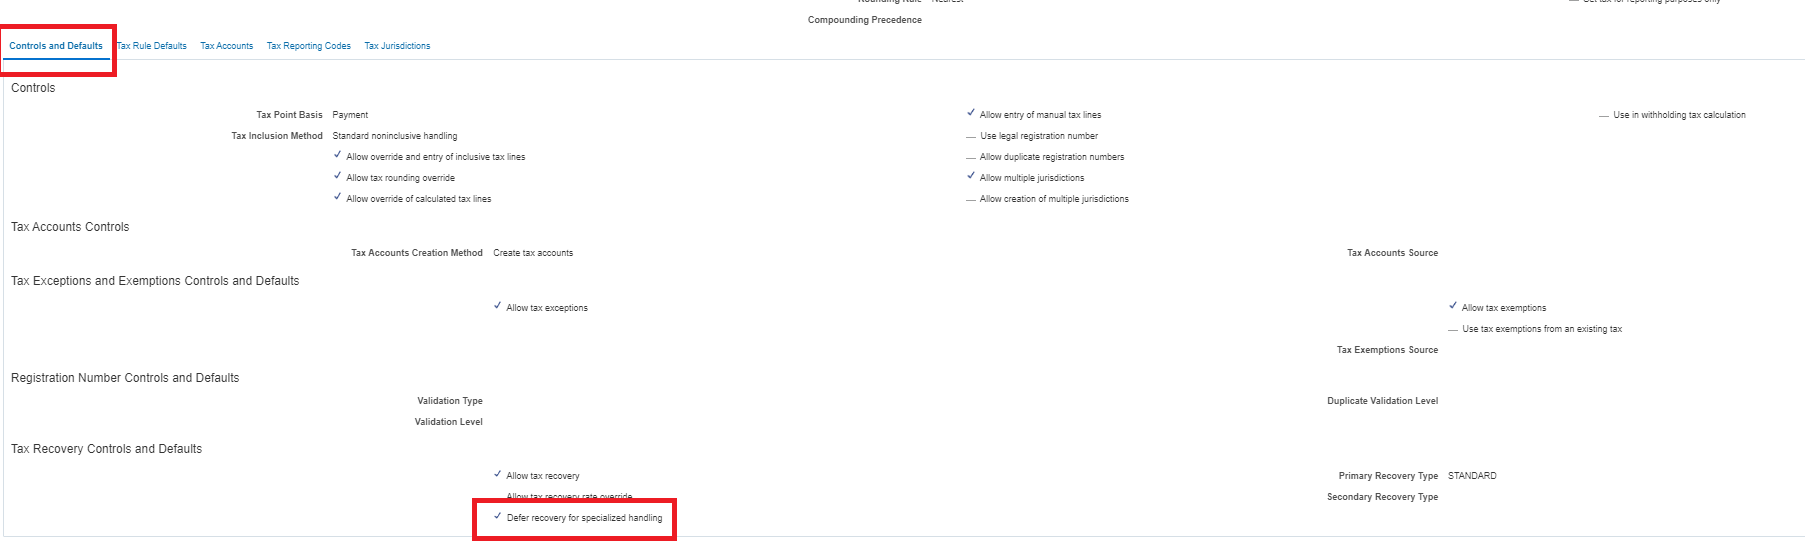
- Go to the Control and Defaults tab.
- In the Tax Recovery Controls and Defaults section, enable the Defer recovery for specialized handling option.
- Click Save and Close.
PROCESS STEPS:
INDIA OUTBOUND PROCESS
- Tax Manager role/privilege is required to run the Process.
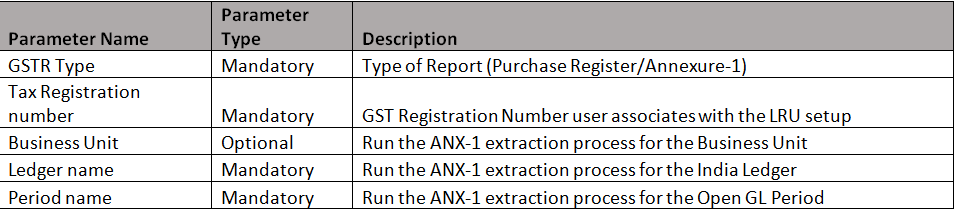
- In the Navigator work area, Go to Tools - Scheduled Processes - Schedule New Process.
Search for the Job: Record Inward and Outward Taxes for India. Run the Process.
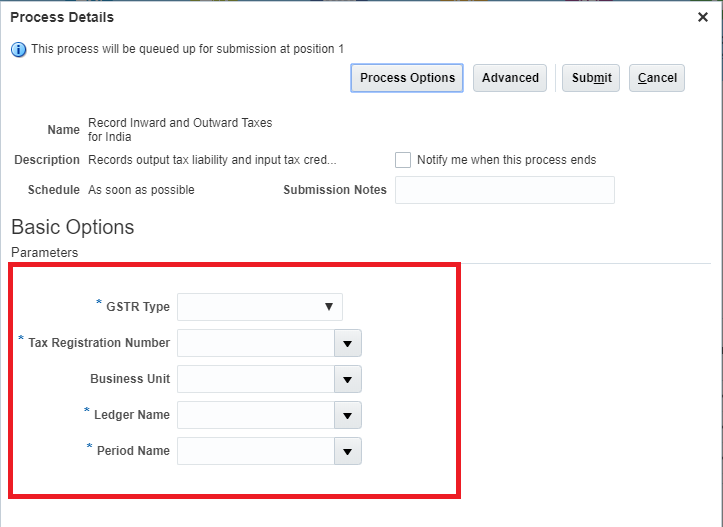
Parameters:
India Inbound Process:
The web service that can be used to automate the Annexure-2 file upload and import process is the ERP Integration Service
Provides external operations for ERP integration scenarios to execute end-to-end inbound and outbound data flows. It also tracks the status of inbound and outbound data processes.
Life Cycle Status: Active
QName: {http://xmlns.oracle.com/apps/financials/commonModules/shared/model/erpIntegrationService/}ErpIntegrationService
Service WSDL URL: https://(FADomain,FSCMServices)/fscmService/ErpIntegrationService?WSDL
Operation: importBulkData
JobName: /oracle/apps/ess/financials/apacLocalizations/financialReports,IndiaGSTInboundReport
ParameterList: ANNEXURE2
jobOptions: interfaceDetails=128
Tips And Considerations
The India Inbound process will work correctly and let you process recoverable taxes if all of these conditions are met:
- The Taxes in the Payables Invoice are Recoverable in nature.
- "Enable Defer Recovery for Specialized Handling” at Tax setup level.
- Associate the Taxes defined in the Functional Setup Manager into India Taxes Types (Tax Reporting Codes: ORA_IN_TRANS_TAX_TYPE).
- The Payables invoice should be in Accounted status.
- Supplier Tax Invoice number and Date should exactly match with the Document Number and Document date of the Annexure-2 file uploaded into ERP.
- The file format should be CSV which the ERP Integration web service for India Inbound process accepts for the Recovery management.
Key Resources
- For an overview of REST APIs and the technical details, see the REST API for Oracle Financials Cloud guide in the Oracle Help Center.
- Oracle® Applications Financials Implementation Guide, Release 13
Role Information
You need one of these roles to maintain account hierarchies using the Import Segment Values and Hierarchies template:
- Financial Application Administrator
- Application Implementation Consultant
- Tax Administrator
Process Lockbox Customer Payments Using Zengin Format for Japan
Process lockbox customer payments using the Zengin format for Japan. A new control file supporting Zengin format identifies customers using the alternate payer name, creates the customer receipts, and processes all receipt applications. The lockbox process optionally uses the customer bank name and customer branch name, along with the alternate payer name, to identify the customer associated to the payment.
The feature provides the following functionality:
- Enhancements to the existing Process Receipts through Lockbox process to record customer payments through lockbox using the Zengin format. See the example below for details.
- New Functional Setup and Maintenance Task called Manage Alternate Name Mapping Rules to create and maintain Alternate Name Mapping Rules to map the Alternate Payer Name along with the Customer Bank Name and Customer Bank Branch to the customer account number and site.
- New predefined transmission format called ORA_ZENGIN_LOCKBOX (arlockboximportzenginr.ctl) with Lockbox Header and Payment Record types.
- New predefined context Zengin Cash Receipts for the Receipts Descriptive Flexfield to store the additional required information for a Zengin lockbox.
The existing Process Receipts through Lockbox process has been enhanced to perform the following:
- Process customer payments through lockbox using the Zengin format.
- Convert the Japanese Imperial date format to the western calendar date.
- Support conversion of the bank file dates in the Reiwa era to the Western Calendar date.
- Leverage the Alternate Name Mapping Rules to use the Alternate payer name, and optionally the customer bank name and customer bank branch name, to identify the customer account associated to the receipt.
- Create receipt for the site defined in the Alternate Name Mapping Rules for the matching alternate name mapping rule.
- If no site has been defined for the matching alternate name mapping rule, create receipt for the primary bill-to site of the business unit of the receipt.
- Assign an appropriate error message to Zengin customer payments that failed due to a missing or invalid alternate name mapping rule.
- Allow download of the Manage Lockbox Transmission ADFDI to update the customer account and site to create records as identified receipts on resubmission of the process.
- Also allow download of the Manage Lockbox Transmission ADFDI to enter null values for the customer account and site to create records as unidentified receipts on resubmission of the process.
- On successful completion of the process, create the customer payment record accordingly as an identified or unidentified receipt.
- Capture additional information in the Zengin Cash Receipts DFF context for user review and research.
- The existing functionality for applying receipts to transactions remains unchanged.
The following example illustrates how to update the Manage Lockbox Transmission ADFDI to create a receipt as identified or unidentified:
- Navigate to the Manage Lockbox Transmission in the Accounts Receivable work area and click on it.
- Download the Manage Lockbox Transmission ADFDI.
- Search for the relevant Zengin customer payment record.
- Identify the payment record that did not find a matching alternate payer name rule.
- Scroll to the Customer Account Number and Site columns for this record.
- To create the receipt as identified, replace the alternate payer name in the customer account number field with the valid customer account and site.
- To create the receipt as unidentified, remove the alternate payer name from the customer account number field and leave it blank.
- Click Upload or Submit and Post in the Lockbox Errors tab to continue with the process.
Steps to Enable
The following setups are predefined for this feature:
- New predefined transmission format called ORA_ZENGIN_LOCKBOX (arlockboximportzenginr.ctl) with Lockbox Header and Payment Record types.
- Predefined context Zengin Cash Receipts under the Receipts descriptive flexfield.
The following setups need to be performed for processing Zengin lockbox payments:
- Set up the alternate name mapping rules using the Functional Setup Manager Task Manage Alternate Name Mapping Rules under the Task List Define Customer Payments.
- Setup the lockbox from the Functional Setup Manager task Manage Lockbox.
- Define the context sensitive segments as indicated in the table below for the Zengin Cash Receipts context for lockbox, to store the Zengin lockbox information on the receipt:
| Segment Name | Description | Table Column |
|---|---|---|
| Transmission Name | Name that the user has specified to identify the transmission. | Attribute1 |
| Alternate Payer Name | EFT requester name in the Zengin file. | Attribute2 |
| Zengin Customer Bank Name | EFT requester bank name in the Zengin file. |
Attribute3 |
| Zengin Customer Bank Branch Name | EFT requester bank branch name in the Zengin file. |
Attribute4 |
Tips And Considerations
LOCKBOX BANK FILE
- Lockbox bank file names must use the prefix ‘arlockboximportzenginr’. For example: arlockboximportzenginr_yymmdd.
- Do not include records with the Deposit/Withdrawal Type = 2 to the bank file that is loaded for import.
-
Do not include records with the Deposit/Withdrawal Type = 1 and Transaction Type not equal to 11 (and optionally, 14) to the bank file that is loaded for import.
-
Populate the Payment Number(Check/Bill Number) with a unique number for each data record to the bank file that is loaded for import. Example: It could be the first 20 characters of the file name followed by a delimiter and a sequence number starting from 1.
- Do not include the trailer and end records with data type 8 and 9 respectively to the bank file that is loaded for import.
- The header and payment record types can have the data type as 1 and 2 respectively.
- Do not include multiple header records from different remittance banks, branches, and accounts in a single lockbox bank file, as this will cause validation failure.
MANAGE ALTERNATE PAYER NAME RULES
- Set up the Alternate Name Mapping Rules before the process run to increase the count of lockbox receipt records to be created with the customer identified.
- For successful matching, set up unique individual rules for each combination of alternate payer name and customer bank/branch, based on how the information will be received from the remittance bank.
- Users can only set up rules for the customer sites for which they are authorized to handle lockbox payments.
- Establish best practices to manually update the Alternate Name Mapping Rules for new mappings for future payment processing.
MANAGE TRANSMISSION FORMATS FOR LOCKBOX
-
Item Number in the ORA_ZENGIN_LOCKBOX Transmission format is a System-generated sequence number assigned to each payment. It need not be passed in the bank file loaded for import.
MANAGE LOCKBOX TRANSMISSION ADFDI
-
Do not make edits to the attribute column values in the ADFDI spreadsheet. These values contain logic that identifies the records as Zengin payments.
Role Information
No additional role is required.
Process SHAAM Supplier Certificates for Israel
Israeli Tax Authorities provide a computerized processing system known as SHAAM to maintain bookkeeping and withholding tax certificates for suppliers that trade goods or services in Israel. Tax Managers can send supplier information electronically and receive back a file with the valid certificate details. Use the Process SHAAM Certificates for Israel feature to identify the supplier details to send, and update the returned certificate and withholding tax exemption information.
Steps to Enable
To use this feature, perform the following steps:
- For suppliers and/or supplier sites which should be included for SHAAM processing, create a withholding tax registration.
- Define withholding tax rates for each of the different exemption categories of withholding and assign the predefined tax reporting code.
Tips And Considerations
- Generate a file of suppliers and supplier sites whose bookkeeping certificates will soon expire and transmit the file to the tax authority SHAAM processing system.
- Upload the validated file returned by the tax authority to update the latest bookkeeping certificate and withholding tax exemption details for those suppliers and sites.
Key Resources
For additional information, refer to the following topical essays which can be found on My Oracle Support:
- Process SHAAM Supplier Certificates for Israel
- Withholding Tax Reporting for Israel
Role Information
Assign the role ORA_JE_EMEA_FINANCIAL_REPORTING_DUTY to users who need to perform this processing.
Integrate Document Printing and Delivery for Portugal
Integrate the country-specific Portugal commercial document print and delivery process with the Receivable print and delivery process. This integration provides Portuguese users with a unified bill presentment solution. Use this feature after completion of Oracle ERP Cloud certification for Portugal. Refer to MOS Note 2470182.1 for updates on the certification progress.
Here are the added actions that you can perform using this feature for Portugal, compared to the existing Print Commercial Documents for EMEA solution:
- Print any attached files to the Receivables transactions in PDF form, along with the invoice output.
- Create a zipped PDF file for sending the transactions for third party printing.
- Send Receivables transactions output by email.
Steps to Enable
To enable this feature, define a lookup code ORA_PORTUGAL under the Receivables lookup type ORA_AR_TRX_PRINT_REGIONS.
Tips And Considerations
Use this feature to print all Receivables transactions for Portugal, except when you use invoices as Bill of Lading or Proforma invoices.
In training mode, you can only print a hard-copy of the transaction, with a modified template as required by the Portugal Tax Authority.
Key Resources
- Oracle® Fusion Applications Financials Implementation Guide, Release 20B
Role Information
To use this feature, you must have the Print Receivables transaction privilege of:
- AR_SUBMIT_BPA_TRANSACTION_PRINT_PROCESS_PRIV
Generate Online VAT Registers for Spain with Legal Format Changes
Generate Online VAT Registers for Spain with support for version 1.1 of the XML format used in Spain.
The changes in the legal format effective from the July 1, 2018, are incorporated in the output format of Online VAT Registers for Spain.
In addition, the Online VAT Registers for Spain reporting contains these enhancements:
- The Receivables invoices, created by using the duplicate feature, are not selected for Online VAT Registers for Spain reporting if the source Receivables invoices are already in submitted status for reporting. You can view these duplicated invoices that meet the reporting criteria, but not selected for reporting, in the log file of the Online VAT Registers for Spain.
- You can distinguish between the issued invoices for resident customers and foreign customers for the reporting purposes by using the newly introduced Tax Reporting Type.
- When the received and issued invoices are created from the same intercompany batch, you can report the transaction number of the issued invoice as a document sequence name and number or document sequence number only.
- The taxable base reported on the Online VAT Registers for Spain no longer includes taxable amounts of the invoice lines with 0% VAT.
Steps to Enable
You don't need to do anything to enable this feature.
Tips And Considerations
- Define Tax Reporting Type ‘XXXXNS_LOC’
- Define Tax Rate used for foreign customer invoices, and assign ‘XXXXNS_LOC’ Tax Reporting Type to it.
- Setup ‘JE_SII_AR_IC_DOC_DISABLE' Lookup Code to ‘Yes’. The default is ‘No’
Key Resources
- Online VAT Reporting for Spain Topical Essay
Role Information
The feature is secured by EMEA Financials Reporting duty role. This duty role is an orphan role. You must assign it to another role or user to get access to the feature.
Generate VAT Reports for Spain with Online VAT Registers for Spain Reporting Attributes
View Online VAT Registers for Spain reporting attributes in the VAT reports for Spain. This helps with reconciliation across different types of reporting.
The data model for VAT reports for Spain contains these reporting attributes:
- Document Type
- Special Regime
- Transaction Status
- Tax Authority Status
- Error Code
- Error Description
- Invoice Description
- Tax Point Date
- Tax Period
- Tax Year
- Date used as reference for 8 days submission
You can include these attributes in the VAT reports for Spain, Input VAT Journal for Spain and Output VAT Journal for Spain, for improved reconciliation.
You no longer need to manually update the Transaction Business Category of the invoices from an intercompany batch, where both intercompany parties reside within EU, to INTERCOMPANY/MOD349’. These invoices are automatically reported on the Modelo 349 Report for Spain.
Steps to Enable
You don't need to do anything to enable this feature.
Key Resources
- VAT Reporting for Spain Topical Essay
Role Information
The feature is secured by EMEA Financials Reporting duty role. This duty role is an orphan role. You must assign it to another role or user to get access to the feature.
Financials for Regional Localizations
Use SAF-T Data Extract to Report Source Documents, Payments and Assets
Use the SAF-T data extract to report source documents, payments, and assets. These, along with accounting information currently extracted, support audit report requirements in Austria, Germany, Lithuania, Luxembourg, Norway, and UAE.
The output of this process is a set of file extracts, generated in CSV format after successfully running the Create Generic SAFT Extract, that will help you with the preparation of the country specific audit file. The extract will be run at legal entity and tax registration number level, for closed periods only.
Using this extract you can do the following:
- Extract all the master-file information for the natural accounts defined under the specified legal entity implementation.
- Extract all the master-file information for the third parties that have transactions during a given period or have non-zero balances for the same period.
- Extract all the master-file information for the taxes setup in the system and the products used in the source documents.
- Extract all the master-file information for the assets that have a date placed in service before the end date of the period specified and are not fully retired before the given fiscal year.
- Extract all the General Ledger or Subledger Accounting journal information for a given period or a range of days within a period.
- Extract all the Receivables transactions and receipts for a given period or range of days within a period, based on either the accounting or the transaction date.
- Extract all the Payables transactions and payments for a given period or range of days within a period, based on either the accounting or the transaction date.
- Extract all asset transactions of the current fiscal year and until the end-date of the accounting period selected in the parameters.
Steps to Enable
You don't need to do anything to enable this feature.
Tips And Considerations
- A hierarchy structure is in place for the natural account segment, with the tree being organized under a single top level account which will identify the particular hierarchy structure. This top level account value will be used in the ESS job parameter so that the program will extract the required data.
- The extract exports all contacts and registrations for the selected legal entity and third parties.
Role Information
The Generate SAFT Data Extract is automatically available after completing the Generate SAFT Extract security setup.The feature is available under the Generic SAFT privilege GENERATE_SAFT_DATA_EXTRACT_PRIV.