
- Revision History
- Overview
- Optional Uptake of New Features (Opt In)
- Feature Summary
- Common Technology and User Experience
-
- Common Financials Features
-
- All Transaction Attributes in Simplified Workflow Rules Configuration Spreadsheets
- Optimization of Workflow Rule Evaluation
- Refined User Experience for Key Lists of Values Search
- Rules Import from Oracle BPM for Payables Invoice Approval and General Ledger Journal Approval Workflows Using a Spreadsheet
- Service Excellence Continuing Investments
-
- Intercompany
- REST APIs for Financials
- Common Financials Features
- Financials
-
- Advanced Collections
- Assets
- Budgetary Control
- Cash Management
- Expenses
-
- Configurable Expenses Workflow Notifications
- Delegate Assignment for Inactive Employees
- Descriptive Flexfields with SQL-Based Value Sets in the Expenses Mobile Application
- Enforce Meals and Accommodations Policies in Expenses Android Application
- Expense Detail Capture from Receipts Using Expenses iOS Application
- Funds Release from Unused Spend Authorization Reservations
- Search for Projects and Tasks to Assign to Expense Items in the Expenses Mobile Applications
- Expenses Digital Assistant
-
- General Ledger
-
- Balanced Manual Journals by Entered Currency
- Configurable Journal Workflow Notifications
- Income Statement Accounts Average Daily Balance Tracking
- Manage Dependencies Between Chart of Accounts Segments Using Related Value Sets
- Prevent General Ledger Period Closure When Open Subledger Periods Exist
- Single Currency Journals
-
- Joint Venture Management
- Lease Accounting
- Payables
-
- Configurable Payables Workflow Notifications
- Electronic Invoices with File Attachments
- Payables Variance Drill Down in Payables to General Ledger Reconciliation Report
- Payment Process Request Template Replication Across Environments
- Project Attribute Sources for Withholding Tax Distributions
- Purchase Order Drilldown from OTBI Using Predefined Payables Job Roles
- Update Income Tax Type and Region Without Resubmitting Invoice for Approval
-
- Receivables
-
- Configurable Receivables Credit Memo Request Manual Entry Workflow Notification
- Credit Memo Creation in the Earliest Open Accounting Period
- Credit Memo Processing Using Oracle Receivables for Oracle Joint Venture Management
- Oracle Channel Revenue Management Integration with Oracle Receivables to Perform Claim Investigations
- Structured Payment Reference on Receipts Created Using Lockbox and Services
-
- Revenue Management
- Subledger Accounting
- Tax
- Regional and Country-Specific Features
This document will continue to evolve as existing sections change and new information is added. All updates appear in the following table:
| Date | Product | Feature | Notes |
|---|---|---|---|
| 15 DEC 2020 | Joint Venture Management | Updated document. Added Tips and Considerations. | |
| 14 DEC 2020 | Intercompany | Configurable Intercompany Workflow Notifications | Updated document. Revised opt in information. |
| 14 DEC 2020 | Payables | Configurable Payables Workflow Notifications | Updated document. Changed Opt In Expiry to 21B. |
| 14 DEC 2020 | Revenue Management | Accounting Rules for Revenue Contracts Using Item Attributes |
Updated document. Added new Key Resources. |
| 25 NOV 2020 | Expenses | Updated document. Revised opt in information. | |
| 25 NOV 2020 | General Ledger | Updated document. Revised opt in information. | |
| 25 NOV 2020 | Payables | Updated document. Revised opt in information. | |
| 25 NOV 2020 | Payables | Update Income Tax Type and Region Without Resubmitting Invoice for Approval |
Updated document. Delivered feature in update 20D. |
| 25 NOV 2020 | Budgetary Control | Carry Forward Open Purchase Orders for Budgetary Controlled Non-Sponsored Projects |
Updated document. Delivered feature in update 20D. |
| 30 OCT 2020 | Revenue Management | Pricing Dimension Assignment Based on Cost Amount, List Price, and Base Price of Performance Obligation | Updated document. Revised steps to enable. |
| 25 SEP 2020 | Tax | Transaction Data Extract for Tax Partner Integration | Updated document. Revised feature information. |
| 25 SEP 2020 | Intercompany | Updated document. Delivered feature in update 20D. | |
| 04 SEP 2020 | Created initial document. |
This guide outlines the information you need to know about new or improved functionality in this update, and describes any tasks you might need to perform for the update. Each section includes a brief description of the feature, the steps you need to take to enable or begin using the feature, any tips or considerations that you should keep in mind, and the resources available to help you.
Join Oracle Cloud Customer Connect
Please take a moment to join the Cloud Customer Connect forums for Financials Cloud. Oracle Cloud Customer Connect is a community gathering place for members to interact and collaborate on common goals and objectives. This is where you will find the latest release information, upcoming events, or answers to use-case questions. Joining takes just a few minutes. Join now!
https://cloud.oracle.com/community
Security and New Features
The Role section of each feature identifies the security privilege and job role required to use the feature. If feature setup is required, then the Application Implementation Consultant job role is required to perform the setup, unless otherwise indicated. (If a feature doesn't include a Role section, then no security changes are required to use the feature.)
If you have created job roles, then you can use this information to add new privileges to those roles as needed.
Give Us Feedback
We welcome your comments and suggestions to improve the content. Please send us your feedback at oracle_fusion_applications_help_ww_grp@oracle.com.
Optional Uptake of New Features (Opt In)
Oracle Cloud Applications delivers new updates every quarter. This means every three months you'll receive new functionality to help you efficiently and effectively manage your business. Some features are delivered Enabled meaning they are immediately available to end users. Other features are delivered Disabled meaning you have to take action to make available. Features delivered Disabled can be activated for end users by stepping through the following instructions using the following privileges:
- Review Applications Offering (ASM_REVIEW_APPLICATIONS_OFFERINGS_PRIV)
- Configure Oracle Fusion Applications Offering (ASM_CONFIGURE_OFFERING_PRIV)
Here’s how you opt in to new features:
- Click Navigator > My Enterprise > New Features.
- On the Features Overview page, select your offering to review new features specific to it. Or, you can leave the default selection All Enabled Offerings to review new features for all offerings.
- On the New Features tab, review the new features and check the opt-in status of the feature in the Enabled column. If a feature has already been enabled, you will see a check mark. Otherwise, you will see an icon to enable the feature.
- Click the icon in the Enabled column and complete the steps to enable the feature.
For more information and detailed instructions on opting in to new features for your offering, see Offering Configuration.
Opt In Expiration
Occasionally, features delivered Disabled via Opt In may be enabled automatically in a future update. This is known as an Opt In Expiration. If your cloud service has any Opt In Expirations in this update, you will see a related tab in this document. Click on that tab to see when the feature was originally delivered Disabled, and when the Opt In will expire, potentially automatically enabling the feature. You can also click here to see features with current Opt In Expirations across all Oracle Cloud Applications. Beyond the current update, the Financials forums on Cloud Customer Connect have details of Opt In Expirations upcoming in future updates.
Column Definitions:
Features Delivered Enabled
Report = New or modified, Oracle-delivered, ready to run reports.
UI or Process-Based: Small Scale = These UI or process-based features are typically comprised of minor field, validation, or program changes. Therefore, the potential impact to users is minimal.
UI or Process-Based: Larger Scale* = These UI or process-based features have more complex designs. Therefore, the potential impact to users is higher.
Features Delivered Disabled = Action is needed BEFORE these features can be used by END USERS. These features are delivered disabled and you choose if and when to enable them. For example, a) new or expanded BI subject areas need to first be incorporated into reports, b) Integration is required to utilize new web services, or c) features must be assigned to user roles before they can be accessed.
Common Technology and User Experience
All Transaction Attributes in Simplified Workflow Rules Configuration Spreadsheets
The Simplified Workflow Rules Configuration feature, introduced in update 18C, provides spreadsheet-based templates to create rules for Payables Invoice Approval and General Ledger Journal Approval workflows. Each template contains transaction attributes that can be used to define the rules. In update 20D, additional transaction attributes that are available in Oracle Business Process Management (BPM) have been added to the spreadsheet-based templates. Workflow administrators can use these attributes to define rules.
Availability of additional attributes gives greater flexibility in modelling rules using the spreadsheet-based templates in accordance with approval policies.
For additional details about this feature, please click here.
Steps to Enable
You don't need to do anything to enable this feature.
Key Resources
- For an overview of the Simplified Workflow Rules Configuration feature, refer to the Manage Workflow Rules Using a Spreadsheet topic on the Oracle Help Center.
Role Information
- Financial Application Administrator
Optimization of Workflow Rule Evaluation
Optimize the rule evaluation when parent and child attributes are used within the same rule in a workflow and avoid the performance issues during evaluation process.
An example on how this feature works:
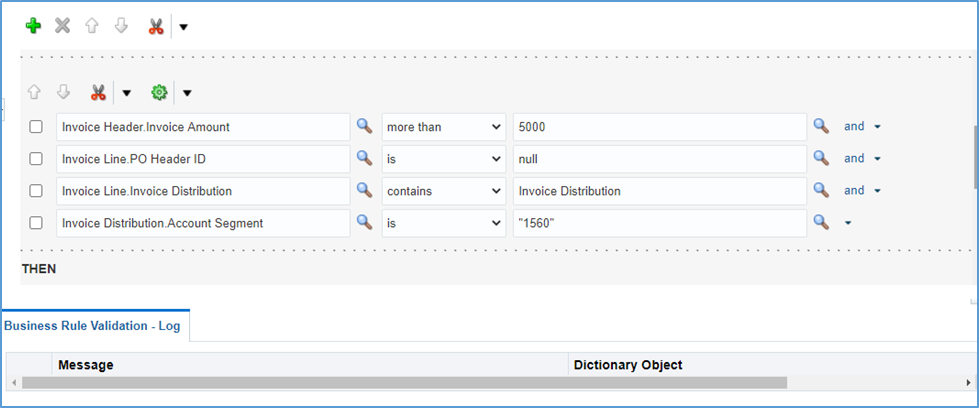
An organization’s approval policy mandates that the Finance department must approve all invoices matched to a purchase order that have a capital expenditure in excess of 5000 dollars. Capital expenditures are charged to a specific account. To meet this requirement, the workflow administrator needs to configure a rule to evaluate invoices that meets the following conditions:
- Invoice amount more than 5000
- Invoice line is matched to purchase order
- Invoice distribution account for the related lines reference the capital expenditure account.
This rule is configured in basic mode with parent (Invoice Line) and child (Invoice Line Distributions) attributes in the same rule without additional condition, in order to establish the relationship between parent and child attributes.

Rule Configured Using Parent and Child Attributes in the Same Rule
When the rule is validated, BPM checks whether a join condition exists between the parent and child attributes to establish the relationship. If a relationship does not exist, then the business rule validation displays the message that the rule configuration ended in an inefficient rule evaluation. Click the message link to add the missing join condition to establish the relationship between the parent and child attributes..
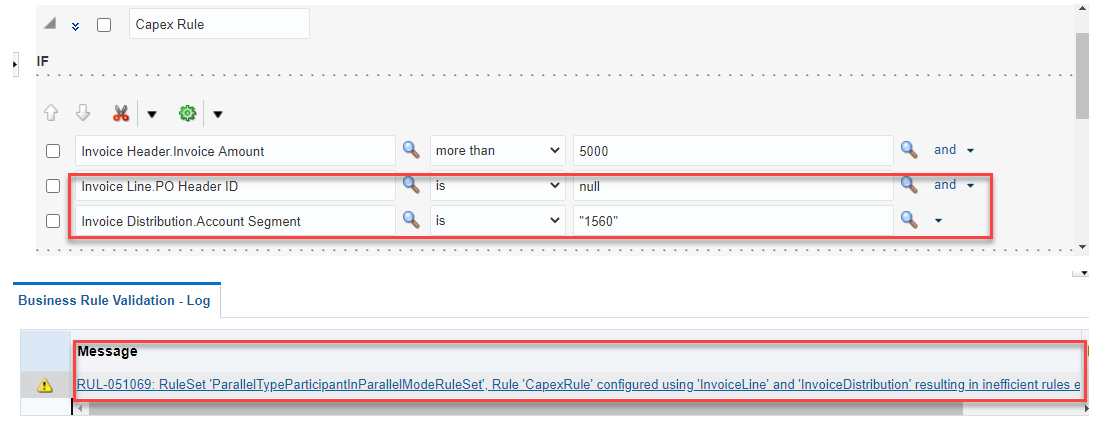
Business Rule Validation Message
Click the message link to open the Rule Recommendation page. The page displays two radio buttons with these options.
Option 1: Optimize rule definition by adding 'contains' condition automatically between parent and child facts.
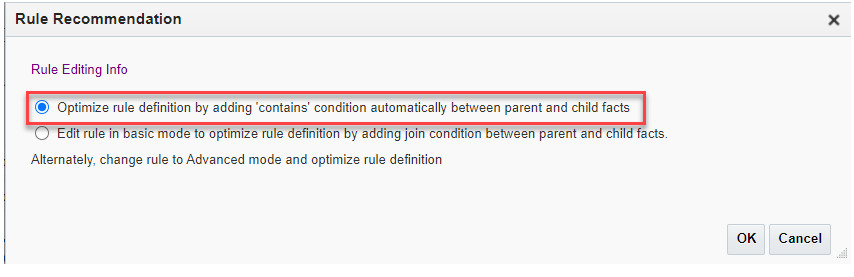
If you select this option, the system adds the additional join condition automatically between the parent and child facts to establish the relationship between parent and child, as shown in this screenshot.
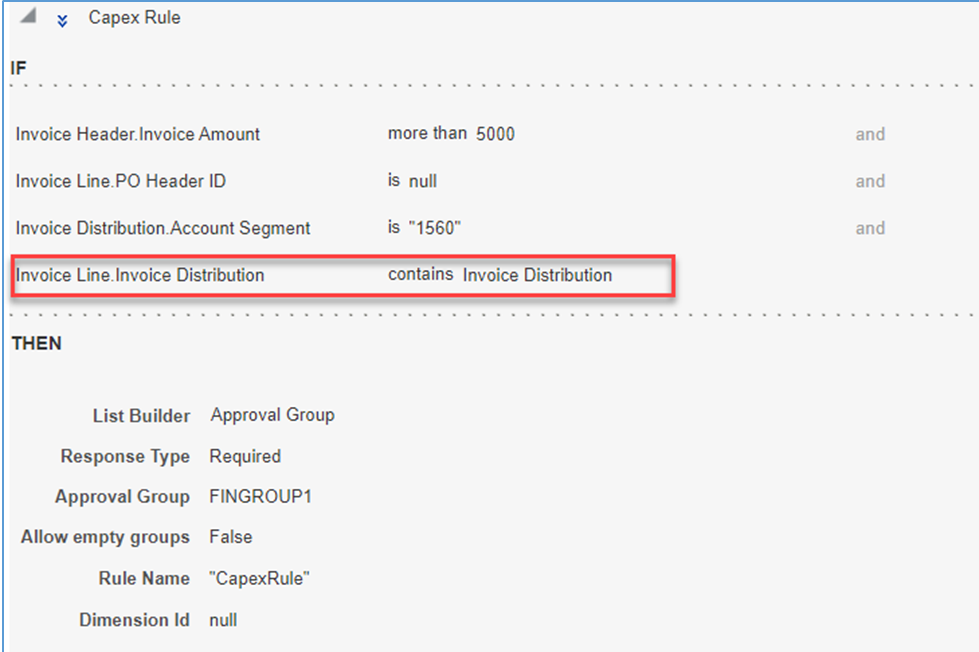
Join Condition Added to Establish Relation Between Parent and Child Facts
Option 2: Edit rule in basic mode to optimize rule definition by adding join condition between parent and child facts. Alternatively, change rule to advanced mode and optimize rule definition.
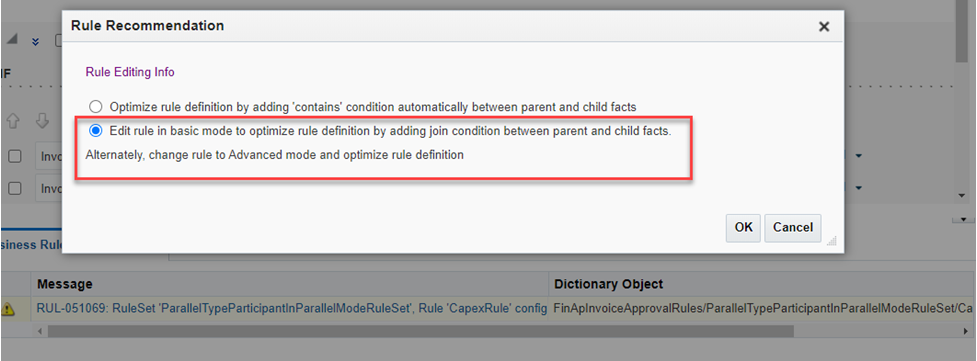
If you select this option, the page displays the problematic rule and condition for you to either add the join condition manually or change the rule to Advanced mode.

Validation Message At Condition Level
Once the join condition is added manually to establish the relationship between parent and child facts, the rule is validated and saved.
Rule Saved Successfully Without Any Warning Message
This feature ensures that workflow rules that use parent and child attributes within the same rule are configured in a manner that optimizes the rules evaluation process and avoids the performance issues during rules evaluation.
Steps to Enable
Use the Opt In UI to enable this feature. For instructions, refer to the Optional Uptake of New Features section of this document.
Offering: Financials No Longer Optional From: Update 21A
Role Information
- Financial Application Administrator
Refined User Experience for Key Lists of Values Search
Experience improved performance and enhanced type ahead suggestions for additional lists of values in Financials.
These lists of values facilitate faster manual data entry for the corresponding attributes.
Steps to Enable
You don't need to do anything to enable this feature.
Rules Import from Oracle BPM for Payables Invoice Approval and General Ledger Journal Approval Workflows Using a Spreadsheet
Import workflow rules for the Payables Invoice Approval and General Ledger Journal Approval workflow from Oracle Business Process Management (BPM) into spreadsheet-based templates. Using this import feature, you can migrate existing BPM rules and use the Simplified Workflow Rules Creation feature to manage your rules for these workflows. The Simplified Workflow Rules Creation feature was released in update 18C and it helps you define and manage workflow rules for the Payables Invoice Approval and General Ledger Journal Approval workflows using spreadsheet-based templates.
A new section 'Migrate Rules from BPM' is added to the Manage Workflow Rules in Spreadsheet page. Use the Download BPM Rules button to download the rule file containing your BPM rules for the Payables Invoice Approval or General Ledger Journal Approval workflows.
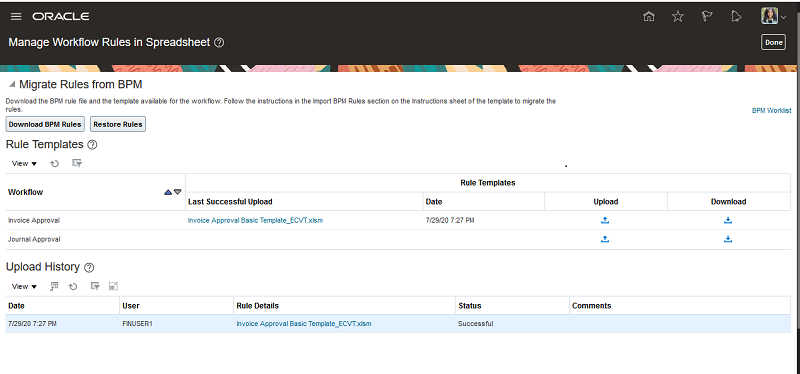
Migrate Rules from BPM Section in Manage Workflow Rules in Spreadsheet Page
Download any of the templates available for the required workflow and follow the instructions in the Import BPM Rules section in the Instructions sheet of the template. Use the Import Rules into Spreadsheet button to import the downloaded BPM rule file into the template.
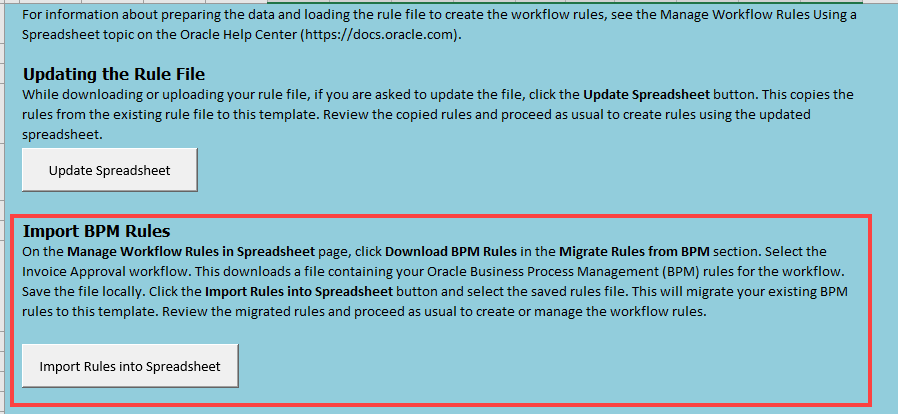
Import BPM Rules Section in Instructions Sheet of the Template
This imports your BPM rules into the spreadsheet, where you can view and manage the rules as required. Once done, generate the workflow rules file using the 'Generate Rule File' button and upload your rules using the Manage Workflow Rules in Spreadsheet page. For any subsequent modifications to the workflow rules, use the last successfully uploaded template for the workflow that is available on the Manage Workflow Rules in Spreadsheet page.
The rules import feature allows you to seamlessly migrate your workflow rules from BPM to the spreadsheet without having to manually enter the rules in the spreadsheet. Once migrated, you can use the templates to view and manage the workflow rules. The Manage Workflow Rules in Spreadsheet page stores a copy of the last successfully uploaded rules. Workflow Administrators can use the spreadsheet to view and edit the workflow rules going forward.
Steps to Enable
You don't need to do anything to enable this feature.
Tips And Considerations
- The Import Rules feature is currently available only for the Payables Invoice Approval and General Ledger Journal Approval Workflows.
- When using this feature to migrate rules from BPM to spreadsheet, you must test the migration in a test environment before migrating the rules in the Production environment.
- A link to the BPM worklist is available on the Manage Workflow Rules in Spreadsheet page.
- Refer to the 'Manage Workflow Rules in Spreadsheet' topic in the Oracle Help Center to familiarize yourself with the Simplified Workflow Rules Configuration feature.
Key Resources
- Manage Workflow Rules Using a Spreadsheet topic in the Oracle Help Center.
Role Information
- Financial Application Administrator
Service Excellence Continuing Investments
Our ongoing investment in service excellence has a focus on overall resiliency, performance, and usability. This work is based on monitoring performance trends, reviewing common use patterns, analyzing service requests, and participating in many discussions with customers.
In this update, our on-going investment in service excellence includes improvements in the following areas:
- Performance: Scalability of BICC (Business Intelligence Cloud Connector) to extract data from Expenses and Payables, asset reporting, budgetary control balance maintenance, country-specific withholding tax reports.
- Documentation: Receivables document sequencing setup.
- Messages: Improved explanations of errors and corrective actions for Intercompany, Payables and Receivables Netting, Payables invoice processing.
- Usability: Performance and enhanced type ahead suggestions for lists of values in key business areas.
Steps to Enable
You don't need to do anything to enable this feature.
Attachments to Intercompany Batches and Transactions Using the Attachment SOAP Service
You can now attach reference documents to Intercompany batches and transactions.
Business enterprises often need to associate specific documents to Intercompany batches and transactions. These documents can provide additional reference information for your Intercompany transactions.
Steps to Enable
You don't need to do anything to enable this feature.
Configurable Intercompany Workflow Notifications
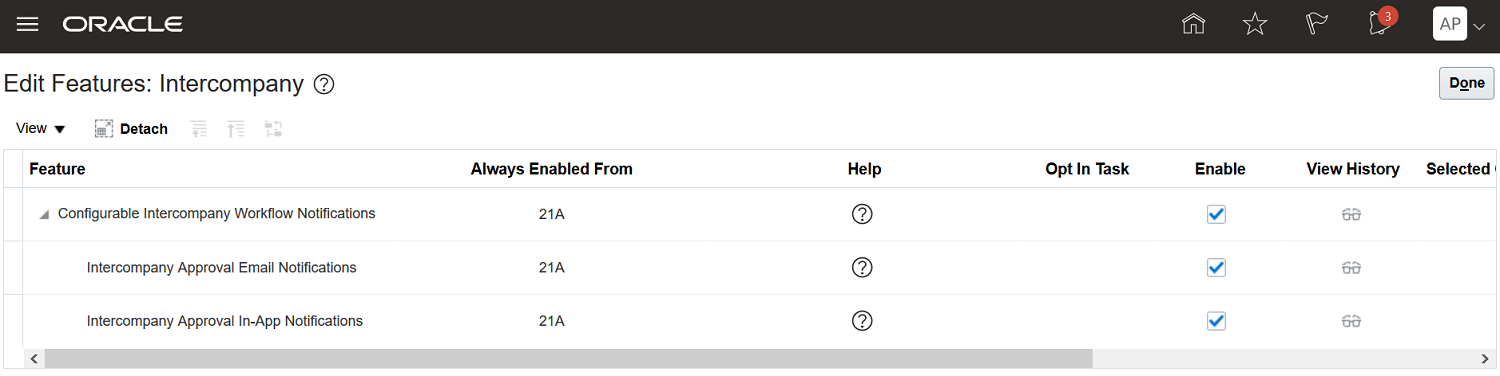
There is a change in the opt-in method for the Configurable Intercompany Workflow Notifications feature. When using the New Features Work Area or the Setup and Maintenance Work area to change the opt-in selection for this feature, the individual notifications are now displayed as a list of child features instead of being displayed within a window.
In 20D, all the notifications within the Configurable Intercompany Workflow Notifications feature are enabled by default for all customers. If you had opted out of using this feature in previous updates, you will find that the feature is enabled by default for you in 20D. You still have the option to opt-out of using this feature for any or all of the notifications within the Configurable Intercompany Workflow Notifications in 20D. However, the opt-in for this feature will expire in 21A. This means that from update 21A onwards, the Oracle Business Intelligence Publisher based notifications will be the default method to generate email and in-app notifications for Intercompany workflows and you will no longer be able to opt out of using this feature.
Configurable Intercompany Workflow notifications use Oracle Business Intelligence templates to generate the email and in-app notifications. You can modify the notifications to display information based on your business requirements and policies. Choose from a comprehensive list of attributes to modify the notifications in accordance with your requirements. You can change both layout and content - add images, change colors and styling, add or remove attributes or modify text.
Configurable email and in-app notifications are available for use for Intercompany transaction approvals.
Additional details for this feature are available here.
Steps to Enable
Use the Opt In UI to enable this feature. For instructions, refer to the Optional Uptake of New Features section of this document.
Offering: Financials No Longer Optional From: Update 21A
Default Behavior
- The feature is enabled by default for all customers in 20D. Even if you have opted out of the feature in prior updates, you will find the feature enabled by default for you in 20D.
- You still have the option to opt-out of using this feature in update 20D. However, considering that the opt-in for this feature will expire in update 21A, we strongly recommend that you plan for the uptake of this feature.
If you wish to opt-out of using the feature, follow these steps:
- Click the Navigator, and then click New Features (under the My Enterprise heading)
- On the Features Overview page, go to the Available Features tab.
- Select the Configurable Intercompany Workflow Notifications feature and click on the Enabled icon.
- On the Edit Features page, deselect the Enable option for the feature or child features required and then click Done.
Tips And Considerations
- The feature is enabled by default for all customers in 20D. Even if you have opted out of the feature in prior updates, you will find the feature enabled by default for you in 20D.
- You still have the option to opt-out of using this feature in 20D. However, considering that the opt-in for this feature will expire in update 21A, we strongly recommend that you plan for the uptake of this feature.
- The templates used for the generation of the workflow notifications are located in the Reports and Analytics > Shared Folders > Financials > Workflow Notifications folders.
- A single template is used to generate both the email and in-app notifications for a particular workflow. If you have chosen to use configurable notifications for both in-app and email notifications for a workflow, any modifications that you make to the predefined template, will be reflected in both types of notifications.
Key Resources
- Configuring Intercompany Workflow Notifications topic on the Oracle Help Center.
Rejected Intercompany Transactions with Marked as Reviewed Status
You can now mark rejected Intercompany transactions as Rejection Reviewed. Once a rejected Intercompany transaction is marked as Rejection Reviewed, the transaction no longer appears in the Requiring Attention tab and will not be available for any further action.
The receiver Intercompany organization can reject an Intercompany transaction for a variety of reasons. After an Intercompany transaction is rejected, it remains in the Requiring Attention tab and can cause unnecessary audit inquiries. You can mark these rejected Intercompany transactions as Rejection Reviewed to remove them from the Requiring Attention tab display.
Steps to Enable
You don't need to do anything to enable this feature.
Foreign Currency Cash Advance Creation with Cash Advances REST API
Create cash advances in currencies other than your company’s ledger currency using the Cash Advances REST API.
Companies can use the Cash Advances REST API to create cash advances in currencies other than their ledger currency by providing both the amount and the currency for a cash advance.
Steps to Enable
You don't need to do anything to enable this feature.
Key Resources
- For an overview of REST APIs and the technical details, see the REST API for Oracle Financials Cloud guide in the Oracle Help Center. If you're new to Oracle's REST services you may want to begin with the Quick Start section.
Role Information
To create cash advances for yourself using the Cash Advances REST API, you need the Employee role with expense entry privileges.
Invoice Approvals and Notifications History REST API
View the invoice approval and holds notification history information using the Invoice Approvals and Notifications History REST API.
You can build integrations to achieve your PaaS application requirements to view Supplier Invoice information by using Invoices REST API and Invoice Approvals and Notifications History REST API.
Steps to Enable
Review the REST service definition in the REST API guides, available from the Oracle Help Center > your apps service area of interest > REST API. If you're new to Oracle's REST services you may want to begin with the Quick Start section.
Tips And Considerations
To use this REST resource, assign the privilege or job roles listed in the "Role" section.
Key Resources
- For an overview of REST APIs and the technical details, see the REST API for Oracle Financials Cloud guide in the Oracle Help Center.
Role Information
To use this feature, you need this privilege or one of the roles:
- Privilege Name and Code:
- View Holds Resolution and Negotiation History (AP_VIEW_HOLDS_RESOLUTION_AND_NEGOTIATION_HISTORY_PRIV)
- Job Role Name and Code:
- Accounts Payable Supervisor (ORA_AP_ACCOUNTS_PAYABLE_SUPERVISOR_JOB)
- Accounts Payable Manager (ORA_AP_ACCOUNTS_PAYABLE_MANAGER_JOB)
- Accounts Payable Invoice Supervisor (ORA_AP_ACCOUNTS_PAYABLE_INVOICE_SUPERVISOR_JOB)
You can view invoice approval and holds notification history information only for the business units to which you have permission.
Receivables Customer Account Site Activities REST API
View the activities on a customer account site using the Receivables Customer Account Site Activities REST API. Review the open receivable balances, transactions due, credits pending application, and the account activity history.
This capability can be leveraged to build custom tools or external user interfaces covering customer account activity information.
Steps to Enable
Review the REST service definition in the REST API guides, available from the Oracle Help Center > your apps service area of interest > REST API. If you're new to Oracle's REST services you may want to begin with the Quick Start section.
This feature is automatically opted in through the release update.
Role Information
You don't need a new role or privilege to use this feature.
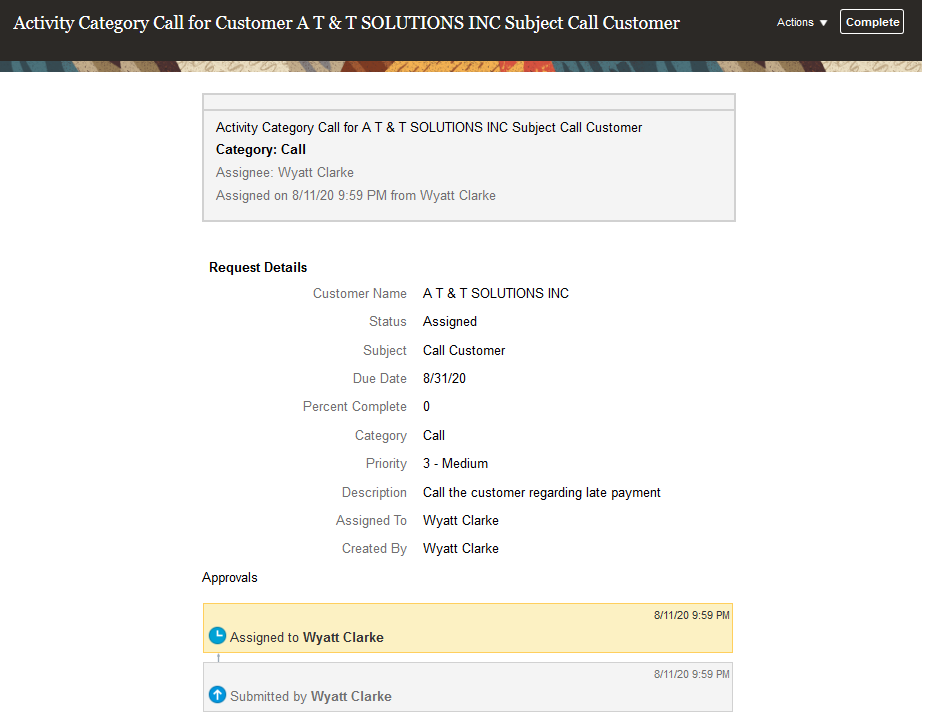
Configurable Collections Activity Management Notification
Use enhanced workflow notifications for Collections Activity Management approval. You can use Oracle Business Intelligence Publisher templates to generate modern and unified look and feel email and in-application notifications. Copy and modify templates to meet business requirements and policies.
You can access the Collections Activity Management Notification template and modify it to add new fields into the template. You can also modify the predefined template to display information based on your business requirements and policies. Choose from a comprehensive list of attributes to modify the notifications according to your requirements. You can change both layout and content: add images, change colors and styling, add or remove attributes or modify text.
Screenshot of the default Collections Activity Management Approval Notification is shown below:
Screenshot of the Collections Activity Management Approval Notification Data Model is shown below:
Select the fields that you want from the data model to add to the .rtf template for your report.

Configurable Collections Activity Management Workflow notification uses Oracle Business Intelligence templates to generate the email and in-app notifications. You can easily use the existing template or update it to meet your business needs.
Steps to Enable
Use the Opt In UI to enable this feature. For instructions, refer to the Optional Uptake of New Features section of this document.
Offering: Financials No Longer Optional From: Update 21B
Tips And Considerations
- The predefined template is used by default to present the workflow notification. You can copy and modify this template according to your business requirements and set the modified template as the new default.
- Navigation for accessing the default template: Reports and Analytics - Shared Folders - Financials - Workflow Notifications - Collections - Activity - Activity Management Notification
-
A single template is used to generate both the email and in-app notifications for a particular workflow. Any modifications that you make to the predefined template will be reflected in both in-app and email notifications.
- The opt-in for this feature will expire in Release 21B. Once the opt-in is expired, Configurable Collections Activity Management Workflow Notification will be enabled by default and you can no longer opt out of using this feature.
- We recommend that you use the time between now and Release 21B to prepare for the uptake of this feature.
Key Resources
- Overview of Financials Configurable Workflow Notifications on the Oracle Help Center.
Role Information
You don't need any new role or privilege access to use this feature. BI Administrator Role and BI Consumer Role have default permissions to access the report and modify the predefined template.
Historical and Revalued Amounts Displayed Separately on Asset Reports for UK Government
The following reports are enhanced to display historical and revalued amounts separately for the UK Government revaluation enabled asset books.
- Asset Category Change Report
- Asset Transfer Report
- Asset Retirements Report
ASSET CATEGORY CHANGE REPORT
The report now includes the following new columns in the source and destination sections:
Account columns:
- Revalued Cost Account
- Backlog Depreciation Reserve Account
- Revaluation Reserve Amortization Account
Amount columns:
- Revalued Cost Amount
- Backlog Depreciation Reserve Amount
- Revaluation Reserve Amortization Amount
ASSET TRANSFER REPORT
The report now includes the following new columns:
- Revalued Cost
- Backlog Depreciation Reserve
- Revaluation Reserve Amortization
ASSET RETIREMENT REPORT
The report now includes the following new columns.
- Historical cost (Unrevalued cost)
- Retired revalued cost
This feature allows you to separately track historical and revalued amounts.
Steps to Enable
You don't need to do anything to enable this feature.
Tips And Considerations
HOW TO RUN THE REPORT
- From the Scheduled Processes page, click Schedule New Process.
- Select the report you want to run, for example, Asset Transfers Report.
- In the Process Details window, click the Advanced button.
- Select the report layout and click Submit.
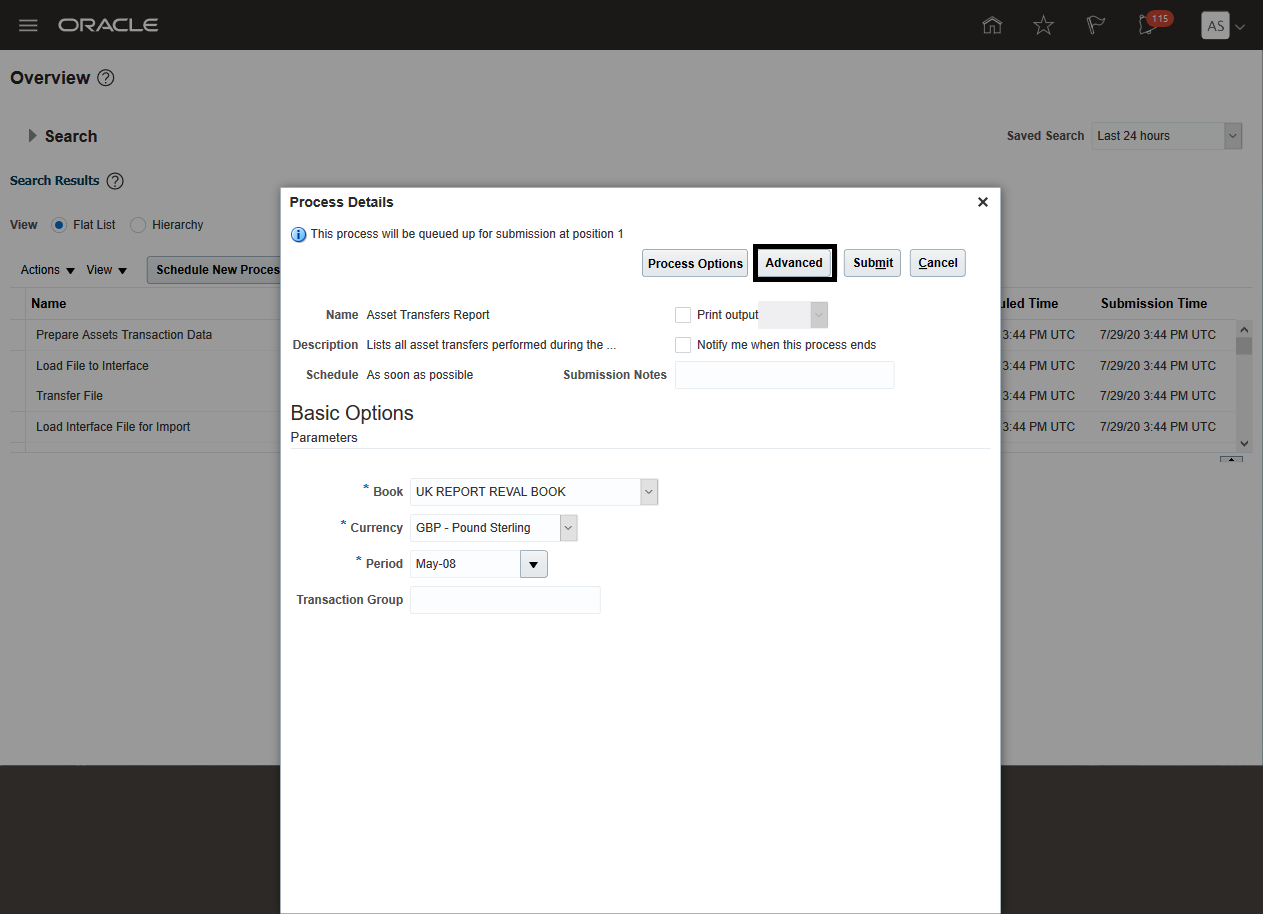
Process Details Window
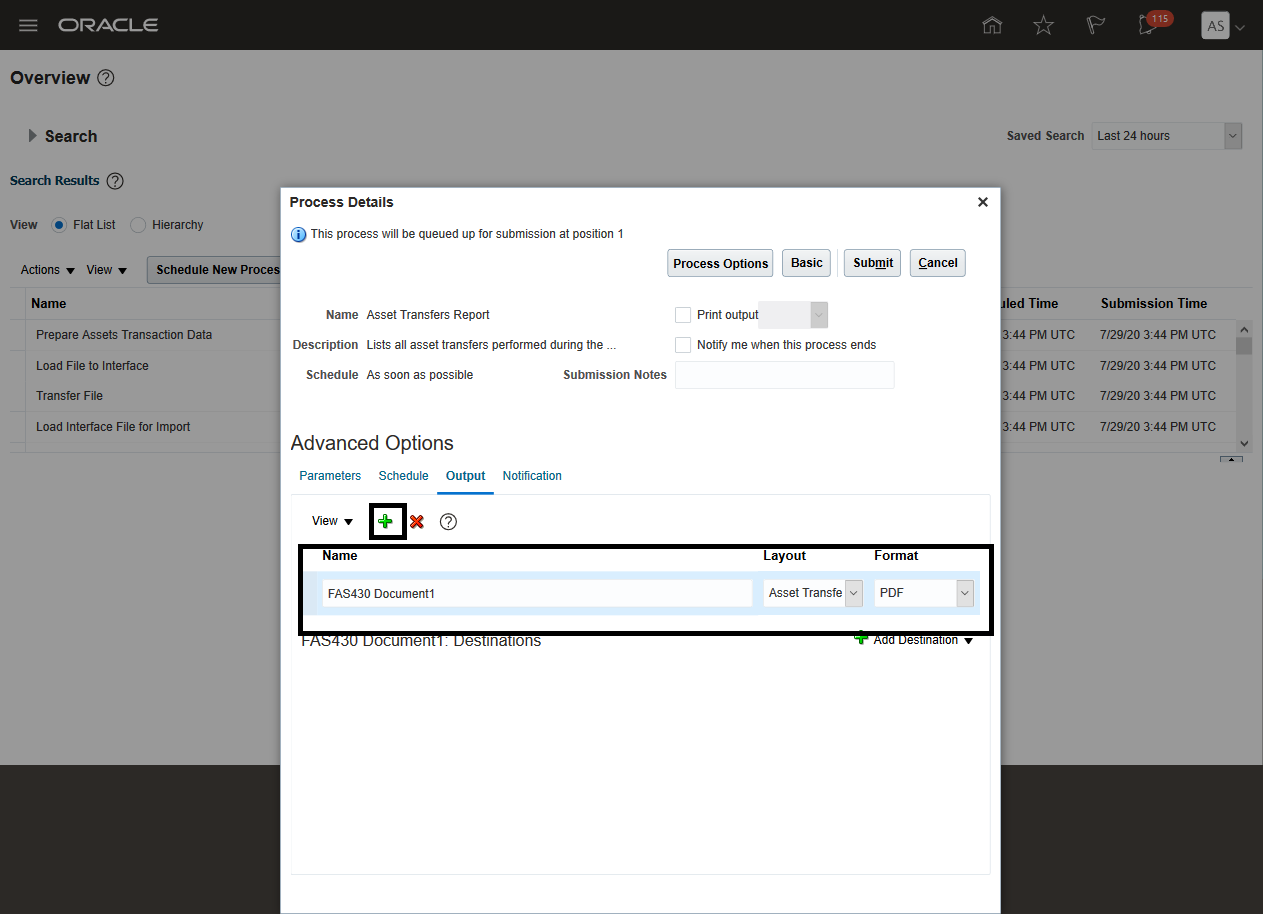
Select the Report Format
Carry Forward Open Purchase Orders for Budgetary Controlled Non-Sponsored Projects
Use the Carry Forward Open Purchase Orders process to move purchase orders associated with budgetary controlled non-sponsored projects from one budget year to another. The process automatically updates the budget date to the corresponding budget year for these purchase orders.
Budget year-end processing has been simplified for purchase orders that impact non-sponsored project control budgets. A non-sponsored project control budget is a project control budget without an award. The Carry Forward Open Purchase Order process will automatically move these purchase orders to the new budget year. Run the process in draft mode to review which purchase orders will be carried forward automatically and choose to let the system process them or manually update the purchase orders that need additional attention.
Steps to Enable
You don't need to do anything to enable this feature.
Tips And Considerations
- Purchase orders that impact sponsored project control budgets will not be processed automatically. A sponsored project control budget is a project control budget with an award.
- There is no impact on burden amounts as the expenditure item date isn’t changed. The Carry Forward Open Purchase Orders process updates only the purchase order budget date. When the expenditure item date also needs to be updated, the purchase order should be reviewed and updated manually.
- Project control budget changes are centralized in Project Portfolio Management. Budget adjustments created automatically for chart of accounts based control budgets will not be done automatically for projects control budgets.
- If a budget adjustment is required for a project, use the following report information to update the budget balance for the project control budget by creating and baselining a new project budget version in Project Portfolio Management:·
- Not Attempted Budget Entries Details layout of the Carry Forward Purchase Order
Key Resources
- Managing Budgetary Control Carry Forward support note 2705986.1
Role Information
Budget Manager role is needed to run the Carry Forward Open Purchase Order process.
Configurable Budgetary Control Override Workflow Notifications
Use the enhanced workflow notification for Budgetary Control Override Notifications. You can use Oracle Business Intelligence Publisher templates to generate modern and unified look and feel email and in-application notifications. Modify templates to meet business requirements and policies.
In 20D, all the notifications for new customers within the Configurable Budgetary Control Override Workflow Notifications are enabled by default. Upgrade customer must enable the feature in order to use it.
Starting In 21B the Oracle Business Intelligence Publisher notification templates will be the only method for email and in-app notifications.
There are two templates that can be configured for Budgetary Control Override Workflow Notifications:
- Budget Override Request
- Budget Override Taken
You can use and configure the Oracle Business Intelligence Publisher templates to generate the email and in-app notifications to display information based on your business requirements and policies. Choose from a comprehensive list of attributes to modify the notifications according to your requirements. You can change the layout and content by adding images, change colors and styling, add or remove attributes or modify text.
Steps to Enable
Use the Opt In UI to enable this feature. For instructions, refer to the Optional Uptake of New Features section of this document.
Offering: Financials No Longer Optional From: Update 21B
Tips And Considerations
- The opt-in for the feature will expire in update 21B, we strongly recommend that upgrade customers plan for the uptake of this feature.
- The templates used for the generation of the workflow notifications are located in the Reports and Analytics > Shared Folders > Financials > Workflow Notifications folders.
- A single template is used to generate both the email and in-app notifications for a particular workflow. If you have chosen to use configurable notifications for both in-app and email notifications for a workflow, any modifications that you make to the predefined template, will be reflected in both types of notifications.
Saved Search for Review Budgetary Control Balances
Reduce data entry for frequently reviewed control budget account balances by saving your search criteria in Review Budgetary Control Balances.
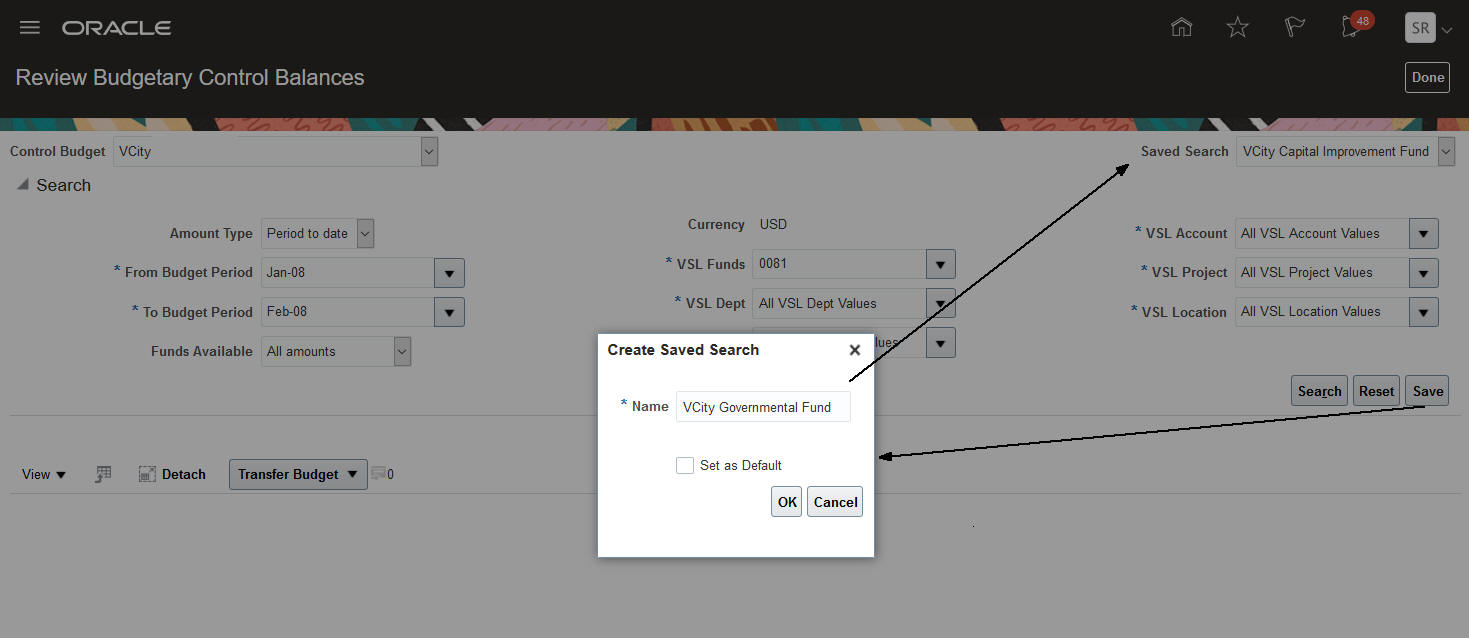
Saved Search on Review Budgetary Control Balances
The page now summarizes the balances of the accounts returned by the search criteria in a row titled Total.

Review Budgetary Control Balances Total
Quickly access the budget account balances that you monitor frequently by using the search criteria you saved previously.
Steps to Enable
You don't need to do anything to enable this feature.
Tips And Considerations
- Saved searches are user specific. Each user can define their own saved searches.
Role Information
Budget Manager role is needed to access Review Budgetary Control Balances page.
Configurable Cash Management Workflow Notifications
Use the enhanced workflow notifications for Cash Management workflows. You can use Oracle Business Intelligence Publisher templates to generate email and in-application notifications. Modify the templates to meet business requirements and policies.
In 20D, all the notifications for new customers within the Configurable Cash Management Workflow Notifications are enabled by default. Upgrade customers must enable the feature in order to use it.
Starting In 21A the Oracle Business Intelligence Publisher notification templates will be the only method for email and in-app notifications.
You can use and configure the Oracle Business Intelligence Publisher templates to generate the email and in-app notifications to display information based on your business requirements and policies. Choose from a comprehensive list of attributes to modify the notifications according to your requirements. You can change the layout and content by adding images, change colors and styling, add or remove attributes or modify text.
Steps to Enable
Use the Opt In UI to enable this feature. For instructions, refer to the Optional Uptake of New Features section of this document.
Offering: Financials No Longer Optional From: Update 21A
Tips And Considerations
The opt-in for the feature will expire in update 21A, we strongly recommend that upgrade customers plan for the uptake of this feature.
The templates used for the generation of the workflow notifications are located in the Reports and Analytics > Shared Folders > Financials > Workflow Notifications folders.
A single template is used to generate both the email and in-app notifications for a particular workflow. If you have chosen to use configurable notifications for both in-app and email notifications for a workflow, any modifications that you make to the predefined template, will be reflected in both types of notifications.
Key Resources
- Overview of Financials Configurable Workflow Notifications on the Oracle Help Center.
Role Information
- You don't need any new role or privilege access to use this feature.
- BI Administrator Role and BI Consumer Role have default permissions to access the report and modify the predefined template.
- You don't need any new role or privilege access to use this feature.
- BI Administrator Role and BI Consumer Role have default permissions to access the report and modify the predefined template.
Journal Reconciliation with Value Date
Reconcile journal lines to bank statements automatically using the value date as matching criteria in the Autoreconciliation process.
When the journal line value date is stored in one of the journal line attributes available for bank statement reconciliation, including reconciliation reference, journal line description, journal name, and journal batch name, this date can be used as a matching criteria during Automatic Reconciliation.
For a successful matching, the journal line value date needs to be converted to the string format 'YYYY/MM/DD' before the cash journal lines are imported into General Ledger.
When creating your reconciliation matching rules, the new attribute 'Statement value date in string format' can be used either in the advanced matching criteria or as a statement line grouping attribute, to match the statement value date in string format with the journal line value date stored in string format.
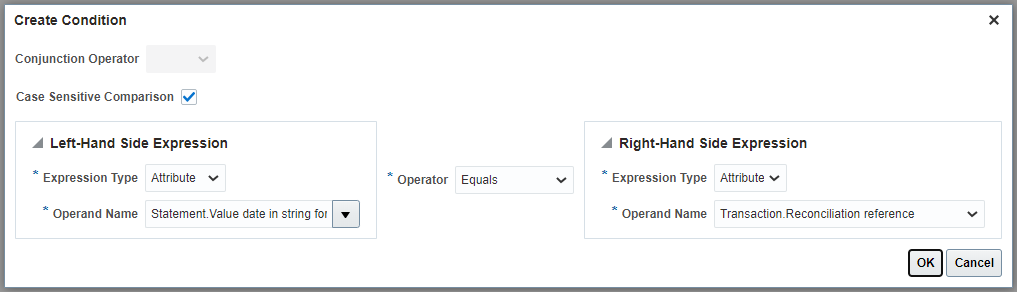

Adding the statement value date in string format in the reconciliation matching rules allows you to automatically reconcile journal entries using the value date as matching criteria, when this date is stored in the journal line reconciliation reference, journal line description, journal name, or journal batch name.
Steps to Enable
- Set up a new reconciliation matching rule, matching the statement value date with journal line value date in string format.
For One to One reconciliation matching rules:
- In Setup and Maintenance, go to the task Manage Bank Statement Reconciliation Matching Rules.
- Select 'Journals' as transaction source.
- Select 'One to One' matching type and the attributes you want to use as matching criteria.
- Create an advanced matching criteria, matching the statement value date in string format with the attribute you are storing the journal line value date in string format.
For One to Many reconciliation matching rules:
- In Setup and Maintenance, go to the task Manage Bank Statement Reconciliation Matching Rules.
- Select 'Journals' as transaction source.
- Select 'One to Many' matching type.
- Select the system transaction attributes you want to group your journal lines, including the attribute you are storing the journal value date in string format, such as reconciliation reference.
- Create an advanced matching criteria matching the statement value date in string format with the attribute you are storing the journal line value date in string format.
For Many to One reconciliation matching rules:
- In Setup and Maintenance, go to the task Manage Bank Statement Reconciliation Matching Rules.
- Select 'Journals' as transaction source.
- Select 'Many to One' matching type.
- Select the statement line grouping attributes you want to group your bank statement lines, including the statement value date in string format.
- Create an advanced matching criteria matching the statement value date in string format with the attribute you are storing the journal line value date in string format.
For Many to Many reconciliation matching rules:
- In Setup and Maintenance, go to the task Manage Bank Statement Reconciliation Matching Rules.
- Select 'Journals' as transaction source.
- Select 'Many to Many' matching type.
- Select the statement line grouping attributes you want to group your bank statement lines, including the statement value date in string format attribute.
- Select the system transactions grouping attributes you want to group your system transactions, including the attribute you are storing the journal line value date in string format.
- Create an advanced matching criteria matching the statement value date in string format with the attribute you are storing the journal line value date in string format.
- Add the new reconciliation matching rule to your existing reconciliation matching rule set assigned to your bank account.
- In Setup and Maintenance, go to the task Manage Bank Statement Reconciliation Rule Sets.
- Select your existing reconciliation rule set assigned to your bank account.
- Add the new reconciliation matching rule.
Tips And Considerations
- You must have the Journal Reconciliation Enabled profile option (CE_GL_RECON_ENABLED) set to Yes to perform manual and automatic reconciliation of bank statement lines directly from GL Journal Lines.
- Define one of the available attributes for bank statement reconciliation, including reconciliation reference, journal line description, journal name, or journal batch name to store the journal line value date in string format.
- Journal line value date must be converted to the string format 'YYYY/MM/DD' for successful matching.
-
Use the advanced matching criteria to compare the attribute you have chosen to store the journal line value date with statement value date in string format.
Key Resources
- For more information on Bank Statement and Reconciliation solution, refer to Oracle Financials Cloud Using Payables Invoice to Pay, or Oracle Financials Cloud Using Receivables Credit to Cash.
Role Information
You don't need any new role or privilege access to set up and use this feature.
Notional and Physical Cash Pools
Create and manage notional and physical cash pools to review pool level cash positioning and optimize liquidity management.
View the pooled cash position in the Smart View by maintaining notional and physical cash pools using Cash Pools REST API.
Steps to Enable
You don't need to do anything to enable this feature.
Tips And Considerations
You must clear the existing cash position data before attempting the rest operations to create or update the cash pools.
Role Information
To use this feature, you need this privilege or one of the roles:
- Privilege Name and Code:
- Manage Cash Pool - ORA_CE_MANAGE_CASH_POOL_PRIV
- View Cash Pool - ORA_CE_VIEW_CASH_POOL_PRIV
These privileges are already attached to the Cash Manager job role (ORA_CE_CASH_MANAGER_JOB).
Configurable Expenses Workflow Notifications
There is a change in the opt-in method for the Configurable Expenses Workflow Notifications feature. When you use the New Features Work Area or the Setup and Maintenance Work area to change the opt-in selection for this feature, the individual notifications are now displayed as a list of child features instead of being displayed within a window.
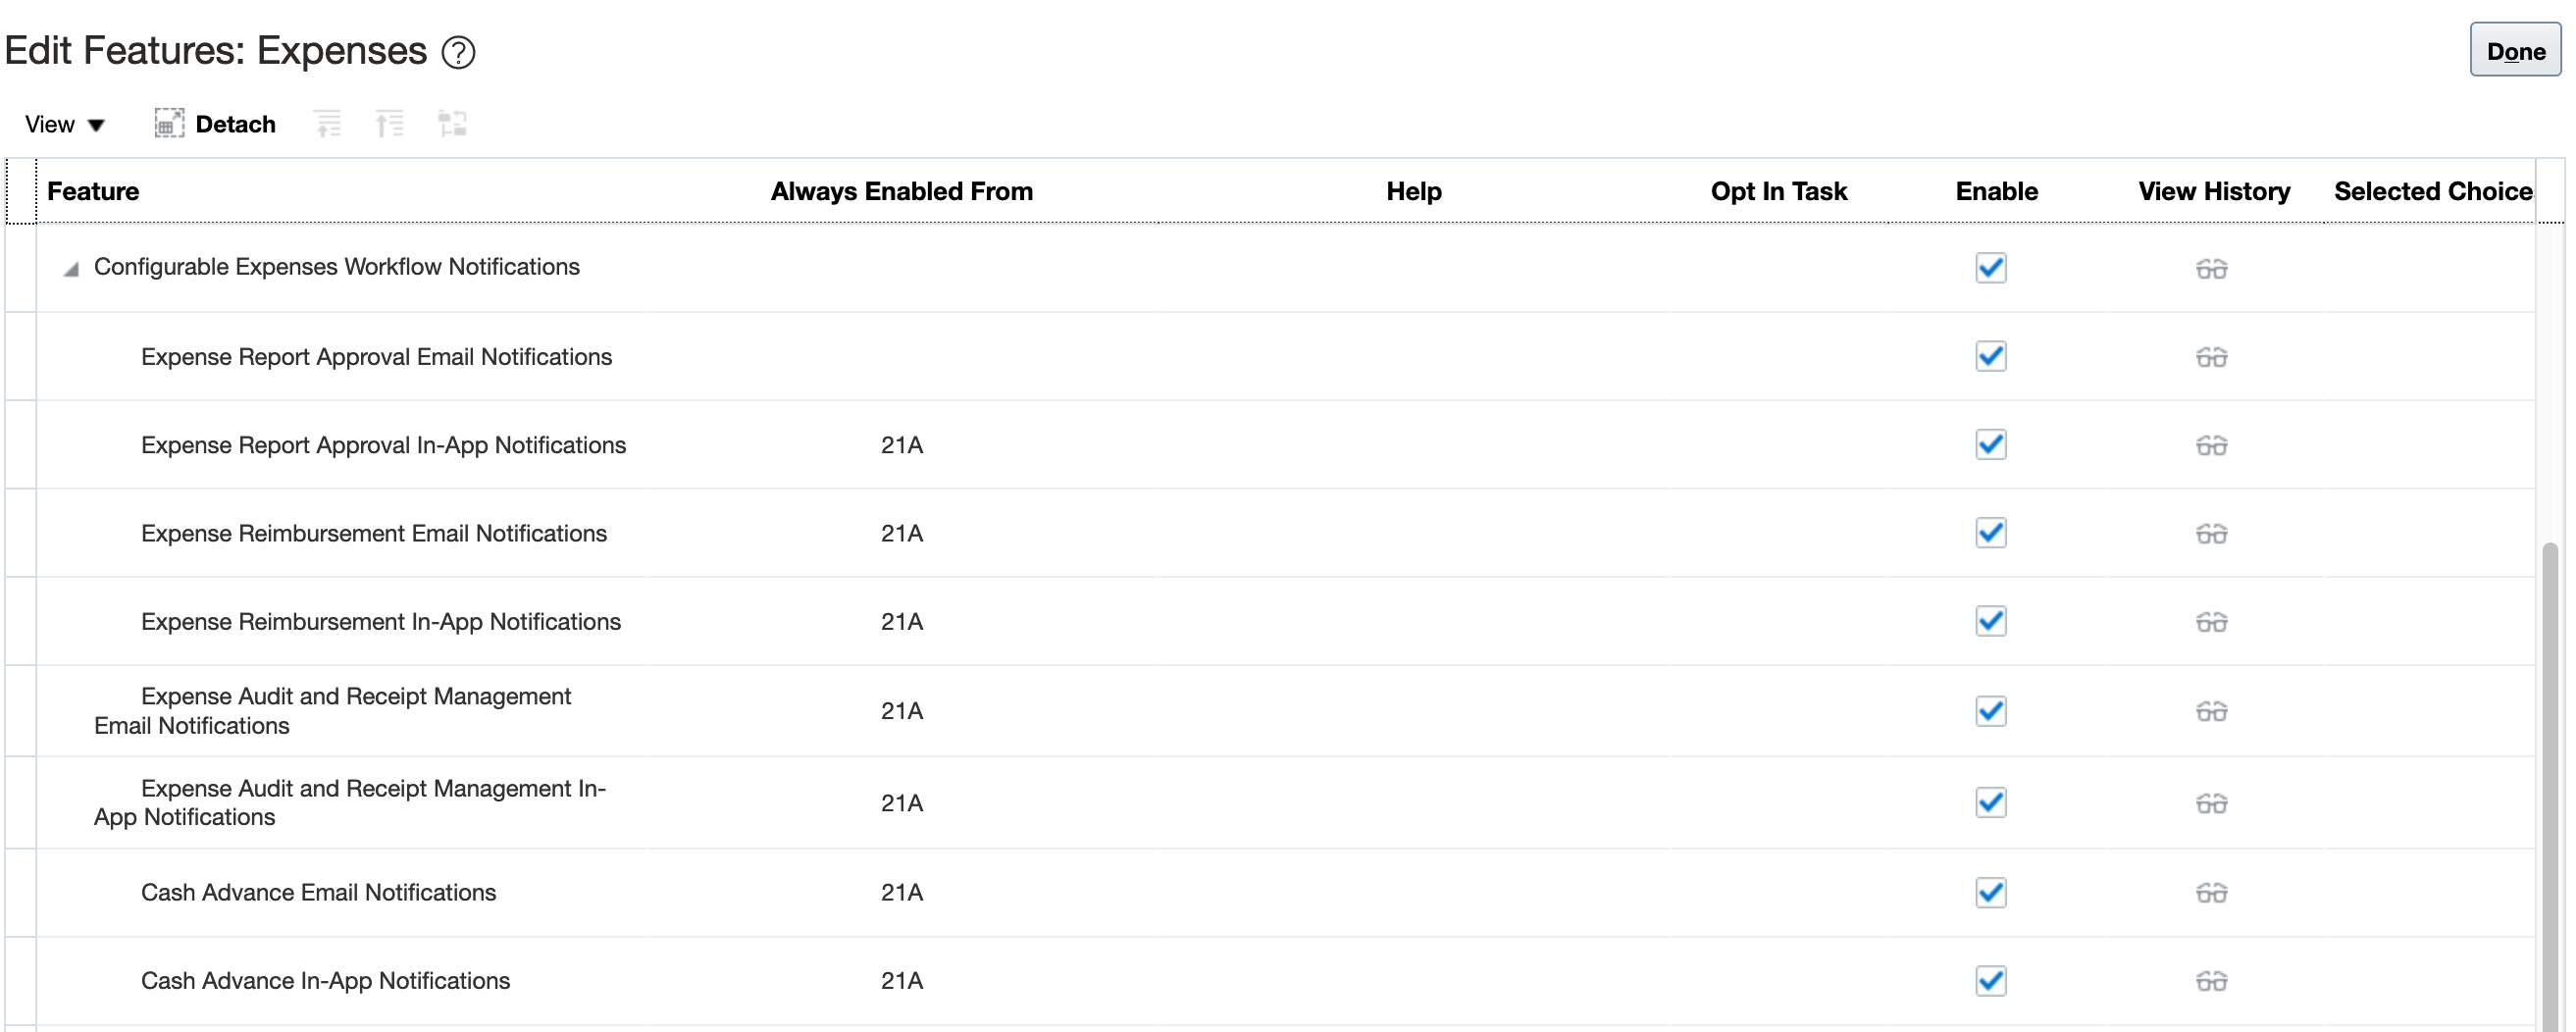
Configurable Expenses Workflow Notifications Opt In in 20D
In 20D, all the email notifications within the Configurable Expenses Workflow Notifications feature except expense report approval email notification are enabled by default for all customers. If you had opted out of using this feature in previous updates, you will find that the feature is enabled by default for you in 20D. You still have the option to opt-out of using this feature for any or all of the notifications within the Configurable Expenses Workflow Notifications in 20D. However, the opt-in option for this feature will expire in 21A. So, from 21A onwards, the Oracle Business Intelligence Publisher based notifications will be the default method to generate email and in-app notifications for Expenses workflows and you will no longer be able to opt out of using this feature.
Configurable Expenses Workflow notifications use Oracle Business Intelligence templates to generate the email and in-app notifications. You can modify the notifications to display information based on your business requirements and policies. Choose from a comprehensive list of attributes to modify the notifications in accordance with your requirements. You can change both layout and content - add images, change colors and styling, add or remove attributes or modify text.
Configurable email and in-app notifications are available for use for the following Expenses workflows:
- Expense Report Approval
- Expense Reimbursement
- Expense Audit and Receipt Management
- Cash Advance
Additional details for this feature are available here.
Steps to Enable
Use the Opt In UI to enable this feature. For instructions, refer to the Optional Uptake of New Features section of this document.
Offering: Financials No Longer Optional From: Update 21A
Default Behavior
- The feature is enabled by default for all customers in 20D. Even if you have opted out of the feature in prior updates, you will find the feature enabled by default for you in 20D.
- You may need to reselect the Expense Report Approval Email Notification option again in 20D.
If you wish to opt-out of using the feature, follow these steps:
- Click the Navigator, and then click New Features (under the My Enterprise heading)
- On the Features Overview page, go to the Available Features tab.
- Select the Configurable Expenses Workflow Notifications feature and click on the Enabled icon.
- On the Edit Features page, deselect the Enable option for the feature or child features required and then click Done.
Tips And Considerations
- The Configurable Expenses Workflow Notifications don't require any setup and are ready to use as delivered.
- The configurable notifications contain all the information that's currently available in the classic notifications. If required, you can modify the notifications to display information as per your business requirements.
- You still have the option to opt-out of using this feature in 20D. However, considering that the opt-in option for this feature will expire in update 21A, we strongly recommend that you plan for the uptake of this feature.
- The templates used for the generation of the workflow notifications are located in the Reports and Analytics > Shared Folders > Financials > Workflow Notifications folders.
- A single template is used to generate both the email and in-app notifications for a particular workflow. If you have chosen to use configurable notifications for both in-app and email notifications for a workflow, any modifications that you make to the predefined template, will be reflected in both types of notifications.
- When using the in-app notifications to take actions on the workflow task, use the Actions button to view a list of available actions for the notifications.
- To add comments or attachments, select the Add Comments or Add Attachment buttons respectively.
Key Resources
- Refer to the Enable Expenses Configurable Email Notifications section in the Oracle Financials Cloud Implementing Expenses Guide.
Role Information
To configure additional recipients for audit and reimbursement notifications, you need one of these roles:
- Expense Manager
- Application Implementation Consultant
- Financials Administrator
Delegate Assignment for Inactive Employees
Allow administrators to assign delegates for inactive employees to submit outstanding expenses. Assign project and account allocation access to delegates of inactive employees when required.
To assign delegates, you navigate to the Manage Delegations task from the Setup and Maintenance work area.
In their Expenses work area, delegates can access the inactive employee's expenses, assign outstanding corporate card charges to projects or cost centers, and submit the expenses in expense reports.
When employees are terminated or they resign from a company, the Process Corporate Card Transactions for Inactive Employees process expects employees’ managers to submit outstanding corporate card transactions of the employee. This can be very cumbersome for managers. Companies prefer to have a designated employee to submit these charges instead of the managers. This feature enables companies to process the outstanding corporate card charges without burdening managers.
Steps to Enable
You don't need to do anything to enable this feature.
Role Information
To assign a delegate for an inactive employee, you need the Expense Manager role.
Descriptive Flexfields with SQL-Based Value Sets in the Expenses Mobile Application
Select valid values for descriptive flexfields based on SQL queries during expense creation using the Expenses mobile application.
The descriptive flexfield list allows users to search for specific values when the list contains more than 25 values.
This feature enforces valid values in expense entry and alerts employees when required fields are not completed.
Steps to Enable
You don't need to do anything to enable this feature.
Tips And Considerations
To use this feature, ensure that you have downloaded the latest Expenses mobile application.
Role Information
You don't need a new role or privilege access to use this feature.
Enforce Meals and Accommodations Policies in Expenses Android Application
Validate meals and accommodation expenses for policy violations within the Expenses Android application. The Android application performs the same validations that are enforced online. If your company policy permits submission of expenses with policy violations, provide a justification in the mobile application. If company policy does not allow an expense report submission with policy violations, you cannot submit an expense item. You must correct the expense item using the mobile application.
The mobile application validates meal and accommodation expenses for policy violations and displays the warning and error messages on the View screen if the expenses exceed these rate limits and applicable warning tolerances.
- Single instance limit and daily sum limit for meals
- Daily limit for accommodations
Additionally, the mobile application limits reimbursement of the specified amount if the expense policy enforces an upper limit.
Enforcing meals and accommodation policies on the Expenses mobile application enables employees to fully complete entry of meals and accommodation expenses and submit them directly from the mobile application.
Steps to Enable
You don't need to do anything to enable this feature.
Tips And Considerations
To use this feature, ensure that you have downloaded the latest Expenses mobile application.
Role Information
You don't need a new role or privilege access to use this feature.
Expense Detail Capture from Receipts Using Expenses iOS Application
Capture expense details from receipts using image recognition in the Expenses iOS application.
Companies can leverage the enhanced receipt scanning capability in the Expenses iOS application for better accuracy. The application uses the Intelligent Document Recognition engine to extract receipt details and then populates the expense details in the Enter Expense screen. For each receipt, employees can select an expense type, create an expense item from the receipt details, and make modifications as needed.
Better accuracy from receipt scanning reduces manual entry and simplifies the user experience.
Steps to Enable
Use the Opt In UI to enable this feature. For instructions, refer to the Optional Uptake of New Features section of this document.
Offering: Financials
Tips And Considerations
To use this feature, the Expenses mobile application must have a network connection to the Expenses Cloud environment. This feature does not work in the offline mode.
Key Resources
- To disable the Scan option, refer to the Disable the Scan Option on Mobile Expenses section in the Implementing Expenses guide.
Role Information
You don't need a new role or privilege access to use this feature.
Funds Release from Unused Spend Authorization Reservations
Release funds from a spend authorization with unused funds after travel is complete and expense reports are approved, to gain greater control of funds and manage travel budgets efficiently.
Employees can release the unused funds from their spend authorizations in the Expenses work area by selecting the Close action for each spend authorization that has an unused balance. A spend authorization is closed if the authorization meets these criteria:
- Spend authorization passes budgetary control validation.
- Spend authorization doesn't include spend authorization lines that are currently associated with any outstanding transactions.
When a spend authorization is closed, the status changes to Closed and the previously applied amount is displayed on the status line. Budget managers can review the balance in the Budget Control Analysis Report in Commitment Control.
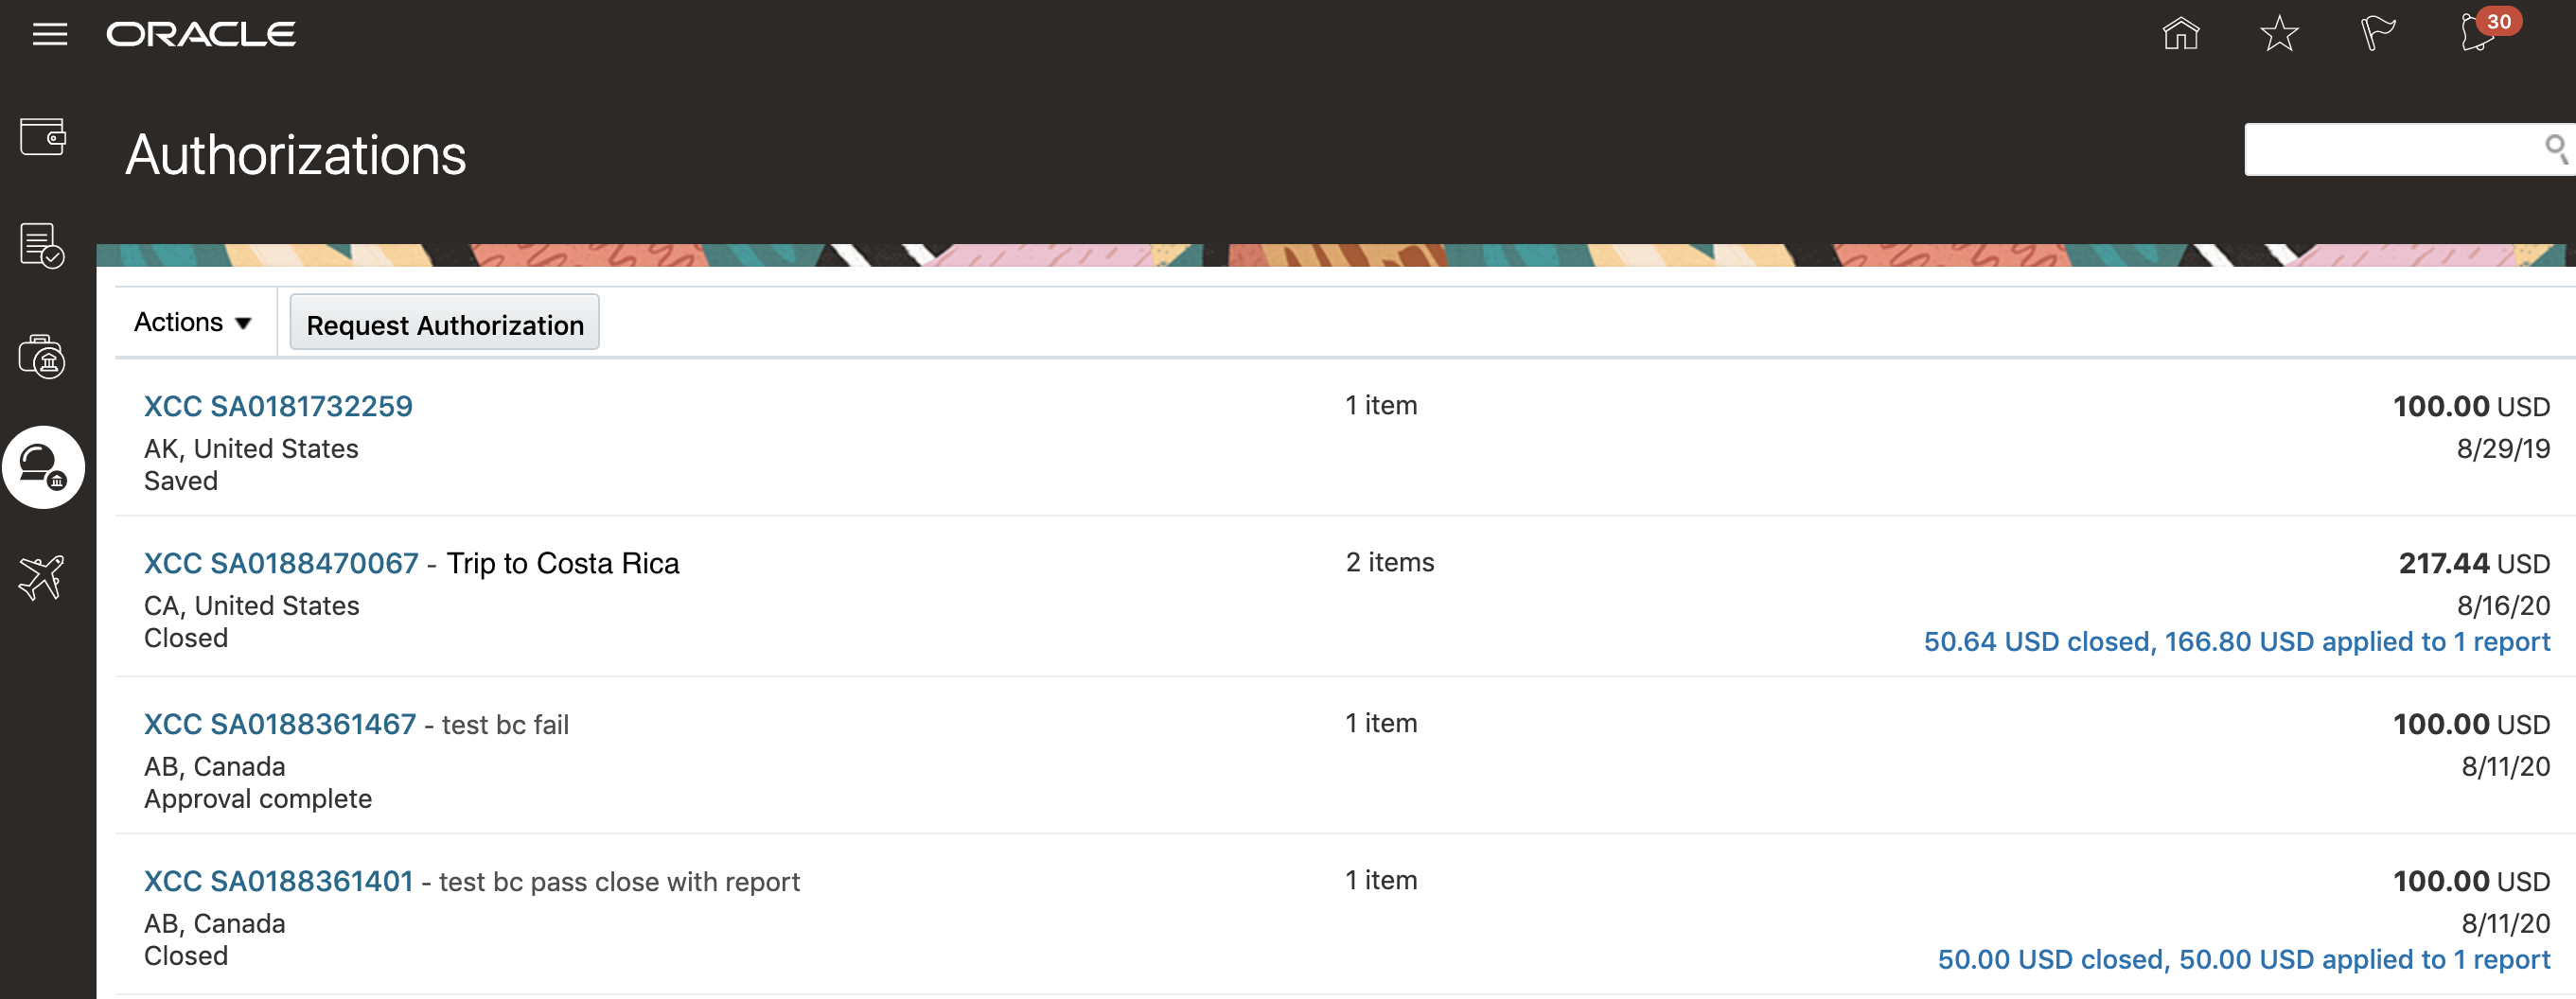
Closed Spend Authorization in Expenses Work Area
This feature allows companies to release any unused funds from spend authorizations at the time of budget period close and when projects and grants funding are no longer available.
Steps to Enable
You don't need to do anything to enable this feature.
Role Information
You don't need any new role or privilege to use this feature.
Search for Projects and Tasks to Assign to Expense Items in the Expenses Mobile Applications
Assign a project and task to an expense by using the searchable list of projects on the Add Expense screen in the Expenses mobile application. Employees can select projects from their list of recently used five projects or search the full project list.
Here is the sequence in which the projects are displayed in the project list:
- Last five used projects
- Projects assigned to the employee
- Projects in the project business unit assigned to the employee
- Projects in all business units.
You can search for a specific project. To download additional projects, pull down the search screen.
The task list displays the tasks defined for the selected project. You can search for a specific task. To download additional tasks, pull down the search screen.
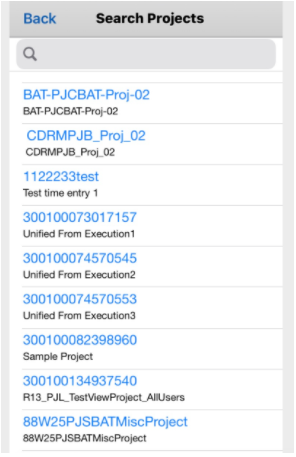
Project Search and List of Values
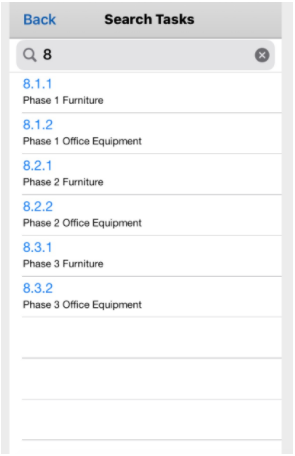
Task Search and List of Values
By enabling real time project and task search, employees can charge expenses to correct projects and tasks.
Steps to Enable
You don't need to do anything to enable this feature.
Tips And Considerations
To search for projects and tasks that were not previously downloaded, the Expenses mobile application must have a network connection to the Expenses Cloud environment. You can select from the previously downloaded list in the offline mode.
Role Information
You don't need any new role or privilege to set up and use this feature.
Mileage Expenses and Refined Corporate Card Handling Using the Oracle Digital Assistant
Leverage continuously expanding capabilities for submitting expenses using the Oracle Digital Assistant. In addition to hotel, entertainment, meals, taxi, and miscellaneous expenses, employees can now enter the travel date and distance traveled to create mileage expenses. Employees can control whether to have their expenses automatically submitted or held until later for submission of a larger expense report. For example, employees with a corporate credit card may choose to hold off on submission until all their expenses for a trip are available. The digital assistant confirms use of a corporate card and alerts employees when it uses the enhanced logic to match to a card transaction during expense creation.
Here are the capabilities that are available with Oracle Digital Assistant for Expenses:
-
Mileage Expense
You can create a mileage expense using the Oracle Digital Assistant by entering the travel date and the number of miles traveled.
-
Conversational Interaction to Capture Payment Method of Expense
When you create an expense item using the Oracle Digital Assistant, it captures the payment method, such as cash or a corporate card. The Oracle Digital Assistant identifies employees with corporate cards and confirms the method of payment using conversational interaction.
-
Alert for Matched Expense Item
Employees are alerted when an expense item created using the Oracle Digital Assistant is matched with a corporate card charge immediately on creation of the item.
-
Disable Automatic Submission of Expenses
Through a conversational interaction with the Oracle Digital Assistant, employees can disable automatic submission of Digital Assistant expenses.
-
Matching Using a Scoring Model
A scoring model is used to better identify both exact and potential matches between expenses created from the Oracle Digital Assistant and corporate card transactions.
Oracle Digital Assistant Expenses skill enables companies to offer a conversational, yet simple expense entry experience to their employees. Employees can create expense items by simply uploading the receipts. This eliminates manual expense entry. Companies can leverage automatic expense submission to completely automate the expense entry experience.
Steps to Enable
You don't need to do anything to enable this feature.
Key Resources
- To learn more about Oracle Digital Assistant Expenses skill, refer to the Expense Assistant section in the Using Expenses guide.
Role Information
You don't need any new role or privilege to use this feature.
Balanced Manual Journals by Entered Currency
Optionally require the journal preparer to enter fully balanced actual journals in Create Journal or Create Journal in Spreadsheet page to ensure that total debits and credits are equal for each entered currency.
This enables organizations to ensure that journals entered manually are balanced by entered currency. They can continue to rely on posting to balance any unbalanced journals coming in via external feeds.
Steps to Enable
- In the Setup and Maintenance work area, go to the Specify Ledger Options task:
- Offering: Financials
- Functional Area: General Ledger
- Task: Specify Ledger Options, with the ledger scope set
- On the Specify Ledger Options page, enable the Require manually entered journals balance by currency option in the Journal Processing Balancing section for the primary ledger. This will automatically enable the option for any associated secondary and reporting ledgers.
Key Resources
- Refer to the Implementing Enterprise Structures and General Ledger guide, Ledgers chapter.
Configurable Journal Workflow Notifications
The display of the Configurable Journal Workflow Notifications opt-in feature has changed. The individual notifications are now displayed as a list of child features instead of being displayed within a dialog box. Access the opt-in selection from the New Features work area or the Setup and Maintenance work area.
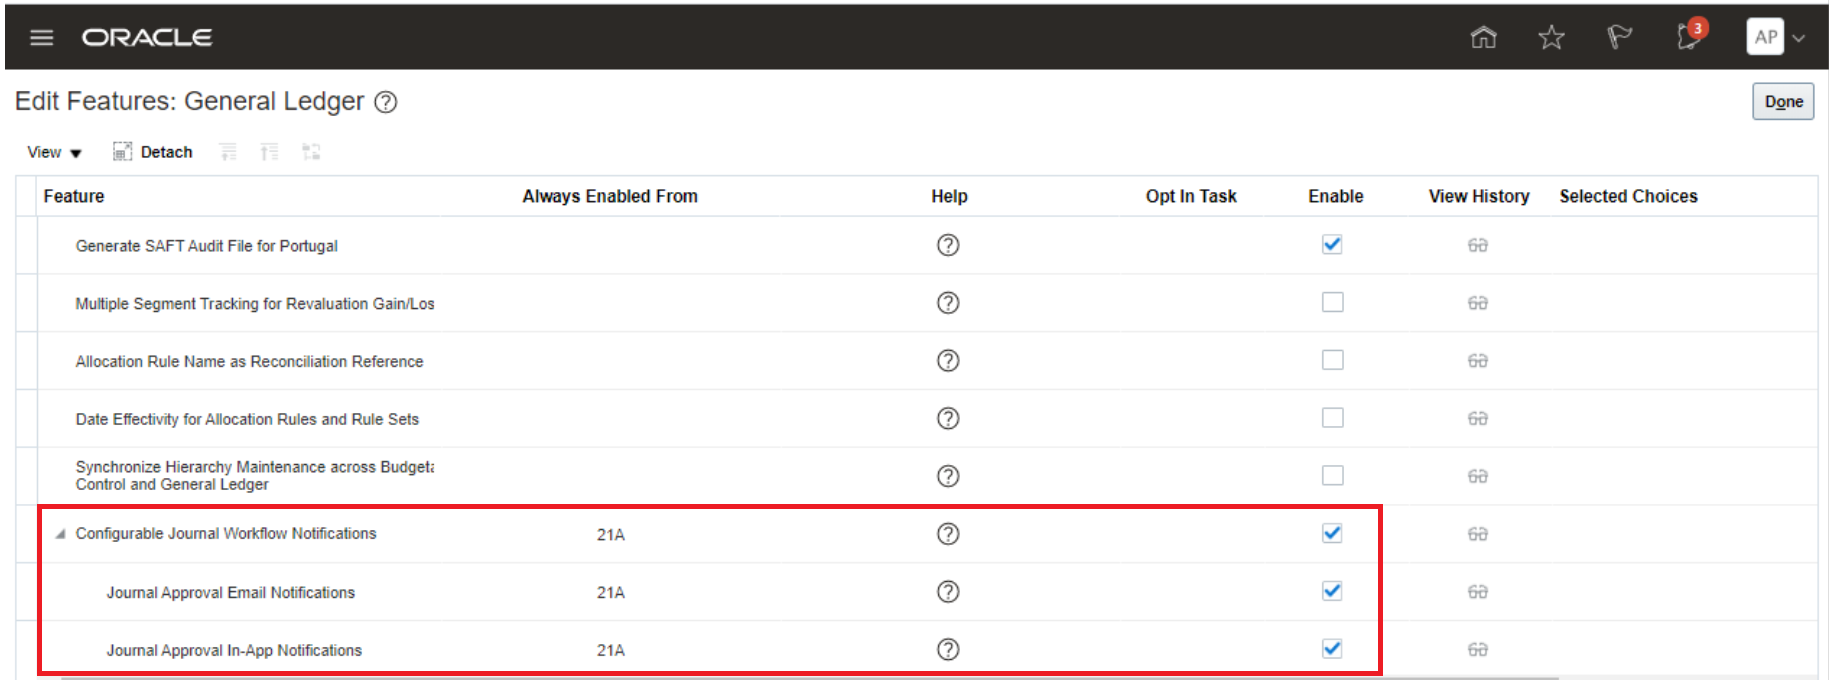
Configurable Journal Workflow Notifications Opt-In in Update 20D
In this release, all of the notifications within the Configurable Journal Workflow Notifications feature are enabled by default for all customers. If you had opted out of using this feature in previous updates, you will find that the feature is now enabled. You still have the option to opt-out for any, or all, of the notifications within the Configurable Journal Workflow Notifications feature. However, the opt-in will expire in update 21A. This means that from update 21A onward, the Oracle Business Intelligence Publisher based notifications will be the default method to generate email and in-app notifications for Journal workflows and you will no longer be able to opt out.
You can use and configure the Oracle Business Intelligence Publisher templates to generate the in-app and email notifications. You can also modify the predefined template to display information based on your business requirements and policies. Choose from a comprehensive list of attributes to modify the notifications according to your requirements. You can change both layout and content – add images, change colors and styling, add or remove attributes or modify text.
Additional details for the feature are available here:
Steps to Enable
Use the Opt In UI to enable this feature. For instructions, refer to the Optional Uptake of New Features section of this document.
Offering: Financials No Longer Optional From: Update 21A
This feature is delivered enabled by default from update 20C onwards. You still have the option to opt-out of using this feature. However, considering that the opt-in for the feature will expire in 21A, we strongly recommend that you plan for the uptake of this feature. If you wish to opt-out of using the feature, follow these steps:
- Click the Navigator, and then click New Features (under the My Enterprise heading)
- On the Features Overview page, go to the Available Features tab.
- Select the Configurable Journal Workflow Notifications feature and click on the Enabled icon.
- On the Edit Features page, deselect the Enable option for the feature or feature choices as required and then click Done.
Tips And Considerations
- The feature is enabled by default for all customers in update 20D. Even if you have opted out of the feature in prior updates, you will now find the feature enabled by default.
- You still have the option to opt-out of using this feature in 20D. However, considering that the opt-in for this feature will expire in update 21A, we strongly recommend that you plan for the uptake of this feature.
- The templates used to generate workflow notifications are located in the Reports and Analytics work area under the Shared Folders > Financials > Workflow Notifications folders in the Oracle Business Intelligence catalog.
- A single template is used to generate both the email and in-app notifications for a particular workflow. If you have chosen to use configurable notifications for both in-app and email notifications for a workflow, any modifications that you make to the predefined template will be reflected in both types of notifications.
Key Resources
- Overview of Financials Configurable Workflow Notifications in the Implementing Common Features and Project Portfolio Management guide on the Oracle Help Center.
-
Journal Approval Notifications in the Implementing Enterprise Structures and General Ledger guide on the Oracle Help Center.
Income Statement Accounts Average Daily Balance Tracking
Record and report on revenue and expense accounts using calculated and stored daily activity amounts, end-of-day balances, and average-to-date balances for periods, quarters, and years.
Average balance tracking of income statement accounts facilitates reporting for financial services customers.
Steps to Enable
During the new ledger creation process, select the Include income statement accounts check box when you enable average balances on the Specify Ledger Options page.
Tips And Considerations
The feature is only available for newly created ledgers.
You cannot enable this feature on average balance processing ledgers that are already created.
Key Resources
- Refer to the Implementing Enterprise Structures and General Ledger guide, Ledgers chapter.
Manage Dependencies Between Chart of Accounts Segments Using Related Value Sets
Related Value Sets provide a new way to define dependencies between two segments in a chart of accounts to ensure only valid combinations are used during data entry. You can define these relationships immediately for new or existing charts of accounts. If you use Cross-Validation Rules to validate values for a segment based on another segment, you may consider converting them to Related Value Set rules to improve journal processing performance.
A related value set is an Independent type value set whose values are related to another Independent type value set. Use this feature to automatically display a list of related values in a segment value choice list, based on what value was selected in a preceding segment in your chart of accounts. For example, if you have Company and Division segments in your chart of accounts, and the company US East has transactions in only the Car and Truck divisions, while the company US West deals with only the Motorcycle and Car divisions, you can define relationships between the Company and Division segments to enforce the relationships between their segment values.
The order of the segments in a chart of accounts impacts the behavior of related value sets. For example, if the value of the Company segment determines the valid values for the Division segment, then the Company segment must precede the Division segment when defining the order of the segments in a chart of accounts.
The meaning of a segment value is unique within each value set. Going back to the previous example, the Car division segment values have the same identity when paired with the company US East or the company US West. In other words, Car division segment values cannot represent one thing when paired with US East, while representing another when paired with US West.
Using the relationship feature, you can potentially reduce the need of having to define huge numbers of cross-validation rules and consequently benefit from the cost incurred on otherwise maintaining those rules.
You will also realize an improved performance during data entry, since there is no need to repeatedly scan through a huge number of cross-validation rules before deciding that a new account combination is indeed a valid one.
Finally, it reduces the possibility of entering wrong account combinations, since the value set relationship automatically applies valid value filters to the succeeding segments.
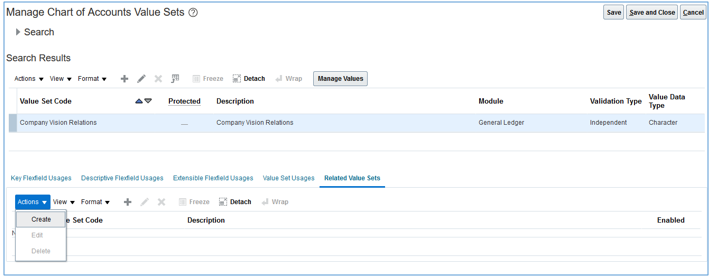
Steps to Enable
- Define the relationship between a pair of value sets.
- Offerings: Financials
- Functional Area: Financial Reporting Structures
- Task: Manage Chart of Accounts Value Sets
- Search for an Independent value set.
- In the Search Results section, click the Related Value Sets tab.
- From the Actions menu, select Create to create a relationship, or select Edit or Delete to update or delete an existing relationship.
- Click Save or Save and Close to complete the definition.
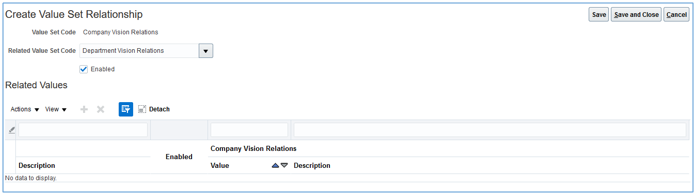
An Example of a Value Set Relationship Created Between the Two Independent Value Sets of Company Vision Relations and Department Vision Relations
- Click the Add (+) icon to add the related values.
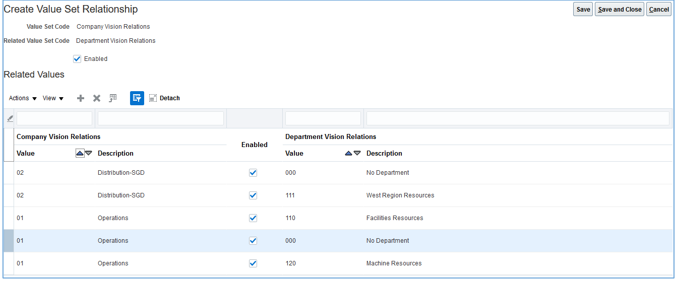
An Example of the Related Values for a Specific Value Set Relationship
- For the value set relationship to take effect, redeploy the chart of accounts structure. It is not necessary to perform this step when you only create or update the related values.
- Optionally, import the related value sets and related values.
Besides the manual method previously described, you can also use the Import Related Values action from the Manage Chart of Accounts Value Sets page. This method is particularly useful when you have a huge number of related value records to map. The process can be used to manage both related value sets and the related values or either one of them. You can also use this method for future maintenance such as updating an existing relationship.
Steps to import related value sets and values:
As a first step, prepare the appropriate .csv files. The first row in the file is the header. The subsequent rows are the relationship records to upload. Values for VALUE_SET_CODE1, VALUE_SET_CODE2 and ENABLED_FLAG must be separated using a vertical bar ( | ).
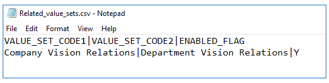
A Sample of a Related Value Sets .csv File
Similarly, for the related values .csv file, the first row represents the header. The subsequent rows are relationship records to upload. Values for VALUE_SET_CODE1, VALUE_SET_CODE2, VALUE1, VALUE2 and ENABLED_FLAG must be separated using a vertical bar ( | ).
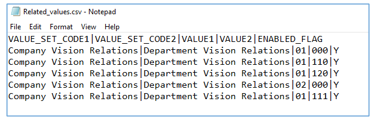
A Sample of a Related Value Set Values .csv File
Load the files into the document repository of Oracle WebCenter Content. To do this, navigate to the Tools work area and select File Import and Export. Select the location in the Account field, where the files will be loaded.
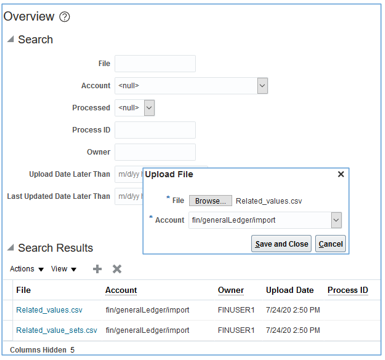
An Example of the File Import and Export Page with Related Value Set and Value Files, in the /fin/generalLedger/import Account
In the Setup and Maintenance work area, navigate to the Manage Chart of Accounts Value Sets task. From the Actions menu in the Search Results region, select Import Related Values to upload either one or both the files. If the relationship between value set pairs has already been created manually, upload only the related values file.
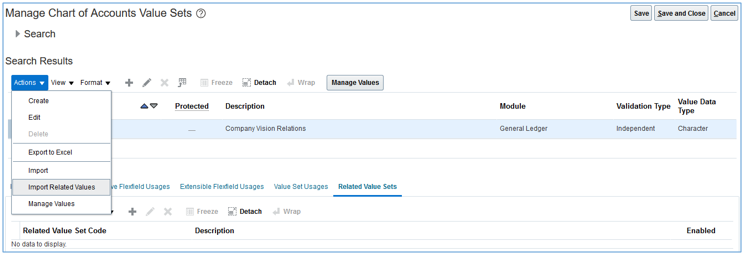
An Example of the Manage Chart of Accounts Value Sets Page Showing the Import Related Values Action
In the Account field, select the same location that was used to load the .csv files in the document repository of Oracle WebCenter Content. Specify the .csv file names and click Upload.
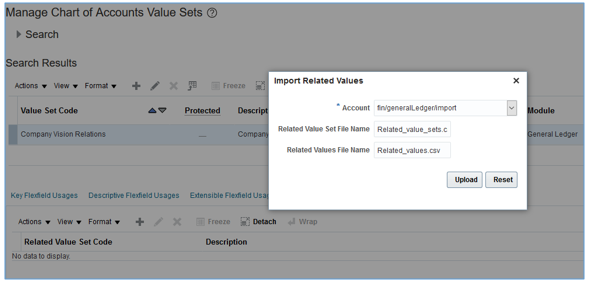
An Example of the Import Related Values Page
Click the Download Log file link to verify the import log file.
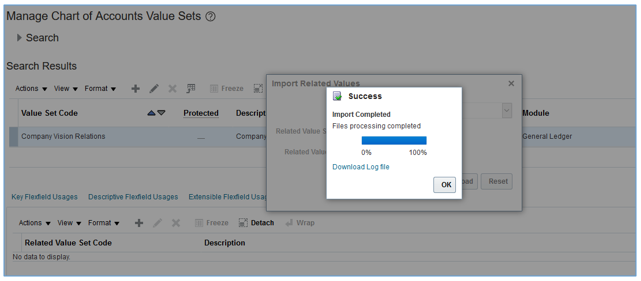
An Example of the Page Showing the Completed Process and the Download Log File Link
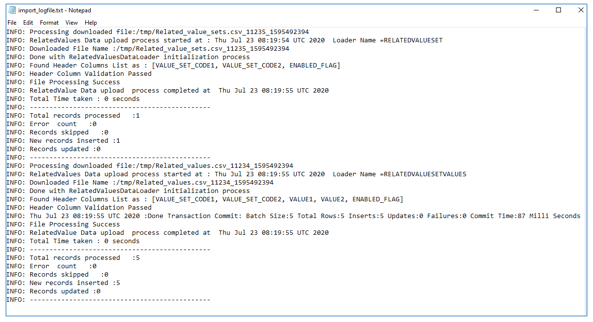
A Sample Import Log File
If you also created a value sets relationship, verify that the chart of accounts structure has been successfully redeployed.
As an alternative, you can go to the Scheduled Processes page and submit the ESS process for Applcore csv file upload. Enter the .csv file name and its location in the document repository. Select the appropriate file type of either RELATEDVALUESET or RELATEDVALUESETVALUES, depending on what you want to upload.
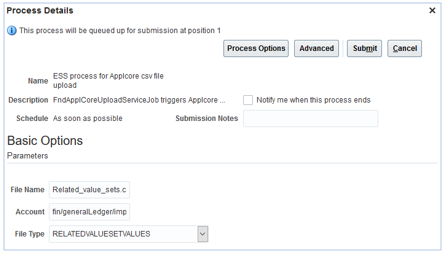
ESS Process for Applcore csv File Upload Process Details Page
- Optionally, use the Create Journal page to verify the impact of related values on account combinations.
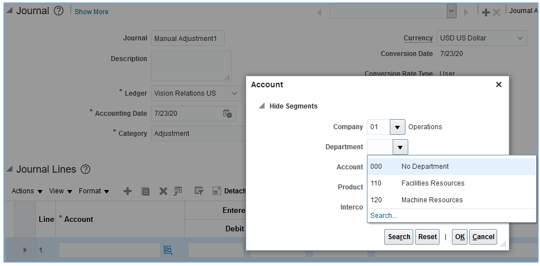
An Example of the Account Page Showing That Company 01 Can Use Departments 000, 110 and 120
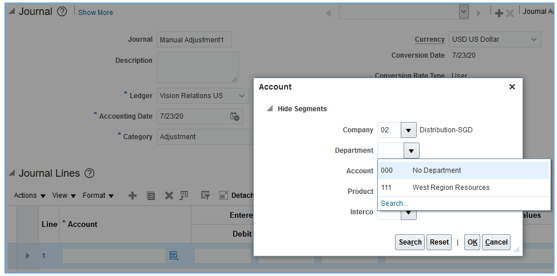
An Example of the Account Page Showing That Company 02 Can Use Departments 000 and 111
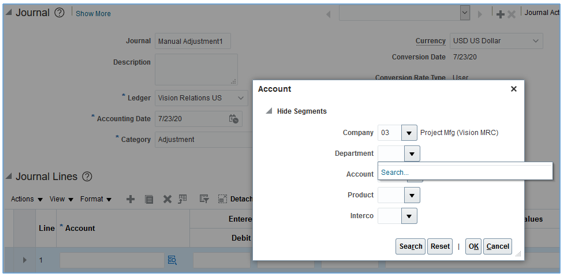
An Example of the Account Page Showing That Company 03 Currently Does Not Have Any Related Department Values
Tips And Considerations
- The Related Value Sets feature requires that both value sets must have a validation type of Independent.
- If you plan to create a relationship between your company and intercompany segments, you should assign them different value sets.
- After you create or update relationships between pairs of value sets, the chart of accounts structure must be successfully redeployed,
- A succeeding segment's list of valid values is filtered based on a preceding segment's value. For example, a chart of accounts has segments in the following sequence: Company – Cost Center - Account - Subaccount - Product. Assuming the company and cost center value sets are related, the list of values for the Cost Center segment is filtered based on the value selected in the Company segment for that chart of accounts. Since you cannot change the sequencing of segments in a chart of accounts structure that is already in use, it is important to carefully plan your chart of accounts structure and determine the appropriate sequencing of segments.
- You must also complete a comprehensive mapping of related value set values. Once two value sets are related, every value in the preceding driving segment must be mapped to one or more values in the succeeding segment to ensure that you can create a valid account combination during transaction entry. If no mapping exists for a driving segment value, then the related segment value choice list will be blank for that driving segment value.
- When creating a new relationship between value sets, do not enable it until all the related values have been entered. After you finish mapping the values, then enable the relationship.
- Use the Import Related Values method to perform a mass upload and import of a value set relationship, as well as the related values. As an alternative, you can also use the Scheduled Processes page and submit the ESS process for Applcore csv file upload.
- You can enforce value sets relationship for an existing charts of accounts. Once you have created a relationship between two value sets, the relationship impacts every chart of accounts structure that uses those related pairs of value sets.
- If an existing relationship is no longer relevant, you can disable it. If you delete the related value sets and value mappings, you will have to redefine the relationships later if you need them.
- Existing account combinations that violate a new relationship are still considered valid.
Key Resources
- Watch Manage Dependencies Between Chart of Accounts Segments Using Related Value Sets Readiness Training
- For more information on chart of accounts and value sets, refer to the Oracle Financials Cloud Implementing Enterprise Structures and General Ledger guide.
- For more information on file import and export, refer to the Oracle Financials Cloud Implementing Common Features for Financials and Project Portfolio Management guide.
Role Information
- To set up this feature, you need one of these job roles: Application Implementation Consultant or Financial Application Administrator.
- To verify the impact on transaction pages, you need either the General Accounting Manager or the General Accountant job role.
- To verify the impact on the data inquiry pages, you need any one of these job roles: General Accounting Manager, General Accountant, Financial Analyst.
Prevent General Ledger Period Closure When Open Subledger Periods Exist
Prevent the closure of a General Ledger accounting period if the accounting period for any of the corresponding subledgers is still open, or if incomplete accounting entries or transactions exist for the period. This ensures an effective period close process by validating all transactions are complete and not held up during the close.
Cost Management is now included in the list of subledgers along with the existing Payables, Receivables, Project Foundation and Revenue Management subledgers.
You can enforce the enhanced period close process on a primary ledger. When you enable this feature, the period close process prevents the corresponding General Ledger accounting period from being closed if any of the following exceptions exist:
- Period Status exception
- Subledger accounting periods are not closed
- Transaction exception
- Unprocessed and untransferred subledger transactions
- Pending Intercompany transactions
- Pending transactions in the General Ledger interface
- Unposted transactions in General Ledger
By including the Cost Management subledger, the period statuses of the cost organization books are also checked and the General Ledger period close is prevented if any of the cost organization books associated with the primary ledger have not been closed.
You can exclude one or more of the following subledgers so the General Ledger period close process skips the period status exceptions encountered within the context of the excluded subledgers:
- Payables
- Receivables
- Revenue Management
- Project Foundation
- Cost Management
This feature provides the following business benefits:
- Brings the General Ledger period close process in line with your corporate-wide business policy, if any.
Comply with the general business practice of not allowing a closed General Ledger period to be reopened, unless there are material changes. In general, companies follow this practice unless there are strong justifications and related approvals. By using this feature, you might not need to reopen a closed accounting period, because you already ensured all unprocessed transactions and exceptions were duly resolved before the General Ledger period was closed.
- Provides more meaningful and accurate financial reporting, because all exceptions would have been duly resolved and accounted for, before reporting.
- Helps comply with audit requirements, if any.
Steps to Enable
To enable this feature for a primary ledger, perform the following steps:
- In the Setup and Maintenance work area, use the Specify Ledger Options task:
- Offerings: Financials
- Functional Area: General Ledger
- Task: Specify Ledger Options, with the ledger scope set
- On the Specify Ledger Options page, select the Prevent General Ledger Period Closure When Open Subledger Periods Exist option in the Period Close section.
- Save and close the page.
To exclude one or more subledgers so the General Ledger period close process skips the period status exceptions encountered in the context of those subledgers, perform the following steps:
- In the Setup and Maintenance work area, use the Manage General Ledger Lookup Values task:
- Offerings: Financials
- Functional Area: General Ledger
- Task: Manage General Ledger Lookup Values
- Enter ORA_GL_INCLD_STRICT_PRD_CLOSE in the Lookup Type field and click Search.
- For each subledger that you want to exclude, click in the Enabled field to deselect it.
- Save and close the page.
Tips And Considerations
- Currently, the primary ledgers use this feature.
- You are allowed to revert back to the pre-existing functionality by deselecting the Prevent General Ledger Period Closure When Open Subledger Periods Exist option in the Period Close section on the Specify Ledger Options page of a primary ledger.
- By default, the General Ledger accounting period close process considers period status exceptions, if any, within the context of the included subledgers. You can optionally exclude one or more subledgers, so the General Ledger period close process skips the period status exceptions encountered in the context of those subledgers. The transaction exceptions previously listed will still be checked and period close prevented if the process encounters such exceptions.
- You need to set up the subledger exclusions and reinclusions only once to apply to every primary ledger for which the Prevent General Ledger Period Closure When Open Subledger Periods Exist option is enabled.
- The Close period action initiated using the application pages will display an error message when the subledger periods are not yet closed. When encountering any other exception and in all cases when the Close period action was initiated using the Enterprise Scheduler Service processes, the error messages are rendered in the log files.
Key Resources
- Watch: Prevent General Ledger Period Closure When Open Subledger Periods Exist readiness training (20A)
- Related Help:
- Period Close chapter in the Implementing Enterprise Structures and General Ledger guide
- Accounting Period Close chapter in the Using General Ledger guide
Role Information
You don't need any new role or privilege access to set up and use this feature.
Limit journals to a single currency and enable separation of journals by currency during journal import for journal sources that have this option enabled.
This enables organizations to ensure that journals are separated by currency.
Steps to Enable
To enable this feature, perform the following steps:
- In the Setup and Maintenance work area, go to the Specify Ledger Options task:
- Offering: Financials
- Functional Area: General Ledger
- Task: Specify Ledger Options, with the ledger scope set
- On the Specify Ledger Options page, enable the Limit a Journal to a Single Currency option in the Journal Processing Entry section for the primary ledger. This will automatically enable the option for any associated secondary and reporting ledgers.
- Go to the Manage Journal Sources task:
- Offering: Financials
- Functional Area: General Ledger
- Task: Manage Journal Sources
- On the Manage Journal Sources page, enable the Limit Journal to Single Currency option for journal sources that you want to enable the option for.
Tips And Considerations
The following internal General Ledger journal sources cannot be enabled for this option: Allocations, AutoCopy, Balance Transfer, Closing Journal, and Revaluation.
Key Resources
- Refer to the Implementing Enterprise Structures and General Ledger guide, Ledger and General Ledger Options chapters.
Billing Retroactive Adjustments for Joint Ventures
Billing Retroactive Adjustments for Joint Ventures enables managing partners to automatically reprocess and redistribute joint venture transactions to create adjustments when an ownership definition is changed.
This feature automatically:
- Identifies when an ownership definition changes, and marks the ownership definition for reprocessing.
- Selects and marks joint venture distributions associated with the changed ownership definition for reprocessing.
- Deletes any unprocessed joint venture distributions that have been marked for reprocessing.
- Reverses any draw from partner contributions for processed joint venture distributions.
- Reverses project capitalization information written into Project Costing for the joint venture distributions.
- Creates Receivables credit memos to reverse the invoiced distributions and updates the credit memo information on the joint venture distribution.
- Redistributes the joint venture transactions using the ownership definition that has the new ownership percentage to create new joint venture distributions.
Watch a Demo
Business Benefits:
- Enables companies to automatically conform to joint operating agreement changes through automated processes and billing adjustments.
- Provides an audit trail to help resolve partner disputes over invoices or partner contributions.
- Enables the joint venture accountant to minimize month-end processing and reduce the risk of manual errors.
Steps to Enable
You don't need to do anything to enable this feature.
Key Resources
- Watch Billing Retroactive Adjustments for Joint Ventures Readiness Training
- Readiness Training - Introduction to Joint Venture Management (update 20B)
- Readiness Training - Joint Venture Accounts Receivable Invoices (update 20C)
- Readiness Training - Transaction Date Determination from Subledger Accounting Supporting References and General Ledger Transactions (update 20C)
- Readiness Training – Partner Contribution Management for Joint Ventures (update 20D)
- Readiness Training – Project Capitalization and Progress Management (update 20D)
- For more information on the Joint Venture Management solution, refer to Oracle Joint Venture Management Cloud implementation guide.
Role Information
To implement this feature, you will need the following job roles/privileges:
- Role
- Joint Venture Accountant
- Privileges
- Create Joint Venture Accounts Receivable Invoices
- View Joint Venture Invoicing Partners
Joint Venture Accounting Manager Dashboard
The Joint Venture Accounting Manager Dashboard provides metrics for joint ventures, joint venture transactions, and joint venture distributions. It provides analytics to help you easily monitor your joint ventures:
- Number of unapproved joint ventures
- Joint ventures that are active vs. not active
- Transaction amounts by transaction status
- Transaction counts by transaction status
- Distribution amounts by transaction status
- Distribution counts by distribution status
Watch a Demo
Business Benefits:
- The Joint Venture Accounting Manager Dashboard includes analytics that can be used to analyze and resolve issues in joint ventures.
- Enables the Joint Venture Accounting Manager to oversee the activities of the joint venture to minimize month-end processing and reduce the risk of manual errors.
Steps to Enable
You don't need to do anything to enable this feature.
Key Resources
- Watch Joint Venture Accounting Manager Dashboard Readiness Training
- Readiness Training - Introduction to Joint Venture Management (update 20B)
- Readiness Training – Joint Venture Accounting Manager Dashboard (update 20B)
- For more information on the Joint Venture Management solution, refer to Oracle Joint Venture Management Cloud implementation guide.
Role Information
To implement this feature, you will need the following job roles/privileges:
- Role
- Joint Venture Accounting Manager
- Privileges
- View Distributions
- View Accounting Manager Dashboard
Partner Contribution Management for Joint Ventures
Use date-effective Joint Venture Partner Contributions to manage cash advances from joint venture partners to the managing partner to cover up-front and continuing costs related to a joint venture.
This solution enables you to:
- Define joint venture partner contributions.
- Identify Receivables invoices for partner contributions.
- Automatically draw from partner contributions.
- Mark the draw from partner contributions in the Receivables invoice that is sent to the partners to record the reimbursement from partners.
- Close the partner contributions.
Watch a Demo
Business Benefit:
- Ensures that payment is requested from partners for only those costs that are not covered by the respective joint venture partner contribution(s).
- Provides visibility to joint venture partners about the draw from partner contributions in the Receivables invoice that is issued to each partner for reimbursing the costs incurred by the joint venture managing partner.
- Enables the joint venture accountant to minimize month-end processing and reduce the risk of manual errors through the automated processes.
Steps to Enable
You don't need to do anything to enable this feature.
Key Resources
-
Watch Partner Contribution Management for Joint Ventures Readiness Training
-
Readiness Training - Introduction to Joint Venture Management (update 20B)
- Readiness Training - Joint Venture Accounts Receivable Invoices (update 20C)
- Readiness Training - Billing Retroactive Adjustments for Joint Ventures (update 20D)
- Readiness Training – Project Capitalization and Progress Management (update 20D)
- For more information on the Joint Venture Management solution, refer to Oracle Joint Venture Management Cloud implementation guide.
Role Information
To implement this feature, you will need the following job roles/privileges:
- Role:
- Joint Venture Accountant
- Privileges:
- Manage Partner Contributions
- Assign and Draw from Partner Contributions
- Create Joint Venture Accounts Receivable Invoices
Project Capitalization and Progress Management
Joint Venture Management creates cost transactions in Project Management to account for the external partners’ share of the joint venture costs. Leverage this project information across the joint venture life cycle to get visibility of costs that can be capitalized for the project.
Project information from the original transaction is now available within Joint Venture Management, which includes - Project Name, Task Name, Expenditure Type, Expenditure Organization and Expenditure Date.
Project information is added to the accounts receivable invoices created to recoup the partners’ share of expenses and can be viewed in the invoice. This provides traceability to a specific project and task for individual joint venture partner’s share of costs.
Watch a Demo
Business Benefit:
- Joint Venture Management creates cost transactions in Project Management, enabling Project Managers to have better visibility of capital expenditures and asset creation.
- Joint Venture Accountants save time and eliminate manual errors by leveraging automated processes.
Steps to Enable
Use the Opt In UI to enable this feature. For instructions, refer to the Optional Uptake of New Features section of this document.
Offering: Financials
- Opt-in to Project Costing in Project Management.
- Opt-in to Project Capitalization and Progress Management in Joint Venture Management
- Ensure all source systems for costs (Accounts Payable, Procurement, Receipts, Time & Labor, etc.) have been set up with the required project-related supporting references (project, task, expenditure type, expenditure date, expenditure org).
- Ensure that Joint Venture System Options have been set up with the project-related supporting references (project, task, expenditure type, expenditure date, expenditure org).
Watch a Setup Demo
Tips And Considerations
Once the Project Capitalization and Progress Management is enabled and the corresponding configuration completed in Joint Venture System Options, any subsequent transactions imported into Joint Venture Management will reflect the enabled integration with projects. New joint venture transactions that are associated with a project will contain project information and corresponding project costing adjustment records will be created in Project Costing.
Key Resources
- Watch Project Capitalization and Progress Management Readiness Training
- Readiness Training - Introduction to Joint Venture Management (update 20B)
- Readiness Training - Joint Venture Accounts Receivable Invoices (update 20C)
- Readiness Training - Billing Retroactive Adjustments for Joint Ventures (update 20D)
- Readiness Training – Partner Contribution Management for Joint Ventures (update 20D)
- For more information on the Joint Venture Management solution, refer to Oracle Joint Venture Management Cloud implementation guide.
Role Information
To implement this feature, you will need the following job roles/privileges:
- Role
- Joint Venture Accountant
- Joint Venture Application Administrator
- Application Implementation Consultant
- Privileges
- Distribute Joint Venture Transactions
- Create Project Costing Entries
- Create Joint Venture Accounts Receivable Invoices
- Manage Joint Venture System Setup
Configure lease system options to align with specific organizational business practices. The Financial Application Administrator can create or update system options, add or update rates for calculating Right-of-Use and liability balances and maintain payment templates to simplify lease creation.
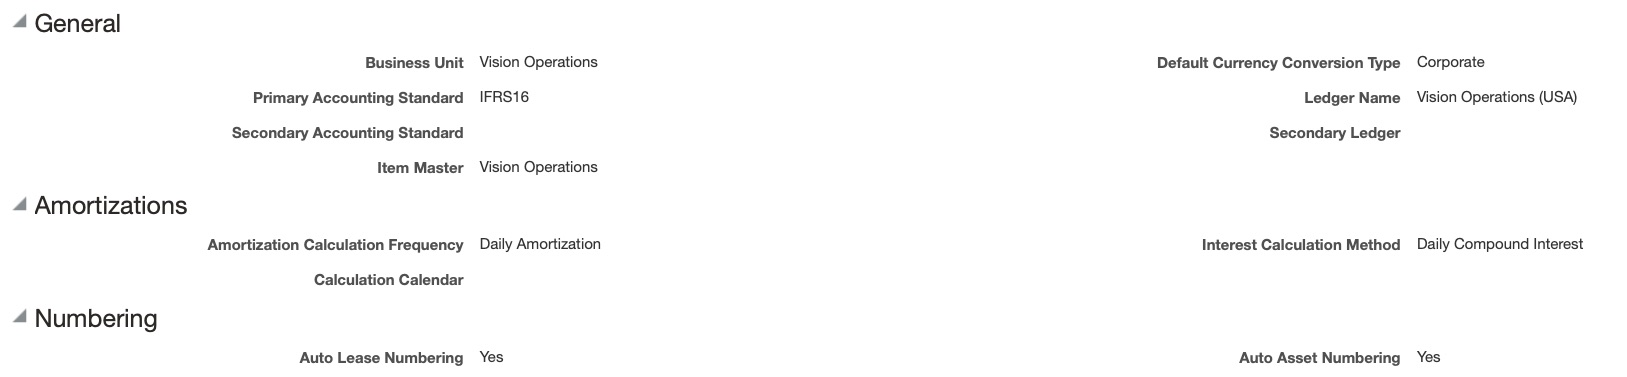
System Options
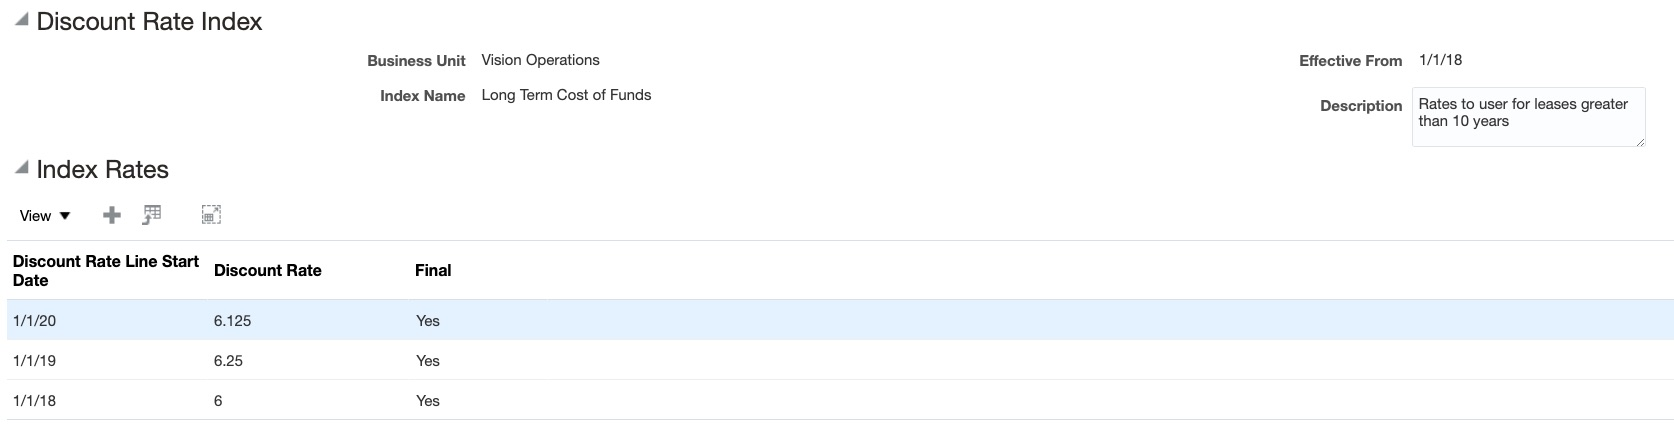
Discount Rate Index
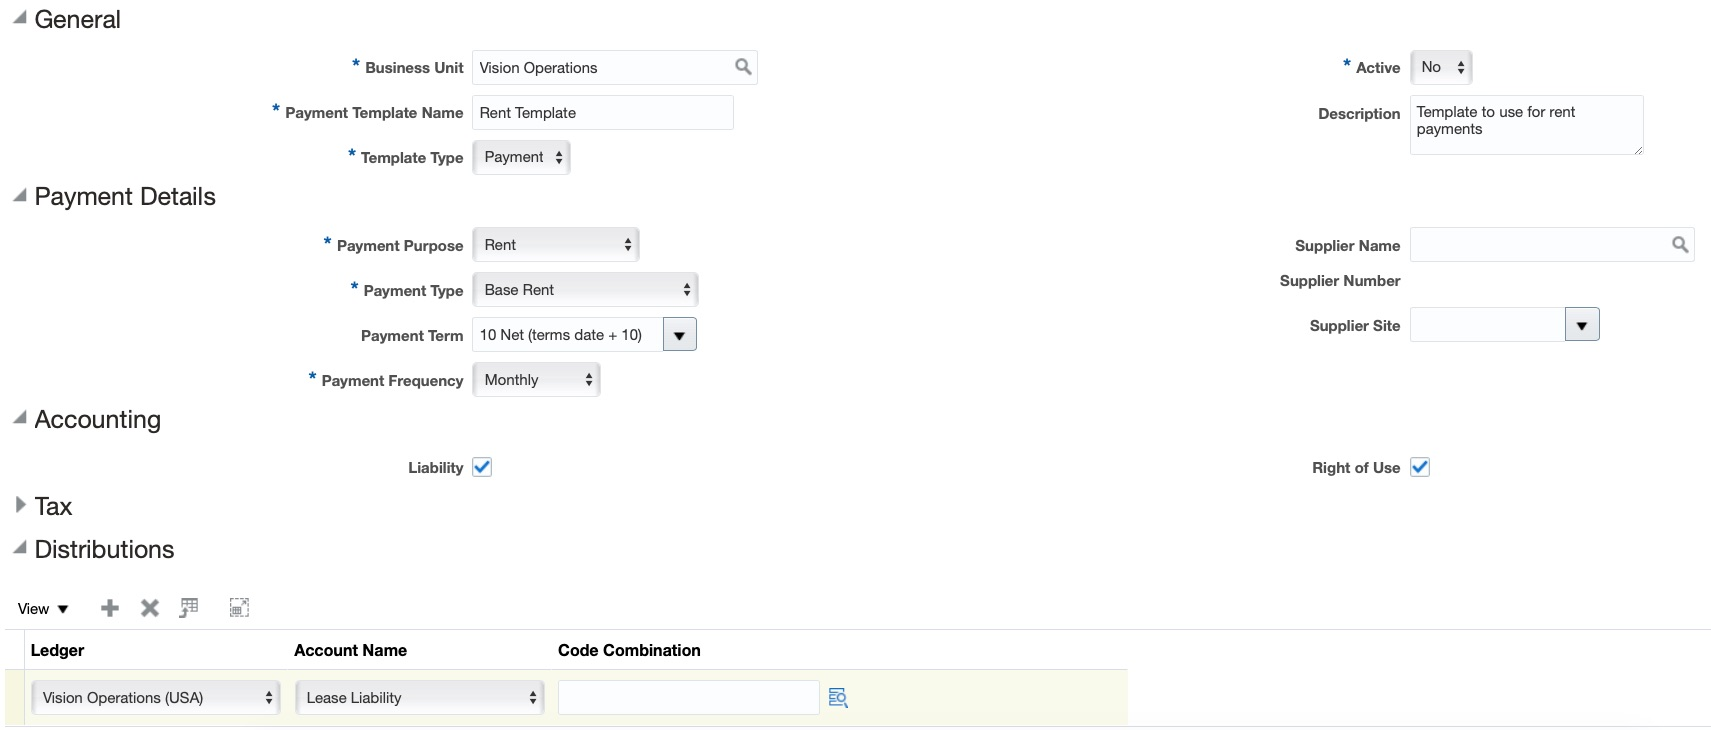
Payment Template
The business benefit is a simplified lease configuration process using new user interfaces.
Steps to Enable
Use the Opt In UI to enable this feature. For instructions, refer to the Optional Uptake of New Features section of this document.
Offering: Financials
Role Information
The Manage Lease Configuration privilege is assigned to the Financial Application Administrator. Please use this role to complete the Lease Accounting setup configuration.
Activate lease contracts to complete the lease creation process. The activation process generates the lease booking transaction and includes the contract in the periodic accruals processing. These transactions are accounted for according to IFRS16 and ASC842. The activation process also stores the amortization schedule, calculated by either daily or periodic compound, as an attachment on the contract. Active contracts are available for viewing in read-only mode. Before activation, lease administrators can capture options, such as renewal options or early termination options for a lease.
OPTIONS
Options are a crucial part of a lease agreement, both from operations and accounting perspectives. There are many types of options on a contract, such as renewal options or early termination options. Lease administrators routinely monitor upcoming options to make the right decision for the organization.
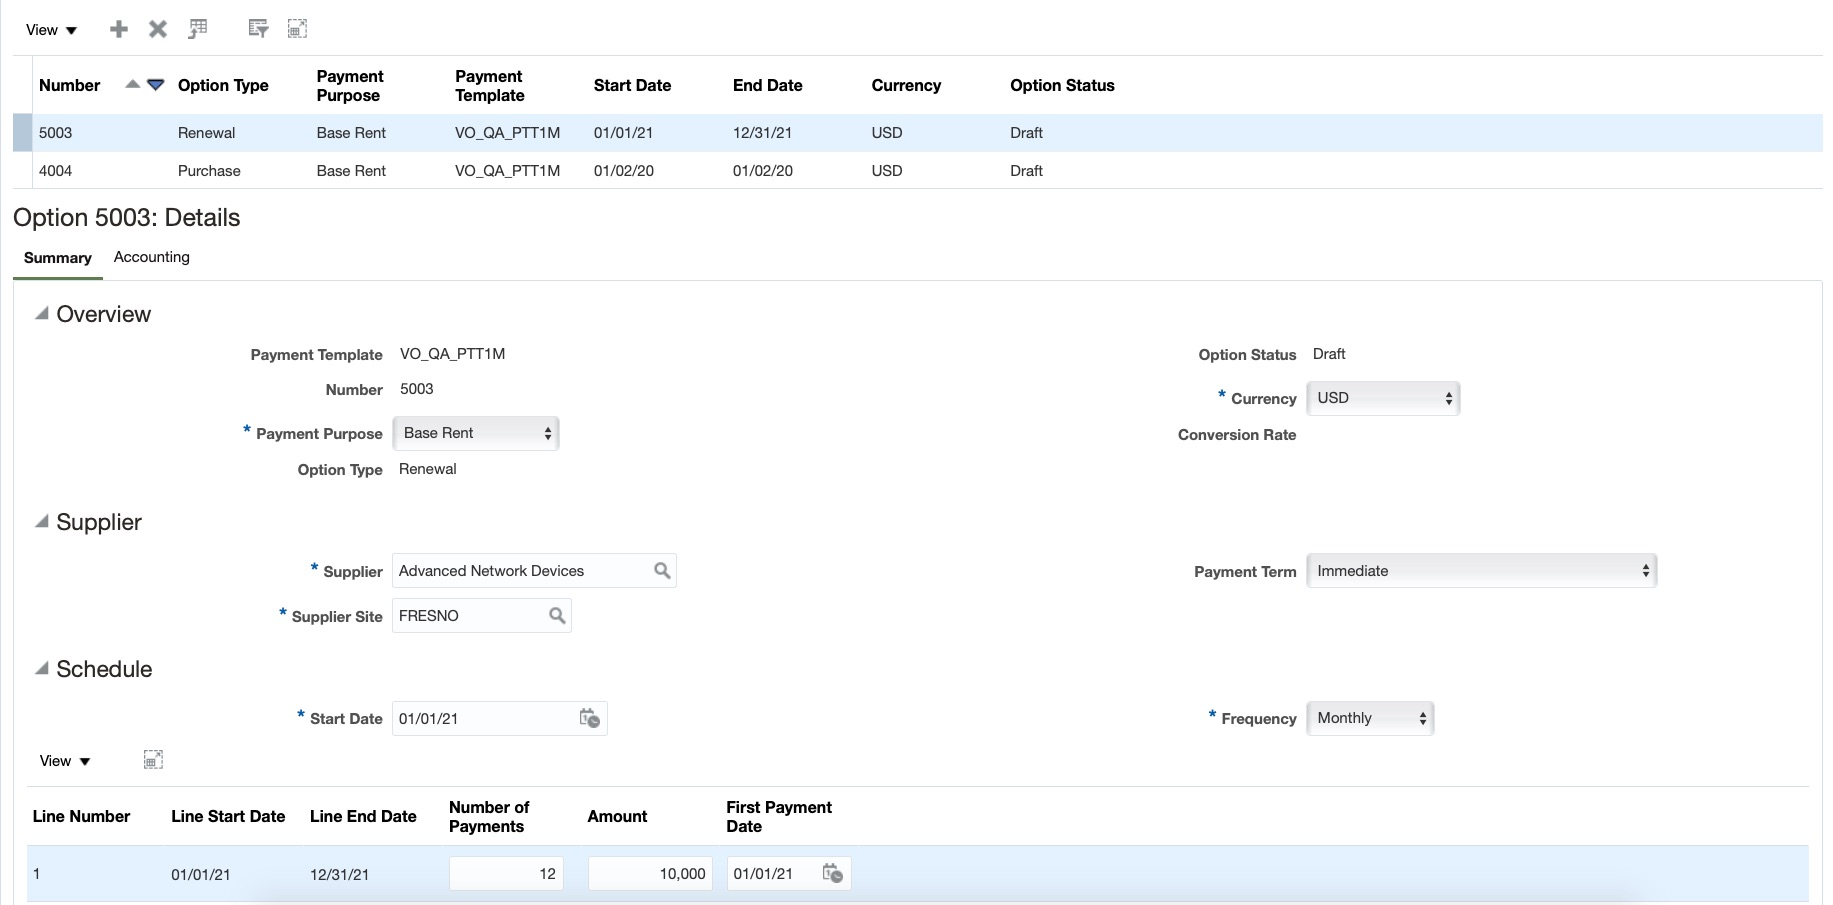
Lease Options Page
ATTACHMENTS
Many business documents are created as part of the lease transaction. Examples of these include the lease contract, schedules, financial statements, insurance policies, warranties. An attachment tab is available on the lease creation page to upload documents or provide links to documents

Lease Attachments tab
SCHEDULES
After validation, the lease is available for schedule generation. The schedule contains all the future payments for the lease as well as the periodic amortization of the ROU and Liability balances. The amortization calculation is done on either a daily or periodic basis, depending on the system setup. The schedules tab provides the Lease administrator or accountants the ability to view the schedules before lease activation.
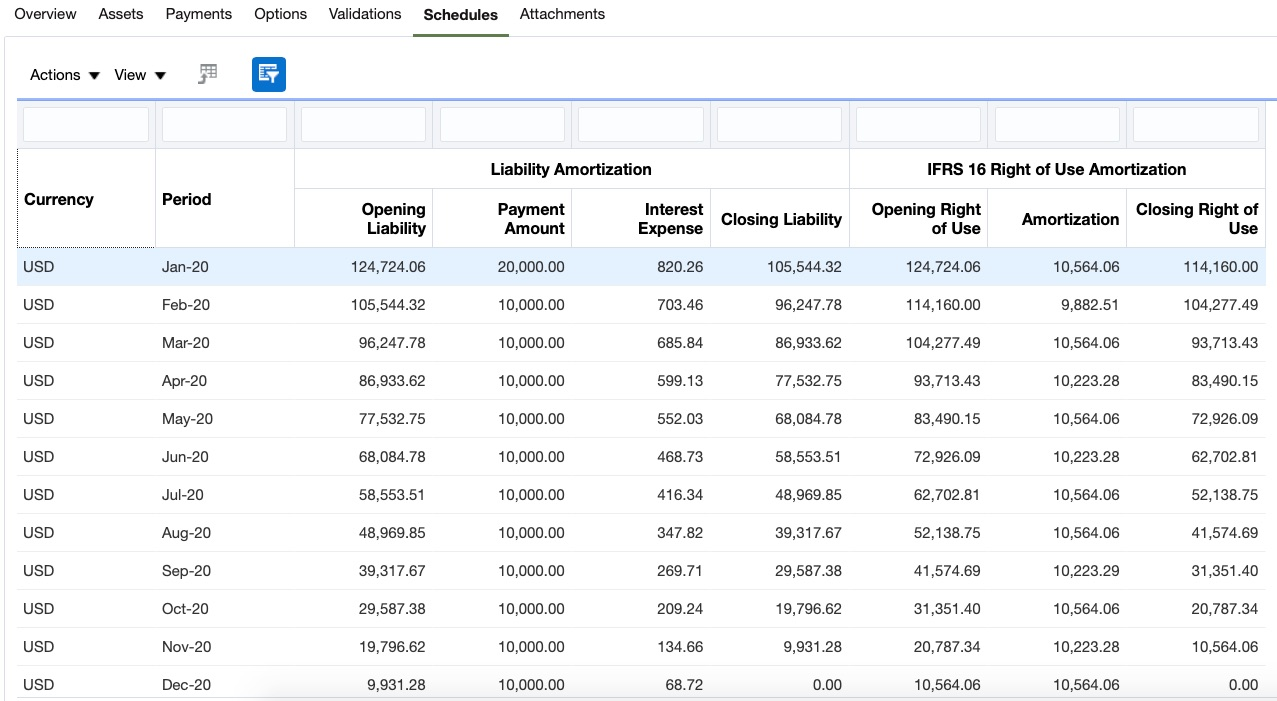
Schedules tab
ACTIVATION
The final step of the booking process is activation. The activation step creates the accounting transaction for initiating the ROU and Liability balances. An active lease is only available for change through an amendment.
LEASE DETAIL REPORT
A detailed report of the payment and amortizations down to the asset and payment level is available after contract activation.
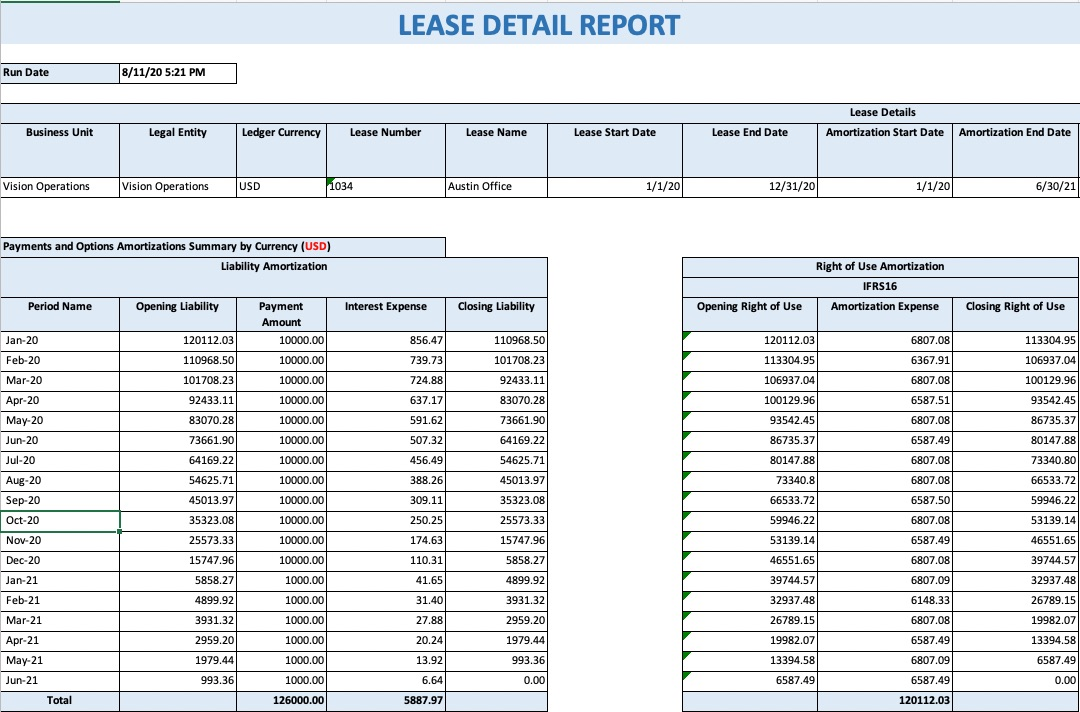
Sample of Lease Detail Report
IFRS16 AND ASC842 ACCOUNTING
The introduction of IFRS16 and ASC842 increases the accounting and complexity of lease transactions. The Lease Accounting module supports these accounting needs through new lease transactions and integration with the subledger architecture. The booking process generates transactions for initiating the ROU and Lease Liability balances. The Lease Accruals process generates transactions for the lease liability expense and ROU amortization. This transaction reduces the initial Liability and ROU balances.
Both the booking and accruals transactions are accounted for in subledger. Generating accounting in the primary ledger under one GAAP (e.g., IFRS16) and in the secondary ledger under the other GAAP (e.g., ASC842) is available for multi-national organizations. The accounting infrastructure also provides support for lease payments in different currencies than the ledger currency.
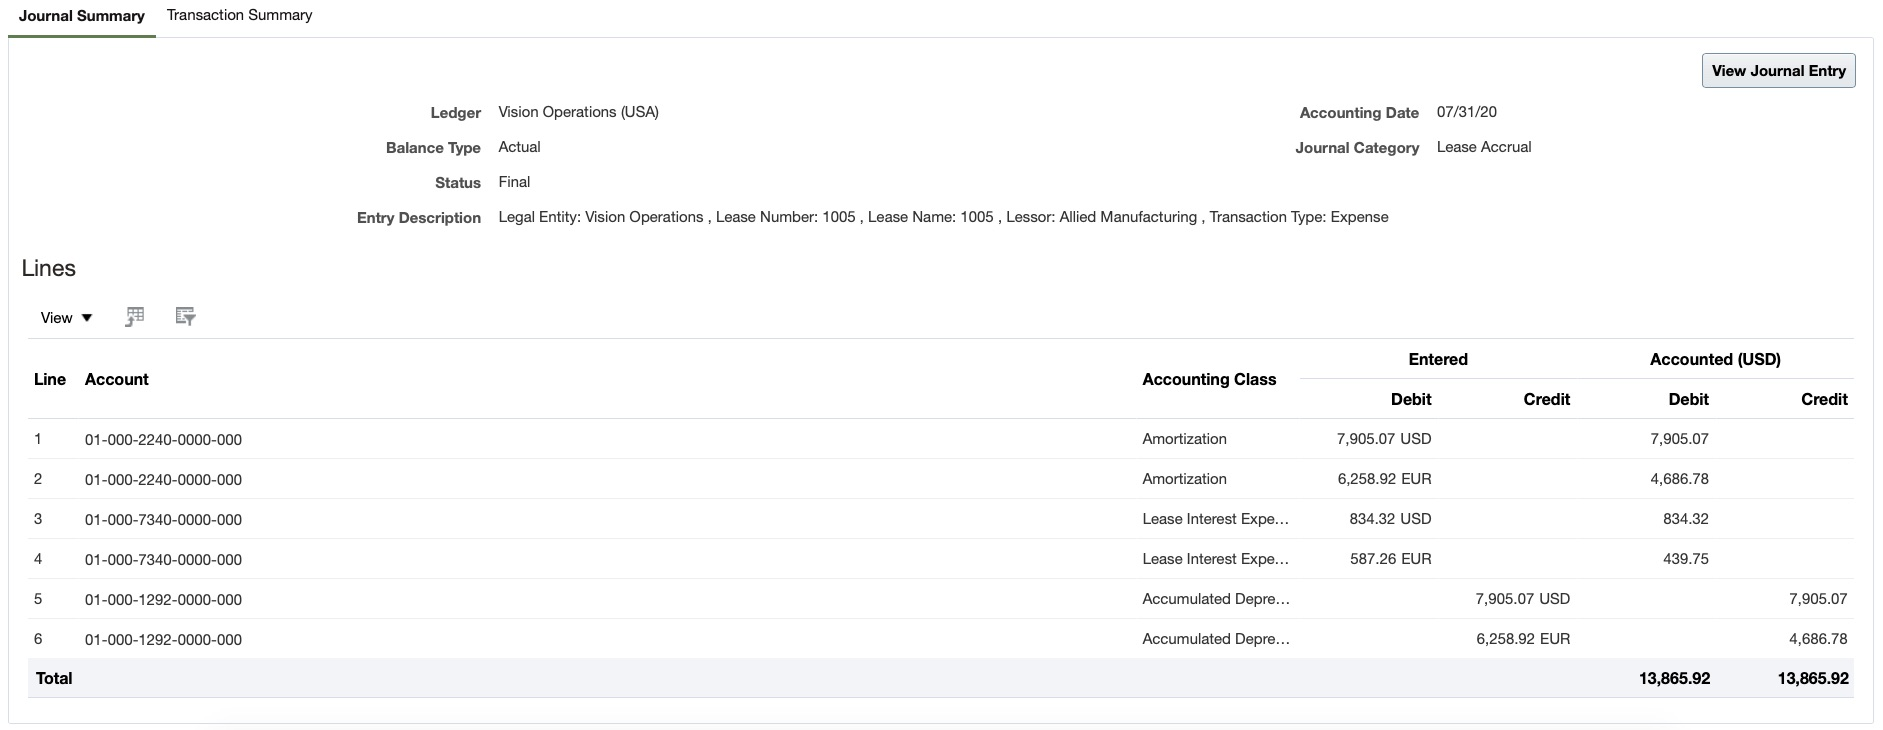
Accounted Lease Transaction in SLA
The business benefits of this feature include:
- Enforcement of lease accounting policies consistently across the organization
- Automation of ASC 842 and IFRS 16 lease processes, increasing productivity and reducing the risk of error
- Review of lease exceptions to ensure best-practice compliance and consistency
- Standardization of lease information in a single repository via actionable user interfaces
Steps to Enable
Use the Opt In UI to enable this feature. For instructions, refer to the Optional Uptake of New Features section of this document.
Offering: Financials
Functional Area: Lease Accounting
Feature: Create Property and Equipment Leases
Perform the following steps:
- Update Subledger Accounting Options:
- If reporting into secondary ledgers for multi-GAAP, ensure Valuation Method is enabled for the secondary ledger for lease accounting
- Ensure Standard Accrual accounting method for all ledgers
- Assign Business Function for Lease Accounting
- Setup Payables Common Options
- Manage Lease Configurations
- Define System Options
- Define Discount Rate Index
- Define Payment Templates
Role Information
Assign the ORA_FLA_LEASE_CONTRACT_DUTY_OBI to the same role that the lease contract duty is assigned.
Configurable Payables Workflow Notifications
There is a change in the opt-in method for the Configurable Payables Workflow Notifications feature. When using the New Features Work Area or the Setup and Maintenance Work area to change the opt-in selection for this feature, the individual notifications are now displayed as a list of child features instead of being displayed within a window.
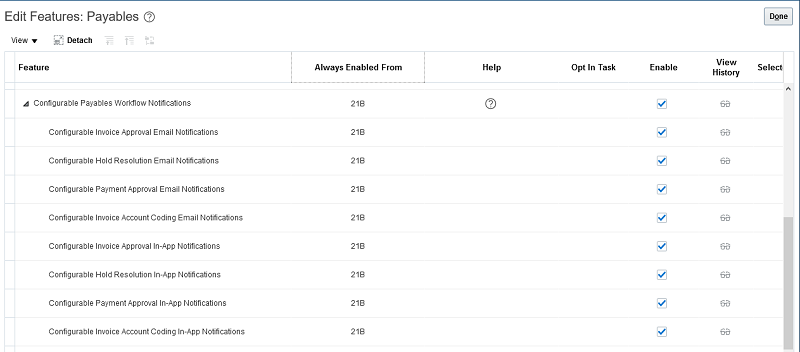
Configurable Payables Workflow Notifications
In 20D, all the notifications within the Configurable Payables Workflow Notifications feature are enabled by default for all customers. If you had opted out of using this feature in previous updates, you will find that the feature is enabled by default for you in 20D. You still have the option to opt-out of using this feature for any or all of the notifications within the Configurable Payables Workflow Notifications in 20D. However, the opt-in for this feature will expire in 21B. This means that from update 21B onwards, the Oracle Business Intelligence Publisher based notifications will be the default method to generate email and in-app notifications for Payables workflows and you will no longer be able to opt out of using this feature.
Configurable Payables Workflow notifications use Oracle Business Intelligence templates to generate the email and in-app notifications. You can modify the notifications to display information based on your business requirements and policies. Choose from a comprehensive list of attributes to modify the notifications in accordance with your requirements. You can change both layout and content - add images, change colors and styling, add or remove attributes or modify text.
Configurable email and in-app notifications are available for use for the following Payables workflows:
- Invoice Approval
- Payment Approval
- Hold Resolution
- Invoice Account Coding
Additional details for this feature are available here.
Steps to Enable
Use the Opt In UI to enable this feature. For instructions, refer to the Optional Uptake of New Features section of this document.
Offering: Financials No Longer Optional From: Update 21B
This feature is delivered enabled by default in update 20D. You still have the option to opt-out of using this feature. However, considering that the opt-in for the feature will expire in 21B, we strongly recommend that you plan for the uptake of this feature.
If you wish to opt-out of using the feature, follow these steps:
- Click the Navigator, and then click New Features (under the My Enterprise heading)
- On the Features Overview page, go to the Available Features tab.
- Select the Configurable Payables Workflow Notifications feature and click on the Enabled icon.
- On the Edit Features page, deselect the Enable option for the feature or child features required and then click Done.
Tips And Considerations
-
The Configurable Payables Workflow Notifications don't require any setup and are ready to use as delivered.
-
The configurable notifications contain all the information that's currently available in the classic notifications. If required, you can modify the notifications to display information as per your business requirements.
- You still have the option to opt-out of using this feature in update 20D. However, considering that the opt-in for this feature will expire in update 21B, we strongly recommend that you plan for the uptake of this feature.
- The templates used to generate workflow notifications are located in the Reports and Analytics work area under the Shared Folders > Financials > Workflow Notifications folders in the Oracle Business Intelligence catalog.
- A single template is used to generate both the email and in-app notifications for a particular workflow. If you have chosen to use configurable notifications for both in-app and email notifications for a workflow, any modifications that you make to the predefined template, will be reflected in both types of notifications.
- When using the in-app notifications to take actions on the workflow task, use the 'Actions' button to view a list of available actions for the notifications.
-
To add comments or attachments, select the 'Add Comments' or 'Add Attachment'.
-
For Invoice Approval and Account Coding in-app notifications, you can edit the invoice distributions using the 'Edit Distributions' option in 'Actions'.
-
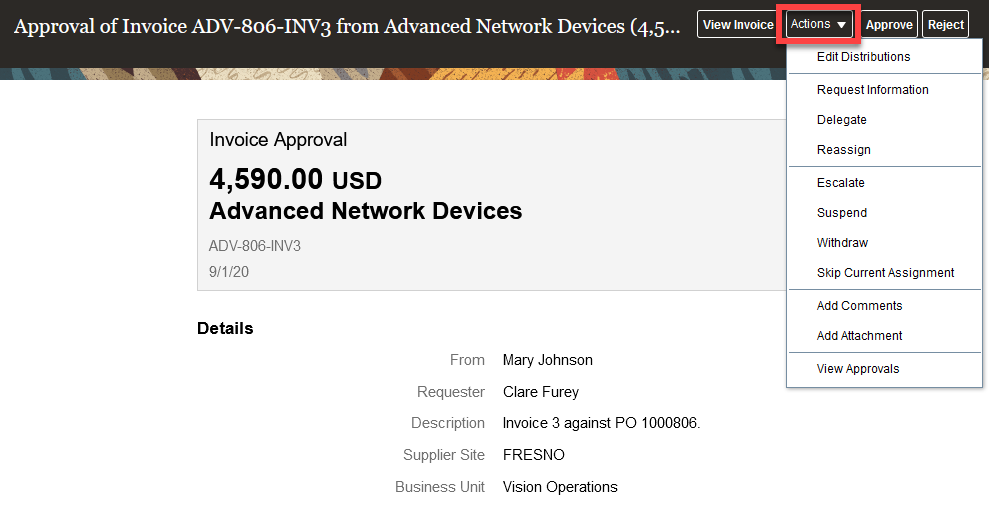
Actions Menu for In-App Notifications
- To view approval history for the notification, select the ''View Approvals' option in Actions. The approval history displays the past, current and future approvers for the transaction in a simplified and linear fashion. Any comments and attachments added by users during the course of approval are displayed inline in the history section.
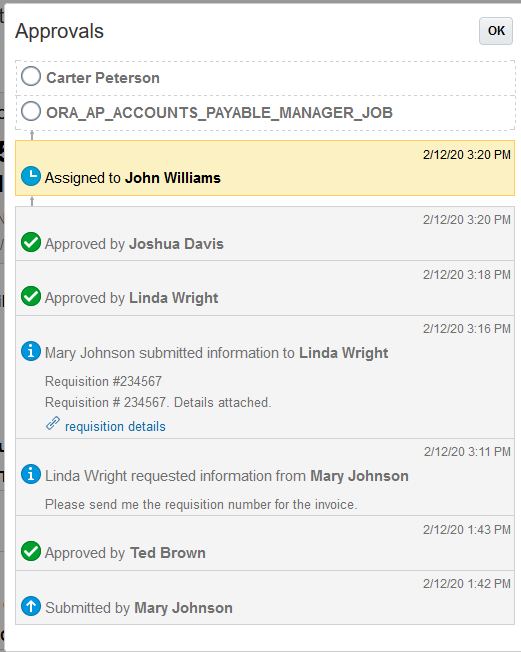
Approval History
Key Resources
- Configuring Payables Workflow Notifications topic on the Oracle Help Center.
Electronic Invoices with File Attachments
Receive and process electronic invoices with file attachments. Attachments can include supporting documents substantiating the claims made in the invoice. You can attach documents using any of these formats: PDF, Word, Excel, and image files. The sender must convert the file into a text sequence using Base64 encoding and include it within the invoice. When the invoice is imported, the documents are decoded and saved along with the invoice. The attachments can be referenced during approval workflow or audit.
File attachments are available by default for invoices using UBL 2.1 standard. File attachments can also be enabled in OAG 10.1 invoices by updating the mapping in OAG 10.1 message definition.
Suppliers can send supporting documents as attachments, for example, to substantiate the claims made in the invoice, such as time sheets for service invoices or usage reports.
Steps to Enable
You don't need to do anything to enable this feature.
Payables Variance Drill Down in Payables to General Ledger Reconciliation Report
The Payables Variance Details Report provides details of Payables Variance amounts in the Payables to General Ledger Reconciliation Report. Click the Payables Variance amount to access the drilldown report.
The Payables Variance Details report lists all the transactions and transaction amounts that affect the Payables Variance. The report displays the validation status of each transaction and the component causing the variance. Use this information to correct the transactions and eliminate the reconciliation variance for the related accounting period.
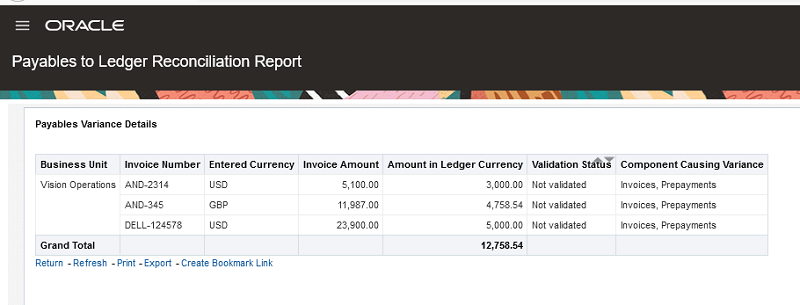
Payables Variance Details report
The Payables Variance Details report provides a list of transactions that cause the Payable Variance. Prior to this, the transactions for this variance had to be identified manually. This report makes it easier to rectify the issues causing the variance and reduces the time taken to complete period close activities.
Steps to Enable
You don't need to do anything to enable this feature.
Payment Process Request Template Replication Across Environments
Use the Functional Setup Manager Export/Import service to move Payment Process Request templates from one environment to another. This allows system administrators to replicate PPR templates across environments more efficiently.
Replication of payment process request templates across environments using the FSM Export/Import service helps eliminate user intervention and repetitive steps, and improve data integrity.
Steps to Enable
Make the feature accessible by assigning or updating privileges and/or job roles. Details are provided in the Role section below.
The new setup task Create Payment Process Request Templates is secured by the privilege "Manage Payables Payment Process Request Template". You need to assign this privilege to the required setup users to access this page from FSM.
Role Information
The new setup task Create Payment Process Request Templates is a secured page and the predefined setup roles do not have access to this page. You would need to assign the privilege "Manage Payables Payment Process Request Template" to the required setup users to access this page from FSM.
Project Attribute Sources for Withholding Tax Distributions
Create account rules based on project attributes for withholding tax distributions. Custom account rules help meet specific accounting and reporting requirements.
Users can define accounting rules based on project attributes to override the default accounting of withholding tax distributions and its related liability line.
Steps to Enable
There are no additional setups required to enable this feature. Customized account rules can be used to get the desired accounting.
Tips And Considerations
Project attributes are not included in withholding distributions. Project attributes for withholding distributions are derived from the related item distribution.
Purchase Order Drilldown from OTBI Using Predefined Payables Job Roles
Use predefined Payables job roles to drill down to purchase orders using deep links. A deep link is a URL to open a page without navigating through the application menu structure. Drill down from Oracle Transactional Business Intelligence, or OTBI, analyses to purchase orders, and view the related purchase order details.
Analysis of Payables reports using Oracle Transactional Business Intelligence can now be done more efficiently using the deep links. Deep links allow you to directly drill down from OTBI reports to purchase orders and view the related purchase order details. This eliminates the need to open a separate window to query the purchase orders related to the invoices under review.
Steps to Enable
There are no setups required to be enable this feature. You would just need to have one of the roles mentioned in the Roles section and create an OTBI report with deep links to PO.
Role Information
You need to have one of the following roles to be able to use this feature.
- Accounts Payable Specialist
- Accounts Payable Supervisor
- Accounts Payable Manager
- Accounts Payable Invoice Supervisor
Update Income Tax Type and Region Without Resubmitting Invoice for Approval
Invoice approval status remains unchanged when you update the income tax type and region on invoices that are reported in US 1099 report. You can update the income tax attributes on invoices that are already approved without resubmitting them for approval. Please note that the income tax type must be updated on the Invoice Distributions, not on the Invoice Lines.
As part of US 1099 reporting process, you can update the income tax type and region on invoices that are already approved and paid. Since the approval status remains unchanged, the invoices don't have to be resubmitted for approval.
Steps to Enable
You don't need to do anything to enable this feature.
Tips And Considerations
Please note that the income tax type must be updated on the Invoice Distributions, not on the Invoice Lines. The values from the invoice lines are defaulted on the distributions only when they are first created. For subsequent updates, you must update the distributions.
Configurable Receivables Credit Memo Request Manual Entry Workflow Notification
Use the enhanced workflow notification for Receivables Credit Memo Request Requires Manual Entry. You can use Oracle Business Intelligence Publisher templates to generate modern and unified look and feel email and in-application notifications. Copy and modify templates to meet business requirements and policies.
You can access the Receivables Credit Memo Request Requires Manual Entry Notification template and modify it to add new fields into the template. You can also modify the predefined template to display information based on your business requirements and policies. Choose from a comprehensive list of attributes to modify the notifications according to your requirements. You can change both layout and content – add images, change colors and styling, add or remove attributes or modify text.
Screenshot of the default Receivables Credit Memo Request Requires Manual Entry Notification is shown below:
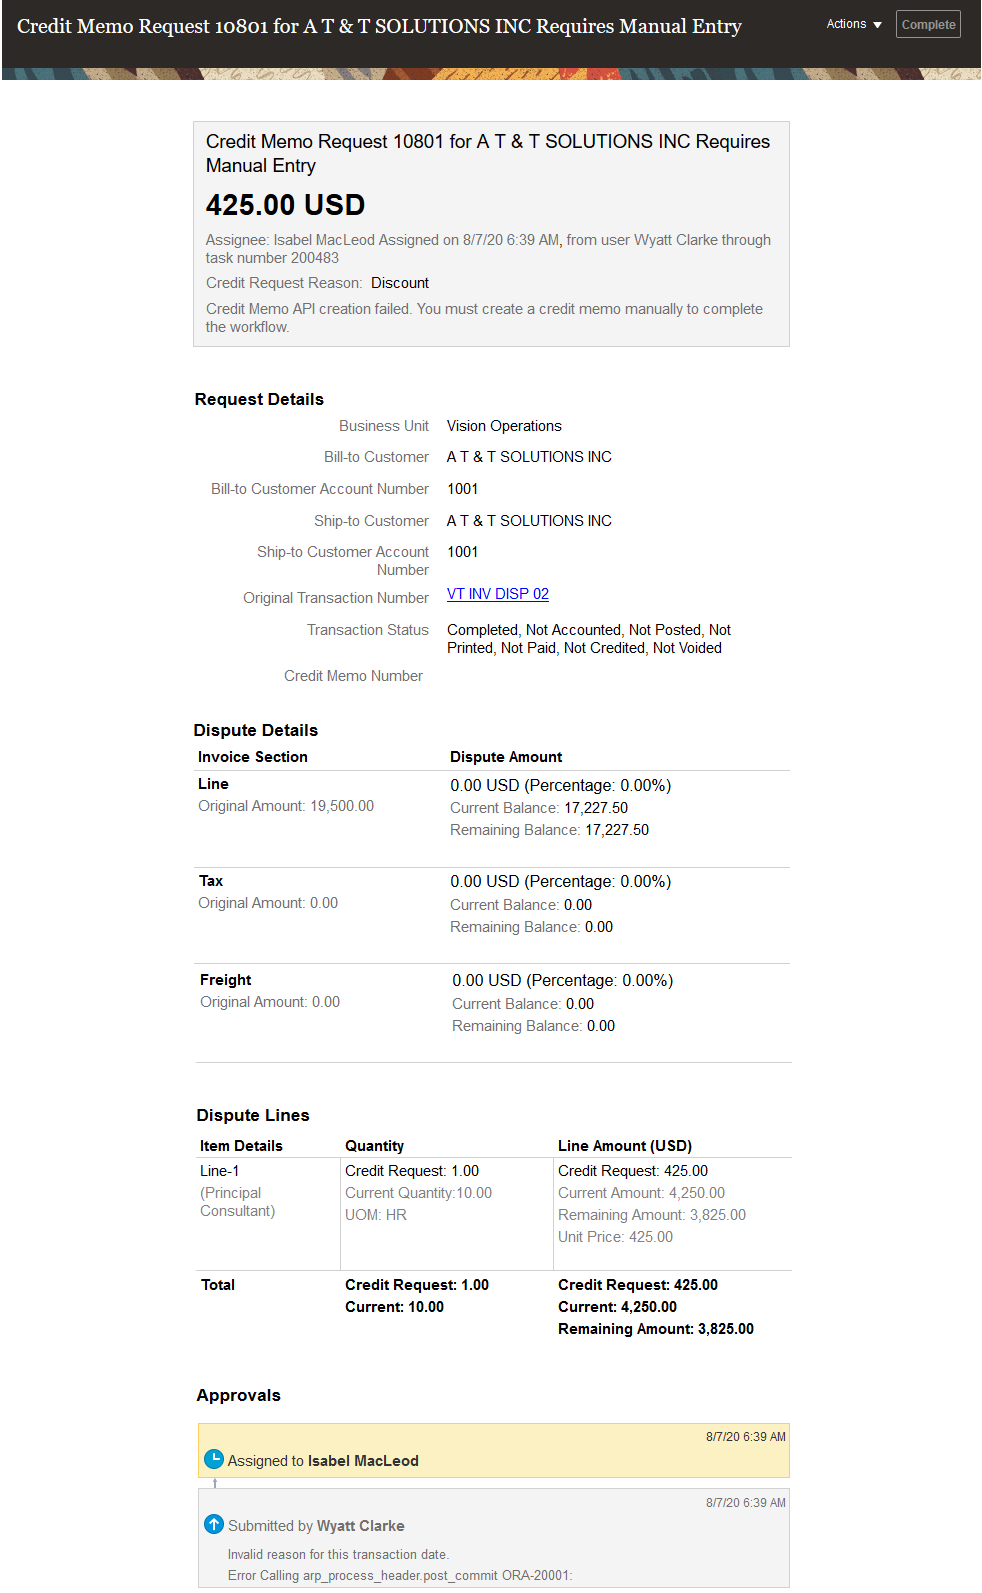
Screenshot of the Receivables Credit Memo Request Requires Manual Entry Notification Data Model is shown below:
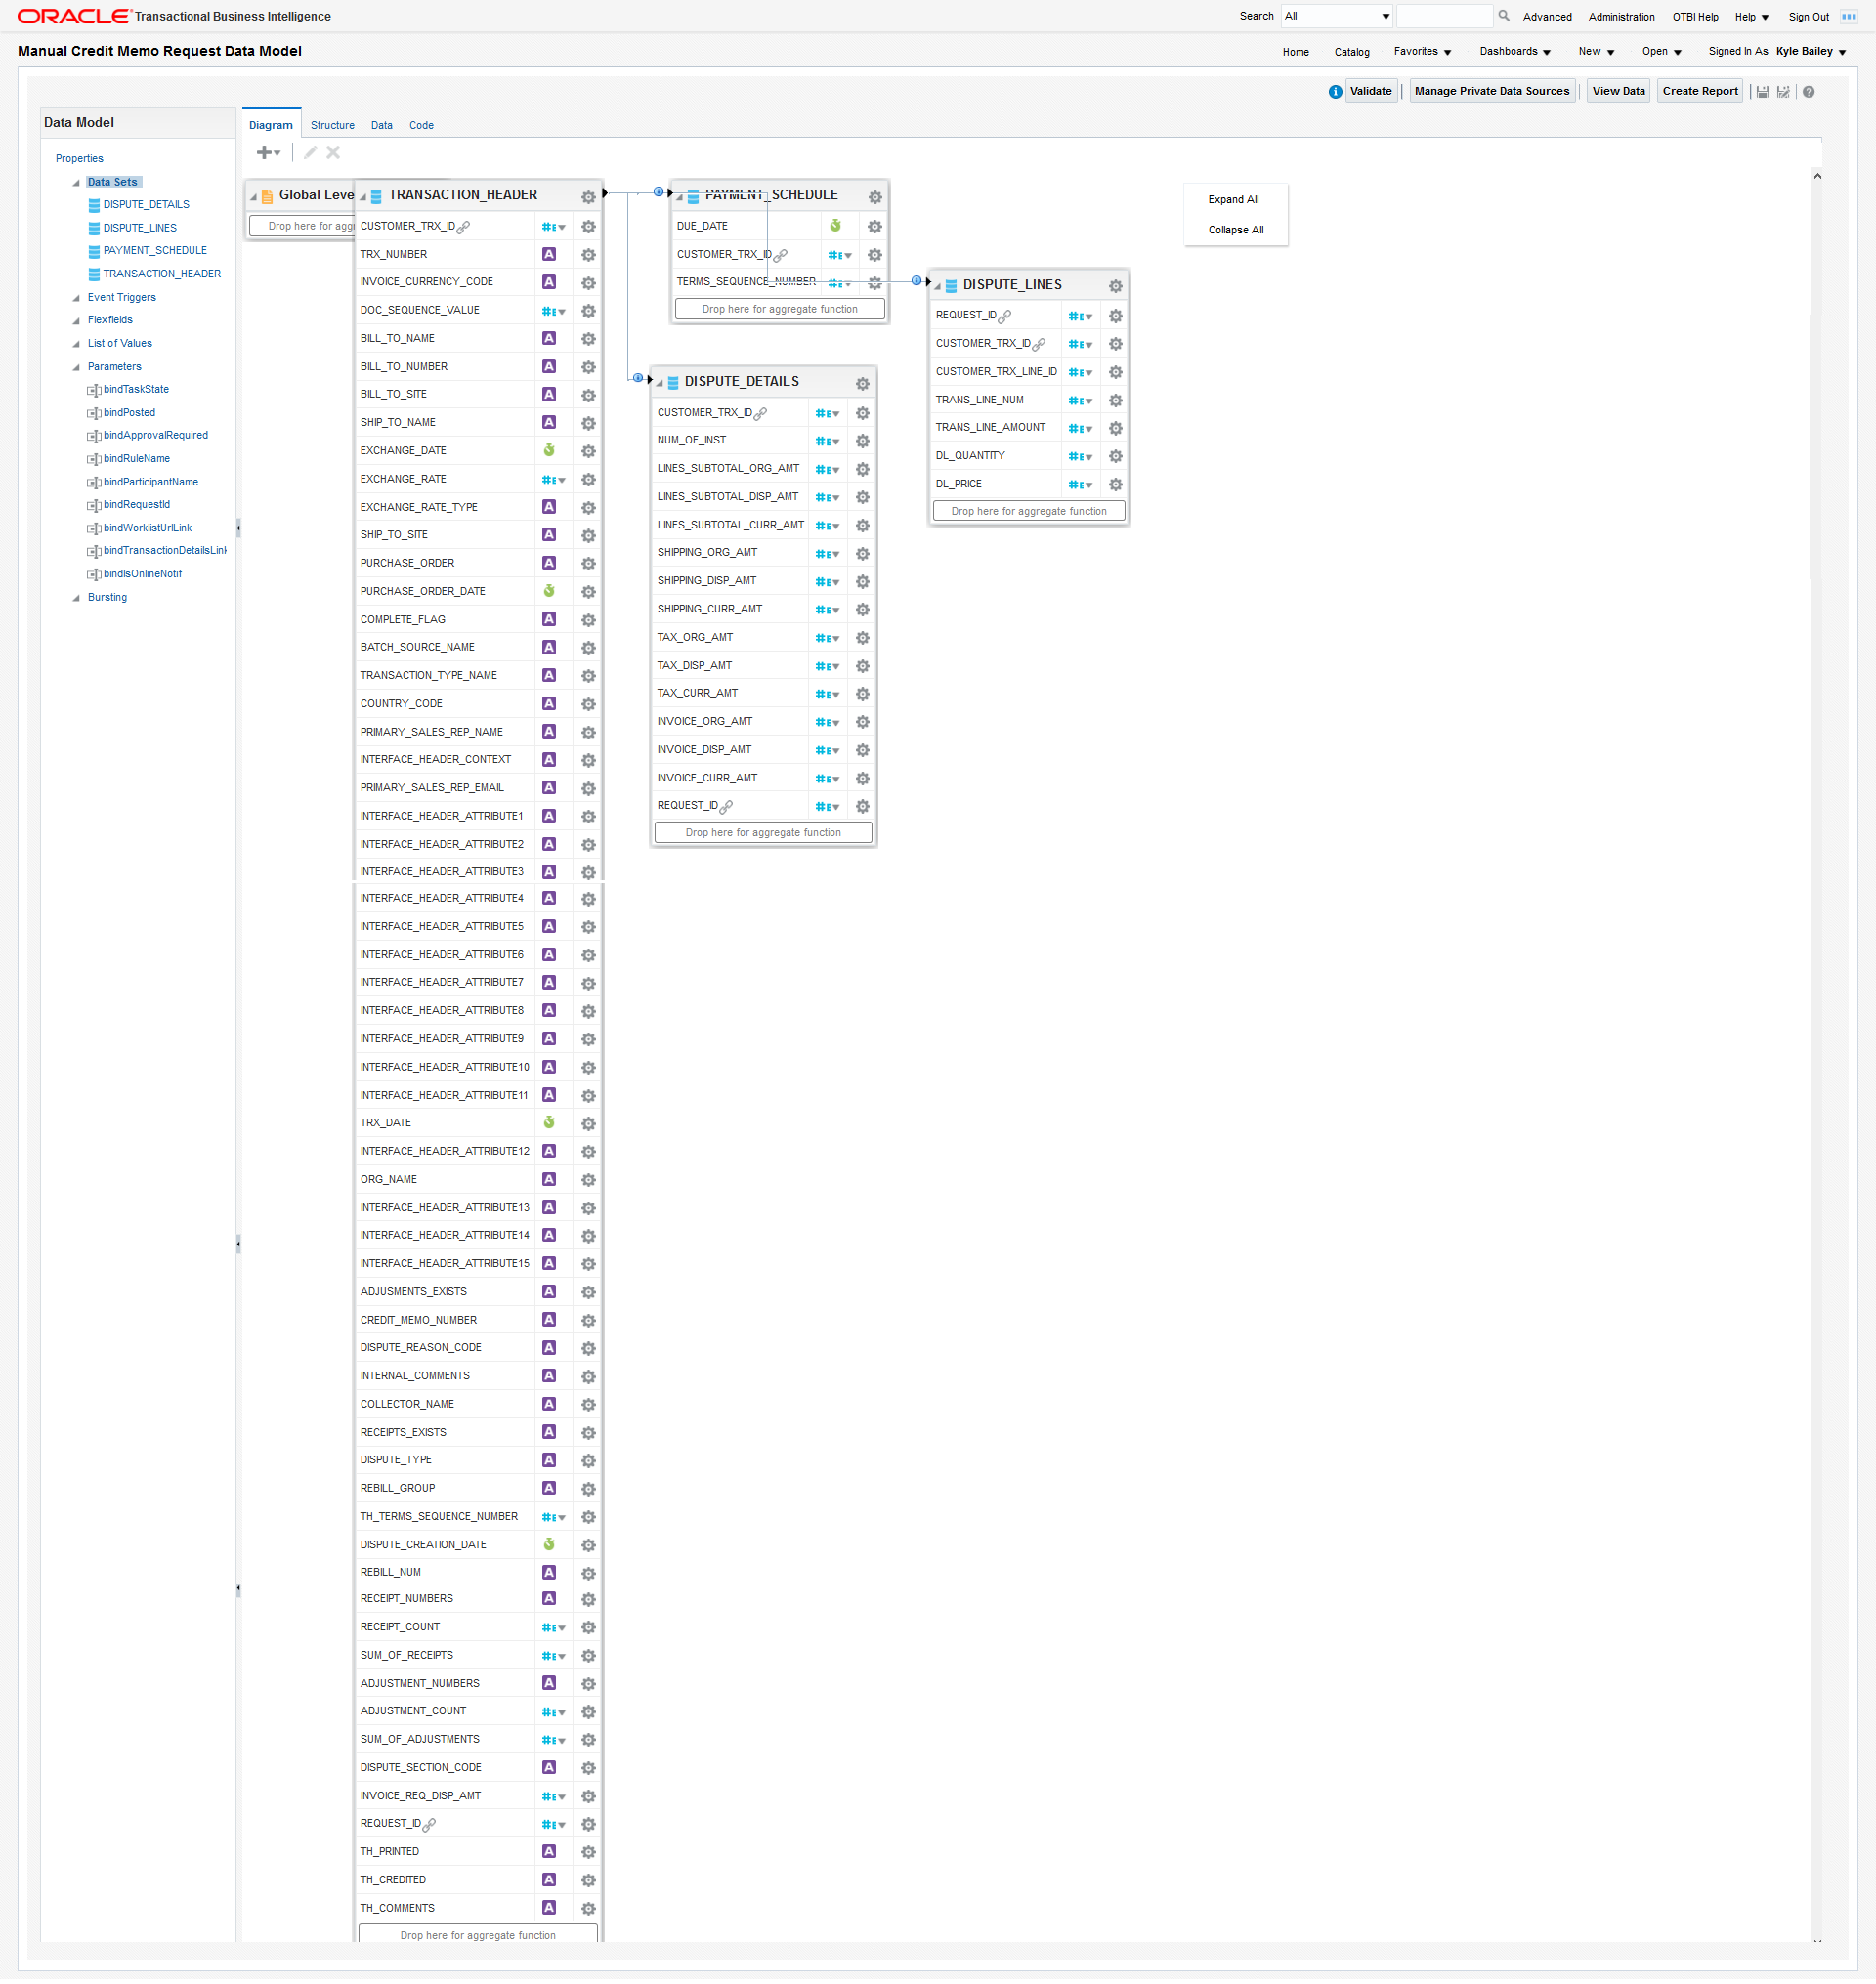
Select the fields that you want from the data model to add to the .rtf template for your report.
The Configurable Receivables Credit Memo Request Manual Entry Workflow notification uses Oracle Business Intelligence templates to generate the email and in-app notifications.
Steps to Enable
Use the Opt In UI to enable this feature. For instructions, refer to the Optional Uptake of New Features section of this document.
Offering: Financials No Longer Optional From: Update 21B
Tips And Considerations
- The predefined template is used by default to present the workflow notification. You can copy and modify this template according to your business requirements and set the modified template as the new default.
- Navigation for accessing the default template: Reports and Analytics - Shared Folders - Financials - Workflow Notifications - Receivables - Billing - Credit Memo Request Manual Entry Notification
-
A single template is used to generate both the email and in-app notifications for a particular workflow. Any modifications that you make to the predefined template will be reflected in both in-app and email notifications.
- The opt-in for this feature will expire in Release 21B. Once the opt-in is expired, Configurable Receivables Credit Memo Request Requires Manual Entry Workflow Notification will be enabled by default and you can no longer opt out of using this feature.
- We recommend that you use the time between now and Release 21B to prepare for the uptake of this feature.
Key Resources
- Overview of Financials Configurable Workflow Notifications on the Oracle Help Center.
Role Information
You don't need any new role or privilege access to use this feature. BI Administrator Role and BI Consumer Role have default permissions to access the report and modify the predefined template.
Credit Memo Creation in the Earliest Open Accounting Period
When Disputes are created and approved, credit memos are automatically created. Instead of using the system date, the transaction date and accounting date will be set to the last day of the earliest open period. For example, if a dispute is approved on January 3rd and the December period is open, the transaction date and accounting date will be set to December 31st. This ensures that the revenue reversal is created in an accounting period as close to the original transaction as possible.
This feature enables you to report revenue more accurately.
Steps to Enable
Use the Opt In UI to enable this feature. For instructions, refer to the Optional Uptake of New Features section of this document.
Offering: Financials No Longer Optional From: Update 21B
Tips And Considerations
The creation date field will continue to represent the date the credit memo was created.
Role Information
The feature does not require any additional role to be granted to the user.
Credit Memo Processing Using Oracle Receivables for Oracle Joint Venture Management
Automate the processing of credit memos for Joint Venture transactions using the Receivables integration with Joint Venture Cloud Management.
This helps streamline credit processing for the respective joint venture partners.
Steps to Enable
You don't need to do anything to enable this feature.
Tips And Considerations
A predefined transaction type ‘JV Credit Memo’ has been introduced to support the processing of credit memo details from Joint Venture Management.
Key Resources
- For more information on Joint Venture Management, refer to the Oracle Cloud Readiness content for Joint Venture Management.
Role Information
You do not need a new role access to use this feature.
Oracle Channel Revenue Management Integration with Oracle Receivables to Perform Claim Investigations
Use the Edit Receipt page to initiate claim investigations in Channel Revenue Management for non-invoice related underpayments and overpayments made by Receivables customers. This helps streamline claim processing and settle underpayments and overpayments, including processing of all settlement-related financial transactions.
The feature provides the following functionality for creation of non-invoice related claim investigations:
- Initiate a claim investigation for non-invoice related underpayments or overpayments on a receipt by creating a claim investigation application against the receipt using the Edit Receipt page.
- To initiate a claim investigation, select Create Claim Investigation from the Actions menu to open the Create Claim Investigation window.
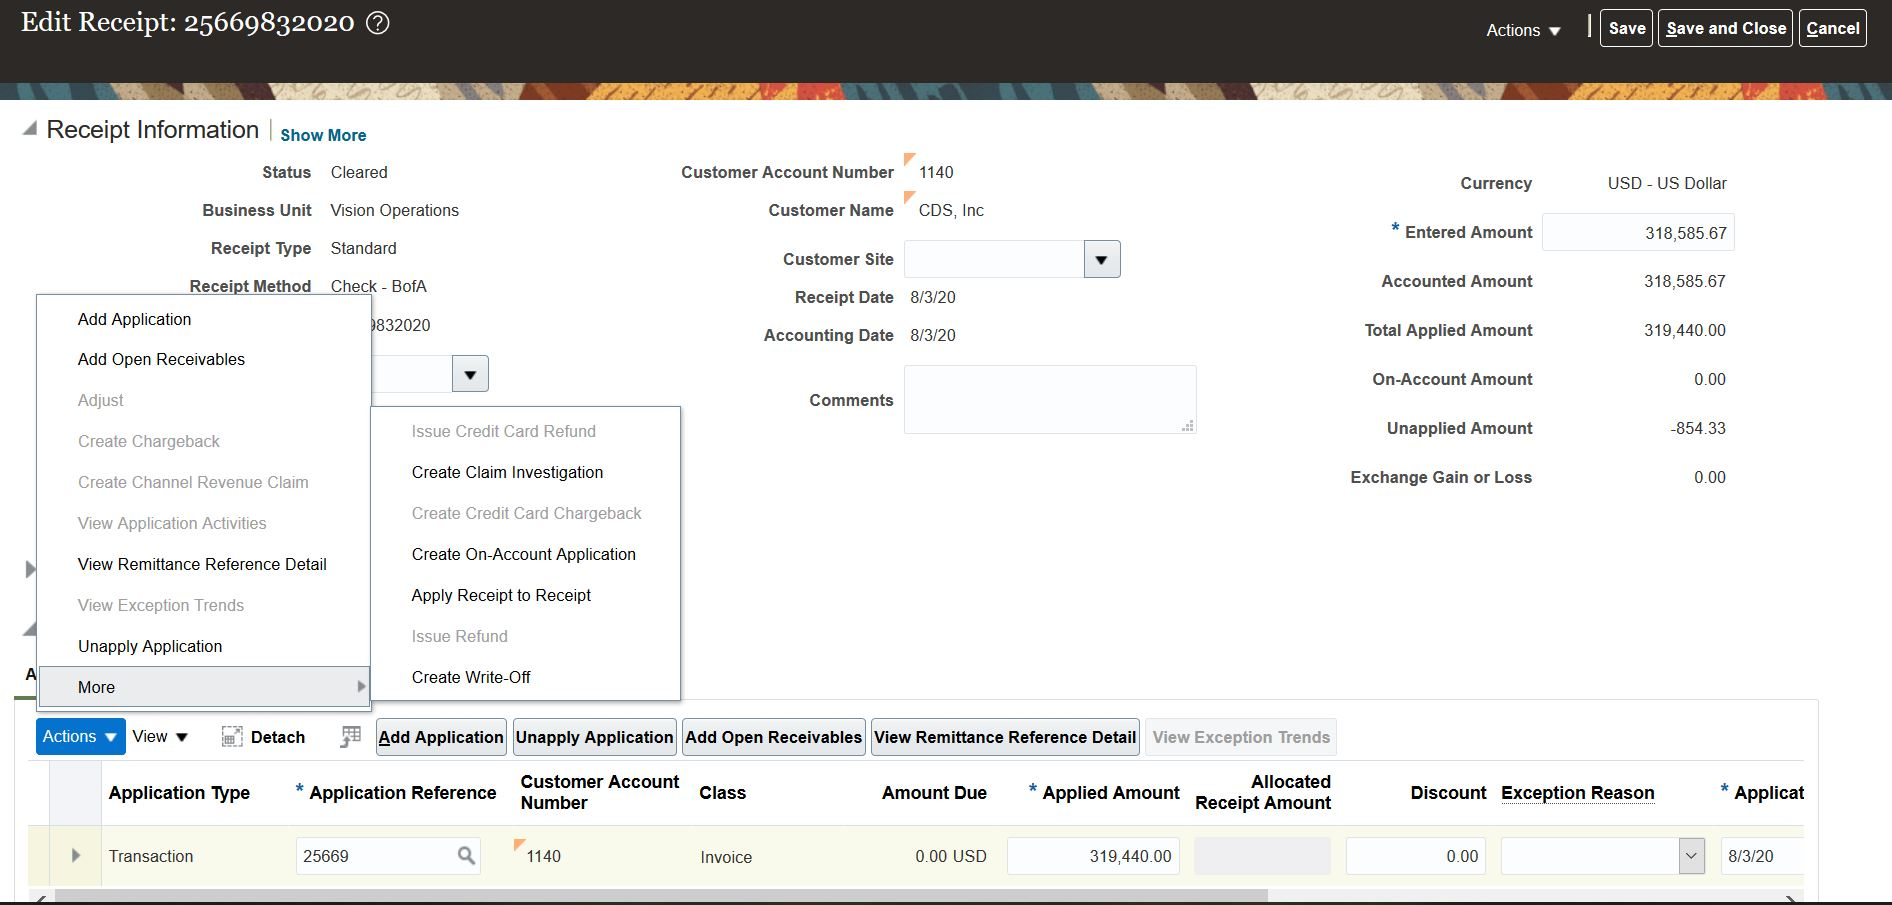
- Complete the fields in the Create Claim Investigation window, then click OK and save the receipt:
- Receivables Activity Name: Select a receivables activity from the list of values. The LOV contains the active and valid receivables activities defined for the Claim Investigation activity type for the business unit of the receipt.
- Claim Amount: The field is populated by default with the unapplied receipt amount. If necessary, modify the amount to reflect the user override for the underpayment or overpayment.
- Application Reference Reason: Select from the reference reasons configured in Channel Revenue Management for a claim.
- Customer Reason: Enter the customer reason for the claim.
- Customer Reference: Enter any additional reference information related to the claim.
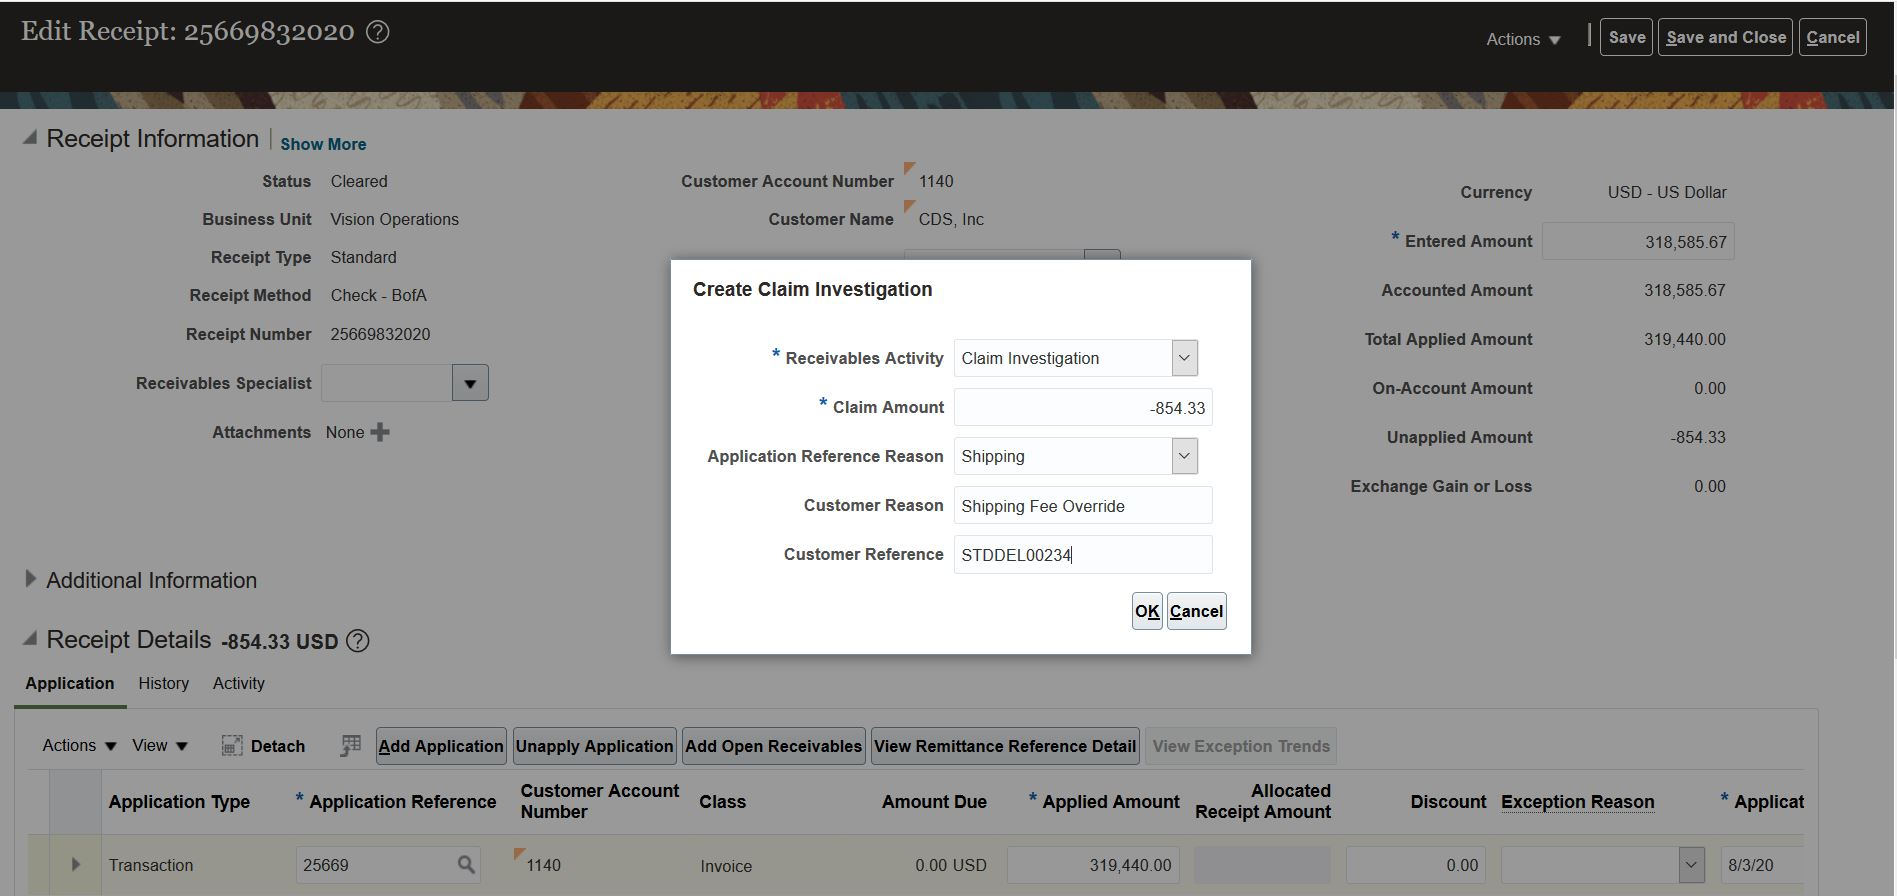
- A Claim Investigation activity application is considered as an open or unresolved credit pending investigation.
- A Claim Investigation application is accounted, and the accounting flexfield is derived from the Claim Investigation receivables activity.
- A Claim Investigation application on the receipt automatically creates a deduction or overpayment claim in Oracle Channel Revenue Management.
- The claim number is displayed as the Application Reference Number in the Application tab of the receipt.
- The details of the Channel Revenue Management deduction or overpayment claim can be viewed in the Activity tab under Receipt Details
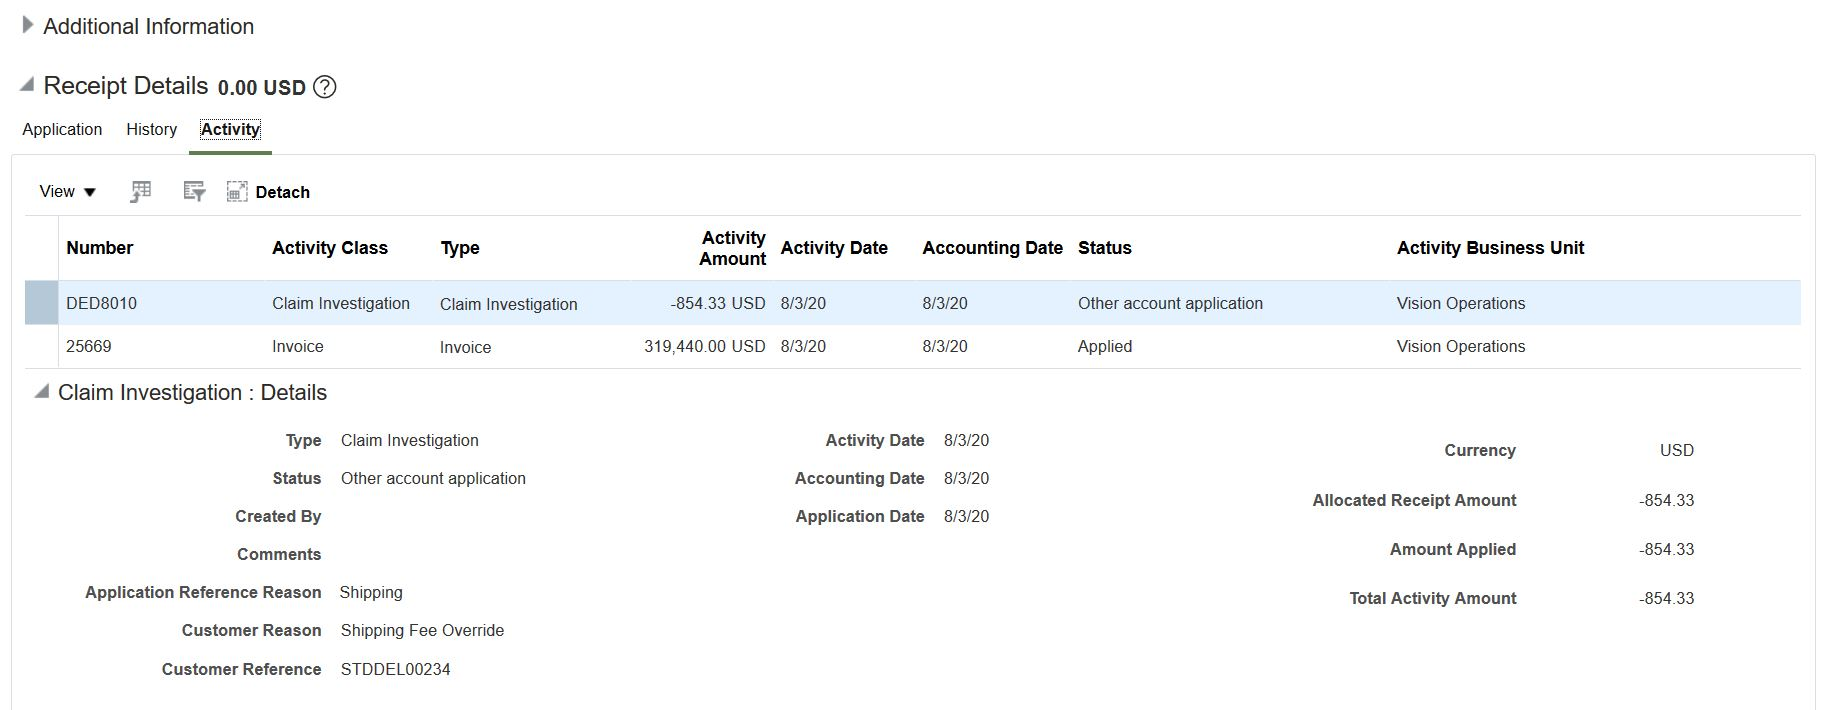
-
Non-invoice related claims take the currency and business unit of the receipt.
-
Multiple non-invoice related claim investigation applications may be performed per receipt as long as the sum of application amounts is equal to the receipt amount.
The feature provides the following functionality for resolving the non-invoice related claim investigation from Channel Revenue Management:
- After investigation on a claim is completed and validated, the claim will be settled in Oracle Channel Revenue Management.
- The user chooses to settle the claim for the entire or partial claim amount using one or more of the settlement documents to resolve the claim investigation underpayment or overpayment application on the receipt.
- Deductions can be settled using the following settlement methods:
- Credit Memo - On Account as a settlement method creates On account credit memo in Receivables.
- Open Credit Memo method uses existing unapplied On account credit memo to apply to the receipt.
- Open Overpayment method selects existing open overpayment claims to which this claim can be netted.
- Overpayments can be settled by creating invoices against the claim or by applying to existing deductions.
The feature provides the following functionality on settlement of a resolved non-invoice related claim investigation from Channel Revenue Management:
-
The Settle Customer Claims process settles the claims for a business unit.
-
The process performs the following:
- Creates the Receivable credit memo or invoice as per the settlement method chosen on resolution of the claim
- During credit memo or invoice creation, Receivables calculates taxes according to the Oracle Tax setup on the amount passed from Channel Revenue Management as the settlement amount of the claim.
- Unapplies the claim investigation application on the receipt to the extent of the amount settled.
- Applies the receivables transaction created to the receipt.
-
In case of a partial settlement, the claim in Channel Revenue Management is split to be a child claim for the claim investigation to continue.
Business benefits include:
- Complete deductions settlement solution with automated integration between Channel Revenue Management and Receivables.
- Reduce revenue leakage from invalid deductions.
- Fast and accurate cash processing capability with accountability.
- Flexibility to process multiple settlement-related financial transactions.
Steps to Enable
Use the Opt In UI to enable this feature. For instructions, refer to the Optional Uptake of New Features section of this document.
Offering: Order Management
-
You must opt in to the functional area named: Channel Revenue Management. Then opt in to the feature named: Deductions and Settlement.
-
Under the offering named: Financials and functional area named: Receivables, go to a task named: Manage Receivables System Options. Search for and select your business unit. Click the 'Cash Processing' tab. Select the 'Enable channel revenue management integration' check box, and click Save.
The following setups are predefined for this feature:
- Predefined Claim Investigation activity type under Receivables Activities. Edit this predefined activity type to include the business unit and the valid GL Code Combination Flexfield.
- Predefined Subledger Journal Entry Rule for the Event Class Receipt and Accounting Class Claim Investigation.
- Predefined Channel Revenue Management transaction source to assign to Receivables credit memos and invoices created upon settlement of a claim.
- Refer to the Channel Revenue Management's Deductions and Overpayments feature documentation for the Channel Revenue Management related setups.
Tips And Considerations
-
Transaction types assigned to the invoices applied to the receipt to which non-invoice related claim investigation is applied must have the the Allow Overapplication option enabled.
-
Run the Create and Assign Subledger Sources process if the Application Reference Reason (APPLICATION_REF_REASON) needs to be made available as a subledger application source.
Key Resources
- For more information on Channel Revenue Management, refer to the Oracle Cloud Readiness content for Order Management.
- For more information on the Create Claims for Deductions and Overpayments feature, click here.
Role Information
No additional role is required.
Structured Payment Reference on Receipts Created Using Lockbox and Services
Include the structured payment reference on receipts created using lockbox and services. Set up Automatic Bank Reconciliation in Cash Management to match receipts based on the structured payment reference to improve automatic bank statement reconciliation.
Gain efficiency and accuracy in automatic bank statement reconciliation of your receipts in Cash Management by including the structured payment reference when creating receipts using any of these services:
- Standard Receipts Import File Based Data Import Template: The template Payments tab and control files have been extended to capture the structured payment reference attribute during receipt creation using Process Receipts Through Lockbox.
- Create Standard Receipt REST API: Include the structured payment reference when you create a standard receipt using the REST API service.
- createStandardReceipt Web Service: Include the structured payment reference when you create a standard receipt using the SOAP web service.
In Cash Management, define a Reconciliation Matching Rule using the structured payment reference in the System Transaction Grouping Attribute, to match receipts to bank statement lines during the Automatic Reconciliation process. The receipts you create are automatically matched to bank statement lines using the structured payment reference.
Steps to Enable
You don't need to do anything to enable this feature.
Role Information
You do not need a new role access to use this feature.
Accounting Rules for Revenue Contracts Using Item Attributes
You can now use item attributes, such as the Item Category Code, Item Category Description, and Item Type, to derive values in Subledger Accounting rules for Revenue Management. To derive accounting using inventory item in Revenue Management, you must first associate the inventory items to a category under the item catalog in Product Information Management.
Define accounting rules based on the Item Category Code, Item Category Description, and Item Type, of the promised items to override the default accounting of the revenue contracts.
Since these item attributes are available as SLA sources in Subledger Accounting, you can also use them with other Subledger Accounting features, such as journal line descriptions, mapping sets, and supporting references.
Steps to Enable
You don't need to do anything to enable this feature.
Key Resources
- Refer to documentation on Implementing Subledger Accounting for further information on how to define accounting rules for a subledger application.
- Refer to documentation on Manage Catalogs in Product Information Management Guide.
Role Information
No new role access is needed to use this feature.
Pricing Dimension Assignment Based on Cost Amount, List Price, and Base Price of Performance Obligation
When creating your pricing dimension structure, you can now define the cost amount, list price, and base price as amount band segment values, in addition to the line amount. In addition, the segment value for the amount band of a performance obligation template is now derived based on the aggregate value of the amount band of all of the components of the performance obligation template.
When using the cost amount, list price, and base price in the pricing band segment values, revenue managers can derive the standalone selling prices based on the band value of these attributes as per their business needs. The standalone selling price is used to allocate the transaction price of the contract across all of the performance obligations.
When a performance obligation template is associated to a pricing dimension structure with an amount band as a segment, the pricing dimension combination for the performance obligation template is derived based on the aggregate value of the amount band. The standalone selling price of this pricing dimension combination is used to allocate the transaction price of the contract across all of the performance obligations.
Steps to Enable
You don't need to do anything to enable this feature.
Key Resources
- Refer to the Revenue Management documentation for further information on defining pricing bands, pricing dimension structures and pricing dimension structure assignments.
Role Information
No new role access is needed to use this feature.
Review and Correct Accounting Exceptions for Subledgers
The Review and Correct Accounting Exceptions for Subledgers feature is now enhanced to include multiperiod accounting errors.
You can use the Manage Accounting Errors page to search for exceptions generated by the Create Accounting, Create Multiperiod Accounting, and Post Subledger Journal Entries processes.
After you have corrected the accounting errors, you can submit the Create Accounting or Create Multiperiod Accounting process again by selecting the Action button. Use any of the following options to run these processes:
- Select Create Accounting to submit the Create Accounting process in Final mode and close all error records up to current date.
-
Select Create Draft Accounting to submit the Create Accounting process in Draft mode and close all error records up to current date.
-
Select Create Accounting and Replace Invalid Account to submit the Create Accounting process in Final mode and close all error records up to current date. In this case, if an invalid account is encountered, the application replaces the invalid account with the suspense account defined for the ledger.
-
Select Create and Post Multiperiod Accounting to submit the Create Multiperiod Accounting process in Final mode and transfer the multiperiod journals to General Ledger.
-
Select Create Draft Multiperiod Accounting to submit the Create Multiperiod Accounting process in Draft mode.
The Manage Accounting Errors page allows you to streamline and centralize exception handling. You can now view all the accounting exceptions for a particular ledger and subledger in one page, and review and take suggested action to resolve the issue.
Steps to Enable
Use the Opt In UI to enable this feature. For instructions, refer to the Optional Uptake of New Features section of this document.
Offering: Financials No Longer Optional From: Update 21B
Key Resources
- Watch Review and Correct Accounting Exceptions for Subledgers Readiness Training
- Oracle Financials Cloud What's New for Update 20C: Review and Correct Accounting Exceptions for Subledgers
Transaction Data Extract for Tax Partner Integration
The tax partner transaction data extract and the tax partner payload that is sent to the tax partner now includes these additional data elements for advanced tax calculation: identification of the project; identification of the task; purchase order number; lookup code of the vendor type; and vendor number. You can also send the long postal code to the partner instead of the short postal code.
The Tax partners would be able to perform advanced tax calculation based on the additional data elements such as identification of the project, identification of the task, purchase order number, lookup code of the vendor type, the vendor number.
Steps to Enable
To enable the feature, you need to define the Lookup Codes 'PTNR_EXTENSION_PAYLOAD' and 'PTNR_PLUS4ZIPCODE' under the Lookup Type - ZX_OPTIN_OPTIONS with the following details:
- Lookup Type - ZX_OPTIN_OPTIONS
Description - <ZX_OPTIN_OPTIONS>
Meaning - <ZX_OPTIN_OPTIONS>
Module - Tax
Lookup Configuration Level - User
REST Access Secured - Secure
- Lookup code - PTNR_EXTENSION_PAYLOAD
Display Sequence - 1
Enabled - <Check Box Checked>
Start Date - <start date>
Meaning - 1
Description - Lookup for Partner Extension Payload
Tag - PTNR_EXTENSION_PAYLOAD
- Lookup code - PTNR_PLUS4ZIPCODE
Display Sequence - 1
Enabled - <Check Box Checked>
Start Date - <start date>
Meaning - Long Zip Code
Description - Lookup for Long Zip Code for the Partner Extension Payload
Tag - PTNR_PLUS4ZIPCODE
Regional and Country-Specific Features
Additional Information in Fiscal Document Extract for Brazil
Generate fiscal document extract files for Brazil with additional information, such as certain descriptive flexfields and legal justification messages associated with your tax configuration.
DESCRIPTIVE FLEXFIELDS
Use descriptive flexfields in Receivables transactions to capture additional transaction information that is specifically required for your business. These custom attributes entered in the transaction header and lines are extracted to the fiscal document extract file as described in Fiscal Document Extract Layout section.
LEGAL JUSTIFICATION MESSAGES
Legal messages in the fiscal document are required information of interest to the tax authorities. They provide a legal support for some tax scenarios, like exemption from IPI, reduction of the ICMS taxable basis, and tax deferral.
To implement legal messages for fiscal document generation, use one or both of these options:
- Enter legal messages as fiscal attributes in the Update Fiscal Attributes page. You can assign the legal messages by default from a predefined Fiscal Attributes template.
- Define legal messages as Tax Reporting Types and Tax Reporting Codes and associate them with your tax configuration. This way, the legal messages are aligned with the tax calculation.
With either of these options, the legal messages are extracted to the fiscal document extract file as described in Fiscal Document Extract Layout section.
TAX BASE MODIFIER RATE FOR VALUE-ADDED MARGIN TAX
Define a Value Addition Percentage in your taxable basis formula when you need to calculate a value-added margin tax. The Value Addition Percentage is extracted to the fiscal document extract file as the Tax Base Modifier Rate element, described in Fiscal Document Extract Layout section.
The value-added margin percentage that is reported to tax authorities is derived by the fiscal partner:
- Value-added margin percentage = (TAX_BASE_MODIFIER – 1) * 100
- When TAX_BASE_MODIFIER = 1 there is no value-added margin
FISCAL DOCUMENT EXTRACT LAYOUT
These changes are implemented in the output file of the Send Fiscal Document to Tax Authority process:
- The existing TAX_REPORTING_CODES element group contains only:
- Tax reporting type codes associated with tax hierarchy, where Tax Reporting Type Purpose = 'Tax Reporting Type' or 'Withholding Tax Reporting Type'.
- Respective tax reporting codes.
- The legal messages are no longer extracted to this element group.

- Added a new element group LEGAL_JUSTIFICATION_MESSAGES:
- Tax reporting type codes associated with tax hierarchy where Tax Reporting Type Purpose = 'Legal Justification Message Type'.
- Respective tax reporting codes.
- Respective legal justification text.

- Added a new element Tax Base Modifier Rate to the TAX_LINES element group:
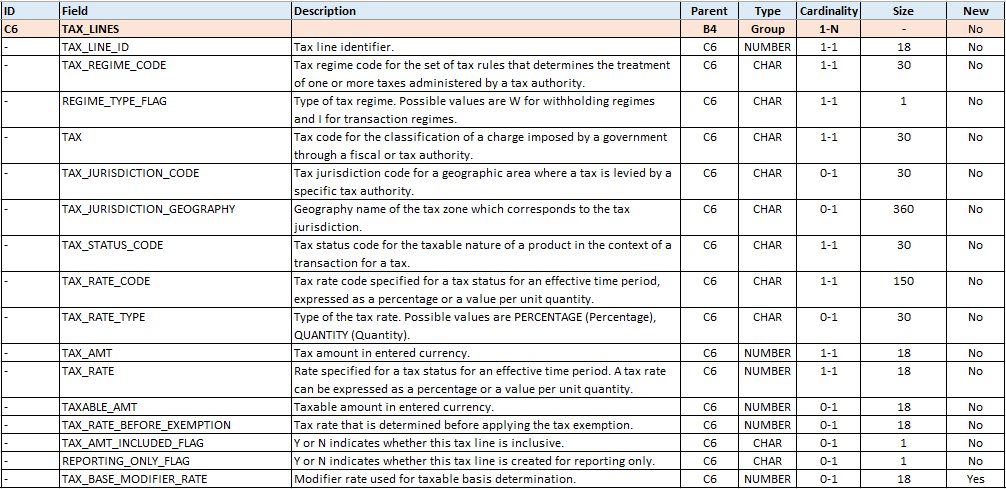
- Added the descriptive flexfields of the Receivables Transaction header (RA_CUSTOMER_TRX_ALL table):
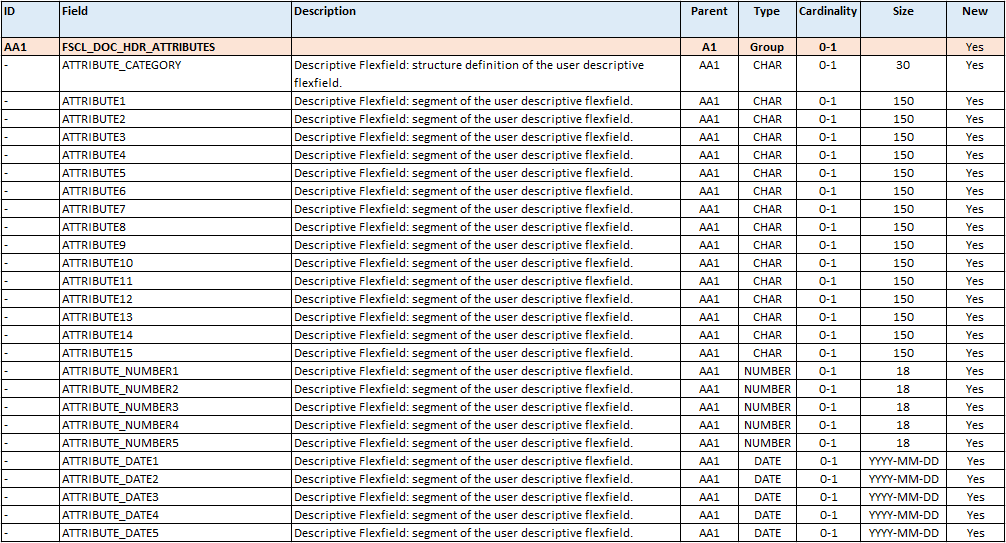
- Added the descriptive flexfields of the Receivables Transaction line (RA_CUSTOMER_TRX_LINES_ALL table):
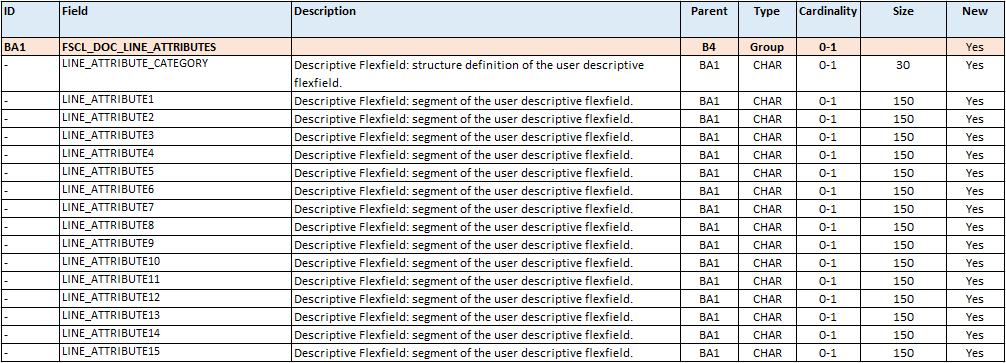
Steps to Enable
You don't need to do anything to enable this feature.
Advanced Configuration Options to Generate Fiscal Documents for Brazil
Enable or disable fiscal document generation for Brazil for Receivables transactions based on event class, business unit, and document fiscal classification. Use this feature to create an invoice or debit memo without linking it to a fiscal document, based on your business needs. Within the same business unit, you can control the transactions that don’t require a fiscal document by using the document fiscal classifications.
Whether you create Receivables transactions manually or through the Import AutoInvoice process, these types of invoices and debit memos can be completed immediately, without requesting and waiting for tax authority approval.
Steps to Enable
Document fiscal classifications are fiscal classifications that you can use to define tax rules based on the transactions. Use document fiscal classifications to configure the specific transactions that you don’t want to associate with a fiscal document.
ENABLE FISCAL DOCUMENT GENERATION
- Navigate to the Manage Localization System Options page.
- Search for the business unit and click Edit.
- Select Enable Fiscal Document Processing.
- Click Save and Close.

CREATE A DOCUMENT FISCAL CLASSIFICATION
- Navigate to the Manage Transaction-Based Fiscal Classifications page.
- Search for document fiscal classification codes.
- Click Create Level 1 Node.
- Enter the code, name, and start date for the fiscal classification code.
- Click Save and Close.
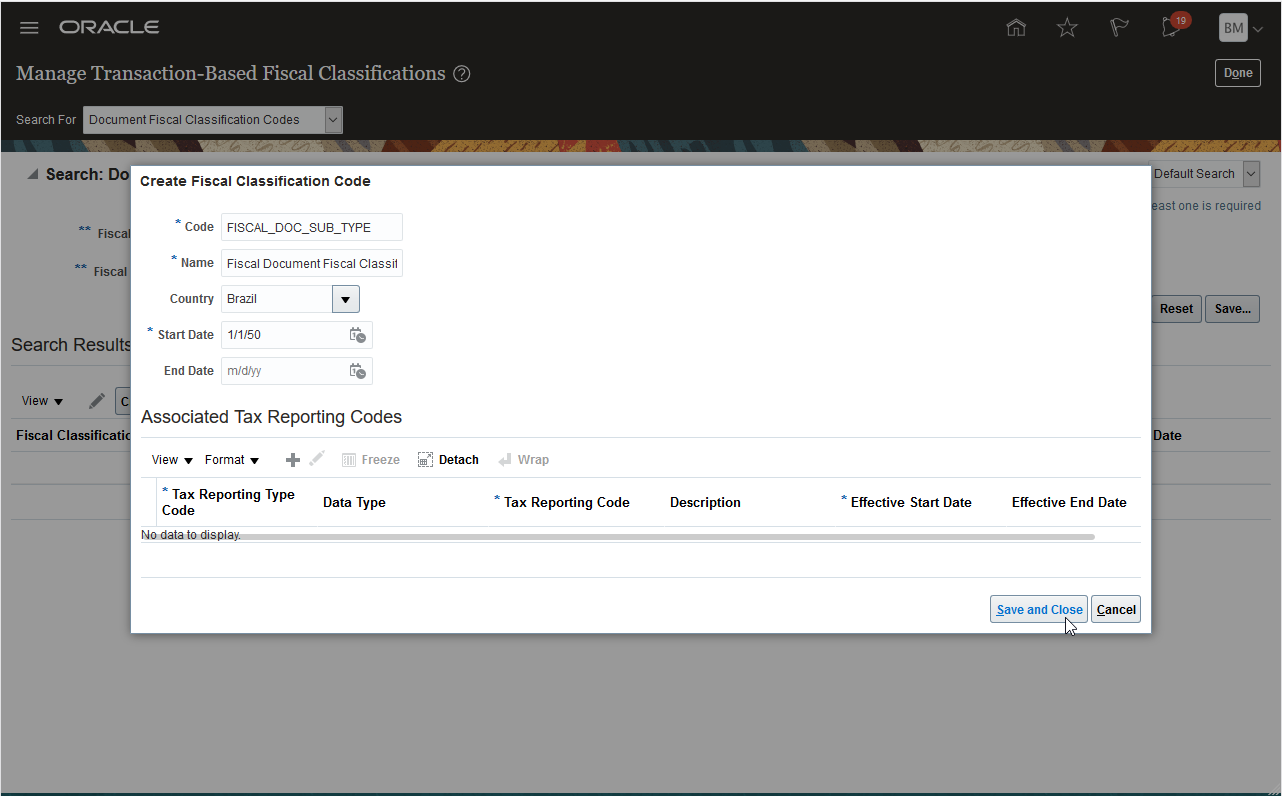
- Select the level 1 node that you just created and click Create Child Node.
- Enter the code, name, and start date for child fiscal classification code.
- Click Save and Close.
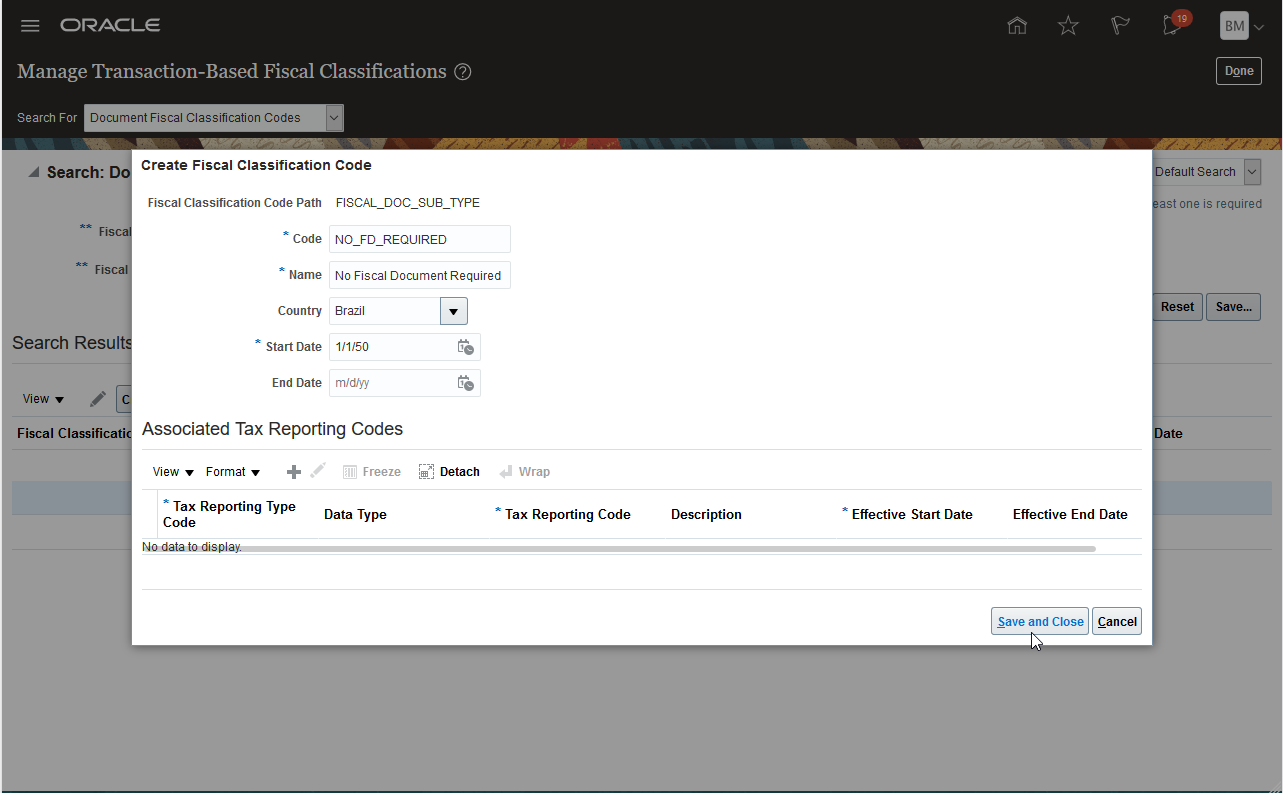
DISABLE THE FISCAL DOCUMENT GENERATION FOR SPECIFIC TRANSACTIONS
- Navigate to the Manage Fiscal Document Generation Controls page.
- Click Create.
- Select the event class as Invoice or Debit Memo.
- In the Associated Business Units region, select the business unit and the document fiscal classification.
- Deselect the Require fiscal document checkbox.
- Click Save and Close.
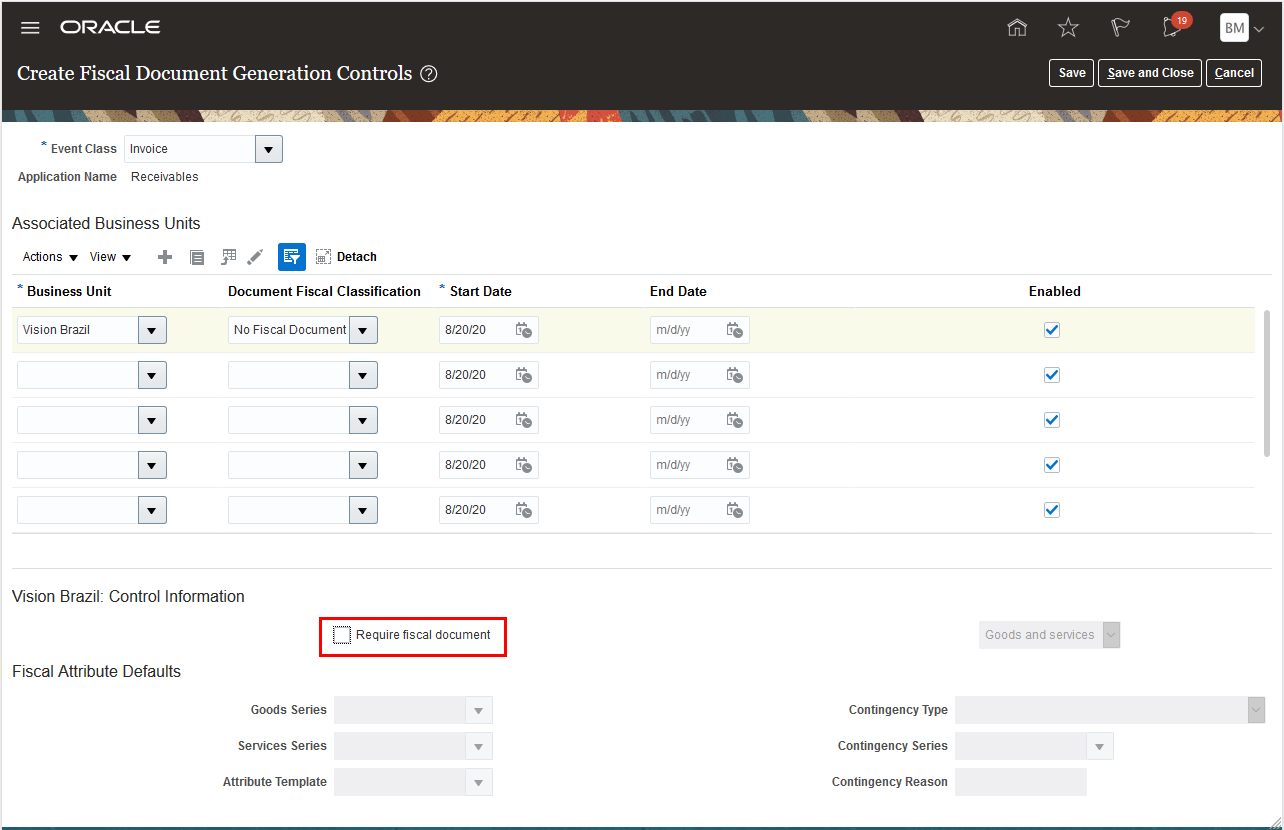
FOR RECEIVABLES TRANSACTIONS ENTERED MANUALLY
- Navigate to the Receivables > Billing > Create Transaction page.
- Select the transaction class as Invoice or Debit memo, and enter the transaction information.
- Click Show More.
- On the Miscellaneous tab, enter the same document fiscal classification for which you disabled the fiscal document generation.
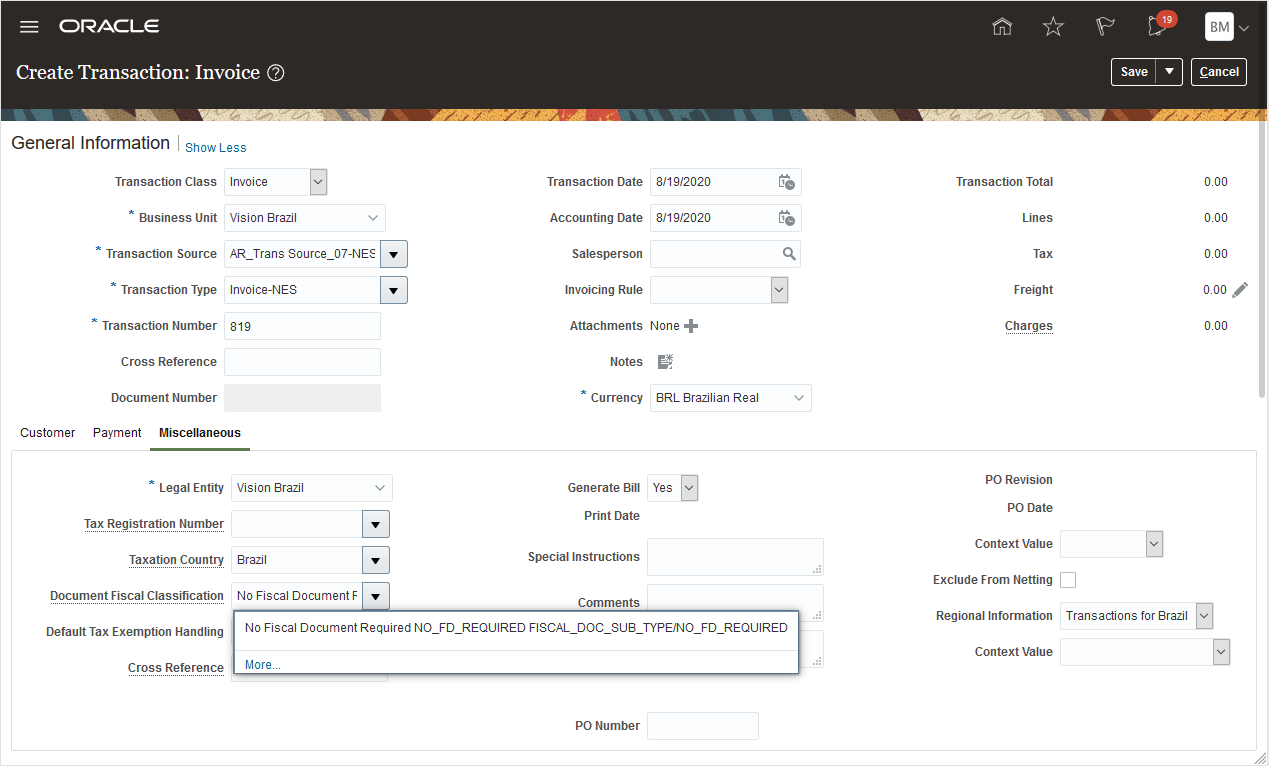
- Click Save and Close.
- On the Manage Transactions page, search for the same transaction.
- Click Complete and Close.
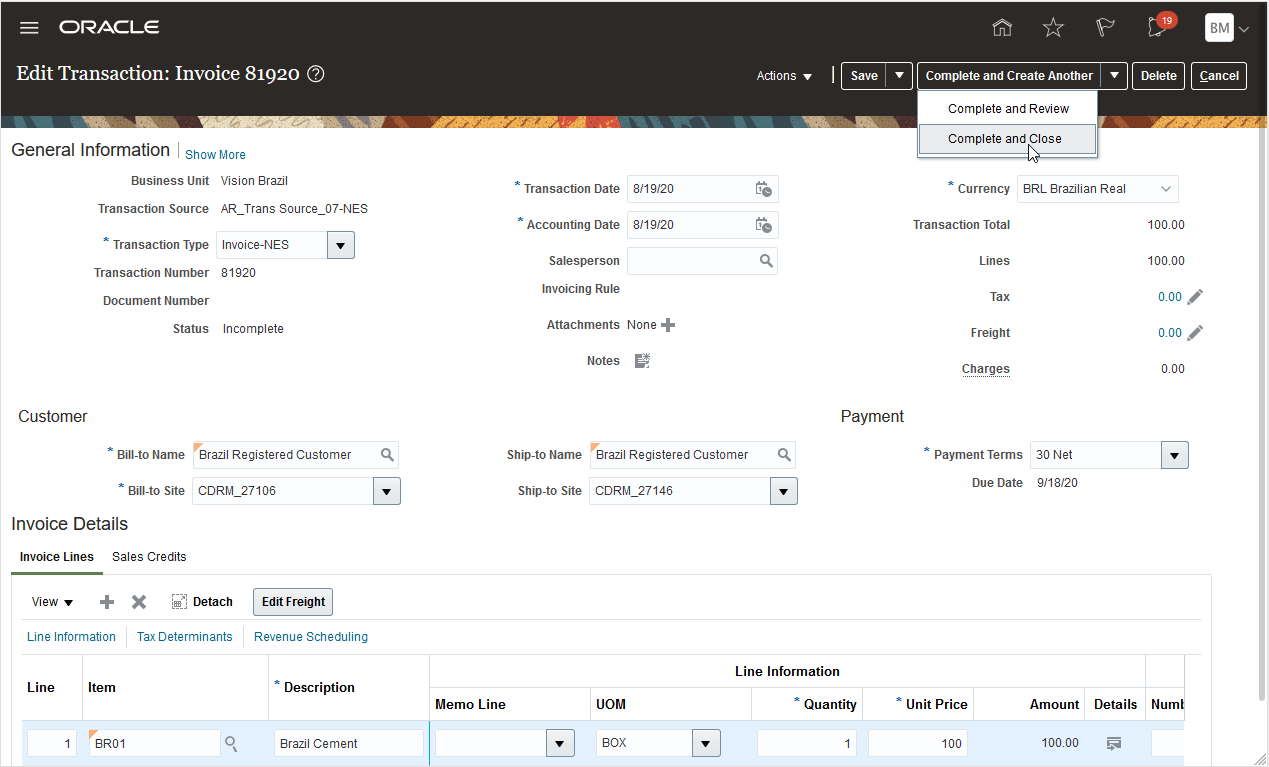
- The transaction is completed, and the transaction Status is set as Complete.
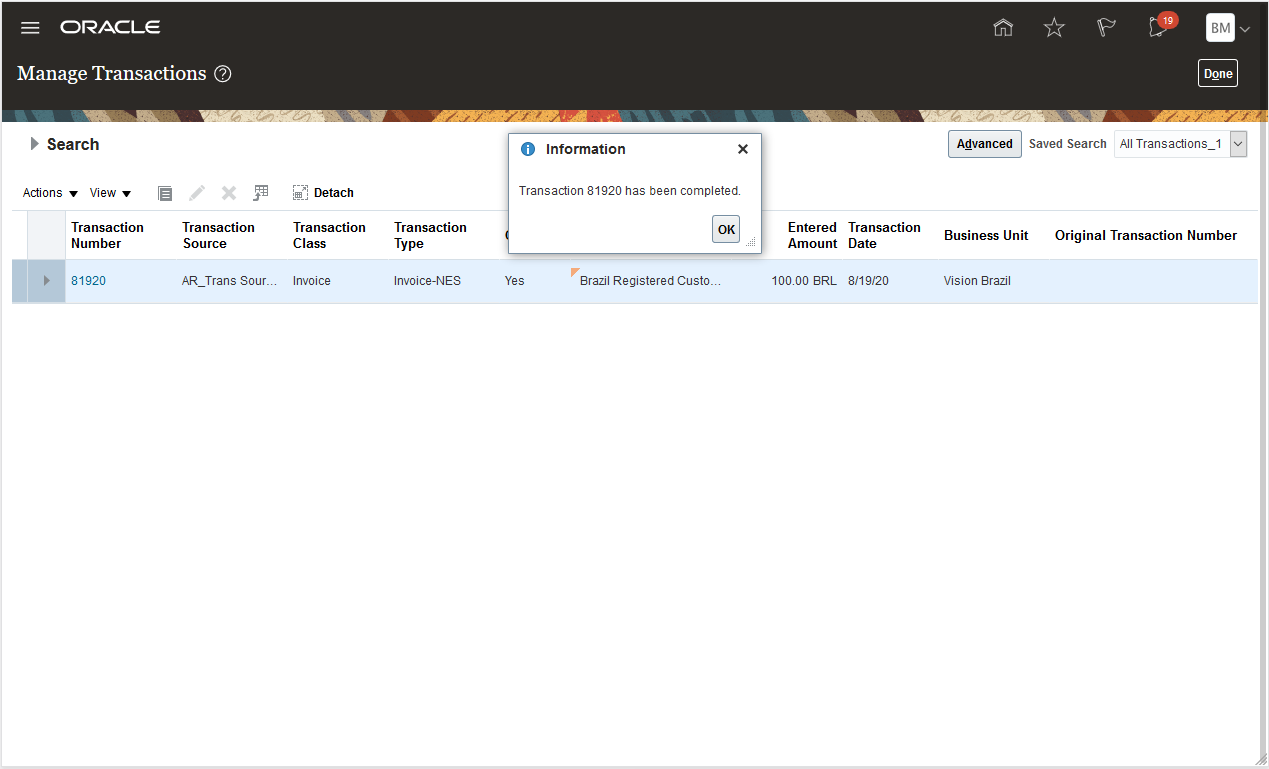
FOR RECEIVABLES TRANSACTIONS CREATED BY IMPORT AUTOINVOICE PROCESS
- Similarly, use the FBDI template spreadsheet AutoInvoiceImportTemplate.xlsm for Receivables transactions. In the Document Sub Type field (DOCUMENT_SUB_TYPE column from RA_INTERFACE_LINES_ALL table), enter the same document fiscal classification for which you disabled the fiscal document generation.
- The status of the invoices or debit memos for these transactions is set as Complete and no fiscal document is required.
Tips And Considerations
- Your current configuration isn’t changed by this feature. In other words, your current setup definition in Manage Fiscal Document Generation Controls continues with the Require fiscal document option enabled, unless you create a new configuration.
- The document fiscal classification isn’t mandatory in Manage Fiscal Document Generation Controls. If you don’t enter any document fiscal classification and disable the Require fiscal document option, all transactions of that event class (Invoice or Debit Memo) will not generate a fiscal document.
Original Party Information in Electronic Accounting Reports for Mexico
Capture original party information in Payables invoice lines, including country, name, tax registration number, and universal unique identifier, using the regional information fields. Original party information is a legal requirement in Mexico on electronic accounting reports.
You can capture and report on original party information such as name, tax registration number, unique identifier (CFDI) in the invoice lines. These invoices can be customs transactions and petty cash payments to third parties where the original party is different from the main supplier in the invoice. It's mandatory to report original party information in electronic accounting report in Mexico.
Steps to Enable
You don't need to do anything to enable this feature.
Tips And Considerations
You can define original party information at the Payables invoice line level. Click Details on the Payables invoice line and then select Invoice Lines for Mexico from the Regional Information list on the Update Additional Information dialog box.
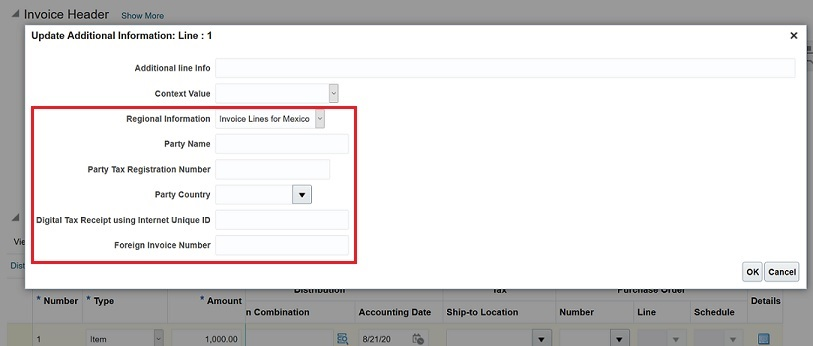
Invoice Lines for Mexico Regional Information
NOTE: If you enter data in the Invoice Lines for Mexico, this will be used in the Mexico Electronic Accounting Reports instead of the merchant information on payment requests from Expenses.
Key Resources
- Related Help: Mexico Electronic Accounting (Doc ID 2635219.1) in My Oracle Support.
Role Information
Your role needs the data security privilege, Report Person National Identifier, for the report to show the employee national identification number for payment requests from Expenses.
Lockbox Payment Matching with Balance Forward Bills
Process customer payments using lockbox against transactions included in balance forward bills. This feature is applicable for customers who deliver balance forward bills and process their customer payments using the Zengin format for lockbox.
The feature provides the following functionality:
- Enhancements to the existing Process Receipts Through Lockbox process to match customer payments created using the Zengin format to transactions contained in a balance forward bill with outstanding amounts due. The process applies the transactions included in a matching balance forward bill to the receipt.
- The feature also requires the predefined balance forward bill BIP report output to be modified to include only the following transactions in calculating the Amount Due displayed in the output:
- Invoices, debit memos and chargebacks included in the current charges.
- On Account Credit Memos included in the current charges.
- Standard Credit Memos that credit any transaction included in the current charges.
-
The lockbox process only matches transactions in the balance forward bill for receipt application where the balance forward bill amount due exactly matches the receipt amount.
-
The lockbox process creates a receipt as unapplied without attempting to apply the receipt if there is more than one balance forward bill with the amount due that exactly matches the customer payment amount.
Customers that deliver balance forward bills can now apply payments to close outstanding balances of the transactions included in a balance forward bill.
Steps to Enable
Use the Opt In UI to enable this feature. For instructions, refer to the Optional Uptake of New Features section of this document.
Offering: Financials No Longer Optional From: Update 21B
To use this feature, complete the following setup steps:
- Navigate to the FSM Task Manage Receivables Lookups.
- Search for the Lookup Type 'ORA_LOCKBOX_PAY_MATCH_BFB'.
- Enable the lookup Code 'ORA_LOCKBOX_PAY_MATCH_BFB' by checking the Enabled checkbox.
Tips And Considerations
The balance forward bill report output needs to be modified for the Amount Due displayed in the bill output as specified in the description section.
Role Information
No additional role is required.
Payment Condition Printed Automatically on Withholding Tax Certificate for Thailand
Enter the payment condition in the supplier profile instead of a regional information field on individual payments. This enables printing of the withholding tax certificate without having to enter the payment condition on each payment.
Using the payment condition tax reporting code in the supplier profile, generate withholding tax certificates for a payment process request without having to enter the payment condition on each payment individually.
Steps to Enable
To use this feature, assign the appropriate payment condition in the supplier profile:
- Go to Navigator > Procurement > Suppliers
- Click Create Supplier to create a new supplier. Alternatively, you can edit an existing supplier record.
- Go to the Transaction Tax tab.
- Set the payment condition on the Tax Reporting Codes subtab using the Tax Reporting Type Code, ORA_TH_WHT_PAYMENT_CONDITION. Select the appropriate tax reporting code:
| Tax Reporting Code | Description |
|---|---|
| 1 | Withhold at source |
| 2 | Pay every time |
| 3 | Pay one time |
| 4 | Others |
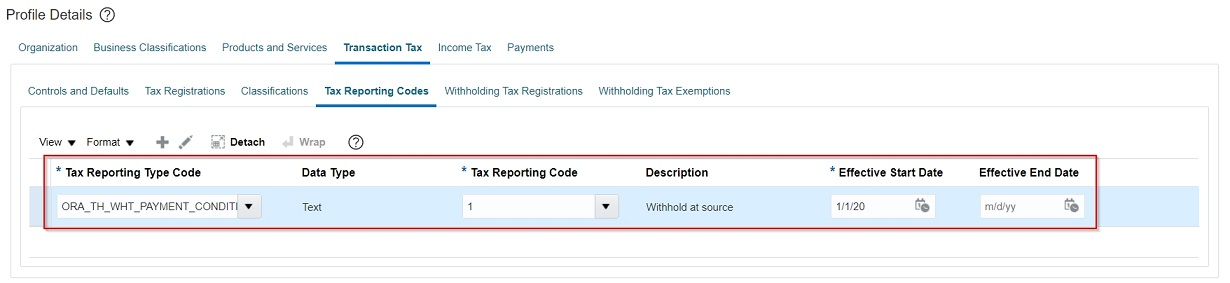
Payment Condition Tax Reporting Type and Code in Supplier Profile
You can also update the payment condition tax reporting code for multiple suppliers using the Tax Implementation Workbook.
- Go to Navigator > Others > Setup and Maintenance > Tasks icon > Manage Tax Regimes.
- On the Manage Tax Regimes page, click Rapid Setup Spreadsheets and then select Download Tax Implementation Workbook.
- Open the spreadsheet (TaxImplWorkbookTemplate) and go to the Party Reporting Codes sheet.
- On the Party Reporting Codes sheet, enter the required information:
Attribute Value Party Type Supplier Party Number Supplier Number Tax Reporting Type Code ORA_TH_WHT_PAYMENT_CONDITION Tax Reporting Code Enter the appropriate payment condition for the supplier (1, 2, 3 or 4) Effective Start Date 1951/01/01 - Once you have entered all the suppliers and the applicable tax reporting type and codes, go to the Tax Impl Workbook Instructions sheet and click Generate CSV File. This generates the the ZIP file containing the CSV file for the party reporting codes.
- Go back to the Manage Tax Regimes page, click Rapid Setup Spreadsheets and then select Upload Tax Implementation Workbook and select the ZIP file created from step #5.
- Go to Monitor Upload and Download Processes tab to check the status of the job.
NOTE: If you don't set the payment condition in the supplier profile, the payment condition in the regional information of individual payments will be used in the withholding tax certificate.
Key Resources
- For more information on configuring withholding tax certificate for Thailand, refer to Withholding Tax Certificate for Thailand on the Oracle Help Center.