
- Revision History
- Overview
- Optional Uptake of New Features (Opt In)
- Feature Summary
- Common Technology and User Experience
- Financials
-
- Advanced Collections
- Assets
- Budgetary Control
- Cash Management
- Expenses
- Federal Financials
- General Ledger
- Joint Venture Management
- Lease Accounting
- Payables
- Payments
- Receivables
-
- Channel Revenue Management Integration with Receivables for Claim Creation and Settlement for Receipts Created Using Spreadsheet or SOAP Services
- Custom Data Points and External Data Source Integration for Credit Management Using a REST API
- Enhanced Message Content in Transactions Delivered Using Email
-
- Revenue Management
- Subledger Accounting
- Tax
- Regional and Country-Specific Features
- IMPORTANT Actions and Considerations
This document will continue to evolve as existing sections change and new information is added. All updates appear in the following table:
| Date | Product | Feature | Notes |
|---|---|---|---|
| 29 JUL 2022 | Payables | Creation and Management of Supplier Invoices with Retainage Payment Terms |
Updated document. Added further tips and considerations. |
| 24 AUG 2021 | Expenses | Detection of Duplicate Expenses | Updated document. Added opt in expiry date. |
| 30 JUL 2021 | Financials for the Americas | Fiscal Attribute Import for Transactions with the Same Transaction Number |
Updated document. Delivered feature in update 21B. |
| 13 MAY 2021 | Expenses | Detection of Duplicate Expenses | Updated document. Made this an opt in feature. |
| 13 MAY 2021 | Intercompany | Intercompany Clearing Account Generation Without Segment Value Security for Existing Accounts | Updated document. Delivered feature in update 21B. |
| 13 MAY 2021 | Intercompany | Descriptive Flexfield Improvements on Intercompany Spreadsheets | Updated document. Delivered feature in update 21B. |
| 30 APR 2021 | Joint Venture Management | Updated document. Revised feature information. | |
| 30 APR 2021 | Joint Venture Management | Task and Expenditure Type Overrides on Project Costing Adjustments |
Updated document. Clarified business benefits. |
| 05 MAR 2021 | Created initial document. |
This guide outlines the information you need to know about new or improved functionality in this update, and describes any tasks you might need to perform for the update. Each section includes a brief description of the feature, the steps you need to take to enable or begin using the feature, any tips or considerations that you should keep in mind, and the resources available to help you.
Join Oracle Cloud Customer Connect
Please take a moment to join the Cloud Customer Connect forums for Financials Cloud. Oracle Cloud Customer Connect is a community gathering place for members to interact and collaborate on common goals and objectives. This is where you will find the latest release information, upcoming events, or answers to use-case questions. Joining takes just a few minutes. Join now!
https://cloud.oracle.com/community
Security and New Features
The Role section of each feature identifies the security privilege and job role required to use the feature. If feature setup is required, then the Application Implementation Consultant job role is required to perform the setup, unless otherwise indicated. (If a feature doesn't include a Role section, then no security changes are required to use the feature.)
If you have created job roles, then you can use this information to add new privileges to those roles as needed.
Give Us Feedback
We welcome your comments and suggestions to improve the content. Please send us your feedback at oracle_fusion_applications_help_ww_grp@oracle.com.
Optional Uptake of New Features (Opt In)
Oracle Cloud Applications delivers new updates every quarter. This means every three months you'll receive new functionality to help you efficiently and effectively manage your business. Some features are delivered Enabled meaning they are immediately available to end users. Other features are delivered Disabled meaning you have to take action to make available. Features delivered Disabled can be activated for end users by stepping through the following instructions using the following privileges:
- Review Applications Offering (ASM_REVIEW_APPLICATIONS_OFFERINGS_PRIV)
- Configure Oracle Fusion Applications Offering (ASM_CONFIGURE_OFFERING_PRIV)
Here’s how you opt in to new features:
- Click Navigator > My Enterprise > New Features.
- On the Features Overview page, select your offering to review new features specific to it. Or, you can leave the default selection All Enabled Offerings to review new features for all offerings.
- On the New Features tab, review the new features and check the opt-in status of the feature in the Enabled column. If a feature has already been enabled, you will see a check mark. Otherwise, you will see an icon to enable the feature.
- Click the icon in the Enabled column and complete the steps to enable the feature.
For more information and detailed instructions on opting in to new features for your offering, see Offering Configuration.
Opt In Expiration
Occasionally, features delivered Disabled via Opt In may be enabled automatically in a future update. This is known as an Opt In Expiration. If your cloud service has any Opt In Expirations in this update, you will see a related tab in this document. Click on that tab to see when the feature was originally delivered Disabled, and when the Opt In will expire, potentially automatically enabling the feature. You can also click here to see features with current Opt In Expirations across all Oracle Cloud Applications. Beyond the current update, the Financials forums on Cloud Customer Connect have details of Opt In Expirations upcoming in future updates.
Column Definitions:
Report = New or modified, Oracle-delivered, ready to run reports.
UI or Process-Based: Small Scale = These UI or process-based features are typically comprised of minor field, validation, or program changes. Therefore, the potential impact to users is minimal.
UI or Process-Based: Larger Scale* = These UI or process-based features have more complex designs. Therefore, the potential impact to users is higher.
Features Delivered Disabled = Action is needed BEFORE these features can be used by END USERS. These features are delivered disabled and you choose if and when to enable them. For example, a) new or expanded BI subject areas need to first be incorporated into reports, b) Integration is required to utilize new web services, or c) features must be assigned to user roles before they can be accessed.
Common Technology and User Experience
Service Excellence Continuing Investments
Our ongoing investment in service excellence has a focus on overall usability, resiliency, performance, and security. This work is based on monitoring performance trends, reviewing common use patterns, analyzing service requests, and participating in many discussions with customers.
In this update, our on-going investment in service excellence includes improvements in the following areas:
Usability
- Index File for Generic SAF-T Extract: To help upload the CSV generated by the generic SAF-T solution to the IDEA Audit software, we have built an index file available on My Oracle Support: Note 2753649.1.
Performance
- Intelligent performance optimization for Multi Period Accounting Process: Introduced SQL hint injection mechanism based on customer data shape for the Multi Period Accounting process to deliver faster throughput when CBO does not choose the optimal plan.
- Performance improvements while accounting voided payments associated with invoices having a large number of distributions.
- Performance improvements in US 1099 Invoice Exception report.
- Performance improvements in the create and print transaction flow: Paying customer LOV on Create Invoice page, View Image button on Review Transaction page, and Print Transaction process.
Resiliency
- Resiliency and Diagnostic Improvements for Fiscal Documents for Brazil: This includes tax calculation for the fiscal documents in the Return to Vendor flow and date discrepancies between the fiscal documents and the source transactions.
- Fixed time out issue of Payables Unaccounted Transactions and Sweep.
Steps to Enable
You don't need to do anything to enable this feature.
Descriptive Flexfield Improvements on Intercompany Spreadsheets
The following additions have been made to the Intercompany spreadsheets.
-
The Intercompany receiver distribution descriptive flexfield is now available in both the Single and Multiple Batch spreadsheets.
-
The Intercompany Single and Multiple Batch spreadsheets are enhanced to include the context field for all the descriptive flexfields. This ensures that the copy feature will replicate the context information to the new rows.
Manual editing of intercompany transactions is now reduced because you can capture receiver distribution descriptive flexfields directly on the spreadsheets.
You can also copy rows in the intercompany spreadsheets and the context values will be properly replicated to the new rows reducing the need for updates.
Steps to Enable
You don't need to do anything to enable this feature.
Intercompany Clearing Account Generation Without Segment Value Security for Existing Accounts
If you create intercompany clearing account combinations before entering transactions, segment value security will not be applied to these accounts when they are submitted for processing. This only applies to the intercompany receivables and payables account generated by the application.
You can now approve an intercompany transaction even if you don’t have access to the intercompany receivables and intercompany payables accounts as long as these accounts were created prior to creating and submitting the transaction.
- Simplifies configuration and assignment of segment value security rules for Intercompany users. You no longer require segment value security for both provider and receiver intercompany clearing accounts.
- Reduces manual processing steps as a single user can submit an intercompany transaction for processing even if they don't have segment value security for both the provider and receiver clearing accounts.
Steps to Enable
You don't need to do anything to enable this feature.
Tips And Considerations
Create all intercompany receivables and payables account combinations before beginning transaction processing.
Intercompany Descriptive Flexfield Transfer to Receivables and Payables
Transfer Intercompany descriptive flexfield information to Receivables and Payables. Transfer batch and provider descriptive flexfields to Receivables. Transfer transaction and receiver distribution descriptive flexfields to Payables.
- Intercompany Transaction Batches descriptive flexfield is transferred to the Receivables Invoice Lines descriptive flexfield
- Intercompany Transaction Headers descriptive flexfield is transferred to the Payables Invoices descriptive flexfield
- Intercompany Transaction Distributions
- Provider descriptive flexfield is transferred to the Receivables Line Distributions descriptive flexfield
- Receiver descriptive flexfield is transferred to the Payables Invoice Lines descriptive flexfield
Capture additional reference information about Intercompany transactions, such as serial numbers, and transfer this information to Receivables and Payables transactions. You can view and use this information in Receivables and Payables.
Steps to Enable
To enable this feature, perform the following steps:
- Enable the Descriptive Flexfield Transfer option on the related Intercompany transaction types. You can only enable this option on Intercompany transaction types that also have the Invoicing option enabled, because this option enables Intercompany transactions for transfer to Receivables and Payables.
- In the Manage Descriptive Flexfields page, configure Intercompany, Receivables, and Payables descriptive flexfields:
- Define the Receivables Invoice Lines descriptive flexfield to match the Intercompany Transaction Batches descriptive flexfield definition.
- Define the Payables Invoices descriptive flexfield to match the Intercompany Transaction Headers descriptive flexfield definition.
- Define the Receivables Line Distributions and Payables Invoice Lines descriptive flexfields to match the Intercompany Transaction Distributions definition.
Key Resources
- Refer to the Oracle Applications Cloud, Implementing Applications documentation for information on Descriptive Flexfields.
Role Information
You will need the Application Administrator role to configure descriptive flexfields and complete the Intercompany transaction types setup.
Oracle Fusion Cloud Applications Suite provides a digital assistant built on the Oracle Digital Assistant (ODA) platform. The digital assistant delivers an intelligent conversational experience for employees to complete key tasks and quickly access information across Fusion Applications. For information about the complete set of current capabilities, see the Oracle Digital Assistant: Oracle Skills documentation.
For ERP, the digital assistant helps finance and operational professionals easily navigate and identify data and business insights that is contextual, relevant, and thoughtful. In update 21B, ERP has digital assistant capabilities for expenses, project time capture, and project management using channels including SMS, Oracle Web, and Microsoft Teams.
Look for enhancements and expansion to additional roles and business processes in future updates.
To learn more, review the update 21B features in the Oracle Financials Cloud and Oracle Project Management Cloud What’s New documents. In addition, see the topic: Getting Started with Oracle Digital Assistant for Cloud Applications for setting up the assistant.
The Oracle Expense Assistant is a skill within the Oracle Fusion Applications Digital Assistant that lets you create and manage your expenses using a conversational experience. It uses conversational channels such as native SMS, Slack, or Microsoft Teams on your mobile device to guide you through common expense tasks. As you interact with the assistant, it directly communicates with the Oracle Expenses web application to perform the tasks.
Conversational Expense Creation with Microsoft Teams
Create expense items from Microsoft Teams using conversational phrases, such as meal 30$ today, or create a taxi expense. Employees can also perform these actions: upload a receipt to create an expense; modify an existing expense; view the status of an expense report.
When employees create expenses using conversations in the Microsoft Teams channel, Oracle Digital Assistant (ODA) automatically predicts expense types from the information provided in the conversation using natural language processing. ODA works as an assistant that is encapsulated within an application on Microsoft Teams - which ultimately enables users of Expenses Assistant to take advantage of additional capabilities specific to the Microsoft Teams user experience. The Expenses Assistant on Microsoft Teams groups together similar information; this information is related to the expense creation process and includes: expense types, currency types, merchant names, and user-entered expense dates. In addition, users can now modify existing expenses using Expenses Assistant on Microsoft Teams.

Submitting an Expense Using the Digital Assistant in Microsoft Teams
Business benefits include:
- Saves time by streamlining the expense process.
- Saves money by reducing expense process errors that often require manual intervention.
- Delivers a better user experience by offering users the ability to process expense reports based on their personal or organizational preferences, i.e. using Microsoft Teams to process expenses.
- Increases compliance with an organizations’ expense reporting policies and processes by providing an easier way to process employee expenses.
Steps to Enable
To enable Microsoft Teams for the Expenses Digital Assistant, you need to create a Microsoft bot in one of the following three ways:
- Directly in Microsoft Teams, using App Studio.
- Through Azure Bot Service, which requires having a Microsoft Azure account. See Azure Bot Channels Registration for the setup details.
- Through Microsoft Bot Framework, which requires having an Office 365 account at a level of E1 or higher. See Bot Framework Channels Registration for the setup details.
The first of these options - using App Studio in Microsoft Teams - is the most straightforward. To set up a bot channel registration through App Studio, create the following:
- A Microsoft Teams app. This app is the container for the bot that you create and is how you access the bot in Teams.
- A bot. This is the artifact within the app that communicates with Oracle Digital Assistant
Here are the steps:
- Go to https://teams.microsoft.com and log in with your Microsoft account.
- In the left navigation, click the App Studio icon.
NOTE: If the App Studio icon isn't shown, do the following to add it:
- In the left navigation of the service, click the Search field and then search for and select App Studio.
- Click the Add button. The icon for App Studio should appear in the left navigation.
- In App Studio, select the Manifest Editor tab. Click the Create a New App button.
- On the App details page, fill in the Short Name field with the name you want to use for the app as it will appear in Microsoft Teams. This app will encapsulate the bot, which you will create later.
- Under Identification, click Generate to create an app ID.
- Fill in all required fields including Package Name and Version.
- In the left navigation of the page, under the Capabilities section, select Bots followed by Set up.
- On the Set up a bot page, with the New bot tab selected, do the following:
- Enter a name for the bot.
- Select My bot supports uploading and downloading of files.
- Select the Personal scope.
- If you intend the channel to be used for group chats, also select Team and/or Group Chat.
NOTE: Selecting the Team scope enables the bot to be added to a team. Selecting Group Chat enables the bot to be added to an ad hoc group created by users.
- Click Create bot.
- Once the bot is created, a tile will appear at the top of the page with the bot name and a generated ID below it. Copy the ID and save it in a text file.
IMPORTANT: You will need this ID when you create the channel in Digital Assistant.
- Click Generate new password. Then copy the password and save it in the text file where you saved the ID.
- In the left navigation of the page, under the Finish section, select Domains and permissions. Under Valid domains add any domains that the bot's users may be coming from.
- Leave App Studio open in your browser.
NOTE: Later, you will complete the registration with a webhook URL that you get when you create the channel in Digital Assistant.
Tips And Considerations
To use this feature, ensure that you have downloaded the latest Expenses skill for Microsoft Teams from the Digital Assistant store. Refer to the Upgrade Digital Assistant section in the Getting Started with Oracle Digital Assistant for Cloud Applications guide to learn more about upgrading the Expenses skill and/or using the the Expenses skill for Microsoft Teams.
Key Resources
- To learn more about Oracle Digital Assistant Expenses skill, refer to the Expense Assistant section in the Using Expenses guide
Frequently Asked Questions and Tips in Oracle Digital Assistant
Use Oracle Digital Assistant to allow employees to ask questions and seek tips using conversation.
Examples of this feature are “show me how to upload a receipt,” or “ask a question.” This provides users with an alternative learning path that is quick and easy way to communicate answers to the most commonly-asked questions related to using the Expenses Digital Assistant. Users can also access a list of tips and best practices about using Expenses Digital Assistant.

Shows the Kinds of Tips the Expenses Digital Assistant Will Provide
Business benefits include:
- Provides a learning path within the application, for new and existing users of the Expenses Digital Assistant.
- Saves users time by learning to use Expenses Digital Assistant and completing the overall expense report process.
Steps to Enable
You don't need to do anything to enable this feature.
Key Resources
- To learn more about the ODA Expenses skill, please review the “Expense Assistant” section in the Using Expenses guide.
Number of Attendees Recording for Expenses with Oracle Digital Assistant
Capture the number of attendees when meals and entertainment expenses surpass the designated limits specified by the company policy. Auditors can view the cost per attendee when auditing the expense.
This feature allows users to include the number of attendees required for an expense that surpasses the designated limits specified by company policy, such as expenses for meals and/or entertainment purposes. This feature also allows auditors to view the cost per attendee when auditing the expense to ensure compliance with company policies.
Business benefits include:
- Saves money by reducing expense process errors, which typically require manual intervention and additional reviews.
- Improves the review of key expense report details.
- Increases compliance with an organization’s expense reporting policies and procedures.
Steps to Enable
You don't need to do anything to enable this feature.
Key Resources
- To learn more about the ODA Expenses skill, review the “Expense Assistant” section in the Using Expenses guide.
Approval Rules Navigation for Financial Workflows in Workflow Transaction Console
Use approval rules navigation in the Workflow Transaction Console to edit the rules for Invoice, Journal, Expense, and Holds Resolution workflows, and to enable the Alert Initiator on Error option to send notifications to the workflow initiator for failed workflow notifications.
The Approval Rules page in the Workflow Transaction Console allows you to:
- Navigate to the Workflow Rules page to edit rules for Invoice, Journal, Expense, and Hold Resolution workflows.

Approval Rules Page
- Enable the Alert Initiator on Error option to send error notifications to the workflow initiator when an approval task fails in the Workflow Transaction Console.
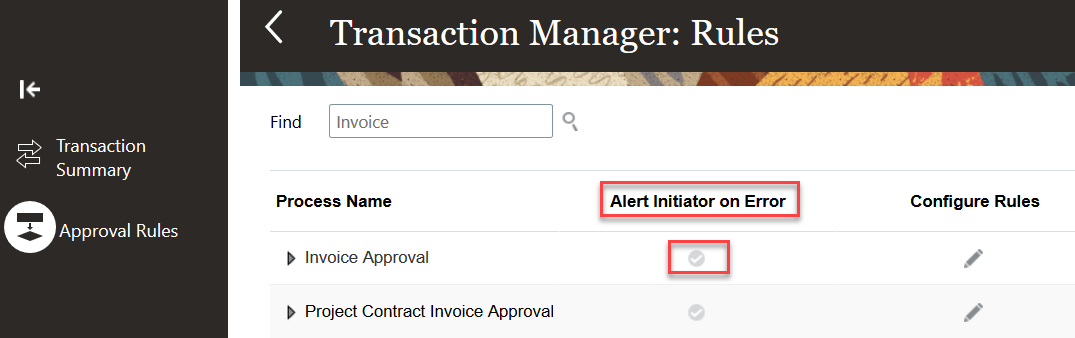
Alert Initiator on Error
Workflow administrators can use the Workflow Transaction Console to proactively monitor all workflow tasks and resolve the exceptions for the Invoice, Expense, Journal, and Invoice Hold Resolution workflows. The workflow administrator can navigate to the Workflow Rules page from the Workflow Transaction Console to edit the rules for financial workflows.
- Workflow administrators review the issue description and resolution for the failed transactions. If a transaction failed due to incorrect rule configuration, then the workflow administrator can correct the rules and recover the transaction from the point of failure.
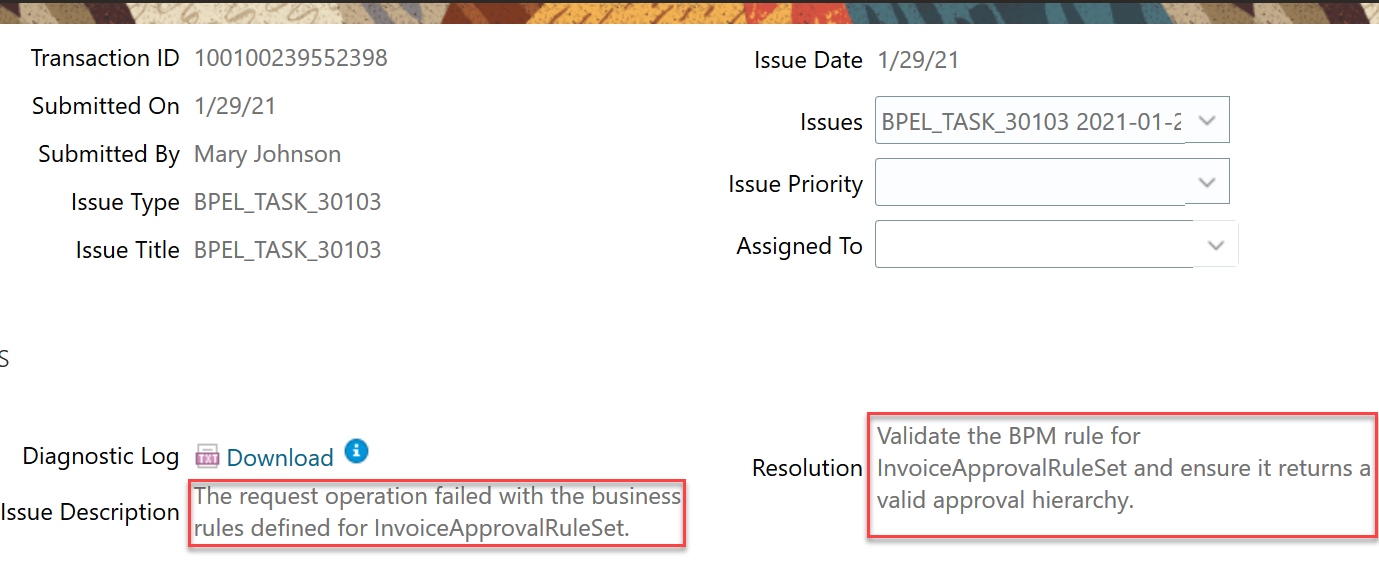
View Issue Description and Resolution for Failed Task
- Navigate to the Approval Rules page from the Workflow Transaction Console to edit the workflow rules for Invoice, Journal, Expense, and Holds Resolution workflows.
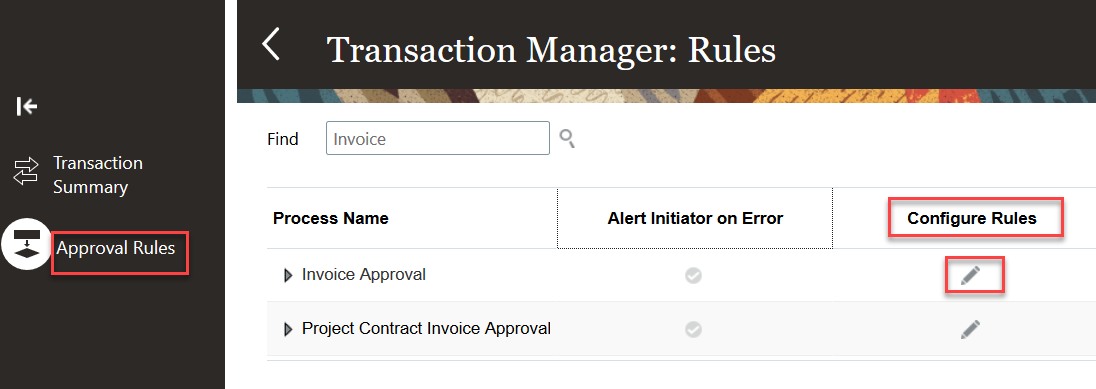
Approval Rules Page
- Click the edit icon in the Configure Rules column to navigate to the Workflow Rules page to correct the rules.
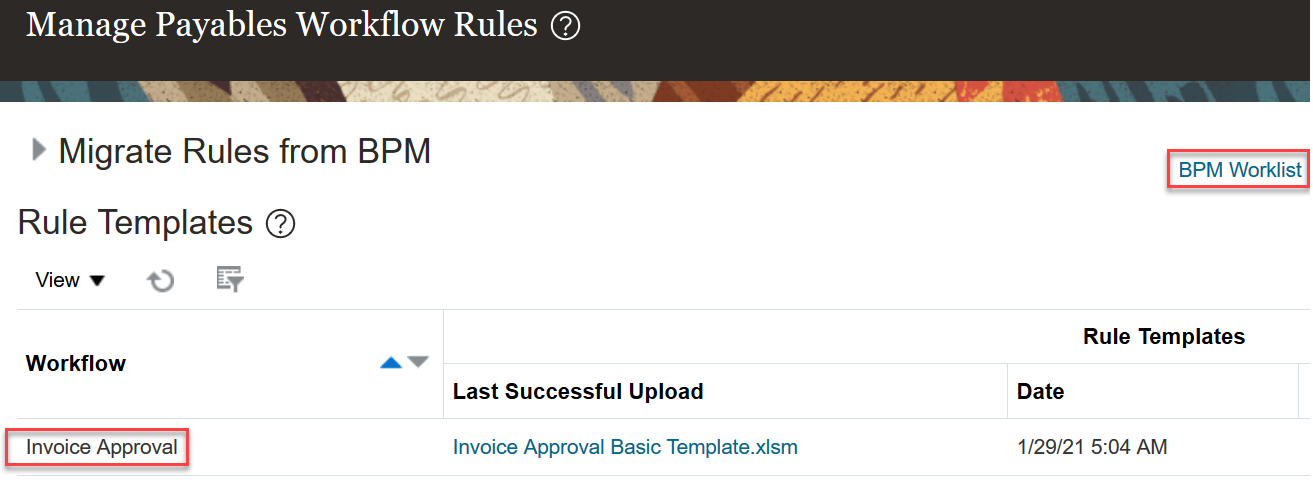
Manage Payables Workflow Rules
Steps to Enable
Make the feature accessible by assigning or updating privileges and/or job roles. Details are provided in the Role section below.
Role Information
You need the following privilege to access the Approval Rules Page in Workflow Transaction console:
- PER_MANAGE_APPROVAL_RULES_PRIV
You need the following privilege to access the Configure Rules Page in Workflow Transaction Console:
- PER_CONFIGURE_APPROVAL_RULES_PRIV
Using a single dashboard, administrators can proactively monitor workflow tasks and resolve exceptions for the Invoice Hold Resolution workflow. This feature was first delivered in update 19D for the Invoice, Expense, and Journal workflows. In update 21B, the Workflow Transaction Console is enhanced to display the workflow tasks related to the Invoice Hold Resolution workflow.
The Workflow Transaction Console lets you monitor workflow tasks, resolve exceptions, and search using your own criteria.
Use the Workflow Transaction Console to:
-
View the latest status of all the tasks in the system

-
Review the issue description and resolution for failed tasks.
Select a Failed Task

View Issue Description and Resolution
- Take appropriate actions based on the issue description and resolution. For example, you can recover a failed task after correcting the rule
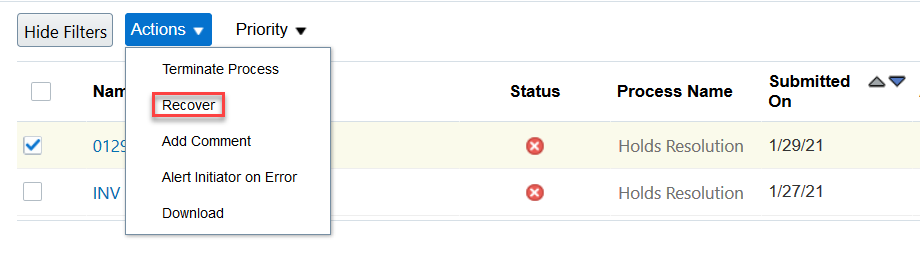
Recover a Failed Task After Correcting the Rule
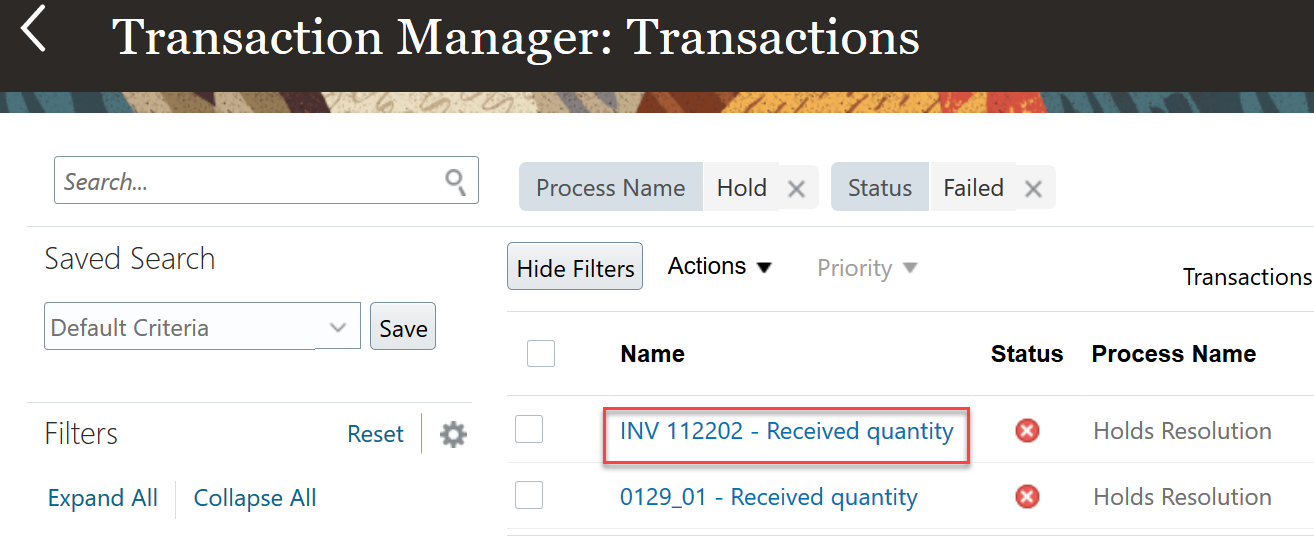
- Search based on the user-defined criteria.
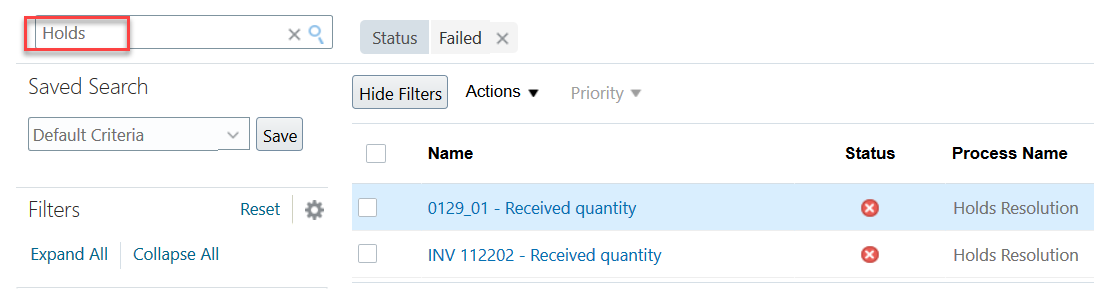
Search Transactions
- Download the search results to a spreadsheet in the CSV format.
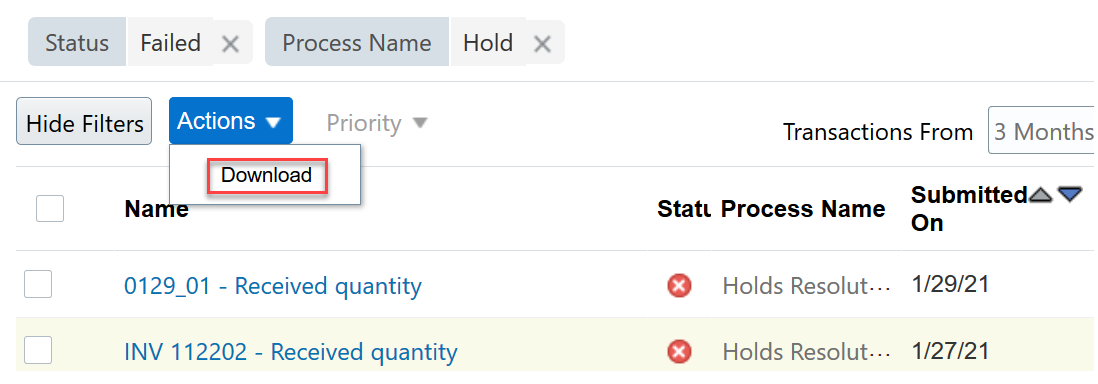
Download Search Results
Steps to Enable
Use the Opt In UI to enable this feature. For instructions, refer to the Optional Uptake of New Features section of this document.
Offering: Financials
Tips And Considerations
To display only financial-related tasks in the Workflow Transaction Console, enable the transaction security feature by performing the following steps:
- Go to Navigator > Setup and Maintenance > Manage Enterprise HCM Information.
- Click Edit > Correct.
- In the Transaction Console Information section, select Enable Transaction Security.
Role Information
- Financial Application Administrator
Enhanced Message Content for Dunning Letters Delivered Using Email
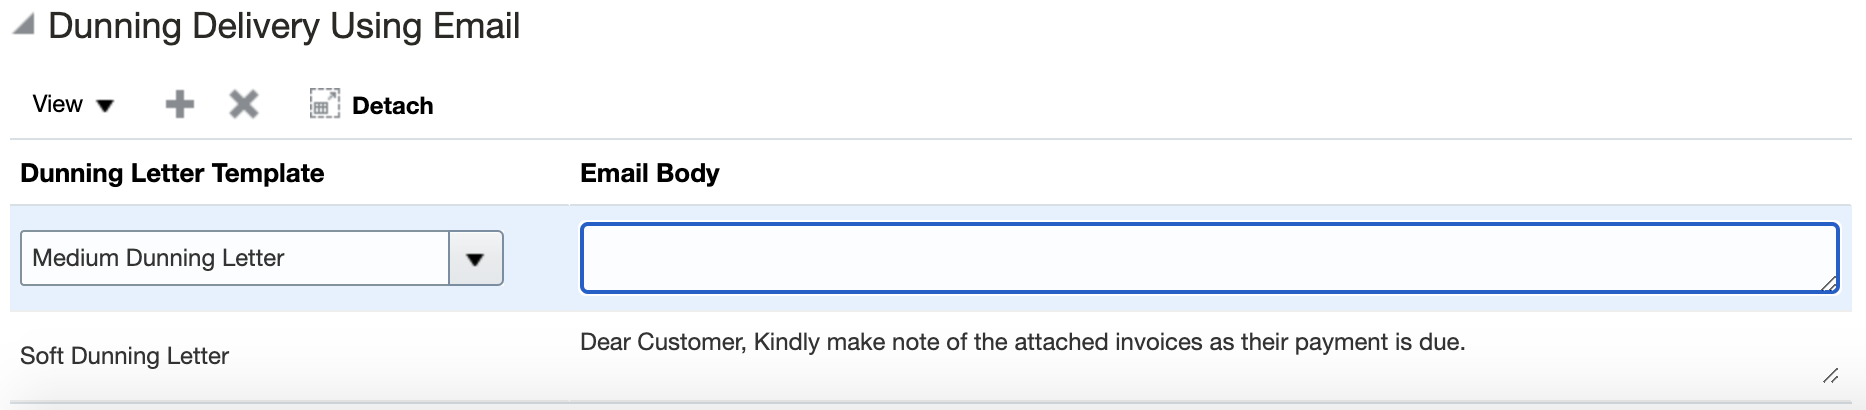
Send dunning letters using email with enhanced rich text content in the body of the message. Users can choose different fonts, modify font size and style, and insert logos and hyperlinks. The enhanced content improves the user experience for customers who receive dunning letters as an email attachment.
Use the Dunning Delivery Using Email section of the Manage Collections Preferences page to configure the email body content. The email body can be configured for each of the Dunning Letter Templates which are already available in the product.
Dunning Delivery Using Email
Provides users with various tools for improving the content of an email message, including emphasis, promotional material, access to additional information, and an overall professional look and feel.
Steps to Enable
You don't need to do anything to enable this feature.
Tips And Considerations
- The character limit for the Email Body field is 4000 which includes values of the dynamic tokens if used.
- If you do not define email body content for a particular Dunning Letter Template, then the email body content uses predefined messages.
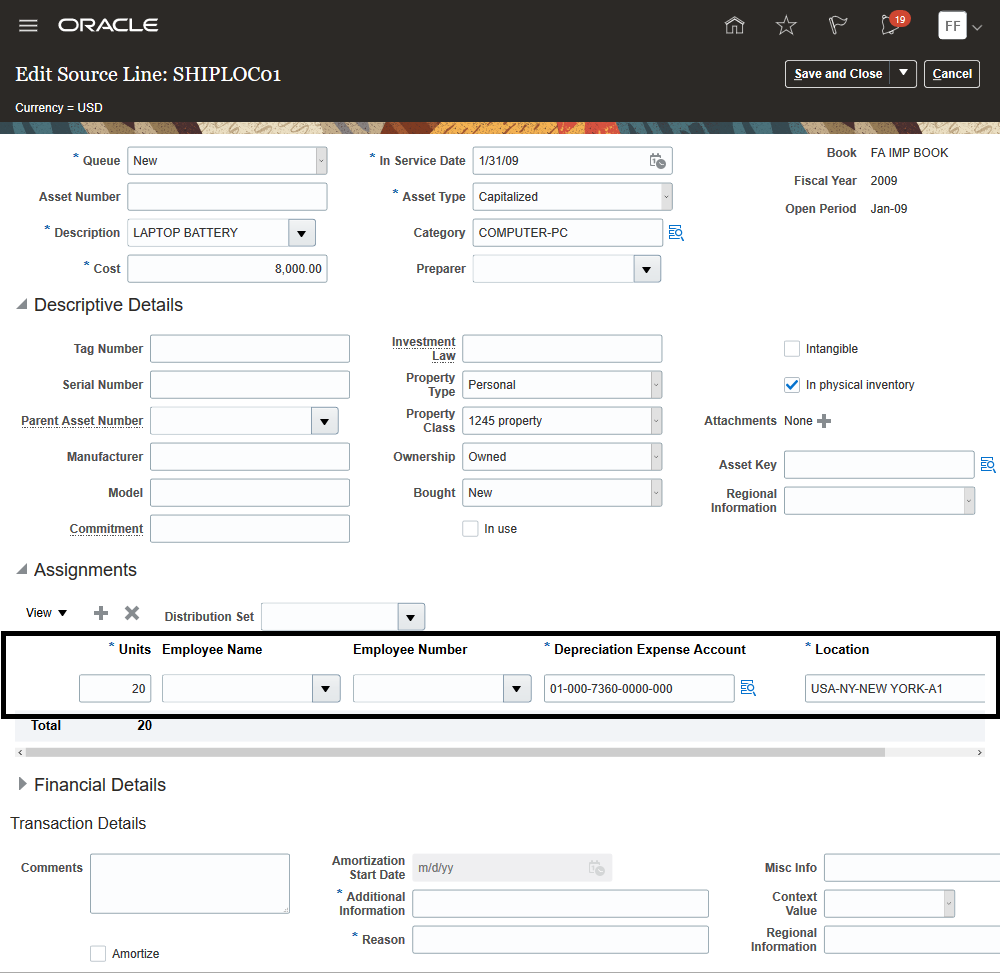
Derivation of Asset Location from Payables Invoice Ship-To Location
Use the Create Mass Additions process to transfer ship-to location information from Payables invoices to Assets. Assets automatically assigns an asset location to each Payables invoice line based on the HR location to asset location mapping, eliminating the need to enter an asset location manually.
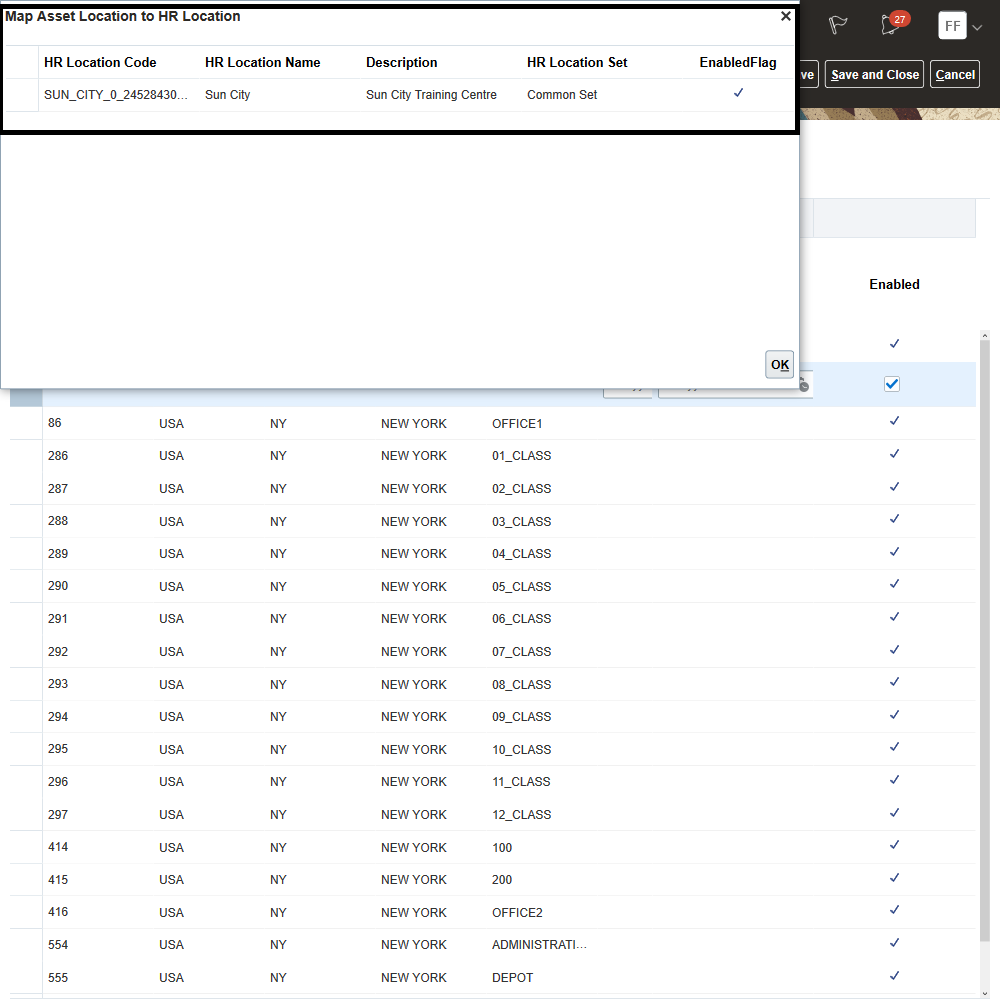
Use the mapping table to map the Assets location and the HR location. You can view mapped locations in the Manage Assets Locations page.
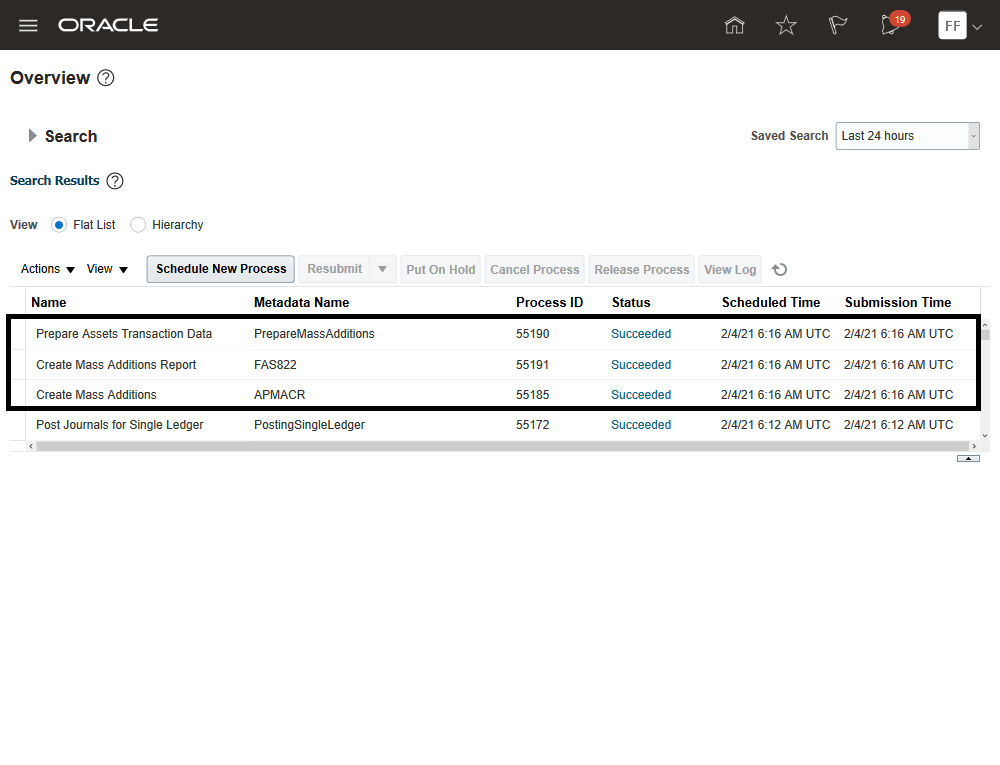
You can now automatically populate the asset location for each invoice line by defining a mapping between the asset location and ship-to location setup in HR Locations. When you run the Create Mass Additions process, the Prepare Assets Transaction Data automated process populates the asset location that is mapped to the ship-to location of the invoice line. The mapped locations can be viewed from the Manage Assets Locations page.
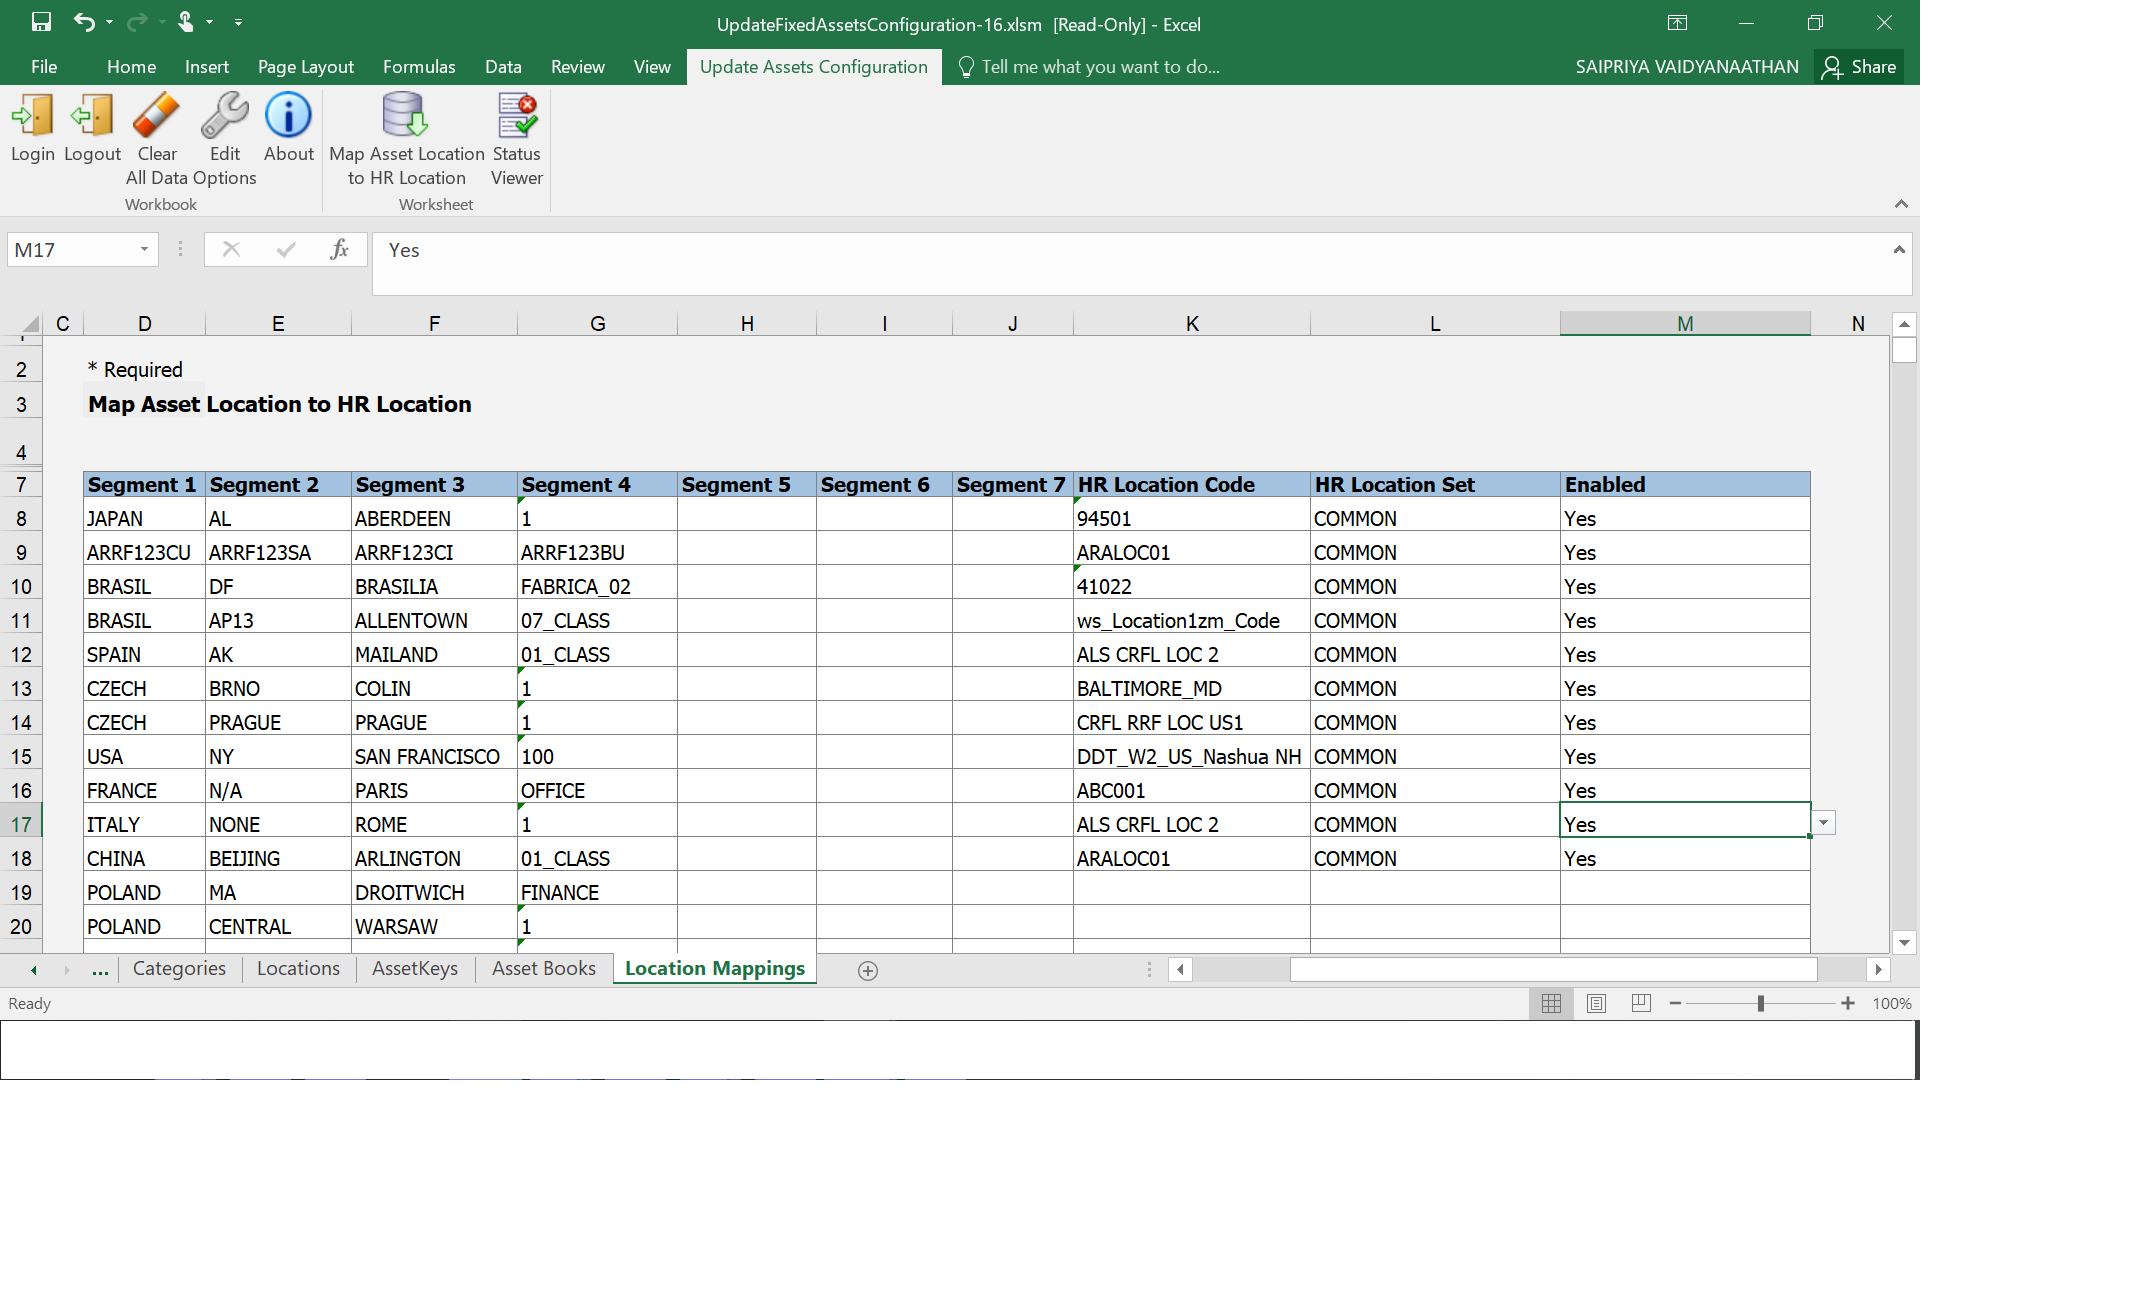
You can create a mapping between the asset location and HR location using:
- Location Mapping worksheet in the Update Fixed Assets Configuration Sheet.
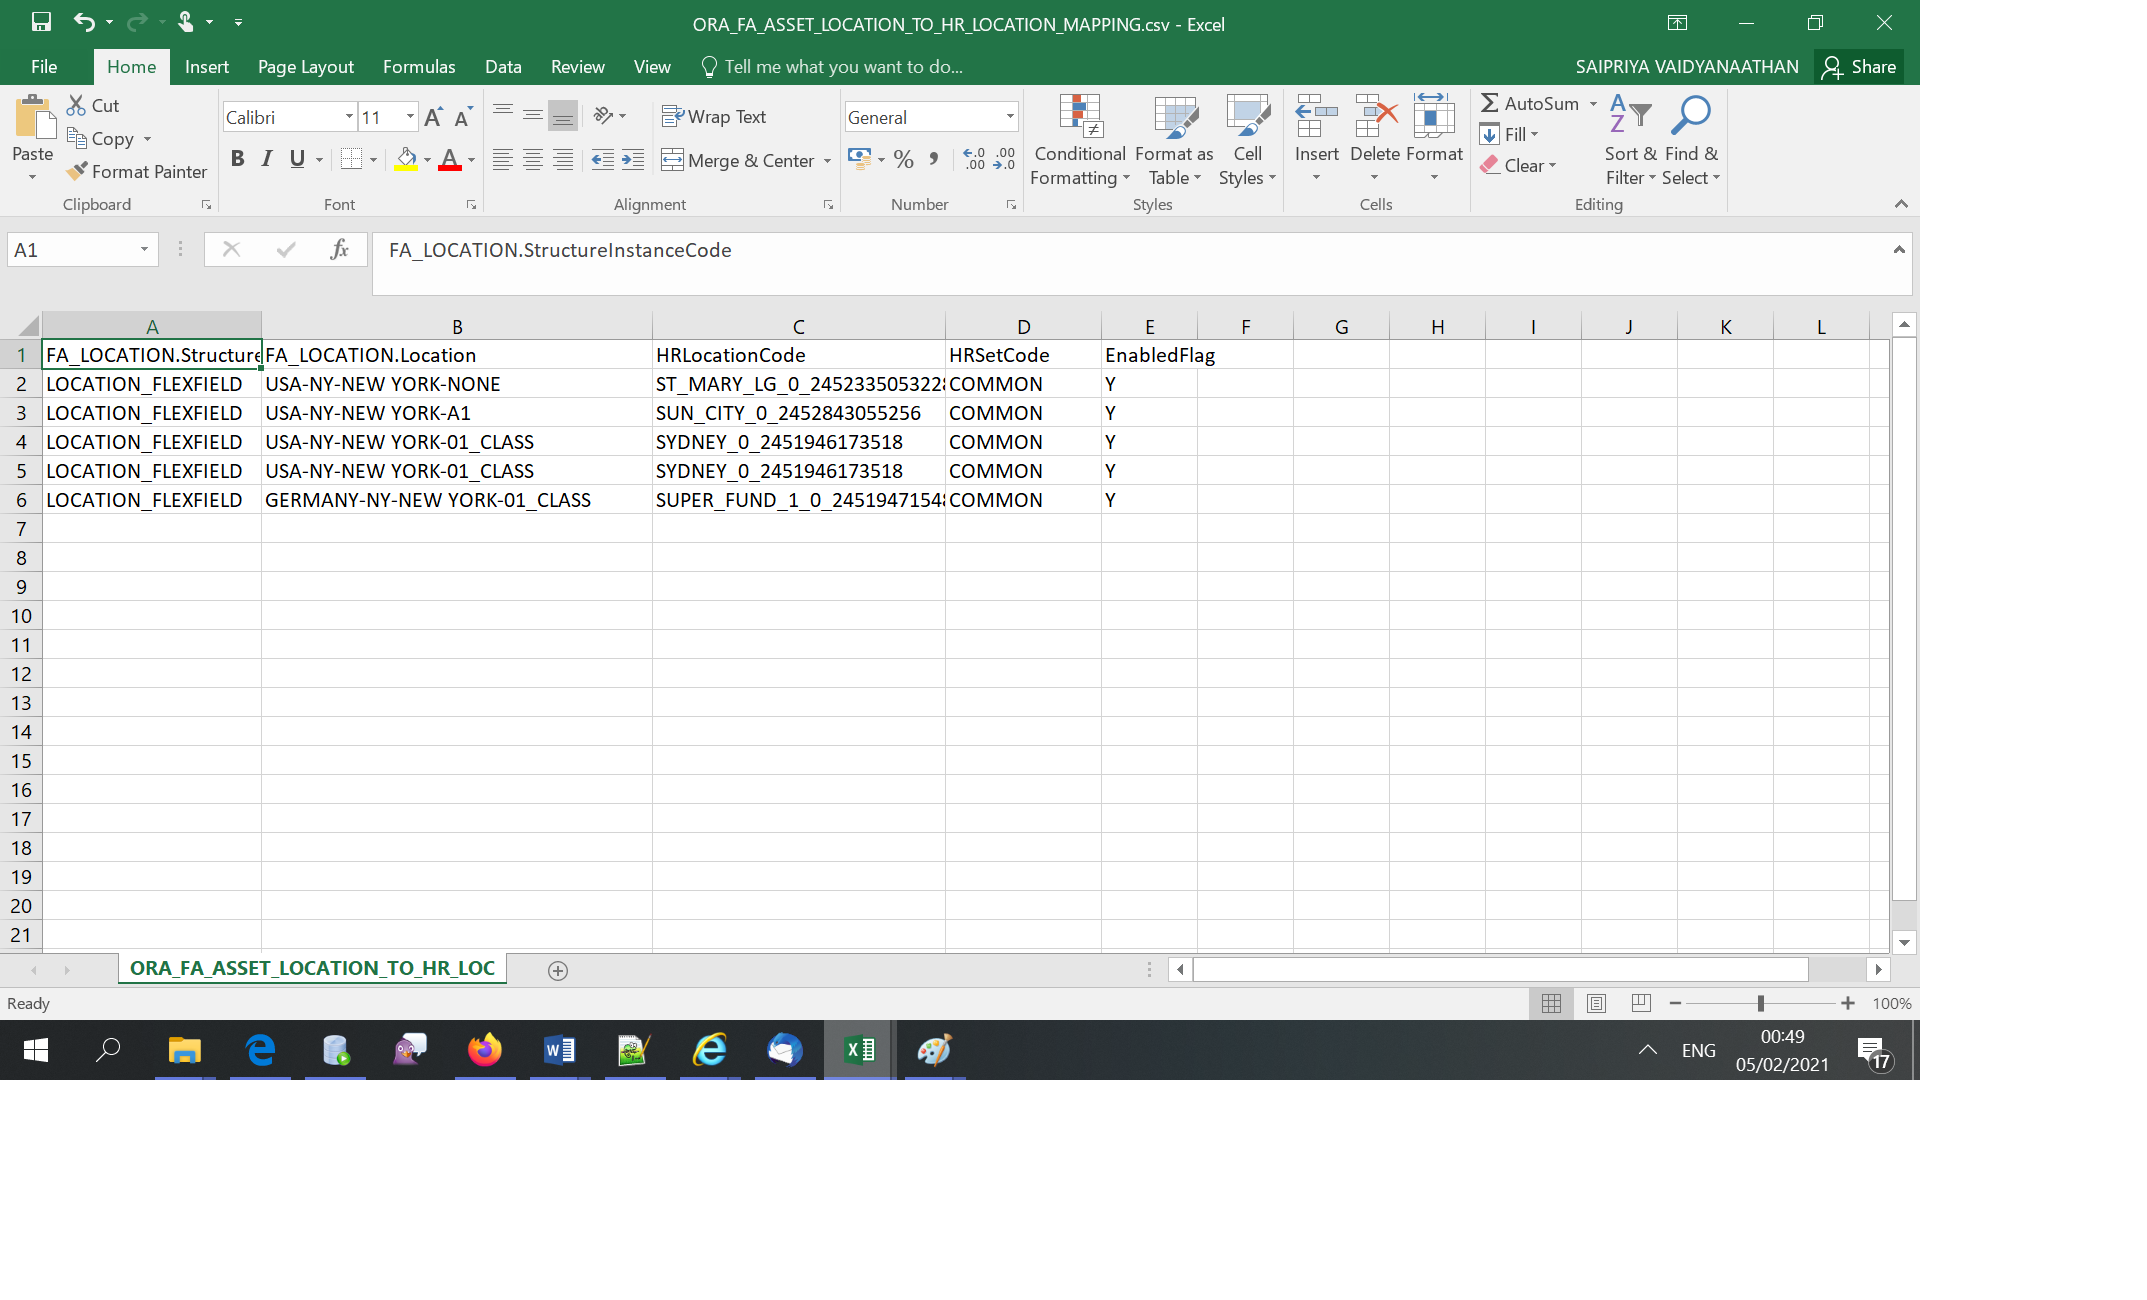
- Manage Asset Location in Export and Import Process.
The Update fixed Assets Configuration Sheet downloads all the assets location including the location for which mapping already exists. To create the mapping between the assets location and HR location, select the HR Location Code from the list of values against the Assets locations.Upload the generated csv files.The upload fixed assets configuration process creates the mapping. Enter the HR Location Code to create mapping through Export Import csv file.The assets location and mapping of asset location to HR location can be done simultaneously by entering the assets locations in the Location sheet and the Mapping in the Location Mapping sheet.
The asset location and HR location must both exist and be active before you can complete the mapping. You can create the assets location and map the asset location to the HR location at the same time. You can disable the existing mapping at any time. You can view the mapped locations from the Manage Assets Location Page.and download them in Updated Fixed Assets Configuration spreadsheet and Export and Import csv file.
- Create a mapping between the asset location and HR location using the Update Fixed Assets Configuration spreadsheet and the Export and Import csv file.
- Create Invoices with Ship to Location

- Create Mass Additions and Prepare assets transaction data.
- Auto populate Assets location in Edit Asset Page
- View Mapped Asset Location to HR Location.
You can now automatically assign an asset location to each invoice line transferred from Payables. This eliminates the need to enter asset locations manually.
Steps to Enable
- In Setup and Maintenance, navigate to the task Manage Fixed Assets Lookups.
- Search for the lookup type FA_MASS_ADD_PREPARE_RULES.
- Enable the option for the Default lookup code.

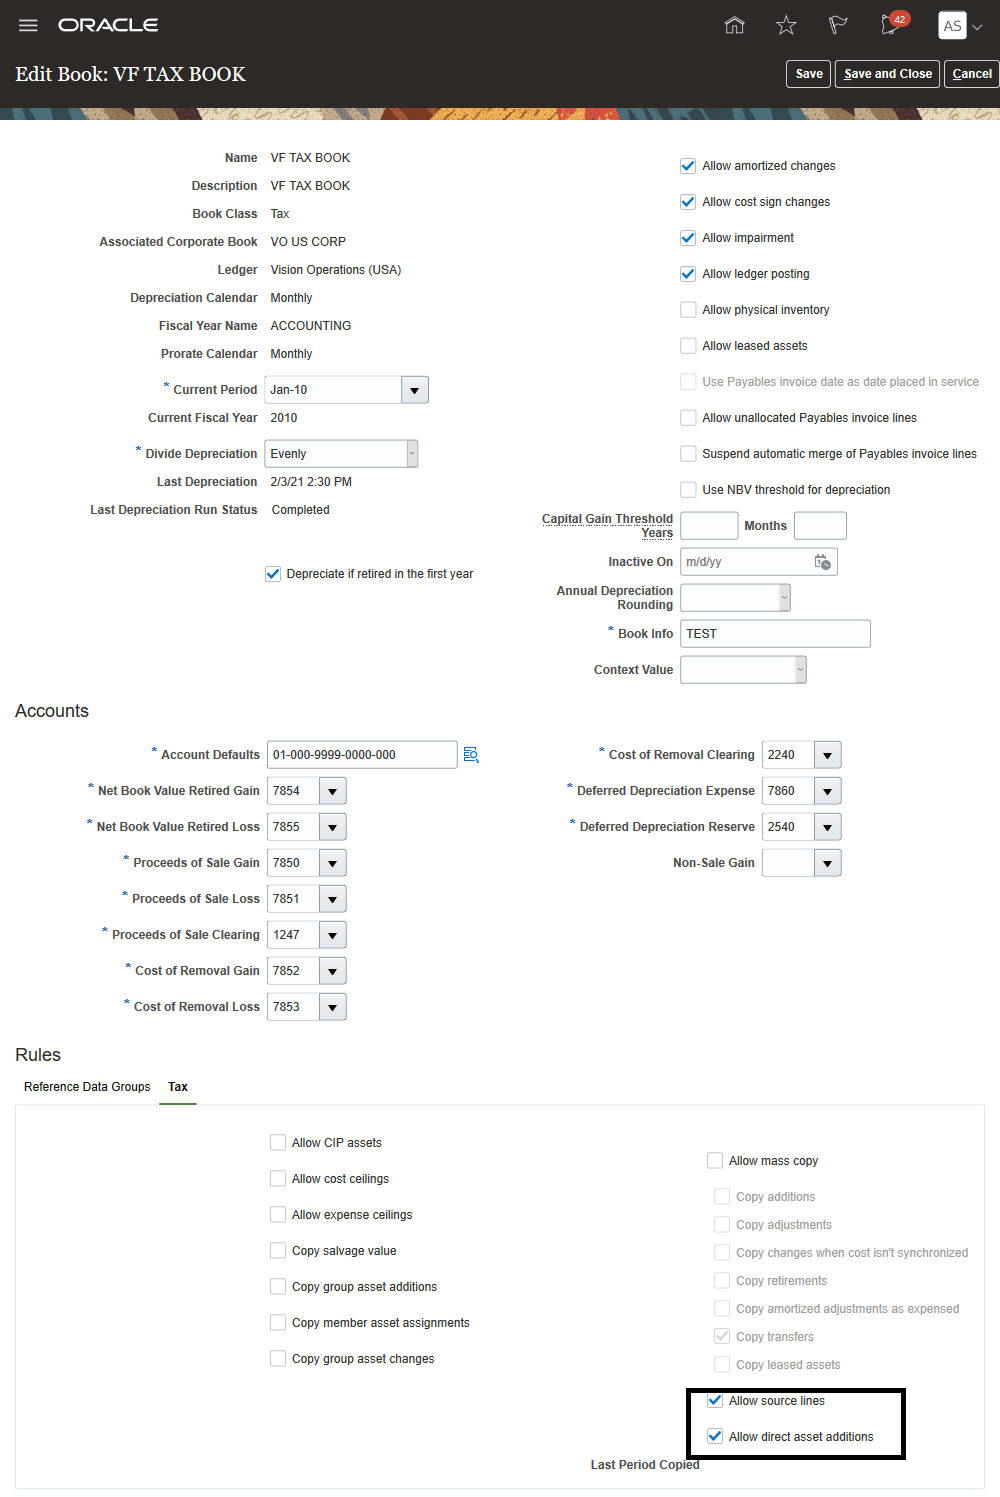
Directly Add Assets in Tax Books
Add assets directly to a tax book using either the Add Asset page or the Add Assets spreadsheet.
You can easily add assets to a tax book. These assets can be depreciated in tax books only.
Steps to Enable
- To add assets to a tax book using the Add Asset page or the Asset Additions spreadsheet,complete these steps: Set up tax books for the corporate books ledger, and a secondary ledger with the same currency as the primary ledger. Enable the "Allow direct asset additions" option.
-
To add assets to a tax book with source line information, enable the "Allow source lines" option in the Edit Book page. Enable this option before adding assets to the tax book. If you do not enable this option before adding assets to the tax book: Assets will be added without source line information. Merge and Add to Asset transactions are not allowed on this book, because these are source line transactions.
- Create a tax book for the corporate book ledger, and a secondary ledger with the same currency as the primary ledger.
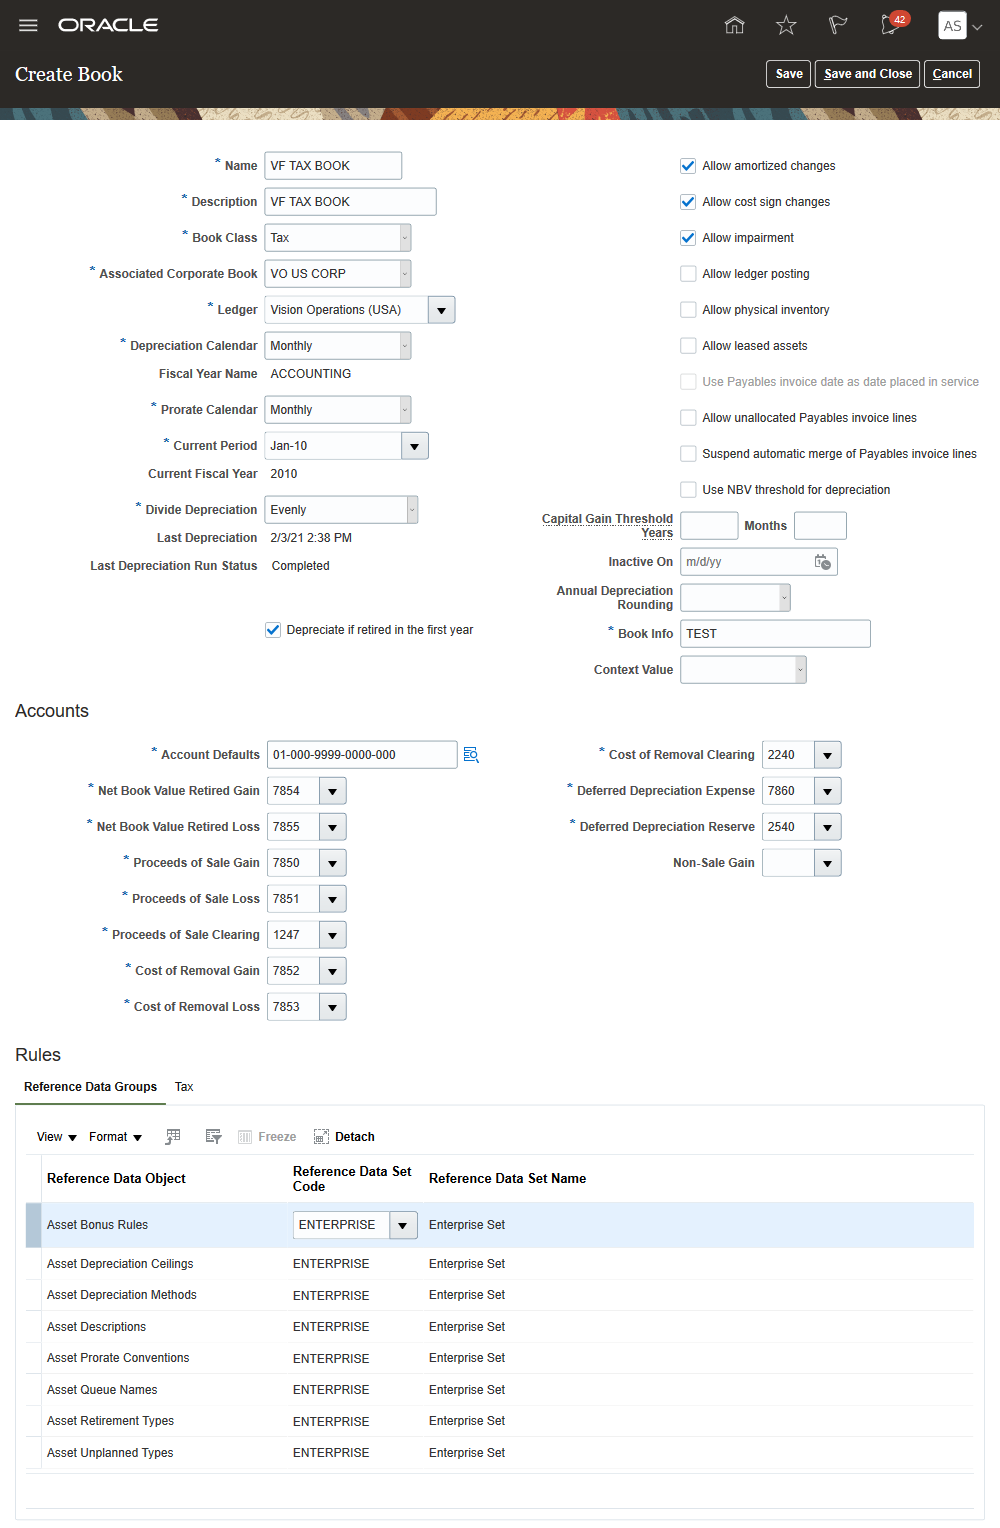
- Enable the "Allow direct asset additions" and "Allow source lines" option.
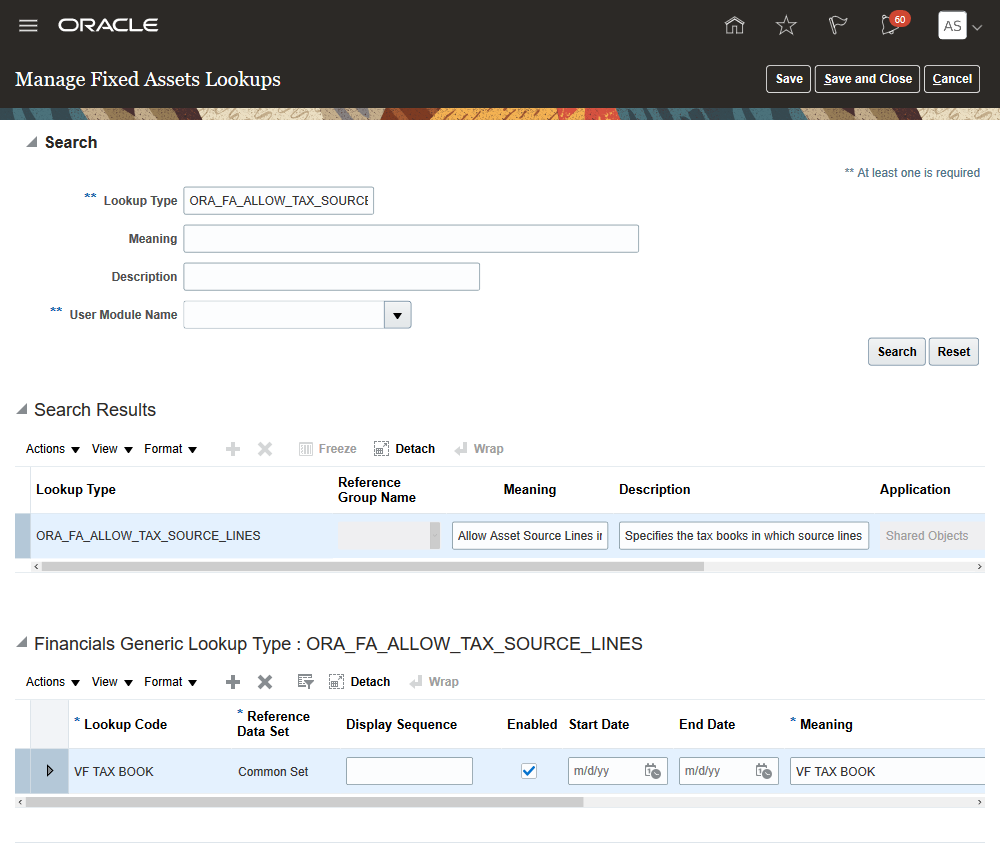
- In Setup and Maintenance, search and go to the task ‘Manage Fixed Assets Lookups’.
- Search for the lookup types- ‘ORA_FA_ALLOW_TAX_SOURCE_LINES’ and ‘ORA_FA_ALLOW_TAX_DIRECT_ADD’.
- Enter your asset book name as the lookup code.

- In the Edit Book page, enable the following options.
- Allow source lines.
- Allow direct asset additions.
Budget Entry Classification for Initial or Adjustment Budget Balance Using Spreadsheet
Select the budget entry type to impact either initial or adjustment budget balances. Specify the budget entry type when you use file-based data import or spreadsheet to load budgets. You can make budget revisions to the initial budget balance when the budget period is open for consumption.
Control the classification of your budget entries as initial budget or budget revision to reflect the intention of the budget entry for reporting and inquiry on budget balances.
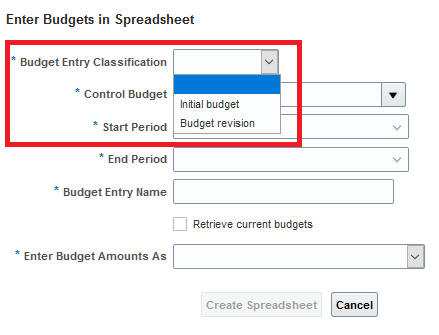
Budget Entry Classification
Steps to Enable
Use the Opt In UI to enable this feature. For instructions, refer to the Optional Uptake of New Features section of this document.
Offering: Financials
Tips And Considerations
New Customer Installations:
- This feature defaults with Opt-In enabled.
Upgraded Customer Installations:
- This feature defaults with Opt-In disabled.
- When this feature is disabled, the budget entry classification is determined by period status. When the budget period status is Open, the budget balance is classified as an adjustment. When the budget period status is Available for budgeting, the budget balance is classified as initial. When this feature is enabled, you select the budget entry classification of the budget balance regardless of the period status.
- We recommend implementing this feature in your next fiscal year budget preparation cycle to ensure all budget entries are categorized consistently. However, don’t enable the feature on the Opt In page until you’re ready to load the budget entries for the new fiscal year budget.
- Classification of budget entries by budget period will be removed in a future release.
- If you have scheduled either the Import Budget Amounts or Import Budget for Budgetary Control and General Ledger process, or you have created custom ERP integration to invoke any of these processes, you must update them to reflect the new and changed parameters introduced by this feature.
- The Import Budget Amounts process Import mode parameter has been renamed to Budget Amounts Entered As and has these new values.
Previous Parameter Name New Parameter Name Fail This parameter is no longer available and the logic has been merged with "New budget or replacement of current budget." Overwrite New budget or replacement of current budget Increment Addition to or subtraction from current budget
Key Resources
- Import Budget Data from a Flat File for Budgetary Control in Using Financials for the Public Sector
- Budgetary Control Budget Import in File-Based Data Import for Financials
Role Information
Budget Manager role is needed to submit these processes:
- Enter Budgets in Spreadsheet
- Import Budget Amounts
- Import Budget for Budgetary Control and General Ledger
Initial Budget Adjustments for Carry Forward Processes
Update the initial budget balance using the Carry Forward Purchase Order Budgetary Control Balances process and the Carry Forward Funds Available process. Budget entries for the carry forward of funds available and purchase orders updates the initial budget balance regardless of budget period status.
Carried forward budget are reported separately from budget revisions entered in the new budget year. Carried forward budget updates the initial budget balance, whereas budget changes made during the new year will update the adjusted budget balance.
Steps to Enable
You don't need to do anything to enable this feature.
Tips And Considerations
When carrying forward funds available balance to the next year, the funds available balance will be classified as initial budget in the new budget year regardless of the budget period status being Available for budgeting or Open.
When you carry forward the purchase order to the next year and you choose to leave the funds available unchanged in the current year, the current year budget is still classified as adjustment.
To carry forward the purchase order obligation to the next budget year, you must continue to open the budget period in the new budget year.
To understand the impact of the feature on the Carry Forward Purchase Order Budgetary Control Balances process, consider the following example. You want to carry forward a purchase order’s obligation and budget balance from 2020 to 2021 while leaving the funds available unchanged in 2020.
The control budget period status must be OPEN for:
- 2020
- 2021
The Carry Forward Purchase Order Budgetary Control Balances process is run with these parameter values.
- Finally Close Through Budget Date = 2020
- Reopen Open Budget Date = 2021.
These are the budgetary control balance results.
- 2020 (no change to the functionality)
- Obligation is reduced
- Reduction of the budget in 2020 is classified as adjusted budget.
- 2021
- Obligation is reserved (There are no changes to the feature)
- Carry forward of the budget to 2021 is classified as initial budget. (This is the change to the feature)
- The results are shown in the table below.
Obligation Budget 2020 2021 2020 2021 Initial Budget Adjusted Budget Initial Budget Adjusted Budget Final Close PO in 2020 Reduction of Obligation Reopen PO in 2021 Reservation of Obligation Budget Impact Reduce Budget in 2020 Reduction of Budget Move Budget to 2021 Carry Forward of Budget (changed)
Key Resources
- Managing Budgetary Control Carry Forward support note 2705986.1
Role Information
Budget Manager role is needed to run the Carry Forward Purchase Order Budgetary Control Balances process.
View Funds Reservation Errors When Final Close or Reopen Fails for a Purchase Order
Drill down to the funds reservation results from error messages. These error messages are displayed when final close or reopen fails for a purchase order because of issues in releasing or reserving funds. You can contact the budget manager listed on the results for assistance in resolving the issues.
These screen captures illustrate the feature:
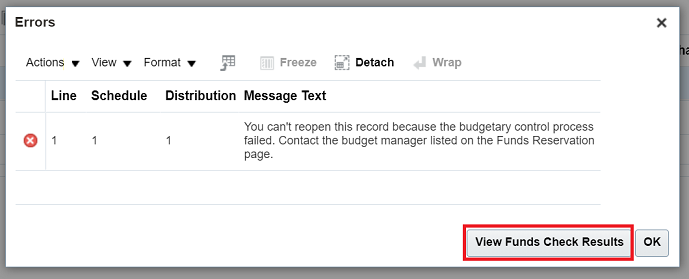
Reopen Purchase Order Error Message Dialog Box
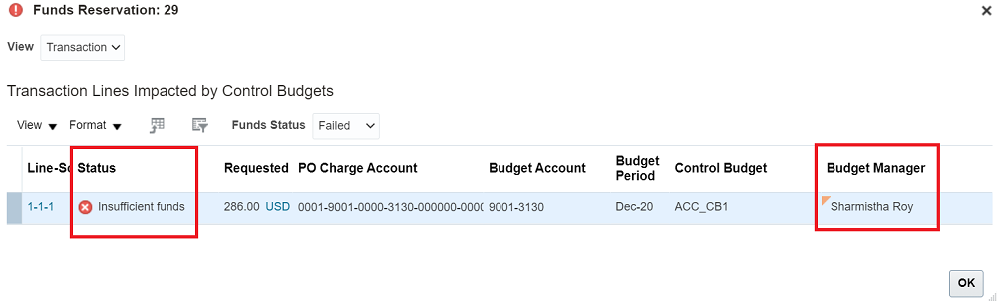
Purchase Order Funds Reservation Results
Steps to Enable
You don't need to do anything to enable this feature.
Role Information
You have a couple of options for giving people access to set up and use this feature, depending on whether you're assigning them predefined job roles or your own configured job roles.
- Users who are assigned this predefined job role are automatically able to access this feature:
- Buyer (ORA_PO_BUYER_JOB)
- Users who are assigned configured job roles that contain these privileges are able to access this feature:
- Create Purchase Order (PO_CREATE_PURCHASE_ORDER_PRIV)
- Change Purchase Order (PO_CHANGE_PURCHASE_ORDER_PRIV)
Wildcard Support for Bank Statement Processing Using UCM Protocol
Retrieve multiple bank statements using the Universal Content Management Reader Protocol with a wildcard. Enter a wildcard in the file name to retrieve and download multiple files at once instead of doing it for each file.
The capability to retrieve files using a wildcard reduces the manual effort of downloading files individually. You can retrieve multiple bank statements (that match the wildcard pattern) at once, instead of individually retrieving each file. Prior to this update, only the SFTP protocol was supported for loading bank statement files. Support for Universal Content Management Reader (UCM) protocol improves your integration capability with banks using this protocol.
Steps to Enable
You don't need to do anything to enable this feature.
Cancellation of Payment Requests for Cash Advances
Automatically update an employee's cash advance status when a payment request for a cash advance is canceled. Employees see the correct status, thereby reducing inquiries to the accounts payable department.
The new status in the Cash Advances work area allows employees to easily track the changes to their cash advance statuses, thereby improving employee experience.
When an auditor is notified that an approved cash advance is no longer required due to a trip or event cancellation or due to incorrect entries, the auditor can request the payables supervisor to cancel the cash advance. The cancellation of a cash advance takes place in Oracle Payables. Only invoiced or validated payment requests are eligible for cancellation. When a cash advance is canceled, a cancellation event is raised and the Expenses application sets the status of the cash advance to Invoice Canceled. No further actions can be performed on a cancelled cash advance.
Steps to Enable
You don't need to do anything to enable this feature.
Role Information
To cancel payment requests, you need the Payables Supervisor role.
Cancellation of Payment Requests for Expense Reports
When a payment request for an expense report is canceled, update the expense report status, delete both pay expense reports created to pay corporate card issuers, and reverse cash advance applications. This allows auditors to reprocess the expense report to Payables when needed to pay the employee and card issuer according to the correct schedule.
The ability to cancel payment requests for expense reports allows companies to prevent incorrect reports from reimbursement processing and communicate real time status to employees. Employees see the new status in the cards in the Expenses work area, thereby reducing inquiries to the accounts payable department.
Only payment requests with the status Invoiced or Validated can be canceled. When a payment request is canceled, the associated expense report status is changed to Invoice Canceled and the suffix “+1” is added to the expense report number. The references to the original payment request are removed. The Expenses work area reflects the status change and the new expense report number. Employees cannot take any action on an expense report in the Invoice Canceled status. In the Audit Expense Report page, an auditor can update a canceled expense report and process it again for expense reimbursement or return a canceled expense report to the employee. The employee can rework a returned report and resubmit it again.
A payables supervisor can cancel the following types of payment requests for expense reports.
- Expense reports containing cash expenses
When reprocessed for reimbursement, a new payment request to an employee is created.
- Expense reports containing individual pay corporate card transactions
When reprocessed for reimbursement, a new payment request to an employee is created.
- Expense report containing both pay corporate card transactions
When a payables supervisor initiates the cancel action, the application prevents the supervisor from further action if the expense report is a both pay report and one of the payment request is already in payment process. When both payment requests are in invoiced or in validated statuses, the application alerts the supervisor that both of these payment requests will be cancelled. When the expense report is reprocessed for reimbursement, the application creates two new payment requests, one for the employee and the second for the card issuer.
- Expense report containing company pay card transactions
When a payment request for the card issuer is canceled, the invoice number is removed from the card transactions and these transactions are available for reprocessing. When a payment request for the employee is canceled, the expense report status is changed to Invoice Canceled.
Steps to Enable
You don't need to do anything to enable this feature.
Role Information
To cancel payment requests, you need the Payables Supervisor role.
Detection of Duplicate Expenses
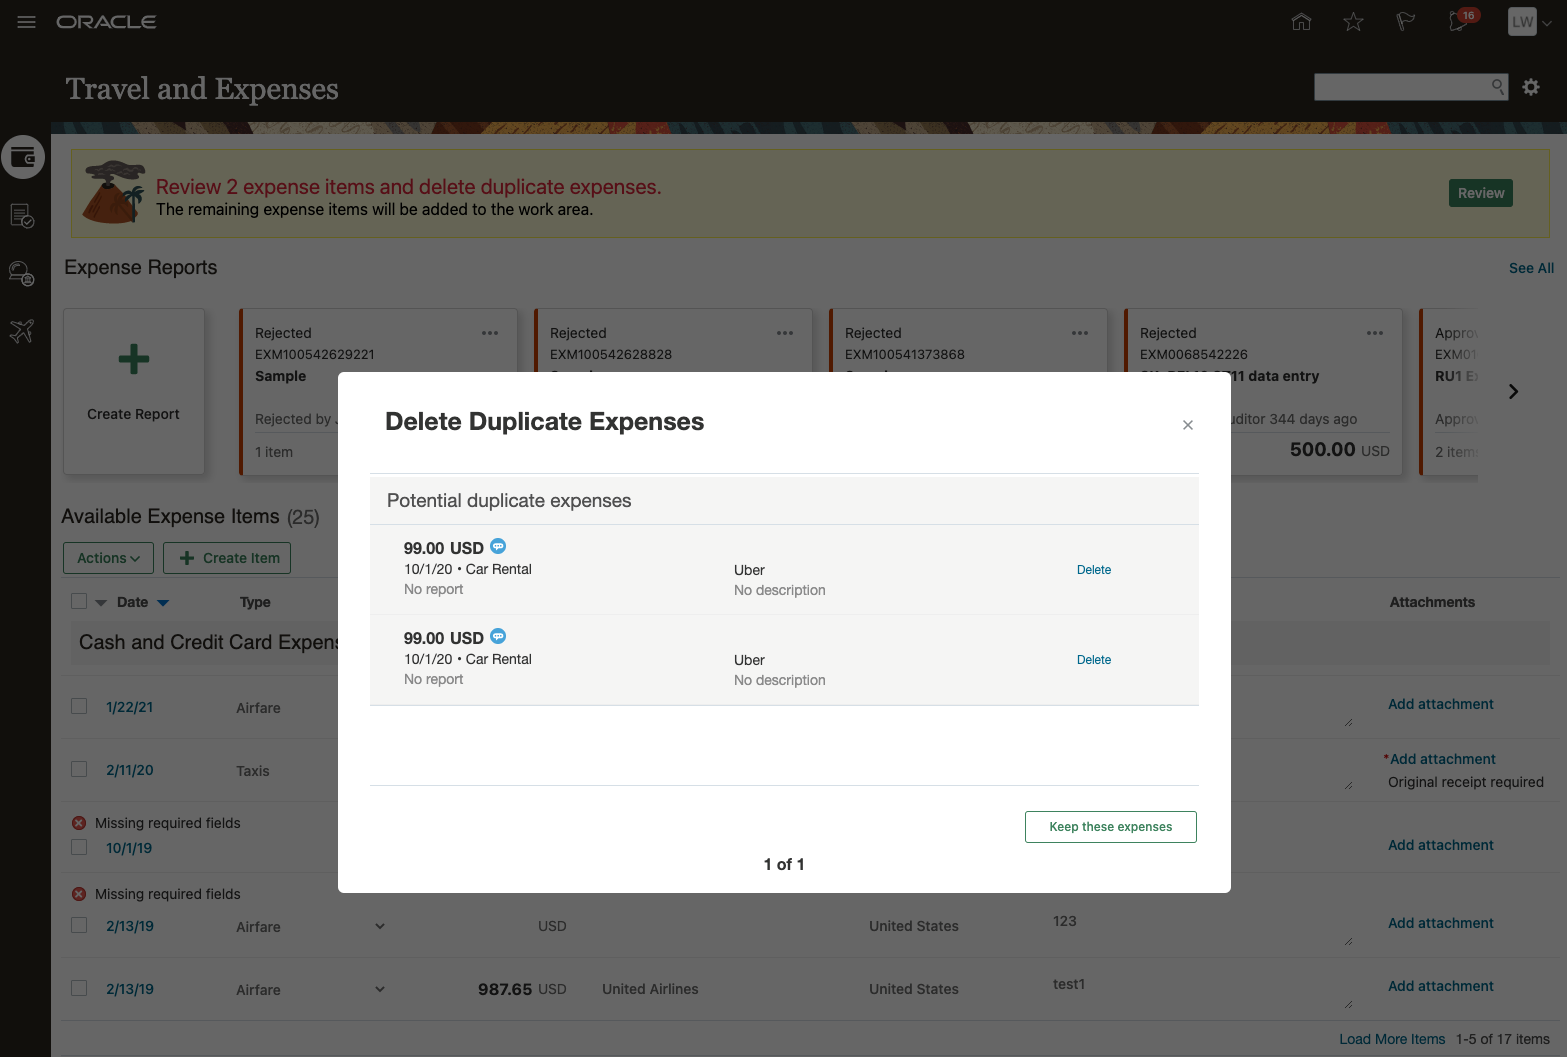
Identify duplicate expenses using a scoring model and alert employees when duplicates are found. Employees can review the duplicate expenses in the Expenses work area and take actions, such as deleting the duplicate or merging the duplicate expense with the original expense.
When are two expenses considered duplicates?
- Based on the expense fields such as amount, date, currency, expense type, merchant, etc., the duplicate detection algorithm determines if two expenses are considered duplicates and notifies the user. Duplicate detection also takes into account the values on a receipt to identify duplicate expenses created with the same receipt. The notification appears in two ways:
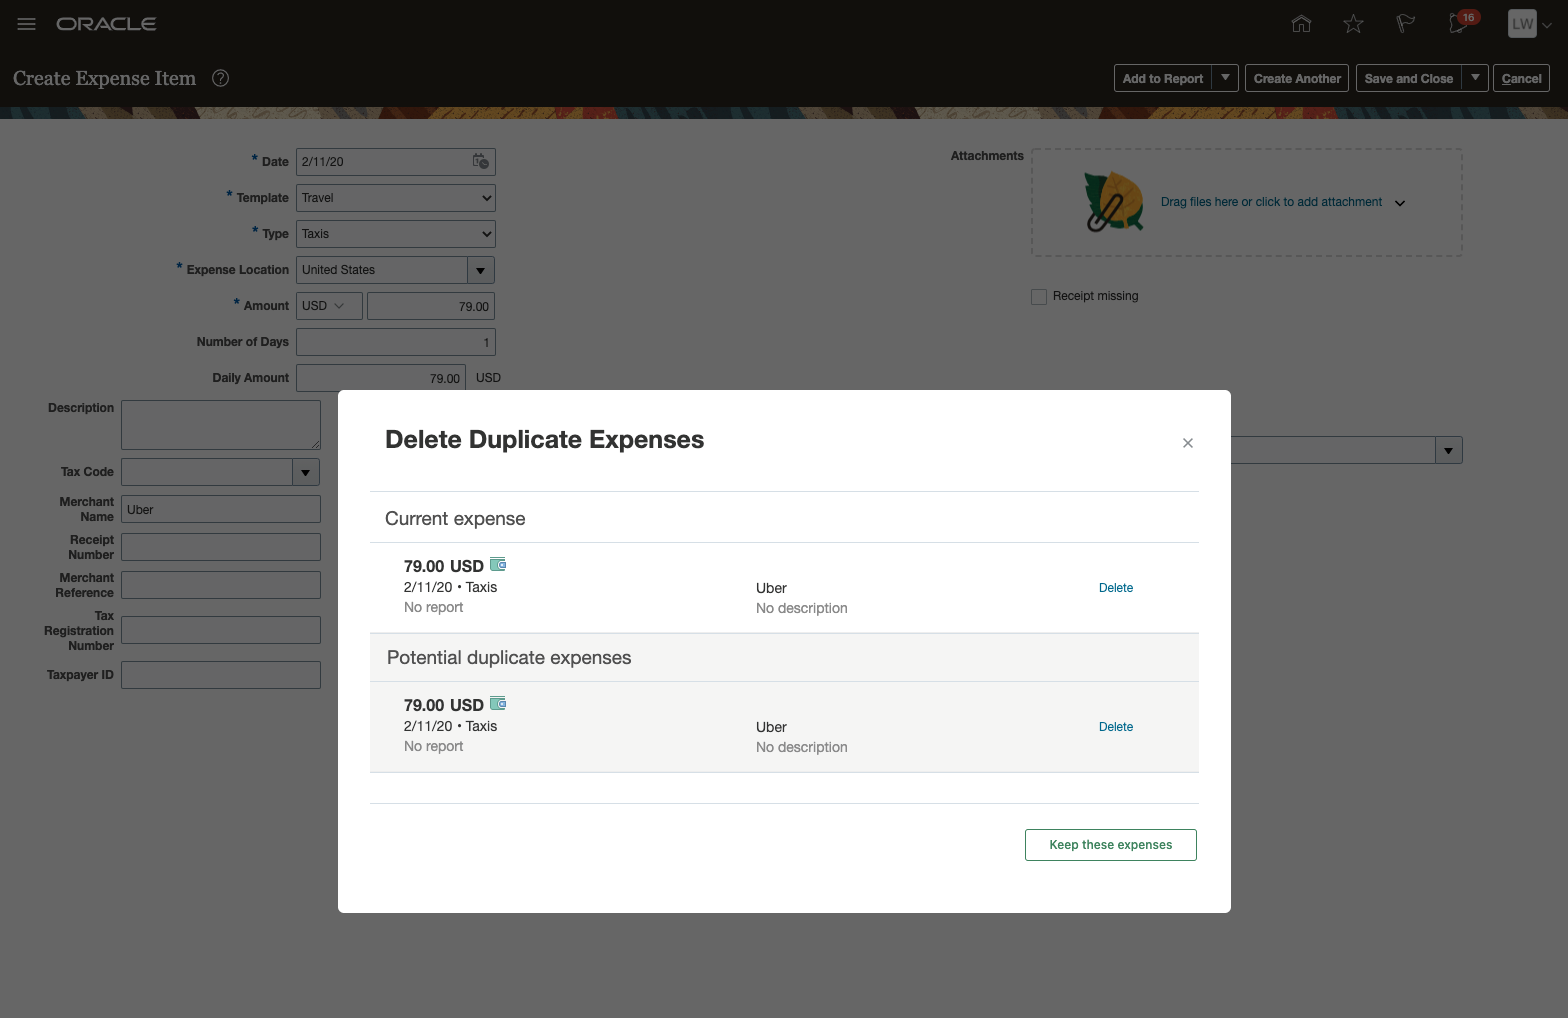
- When the user is creating an expense and fills out all the details and tries to save it; the duplicate detection algorithm runs and it immediately shows the user a warning pop-up that the expense being created is marked as a "duplicate" to an existing expense and allows the user to take the necessary action to either 1) delete the current expense or 2) continue creating the expense, in the case it is not actually a duplicate.
- When a user creates two duplicate expenses from sources other than the web such as email forwarding or Digital Assistant, they are marked as duplicates on the web UI and users are notified in the form of a banner at the top of the work area.
What happens when a duplicate is inside a report?
- When a duplicate expense is inside a report, it is marked with an error to resolve the potential duplicates and the user is not allowed to submit the report until the error is resolved. The error makes sure double payment is avoided for duplicate expenses.
What happens when a duplicate is detected in an already submitted reports?
- Duplicates are detected for all expenses created by the user within a six month period. This means that expenses that are not yet submitted can be marked as duplicates of already submitted expenses. Note: the employee is only allowed to delete or take action on the expenses that are not yet submitted.
Duplicates are detected and shown in the banner (as show below).
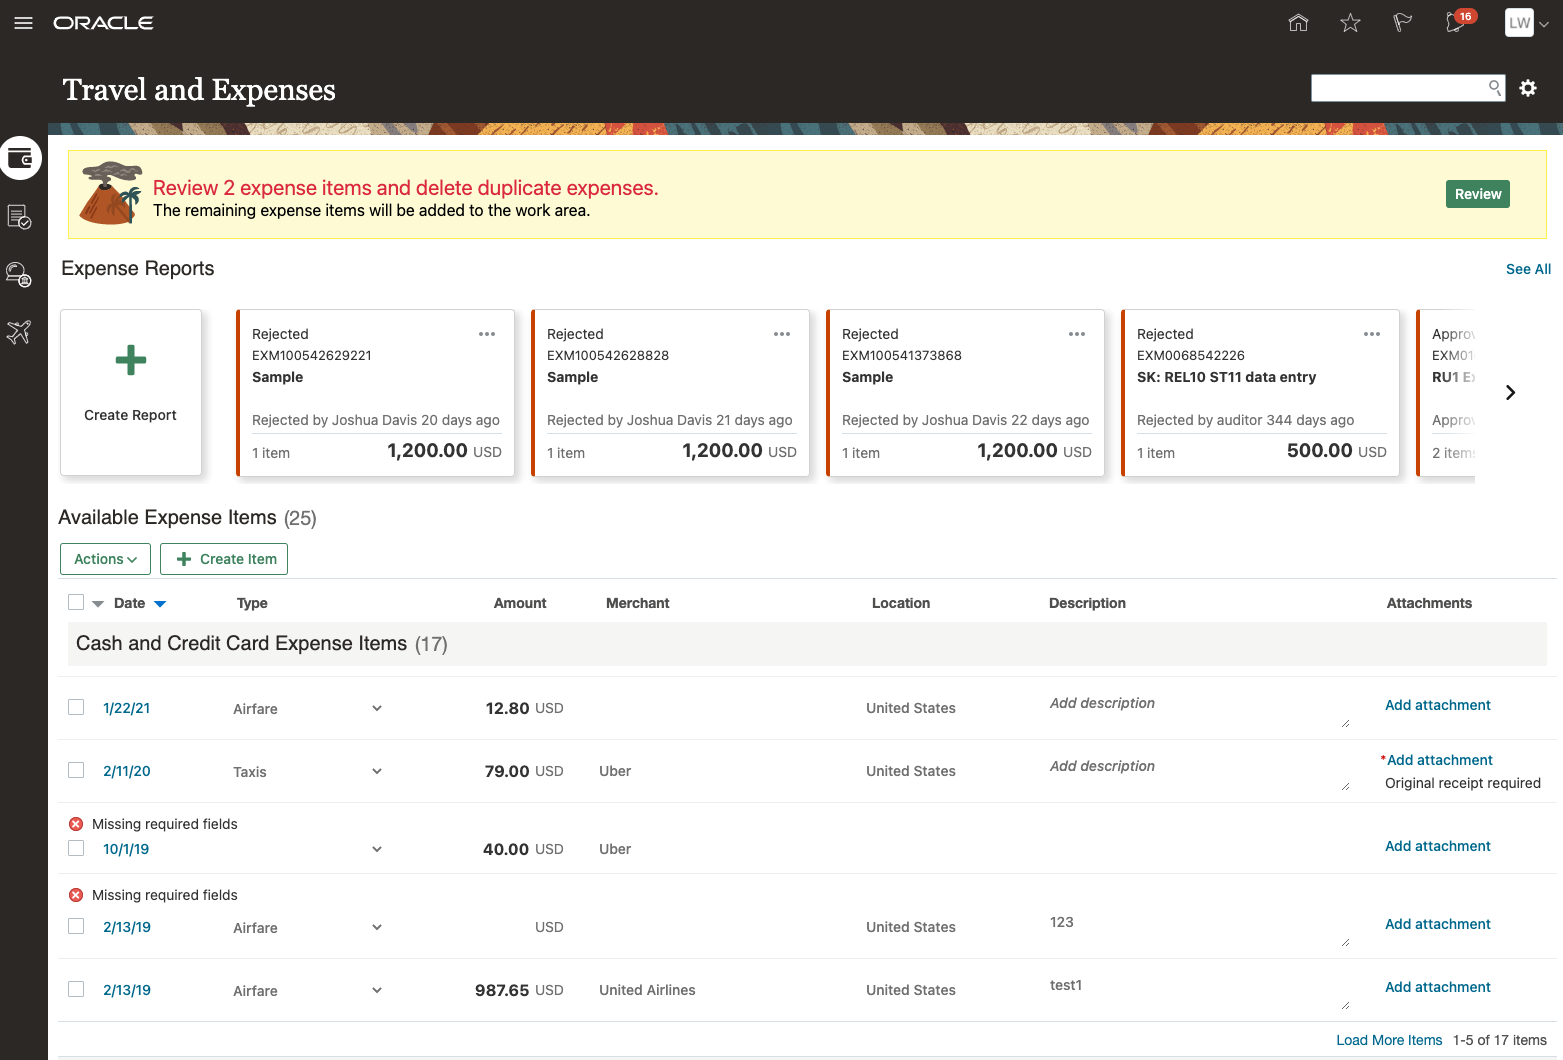
Open the banner to review the expense items currently marked as duplicate. The employee can delete duplicate items or merge one or more item with the original expenses.
After the user deletes the duplicates, they can click Done to finish.
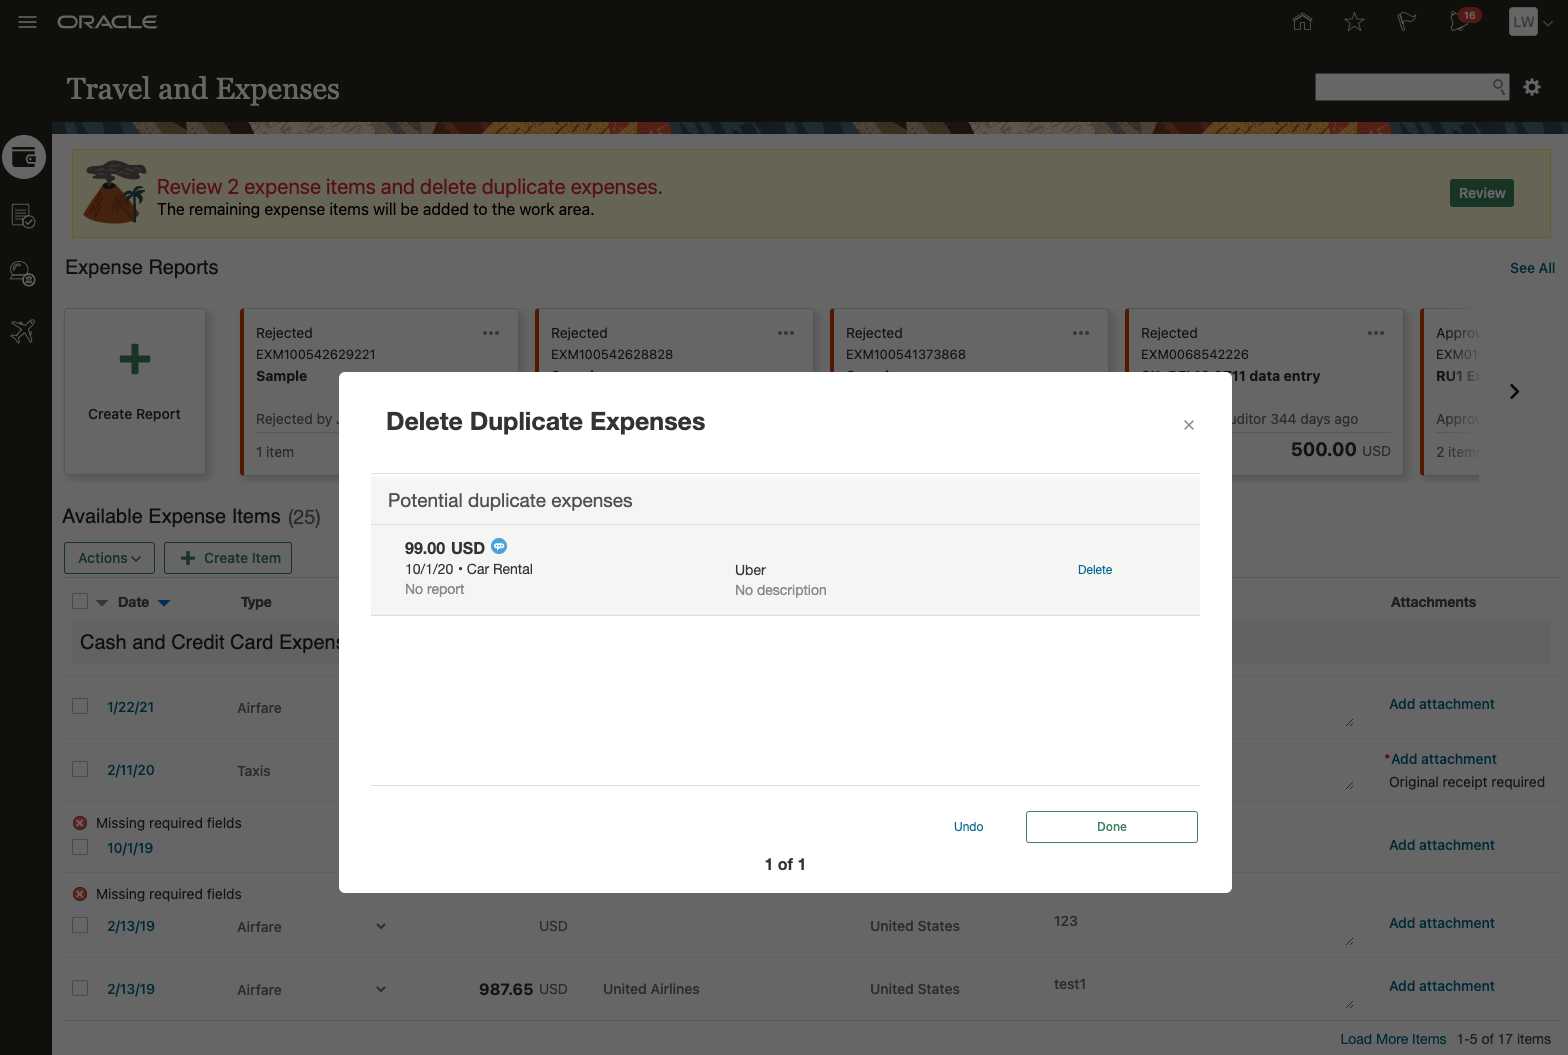
The remaining items get added to the work area and with the Just Added tag.

If an expense was already created and the user tries to create a duplicate, the item is marked when the user clicks Save and Close.
Business benefits include:
- Saves time and money by reducing potential expense process errors associated with duplicate expenses going undetected during the expense report process.
- Delivers a better user experience by offering users the ability to process expense reports based on their personal or organizational preferences, i.e. using SMS or Web channels to process expenses.
- Increases compliance with an organization's expense reporting policies and processes.
Steps to Enable
Use the Opt In UI to enable this feature. For instructions, refer to the Optional Uptake of New Features section of this document.
Offering: Financials No Longer Optional From: Update 21D
U.S. Federal Financials is a configurable and flexible solution that enables U.S. Federal agencies to meet Federal financial management system requirements. It supplements Financials and Procurement functionality by providing U.S. Federal specific functionality. The initial release of U.S. Federal Financials will include the features described below. Additional functionality to fully meet mandatory Federal financial management requirements will be provided in upcoming releases.
U.S. Federal Payment Attributes
Capture voided payment numbers on the payment transactions to support the reclassification of payments.
The Manage Payment page contains a Voided Payment field to use to reference a reclassified payment.
Use the voided payment field for selecting a payment when:
- The referenced payment document is voided.
- The new and voided payments have the same supplier and supplier site.
- The new payment amount equals the original voided payment amount.
- The new and voided payments have the same Agency Location Code (ALC) on their internal bank accounts.
- The new and voided payments have the same general ledger period.
- The voided payment document isn't referenced on any other payment.

U.S. Federal Payment Attributes
Watch a Demo
The value in the Voided Payment field provides a link between a payment and the payment it's reclassifying. This is a prerequisite requirement for the CTA interface feature which is functionality to be provided in a future release.
Steps to Enable
You don't need to do anything to enable this feature.
Key Resources
- Watch U. S. Federal Payment Attributes Readiness Training
- For more information on the Voided Payment attribute, refer to the Using U.S. Federal Financials guide.
Journal Categories Excluded During Manual Journal Entry
Optionally restrict the list of journal categories available for manual journal entry.
Use the Exclude from Manual Journal Entry field on the Manage Journal Categories page to indicate a journal category should not be available to users when creating manual journal entries.
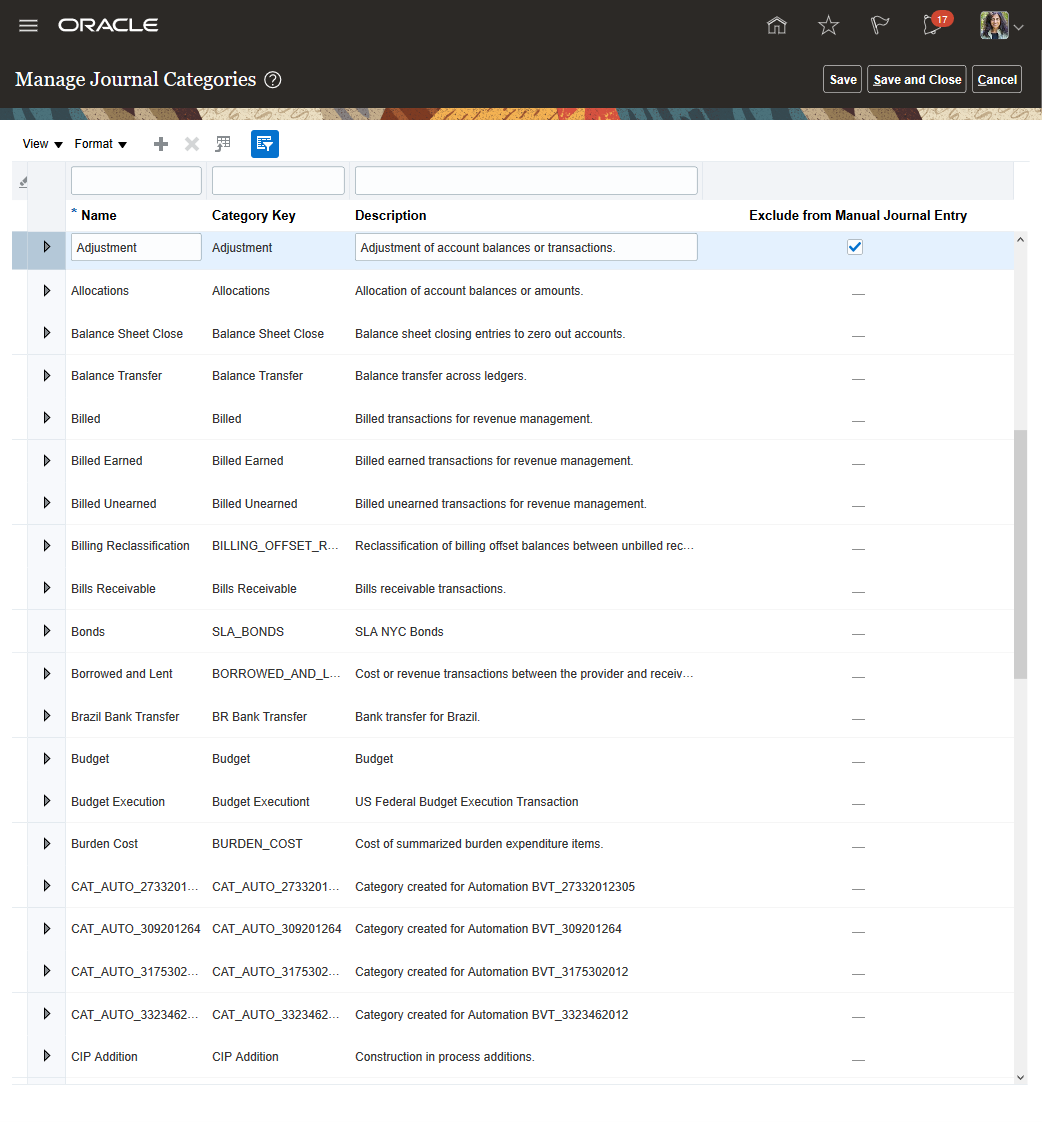
Exclude from Manual Journal Entry in the Manage Journal Categories Page
The setting restricts the list of journal categories users can choose from when entering journals manually or creating journals using the spreadsheet interface.
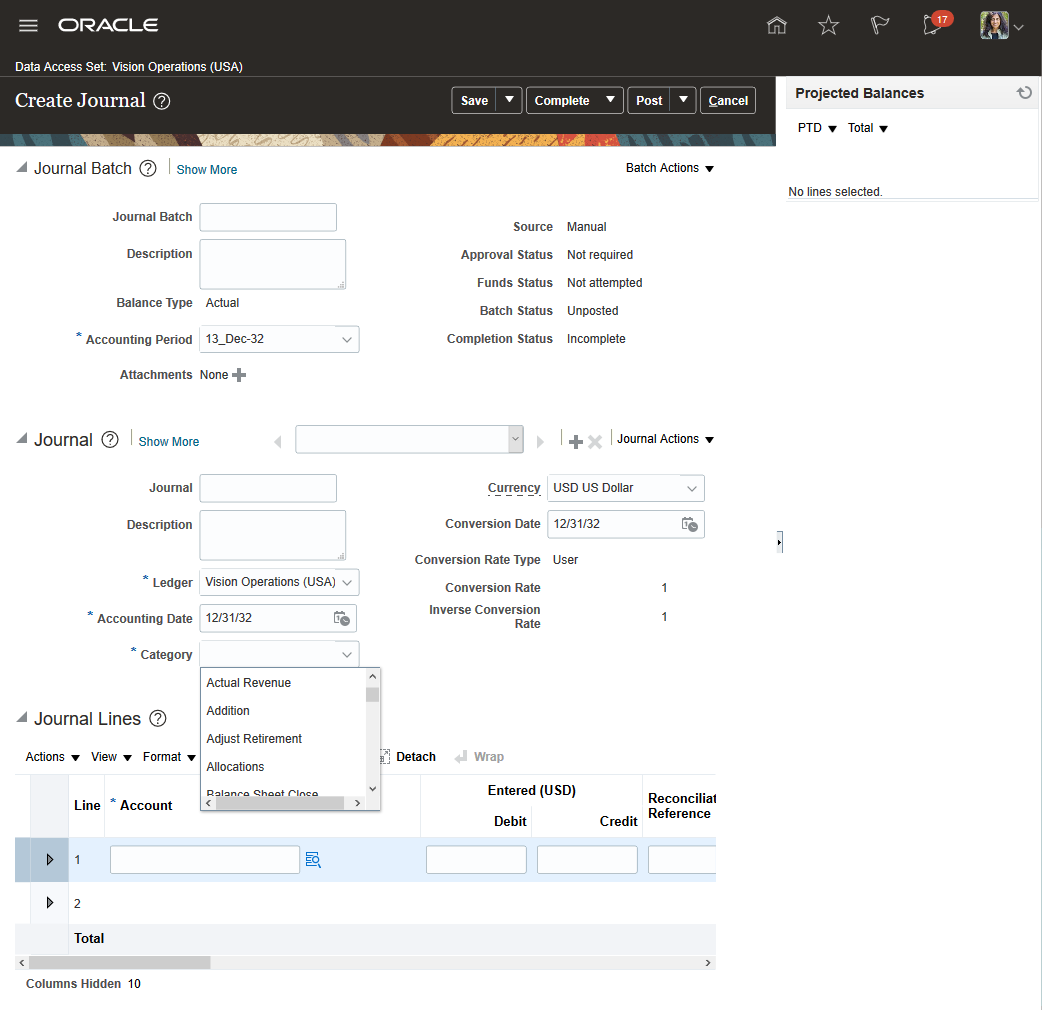
Create Manual Journal Page
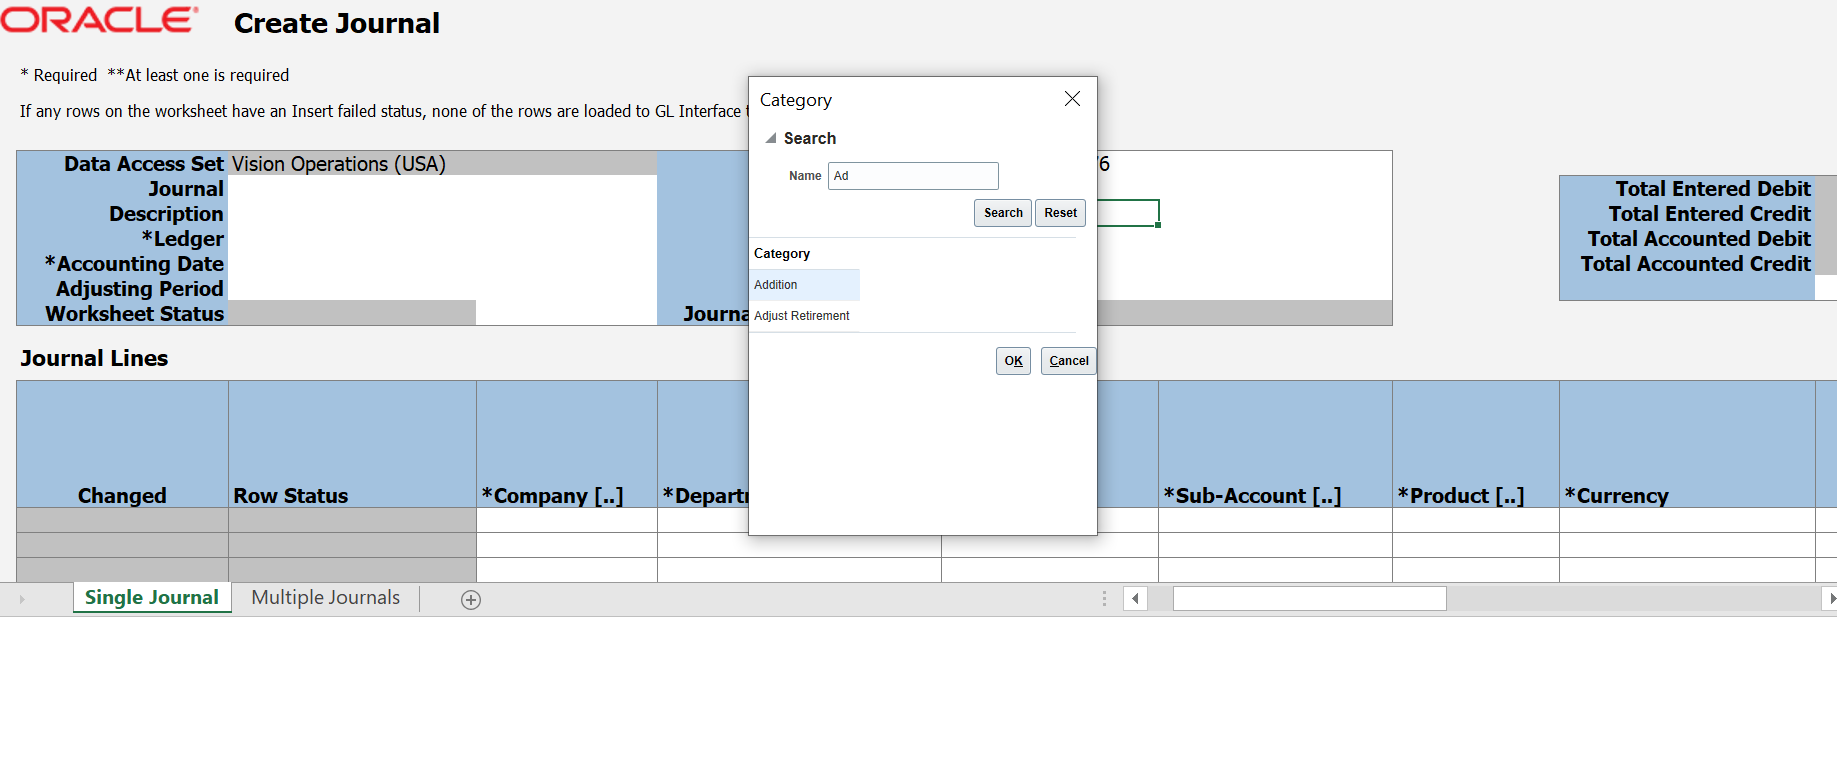
Create Manual Journal Using Spreadsheet
The journal Categories that are excluded in the Journal Category definition page will still be available for journal entry from transactions imported from Oracle subledgers or from third-party source systems. Also, journals using those journal categories can be viewed from the Manage Journals page.
This feature lets you simplify manual journal entry by hiding journal categories that are not relevant for your business and hence easing the usability of Create Journal page.
Steps to Enable
You don't need to do anything to enable this feature.
Tips And Considerations
By default, all journal categories are available for manual journal entry unless you choose to exclude some in the Manage Journal Categories Page.
You may need to sign out and sign back in to see the setup change take effect.
Search Section on Manage Journals Page Remains Expanded After Search
Optionally configure the Manage Journals page to leave the Search section expanded by default after search results are displayed.

Manage Journals Search Page Expanded
Enabling this preference helps reduce clicks between multiple searches on the Manage Journals page.
Steps to Enable
- On the Settings and Actions menu, click Set Preferences.
- On the Preferences page, click General Ledger Preferences.
- In the General section, select the Keep Manage Journals Search Section Expanded check box.
- Save the change.
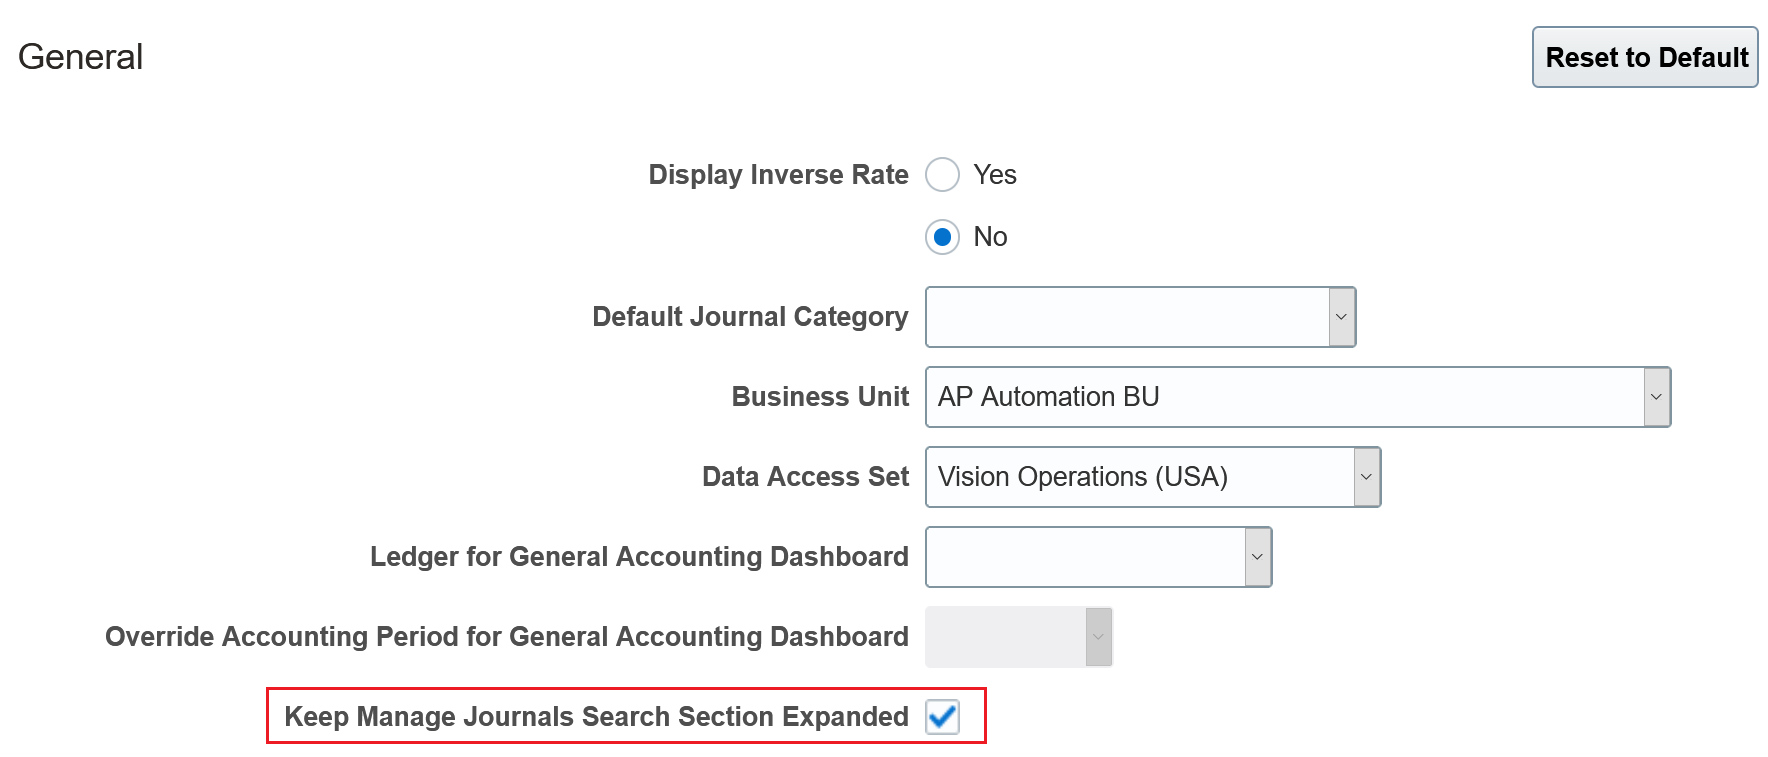
Enable Keep Manage Journals Search Section Expanded Preference
Distributable Costs by Project Attributes
Currently, Joint Venture Management identifies transactions to be distributed to joint venture partners based on distributable chart of account segment values.
This enhancement provides the option for customers to additionally specify project attributes—Project, Task, and Expenditure Type—to identify distributable transactions for a joint venture.
Watch a Demo
This provides increased flexibility to designate cost transactions as eligible to be distributed to joint venture stakeholders based on project-related attributes.
Distributable chart of account segment values provide the first level of designation for determining joint venture transactions from subledger accounting and general ledger. Project-level attributes provide the ability to refine these further and eliminate transactions that shouldn’t be brought into Joint Venture Management.
Steps to Enable
Opt-in to the following features to use this capability:
- Project Costing and Capital Projects features in Project Financial Management
- Project Capitalization and Progress Management feature in Joint Venture Management
To use project attributes for identifying distributable transactions for a joint venture, the joint venture accountant must complete the following setup:
- Access the Joint Venture Definition for the joint venture.
- Navigate to Distributable Project Values tab and enter the Project, Task and Expenditure Type that are eligible for joint venture processing.
Tips And Considerations
If Project Capitalization and Progress Management is enabled, corresponding configuration is completed in Joint Venture Management, and distributable project values are set up, any subsequent and new joint venture transactions with projects information will be eligible to be designated as distributable based on the Distributable Costs by Projects Attributes feature in addition to Chart of Account segment values.
Preexisting transactions created by Joint Venture Management prior to distributable project values being set up will be designated as distributable based exclusively on distributable Chart of Account segment values.
Key Resources
- Watch Distributable Costs by Project Attributes Readiness Training
- Watch Task and Expenditure Type Overrides on Project Costing Adjustments Readiness Training
- Watch Joint Venture and Project Management Enhanced Data (update 21A) Readiness Training
- Watch Project Capitalization and Progress Management (update 20D) Readiness Training
- For more information, refer to the Implementing Joint Venture Management guide
Role Information
- Joint Venture Accountant
Task and Expenditure Type Overrides on Project Costing Adjustments
The existing Joint Venture Management and Project Costing integration enables customers to automatically adjust Project Costing to facilitate accurate project capitalization and gross to net reporting, budgeting and forecasting. With this integration, distributed costs sent to partners to recoup joint venture costs are also sent to Project Costing in accounted mode as cost adjustments. This integration enables customers to reconcile costs in Project Costing with General Ledger and gives the ability to budget and forecast by net costs.
The feature—Task and Expenditure Type Overrides on Project Costing Adjustments—will provide you with the option to tailor project attributes in cost adjustments sent to Project Costing from Joint Venture Management.
With the ability to override the task number and expenditure type in cost adjustments, customers can now budget and forecast by gross costs.
Note that the ability to budget and forecast by gross costs is in addition to the existing capability to budget and forecast by net costs.
Steps to Enable
To specify the project attributes that should be used as override on the project costing adjustments, the joint venture application administrator must complete the following setup:
- Access Joint Venture System Options.
- Enter the Task Number and Expenditure Type under the Project Overrides section.
Tips And Considerations
If Project Capitalization and Progress Management is enabled, corresponding configuration is completed in Joint Venture Management, and either task or expenditure type override is set up, any subsequent and new joint venture distributions will be eligible for task or expenditure type override.
Preexisting distributions created by Joint Venture Management prior to task or expenditure type overrides being set up will not be eligible for these overrides.
Key Resources
- Watch Task and Expenditure Type Overrides on Project Costing Adjustments Readiness Training
- Watch Distributable Costs by Project Attributes Readiness Training
- Watch Joint Venture and Project Management Enhanced Data (update 21A) Readiness Training
- Watch Project Capitalization and Progress Management (update 20D) Readiness Training
- For more information, refer to the Implementing Joint Venture Management guide
Role Information
- Joint Venture Application Administrator
Transaction Date Determination from GL Lines
Currently, Joint Venture Management has the following options to determine the transaction date (also known as the service date or activity date in different industries) for transactions brought into Joint Venture Management for distribution to stakeholders:
- Transaction date is defaulted from the accounting date for transactions that originate in subledger accounting.
- Transaction date is defaulted from the effective date for transactions that originate in general ledger.
- Configure the system to specify a reference date from the original subledger to use as the transaction date.
- Configure the system to specify a date attribute from the general ledger header to use as the transaction date.
To split transactions for distribution among joint venture partners, Joint Venture Management uses the transaction date to determine which date effective ownership definition is used to calculate the split.
With this enhancement, it is now possible to select a field that represents the transaction date from one of the general ledger line attributes.
Watch a Demo
Business benefits include:
- The list of fields that can be used to determine the transaction date are no longer restricted to date fields only since some systems and technologies may only have the ability to write a date to a string field.
- Provides companies with a stricter conformance to the joint operating agreement when the transaction date at the general ledger line level is different from the transaction date at the general ledger header.
- Minimize the time for month-end joint venture processing with automatic determination of joint venture transaction date based on additional source fields.
- Conform to the Joint Operating Agreement by ensuring that the actual activity date is used to resolve the ownership definition percentages for the joint venture partners including those transactions where the transaction date at the general ledger line level is different from the general ledger header level.
Steps to Enable
You don't need to do anything to enable this feature.
Key Resources
- Watch Transaction Date Determination from GL Lines Readiness Training
- Watch Transaction Date Determination from Subledger Accounting Supporting References and GL Transactions (update 20C) Readiness Training
- For more information, refer to the Implementing Joint Venture Management guide
Role Information
- Joint Venture Application Administrator
Usability and Navigation Improvements for Joint Venture Invoicing
Improve the usability of Joint Venture applications and increase productivity by reducing the number of clicks, minimizing scrolling, and simplifying navigation.
Enhancements include:
- Incorporation of new application designs from the Oracle User Experience team in the Joint Venture Invoices work area, such as using smart filters and drawer panels for detail review.
- Ability to copy ownership definitions.
- Joint Audit Data Exchange (JADE) reporting.
Watch a Demo
Business benefits include:
- Improvements to the Joint Venture Invoices work area provide a streamlined and intuitive user experience for review of Receivables invoices sent to partners, and management of disputes and errors related to joint venture transactions and distributions.
- Improve the productivity of the joint venture accountant on a day-to-day basis by significantly reducing the time required to perform updates with the ability to copy joint venture ownership definitions easily.
- Generate detailed audit reports of joint venture expenditures for review by external auditors to verify compliance with the joint operating agreement (JOA).
Steps to Enable
To enable the use of smart filters in the Joint Venture Invoices work area, an administrator must complete the following setup tasks:
- Enable Oracle Search Extension Framework in the profile options.
- Run initial ingest process to build the indices (invoices and distributions) in the Oracle Search Cloud Service (OSCS) database and populate existing invoices and distributions data to the database.
All other enhancements are delivered enabled and do not require any action to be taken to use them.
Watch a Setup Demo
Tips And Considerations
- The Joint Venture Invoices work area requires Oracle Search Extension Framework, which is delivered with your SaaS subscription.
- Running the initial ingest process is typically a one-time task for each predefined index for your product. The Joint Venture Invoices work area requires two indices to load the data, one for invoices and the other for distributions. Therefore, you will need to run the process twice, once for each index.
Key Resources
- Watch Usability and Navigation Improvements for Joint Venture Invoicing Readiness Training
- For more information, refer to the Implementing Joint Venture Management guide
Role Information
- Joint Venture Accountant
- Application Implementation Consultant
The asset start and end date are key attributes of the lease. When the asset life is less than the lease term, the Right-of-Use amortization for the equipment is through the asset life rather than the lease term. This amortization calculation is necessary because all assets on the lease may not have the same useful life, and the options on the lease may not pertain to all assets. Lease administrators can update asset end dates and associate options to assets.
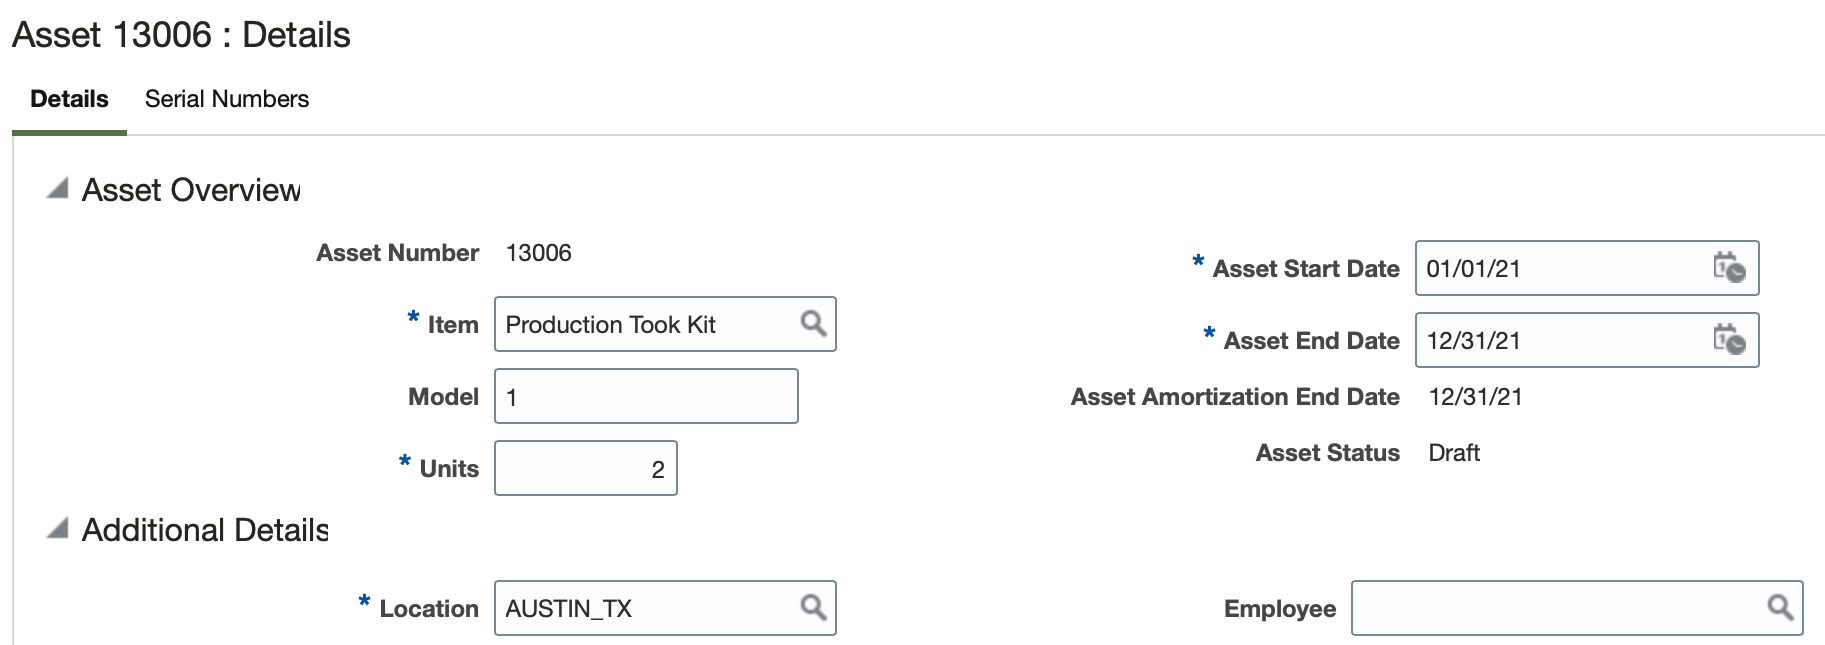
Asset Start and End Date Available on Asset Overview
Business benefits include:
- Reduce lease administration effort by supporting multiple assets with different useful lives on the same lease.
- Maximize the benefits of each asset with options at the asset level.
Steps to Enable
Use the Opt In UI to enable this feature. For instructions, refer to the Optional Uptake of New Features section of this document.
Offering: Financials
Lease Amendments for Scope Decreases
Perform amendments on a lease to modify payment amounts and shorten lease terms. Amendments include creating a new version of the lease, adjusting the accounting balances for the lease, and maintaining an audit of the changes.

Amendment for Scope Decrease
Business benefits include:
- Reduce time and effort to perform a contract amendment.
- Improve controls with a complete audit history of lease amendments.
- Better transparency with access to prior version of the lease.
- Automate accounting for adjustment to Right-of-Use and Liability balances.
Steps to Enable
Use the Opt In UI to enable this feature. For instructions, refer to the Optional Uptake of New Features section of this document.
Offering: Financials
Lease Contract Import and Conversion
Use the Lease Import utility to simplify both lease conversions and new lease creation. The Lease Import utility removes or reduces the need for manual intervention during the lease creation process. Import a batch of leases directly into the desired status: Draft, Validated, Complete, or Booked. Additional attributes for converted leases support the calculation and amortization of Liability and Right-of-Use balances mid-life.
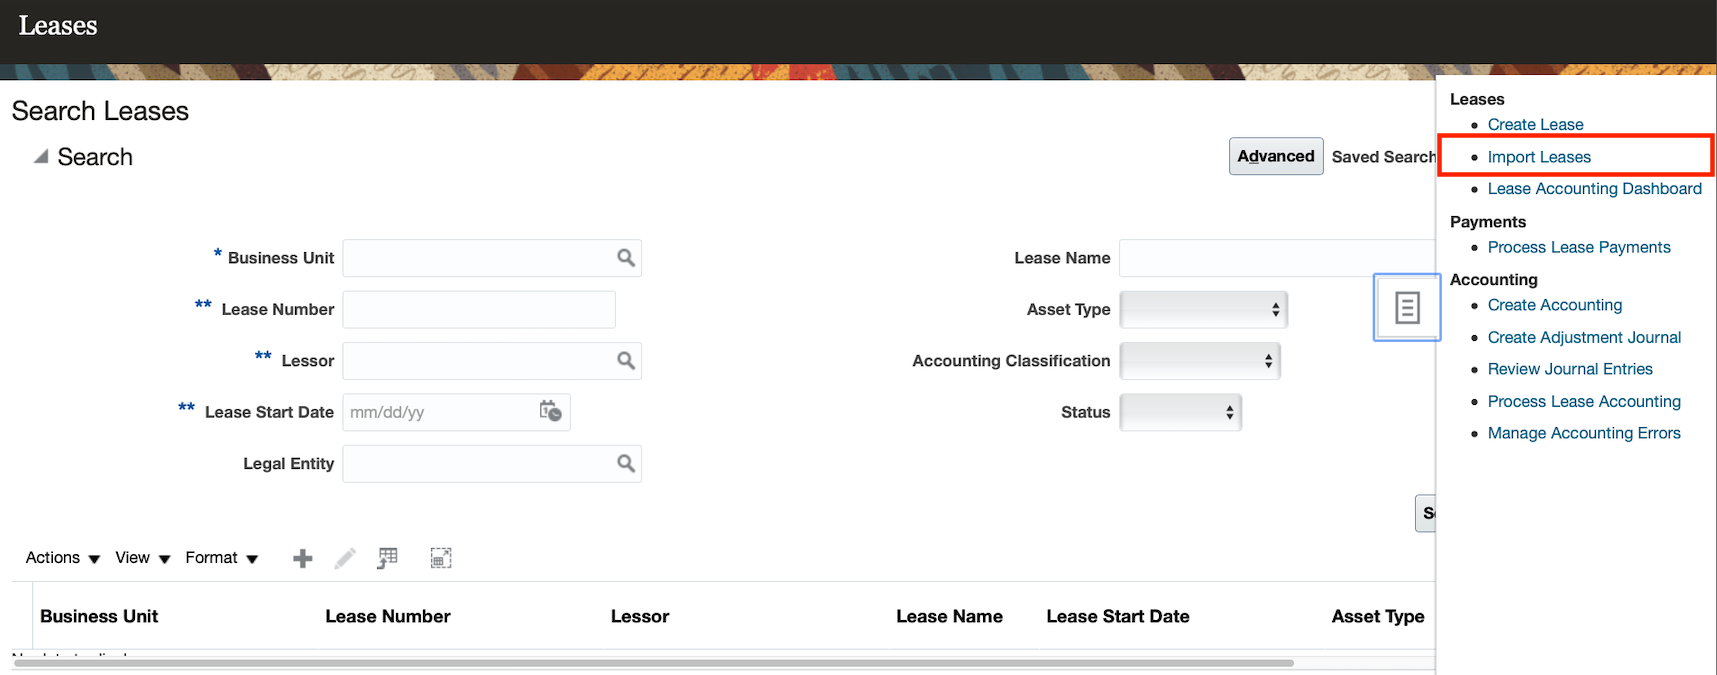
Import Lease Option
Business benefits include:
- Reduce data entry effort with a lease import.
- Streamline business processes by populating Lease Accounting import from origination systems.
- Reduce ROI and implementation time with functionality to migrate existing portfolios.
Steps to Enable
Use the Opt In UI to enable this feature. For instructions, refer to the Optional Uptake of New Features section of this document.
Offering: Financials
Tips And Considerations
The steps to import agreements follow standard import procedures.
- Create leases in an FBDI spreadsheet template. This method is useful when there is a large volume of leases to create. Help text exists for each column to explain what to enter, what is required, and the field type.
- The FBDI spreadsheet converts the data to a zip file for the File Import process. You then load the file to the lease interface table. The final step is to run the Import Lease process. The Import Lease process imports the leases from the interface table to the Lease Accounting module. Leases are visible in the Lease Accounting module after this process completes.
- The Lease Dashboard includes exceptions or errors.
Key Resources
- To access the Lease Accounting FBDI template, please refer to My Oracle Support.
Create lease invoices automatically in Payables for payment processing. Lessees can pay their lessors and other parties associated with their leases each period for rent, service, insurance, common area maintenance charges, or other amounts included in the leases.
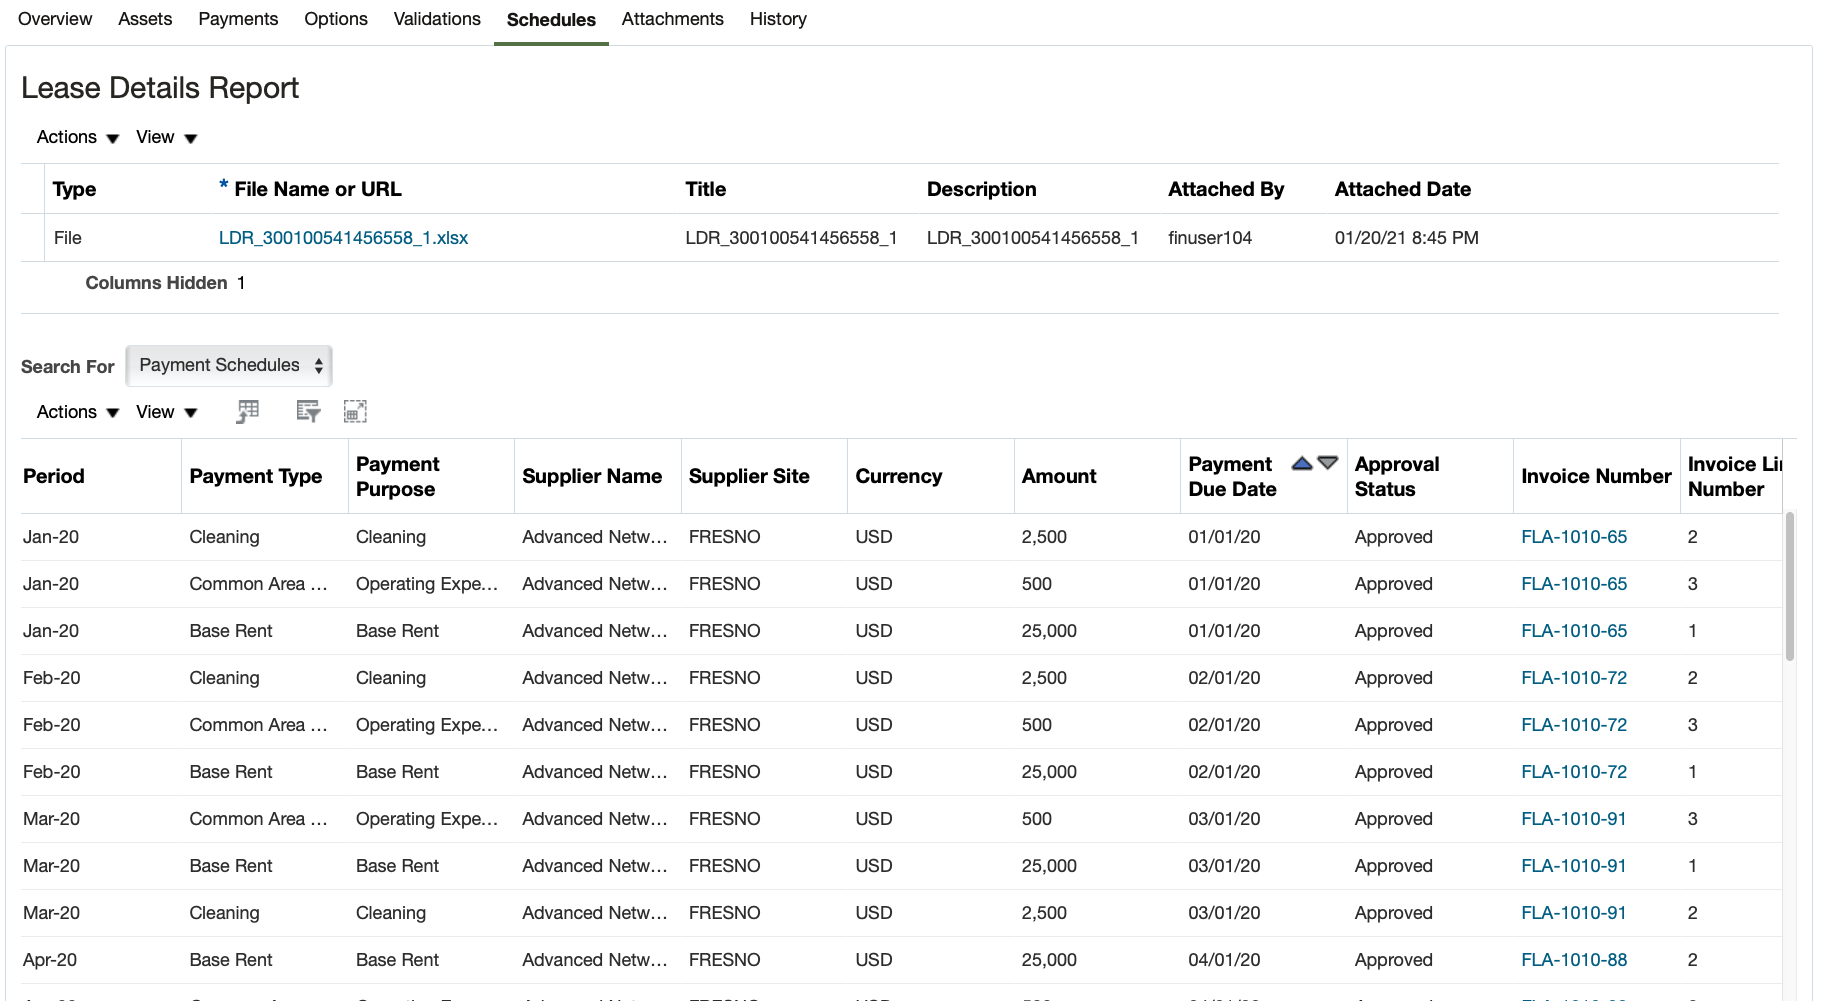
Payment Schedule with Payables Invoice Number Reference
Business benefits include:
- Increase control of payments to lessors by authorizing and paying only approved amounts from the lease.
- Reduce effort to pay lessors through automated integration with the Oracle Payables module.
- Improve transparency with Payables invoices initiated from Lease Accounting visible on the lease.
Steps to Enable
Use the Opt In UI to enable this feature. For instructions, refer to the Optional Uptake of New Features section of this document.
Offering: Financials
Tips And Considerations
Customers can choose to opt out of Lease Payment Processing for a particular business unit by setting the system option Payables Integration to No for that business unit. This option suppresses any processing of payments to Payables from Lease Accounting for that specific Business Unit.
The Process Lease Payment process provides the ability to:
- Limit transfer of payments to one lease only, payments within a specific range of dates, a particular supplier and supplier site, payment type, and payment purpose.
- Launch Payables Invoice Import as part of the lease process.
- Put payments on hold and subsequently release the hold.
The invoice number is available on the Schedule tab for a lease after the payment interface to Payables.
Any exceptions that need action are available on the Lease Accounting dashboard.
Configurable Payables Workflow Notifications
Configurable Payables Workflow notifications use Oracle Business Intelligence templates to generate the email and in-app notifications. You can modify the notifications to display information based on your business requirements and policies. Choose from a comprehensive list of attributes to modify the notifications in accordance with your requirements. You can change both layout and content - add images, change colors and styling, add or remove attributes or modify text.
In update 21B, the following additional attributes are available in the Invoice Approval Data Model.
- Invoice Header Descriptive Flexfield
- Invoice Header Global Descriptive Flexfield
- Invoice Line Global Descriptive Flexfield
- Invoice Distribution Global Descriptive Flexfield
Use these attributes when modifying the Invoice Approval, Hold Resolution and Invoice Account Coding workflow notifications in accordance with your business requirements.
Steps to Enable
You don't need to do anything to enable this feature.
Tips And Considerations
- The descriptive flexfield and global descriptive flexfield attributes are available as raw attributes. For example, the invoice line global descriptive flexfield attributes are available as 'INVL_GLOBAL_ATTRIBUTE1', 'INVL_GLOBAL_ATTRIBUTE2' and so on. When modifying the notification report to use these attributes, remember to use the appropriate labels.
- The templates used to generate workflow notifications are located in the Reports and Analytics work area under the Shared Folders > Financials > Workflow Notifications folders in the Oracle Business Intelligence catalog.
-
A single template is used to generate both the email and in-app notifications for a particular workflow. Any modifications that you make to the predefined template, will be reflected in both email and in-app notifications for the workflow.
-
For additional tips and considerations, click here.
Key Resources
- Configuring Payables Workflow Notifications topic on the Oracle Help Center.
Role Information
Financial Application Administrator is required to modify the workflow notifications.
Creation and Management of Supplier Invoices with Retainage Payment Terms
In addition to calculating taxes on the net line amount (after deducting retainage) of Payables invoices, you can also calculate taxes on the gross amount. The gross amount is the amount of the line without deducting the retainage.
The Retainage feature was introduced in update 21A. In update 21A, the taxes were calculated on the net line amount, i.e., the line amount after deducting the retainage amount.
In update 21B, you can calculate taxes on the gross line amount for Payables invoices with retainage.
RETAINAGE RELEASE INVOICES
Since the taxes are calculated on the full (i.e., gross) amount on Payables standard invoices, there would be no taxes calculated on Payables retainage release invoices.
Additional details for the main feature in 21A are available here.
This feature enables companies to calculate the transaction taxes and the invoice time withholding on the full invoice amount on Payables standard Invoices, without calculating transaction taxes and invoice time withholding Payables retainage release invoices.
Steps to Enable
- Create the Lookup Type and Lookup Code:
Task – Manage Standard Lookups
Lookup Type – ZX_OPTIN_OPTIONS
Meaning – ZX_OPTIN_OPTIONS
Description – ZX_OPTIN_OPTIONS
Module – Tax
Lookup Configuration Level – User
REST Access Secured – Secure
Under this Lookup Type, create the Lookup Code with the following details:
Lookup Code – ZX_21B_OI_GROSS_RET
Display Sequence – 1
Enabled – Checked (Yes)
Start Date – <start date of the choice>
Meaning – ZX_21B_OI_GROSS_RET
Description – ZX_21B_OI_GROSS_RET

Lookup Code Setup
- Enable the 'Use gross amount for payable retainage invoices' option at the Party Tax Profile of the Business Unit or Legal Entity
Task – Manage Party Tax Profile
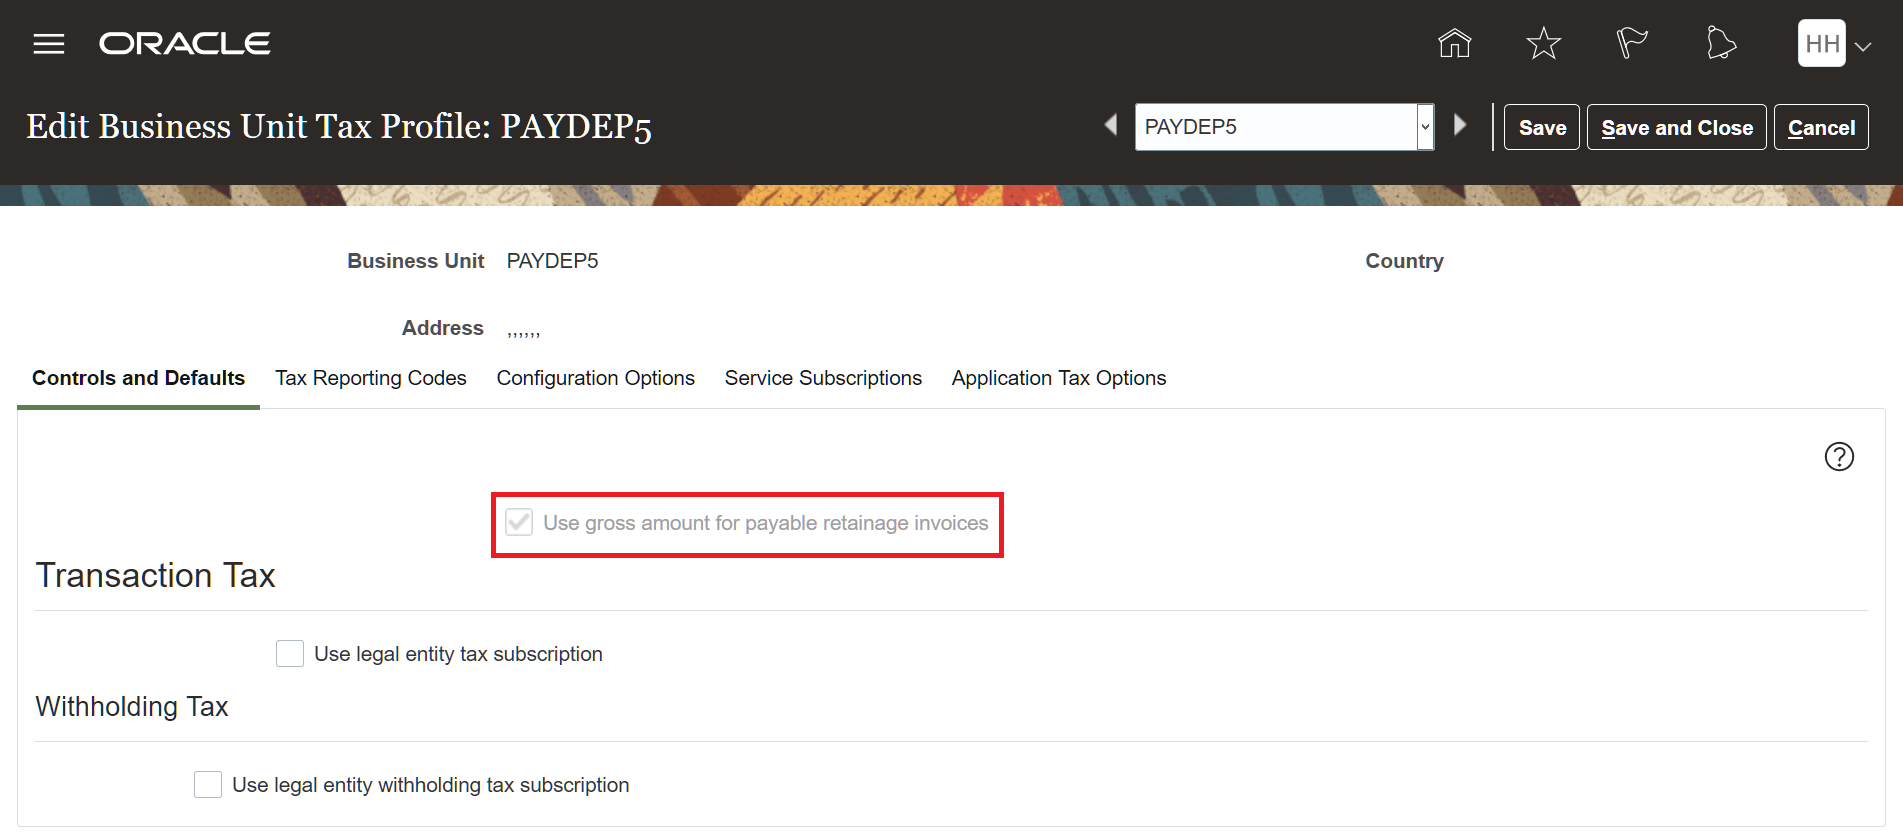
BU PTP Setup
NOTE: This setup is irreversible. Once this option is checked, it can’t be reverted back.
Tips And Considerations
-
The Tax Engine uses the setting for 'Use gross amount for payable retainage invoices' at the LE or BU, depending on whether the 'Use legal entity subscription' is checked or not for the BU for Transaction Taxes. The 'Use legal entity subscription' setting for Withholding is ignored. This is described in the table below.

BU or LE Level Flag to Be Considered
-
If the 'Use gross amount for payable retainage invoices' is enabled, then the transaction taxes and the invoice time withholding will be calculated on the gross amount. If this flag is not enabled, then the transaction taxes and the invoice time withholding will be calculated on the net amount.
-
Payment time withholding is always calculated on the payment amount for both Payables standard invoices and Payables retainage release invoices. (The 'Use gross amount for payable retainage invoices' is ignored for Payment time withholding)
-
Retainage with the Net amount option is supported for the Partner enabled tax calculation. Retainage with the Gross amount option is currently not supported for the Partner enabled tax calculation.
Data Security for Collaboration Documents
Secure access to business-to-business (B2B) messages in Collaboration Messaging Framework work area based on the user's job role. The documents Credit Note and Invoice Rejection can be viewed only by users having job roles Accounts Payable Manager, Accounts Payable Supervisor and Accounts Payable Invoice Supervisor.
- Secures B2B messages based on the user's job roles. For example, Supplier Invoices, Credit Notes and Invoice Rejection can be viewed only by Payables users.
- Improves usability since documents unrelated to user's job roles are not visible.
- Eliminates errors due to users from one process flow accidentally taking action on documents related to other business flows.
Steps to Enable
You don't need to do anything to enable this feature.
Tips And Considerations
If you want to set up a single user for access to all B2B messages, you can assign the role B2B Administrator (ORA_CMK_B2B_ADMINISTRATOR_ABSTRACT) to the user.
Role Information
- Accounts Payable Supervisor
- Accounts Payable Manager
Display of Cumulative Total Amount for Selected Lines in the Match Invoice Lines Page
View the cumulative total amount of the selected purchase order schedules in the Match Invoice Lines page.
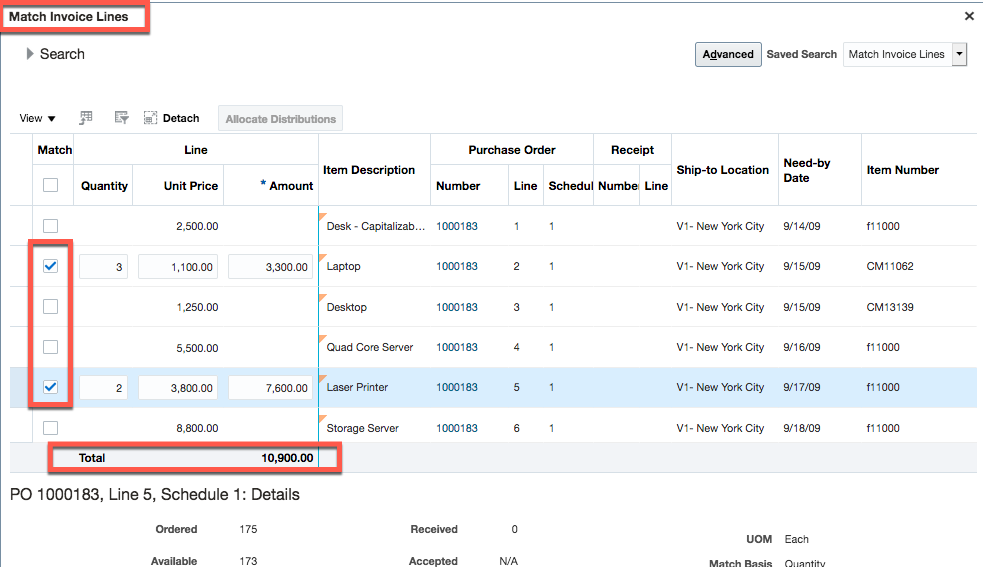
Amount Total for Selected Lines
While matching invoice lines with purchase orders that have a large number of shipments, Accounts Payables Specialists can use cumulative total to verify the value of the lines selected for matching with the physical invoice and reduce data entry errors.
Steps to Enable
You don't need to do anything to enable this feature.
Supplier Invoice Import with Requester Email Address
Specify the requester email address instead of the requester name when creating supplier invoices using the Import Payables Invoices process. This improves the process of identifying the correct requester details, because multiple users can have the same requester name.
This feature is supported for invoices created through FBDI and ADFDI. It is supported even in the correction spreadsheet to allow corrections for rejected invoices.
Because every user has a unique email address, the Import Payables Invoices process can more accurately identify the invoice requester using the email address instead of the first and last name. This reduces the number of invoice rejections due to the inability to find a unique invoice requester.
Steps to Enable
You don't need to do anything to enable this feature.
Tips And Considerations
Requester details are assigned to the invoice header and invoice lines from the following columns in the Payables invoice interface table: Requester ID, Employee Number, Email address, First Name and Last Name. The application searches for requester information in the table columns using this hierarchy:
- Requester ID
- Requester Employee Number
- Requester Email Address
- Requester First Name and Requester Last Name
The application assigns the first column with requester information to the invoice header. For example, the application first looks for requester information in the Requester ID column. If no data is found, the application then looks in the Requester Employee Number column. If this column contains requester information, the application assigns this information to the invoice. The application performs the same search to assign requester information to each invoice line. If invoice line does not contains requester information, the requester information on the invoice header is assigned to the invoice lines.
Note: If the information in the table column that is assigned to the invoice or an invoice line turns out to be invalid, the invoice is rejected without a further search for requester information from other columns.
Role Information
Users with access to create Payables invoices will be to use this feature. Following seeded roles provide access users to create Payables invoices.
- Accounts Payable Supervisor
- Accounts Payable Specialist
Creation of All Payment Files in One Payment Batch Without User Intervention
Create and complete all the payment files in an electronic payment batch automatically when it is submitted with a payment document and results in multiple payment files. Payment supervisors can seamlessly process multiple electronic payment files in a payment batch without submitting the format payment files job for each payment file manually.
Prior to update 21B, a payment batch submission only created the first payment file automatically. It was necessary to generate the remaining files manually by submitting the format payment files job for each file. Now, when multiple payment files are generated as a result of submitting an electronic payment batch with payment document, all payment files will be generated automatically, without any user intervention.
Steps to Enable
You don't need to do anything to enable this feature.
Channel Revenue Management Integration with Receivables for Claim Creation and Settlement for Receipts Created Using Spreadsheet or SOAP Services
Initiate claims in Channel Revenue Management for receipts created using spreadsheet and SOAP services, when Receivables customers make invoice-related and non-invoice related underpayments and overpayments. Accelerate claim processing to quickly settle underpayments and overpayments, including processing all settlement-related financial transactions. Receipts created using a spreadsheet and receipt applications performed using the Apply Receipts Using AutoMatch Process can now create claims in Channel Revenue Management for invoice-related underpayments and non-invoice related overpayments.
ENHANCEMENTS TO THE RECEIPTS CREATED USING SPREADSHEETS OR CREATE RECEIPT PAGE AND APPLICATION PROCESSED USING APPLY RECEIPTS USING AUTOMATCH PROCESS
The feature provides the following functionality for creation of invoice-related and non-invoice related underpayments and overpayments:
- Ability to optionally include the customer reason and customer reference for each remit reference provided in the Remittance Reference Detail section of the Create/Edit/View Receipt pages:
- Hidden field Customer Reason to store the customer reason for deductions and overpayments to the remittance reference.
- Hidden field Customer Reference to store the customer reference for deductions and overpayments to the remittance reference.
- Ability to optionally include the customer reason and customer reference for each remit reference provided in the reference section of the Create Receipt Batches ADFDI sheet.
- Ability to optionally include the customer reason and customer reference for each remit reference provided in the reference information section of the Edit Remittance Receipt References ADFDI sheet.
- Enhancements to the existing predefined setups to control how Apply Receipts Using AutoMatch process creates claims:
- Manage Receipt Application Exception Rules to create invoice-related Channel Revenue Claim and non-invoice related Claim Investigation.
- Enhancements to the existing Apply Receipts Using AutoMatch process to create Channel Revenue Claim for invoice-related underpayments for the following:
- Matched Remittances with applied amount that underpays the transaction’s outstanding balance.
- Manage Receipt Application Exception Rules is set to have exception rules, where the action is set to Claim.
- Channel Revenue Claim will take the business unit and currency of the invoice and the outstanding amount due on the invoice as the claim amount.
- Enhancements to the existing Apply Receipts Using AutoMatch process to create Claim Investigation for non-invoice related overpayment for the following:
- Remaining unapplied amount on the receipt post applications.
- Manage Receipt Application Exception Rules is set to have exception rules, where the action is set to Claim.
- Claim investigation overpayment claim will take the business unit and currency of the receipt and the remaining unapplied amount on the receipt post applications as the claim amount.
- The claim investigation activity defined at the receipt's receipt method's remittance bank account is used as the default activity for the claim investigation application to the receipt.
ENHANCEMENTS TO THE RECEIPTS CREATED USING SOAP SERVICES
The feature provides the following functionality for creation of invoice-related and non-invoice related underpayments and overpayments:
- Enhancements to the existing Create Standard Receipt SOAP service for creation of invoice-related underpayments and overpayments for the following:
- Use the CreateApplyReceipt and ProcessApplyReceipt operations to create invoice-related Channel Revenue Claim.
- Optional attribute Create Claim for Transaction accepts ‘Y’ to indicate that an invoice-related Channel Revenue Management claim has to be created. ‘N’ or Null indicates no claim to be created.
- Channel Revenue Claim will take the business unit and currency of the invoice and the outstanding amount due on the invoice as the claim amount.
- Optional attribute Customer Reference accepts the reference supplied by the customer for a Channel Revenue Management claim.
- Optional attribute Customer Reason accepts the customer reason for Channel Revenue Management deductions and overpayments associated with an application.
- Enhancements to the existing Create Standard Receipt SOAP service for creation of non-invoice related underpayments and overpayments for the following:
- Use the CreateActivityApplication and ProcessActivityApplication operations to create non-invoice related Claim Investigations.
- Use the CreateActivityUnapplication and ProcessActivityUnapplication operations to unapply non-invoice related Claim Investigations if prerequisite conditions are met.
- Enhancements to the existing Standard Receipt and Receipt Application SOAP service for creation of invoice-related overpayments for the following:
- Use the CreateandApplyReceipt operation to create invoice-related Channel Revenue Claim for overpayment.
- Optional attribute Create Claim for Transaction accepts ‘Y’ to indicate that an invoice-related Channel Revenue Management claim has to be created. ‘N’ or Null indicates no claim to be created.
- Channel Revenue Claim will take the business unit and currency of the invoice and the overpayment amount on the invoice as the claim amount.
- Optional attribute Customer Reference accepts the reference supplied by the customer for a Channel Revenue Management claim.
- Optional attribute Customer Reason accepts the customer reason for Channel Revenue Management deductions and overpayments associated with an application.
COMMON CONSIDERATIONS
- Below are the other considerations to this feature:
- Details of the claim created by the Spreadsheet and SOAP services can be viewed in the Application and Activity tab under Receipt Details of the Edit Receipt page.
- All Match By values supported by spreadsheet and having the underlying transaction class as an invoice will be supported for the Channel Revenue Management Integration.
- Remittance references with recommendations for receipt application are not supported under automatic claim creation. Users can manually create the claim in the Edit Receipt page.
- The functionality related to the resolution and settlement of claims created for receipts created using spreadsheet or SOAP services in Channel Revenue Management is the same as for claims created using the Edit Receipt page.
- The CreateReverseReceipt, ProcessReverseReceipt, CreateUnapplyReceipt, ProcessUnapplyReceipt operations of the Standard Receipt SOAP service have been enhanced to cancel any open claims eligible for cancellation on reversal of the receipt or unapplication of the related application.
Business benefits include:
- Automatic claim creation via the Apply Receipts using AutoMatch process.
- Integration using SOAP services for high volume processing.
- Reduce revenue leakage from invalid deductions.
- Fast and accurate cash processing capability with accountability.
- Complete deductions settlement solution with automated integration between Channel Revenue Management and Receivables.
Steps to Enable
Use the Opt In UI to enable this feature. For instructions, refer to the Optional Uptake of New Features section of this document.
Offering: Order Management
- You must opt in to the functional area named: Channel Revenue Management. Then opt in to the feature named: Deductions and Settlement.
Offering: Financials
- Under the offering named: Financials and functional area named: Receivables, go to a task named: Manage Receivables System Options. Search for and select your business unit. Click the 'Cash Processing' tab. Select the 'Enable channel revenue management integration' check box, and click Save.
- Under the offering named: Financials and functional area named: Receivables, go to a task named: Manage Receipt Classes and Methods. Search for and select your receipt class and receipt method. Click on Remittance Bank Accounts. Search for and edit your remittance bank account to select the ‘Claim Investigation’ activity.
- Under the offering named: Financials and functional area named: Receivables, go to a task named: Manage Receipt Application Exception Rules. Search for and select your Receipt Application Exception Rules. Create or extend exception rules with condition whose action is ‘Claim’ to automatically create Channel Revenue Management Claim.
- Under the offering named: Financials and functional area named: Receivables, go to a task named: Manage Receivables System Options. Search for and select your business unit. Click the 'Cash Processing' tab. Set the Receipt Application Exception Rule Set.
- Optionally set the Application Exception Rule Set at the customer account and/or site profile.
The following setups are predefined for this feature:
- Predefined Channel Revenue Management transaction source to assign to Receivables credit memos and invoices created upon settlement of a claim.
- Predefined Claim Investigation activity type under Receivables Activities. Edit this predefined activity type to include the business unit and the valid GL Code Combination Flexfield.
- Predefined Subledger Journal Entry Rule for the Event Class Receipt and Accounting Class Claim Investigation.
- Refer to the Channel Revenue Management's Deductions and Overpayments feature documentation for the Channel Revenue Management related setups.
Tips And Considerations
- Manage Receipt Application Exception Rules should not have exception rules with overlapping or duplicate conditions.
- User review required of Manage Receipt Application Exception Rules is not supported for Channel Revenue Management Integration scenarios and hence should not be enabled for rules, which have Claim as an action.
Key Resources
- For more information on Channel Revenue Management, refer to the Oracle Cloud Readiness content for Order Management.
- For more information on the Create Claims for Deductions and Overpayments feature, click here.
Custom Data Points and External Data Source Integration for Credit Management Using a REST API
Define custom data points using the Credit and Collections Data Points REST API. Populate the values for the custom data points, along with any non-system-derived, predefined data points, using the Data Point Values REST API.
CREATING THE DATA POINT DEFINITIONS
Use the ORA_UNIFIED_INV_DATA_SOURCE lookup type to define a lookup code for custom third party data sources. ORA_UNIFIED_INV_DATA_SOURCE includes two predefined lookup codes for data points predefined by the application.
Once you have your sources defined, you can create custom data point definitions using the Credit and Collections Data Point REST API. To create a custom data point, enter the following data point attributes:
- Data Point Name - The data point name.
- Data Point Category - Refers to what kind of information the data point provides. The predefined data point categories include Bank References, Billing and Payments, Business Information and Credit, Collateral, Financial Data, Guarantors, References, Trade References, Venture Funding, and Additional.
- Data Point Source - The data point source lookup code meaning.
- Data Point Data Type - The type of data this data point stores. A data point may be of type Number, Character, or Date.
- Data Point Description - The data point description.
- Scorable - Whether or not this data point may be used in scoring models (Yes or No).
- Amount Based - Whether or not this data point is a currency-amount based value (Yes or No).
After you create a data point, a unique data point ID is generated that you can use to identify the data point.
You can update these data point attributes at any time, even after the data point is assigned to a credit case folder template or scoring model: Data Point Name, Data Point Category, Data Point Source, Data Point Description. If a data point is assigned to an active credit case folder template or scoring model, you cannot disable the data point or update the Data Point Data Type, the Scorable setting, or the Amount Based setting.
POPULATING VALUES FOR CUSTOM DATA POINTS
After successfully creating the custom data point definitions, you can populate values for those data points using the Credit and Collections Data Point Values REST API. You need to provide the following data point value attributes to successfully create a value:
- Data Point ID - The unique identifier of the data point. This can be found by retrieving the data point from the Credit and Collections Data Point REST API.
- Account Number or Party Number - The unique customer account or party number for which the value applies.
- Data Point Value - The data point value.
- Currency Code - The currency code for amount based data points. This field is only required if the data point is amount based.
When a data point value is successfully created, the application generates a unique data point repository ID for the value. To update a data point value, you need to pass the unique data point repository ID along with a valid data point value to successfully update.
USING THE DATA POINTS IN CREDIT MANAGEMENT
Use custom data points like any other data points. During Credit Management setup, add custom data points to credit case folder templates or scoring models according to your requirements. Custom data points display both the data point name and data point source, to distinguish them from the predefined data points. All data points display timestamps to indicate the most recent update to data point values, credit case folders, and scoring models. The timestamps also indicate the time zone.
AUTOMATIC UPDATE OF CASE FOLDERS WITH REST ENDPOINT CALL
Another key dimension of the Custom Data Points and External Data Source Integration feature is the automatic update of case folders and scores as new data point values are passed into the REST endpoint. When new data point values are provided successfully, case folders of status New or Analyst Working see their data point values and/or score updated if they use that data point value. Analysts are notified that data point values have been refreshed when they come back to the case folder UI.
Custom data point values are not updated by default in credit case folders with the status Pending Approval. Instead, when you open a case folder, a notification displays the new data point values available for manual update. You must open each case folder to review and update new data point values.
You can opt-out of automatic updates when making a REST endpoint call by passing No in the Update Case Folder Flag field.
Custom data points provide these benefits:
- Consider third party data when reviewing a case folder.
- Include third party data in your credit scores.
- Gain visibility into third party data sources and the most current data.
- Improve the overall credit review process: creating, reviewing, approving, rejecting, making recommendations.
Steps to Enable
Review the REST service definition in the REST API guides, available from the Oracle Help Center > your apps service area of interest > REST API. If you're new to Oracle's REST services you may want to begin with the Quick Start section.
To use the Custom Data Points and External Data Source Integration feature:
- Define your data point sources using the ORA_UNIFIED_INV_DATA_SOURCE lookup.
- Integrate with the two REST API endpoints to create and populate values for custom data points: Credit and Collections Data Point and Credit and Collections Data Point Values.
Tips And Considerations
- To create a custom data point, you must first define your third party data providers as a Source in Receivables lookups.
- You won’t be able to modify or populate values for system derived data points.
- Custom data points can be used in both case folders and scores in Credit Management.
Enhanced Message Content in Transactions Delivered Using Email
Send transactions using email with enhanced rich text content in the body of the message. Users can choose different fonts, modify font size and style, and insert logos and hyperlinks. The enhanced content improves the user experience for customers who receive transactions as an email attachment.
Business benefit:
Provides users with various tools for improving the content of an email message, including emphasis, promotional material, access to additional information, and an overall professional look and feel.
Steps to Enable
You don't need to do anything to enable this feature.
Tips And Considerations
The character limit for the Email Body field is 4000 which includes values of the dynamic tokens if used.
Subscription Duration and Price Periodicity for Promised Services in Revenue Contracts
Capture the service duration and price periodicity for promised services created from Subscription Management, Order Management and Service Contracts for Oracle E-Business Suite, and third party applications. Use the subscription duration and price periodicity information to assign standalone selling prices to promised services for robust revenue allocation.
Price periodicity refers to the periodicity at which the service is priced. Examples of price periodicity are Year, Month, Week, or Day. Service duration is the duration of the service in terms of price periodicity. The unit selling price of an item represents the price per unit of measure of the item and per price periodicity.
The Service Duration and Price Periodicity attributes can be revised if the integrating source system sends the revision lines with the revised attributes.
INTEGRATION WITH SUBSCRIPTION MANAGEMENT
Subscription Management now sends the service duration and price periodicity into Revenue Management, along with the subscription details as the revenue basis data. Previously, the service duration was factored into the unit selling price and was not populated separately into Revenue Management. Now the actual unit selling price of the subscription charge per price periodicity per item is sent to Revenue Management, along with the service duration and price periodicity, and displayed on the revenue contract as well.
The line amount of a promised service represents Quantity * Service Duration * Unit Selling Price.
Subscription Management sends the unit list price of the subscription charge as the unit standalone selling price.
INTEGRATION WITH E-BUSINESS SUITE ORDER MANAGEMENT AND SERVICE CONTRACTS
E-Business Suite Order Management and Service Contract applications now send the service duration and price periodicity into Revenue Management, along with the promised services details as the revenue basis data. Previously, the service duration was factored into the unit selling price for promised services from E-Business Suite Order Management and was not populated separately into Revenue Management. For promised services from E-Business Suite Service Contracts, the service duration was previously factored into the quantity.
INTEGRATION WITH THIRD PARTY SOURCE SYSTEMS THROUGH REVENUE BASIS DATA IMPORT TEMPLATE
When you integrate third party source systems with Revenue Management, you can now provide the two new attributes, Service Duration and Price Periodicity, on the VRM_SOURCE_DOC_LINES worksheet in the Revenue Basis Data Import template. When you provide these two attributes, the line amount of the promised service is represented as Quantity * Service Duration * Unit Selling Price. Similarly, the extended standalone selling price is calculated as Quantity * Service Duration * Unit SSP.
The Service Duration and Price Periodicity attributes are not required. You can continue to integrate the promised services without the service duration and price periodicity. In such cases, the line amount is represented as Quantity * Unit Selling Price and the extended standalone selling price is calculated as Quantity * Unit SSP.
UNIT STANDALONE SELLING PRICE BASED ON SERVICE DURATION AND PRICE PERIODICITY
You can upload or calculate the unit standalone selling price based on the Service Duration and Price Periodicity attributes by defining these two attributes as part of your pricing dimension structure.
You can also use the Service Duration attribute as your pricing band that can be used in your pricing dimension structure if the Unit SSP depends on the service duration.
MANAGE CUSTOMER CONTRACTS PAGE
View the service duration and price periodicity on the contract in the Promised Details tab of the Edit Customer Contract page.
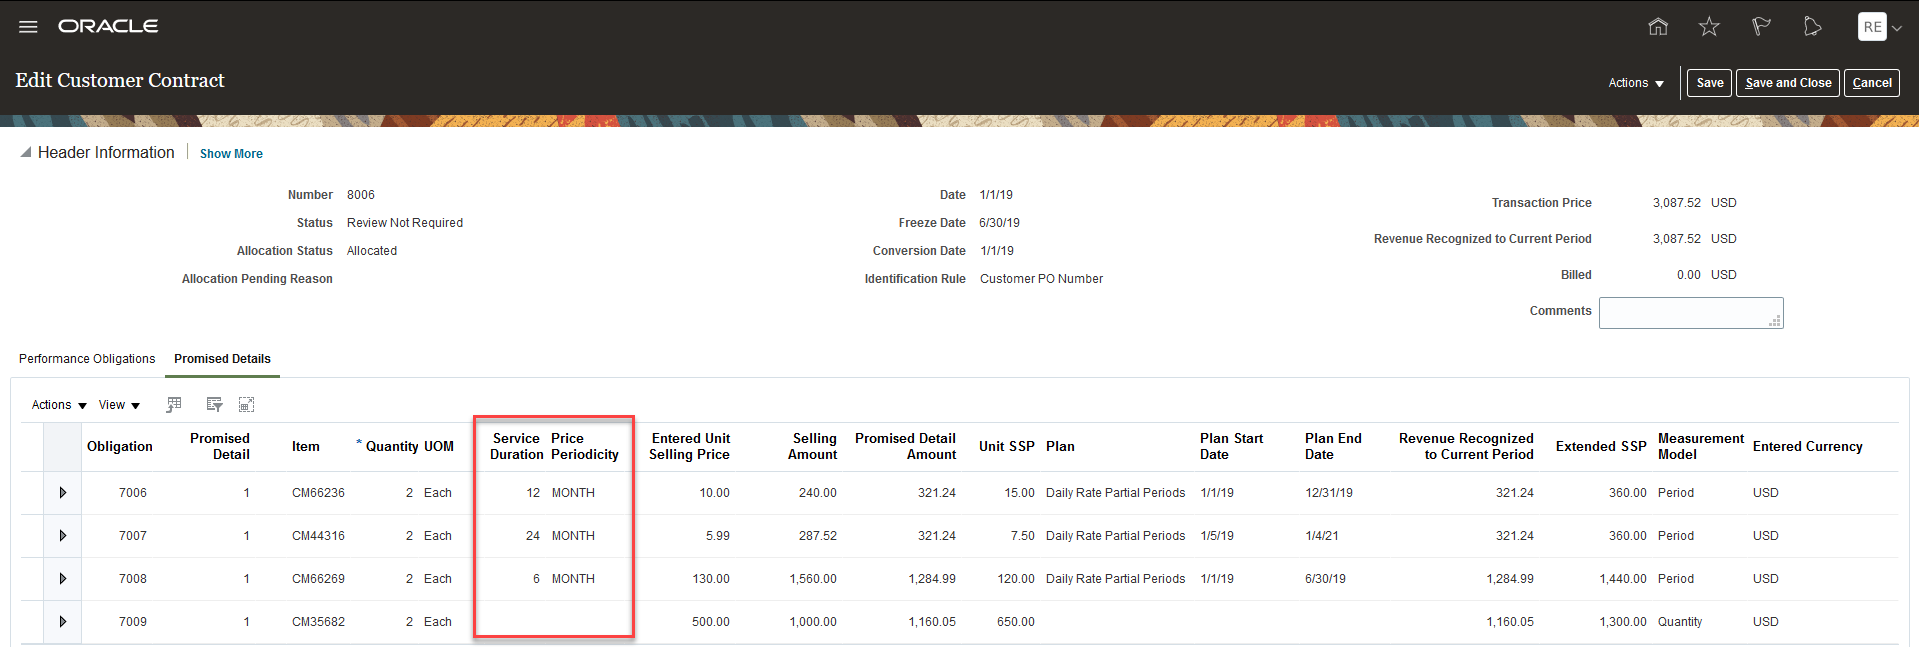
Customer Contract page
Revisions to the Service Duration attribute can be viewed within the Line reference details section for the promised detail line.
IMPLIED PERFORMANCE OBLIGATION TEMPLATE
As part of the new feature, you can provide the service duration and price periodicity on implied performance obligation lines defined with a satisfaction measurement model of Period. Enter the service duration and price periodicity for the implied obligation lines of unfrozen contracts on the Edit Customer Contract page. You can enter these fields only on contracts that aren't frozen. Once the contract is frozen, you can’t make any edits to these two attributes. The two attributes are optional.
IMPACT ON CONTRACTS CREATED BEFORE UPTAKE OF THIS FEATURE
- Revenue contracts that are created before this feature is available are displayed without the service duration and price periodicity. Revenue contracts that are created after this feature is available are displayed with the service duration and price periodicity, if these values are populated by the integrated application.
- In the case of a revision to a contract created before uptake of this feature, the base contract is displayed without the service duration and price periodicity. The following three scenarios explain the behavior of these two attributes when they are populated by the source system for the revision:
- Scenario 1: Source is Subscription Management and SRC_ATTRIBUTE_CHAR30 is not equal to CUSTOM
- For revenue lines whose source is Subscription Management and the value of the SRC_ATTRIBUTE_CHAR30 in the VRM_SOURCE_DOC_LINES table is not equal to CUSTOM then Revenue Management will ignore the service duration and price periodicity populated in the version lines. The application calculates the unit selling price as (Unit Selling Price * Service Duration) on the revenue contract. The unit standalone selling price of the base revenue line is copied to the version line as well. The promised service is represented as if it was imported from Subscription Management without the service duration and price periodicity.
- Scenario 2: Source is Subscription Management and SRC_ATTRIBUTE_CHAR30 = CUSTOM
- For revenue lines whose source is Subscription Management, if you are overriding the values of Quantity, Unit Selling Price, or Unit Standalone Selling Price using Service Mapper, then you populate SRC_ATTRIBUTE_CHAR30 = CUSTOM for the version line. In this scenario, the version line is processed as it is received from Subscription Management and the revenue line is displayed with the service duration and price periodicity.
- Scenario 3: All other sources
- For revenue basis lines where the source system is not Subscription Management, the version lines are displayed in the error correction spreadsheet if the version lines have values for service duration and price periodicity, while the base line does not have values. You can correct the values in the error correction spreadsheet so that the version line does not have values for these two attributes.
- Scenario 1: Source is Subscription Management and SRC_ATTRIBUTE_CHAR30 is not equal to CUSTOM
ERROR HANDLING
When an invalid value for the service duration and price periodicity is identified during processing, the error is captured and displayed in the Correct Contract Document Errors spreadsheet where you can correct and reprocess the revenue lines.
- You can view the revenue contract for subscription services in terms of the service duration and price periodicity.
- Capture and use SSPs based on the service duration or price periodicity to allocate revenue for your subscription contracts.
- Improve revenue recognition accuracy of amended and suspended subscription service contracts by using the appropriate Unit SSP for allocation.
Steps to Enable
You don't need to do anything to enable this feature.
Tips And Considerations
- For revisions of promised services from Subscription Management, populate the attribute SRC_ATTRIBUTE_CHAR30 in the VRM_SOURCE_DOC_LINES table with the value CUSTOM using Service Mapper if you are customizing the values of the attributes Unit Selling Price, Quantity or Unit Standalone Selling Price using Service Mapper and not using out of the box integration. This is required if you want to process the version line as it is without recalculating the unit selling price.
- Subscription Management doesn't populate the service duration and price periodicity for Usage Charges.
- Subscription Management will populate the price periodicity as One Time and the service duration as 1 for One Time charges. Subscription Management also populates the price periodicity as Usage Charge and the service duration as 1 for Usage Charges. This enables you to use the service duration and price periodicity in your pricing dimension structure for all items.
- Subscription Management lets you opt out of this feature if you do not want to populate the Service Duration and Price Periodicity attributes. To opt out, enable the look up RMCS_DURATION_UOM_OPT_OUT in Subscription Management.
Key Resources
- Refer to the Revenue Management documentation for further information on how to integrate with Subscription Management, or with E-Business Suite products, or how to import revenue basis data from third party sources and to download the new Revenue Basis Data Import file-based data import.
- You can also refer to Subscription Management documentation for information on creation, importing and processing of subscription services.
Subledger Journal Entry Analysis
Analyze the accounting rules and source values used to create a subledger journal entry. Use this analysis to determine whether appropriate rules were used, and make changes where required. This facilitates rules configuration during implementation, provides better visibility into rule exceptions, and creates a full audit trail of accounted transactions.
Navigate to the new Analyze Journal Entry page from the Review Journal Entries page, from the View Accounting window, or directly from the Manage Accounting Errors page.
Use the Analyze Journal Entry Page to review the source transaction distributions behind a journal entry along with details of the various subledger accounting rules applied at the time accounting was created. You can do that for both draft and final accounted journal entries, as well as for invalid journal entries.
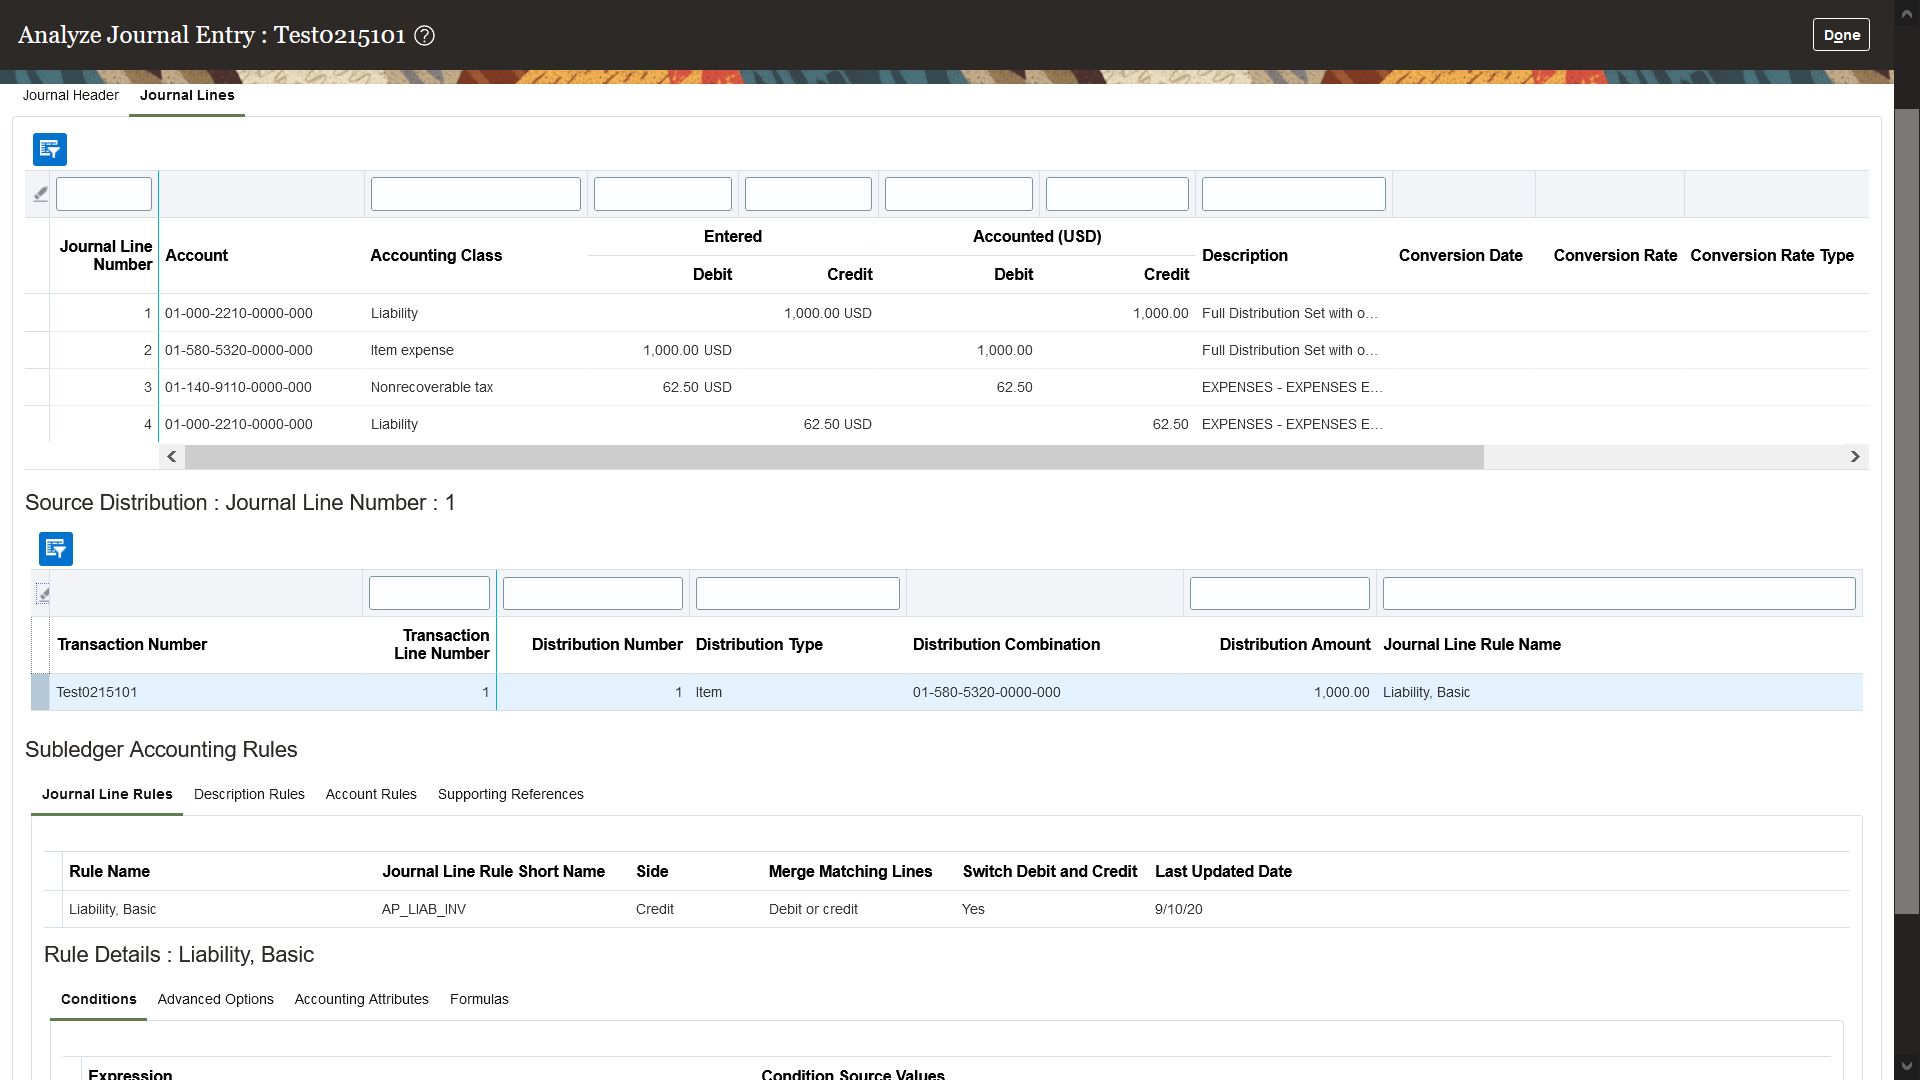
This feature provides useful insight into why accounting is created in a particular way or why there are errors. It simplifies analysis of unexpected accounting results and helps reduce efforts for implementing and troubleshooting accounting rules.
Steps to Enable
Make the feature accessible by assigning or updating privileges and/or job roles. Details are provided in the Role section below.
Tips And Considerations
- Keep in mind accounting rules may have changed since a journal entry was first created. For draft journal entries, you can create accounting again to apply the current rules.
- The analysis focuses on journal entries created based on subledger accounting rules. Exceptions – like automatically generated lines (gain or loss, suspense, intercompany, rounding, etc.) – are flagged accordingly.
Role Information
To access the Analyze Journal Entry page you need a custom job role with the Review Accounting Diagnostic function security policy added.
Supporting Reference Balance Initialization Using a Simplified Template
Use the Adjust Supporting Reference Balances template to initialize or adjust balances for a supporting reference. The simplified template restricts users from entering unbalanced journals.
You can access the template from the Adjust Supporting Reference Balances task in the Journals work area.

Navigate to Adjust Supporting Reference Balances Task
Enter the Ledger and Journal Source and click on the Open Spreadsheet button to render the Adjust Supporting Reference Balances template.

Enter the Ledger and Journal Source
Complete the details and submit the adjustments to either initialize supporting reference balances or adjust existing balances for the entered combination. The upload creates subledger journal entries for all adjustments and submits the Update Subledger Balances program for processing.

Adjust Supporting Reference Balances Using the Spreadsheet Template
For each row in the spreadsheet an offset line is automatically created on the opposite side with the same account combination but no supporting references so that the journal entry is balanced. These journal entries help you maintain an audit trail of the supporting reference balance adjustments.

The simplified template streamlines balance adjustments during initial data migration or when an additional dimension is implemented at a later stage.
Steps to Enable
You don't need to do anything to enable this feature.
Tips And Considerations
-
You can also use the Import Supporting Reference Initial Balances task in the Setup and Maintenance work area to access the Adjust Supporting Reference Balances template.
-
Resulting subledger journal entries are not transferred to the general ledger.
Role Information
Access to the "Adjust Supporting Reference Balances" task would be available through the existing Subledger Accounting Manager duty. You don't need a new role to use this feature.
First Party Tax Registration Number Default on Payables Invoices
Automatically default the first party tax registration number on Non-PO Matched Imported Payables invoices with advanced legal structures, such as a legal entity with multiple legal reporting units and a different tax registration defined for each legal reporting unit.
The First Party Tax Registration Number is defaulted as per the logic instead of NULL for the imported Non-PO Matched Payables invoices.
- Associate the Legal Reporting Unit (LRU):
To associate the LRU:
Navigator -> Setup and Maintenance -> Manage Implementation Projects
Task - Manage Associated Business Entities
Select the scope and go to the task:

Manage Associated Business Entities
- Logic to fetch the Legal Reporting Unit (LRU) for a Legal Entity (LE):
For Global For India - Ship-to Location (lines)
- Bill-to location (BU address) and LRU association to get LRU
- BU
- Main LRU
- Ship-to Location (lines)
- Bill-to location(BU address) and LRU association to get LRU
- Main LRU
- If all Payables invoice lines have same Ship-to location without association OR no Ship-to location, then go to next level hierarchy from the list of LRUs attached to the LE.
- If there are multiple not null Ship-to Locations and without any association for any one of those Ship-to locations, then go to Next hierarchy.
- If there is no Bill-to location association, then go to Next hierarchy.
- If there is no BU association, then go to Next hierarchy.
- Logic to fetch the TRN record for the derived LRU:
For the LRU determined in the previous step, the logic to pick up the Tax Registration Number (TRN) is as follows:
For Global:
- After LRU is derived as per the hierarchy setup, the logic to pick up the Tax Registration Number (TRN) is:
-
If there is only 1 active TRN for the LRU, it is being considered whether the default registration flag is enabled or not, and the country default control setup is not considered.
-
If there are multiple active TRN records, the one with the default registration flag enabled is picked up.
- If there are multiple active TRN records, none with default registration flag enabled, then:
- If only a regime is mapped in the country defaults, with an active TRN record, then this TRN is considered.
- If only a regime is mapped in the country defaults, but no active TRN record is available for this regime, then no TRN is defaulted (Left Blank).
- If a regime and tax mapping is done in the country defaults, with an active TRN record for this combination, then this TRN is considered.
- If a regime and tax mapping is done in the country defaults, but no active TRN record is available for this regime and tax combination, and an active TRN record for the Regime exists, then this TRN is considered.
- If a regime and tax mapping is done in the country defaults, but no active TRN record is available for this regime and tax combination, and no active TRN record for the Regime as well, then no TRN is defaulted (Left Blank).
- If there is no regime mapped in the country default controls, then no TRN is defaulted (Left Blank).
-
- If there is no LRU fetched as per the hierarchy (Ship-to - Bill-to - BU), then the Main LRU is considered. For the Main LRU, no change to the existing behavior, the TRN with default registration flag enabled is considered. If there is no TRN with a default registration flag enabled, then no TRN is defaulted (Left Blank).
For India:
- If 1 LRU is associated with multiple regimes, then no TRN is defaulted (Left Blank).
- Since only 1 regime is expected to be configured for India GST, there should be only 1 active TRN.
NOTE: The TRN is not defaulted (Left Blank) in the following scenarios:
- If there are multiple NOT NULL Ship-to Locations or If there are any NULL Ship-to locations in any of the Payables Invoice lines.
- If same Ship-to / Bill-to / BU location is attached to multiple LRUs for same LE.
- If there is no Main LRU.
Enables companies to derive the correct First Party Tax Registration Number. An incorrect First Party Tax Registration Number can lead to incorrect tax calculation and reporting.
Steps to Enable
The FP TRN is defaulted as per the Logic described for the Non-PO Matched AP Invoices only when the Reporting Type Code is associated with the Business Unit / Legal Entity in the respective Party Tax Profile.
Steps to Associate:
A. Create the Reporting Type Code
- Navigator -> Setup and Maintenance Task - Manage Tax Reporting Types.
- Click on ‘+’ to create a new tax reporting type with the below values.
Tax Reporting Type Code - ZX_ENABLE_FPTRN_DEFAULTING
Tax Reporting Type Purpose - Tax reporting type
Data Type - Yes or no indicator
Start Date - 1/1/01 (any date).
- Enable Reporting type use
Party tax profile Enabled - Y
- Save and Close.
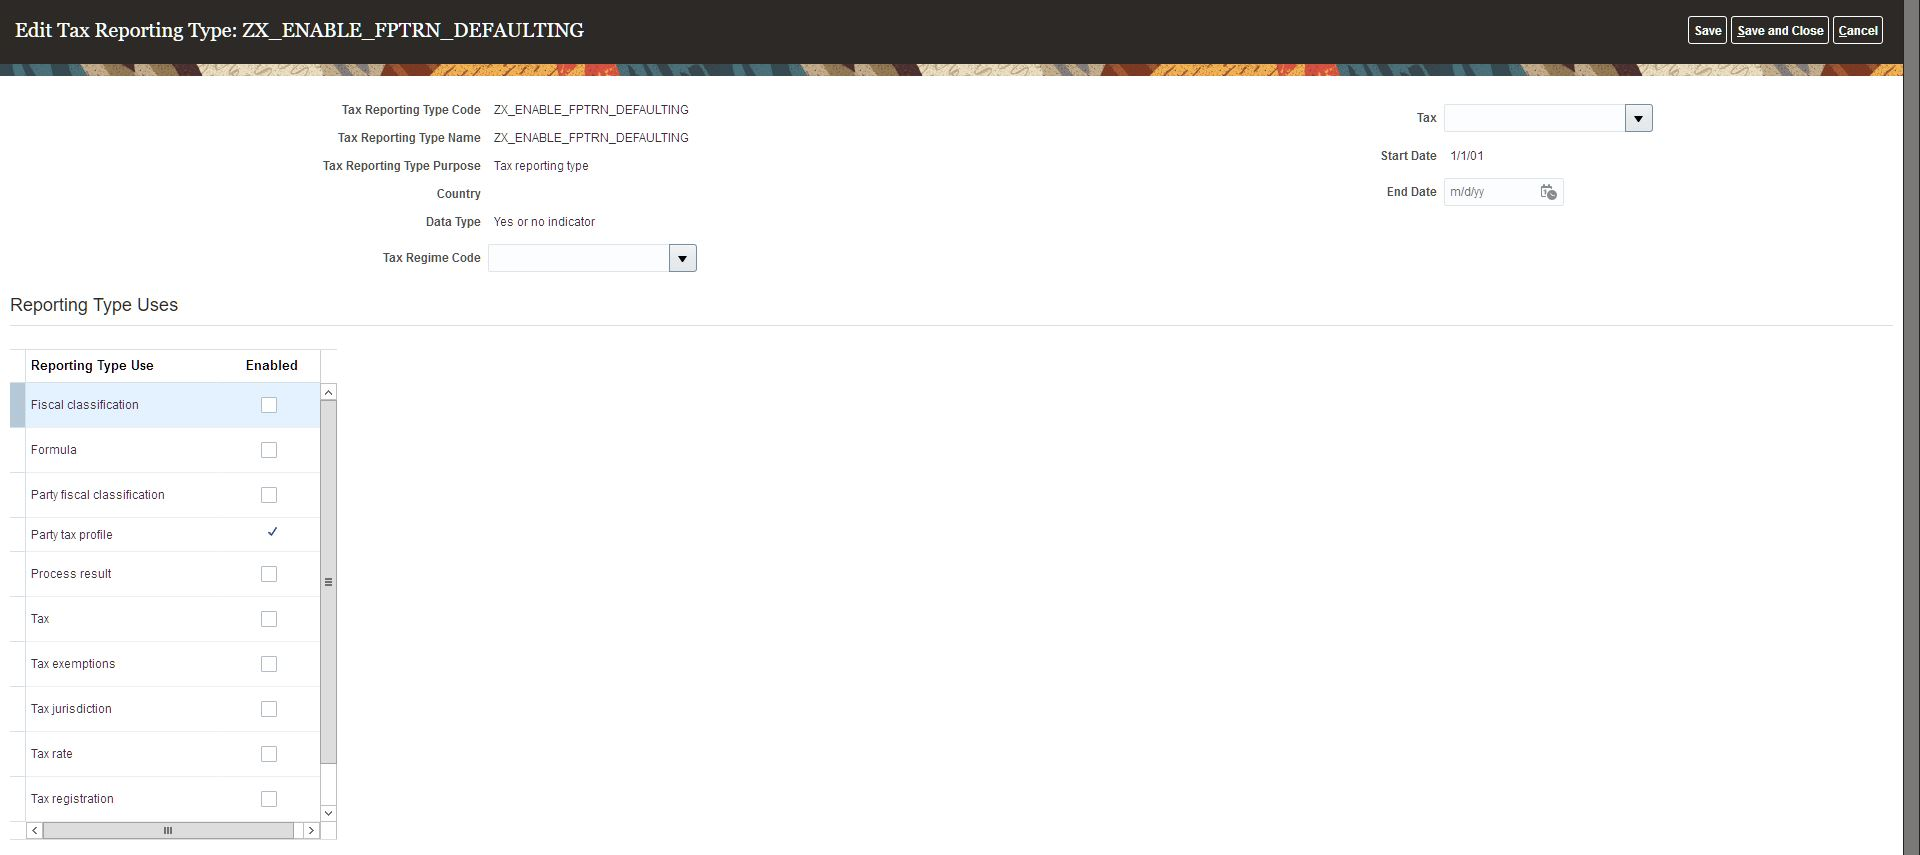
Reporting Type Code Setup
B. Associate the reporting type code with the BU/LE Party Tax Profile
- Navigator -> Setup and Maintenance Task - Manage Party Tax Profiles
- If required for BU, select Business Unit Tax Profiles in the LOV and Open Business Unit in edit mode. Go to the Tax Reporting Codes tab. Click on ‘+’ , and select ZX_ENABLE_FPTRN_DEFAULTING in the reporting type LOV. Select ‘Y’ in the reporting code LOV. Enter effective start date from which defaulting should be enabled. Save and Close.
- If required for LE, Select Legal Entity Tax Profiles Open Legal Entity in edit mode. Go to Tax Reporting Codes tab. Click on ‘+’ , and select ZX_ENABLE_FPTRN_DEFAULTING in the reporting type LOV. Select ‘Y’ in the reporting code LOV. Enter effective start date from which defaulting should be enabled. Save and Close.
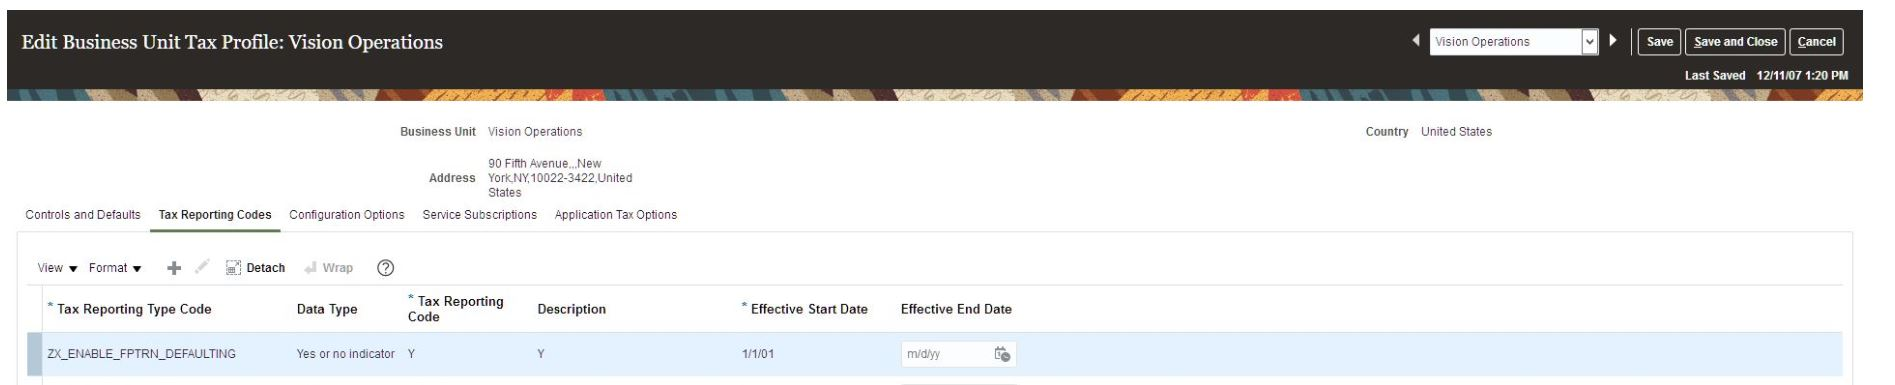
BU and Reporting Type Code Association
Tips And Considerations
The FP TRN is defaulted as per the logic only for the imported Non-PO Matched Payables invoices.
Tax Deducted At Source Rate Change Within a Fiscal Year
Change the Tax Deducted at Source rate within a fiscal year. Being able to change this rate helps you accommodate legislative changes to the withholding rate.
You can manage changes in withholding tax rates within a Withholding Tax Calendar Year that occur due to unusual circumstances (such as the COVID pandemic), and calculate WHT using the new applicable rate
- The feature supports both Threshold Based configuration and Rate Schedules Configuration. The support for both configurations is critical as WHT rate changes handling is configured using Threshold Setup or Rate Based Schedules.
- The feature does not hamper existing configuration for customer and there should not be any upgrade required in their configuration.
- There will not be any impact on existing transactions, so the solution will NOT correct tax calculation on existing documents.
- This feature is capable of handling tax rate changes during mid period.
- The feature will track bucket changes for each transition of tax rate change.
- For any new invoices validated post rate changes, Tax Engine will calculate WHT on new applicable rate.
Business benefits include:
- Withholding Tax Engine will now be able to support any unprecedented changes in the Tax Rates in the middle of Financial year or Tax Period
- Customers will not be required to make any new Setups to enable this feature and can carry on with the existing Rate schedules or Threshold setup after up taking the new solution. They can end date the existing Rate and create a new rate with changed Rate schedule or Rate percentage as per compliance needs.
- There is no Manual intervention required to adjust the WHT Tax Buckets in case of any abrupt change in rate in the middle of Financial year. The system will automatically start calculating the accumulated tax amount basis the new rate from the point when rate change happens in the system.
- This feature will automatically retrospect the related invoices on which any adjustments like Cancellation, Prepayment Application, Un-application etc will be done and re-evaluate the bucket amounts to conclude the correct Gross TDS and accordingly adjustments will be made in the system.
- Batch validation is also handled by the solution.
Steps to Enable
To enable this feature, make sure the existing Withholding Tax rate needs to be end dated in the middle of the period of Withholding Tax calendar and a new Rate is created within same period.
Rate Schedules:
- Sign in with a role similar to that of an Application Implementation Consultant.
- In the Setup and Maintenance work area, go to the Manage Tax Rates and Tax Recovery rates task:
Offering: Financials Functional area: Transaction Tax: Manage Tax Rates and Tax Recovery rates
- Search for the required Withholding Tax Rate or Create a new Tax Rate.
- Make sure Tax Rate Type: Gross Amount Rate Schedule.
- Go to Rate Schedule and Click on Add Row.
- Provide the necessary details to create a Rate schedule.
- End Date the existing Rate with Rate Schedules and create a new rate with new Rate schedule in the same WHT Calendar Year.
- Save and close.
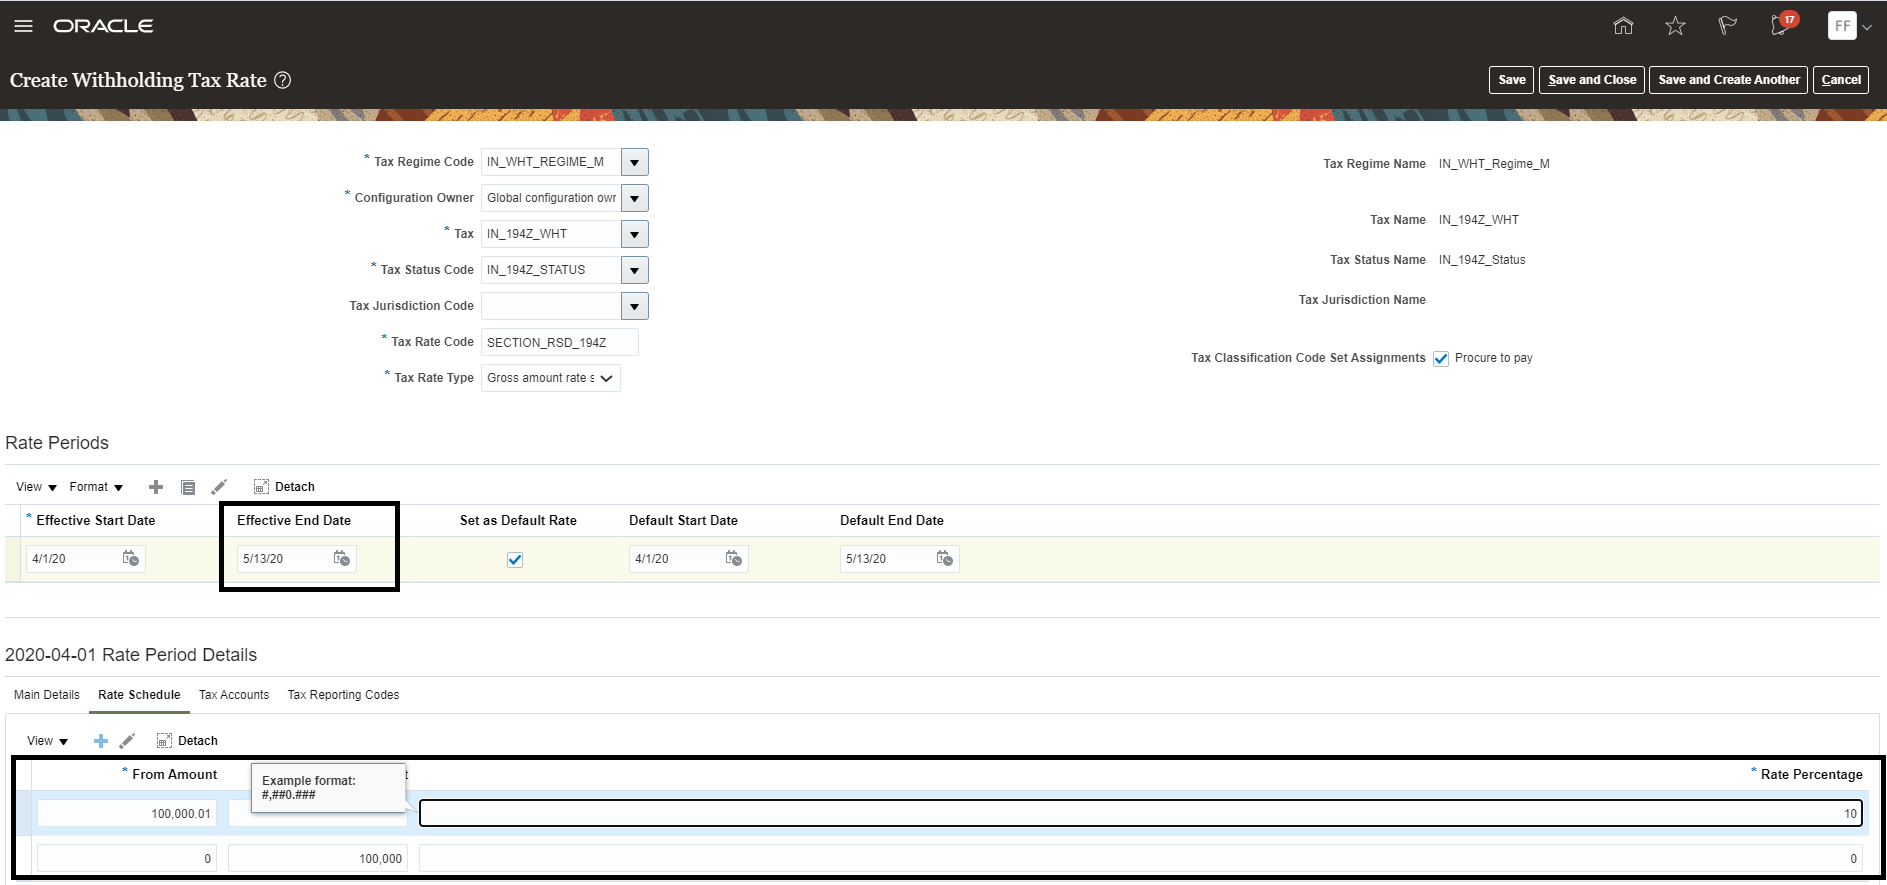
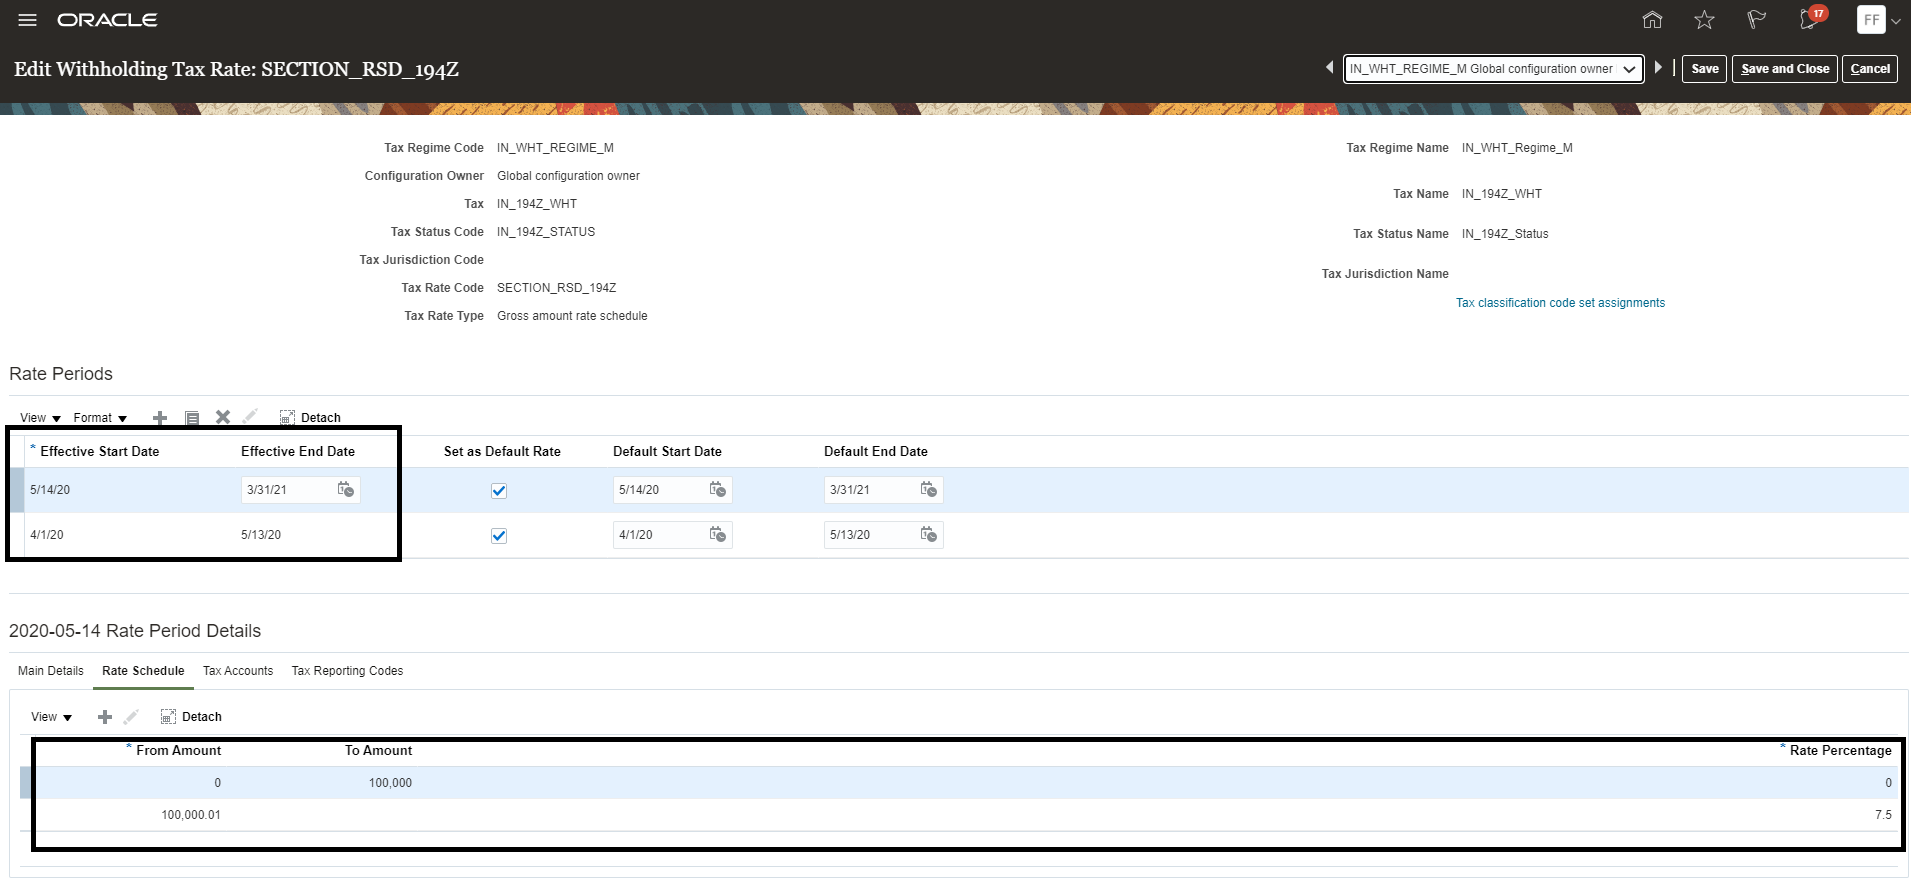
Tax Threshold:
- Sign in with a role similar to that of an Application Implementation Consultant.
- In the Setup and Maintenance work area, go to the Manage Taxes task:
Offering: Financials Functional area: Transaction Tax: Manage Taxes
- Search for the required Withholding Tax or Create a new Tax.
- Go to Threshold Controls and Click on Add Row.
- Enter the Threshold details.
- Save and close.

- In the Setup and Maintenance work area, go to the Manage Tax Rates and Tax Recovery rates task:
Offering: Financials Functional area: Transaction Tax: Manage Tax Rates and Tax Recovery rates
- Search for the required Withholding Tax Rate or Create a new Tax Rate.
- Make sure Tax Rate Type: Percentage.
- Go to Rate Periods and Click on Add Row.
- Provide the necessary details to create a New Rate.
- End Date the existing Rate and create a new rate with new Rate Percentage in the same WHT Calendar Year.
- Save and close.
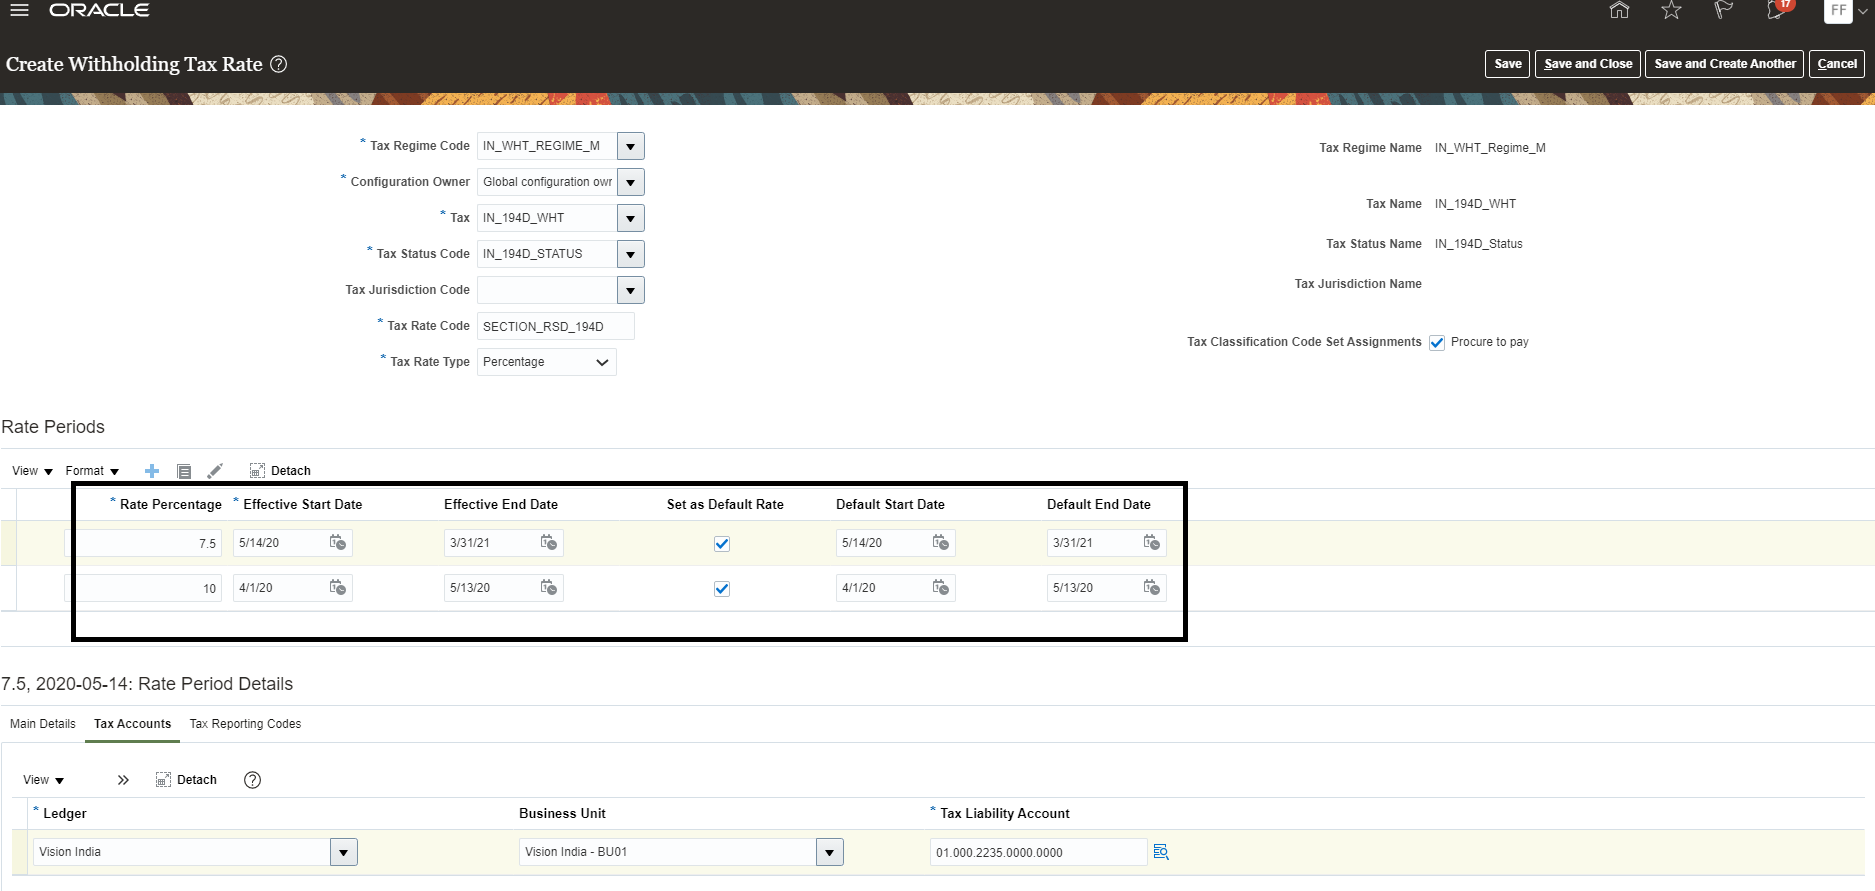
Tips And Considerations
- Customers will not be required to change any existing setup of Rate schedules or Threshold after up taking the new feature. They can end date the existing Rate and create a new rate with changed Rate schedule or Percentage.
- The new solution will work for future changes and will not be able to retrospect any adjustments done in past for the current FY.
- Any adjustment on existing invoices in the current FY, like Cancellation, Prepayment Application, Un-application etc will be required to be adjusted Manually, to calculate correct WHT. The new solution will not be able to handle any such adjustments in the current Financial Year.
Tax Registration Number Validation for Northern Ireland (XI)
Validate tax registration numbers in Northern Ireland for EU transactions, in accordance with the Brexit treaty business number validation rules.
On 27-Nov-2020, Her Majesty’s Revenue and Customs (HMRC) updated the policy paper on VAT on the sale of goods between Great Britain and Northern Ireland, and issued a paper on what to do if trading under the Northern Ireland Protocol.
- No new UK VAT registration numbers for NI businesses.
- For Intra EU transactions under the NI protocol, the 'XI' prefix must replace 'GB' in front of the VAT number when communicating with an EU customer or supplier.
Ensure that the following details are correct for GB or NI:
Validation Type: ORA_GB_VAT
Description: United Kingdom GB VAT
No. of digits: 5 / 9 / 12 / 14 / 15
Format:
- Two character Country code(GB/XI) + 3/7/10/12/13 digit numeric
- Government Department/Health Authority
- Standard
- Commercial Group
- Isle of Man (Normal)
- Isle of Man (Commercial Group)
- A(1-2) = {GB}/{XI}
Check digits: Yes
Here’s how the GB/XI VAT is validated:
- 11, or 12 Characters:
- 14, or 15 Characters:
Example:
- GB1234567823
- XI001123456782
- GB0011234567823
Invalid GB/XI VAT: AC123554567 (invalid country code)
Enables companies to validate tax registration numbers in Northern Ireland for EU transactions, in accordance with the Brexit treaty business number validation rules.
Steps to Enable
To enable Tax Registration Number Validation, select the correct Validation Type while creating the Tax Registration Number.
Regional and Country-Specific Features
Fiscal Attribute Import for Transactions with the Same Transaction Number
Use the enhanced Outbound Fiscal Document Import FBDI template to import fiscal attributes for transactions with the same transaction number, but from different product sources, such as Distributed Order Orchestration, Contracts, and Intercompany.
The Fiscal Attribute Headers sheet of the Outbound Fiscal Document Import FBDI template includes the column Transaction Batch Source Name, to distinguish Receivables transactions with the same transaction number but a different transaction source.
NOTE: The file layout of the Outbound Fiscal Document Import FBDI template has changed because the Transaction Batch Source Name column is a mandatory column. Review your existing integrations with external systems that use this template
You can successfully import and apply fiscal attributes to a specific transaction from one product source that has the same transaction number as a transaction from a different product source.
Steps to Enable
You don't need to do anything to enable this feature.
Billing Software Certification for Portugal
Oracle Fusion Cloud ERP has received the Billing Software Certification from the Portuguese Tax and Customs Authority. Comply with the legal requirements for billing software in Portugal using features across Financials and Supply Chain Management.
Functionality to meet the legal requirements of the Portuguese Billing Software Certification:
- User ID’s, passwords and configurable user profiles to access and utilize Oracle Fusion Cloud ERP.
- An audit trail of the entry and subsequent updates of transactions including document sequencing.
- The addition of information to invoicing and shipping printed documents, as per the requirements above.
- An encrypted signature is added to invoices and shipping documents.
- The Portuguese Standard Audit File for Tax (SAF-T PT).
The Billing Software Certification for Portugal allows you to comply with the legal requirements in Portugal.
Steps to Enable
You don't need to do anything to enable this feature.
Tips And Considerations
Before you use this feature, you must complete all the prerequisite steps and mandatory setups. For details, see Billing Certification for Portugal topical essay.
Key Resources
- Billing Software Certification for Portugal topical essay.
- Notes in My Oracle Support:
Customer and Supplier Balance Netting in Invoice Currency When Payment Currencies Are Different
Include invoices in netting settlements based on the invoice currency even when the payment currency is different.
You can now select the transactions to net using a transaction date range.
Business benefits include:
- Allows invoices, with payment currency different from the invoice currency, to be processed for netting.
- Provides greater flexibility in the selection criteria for netting by allowing transactions to be selected for a specific transaction date range. As an example, you can now select transactions for a specific month for netting.
Steps to Enable
To enable this feature, do the following:
- Navigate to the Create Netting Agreements page.
- From the Netting Currency Rule drop-down list, select the Netting Currency Rule as Use single currency.
- From the Invoice Currency drop-down list, select the invoice currency.
- From the Settlement Currency drop-down list, select the settlement currency.
- Click Save and Close.
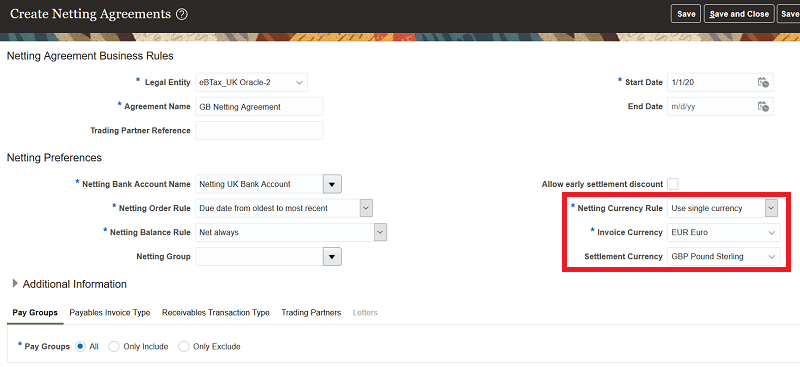
Tips And Considerations
Enter in the Conversion Rate Date field in the Create Netting Settlements page or the Generate Netting Settlements process the date to use for converting amounts from the invoice currency to the settlement currency, as well as to the ledger currency.
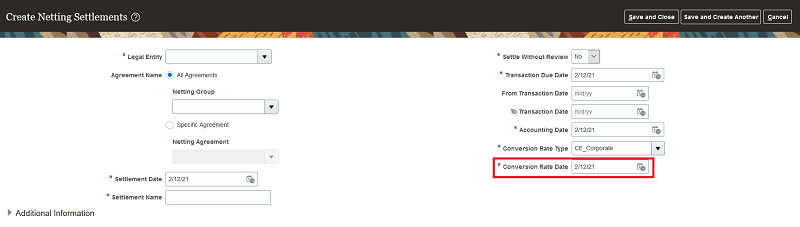
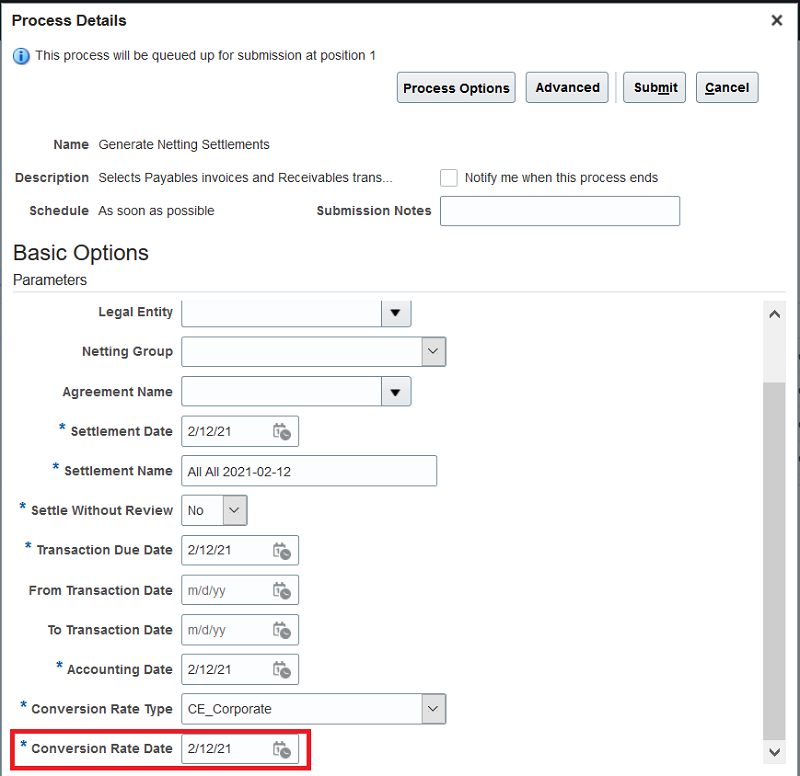
Key Resources
- Netting Topical Essay
Transaction Review Before Finalization of the VAT Period
Before finalizing the VAT period, alert users about transactions potentially modified after the last run of the selection process. This helps reduce unexpected errors in VAT Reporting.
The recommendation is that you shouldn't create or modify transactions in between the selection process run and the tax reports run for the tax period. However, you may do some changes during this period. You can now enable the Finalize Transactions for Tax Reporting process to check for any new or modified transactions that impact tax reporting after the last selection process run. You can also optionally choose to report such transactions in the next tax period if you have already submitted the reports to the tax authorities for the current tax period.
The improved handling of transaction modifications reduces unexpected errors in VAT reporting, saves time and effort, and facilitates more timely and accurate reporting to the tax authorities.
Steps to Enable
To enable this feature, select the Enable Final Data Validation check box for the Tax Reporting Configuration. Optionally select the Enable Sweep Process check box to complete the finalization process without re-executing the selection process and subsequent reporting steps. The transactions that were created or modified after the last selection process run, will be picked up in the next tax period.
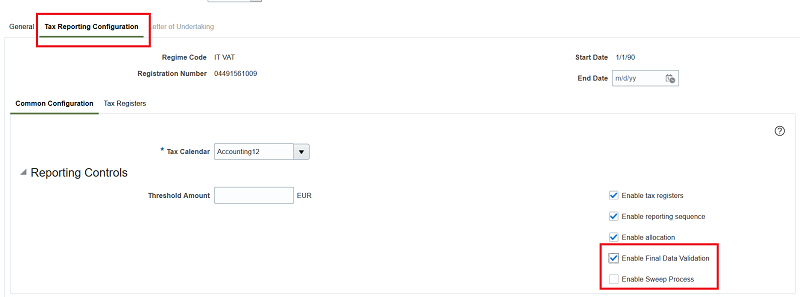
Tips And Considerations
Select the Enable Final Data Validation check box to enable Finalize Transactions for Tax Reporting process to check for any new or modified transactions created after the last selection process run.
If the Finalize Transactions for Tax Reporting process detects such transactions, the process ends in an error. The error message indicates the reason and informs the user to check the log file. The log file contains the details of transactions that were created or modified after the last selection process run.
If these transactions are to be reported in the current tax period, re-run the selection process and the tax reports again. For the Tax Box Return Preparation Report, you must re-run the Tax Box Allocation process.
If the reporting for the current period is already done, select the Enable Sweep Process checkbox for the Tax Reporting Configuration and run the Finalize Transactions for Tax Reporting process again. The Finalize Transactions for Tax Reporting process will be completed and these transactions will be reported in the next tax period. The Enable Sweep Process checkbox will then be automatically disabled. When the Finalize Transactions for Tax Reporting process is run for the next tax period, you must select the Enable Sweep Process checkbox again to report transactions in the next tax period.
Key Resources
- Tax Box Allocations and Reporting Topical Essay
Financials for Regional Localizations
Predefined Rules for Tax Point Date Adjustment
Use the Tax Point Date Adjustment process with predefined rules to automate the adjustment of tax point date information. The rules include criteria for Invoice Received Date, Goods Received Date, Invoice Date, and Delivery Date to provide updated processing over the existing tax point date adjustment spreadsheet.
The existing Tax Point Date Adjustment feature is enhanced to use predefined rules. You can predefine new rules for tax point date adjustment based on the document fiscal classification code or the parameter value that you entered during the Process Tax Point Date Adjustment submission. You can define various rules for Payables invoices and Receivables transactions.
Predefined rules on the document fiscal classification code are as follows:
- Payables invoices
- Goods received date
- Invoice received date
- Later of invoice received date and goods received date
- No update
- Receivables transactions
- Delivery date
- Later of invoice date and delivery date
- No update
Predefined rules entered as parameters are as follows:
- Payables Default Rule parameter
- Goods received date
- Invoice received date
- Later of invoice received date and goods received date
- Receivables Default Rule parameter
- Delivery date
- Later of invoice date and delivery date
The Tax Point Date Adjustment feature now uses predefined rules. Countries that are already using this feature with Adjusted Tax Point Date GDFs and spreadsheets, can use predefined rules too. Countries where this feature has not been available previously can now use this feature with predefined rules only.
Here’s the Tax Point Date Adjustment flow:
- Complete mandatory setups for Tax Point Date Adjustment rules. For details, see Tax Point Date Adjustment Topical Essay.
- Create Payables invoices with the required fields at the header level or the required field at the line level. The required fields at the header level are Document Fiscal Classification, Invoice Received Date, Goods Received Date, and Adjusted Tax Point Date GDF. The required field at the line level is Adjusted Tax Point Date GDF.
- Create Receivables transactions with the required fields at the header level or with the required field at the line level. The required fields at the header level are Delivery Date for Tax Point Date and Adjusted Tax Point Date GDF. The required field at the line level is Adjusted Tax Point Date GDF.
- Run the Select Transactions for Tax Point Date Adjustment process. Modify and upload the spreadsheet file for processing. This is an optional step for countries using Adjusted Tax Point Date GDFs.
- Run the Process Tax Point Date Adjustments process with the Process Type parameter value as Import and the Processing Mode parameter value as Draft. The Process Tax Point Date Adjustments process updates the tax point date based on the spreadsheet file, but not with predefined rules. This is an optional step for countries using Adjusted Tax Point Date GDFs.
- Run the Process Tax Point Date Adjustments process with the Process Type parameter value as Manual, the Source parameter value as Payables or Receivables, and the Processing Mode parameter value as Draft. This step is not required when only spreadsheet files are used. The process updates the Tax Point Date in this priority order:
- Adjusted Tax Point Date GDF at the line level
- Adjusted Tax Point Date GDF at the header level
- Predefined rule on Document Fiscal Classification
- Predefined rule as Payables Default Rule or Receivables Default Rule parameter
- Review tax point date adjustment data reported in the Process Tax Point Date Adjustment process log file.
- Run the Process Tax Point Date Adjustments process in Final mode.
Business benefits include:
- Supports compliance with most common tax point date defaulting rules based on other transaction data.
- Helps automate the tax period closure and allows to reduce tax reporting processing time.
Steps to Enable
You don't need to do anything to enable this feature.
Tips And Considerations
- When you enter Payables or Receivables transactions and you have predefined rules on the Document Fiscal Classification code, you must define the Document Fiscal Classification code at the invoice header.
- The Process Tax Point Date Adjustments process updates tax point date with predefined rules only when you select the Source parameter value as Manual. If you select the Source parameter value as Import, the process doesn't update the tax point date with predefined rules.
- The Process Tax Point Date Adjustments process updates the tax point date on a transaction only when the transaction is accounted.
- For more tips and considerations, see Tax Point Date Adjustment Topical Essay.
Key Resources
- Related Help: Tax Point Date Adjustment Topical Essay
Role Information
To use this feature, you need these privileges and roles:
- Privilege Name and Code:
- Run Tax Point Date Adjustment Process (JE_RUN_TAX_POINT_DATE_ADJUSTMENT_PROCESS)
IMPORTANT Actions and Considerations
TRANSITION TO REPORTING WEB STUDIO
Reporting Web Studio is a web-based report authoring solution that has a similar look and feel to the current Windows-based Financial Reporting Studio. Reporting Web Studio has been available to General Ledger users since Update 20A. Beginning with Update 21B, Windows Financial Reporting Studio will no longer be available for use. After Update 21B is applied to your environments, you will no longer be able to connect using your Financial Reporting Studio Desktop Client and will receive the message, "You are not authorized to use this functionality. Contact your administrator." You will also be unable to download or launch Financial Reporting Studio Desktop Client from the Tools menu of the "Enterprise Performance Management System Workspace, Fusion Edition" page.
You must use Reporting Web Studio for all of your General Ledger financial reports as soon as possible. All reports created with Windows-based Financial Reporting Studio are compatible with Reporting Web Studio.
For information about Reporting Web Studio, refer to the Overview of Reporting Web Studio topic in the Implementing Enterprise Structures and General Ledger guide.