
- Revision History
- Overview
- Optional Uptake of New Features (Opt In)
- Feature Summary
- Collaboration Messaging Framework
- Financials Common
- Accounting and Control
-
- Budgetary Control
- General Ledger
- Joint Venture Management
-
- Classification of Operated and Non-Operated Joint Ventures
- Joint Venture Distributions in Entered Currency
- Joint Venture Management Overhead Method - Percentage of Cost with Sliding Scale Option
- Joint Venture Ownership Definition and Direct Billed Stakeholder Assignment Rules
- Joint Venture Partner Contribution Requests
- Partner Contributions for Internal Stakeholders
- Statistical Journal Entry Creation for Joint Venture Operational Measures
- Transaction Date Default Configuration
-
- Subledger Accounting
- Asset and Lease Management
- Payables and Expenses
-
- Expenses
- Payables
-
- Adaptive Learning Data Sharing Between Environments for Intelligent Document Recognition
- Adaptive Learning for Invoice Lines Using Intelligent Document Recognition
- Adaptive Learning for Routing Attributes Using Intelligent Document Recognition
- Legal Entity Recognition from Invoice Document
- Receipt-Matched Invoices for Catch Weight Items
- Recognition of Specific Internal Suppliers for Invoices Created Using Intelligent Document Recognition
- Recognition of Supporting Document Separators for Invoices Using Intelligent Document Recognition
-
- Payments
- Receivables and Cash
- Region and Country-Specific Features
- U.S. Federal Financials
- IMPORTANT Actions and Considerations
This document will continue to evolve as existing sections change and new information is added. All updates appear in the following table:
| Date | Product | Feature | Notes |
|---|---|---|---|
| 23 JUN 2022 | Regional Shared Features | Single Step Submission of Select Transactions for Tax Reporting and Tax Allocation Processes | Updated document. Revised feature information. |
| 23 JUN 2022 | Regional Shared Features | First Party Tax Registration Number Enforcement on Payables and Receivables Transactions | Updated document. Revised feature information. |
| 17 JUN 2022 | Payments | Updated document. Delivered new feature in update 22B. | |
| 17 JUN 2022 | Receivables | Management of Negative Invoice Line Amounts and Transaction Completion |
Updated document. Revised feature information. |
| 27 MAY 2022 | U.S. Federal Financials | U.S. Federal Treasury Payment Schedules | Updated document. Revised steps to enable. |
| 27 MAY 2022 | Common Financials | Service Excellence Continuing Investments | Updated document. Revised feature information. |
| 27 MAY 2022 | IMPORTANT Actions and Considerations | Deprecation of Payment Infotile | Updated document. Added information about upcoming feature deprecation. |
| 29 APR 2022 | Budgetary Control | OTBI Drilldown to Review Budgetary Control Transactions | Updated document. Added additional Key Resources. |
| 29 APR 2022 | Common Financials | Workflow Transaction Console | Updated document. Added upcoming opt in change. |
| 27 APR 2022 | Collaboration Messaging Framework | Retrieve Large Purchase Order Payloads for B2B Messaging | Updated document. Added a feature that was backported to update 22B in the May monthly maintenance pack. |
| 18 MAR 2022 | Common Financials | Simplified Workflow Rules Configuration | Updated document. Delivered new feature in update 22B. |
| 04 MAR 2022 | Created initial document. |
IMPORTANT NOTE: If you are being updated directly from 21D to 22B you should review the content of both 22A and 22B sections to ensure you see all the changes included in the update.
 HAVE AN IDEA?
We’re here and we’re listening. If you have a suggestion on how to make our cloud services even better then go ahead and tell us. There are several ways to submit your ideas, for example, through the Ideas Lab on Oracle Customer Connect. Wherever you see this icon after the feature name it means we delivered one of your ideas.
GIVE US FEEDBACK
We welcome your comments and suggestions to improve the content. Please send us your feedback at oracle_fusion_applications_help_ww_grp@oracle.com.
DISCLAIMER
The information contained in this document may include statements about Oracle’s product development plans. Many factors can materially affect Oracle’s product development plans and the nature and timing of future product releases. Accordingly, this Information is provided to you solely for information only, is not a commitment to deliver any material, code, or functionality, and should not be relied upon in making purchasing decisions. The development, release, and timing of any features or functionality described remains at the sole discretion of Oracle.
This information may not be incorporated into any contractual agreement with Oracle or its subsidiaries or affiliates. Oracle specifically disclaims any liability with respect to this information. Refer to the Legal Notices and Terms of Use for further information.
Optional Uptake of New Features (Opt In)
Oracle Cloud Applications delivers new updates every quarter. This means every three months you'll receive new functionality to help you efficiently and effectively manage your business. Some features are delivered Enabled meaning they are immediately available to end users. Other features are delivered Disabled meaning you have to take action to make available. Features delivered Disabled can be activated for end users by stepping through the following instructions using the following privileges:
- Review Applications Offering (ASM_REVIEW_APPLICATIONS_OFFERINGS_PRIV)
- Configure Oracle Fusion Applications Offering (ASM_CONFIGURE_OFFERING_PRIV)
Here’s how you opt in to new features:
- Click Navigator > My Enterprise > New Features.
- On the Features Overview page, select your offering to review new features specific to it. Or, you can leave the default selection All Enabled Offerings to review new features for all offerings.
- On the New Features tab, review the new features and check the opt-in status of the feature in the Enabled column. If a feature has already been enabled, you will see a check mark. Otherwise, you will see an icon to enable the feature.
- Click the icon in the Enabled column and complete the steps to enable the feature.
In some cases, you might want to opt in to a feature that's not listed in the New Features work area. Here's how to opt in:
- Click Navigator > My Enterprise > Offerings.
- On the Offerings page, select your offering, and then click Opt In Features.
- On the Opt In page, click the Edit Features (pencil) icon for the offering, or for the functional area that includes your feature.
- On the Edit Features page, complete the steps to enable the feature.
For more information and detailed instructions on opting in to new features for your offering, see Offering Configuration.
Opt In Expiration
Occasionally, features delivered Disabled via Opt In may be enabled automatically in a future update. This is known as an Opt In Expiration. If your cloud service has any Opt In Expirations you will see a related tab in this document. Click on that tab to see when the feature was originally delivered Disabled, and when the Opt In will expire, potentially automatically enabling the feature. You can also click here to see features with Opt In Expirations across all Oracle Cloud Applications.
Column Definitions:
Report = New or modified, Oracle-delivered, ready to run reports.
UI or Process-Based: Small Scale = These UI or process-based features are typically comprised of minor field, validation, or program changes. Therefore, the potential impact to users is minimal.
UI or Process-Based: Larger Scale* = These UI or process-based features have more complex designs. Therefore, the potential impact to users is higher.
Features Delivered Disabled = Action is needed BEFORE these features can be used by END USERS. These features are delivered disabled and you choose if and when to enable them. For example, a) new or expanded BI subject areas need to first be incorporated into reports, b) Integration is required to utilize new web services, or c) features must be assigned to user roles before they can be accessed.
Collaboration Messaging Framework
Retrieve Large Purchase Order Payloads for B2B Messaging
Configure Oracle Collaboration Messaging Framework to process large purchase orders (typically more than 2,000-lines) when you initiate B2B communication. The payload for a large purchase order is retrieved in small parts from Oracle Purchasing and then combined and delivered as one purchase order, resulting in improved performance. This feature is available in the May monthly maintenance pack for update 22B.
After you enable the feature, enter a value in the Large PO Processing section of the Manage Collaboration Messaging Configuration page in the Large PO Minimum Line Count field to specify the minimum number of lines in a large PO. Then enter a value in the PO Lines Retrieved in a Single Query field to specify the number of lines to retrieve from Oracle Purchasing in each part (1000 lines by default). The values you set in the Large PO Delivery Duration (30 minutes by default) and Large PO Delivery Attempt Interval (3 minutes by default) fields indicate how long and how often to attempt delivery of the PO.

Large Purchase Order Processing in Manage Collaboration Messaging Configuration
Steps to Enable
Use the Opt In UI to enable this feature. For instructions, refer to the Optional Uptake of New Features section of this document.
Offering: Order Management
Tips And Considerations
A purchase order with more than 2,000 lines is considered a large purchase order, but you can determine the minimum line count for your large purchase orders based on your specific business needs.
Key Resources
- Oracle Supply Chain Management Cloud: Configuring and Managing B2B Messaging guide available on the Oracle Help Center.
Role Information
You have a couple of options for giving people access to this feature, depending on whether you're assigning them predefined job roles or your own configured job roles.
- Users who are assigned this predefined job role can access this feature:
- B2B Administrator (ORA_CMK_B2B_ADMINISTRATOR_ABSTRACT)
- Users who are assigned configured job roles that contain this privilege are able to access this feature:
- Manage Collaboration Messaging Configuration (CMK_MANAGE_COLLAB_MESG_CONFIG_PRIV)
Service Excellence Continuing Investments
Our ongoing investment in service excellence has a focus on overall usability, resiliency, performance, and security. This work is based on monitoring performance trends, reviewing common use patterns, analyzing service requests, and participating in many discussions with customers.
In this update, our ongoing investment in service excellence includes improvements in the following areas:
Usability
-
Convert the quantity-based tax on invoices to the invoice currency, when the invoice currency is different from the tax currency. This enables users to compute, charge, and report more accurate tax amounts on both Payables and Receivables invoices.
-
Identification of credit analyst using email address in the Customer Import Upload FBDI. Previously, the Credit Analyst field of the Customer Import Upload FBDI only supported the import of credit analyst names. Enable this functionality by adding a new lookup code CR_ANALYST_EMAIL_CUST_PROFILE under the lookup type AR_FEATURES.
-
Intercompany workflow transactions are rejected on expiration and notified to the relevant stakeholders.
-
Splitting of customer statements by site for PRINT delivery method. Enable this functionality by adding a new lookup code AR_PRINT_STATEMENT_BURSTING under the lookup type AR_FEATURES.
Resiliency
-
Import Segment Values and Hierarchies process ends gracefully on cancellation.
-
Improved readability of log files when high volumes of journals are imported.
- Resiliency and diagnostic improvements to the fiscal document generation process for Brazil. Improvements include
- Simplification to Fiscal Document processing to allow multiple ESS processes to run on a single request.
- Better visibility for standalone fiscal documents.
- Corrections in handling CST (Tax Situation Code) for vendor flows.
- Resiliency and diagnostic improvements to the collection documents process for Brazil. Improvements include
- The anticipated withholding tax amount is displayed when the installment amount is updated.
- Improved performance of the Receivables Bank Return process.
Performance
- Performance improvements to the tax engine for account-based tax rules.
- Performance improvement in invoice validation through improved invocation of tax calculation.
- The Import Segment Values and Hierarchies process contains performance improvements when importing descriptive flexfield information.
- Support for purging of Collection Scoring History. Customers with high volume can purge the collection scoring history for optimal performance. Enable this functionality by adding a new lookup code IEX_SCORE_HISTORIES_UPSERT under the lookup type IEX_FEATURES. Optionally, stop storing data point histories by adding a new lookup code DISABLE_STORING_DATA_POINTS under lookup type IEX_FEATURES.
Steps to Enable
You don't need to do anything to enable this feature.
Simplified Workflow Rules Configuration
Use the Simplified Workflow Rules Configuration feature to create workflow rules using spreadsheets for Payables Invoice Approval and General Ledger Journal Approval workflows. Download the templates using the Manage Workflow Rules in Spreadsheet task to create and manage workflow rules according to your approval policies.
This feature was introduced in update 18C. In addition to the existing features, the 22B update also lets you do the following:
- Create rules using advanced configurations (rule conditions using sum, aggregate, count, and others).
- Specify the type and date of currency conversion rates for rules that evaluate transaction amounts in a different currency.
The advanced options allows you to configure approval rules to meet the complex approval requirements, such as routing approval notification to the approver based on the sum of all distribution lines amount for a particular cost center entered on distribution lines.
Steps to Enable
You don't need to do anything to enable this feature.
Tips And Considerations
Follow these steps to use advanced configuration:
- Select the newly introduced 'Advanced Configuration' in attribute categories.
- Select one of the options from the list within advanced configuration.
- Enter the values using dialog box by clicking on the respective cells.
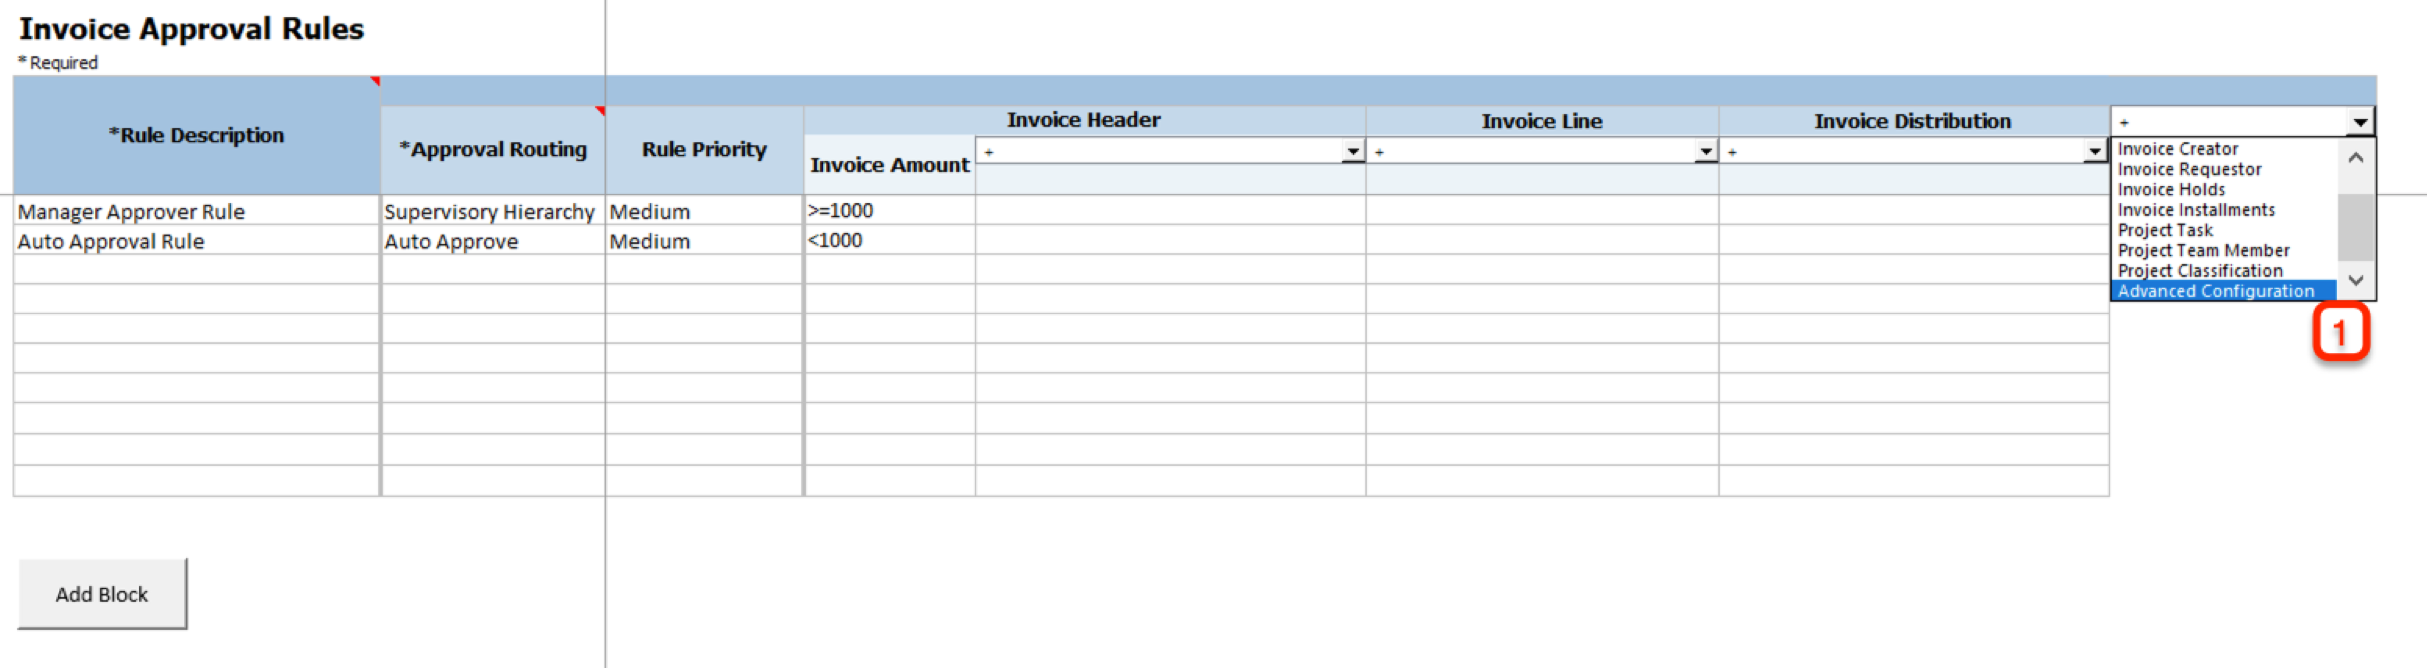
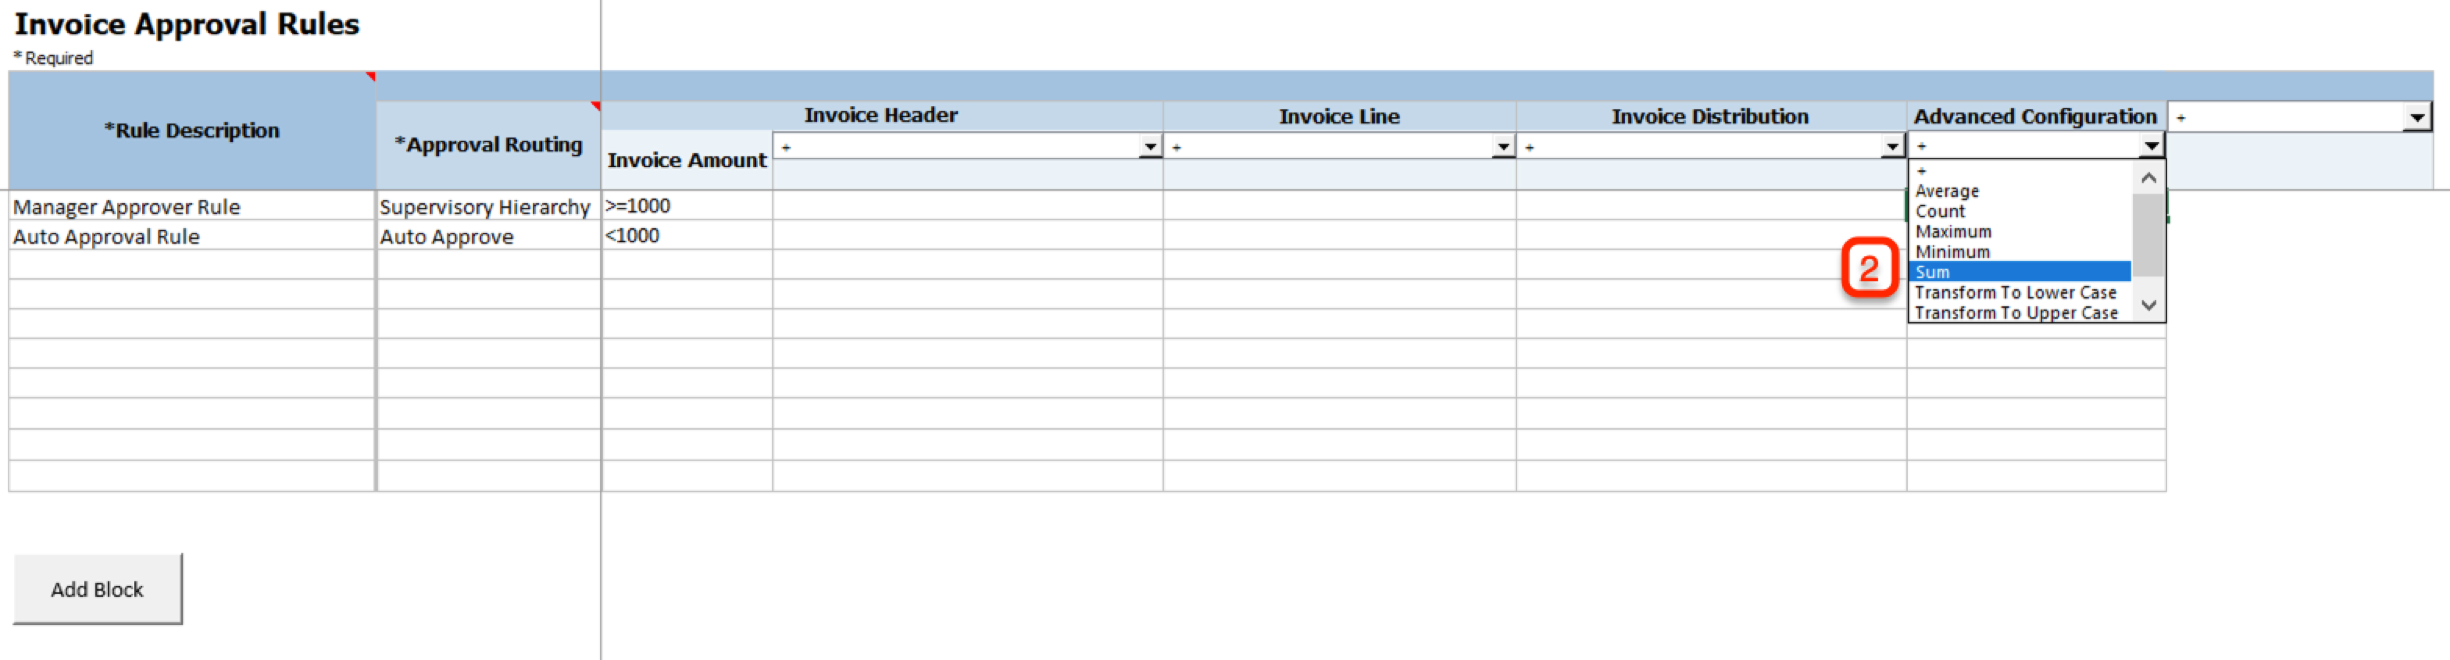
Select Advanced Configuration and Then Select an Option
You can select from the following options to configure advanced rules:
| Advanced Configuration Option |
Description |
| Count |
Returns the total number of data items such as Invoice Lines, Invoice Distributions etc. |
| Sum |
Returns the total of all the values of the selected attribute. |
| Maximum |
Returns the largest value in a set of values of the selected attribute. |
| Minimum |
Returns the smallest number in a set of values of the selected attribute. |
| Average |
Returns the average of all the values of the selected attribute. |
| Transform to Uppercase |
Converts the text in the attribute to upper case. |
| Transform to Lowercase |
Converts the text in the attribute to lower case. |
| Trim White Spaces |
Removes white spaces and rearranges the text in the attribute. |
Example using SUM:
For cost center 110, Approver A is authorized to approve when the total for cost center is less than or equal to $1000 and Approver B is authorized to approve when the total for cost center is above $1000.

Enter Values for SUM
Using No Case Where:
In specific cases, you can use the 'no case where' pattern with COUNT option by setting the value as '0' or '= 0'. This lets you check that a selected data item doesn’t have a count of 0. For example, you can validate that none of the Distributions contain Cost Center as 520 or no Lines cross an amount limit.
Additional rule evaluation currency conversion options:
When defining rule evaluation currencies, you can now also provide these values for accurate calculation of currency conversion rate:
- Conversion Date
- Conversion Rate Type
The business requirement in the following example is to configure approval rules based on the invoice amount limit in functional currency always which is ‘GBP’. Invoice amount has to be converted into GBP using the invoice creation date as currency conversion date and currency conversion type "Spot".
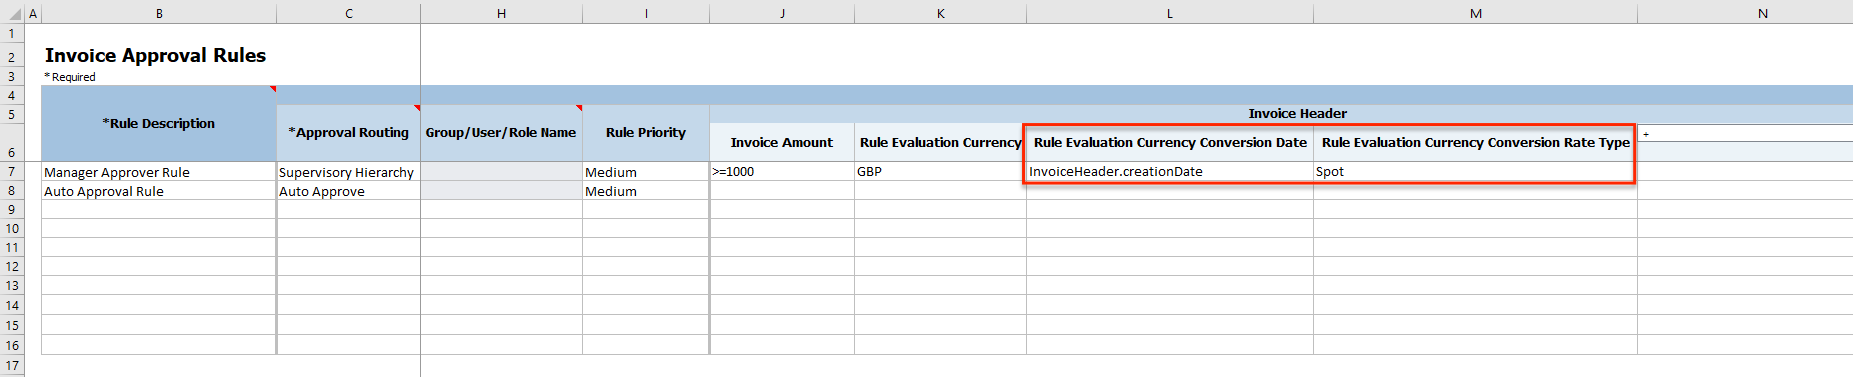
Enter Date & Rate Type Values in Rules with Currency Conversion Evaluation
Key Resources
- For an overview of the Simplified Workflow Rules Configuration feature, refer to the Manage Workflow Rules Using a Spreadsheet topic on the Oracle Help Center.
Role Information
- To use simplified workflow rules configuration, you need this role:
- Financial Application Administrator
Use the Workflow Transaction Console to proactively monitor all workflow tasks and resolve the exceptions for these workflows:
- Invoice Approval
- Expense Approval
- Journal Approval
- Invoice Hold Resolution
This feature was introduced in update 19D, with Invoice Hold Resolution workflow added in update 21B. In update 22C, this feature will be enabled by default for all customers.
When this feature is enabled, users will continue to see the following statuses on the transactions, even when the approval process fails for the transaction.
| Workflow Name | Workflow Transaction Status |
|---|---|
| Invoice Approval | Initiated |
| Expense Approval | Pending manager approval or Pending individual approval |
| Journal Approval | In process |
If you have not enabled this feature, the following statuses are displayed for the transactions where the approval process failed.
| Workflow Name | Workflow Transaction Status |
|---|---|
| Invoice Approval | Rejected |
| Expense Approval | Required |
| Journal Approval | Saved |
In case of the Hold Resolution Workflow, there are no changes to the workflow status of the transaction irrespective of whether this feature is enabled or not.
If you had already enabled this feature and then decided to opt out, this feature will not be re-enabled for you in update 22C.
For all failed workflow transactions, the workflow administrator or workflow submitter of the transaction receives an email notification for the error. Workflow administrators must review all failed transactions and the failure causes on the Workflow Transaction Console page and take appropriate action.
You can find additional details for this feature in the 19D release notes and help center documentation.
Steps to Enable
Use the Opt In UI to enable this feature. For instructions, refer to the Optional Uptake of New Features section of this document.
Offering: Financials
This feature has been enabled by default for new customers from update 19D onwards.
From 22C update, this feature will be enabled by default for upgraded customers as well.
You still have the option to opt out of using this feature. However, we strongly recommend that you plan for the uptake of this feature. If you wish to opt out of using the feature, follow these steps:
-
Click the Navigator, and then click New Features (under the My Enterprise heading).
-
On the Features Overview page, go to the Available Features tab.
-
Select the Workflow Transaction Console feature and click on the Enabled icon.
-
On the Edit Features page, deselect the Enable option for the feature or feature choices as required and then click Done.
Tips And Considerations
To display only financial-related tasks in the Workflow Transaction Console, enable the transaction security feature by using these steps:
-
Go to Navigator > Setup and Maintenance > Manage Enterprise HCM Information.
-
Click Edit > Correct.
-
In the Transaction Console Information section, select Enable Transaction Security.
Role Information
- Financial Application Administrator
Different Tax Exception and Tax Exemption Source Taxes
Apply tax exception and tax exemption derived from different source taxes to a related tax of the same regime. This helps reduce the setup and ongoing maintenance of the tax setup, and improve run-time performance during tax calculation.
Customers in the US (and countries like Brazil, Argentina, Colombia) with nexus in multiple states/provinces and needing to use Product Fiscal Classification to determine the tax rate that applies can define Tax Exceptions by Product Fiscal Classifications as an alternative to tax rate determination rules that are based on Product Fiscal Classification codes. This avoids maintaining too many tax rules/conditions for changes in tax rates and new states. For example, even if the customers leverage Tax Exceptions by Product Fiscal Classifications, the sheer number of required jurisdictions puts a burden on configuration, maintainability, and performance. In almost all cases, each category treatment is different only by state, not by each county, city, and so on. Hence, it is required for users to specify the exceptions for the state level. The Tax engine should pick up the exception for the lower-level jurisdictions from the state level tax.
Using this feature, you can derive the Tax Exception rate for lower-level jurisdictions by using the Tax Exception Source Tax specified at the Tax level. For example, users can specify the Tax Exception Source Tax as State for the county tax. If this is done, the Tax engine will use the exception derived for the state tax for the current transaction line and apply it for the tax line for the county tax. You can also define Tax exception based on both Product category and Inventory Linked Product Fiscal Classification, only once for each of the higher jurisdiction level taxes, and it will be applicable for all lower jurisdiction level taxes.
Countries like the US have tens of thousands of jurisdictions, and the tax rates, whether exempt/zero-rated or others, can vary from state to state for each product fiscal classification code. This feature will ensure that the tax rates can be applied to transactions with a minimum configuration, which will avoid performance issues and maintenance overhead.
If there is any change to the Tax rate or the inclusion of new states, this feature helps users to implement the minimum changes necessary to the Tax exception setups. Users no longer need to create new Tax Rules or change the conditions, reducing overall maintenance.
Steps to Enable
To use this feature, assign the source tax to a lower level tax using the following steps:
- Navigator -> Setup and Maintenance Task - Manage Taxes.
- Search the Tax and go to Control and Defaults.
- Check "Use tax exceptions from an existing tax".
- Provide Source Tax in "Tax Exceptions Source" field

- Save and Close.
NOTE: You can only find these fields on the Create/Edit Tax page. These fields are not available when you create tax using other methods such as rapid setup spreadsheets and setup services.
- Navigator -> Setup and Maintenance Task - Manage Tax Exceptions.
- Create a tax exception for the source tax based on Product Fiscal Classification.

Tips And Considerations
- To apply the tax exception to lower tax from source tax, we also need to have both taxes applicable to the transaction. This will ensure that the correct tax exception against the source tax and jurisdiction is picked up while calculating lower level tax amount.
- The compounding precedence of source tax should be lower than the compounding precedence of lower tax.
- If an exception is defined at a lower level, it will take precedence. If not found engine will search for source tax exception.
- If no source tax is applicable during tax calculation, the engine will consider it as no exception from source tax.
- If the exception type from source tax is ‘Special Rate’, it is not applied to the lower level tax.
Budgetary Control Analysis Report Enhancements
Use the Budgetary Control Analysis Report to display budget transactions that update budget balances for control budgets with a control level of None as budget balance activities.
The Budget Entry Classification for Initial or Adjustment Budget Balance using Spreadsheet and Budget Transfer feature opt in impacts the records shown in the Balance Activity Detail region. Enable this feature to display both initial and adjustment budget balance activities in the Balance Activity Detail region.
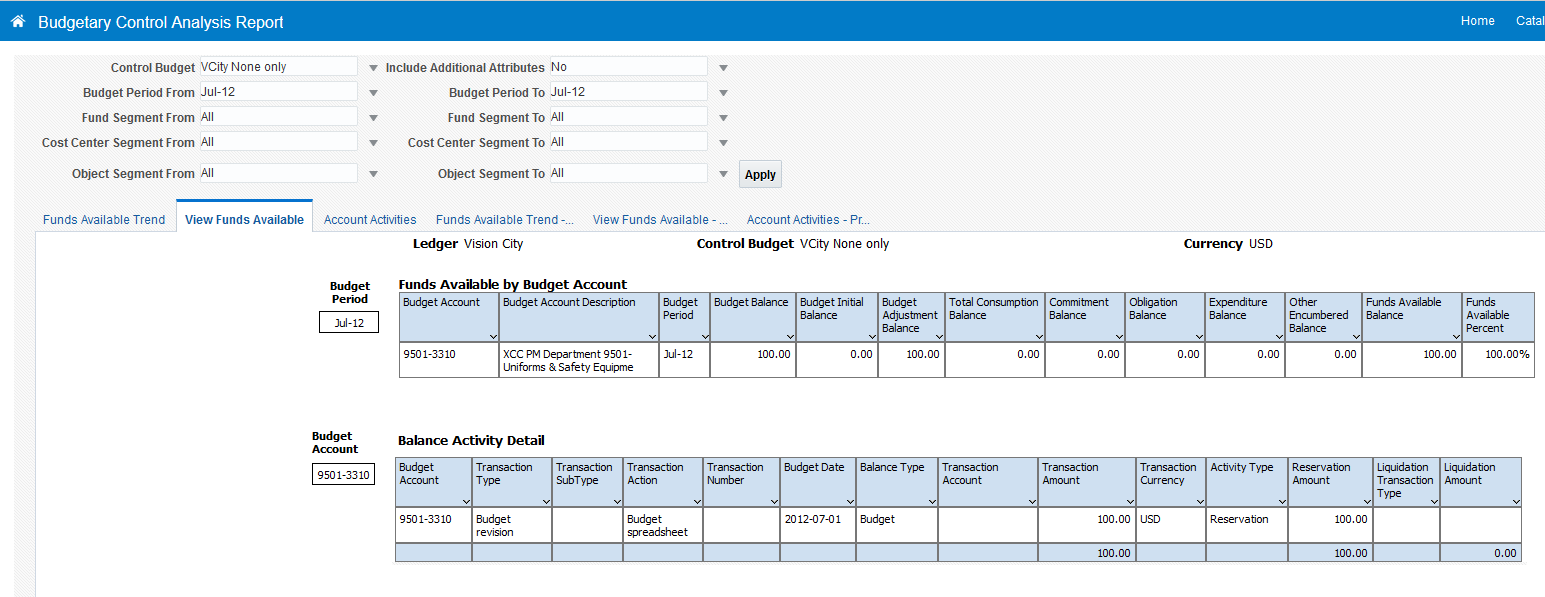
Budgetary Control Analysis Report
Steps to Enable
You don't need to do anything to enable this feature.
Tips And Considerations
For custom reports using the Budgetary Control Analysis Data Model, there is a change in the control level code field values for control budgets with a control level of None at the header.
The control level code will display:
- NONE for budget balance activity records created prior to 22B
- TRACK for budget balance activity records created starting in 22B
NOTE: The shipped Budgetary Control Analysis Report doesn’t show the control level field.
Key Resources
- Budget Balance Classifications in Using Financials for the Public Sector
Carry Forward Open Purchase Orders for Budgetary Controlled Sponsored Projects
Use the Carry Forward Open Purchase Orders process to move purchase orders associated with budgetary controlled sponsored projects from one budget year to another. The process automatically updates the budget date to the corresponding budget year for these purchase orders.
Budget year-end processing now supports sponsored and non-sponsored project.
The Carry Forward Open Purchase Order process will automatically move these purchase orders to the new budget year. Run the process in the Draft mode to review which purchase orders will be automatically carried forward and then choose to let the system process them. You can also manually update the purchase orders that need additional attention.
Steps to Enable
You don't need to do anything to enable this feature.
Tips And Considerations
- There is no impact on burden amounts as the expenditure item date isn’t changed. The Carry Forward Open Purchase Orders process updates only the purchase order budget date. To update expenditure item date also, review and manually update the purchase order.
- Project control budget changes are centralized in Project Portfolio Management. Budget adjustments created automatically for chart of account-based control budgets are not created automatically for project control budgets.
- If a budget adjustment is required for a project, use the following report information to update the budget balance for the project control budget by creating and baselining a new project budget version in Project Portfolio Management:·
- Not Attempted Budget Entries Details layout of the Carry Forward Purchase Order
Key Resources
- Managing Budgetary Control Carry Forward support note 2705986.1
- This feature originated from the Idea Labs on Oracle Customer Connect: PO Obligation Carry Forward Job does not carry forward PO's with Project Data
OTBI Drilldown to Review Budgetary Control Transactions
Drill down from Oracle Transactional Business Intelligence (OTBI) to the Review Budgetary Control Transactions page. Add an action link on a column, such as control budget account, to enable the drilldown using a deep link. A deep link is a URL to open a page without navigating through the application menu structure. Budget managers can easily navigate back and forth from the analysis to the application to review details.
Provide budget managers with direct access to the details of the underlying transactions that make up the budgetary control balance.
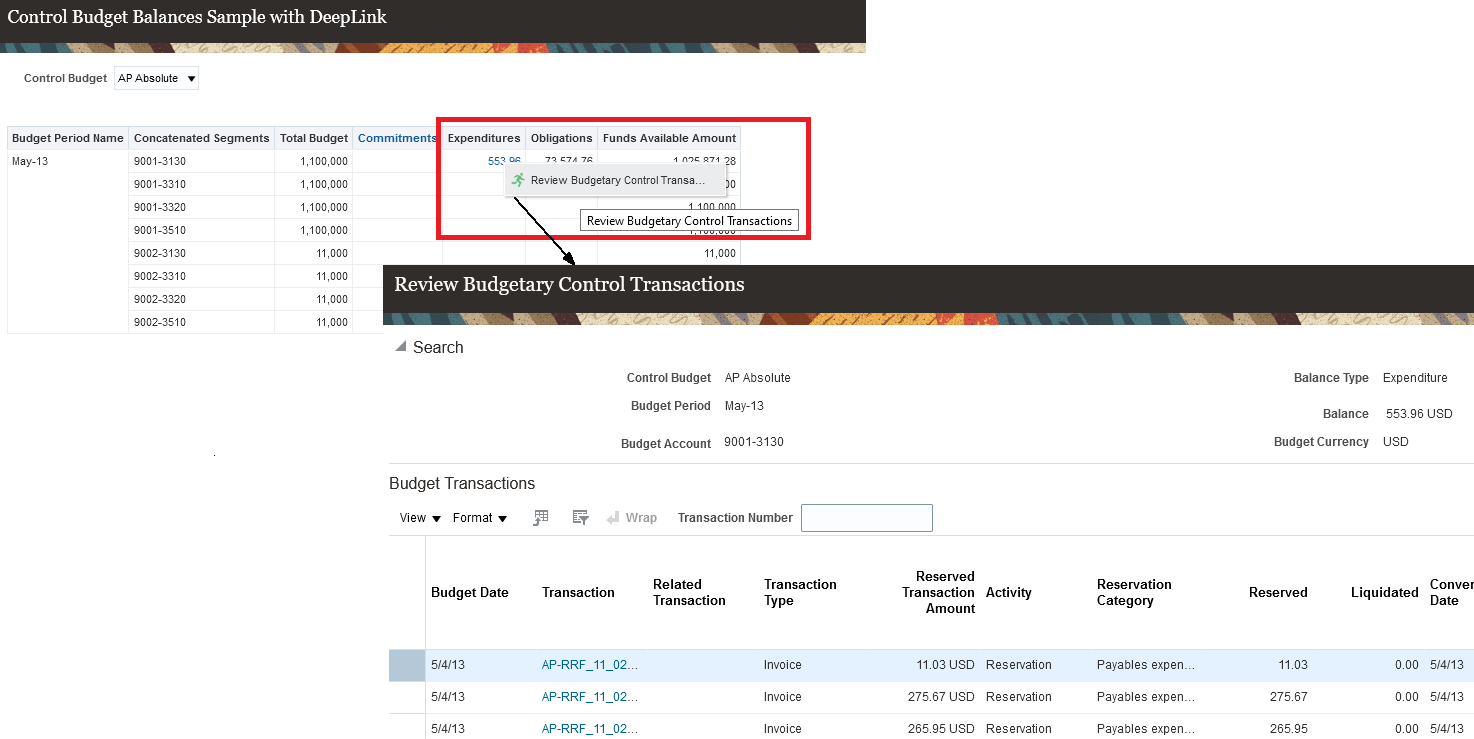
Drill Down from OTBI Report to Review Budgetary Control Transactions
Steps to Enable
You don't need to do anything to enable this feature.
Tips And Considerations
-
A sample report called Control Budget Balances Sample with Deep Link is available for download on Customer Connect.
Key Resources
-
Budgetary Control Balances OTBI with Deep Link Sample Report in Oracle Customer Connect
-
Balances Real Time Subject Area of Budgetary Control in Using Financials for the Public Sector
- For more information on other deep links available for Financials see this document:
- How to Drill down to Fusion Financial Applications Transactions from OTBI ERP Reports. Support document 2603149.1
-
This feature originated from the Idea Labs on Oracle Customer Connect: Need deep link into Review Budgetary Control Transactions
Role Information
- Budget manager role is needed to access the Review Budgetary Control Transaction page.
General Ledger Account Details Report Data Model Changes
The data model for the General Ledger Account Details report is enhanced to include additional columns. The new additional columns provide more information about the periodic journal activity for each general ledger account to reconcile beginning and ending account balances.
NOTE: This data model change does not impact the existing report layout. The new additional columns are only viewable in the CSV output and not in the other report delivery output formats (PDF, Excel, HTML).
Here are the new GL balance-related columns that were added to the data model:
| Column |
Description |
| EFFECTIVE_PERIOD_NUM |
Denormalized period number (PERIOD_YEAR*10000 + PERIOD_NUM). |
| ACCOUNT_VALUE | Account segment value. |
| COST_CENTER_VALUE |
Cost center segment value. |
| INTERCOMPANY_SEGMENT_VALUE |
Intercompany segment value. |
| LEGAL_ENTITY_ID |
Legal entity identifier. |
| LEGAL_ENTITY_NAME |
Legal entity name. |
| LE_ADDRESS_LINE_1 |
Legal entity address line 1. |
| LE_ADDRESS_LINE_2 |
Legal entity address line 2. |
| LE_ADDRESS_LINE_3 |
Legal entity address line 3. |
| LE_CITY |
Legal entity city name. |
| LE_POSTAL_CODE |
Legal entity postal code. |
| LE_REGISTRATION_NUMBER |
Legal entity registration number. |
| LE_ACTIVITY_CODE |
Legal entity activity code. |
| ACCT_DESC |
Journal account description. |
| COST_CENTER_DESC |
Cost center segment description. |
| ACCT_LEVEL10_VALUE |
Not currently used. For future use only. |
| ACCT_LEVEL10_VALUE_DESC |
Not currently used. For future use only. |
| ACCT_LEVEL9_VALUE |
Not currently used. For future use only. |
| ACCT_LEVEL9_VALUE_DESC |
Not currently used. For future use only. |
| ACCT_LEVEL8_VALUE |
Not currently used. For future use only. |
| ACCT_LEVEL8_VALUE_DESC |
Not currently used. For future use only. |
| ACCT_LEVEL7_VALUE |
Not currently used. For future use only. |
| ACCT_LEVEL7_VALUE_DESC |
Not currently used. For future use only. |
| ACCT_LEVEL6_VALUE |
Not currently used. For future use only. |
| ACCT_LEVEL6_VALUE_DESC |
Not currently used. For future use only. |
| ACCT_LEVEL5_VALUE |
Not currently used. For future use only. |
| ACCT_LEVEL5_VALUE_DESC |
Not currently used. For future use only. |
| ACCT_LEVEL4_VALUE |
Not currently used. For future use only. |
| ACCT_LEVEL4_VALUE_DESC |
Not currently used. For future use only. |
| ACCT_LEVEL3_VALUE |
Not currently used. For future use only. |
| ACCT_LEVEL3_VALUE_DESC |
Not currently used. For future use only. |
| ACCT_LEVEL2_VALUE |
Not currently used. For future use only. |
| ACCT_LEVEL2_VALUE_DESC |
Not currently used. For future use only. |
| ACCT_LEVEL1_VALUE |
Not currently used. For future use only. |
| ACCT_LEVEL1_VALUE_DESC |
Not currently used. For future use only. |
Here are the new Journal-related columns that were added to the data model:
Column
Description
JRNL_HEADER_ID
Journal entry header identifier.
JRNL_CURRENCY_CODE
Journal entry currency.
SUB_DOC_SEQ_ID
Subledger document sequence Identifier.
ACCT_VALUE_IN
Journal Account value.
JGZZ_RECON_STATUS
Reconciliation status.
BATCH_PERIOD
Accounting period.
CODE_COMBIINATION_ID
Account combination identifier.
JRNL_EFFECTIVE_DATE
Journal entry default effective date.
CP_START_DATE
Not currently used. For future use only.
CP_END_DATE
Not currently used. For future use only.
CHART_OF_ACCOUNTS_ID
Key flexfield structure instance identifier.
ACCT_LEVEL_PARAM
Not currently used. For future use only.
PAGE_NUM_START_PARAM
Not currently used. For future use only.
The General Ledger Account Details report data model enhancement provides additional GL balance and journal information in the CSV output for better reporting and audit purposes.
Steps to Enable
You don't need to do anything to enable this feature.
Tips And Considerations
The existing display order of the columns in the CSV output has been changed with the addition of the new columns. If you use the CSV output for any integrations, review the revised columns order display in the output for any potential impact.
Journals Report Data Model Changes
The data model for the Journals report is enhanced to include additional columns. View more information about your batches, journals, and journal lines when you export the report to the CSV format.
NOTE: This data model change does not impact the existing report layout. The new additional columns are only viewable in the CSV output and not in the other report delivery output formats (PDF, Excel, HTML).
Here are the new batch-related columns:
| Column | Description |
|---|---|
| BATCH_ID |
Journal entry batch identifier. |
| BATCH_POSTED_STATUS |
Journal entry batch status. |
| BATCH_DESC |
Journal entry batch description. |
Here are the new journal-related columns:
| Column | Description |
|---|---|
| HEADER_ID |
Journal entry header identifier. |
| PERIOD_NAME |
Accounting period type. |
| JRNL_ACCT_SEQ_NAME |
Journal accounting sequence name. |
| JRNL_ACCT_SEQ_VERSION |
Journal accounting sequence version. |
| JRNL_ACCT_SEQ_NUM |
Journal accounting sequence number. |
| JRNL_DOC_SEQ_NAME |
Journal document sequence name. |
| JRNL_DOC_SEQ_NUM |
Sequential numbering sequence. |
| JRNL_REP_SEQ_NUM |
Journal reporting sequence number. |
| JRNL_REP_SEQ_VERSION |
Journal reporting sequence version. |
| JRNL_REP_SEQ_NAME |
Journal reporting sequence name. |
| JRNL_EFFECTIVE_DATE |
Journal entry default effective date. |
| JRNL_DESC |
User entered description of the journal header. |
Here are the new journal line-related columns:
| Column | Description |
|---|---|
| REFERENCE1 |
Sequential numbering sequence. |
| ACCT_DESC |
Account description. |
| BALANCING_SEGMENT_DESC |
Balancing segment description. |
| NATURAL_ACCOUNT_DESC |
Natural account segment description. |
| COST_CENTER_DESC |
Cost center segment description. |
| MANAGEMENT_SEGMENT_DESC |
Management segment description. |
| INTERCOMPANY_SEGMENT_DESC |
Intercompany segment description. |
| GL_SECONDARY_DESC |
Secondary balancing segment description. |
| ACCT_VALUE |
Account segment value. |
| BALANCING_SEGMENT_VALUE |
Balancing segment value. |
| COST_CENTER_VALUE |
Cost center segment value. |
| MANAGEMENT_SEGMENT_VALUE |
Management segment value. |
| INTERCOMPANY_SEG_VAL |
Intercompany segment value. |
| SECONDARY_TRACK_SEG_VAL |
Secondary balancing segment value. |
| LEGAL_ENTITY_ID |
Legal entity identifier. |
| LEGAL_ENTITY_NAME |
Legal entity name. |
| LE_ADDRESS_LINE_1 |
Legal entity address line 1. |
| LE_ADDRESS_LINE_2 |
Legal entity address line 2. |
| LE_ADDRESS_LINE_3 |
Legal entity address line 3. |
| LE_CITY |
Legal entity city name. |
| LE_POSTAL_CODE |
Legal entity postal code. |
| LE_REGISTRATION_NUMBER |
Legal entity registration number. |
| LE_ACTIVITY_CODE |
Legal entity activity code. |
Here are the new generic columns:
| Column | Description |
|---|---|
| CHART_OF_ACCOUNTS_ID |
Key flexfield structure instance. |
| PERIOD_TO_PARAM |
Not currently used. For future use only. |
| PAGE_NUM_START_PARAM |
Not currently used. For future use only. |
| DOC_SEQ_NAME_PARAM |
Not currently used. For future use only. |
| START_DOC_SEQ_NUM_PARAM |
Not currently used. For future use only. |
| END_DOC_SEQ_NUM_PARAM |
Not currently used. For future use only. |
| ACCT_SEQ_NAME_PARAM |
Not currently used. For future use only. |
| START_ACCT_SEQ_NUM_PARAM |
Not currently used. For future use only. |
| END_ACCT_SEQ_NUM_PARAM |
Not currently used. For future use only. |
| REP_SEQ_NAME_PARAM |
Not currently used. For future use only. |
| START_REP_SEQ_NUM_PARAM |
Not currently used. For future use only. |
| END_REP_SEQ_NUM_PARAM |
Not currently used. For future use only. |
| USER_JRNL_SRC_PARAM |
Not currently used. For future use only. |
| JRNL_CATEGORY_PARAM |
Not currently used. For future use only. |
| FILTER_CONDITIONS_ATT |
Not currently used. For future use only. |
| FILTER_CONDITIONS_OPT |
Not currently used. For future use only. |
| ACTUAL_FLAG |
Balance type (Actual, Budget, or Encumbrance). |
| LEDGER_ID |
Ledger unique identifier. |
| CONFIGURATION_ID |
Not currently used. For future use only. |
| ENVIRONMENT_CODE |
Not currently used. For future use only. |
Business Benefit:
The Journals report data model enhancement provides additional journal batch, header and line information columns in the CSV output for better reporting and audit purposes.
Steps to Enable
You don't need to do anything to enable this feature.
Tips And Considerations
The existing display order of the columns in the CSV output has been changed with the addition of the new columns. If you use the CSV output for any integrations, review the revised columns order display in the output for any potential impact.
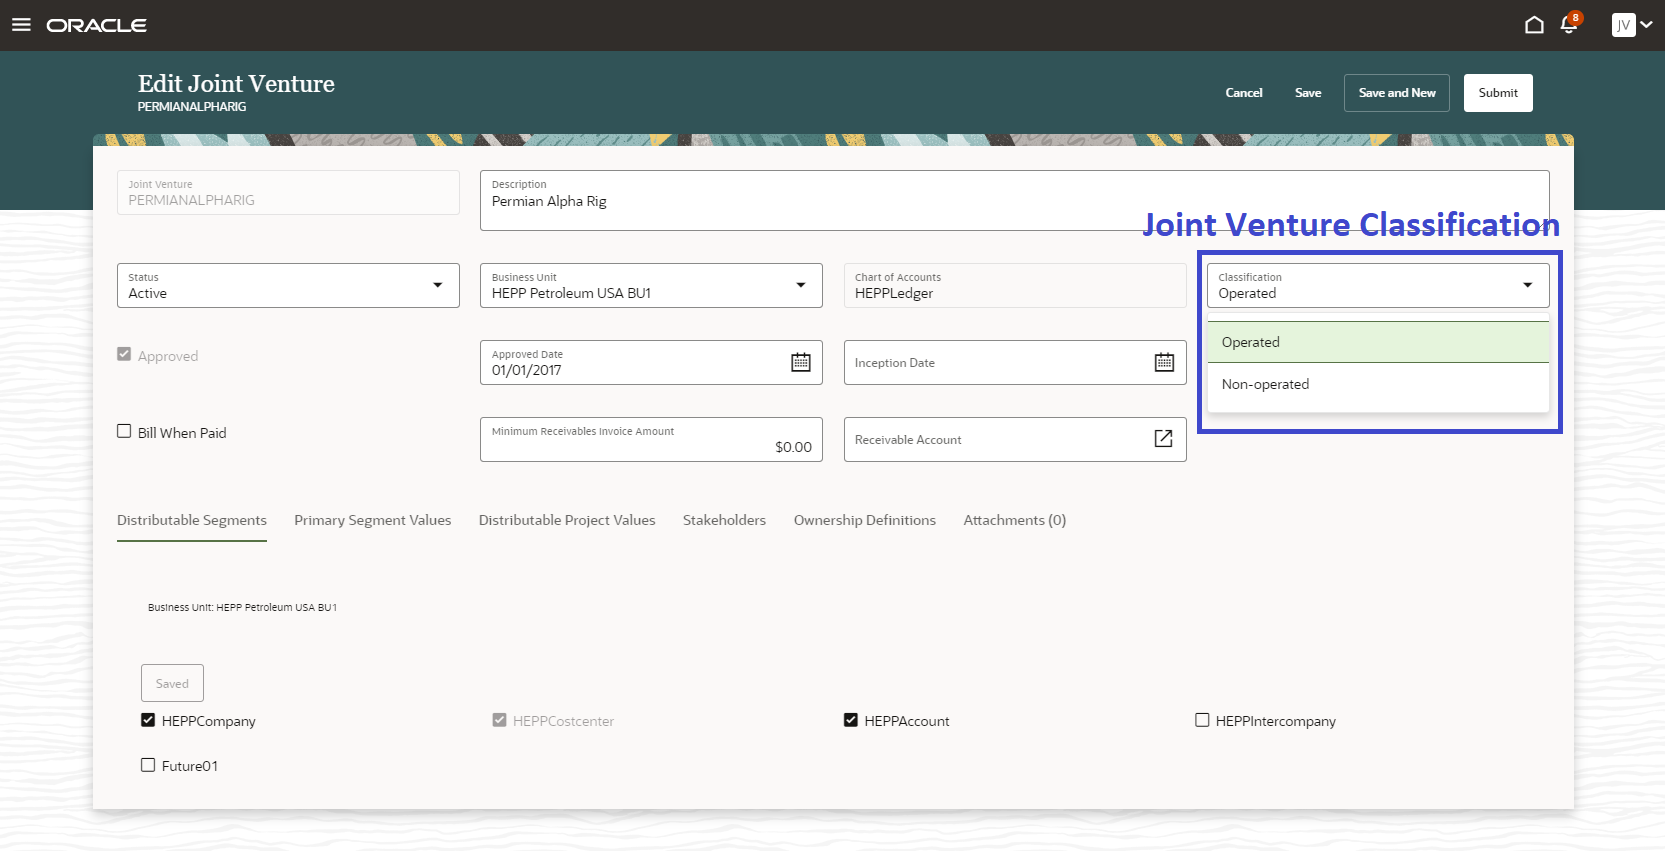
Classification of Operated and Non-Operated Joint Ventures
Identify joint ventures as Operated or Non-Operated ventures. This attribute enables users to identify their role in a joint venture.
Business Benefit:
The new classification is useful for reporting and auditing purposes.
Steps to Enable
You don't need to do anything to enable this feature.
Tips And Considerations
Ensure the appropriate classification is set up in the Joint Venture Definition for your joint ventures.
Key Resources
- For more information, refer to Implementing Joint Venture Management guide
Role Information
- Joint Venture Application Administrator
- Joint Venture Accountant
Joint Venture Distributions in Entered Currency
Distribute entered amounts on transactions during the joint venture distribution process.
Business benefits include:
- Distribution of both the accounted and entered amounts improves reporting and audit processes.
- Facilitates the creation of invoices or journal entries in the entered currency, saving time and reducing processing errors.
Steps to Enable
You don't need to do anything to enable this feature.
Tips And Considerations
The Entered Amount is never populated for overhead distributions because overhead is calculated from within Joint Venture Management.
Key Resources
- For more information, refer to Using Joint Venture Management guide.
Role Information
- Joint Venture Accountant
- Joint Venture Accounting Manager
Joint Venture Management Overhead Method - Percentage of Cost with Sliding Scale Option
Calculate overhead costs using a sliding scale based on incurred costs. Use the existing percentage of costs overhead method with a basis source of General Ledger and Subledger transactions and sliding scale option to specify percentages for the overhead calculation.
A sliding scale enables you to calculate overhead by applying different percentages to different portions of the total cost amount that you are basing the overhead calculation on.

Business benefits include:
- Conform to the joint operating agreement by ensuring accurate calculation and distribution of overhead and management fees to be billed to the joint venture partners.
- Minimize month-end processing and reduce potential errors caused by manual entry through the use of automated processes.
Steps to Enable
Use the Opt In UI to enable this feature. For instructions, refer to the Optional Uptake of New Features section of this document.
Offering: Financials
- Opt in to Joint Venture Overhead in Joint Venture Management.
- Access the task Manage Joint Venture Overhead Methods under the functional area Joint Venture Management.
- Create the overhead method with the following values for the attributes:
- Type - Percentage of cost
- Basis Source - General ledger and subledger transactions
- Enable the checkbox for “Use Sliding Scale”.
- Click “Edit Sliding Scale” and then enter the sliding scale thresholds.
Tips And Considerations
- In an overhead method, you must specify the partner account before the method can be activated. This partner account is used while creating the Receivables invoice to recoup the overhead costs from partners. Before you define the partner account on the overhead method, ensure that the GL Code Combination for the partner account has been defined using Manage Account Combinations.
- Use Joint Venture Account Sets to identify the accounts to be included from the General Ledger and Subledger Accounting based upon the joint operating agreement terms for the overhead calculation.
- To enable Inception to Period calculations, make sure that the inception date for the joint venture is specified in the joint venture definition.
Key Resources
-
Watch Joint Venture Overhead Enhancements Readiness Training.
- For more information, refer to
- Implementing Joint Venture Management guide and
- Using Joint Venture Management guide.
Role Information
- Joint Venture Application Administrator
- Joint Venture Accountant
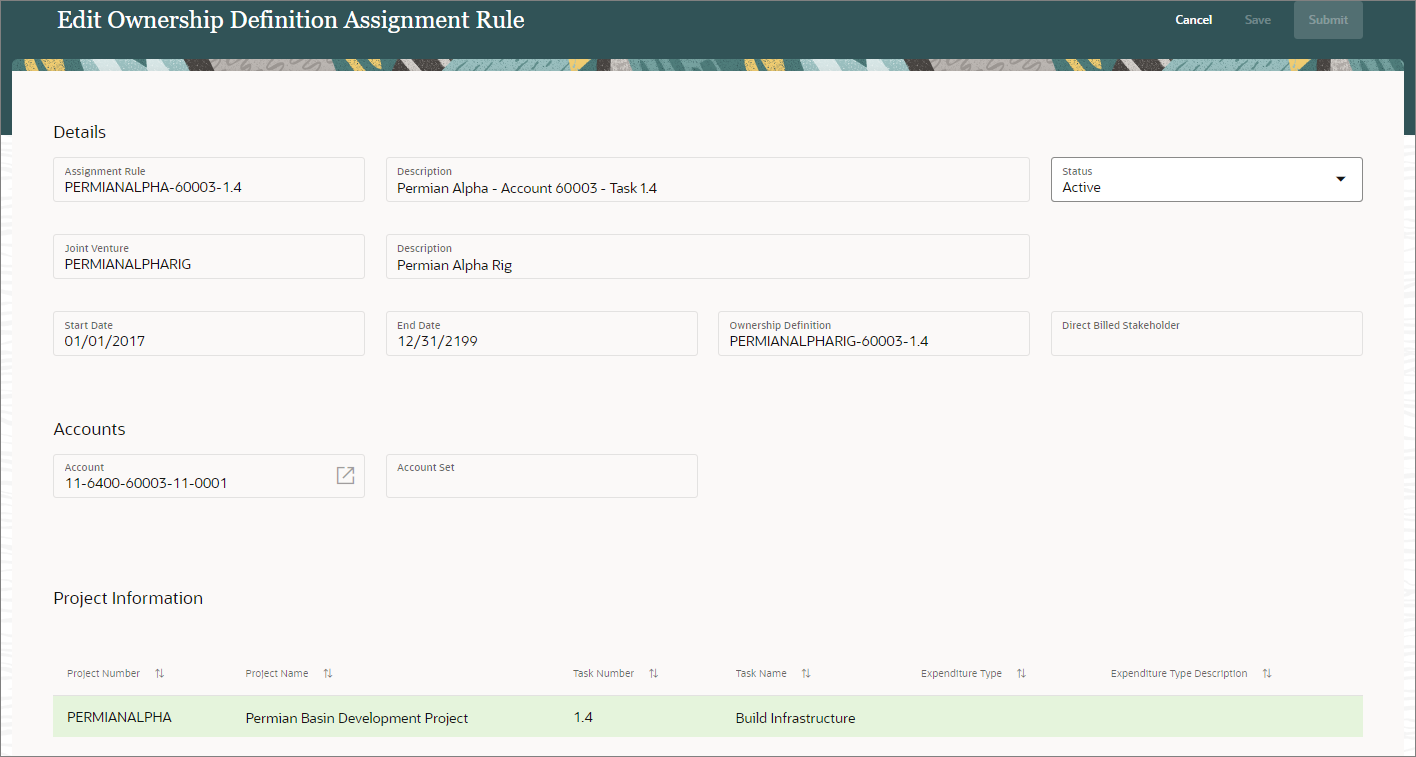
Joint Venture Ownership Definition and Direct Billed Stakeholder Assignment Rules
Assign an ownership definition or a direct-billed stakeholder to joint venture transactions using a configuration based on the transaction's account and project information. Use the configuration to enforce the ownership percentage requirements stated in the joint operating agreement for all accounts that will be distributed to your partners.
Watch a Setup Demo.
Business Benefit:
Automatically conform to the specifications for partner splits for distributed transactions in the joint operating agreement.
Watch a Demo.
Steps to Enable
You don't need to do anything to enable this feature.
Tips And Considerations
- Carefully plan the assignment rules based upon the joint operating agreement.
- Create Joint Venture Account Sets to identify the accounts for rules that will apply to multiple accounts.
Key Resources
- For more information, refer to
- Implementing Joint Venture Management guide
- Using Joint Venture Management guide.
Role Information
- Joint Venture Application Administrator
- Joint Venture Accountant
Joint Venture Partner Contribution Requests
Create and process joint venture partner contribution requests based on the frequency of processing, requested amount, ownership definition, and direct billed stakeholder. Users can select to not specify a requested amount and instead configure the request to calculate the requested amount during processing based on distributions that are available to process.
Business Benefit:
This solution will save time and reduce errors associated with manual creation of partner contributions.
Watch a Demo.
Steps to Enable
You don't need to do anything to enable this feature.
Tips And Considerations
- Carefully plan the partner contribution requests frequency and the process schedule for the Joint Venture Partner Contributions ESS job to ensure all partner contributions are created per their frequency.
- Create all joint venture distributions before processing partner contribution requests that calculate the amount based upon open distributions.
Key Resources
- For more information, refer to
- Implementing Joint Venture Management guide
- Using Joint Venture Management guide.
Role Information
- Joint Venture Accountant
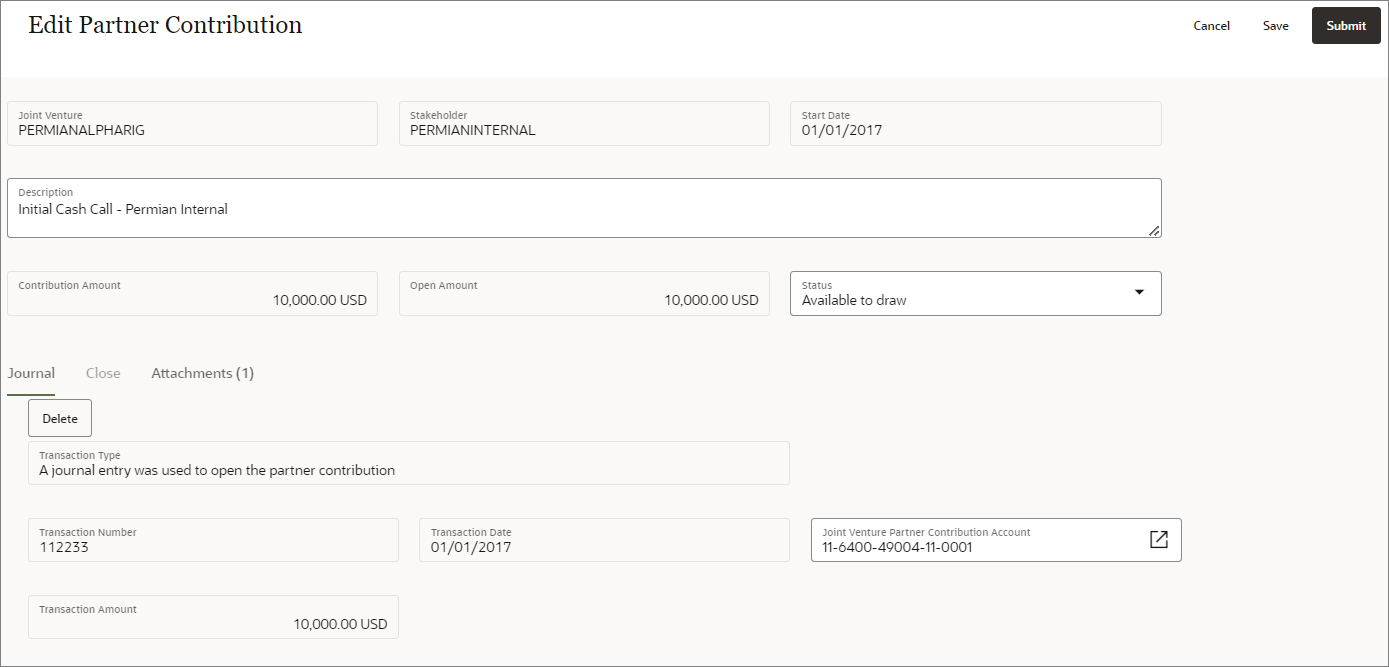
Partner Contributions for Internal Stakeholders
Enable the creation of partner contributions for internal stakeholders and manually add a reference to the journal entries associated with the contribution within Joint Venture Management.
Business Benefit:
Including internal stakeholders in the partner contribution process saves time and reduces human errors associated with manual processes for creating partner contributions.
Watch a Demo.
Steps to Enable
You don't need to do anything to enable this feature.
Tips And Considerations
- Determine how the partner contribution for the internal partners will be requested.
- Partner contributions can support a reference to an invoice or a journal entry.
Key Resources
-
Watch Partner Contribution Management for Joint Ventures Update 20D Readiness Training
- Watch Joint Venture Subledger for Internal Transfers Update 20D Readiness Training
- For more information, refer to
- Implementing Joint Venture Management guide
- Using Joint Venture Management guide.
Role Information
- Joint Venture Accountant
Statistical Journal Entry Creation for Joint Venture Operational Measures
Record statistics for joint venture operations using Joint Venture Operational Measures. Use statistics, such as units of production, employee hours, and utility usage to support cost allocation during period close. This capability creates statistical journal entries based on operational measures using the Joint Venture subledger.
Business Benefit:
Automatic creation of statistical journal entries based on operational measures improves the overall efficiency of the allocation process.
Watch a Demo.
Steps to Enable
You don't need to do anything to enable this feature.
Tips And Considerations
- Ensure that you have set up the appropriate Operational Measure Types for the measures that will be used to create statistical journal entries.
- Set up Subledger Accounting to ensure each operational measure type is directed to the appropriate account that will be used in your allocation processes.
Watch a Setup Demo.
Key Resources
- For more information, refer to
- Implementing Joint Venture Management guide
- Using Joint Venture Management guide.
Role Information
- Joint Venture Application Administrator
- Joint Venture Accountant
Transaction Date Default Configuration
Configure Joint Venture Management to either use the default transaction date or set the transaction to error if it is blank. Currently, it uses the accounting date as the transaction date if it cannot determine a date using supporting references for transactions originating from the General Ledger and Subledger Accounting.
With this enhancement, you can determine how Joint Venture Management handles the processing of transactions without a transaction date. You can configure the joint venture system options to:
- Use the effective date for transactions from the general ledger and the accounting date for transactions from subledger accounting.
- Use the system date for the transaction date.
- Leave the transaction date blank, which sets the transaction to an error status in the Joint Venture Transactions work area. This enables you to locate the transactions in error for troubleshooting purposes.
Business Benefit:
This option ensures that the recorded activity date that determines the ownership percentages to distribute transactions to joint venture partners conforms to the joint operating agreement.
Steps to Enable
- Access the task Manage Joint Venture System Options under the functional area Joint Venture Management.
- Select values for the Default GL Transaction Date and the Default SLA Transaction Date based upon your business needs.
Key Resources
- For more information, refer to
- Implementing Joint Venture Management guide
- Using Joint Venture Management guide.
Role Information
- Joint Venture Application Administrator
- Joint Venture Accountant
Manual Subledger Journal Transfer to General Ledger by Preparer
Transfer manual subledger journal entries to the general ledger by preparer while creating subledger journals using a spreadsheet or submitting the Post Subledger Journal Entries process. Manual journal entries created by different users are split into separate general ledger journal batches. This facilitates routing the journal batches to different approvers or reviewers based on the preparer. You can also choose to transfer all subledger journals, or exclude manual journal entries, while submitting the Post Subledger Journal Entries process.
On enabling this feature, the following changes are applied -
- When you create subledger journals using a spreadsheet with Completion Status as ‘Final and Transfer’ or ‘Final and Post’, eligible manual subledger journals created by the same user will be transferred to the general ledger. Manual subledger journals created by other users will not be transferred.
- Use the Journal Batch field to optionally enter text to use as a prefix to the General Ledger journal batch name when creating subledger journals using a spreadsheet.
- An additional parameter, Journal Entries to Transfer, would be displayed in the Post Subledger Journal Entries ESS Parameter submission window for users to select which subledger journal entries should be transferred -
- All - Selecting this option will allow continuing current behavior i.e. submit transfer for all subledger journals.
- All except manual journals - Selecting this option will exclude manual subledger journals from transferring to general ledger.
- Manual journals created by me - Selecting this option will only transfer manual subledger journals created by the current user.
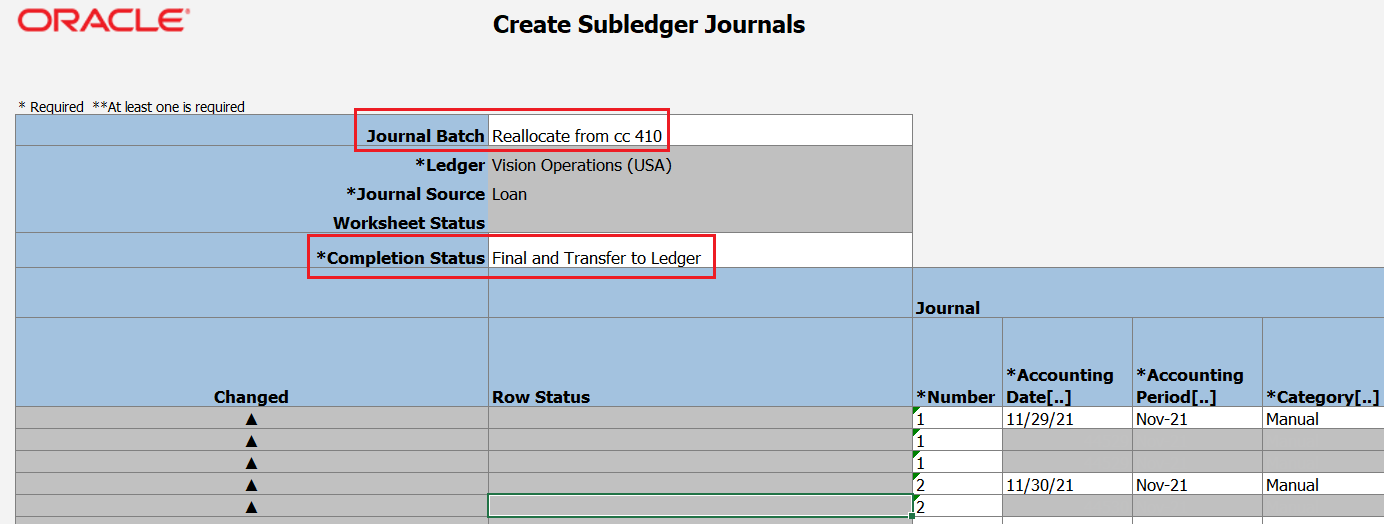
Entering a Journal Batch Prefix in Create Subledger Journals Spreadsheet
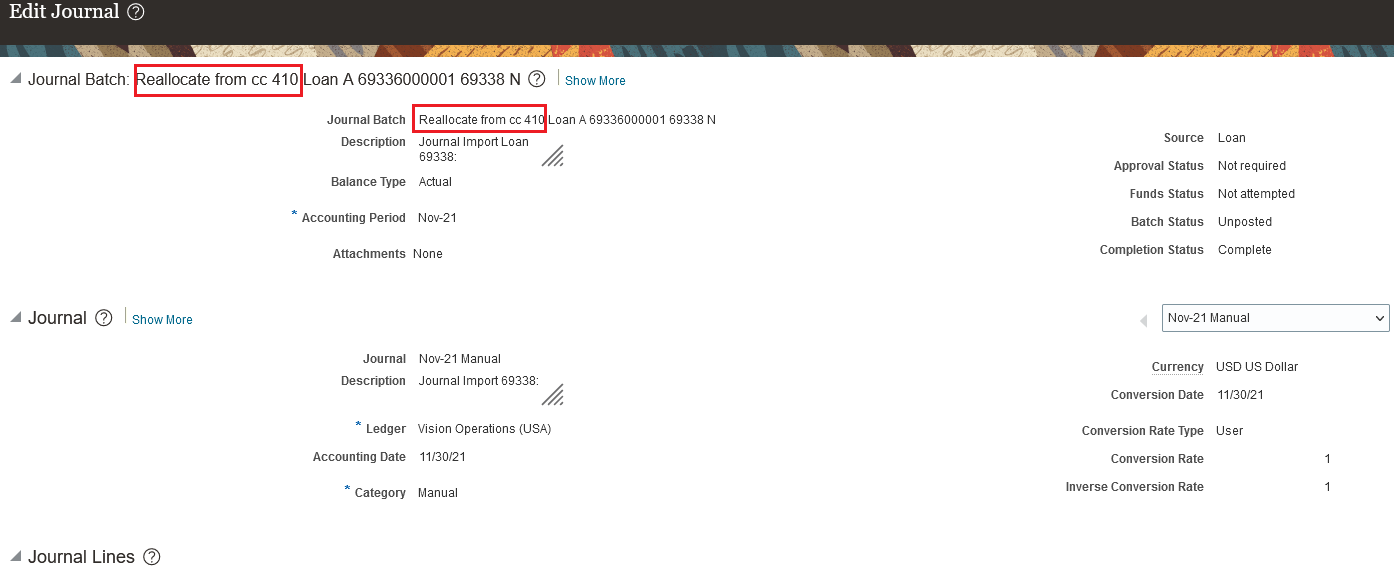
General Ledger Journal Batch Created with the Prefix Entered
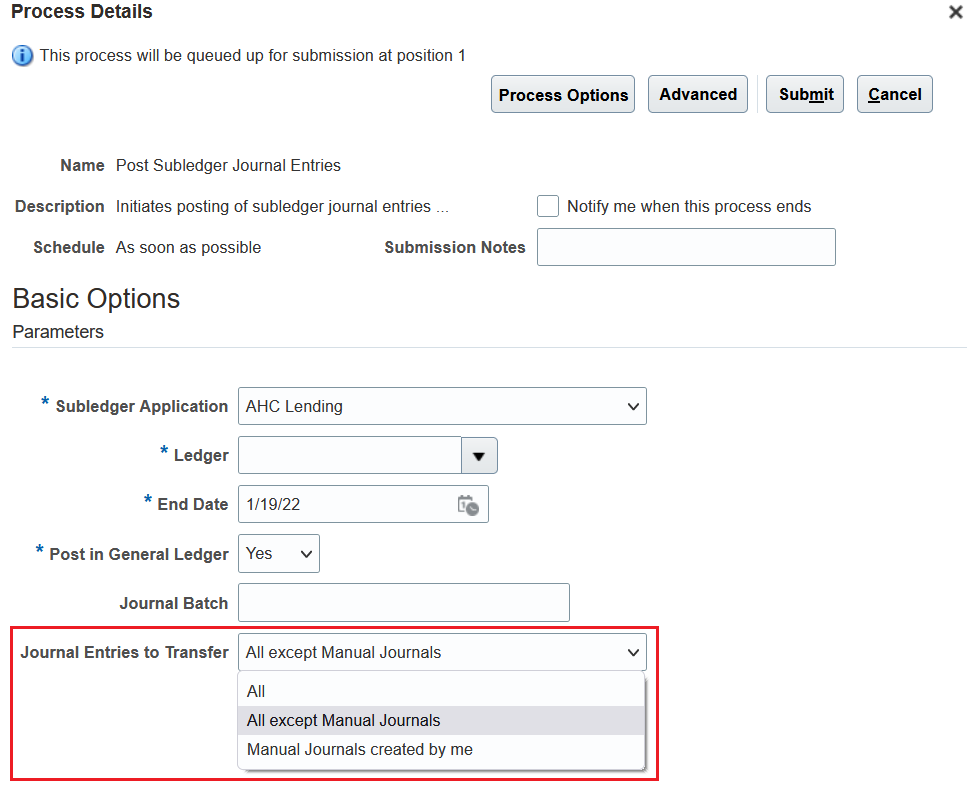
Selecting Journal Entries to Transfer in the Post Subledger Journal Entries Program
Business benefits include:
- Leverage general ledger journal approval workflow to review and approve subledger journals created for accounting hub subledgers.
- Improved user experience in tracing general ledger journal batches generated for manual subledger journals.
Steps to Enable
- Log in with a user having access to Setup pages. For example, User with Application Implementation Consultant role.
- Navigate to Fusion Setup and Maintenance page.
- Select Offering: Fusion Accounting Hub and Functional Area: Accounting Transformation.
- Click on the Task: Manage Subledger Accounting Lookups.
- Search the Lookup Type: ORA_XLA_PROMOTIONAL_OPTIONS and add a lookup code under it with the following details –
- Lookup Code: XLA_PROMO_32177682_ON
- Reference Data Set: Common Set
- Enabled: <Checked>
- Meaning: Transfer Accounting Hub Manual Journals to GL by Preparer
- Save the changes.
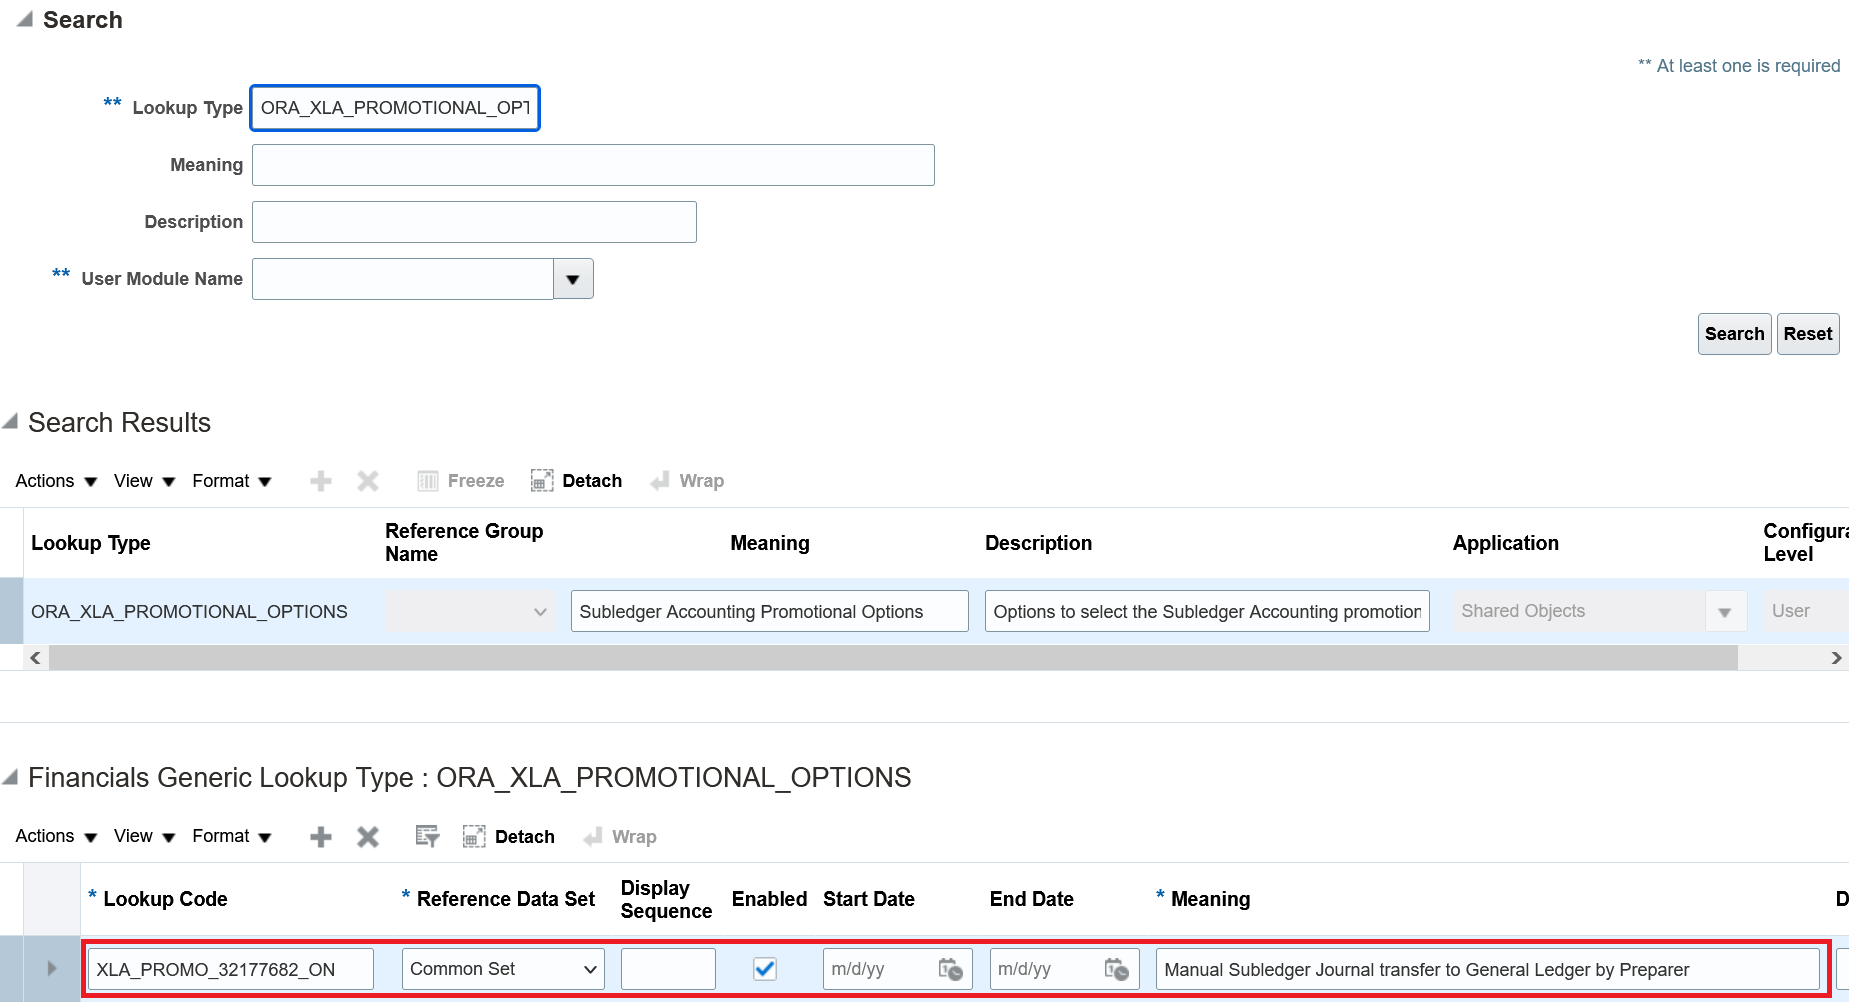
Lookup Code Setup to Enable the Feature
Tips And Considerations
- You can also create manual subledger journal entries using the Create Subledger Journal page and group them into one GL batch by posting them using the Post Subledger Journal Entries process. All manual adjustments entered through UI or spreadsheet will be grouped into one GL batch when a user selects ‘Manual Journals created by me’ in the Journal Entries to Transfer parameter.
- To group all accounting hub transactions which have not been transferred yet into one GL batch, you can account the transactions in Final status and then submit the Post Subledger Journal Entries ESS program with Journal Entries to Transfer set to ‘All except Manual Journals’.
NOTE: This option will not transfer any manual subledger journal entries to GL. It will not select eligible journals by the preparer.
- If a Journal Batch is not specified in the spreadsheet, or you’re using an old template, a system generated batch name will be assigned to the GL journal batch.
NOTE: You can't enter a Journal Batch exceeding 50 characters.
Role Information
No new roles/privileges are required to secure access to this feature.
Asset Operations from ERP Integrations REST Service
Create fixed asset transactions, such as additions, adjustments, retirements, or transfers, as asset REST operations.
Submit a REST payload with the ERP Integrations REST service endpoint using the Post method for any of the following Asset life cycle operations:
- Create assets.
- Adjust financial details or units of your assets.
- Retire assets or reinstate recent retirements.
- Capitalize your construction-in-process (CIP) assets or reverse recent CIP capitalizations.
- Reclassify assets.
- Transfer assets from your cost center, location or employee to others.
- Perform descriptive detail updates.
- Update mass additions or get the details of your mass additions.
- Perform unplanned depreciations.
- Perform source line transfers.
- View asset details such as book information, source line attributes or descriptive details.
- View asset transaction history or retirement history.
- View asset details, such as book information, source line attributes or descriptive details.
Business benefits include:
- Simpler, scalable option to manage your fixed assets from REST clients.
- Integrate asset operations into your own asset cycle management framework.
- Enhance your existing asset life cycle framework to add additional business validations.
Steps to Enable
Review the REST service definition in the REST API guides, available from the Oracle Help Center > your apps service area of interest > REST API. If you're new to Oracle's REST services you may want to begin with the Quick Start section.
This feature is automatically enabled from 22B.
Key Resources
- Refer to the Use Cases section of the REST API for Oracle Financials Cloud Guide for 22B for use cases.
Role Information
- You do not need any new role or privilege access to set up and use this feature.
Use the Lease Amendment Import utility to simplify contract changes. The Lease Amendment Import utility removes or reduces the need for manual intervention during the lease amendment process. Amendments include scope increases, scope decreases, non-financial changes, and changes to the borrowing rate. Import a batch of lease amendments directly into the desired status: Draft, Validated, Complete, or Booked.
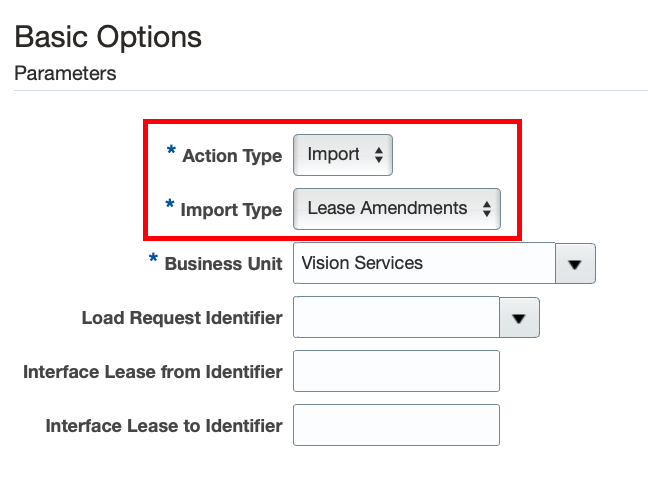
Lease Amendment Import
Business benefits include:
- Reduce data entry effort with a lease amendment import.
- Streamline business processes by populating Lease Accounting amendment import from originating systems.
Steps to Enable
Use the Opt In UI to enable this feature. For instructions, refer to the Optional Uptake of New Features section of this document.
Offering: Financials
Tips And Considerations
The steps to import amendments follow standard import procedures.
- Create leases in an FBDI spreadsheet template. This method is useful when there is a large volume of lease amendments. Help text exists for each column to explain what to enter, what is required, and the field type.
- The FBDI spreadsheet converts the data to a zip file for the File Import process. You then load the file to the lease interface table. The final step is to run the Import Lease process with the import type of Lease Amendments. The Lease Amendments type imports the lease modifications from the interface table to the Lease Accounting module. Amendments are visible in the Lease Accounting module after this process completes.
- The Lease Dashboard includes exceptions or errors.
Key Resources
- To access the Lease Accounting Amendment FBDI template, please refer to My Oracle Support.
- This feature originated from the Idea Lab:
- https://community.oracle.com/customerconnect/discussion/612430
Expense Allocation to Projects and Accounts by Amount At Expense Report Level
Allocate specific amounts to a project or expense account during expense report entry. The application calculates the percentage of allocation to the project or account using the amounts entered.
Use the Split Allocation window to split expense allocations across projects or accounts by amount or percentage.
You can access the Split Allocation window using the Split Allocations button in the expense report. Click the button to enter project or account allocations for the entire report, or select individual lines in the report and click the button to enter allocations for these lines only.
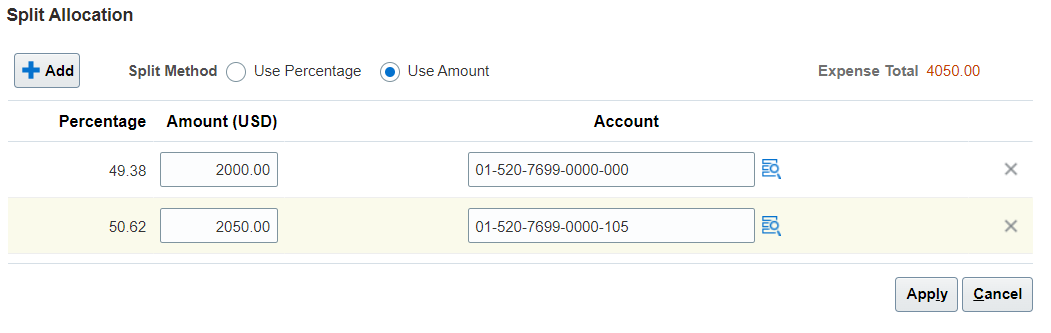
The inclusion of split allocations by amount lets you apply costs directly to a project or account, and optionally apply allocations to specific lines of an expense report. This is useful, for example, when allocating funds to projects or accounts with specific reimbursement maximums.
Steps to Enable
You don't need to do anything to enable this feature.
Tips And Considerations
- This feature uses the split allocation setting,
- You can only have one set of lines at a time for the line level split.
Key Resources
- Watch Split Allocations in Expense Reports Readiness Training
- This feature originated from the Idea Labs on Oracle Customer Connect: https://community.oracle.com/customerconnect/discussion/557070
Role Information
There is no need for a new role.
Expense Approval Routing Using Accounting Segments
Configure expense approval rules using accounting segments. This enables companies to route expense reports to account owners for approval, thereby providing visibility into expenses charged to their accounts.
An expense can be charged to one or more accounts, thereby creating one or more expense allocations for an expense. The Expense Distribution folder in the FinExmWorkflowExpenseApproval workflow is enhanced to include all account segments and its characteristics for each expense allocation.
You can create expense approval rules or update existing rules to take advantage of these new attributes. These attributes let you route expense report approval notifications to appropriate account owners.
These accounting attributes are added to the Expense Distribution folder for expense approval routing:
- Account Enabled Indicator
- Account End Date
- Account Segment 1 - Account Segment 30
- Account Start Date
- Account Type
- Detailed Budgeting Allowed Indicator
- Detailed Posting Allowed Indicator
- Financial Category
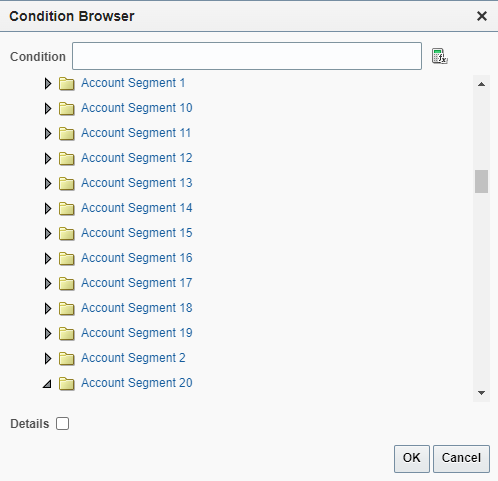
Accounting Segments Added to Expense Distribution Folder
Configuring approval rules by accounting segments provides the account owners better visibility into the expenses that are charged to their accounts, and also helps add another level of approval if needed.
Steps to Enable
You don't need to do anything to enable this feature.
Key Resources
- This feature originated from the Idea Labs on Oracle Customer Connect: https://community.oracle.com/customerconnect/discussion/609253
Role Information
To configure expense approval rules, you need to have the role of Application Implementation Consultant.
Manual Application of Cash Advances to Expenses
Manually apply cash advances to expenses during expense report submission. Employees can apply the cash advance designated for a specific trip to the corresponding expenses, providing visibility to approvers and auditors.
When submitting expenses, employees can select cash advances that are applicable to the selected expenses and submit the reports. If they choose not to apply a cash advance, they can provide a justification for not applying the available cash advances. The available cash advance amounts and the cash advance statuses get updated after employees apply cash advances and submit reports. Employees can view applied cash advances details in expense reports after submission.
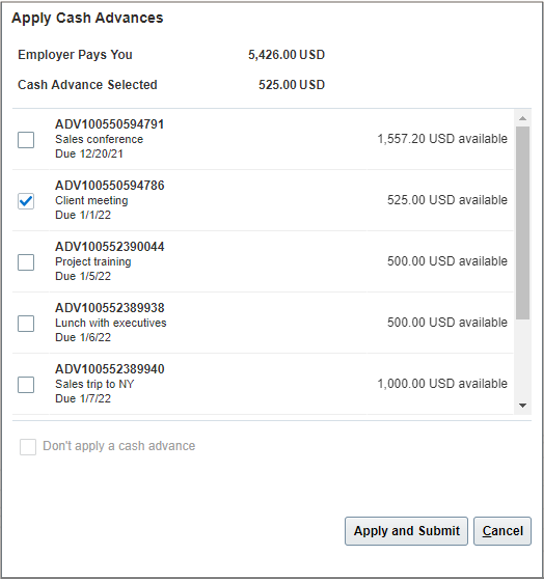
Select Applicable Cash Advances
Approvers can review the applied cash advances in approval notifications and take necessary action. If the employee has provided a justification for not applying the available cash advances, then the approver can review it in the notification..
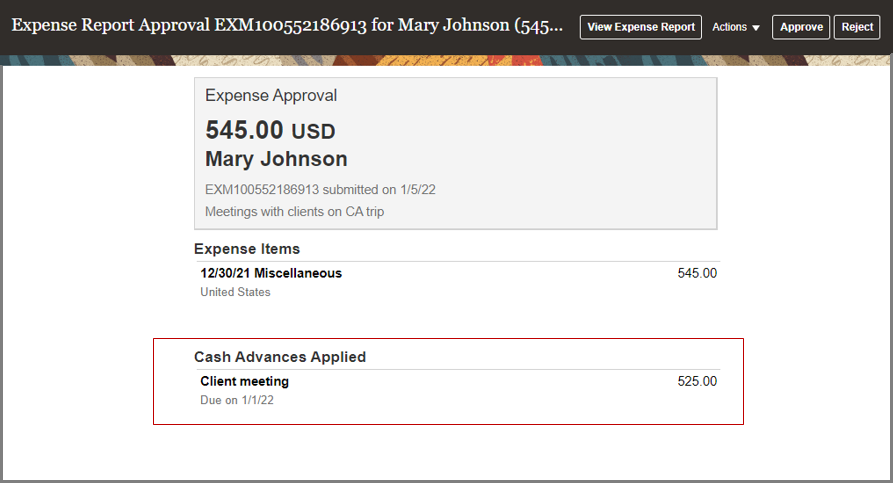
Review Applied Cash Advances
Auditors can view the applied cash advances on the Audit Expense Report page. Auditors cannot make any changes to cash advances that are applied to a report.
If approvers or auditors reject expense reports, then cash advances that are applied to the reports are automatically removed and returned to the employee’s available cash advances. If expense amounts are adjusted during expense report audit and applied cash advances exceed the reimbursement due to employee, then the difference is added back to employee’s available cash advances. The available cash advance amounts and the statuses are updated accordingly on the Cash Advances work area. The adjustment and rejection notifications identify any changes to the applied cash advances.
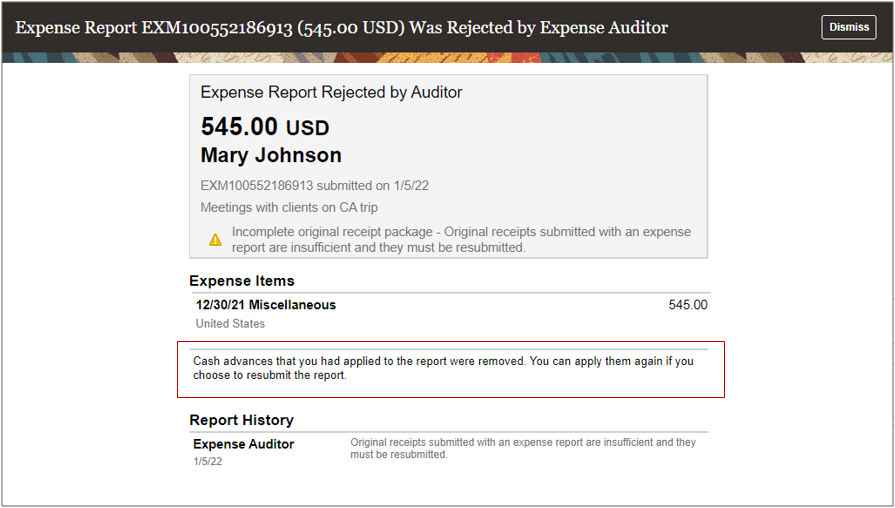
Cash Advances Removed
Enabling employees to manually apply cash advances provides more flexibility to employees and allows them to apply the cash advance obtained for a specific purpose to corresponding expenses. Additionally, approvers and auditors have better visibility into the outstanding cash advances.
Steps to Enable
To enable manual application of cash advances, perform the following steps:
- Sign in as the Application Implementation Consultant.
- From the Setup and Maintenance work area, navigate to the Manage Cash Advance and Authorization Policies page.
- Under Cash Advances, set Methods of Applying Advances to Manually Apply.
You can enable this at the implementation level on the Manage Cash Advance and Authorization Policies page, which applies to all business units. Alternatively, you can enable this for specific business units on the Create/Edit Business Unit window.

Configure Methods of Applying Advances
Key Resources
- Watch Manual Application of Cash Advances Readiness Training
- This feature originated from the Idea Labs on Oracle Customer Connect: https://community.oracle.com/customerconnect/discussion/557032
Role Information
To enable manual application of cash advances, you need one of these roles:
- Expense Manager
- Application Implementation Consultant
Manual Submission of All Expenses from Digital Assistant
Enable employees to submit all expenses from the digital assistant, including corporate card charges and cash expenses created from the Expenses web application.
Expenses that require more information, contain any errors, or are waiting for corporate card matches are not available for submission.
Employees can submit all the expenses together using Digital Assistant thereby simplifying the expense submission process.
Steps to Enable
You don't need to do anything to enable this feature.
Role Information
You don't need a new role or privilege access to use this feature.
PDF Attachments in Expenses Mobile Application
Enable employees to select PDF documents as attachments to their expenses. Search for and select PDF files that exist on the device.
When creating expenses from the mobile application, employees can browse through their device folders or cloud drives and attach PDF documents to their expenses in addition to image files. Approvers can also view the PDF attachments when approving the expenses from the mobile application.
This enables employees to attach PDF files, such as hotel, car rental, and airfare receipts easily, and to comply with local regulations where employees are required to attach the original PDF receipts from the merchants.
Steps to Enable
You don't need to do anything to enable this feature.
Tips And Considerations
To use this feature, ensure that you have downloaded the latest Expenses mobile application.
Key Resources
- Watch Expense Attachments in Expenses Mobile Application and Expense Approval Rules Readiness Training
- Refer to this idea in Idea Lab: https://community.oracle.com/customerconnect/discussion/534521
Role Information
You don't need a new role or privilege access to use this feature.
Adaptive Learning Data Sharing Between Environments for Intelligent Document Recognition
Copy the invoice recognition adaptive learning data from one environment to another, while using Intelligent Document Recognition (IDR) to process supplier invoices. You can perform adaptive learning for IDR invoices on the source environment, and copy this training data onto the target environment.
Previously, training for adaptive learning would need to be performed separately for the source and target environments.
Use this feature to perform adaptive learning for IDR on your test environment and reap the benefits of such training directly on your production environment. This eliminates the need to train IDR on the production environment separately and helps you achieve better recognition results faster.
Steps to Enable
To enable this feature you need to log a Service Request (SR).
Prerequisites for using this feature:
- The adaptive learning training data is maintained based on supplier IDs. Ensure that the source and the target environments have the same supplier IDs. You can do this by requesting for a P2T refresh via a Service Request (SR).
- Train IDR on the source environment by testing with invoices for your most frequently used suppliers. Perform corrections using the interactive invoice viewer wherever necessary. This builds the adaptive learning training data on the source environment.
Log a Service Request when you're ready to copy the adaptive learning training data to the target environment. Note that you can specify the date range for which you want to copy the training data. This gives you the flexibility to exclude any prior training data and only copy the most recent set of adaptive learning training data.
Tips And Considerations
When implementing Intelligent Document Recognition to process supplier invoices, we recommend testing with at least 10 sample invoices each, for your most frequently used suppliers. This testing also helps in building adaptive learning training data, that IDR uses to accurately recognize subsequent invoices for such suppliers.
Key Resources
- For additional details, refer to Features, Recommendations, Guidelines, and Tips for Oracle Intelligent Document Recognition for Payables Invoices (Doc ID 2656229.1) on My Oracle Support.
- This feature originated from the Idea Labs on Oracle Customer Connect: bf61e80448
Adaptive Learning for Invoice Lines Using Intelligent Document Recognition
Use the interactive invoice viewer to correct line information for invoices processed using Intelligent Document Recognition (IDR). IDR uses adaptive learning to improve line recognition on subsequent invoices from the same supplier.
This adds adaptive learning capability for invoice lines where it was previously available only for invoice header attributes.
The interactive invoice viewer can be used to make corrections for the following invoice line-level attributes:
- Description
- Quantity
- Unit Price
- UOM (Unit of Measure)
- Amount
Business Benefit:
Adaptive learning lets IDR continuously improve the recognition rate for invoice lines, based on the corrections that you make using the interactive invoice viewer. This helps improve the recognition accuracy for subsequent invoices from the same supplier.
Steps to Enable
You don't need to do anything to enable this feature.
Tips And Considerations
Correcting the line information helps IDR use adaptive learning to improve the recognition of lines for subsequent invoices from the same supplier in the following scenarios:
- None of the lines are extracted.
- Invoice lines are extracted, but one or more columns within the lines are not extracted. Note that these missing columns should be amongst the supported attributes for adaptive learning (Description, Quantity, Unit Price, Unit of Measure and Amount).
- One of more columns within the extracted lines are incorrectly identified. For example, IDR extracted the amounts from the 'Total without tax' column on the invoice document, whereas the requirement was to extract from the 'Total with Tax' amount.
The adaptive learning capability won't improve line recognition on subsequent invoices in cases where the interactive invoice viewer is used to detect additional lines or delete extra lines recognized by IDR.
Key Resources
- For additional details, refer to Features, Recommendations, Guidelines, and Tips for Oracle Intelligent Document Recognition for Payables Invoices (Doc ID 2656229.1) on My Oracle Support.
Role Information
To use interactive invoice viewer, you need either of these roles:
- Accounts Payable Specialist
- Accounts Payable Supervisor
Adaptive Learning for Routing Attributes Using Intelligent Document Recognition
Use the interactive invoice viewer to identify information that you want to recognize for Routing Attribute 2, 3 and 4 on the supplier invoice. Adaptive learning uses this information to recognize the values for these attributes for subsequent invoices for the same supplier.
Business Benefit:
Using this feature, you can recognize attributes from a supplier invoice document that are specific to the supplier and your business. This helps you avoid manually updating the information in these attributes on every invoice.
Steps to Enable
You don't need to do anything to enable this feature.
Tips And Considerations
- To view the Routing Attributes 2, 3 and 4, click on the Show More link in the Invoice Header section when editing the invoice. The attributes are available in the Additional Information tab.
- Place the cursor on the routing attribute that requires update on the invoice page. Double-click or highlight the relevant text on the invoice document in the interactive image viewer. The selected value on the invoice document will be copied onto the selected routing attribute field in the invoice page. Save your changes.
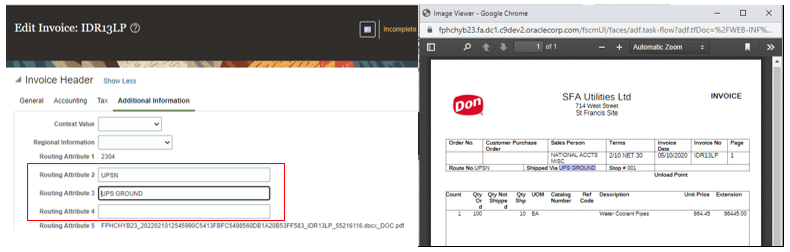
Routing Attributes on the Additional Information Tab in Invoice Header Section
Key Resources
- For additional details, refer to Features, Recommendations, Guidelines, and Tips for Oracle Intelligent Document Recognition for Payables Invoices (Doc ID 2656229.1) on My Oracle Support.
Role Information
To use interactive invoice viewer, you need either of these roles:
- Accounts Payable Specialist
- Accounts Payable Supervisor
Legal Entity Recognition from Invoice Document
Use Intelligent Document Recognition to recognize the legal entity on the invoice image through key elements such as the bill-to location and the legal entity registration number. This helps in accurate tax calculation without user intervention.
Intelligent Document Recognition (IDR) always attempts to identify and extract all invoice attributes, including the legal entity, supplier name, invoice number, and so on. This feature can’t be disabled. IDR matches the Bill-to location address on the invoice with the legal entity address in the Fusion Legal Entity Configurator. The addresses of both the legal entity as well as the associated legal reporting unit (LRU) are used for this purpose. IDR improves the accuracy further by also considering the registration numbers (EIN, TIN, and so on) of the legal entity or the LRU during the matching process.
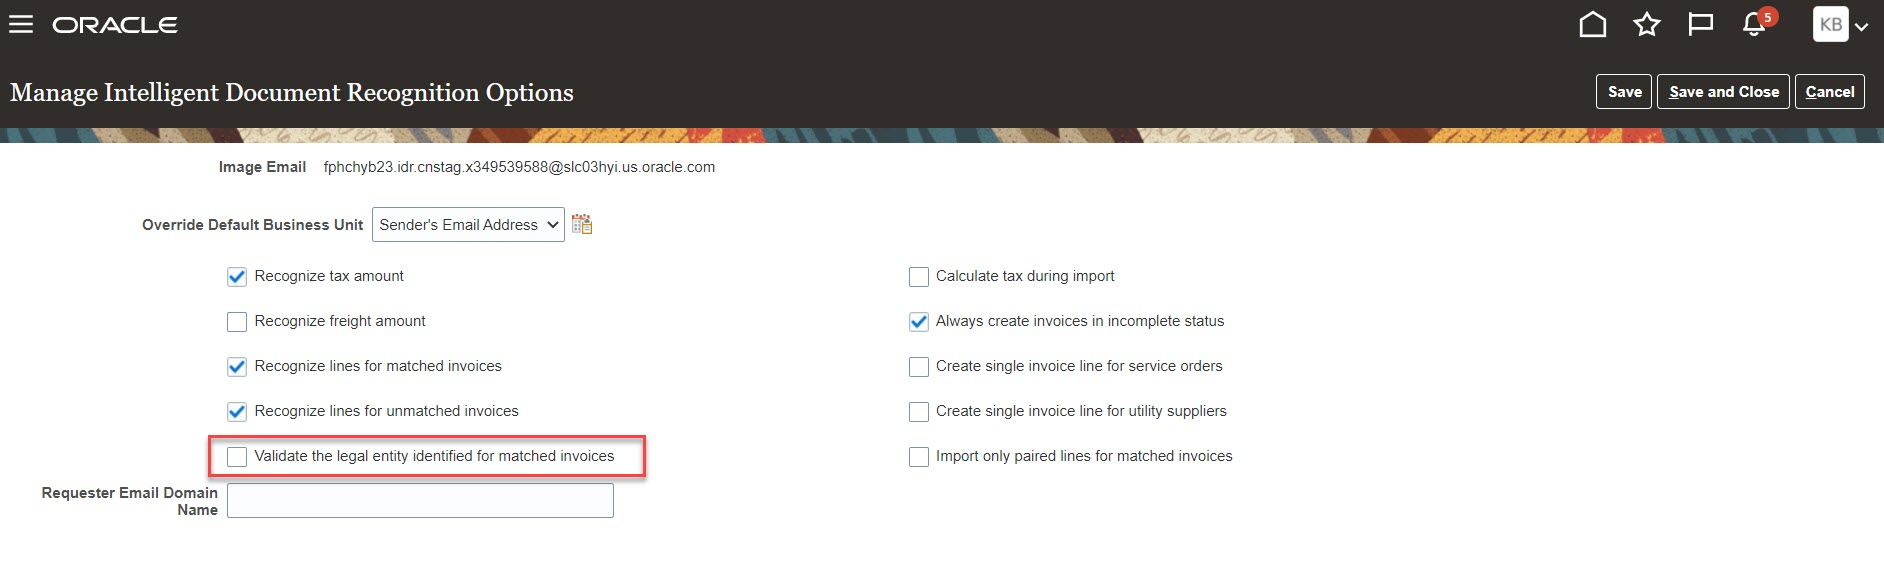
For matched invoices, you can opt to verify that the legal entity identified for the invoice matches the legal entity of the purchase order recognized from the invoice. You can enable these options on the Manage Intelligent Document Recognition Options page. If this configuration is enabled and the legal entity on the matched invoice doesn’t match the legal entity of its purchase order, then the purchase order is rejected during the invoice import process and the invoice is imported in incomplete status. In the application, you can see an error on the PO field which you can correct to proceed further.
IDR Options
Deriving the Default Legal Entity Based on Invoice Type
- Unmatched invoices:
- Legal entity is recognized from the invoice document.
- If it’s not recognized for the invoice document, derive the default legal entity using the same logic as used on the Create Invoice page.
- Matched invoices when the option to validate legal entity isn’t enabled in the IDR options:
- Derive the default legal entity from the purchase order.
- Matched invoices when the option to validate legal entity is enabled in the IDR options:
- Legal entity is recognized from the invoice document.
- If it’s not recognized from the invoice document, derive the default legal entity from the purchase order.
Business benefits include:
- Recognition of legal entity by the Intelligent Document Recognition reduces manual efforts.
- Queue the purchase order matched invoices for user review if the legal entity identified for the invoice does not matches the legal entity of the purchase order recognized from the invoice..
Steps to Enable
You don't need to do anything to enable this feature.
Tips And Considerations
- Any changes in the addresses of the legal entities or the associated LRUs can take up to 24 hours to synchronize with IDR.
- Any changes on the Manage Intelligent Document Recognition Options page related to legal entity validation are enforced immediately.
Receipt-Matched Invoices for Catch Weight Items
Create receipt-matched invoices for catch weight items using the pricing unit of measure. The pricing unit of measure is the secondary unit of measure on the receipt. A segment of customers in industries such as food and beverages procures catch weight items that vary in concentration or weight. These items are ordered and shipped in one unit of measure, for example Cases, and priced in a different unit of measure, for example Pounds. In existing functionality, receipt-matched invoices must be in the receiving unit of measure and not the pricing unit of measure. This enhancement allows the shipping and receiving in one unit of measure and buying in another for catch weight items.
For example, a buyer places an order for chicken in cases, the item's primary UOM. However, the supplier invoices the chicken in pounds, based on the actual quantity delivered.
- Each case weighs around 80 pounds on average.
- The price agreed is $ 1.25 per pound.
- Supplier delivers a case of chicken weighing 82 pounds.
- The invoice is based on the actual weight of item delivered in its secondary UOM (82 pounds).
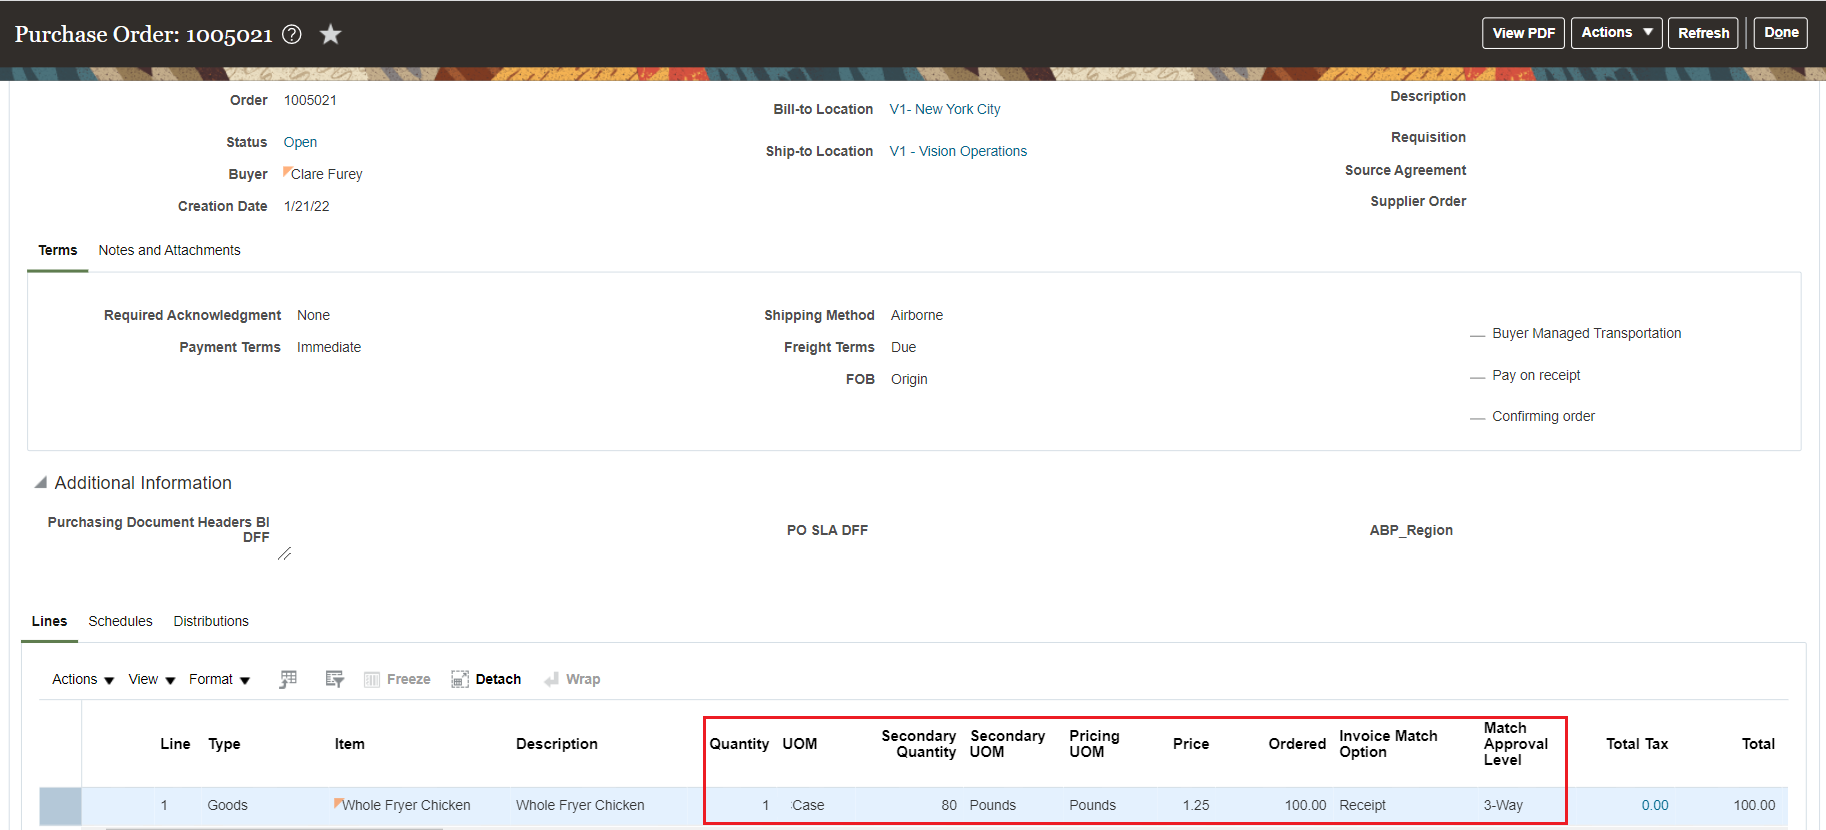
Purchase Order Line Ordered in Primary UOM and Priced in Secondary UOM. Invoice Match Option is Receipt.
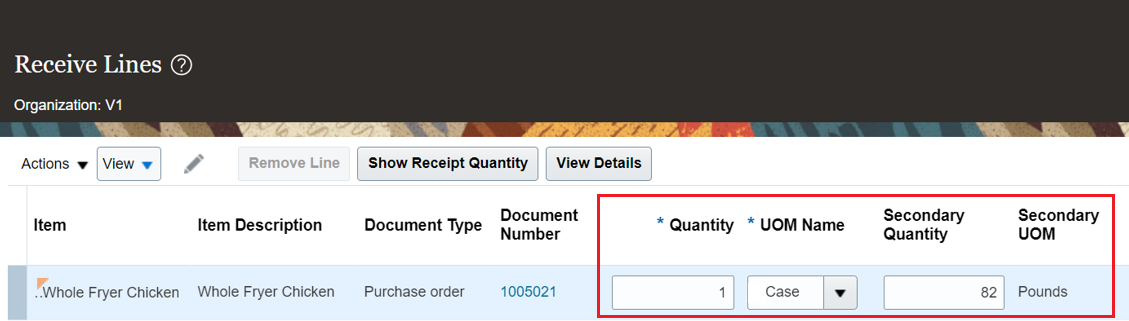
Receive in the UOM from the Order Line and Capture Exact Weight Delivered in Secondary UOM Quantity.
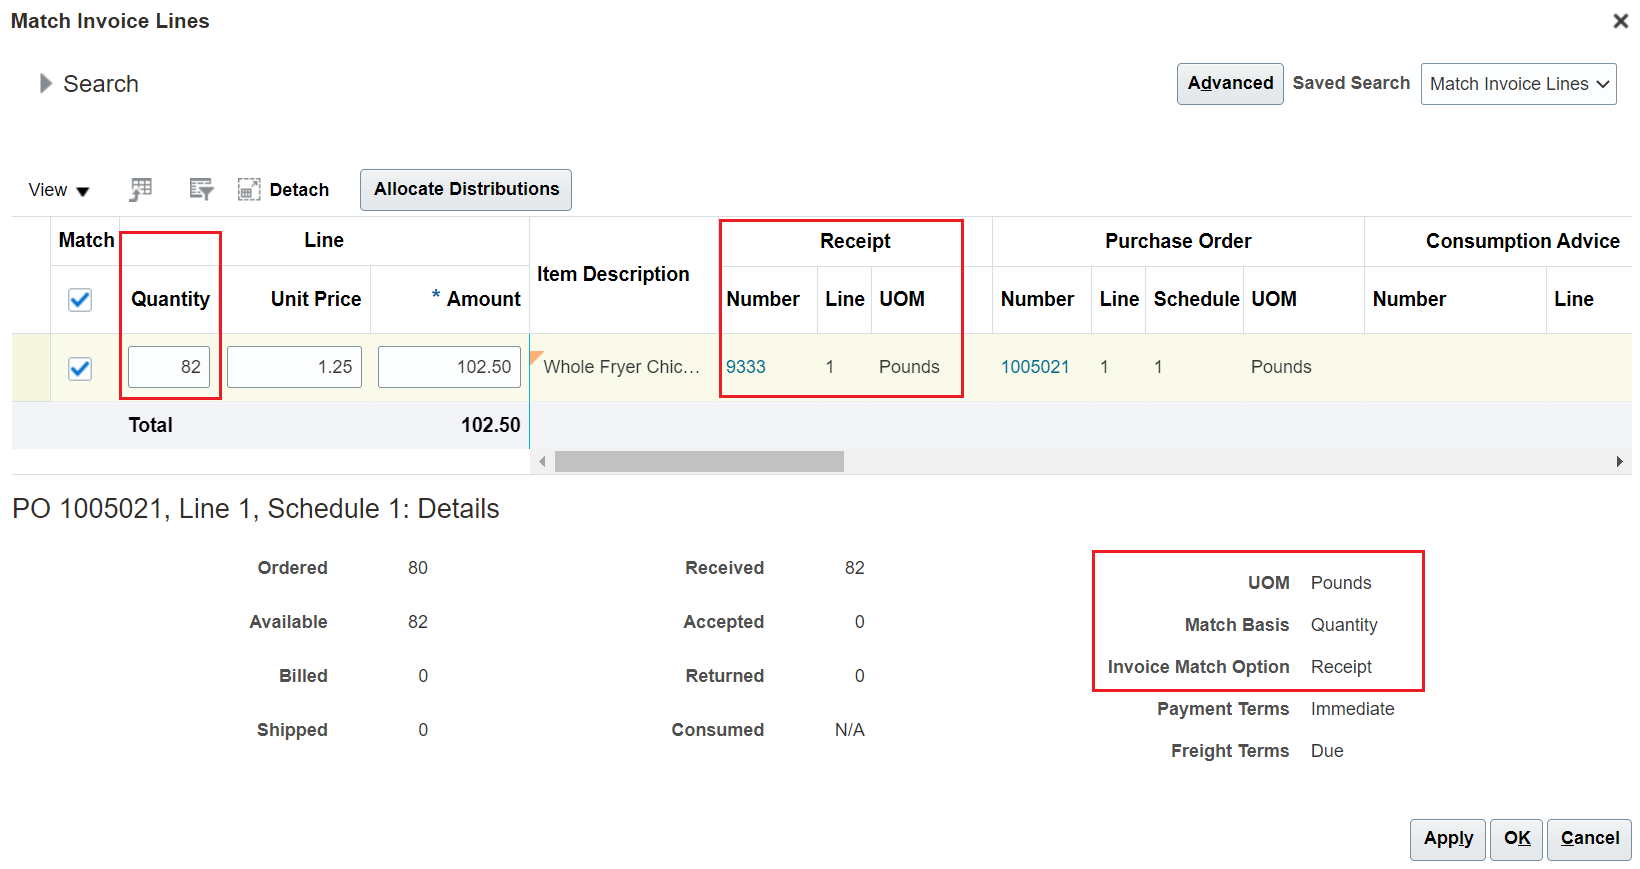
Invoice Matched to Receipt in the Item's Secondary UOM.
Business Benefit:
This feature enables you to accurately price and invoice the item based on the exact weight delivered, while ordering it in the UOM used for packing and shipping.
Steps to Enable
Use the Opt In UI to enable this feature. For instructions, refer to the Optional Uptake of New Features section of this document.
Offering: Procurement
You don't need to do anything in Payables to enable this feature. However, you must enable the parent feature ‘Purchase Items That Are Priced in Their Secondary UOM’ via Opt In UI in Procurement.
Tips And Considerations
- If the dual UOM item is priced in primary UOM, invoice match to receipt will be performed based on the receipt UOM as opposed to the receipt secondary UOM.
- You can use this feature with REST API, ADF Desktop Integration, or File-Based Data Import (FBDI). Error messages for REST API and rejection reason/description for 'Import Payables Invoices' program are suitably modified to compliment the feature.
- While creating receipt-matched invoices for dual UOM items via REST API, ADF Desktop Integration, or FBDI, the UOM you provide must match the receipt secondary UOM if an item is priced in its secondary UOM. For all other cases, use the receipt UOM.
- Due to the nature of these items, invoiced quantity may vary from the expected quantity on the order. Configure an appropriate tolerance for quantity ordered to allow variations. Use 3-way matching level with tighter tolerances for quantity received to avoid overbilling.
Key Resources
- Related Help: Purchase Items That Are Priced in Their Secondary UOM feature in Procurement
- Procurement 21D What's New
Role Information
No new role access is needed to use this feature.
Recognition of Specific Internal Suppliers for Invoices Created Using Intelligent Document Recognition
Specify the internal suppliers that you want Intelligent Document Recognition (IDR) to recognize while using IDR to create supplier invoices. Use a distinct supplier type for internal suppliers from whom you receive invoices. IDR uses this information to accurately predict the supplier when there is no external supplier address available on the invoice.
The ship-to or bill-to address printed on a supplier invoice often gets inadvertently recognized by IDR as the supplier for the invoice. Thus, as a best practice, we recommend eliminating such suppliers from IDR recognition process by using the AP_EXCLUDE_IMAGE_VENDOR_TYPE lookup code.
However, there are scenarios where you may want to use IDR to create invoices received from internal suppliers.
For example, when one legal entity provides goods or services to another legal entity within the same organization.
Legal Entity XYZ provides services to Legal Entity PQR. To account for such transactions, Legal Entity XYZ sends an invoice to Legal Entity PQR. When this invoice is processed using IDR, Legal Entity XYZ should be correctly recognized as the supplier.
To facilitate accurate recognition of the supplier for such invoices, assign a distinct supplier type to the internal suppliers. IDR will use this supplier type information to predict the correct supplier for the invoice.
Business Benefit:
This feature helps you use IDR to create invoices received from specific internal suppliers, without affecting IDR's capability to accurately predict the supplier when the invoice is received from external suppliers. You can automate the creation of invoices received from internal suppliers by using IDR.
Steps to Enable
To enable this feature you need to log a Service Request (SR).
Prerequisites for using IDR to accurately predict specific internal suppliers on invoices:
- Identity the internal suppliers from whom you expect to receive supplier invoices.
- Assign a distinct supplier type for such suppliers. You can create such supplier types using the Manage Supplier Type Lookup task in Functional Setup Manager.
- Provide this supplier type information when you log the Service Request to enable this feature.
Tips And Considerations
If you have multiple internal suppliers and plan to use IDR to create invoices for only some of them, then you must create 2 distinct supplier types to uniquely identify such suppliers.
For example, if you have 10 internal suppliers and will be using IDR to create invoices received from only 4 of them, then you should create 2 separate supplier types:
- Internal_Include : Assign this supplier type to the 4 internal suppliers that you want IDR to recognize.
- Internal_Exclude: Assign this supplier type to the 6 remaining internal suppliers.
When you create the Service Request for enabling this feature, provide the supplier type 'Internal_Include' in the service request information.
Use the 'Internal_Exclude' supplier type for the AP_EXCLUDE_IMAGE_VENDOR_TYPE profile option. For details on how to use this profile option, refer to the documentation in the Key Resources section.
Note that these supplier types names are only examples. You can create the supplier type as per your business requirement.
Key Resources
- For additional details, refer to Features, Recommendations, Guidelines, and Tips for Oracle Intelligent Document Recognition for Payables Invoices (Doc ID 2656229.1) on My Oracle Support.
Recognition of Supporting Document Separators for Invoices Using Intelligent Document Recognition
Specify supporting document separators to enable Intelligent Document Recognition (IDR) to distinguish supporting documents from the primary supplier invoice. This ensures that IDR extracts invoice information only from the primary invoice document.
Business benefits include:
- When processing supplier invoices using Intelligent Document Recognition (IDR), the scanned invoice may contain supporting documents (such as receiving documents, contracts, notices and others). Using a supporting document separator to distinguish between the primary invoice and supporting documents helps ensure that IDR extracts invoice information only from the primary invoice document. This increases accuracy and reduces incorrect predictions.
- The supporting documents are imported along with the invoice and are available in the interactive invoice viewer.
Steps to Enable
You don't need to do anything to enable this feature.
Tips And Considerations
- When scanning the invoice and supporting documents, you must add a page separator with the text 'Invoice Supporting Documents' between the end of the invoice pages and the beginning of the supporting document pages.
- The complete set of documents comprising the primary invoice and all supporting documents is added as an attachment to the invoice and is available in the interactive invoice viewer.
Key Resources
-
An example separator page is available here.
-
For additional details, refer to Features, Recommendations, Guidelines, and Tips for Oracle Intelligent Document Recognition for Payables Invoices (Doc ID 2656229.1) on My Oracle Support.
Fiserv SnapPay Integration and Credit Card Processing
Use Fiserv SnapPay for processing your credit card payments. Fiserv SnapPay is a cloud-based solution that integrates with payment gateways/processors for payment processing. With this feature, you can tokenize credit cards and make payments on a secure payment page hosted by Fiserv SnapPay as shown in the image.
This feature also lets you do various merchant-initiated transactions such as authorization, capture, refund, and status inquiry.
For all the transactions mentioned above, you can customize the outbound and inbound communication with Fiserv SnapPay by modifying the respective message formats. For more details on customizing the formats, see the documentation provided in Key Resources.
Fiserv SnapPay can be used for processing credit card payments in various use cases such as customer-initiated and merchant-initiated payments.
Fiserv (through its subsidiary FDC) has 6 million merchants, the largest in the payments industry. This feature caters to the customers who prefer Fiserv SnapPay for their payment processing needs.
Steps to Enable
- You need a merchant account with Fiserv SnapPay to use this feature.
- Fiserv SnapPay is predefined in Oracle Payments as a payment system. For the steps to enable it for accepting credit card payments, see the documentation provided in Key Resources.
Tips And Considerations
- Tokenize a credit card in Fiserv SnapPay's hosted payment page and save the token returned. You can use this token later for merchant-initiated transactions such as authorization, capture, and refund.
- This feature lets you perform an authorization (with tokenization) for a particular amount in Fiserv SnapPay's hosted payment page. Use the authorization details to perform a capture transaction (merchant-initiated) at a later point of time.
- This feature lets you perform a sale transaction (which includes authorization and capture) in Fiserv SnapPay's hosted payment page.
- This feature allows zero-fee credit card processing which is very useful for government and public sector organizations. Zero-fee refers to a processing method where merchants can pass the processing fees onto their customers.
Key Resources
- Payment gateway integration and credit card processing
- Fiserv SnapPay integration and credit card processing
Additional Data Points for Collections Scoring
Provide the following data points at customer, account and site levels for collections scoring to improve collection efficiency.
- Amount Past Due More Than 15 Days
- Age of Latest Payment
Use these data points in your scoring formulas for a customer, customer account, or customer site.
Amount Past Due More Than 15 Days
Total amount in USD that is past due for more than 15 days at customer, customer account, or customer site. Adjustments, Disputes, and On-account or Unapplied cash are taken into consideration to reduce the outstanding amount.
- Customer Amount Past Due More Than 15 Days
- Account Amount Past Due More Than 15 Days
- Site Amount Past Due More Than 15 Days
Age of Latest Payment
The number of days passed since the last payment was made by the customer, customer account, or customer site. For example, assume the latest payment was made on March 1st, 2022. When the Collections Scoring or Collections Scoring and Strategy Assignment process is run on March 2nd, 2022, the value of this data point will be 1. When the Collections Scoring or Collections Scoring and Strategy Assignment process is run on March 3rd, 2022, the value of this data point will be 2.
- Customer Age of Latest Payment
- Account Age of Latest Payment
- Site Age of Latest Payment
Business benefits include:
- This helps the collector to manage the collection resources and strategies in an effective way.
- This helps determine the collectability of the customer, customer account, and customer site.
Steps to Enable
You don't need to do anything to enable this feature.
Enhanced Customer Account Level Setup for XML Invoice Delivery
Enhance the XML Invoice Delivery setup on the customer account profile to include only customer sites without a preferred delivery method of Print or Email. This provides a more focused delivery of XML transactions to the related sites belonging to the customer account.
You set this enhancement at the customer account level of a customer profile by enabling the AR_XML_INVOICE_ENHANCED lookup code under the AR_FEATURES lookup type. If the Generate and Transfer XML Transactions process is run and AR_XML_INVOICE_ENHANCED is Not Enabled, then all transactions belonging to the customer account and all related customer sites are included in XML delivery, and site-level delivery method settings are ignored. If the Generate and Transfer XML Transactions process is run and AR_XML_INVOICE_ENHANCED is Enabled, then transactions belonging to customer sites with a preferred delivery method of Print or Email are excluded from XML delivery. The process only includes transactions in XML delivery belonging to customer sites with no site-level delivery method setting.
Business benefits include:
- Targeted delivery of XML invoices to the relevant customer sites.
- Avoid unnecessary delivery to sites with a different preferred delivery method
Steps to Enable
- Navigate to the Setup and Maintenance work area.
- Search for the setup task Manage Receivables Lookups.
- On the Manage Receivables Lookups page, search for the AR_FEATURES lookup type. (If the lookup type AR_FEATURES does not exist, create it first using the setup task Manage Standard Lookups.)
- Add a lookup code AR_XML_INVOICE_ENHANCED to the AR_FEATURES lookup type and save the changes.
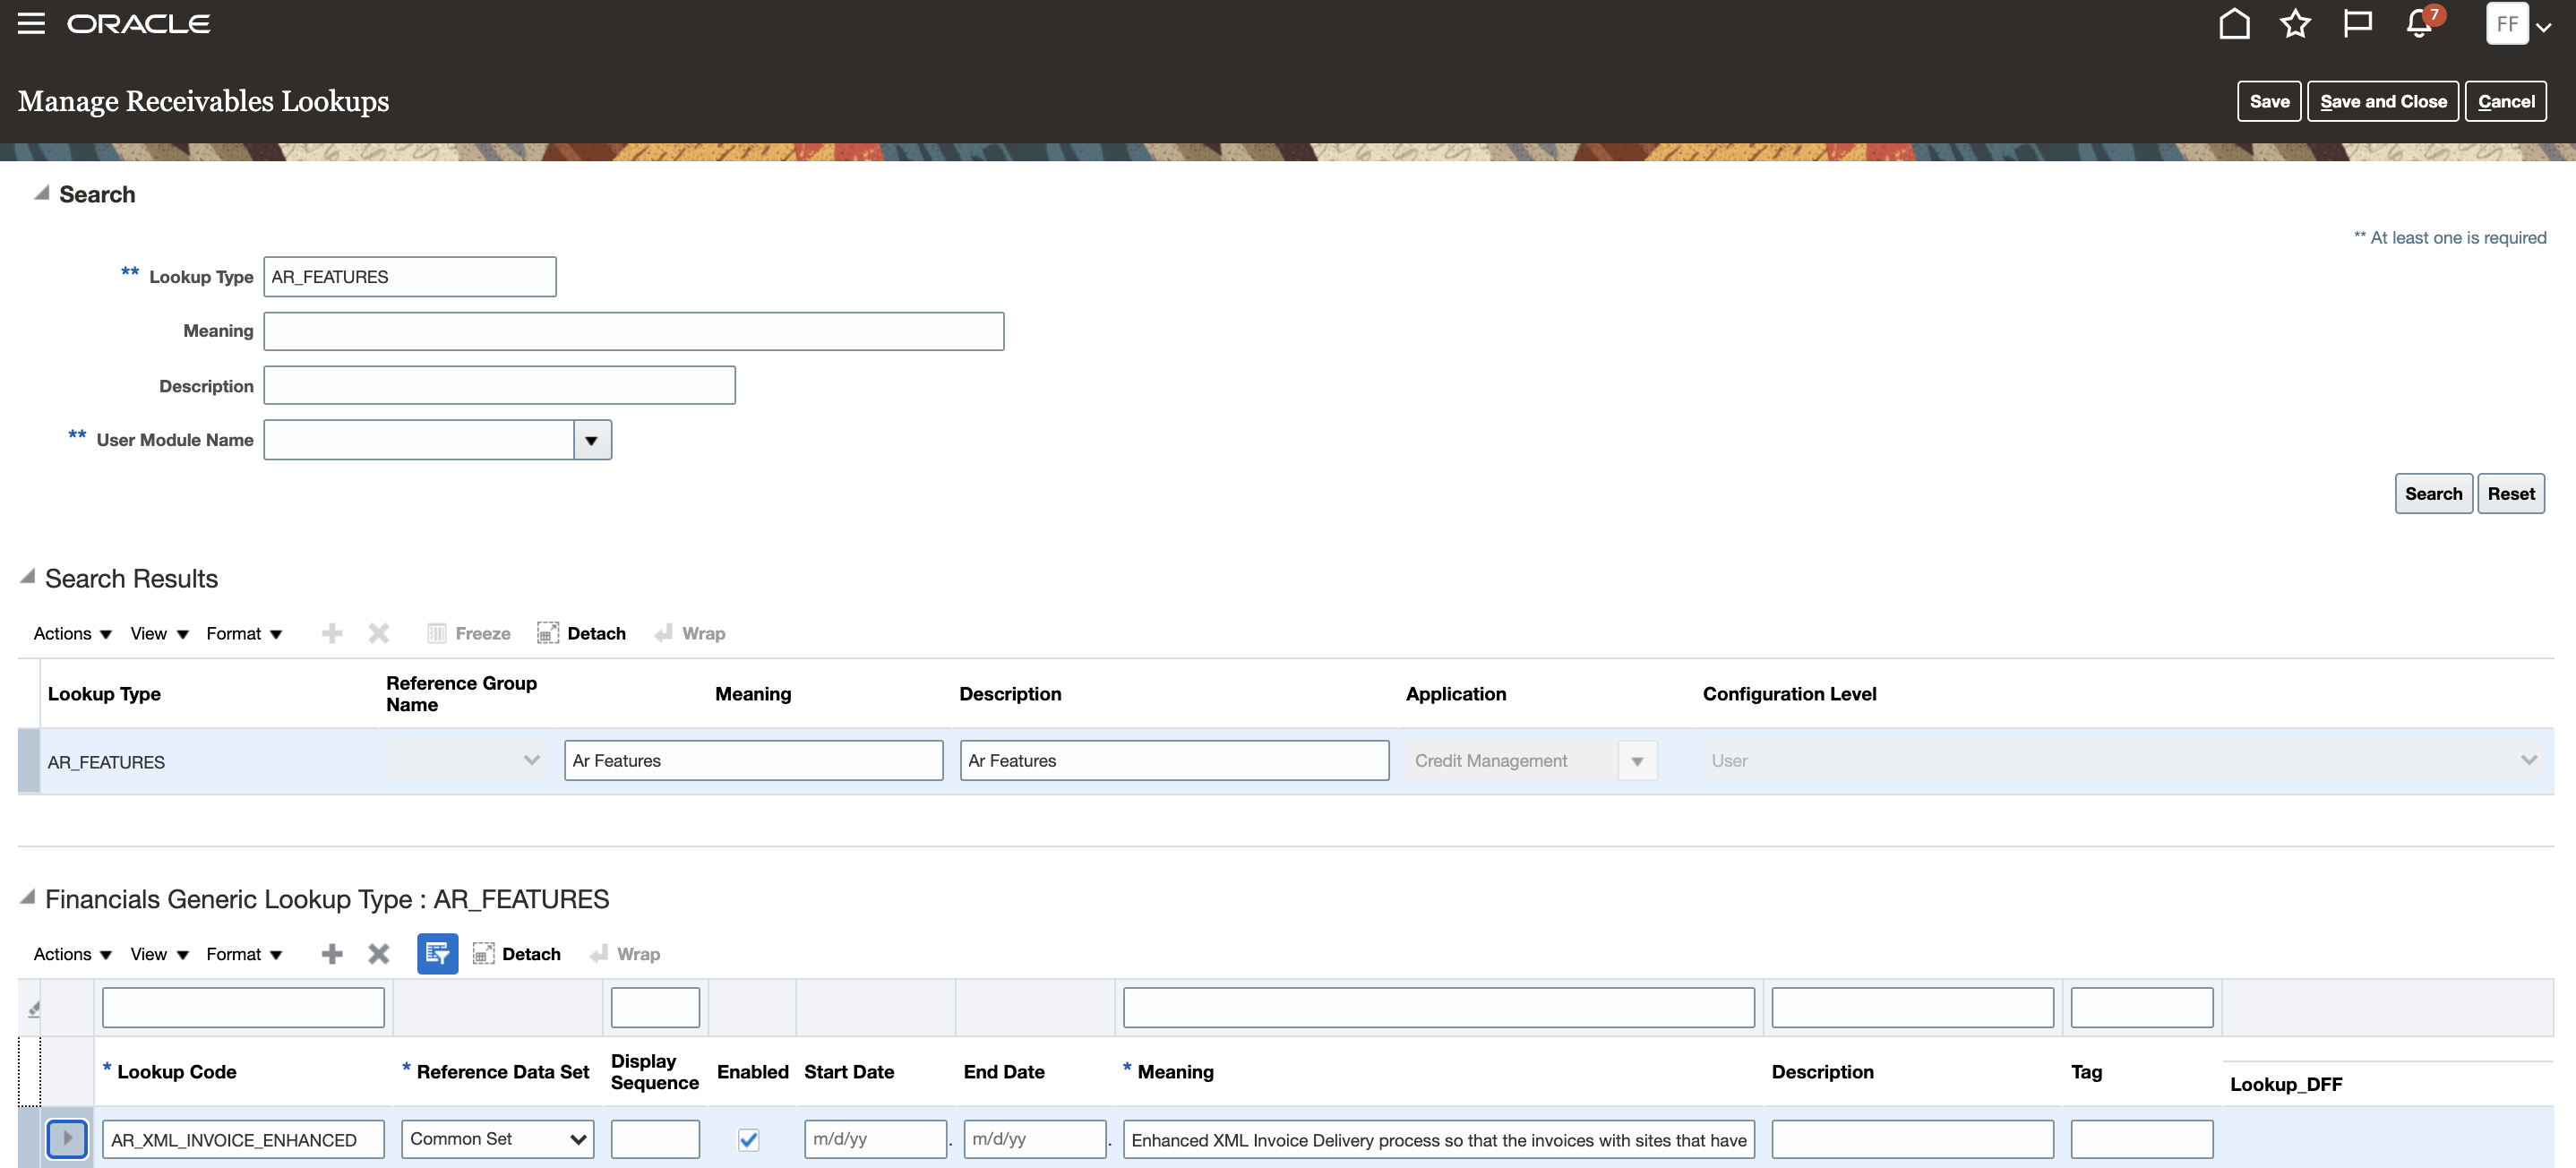
Enhancements to the Receivables Aging by General Ledger Account for Multifund Accounting Report
Run the Receivables Aging by General Ledger Account and Multifund Accounting report from Scheduled Processes. Generate a consolidated report for all balancing segments, and review the report from the output section of the process.
Business benefits include:
- Generate reports for multifund accounting from Scheduled Processes instead of from the BIP catalog.
- Optionally generate a single report from Scheduled Processes for all Balancing Segment Values, instead of running separate reports for each Balancing Segment Value.
Steps to Enable
You don't need to do anything to enable this feature.
Tips And Considerations
The Receivables Aging by General Ledger Account for Multifund Accounting Report is only available to Business Units enabled for Multifund Accounting.
Management of Negative Invoice Line Amounts and Transaction Completion
Provide additional controls during invoice entry and completion. If the transaction type assigned to an invoice created using AutoInvoice or the Create Transaction page has a Creation Sign of Positive, then all invoice lines must have a positive sign. This helps prevent inadvertent entry of negative line amounts that would affect the overall invoice amount. In addition, after the creation of an invoice or a credit memo using AutoInvoice or the Create Transaction page, the transaction remains Incomplete and can be completed only after the designated approver reviews and confirms the accuracy of the transaction.
Process Flow for Management of Negative Invoice Line Amounts and Transaction Completion:
- A new attribute is introduced in the Transaction Source setup to enable the complete action on the transaction: Control transaction completion check box. If checked, the restriction is triggered according to the setup of the Transaction Type.
- A new attribute is introduced in the Transaction Type setup to control the complete action of the transaction: Level of Control of Transaction Completion field with three dropdown values: None, All, Lines With Negative Amount.
-
This new attribute on the Transaction Type is enabled for the transaction class of Invoice and Credit Memo only and is disabled for Debit Memo, Bills Receivables, and Chargebacks.
-
Based on the setup, the system will create invoices or credit memos as Incomplete for the transactions created using the FBDI for Legacy Third Party Sources and the Create and Edit Transaction Source pages.
-
This does not apply to the predefined sources used for Order Orchestration, Projects, Subscriptions, or to transactions created using REST/SOAP.
- The Receivables manager or specialist reviews the transaction. (Note: This review can be either a manual process outside Oracle applications or an Oracle process using PaaS extensions.)
- Post review:
- If the data is correct, the reviewer can complete the invoice or credit memo after setting AllowCompletion to Y using either the Receivables Invoice or the Receivables Credit Memo Web Service (REST).
- If the data is incorrect, and if the reviewer doesn't want to allow transaction completion:
- the transaction can be left as Incomplete; or
- the transaction can be deleted using the existing delete options under the UI or REST.
- void the transaction by applying a Void transaction type.
Business Benefit:
This feature helps financial managers maintain transaction integrity according to business requirements.
Steps to Enable
To enable the feature, complete these steps:
- Enable the Control transaction completion option on the applicable transaction source.
Task - Manage Transaction Sources
Check box - Control transaction completion
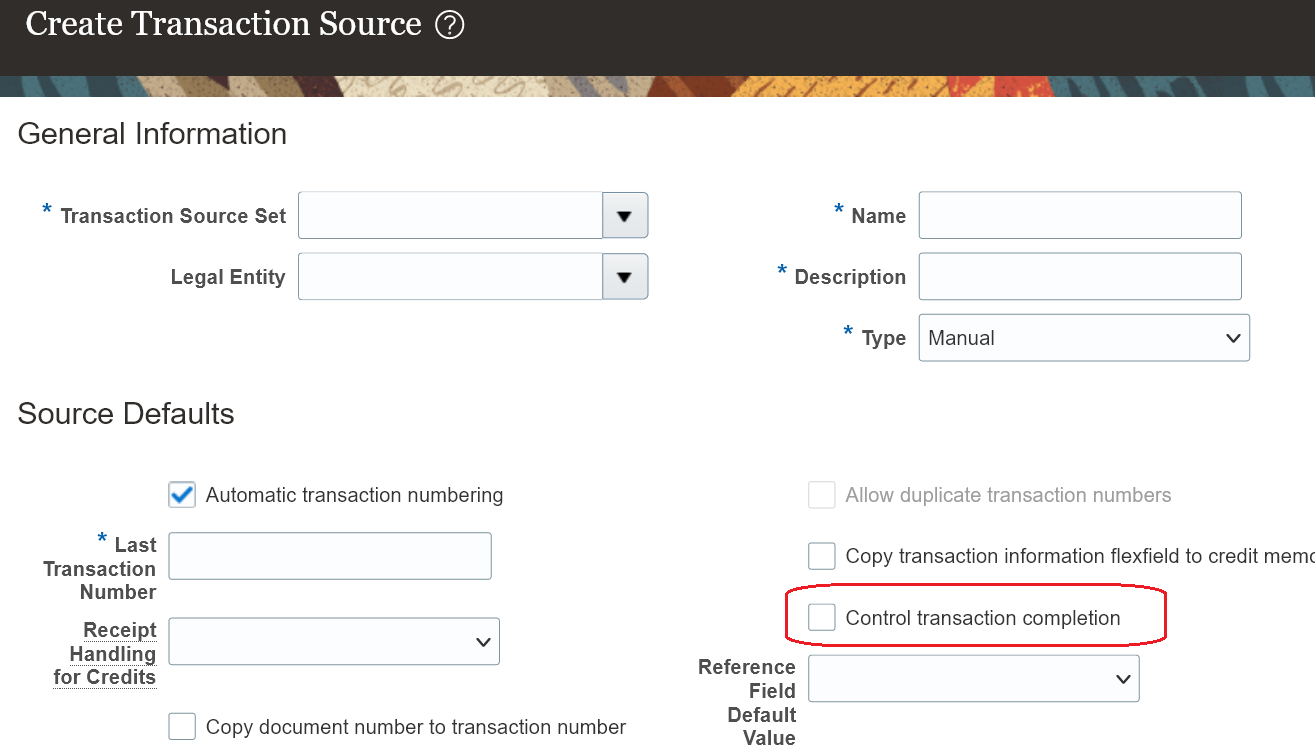
Manage Transaction Sources
- Select the Level of Control of Transaction Completion on the transaction type assigned to the applicable transactions.
Task - Manage Transaction Types
Options for the Level of the Control are:
- All
- Lines With Negative Amount
- None

Manage Transaction Types
Choose the Level as:
- All - Create all the transactions using this transaction type as Incomplete. The transaction can be marked as Complete only after review and setting the Allow Completion flag to Y.
- Lines With Negative Amount - Create transactions using this transaction type that have lines with negative amounts as Incomplete. The transaction can be marked as Complete only after review and setting the Allow Completion flag to Y.
- None - Create all the transactions using this transaction type as Complete without any review.
- The GET and PATCH operation of the Credit Memo REST Service has been enhanced to process the Standard credit memo. Enable the Lookup Code AR_STD_CM_REST to use the GET and PATCH Operations of the Credit Memo REST Service.
- Steps to Enable the Lookup Code AR_STD_CM_REST:
- Task - Manage Receivables Lookups.
- Query for the Lookup Type - AR_FEATURES.
- Under this Lookup Type, create the Lookup Code AR_STD_CM_REST and enable.
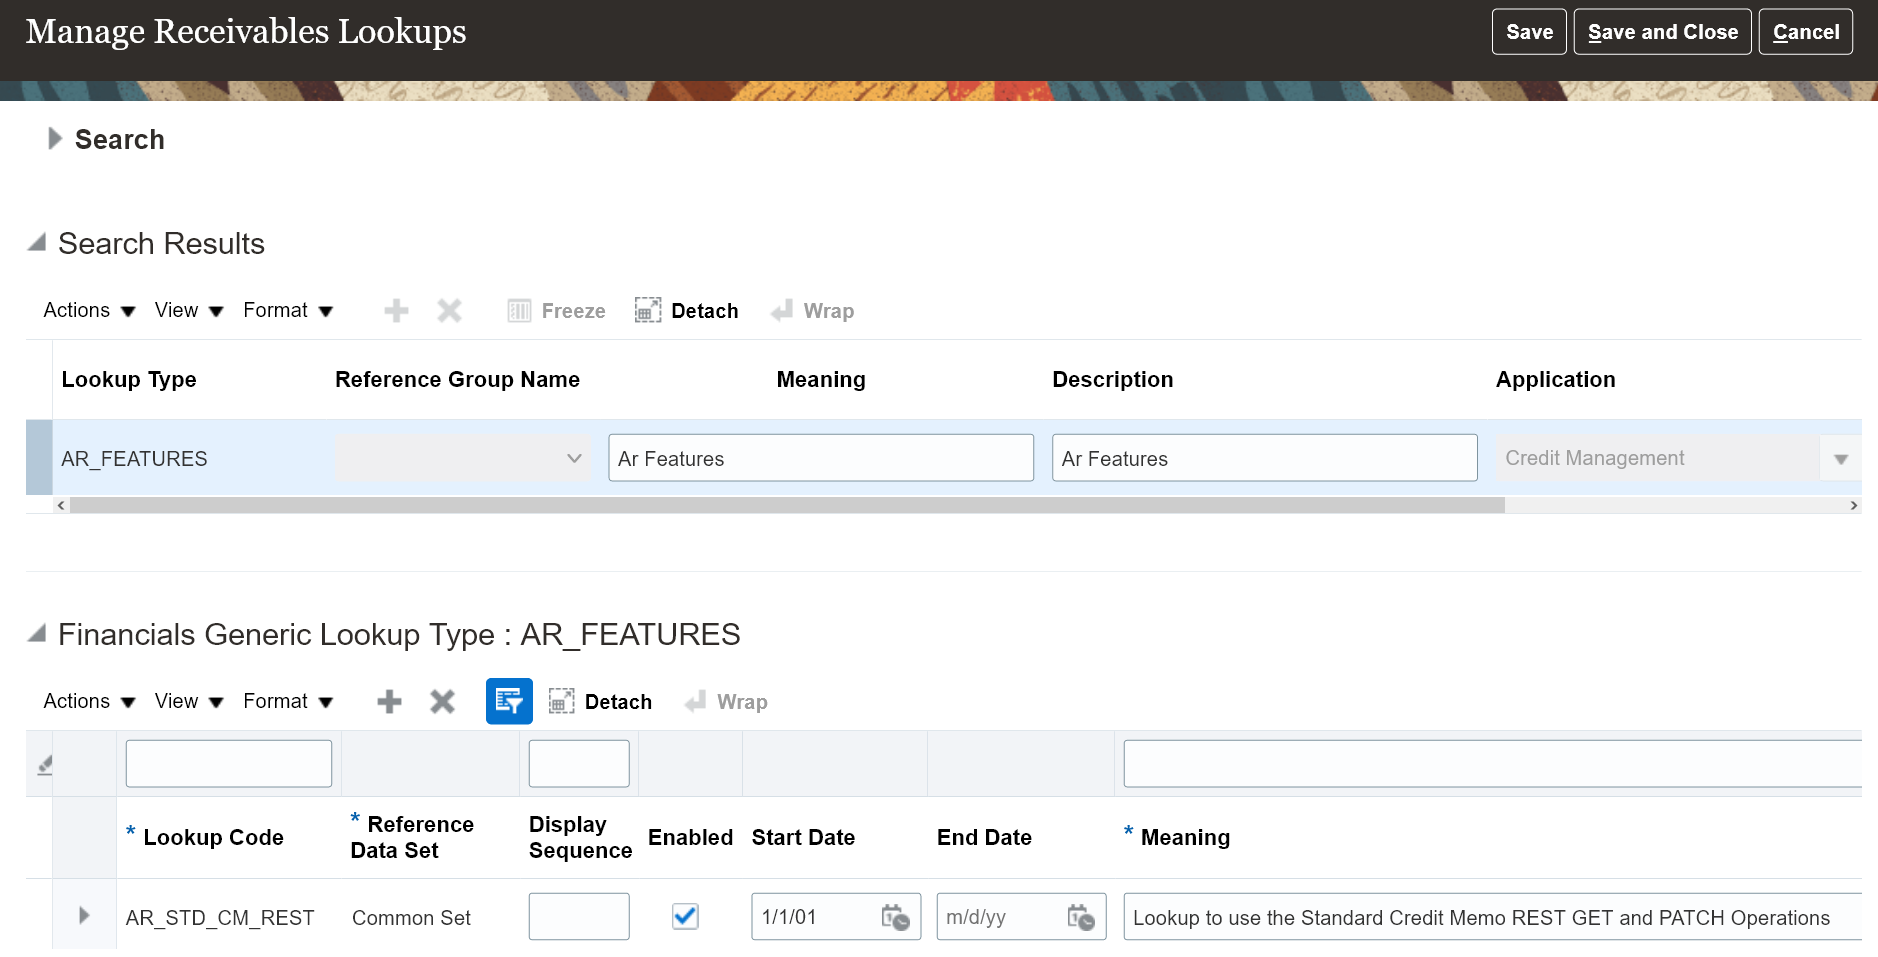
Manage Receivables Lookups
Tips And Considerations
-
This feature applies to invoices and credit memos only, including both on-account credit memos and standard credit memos created from the Invoice Actions > Credit Transactions option.
-
The transactions (invoices/credit memos) created using REST/SOAP flows are created as Complete, irrespective of the Transaction Source and Transaction Type setup introduced for this feature.
-
This feature applies only to transactions having the Line and Freight line types.
- The following flows are not impacted by this feature:
- Brazil Transactions
- Portugal Transactions
- Third-party tax invoices
- Use the new finder on the AllowCompletion attribute of the ReceivablesInvoices or ReceivablesCreditMemos REST APIs to obtain the reasons for transactions created as Incomplete.
-
When the Control Transaction Completion check box is enabled on the transaction source assigned to the transaction, the Transaction Type field in the Create or Edit Transaction page only includes transaction types with the level set to All or Lines With Negative Amount, and Void transaction types.
- Document Sequencing and Chronological Document Sequencing Impact:
- The transactions are created as Incomplete and can be marked as Complete after the Allow Completion Flag is set to Y.
- If there is a change in the document sequence date, then the user should update the transaction date and accounting date and then complete the transaction so that the document sequence number is generated according to the updated transaction and GL dates.
- Gapless Document Sequencing Impact:
- The document sequence is generated when the transaction is created from the Import AutoInvoice process, irrespective of the document sequence generation time (at Save or Complete) setup at the Receivables System Options level.
- The user-provided document sequence number is honored. There is no change in the behavior when the document sequence is provided by the user for the transactions that are created from the Import AutoInvoice process.
- Automatic Receipt Handling Impact:
- Automatic Receipt handling during Import AutoInvoice is not triggered, and credit memos are created as Incomplete.
- After a credit memo is reviewed and the Allow Completion Flag is set to Y, the user must manually process the receipt for a Refund / On-Account Credit Memo and then complete the credit memo.
- Upgrade Impact:
- For existing transaction sources, the Control transaction completion check box is considered by default as unchecked. There is no change in behavior to existing completed transactions.
- For existing transaction types, the Level of Control of Transaction Completion field value is considered by default as None. There is no change in behavior to existing completed transactions.
- For existing Incomplete transactions: If the Control transaction completion check box on the transaction source is checked, and the Level of Control of Transaction Completion field value is updated to All or Lines with Negative Amount, and if any update is performed on the Invoice or Credit Memo, then the feature validations are triggered.
- For existing Complete transactions: If an existing Complete transaction is set to Incomplete, and changes are made to existing line amounts, or new lines are added; and if the Control transaction completion check box on the transaction source is checked, and the Level of Control of Transaction Completion field value is updated to All or Lines with Negative Amount, and if any update is performed on the Invoice or Credit Memo, then the feature validations are triggered.
Role Information
Assign reviewers the AR_MANAGE_TRANSACTION_CONTROL_REST privilege to allow them to set the AllowCompletion flag to Y.
Region and Country-Specific Features
Withholding Certificate Generation At Tax Rate Code Level for Argentina
Generate the withholding tax certificate at the tax rate code level instead of the tax level for Argentina. This reduces the number of taxes to simplify the Tax setup and improve tax processing.
This feature simplifies the withholding tax configuration and improves performance in tax calculations, particularly for organizations with complex withholding setup.
Steps to Enable
To enable this feature, first perform the same setup steps at the tax rate level that are performed for the configuration at tax level. Then complete the following additional setup:
- Click Navigator > My Enterprise > Setup and Maintenance > Search > Manage Standard Lookups.
- Search for the JL_ENABLE_FEATURE lookup type. If it is not defined, create it.
- In the Lookup Codes section, add and enable the JLARWHT_22B_OI_TAX_RATE_LEVEL lookup code.
- Click Save.
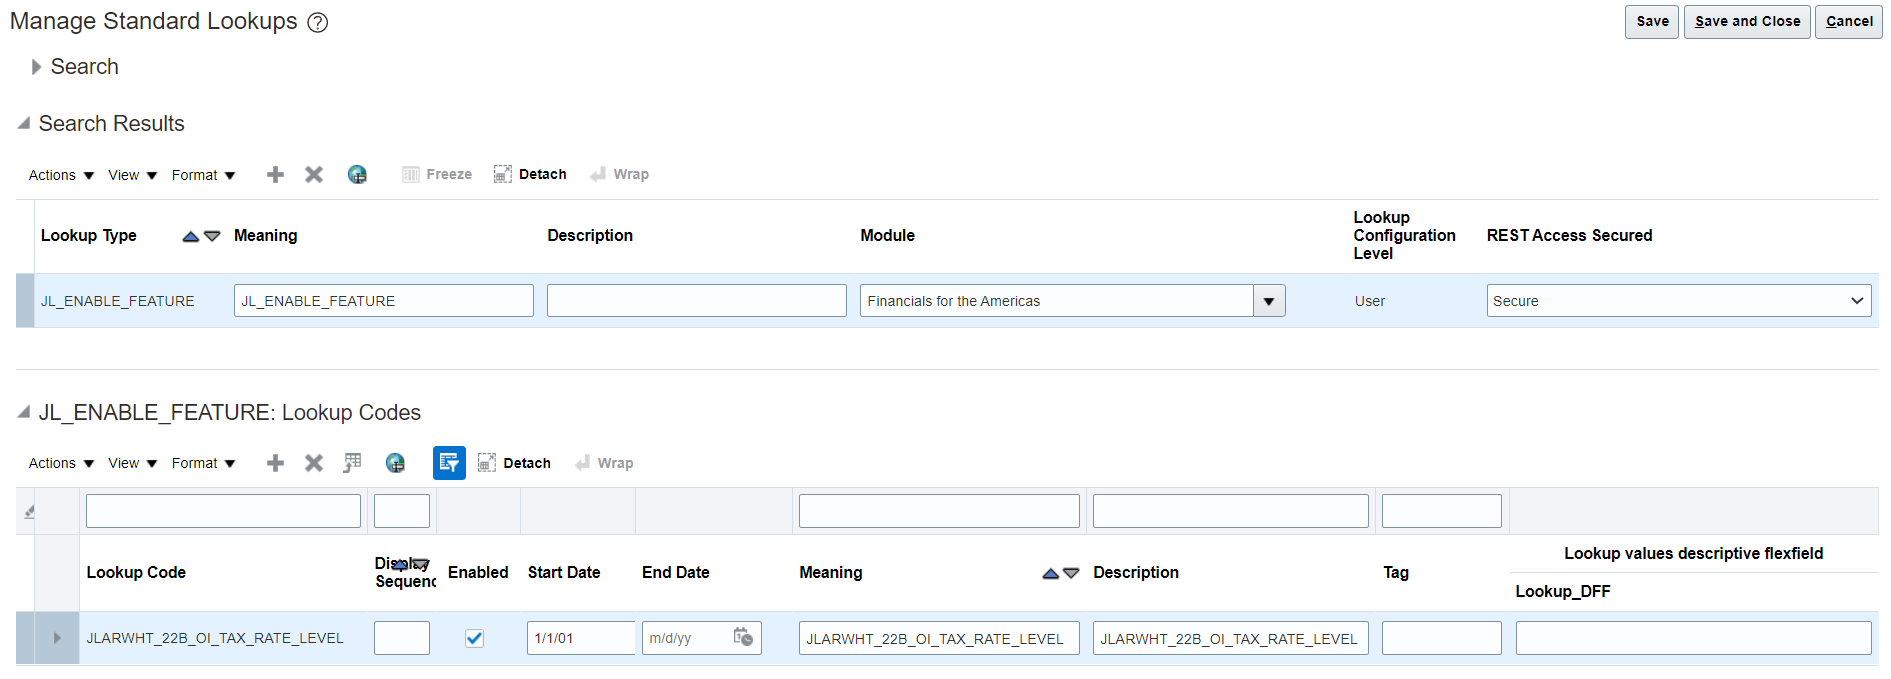
NOTE: Only the Enabled flag is considered and not the start and end dates for the lookup.
- Define Document Sequence Categories and Document Sequences. These steps remain the same as the configuration done at tax level.
- Assign the sequences to a combination of legal entity, withholding tax regime, withholding tax and withholding tax rate. To assign sequences to the required context, use these steps:
- Go to Navigator > Setup and Maintenance > Tasks panel tab > Search.Search for Manage Localization Document Numbering.
- Select Manage Localization Document Numbering from the results.
- On the Manage Localization Document Numbering page > Search for drop-down list > select Argentina.In the Create Document Numbering in Spreadsheet dialog box, select the Business Unit and set Configuration For as Setup for withholding certificate numbering.
- Click OK to download the file.

- Add the required context as a new row and upload the file.
Tips And Considerations
- If you are an existing customer and use the solution with configuration at tax level, you can continue to do so.
- Both configurations are not supported at the same time. If you choose to configure certificate generation at tax rate level, you have to specify the tax rate for all sequence assignments.
- If you have switched from tax level configuration to tax rate level configuration, you will have to end-date your existing tax level sequence assignments and configure new tax rate level assignments for them. You can re-use the existing sequences.
As an example:
Setup prior to the switch
The withholding tax rate code will be blank as this field is not available prior to the switch.
| Legal Entity |
Withholding Tax Regime Code |
Withholding Tax Code |
Withholding Tax Rate Code | Sequence | Start Date | End Date |
|---|---|---|---|---|---|---|
| Arg LE | AR WHT REG |
AR WHT TAX |
AR WHT SEQ1 |
1/1/2019 |
Setup after the switch
End date the existing sequence assignment and add a new sequence assignment with the tax rate as shown
| Legal Entity | Withholding Tax Regime Code | Withholding Tax Code | Withholding Tax Rate Code | Sequence | Start Date | End Date |
|---|---|---|---|---|---|---|
| Arg LE | AR WHT REG | AR WHT TAX | AR WHT SEQ1 | 1/1/2019 | 12/31/2021 | |
| Arg LE | AR WHT REG | AR WHT TAX | AR WHT TAX RATE | AR WHT SEQ1 | 1/1/2022 |
- It is recommended that once you start using tax rate level configuration, you do not disable the lookup to revert to the tax level configuration.
- If there is a change in the tax rate, you have to create a new sequence assignment for the new tax rate. You can re-use the existing sequence.
- There are some additional fields displayed in the certificate.
Inscription Number in the Withholding Agent Information - This will be derived from the registration of the legal entity. To setup the inscription number, do the following:
- Click Navigator > My Enterprise > Setup and Maintenance > Search > Manage Legal Entity Configurator Lookups.
Add a new lookup type code "IIBB" to the lookup types XLE_REG_CODE and XLE_REG_CODE_EST.


- Navigate to the Manage Legal Jurisdictions task and add a new jurisdiction.
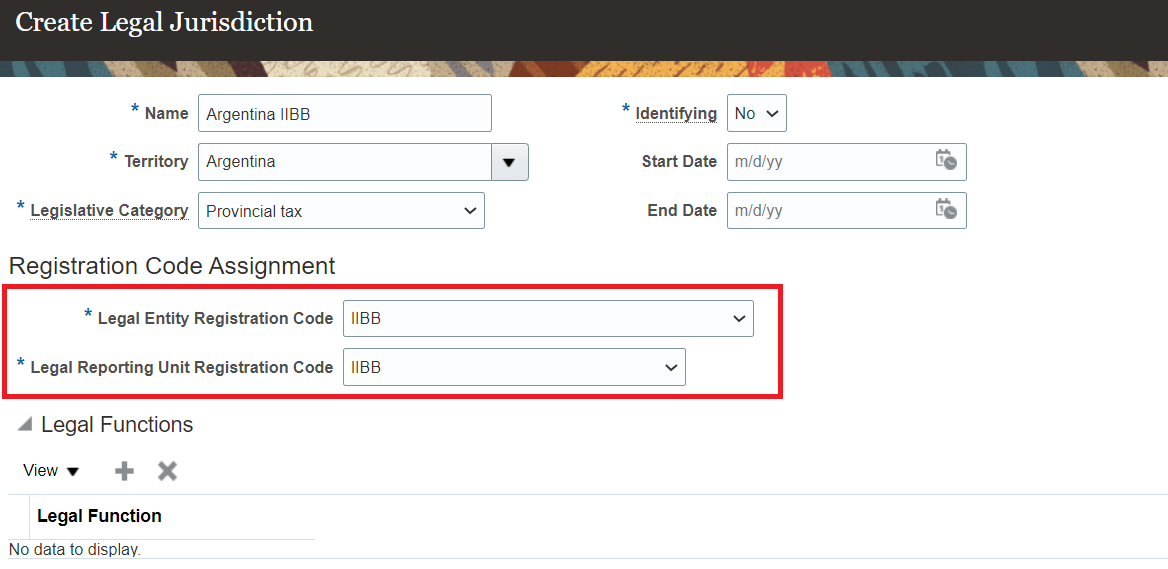
- Navigate to the Manage Legal Entity Registrations and create a new registration. The IIBB number entered here will be displayed as the Inscription Number.
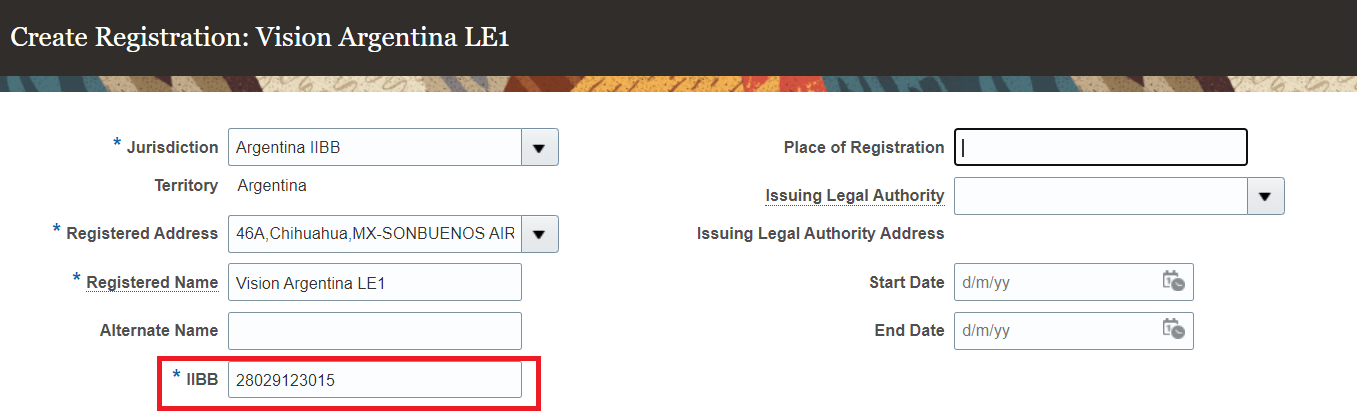
Phone number in the Supplier Information section - This will be derived from the phone number field of the address associated with the supplier site.
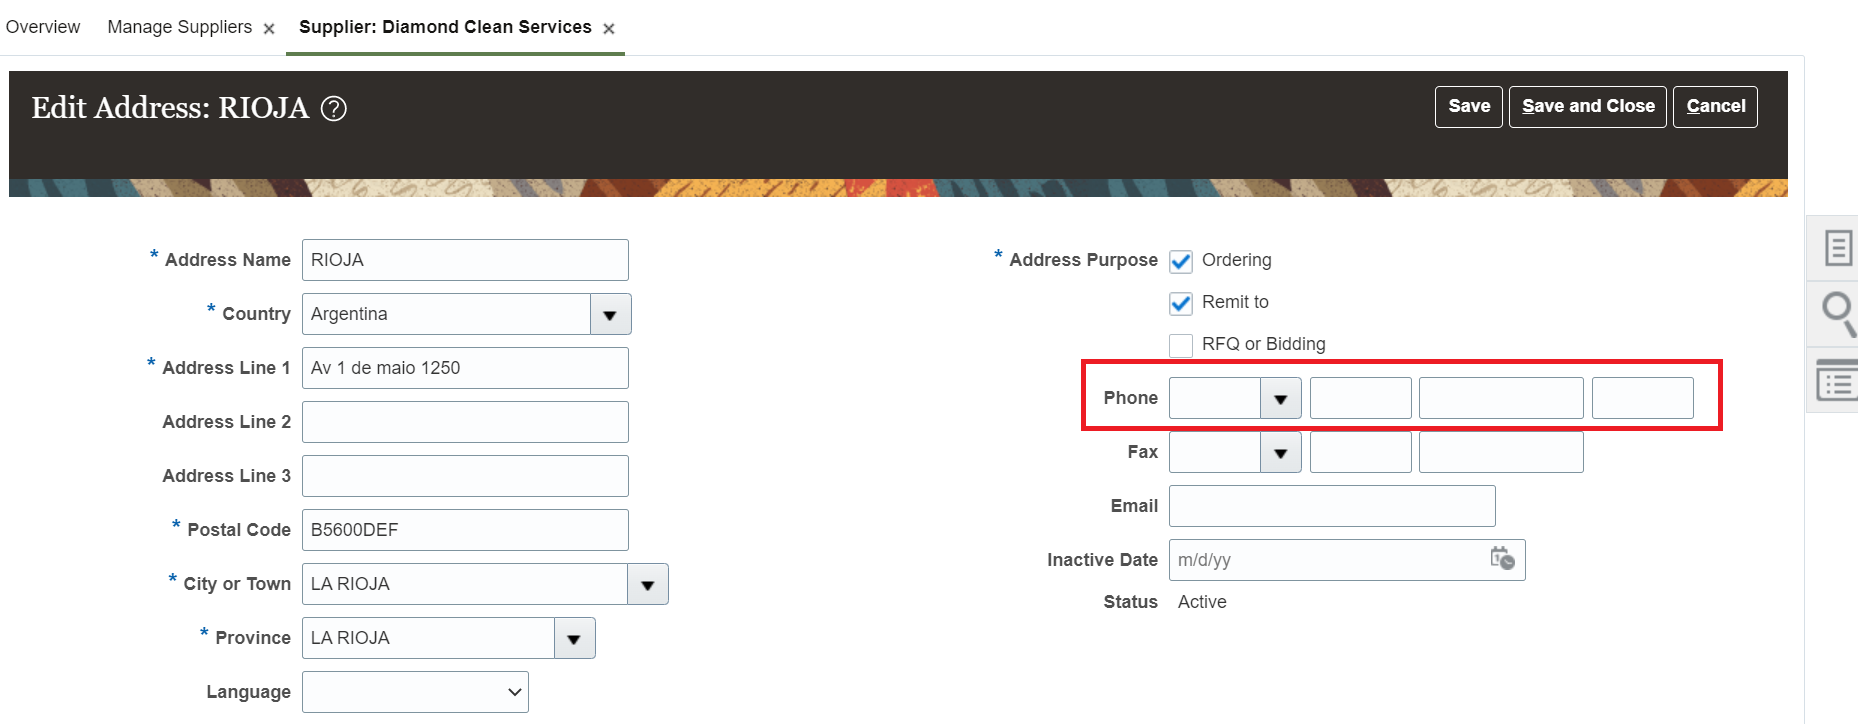
- If you have tax rate level configuration, enable the reporting type use of Tax rate for the reporting type ORA_JL_ARG_REGIME_CODE and assign the reporting code at the tax rate level instead of the tax level. This value is displayed in the Tax Regime field in the certificate.
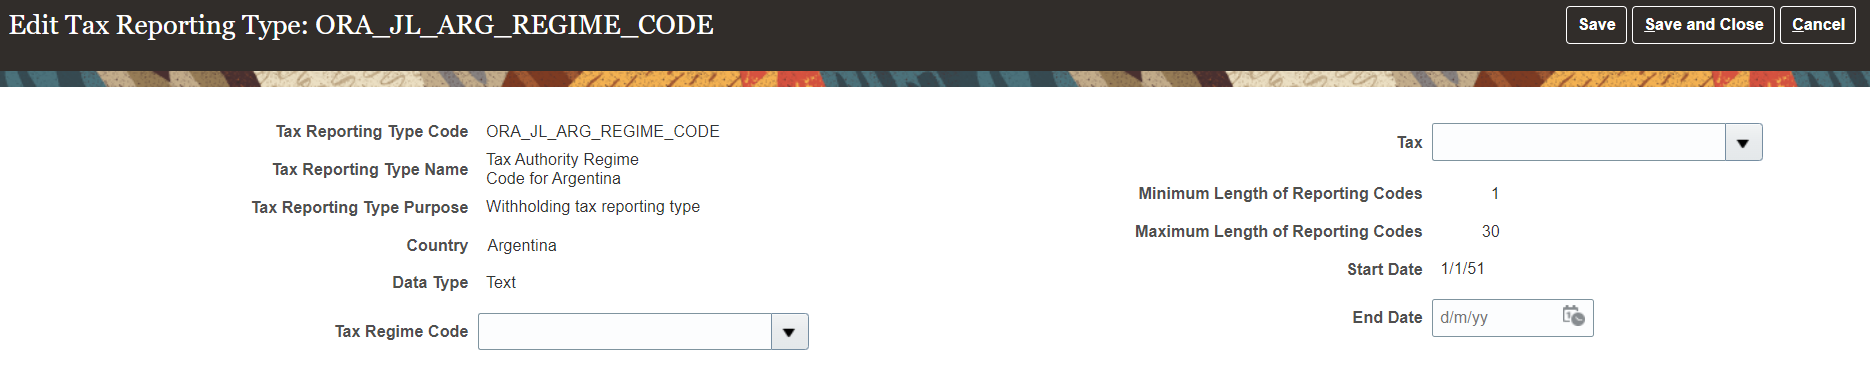
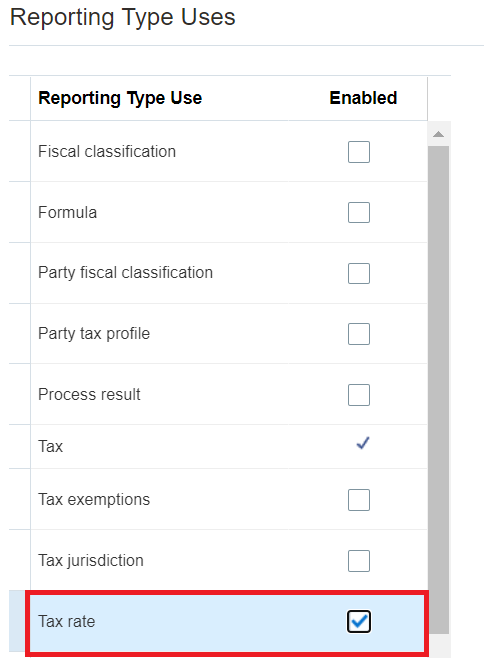
Fiscal Documents for Standalone Transactions
Use the Import Standalone Fiscal Documents FBDI to import standalone transactions and corresponding fiscal attributes in order to generate fiscal documents.
The Import Standalone Fiscal Documents FBDI lets you create a fiscal document for booking purposes that is not based on a physical shipment or a Receivables transaction.
After you add the transaction information into the spreadsheet and import the data, the system validates the data and generates a fiscal document.
Once the tax authority approves the fiscal document, run the Import Fiscal Document Approval process for the fiscal document to generate accounting for the transaction.
Create fiscal documents for standalone transactions which are not based on a physical shipment or a Receivables transaction and account them.
Steps to Enable
You don't need to do anything to enable this feature.
Key Resources
- Import Standalone Fiscal Documents in File-Based Data Import for Financials
Fiscal Document XML Generation Simplified Processing
Use the fiscal document xml generation simplified processing to execute all ESS jobs to generate a fiscal document XML file in a single request.
Use the Generate XML File option in the Import AutoInvoice with Fiscal Attributes process for Brazil to import the fiscal attributes for Receivables transactions, create fiscal documents, and generate a fiscal document XML file for delivery to the tax authority. You can also use the Generate XML File option in the Generate Fiscal Documents process to create a fiscal document XML file.

Generate XML Option
Improve the process of generating fiscal document XML files and delivering them to the tax authority in a timely manner.
Steps to Enable
You don't need to do anything to enable this feature.
On-Account Credit Memo Processing in the Electronic Invoice Flow for India
Include the processing of on-account credit memos in the electronic invoice flow for India to generate a tax invoice number for credit memos not linked to a source transaction. This is in accordance with legislative changes in India.
From India GST compliance perspective, the link between a Credit Memo and the reference transaction is not needed anymore to be shown in any GSTR report as post supply adjustments. Hence it becomes very important that on-account credit memos are supported in India GST. A valid Tax Invoice Number (India document sequence) should be generated for standalone credit memos as well if document sequence is enabled for India BU. The E-Invoice process should be able to pick such Credit memos as well for generation of IRN.
India GST compliance no longer requires links between credit memos and source transactions to appear in GSTR reports as post-supply adjustments. This feature enables the inclusion of on-account credit memos in GSTR reports by using the India document sequence to generate tax invoice numbers for on-account credit memos. The India E-Invoice process can then include the on-account credit memos for generation of Invoice Reference Numbers (IRN). Users can continue to use on-account credit memos for accounting adjustments in Receivables. In the current India E-Invoice flow, if the tax authority rejects a tax invoice number assigned to a Receivables transaction, the transaction is cancelled. Since cancellation is not an option in Receivables, customers can use on-account credit memos both to reverse the accounting for the Receivables transaction and ensure that the on-account credit memo is not reported to the tax authority, since it is an adjustment against the original rejected transaction.
Steps to Enable
To enable this feature, define the lookup code TAXINV_22B_OI_ONACC_CM under the ZX_OPTIN_OPTIONS lookup type to generate tax invoice numbers for on-account credit memos.
Steps to create the Lookup Code:Lookup Type: ZX_OPTIN_OPTIONS:
- Navigate to "Setup and Maintenance".
- Search for task: Manage Standard Lookups.
- Search for Lookup Type: ZX_OPTIN_OPTIONS
- If Search does not return this value, Click on '+' to create new Lookup Type.
- Enter the details as below: and save and close.
- Lookup Type: ZX_OPTIN_OPTIONS
- Meaning: Lookup type for lookup codes used for Dev Opt-in and Opt-out.
- Description: Lookup type for lookup codes used for Dev Opt-in and Opt-out.
- Module: Tax
- On ZX_OPTIN_OPTIONS Lookup Codes, see if Lookup Code: TAXINV_22B_OI_ONACC_CM is already defined. If not, Click on '+' to create new Lookup Code option.
- Enter the details as below and save and close
- Lookup Code: TAXINV_22B_OI_ONACC_CM
- Display Sequence: Any Sequence value. Say 1.
- Enabled: Checked
- Start Date: 7/1/2017
- End Date: Do not Provide any Value
- Meaning: TAXINV_22B_OI_ONACC_CM
- Description: TAXINV_22B_OI_ONACC_CM
- Tag: TAXINV_22B_OI_ONACC_CM
Tips And Considerations
- This feature will work for on-account credit memos created from Application as well as for Batch import process.
- This feature will work for unreferenced RMA Credit Memos also.
- The unique sequence for Tax Invoice Number for on-account credit memos will also be generated based on existing configuration used today for Credit Memos in India Document Numbering setups.
- The India E-Invoice process will pick up such Credit memos in the Outbound and Inbound processes.
- This feature will also work based on the flag Use AR Transaction Number as Tax Invoice Number in Localization Systems Options setup. Accordingly, E-Invoice Outbound process will pick the Receivables on-account credit memo number as Tax Invoice number and generate the XML file.
Key Resources
- For information on how to manage the fundamental India GST compliance in Oracle ERP Cloud, see the related topics.in MOS Doc Id: 2492641.1
- Oracle® Applications Financials Implementation Guide, Release 13
Role Information
You need one of these roles:
- Financial Application Administrator
- Application Implementation Consultant
- Tax Administrator
Bonus Depreciation Calculation Basis for Japan
Apply a percentage of the asset cost or annual depreciation amount to calculate bonus depreciation deductions for assets, in accordance with the accelerated depreciation requirements in Japan. Select all periods or a subset of periods to calculate the bonus depreciation.
Bonus depreciation is calculated over and above the actual depreciation charged to the asset. You can create a bonus rule with a calculation basis and bonus class with bonus rates for specific periods in the calendar or for a year as follows:
- Calculation Basis of Cost and a Bonus Class of One time depreciation.
- Calculation Basis of Cost and a Bonus Class of Special depreciation.
- Calculation Basis of Annual depreciation and a Bonus Class of Additional depreciation.
- Calculation basis of Annual depreciation and a Bonus Class of Increased depreciation.
When the rate type is Period, the rate defined is for every period in the calendar. If the rate type is Year, then the application applies the rate defined to every period in the year.
Periodic bonus depreciation amount is calculated as follows:
- Calculation Basis of Cost = Asset Cost * Bonus Rate
- Calculation Basis of Annual depreciation = Annual Depreciation Calculated as per Depreciation Method * Bonus Rate
The bonus depreciation calculated is reported in the Japanese Corporate Tax Reporting Schedule 16 based on the bonus class selected.
You can now calculate the bonus depreciation using the Cost and Annual Depreciation Calculation basis and report the calculated amounts in the Japanese Corporate Tax Reporting Schedule 16.
Steps to Enable
Use the Opt In UI to enable this feature. For instructions, refer to the Optional Uptake of New Features section of this document.
Offering: Financials No Longer Optional From: Update 23A

Create Bonus Rule
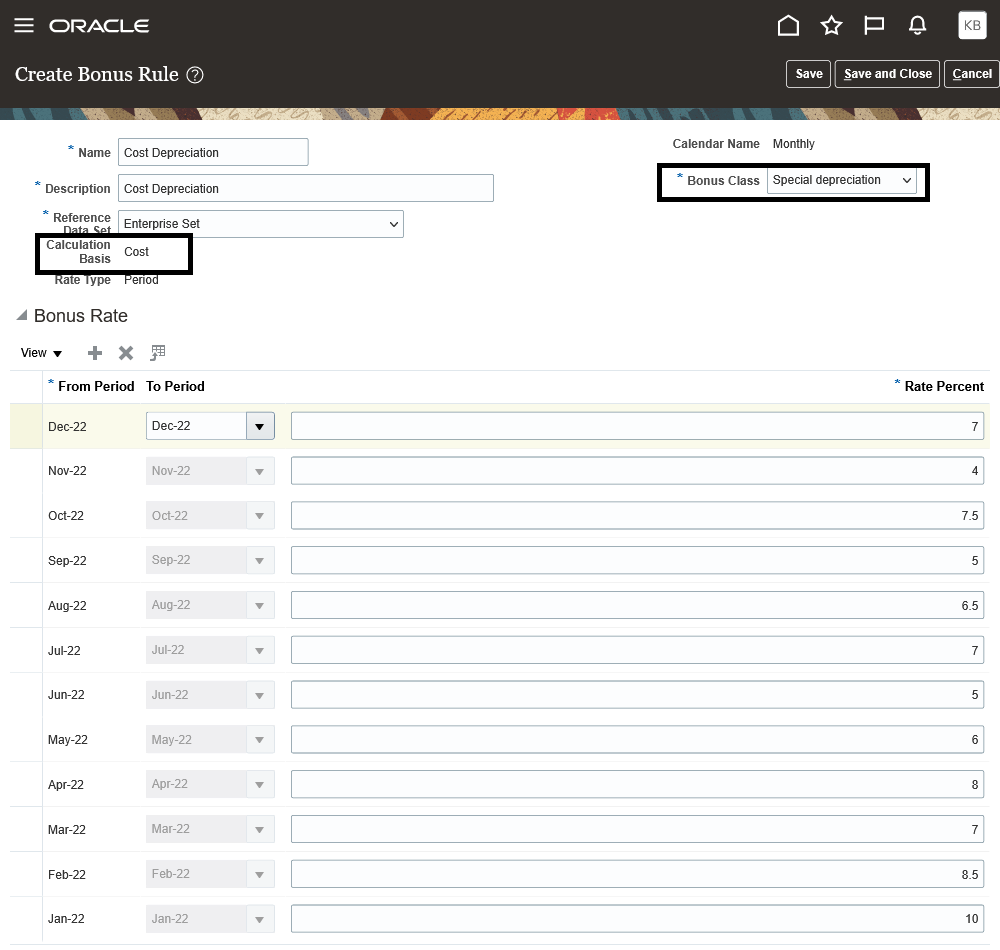
Role Information
Virtual Account Number Support in Lockbox Using Zengin Format for Japan
Include the virtual account number of a customer account or site provided by a Japanese bank in a Zengin lockbox to identify customers and process their payments. A new Zengin Format for Japan control file includes a Virtual Account Number field that can be used to identify the customer account or site for receipt creation and cash application. If the customer account cannot be identified, the alternate payer name is used to identify the customer and issue receipts.
The Virtual Account Number lockbox support includes these features:
- Enhancements to the existing Manage Alternate Name Mapping Rules UI to create and maintain Alternate Name Mapping Rules to map Virtual Account Number, Remittance Bank Number, Remittance Bank Branch Number, Alternate Payer Name, Customer Bank Name, and Customer Bank Branch to the customer account number.
- New predefined transmission format supporting VAN is called ORA_ZENGIN_LOCKBOX_VAN (arlockboximportzenginvan.ctl) with Lockbox Header and Payment Record types.
- New predefined regional information Lockboxes for Japan Global Descriptive Flexfield to configure Virtual Account Number Location and Virtual Account Number Length.
- New predefined 'Receipts for Japan' Receipts Global Descriptive Flexfield to store the additional required information for a Zengin lockbox. Starting with this release, all Zengin control files will store information in this 'Receipts for Japan' GDF rather than the 'Zengin Cash Receipts' DFF.
The existing Process Receipts through Lockbox process has been enhanced to perform the following:
- Process customer payments through lockbox using the Virtual Account Number.
- Use the Alternate Name Mapping Rules to identify the customer account connected with the receipt by using the VAN and/or Alternate payer name, as well as the remittance bank number and remittance bank branch number.
- If the check/bill number is blank in the Zengin file, create and automatically number a receipt for the payment record. The automatic number for payment record receipts is 30 characters in length and uses the format: Transmission Name_DDMMYYHHMI_SequenceNum.
- Allow download of the Manage Lockbox Transmission ADFDI to update the customer account and site to create records as identified receipts on resubmission of the process.
- Also allow download of the Manage Lockbox Transmission ADFDI to enter null values for the customer account and site to create records as unidentified receipts on resubmission of the process.
- On successful completion of the process, create the customer payment record accordingly as an identified or unidentified receipt.
- Capture additional information in the Zengin Cash Receipts GDF context for user review and research.
- The existing functionality for applying receipts to transactions remains unchanged.
This feature will be able to match the customer with receipt data using the Virtual Account Number, increasing the efficiency of the Zengin receipt customer matching process. It will reduce the number of receipts that are incorrectly matched to the wrong customers.
Steps to Enable
The following set up are predefined for this feature:
- New predefined transmission format called ORA_ZENGIN_LOCKBOX_VAN (arlockboximportzenginvan.ctl) with Lockbox Header and Payment Record types.
- Predefined context Zengin Cash Receipts under the Receipts global descriptive flexfield.
Receipt GDF Information
| Segment Name | Description |
|---|---|
| Transmission Name | Name specified by the user to identify the transmission. |
| Alternate Payer Name | EFT requestor name in the Zengin file. |
| Customer Bank Name | EFT requestor bank name in the Zengin file. |
| Customer Bank Branch Name | EFT requestor bank branch name in the Zengin file. |
| Customer Virtual Account Number | Customer VAN in the Zengin file. |
| EFT Requestor Number | EFT Requestor Number field of the Zengin file. |
| EDI Information | EDI Information field of the Zengin file. |
| Description | Description field of the Zengin file. |
| Customer Remittance Bank Branch Number | Customer remittance bank branch number. |
| Customer Remittance Bank Number |
Customer remittance bank number. |
The following setups need to be performed for processing Zengin lockbox payments:
- Set up the VAN using the Functional Setup Manager Task Manage Alternate Name Mapping Rules under the Task List Define Customer Payments.
- Setup the lockbox from the Functional Setup Manager task Manage Lockbox.
- Select Virtual Account Number Length-Length of VAN in the Zengin file.
- 7 digits VAN
- 10 digits VAN
- Select Virtual Account Number Location-Location of VAN in the Zengin file.
- EFT Requester Number
- EFT Requester Name
- EDI Information
- EFT Description
- Select Virtual Account Number Length-Length of VAN in the Zengin file.
- Scheduled Process - While running Process Receipts Through Lockbox use ORA_ZENGIN_LOCKBOX_VAN as a transmission format
Tips And Considerations
LOCKBOX BANK FILE
- Lockbox bank file names must use the prefix ‘arlockboximportzenginvan’. For example: arlockboximportzenginvan_yymmdd.
- Enhancement to existing lockbox payment file processing by automating-
- Exclude all records with the Deposit/Withdrawal Type equal 2 in the data record
- Exclude all records with the Transaction Type not equals to 11 or 14 in the data record
- Exclude all trailer and end records
- Do not include multiple header records from different remittance banks, branches, and accounts in a single lockbox bank file, as this will cause validation failure.
Manage Lockbox
- Set up Virtual Account Number Length as 7 or 10 digit
- Set up Virtual Account Number Location
- Few examples
| VAN Length | VAN Location | VAN in Alternate Name Payer Rule | VAN in Data File | VAN in Receipt GDF |
|---|---|---|---|---|
| 10 | EFT Requestor Number | 1234567890 | 1234567890 | 1234567890 |
| 7 | EFT Requestor Number | 0001234567 | 1234567 | 0001234567 |
| 10 | EFT Requestor Name | 1234567890 | 1234567890ABCDEF | 1234567890 |
| 7 | EFT Requestor Name | 0001234567 | 1234567ABCDEF | 0001234567 |
| 10 | EDI Information | 1234567890 | 1234567890 | 1234567890 |
| 7 | EDI Information | 0001234567 | 1234567 | 0001234567 |
| 10 | Description | 1234567890 | 1234567890 | 1234567890 |
| 7 | Description | 0001234567 | 1234567 | 0001234567 |
MANAGE ALTERNATE PAYER NAME RULES
- Update the existing Alternate Name Mapping Rules to optionally include Virtual Account Number, Remittance Bank Number, Remittance Bank Branch Number Zengin Customer Bank Name, Zengin Customer Bank Branch Name before the process run to increase the count of lockbox receipt records to be created with the customer identified.
- For successful matching, set up unique individual rules for each combination of VAN, alternate payer name, and customer bank/branch, based on how the information will be received from the remittance bank.
- Users can only set up rules for the customer sites for which they are authorized to handle lockbox payments.
- Establish best practices to manually update the Alternate Name Mapping Rules for new mappings for future payment processing.
- Here are a few examples of Virtual account number & Alternate Payer Name combinations-
Alternate Payer Name Rule
| Alternate Payer Name | Zengin Customer Bank Name | Zengin Customer Bank Branch Name | Remittance Bank Name | Remittance Bank Number | Remittance Bank Branch Number | Virtual Account Number | Customer Name | Customer Account Number | Bill-to Site | Active |
|---|---|---|---|---|---|---|---|---|---|---|
| ABC | ABC | ABC | CDE | 123 | 456 | 1234567890 | ABCDEF | 1001 | ABC | Yes |
| XYZ | ABC | ABC | CDE | 123 | 456 | 1234567891 | BCDEF | 1002 | BCE | Yes |
| ABC | ABC | ABC | CDE | 123 | 456 | 1234567892 | ABCDEF | 1001 | ABC | No |
| CCC | 1234567893 | CDEFG | 1003 | CDD | Yes | |||||
| DDD | ABC | ABC | 1004 | DDD | Yes |
MANAGE LOCKBOX TRANSMISSION ADFDI
-
Do not make edits to the attribute column values in the ADFDI spreadsheet. These values contain logic that identifies the records as Zengin payments.
JPK VAT Register for Poland with January 2022 Legislative Update
Generate the JPK VAT Register for Poland with the January 2022 legislative updates to comply with the latest legislative reporting requirements.
Changes valid in the JPK_V7M(2) from 1st of January 2022 are:
| Changes |
Solution |
|---|---|
| New tags DataZaplaty (Due date) and TerminPlatnosci (Payment date) in the Sales Register |
New tags Payment Date (TerminPlatnosci) and Due Date (DataZaplaty) are reported In the Sales Register and KorektaPodstawyOpodt block. To identify Correction transactions for Overdue 90 Days (Bad Debt) and Correction transactions for Overdue 90 Days (Bad Debt) paid, the new User-Defined Fiscal Classification (UDFC) codes for Due Date and for Payment Date are used. For Correction transactions for Overdue 90 Days define new Due Date UDFC. For Correction transactions for Overdue 90 Days paid define the Payment Date UDFC. |
| New tag IED in the Sales Register |
In the Sales Register new tag IED is reported and new IED User-Defined Fiscal Classification code is used. |
| Replace the symbols SW and EE with a single joint code WSTO_EE |
In the Sales Register tags SW and EE are removed and replaced with new tag WSTO_EE. Create a new Tax Reporting Type Code and new User-Defined Fiscal Classification code for WSTO_EE. |
| New tag P_660 for Internet Service Provider (LRU level) |
In the Declaration block new tag P_660 is reported. To report value 1 in the new tag P_660 define in the ORA_JEPL_JPK_VAT_PARAMETERS Standard Lookup new P_660 Lookup Code with description value 1. |
| Changes in the Header block (Naglowek) KodFormularza and WariantFormularza |
In the header KodFormularza block the values VAT-7 (22) (tag kodSystemowy) and 1-0E (tag wersjaSchemy) are reported. |
| Changes in the Declaration block (Deklaracja) |
In the header KodFormularzaDekl block the values JPK_V7M (2) (tag kodSystemowy) and 1-0E (tag wersjaSchemy) are reported. The P_53 Amount with new formula is calculated automatically by program. In the Declaration block new tags P_540, P_550 and P_660 are reported. To report value 1 in the new tags define in the ORA_JEPL_JPK_VAT_PARAMETERS Standard Lookup new P_540, P_550 and P_660 Lookup Code with description value 1. |
| Changes in the Purchase Register block |
The tag MPP removed from the Purchase Register block. |
| Changes in the Sales Register block |
The SW, EE and MPP tags removed from the file. The new WSTO_EE, IED, TerminPlatnosci and DataZaplaty tags. |
The JPK VAT Register for Poland provides the updated JPK VAT file in the JPK_V7M(2) file version, effective 1st of January 2022, in accordance with the requirements of the tax authority.
Steps to Enable
To implement the changes valid from 1st of January 2022, complete the respective application setups:
- Create a new Tax reporting type PL_TRX_ATTR_WSTO_EE and Code WSTO_EE. For new tags DataZaplaty and TerminPlatnosci define new Tax Reporting Type PL_KOREKTAPODSTAWY with new Tax Reporting Codes PL_DUE_DATE and PL_PAYMENT_DATE.
- Define User-Defined Fiscal Classification Code for Tax Reporting Type Code PL_TRX_ATTR_WSTO_EE and PL_TRX_ATTR_IED.
- Define User-Defined Fiscal Classification Code for Tax Reporting Code PL_KOREKTAPODSTAWY and Tax Reporting Codes PL_PAYMENT_DATE and PL_DUE_DATE
- Define new Lookup Codes P_540, P_550 and P_660 for the Standard Lookup code.
- Create new TBA rules with Start Date 01 January 2022 for Correction transactions for Overdue 90 days (Bad Debt). This specific correction transaction should be reported in the Declaration block in the tags as standard transaction and also in the tags P_68 and P_69.
Tips And Considerations
- Create a Receivables transaction and select a User-Defined Fiscal Classification Codes to generate tag WSTO_EE and IED.
- Create Correction transactions for Overdue 90 Days (Bad Debt) and Correction transactions for Overdue 90 Days (Bad Debt) paid and select the new User-Defined Fiscal Classification (UDFC) codes for Due Date and for Payment Date.
- Before you generate new JPK_V7M(2) file, create predefined parameter tags in the ORA_JEPL_JPK_VAT_PARAMETERS Standard Lookup.
- The generated XML file JPK_V7M(2) contains all the mandatory and conditionally mandatory tags
Key Resources
- Related Help: VAT Registers and JPK Extracts for Poland Topical Essay.
Role Information
- Assign the privilege Create JPK Extracts for Poland with the code JE_CREATE_JPK_EXTRACTS_FOR_POLAND_PRIV and JE_CREATE_JPK_EXTRACTS_FOR_POLAND_PRIV_OBI to any duty or job role.
First Party Tax Registration Number Enforcement on Payables and Receivables Transactions
Enforce the setup of First Party Tax Registration Number in countries where the tax reporting is based on this number. This ensures that the First Party Tax Registration Number is always stamped on transactions and appears on all related tax reports.
Certain ERP Cloud for Europe countries are required to report Payables and Receivables transactions to their tax authority with the correct First Party Tax Registration Number (TRN). In these countries, tax reporting requires an association between each transaction and the First Party Tax Registration Number of the designated legal entity.
To prevent the creation of Payables invoices and Receivables transactions without a First Party Tax Registration Number, TRN enforcement takes place at the time of Payables invoice validation and Receivables transaction completion.
This feature applies to Italy, Spain, France, Poland, Belgium and the United Kingdom only. You enable this feature using the ORA_JE_ENF_TRN_COUNTRY_CODES lookup type. To exclude countries from TRN enforcement, define a JE_OPTOUT_TRN_COUNTRY_CODES lookup type and provide the country code of the country that you want to exclude.
Validations on the Create Invoice page and the AutoInvoice process and Create Transaction page prevent users from creating invoices and transactions with missing First Party Tax Registration Number. The validation for Payables invoices is part of the invoice validation process. The validation for Receivables transactions created manually is to generate an error message when the user tries to complete the transaction without a TRN. The validation process for Receivables transactions created using AutoInvoice inserts an error in the RA_INTERFACE_ERRORS table for each transaction created without a TRN.
Provides enforcement of recording the legal entity First Party Tax Registration Number on all Payables and Receivables transactions, as required by the tax authorities of certain European countries.
Steps to Enable
To enable this feature, follow these steps and define the lookup type JE_ENABLE_FEATURE and the lookup code JEENFTRN:
- Go to the Manage Standard Lookups page.
- Search for the lookup type JE_ENABLE_FEATURE. If the lookup type is not defined, create one with below details:
- Lookup type: JE_ENABLE_FEATURE
- Meaning: JE_ENABLE_FEATURE
- Description: JE_ENABLE_FEATURE
- Module: Financials for EMEA
- Lookup Configuration Level: User
- REST Access Secured: Secure
- Add the new lookup code JEENFTRN to the lookup type and select the Enable check box.
- Save the data.
This feature is enabled by default only for Italy, Spain, France, Poland, Belgium and United Kingdom. For those countries, the lookup codes ORA_IT, ORA_ES, ORA_FR, ORA_PL, ORA_BE and ORA_GB are seeded in the ORA_JE_ENF_TRN_COUNTRY_CODES lookup type.
To exclude countries from TRN enforcement, define a JE_OPTOUT_TRN_COUNTRY_CODES lookup type and provide the country code (Example: FR) of the country that you want to exclude:
- Go to the Manage Standard Lookups page.
- Search for the lookup type JE_OPTOUT_TRN_COUNTRY_CODES. If the lookup type is not defined, create one with below details:
- Lookup type: JE_OPTOUT_TRN_COUNTRY_CODES
- Meaning: OptOut FP TRN Enforcement
- Description: OptOut FP TRN Enforcement
- Module: Financial Reporting
- Lookup Configuration Level: User
- REST Access Secured: Secure
- Add the new lookup code to the lookup type and select the Enable check box. In the lookup code provide the country code ES, IT, FR, PL, BE or GB of the country that you want to exclude.
- Save the data.
Tips And Considerations
First Party TRN validations:
- The validation for Payables invoices is at the time of Invoice Validation. The validation process inserts a “Missing valid first party tax registration number” system hold on the invoice. After you enter the correct legal entity First Party TRN, you recalculate taxes and validate the invoice.
- The validation for Receivables transactions created manually is to generate an error message when the user tries to complete the transaction without the correct TRN. After entering the correct legal entity First Party TRN, the user can complete the transaction.
- The validation process for Receivables transactions created using AutoInvoice is to insert an error in the RA_INTERFACE_ERRORS table for each applicable transaction with the text: “First party tax registration number is required.” After entering the correct legal entity First Party TRN for each transaction, the user can re-run the Import AutoInvoice process.
Key Resources
- Related Help: The setup steps for Legal Reporting Unit Tax Registration see in the Tax Box Allocations and Reporting Topical Essay
Role Information
No additional role is required.
Single Step Submission of Select Transactions for Tax Reporting and Tax Allocation Processes
Submit the Select Transactions for Tax Reporting and the Tax Allocation processes in one step. This streamlines and improves performance of the reporting process.
This is an enhancement to the existing Single Step Submission of Select Transactions for Tax Reporting and Tax Allocation Processes which was introduced in 21D. To enable this feature in 22B, enable manually 'Single Step Submission of Select Transactions for Tax Reporting and Tax Allocation Processes' Feature Opt In.
This feature has no impact on reporting entities that are not using the Tax Allocation Process. For those, you can continue to run the Select Transactions for Tax Reporting process independently.
For a legal reporting unit where Enable allocation is selected and 'Single Step Submission of Select Transactions for Tax Reporting and Tax Allocation Processes' Feature Opt In is enabled, the Select Transactions for Tax Reporting and Tax Allocation processes run in one step. You can't run the Select Transactions for Tax Reporting process as a standalone. When the selection process is submitted as a standalone process, it will finish with an error.
To submit the selection process and tax allocation process in one step, you just submit the Tax Allocation process. The Select Transactions for Tax Reporting process is submitted as a child process. The Tax Allocation process pauses until the selection process completes.
The 21D Lookup Code JE_21D_OI_SINGLE_TRL_EXEC is obsolete and not used. To disable 'Single Step Submission of Select Transactions for Tax Reporting and Tax Allocation Processes' Feature Opt In, the new Lookup Code JE_21D_OO_SINGLE_TRL_EXEC is used.
Submit the selection process and tax allocation process in one step:
- Navigate to the Scheduled Process page and select the Tax Allocation process.
- Define all mandatory and optional parameters.
- Submit the process.
Submit the selection and allocation process to reduce the processing time for the Tax Allocation and the Select Transactions for Tax Reporting processes and to reduce user submission steps in the period closure procedure.
Steps to Enable
To enable this feature, follow these steps in the Feature Opt In:
- Go to the Setup and Maintenance - Setup: Financials - Change Feature Opt In.
- Select Financials - Feature: Single Step Submission of Select Transactions for Tax Reporting and Tax Allocation Processes
- Select Enable check box and save changes.
To disable 'Single Step Submission of Select Transactions for Tax Reporting and Tax Allocation Processes' Feature Opt In, the new Lookup Code JE_21D_OO_SINGLE_TRL_EXEC is used.
Tips And Considerations
Before you use this feature, you must enable the Opt In Single Step Submission of Select Transactions for Tax Reporting and Tax Allocation Processes feature.
Key Resources
- Related Help: Global Implementation Resources (Doc ID 2579071.1), Tax Box Allocations and Reporting Topical Essay
Role Information
- Assign the following privileges to your Tax Manager role:
- Prepare Tax Selection Processing (JE_PREPARE_TAX_SELECTION_PROCESSING_PRIV)
- Prepare Tax Allocations (JE_PREPARE_TAX_ALLOCATIONS_PRIV)
- Prepare Tax Box Allocation Rules (JE_PREPARE_TAX_BOX_ALLOCATION_RULES_PRIV)
- Prepare Tax Allocation Listing (JE_PREPARE_TAX_ALLOCATION_LISTING_PRIV)
- Prepare Tax Allocation Rules Listing (JE_PREPARE_TAX_ALLOCATION_RULES_LISTING_PRIV)
- Prepare Tax Final Reporting (JE_PREPARE_TAX_FINAL_REPORTING_PRIV)
U.S. Federal Treasury Payment Schedules
Confirm federal payments made to the Treasury and create budgetary accounting for Treasury confirmation transactions that complies with the U.S. Standard General Ledger requirements.
Use the Manage Treasury Payment Schedules page to record Treasury confirmation information such as confirmation date and check number range. When the page is opened, all payment process request (PPR) records that are ready for confirmation and have the Unconfirmed status are automatically displayed. After entering the confirmation date, the payment check range type and numbers, the record is ready to be confirmed. The Treasury Confirmation process is submitted when you click the Submit button. The process changes the status of the PPR to Confirmed. Submit the Create Accounting process to create the corresponding accounting entries for Treasury confirmation.
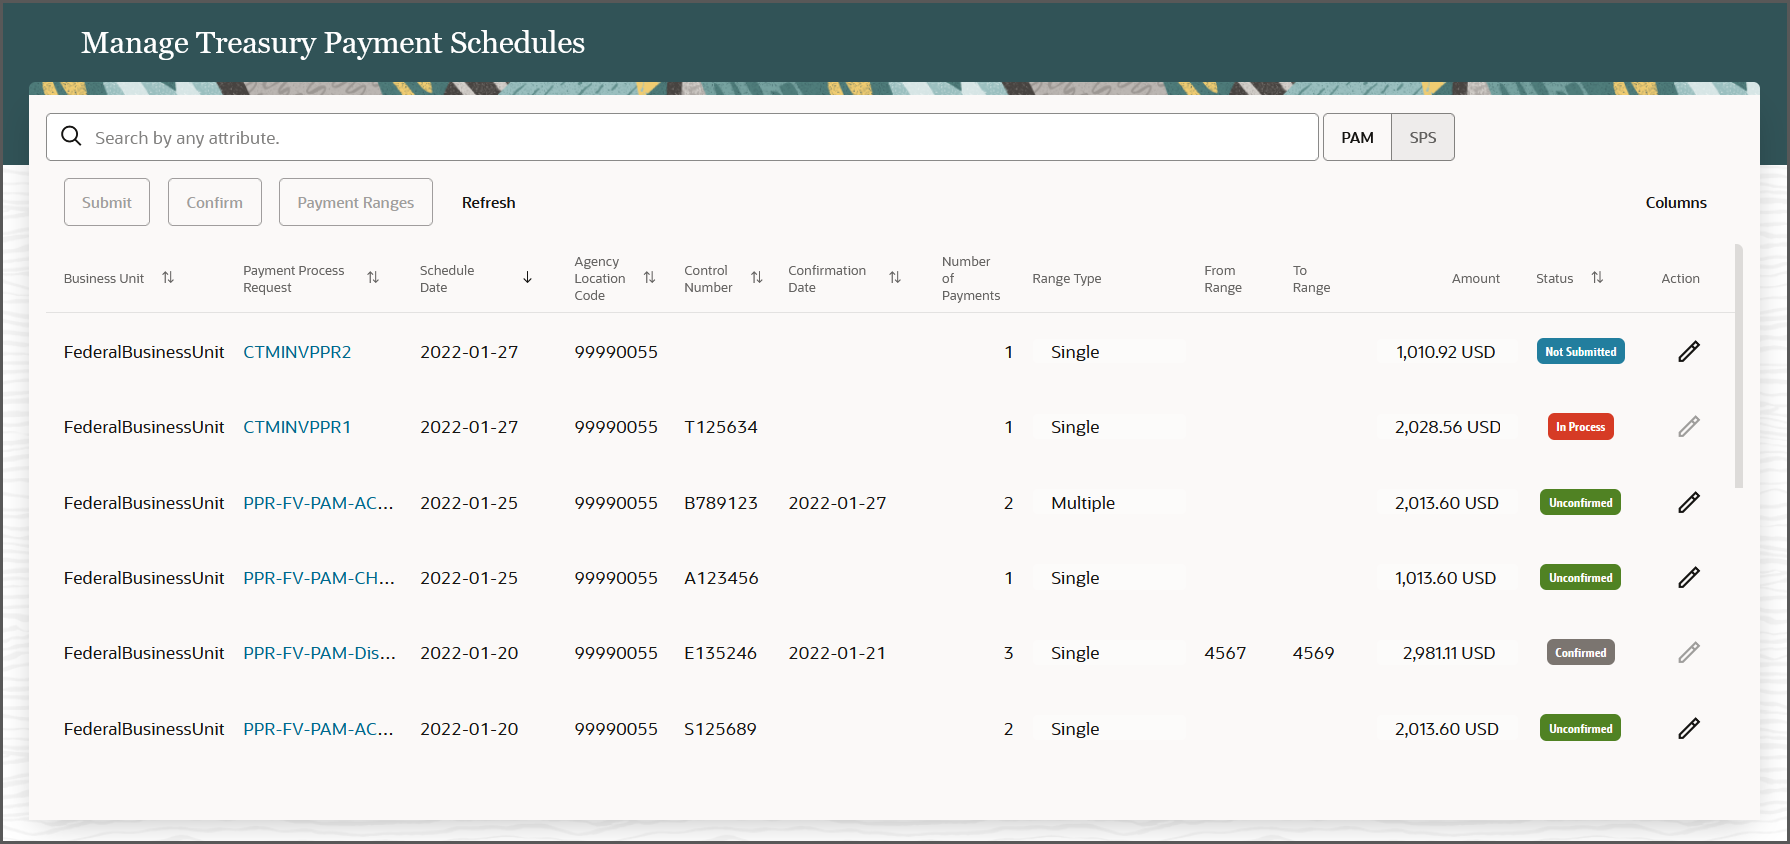
Manage Treasury Payment Schedules Page
If there is a gap in the otherwise sequential check numbers, you can enter multiple check number ranges by changing the range type from single to multiple. You can enter multiple check number ranges on the Payment Ranges window. Note that the number of checks across the multiple payment ranges must be equal to the number of payments in the PPR.
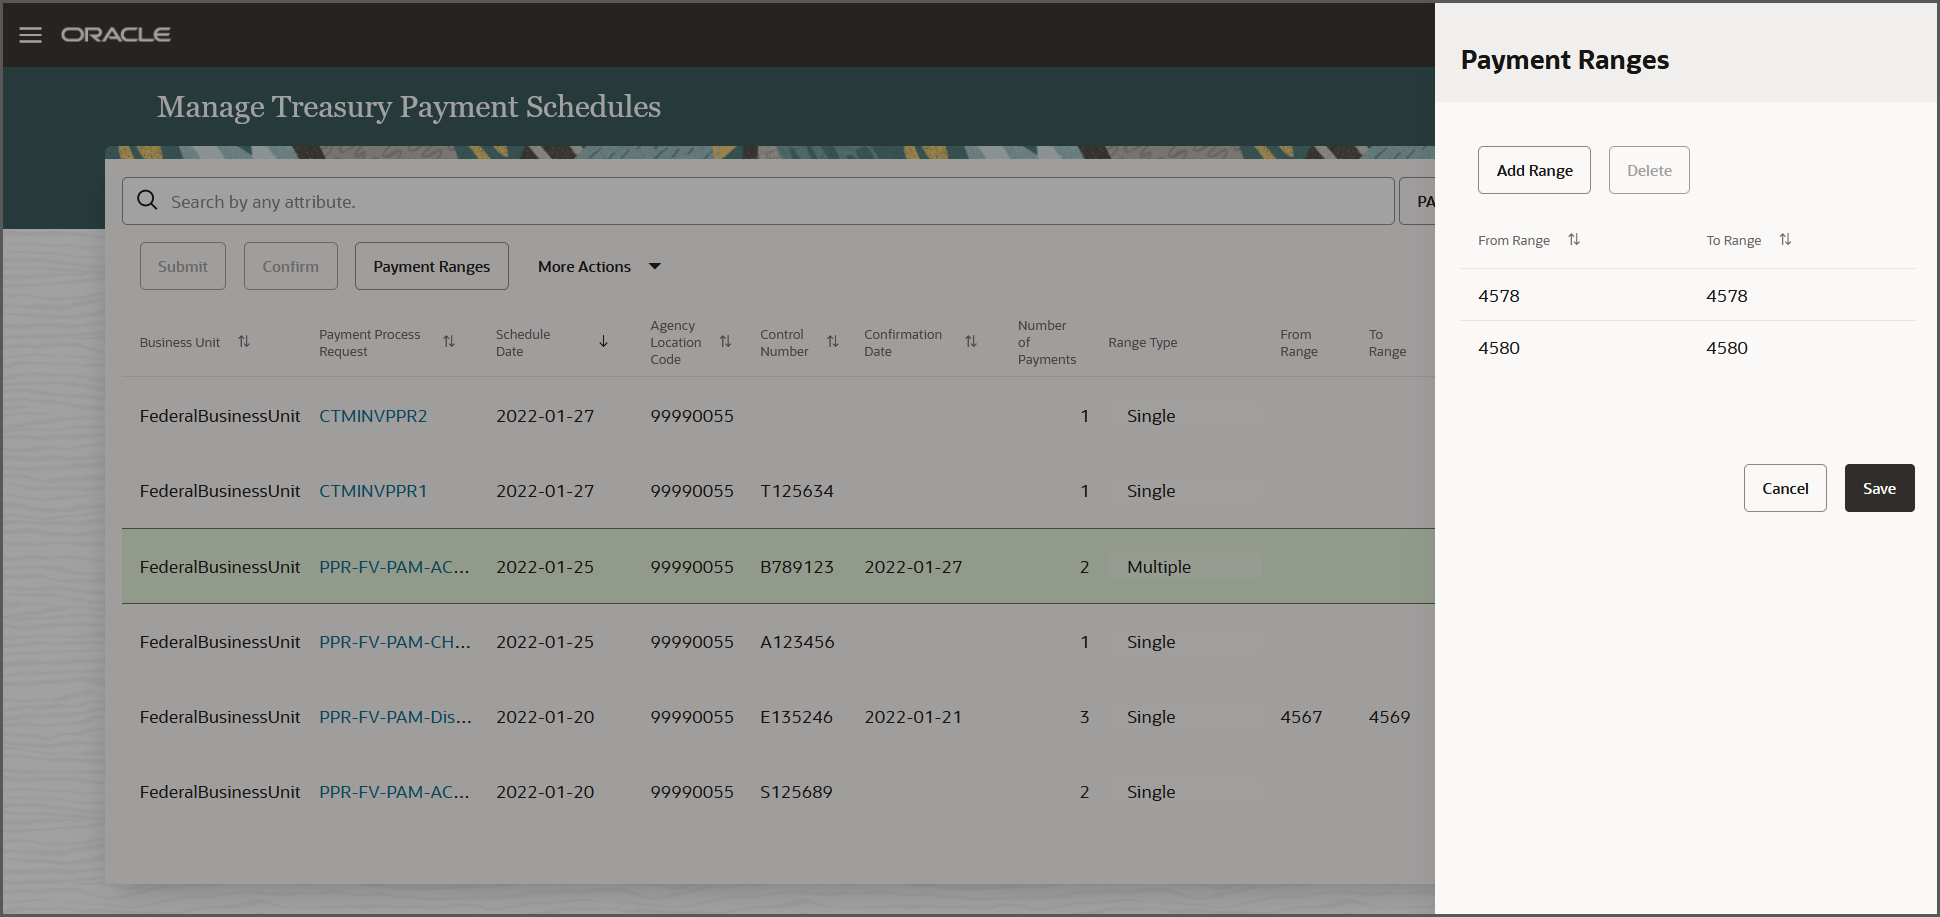
Manage Treasury Payment Schedules Page - Payment Ranges
If you need to record an offset amount against a payment, you can enter the offset amount by using the Offset button on the Manage Treasury Payments page. To create an offset against the payment, enter the offset Treasury payment number, the name of the offset party, and the offset amount. The net payment amount is automatically calculated based on the difference of the original payment amount and the offset amount.

Manage Treasury Payments Page - Offset
The benefits of using the U.S. Federal Treasury Payment Schedules feature are:
- Ability to create the summary payment schedules and the treasury confirmation on the same page without the need to navigate to any other page, enabling you to complete your tasks more quickly.
Ability to query the status of the PPRs on the same page regardless of their summary schedules or Treasury confirmation status, thus saving time in finding the correct PPR.
Steps to Enable
- U.S. Federal Financials must be enabled.
- The Federal Payables Management Duty role (ORA_FV_FEDERAL_PAYABLES_MANAGEMENT_DUTY) must be assigned to a job role that the user has access to and uses to manage payments.
- The Federal Payables Management Duty role must have the Manage Federal Treasury Confirmation privilege assigned.
- To confirm treasury payment schedules, you must have the Confirm Treasury Schedules (ORA_FV_TC_CONFIRM_PRIV) privilege assigned to your role.
- To back out treasury payment schedules, you must have the Back Out Treasury Schedules (ORA_FV_TC_BACKOUT_PRIV) privilege assigned to your role.
- To delete treasury payment schedules, you must have the Delete Treasury Schedules (ORA_FV_TC_DELETE_PRIV) privilege assigned to your role.
IMPORTANT Actions and Considerations
DEPRECATION OF OLDER DIGITAL ASSISTANT SKILL VERSIONS
The Digital Assistant and its skills continuously receive updates as they get smarter and provide enhanced conversational experiences. Check for updated versions every release in the Skill Store. Versions stop working when the underlying platform version becomes inactive, at the longest 2 years after release.
The Expenses skill built using Oracle Digital Assistant platform version 20.08 is deprecated. You can continue the use of your skill in platform version 20.08, however no updates or bug fixes for this specific version of the skill will be provided. We encourage you to move to the latest version of the Expenses skill at the earliest opportunity.
The 20.08 platform version of the Expenses skill will be removed from the Skill Store in six months.
DEPRECATION OF PAYMENT INFOTILE
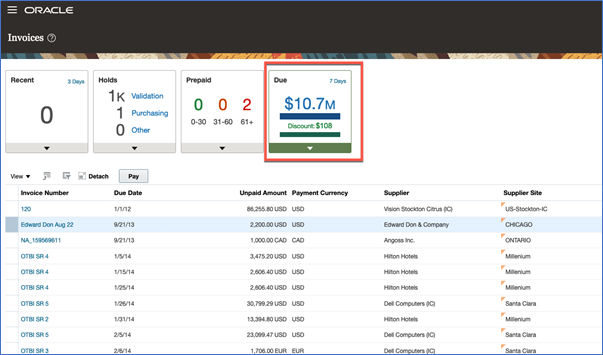
Invoices Landing Page
The Payment infotile on the Invoices landing page displays the total amount due for payment by the currency. Clicking the amount displays the invoices due in the subsequent table. The Payment infotile will no longer be available from update 22C onwards. However, you can still retrieve the information from the Payment infotile using the suggested alternatives.
- Option A: Manage Invoices - Saved Search: Create a saved search to get the supplier invoice balance for validated/approved and fully/partially unpaid invoices.
- Option B: OTBI - Supplier Dashboard: Deploy catalog to get supplier and invoice outstanding balances.
Detailed steps for the above options are explained in MOS Note Alternate Options for Supplier Outstanding Balance (Doc ID 2871676.1) on My Oracle Support.