- Revision History
- Overview
- Optional Uptake of New Features (Opt In)
- Feature Summary
- Financials Common
- Accounting and Control
-
- Budgetary Control
- General Ledger
- Intercompany
- Joint Venture Management
-
- Carried Interest Configuration Usability Improvements, Distribution Reversal, and Retroactive Billing Adjustments
- Joint Venture Definition Management Using a Spreadsheet
- Joint Venture Definition Usability Improvements
- Mass Reversal for Joint Venture Distributions
- Operational Reporting for Oracle Joint Venture Management Improvements
- Periodic Adjustments for Overhead Method Rates and Percentages
-
- Subledger Accounting
- Payables and Expenses
-
- Expenses
- Payables
-
- Automatic Reevaluation and Release of Duplicate Invoice Holds
- Matching of Invoices with Purchase Order Lines with Supplier Credit from Supplier Portal
- Maturity Date Parameter Increment for Update Matured Bills Payable Status Schedule Runs
- Payment Priority Update on Payment Request Invoice Installments Using a REST API
- Performance Evaluation Reports for Intelligent Account Combination Defaulting
-
- Payments
- Receivables and Cash
- Asset and Lease Management
- Region and Country-Specific Features
-
- Brazil
-
- Bulk Processing of Fiscal Documents Based on Shipping Transactions for Brazil
- Bulk Processing of Void and Cancel Actions for Fiscal Documents for Brazil
- Document Sequencing for Non-Electronic Brazilian Fiscal Documents
- Receivables Transaction Date Update for Brazilian Fiscal Documents in Process Using a REST API
-
- Spain
- Regional Shared Features
- Brazil
- U.S. Federal Financials
Update 23B
Revision History
This document will continue to evolve as existing sections change and new information is added. All updates appear in the following table:
| Date | Module | Feature | Notes |
|---|---|---|---|
| 10 DEC 2025 | Payables | Search and Update Suppliers Assigned to Dynamic Discounting Campaigns | Removed feature from update 23B. |
| 28 JUL 2023 | Subledger Accounting | Suspense Account Clean Up Assistance | Updated document. Delivered new feature in update 23B. |
| 01 JUN 2023 | Regional Shared Features | Impact of Performance Improvements for the Account Analysis Report on Subledger Accounting Reporting Account Analysis Reports | Updated document. Added link with additional information. |
| 01 JUN 2023 | Subledger Accounting | Performance Improvements on the Account Analysis Report | Updated document. Added link with additional information. |
| 31 MAY 2023 | Subledger Accounting | Subledger Journal Description Language Configuration | Updated document. Added additional Tips and Considerations. |
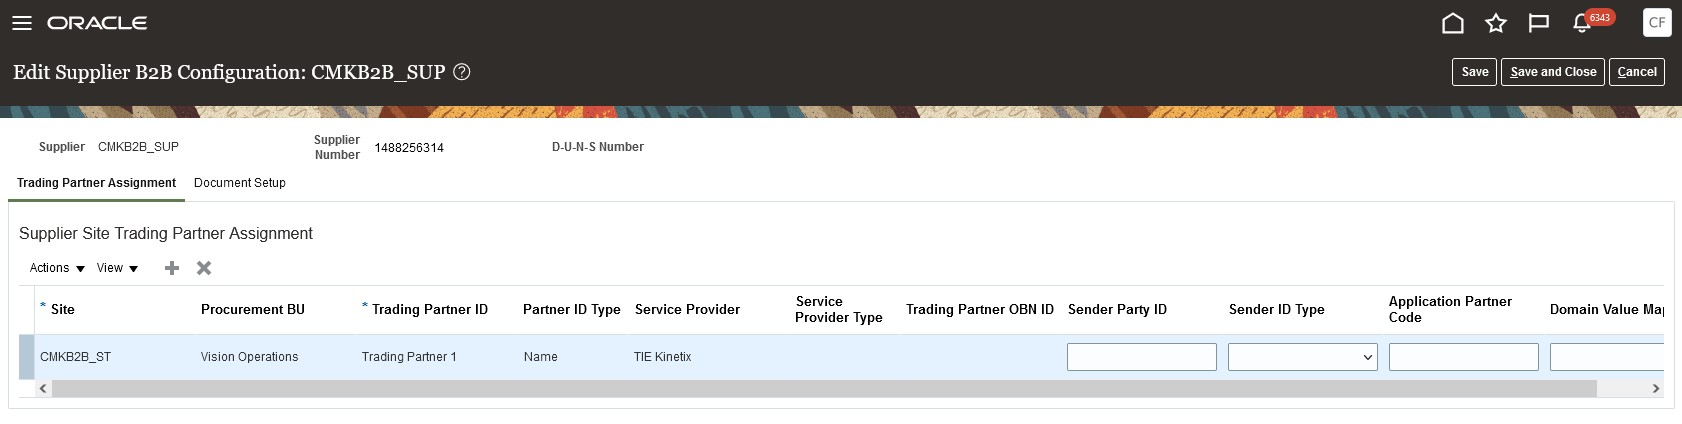
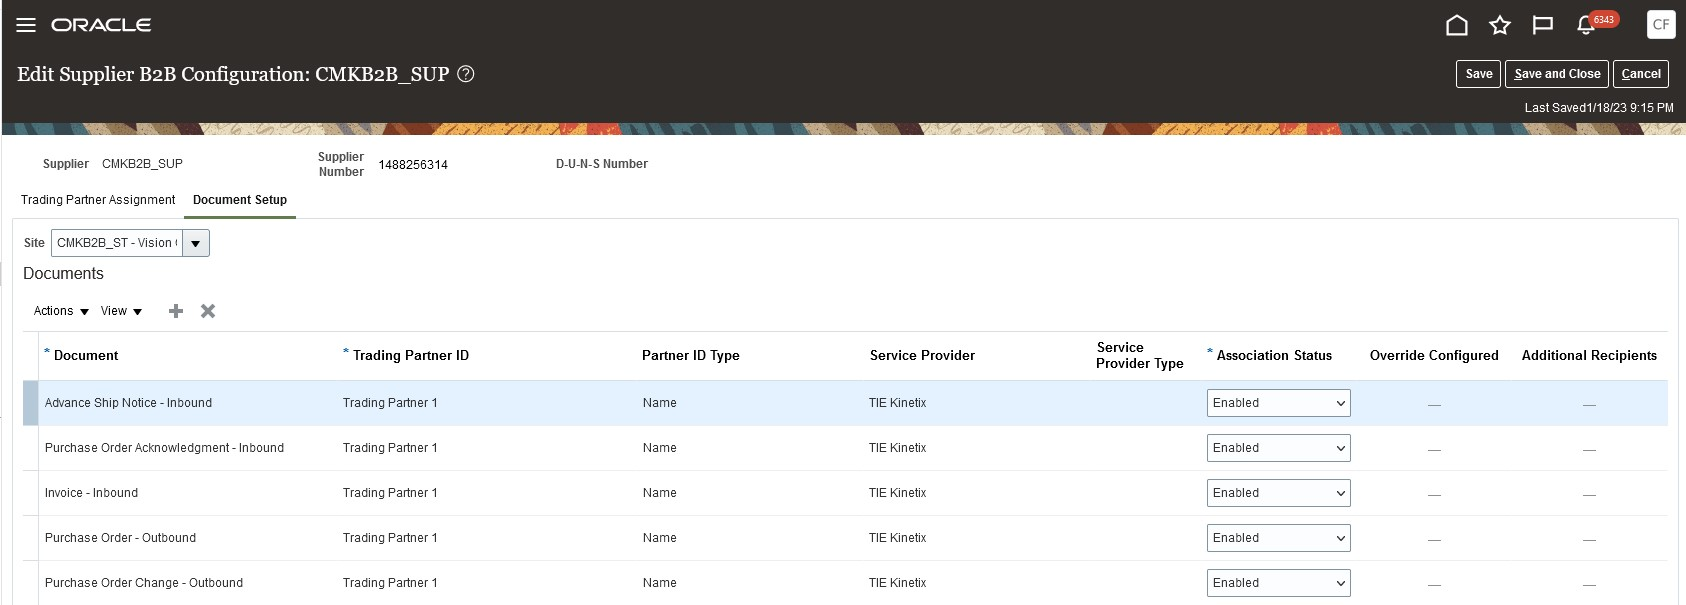
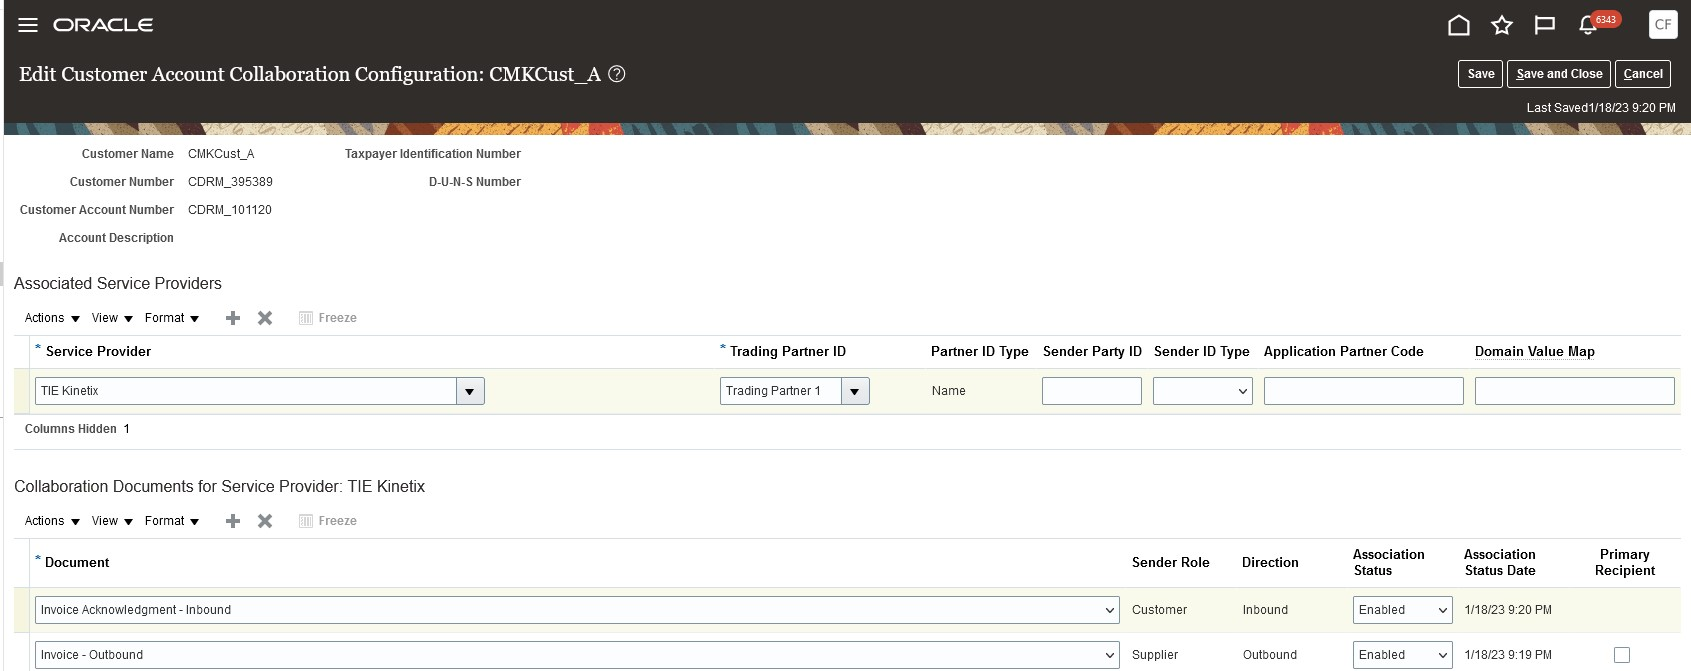
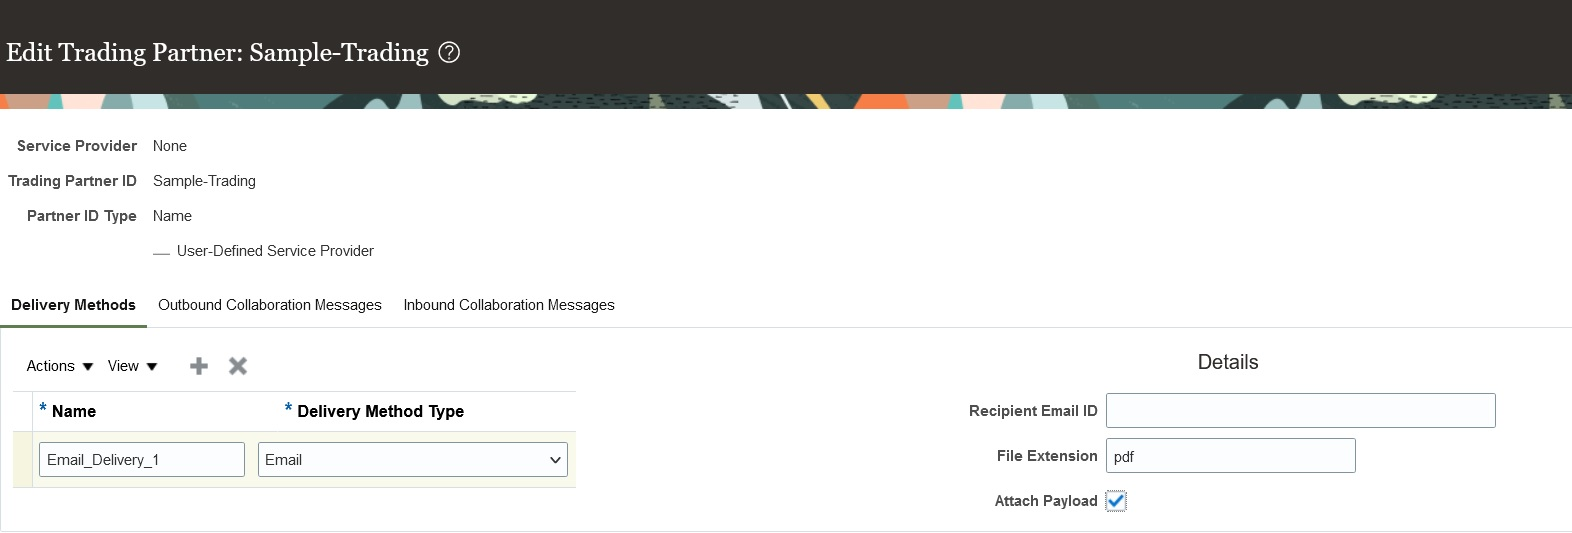
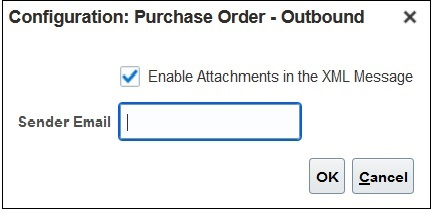
| 31 MAY 2023 | Collaboration Messaging Framework |
Specify the Sender's Email Address for Outbound B2B Messages | Updated document. Revised feature description. |
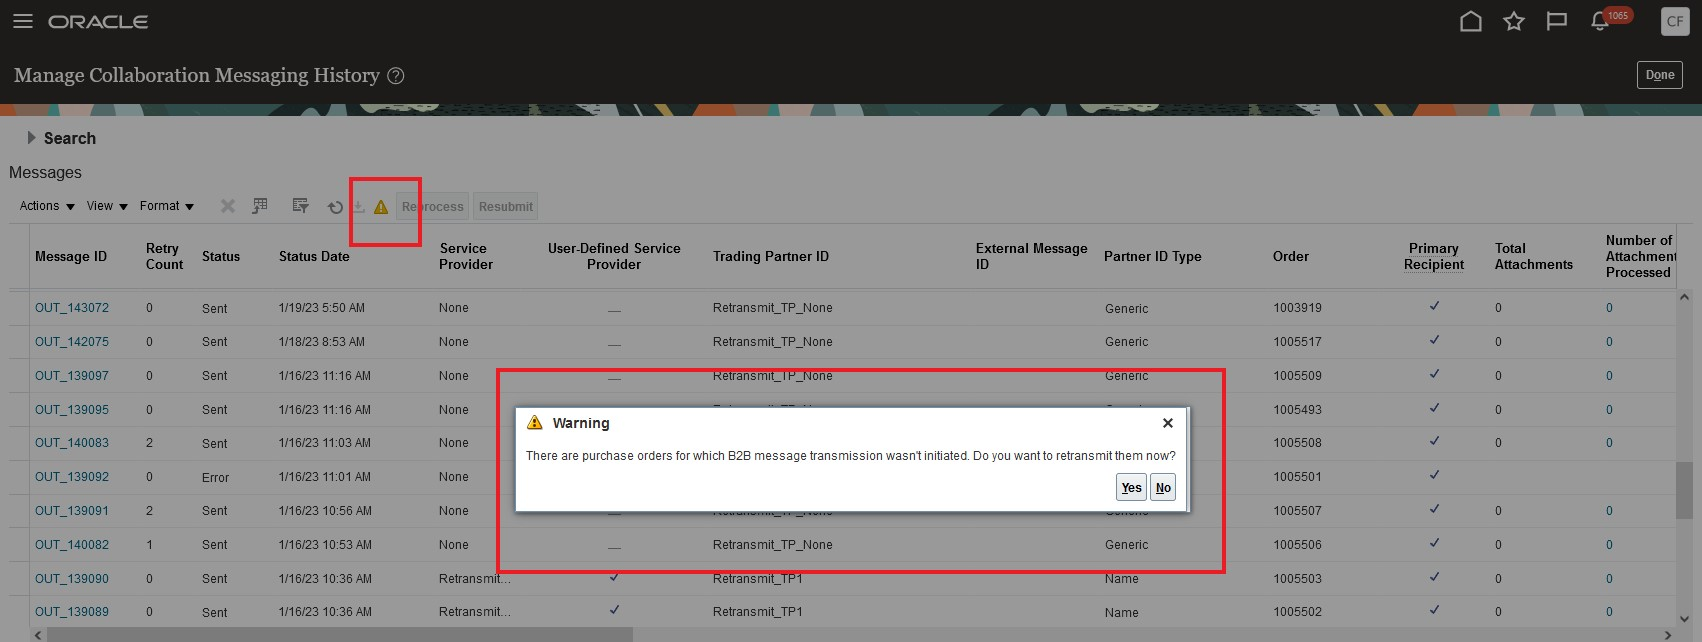
| 31 MAY 2023 | Collaboration Messaging Framework |
Retransmit Unsuccessful B2B Messaging-Enabled Purchase Orders | Updated document. Added a feature that was backported in the May monthly update of 23B. |
| 22 MAY 2023 | Payables | Automatic Reevaluation and Release of Duplicate Invoice Holds | Updated document. Added key resource link. |
| 19 MAY 2023 | Financials Common | Simplified Workflow Rules Configuration Enforcement for Journal and Invoice Approval Workflows | Updated document. Delivered new feature in update 23B. |
| 27 APR 2023 | Subledger Accounting | Performance Improvements on the Account Analysis Report | Updated document. Delivered new feature in update 23B. |
| 27 APR 2023 | Regional Shared Features | Impact of Performance Improvements for the Account Analysis Report on Subledger Accounting Reporting Account Analysis Reports | Updated document. Delivered new feature in update 23B. |
| 27 APR 2023 | Collaboration Messaging Framework | Define the File Extension for Your B2B Messages Delivered by Email or an Oracle Content Repository | Updated document. Added a feature that was backported in the April monthly update of 23B. |
| 27 APR 2023 | Collaboration Messaging Framework | Specify the Sender's Email Address for Outbound B2B Messages | Updated document. Added a feature that was backported in the April monthly update of 23B. |
| 31 MAR 2023 | Assets | Invoice Accounting Date Display for Lines Transferred from Payables to Fixed Assets | Updated document. Revised business benefits. |
| 31 MAR 2023 | Payables | Performance Evaluation Reports for Intelligent Account Combination Defaulting |
Updated document. Delivered new feature in update 23B. |
| 03 MAR 2023 | Created initial document. |
Overview
 HAVE AN IDEA?
We’re here and we’re listening. If you have a suggestion on how to make our cloud services even better then go ahead and tell us. There are several ways to submit your ideas, for example, through the Ideas Lab on Oracle Customer Connect. Wherever you see this icon after the feature name it means we delivered one of your ideas.
GIVE US FEEDBACK
We welcome your comments and suggestions to improve the content. Please send us your feedback at oracle_fusion_applications_help_ww_grp@oracle.com.
DISCLAIMER
The information contained in this document may include statements about Oracle’s product development plans. Many factors can materially affect Oracle’s product development plans and the nature and timing of future product releases. Accordingly, this Information is provided to you solely for information only, is not a commitment to deliver any material, code, or functionality, and should not be relied upon in making purchasing decisions. The development, release, and timing of any features or functionality described remains at the sole discretion of Oracle.
This information may not be incorporated into any contractual agreement with Oracle or its subsidiaries or affiliates. Oracle specifically disclaims any liability with respect to this information. Refer to the Legal Notices and Terms of Use for further information.
Optional Uptake of New Features (Opt In)
Oracle Cloud Applications delivers new updates every quarter. This means every three months you'll receive new functionality to help you efficiently and effectively manage your business. Some features are delivered Enabled meaning they are immediately available to end users. Other features are delivered Disabled meaning you have to take action to make available. Features delivered Disabled can be activated for end users by stepping through the following instructions using the following privileges:
- Review Applications Offering (ASM_REVIEW_APPLICATIONS_OFFERINGS_PRIV)
- Configure Oracle Fusion Applications Offering (ASM_CONFIGURE_OFFERING_PRIV)
Here’s how you opt in to new features:
- Click Navigator > My Enterprise > New Features.
- On the Features Overview page, select your offering to review new features specific to it. Or, you can leave the default selection All Enabled Offerings to review new features for all offerings.
- On the New Features tab, review the new features and check the opt-in status of the feature in the Enabled column. If a feature has already been enabled, you will see a check mark. Otherwise, you will see an icon to enable the feature.
- Click the icon in the Enabled column and complete the steps to enable the feature.
In some cases, you might want to opt in to a feature that's not listed in the New Features work area. Here's how to opt in:
- Click Navigator > My Enterprise > Offerings.
- On the Offerings page, select your offering, and then click Opt In Features.
- On the Opt In page, click the Edit Features (pencil) icon for the offering, or for the functional area that includes your feature.
- On the Edit Features page, complete the steps to enable the feature.
For more information and detailed instructions on opting in to new features for your offering, see Configure Offerings.
Opt In Expiration
Occasionally, features delivered Disabled via Opt In may be enabled automatically in a future update. This is known as an Opt In Expiration. If your cloud service has any Opt In Expirations you will see a related tab in this document. Click on that tab to see when the feature was originally delivered Disabled, and when the Opt In will expire, potentially automatically enabling the feature. You can also click here to see features with Opt In Expirations across all Oracle Cloud Applications.
Feature Summary
Column Definitions:
Report = New or modified, Oracle-delivered, ready to run reports.
UI or Process-Based: Small Scale = These UI or process-based features are typically comprised of minor field, validation, or program changes. Therefore, the potential impact to users is minimal.
UI or Process-Based: Larger Scale* = These UI or process-based features have more complex designs. Therefore, the potential impact to users is higher.
Features Delivered Disabled = Action is needed BEFORE these features can be used by END USERS. These features are delivered disabled and you choose if and when to enable them. For example, a) new or expanded BI subject areas need to first be incorporated into reports, b) Integration is required to utilize new web services, or c) features must be assigned to user roles before they can be accessed.
Financials Common
Common Financials
Service Excellence Continuing Investments
Our ongoing investment in service excellence has a focus on overall usability, resiliency, performance, and security. This work is based on monitoring performance trends, reviewing common use patterns, analyzing service requests, and participating in many discussions with customers.
In this update, our ongoing investment in service excellence includes improvements in the following areas:
Performance
- Improved performance of Import Auto Invoice and Create Receivables Accounting process.
- Improved performance of the Receivables Aging by General Ledger Account Report by generating the aging data and populating the extract tables using a non-BIP-based process. The BIP-based process is used only to extract data from the tables and generate the report.
- Improved performance of the streaming process to reduce delay in updating the Budgetary Control cube and provide more accurate balances on the Budgetary Control dashboard.
- Improved performance of the Budgetary Control validation engine. This helps reduce budgetary control processing time when multiple processes are running at the same time that require budgetary control validation.
- Enabled parallel processing of Customer Statement delivery Business Intelligence bursting process for processing high-volume statements.
- Enabled parallel processing of Automatic Receipt Remittance process for faster processing of extremely high-volume remittances.
Usability
- Submit Synchronize Transaction Workflow Status process for a specific workflow by selecting either Invoice Approval or Journal Approval, to generate a spreadsheet report with records for the selected workflow only.
- Submit the Synchronize Transaction Workflow Status ESS process for a specific supplier in Invoice Approval by selecting the Supplier Name option, which displays and allows recovery action only on transactions specific to the selected supplier. Note that this option is available only for Invoice Approval workflow.
Resiliency
- Select a recovery action for stuck transactions using the Synchronize Transaction Workflow Status With File Upload option. This option provides flexibility by allowing users to choose an action for each record in the spreadsheet, either Withdraw or Force Approve and upload it when submitting the process. Note: Force Approve action is only available if the ‘FUN_ENABLE_FORCEAPPROVE_FROM_STUCK_TRANS_ESSJOB’ profile option is created and set True.
Steps to Enable
You don't need to do anything to enable this feature.
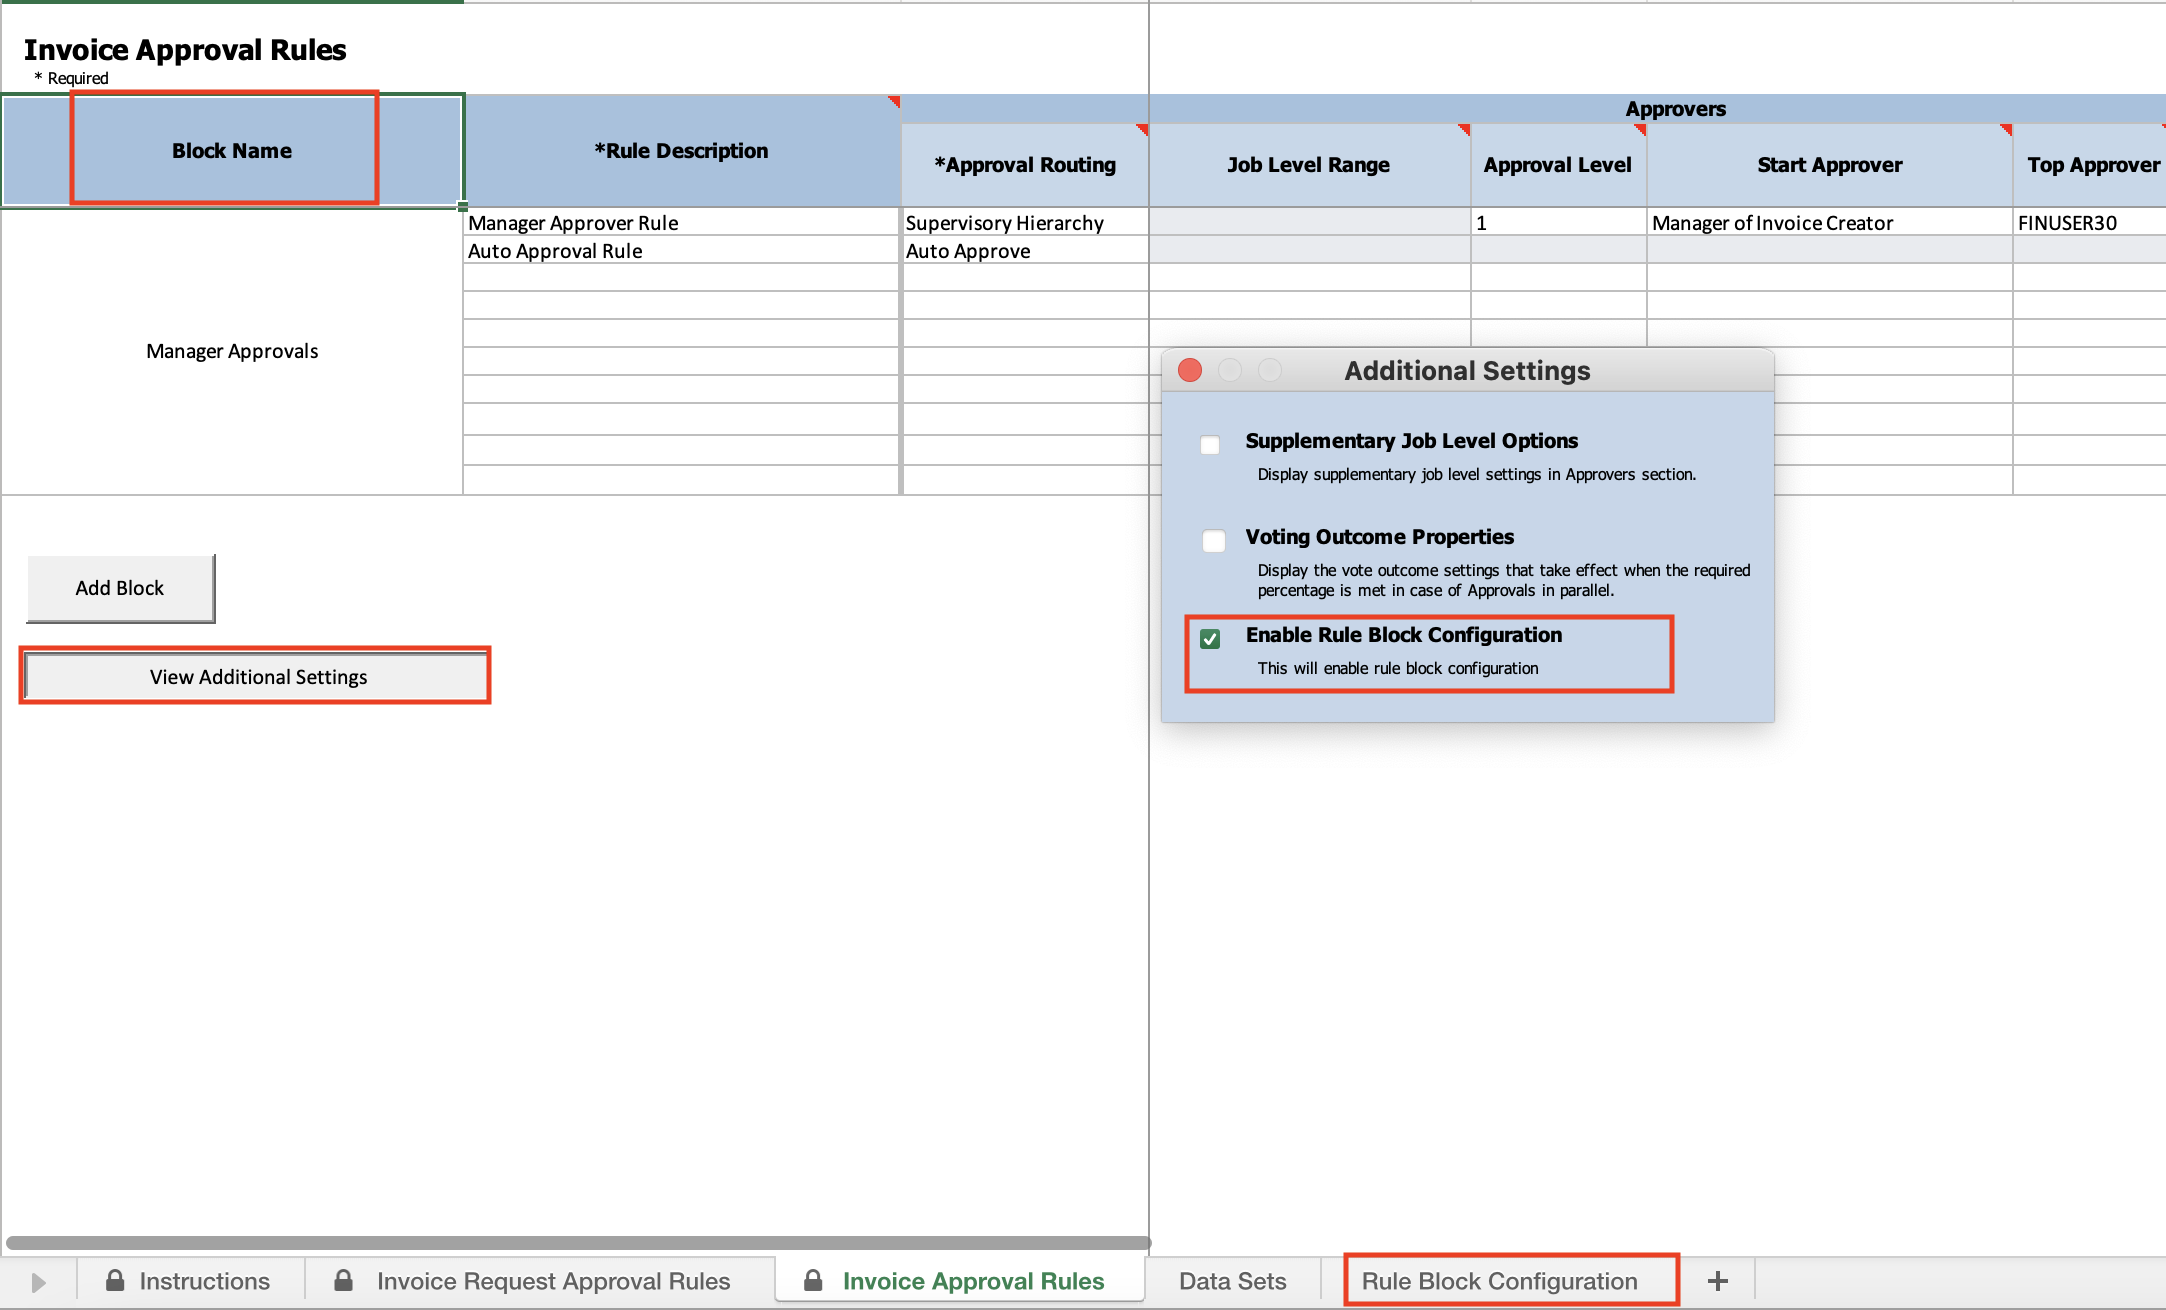
Simplified Workflow Rules Configuration
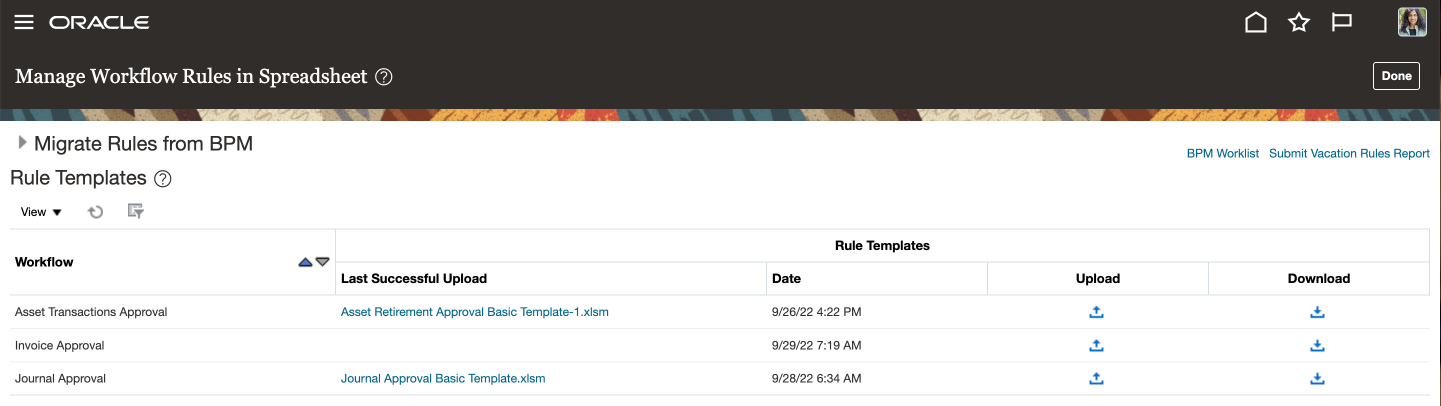
Use the Simplified Workflow Rules Configuration feature to create workflow rules using spreadsheets for Payables Invoice Approval and General Ledger Journal Approval workflows. Download the templates using the Manage Workflow Rules in Spreadsheet task to create and manage workflow rules according to your approval policies.
This feature was introduced in update 18C. In addition to the existing features, the 23B update also lets you to do the following:
- Name the rule blocks for organizing and ease of understanding.
- Initiate various approvals in parallel.
- Configure or model the blocks to facilitate better approval routing.
Naming rules blocks can help to organise the approval process and make it easier for users to understand and navigate, as users can clearly see the purpose and function of each block.
Rule block configuration can increase the accuracy of decisions made during the approval process, as it is easier to track the flow of approvals and identify any potential issues or bottlenecks in the process. It allows for easy configuration and adaptation to specific business needs. Additional advantages include,
- Ability to ensure that each participant has reviewed and approved the item before it moves on to the next stage of the process.
- Faster approval times, as multiple participants can review and approve the item simultaneously.
- A greater number of participants can be involved in the approval process, as different participants may have different areas of expertise.
Steps to Enable
You don't need to do anything to enable this feature.
Tips And Considerations
Naming the Rules Block
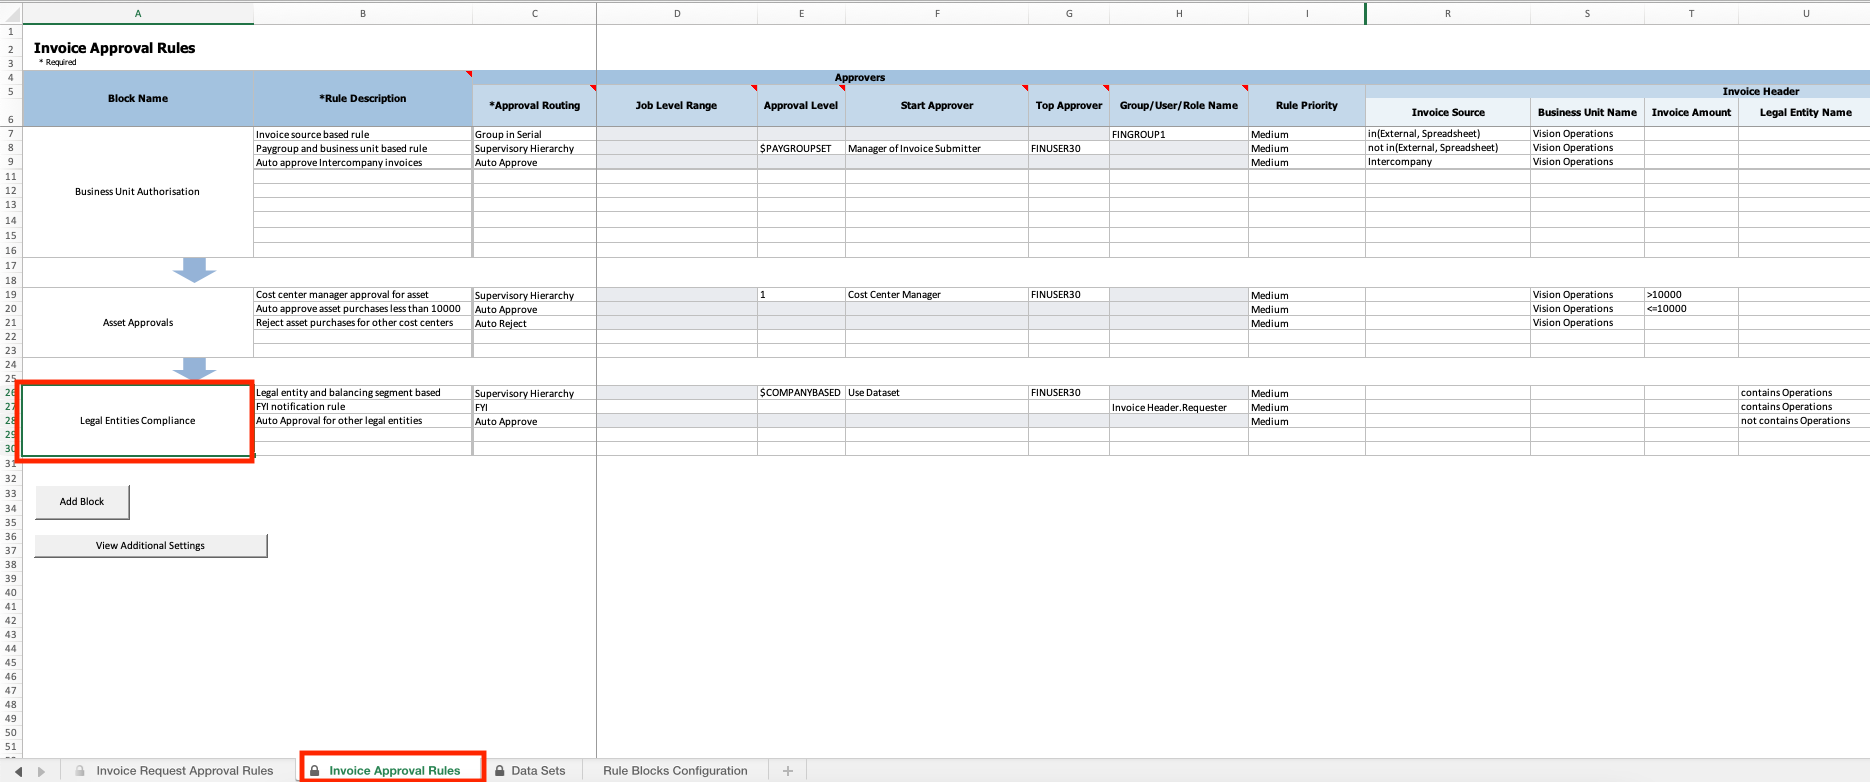
You may enter any legible name describing the rules defined in the block for a block name in the respective column. E.g. Refer screenshot below for block with block name in first column.
Enabling Rule Block Configuration
By default, all the blocks will be executed in serial in the order they are defined in the rules sheet.
Users may Enable Rule Block Configuration by following the below steps,
- Click on View Additional Settings.
- Select the Enable Rule Block Configuration checkbox.
- This will open new sheet where users can define block configuration in different levels.
- Blocks must be named in order to be used in configuration sheet.
Arranging Rule Blocks for Parallel Execution
You may enter multiple rule blocks in one level such that execution of rules configured in those blocks will occur simultaneously. In the example below, you can see both approval processes - Asset Approvals and Legal Entities Compliance - are in one level, therefore initiated at once.


Key Resources
- For an overview of the Simplified Workflow Rules Configuration feature, refer to the Manage Workflow Rules Using a Spreadsheet topic on the Oracle Help Center.
Access Requirements
- To use simplified workflow rules configuration, you need this role:
- Financial Application Administrator
Simplified Workflow Rules Configuration Enforcement for Journal and Invoice Approval Workflows
Use the Simplified Workflow Rules Configuration (SRC) feature to create workflow rules using spreadsheet for Payables Invoice Approval and General Ledger Journal Approval workflows. Download the templates from the Manage Workflow Rules in Spreadsheet task page to create and manage workflow approval rules according to the company policies.
In 23B, this feature is included by default for new customers of the Invoice and Journal approval workflows. Use the Simplified Workflow Rules spreadsheet to configure approval rules for these workflows. There is no change for existing customers.
Business benefits include:
- Provides simple setup and management of approval rules using the spreadsheet.
- Saves time and effort when managing a large number of approval rules.
Steps to Enable
You don't need to do anything to enable this feature.
Tips And Considerations
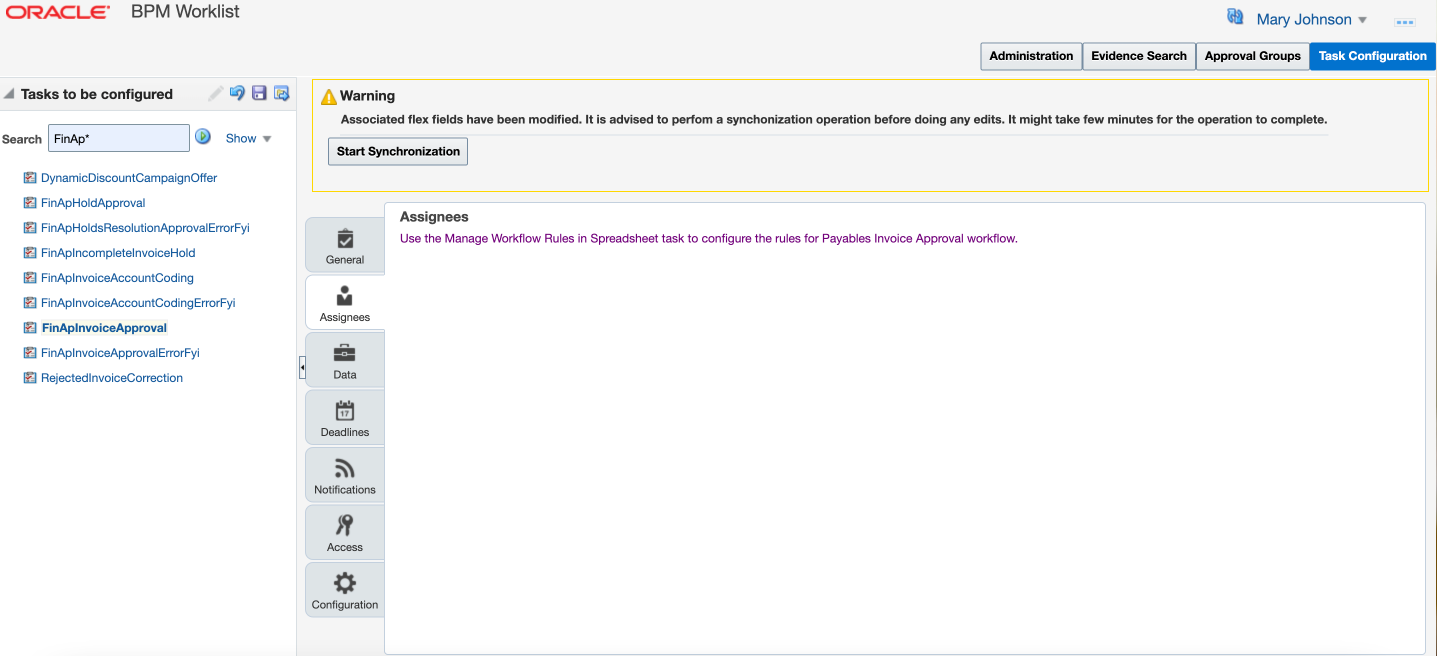
- BPM UI Change for New Users of Approvals Workflow: New customers of the Invoice and Journal approval workflows are redirected from the Assignees tab of the Invoice and Approval Workflow in BPM to the Manage Workflow Rules in Spreadsheet task page.

- Existing customers who use the Invoice and Journal approval workflows in all PODs will continue to use BPM to set up approval rules.
- Existing customers who use either of the workflows in the TEST/DEV POD, but did not migrate changes to the Production POD, no longer have access to the Assignees tab. Use either of these options to configure rules in the Production POD:
- Migrate approval rules from TEST/DEV PODs to the SRC spreadsheet and use the Manage Workflow Rules using Spreadsheet task to configure rules.
- Raise a service request to enable BPM.
Key Resources
- For an overview of how to configure approval rules using Simplified Workflow Rules Configuration feature, refer to Simplified Rules Configuration Support page.
Access Requirements
To use simplified workflow rules configuration, you need this role:
- Financial Application Administrator
Accounting and Control
Budgetary Control
Budgetary Control Validation of Journal Entries Only During Month End
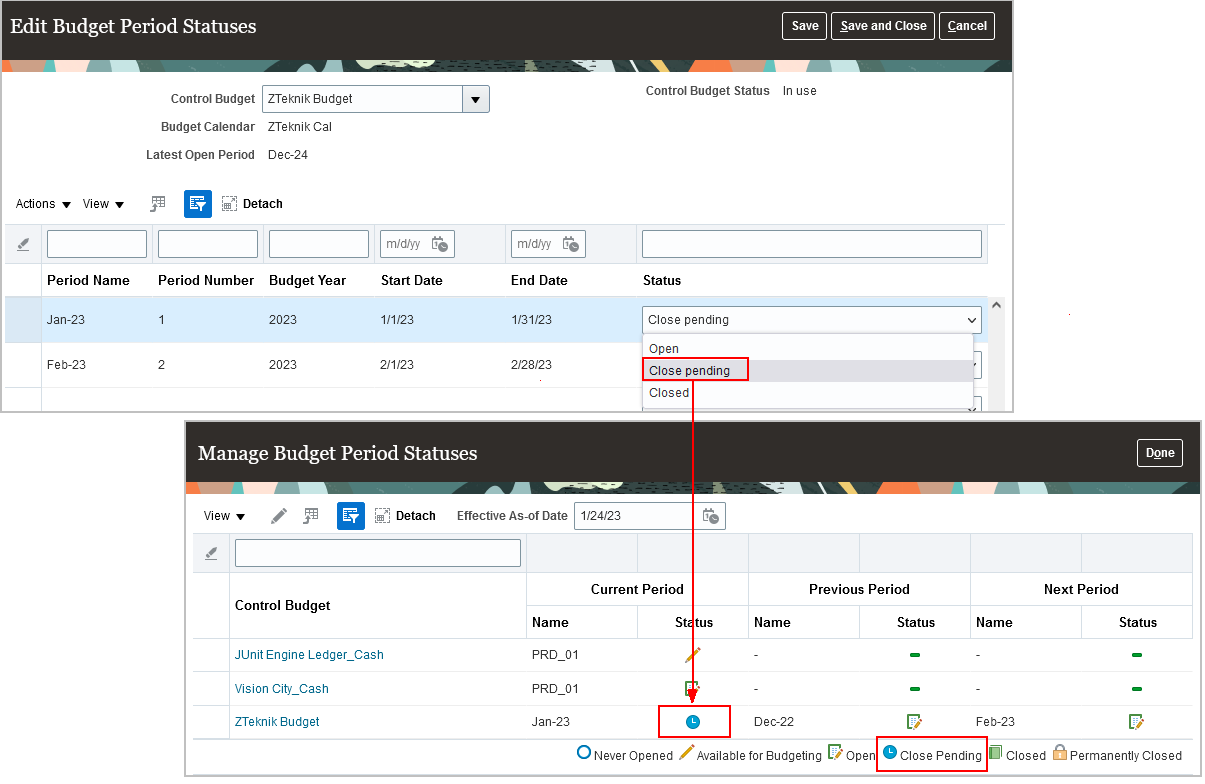
Limit budgetary control validation to journal entries when the budget period status is set to Close Pending. This prevents budgetary control validation of subledger transactions created after the Close Pending status is set.
Set the budget period status to Close pending on the Edit Budget Period Statuses page to prevent consumption of a budget’s funds available balance by subledger transactions while completing month-end or year-end close tasks.
Manage Budget Period Statuses
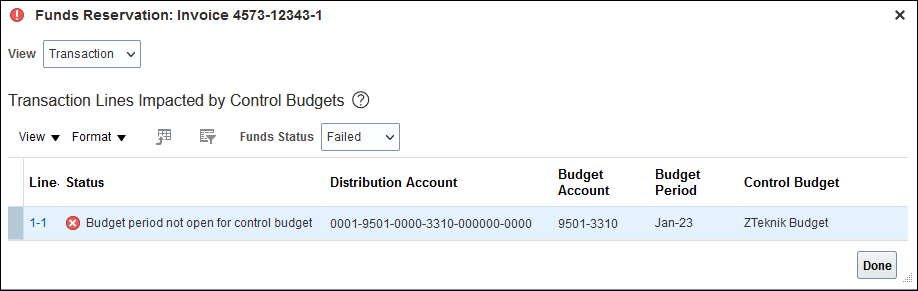
The following transactions fail budgetary control validation with the status of “Budget period not open for control budget” when the control budget period status is close pending:
- All subledger transactions enabled for budgetary control except for the final close action on a purchase order.
- Budget Import of initial budget amounts.
Budget Period Not Open for Control Budget Status
Steps to Enable
You don't need to do anything to enable this feature.
Tips And Considerations
The following transactions pass budgetary control validation when the budget period status is close pending:
- General Ledger and subledger journal entries.
- Budget Import of budget adjusted amounts.
- Final close action on a purchase order including:
- Carry Forward Purchase Order Budgetary Control Balances process
- Manual final close action on a purchase order
Access Requirements
- Budget manager role is needed to manage configuration in Budget Period Statuses page.
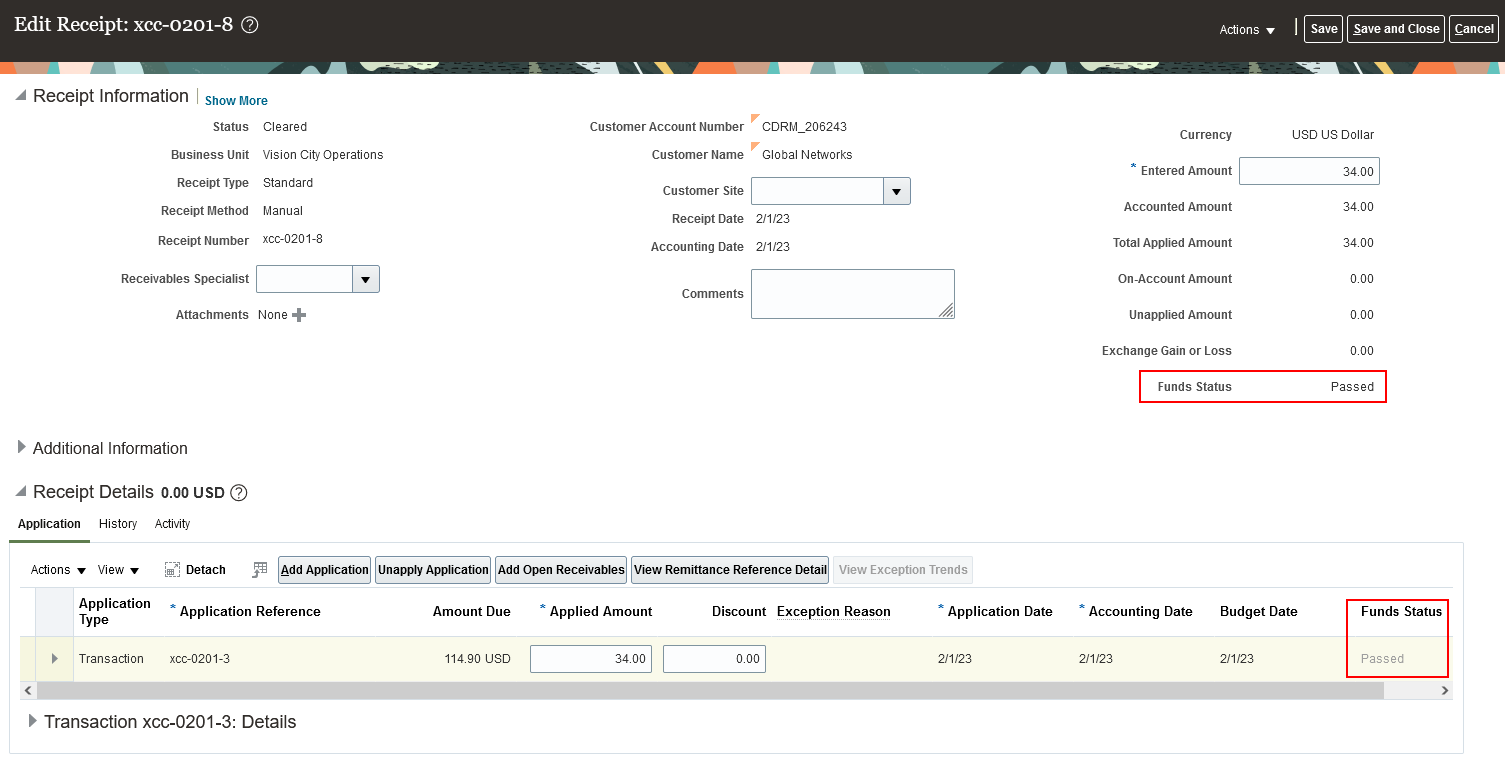
Cash Budget Funding with Receivables Receipts
Use Receivables receipts to fund the cash control budget as receipts are processed. Cash collected for revenue is immediately available for spending when a standard receipt is applied to an invoice or a miscellaneous receipt is created.
Fund the Cash Budget with Receipts
Budgetary control validation has been added to both standard and miscellaneous receipts and increases the cash control budget’s adjusted budget balance.
The receipt funds status indicates the budgetary control validation status. Receipts with a passed status fund the cash budget. Receipts with a failed status need to be reprocessed.
Fund the Cash Budget with Receipts
Failures Requiring Attention
Use the Failures Requiring Attention region on the Budgetary Control Dashboard to review and correct receipts that failed budgetary control validation.
Failed Transactions Tab
Reprocess receipts that failed budgetary control validation on the Failed Transactions tab after viewing and correcting the failures.
Failures Requiring Attention Failed Transaction Tab
Cash Budget Status Exceptions Tab
Correct cash control budget status and budget period status failures on the Cash Budget Status Exceptions tab. Reprocess all receipts for the ledger by following the corrective action hyperlink.
Failures Requiring Attention Cash Budget Status Exceptions Tab
Steps to Enable
You don’t need to do anything to enable this feature.
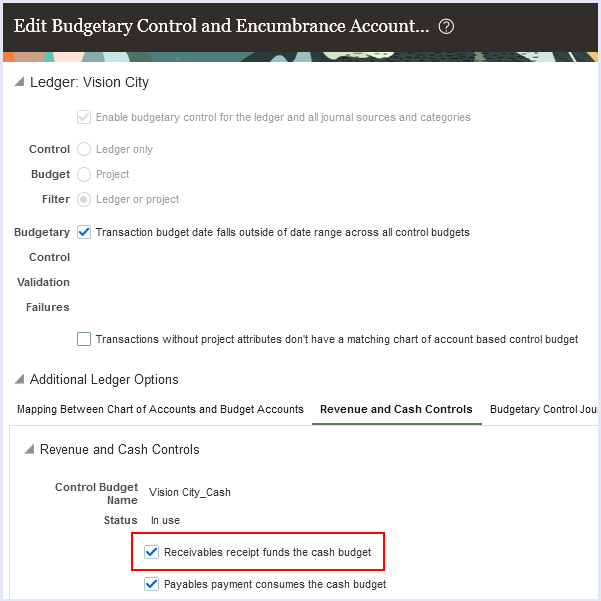
Budgetary Control Setup
- If not using cash control budgets for payments, select cash controls on the Edit Budgetary Control and Encumbrance Accounting page. For details on the setup, refer to Steps to Enable section of this 22C feature:
- Budgetary Control Invoice Payments for Cash Budgets in Manage Payment Process Requests.
- Select the Receivables receipt funds the cash budget setting on the Edit Budgetary Control and Encumbrance Accounting page to enable budgetary control of receipts. This setting only applies to ledgers with business units enabled for Multifund Accounting.
Edit Budgetary Control and Encumbrance Accounting
Tips And Considerations
If not already using cash controls, refer to these features in the What’s New for additional information:
- 22C: Budgetary Control Invoice Payments for Cash Budgets in Manage Payment Process Requests.
- 22D: Budgetary Control Invoice Payments for Cash Budgets in Quick Pay and Pay in Full
- 23A: Budgetary Control Reservation of Invoice Payments When Cash Budget Has Insufficient Funds.
Receivables Receipts Fund the Cash Budget
- Cash budget funding with Receivables receipts only applies to ledgers with business units enabled for Multifund Accounting.
- Standard receipts aren’t budgetary controlled until an invoice, debit memo, credit memo or chargeback is applied. The application funds the cash budget.
- Funds are updated in the cash budget when:
- A standard receipt with an application is updated, unapplied, or reversed.
- A miscellaneous receipt is reversed or deleted.
- The budget date is the:
-
- Application date for a standard receipt.
- Original application date for update, unapply, and reversal activities on a standard receipt.
- Receipt date on a miscellaneous receipt.
- Original receipt date when a miscellaneous receipt is reversed or deleted.
- The budget account segment values are derived from these:
-
- The natural account is the cash account on the receipt method’s remittance bank account.
- All other segments are the revenue distribution account.
- Receipts created with the following methods are supported:
- Create Receipt page
- Lockbox
- Web service
- Automatic Receipt process
- AutoMatch process
- The following receipt applications aren't budgetary controlled and don't fund the cash budget:
- Invoices and debit memos from business units implementing Revenue Management
- Invoices with contingency
- Invoices with revenue schedules
- Invoices for Bills Receivable
- Debit memos with source debit memo reversal
Remittance Bank Account Impact on Funding Cash Budget via Journal Entries
- Accounting created for cleared receipts are no longer budgetary controlled in General Ledger because the cash natural account from the remittance bank account is budgetary controlled in Receivables. These journals have a funds status of Reserved in subledger. Accounting created for confirmed or remitted receipts are still budgetary controlled in General Ledger.
- To avoid overstating the cash budget, assign different GL accounts in your remittance bank account setup.
- The natural account on these remittance bank GL accounts must be different than the natural account defined for cash:
- Receipt Confirmation
- Remittance
- Unapplied receipts
- Unidentified receipts
- On-Account receipts

Remittance Bank Account Setup
- To fund the cash budget from general ledger journals posted to the cash account, such as manual journals or journals from other sources, assign only the GL cash account on your remittance bank account to the Edit Budgetary Control page, Accounts in Journals Subject to Cash Controls region.
Accounts in Journals Subject to Cash Controls
- For example, this table illustrates how to set up the remittance bank account so that the cash budget isn't overstated when Receivables journals are posted in General Ledger.
| Remittance Bank | Remittance Bank | Add to Accounts in Journals Subject to Cash Controls? |
|---|---|---|
| Cash | 8111 | Yes |
| Receipt Confirmation | 8372 | No |
| Remittance | 8373 | No |
| Unapplied Receipts | 8374 | No |
| Unidentified Receipts | 8375 | No |
| On-Account Receipts | 8380 | No |
The remitted and confirmed receipt journal entries will fund and overstate the cash budget when posted in General Ledger in the following cases:
- If 8111 is assigned to any of the other Remittance Bank Account GL Accounts.
- If any of the other Remittance Bank Account GL accounts other than 8111 are assigned to the Accounts in Journals Subject to Cash Controls.
Budget Entry for Cash Budgets
- You can also load initial or adjusted budget amounts in the cash control budget using any of the Budgetary Control budget entry methods.
Key Resources
- How Receivables Receipts Fund the Cash Budget Demo Video
- Revenue and Cash Controls in Using Financials for the Public Sector
- Manage Bills Receivables in Using Receivables Credit to Cash
- Overview of Multifund Accounting in Implementing Receivables Credit to Cash
- Receipt Classes and Methods in Implementing Receivables Credit to Cash
Access Requirements
- The Budget Manager role is needed to manage budgetary control configuration.
- The Accounts Receivables Supervisor role is needed to create and manage receipts
General Ledger
Automated Resolution of Cross-Validation Combination Violations
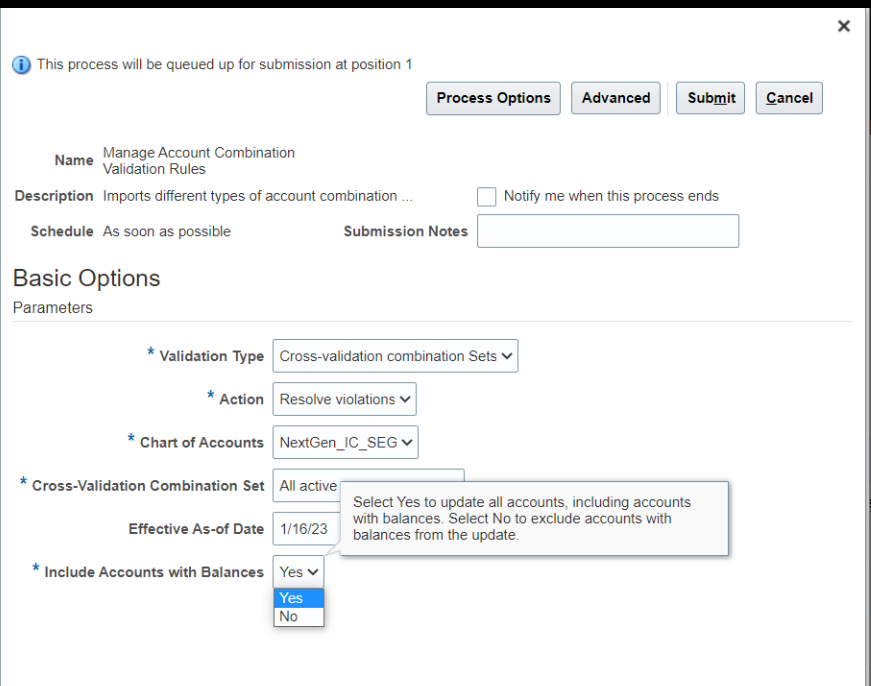
Resolve cross-validation combination violations automatically during a run of the Manage Account Combination Validation Rules process.
Use the Include Accounts with Balances parameter in the Manage Account Combination Validation Rules process to manage the automatic update of accounts with balances.
Manage Account Combination Validation Rules
When you select the Resolve violations action, the Manage Account Combination Validation Rules process automatically updates account combinations based on the recommendations in the Cross-Validation Combinations Violation report. The process either disables or end dates each account combination. Use the Include Accounts with Balances parameter to indicate whether the process disables or end dates account combinations with balances.
Business benefits include:
- Improved operational efficiency with automatic updates to account combination end dates and the enabled indicator, based on recommendations from the Cross-Validation Combinations Violation report.This results in journals being posted only to valid accounts according to the account validation rules, and reduces error cycles in accounting processes.
- Reduced effort to validate and move the balances from one account to the other before disabling the accounts.
Steps to Enable
You don't need to do anything to enable this feature.
Key Resources
- Refer to the How Cross-Validation Combination Set Violations Are Managed topic in the Implementing Enterprise Structures and General Ledger guide on the Oracle Help Center.
Revaluation in Reporting Currency Ledger of Account Balances Denominated in Reporting Currency
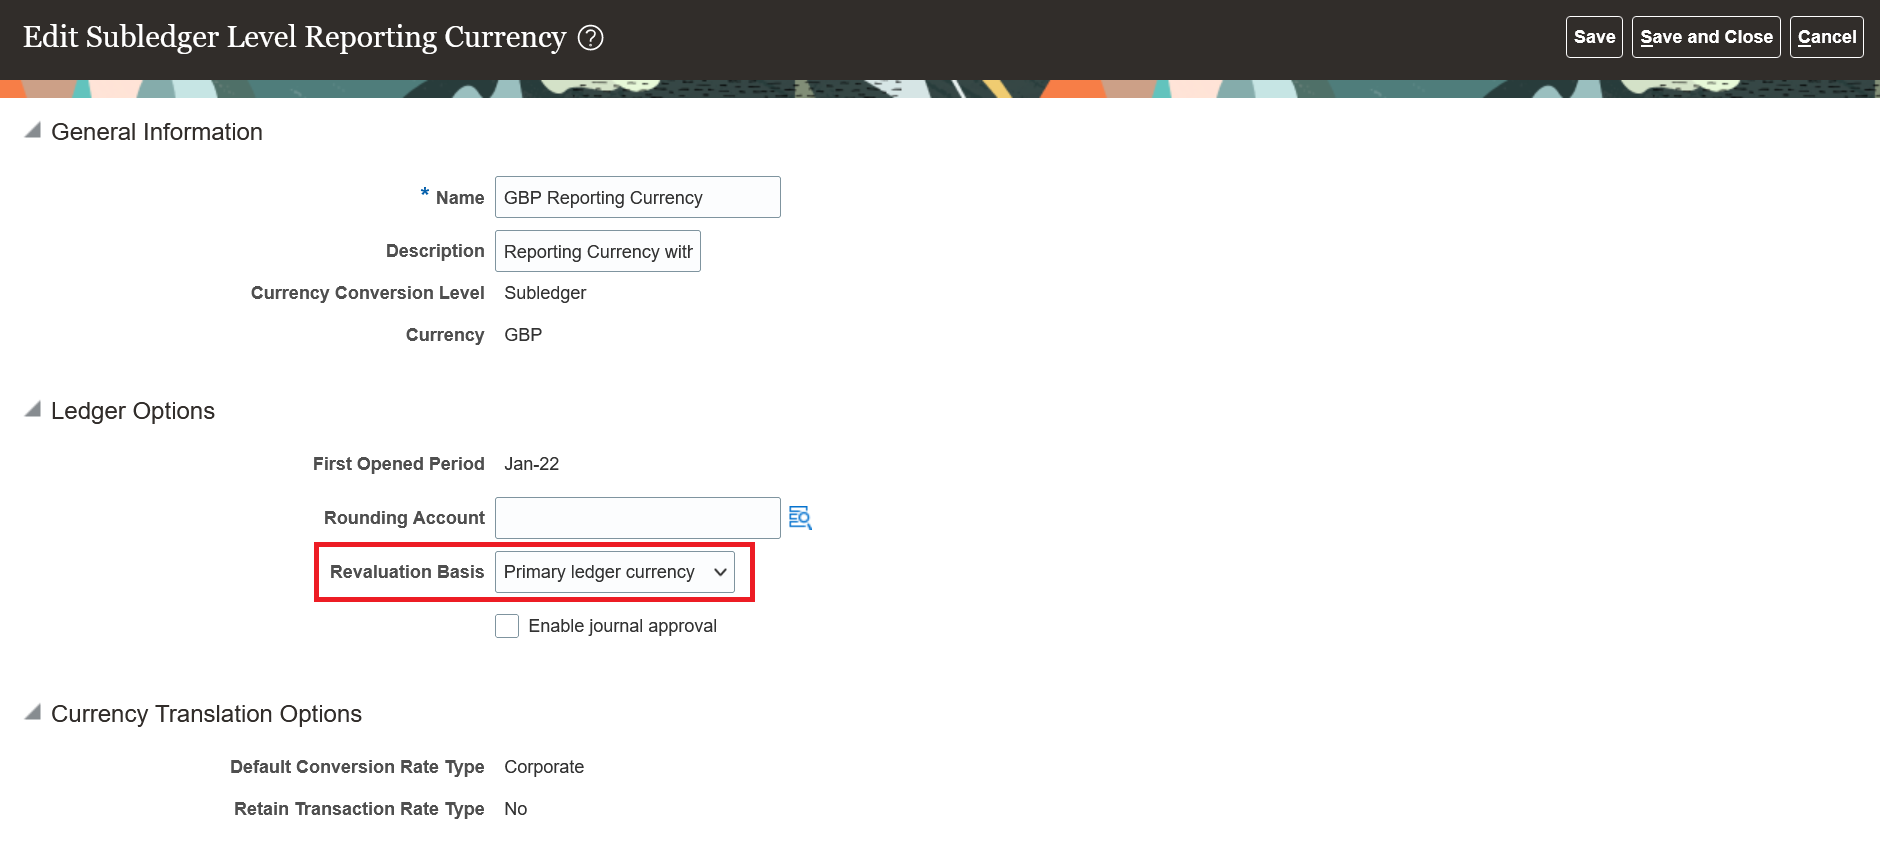
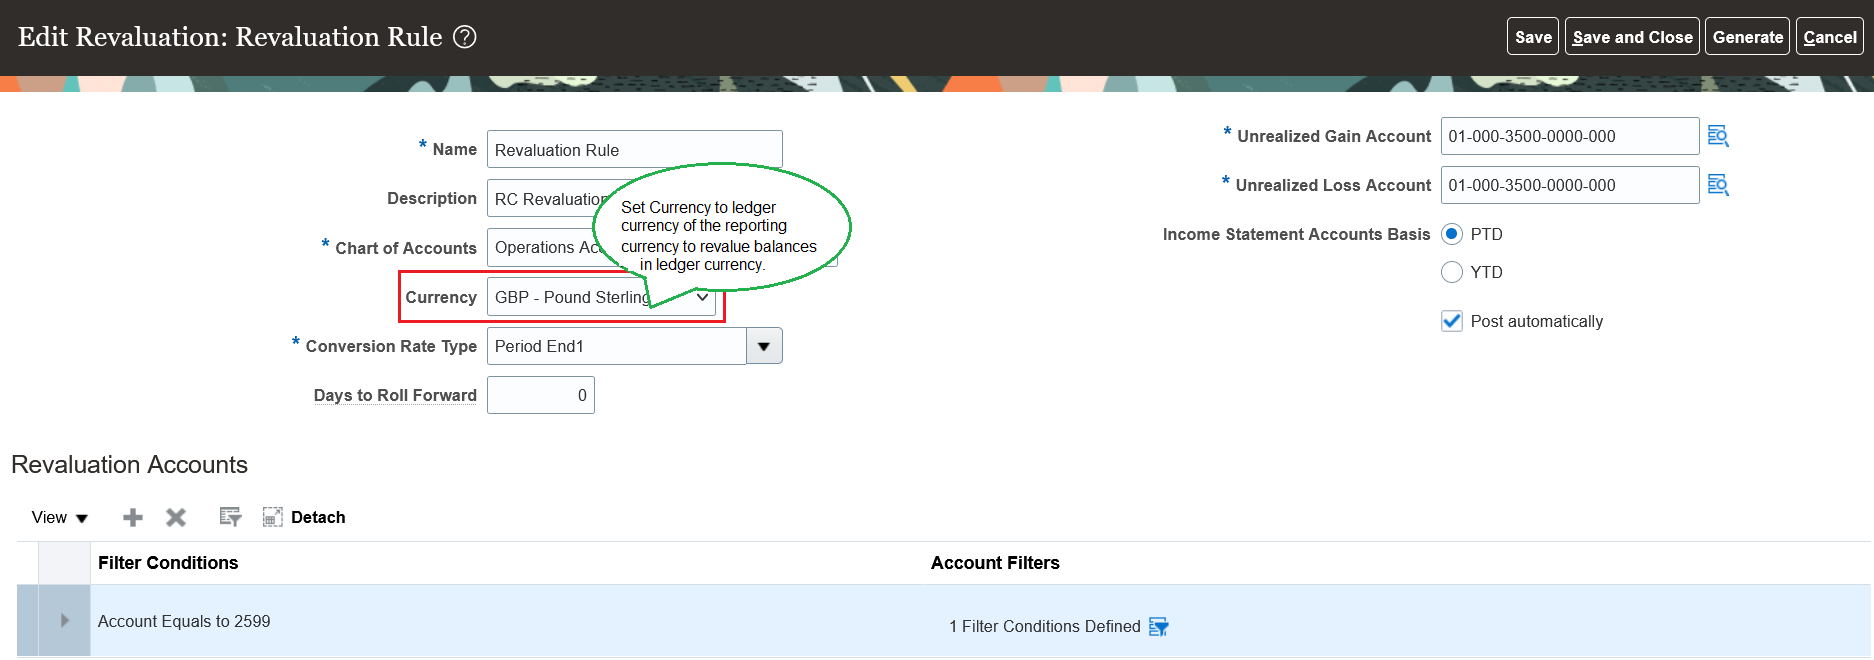
Revalue account balances in the reporting currency ledger when the entered currency is the same as the reporting ledger currency. If you want a journal-level or subledger-level reporting currency to produce the same balances that you would get after running the Translate General Ledger Account Balances process for a balance-level reporting currency, run the Revalue Balances process in the reporting currency ledger.
In certain cases, you might want your primary or secondary ledger balances translated to a reporting currency not at the account balance level, but with journal level details. When the revaluation basis in a journal-level or subledger-level reporting currency is set to Primary ledger currency, the revaluation adjustment calculated for the reporting currency ledger is based on the account balance in the primary or secondary source ledger's ledger currency. The difference in an account balance due to the fluctuation in the conversion rate between the source ledger's ledger currency and the reporting currency's ledger currency is booked as an adjustment in the reporting currency ledger.
In general, when the Revalue Balances process is submitted for all currencies by leaving the Currency field blank in the revaluation rule, the process skips the ledger currency of the reporting currency, and completes revaluation for all other foreign currency balances for the selected accounts.
With the revaluation basis in a journal-level or subledger-level reporting currency set to Primary ledger currency, you can submit revaluation for the ledger currency of the reporting currency by setting the Currency field to the ledger currency of the reporting currency in the revaluation rule definition. The process revalues balance sheet accounts at the month-end rate and income statement accounts at the average rate, or a revaluation rate of your specification, even if the entered currency for an account is the same as the reporting ledger currency. This enables journal-level or subledger-level reporting currencies to produce reporting currency balances that would be the same as that of a balance-level reporting currency when the Translate General Ledger Account Balances process is run.
Business benefits include:
Flexibility of maintaining reporting currencies at the detailed transactional level with the ability to make adjustments using the revaluation process to reconcile these to a balance level reporting currency.
Steps to Enable
To submit revaluation in the ledger currency of the reporting currency, you must complete the following setup steps :
Step 1 : Set the Revaluation Basis to Primary ledger currency in the reporting currency configuration.

Step 2 : Set the Currency field explicitly to the ledger currency of the reporting currency in the revaluation rule definition.
Step 3 : Submit the Revalue Balances process using the revaluation rule definition created in step 2.
Tips And Considerations
This method of using revaluation to adjust the balances of a journal or subledger level reporting currency does differ from using the translation method of generating translated balances or using a balance level reporting currency. Please note your organization's Chief Accounting Officer must consent to this currency treatment before performing revaluation in your journal or subledger reporting currency in this manner for this purpose.
Key Resources
- Refer to the Revaluation topic of the Accounting Period Close chapter in the Using General Ledger guide on the Oracle Help Center.
Security Access Segregation of Import Journals from File-Based Data Import Process for Journals
Provide the option to restrict the combined use of the Import Journals process and the Load Interface File for Import process for FBDI Journals for certain users. Some organizations use different users to import data from external integrations using FBDI, to run the Create Accounting process, or to create journals using ADFdi, but they are not able to segregate the different functions using the existing privileges. With these new privileges, an enterprise can segregate duties by granting some users the existing security privileges to use the Import Journals process with FBDI-based journal imports for high volume data conversions and external integrations, while assigning other users security privileges that limit the use of Import Journals to processes such as Create Accounting and ADFdi journal creation.
Business benefits include:
- Provide organizations the flexibility to assign different users different levels of access to the Import Journals process to optimize security control.
- Prevent interruptions in FBDI journal import procedures that are reserved for automated and mass volume imports.
- Ensure users not authorized to use the Import Journals process with FBDI are still able to submit other General Ledger and Subledger Accounting processes involving journal import, such as creating General Ledger journals using the Application Development Framework Integration (ADFdi) Journals spreadsheet and running the Create Accounting process for subledger transactions. Such users can also still be allowed to carry out other FBDI related processes besides Import Journals, such as Import Bank Statements from a Spreadsheet and Import AutoInvoice.
Steps to Enable
To enable this feature, you can create a custom role derived from a copy of a predefined role to assign the new privileges that are provided. For example, use a General Accountant custom role to enable this feature to restrict a general accountant from using Import Journals with FBDI, but still allow to create journals using the ADFdi journal spreadsheet and submit other FBDI processes besides Import Journals.
Follow these steps:
- Use the Security Console to make a deep copy of the seeded General Accountant job role by copying its top role and inherited roles, which includes the Journal Management and Subledger Accounting Manager duty roles.
- Once the role is copied, search for the Journal Management custom duty role that was generated. Under the Function Security Policies tab, add the “Run Import Journals Program without FBDI Access” privilege and delete the “Run Import Journals Program” privilege for this role.
- Search for the Subledger Accounting Manager custom duty role that was generated. Under Function Security Policies tab, add the “Post Subledger Journal Entry to General Ledger No Journal Import Access for FBDI” privilege and delete the “Post Subledger Journal Entry to General Ledger" privilege for this role.
- You will want to make sure that the “Run Import Journals Program” and “Post Subledger Journal Entry to General Ledger” privileges are completely removed from your custom role to prevent the user who is assigned this role from running the Import Journals process with FBDI.
NOTE: You may be working with a custom role of your own. You can follow the relevant steps noted above for your custom role to achieve the same results.
Tips And Considerations
You should enable this feature if you’re seeking to prevent access to the General Ledger Import Journals process using FBDI by users who need to submit Import Journals for other purposes.
- The Import Journals process using FBDI is typically utilized for automated journal import with mass volume of data coming from external sources.
- The "Run Import Journals Program without FBDI Access" and "Post Subledger Journal Entry to General Ledger No Journal Import Access for FBDI" privileges will not disrupt the user’s ability to continue using Import Journals with processes such as Create Accounting and ADFdi GL journal creation.
- Users will continue to be able to use FBDI for processes other than Import Journals, and successfully run the Load Interface File for Import program with processes like Import Bank Statements from a Spreadsheet and Import AutoInvoice.
Example log file generated from the submission of the Load Interface File for Import process with the Import Journals process that ended in error. This was submitted by a user who only carries the “Run Import Journals Program Without FBDI Access” or “Post Subledger Journal Entry to General Ledger No Journal Import Access for FBDI” privilege. For a user who carries the “Run Import Journals Program” or “Post Subledger Journal Entry to General Ledger” privilege, this submission would be successful.
Key Resources
Access Requirements
The following privileges are shipped without being assigned to any role and will need to be assigned as substitutes respectively for the “Run Import Journals Program” and “Post Subledger Journal Entry to General Ledger” privileges. Use the Security Console to assign the following privileges to a custom role. This feature to restrict the combined use of the Import Journals process and the Load Interface File for Import process for FBDI Journals will apply to users assigned a configured custom role that is assigned the following.
- Name: Run Import Journals Program without FBDI Access
Code: GL_RUN_IMPORT_JOURNALS_PROGRAM_WITHOUT_FBDI_ACCESS
Description: Allows submission of the journal import program using the Oracle Fusion Enterprise Scheduler Services. However, this privilege does not include the ability to use the Import Journals process when submitting the Load Interface File for Import program to support creating journal records using File Based Data Import.
- Name: Post Subledger Journal Entry to General Ledger No Journal Import Access for FBDI
Code: XLA_POST_SUBLEDGER_JOURNAL_ENTRY_TO_GL_NO_JOURNAL_IMPORT_ACCESS_FOR_FBDI
Description: Allows submission of the program to transfer to and post journal entries in General Ledger. However, this privilege does not include the ability to use the Import Journals process when submitting the Load Interface File for Import program to support creating journal records using File Based Data Import.
Intercompany
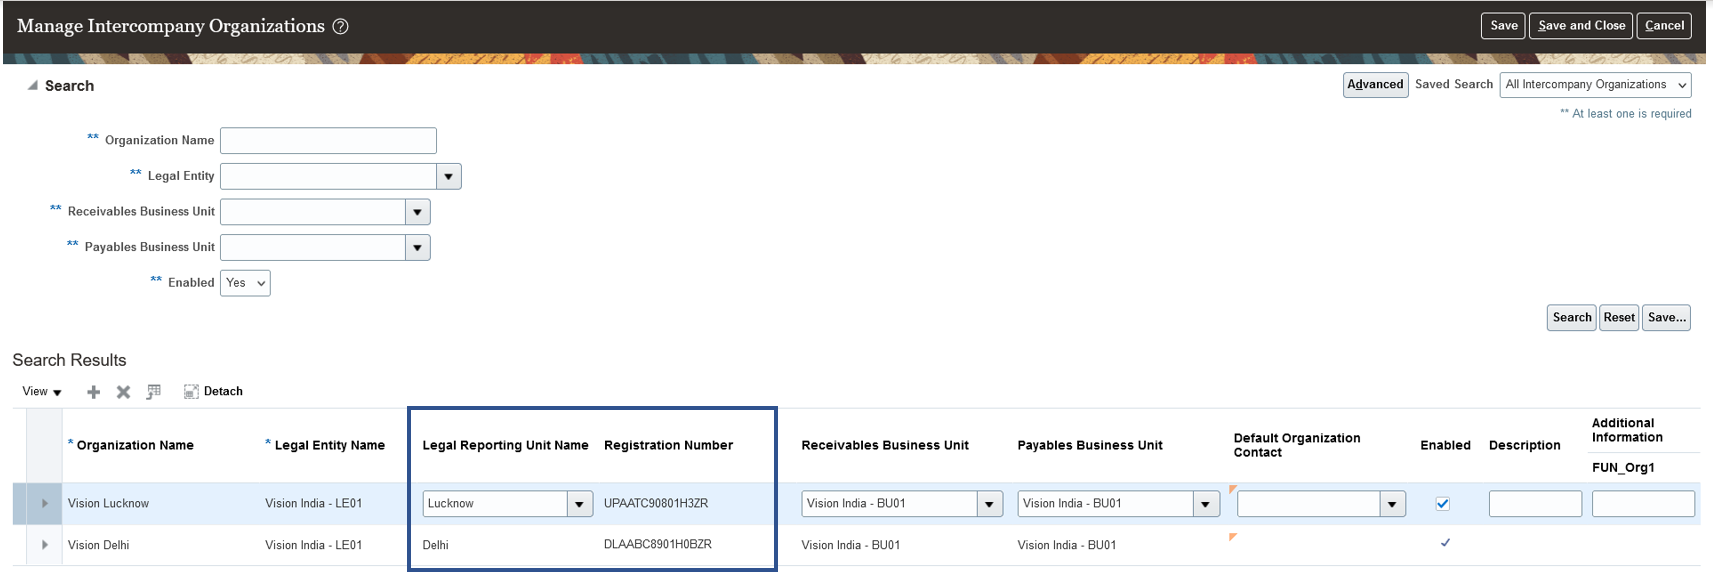
Tax Calculation for Intercompany Invoices Based on First-Party Tax Registration Number
Associate the first-party tax registration number with the intercompany organization and pass the number as an attribute to the subledger for intercompany transaction tax calculations.
Users can select Legal Reporting Unit and applicable Tax Registration Number on Manage Intercompany Organizations setup user interface as below:
Search for and select the applicable intercompany organization and legal entity, then select the associated legal reporting unit and tax registration number. After completing this setup, the system automatically calculates taxes on the related intercompany transactions created and transferred to Receivables.
Business benefits include:
- Automatically calculate taxes on intercompany invoices in Receivables.
- Reduce manual entry of tax parameters in the subledger for correct tax calculation.
- Reduce the processing time for intercompany invoices.
Steps to Enable
You don't need to do anything to enable this feature.
Joint Venture Management
Carried Interest Configuration Usability Improvements, Distribution Reversal, and Retroactive Billing Adjustments
Use carried interest agreement processing to define the terms and conditions of carried interest agreements, track carried interest distributions, process distribution reversals, create retroactive billing adjustments, and report on carried interest for the partners in the agreement.
Business benefit:
Timely and accurate processing of carried interest agreements eliminates errors associated with manual processing and ensures compliance to the joint operating agreement.
Steps to Enable
Use the Opt In UI to enable this feature. For instructions, refer to the Optional Uptake of New Features section of this document.
Offering: Financials
- Opt in to Carried Interest Configuration and Tracking in Joint Venture Management.
- Set up the components of carried interest using the following tasks under the functional area: Joint Venture Management
- Task: Manage Carried Interest Agreements
Create the carried interest agreement, carried interest stakeholder groups and carried interest ownership definitions
-
- Task: Manage Joint Venture Definitions
Associate the carried interest ownership definition as the default ownership definition
-
- Task: Manage Joint Venture Ownership Definition Assignment Rules
Associate the carried interest ownership definition
Key Resources
-
Watch Carried Interest Configuration and Tracking Readiness Training
- For more information, refer to
- Implementing Joint Venture Management guide and
- Using Joint Venture Management guide.
Access Requirements
- Joint Venture Application Administrator
- Joint Venture Accountant
- Joint Venture Accounting Manager
Joint Venture Definition Management Using a Spreadsheet
Independently add, update, delete, and report on joint venture definitions using spreadsheets:
- Basic joint venture details, such as the name, description, business unit, and status
- Billing and reporting information for creating invoices and generating joint interest billing reports for the joint venture
- Account information to identify the accounts for joint venture processing
- Distributable project values to identify the projects to include in joint venture processing.
Business benefit:
Downloading and updating the information through the spreadsheets makes the management of the joint venture definitions easier for the joint venture accountants and administrators.
Steps to Enable
You don't need to do anything to enable this feature.
Tips And Considerations
The ability to add, update, delete, and report on the Stakeholders and Ownership Definitions for the joint venture will be made available on a subsequent release.
Key Resources
- For more information, refer to
- Implementing Joint Venture Management guide and
- Using Joint Venture Management guide.
Access Requirements
- Joint Venture Application Administrator
- Joint Venture Accountant
Joint Venture Definition Usability Improvements
Manage joint venture definitions using a guided process that takes the user through the steps of creating or updating the terms and conditions of the joint venture.
Business benefit:
This streamlined user experience improves the productivity of a joint venture accountant by significantly reducing the time and effort required to create and update a joint venture definition.
Watch a Demo.
Steps to Enable
You don't need to do anything to enable this feature.
Key Resources
-
Watch the Joint Venture Definition Usability Improvements Demo.
- For more information, refer to
- Implementing Joint Venture Management guide and
- Using Joint Venture Management guide.
Access Requirements
- Joint Venture Application Administrator
- Joint Venture Accountant
- Joint Venture Accounting Manager
Mass Reversal for Joint Venture Distributions
Reverse large volumes of joint venture distributions for selected joint venture transactions using a scheduled process. This process corrects transactions processed in error by creating the necessary reversal entries for processed distributions.
Business benefit:
Mass reversal of joint venture distributions improves the productivity of the joint venture accountant by saving time and reducing potential errors associated with manual corrections.
Watch a Demo.
Steps to Enable
You don't need to do anything to enable this feature.
Key Resources
- Watch the Mass Reversals for Processed Joint Venture Distributions Demo
- For more information, refer to
- Implementing Joint Venture Management guide and
- Using Joint Venture Management guide.
Access Requirements
- Joint Venture Accountant
Operational Reporting for Oracle Joint Venture Management Improvements
Oracle Transactional Business Intelligence (OTBI) for Joint Venture Management enables operational reporting of joint venture transactions and distributions along with their associated general ledger, subledger accounting, and overhead information. The reports provide insight into joint venture operations, with sorting and summarization by joint venture, stakeholder, account, and joint venture source transactions.
Business benefits include:
- Operational reporting helps ensure efficient and timely data review and reconciliation.
- Business users can create custom report templates based upon specific business needs, to help ensure a quick financial close with better insight into overall joint venture operations.
Steps to Enable
You don't need to do anything to enable this feature.
Key Resources
- For more information, refer to
- Implementing Joint Venture Management guide and
- Using Joint Venture Management guide.
Access Requirements
- Joint Venture Application Administrator
- Joint Venture Accountant
- Joint Venture Accounting Manager
Periodic Adjustments for Overhead Method Rates and Percentages
Adjust the rates or percentages for calculating overhead based on indices on a periodic basis. Apply these adjustments to a single rate, percentage, or to a sliding scale of rates or percentages.
Business benefit:
Ensure compliance with the joint venture operating agreement with accurate calculation and distribution of overhead charges.
Steps to Enable
- Navigate to the offering: Financials
- Select the Functional Area: Joint Venture Management
- Set up periodic adjustment factors using the task Manage Joint Venture Periodic Adjustment Factors
- Associate the periodic adjustment factor to the overhead method using the task Manage Joint Venture Overhead Methods
- Periodically apply the adjustment to the overhead methods using the process Process Joint Venture Overhead with mode Apply Periodic Adjustment Factors
Key Resources
-
Watch Periodic Adjustments for Overhead Method Rates and Percentages Readiness Training.
- For more information, refer to
- Implementing Joint Venture Management guide and
- Using Joint Venture Management guide.
Access Requirements
- Joint Venture Accountant
Subledger Accounting
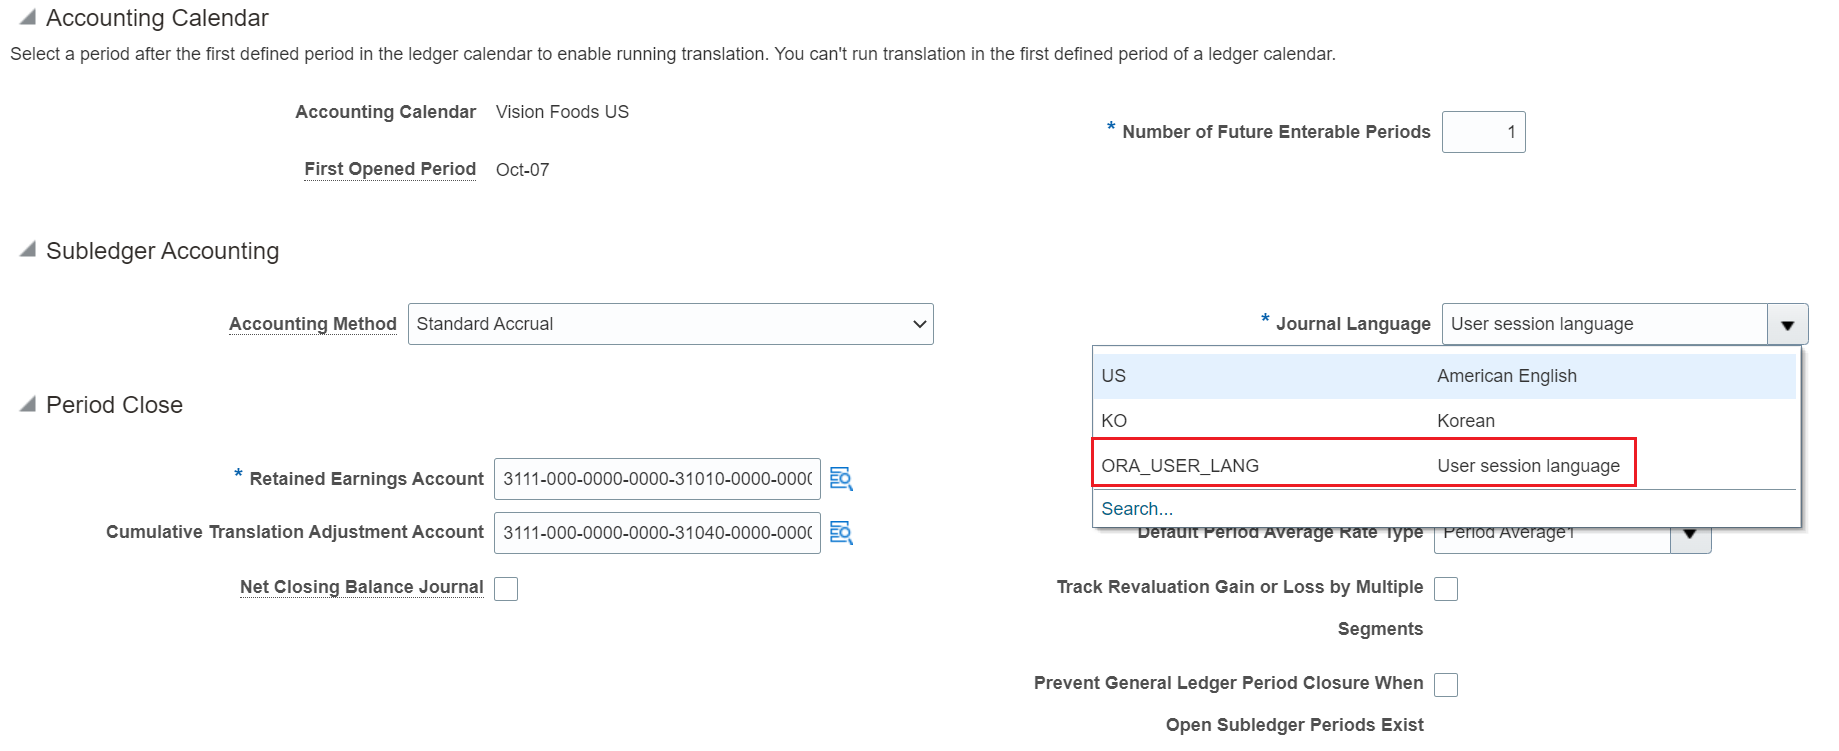
Subledger Journal Description Language Configuration
Configure the display of the subledger journal description to use either the journal language set for the ledger or the user session language.
The Journal Language list of values in the Subledger Accounting section of the Specify Ledger Options page will also include the value "User session language", in addition to the languages installed.
The Journal Language determines the language that is used to retrieve and store the subledger journal sources in the journal entry description. All the predefined subledgers provide multiple language support and on submission of the Create Accounting process, the sources used in the description are retrieved in the corresponding language and saved. When the Journal Language is set to "User session language", the session language of the user who submits the Create Accounting process will be used to retrieve the translated source values used in the journal description.

Specify Ledger Options - Journal Language
Business benefits include:
- Supports organizations that require multiple official languages.
- Provides translation of subledger journal entry descriptions in the language selected by the user for the current application session.
Steps to Enable
You don't need to do anything to enable this feature.
Tips And Considerations
- It is important to note that once the subledger journal entry is created in Final status, the descriptions can't be translated in a different language. So, when other users review the subledger journal, they may see the journal description in a different language than their own session language.
- When online accounting is used with Journal Language set to User session language, it must be noted that the Journal Language value is cached when the process is running. So, any modifications to the Journal Language setting while the online accounting process is running will not be applicable until the process is restarted.
Key Resources
- Refer to the Ledgers chapter in the Implementing Enterprise Structures and General Ledger guide on Oracle Help Center.
Performance Improvements on the Account Analysis Report
The BI Publisher version of the Account Analysis Report has been optimized to improve the overall performance of this report. Changes pertaining to this have been made to the "AccountAnalysisDm" data model used in the Account Analysis Report.
NOTE: Any existing customizations built on top of the "AccountAnalysisDm" data model will cease to work as new lexicals have been introduced to improve the report performance.
If you have customized the data model, the Account Analysis Report will not be rendered successfully. You must use the seeded version of the data model for the Account Analysis Report.
Any existing customizations to the data model and report can be removed by following the below steps -
- Log in to BI Publisher Enterprise through the /xmlpserver URL (<host url>/xmlpserver/).
- Under Folders pane, navigate to /Shared Folders/Custom/Financials/Fusion Accounting Hub (if this folder structure exists).
- Delete the Account Analysis Report in this folder.
- Delete Account Analysis Data Model under /Shared Folders/Custom/Financials/Fusion Accounting Hub/Data Models folder.
If customizations were made to address specific business requirements, the custom data model has to be changed to uptake the new lexical ‘&p_period_with_clause’ to address the performance issues that have been reported in earlier releases. Please refer detailed steps in the support document Doc ID 2946797.1.
Improved runtime performance on the Account Analysis Report
Steps to Enable
You don't need to do anything to enable this feature.
Suspense Account Clean Up Assistance
When the Create Accounting process is unable to create a journal line for an invalid account and instead records the amount to a suspense account, it keeps a record of the original account for which the journal line was intended. This feature tracks the original exception message along with the original account. Doing so helps accountants understand the cause for the exception and decide on the proper treatment when clearing the balance from the suspense account.
Business Benefit:
Accountants can clear suspense account balances more quickly and accurately by having visibility to the original exception message.
Steps to Enable
You don't need to do anything to enable this feature.
Payables and Expenses
Expenses
Payment Method Selection in Cash Advance Request
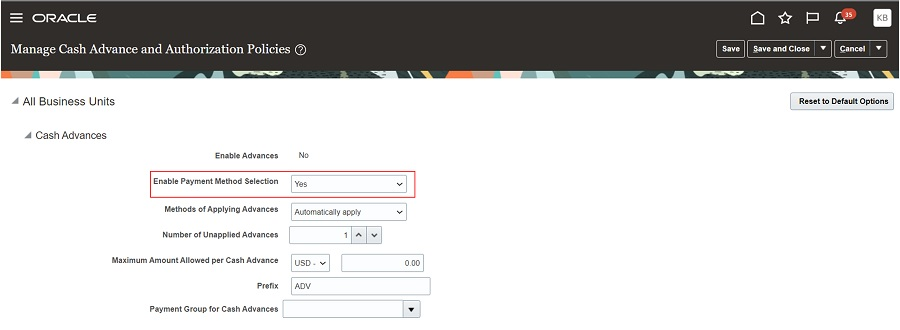
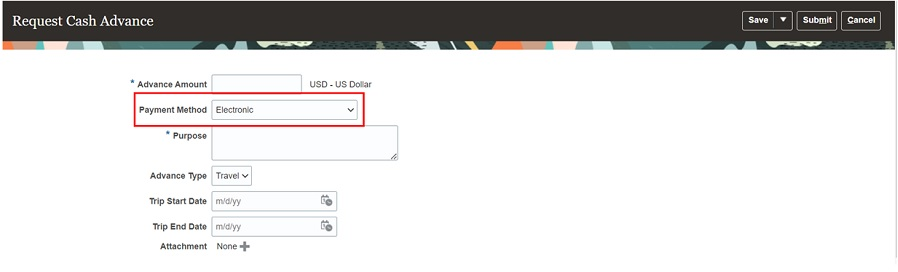
Allow employees to select a cash advance payment method. This option allows employees to select their preferred payment method as part of the cash advance request process.
Administrators can enable this option using the Manage Cash Advances and Authorization Policies task. This option is configurable at the business unit level and thus can be enabled for all business units, or for individual business units.
Once enabled in the setup, employees can choose the payment method at the time of requesting for the Cash Advance.
Business benefit:
This gives employees the flexibility to select the payment method (such as Cash, Electronic, check etc.) through which they would like to get their Cash Advance credited to them
Steps to Enable
You don't need to do anything to enable this feature.
Tips And Considerations
If the 'Enable Payment Method' option in the 'Manage Cash Advance and Authorization Policy' is set to 'No' then the default payment method for the business unit will apply to all cash advances raised by employees assigned to that business unit.
Key Resources
- This feature originated from the Idea Labs on Oracle Customer Connect : Idea 596577
Access Requirements
- Only users with the Financial Application Administrator job role can enable the Payment method option for Cash Advances, through the "Manage Cash Advances and Authorization Policies" task in the Functional Setup Manager available in Setup and Maintenance work area.
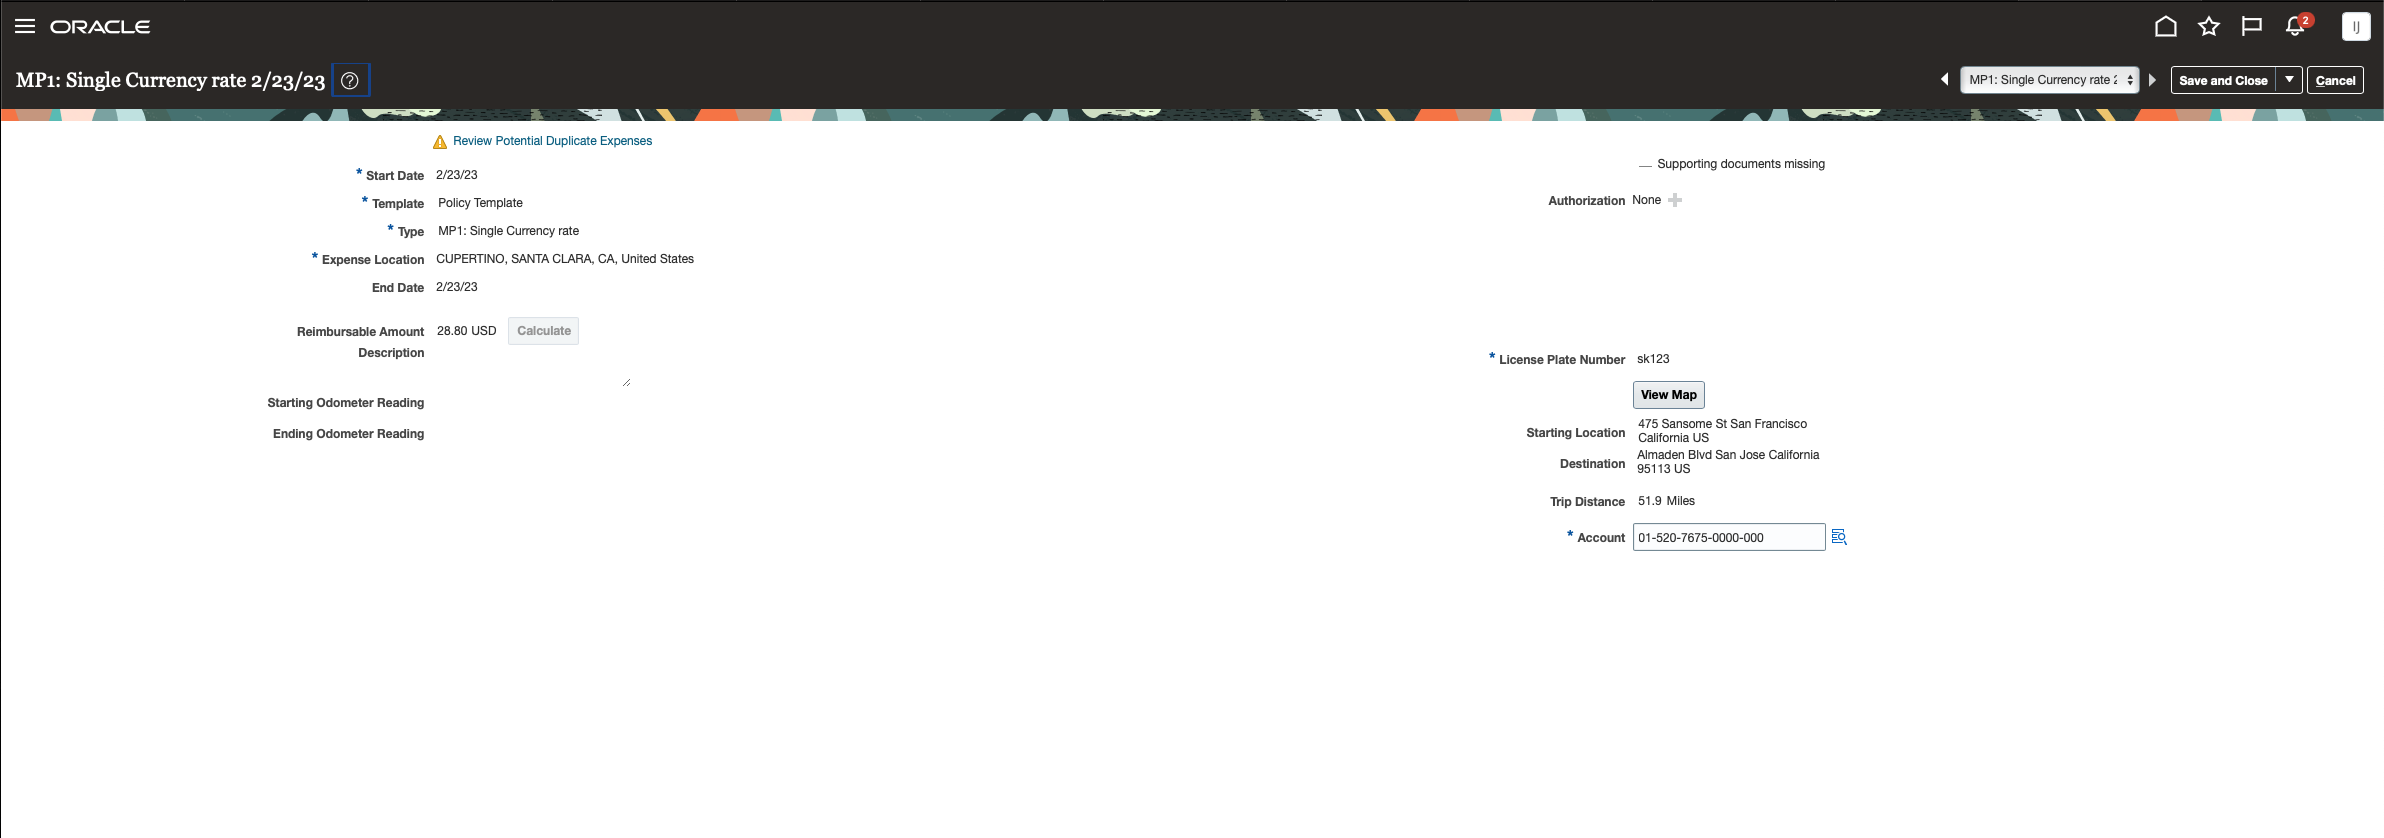
Waypoints in Audit and View Expense Report Pages
View waypoints in routes for mileage expenses in the Audit Expense Report and the View Expense Report pages. This lets auditors and managers view the complete route information for mileage expenses and ensure compliance with regulations.
Auditors can review the interim stops of a mileage expense trip directly from the View Expense Item page by clicking the View Maps button.
Companies can configure the expense report approval notification to provide the route visibility to managers.
Allow better insight into policy compliance on mileage expenses. Readily available route details allow auditor and managers to process mileage expenses more efficiently as they don't have to look for them outside the system.
Steps to Enable
You don't need to do anything to enable this feature.
Tips And Considerations
Customers can display interim stops of a mileage expense to managers by configuring the expense report notification using the BI Publisher template. Attributes SEQUENCE_NUM and DISPLAYED_ADDRESS in the EXM_MILEAGE_WAYPOINTS table are newly added to the BIP data model to support this custom configuration. Refer to Example of Modifying Expenses Email Notifications Using Oracle Analytics Publisher in the Implementing Expenses guide.
Key Resources
- This feature originated from the Idea Labs on Oracle Customer Connect : Idea 636944
Access Requirements
- You don't need any new privileges.
Payables
Automatic Reevaluation and Release of Duplicate Invoice Holds
Automatically reevaluate duplicate invoice hold conditions and release a duplicate invoice hold during invoice validation. This lets users avoid manually releasing a duplicate hold after making the necessary updates to an invoice.
The feature is applicable only when the duplicate invoice check is enabled, and it provides automatic release of an existing duplicate invoice hold when the duplicate conditions no longer apply. The feature does not place a new duplicate invoice hold on an invoice if it is duplicate of another invoice.
Business benefit:
You don't need to manually release the duplicate invoice hold after making the necessary changes to address the duplicate issue.
Steps to Enable
In the Manage Invoice Options page, enable the "Evaluate duplicate invoice hold during invoice validation" option.
Tips And Considerations
- This option is not enabled by default.
- You can enable or disable this feature any time and it will not have any impact on the existing transactions.
Key Resources
- Review the following documents to understand more about duplicate invoice check feature in Fusion Payables: https://docs.oracle.com/en/cloud/saas/financials/23b/fappp/how-can-i-find-duplicate-invoices-without-considering-the.html
Matching of Invoices with Purchase Order Lines with Supplier Credit from Supplier Portal
Match invoices to trade-ins and discounts on the purchase order from the supplier portal. For example, if a buyer trades in older equipment when purchasing new equipment, the value of the equipment traded in is created as a negative line on the purchase order. Match the invoice to negative lines in the purchase order to record the supplier credit.
Update 23A introduced the ability to create invoices matched to negative purchase order lines from the Create Invoice page and through Import Payables Invoices process. In update 23B, suppliers can create invoices matched to negative purchase order lines from supplier portal.

Supplier Portal Invoice Matched to Negative PO Line
Business benefit:
Matching invoice lines separately to item lines and supplier credit on the purchase order ensures that an invoice reflects the cost of the item accurately.
Steps to Enable
You don't need to do anything to enable this feature.
Tips And Considerations
- Supplier portal invoices can't have combination of negative and positive amount lines. Invoice lines matched to negative PO lines must be created as credit memos.
- Reversal of previously matched PO lines are created as positive amount lines and must be created in standard invoices.
Key Resources
- Additional details about the feature introduced in update 23A are available here.
Access Requirements
To use this feature, you need these privileges and roles:
- Privilege Name and Code:
- Enter Matched Payables Invoice As Supplier (AP_ENTER_MATCHED_PAYABLES_INVOICE_AS_SUPPLIER_PRIV)
- Job Role Name and Code:
- Supplier Accounts Receivable Specialist (ORA_POS_SUPPLIER_ACCOUNTS_RECEIVABLE_SPECIALIST_JOB)
Maturity Date Parameter Increment for Update Matured Bills Payable Status Schedule Runs
Automatically increment the Maturity Date Parameter of the Update Matured Bills Payable Status process based on the scheduled frequency. Payables supervisors can use this option to schedule the process for the desired frequency without manual intervention.
Changes made to the Update Matured Bills Payable Status ESS job options (In Advanced Options)
- A new checkbox named Auto Increment is available in the Schedule tab under Advanced Options. To view this option, select Using a schedule option to run the job.
- The Auto Increment option is enabled by default. You can disable it while defining new schedules.
Changes to Schedule creation
- Based on the scheduled frequency as hourly, daily, weekly, or monthly, ESS infrastructure creates the Parent job and child jobs.
- When child jobs are executed, the Maturity Date is incremented according to the frequency set (Parent job maturity date + Frequency defined by user).
UI with default enabled Auto Increment checkbox

User Journey
Business benefit:
This feature lets Payables users, supervisors, and managers schedule the "Update Matured Bills Payable Status" job to run for defined frequency intervals (hourly/daily/weekly/monthly/ yearly). The key parameter for the scheduling job runs, "Maturity Date", gets incremented automatically with every run. This eliminates manual intervention for incrementing the date parameter for scheduling runs.
Steps to Enable
You don't need to do anything to enable this feature.
Key Resources
- This feature originated from the Idea Labs on Oracle Customer Connect: Idea 603733.
Payment Priority Update on Payment Request Invoice Installments Using a REST API
Use the enhanced Invoices REST API to update the payment priority on payment request invoice installments. The enhancement includes payment request invoices of employee expense reports, credit card expense reports, employee cash advances, one-time payments, and Receivables refunds. This helps to assign a payment priority to each invoice, based on customer-specific criteria, to indicate the order in which each payment request is processed.
Until this release, the Invoices REST service could update installment attributes on standard, debit memo, credit memo and prepayment type invoices, but not payment request invoices. Now this REST service is enhanced to support payment request invoices in 23B release.
Submit a REST payload with the Invoices REST services endpoint using the Patch method for any of the following Invoice Installment attributes:
- Payment Priority
- Due Date
- Gross Amount
- Payment Method
- Bank Account
- First Discount Date
- First Discount Amount
- Second Discount Date
- Second Discount Amount
- Third Discount Date
- Third Discount Amount
- Message 1
- Message 2
- Message 3
- Reason
Business benefit:
Enhanced Invoices REST API helps business users to update installment attributes on payment request invoices.
Steps to Enable
Review the REST service definition in the REST API guides to leverage (available from the Oracle Help Center > your apps service area of interest > APIs & Schema). If you are new to Oracle's REST services you may want to begin with the Quick Start section.
Tips And Considerations
Refer to the Examples section of the REST API for Oracle Financials Cloud Guide on how to retrieve and update an invoice installment of an invoice.
Access Requirements
- You need Edit Payables Invoice (AP_EDIT_PAYABLES_INVOICE_PRIV) privilege to update the installments on payment request invoices using Invoices REST API.
Performance Evaluation Reports for Intelligent Account Combination Defaulting
Download and review an evaluation report that details the potential performance of the Intelligent Account Combination Defaulting feature. The machine learning models are trained on your data and the potential performance of the feature on each segment is validated against your recent transactions. This helps you understand how beneficial implementing this feature can be without creating large volumes of test data.
The evaluation report also contains the promotion code that you need to enter for the feature opt in to be activated. On the Connections page of the AI Apps for ERP app, you can download the evaluation report for the feature after the model is trained.

Here's an example of the report.

Steps to Enable
To download the evaluation report, you need to enable data ingestion and model training. The evaluation report will be available after model training is completed.
Tips And Considerations
- The model's performance is evaluated using a set of generic assumptions. The actual performance might be different from the performance estimated in the report.
- The performance of the model will change with time. Changes in your data capture approach and any significant changes that you make to the Chart of Accounts will also impact the model's performance.
Key Resources
- Train Models for AI Apps Features and Download Evaluation Reports
- FAQs for Intelligent Account Combination Defaulting
Access Requirements
You need the Application Implementation Consultant role to access the Connections page in the AI Apps for ERP application and download the model evaluation report.
Payments
Automatic Resumption of Payment Process Request After Payment Approval
Automatic Resumption of Payment Process Request After Payment Approval refers to the automatic process of allowing a transaction to proceed after payment approval has been received. Previously, a manual step was required to resume payment processing after payment approval.
Once the payment has been approved, the auto resumption process allows the transaction to proceed automatically, without any manual intervention. This tries to improve the payment process and aims to ensure transactions are completed in a timely and efficient manner.
Business benefits include:
- Automate the process of resuming payments without manual intervention.
- Move seamlessly to the next steps in the payment process, such as updating the status of the order or sending confirmation emails.
- Save time, and reduce errors and administrative costs.
- Reduce the risk of late or missed payments.
Steps to Enable
You don't need to do anything to enable this feature.
Receivables and Cash
Advanced Collections
Collector Update of Invoice Attributes and Contacts in Collections
Update the purchase order information, user comments, line-level descriptions, and contact information on invoices using the Advanced Collections pages. This improves collection efficiency by letting collectors make these updates directly without recourse to Receivables.
The Advanced Collections pages include two additional updateable fields at the transaction line level to display comments and translated descriptions for improved efficiency.
Updateable User Comments, Purchase Order Information and Contact Information
Updateable Line-level Descriptions
Business benefit:
Improves collection efficiency by allowing collectors to make updates directly in the Advanced Collections pages.
Steps to Enable
- Navigate to the Setup and Maintenance work area.
- Search the setup task Manage Collection Preferences.
- Under Global Preferences, change the preference to yes for parameter 'Allow collector to update transaction attributes.'
Receivables
Cash Budget Funding with Receivables Receipts
Use Receivables receipts to fund the cash control budget as receipts are processed. Cash collected for revenue is immediately available for spending when a standard receipt is applied to an invoice or a miscellaneous receipt is created.
Fund the Cash Budget with Receipts
Budgetary control validation has been added to both standard and miscellaneous receipts and increases the cash control budget’s adjusted budget balance.
The receipt funds status indicates the budgetary control validation status. Receipts with a passed status fund the cash budget. Receipts with a failed status need to be reprocessed.

Fund the Cash Budget with Receipts
Failures Requiring Attention
Use the Failures Requiring Attention region on the Budgetary Control Dashboard to review and correct receipts that failed budgetary control validation.
Failed Transactions Tab
Reprocess receipts that failed budgetary control validation on the Failed Transactions tab after viewing and correcting the failures.
Failures Requiring Attention Failed Transaction Tab
Cash Budget Status Exceptions Tab
Correct cash control budget status and budget period status failures on the Cash Budget Status Exceptions tab. Reprocess all receipts for the ledger by following the corrective action hyperlink.
Failures Requiring Attention Cash Budget Status Exceptions Tab
Steps to Enable
You don’t need to do anything to enable this feature.
Budgetary Control Setup
- If not using cash control budgets for payments, select cash controls on the Edit Budgetary Control and Encumbrance Accounting page. For details on the setup, refer to Steps to Enable section of this 22C feature:
- Budgetary Control Invoice Payments for Cash Budgets in Manage Payment Process Requests.
- Select the Receivables receipt funds the cash budget setting on the Edit Budgetary Control and Encumbrance Accounting page to enable budgetary control of receipts. This setting only applies to ledgers with business units enabled for Multifund Accounting.
Edit Budgetary Control and Encumbrance Accounting
Tips And Considerations
If not already using cash controls, refer to these features in the What’s New for additional information:
- 22C: Budgetary Control Invoice Payments for Cash Budgets in Manage Payment Process Requests.
- 22D: Budgetary Control Invoice Payments for Cash Budgets in Quick Pay and Pay in Full
- 23A: Budgetary Control Reservation of Invoice Payments When Cash Budget Has Insufficient Funds.
Receivables Receipts Fund the Cash Budget
- Cash budget funding with Receivables receipts only applies to ledgers with business units enabled for Multifund Accounting.
- Standard receipts aren’t budgetary controlled until an invoice, debit memo, credit memo or chargeback is applied. The application funds the cash budget.
- Funds are updated in the cash budget when:
- A standard receipt with an application is updated, unapplied, or reversed.
- A miscellaneous receipt is reversed or deleted.
- The budget date is the:
-
- Application date for a standard receipt.
- Original application date for update, unapply, and reversal activities on a standard receipt.
- Receipt date on a miscellaneous receipt.
- Original receipt date when a miscellaneous receipt is reversed or deleted.
- The budget account segment values are derived from these:
-
- The natural account is the cash account on the receipt method’s remittance bank account.
- All other segments are the revenue distribution account.
- Receipts created with the following methods are supported:
- Create Receipt page
- Lockbox
- Web service
- Automatic Receipt process
- AutoMatch process
- The following receipt applications aren't budgetary controlled and don't fund the cash budget:
- Invoices and debit memos from business units implementing Revenue Management
- Invoices with contingency
- Invoices with revenue schedules
- Invoices for Bills Receivable
- Debit memos with source debit memo reversal
Remittance Bank Account Impact on Funding Cash Budget via Journal Entries
- Accounting created for cleared receipts are no longer budgetary controlled in General Ledger because the cash natural account from the remittance bank account is budgetary controlled in Receivables. These journals have a funds status of Reserved in subledger. Accounting created for confirmed or remitted receipts are still budgetary controlled in General Ledger.
- To avoid overstating the cash budget, assign different GL accounts in your remittance bank account setup.
- The natural account on these remittance bank GL accounts must be different than the natural account defined for cash:
- Receipt Confirmation
- Remittance
- Unapplied receipts
- Unidentified receipts
- On-Account receipts
Remittance Bank Account Setup
- To fund the cash budget from general ledger journals posted to the cash account, such as manual journals or journals from other sources, assign only the GL cash account on your remittance bank account to the Edit Budgetary Control page, Accounts in Journals Subject to Cash Controls region.
Accounts in Journals Subject to Cash Controls
- For example, this table illustrates how to set up the remittance bank account so that the cash budget isn't overstated when Receivables journals are posted in General Ledger.
| Remittance Bank | Remittance Bank | Add to Accounts in Journals Subject to Cash Controls? |
|---|---|---|
| Cash | 8111 | Yes |
| Receipt Confirmation | 8372 | No |
| Remittance | 8373 | No |
| Unapplied Receipts | 8374 | No |
| Unidentified Receipts | 8375 | No |
| On-Account Receipts | 8380 | No |
The remitted and confirmed receipt journal entries will fund and overstate the cash budget when posted in General Ledger in the following cases:
- If 8111 is assigned to any of the other Remittance Bank Account GL Accounts.
- If any of the other Remittance Bank Account GL accounts other than 8111 are assigned to the Accounts in Journals Subject to Cash Controls.
Budget Entry for Cash Budgets
- You can also load initial or adjusted budget amounts in the cash control budget using any of the Budgetary Control budget entry methods.
Key Resources
- How Receivables Receipts Fund the Cash Budget Demo Video
- Revenue and Cash Controls in Using Financials for the Public Sector
- Manage Bills Receivables in Using Receivables Credit to Cash
- Overview of Multifund Accounting in Implementing Receivables Credit to Cash
- Receipt Classes and Methods in Implementing Receivables Credit to Cash
Access Requirements
- The Budget Manager role is needed to manage budgetary control configuration.
- The Accounts Receivables Supervisor role is needed to create and manage receipts
Zengin Alternate Mapping Rule Creation for Unidentified Receipts with Customer Assignment
Automatically create an alternate mapping rule when a customer is assigned to an unidentified receipt, to provide touchless cash processing capability for Zengin payments.
During lockbox processing for Japanese banks, the Zengin lockbox process checks alternate mapping rules to identify customers and process their payments. In previous releases, it was necessary to create the alternate mapping rules manually. With this release the rules are created automatically once customer information is provided. This functionality is available for both the Manage Lockbox Transmission ADFDI and the Edit Receipts page.
In the Edit Receipts page, the alternate mapping rules are created once a receipt is changed from an unidentified receipt to an identified receipt using either of these methods:
- Manually enter the customer name of an unidentified receipt.
- Apply an open receivable with the customer name to an unidentified receipt.
Business benefits include:
- Provide touchless cash processing capability for Zengin payments for alternate mapping rules creation.
- Create receipts during lockbox process with the automatically generated alternate mapping rules.
Steps to Enable
You don't need to do anything to enable this feature.
Revenue Management
Revenue Recognition for Subscriptions Originated from Order Management and Managed by Subscription Management
Automate revenue recognition to address IFRS 15 and ASC 606 for integrated subscriptions that originate from Order Management and are managed by Subscription Management.
Integrated data includes sales orders involving services and subscription services, fulfillment data, and sales invoices.
Extraction of sales orders
Run the Extract Sales Orders for Revenue Management process in Order Management to send the sales order information to Revenue Management upon submission of an order in Order Management. For subscriptions and other services, when you enable integration between Order Management and Subscription Management, Order Management also sends the service duration and price periodicity information to Revenue Management. Revenue Management recognizes revenue in accordance with the satisfaction plan based on the integrated service duration and price periodicity.
Revision of order lines in Order Management
Any changes to the sales order lines before fulfillment are communicated to Revenue Management as revision lines. The revised transaction price is reallocated among the performance obligations for every revision.
Returns and revisions of standard items
Returns and revisions of standard items are extracted and sent to Revenue Management from Order Management for further processing.
Fulfillment in Order Management
- Standard item – once the item is fulfilled, Order Management sends the fulfillment information to Revenue Management where revenue is recognized to the extent of fulfillment.
- Service and Subscription items – once the service or subscription item is fulfilled, Order Management passes the information to Subscription Management where the service and subscription items are managed.
Send service or subscription information to Revenue Management
Once Subscription Management receives the service and subscription information from Order Management, Subscription Management processes the information and creates a subscription in Subscription Management. This subscription information is sent to Revenue Management as a revision line, regardless of whether there are any revisions to the line sent earlier by Order Management. If none of the revenue impacting attributes are revised in Subscription Management, then Revenue Management doesn’t perform any reallocation.
Revision of service or subscription information in Subscription Management
If there are any revisions of services and subscriptions performed in Subscription Management, Subscription Management communicates this information to Revenue Management.
Termination or amendment of the service or subscription
When termination of a service or subscription is initiated in Order Management, Order Management sends this information to Subscription Management. Subscription Management then sends the revised or new revenue lines to Revenue Management.
Invoicing
Subscription Management sends the invoicing of the service or subscription items in this integrated subscription flow to Oracle Receivables.
Import billing into Revenue Management
The Import billing data from Fusion Receivables process imports the billing data sent by Subscription Management and matches it with the revenue lines initiated from Order Management.
Configuration
The following setups are required in Revenue Management:
- Configure Revenue Management System Options:
- Assign the Extraction Start Date and Revenue Clearing Account for the Source Document Type DOO Sales Order
- Complete the setups in the Manage System Options for Revenue Management page for the ledger that is used for this integration
These are the same setups used while configuring the integration between Order Management and Revenue Management.
Business benefits include:
- You can address IFRS 15 and ASC 606 with Revenue Management and its configurable execution of the five-step model:
- Automatically identify and create revenue accounting contracts and performance obligations at inception from the sales orders involving services and subscription services (Steps 1-2).
- Automatically calculate the expected consideration from the sale and allocate the transaction price of the contract based on the relative allocation method to each distinct performance obligation such as service and subscription ( Steps 3-4).
- Revenue Management records satisfaction events and recognizes revenue accordingly at a point in time or over time (Step 5).
- Process life cycle events of a service or subscription such as terminations and amendments that are initiated in Order Management but flow to Revenue Management from Subscription Management. Revenue Management automatically revises the accounting contract to reflect the changes and reallocates the new transaction price to the performance obligations.
- Record a Receivables balance by billed amount, apply the billing lines generated in Receivables to the accounting contracts in Revenue Management to offset the corresponding contract asset balance.
Steps to Enable
You don't need to do anything to enable this feature.
Tips And Considerations
- The Extract Sales Orders for Revenue Management process extracts the sales orders initiated in Order Management and sends them to Revenue Management upon submission of an order. This includes all orders except internal sales orders.
- Order Management sends the service duration and price periodicity for revenue lines with service or subscription items (only when Order Management to Subscription Management integration is used).
- The Receivables line transaction flexfield Oracle DOO Integrated Subscriptions is used to generate invoices in the integrated subscription flow.
- The Receivables transaction source Oracle DOO Integrated Subscriptions is used for invoices for transactions generated in Order Management and flowing through Subscription Management.
- Subscription Management sends the satisfaction plan and base price information to Revenue Management in this flow.
- Order Management sends all the multiple charges to Revenue Management upon submission of an order in this integrated flow. In the base Order Management integration with Revenue Management, only the primary charge is sent to Revenue Management.
- Order Management doesn't send user charges to Revenue Management in this flow. Subscription Management sends the user charges directly to Revenue Management.
Key Resources
- Refer to the Guidelines for Integrating Revenue Management with Order Management and Cost Management section of the Revenue Management user guide documentation for further information on the integration of Revenue Management with Order Management.
- Refer to the Order Management and Subscription Management user guide documentation for more information.
Access Requirements
- No new role access is needed to use this feature.
Revenue Recognition Upon Fulfillment of Additional Events
Recognize revenue conditionally after fulfillment of additional events like customer acceptance, proof of delivery and payment received. Configure rules to define additional events based on conditions. Revenue will be recognized only after the primary satisfaction event and all the additional satisfaction events of a promise are fulfilled.
The primary satisfaction event indicates the fulfillment of a performance obligation based on the terms of the contract, whereas an additional satisfaction event indicates the fulfillment of an obligation based on additional events such as customer acceptance, proof of delivery, or payment as dictated by the internal revenue recognition policies of the business.
An additional satisfaction event is assigned to the obligations based on the configuration of the Additional Satisfaction Event Rules. The fulfillment of the additional satisfaction events can be imported through Revenue Basis Data Import FBDI.
Additional Satisfaction Event Rules
A new setup page, Create Additional Satisfaction Event Rule, is introduced as part of this feature. Some of the key attributes in this setup page are specified below.
- Name – Name of the additional satisfaction event rule.
- Additional Satisfaction Event – Additional satisfaction event type, either Customer Acceptance, Proof of Delivery, or Payment.
- Basis For Fulfillment Date – Specify the basis for the fulfillment date in the case of automatic fulfillment of an additional satisfaction event. You can choose from Contract date, First fulfillment date, or Fully satisfied date.
- Days After Basis Date – Number of days from the Basis for fulfillment date when the additional satisfaction event is considered to be fulfilled.
- Priority – Processing priority of the event rule. The lowest numeric value takes priority.
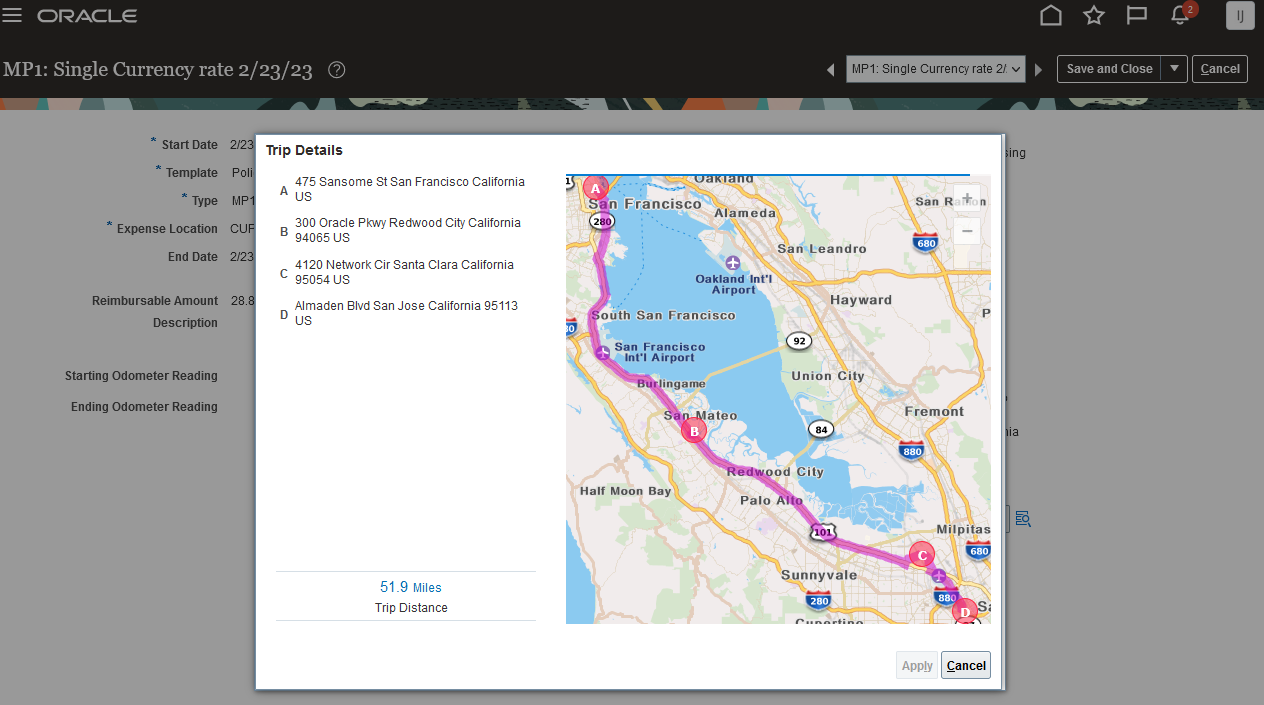
Additional Satisfaction Event Rule

- You can edit all the attributes of an additional satisfaction event rule if it is not yet used in any of the revenue lines.
- You can edit the Priority, Description, and Enabled option if the additional satisfaction event rule is already used in any revenue lines.
- The additional satisfaction event rules can be viewed and managed through the Manage Additional Satisfaction Event Rules page.
Revenue Basis Data Import FBDI
The Revenue Basis Data Import FBDI template contains a new tab called VRM_SOURCE_DOC_ADDL_SUBLINES, through which the fulfillment of additional satisfaction events can be imported into Revenue Management. Each additional subline represents the fulfillment of an additional satisfaction event of an existing source document line or revenue line. Key columns of this tab are:
- Record Type – Specify record type as A for additional subline
- Source Document Type Code
- Source Document Additional Satisfaction Event Subline Unique Identifier Number 1 to Source Document Additional Satisfaction Event Subline Unique Identifier Number 5 and Source Document Additional Satisfaction Event Subline Unique Identifier Character 1 to Source Document Additional Satisfaction Event Subline Unique Identifier Character 5. These attributes together are used to uniquely identify an additional subline
- Source System
- Source Document Line Unique Identifier Number 1 to Source Document Line Unique Identifier Number 5 and Source Document Line Unique Identifier Character 1 to Source Document Line Unique Identifier Character 5. These attributes together help to identify the unique source document line to which the additional subline is associated.
- Additional Satisfaction Event – Specify the additional satisfaction event type
- Satisfied Quantity – The quantity that is fulfilled for the additional satisfaction event when the additional satisfaction event is Customer acceptance or Proof of delivery and the satisfaction measurement model is Quantity
- Satisfied Percent – The percentage of fulfillment of the additional satisfaction event when the additional satisfaction event is Customer acceptance or Proof of delivery and the satisfaction measurement model is Percent
- Amount Applied – The amount received and applied to the related invoice
- Fulfillment Date – The date of fulfillment of the additional satisfaction event
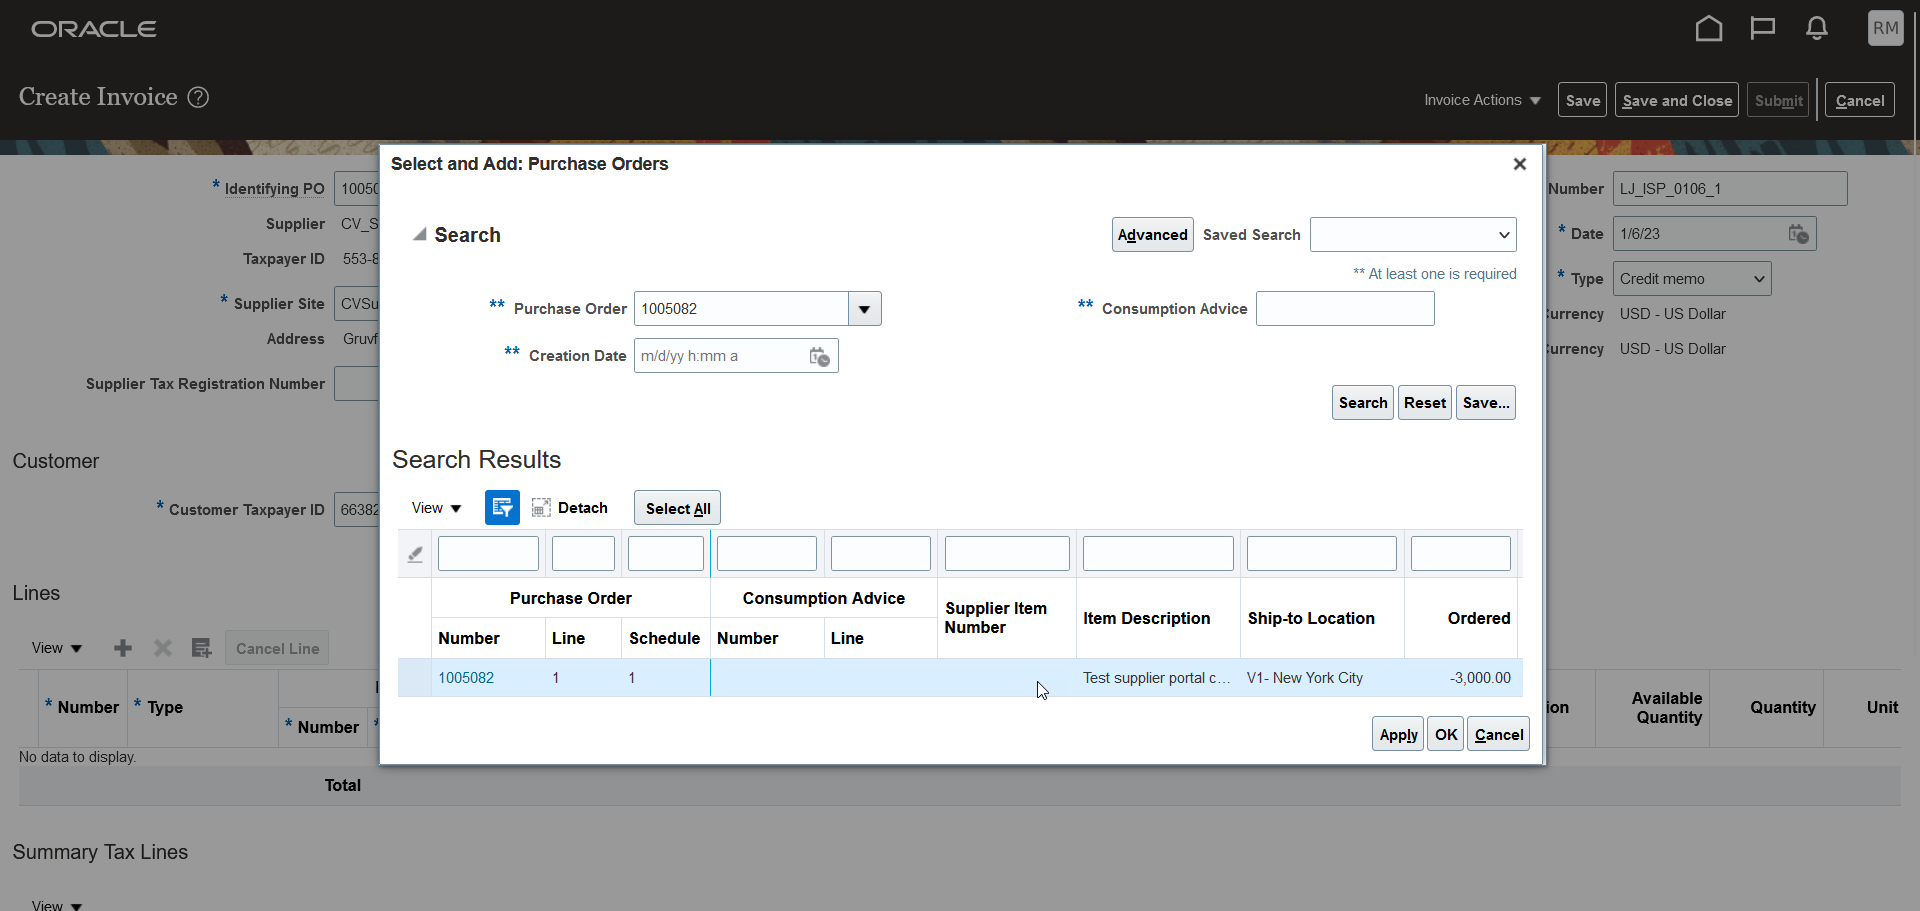
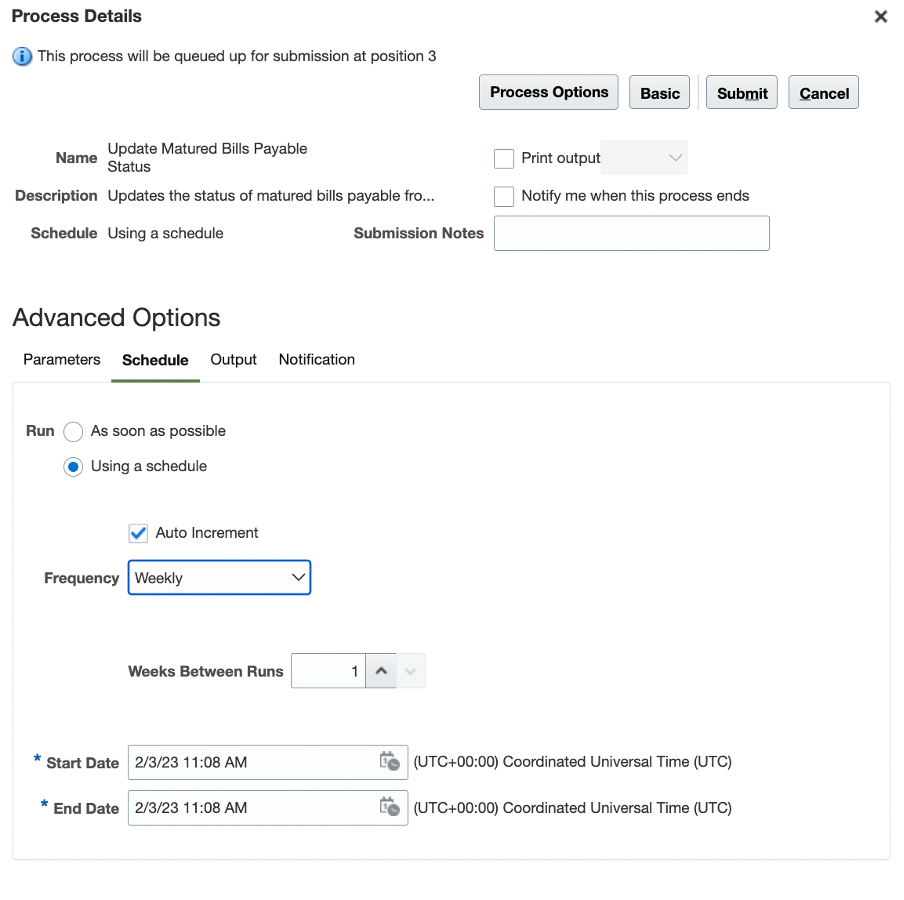
Revenue Basis Data Import FBDI - Figure 1
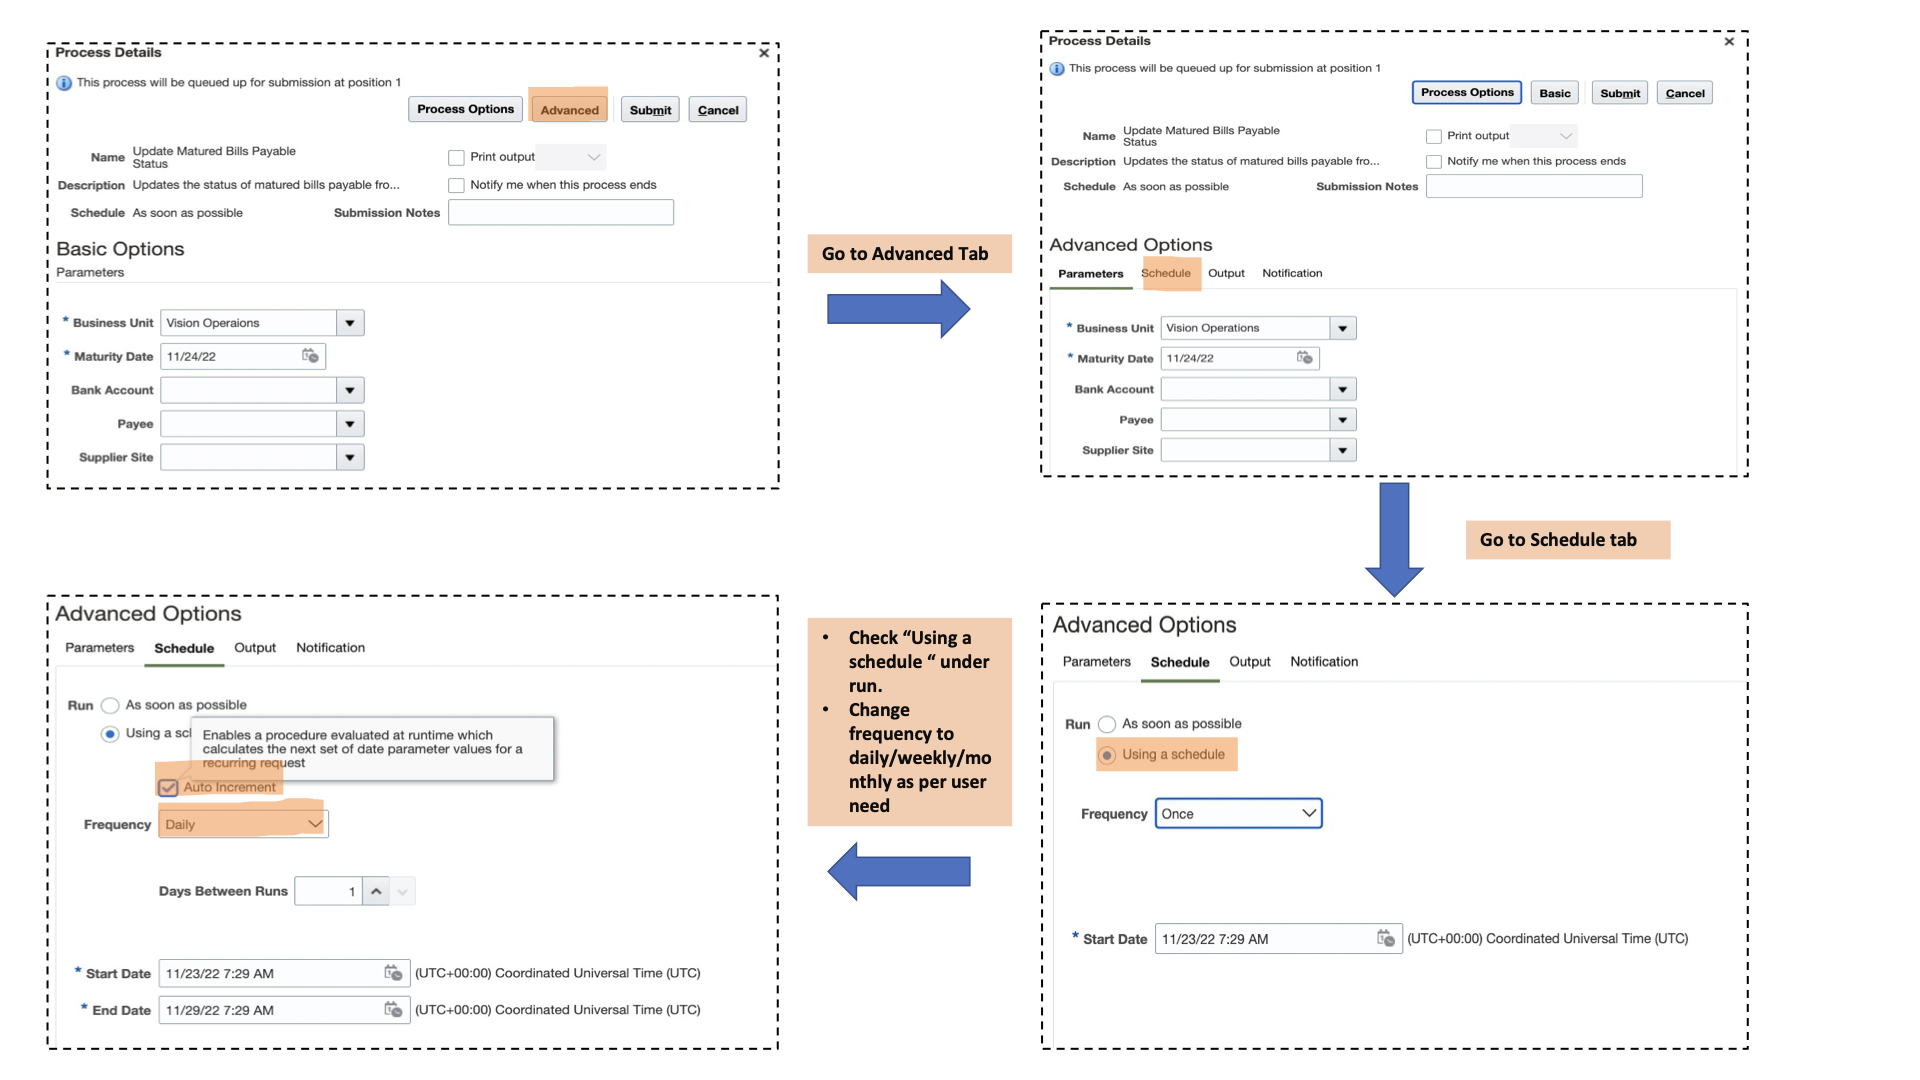
Revenue Basis Data Import FBDI - Figure 2
Error Handling
The Validate Customer Contract Source Data process will validate the additional sublines and display any errors in the output. Users can correct and import the revised additional sublines for further processing.
Revisions and Returns
With any revision on financial impacting attributes of a contract, all the revenue lines in the contract will be re-evaluated for the additional satisfaction event rules to check and assign the additional satisfaction events on the revenue lines. Similarly, in the case of returns, the revenue lines will be re-evaluated for the additional satisfaction event rules.
Edit Customer Contract page
The Edit Customer Contract page is now enhanced to display the additional information related to the additional satisfaction events.
The Performance Obligations tab now has two new columns:
- Additional Satisfaction Event – indicates whether the performance obligation or any line of the performance obligation has at least one additional satisfaction event assigned to it.
- Satisfaction Status of Additional Event – indicates the satisfaction status of all the additional events on the performance obligation. Expected values are Fully satisfied, Extent satisfied, and Not started.
The Promised Details tab also has two new columns:
- Additional Satisfaction Event – indicates whether the promised detail line has at least one additional satisfaction event assigned to it.
- Satisfaction Status of Additional Event – indicates the satisfaction status of all the additional events assigned to the promised detail line. Expected values are Fully satisfied, Extent satisfied and Not started.
The promised details tab now displays a new sub tab called Additional Satisfaction Events, with two sections for Summary information and Detail information.
Key Validations
- During inception, the Identify Customer Contracts process will assign the revenue lines with the additional satisfaction events based on the configuration.
- The Recognize Revenue of Customer Contracts process will hold revenue recognition until both the primary and additional satisfaction events are fulfilled.
- When the satisfaction measurement model is Period, you should import only the fulfillment date for the additional satisfaction event types Customer acceptance and Proof of delivery.
- In case the additional satisfaction event is Payment, the revenue recognized is calculated using the formula ((Amount Applied/Line Amount)*Allocated Amount).
This feature enables you to recognize revenue when both the primary and additional satisfaction events of a performance obligation are fulfilled based on your policies reflecting the ASC 606 and IFRS 15 accounting standards
Steps to Enable
You don't need to do anything to enable this feature.
Tips And Considerations
- A revenue line can have more than one additional satisfaction event assigned to it based on your configuration.
- On discarding a contract, all the revenue lines will be reevaluated for the additional satisfaction events. The additional sublines also will be reprocessed similar to source document sublines.
- You can also configure revenue to be recognized for an additional satisfaction event assigned to a performance obligation once a defined number of days has been reached.
- Additional satisfaction events are not assigned to an implied performance obligation.
- This feature is available for third party integrations only using the Revenue Basis Data Import template. However, you can use the template to import the fulfillment of additional satisfaction events from the cloud integrated sources as well.
Key Resources
- Refer to the Revenue Management user guide documentation for further information on the revenue recognition process.
Access Requirements
- No new role access is needed to use this feature.
Usability Improvements for Handling Complex Performance Obligation Identification Templates
Provide additional capabilities to Performance Obligation Templates, such as duplicating existing performance obligation templates, exempting obligation from allocation, and searching templates based on items or memo lines.
This feature delivers usability improvements to the existing Setup and Maintenance - Manage Performance Obligation Templates page. These usability improvements make it easier to create and update definitions of new templates.
The improvements allow you to easily create copies of templates and make available additional modeling capabilities by enabling you to:
- Flag a performance obligation template as exempt from allocation. When revenue contracts are created, these flagged performance obligations will be excluded from the allocation of total transaction price across performance obligations.
- Apply a default classification value in the template that is assigned to the performance obligation at creation.
- Duplicate an existing template to add new or remove items.
- End date templates no longer valid for performance obligation identification.
In support of these improvements, the following functions and attributes are now available in the Manage, Edit and Create Performance Obligation Template pages.
Manage Performance Obligation Templates

Manage Performance Obligation Templates Page
Search - Advanced Search
The advanced search view in the Manage Performance Obligation Templates page is extended to support searching for performance obligation templates based on the following new attributes:
- Exempt from Allocation – use to retrieve templates that create performance obligations marked as exempt from revenue allocation.
- Active Date – use to retrieve templates where the entered date falls within the template's Effective Start and End date range.
- Default Classification – use to retrieve templates that create performance obligations with the selected classification assignment.
- Item – use to retrieve templates whose item assignment listing contains the item value.
- Memo Line – use to retrieve templates whose line assignment listing contains the memo line value.
View – Show All / Manage Columns
The View – Show All/ Manage Columns functionality is extended to support the display and manageability of the newly added attributes.
Use this option to display or reorder the new attributes in the search results region. Here you can change the attribute settings for performance obligation templates without navigating to the Edit Performance Obligation Template page.
NOTE: The ability to change settings for specific attributes depends on whether the performance obligation template is In Use. When the performance obligation template is In Use, the unchangeable attributes in the region are read only.
Actions – Duplicate
Use the new Duplicate action to duplicate an existing performance obligation template and use the duplicate to update the template definitions and settings.
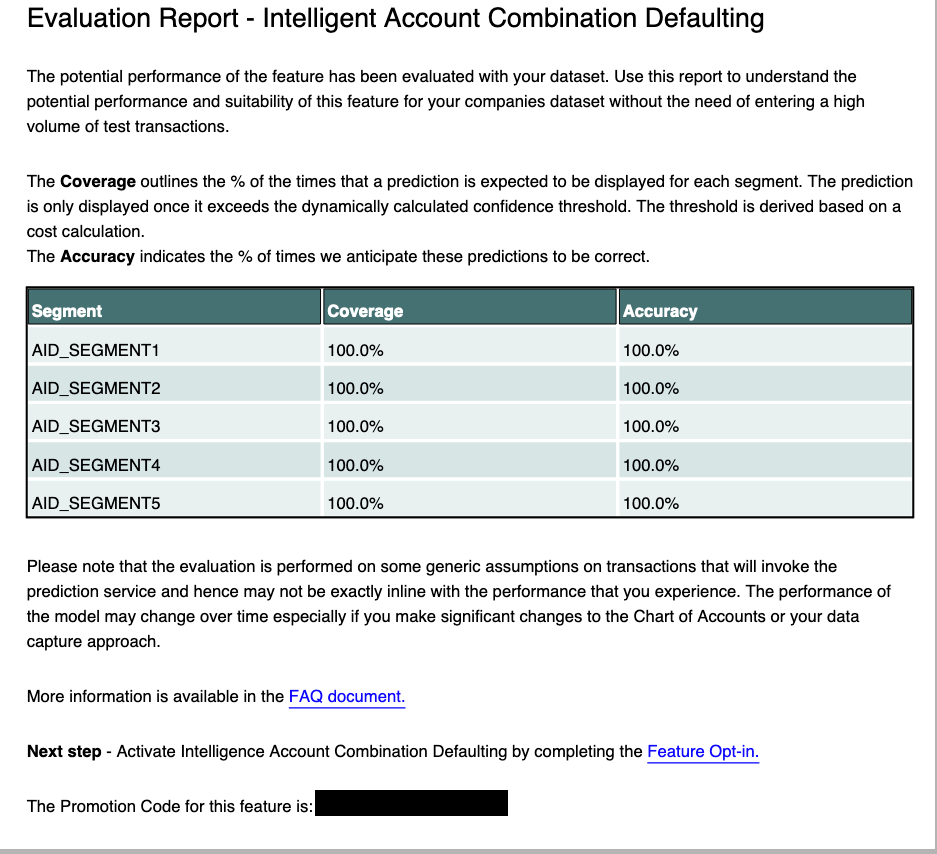
Manage Performance Obligation Templates - Actions: Duplicate
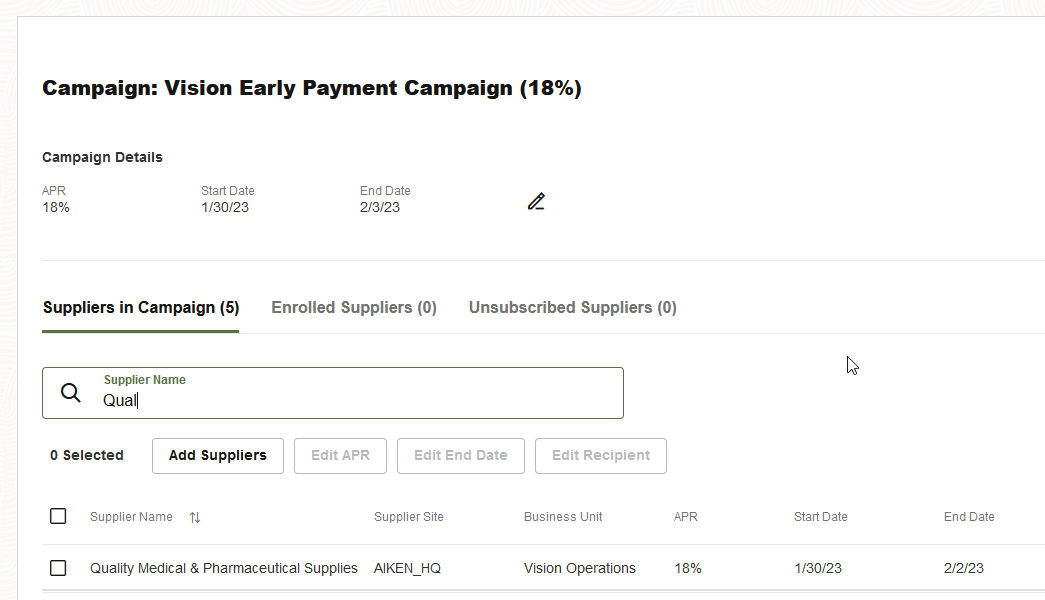
Create Performance Obligation Template Window
Click Actions > Duplicate in the search results section of the Manage Performance Obligation Templates page to select an existing performance obligation template to duplicate. The Create Performance Obligation Template window displays the following:
- Name - is a required field. Enter a name for the new template. The system default is _ 'Name of template being duplicated'.
NOTE: If you want to change the template name, you must enter it in the Create Performance Obligation Template window before clicking Save and Close. Once the template is duplicated, you can't update the template name.
- Description - is an optional field. Enter a description.
- Effective Start Date – Enter the start date for the effective date of the performance obligation template. By default, the application enters the effective end date of the source template plus one day, or the current system date.
When you click Save and Close, the application creates an exact copy of the selected template using the new name, descriptions, and effective start date as entered in the window. All other existing performance obligation header attributes and item assignments will be copied from the original template except for the following which are assigned as follows:
- Name = as entered in the window
- Description = as entered in the window
- Priority = source template Priority + 1 (until reach unused value)
- Effective Start Date = default to End date of original template + 1 or current date
- Effective End Date = Blank
- Enabled = No
- In use check box = Blank/Null
When the application completes the duplication action, the Edit Performance Obligation Template page opens and displays the results of the duplication action.
Edit Performance Obligation Template
Edit Performance Obligation Template
Use the Edit Performance Obligation Template page to make any required changes to the new (duplicated) performance obligation template.
Here you can:
- Change any or all template header attributes except for the name of the template.
- Add or delete items or memo line assignments in the Item Assignments section.
When you click Save or Save and Close, the template is validated for required and valid data. Rows with invalid item assignments or missing data are marked with an X icon.
- Delete the Performance Obligation Template by clicking Actions > Delete.
- Create a duplicate of the currently displayed template by clicking Actions > Duplicate.
Actions – Delete
Click Actions > Delete to delete the performance obligation being displayed on the page. When selecting Delete, you are prompted to confirm the request. A warning message window is displayed.
- Select Yes to delete the performance obligation template and return to the Manage Performance Obligation Template page. Note that once you delete the template, it can’t be undone.
- Select No to cancel the request and remain on the Edit page.
NOTE: Performance obligation templates that are In Use can’t be deleted. If the template is no longer to be used in the identification process, set the Enabled attribute to No or set the effective end date.
Create Performance Obligation Template
Create Performance Obligation Template
The new attributes are available on the Create Performance Obligation Template page. When creating templates without using an existing template as a basis, you can populate these attributes as required.
Steps to Enable
You don't need to do anything to enable this feature.
Tips And Considerations
- Once a Performance Obligation template is In Use, the same restrictions for the Performance Obligation Identification Rule apply. Once in use, you can only update the Effective End Date field. The Exempt from Allocation, Default Classification, and Effective Start Date fields are read only.
- There is no change to the existing Identify Customer Contracts process evaluation logic or processing sequence when processing templates to group source document lines into performance obligations, except when considering which templates are eligible for consideration and use. The template is eligible for consideration when the performance obligation template:
- Has an effective start date that's later than the Revenue Management accounting contract date and earlier or equal to the template's effective end date.
- The Enabled field = Yes."
- When performance obligations are re-identified while performing material contract modifications, the application applies the template in use at the time of the original contract creation, even if the template was subsequently end dated or disabled.
-
If you want to apply a new performance obligation template definition, you must first discard the original contract using the Discard Customer Contracts process. When the performance obligations are re-identified, the application uses the current set of enabled and active templates.
Performance Obligation Template Header Attributes
| Attribute Name | Description |
|---|---|
| Name | Name of template. |
| Description | Description of the template. |
| Satisfaction Method | Method used to satisfy performance obligations. Valid values are Allow Partial or Require Complete. |
| Priority | Processing priority of the template when evaluating source document lines. The lowest numeric value takes priority. |
| Enabled | Indicates if the template is eligible for use in the identification process. Valid Values are Yes, No, and Blank. Blank equals No. |
| Exempt from allocation | Indicates if the resulting performance obligation is exempted from revenue allocation. Valid values are Yes, No, and Blank. Blank equals No. |
| Effective Start Date | Date from which the template is eligible for consideration in the identification process. Used in conjunction with the Enabled attribute. The effective start date can be any past or future date. |
| Effective End Date | Date the template is no longer eligible for consideration in the identification process. Used in conjunction with the Enabled attribute. The effective end date can be any past or future date but can’t be before the effective start date. |
| Default Classification | Indicates the classification type of performance obligation. Valid values are defined in the ORA_VRM_OBLIG_CLASSIF_CODE lookup type. |
| Derive Pricing Dimension Combinations | Indicates only source document lines with the same pricing dimension combination are to be considered. When checked, only source document lines with the same pricing dimension combination are included in the performance obligation. |
| Use Residual Approach | Indicates that the standalone selling price for the performance obligation is to be derived using the Residual SSP method. |
| Allocation Basis | Used in conjunction with Derive Pricing Dimension Combinations. When Derive Pricing Dimension Combinations is enabled, this value indicates how performance obligation allocated revenue is to be distributed to the performance obligation promised detail lines. Using promise detail line component standalone selling prices or selling amount. Valid values are Extended SSP amount or Selling amount. |
| In use | Indicates whether the performance obligation template is in use or not by the application. When checked, the template is in use and can’t be deleted or modified. Only The template Effective End Date or Enabled attributes can be modified. |
Key Resources
- Refer to the Revenue Management user guide documentation for further information on configuration of performance obligation templates and use.
Access Requirements
- No new role access is needed to use this feature.
Asset and Lease Management
Assets
Capitalization of Fixed Assets for Expense Destination Receipts in the Procurement Process
Capitalize and place fixed assets with a destination type of expense in service as soon as they are received. This initiates the process of recognizing depreciation expense at once and eliminates the delays involved in invoice processing.
In addition, create a maintenance asset for such receipts and automatically establish a relationship with the corresponding fixed asset without any manual intervention. The application creates a single maintenance and single fixed asset for non-serialized items, whereas multiple assets are created for serialized items. These maintenance assets will be created in Oracle Fusion Cloud Maintenance, which is part of Oracle Cloud SCM.
After accounting for the receipt of the asset, transfer the estimated costs and non-recoverable taxes from the receipt to Assets using the Transfer Receipts to Mass Additions process. This process transfers the assets to the corporate book associated with the purchase order’s inventory organization, using the receipt date of the goods as the in-service date. In addition, the category is populated by default based upon either the asset category on your purchase order (PO) line item definition, or by matching the natural account of the asset category’s clearing account to that of the PO charge account. The asset location is populated automatically if your asset location is mapped to your ship-to location. The serial number is also transferred from the receipt to the fixed asset.
After you enter and account for the invoice matched to either the purchase order or the receipt, the application posts any variance between the purchase order and the invoice amounts to the asset as an adjustment.
To accomplish this, perform the following steps:
- Create a purchase order in Oracle Cloud Procurement
- You must create the purchase order after the cut-off date used to enable this feature using the opt-in.
- When adding purchase order line items, ensure that the
- Destination Type is set to Expense
- Accrue At Receipt is selected
- The item on the purchase order line is configured with the Create Fixed Asset at Receipt
- Submit the purchase order for approval.
- After successful procurement of the item, receive the items into the inventory organization defined in the purchase order.
- Ensure that this inventory organization is associated with an Assets corporate book.
- Run the following scheduled jobs to import the asset to Assets. Ensure that the Cost Accountant role is assigned to your user.
- Transfer Transactions from Receiving to Costing (Oracle Cost Management)
- Create Receipt Accounting Distributions (Cost Management)
- Run the Create Accounting process for your receipt, and post it to Oracle General Ledger (Cost Management)
- Transfer Receipts to Mass Additions (Oracle Maintenance)
- Optionally Review Receipt Accounting Distributions (Cost Management)
- Navigate to Fixed Assets> Assets. Ensure that the Asset Accountant or Asset Accounting Manager role is assigned to your user for this step.
- Optionally run the Prepare Mass Additions Automatically process.
- Prepare the newly created source lines for your receipt in the corporate book associated with the inventory organization into which you received the goods. You can search the line by using the purchase order number.
- Run the Post Mass Additions process to create assets from mass addition lines.
- Enter the Purchase Order or receipt matched invoice.
- To import these invoice details into Assets, run the following processes. Only charges prorated or allocated to the item lines will be transferred to Assets.
- Create Accounting (Oracle Payables).
- Transfer Costs to Cost Management, (Cost Management)
- Create Receipt Accounting Distributions (Cost Management)
- Transfer Receipts to Mass Additions (Oracle Maintenance)

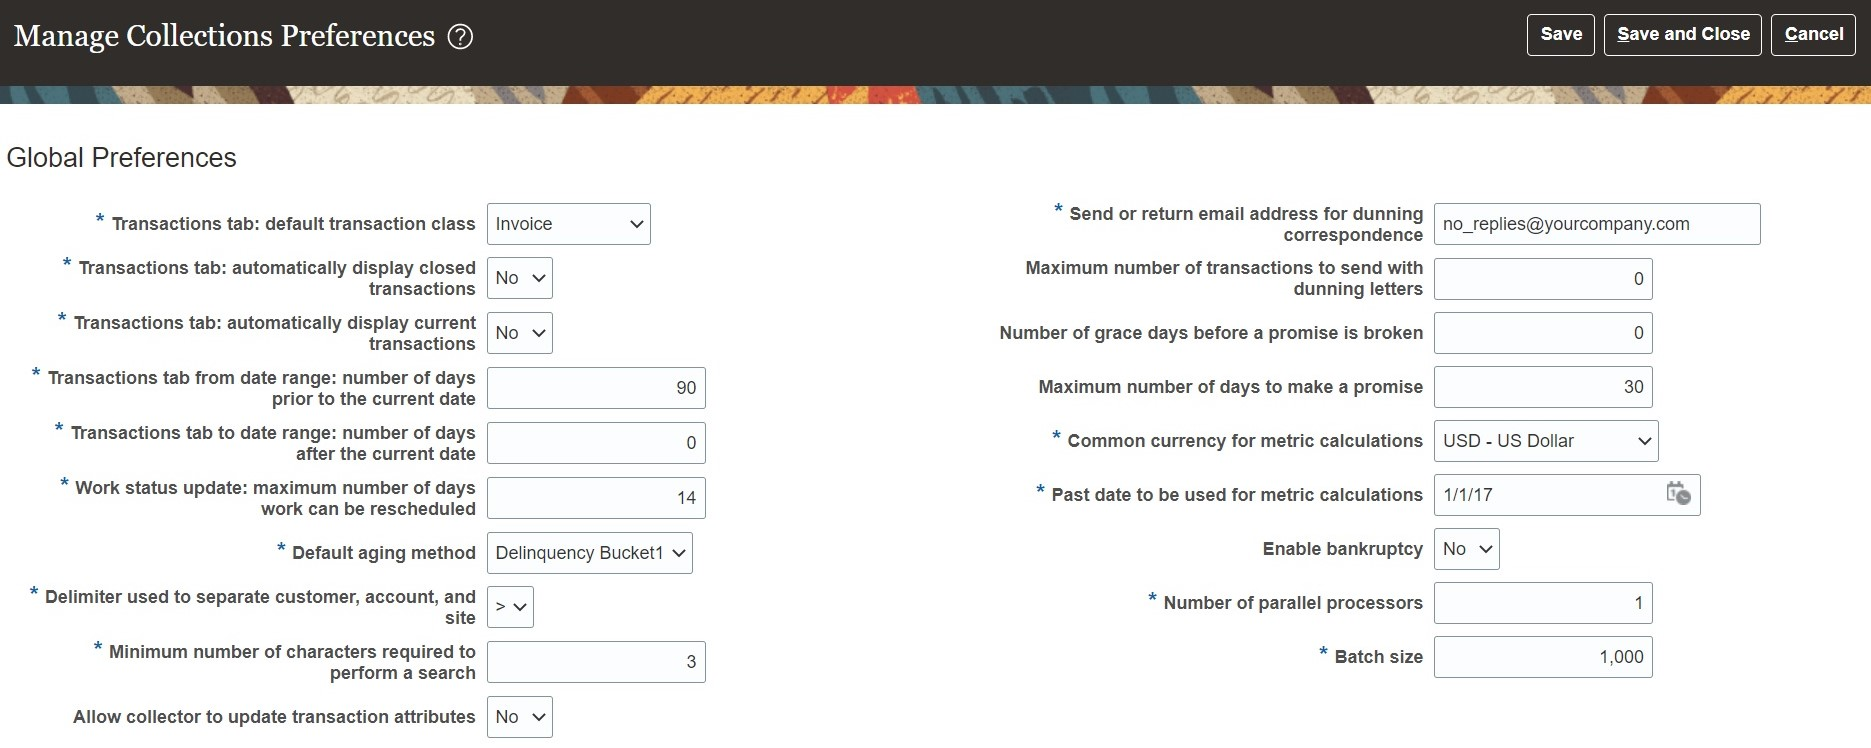
The newly added fixed asset is tied back to its operational counterpart in the Oracle Maintenance, part of Oracle Cloud SCM using the Connect Fixed Assets to Operational Assets process. You can see the fixed asset associated with your maintenance asset on the Fixed Asset tab of the Manage Assets page of Maintenance Management in Oracle Cloud SCM.

Business benefits include:
- Create a fixed asset and a maintenance asset at receipt creation.
- Record the depreciation expense in a timely manner to eliminate any delays due to the invoicing process.
- Establish an automatic relationship between the maintenance asset and the associated fixed asset without manual intervention.
- Provide complete visibility into the operational and financial information of the assets.
Steps to Enable
Use the Opt In UI to enable this feature. For instructions, refer to the Optional Uptake of New Features section of this document.
Offering: Manufacturing and Supply Chain Materials Management
- Use the opt-in for Capitalize Fixed Assets Upon Purchase Receipt to Expense Destination feature in Supply Chain Management to enable this feature.
- Setup and Maintenance > Manufacturing and Supply Chain Materials Management > Change Feature Opt In > Maintenance Management > Edit Feature > Capitalize Fixed Assets Upon Purchase Receipt to Expense Destination.
- In order to import assets into Oracle Assets, use the Manage Inventory Organization page to associate the Assets corporate book to your inventory organization.
- Ensure that you enable the Create Fixed Asset at Receipt option for the purchase order line item in the item definition.
Tips And Considerations
When adding and processing the purchase order for capitalization at receipt, ensure that these conditions are met:
- The Destination Type is set to Expense.
- Select the Accrue at Receipt option and accrue the purchases as you receive them.
- The Create Fixed Asset at Receipt option is enabled for the item on the purchase order line.
- The purchase order is created after the cut-off date to enable this feature.
- Only non-project-based purchase receipts are transferred to Assets.
- Account the receipt fully before transferring any information to Assets.
- Receive the item into the inventory organization associated with an Assets corporate book.
Any Item line transferred to Assets is a merged parent. Any subsequent freight, tax, and miscellaneous charges to the parent are pre-merged with the item line, as long as the line is not in the Post queue. Once the line is in Post queue, the application waits for it to be posted before transferring any new costs. Once the line is posted and a new asset is created, the application adds further costs to this asset as an adjustment using the Add to Asset feature of Assets. You cannot merge or split any lines transferred from receiving to assets. You cannot change the asset book for such mass additions lines in Assets.
The Create Mass Additions process will not be used to transfer any invoice adjustments to Assets. The following set of scheduled jobs are added or updated as part of this integration:
- Transfer Transactions from Receiving to Costing (Oracle Cost Management)
- Create Receipt Accounting Distributions (Cost Management)
- Create Accounting (Cost Management)
- Transfer Receipts to Mass Additions (Oracle Maintenance)
- Post Mass Additions (Oracle Assets)
- Connect Fixed Assets to Operational Assets (Oracle Maintenance)
After invoicing, use the following processes instead of the Create Mass Additions process:
- Transfer Costs to Cost Management
- Create Receipt Accounting Distributions
- Create Accounting
- Transfer Receipts to Mass Additions
Key Resources
- Derive Asset Location From Payables Invoice Ship-To Location (Doc ID 2796502.1)
- What is The Purpose of Prepare Mass Additions Automatically under Prepare Source Lines? (Doc ID 2186041.1)
- Refer to the new feature summary for the Capitalize Fixed Assets Upon Purchase Receipt to Expense Destination feature in Supply Chain Management for additional context.
Access Requirements
- Users who are assigned this predefined job role can access various parts of this feature:
- Maintenance Manager (ORA_MNT_MAINTENANCE_MANAGER_JOB)
- Cost Accountant (ORA_CST_COST_ACCOUNTANT_JOB)
- Asset Administrator (ORA_CSE_ASSET_ADMINISTRATOR_JOB)
- Accounts Payable Supervisor (ORA_AP_ACCOUNTS_PAYABLE_SUPERVISOR_JOB)
- Asset Accountant (ORA_FA_ASSET_ACCOUNTANT_JOB)
File Based Data Import for Revaluation of Fixed Assets
Use the Fixed Asset Revaluations Import template to upload a high volume of fixed asset revaluation transactions. Run the Post Mass Fixed Asset Financial Transactions process to post them.
To upload the fixed assets revaluation transactions:
- Enter the revaluation of assets using Fixed Asset Revaluations file-based import template.
- Upload the generated .csv file using the File Export Import page.
- Run the Post Mass Fixed Asset Financial Transactions process from Scheduled Processes.
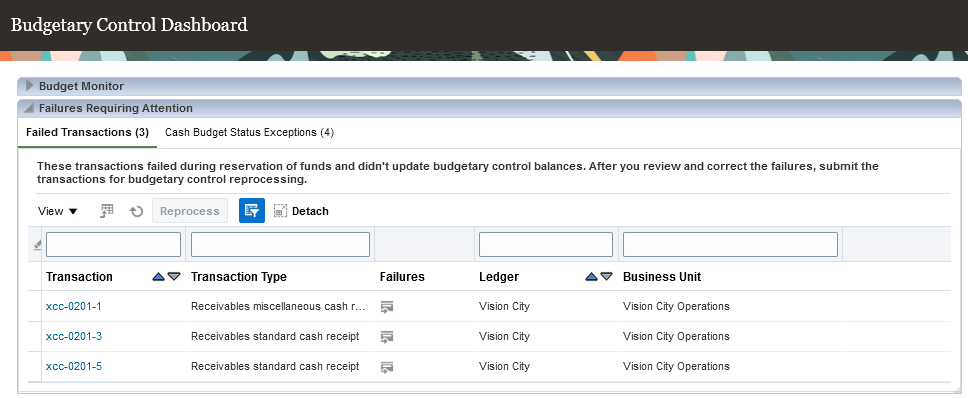
Business benefit:
Revalue a high-volume of assets in one upload.
Steps to Enable
You don't need to do anything to enable this feature.
Invoice Accounting Date Display for Lines Transferred from Payables to Fixed Assets
Include the accounting date in the display of Payables invoice lines in the Additions infotile of the Assets Landing page and the Prepare Source Lines page. This provides immediate view of the accounting date without drilling down to invoice details.
Business benefits include:
- Allows sorting and filtering the pending asset addition invoices by invoice date and process them in correct asset book period.
- Makes available Payables invoice accounting dates in one location on the Assets landing page.
Steps to Enable
You don't need to do anything to enable this feature.
Lease Accounting
Short-Term and Long-Term Lease Liability Accounting
Automatically account for short-term and long-term lease liability. The IFRS16 and ASC842 accounting standards require separating the lease liability into short-term and long-term for disclosure reporting. The short-term is the liability within the next 12 months, and the long-term is the liability due after 12 months. Lease administrators can automatically generate accounting entries to classify the lease liability into short-term and long-term and account for the periodic movements from long-term to short-term. The liability reclassification details are available on the Schedules tab of the lease and in the Lease Details Report.
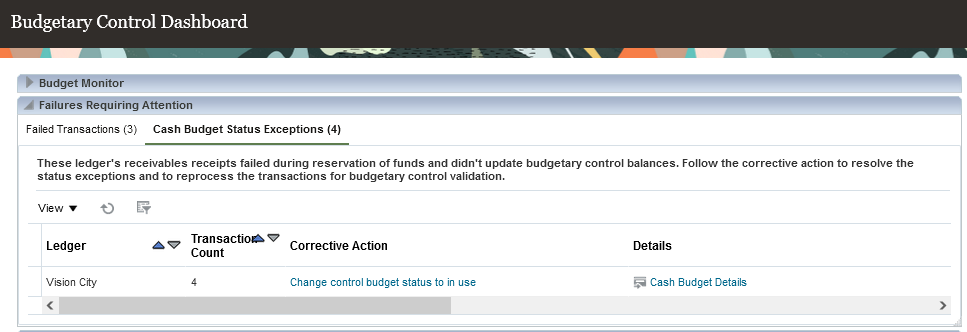
Liability Reclassification available from Schedules
Business benefits include:
- Simplify compliance with IFRS16 and ASC842 lease accounting for short-term and long-term liability.
- Increase efficiency and reduce the risk of manual errors with automated month-end processes.
Steps to Enable
Use the Opt In UI to enable this feature. For instructions, refer to the Optional Uptake of New Features section of this document.
Offering: Financials No Longer Optional From: Update 23D
Access Requirements
- You do not need any new role or privilege access to set up and use this feature.
Region and Country-Specific Features
Brazil
Bulk Processing of Fiscal Documents Based on Shipping Transactions for Brazil
You can generate shipping transaction-based fiscal documents for Brazil in bulk. This removes an existing restriction to process shipping transactions individually for fiscal document generation.
When the Shipment transaction is eligible for fiscal document processing, the import process can perform these tasks in a single process request: initiate the fiscal document request; upload the related fiscal attributes; and optionally generate the fiscal document and create the fiscal document XML extract.
The existing FBDI that was used for fiscal documents based on Receivables transactions is now available for use on Shipping transactions with the same required fiscal attributes, with these minor differences:
- Transaction Batch Source Name is used only for fiscal documents based on Receivables transactions.
- Transaction Number represents the Receivables Transaction Number or the Shipment Transaction Delivery ID.
- Legal Reporting Unit Name doesn't need to be populated for a Shipping transaction as the import process derives it from the legal reporting unit associated with the source inventory organization.
- A new column for Source Document Number is provided in the FBDI and used only for Shipping transactions where it represents:
- the Sales Order Number for a Shipping transaction originating from a sales order.
- the Transfer Order Number for a Shipping transaction originating from a transfer order.
- the Purchase Order Number for a Shipping transaction originating from a return to vendor.
- Line Number represents the Receivables Transaction Line Number or the Shipment Source Line Number.
The Source Document Number and corresponding lines can be verified on Manage Shipments page.

Outbound Fiscal Document Import FBDI Template Example with Shipping Transactions
Business benefits include:
- Request a fiscal document and upload the fiscal attributes for multiple Shipping transactions automatically.
- Update the fiscal attributes for multiple fiscal documents when they have have validation errors and were not submitted for processing.
- Streamlined process for multiple fiscal documents for a Shipping transaction where the fiscal document requesting, fiscal attributes updating, fiscal document generation and fiscal document XML extract generation can be completed with a single process request.
Steps to Enable
You don't need to do anything to enable this feature.
Bulk Processing of Void and Cancel Actions for Fiscal Documents for Brazil
Void and cancel fiscal documents for Brazil in bulk. This makes corrections easier in integration scenarios where fiscal documents originate from external systems.
Use the Import Document Actions FBDI to process multiple voiding or cancellation requests.
To request a cancellation of a fiscal document associated with a Receivables transaction, either provide the Fiscal Document Key or the Receivables Transaction Batch Source Name and the Transaction Number combination.
To request a cancellation or voiding of a fiscal document associated with a Shipping transaction, either provide the Fiscal Document Key or the Shipment Number.
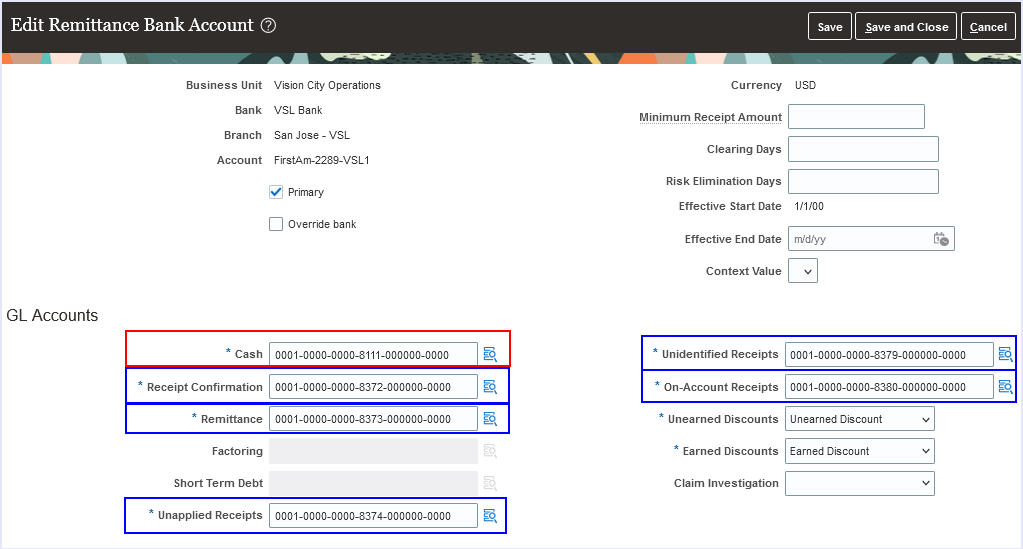
Example of the Import Document Actions FBDI template
For more information about the Import Document Action FBDI, see Import Document Actions.
Business benefit:
Request the voiding or cancellation of multiple fiscal documents automatically.
Steps to Enable
You don't need to do anything to enable this feature.
Document Sequencing for Non-Electronic Brazilian Fiscal Documents
Optionally allow document sequencing when fiscal document generation is enabled on Brazilian transactions imported using Receivables AutoInvoice. Customers with non-electronic fiscal document business scenarios supported by third-party solutions can sequence Receivables transactions correctly.
By default, all Receivables invoice and debit memo transactions, belonging to a business unit enabled for fiscal document processing, require a fiscal document.
To allow document sequencing on business unit transactions with fiscal document generation enabled, create and assign a document fiscal classification to the business unit for the Invoice or Debit Memo event class in the Fiscal Document Generation Controls page and disable the Require Fiscal Document option.
For more information on how to not require a fiscal document for a Receivables transaction, see Advanced Configuration Options to Generate Fiscal Documents for Brazil.
For more information about document sequence number, see Document Sequences.
Business benefits include:
- Use document sequencing on Receivables transactions normally not enabled for fiscal document generation.
- Create custom integrations where it is required to allow a controlled sequence number.
Steps to Enable
You don't need to do anything to enable this feature.
Receivables Transaction Date Update for Brazilian Fiscal Documents in Process Using a REST API
You can update the Receivables transaction date for Brazilian fiscal documents in process using the Receivables Invoice REST API. This helps prevent period-end issues with service fiscal documents when the tax authority approval process is not completed within the specified time limit.
When a fiscal document associated with a Receivables transaction is in Error status, the user could manually update the transaction date to another accounting period in order to resolve the error and reprocess the transaction within the tax authority time limit.
Use this feature to update the transaction date of multiple Receivables transactions with fiscal document errors using the Receivables Invoice REST API. After the transaction dates are updated, use the Import Fiscal Document Approval FBDI to reprocess all transactions with fiscal documents in an Error status.
Example of the receivables invoice REST payload to update the transaction date:
{
"TransactionDate": "2023-03-22",
}
NOTE: The transaction date is the only value available for update using the Receivables Invoice REST API on transactions with fiscal documents in Error status.
For more information about the usage of REST to update Receivables invoices, see Receivables Invoices REST Endpoints.
For more information on how to reprocess fiscal documents in error, see Bulk Reprocessing of Fiscal Documents in Error Status for Brazil.
Business benefits include:
- Update the transaction date on multiple Receivables transactions automatically.
- Allow sufficient time to analyze the fiscal document errors and avoid period-end closure delays.
Steps to Enable
You don't need to do anything to enable this feature.
Spain
Usability Improvements to Withholding Tax Reporting for Spain
Improvements to Withholding Tax Reporting for Spain with possibility to define withholding keys and sub keys, and additional extracted data elements.
The Withholding Magnetic Format for Spain report includes the ability to define withholding keys and sub keys and assign them to the withholding tax rates. The keys (sub keys) allowed in the Modelo 190 are A, B (01, 02, 03), C, D, E (01, 02, 03, 04), F (01, 02), G (01, 02, 03), H (01, 02, 03, 04), I (01, 02), J, K (01, 02, 03), L (01 to 30). If withholding keys and sub keys are not defined and assigned to tax rates, expense reports are populated with the default value A00 and all other transactions populated with the default value G01.
The Withholding Magnetic Format for Spain XML Data extract file contains additional data elements:
- Header elements
- ERP Cloud Program Version - EXTERNAL_VERSION
- Legal Entity primary contact name, phone and email - G_LEGAL_ENTITY - FULL_NAME, EMAIL_ADDRESS and PHONE_NUM
- Detail records
-
Supplier Type and Tax Organization Type - C_VENDOR_TYPE and C_ORGANIZATION_TYPE
Business benefits include:
- Possibility to define additional key and sub key values and assign them to the withholding tax rates.
- New extracted data elements can be used for customized additional withholding layouts.
Steps to Enable
To implement changes related to the keys and sub keys reported in the Withholding Magnetic Format for Spain output file, follow these setup steps:
Create new Tax Reporting Type for withholding keys and sub keys:
- Navigate to the Setup and Maintenance > Manage Tax Reporting Types.
- Create new Tax Reporting Type JEES_WHT_KEY_SUBKEY with below details:
- Tax Reporting Type Code: JEES_WHT_KEY_SUBKEY
- Tax Reporting Type Name: WHT Keys and Subkeys for Spain
- Tax Reporting Type Purpose: Withholding tax reporting type
- Country: Spain
- Data Type: Text
- Minimum Length of Reporting Codes: 1
- Maximum Length of Reporting Codes: 3
- Reporting Type Uses: enable Tax Rate
- Add new Tax Reporting Codes
- Tax Reporting Code: G01
- Description: G: Income from economic activities: Professional activities to which the general withholding rate is applicable: Sub key 01
- Define all required Tax Reporting Codes for Spanish withholding keys and sub keys. Example: A01, G03, H04.
- Save and Close.
Associate Tax Reporting Code JEES_WHT_KEY_SUBKEY to the Withholding Tax Rates Codes:
- Navigate to Setup and Maintenance > Manage Tax Rate and Tax Recovery Rates.
- Search for Withholding Tax and define Search Withholding Tax Rates parameters or create new Withholding Tax Rate.
- Associate Withholding Tax Rate with Tax Reporting Codes with below details:
- Tax Reporting Type Code = JEES_WHT_KEY_SUBKEY
- Data Type = Text
- Tax Reporting Code = G01
- Description = G: Income from economic activities: Professional activities to which the general withholding rate is applicable: Sub key 01
- Save and Close.
Tips And Considerations
- The keys and sub keys values are defined as Tax Reporting Code for the Tax Reporting Type Code JEES_WHT_KEY_SUBKEY. The Tax Reporting Code for key and sub key is assigned to the Withholding Tax Rate. In the Withholding Magnetic Format for Spain output file the Key is the first position from the Tax Reporting Code and is reported in the position 78. The sub key is the second and third position from the Tax Reporting Code JEES_WHT_KEY_SUBKEY and is reported in the position 79 and 80.
- If withholding keys and sub keys are not defined and assigned to tax rates, expense reports are populated with the default value A00 and all other transactions populated with the default value G01.
- Define primary Legal Entity contact name, primary phone and email, Supplier Type and Tax Organization Type for supplier to extract values in the Withholding Magnetic Format for Spain XML extract data file.
Regional Shared Features
Impact of Performance Improvements for the Account Analysis Report on Subledger Accounting Reporting Account Analysis Reports
The General Ledger and Subledger Account Analysis Report and Account Analysis by Legal Entity Report have been enhanced after the optimization made to the BI Publisher version of Account Analysis Report to improve the overall performance of this report. Changes pertaining to this are incorporated into the "AccountAnalysisDm" data model used in the Account Analysis Report.
NOTE: Any existing customizations built on top of the "AccountAnalysisDm" data model cease to work as the new lexical has been introduced to improve the report performance.
This is a common data model and the General Ledger and Subledger Account Analysis Report and Account Analysis by Legal Entity Report also use this data model.
If there are any customizations added on the data model, these reports will not be rendered successfully. You must use the seeded version of the data model for the Account Analysis Report.
You can remove any existing customizations to the data model and report using these steps:
- Log in to BI Publisher Enterprise through the /xmlpserver URL (<host url>/xmlpserver/).
- Under Folders pane, navigate to /Shared Folders/Custom/Financials/Fusion Accounting Hub (if this folder structure exists).
- Delete the Global Account Analysis and Global SLA Account Analysis reports under this folder.
- Delete Account Analysis Data Model under /Shared Folders/Custom/Financials/Fusion Accounting Hub/Data Models folder.
If customizations were made to address specific business requirements, the custom data model has to be changed to uptake the new lexical ‘&p_period_with_clause’ to address the performance issues that have been reported in earlier releases. Please refer detailed steps in the support document Doc ID 2946797.1.
Business benefit:
Improved runtime performance for General Ledger and Subledger Account Analysis Report and Account Analysis by Legal Entity Report.
Steps to Enable
You don't need to do anything to enable this feature.
Tips And Considerations
If there are existing customizations on the "AccountAnalysisDm" data model for these two reports, you must remove them first to uptake the performance improvements that have been delivered. You may re-do the customizations again if there is a business requirement.
U.S. Federal Financials
U.S. Federal Financials
Classification, Transactions, and Accountability, or CTA Module, Report for Payments and General Ledger
The Classification Transactions and Accountability (CTA) module of the Central Accounting and Reporting System (CARS) is used by federal agencies to report reclassified cash transactions to the U.S. Department of the Treasury. A reclassification is used to report a correction to a Treasury Account Symbol (TAS) or Business Event Type Code (BETC) on a payment or collection. Reversals (voided payments) and restatements (new payments) are reportable.
In Payables, a reclassification is created by voiding the original payment and creating a new payment with the updated TAS/BETC. The new payment must contain a voided payment reference which can be entered on the Manage Payments page.
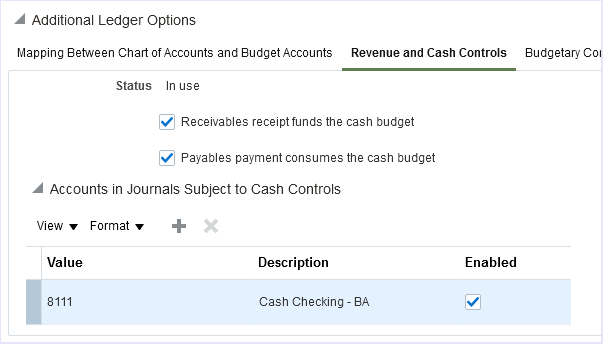
The primary source for payment reclassifications is Payables. General Ledger allows for payment reclassification through a journal entry, but it is recommended that Accounts Payable be used when possible to link to the source transaction. The first journal line is used to reverse the existing TAS/BETC cash entry, creating a journal balance of $0.00.

The second journal line records the new TAS/BETC cash entry.
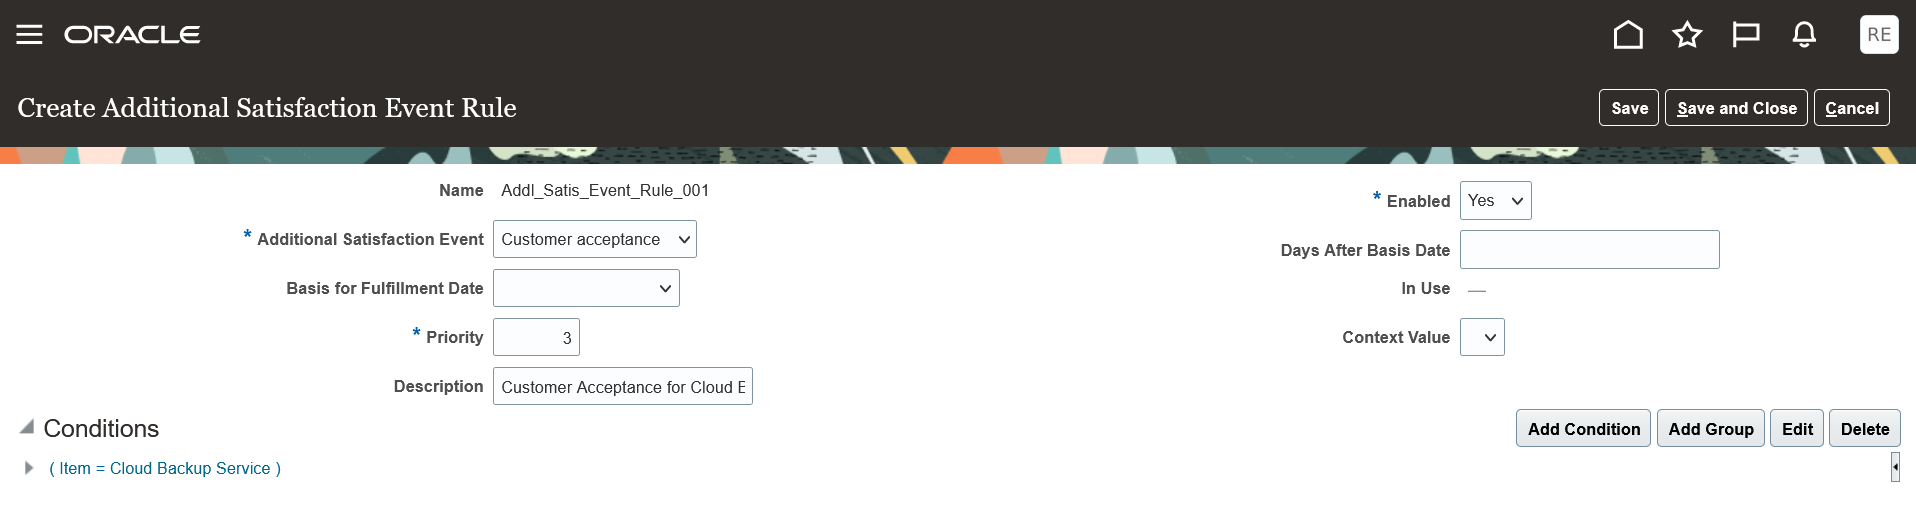
The Create CTA File process is run to create the CTA Bulk File for submission to Treasury.
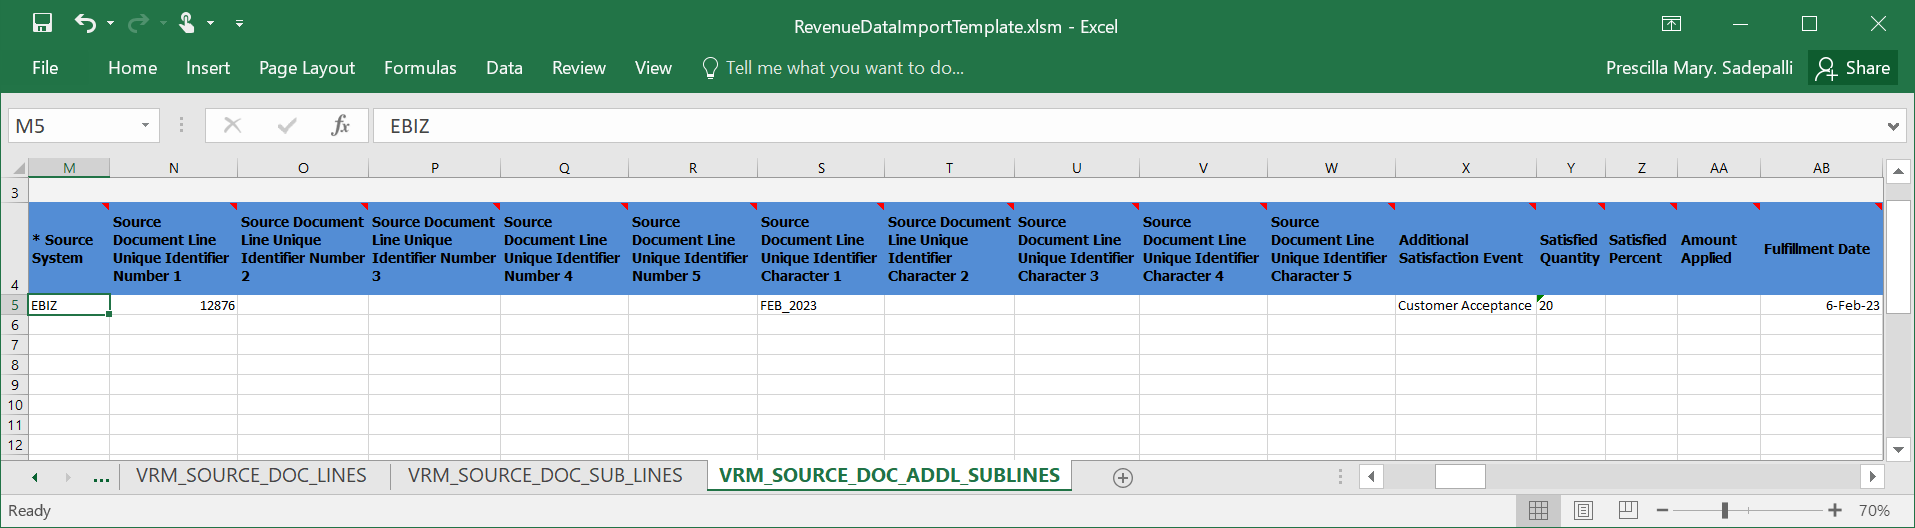
Business benefit:
Federal Program Agencies use the Classification, Transactions, and Accountability Module within the Central Accounting Reporting System to reclassify or correct their accounting activity which serves as a basis of the Department of the Treasury's publications to Congress and the public regarding federal revenues and expenditures.
Steps to Enable
You don't need to do anything to enable this feature.
Key Resources
- For more information on Federal CTA processing, refer to the Implementing U.S. Federal Financials and Using U.S. Federal Financials guides.
Access Requirements
- Financial Application Administrator