- Revision History
- Overview
- Optional Uptake of New Features (Opt In)
- Feature Summary
- Collaboration Messaging Framework
- Financials Common
- IMPORTANT Actions and Considerations
- Accounting and Control
- Payables and Expenses
- Receivables and Cash
- Asset and Lease Management
- Region and Country-Specific Features
Update 23D
Revision History
This document will continue to evolve as existing sections change and new information is added. All updates appear in the following table:
| Date | Module | Feature | Notes |
|---|---|---|---|
| 09 MAY 2025 | Expenses | Touchless Expenses with J.P. Morgan Corporate Cards | Updated document. Removed "Automatic Itemization of Emailed Hotel Receipts" section. |
| 01 OCT 2024 | Taxes | Automatic Invoice Validation for Partner Tax Calculation Process | Updated document. Revised Access Requirements. |
| 31 MAY 2024 | General Ledger | Exclusion of Ledgers from Accounting Automation | Updated document. Added Idea Lab indicator. |
| 31 MAY 2024 | General Ledger | URL Attachments in Create Single Journal ADFdi Spreadsheet | Updated document. Added Idea Lab indicator. |
| 31 JAN 2024 | Financials Common | Service Excellence Continuing Investments | Updated document. Revised feature information. |
| 29 JAN 2024 | Taxes | Tax Calculation on Rounded Amounts on Payables Invoices | Updated document. Revised feature information. |
| 12 JAN 2023 | Payables | Embedded Banking Services with J.P. Morgan | Updated document. Revised Steps to Enable |
| 21 DEC 2023 | Expenses | Payment Method Selection in Cash Advances Using a REST API | Updated document. Revised feature information. |
| 14 DEC 2023 | Assets | Segregation of Asset Transaction Entry and Transaction Posting Duties | Updated document. Revised feature information. |
| 27 NOV 2023 | Taxes | Automatic Invoice Validation for Partner Tax Calculation Process | Updated document. Revised Access Requirements. |
| 27 NOV 2023 | Expenses | Touchless Expenses with J.P. Morgan Corporate Cards | Updated document. Revised Steps to Enable. |
| 27 NOV 2023 | Payables | Embedded Banking Services with J.P. Morgan | Updated document. Revised Steps to Enable. |
| 27 NOV 2023 | Payables | Automated Distribution Creation Using a Transaction Account Definition | Updated document. Added Key Resources for this feature. |
| 29 SEP 2023 | Updated document. Added section. | ||
| 29 SEP 2023 | Joint Venture Management | Expenditure Business Unit for Project Costing Adjustments from Joint Venture Management | Updated document. Delivered new feature in update 23D. |
| 29 SEP 2023 | General Ledger | URL Attachments in Create Single Journal ADFdi Spreadsheet | Updated document. Delivered new feature in update 23D. |
| 22 SEP 2023 | Asset and Lease Management/Assets | Segregation of Asset Transaction Entry and Transaction Posting Duties | Updated document. Revised feature information. |
| 01 SEP 2023 | Created initial document. |
Overview
 HAVE AN IDEA?
We’re here and we’re listening. If you have a suggestion on how to make our cloud services even better then go ahead and tell us. There are several ways to submit your ideas, for example, through the Ideas Lab on Oracle Customer Connect. Wherever you see this icon after the feature name it means we delivered one of your ideas.
GIVE US FEEDBACK
We welcome your comments and suggestions to improve the content. Please send us your feedback at oracle_fusion_applications_help_ww_grp@oracle.com.
DISCLAIMER
The information contained in this document may include statements about Oracle’s product development plans. Many factors can materially affect Oracle’s product development plans and the nature and timing of future product releases. Accordingly, this Information is provided to you solely for information only, is not a commitment to deliver any material, code, or functionality, and should not be relied upon in making purchasing decisions. The development, release, and timing of any features or functionality described remains at the sole discretion of Oracle.
This information may not be incorporated into any contractual agreement with Oracle or its subsidiaries or affiliates. Oracle specifically disclaims any liability with respect to this information. Refer to the Legal Notices and Terms of Use for further information.
Optional Uptake of New Features (Opt In)
Oracle Cloud Applications delivers new updates every quarter. This means every three months you'll receive new functionality to help you efficiently and effectively manage your business. Some features are delivered Enabled meaning they are immediately available to end users. Other features are delivered Disabled meaning you have to take action to make available. Features delivered Disabled can be activated for end users by stepping through the following instructions using the following privileges:
- Review Applications Offering (ASM_REVIEW_APPLICATIONS_OFFERINGS_PRIV)
- Configure Oracle Fusion Applications Offering (ASM_CONFIGURE_OFFERING_PRIV)
Here’s how you opt in to new features:
- Click Navigator > My Enterprise > New Features.
- On the Features Overview page, select your offering to review new features specific to it. Or, you can leave the default selection All Enabled Offerings to review new features for all offerings.
- On the New Features tab, review the new features and check the opt-in status of the feature in the Enabled column. If a feature has already been enabled, you will see a check mark. Otherwise, you will see an icon to enable the feature.
- Click the icon in the Enabled column and complete the steps to enable the feature.
In some cases, you might want to opt in to a feature that's not listed in the New Features work area. Here's how to opt in:
- Click Navigator > My Enterprise > Offerings.
- On the Offerings page, select your offering, and then click Opt In Features.
- On the Opt In page, click the Edit Features (pencil) icon for the offering, or for the functional area that includes your feature.
- On the Edit Features page, complete the steps to enable the feature.
For more information and detailed instructions on opting in to new features for your offering, see Configure Offerings.
Opt In Expiration
Occasionally, features delivered Disabled via Opt In may be enabled automatically in a future update. This is known as an Opt In Expiration. If your cloud service has any Opt In Expirations you will see a related tab in this document. Click on that tab to see when the feature was originally delivered Disabled, and when the Opt In will expire, potentially automatically enabling the feature. You can also click here to see features with Opt In Expirations across all Oracle Cloud Applications.
Feature Summary
Column Definitions:
Report = New or modified, Oracle-delivered, ready to run reports.
UI or Process-Based: Small Scale = These UI or process-based features are typically comprised of minor field, validation, or program changes. Therefore, the potential impact to users is minimal.
UI or Process-Based: Larger Scale* = These UI or process-based features have more complex designs. Therefore, the potential impact to users is higher.
Features Delivered Disabled = Action is needed BEFORE these features can be used by END USERS. These features are delivered disabled and you choose if and when to enable them. For example, a) new or expanded BI subject areas need to first be incorporated into reports, b) Integration is required to utilize new web services, or c) features must be assigned to user roles before they can be accessed.
Collaboration Messaging Framework
Collaboration Messaging Framework
Exchange B2B Messages with Your Trading Partners Using Avalara
A new predefined service provider, Avalara, is available for your electronic invoicing needs. If you subscribe to Avalara’s services, you can use it to connect with your trading partners via the Pan-European Public Procurement Online (PEPPOL) network. Avalara is a certified PEPPOL access point and solution provider.
Avalara's messages and delivery methods are predefined, thereby streamlining B2B setup in the Collaboration Messaging work area.
Steps to Enable
Steps to Enable
At a high level, to set up the predefined Avalara service provider:
- Configure Avalara to exchange messages with your trading partners.
- Create trading partners.
- Associate the trading partners with your suppliers or customers.
- Select the documents you want to exchange with your suppliers or customers.
These steps are detailed in the Configuring and Managing B2B Messaging for Oracle Applications Cloud guide.
Configure the Predefined Service Provider Avalara
- Select Manage Collaboration Messaging Service Providers from the Tasks panel tab, and search for the Avalara service provider.
- On the Edit Collaboration Messaging Service Provider page, select Test or Production in the Outbound Delivery Connection Type field to reflect the environment you are setting up.
- Select the Delivery Methods tab, and enter the username and password for the selected connection type.
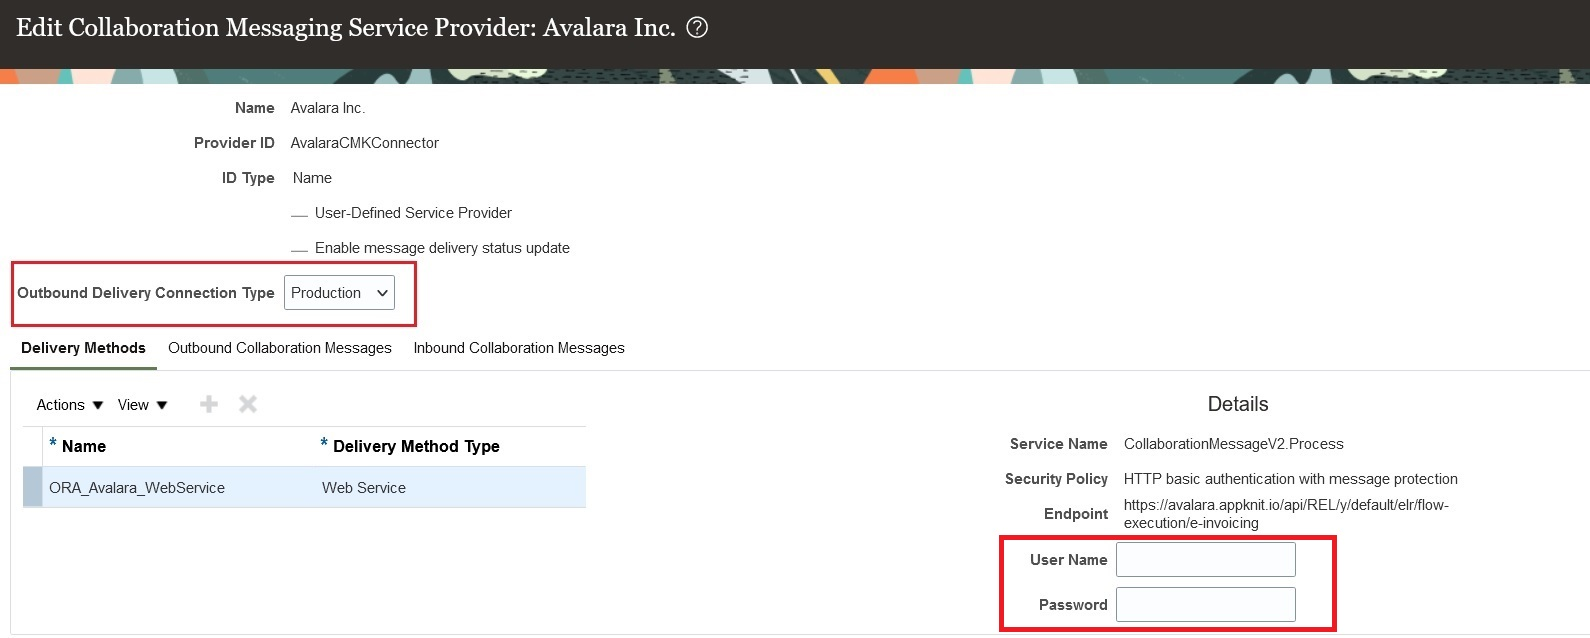
Outbound Delivery Connection Type and Delivery Method
- Select the Outbound Collaboration Messages tab, link the delivery method with the message, and activate the message you want to exchange with your trading partners:
- UBL 2.1 PEPPOL Invoice Outbound (Avalara_UBL-2.1-PEPPOL-Invoice-Out)
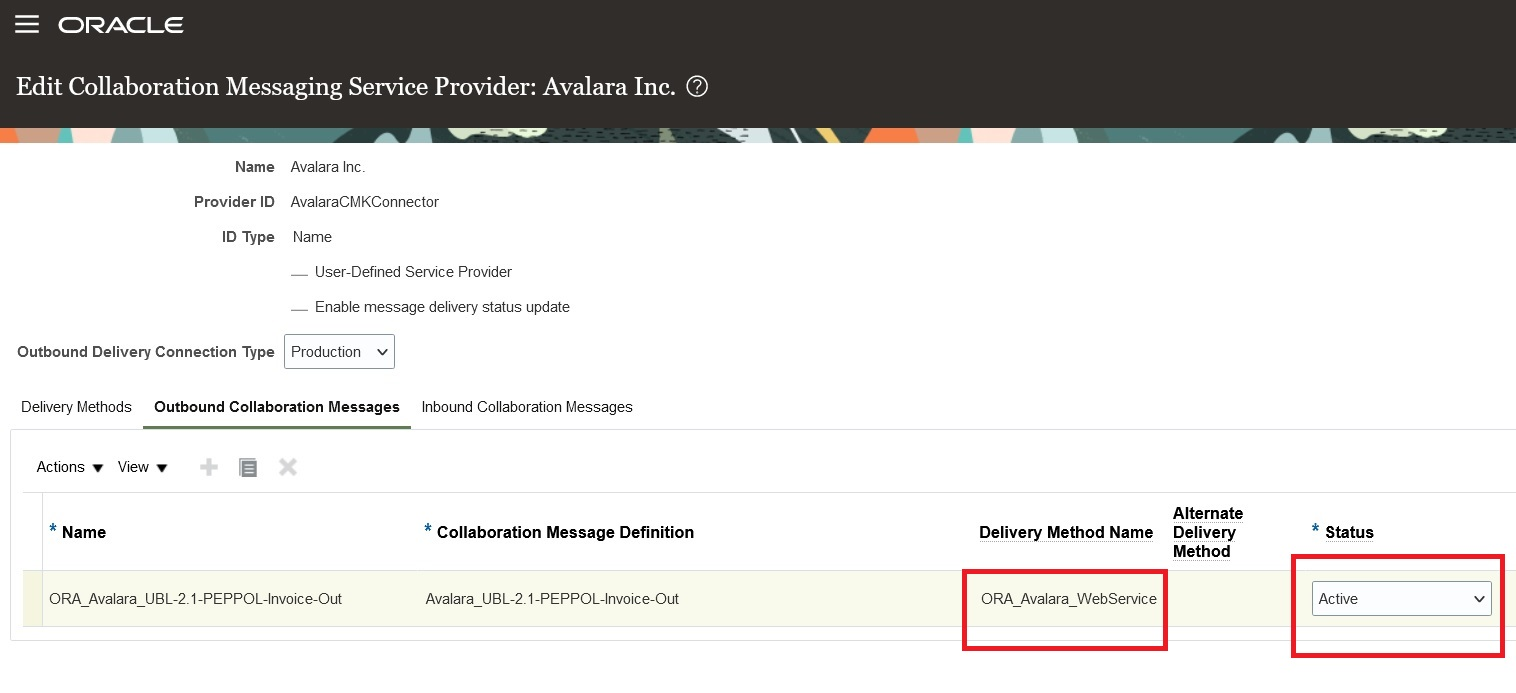
Avalara Outbound Collaboration Message
- Select the Inbound Collaboration Messages tab, and activate the messages you want to use. The following messages are available:
- UBL 2.1 Invoice Application Response Inbound (Avalara_UBL-2-1-InvoiceApplicationResponse-In)
- UBL 2.1 PEPPOL Invoice Inbound (Avalara_UBL-2.1-PEPPOL-Invoice-In)
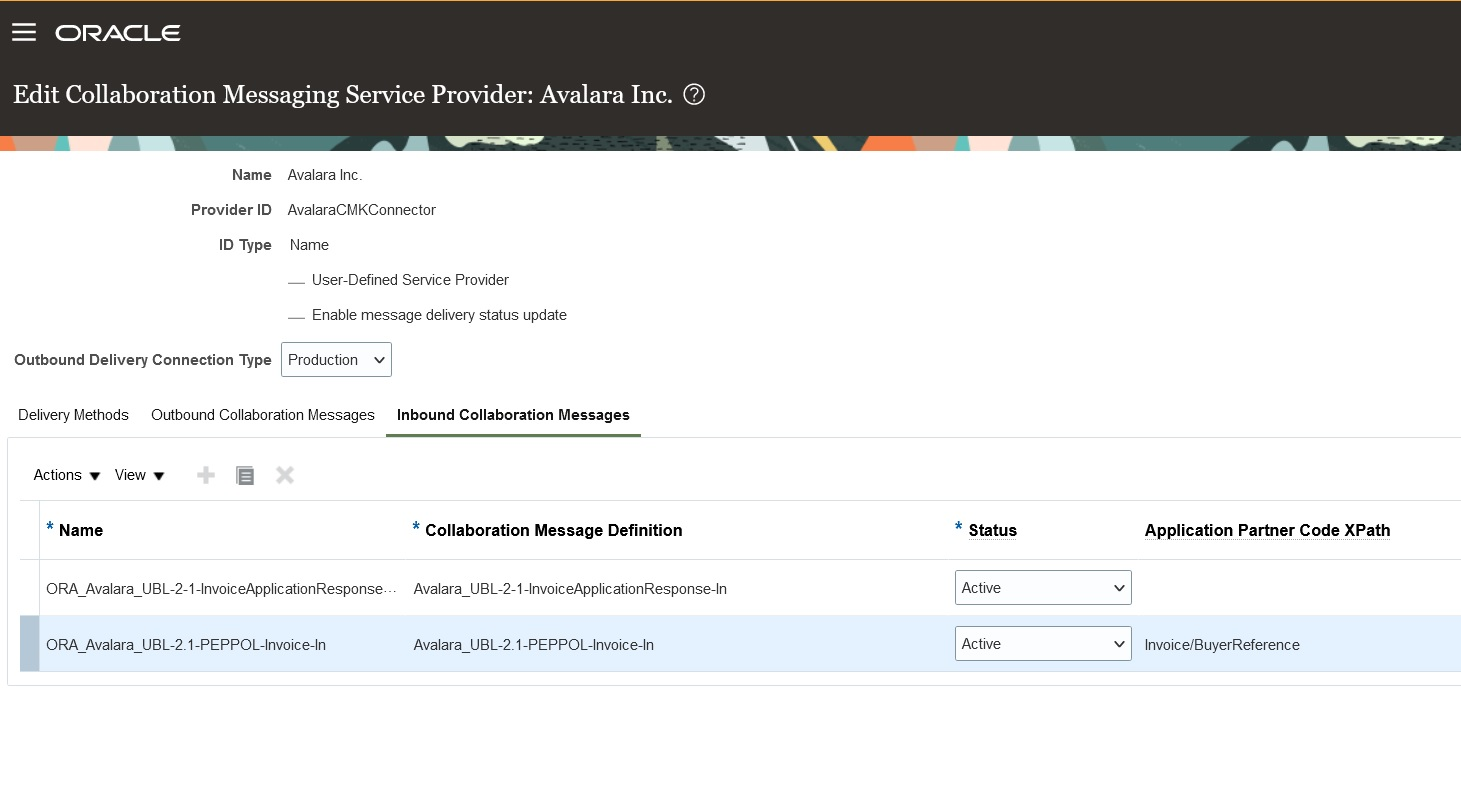
Avalara Inbound Messages
Create Trading Partners
After completing the service provider setup, create your trading partners.
- Select Manage B2B Trading Partners on the Tasks panel tab.
- On the Manage B2B Trading Partners page, select Actions > Create, and add your trading partners.
- Select Avalara as the service provider.
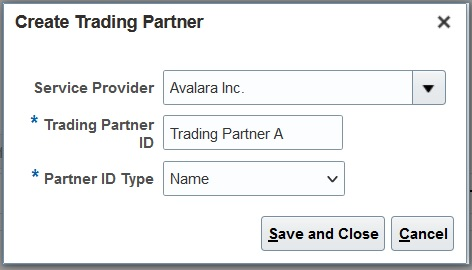
Create a Trading Partner
Associate Trading Partners with Your Suppliers or Customers
Next, associate the trading partners with your suppliers or customers for your electronic invoicing documents.
- Select Manage Supplier B2B Configuration on the Tasks panel tab, and search for your suppliers.
- Select a supplier and then select Edit Supplier B2B Configuration.
- On the Edit Supplier B2B Configuration page, select the Trading Partner Assignment tab and click Actions > Add Row to add a trading partner and the Avalara service provider.
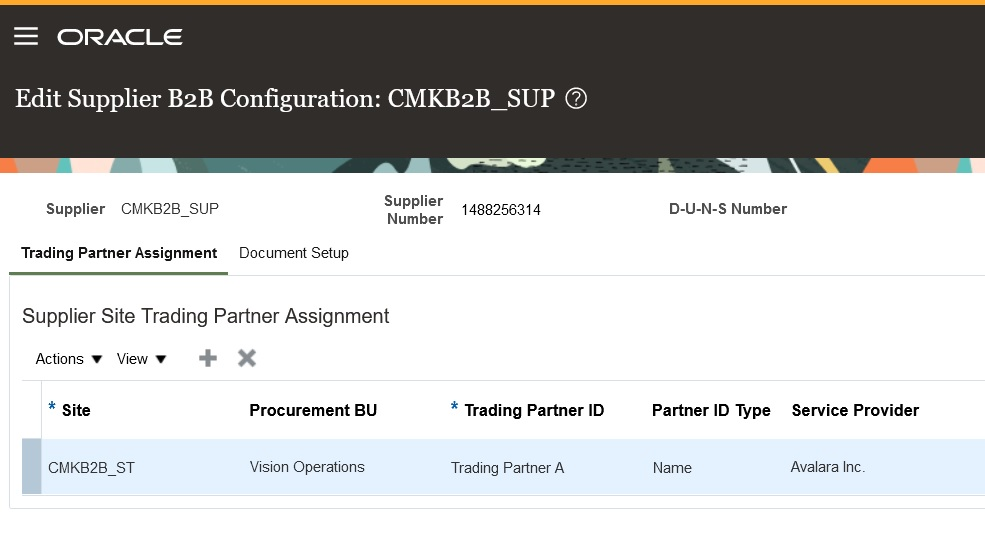
Supplier Trading Partner Assignment
- On the Edit Supplier B2B Configuration page, select the Document Setup tab, and add the Invoice-Inbound to exchange with the selected supplier.
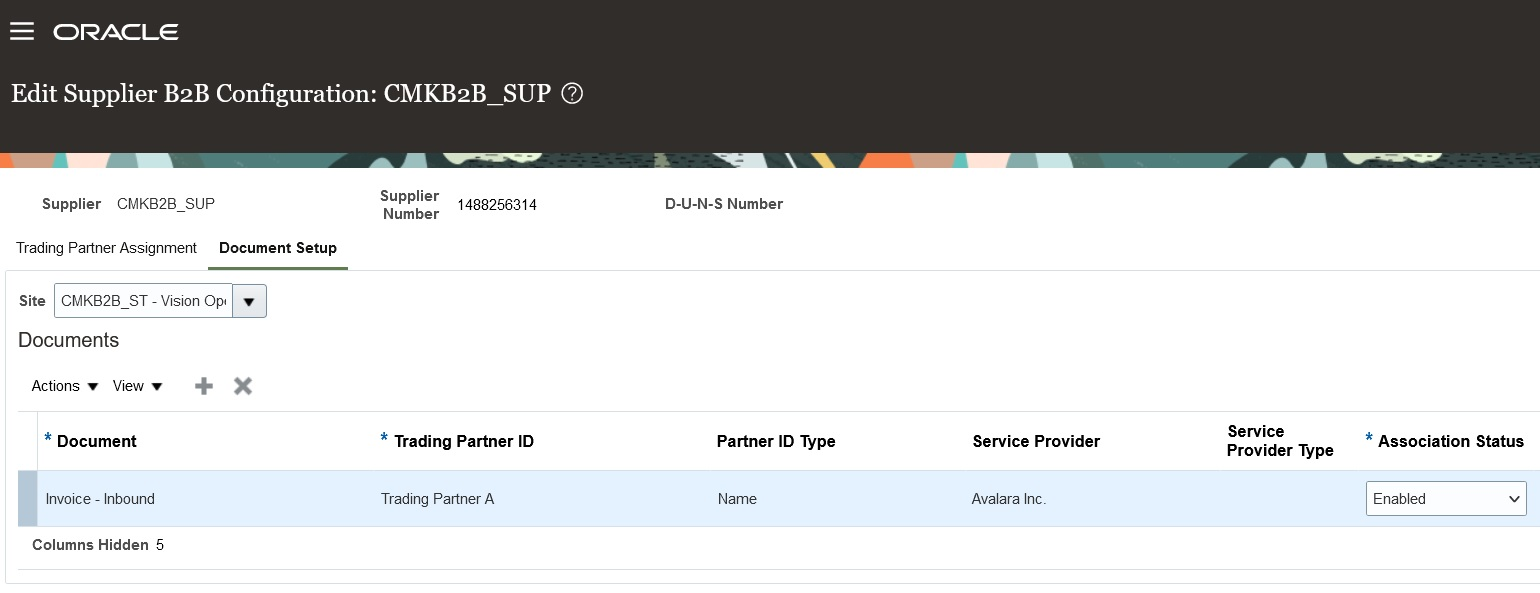
Supplier Document Setup
- Select Manage Customer Account Collaboration Configuration on the Tasks panel tab, and search for your customers.
- Select a customer. On the Edit Customer Account Collaboration Configuration page, select the Avalara service provider and trading partners in the Associated Service Providers section.
- In the Collaboration Documents for Service Provider section, select the documents you want to exchange (outbound invoices or inbound invoice acknowledgments).
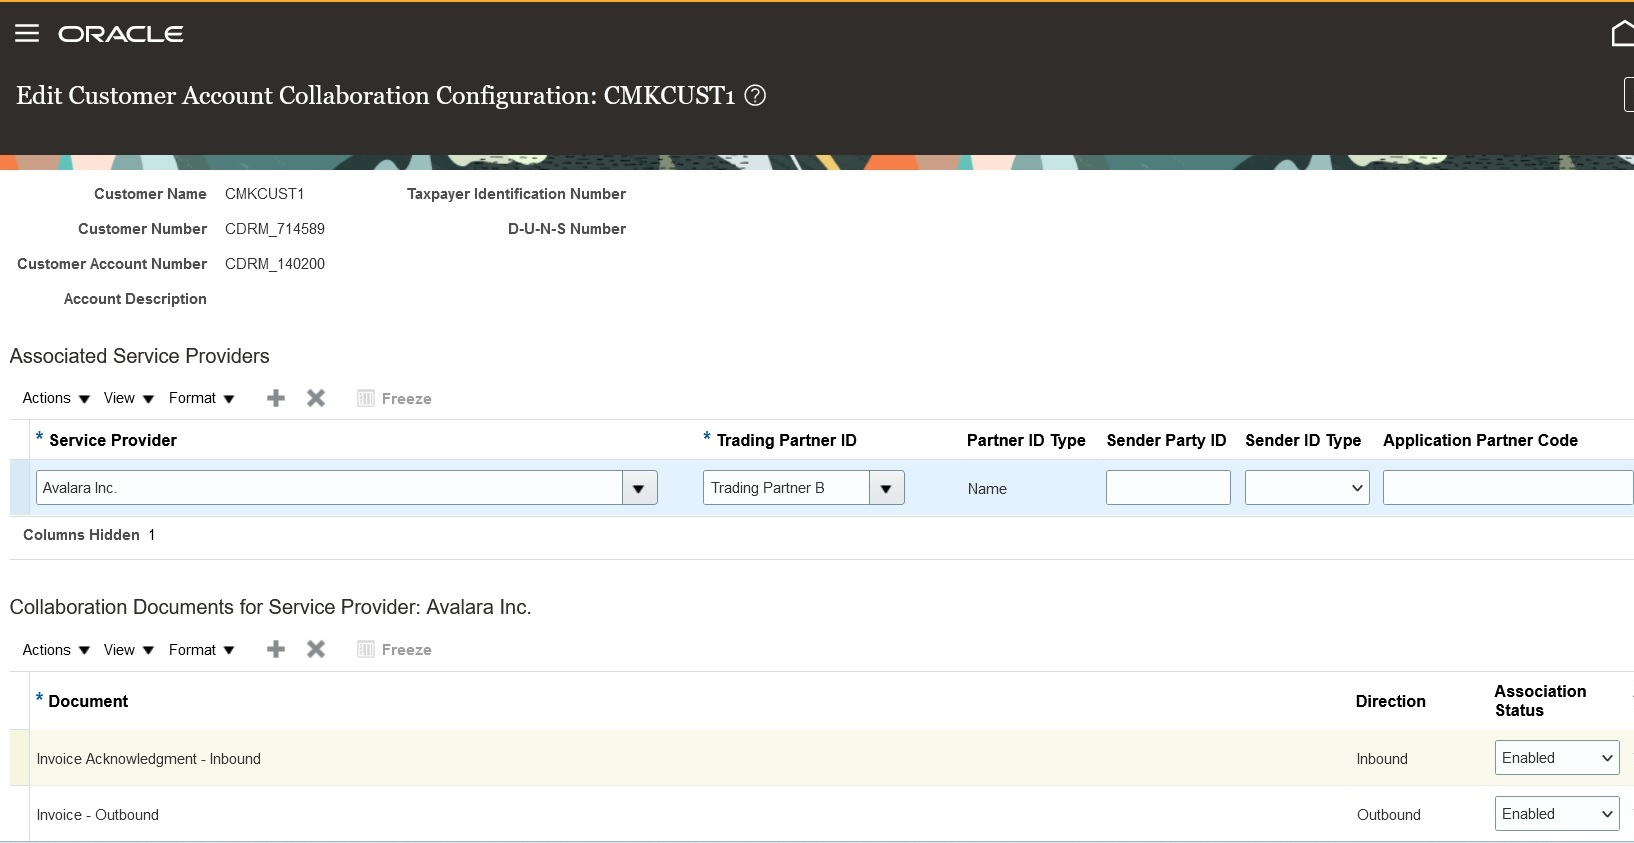
Customer Account Collaboration Configuration
Tips And Considerations
Make sure you select the correct endpoint for your message delivery, Test or Production, in the Outbound Delivery Connection Type field on the Edit Service Provider page. If you don’t select a message delivery type, you’ll get an error message during message processing that you didn’t specify an endpoint for Avalara.
Key Resources
- Refer to the How You Configure Predefined Service Providers section of the Configuring and Managing B2B Messaging for Oracle Applications Cloud guide on the Oracle Help Center.
Access Requirements
Users who are assigned a configured job role that contains these privileges can access this feature:
- Manage B2B Supplier Trading Partners (CMK_B2B_SUPPLIER_TRADING_PARTNERS_PRIV)
- Manage B2B Trading Partners (CMK_B2B_TRADING_PARTNERS_PRIV)
- Manage Customer Account Collaboration Configuration (CMK_B2B_CUSTOMER_ACCOUNT_TRADING_PARTNERS_PRIV)
- Manage Service Provider (CMK_MANAGE_SERVICE_PROVIDER_PRIV)
These privileges were available prior to this update.
Receive Streamlined Error Message Reporting for B2B Messages Sent Using Web Services
The validation process for inbound messages received through synchronous web service operations has been improved. Now, the caller receives only relevant and correctable errors that can be fixed before the message is processed. The refined process validates the following:
- Authentication: The caller of the service is a valid user.
- Authorization: The caller of the web service is assigned a job role with the privilege Invoke Collaboration Message Inbound Service (CMK_INVOKE_INBOUND_COLLAB_DOC_SERVICE_PRIV).
- Sender party: The SENDER_ID and SENDER_ID_TYPE in the payload have a valid trading partner ID and ID type.
- External message definitions: The external message definition in the payload exists in Oracle Collaboration Messaging Framework.
- Invalid order numbers Inbound messages that reference a PO such as PO acknowledgments, invoices, and shipments, have valid PO numbers
Other B2B setup errors are logged and managed in the Collaboration Messaging work area. The asynchronous operation remains unchanged, with the credentials validated and errors returned for invalid credentials.
As the sender of B2B messages, you only receive errors that are in your control to fix. As the receiver of B2B messages, you can review errors in Collaboration Messaging Framework that you have access to correct, ensuring a more efficient process for troubleshooting any issues encountered during the exchange of B2B messages.
Steps to Enable
You don't need to do anything to enable this feature.
Key Resources
- Refer to the Configuring and Managing B2B Messaging for Oracle Applications Cloud guide on the Oracle Help Center.
Simplify the Exchange of Purchase Orders with Other Oracle Cloud Enterprises
There are six new message definitions available for sending and receiving POs. These message definitions use the Oracle B2B messaging standard and enable you to exchange POs directly with your trading partners, B2B service providers, and other Oracle cloud enterprises:
- Oracle-1-0-B2B-Purchase-Order-In
- Oracle-1-0-B2B-Purchase-Order-Change-In
- Oracle-1-0-B2B-Purchase-Order-Cancel-In
- Oracle-1-0-B2B-Purchase-Order-Out
- Oracle-1-0-B2B-Purchase-Order-Change-Out
- Oracle-1-0-B2B-Purchase-Order-Cancel-Out
These messages provide additional options for you to exchange POs with your trading partners and B2B service providers.
Steps to Enable
At a high level, there are two steps to enable these message definitions:
- Set up the message definitions with either a service provider or a trading partner directly.
- Associate the trading partner with your suppliers or customers.
Set Up Message Definitions with a Service Provider or Trading Partner
- Select Manage Collaboration Messaging Service Providers or Manage B2B Trading Partners from the Tasks panel tab, and search for the service provider or trading partner you want to set up.
- If you are sending POs, on the Outbound Collaboration Messages tab, select the new outbound PO message definition you want to exchange with your trading partners:
- Oracle-1-0-B2B-Purchase-Order-Out
- Oracle-1-0-B2B-Purchase-Order-Change-Out
- Oracle-1-0-B2B-Purchase-Order-Cancel-Out
- Associate a delivery method with the message definition and set the status to Active.

Outbound PO Messages
- If you are receiving POs, on the Inbound Collaboration Messages tab, select the new inbound PO message definition you want to exchange with your trading partners and set the status to Active:
- Oracle-1-0-B2B-Purchase-Order-In
- Oracle-1-0-B2B-Purchase-Order-Change-In
- Oracle-1-0-B2B-Purchase-Order-Cancel-In
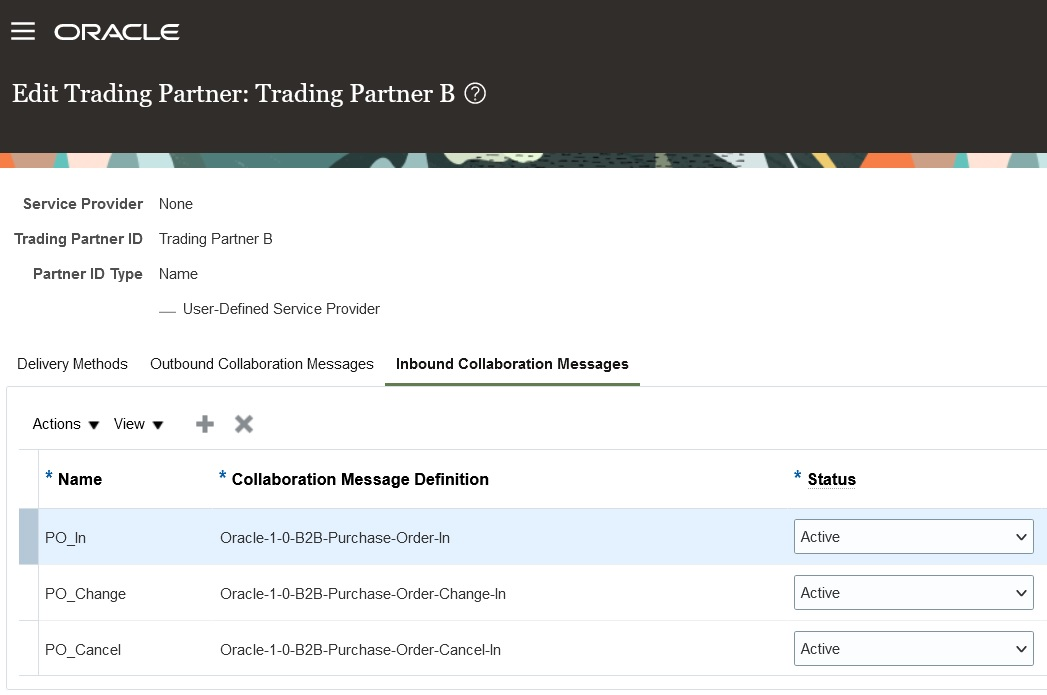
Inbound PO Messages
Associate the Trading Partners with Your Suppliers or Customers
Next, associate the trading partners with your suppliers or customers to exchange POs with them.
- Select Manage Supplier B2B Configuration on the Tasks panel tab, and search for your suppliers.
- Select a supplier and then select Edit Supplier B2B Configuration.
- On the Edit Supplier B2B Configuration page, select the Trading Partner Assignment tab and click Actions > Add Row to add a trading partner, and select your trading partner.
- Select the Document Setup tab, and add the PO documents (Purchase Order-Outbound, Purchase Order Change – Outbound and Purchase Order Cancellation – Outbound) to exchange with the selected supplier.
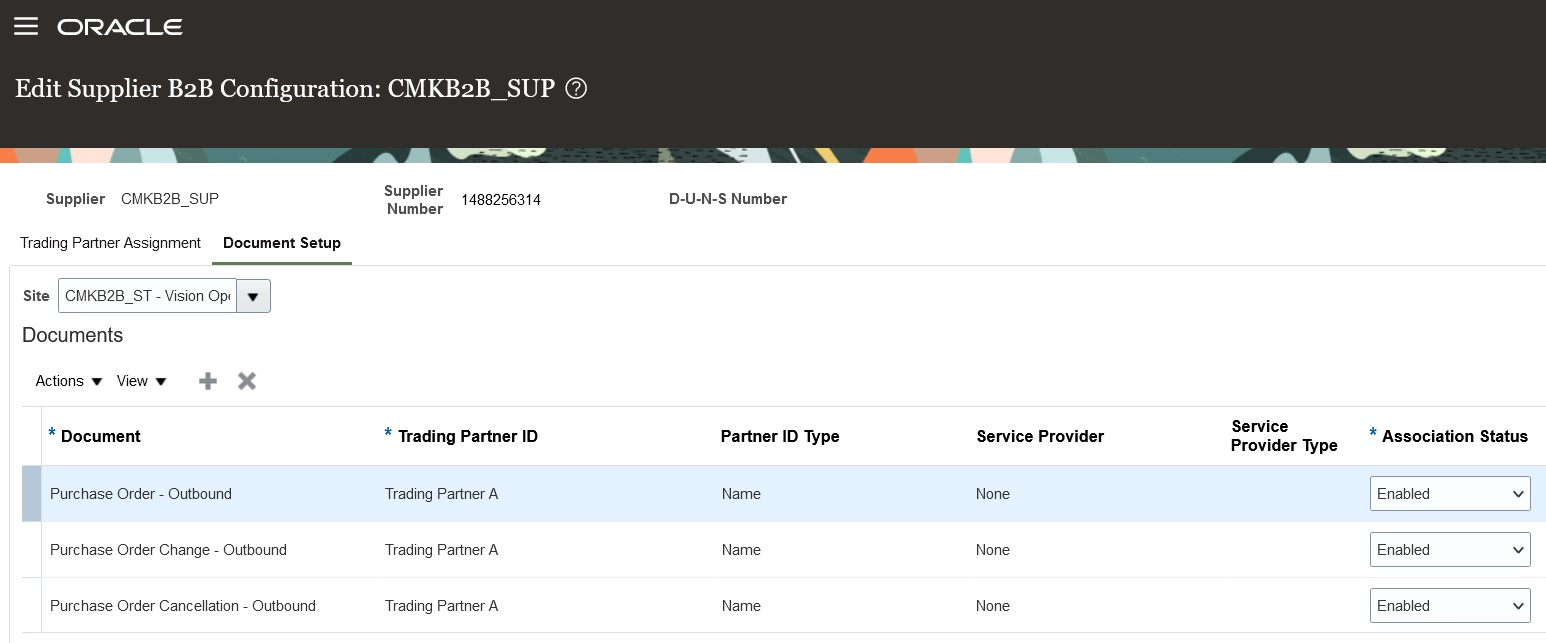
Supplier and Associated PO Documents
- Select Manage Customer Collaboration Configuration on the Tasks panel tab, and search for your customers.
- Select a customer. On the Edit Customer Collaboration Configuration page, select your trading partners in the Associated Service Providers section.
- In the Collaboration Documents for Service Provider section, select the PO documents you want to exchange (Purchase Order- Inbound, Purchase Order Change - Inbound and Purchase Order Cancellation - Inbound).
Key Resources
- Refer to the Configuring and Managing B2B Messaging for Oracle Applications Cloud guide on the Oracle Help Center.
Access Requirements
Users who are assigned a configured job role that contains these privileges can access this feature:
- Manage B2B Trading Partners (CMK_B2B_TRADING_PARTNERS_PRIV)
- Manage Service Provider (CMK_MANAGE_SERVICE_PROVIDER_PRIV)
Financials Common
Common Financials
Service Excellence Continuing Investments
Our ongoing investment in service excellence has a focus on overall usability, resiliency, performance, and security. This work is based on monitoring performance trends, reviewing common use patterns, analyzing service requests, and participating in many discussions with customers.
In this update, our ongoing investment in service excellence includes improvements in the following areas.
Performance:
- Improved performance of accounting sequence processing for large journal batches, along with improved posting performance.
- Improved performance of AP and AR Reconciliation Infolets which reduces the rendering time for high data volumes.
- Improved performance of the Recent Infotile on the Invoice landing page, with more rapid availability of information, such as the number of invoices created over a certain period of time.
Usability:
- Add comments to the invoices created in Oracle Payables. Payables users can enter comments in the Show More section of the Create Invoice page. They can also view or edit comments on the Manage Invoice page by adding Comments and Comments Preview columns. These comments can be edited in the Edit Invoice page.
Steps to Enable
You don't need to do anything to enable this feature.
Taxes
Automatic Invoice Validation for Partner Tax Calculation Process
Automatically validate Payables invoices selected for partner tax calculation after the response is received from the tax partner.
You must currently submit the Validate Payables Invoices process twice, once to flag the invoices for inclusion in the Partner Tax Data Extract and for a second time after the Record Partner Tax Lines process is run.
Once enabled, this feature streamlines the tax partner calculation process by eliminating the submission of the Validate Payables Invoices process for the second time after the Record Partner Tax Lines process is run.
The difference in behavior once the feature is enabled is shown below.

Steps to Enable
- Click Navigator > My Enterprise > Setup and Maintenance > Search > Manage Standard Lookups.
- Search for the ORA_ERP_CONTROLLED_CONFIG lookup type.
- Define the lookup code ZX_35388055 if not already created.
| Field | Value |
|---|---|
| Lookup Code | ZX_35388055 |
| Display Sequence | Any sequence number value like 1. |
| Enabled | checked |
| Start Date | Any valid date from which the optin is active like 01-Jan-2023 |
| End Date | Do not provide any value |
| Meaning | Optin to automatically validate the AP Invoices that use Tax Partner |
| Description | Can be left blank |

Tips And Considerations
The Validate Payables Invoices process only considers for validation invoices that have successfully completed tax partner calculation after a run of the Record Partner Tax Lines process.
You no longer need to schedule or submit the Validate Payables Invoices process post the response from the tax partner if you enable this feature. You can review the existing schedules defined to submit the second Validate Payables Invoices process and cancel them because they become redundant once the invoices are automatically validated.
Invoices with other holds will remain in the same state and you will have to resolve them through the usual process.
Access Requirements
The user defined at the time of Tax Partner onboarding must be assigned configured job roles that have the following privileges:
- AP_VALIDATE_PAYABLES_INVOICE_PRIV
- AP_SUBMIT_PAYABLES_INVOICE_VALIDATION_REPORT_PRIV
- AP_MANAGE_PAYABLES_INVOICES_PRIV
If you enabled the “Enable invoice account coding workflow” option in the Manage Invoices Options page, provide the user with the privilege to access the Initiate Invoice Account Coding Workflow process that is launched from the Validate Payables Invoices process.
If segment security is enabled provide the user with access to the flexfield segments.
You must also provide the user with the data access for all business units for which the invoices would be processed. You can use the Manage Data Access for Users FSM task to grant the access.
You must run the following processes one after the other and wait for completion:
- Retrieve Latest LDAP Changes
- Import User and Role Application Security Data
Tax Calculation on Rounded Amounts on Payables Invoices
Calculate taxes on rounded amounts in the entered currency on Payables invoices before conversion to the ledger currency. This can help reduce rounding differences on Payables invoices with an entered currency different from the ledger currency.
The current Oracle Tax logic is based on unrounded amounts of the entered currency to convert taxes to the ledger currency. In some configurations and use cases, this may generate a rounding difference in the tax amount in the ledger currency that is offset on the Payables transaction line amount.
Use the Rounding Conversion Option field in the Controls and Defaults section of the Create or Edit Tax Regime page to select the default rounding conversion option to use for taxes in the tax regime:
-
Blank: Use the default unrounded amounts in the entered currency for tax conversion calculation to the ledger currency.
-
Functional Currency: Use rounded amounts in the entered currency for tax conversion calculation to the ledger currency.
-
Transaction Tax: Use the internal transaction amount field (TAX_AMT_TAX_CURR) to store the tax amount in the ledger currency. This value is for reporting purposes only. It is not visible on any page nor has any financial impact.
-
Both: Enable both the Functional Currency and the Transaction Tax options.

Tax Regime page
Example of using Functional Currency as Rounding Conversion Option
Business benefit:
- Reduce the impact of rounding differences between transaction line amounts and tax conversion calculations in the ledger currency.
Steps to Enable
Use the Opt In UI to enable this feature. For instructions, refer to the Optional Uptake of New Features section of this document.
Offering: Financials No Longer Optional From: Update 24B
- Use the Opt In page to enable this feature. For instructions, refer to the Optional Uptake of New Features section of this document.
- Offering: Financials
- Use the opt-in for Tax Calculation on Rounded Amounts on Payables Invoices to enable this feature.
- Navigate to Setup and Maintenance -> Financials -> Transaction Taxes -> Manage Configuration Owner Tax Options and add a configuration for Payables.
- Enable the Use Rounded Tax Amount for Conversion check box.
NOTE: If you want to disable this feature, you must select the end date for the existing Configuration Owner Tax Options where the Use Rounded Tax Amount for Conversion option is enabled and create a new entry without this option.
IMPORTANT Actions and Considerations
DEPRECATION OF AI NEWS FEED SUGGESTIONS
As of update 23D, the Controlled Availability feature AI News Feed Suggestions will no longer be supported or enhanced, and no new customers will be accepted into the Controlled Availability program for this feature. If you’re currently using this feature, you should disable it. For details on how to disable the AI News Feed Suggestions feature, see Fusion Applications: AI Newsfeed Suggestions – End of Life in Release 23D (Doc ID 2969200.1).
Accounting and Control
Budgetary Control
Exclusion of Budgetary Control Validation on Journals
Exclude journal entries from budgetary control validation. This helps improve the efficiency and performance of the GL posting process when budgetary controls are not required.
Business benefits include:
- Improve the performance for implementations with only project control budgets.
- Alternatively exclude specific journal sources and categories from budgetary control.
In the Edit Budgetary Control and Encumbrance Accounting page, when you enable a ledger for budgetary control, navigate to the Budgetary Control Journal Exceptions tab in the Additional Ledger Options section and enable the Disable budgetary control for all journal source and categories option to exclude all journal entries from budgetary control validation.
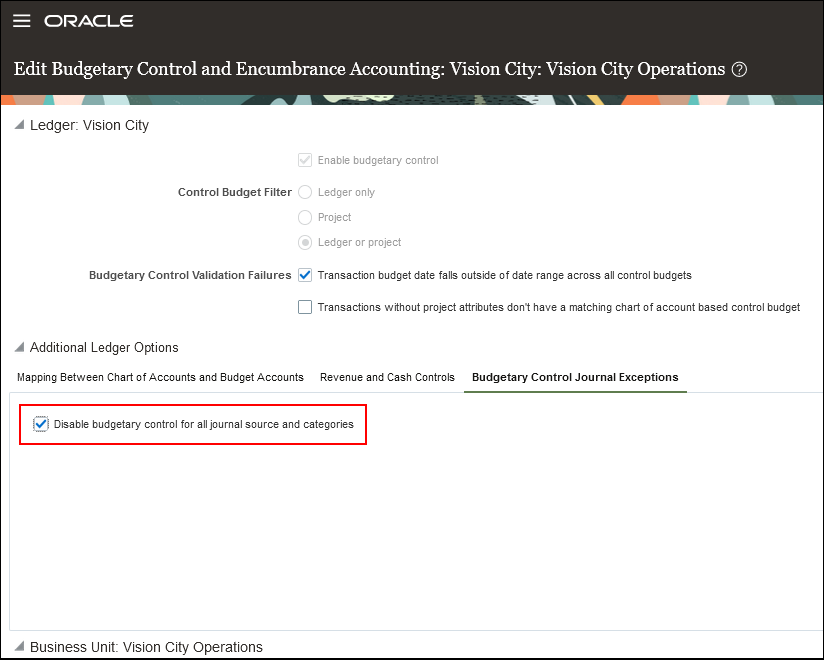
Disable Budgetary Control for All Journal Source and Categories
Steps to Enable
You don't need to do anything to enable this feature.
Tips And Considerations
- When you enable a ledger for budgetary control, the Disable budgetary control for all journal source and categories option is unchecked by default.
- If you choose not to enable the Disable budgetary control for all journal source and categories option, you can use the Journal Source and Category Exceptions section to select specific journal sources and categories to prevent budgetary control on journal entries that match the sources and categories selected.
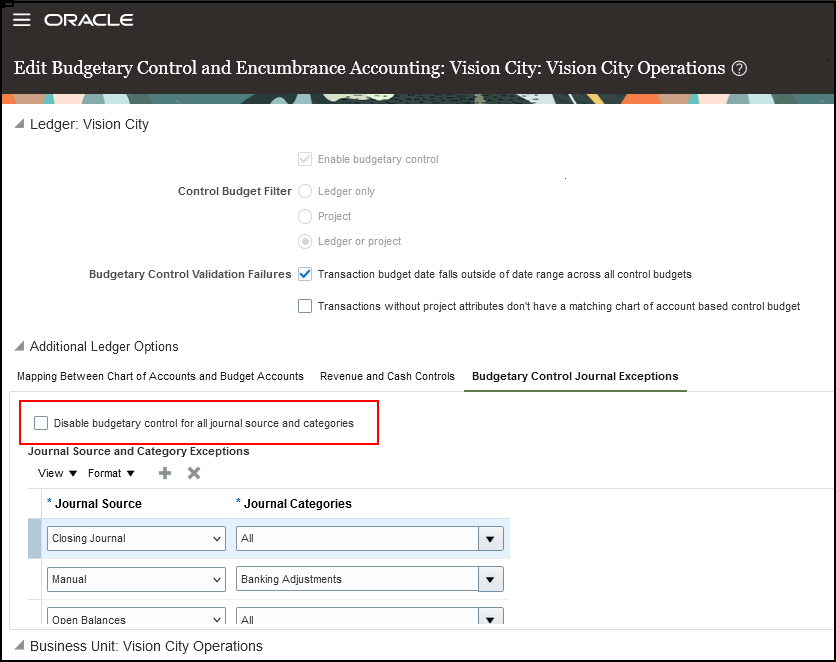
Disable Budgetary Control for Specific Journal Source and Categories
Key Resources
- Enable Budgetary Control in Using Financials for the Public Sector
Access Requirements
The Enable Budgetary Control privilege is needed to mange the budgetary control and encumbrance accounting configuration.
Simplified Maintenance of Control Budget Supplemental Rules
Edit supplemental rules when updating control budgets already in use. This simplifies the maintenance of control budget definitions.
To edit a supplemental rule:
- Navigate to the Edit Control Budget page for the control budget you want.
- Place the control budget in the Not ready for use - redefining status.
- In the Supplemental Rules section, select the rule and click the Edit button.
- Edit the rule and save.
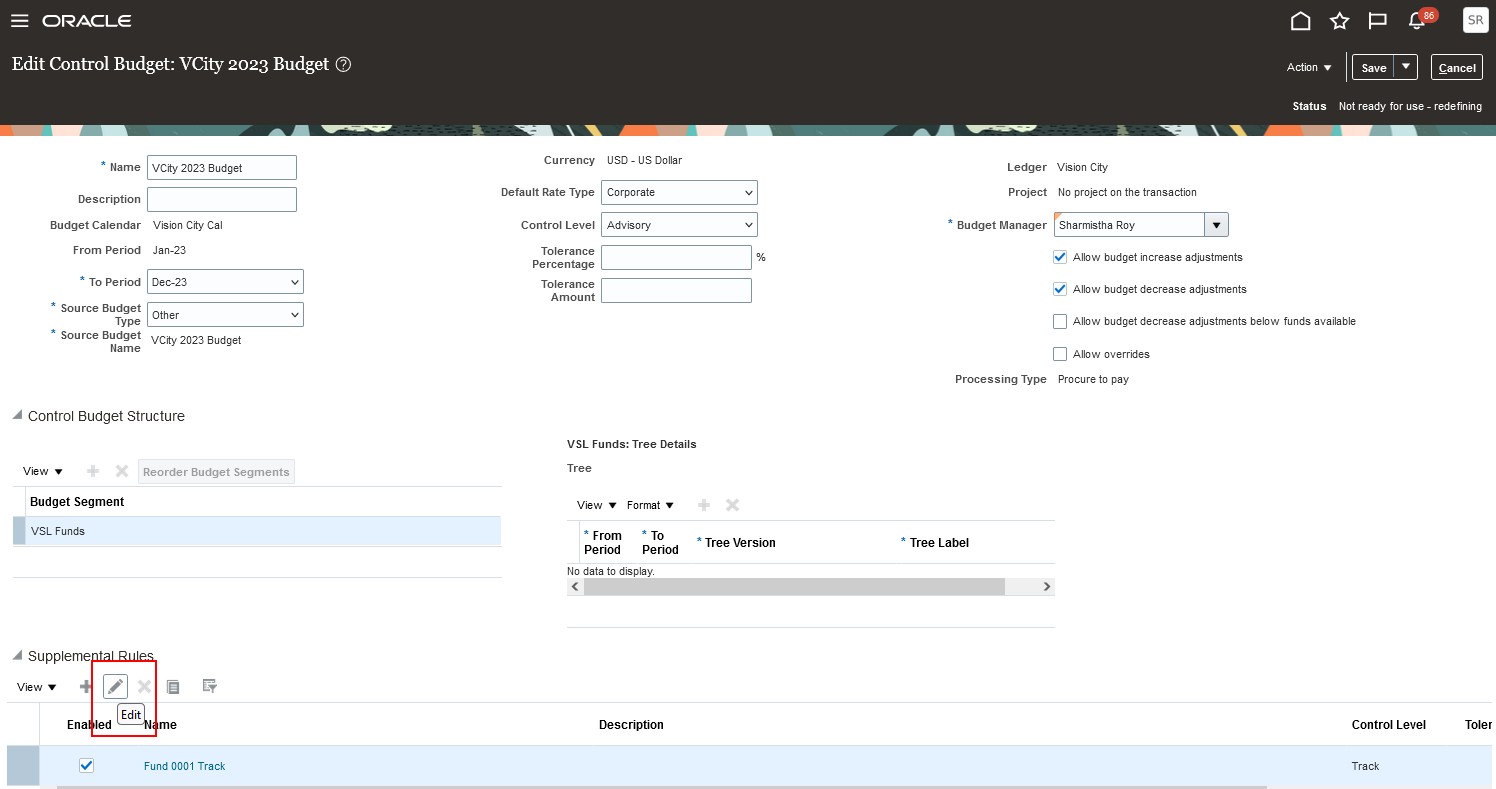
Edit Supplemental Rules for a Control Budget
Steps to Enable
You don't need to do anything to enable this feature.
Tips And Considerations
Set the status of a control budget in use to Not ready for use - redefining status before editing the supplemental rule.
Key Resources
- Budgetary Control Validation Options for Control Budgets in Using Financials for the Public Sector
- This feature originated from the Idea Labs on Oracle Customer Connect: Control Budget Supplemental Rule Must Be Editable To Incorporate New Chart of Account Values
Access Requirements
The Manage Control Budgets privilege is needed to manage control budget configuration.
General Ledger
Exclusion of Ledgers from Accounting Automation
The Accounting Automation feature delivered in Release Update 19D by default selects all ledgers for the routine tasks of creating accounting entries for subledger transactions, and transferring, importing and posting journals to General Ledger. In this release, a system administrator can exclude ledgers that require accounting to be processed at more controlled times or frequencies.
Business benefits include:
Improve the efficiency of accounting automation for ledgers that handle daily business operations, while allowing for separate processing of ledgers that require accounting at specific intervals, for example, for financial consolidation or modeling.
Steps to Enable
- In the Setup and Maintenance work area, use the Manage Accounting Automation task:
- Offering: Financials
- Functional Area: General Ledger
- In the Accounting Automation Exclusions region, enter the ledger or ledger set that you want to exclude:
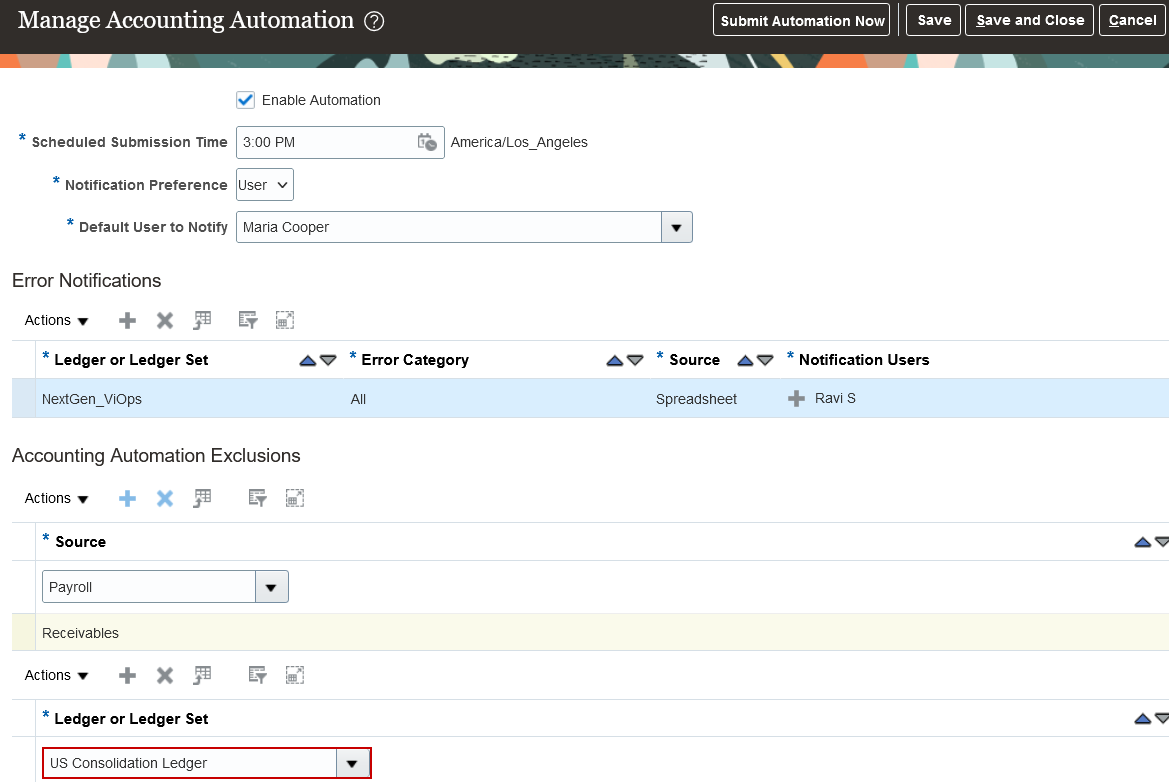
Ledger or Ledger Set Exclusion
Tips And Considerations
When you select a ledger set, the accounting automation process excludes the primary ledgers in that ledger set, along with each primary ledger’s associated secondary ledgers and reporting currencies.
Key Resources
- Refer to the Accounting Automation topic in the Implementing Enterprise Structures and General Ledger guide on Oracle Help Center.
Access Requirements
No new privileges are required to access the new Ledger or Ledger Set section in the Manage Accounting Automation page.
URL Attachments in Create Single Journal ADFdi Spreadsheet
Include URL attachments to General Ledger journal batches when creating single journals in the Create Single Journal ADFdi spreadsheet. This provides an efficient and centralized way to include audit and supporting documentation for journal batches of various sizes.
Business benefits include:
- Include multiple supporting documents for a single journal as URL attachments instead of attaching each document separately.
- Improve efficiency and processing time for bulk journal uploads.
- Use the Create Journal ADFdi spreadsheet for both journal creation and bulk attachments.
Steps to Enable
You don't need to do anything to enable this feature.
Tips And Considerations
- To include multiple URL attachments, use the vertical bar symbol (|) to separate each URL.
- URL attachment entries must start with http://, https://, or ftp:// in order to be included in journal batches.
- The URL attachments field cannot exceed 4,000 characters.
- Attachments are included at the journal batch level.
Joint Venture Management
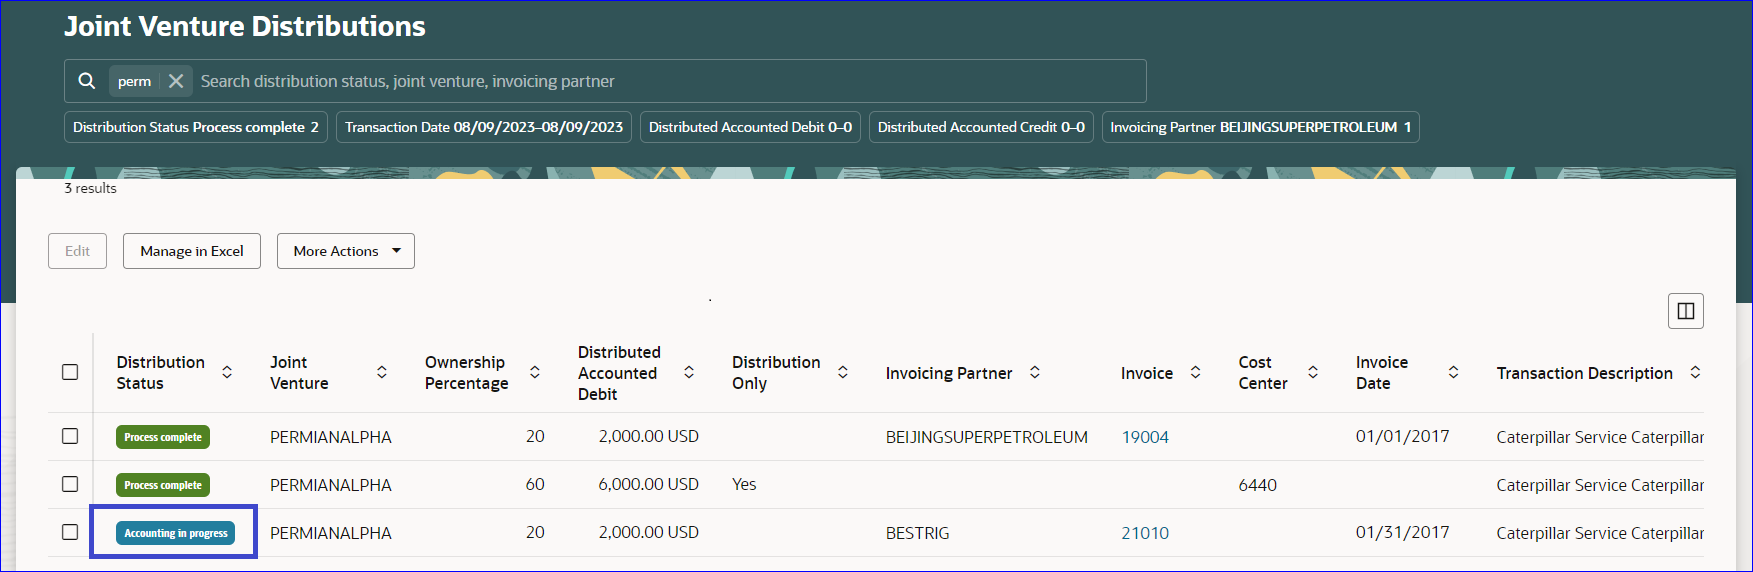
Accounting in Progress Status for Joint Venture Distributions and Operational Measures
A new Accounting in Progress status has been added to help track the processing of joint venture distributions and operational measures. When the process to create invoices or journal entries for distributions and operational measures completes, their status changes to Accounting in Progress instead of Process Complete. Once the invoices and journal entries are posted, the joint venture distributions and operational measures are set to Process Complete.
Business Benefit:
This new status will help the users to know when accounting associated with distributions and operational measures needs to be created and posted before they can move ahead with joint venture processing.
Steps to Enable
You don't need to do anything to enable this feature.
Key Resources
- For more information, refer to
- Implementing Joint Venture Management guide and
- Using Joint Venture Management guide.
Access Requirements
- Joint Venture Application Administrator
- Joint Venture Accountant
- Joint Venture Accounting Manager
Joint Venture Partner Contribution Closure
Refund the remaining balance of a joint venture partner contribution to the stakeholder when it is no longer needed.
Business Benefit:
Managing partner contribution refunds through the Joint Venture Management processes eliminates errors associated with manual processing, increasing joint venture accountant productivity.
Steps to Enable
You don't need to do anything to enable this feature.
Key Resources
-
Watch Joint Venture Partner Contribution Closure demo.
- For more information, refer to
- Implementing Joint Venture Management guide and
- Using Joint Venture Management guide.
Access Requirements
- Joint Venture Application Administrator
- Joint Venture Accountant
- Joint Venture Accounting Manager
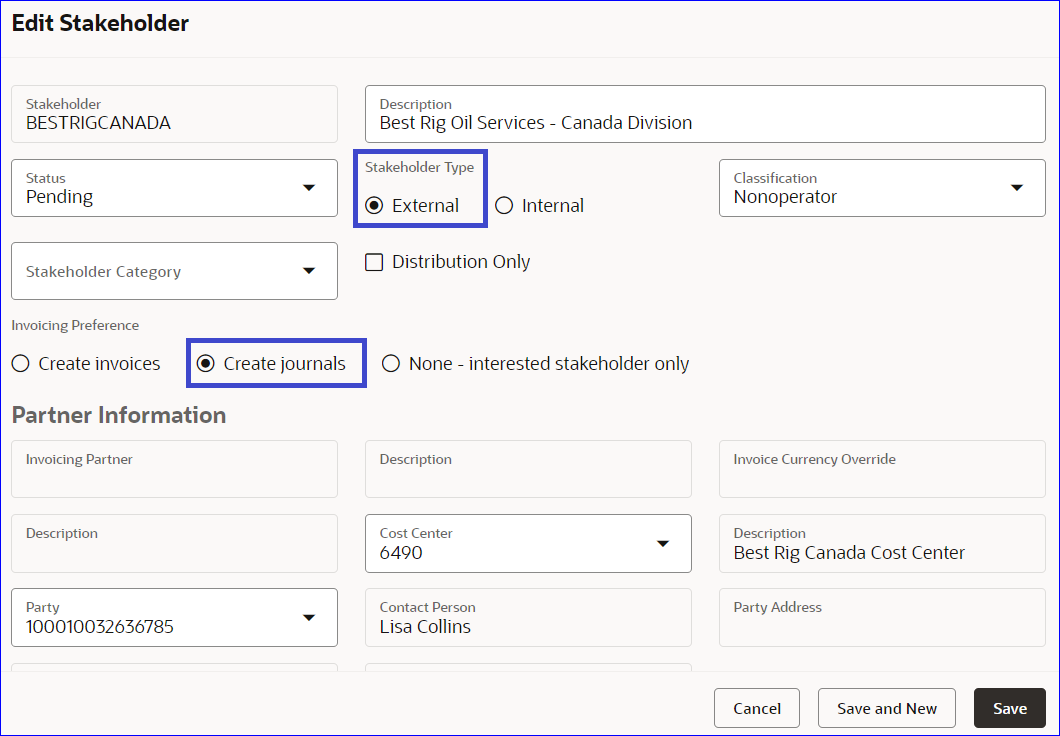
Journal Entries for External Stakeholders
Enable journal entry generation for external stakeholders.
Business Benefit:
This gives managing partners the flexibility to create joint venture accounting on a regular basis and invoice partners for their share of revenue and expenses based upon their business need.
Steps to Enable
You don't need to do anything to enable this feature.
Key Resources
-
Watch Joint Venture Subledger for Internal Transfers (update 21D) Readiness Training.
-
Watch Journal Entries for External Stakeholders demo.
- For more information, refer to
- Implementing Joint Venture Management guide and
- Using Joint Venture Management guide.
Access Requirements
- Joint Venture Application Administrator
- Joint Venture Accountant
- Joint Venture Accounting Manager
Expenditure Business Unit for Project Costing Adjustments from Joint Venture Management
The addition of the expenditure business unit as a project attribute in Joint Venture System Options enables the support of project costing adjustments for transactions with a cross charge. A cross charge occurs when transactions for a project are associated with a different business unit than the business unit of the joint venture.
This configuration will enable Joint Venture Management to correctly create project costing adjustments for transactions in accordance to the project’s business unit.
Steps to Enable
- Create supporting references to capture expenditure business unit ID.
Navigate to Setup and Maintenance > Financials > Joint Venture Management > All Tasks > Manage Supporting References and add a new supporting reference to capture the expenditure business unit ID for each subledger.
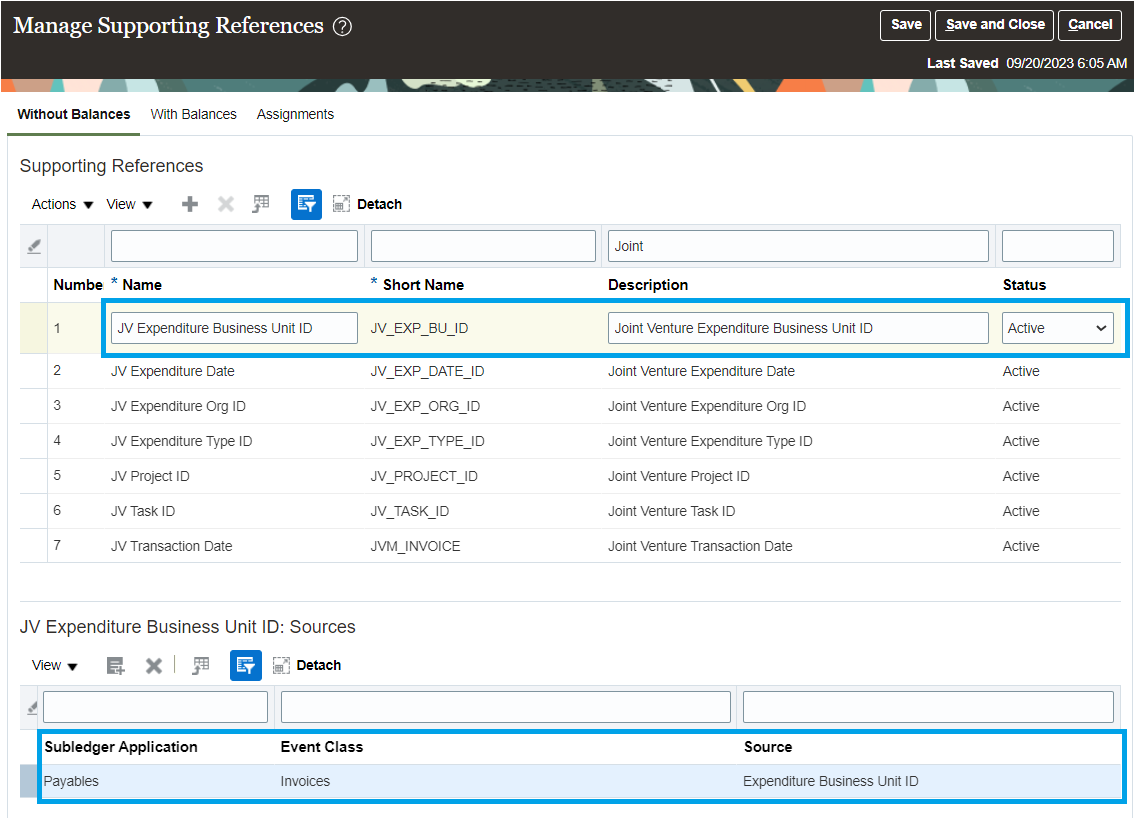
Add the sources for all subledgers and event classes that have project attributes.
- Associate the supporting reference to the accounting method for each subledger using the task Manage Accounting Methods.
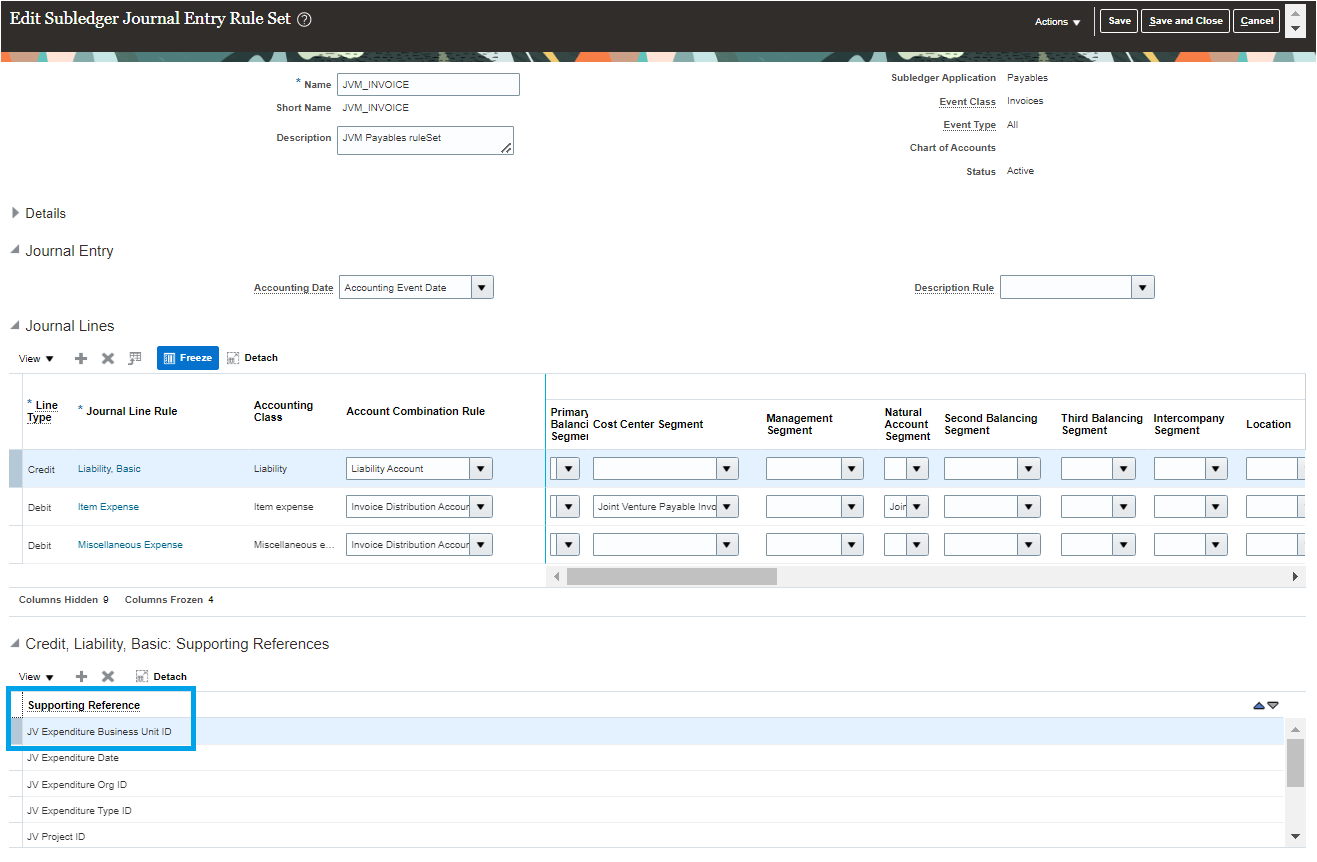
- Associate the new supporting reference in the Joint Venture System Options application.
Navigate to Setup and Maintenance > Financials > Joint Venture Management > Manage Joint Venture System Options and associate the new supporting reference to the attribute Expenditure Business Unit ID.
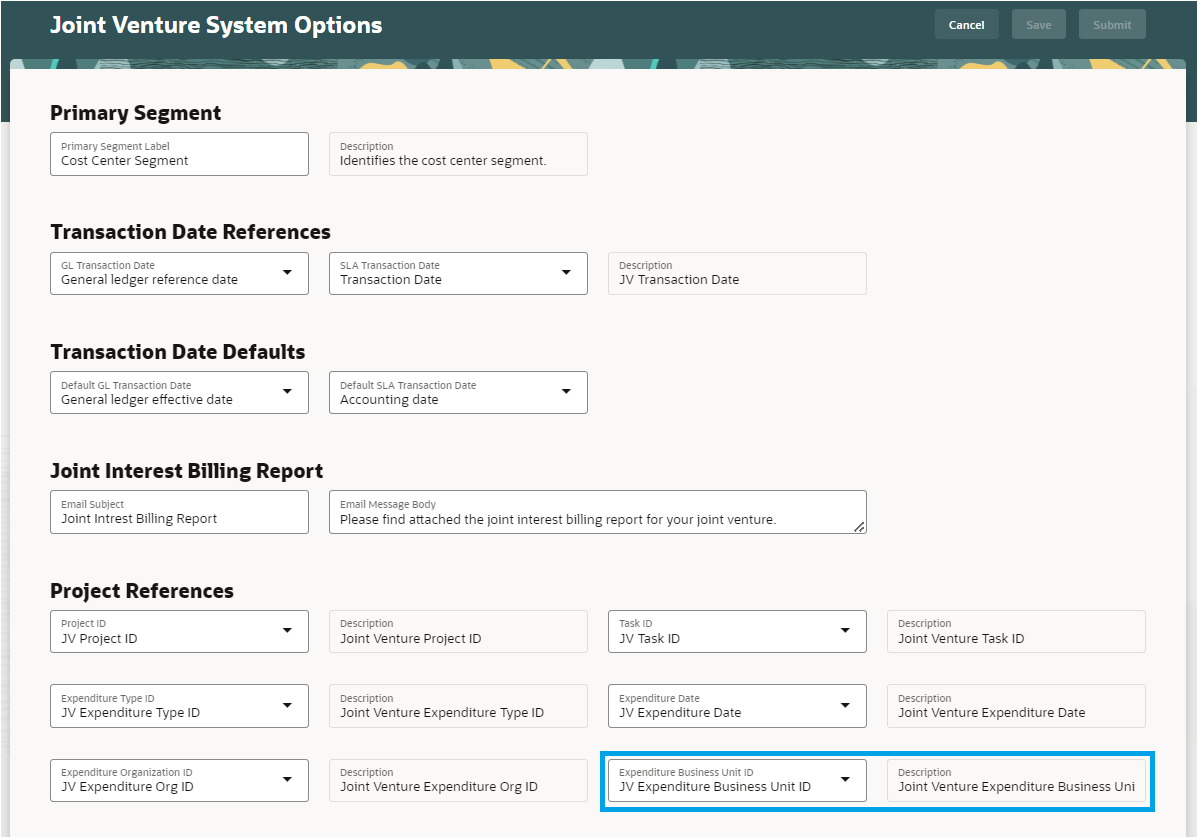
Tips And Considerations
Set up the supporting reference to store the expenditure business unit ID in the Manage Supporting References application, and then in the Expenditure Business Unit ID attribute in Joint Venture System Options, specify the expenditure business unit. If this setup is not completed, an incorrect business unit will be written to project costing adjustments for transactions with cross charges.
Key Resources
- For more information, refer to
- Implementing Joint Venture Management guide and
- Using Joint Venture Management guide.
Access Requirements
- Application Implementation Consultant
- Joint Venture Application Administrator
Subledger Accounting
Performance Improvements on the Create Multiperiod Accounting Execution Report
The BI Publisher version of the Create Multiperiod Accounting Report has been optimized to improve the overall performance of this report. Changes pertaining to this have been made to the "CreateMultiperiodAccountingDm" data model and "CreateMultiperiodAccounting" report used in the Create Multiperiod Accounting Execution Report.
NOTE: It is recommended to use the predefined version of the data model and report for the Create Multiperiod Accounting Execution Report for better performance.
To remove any existing customization made to the Create Multiperiod Accounting Execution Report, follow the steps below:
- Log in to BI Publisher Enterprise through the /xmlpserver URL (<host url>/xmlpserver/).
- Under Folders pane, navigate to /Shared Folders/Custom/Financials/Fusion Accounting Hub (if this folder structure exists).
- Delete Create Multiperiod Accounting Execution Report in this folder.
- Delete Create Multiperiod Accounting Data Model under/Shared Folders/Custom/Financials/Fusion Accounting Hub/Data Models folder.
Business benefit includes:
- Improved runtime performance of the Create Multiperiod Accounting Execution Report.
Steps to Enable
You don't need to do anything to enable this feature.
Access Requirements
No new privileges are required to access the Create Multiperiod Accounting Execution Report and the data model for the Create Multiperiod Accounting Execution Report.
Payables and Expenses
Expenses
MasterCard Centrally Billed Account for Travel Expenses
Upload MasterCard travel charges from an organization’s centrally billed account for employees' expenses. This allows employees to pay for travel expenses using a single MasterCard account, rather than using individual corporate cards. From the Expenses work area, employees can include these travel charges in their expense reports to provide approvers with full visibility into the total cost of a trip.
With this feature, Oracle Expenses supports MasterCard centrally-billed cards. Travel cards, also known as centrally-billed travel cards, business travel accounts, or ghost cards, are used by companies to centrally charge high value travel expenses, such as airfare, accommodations, and car rental.
This feature benefits companies that use a centrally-billed MasterCard to book employees' travel or to prepay employees' travel expenses. The application automatically creates expenses from card transactions and displays them in the employee's Expenses work area. This helps speed up the expense submission and promote faster reimbursements.
Your company can realize the following benefits from using a travel card account:
- Greater visibility into the total trip cost
- Accurate travel expense allocation
- Punctual payments to card issuers
Steps to Enable
This feature doesn't require opt-in.
To create a new centrally-billed MasterCard, you must log in as a corporate card admin.
To create the card manually:
- Create a new card and categorize the card as "Centrally-billed card" in Account Type.
- Make sure the Corporate Card Number matches the "AccountNumber" field in the CDF3 data file.
To create the card from a corporate card data file:
- Schedule the Upload Corporate Card Transactions process, where the card data file contains transactions from the new corporate card.
-
Go to Review Corporate Card Transactions. The new card will show as unassigned. Edit the corporate card and categorize as "Centrally-billed card" in Account Type.
-
Run the Upload and Validate Corporate Card Transaction File with Validation only, and without Company account parameter to revalidate the transactions.
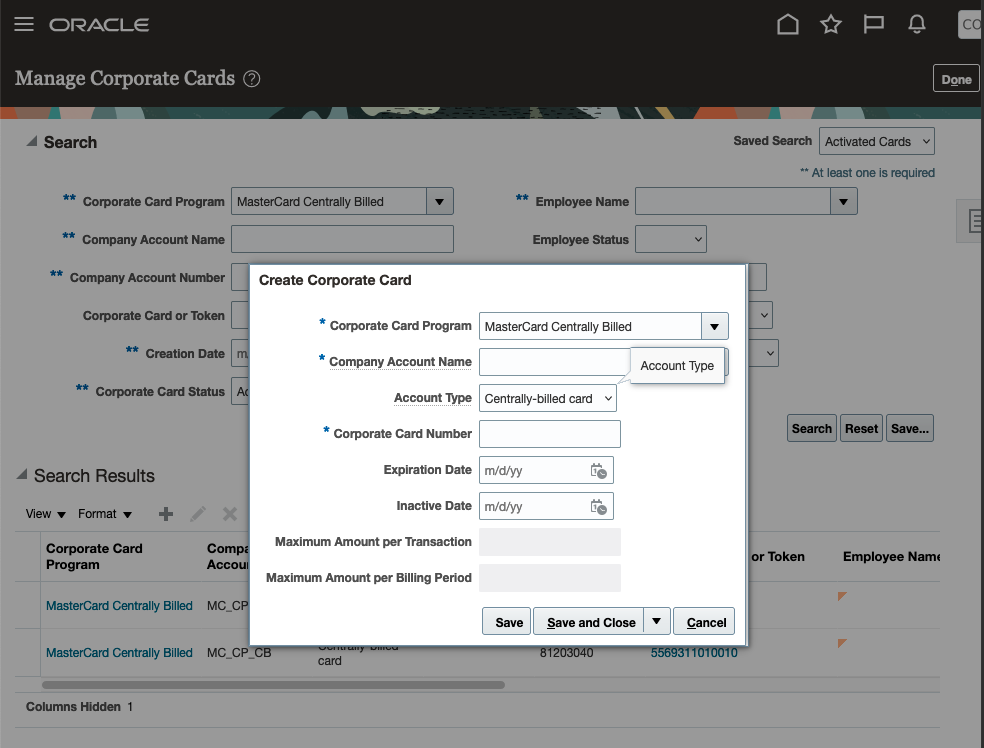
Categorize a Card as a Centrally-Billed Card in Manage Corporate Cards Page
Tips And Considerations
- Centrally-billed MasterCard is supported only for tokenized card program. You must set up the Corporate card program with Token in Card Number Format field.
- Due to the nature of the centrally-billed card, only Company Pay and Both Pay are supported.
-
Employee Matching rule only supports Employee Number in compliance with MasterCard specifications. Every transaction on a centrally-billed MasterCard must have a valid in each transaction for proper matching.
-
The <EmployeeID> that a centrally-billed MasterCard transaction is tagged with must belong to the business unit that the company account for the card belongs to. Otherwise, the transaction returns an "Invalid employee number" error. The corporate card administrator has to manually assign the transaction to an employee in the same business unit on the Review Corporate Card Transactions page.
Key Resources
- This feature originated from the Idea Labs on Oracle Customer Connect: Idea 599762
- Related topics: https://docs.oracle.com/en/cloud/saas/financials/23b/faiex/travel-card-processing.html#s20052277
Access Requirements
To enable the new setting, you must have one of these roles:
- Corporate Card Administrator
- Application Implementation Consultant
Payment Method Selection in Cash Advances Using a REST API
Use the Expense Cash Advances REST API to select the payment method for cash advances.After selecting the preferred payment method, employees can use their preferred payment method when requesting cash advances.
To use the Expense Cash Advances REST API to select a payment method, you must set the Enable Payment Method option to Yes in the Manage Cash Advance and Authorization Policies page for the applicable business unit. Then the payment method associated with the provided code in the PaymentMethodCode attribute is used for cash advances. If the Enable Payment Method option is set to No, then cash advances are created with the default payment method.
The ability to specify a payment method for manually created cash advances was introduced in update 23B. In update 23D, the same ability is extended to the REST API.
Steps to Enable
You don't need to do anything to enable this feature.
Key Resources
- Review the Expense Cash Advances REST service definition in the REST API guides. If you're new to Oracle's REST services you may want to begin with the Quick Start section.
- Payment Method Selection for Cash Advances was introduced in 23B. Additional information about the feature is available here.
Resubmission of Expense Reports using the Expenses Mobile Application
Employees can now withdraw a submitted expense report and resubmit it again. They can also resubmit an expense report rejected by approver(s) or returned by auditor and resubmit it again.
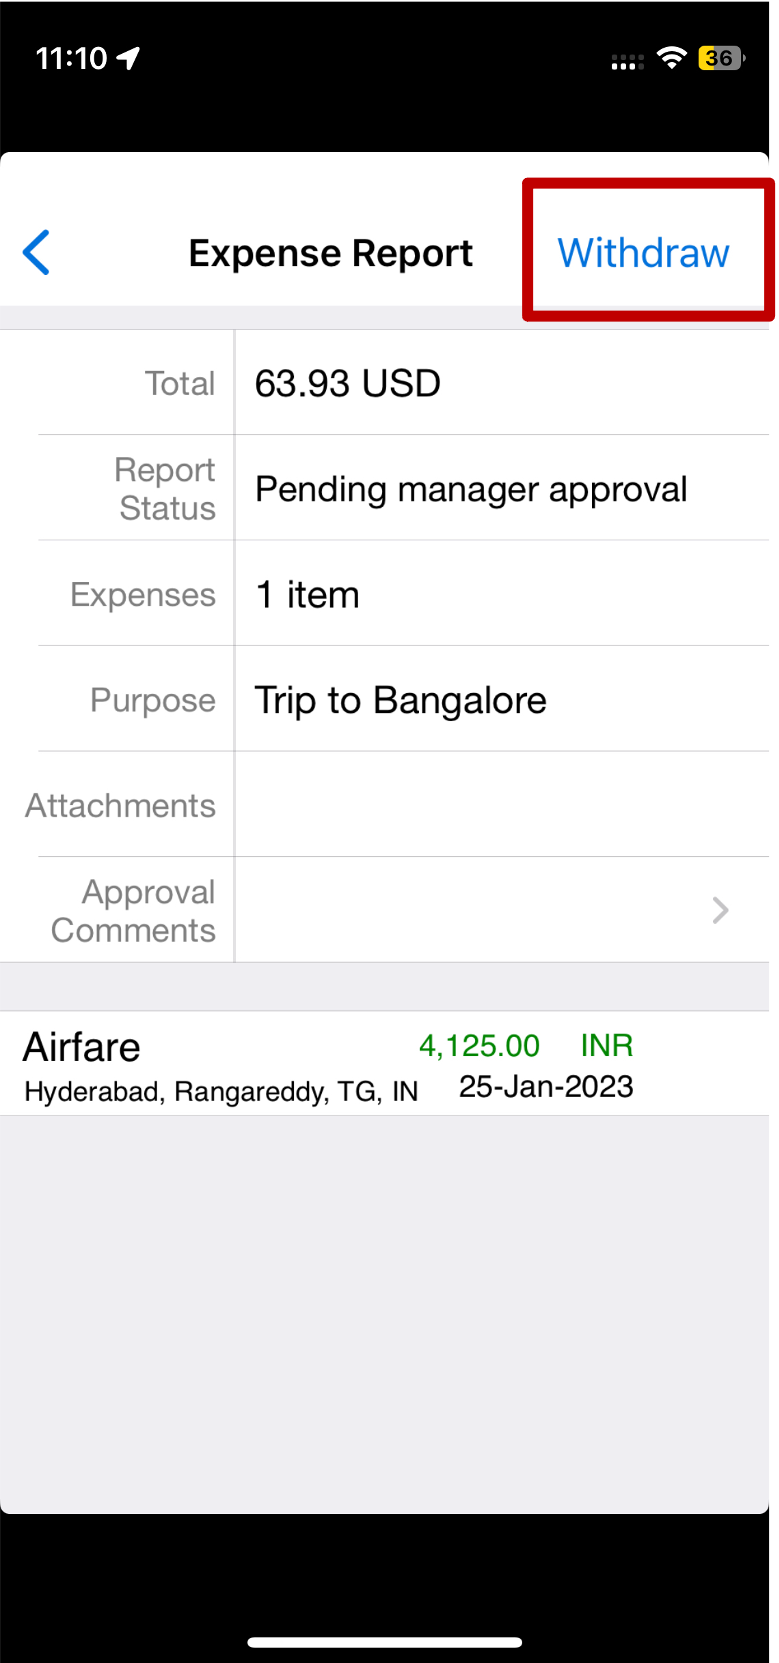
Withdraw action for submitted expense reports
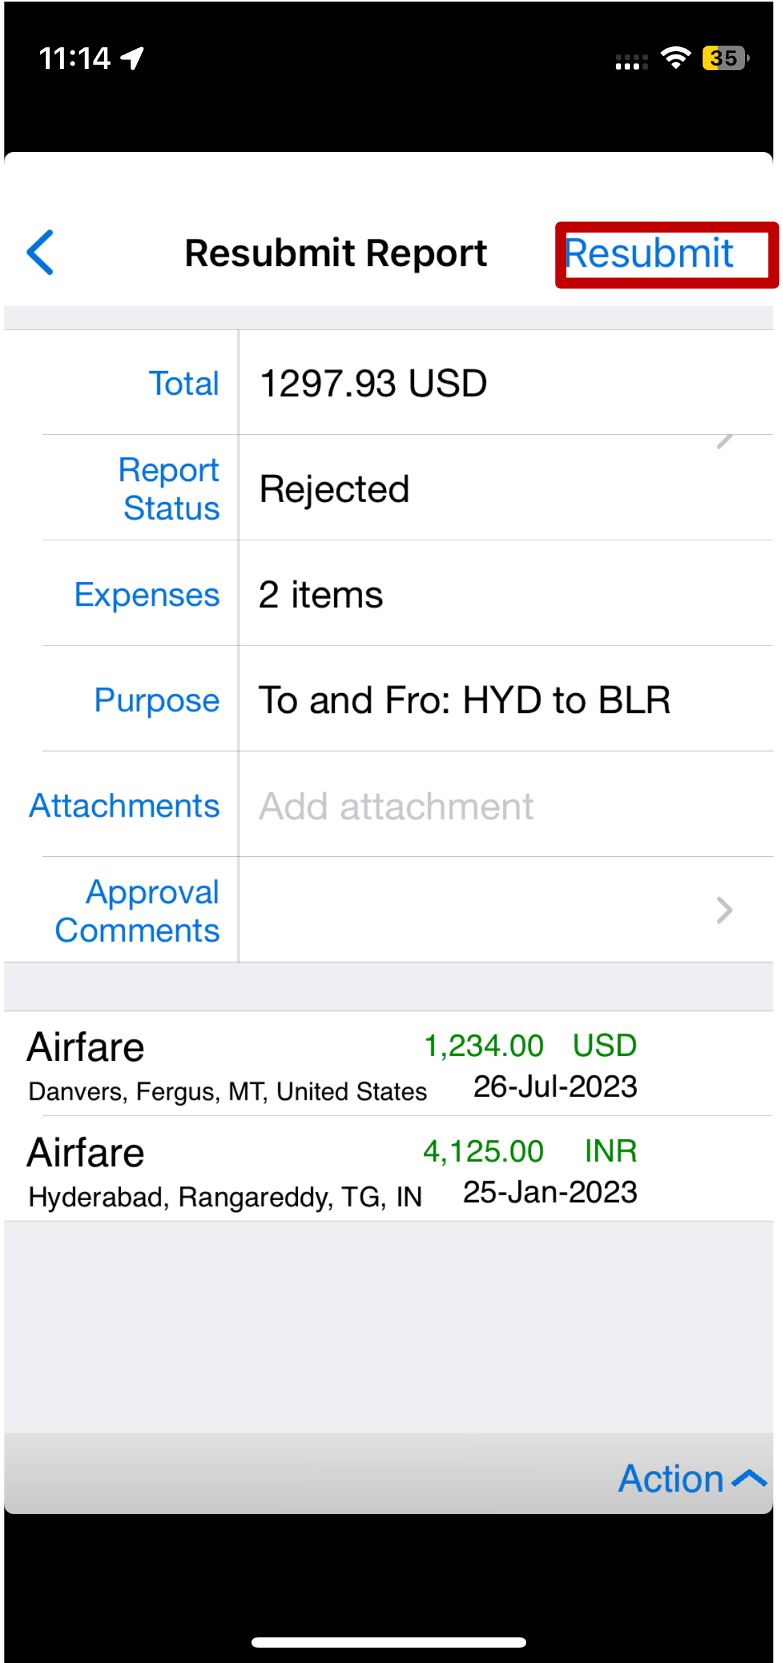
Resubmit action for rejected/returned/withdrawn expense reports
- With this update, employees can now withdraw submitted expenses reports using the Expenses mobile application. This brings parity with the Expenses web application and helps employees manage their expenses on the go.
- Additionally, employees can now use the Expenses Mobile application to edit and resubmit expense reports that are withdrawn, rejected by an approver or returned by an auditor. Prior to this, employees could resubmit expense reports only in the expenses web application.
The ability to withdraw and resubmit expense reports using the mobile application provides employees with greater flexibility and convenience to manage their expenses on the go.
Steps to Enable
You don't need to do anything to enable this feature.
Key Resources
- This feature originated from the Idea Labs on Oracle Customer Connect:
Access Requirements
This feature is available by default for all the Expenses Mobile Application users.
Touchless Expenses with J.P. Morgan Corporate Cards
The new generation mobile experience with J.P. Morgan corporate cards delivers touchless expense submission and faster reimbursement. Receive instant alerts when charges are incurred on J.P. Morgan corporate cards. Use guided correction, intelligent recommendations, and accurate receipt extraction to facilitate automatic expense submission and approval. Available to customers with J.P. Morgan corporate cards.
The Touchless Expenses application is ideally suited for large companies looking to simplify their expense workflow processes and reimbursement policies.
Key functionality of Touchless Expenses include:
- Real-time expense creation with J.P. Morgan corporate cards.
- Guided assistance for expenses that require additional information.
- Automatic submission of completed expenses.
- Intuitive user interface and application experience.
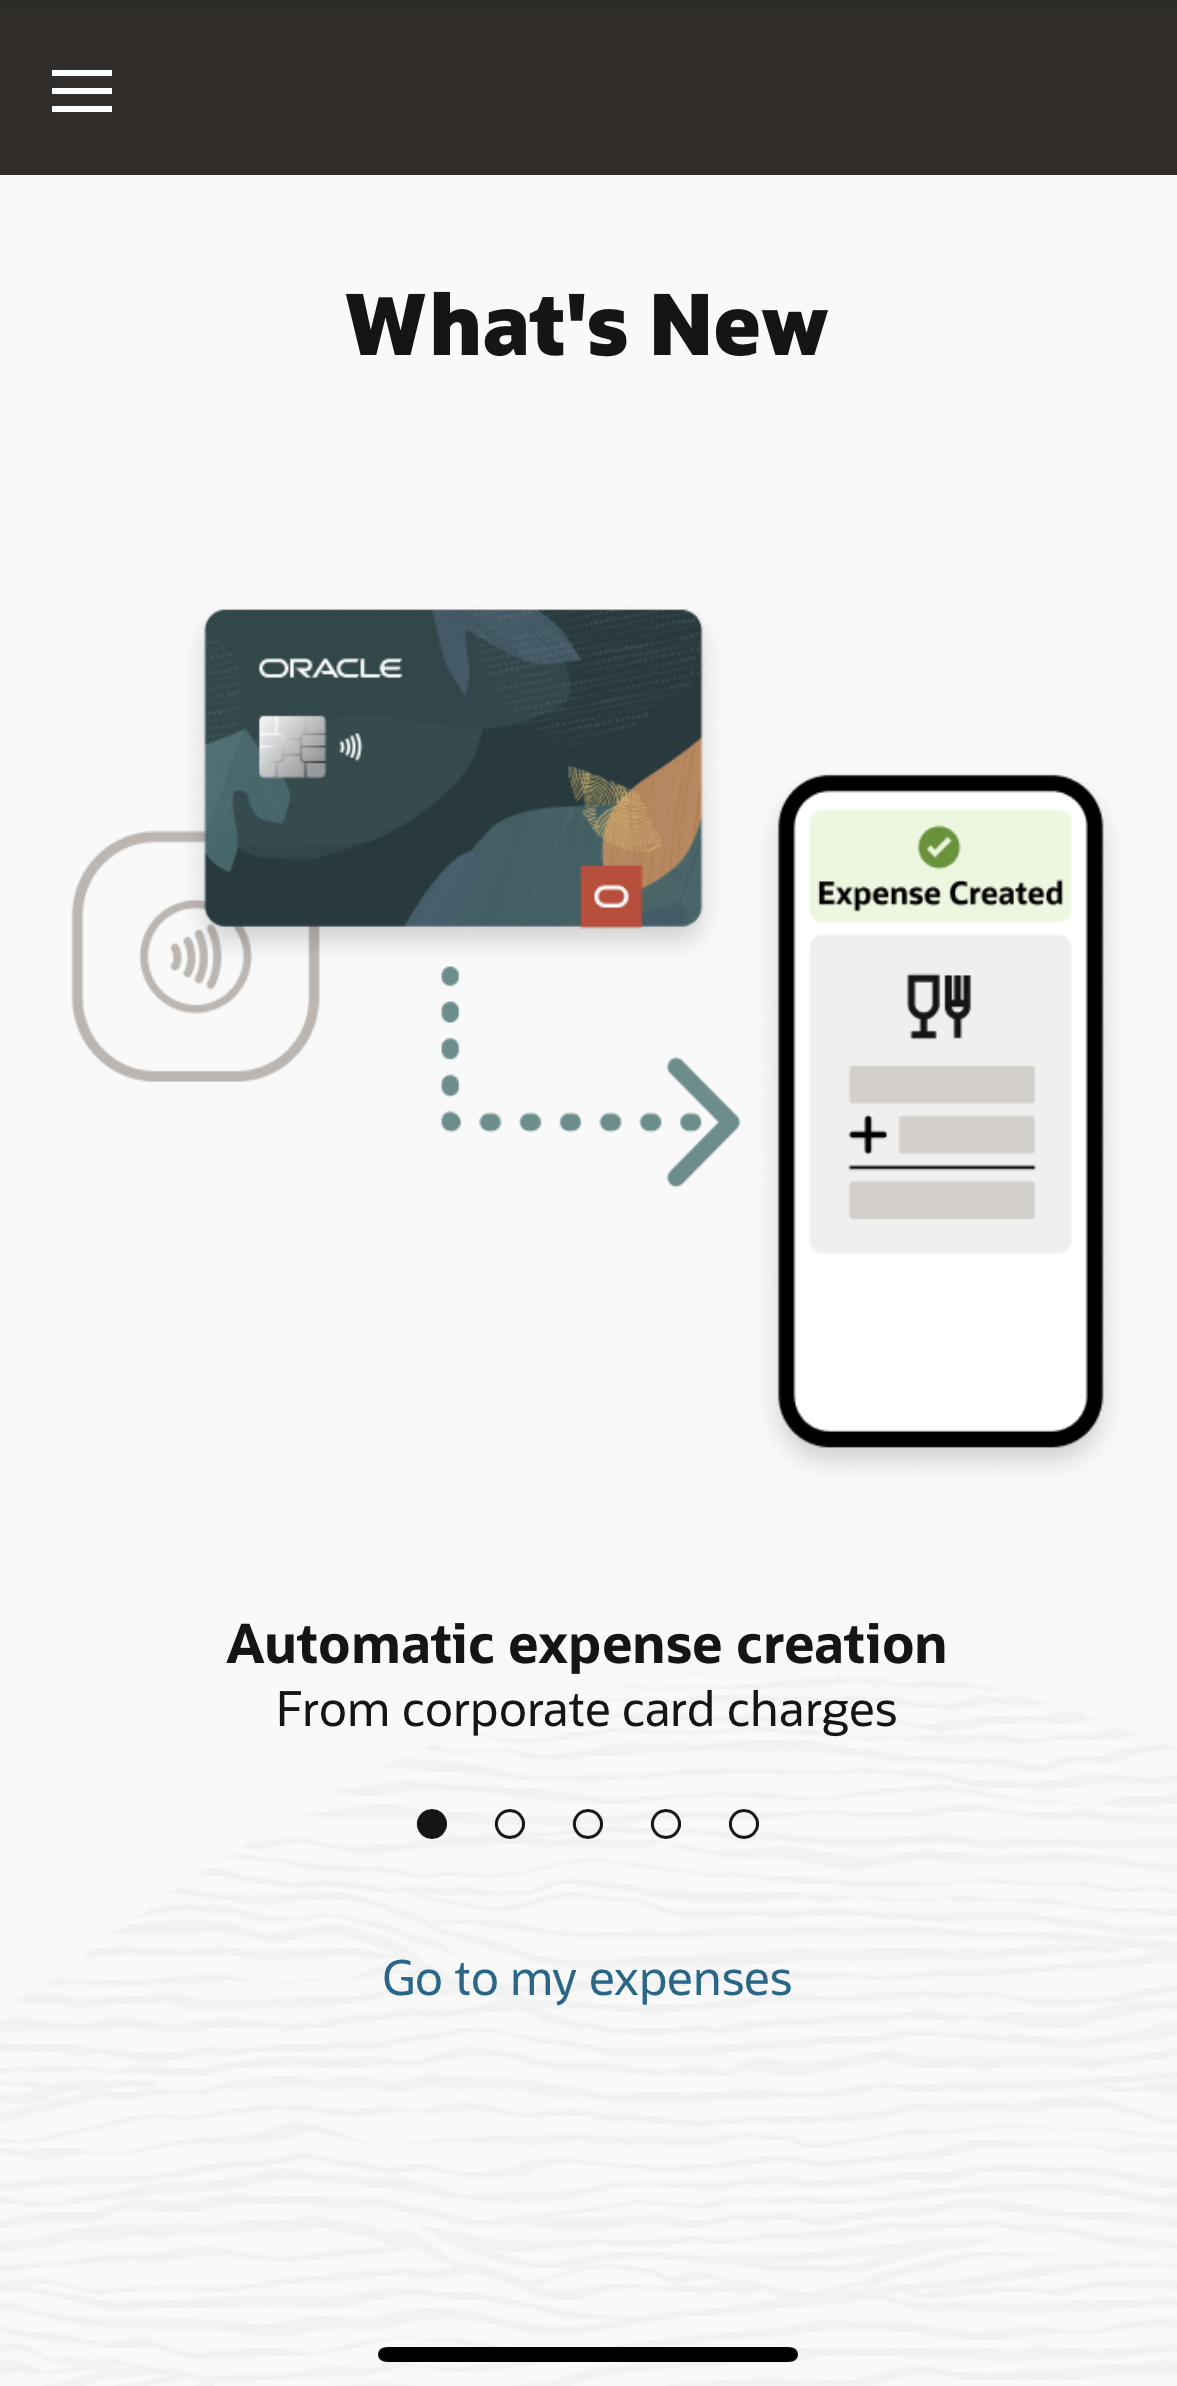
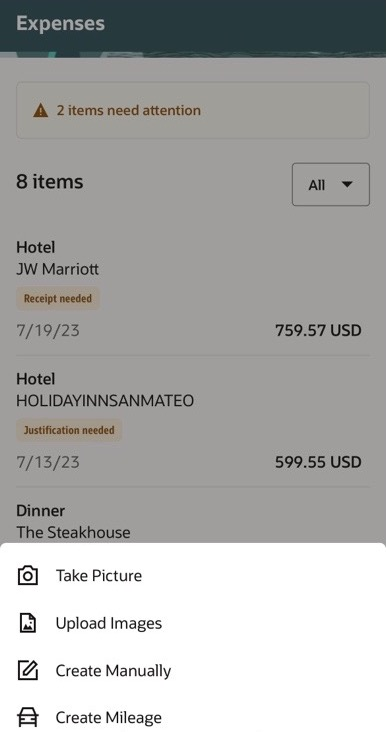
Real-time Expense Creation with J.P. Morgan Corporate Cards
Touchless Expenses users benefit from real-time expense creation when they incur charges on a J.P. Morgan corporate card.
When users incur charges on their J.P. Morgan corporate card, Touchless Expenses instantaneously creates the expenses and notifies the user on their mobile device, clearly identifying the expenses requiring more information. Users can click on the notification to provide the missing information.

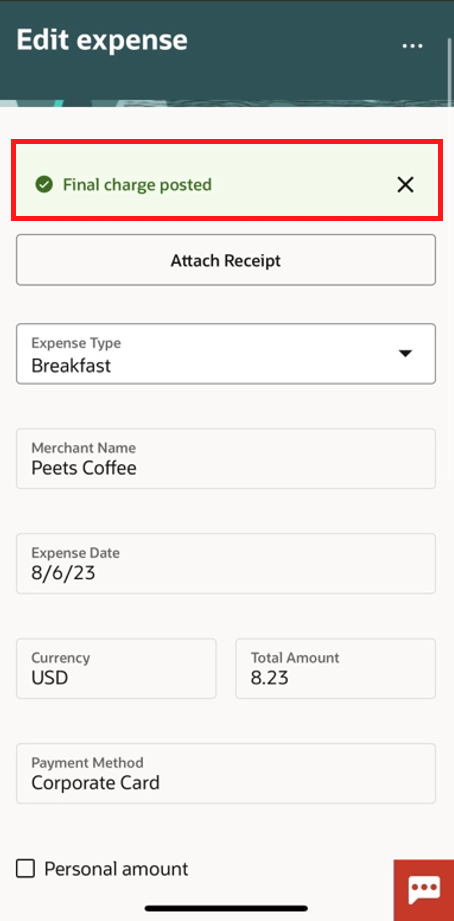
These corporate card expenses remain in the application with a ‘Pending final charge’ status until the settled charge arrives. The status is removed and the expense is now ready for submission if no other information is required. Users see a message: "Final charge posted" at the top of the expense indicating the settled charge has arrived.


Guided Assistance for Expenses that Require Additional Information
Expense users follow guided prompts to quickly provide information for incomplete expenses. For example, in some instances, expenses may require additional user input to comply with company policies. There are two ways to access the guided assistance: from the notification on the user’s mobile device or from within the Touchless Expenses application. When an expense user receives a notification on their mobile device after a corporate card charge is incurred, they select the notification which directs them to a guided experience to complete the expense. From within the application, the user selects the message on the top of the landing page indicating action is required on one or more expenses. The guided assistance provides clear instructions on how to fill in the required information. This allows users to complete their expenses easily and as soon as they are incurred.
The guided assistance supports the following common scenarios:
- Expenses missing simple fields such as expense type, amount, and currency.
- Expenses that require receipt or missing receipt justification.
- Expenses missing more information such as number of attendees and attendee names.
- Expenses violating corporate policies such as amount limits and card usage.
- Potential duplicate expenses.


Automatic Submission of Completed Expenses
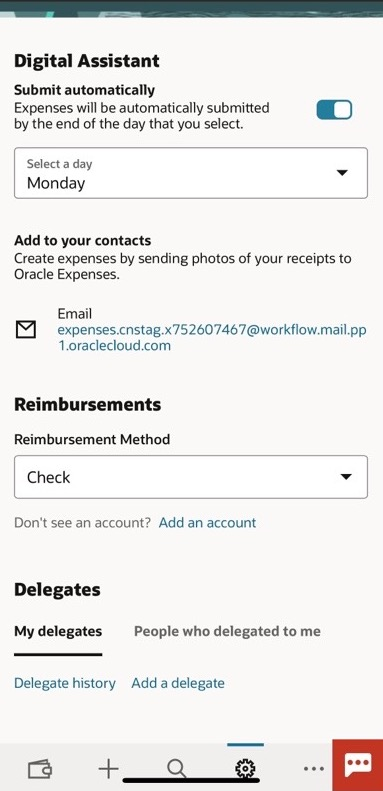
Automatic submission allows the user to set up a specific day of the week to have their expenses compiled into a report and submitted for approval. The company administrator configures this for each business unit and determines which days of the week are available for employees to select for automatic submission, after which employees can turn on auto submission from the Settings page. On the selected automatic submission day, the Touchless Expenses application compiles all eligible expenses into a single report and submits them for approval. Any expenses that require additional information remain in the application and are not automatically submitted. By enabling automatic submission, the expense user’s experience can be fully automated from expense creation to submission.
Intuitive User Interface and Application Experience
Touchless Expenses supports policy enforcement, configuration for company-specific information, attendee capture, and various types of default values. The application is simplified into four main pages: expense landing page, manual expense creation page, search page, and settings page. It also provides employees with a seamless first-time user experience.
- First-Time User Experience
When users log in to Touchless Expenses for the first time, they are taken through a first-time user experience, including an initial welcome screen and a prompt to accept the company's terms and conditions. They can also view what’s new in the application. For companies that currently use the Oracle expenses application, the users’ existing expenses will be migrated to the new Touchless Expenses application seamlessly and will appear on the landing page.

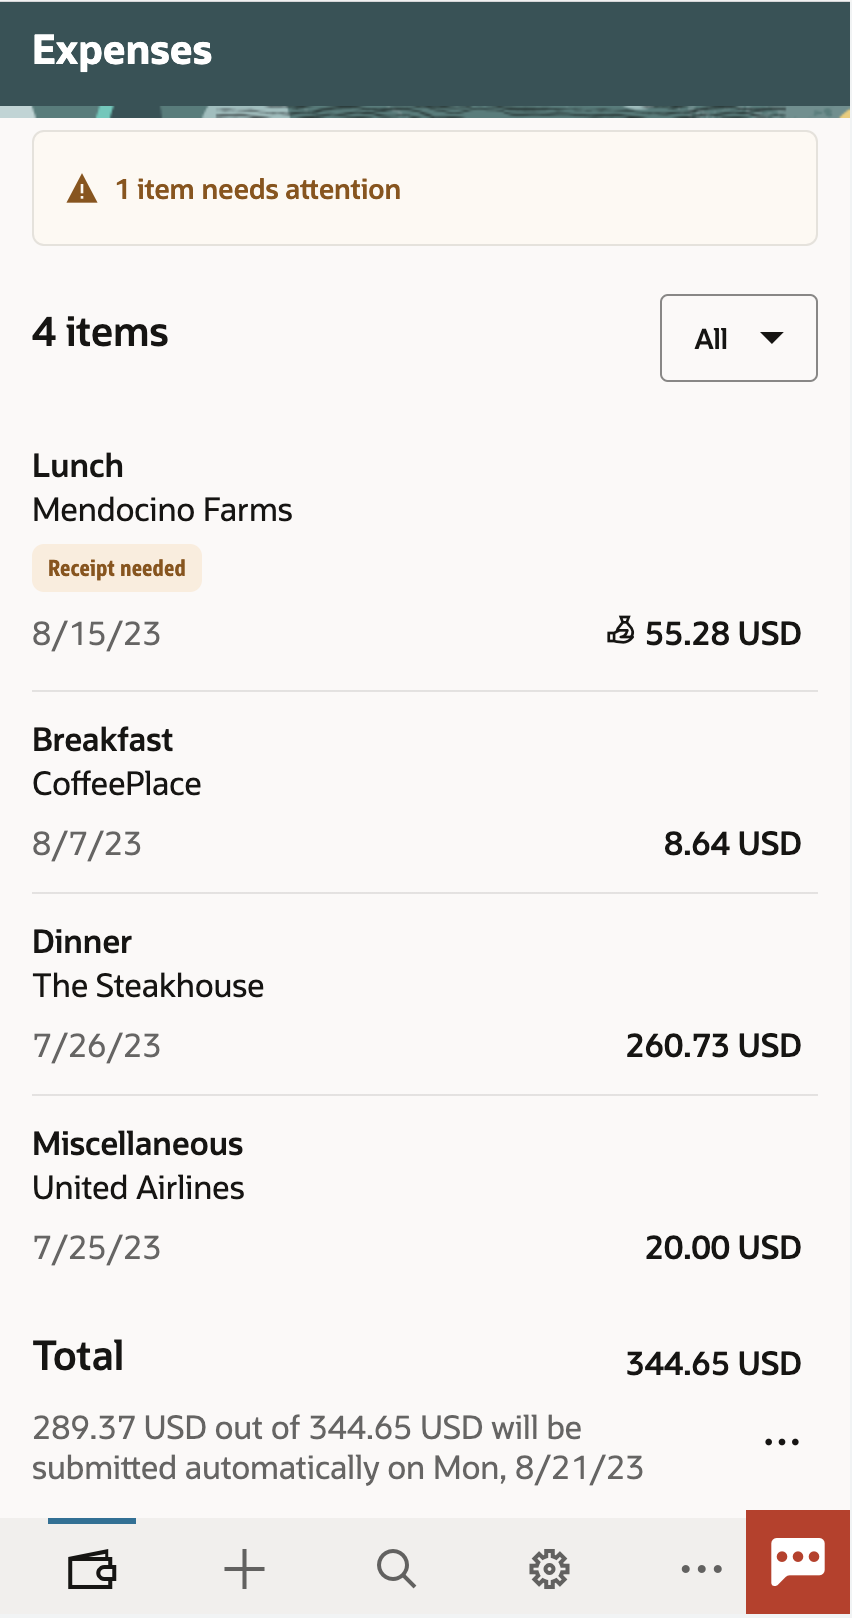
- Expense Landing Page
When users log in to the Touchless Expenses application, they arrive at the landing page. The landing page shows existing expenses and recent expense reports. From the landing page, users can edit or add information to existing expenses, submit expenses manually, view expense statuses, and review expenses that will be included in the next automatic submission. Users can also view recently submitted expense reports and approval activities.
- Manual Expense Creation Page
Expense users can create expenses manually in a few different ways: enter required fields manually to create an expense, upload an image of an expense receipt, or use Oracle Maps to create a mileage expense. When creating an expense from receipt upload, the application scans the receipt and fills in the expense fields based on the receipt details. When creating a mileage expense, the user enters their start and end destinations, and the application automatically calculates the reimbursable amount based on the distance traveled and company expense policies for mileage.
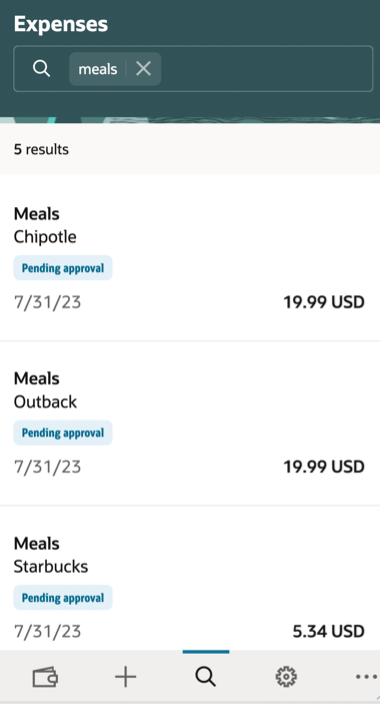
- Search Page
The search page enables expense users to filter expenses by multiple criteria including merchant name, payment method, expense report status, and dates of incurred expenses. The search results return the expenses that best match the criteria specified by the user. Next to each expense on the search page, there is an expense status to help users easily identify where expenses are in the reimbursement process. Users can also filter expenses by the expense status to refine the search results.
- Settings Page
Users can configure aspects of the Touchless Expenses application from the settings page. On this page, expense users can enable automatic submission and select the day of the week they’d like their expenses to be submitted. The settings page is also used to configure reimbursement methods, add bank account details, and assign/view delegation.
Business Benefits include:
- Reduced effort with real-time expense entry from J.P. Morgan corporate cards.
- Increased productivity with guided assistance for expenses that require additional information.
- Time saved with automatic submission of completed expenses.
- Improved employee satisfaction with intuitive user interface that simplifies the employee expense reporting experience.
Steps to Enable
To enable this feature you need to log a Service Request (SR).
Before enabling Touchless Expenses with J.P. Morgan in Cloud ERP, your enterprise must be enrolled in a J.P. Morgan corporate card program. You must also inform your J.P. Morgan implementation team that your enterprise would like to enable the integration with Oracle Touchless Expenses. Please contact your J.P. Morgan Sales/Relationship manager.
If your enterprise is new to Oracle expenses and has not completed the implementation process, please review the Implement Expenses section of Getting Started with Your Financials Implementation before enabling Touchless Expenses.
Touchless Expenses is currently in controlled availability and requires promotion codes. Log a Service Request through My Oracle Support using Product: Oracle Fusion Expenses Cloud Service and Problem Type: Submit Expenses - Submit Expense to request your promotion codes. You will need to provide the production and test pod names, and business units for which Touchless Expenses should be enabled.
Once the above is completed, follow the steps in the Service Request to enable Touchless Expenses for the related business units, including the following setup steps to enable the connectivity between J.P. Morgan and Cloud ERP.
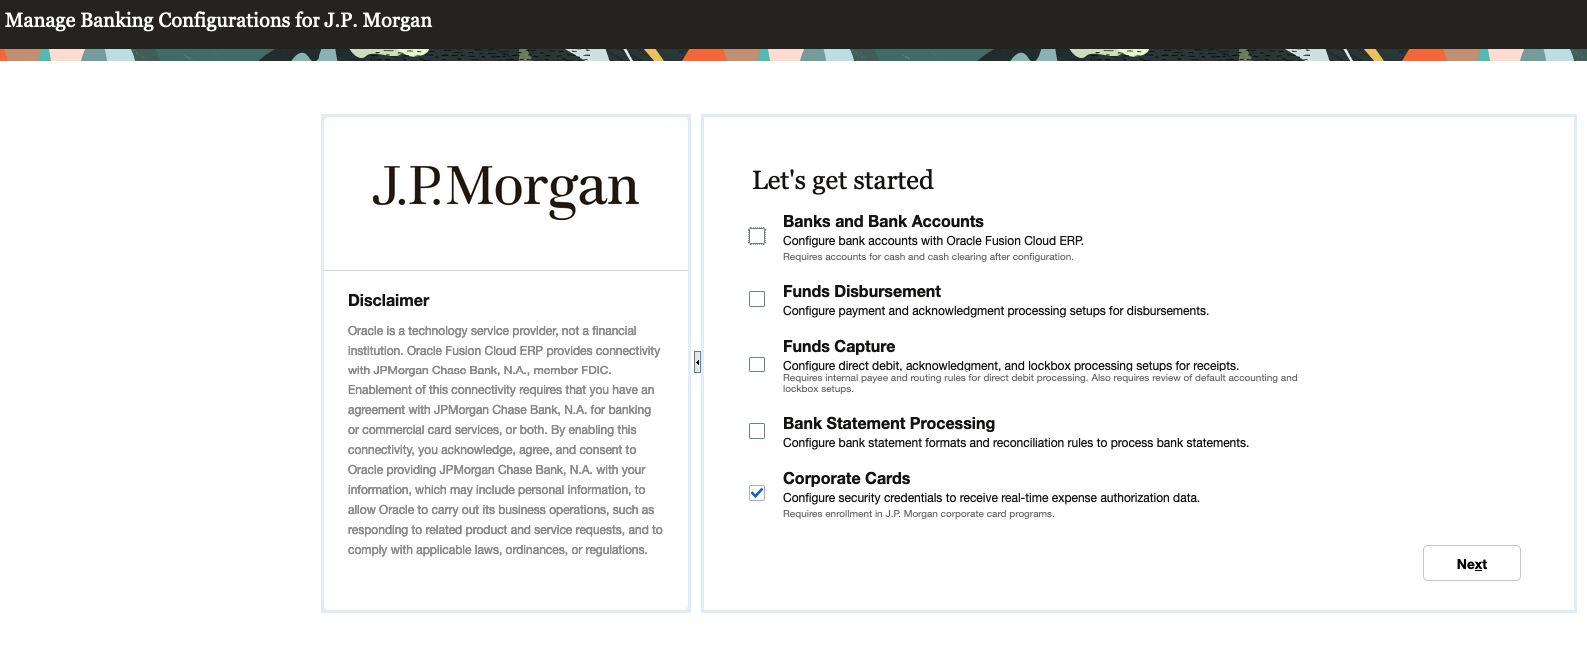
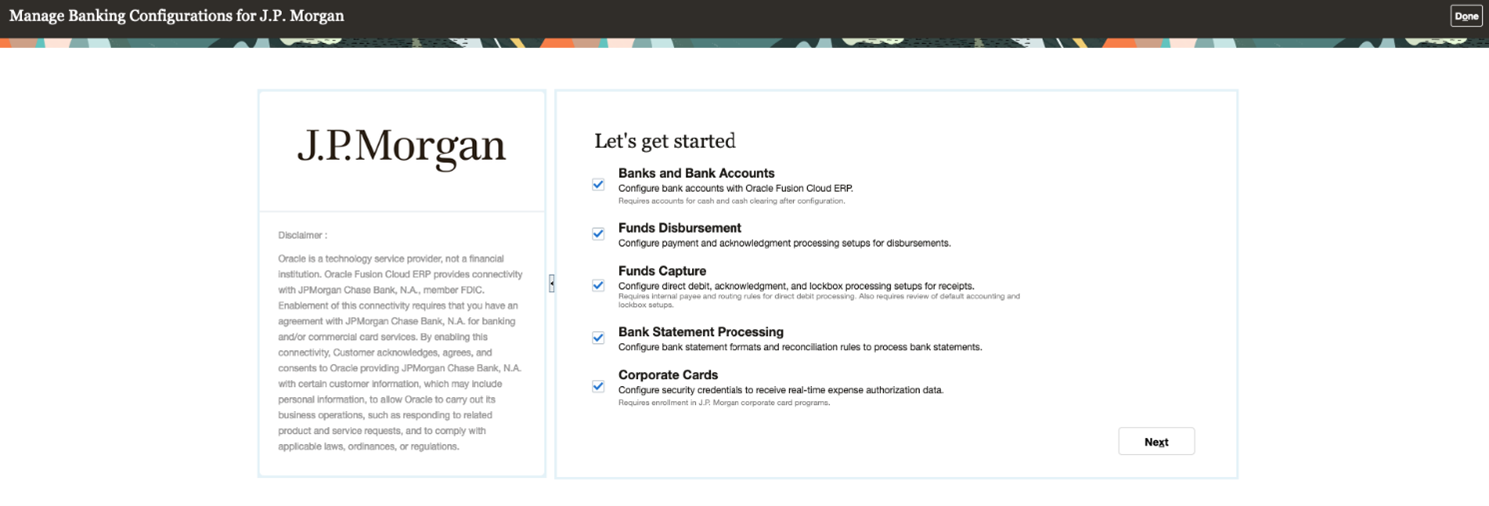
- In the Banking Configurations functional area, click Manage Banking Configurations for J.P. Morgan.
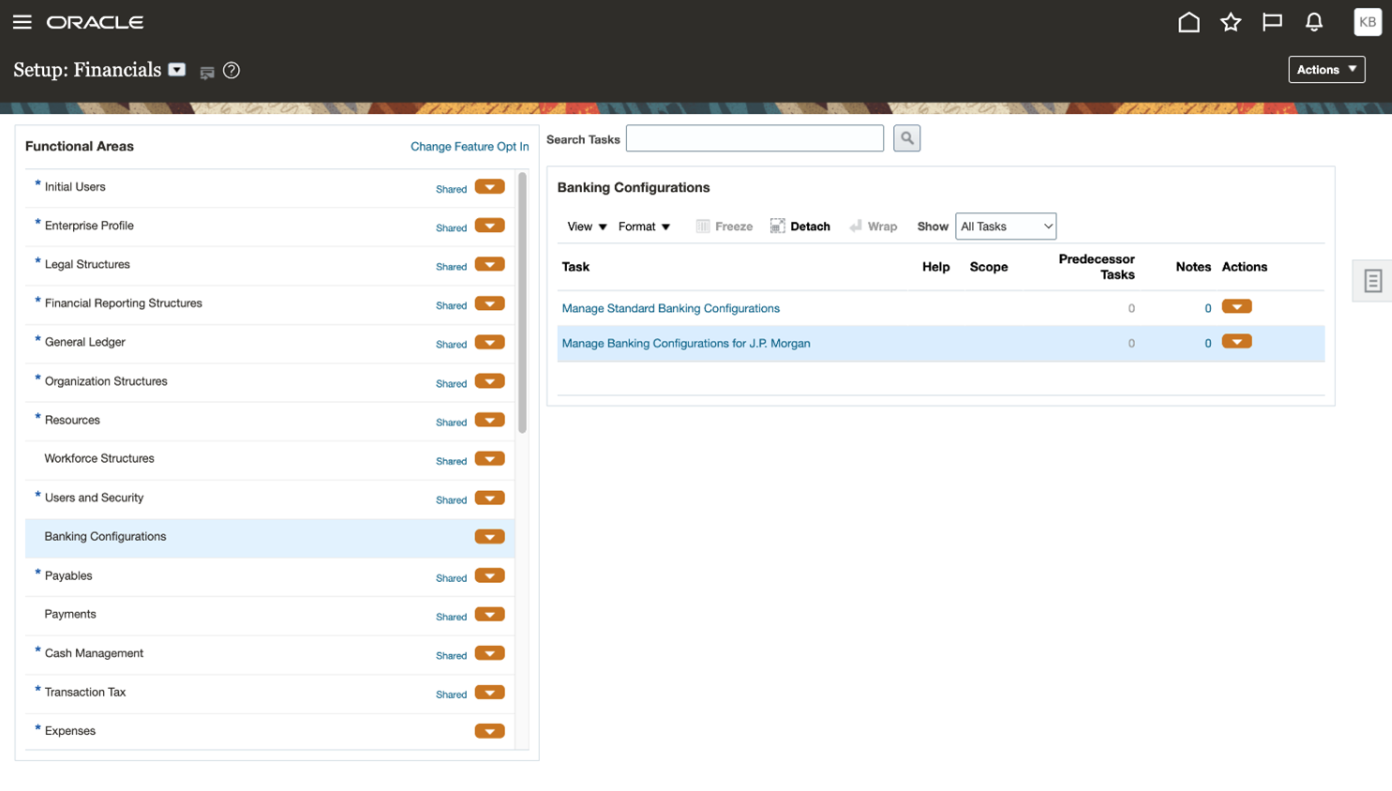
- The following page will be displayed. All services on this page are selected by default. To configure real-time integration for expenses, ensure that ‘Corporate Cards’ is selected, then click Next.
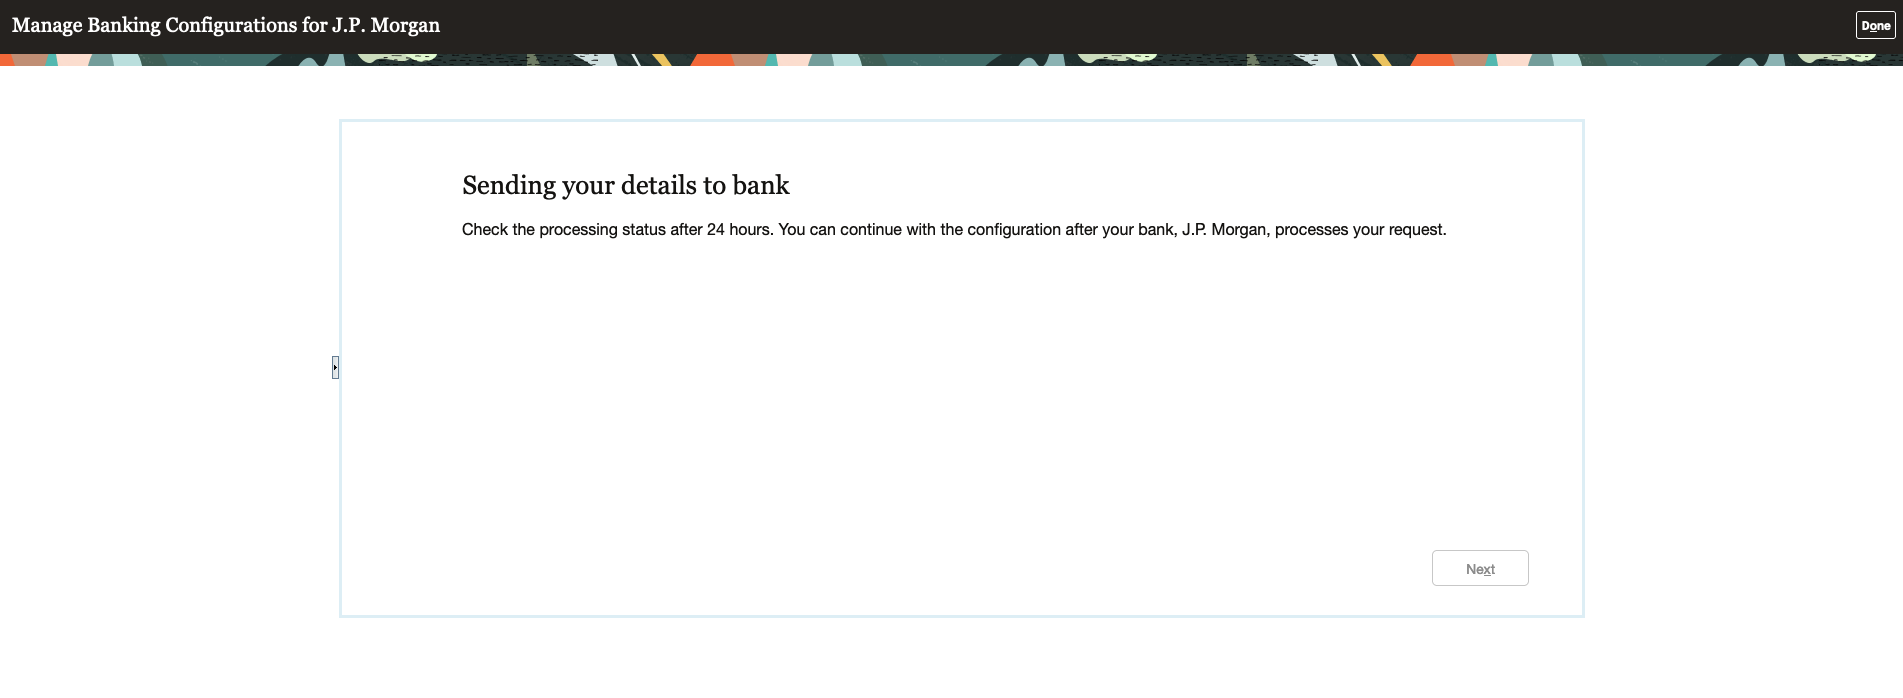
NOTE: Oracle Cloud ERP will directly connect and exchange security keys and other setup data with J.P. Morgan to enable the selected flows. This process may take up to 24 hours to complete.
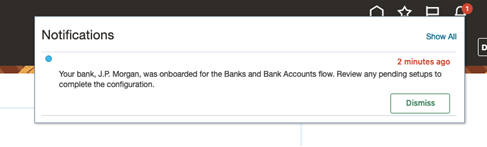
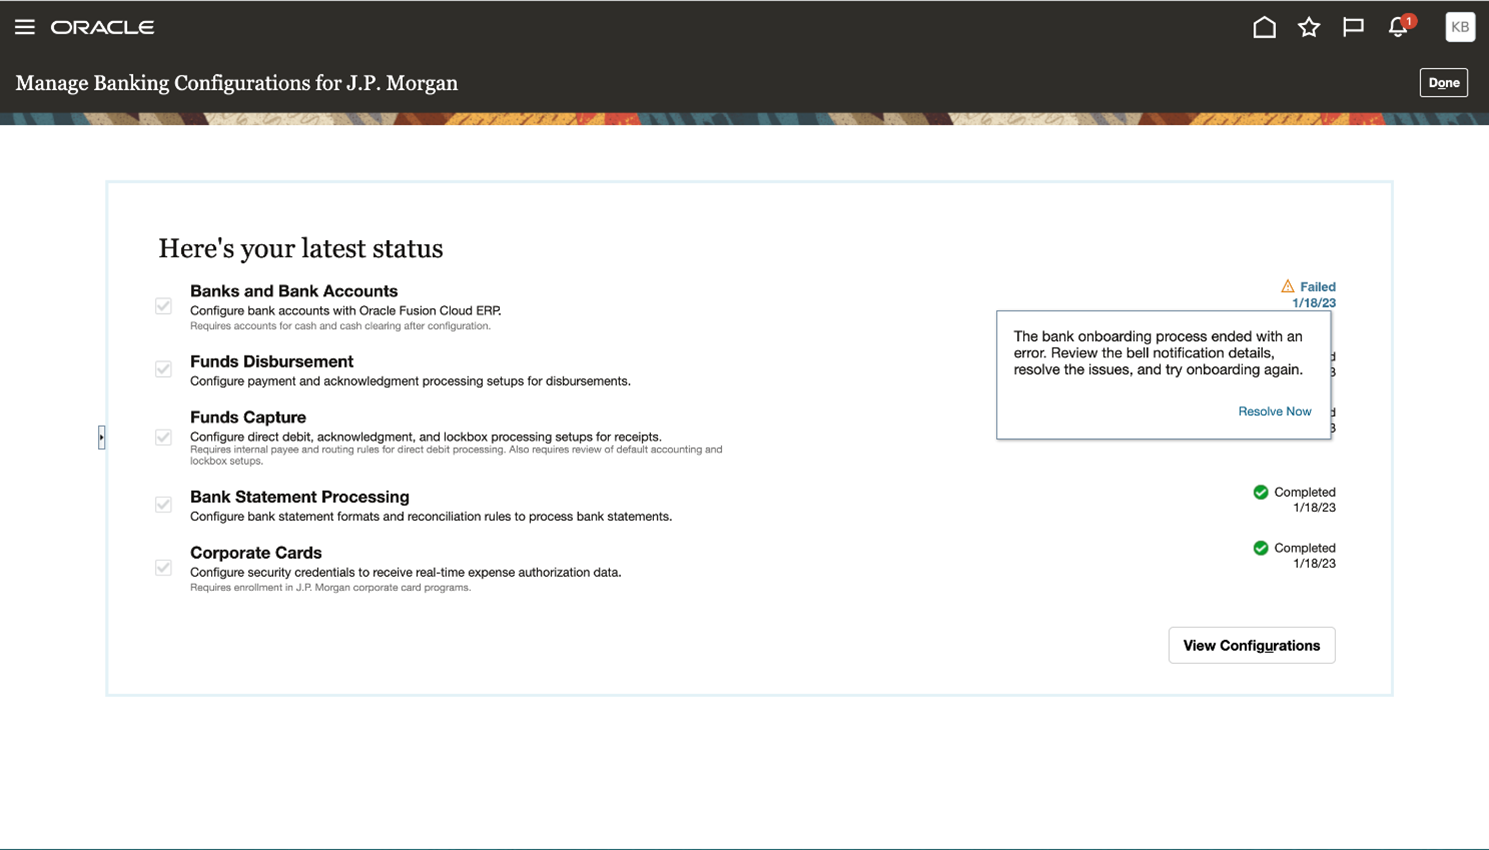
- Once the enablement is complete, you receive a bell notification. Revisit the J.P. Morgan onboarding setup task to view the latest status.
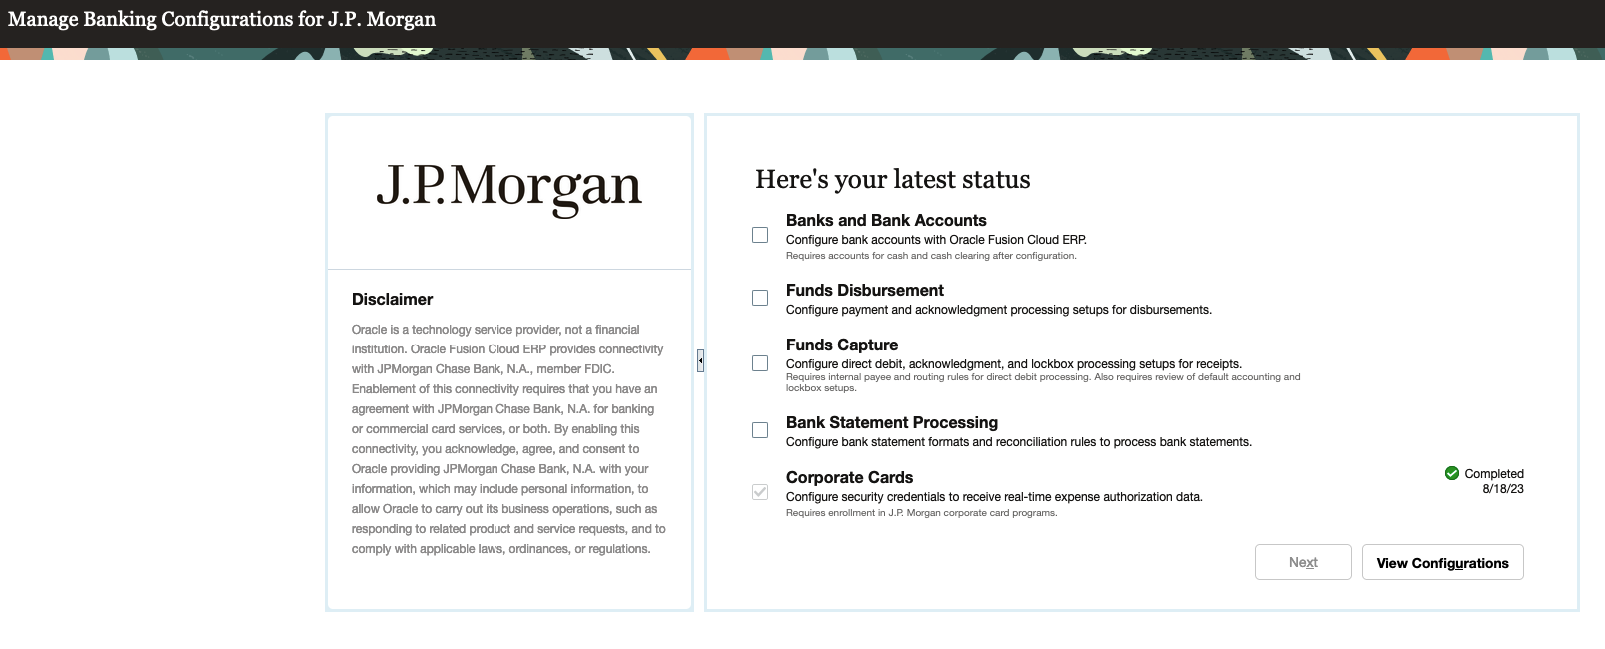
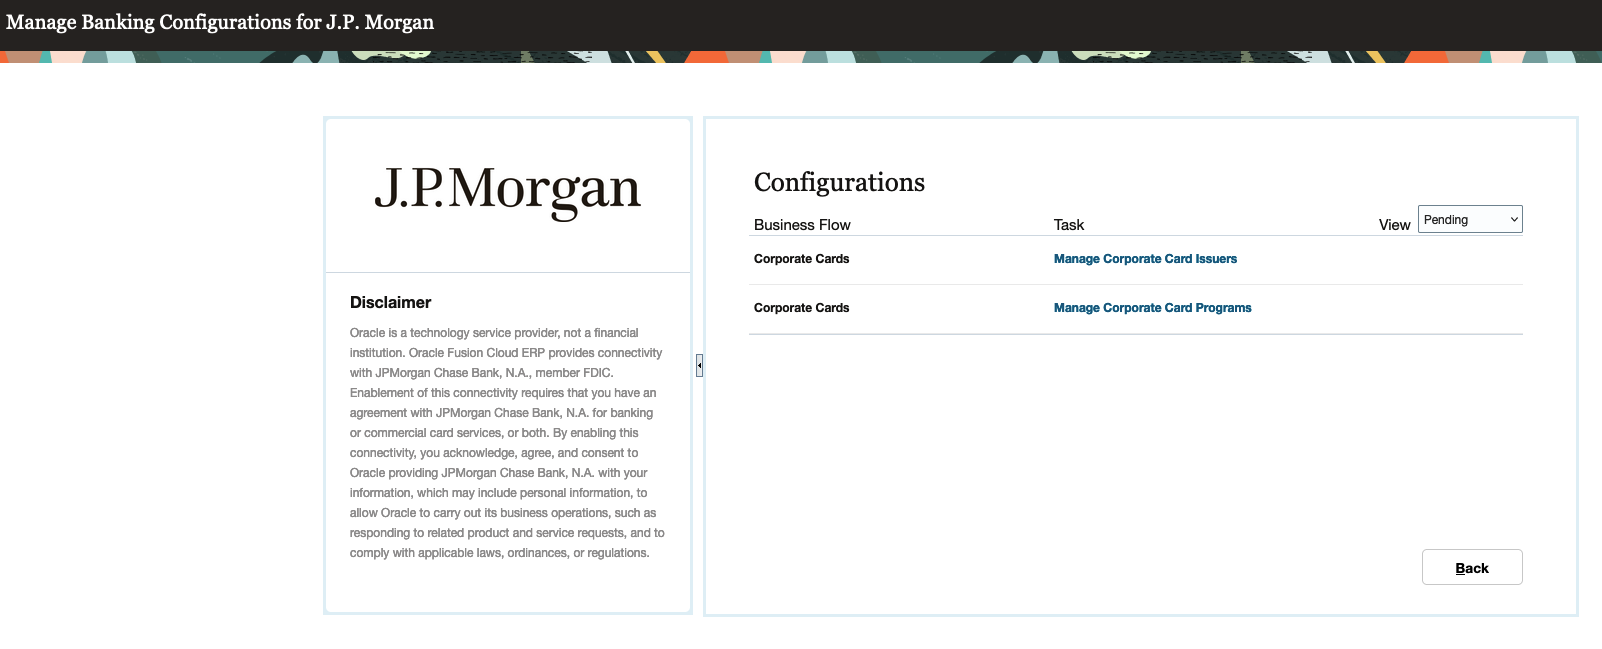
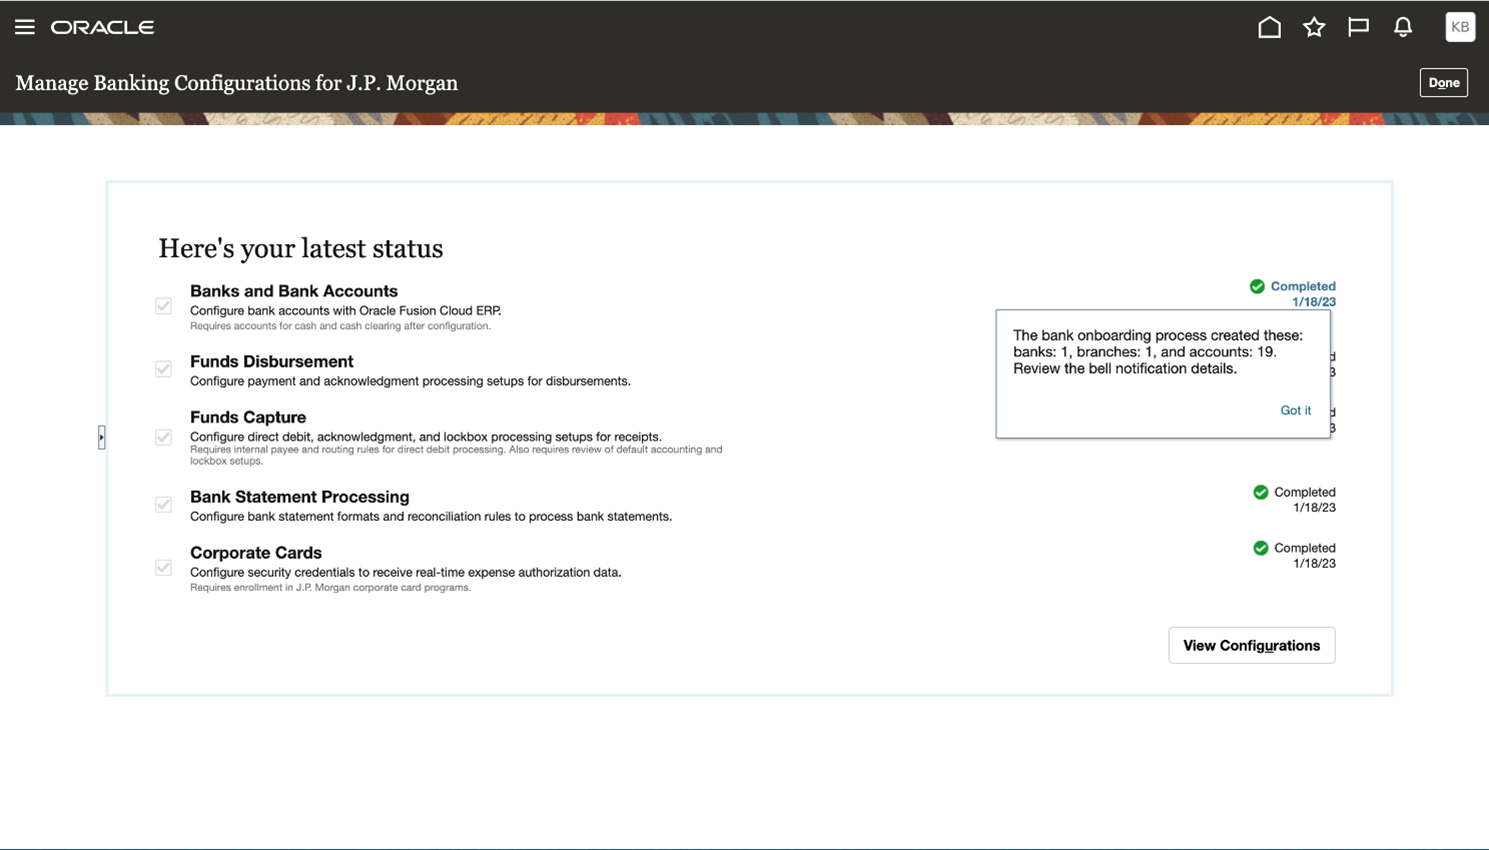
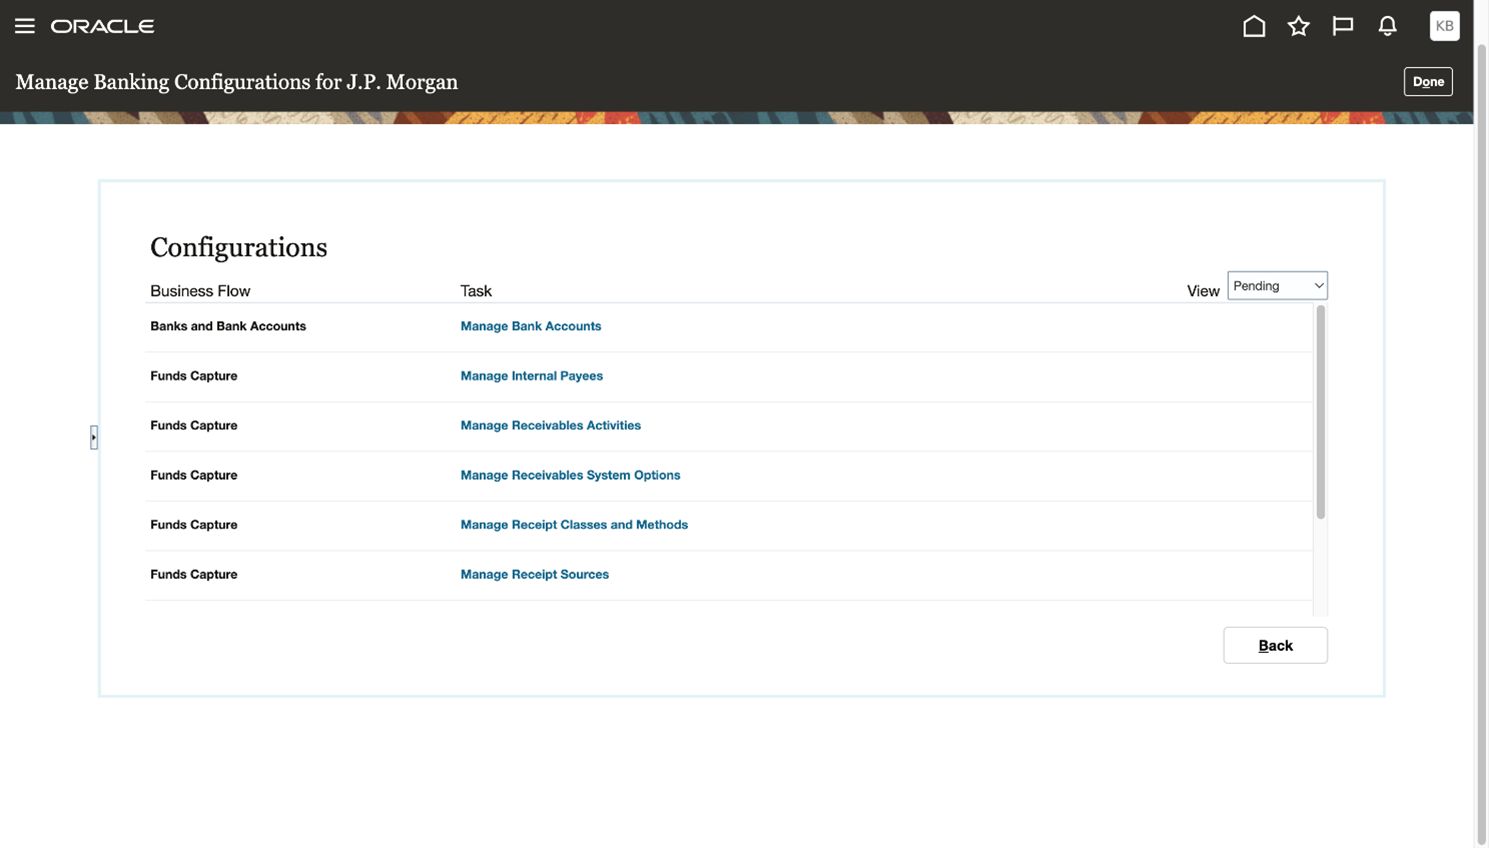
- Click ‘View Configurations’ to review and complete any pending setups. The descriptions under the flows will guide you through the pending setups to be reviewed and completed.
Tips And Considerations
- Touchless Expenses is enabled at the business unit level and can be turned on for specific users. It is possible to have some users on Touchless Expenses and other users on the existing Oracle expenses application.
- If your company uses the delegation functionality, both the delegator and delegate must be on Touchless Expenses to continue using delegation.
- The following functionality is not yet supported in Touchless Expenses: per diem, projects, cash advances, spend authorization, split allocation, trip itineraries, daily/monthly/yearly rate policies, and full key flexfield support.
Access Requirements
You must have the Financial Application Administrator job role to establish connectivity with J.P. Morgan and to review all related predefined and automatically configured Functional Setup Manager tasks.
Payables
Automated Distribution Creation Using a Transaction Account Definition
Use a transaction account definition to simplify invoice account defaulting. Configure a set of rules in Transaction Account Builder to derive an account combination based on designated attributes.
A transaction account definition eliminates these manual activities:
- Providing the account combination during invoice creation process
- Providing account combination details through the account coding workflow process
- Reviewing the account combination details during the invoice approval workflow process.
When invoices are created through the Payables Invoice Import process or when invoices are validated either online or through Validate Payables Invoice process, transaction account definition automatically derives the account combination for invoice lines. Alternatively, you can manually select the required invoice lines and initiate the account derivation from the Create Invoice page.
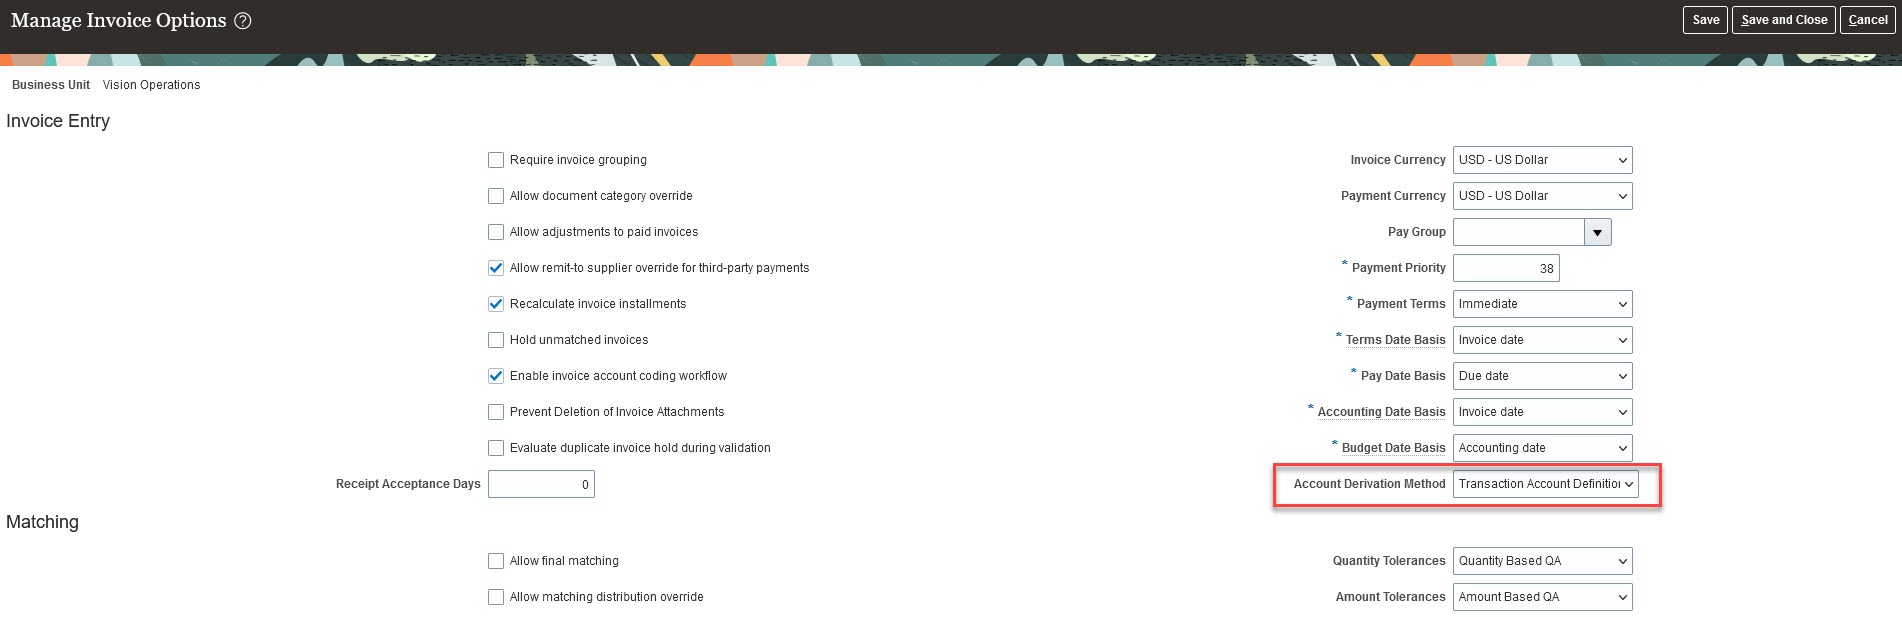
Account combination is derived on Payable’s invoice lines when the following conditions are satisfied.
- Account derivation through Transaction Account Definition is enabled in Manage Invoice Options setup.
- Invoice type is of Standard, Debit Memo, and Credit Memo. Not applicable for Payment Request, and Prepayment.
- Invoice line type is item, freight or miscellaneous.
- Invoice line is not matched to purchase order.
- Distributions are not yet generated for the invoice line.
- Invoice line is not cancelled, and it does not have account combination or distribution set either provided by the user or defaulted from any other setups.
- Invoice is not in incomplete status.
Business benefits include:
- Increased productivity by saving effort spent on manual derivation of expense account combination.
- Reduced errors from automating several steps in deriving account combination.
Steps to Enable
- Create necessary account rules in Subledger Accounting module and assign it to a Transaction Account Definition. See Configuring Subledger Accounting for TAD in Oracle Help Center.
- Assign the Transaction Account Definition to the Ledger.
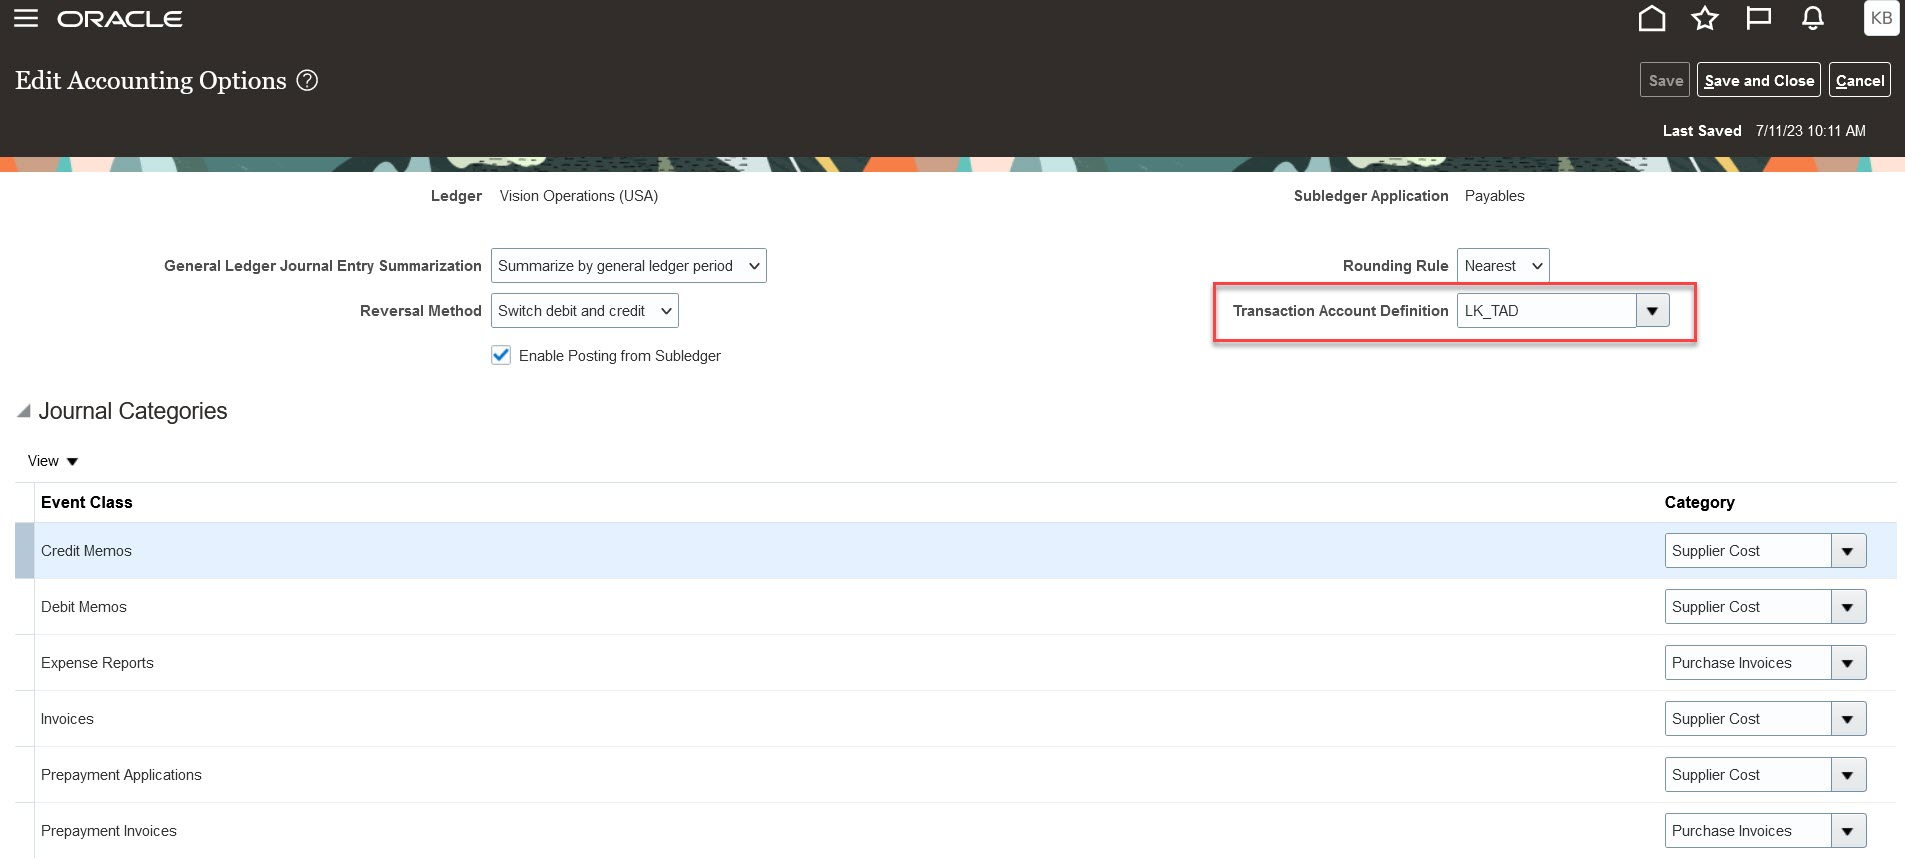
- Enable Transaction Account Definition-based account derivation in Manage Invoice options setup for Payables.
Tips And Considerations
The following flows are not impacted by this feature:
- Derivation of expense account combination for Invoice types of Payment Request and Prepayment.
- Payment request will continue to derive the account combination from the source product that creates the document.
- For Prepayment invoices, the advance paid account combination will continue to default from the Payables Options.
- Transaction account definition-based derivation is not supported for following account combination.
- Invoice liability account. It will continue to default from supplier site configuration.
- Multiperiod accrual account. You will continue to enter the account manually.
- Nonrecoverable tax and recoverable tax account. It will continue to default from the tax configuration.
- Invoice distribution level account derivation through transaction account definition. Invoice distributions shall continue to use the account combination on invoice lines as the default value. You can manually enter the values on the distributions or override the account defaulted from the invoice line.
- Account combination for lines matched to purchase order are derived from the purchase order.
Key Resources
For more details, refer to:
- Transaction Account Definition for Payables (Doc ID 2976588.1)
- Overview of Transaction Account Definition in the Using Payables Invoice to Pay guide on Oracle Help Center
- Configuring Subledger Accounting for TAD in the Implementing Payables Invoice to Pay guide on Oracle Help Center
Access Requirements
Users who are assigned these Payables job roles can access this feature.
- Accounts Payable Invoice Supervisor
- Accounts Payable Supervisor
- Accounts Payable Manager
Business Calendar for Payment Processing Requests
Provide a business calendar on the Payment Process Request template (for scheduling) to exclude processing payments on holidays. The Payment Process Request (PPR) system will skip weekends and holidays when calculating pay-through days and the payment date.
Payment processing takes place on the requested execution date. If the requested execution date falls on a weekend or holiday, some banks reject the payment files and can generate additional charges to the payers.
You can use the GL Transaction Calendar with Payment Process Requests using Payment Process Request template. Set up country-specific calendars in General Ledger, and select the calendar you need in the Payment Process Request template. During payment processing, the calendar skips Pay-Through Dates and Payment Dates that fall on weekends and holidays and rolls forward to the next available date.
This table describes the process of deriving new Pay-Through and Payment Dates:

Business benefits include:
- Process payments with fewer bank rejection.
- Improve the creditworthiness of payers.
- Avoid late payment charges.
Steps to Enable
To enable the feature:
-
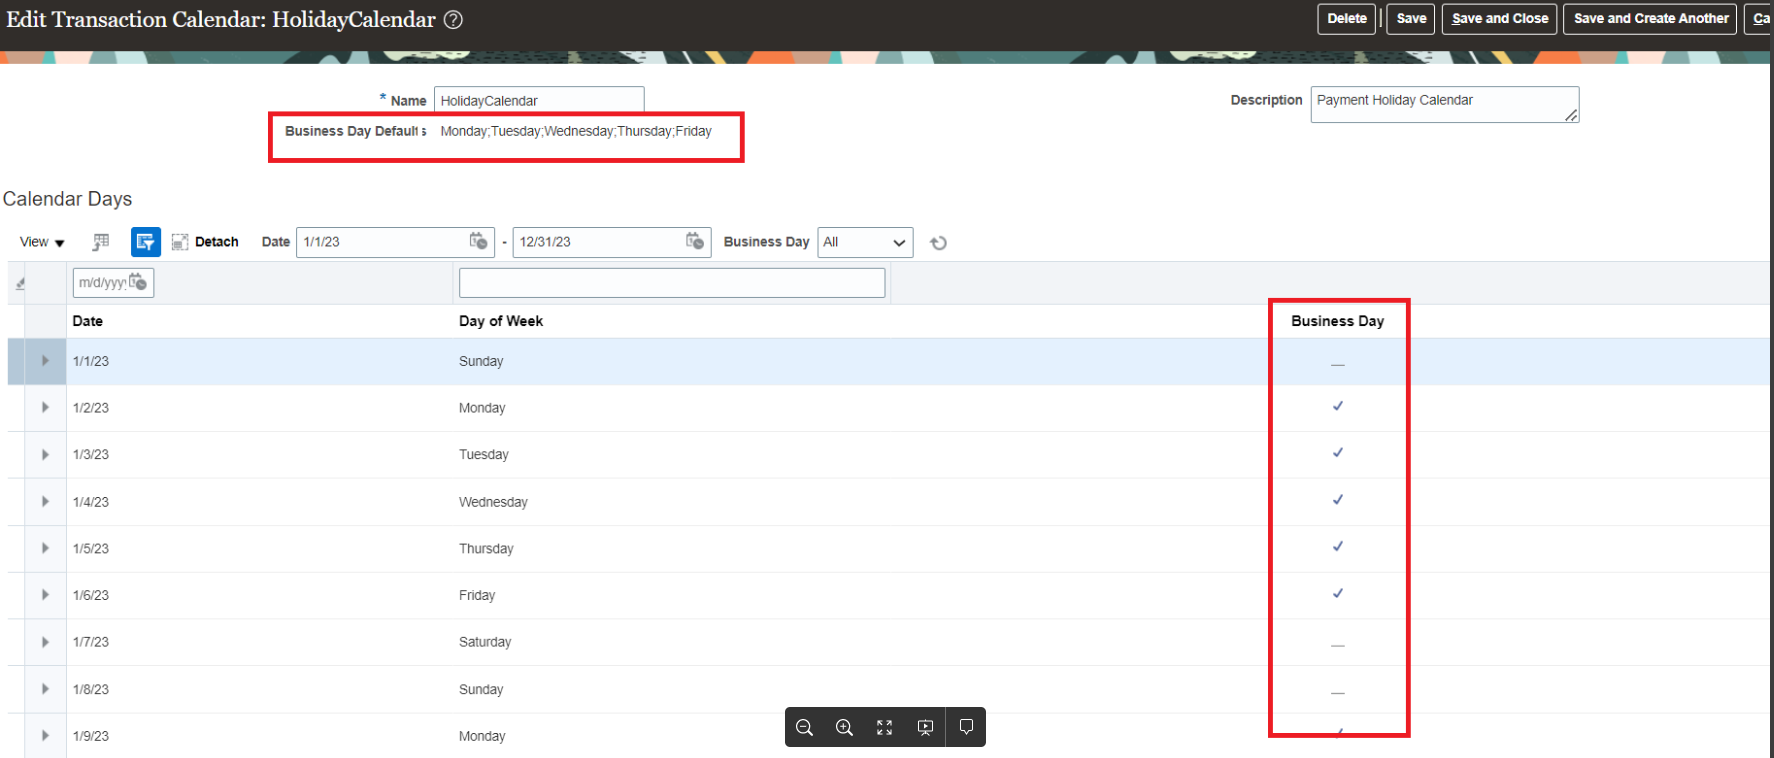
Define a transaction calendar in General Ledger with the business days that apply to the country-specific calendar.
Navigation: Financials-> General Ledger--> Manage Transaction Calendar
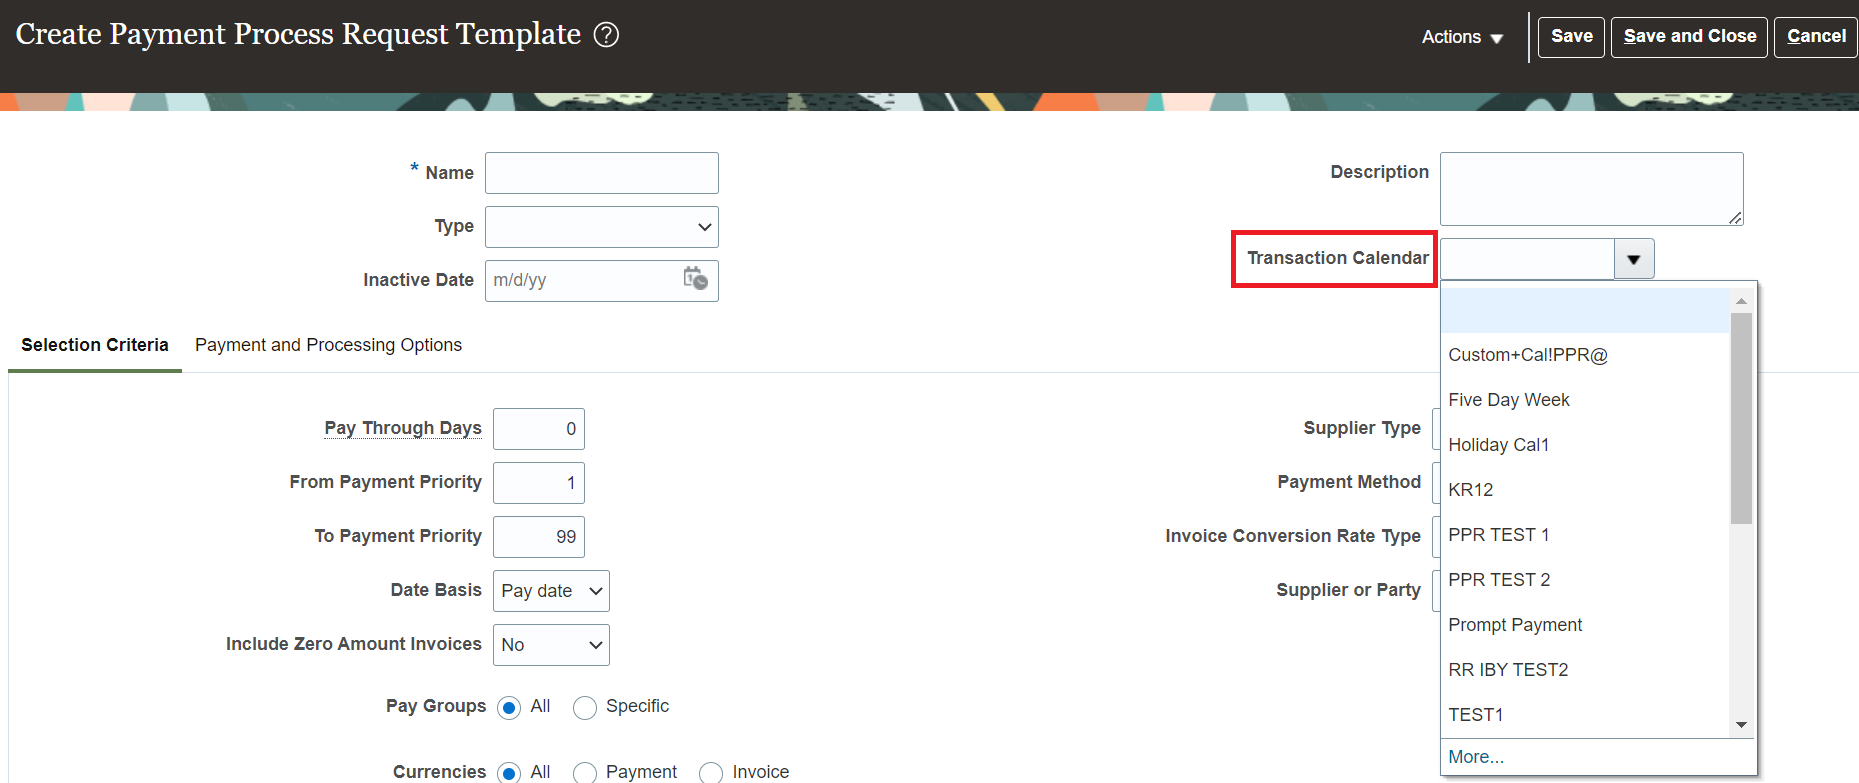
- Select the Transaction Calendar you defined in General Ledger in the Payment Process Request Template. Payment processing requests that use this template will derive the Payment Date and Pay-Through Date based on the business days defined in the Transaction Calendar.
Tips And Considerations
- Once the business calendar is selected on the PPR template, the derived payment date might be different from how it used to be calculated earlier. This might impact the discount, penalty/interest and withholding tax calculations. While selecting the Business calendar, the user must be well informed on these impact and proceed accordingly.
- For Brazil invoices, if a PPR batch is submitted using the PPR Template having the Transaction calendar, the system will evaluate the Brazil related invoices and reject those invoices with a specific reason code. This feature is not applicable for Brazilian installments. Customers will need to submit the Brazil invoices through a separate PPR template(based on BU context) or a separate PPR batch without attaching the Transaction Calendar in it.
Key Resources
- For information on Pay through date and payment date, refer to the "Pay Through Dates and Payment Dates in Payment Process Requests" in Oracle Help Center.
-
Based on Idea 653573 from the Payables, Payments & Cash Management Idea Lab on Oracle Cloud Customer Connect.
Embedded Banking Services with J.P. Morgan
Embedded banking services with J.P. Morgan provides businesses with a comprehensive view of their financial position to operate their day-to-day business finance effectively.
The solution provides integrated banking and payment services enabled from turnkey connectivity between Cloud ERP and J.P. Morgan Payments for U.S. and Canada customers. It includes synchronization of all bank account master data, the requisite setup needed to automate funds capture/disbursement, and continuous bank statement retrieval, processing, and reconciliation.
The integration also provides a seamless onboarding experience by automatically configuring connectivity and importing bank account master data.
The Banking Configurations functional area supports enablement of the following business flows:
- Banks and Bank Accounts: Configure security credentials and your J.P. Morgan bank, bank branches, and bank accounts automatically with Oracle Cloud ERP.
- Funds Disbursement: Configure payment and acknowledgment processing setups for disbursements. Process disbursements seamlessly with J.P. Morgan.
- Funds Capture: Configure direct debit, acknowledgment and lockbox processing setups for receipts. Process receipts and lockbox seamlessly with J.P. Morgan.
- Bank Statement Processing: Configure bank statement formats and reconciliation setups, and quickly process and reconcile J.P. Morgan bank statements.
Connectivity and Bank and Bank Accounts
Manage banks, bank branches, and bank accounts using the integration with J.P. Morgan. This maximizes efficiency and eliminates time-consuming activities through automated maintenance of bank accounts and related reconciliation configurations. The turnkey bank onboarding uses a J.P. Morgan-specific template to generate the banks, bank branches, and bank accounts.
Through the integration, the onboarding process automatically retrieves the template from J.P. Morgan's secured SFTP location and creates the bank master data. Once the bank accounts are created, the process automatically attaches the business functions and business units, reconciliation configurations, and bank statement transaction creation rules needed for payables and receivables processing. Users can review the onboarded bank accounts from the bell notifications.
Funds Disbursement
Process payment and acknowledgment files for funds disbursement using the integration with J.P. Morgan. Customers can generate and transmit payment files in the J.P. Morgan preferred format and retrieve and process disbursement acknowledgment files.
The integration uses the J.P. Morgan message format based on ISO20022 CGI standards. This format includes payment by ACH, Wire, and check for the US and Canada. The integration provides the acknowledgment processing feature with complete automation for file retrieval and processing. It processes L0, L1 and L2 acknowledgment files generated by J.P. Morgan at various points in the clearing flow. The invoice status changes from Paid to Unpaid for rejected payments, allowing users to take corrective action. Users receive bell notifications indicating the successful completion or failure of the payment batch and acknowledgment processing.
Funds Capture - Direct Debit Processing
Process direct debit settlement batch and acknowledgment files using the integration with J.P. Morgan. Customers can generate and transmit direct debit settlement batch files in the J.P. Morgan preferred format and retrieve and process direct debit disbursement acknowledgment files.
The integration uses the J.P. Morgan message format based on ISO20022 CGI standards. This format includes ACH direct debits for the US and Canada. The integration provides the acknowledgement processing feature with complete automation for retrieval and processing of bank acknowledgment files. It processes L0, L1, and L2 acknowledgment files generated by J.P. Morgan at various points in the clearing flow. The receipt status changes from Remitted to Confirmed for rejected settlements, allowing users to take corrective action in Receivables. See How Receipts are Reversed for more information. Users receive bell notifications indicating the successful completion or failure of settlement batch and acknowledgment processing.
Funds Capture - Lockbox
Process intraday lockbox using the integration with J.P. Morgan to enable near real-time customer balances. J.P. Morgan can provide a remittance service that includes payment advice processing and remittance advice collection from emails and Excel files. Payment advice and remittance information are collated and combined with the lockbox file, eliminating the need for manual entry and application.
Bank Statement Processing
Process and reconcile bank statements using the automated integration with J.P. Morgan. This maximizes efficiency and eliminates time-consuming activities through automatic bank statement processing and reconciliation.
The integration uses the J.P. Morgan CAMT053 bank statement template, based on ISO20022 standards. The use of this template enables seamless bank statement file retrieval and processing. Features include:
- Regular retrieval and processing of prior day bank statements.
- Automatic creation of new bank statement transaction codes reported on bank statement lines.
- Automatic creation of bank statement transaction creation rules and reconciliation of bank statement lines.
- Automatic unreconciliation and voiding of rejected payments, and reconciliation of the original and rejected bank statement lines.
- Automatic reversal of rejected direct debit transactions and reconciliation of reversal bank statement lines.
- Automatic generation of bell notifications to confirm completion of the automatic reconciliation process, including reconciliation exceptions, if any.
BUSINESS BENEFITS
Connectivity
The integration between Oracle and J.P. Morgan eliminates weeks of technical integration work during implementation and enables transactional processing in Cloud ERP within hours by directly connecting with J.P. Morgan. Users have the flexibility to enable one or more flows.
- Reduced effort involved in initial connectivity, security keys configuration and future renewal of expired keys using the J.P. Morgan preconfigured connectivity.
- Reduced effort in troubleshooting connectivity issues related to outbound and inbound file transmissions.
- Significantly reduces the cost of doing business by reducing technical complexities in setups using ready-to-use integration with J.P. Morgan.
- Improves the customer experience with a unified and simplified UI, along with guided navigation.
Banks and Bank Accounts
The Banks and Bank Accounts flow reduces setup steps by automatically creating bank account master data that has been identified with J.P. Morgan. This flow can be used for initial and ongoing bank account creation.
Funds Disbursement
- Simplify the entire setup process with predefined setups needed to generate the payment files in accordance with J.P. Morgan's specifications.
- Reduce effort and increase productivity through automated retrieval and processing of multiple acknowledgment files generated at different intervals for payment files.
- Improve efficiency by reducing manual steps and enabling immediate corrective actions for rejected payments.
- Reduce effort related to payment file testing by using the J.P. Morgan preferred format.
Funds Capture - Direct Debit
- Reduce effort with simplified funds capture setup using the J.P. Morgan integration.
- Reduce effort and increase productivity through automated retrieval and processing of multiple acknowledgment files generated at different intervals for direct debit settlement files.
- Reduce effort related to testing direct debit processing by using the J.P. Morgan preferred format.
Funds Capture - Lockbox
- Improve efficiency by eliminating a material amount of manual processing.
- Improve ability to maintain real-time and accurate customer account balances.
- Reduce effort related to testing lockbox processing by using the J.P. Morgan preferred format.
Bank Statement Processing
- Eliminate manual configuration of J.P. Morgan-specific bank statement formats and other bank statement processing configurations through seamless integration.
- Automate retrieval and processing of bank statement files.
- Provide automatic reconciliation of bank statement lines and notification of exceptions, if any.
Steps to Enable
To enable this feature you need to log a Service Request (SR).
Connectivity
Prerequisite Steps
Before embedding banking services with J.P. Morgan in Cloud ERP, you must first work with a J.P. Morgan implementation team to establish the bank accounts and the related scope of the services you want to include. Please contact your J.P. Morgan Sales/Relationship manager.
The legal entity name(s) used by J.P. Morgan must match the legal entity name(s) in Cloud ERP.
If your enterprise is new to Oracle Fusion Cloud ERP and has not completed the implementation process, please review Getting Started with Your Financials Implementation before enabling the banking integration with J.P. Morgan.
Embedded banking services with J.P. Morgan is currently in controlled availability and requires a promotion code. To enable this feature you need to log a Service Request (SR) using Product: Oracle Fusion Payments Cloud Service and Problem Type: Setup and Configuration - Payables. You will need to provide the production and test pod names. Once the above is completed, follow the steps in the Service Request to enable embedded banking services with J.P. Morgan, including the following setup steps to enable the connectivity between J.P. Morgan and Cloud ERP.
- In the Banking Configurations functional area, click Manage Banking Configurations for J.P. Morgan.
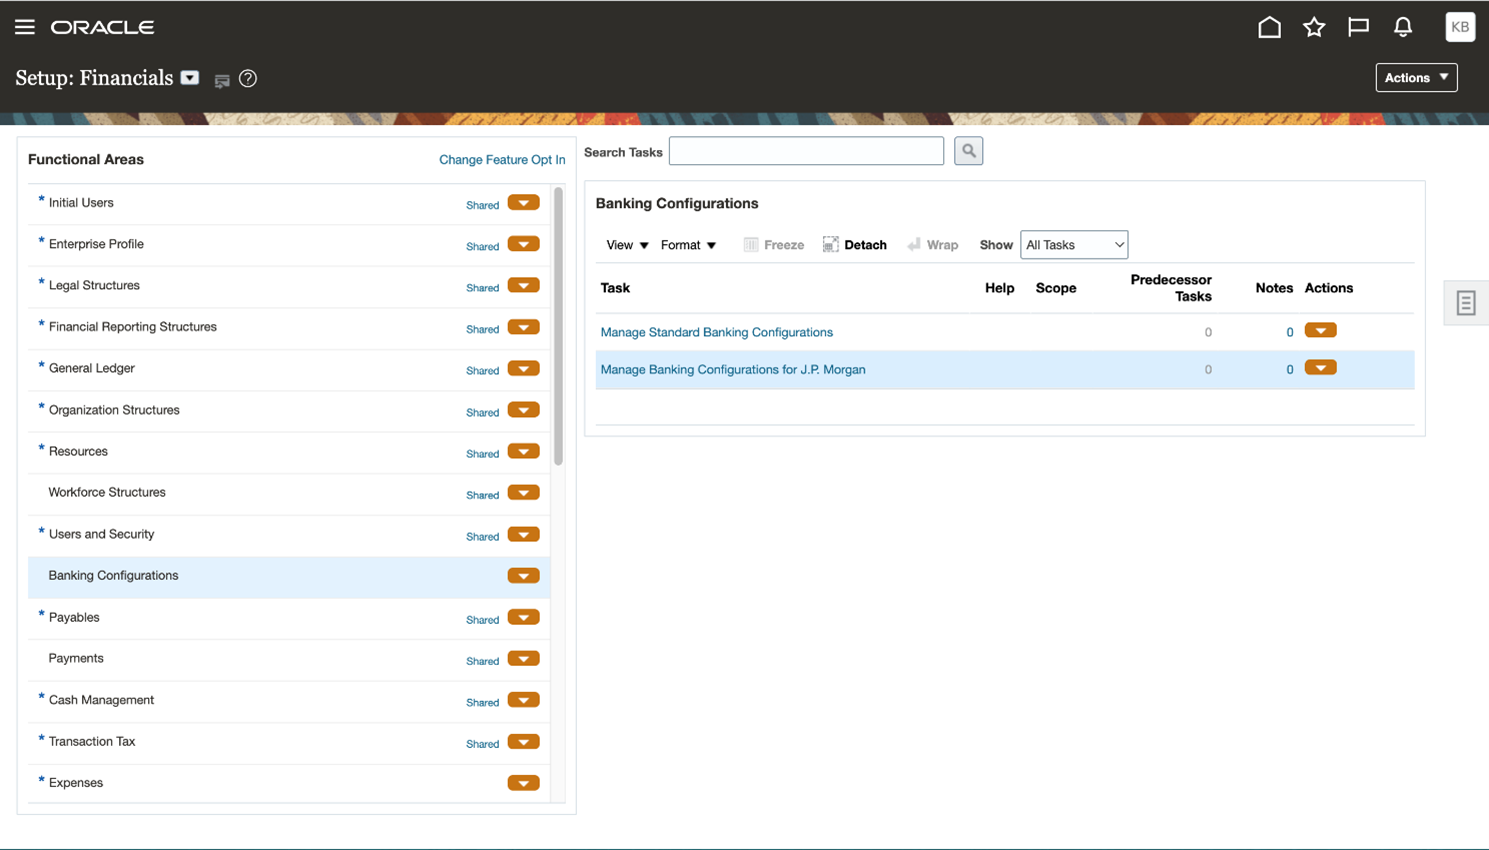
- Select the business flows that you want to enable and click Next.
NOTE: Oracle Cloud ERP will directly connect and exchange security keys and other setup data with J.P. Morgan to enable the selected flows. This process may take up to 24 hours to complete.
- Once the enablement of a business flow completes, you receive a bell notification. Revisit the J.P. Morgan onboarding setup task to view the latest status.
- Click View Configurations to review and complete any pending setups. The descriptions under the flows will guide you through the pending setups to be reviewed and completed.
If the enablement doesn't complete, you will see an error message on the Manage Banking Configurations for J.P. Morgan task page. You will also receive a bell notification with additional details about the configuration issue(s). After the issues are resolved, select the Resolve Now button on the dialog box.
Banks and Bank Accounts
All of your bank and bank account information is loaded as part of the connectivity step described above.
Funds Disbursement
This feature is automatically enabled after you onboard using the Manage Banking Configurations for J.P. Morgan task. This feature lets you use the following preconfigured setups:
- Payment System Account: JPM_PSA
- Payment Process Profile: JPM ISO20022 CGI
- Payment Method: JPM EFT Payment Method (for ACH and Wire payments)
- Payment Method: JPM Paper Payment Method (for check payments)
As part of the integration with J.P. Morgan, you can also create payment files using the predefined BIP template JPM ISO20022 CGI in the J.P. Morgan CGI format.
For outsourced check printing, J.P. Morgan supports assigning unique values to manage multiple check template designs or signature combinations. The values can be configured in the delivery channel code. J.P. Morgan also supports the inclusion of the 5-digit mailing instruction codes in the payment file. The mailing instruction codes can be configured as delivery channel alias values. If the alias value is blank, then it is populated with ‘00000’ to indicate delivery of the printed check by regular post.
Before you can use the acknowledgment flow, you must review the following settings at the payment system account level.
- Disbursement Acknowledgment Automatic Voiding Option
- Disbursement Acknowledgment Voiding Invoice Action
- Email Disbursement Acknowledgment Details
Funds Capture - Direct Debit
This feature is automatically enabled after you onboard using Manage Banking Configurations for J.P. Morgan task. This feature lets you use the following preconfigured setups:
- Payment System: JPM Payment System
- Payment System Account: JPM_PSA
- Funds Capture Process Profile: JPM ISO20022 Direct Debits
You must ensure the following:
- Use the preconfigured setups for your funds capture transactions.
- Configure the routing rules in the internal payee setup.
Funds Capture – Lockbox
This feature is automatically enabled after you onboard using the Manage Banking Configurations for J.P. Morgan task. This feature includes the following preconfigured setups:
- AutoMatch Rule Set: ORA_Automatch 90%
- AutoCash Rule Set: ORA_Invoice Match
- Receivables Activities: ORA_Unearned Discount and ORA_Earned Discount
- Receipt Class and Method: ORA_LOCKBOX
- Receipt Sources
Use the following setup steps to enable Lockbox processing:
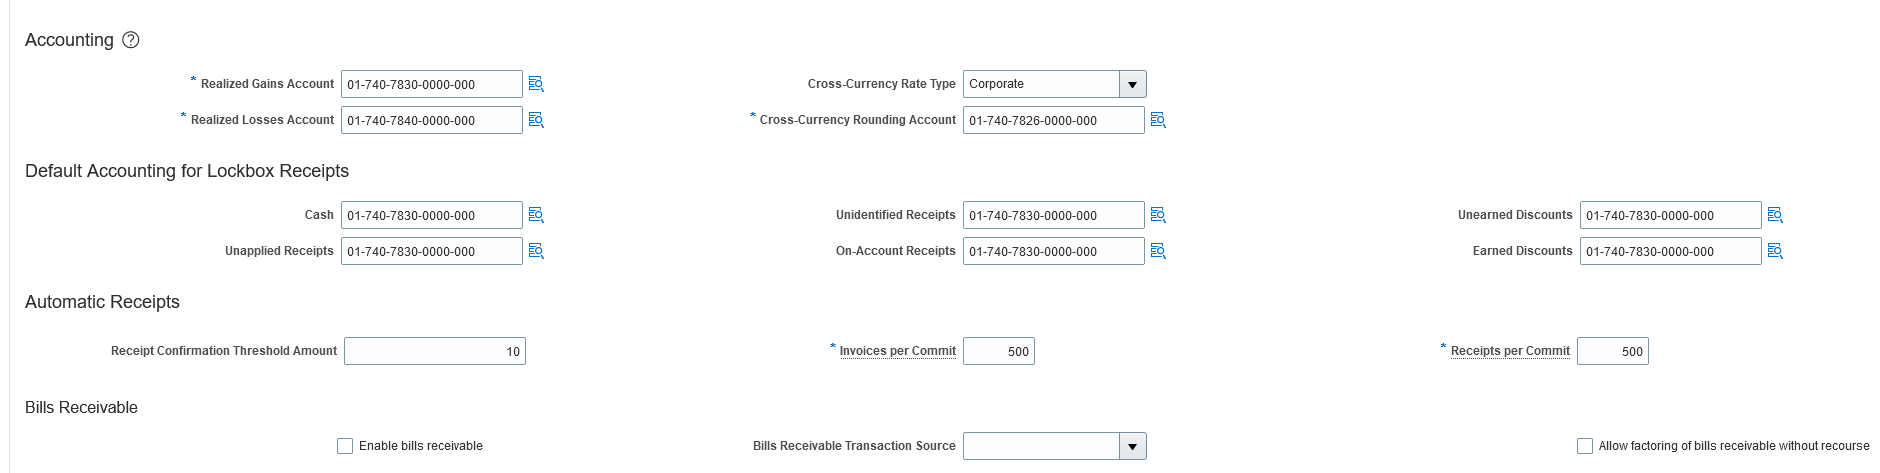
- If lockbox processing is in scope for your funds capture flow, you must enter the required account code combinations in the specified fields of the Default Accounting for Lockbox Receipts section in the Cash Processing tabbed region of the Receivables System Options page for each applicable business unit. Entering this account information will automate the related lockbox setup during bank account onboarding. This is only required for a new lockbox setup.
- The lockbox feature includes a predefined AutoMatch Rule Set and AutoCash Rule Set. Enter these predefined rule sets either in the lockbox transmission or your Receivables System Options definition, as required. You also need to enable AutoApply in Receivables System Options and lockbox. See Tips and Considerations for more information about the predefined AutoMatch Rule Set and AutoCash Rule Set.
Task - Manage Receivables System Options
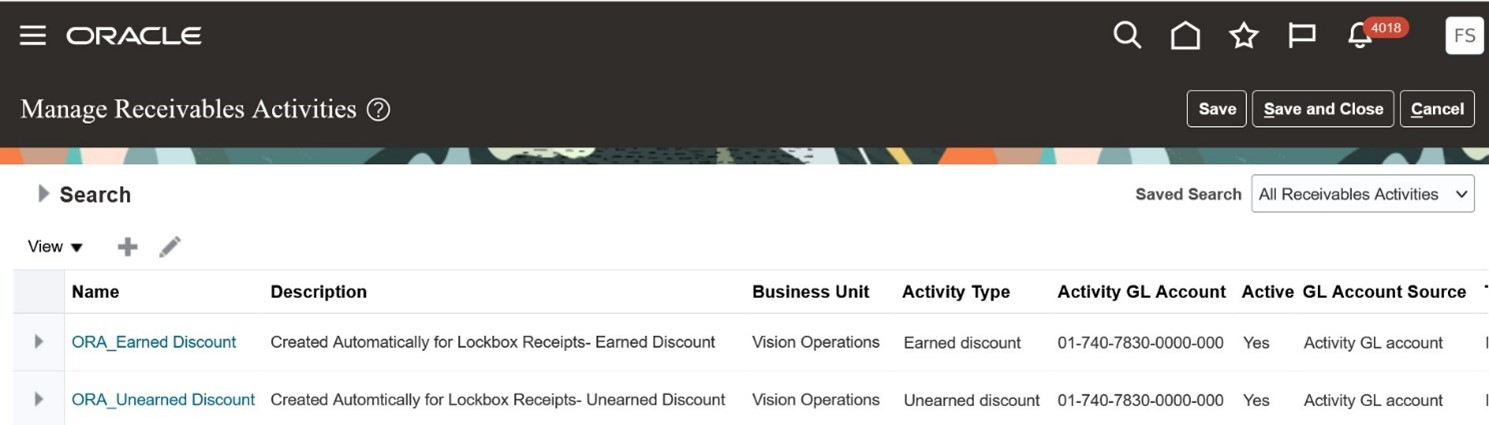
- After your bank accounts are onboarded, use the Manage Receivables Activities page to review the two Receivables Activities that were created for each business unit: Unearned Discounts (ORA_Unearned Discount) and Earned Discounts (ORA_Earned Discount).
Task - Manage Receivables Activities
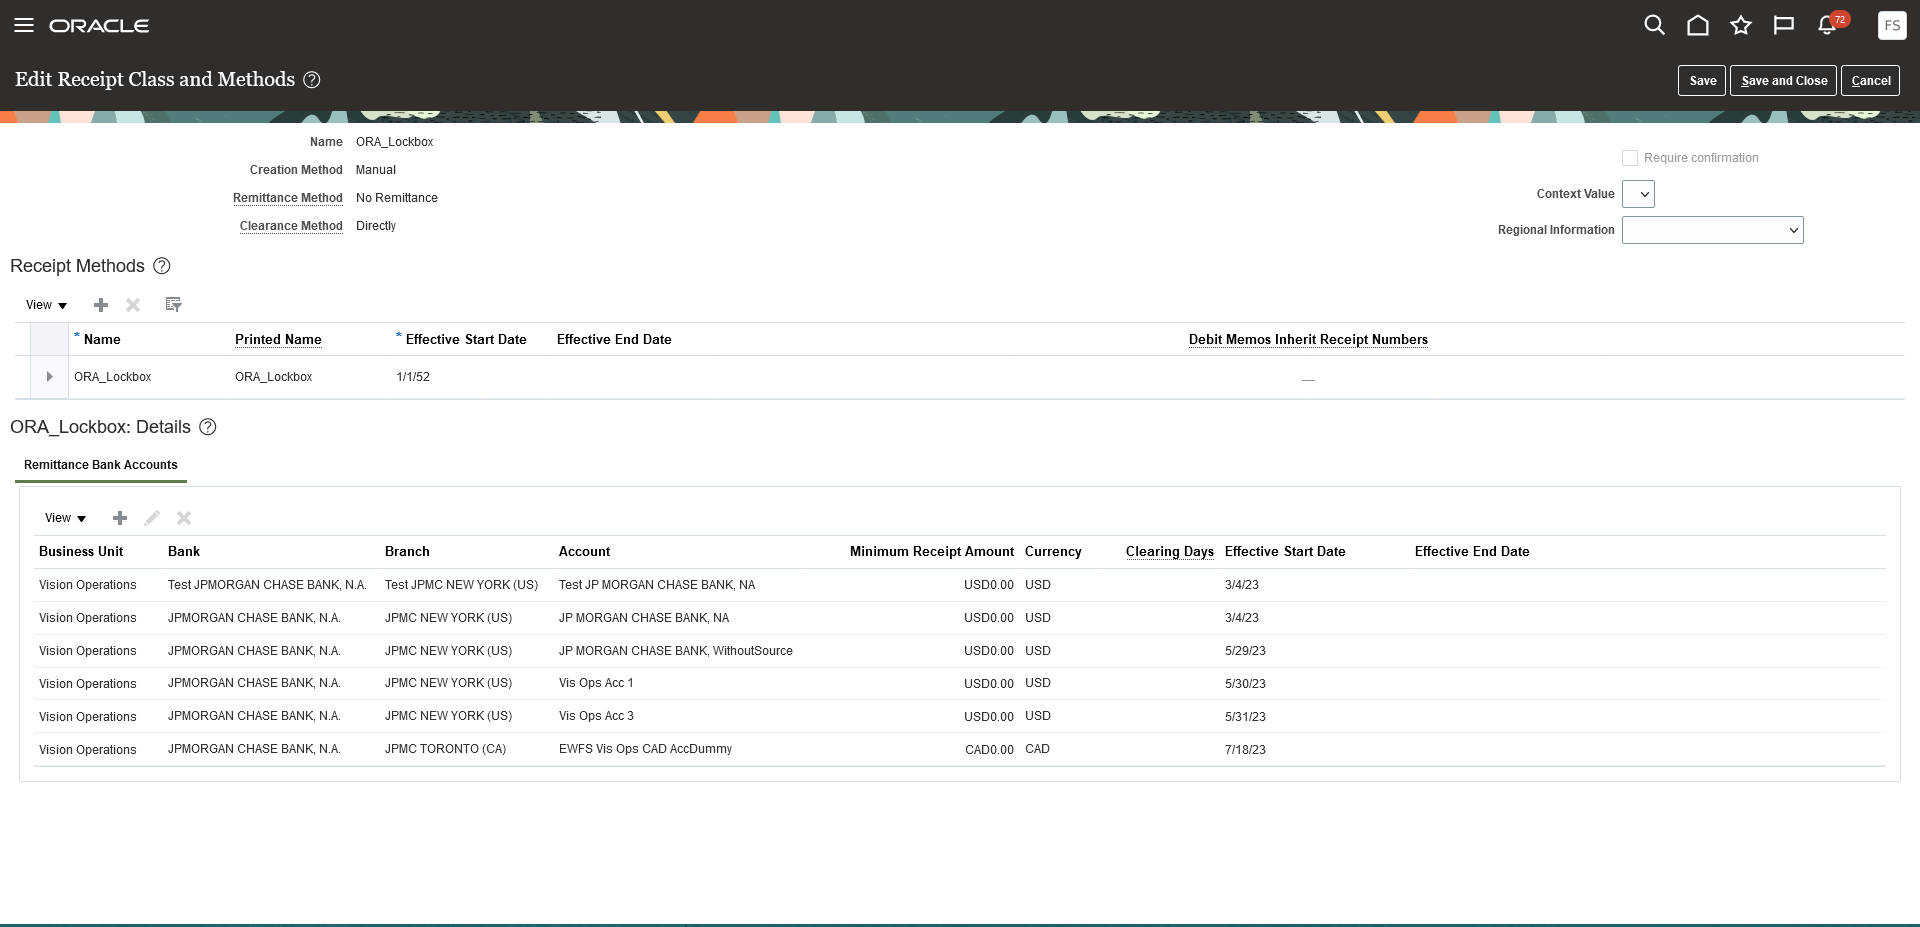
- Use the Edit Receipt Classes and Methods page to review the receipt method, ORA_Lockbox, created for lockbox processing. Remittance bank accounts are added to this receipt method according to your setup and the bank accounts onboarded.
Task - Manage Receipt Classes and Methods
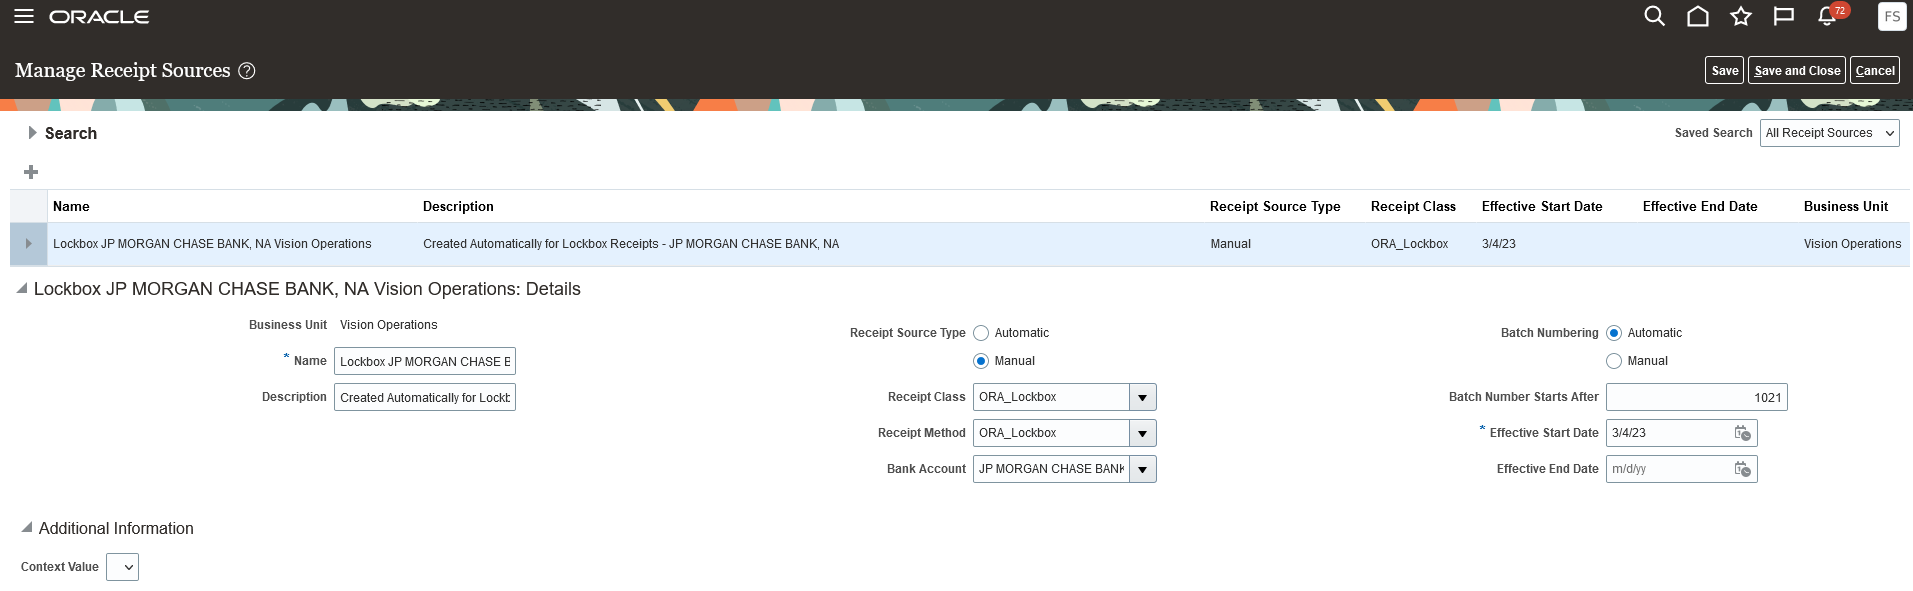
- Use the Manage Receipt Sources page to review the receipt sources created for lockbox processing. Receipt sources are created using the remittance bank account assignments in the ORA_Lockbox receipt method.
Task - Manage Receipt Sources
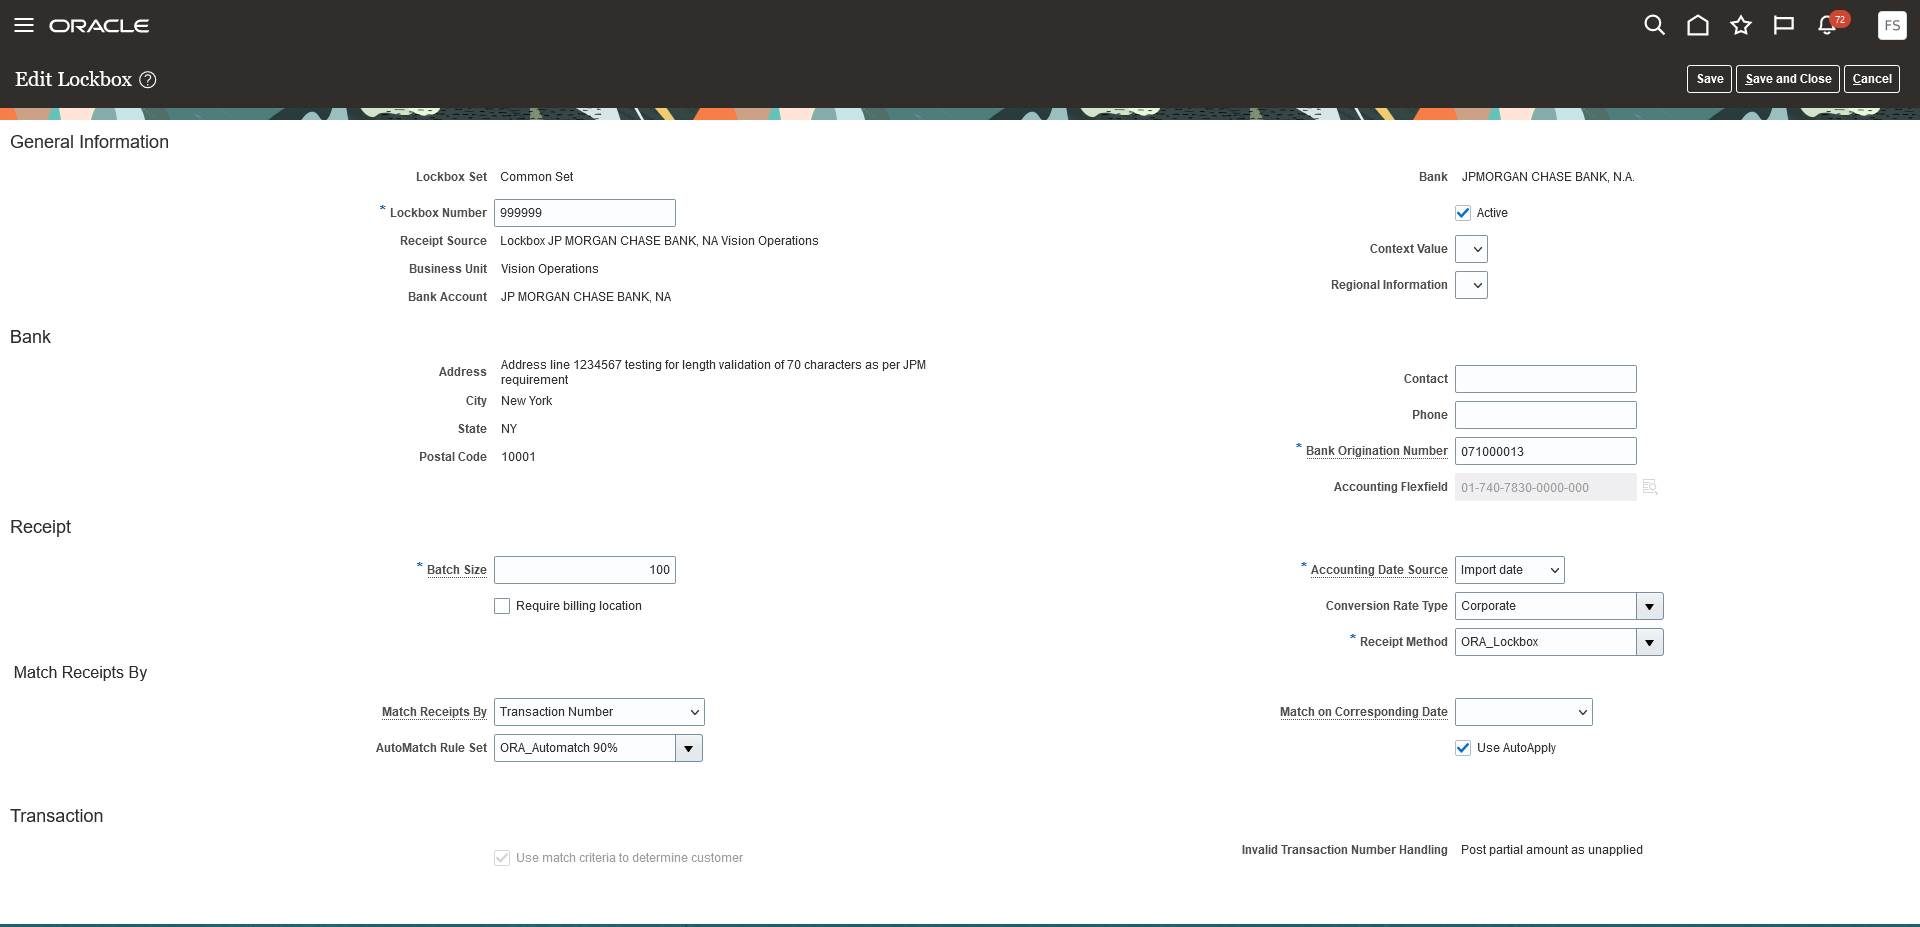
- After reviewing all the related lockbox setup as indicated in the previous steps, use the Create/Edit Lockbox page to manually configure a lockbox for your bank account using the receipt source, receipt method, and AutoMatch rule set provided.
Task - Manage Lockbox
NOTE: If document sequencing is enabled for the applicable Ledger or Legal Entity, the related receipt processing document sequencing is set up automatically.
Bank Statement Processing
This feature is automatically enabled after you onboard using the Manage Banking Configurations for J.P. Morgan task. This feature lets you use the following preconfigured setups:
- Manage Bank Statement Transaction Codes
- Manage Bank Statement Transaction Creation Rules
- Manage Bank Statement Reconciliation Tolerance Rules
- Manage Bank Statement Reconciliation Matching Rules
- Manage Bank Statement Reconciliation Rule Sets
- Manage Formats
- Manage Payment Systems
Tips And Considerations
Connectivity
- Read the descriptions mentioned under the business flows to understand any pending setups to be reviewed and completed for the flow to be enabled.
- The Banks and Bank Accounts business flow will be automatically selected for enablement when you enable the Funds Disbursement, Funds Capture, or Bank Statement Processing flows.
- In order to see the automated processes related to this integration, follow the MOS Note - How to View the Output of an ESS Jobs Submitted By Another User Based on Role? (Doc ID 1980772.1)
- In order to see Business Intelligence reports related to this integration, assign the BI Administrator role to any user who needs to view them.
- Bell notifications with detailed messages are generated as processing occurs. If the enablement of a business flow doesn't complete, you receive a bell notification. Revisit the J.P. Morgan onboarding setup task to retry the process after 24 hours. If the issue still persists, reach out to Oracle Support for assistance.
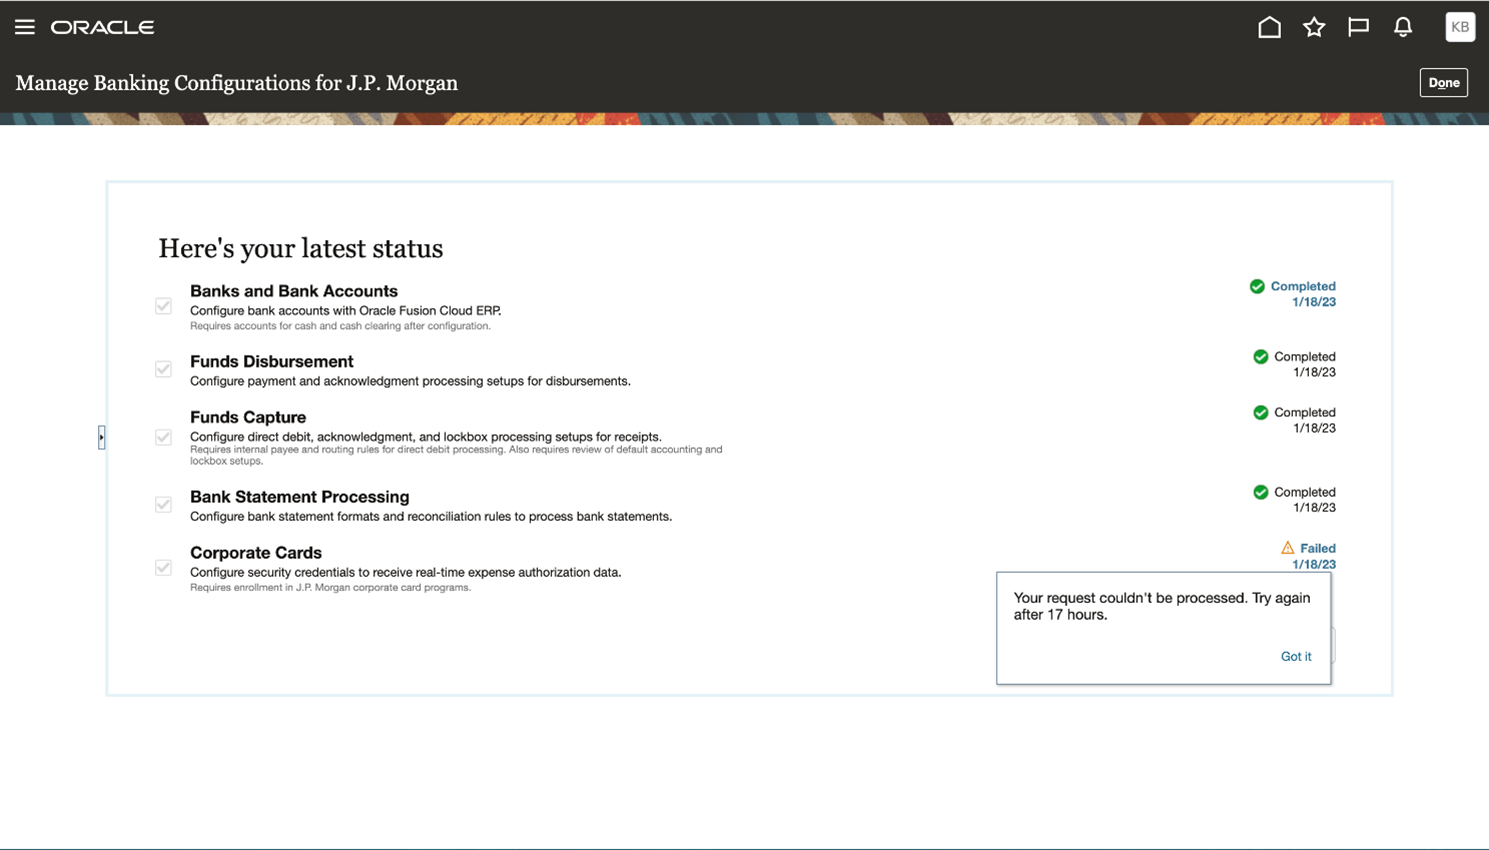
Banks and Bank Accounts
If you notice any issues with the bank account onboarding process, review the related setups in your Cloud ERP instance for possible mismatched or missing legal entity names, legal entities, business units, or other enterprise structures.
Funds Disbursement
- Use NURG as the service level code and delivery channel code as CCD, PPD, CCD+, PPD+, CTX and IAT for ACH transactions.
- Use URGP as the service level code for wire and cross-border transactions.
- Use CHK as the payment method alias for check payments.
- In the payment file, the Service Level Alias Value is sent as SvcLvl. The service levels are predefined with codes NURG, URGP, and so on. Use NURG for ACH and URGP for wire payments.
- n the payment file, the Payment Reason Alias Value is sent as CtgyPurp. For wire payments, use the codes CORT or INTC.
- Users can create their own payment process profile, but must use the preconfigured transmission setup related to this integration.
- For any transmission issues with outbound or inbound files, log a service request.
The bank generates up to three payment acknowledgment files during the clearing process:
- First Level (L0) Acknowledgment: This is generated by the bank within a few minutes of receiving the payment file. It only provides file level acknowledgment to confirm that the file schema or syntax is correct.
- Second Level (L1) Acknowledgment: This is generated by the bank within a few minutes of receiving the payment file. This acknowledgment provides the status at both the file and payment levels.
- Third Level (L2) Acknowledgment: Generated in 2-3 days with a list of payment rejections during the clearing process. This acknowledgment is always at the payment level, and one acknowledgment file can include rejections from multiple payment files.
Once payment file processing is completed, the status of the payment file changes to "Completed and pending acknowledgment".

Acknowledgment file is automatically processed, and the payment file status changes to "Acknowledged" or "Rejected" depending on whether the bank accepts all, some, or none of the payments. At the same time, the payment status changes to "Acknowledged" or "Rejected" depending on whether the bank accepts or rejects the payment.
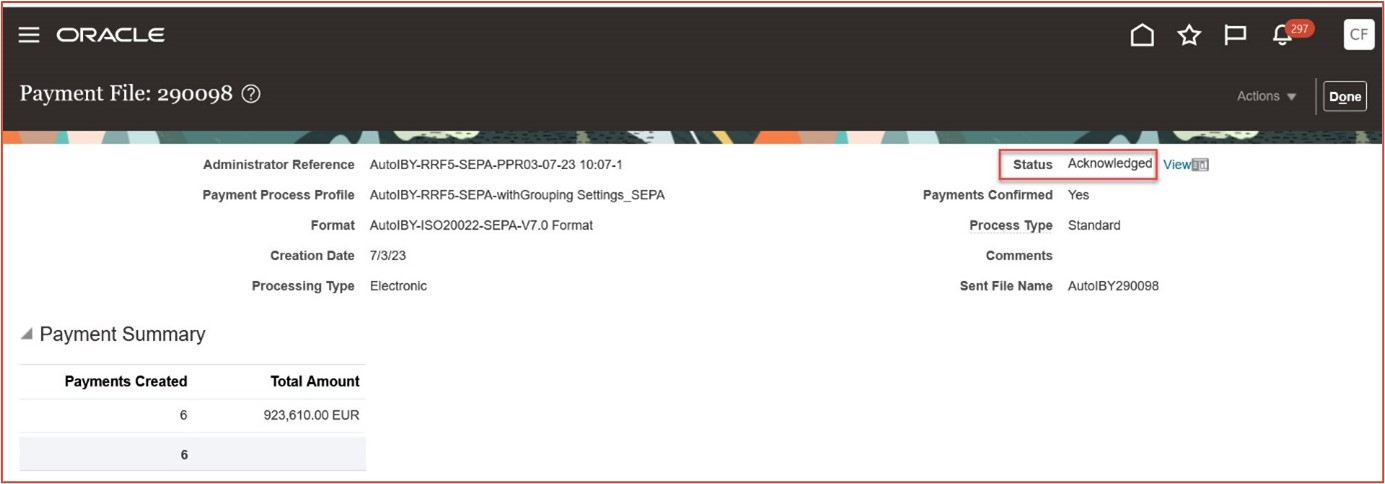
Users can configure the system to automatically void payments that have been rejected by the bank. Users can also configure the system to take automated action on the invoice to cancel or hold it when the payment is voided due to bank rejections.
This table summarizes the payment file and payment status after each step in acknowledgment processing:
| Acknowledgement |
Payment file status |
Payment Status (IBY_PAYMENTS_ALL) |
Payment Status (AP_CHECSK_ALL) |
| L0 – File accepted |
Acknowledged |
Acknowledged |
Negotiable |
| L0 – Rejected |
Rejected |
Rejected / Voided |
Negotiable/Voided |
| L1 – All payments accepted |
Acknowledged |
Acknowledged |
Negotiable |
| L1 – Some payments rejected |
Acknowledged |
Respective payments are changed to rejected / voided status |
Negotiable/Voided |
Following the processing of the acknowledgment file, the Payment File Register report is automatically generated, which includes payment file and payment level acknowledgment details, as well as invoice actions.

Funds Capture – Direct Debit
- Users can create their own funds capture process profile, but must use the preconfigured transmission setup related to this integration.
- For any transmission issues with outbound or inbound files, log a service request.
Funds Capture – Lockbox
- The ORA_BAI2-EXTENDED_GENERIC/arlockboximportgenbai2 is the only supported lockbox transmission format for J.P. Morgan integration. This format uses the control file arlockboximportgenbai2.ctl.
- Before you initiate bank account onboarding for lockbox, verify that the fields in the Default Accounting for Lockbox Receipts section of the Cash Processing tab in Receivables System Options are completed for the applicable business unit. This is a required step for the bank account onboarding process to create the related lockbox setups.
- Review and test the predefined setups generated during the onboarding process. You can also create new ones according to your business requirements.
- AutoMatch Rule Set – ORA_Automatch 90% (AutoMatch above 90% threshold)
Task - Manage AutoMatch Rule Sets
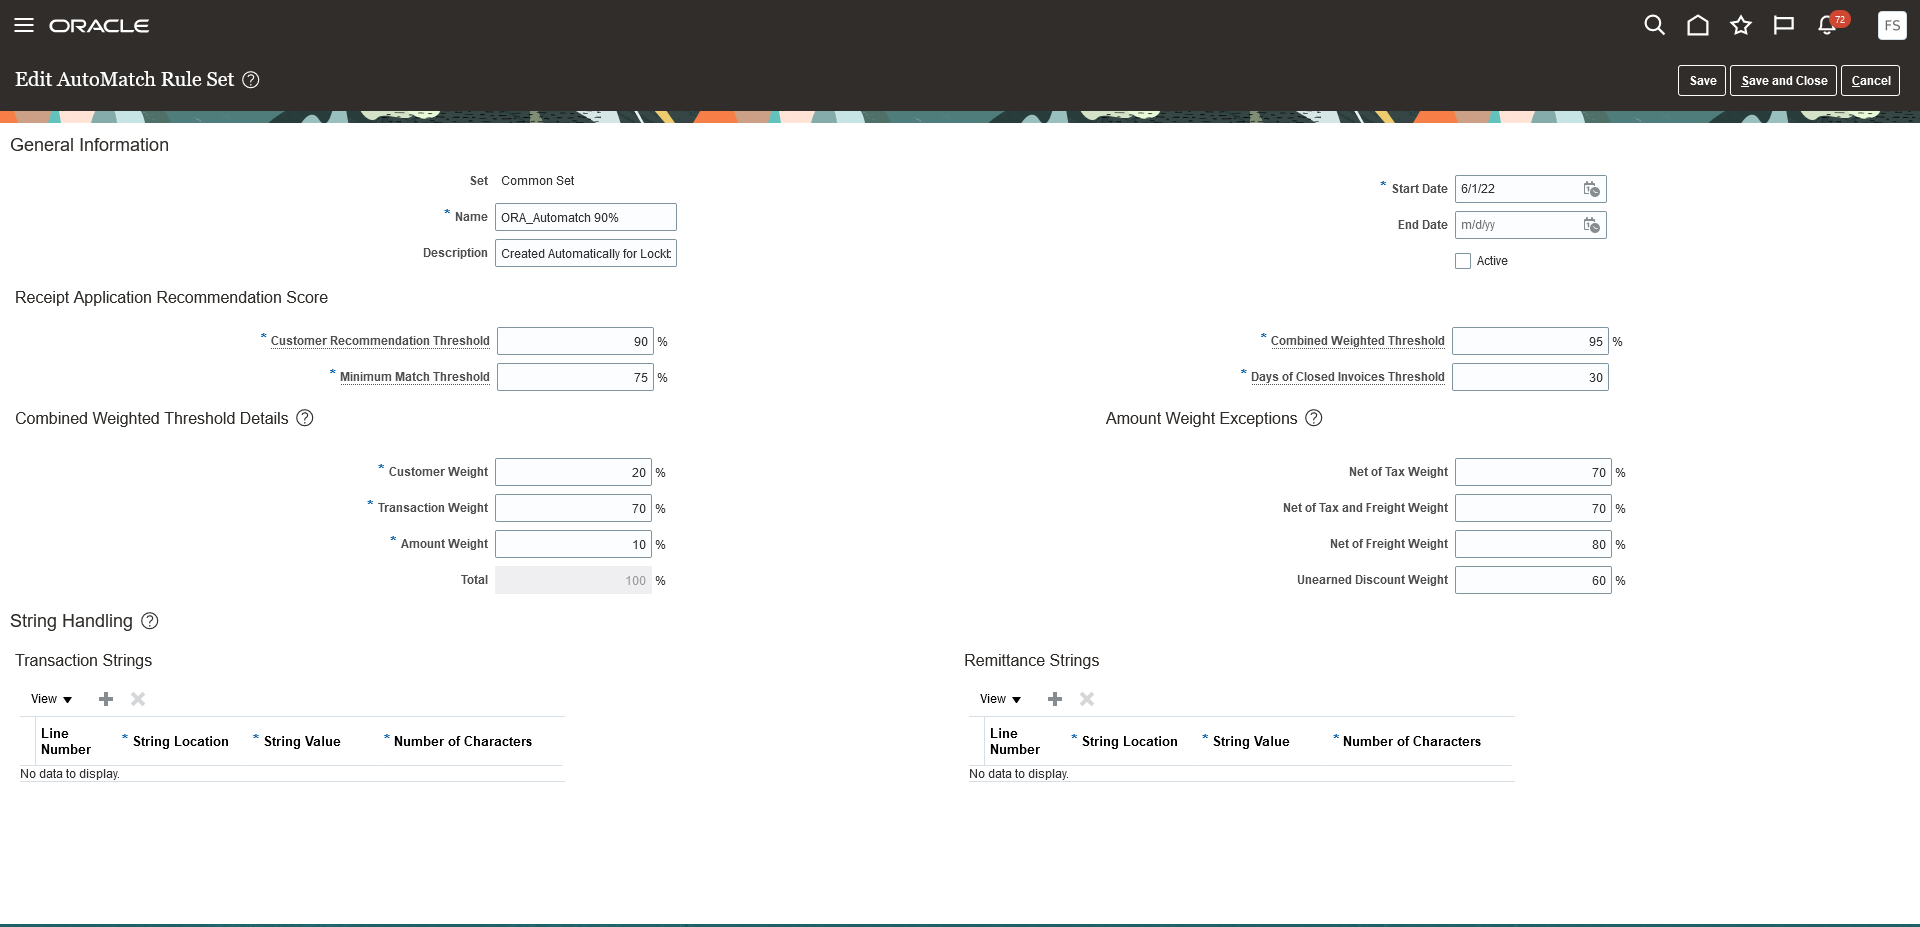
- AutoCash Rule Set – ORA_Invoice Match (Directly match receipt to invoice)
Task - Manage AutoCash Rule Sets
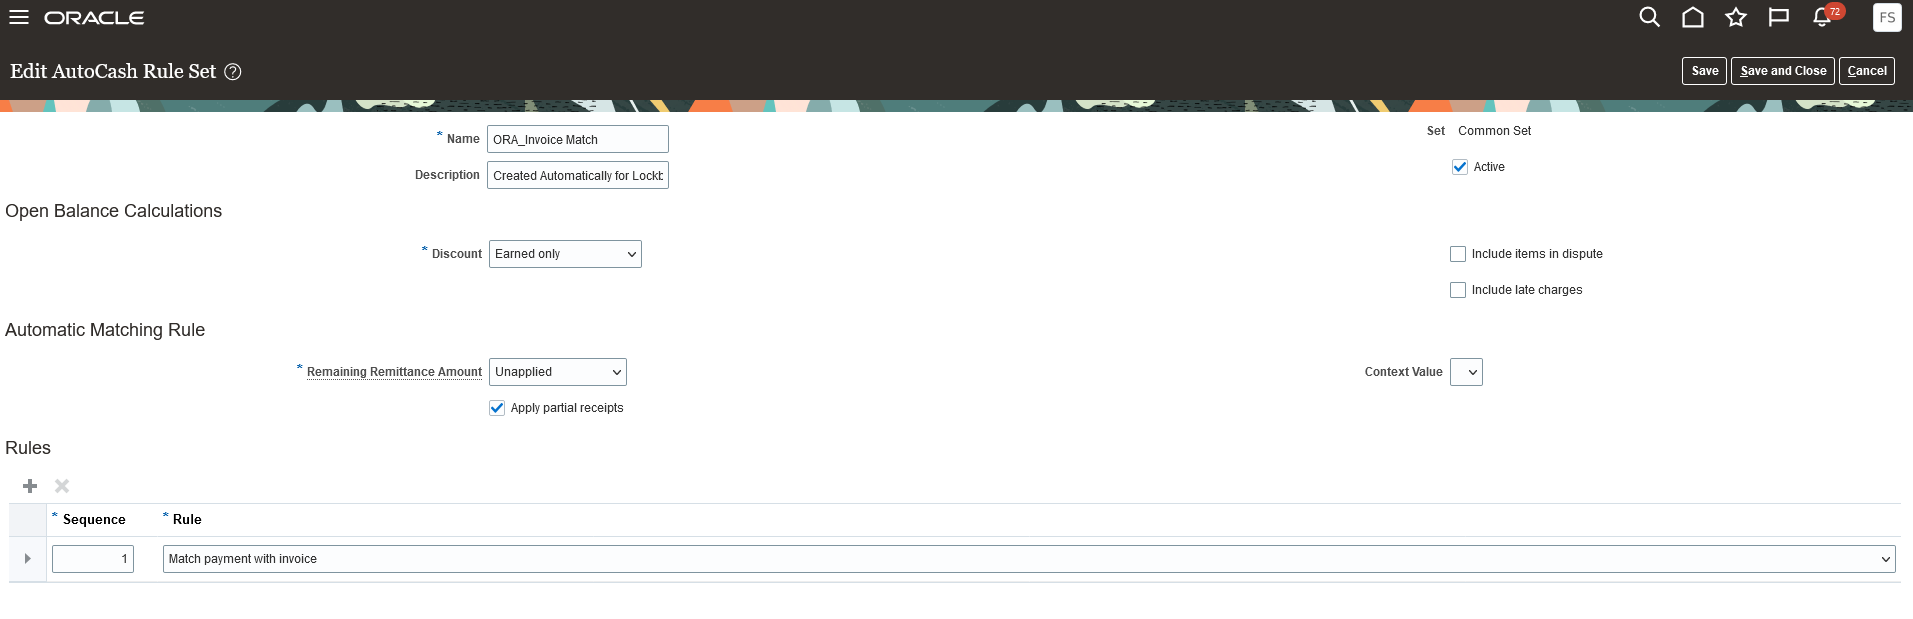
- Transmission Format – ORA_BAI2-EXTENDED_GENERIC
NOTE: This setup is for informational purposes only and should not be changed.
Task - Manage Transmission Format for Lockbox

Bank Statement Processing
- For foreign currency transactions, create tolerance rules and attach to the matching rule set for processing the automatic reconciliation of foreign transactions.
- Attach the cash and cash clearing accounts on the bank accounts to create accounting for the cleared events of payments and receipts.
- Attach the charge and cash account code combinations on the bank statement transaction creation rules to create the accounting for the external transactions generated for the bank charges or fees.
- Update Void Rejected Payments option at the bank account level to automatically void the original payments that are unreconciled after reconciling the reversal bank statement lines,
- Enable the reversal processing method for the receipt action after reconciling the direct debit return bank statement lines.
Access Requirements
You must have the Financial Application Administrator job role to establish connectivity with J.P. Morgan and to review all related predefined and automatically configured Functional Setup Manager tasks.
Single 1099 Return for a Tax Reporting Entity
Consolidate 1099 returns across multiple business units and submit a single 1099 return for a tax reporting entity.
The following processes were already made available in 23C update to consolidate payments made across all the associated business units into one report:
- US 1099 Report
- US 1096 Report
- US 1099 Electronic Media Report
- US 1099 Forms (Comma Delimited Format
The following processes now consolidate payments made across all the associated business units into one report in 23D update:
- US 1099 Invoices Exceptions Report
- US 1099 Suppliers Exceptions Report
- US 1099 Payments Report
- Update and Report Income Tax Details
To submit one of the above processes:
- Select the ledger for this report.
- In the Business Unit parameter:
- Select a business unit to generate a report for this business unit only.
- Leave the parameter blank to generate the report for all business units in the ledger.
- Complete the remaining parameters according to your requirement.
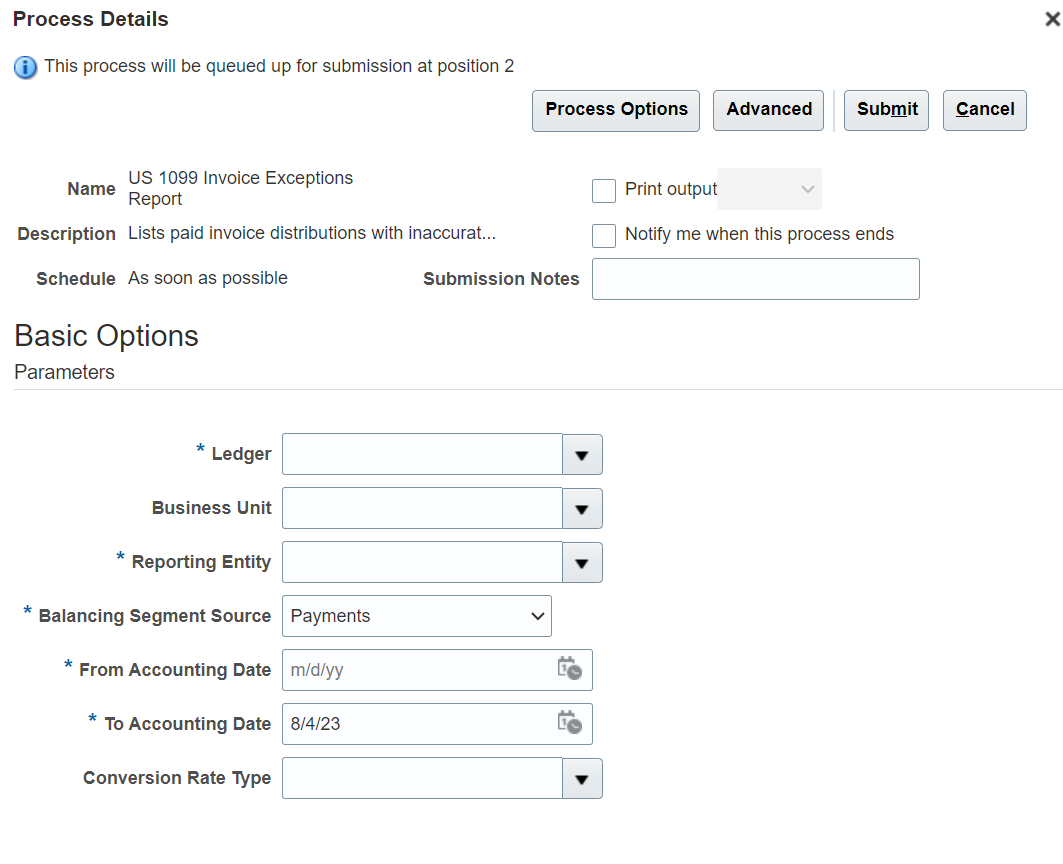
Business benefits include:
- Increases productivity by reducing the effort spent in filing the 1099 returns for individual business units of a single tax reporting entity.
- Improves compliance by making it easier for suppliers to file their tax returns.
Steps to Enable
You don't need to do anything to enable this feature.
Tips And Considerations
Note that if you have scheduled any of these processes to run on recurring basis, you have to cancel the existing schedule and create a new schedule with the new parameters.
Key Resources
- https://www.oracle.com/webfolder/technetwork/tutorials/tutorial/cloud/r13/wn/fin/releases/23C/23C-financials-wn.htm#F28610
- Based on idea 646070 from the Payables, Payments & Cash Management Idea Lab on Oracle Cloud Customer Connect.
Tolerance Validation for PO Quantity on Supplier Portal Invoices
Define validation tolerances for suppliers for purchase order quantity entry using the supplier portal. This allows suppliers to enter invoices with a quantity greater than the ordered quantity within the defined tolerance for the supplier.
Suppliers can use the Supplier Portal to enter overbilled invoices, either with a quantity greater than the purchase order quantity on quantity-based matches or an amount greater than the purchase order amount on amount-based matches. This simplifies common business scenarios between suppliers and buyers, such as additional quantity delivered to the buyer, amount changes on one or more lines or unexpected additional charges for services provided.
After creating and submitting an overbilled invoice, the invoice validation process checks the additional quantity or amount against the tolerances, and places the invoice on hold that exceeds either of the configured tolerances.
The feature enables you to:
- Allow increase of Billed quantity than the ordered quantity for Quantity matched invoices for Supplier Portal invoices.
- Allow Billed amount to exceed the PO line amount for Amount matched invoices for Supplier Portal invoices.
Business benefits include:
- Saves time, effort and cost by reducing purchase order revisions through change orders. Helps avoid initiating a new cycle of purchase order approvals because of overbilling using the Supplier Portal.
- Improves efficiency and reduces efforts of the Payables department with more suppliers using the Supplier portal to create the invoices.
Steps to Enable
To enable this feature:
- Enable the new configuration options in "Manage Invoice Options" setup.
- There will be two configuration options:
- Allow Over Billed Quantity for Quantity-Based Matches
- Allow Over Billing for Amount-Based Matches
- Based on the configurations, system will allow supplier portal user to enter quantity/amount that exceeds the ordered quantity/amount.
Navigation: Financials-->Payables-->Manage Invoice Options
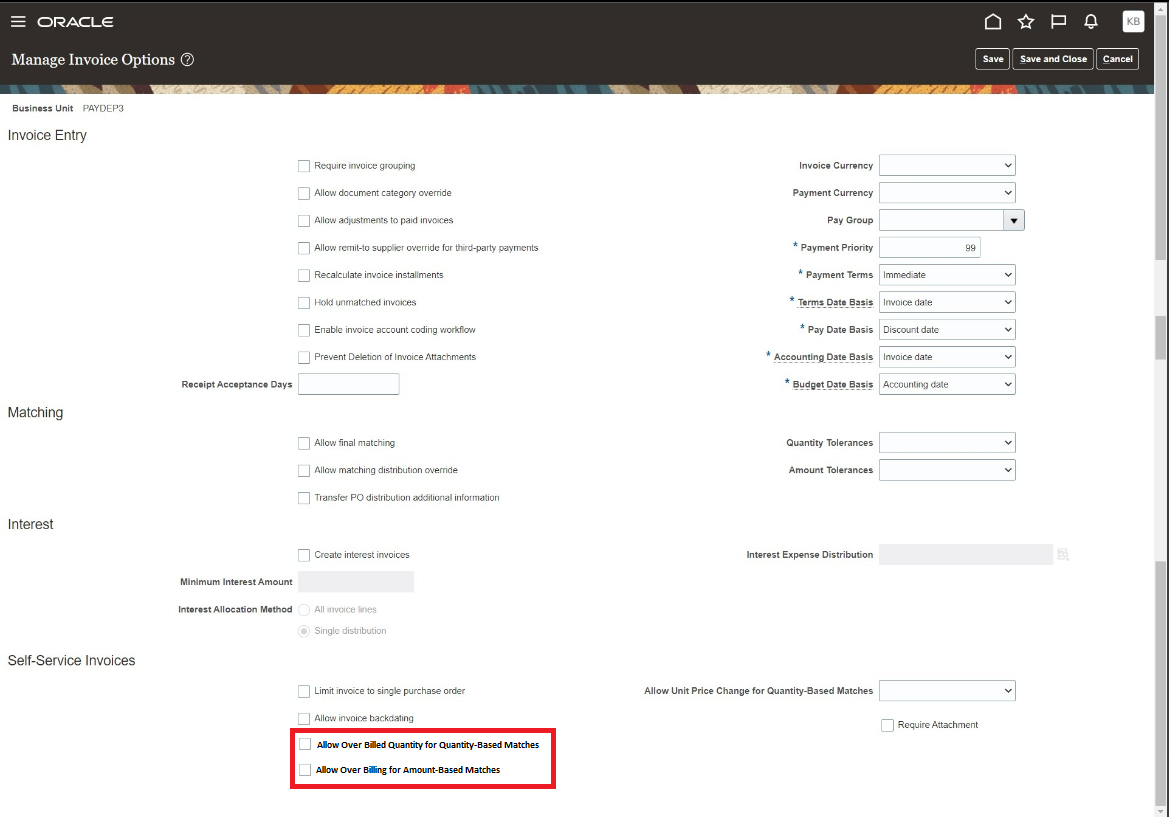
Tips And Considerations
- Tolerance validations on overbilled invoices take place during invoice validation processing and not on the Supplier Portal. Once the invoice is submitted from Supplier portal and during invoice validation process it will place a hold if it exceeds the tolerance.
-
Enabling the overbill options in the Manage Invoice Options page lets suppliers enter Quantity and Amount overbilled invoices in the Supplier portal. If you later disable these settings, then suppliers cannot enter overbilled invoices using the Supplier Portal
Key Resources
- For information on Invoice Tolerances, refer to the "Invoice Tolerances" in Oracle Help Center.
- Based on Idea 648630 from the Payables, Payments & Cash Management Idea Lab on Oracle Cloud Customer Connect
Payments
ISO 20022 Disbursement Acknowledgment
Retrieve and process disbursement acknowledgment files from banks for credit transfers in accordance with ISO 20022 standards. Void payments that were rejected by the bank and perform action on the associated invoices.
The bank generates up to three payment acknowledgment files during the clearing process:
- First Level (L0) Acknowledgment: This is generated by the bank within a few minutes of receiving the payment file. It only provides file level acknowledgment to confirm that the file schema or syntax is correct.
- Second Level (L1) Acknowledgment: This is generated by the bank within a few hours of receiving the payment file. This acknowledgment provides the status at both the file and payment levels.
- Third Level (L2) Acknowledgment: Generated in 2-3 days with a list of payment rejections during the clearing process. This acknowledgment is always at the payment level, and one acknowledgment file can include rejections from multiple payment files.
Once payment file processing is completed, the status of the payment file changes to "Completed and pending acknowledgment".
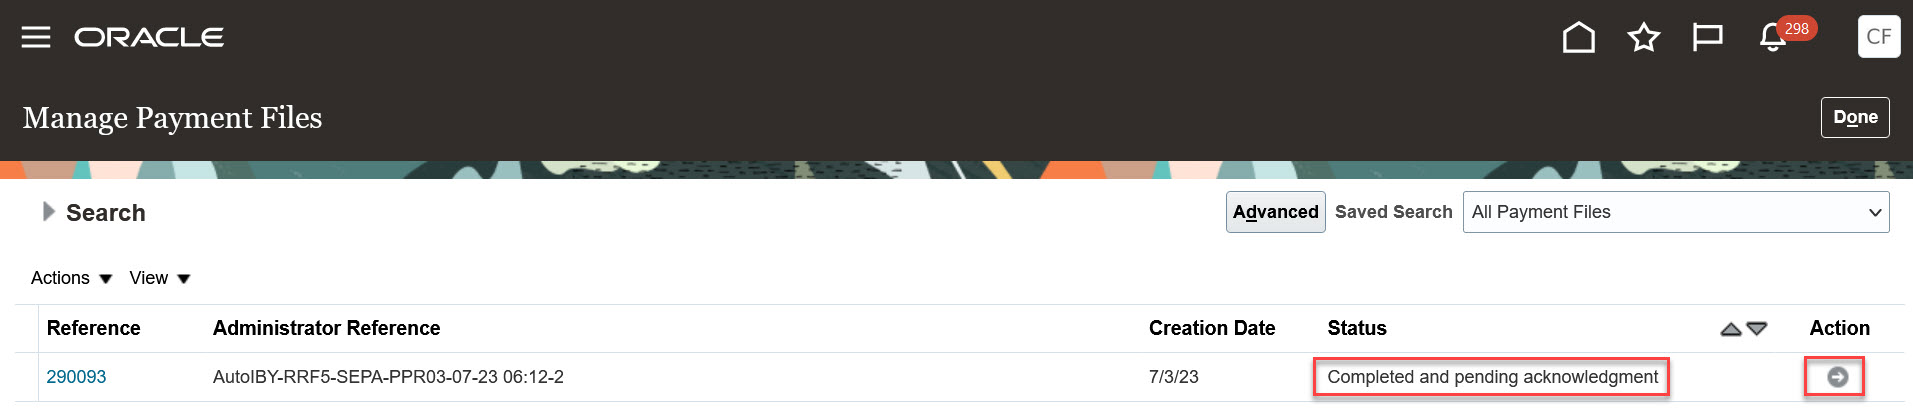
Waiting for Acknowledgment
Once the acknowledgment file is processed, the Payment file status changes to "Acknowledged" or "Rejected" depending on whether the bank accepts all, some, or none of the payments. At the same time, the payment status changes to "Acknowledged" or "Rejected" depending on whether the bank accepts or rejects the payment.
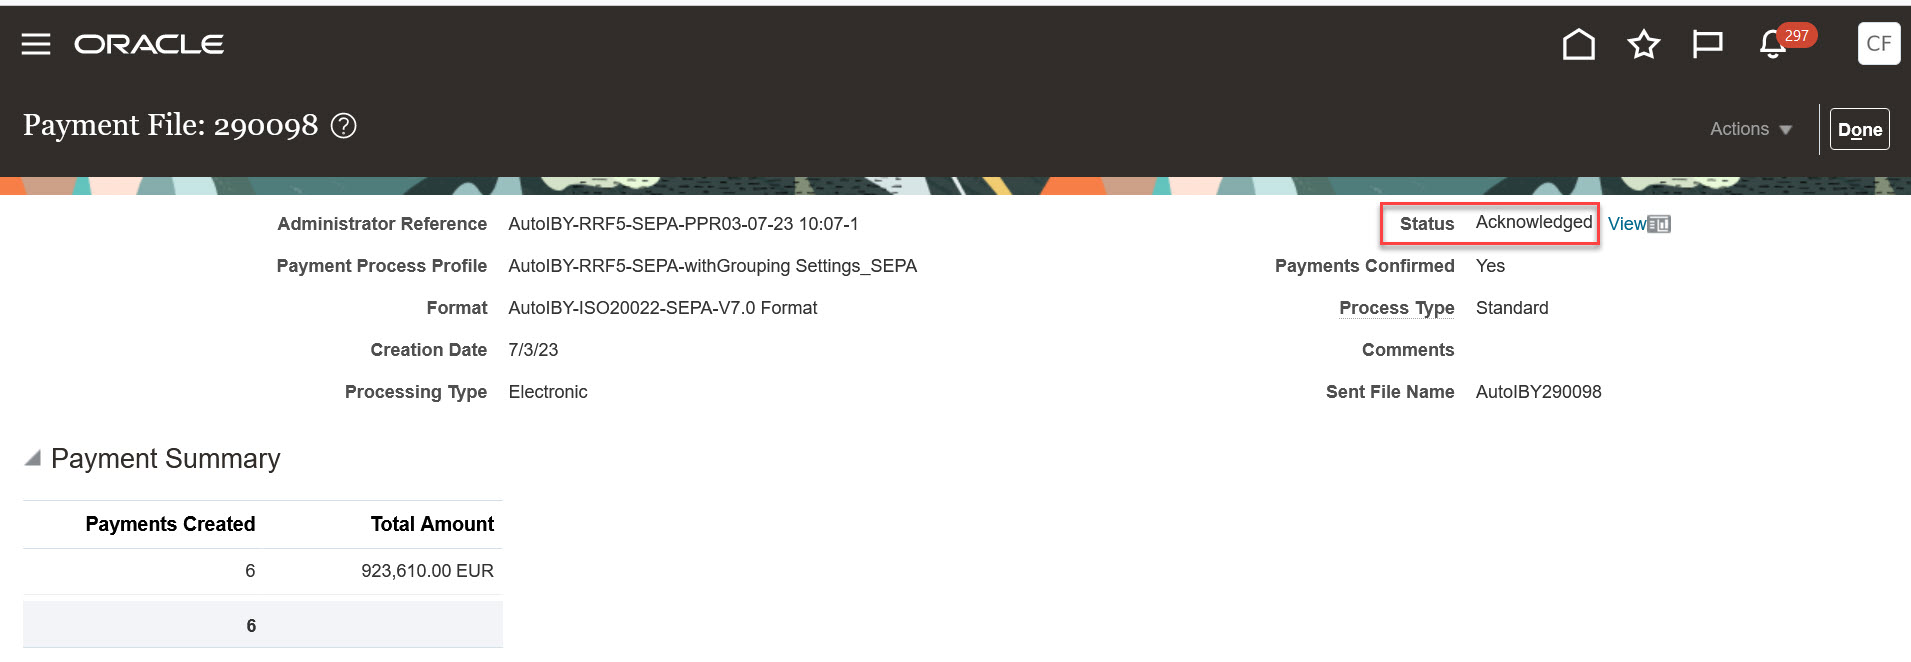
Payment File Status Acknowledged
You can configure the system to automatically void payments that have been rejected by the bank. Furthermore, you can configure the system to take automated action on the invoice to cancel or hold it when the payment is voided due to bank rejections.
Following the processing of the acknowledgment file, the Payment File Register report is automatically generated, which includes payment file and payment level acknowledgment details, as well as invoice actions.

Payment File Register Showing Acknowledgment Details
Retrieve and process acknowledgment files using any of the following methods:
Automatic: System will automatically retrieve, and process acknowledgment based on the time internal set in the payment system account settings.
Contextual Action from payment files page:
Submit the Retrieve Disbursement Acknowledgment process from the Manage Payment Files task page.
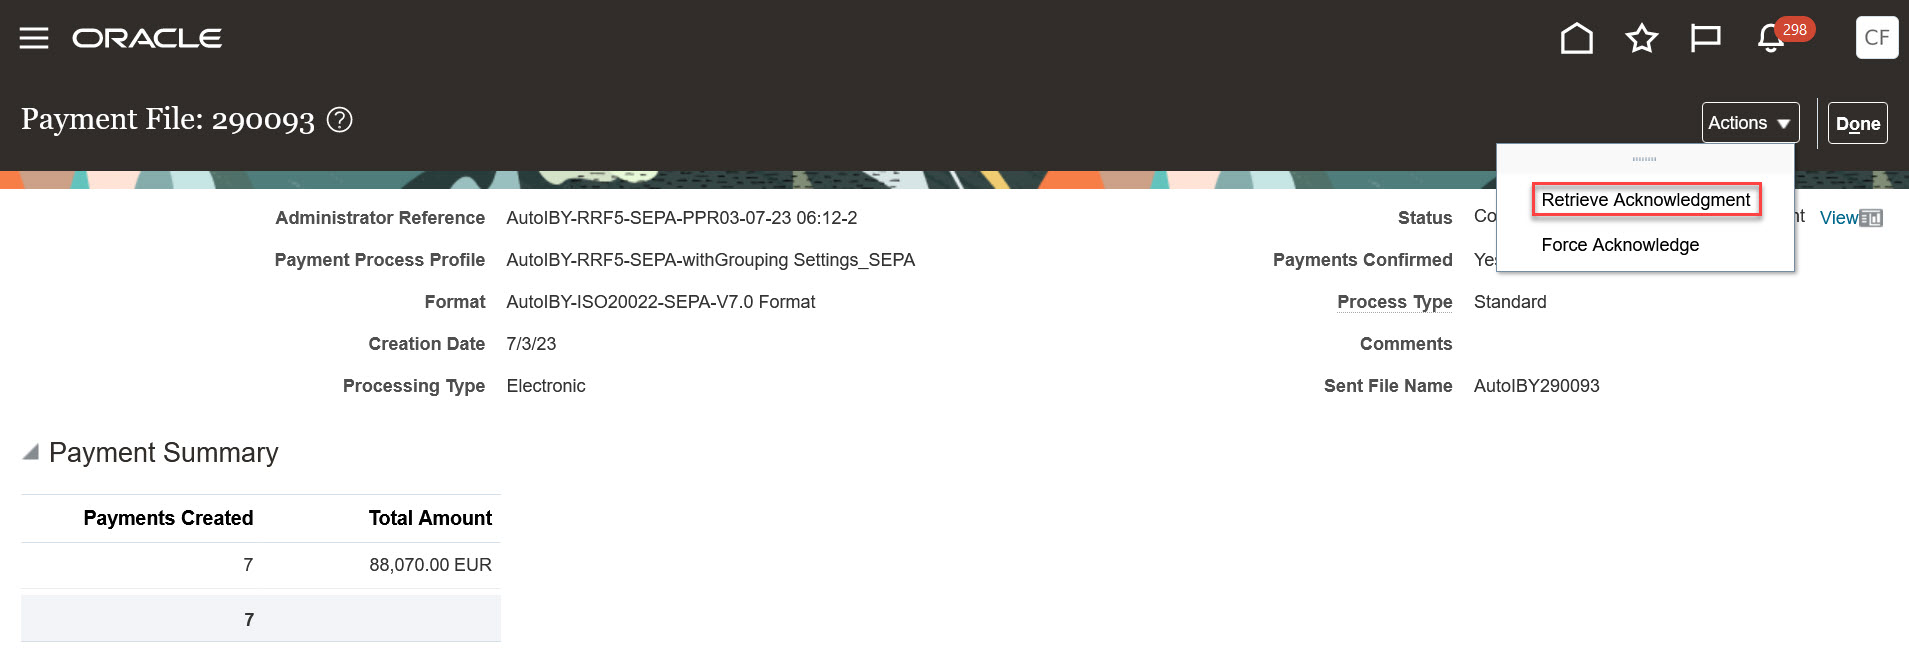
Contextual Action from Payment File Details Page
Action menu on manage payment file page:
Submit the Retrieve Disbursement Acknowledgment process from the action menu on the Payment File page
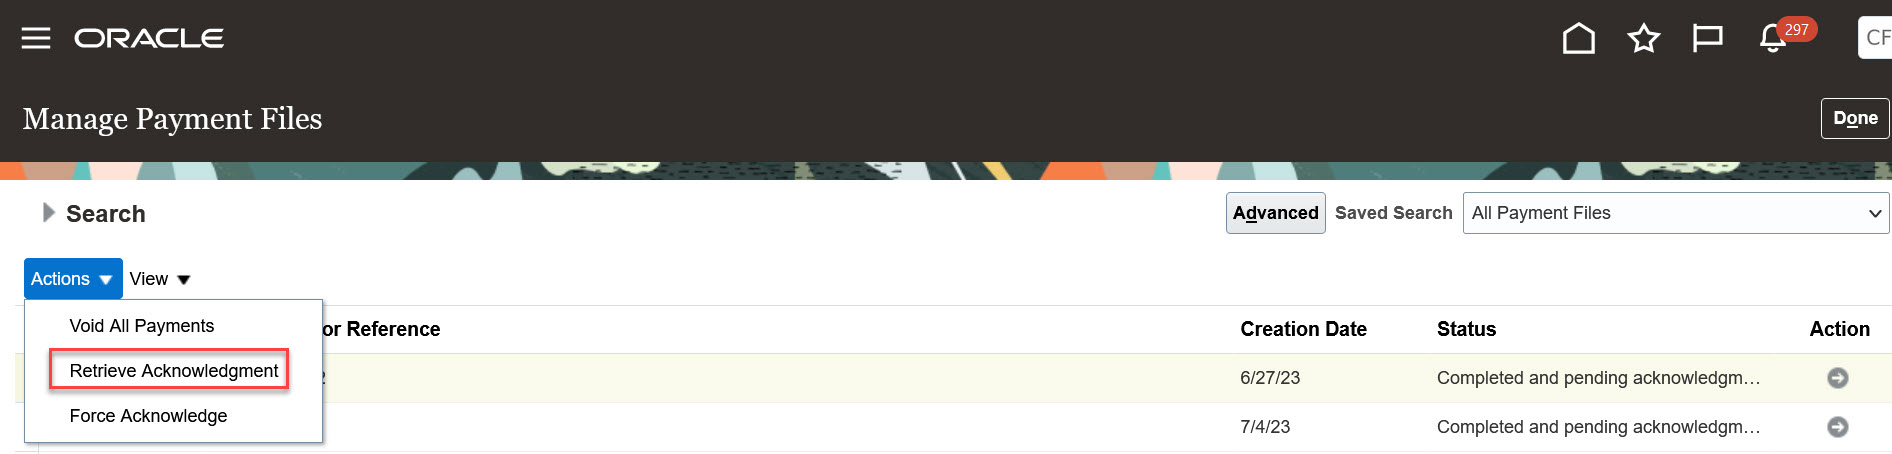
Contextual action from Manage Payment Files page
Using Payments Task:
Submit the Retrieve Disbursement Acknowledgment process from the Payments tasks.
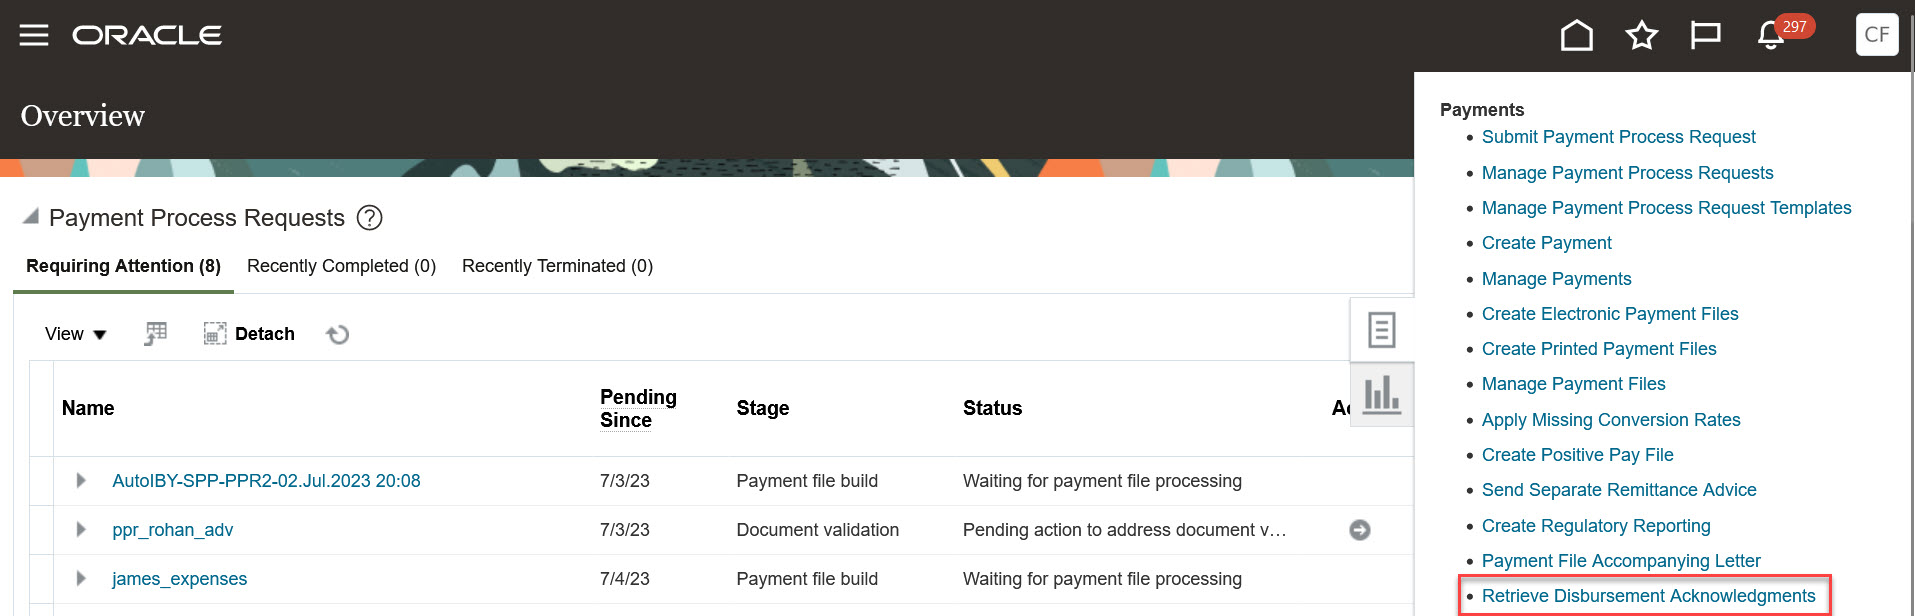
From Payments Tasks
This table summarizes the payment file and payment status after each step in acknowledgment processing:
| Acknowledgement |
Payment file status |
Payment Status (IBY_PAYMENTS_ALL) |
Payment Status (AP_CHECSK_ALL) |
| L0 – File accepted |
Acknowledged |
Acknowledged |
Negotiable |
| L0 – Rejected |
Rejected |
Rejected / Voided |
Negotiable/Voided |
| L1 – All payments accepted |
Acknowledged |
Acknowledged |
Negotiable |
| L1 – Some payments rejected |
Acknowledged |
Respective payments are changed to rejected / voided status |
Negotiable/Voided |
| L2 – Some payments rejected |
Acknowledged |
Respective payments are changed to rejected / voided status |
Negotiable/Voided |
Business benefits include:
- Increased productivity from automating the voiding of bank rejected payments.
- Improved efficiency by reducing manual steps and taking immediate corrective actions on rejected payments.
Steps to Enable
Before you can use the acknowledgment flow, you must complete the following setups at the payment system account level.
- Disbursement Acknowledgment Automatic Retrieval Time Interval Minutes
- Disbursement Acknowledgment Automatic Voiding Option
- Disbursement Acknowledgment Format
- Disbursement Acknowledgment Transmission Configuration
- Disbursement Acknowledgment Voiding Invoice Action
- Email Disbursement Acknowledgment Details
- Payment File Register Format
Tips And Considerations
Force Acknowledgment
If necessary, you can force acknowledge the payment file. This can be necessary, for example, if a bank doesn't support acknowledgments or there are issues with the bank's acknowledgment file. In the Payment File page, select Force Acknowledge from the Actions menu. This acknowledges the payment file and sets the status to Acknowledged.
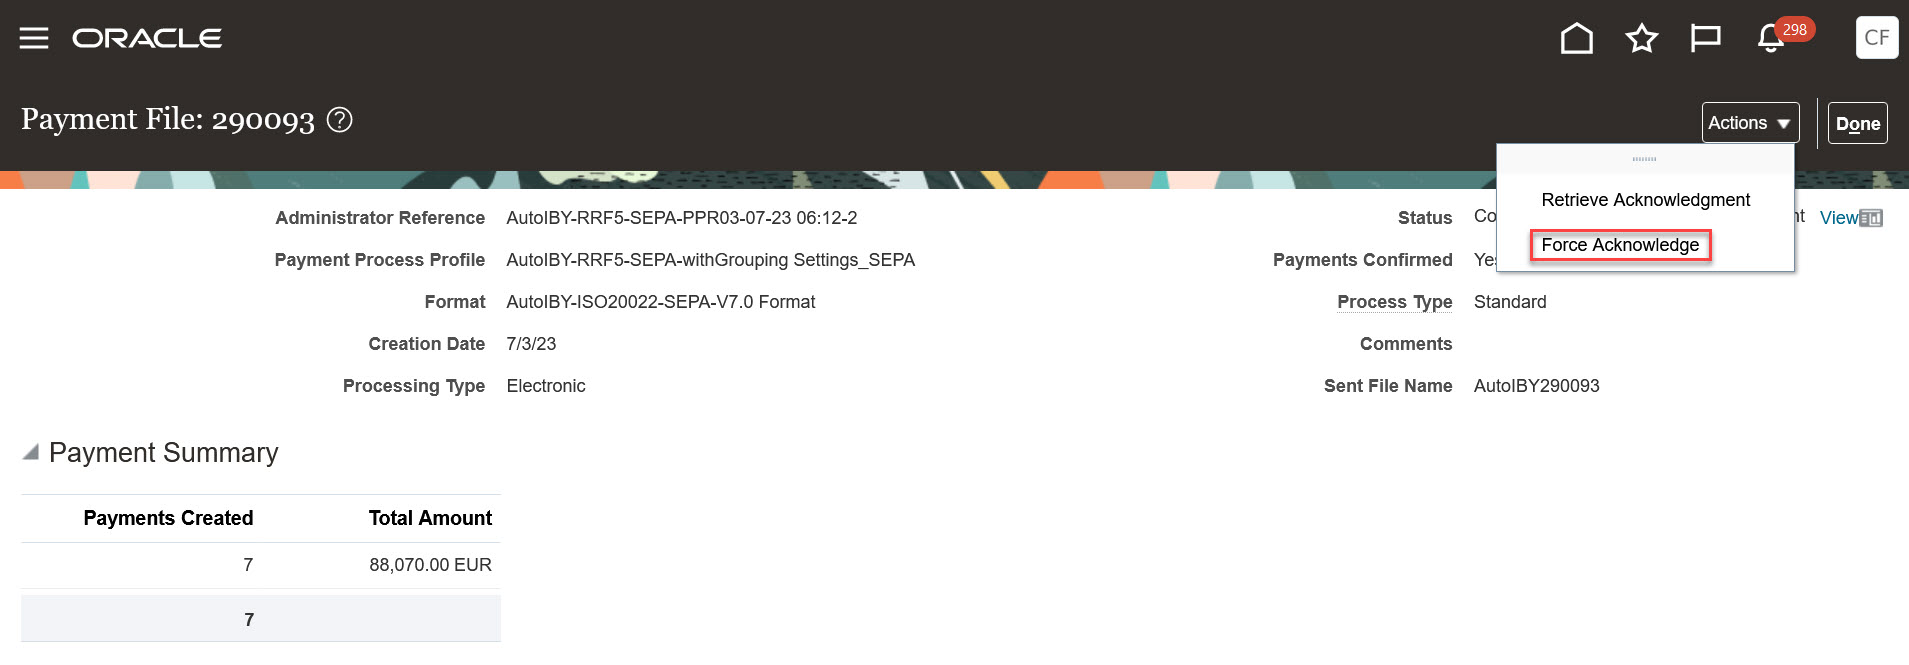
Force Acknowledgment
Receivables and Cash
Receivables
Additional Bill-to and Sold-to Party-Level Attributes as Source for Receivables Accounting
Create and deliver bill-to and sold-to party-level descriptive flexfield attributes as sources for Receivables accounting. This provides additional flexibility for the Receivables accounting configuration.
These attributes are now available as SLA sources for the event class Invoice, Credit memo, Debit memo, Adjustment, Chargeback and Receipt. You can use these attributes in journal line rules, account rules and mapping sets to derive accounting based on these attributes.
You can now derive accounting based on additional bill-to and sold-to party level descriptive flexfield attributes. In cases where your bill-to customer is different from the sold-to customer, you can derive receivables accounting based on sold-to customer attributes.
Steps to Enable
You don't need to do anything to enable this feature.
Key Resources
- Refer to Accounting Transformation section of Implementing Accounting Hub for more information on how to define journal line rules, account rules and mapping sets.
Access Requirements
No new role access is needed to use this feature.
Revenue Management
Prospective Accounting Treatment for Immaterial Price Changes
Use a prospective accounting treatment to reflect minor unit selling price changes for performance obligations over a given time period.
For immaterial price changes on an over-time performance obligation, you can now reflect the change in revenue for current and future periods only by reallocating the unrecognized revenue on the open performance obligations of the contract. This will not impact the revenue that has already been recognized.
Worked Example:
In this example, you have a customer contract with three services.
Step 1: This table shows the use case with values for key attributes that are imported into Revenue Management using the Revenue Basis Data Import file-based data import (FBDI) template.

Initial data imported through FBDI
Step 2: This screenshot shows the resulting customer contract after you process the data in Revenue Management:

Contract at Inception
Step 3: Service 3 undergoes a price change where the unit selling price is revised to 105 USD from the beginning of March 2023. In this case you must split the revenue line into two lines. You must revise the existing revenue line with a new plan end date of 28-Feb-2023, a new service duration of 2 months, and a new line amount. You must also populate this version line with the attributes that trigger prospective accounting. A new line must be sent for the rest of the duration from March 2023 to December 2023 with the new unit selling price. This new line should also be populated with the attributes that trigger prospective accounting and on further processing in Revenue Management, this line is added as a new performance obligation to the existing contract. Refer to the screenshot below for the detailed attributes:

Data Indicating the Immaterial Price Changes
Step 4: When the immaterial price changes are imported into Revenue Management, the process calculates the revenue that is recognized on all performance obligations until the day before the contract revision date. This recognized revenue is reduced from the new transaction price. The resulting transaction price is then allocated across the open performance obligations.
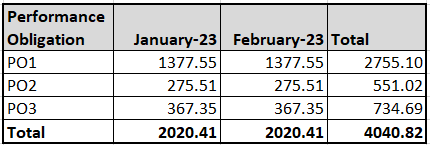
Revenue Recognized Until a Day Prior to the Contract Revision Date (28th February 2023)
This table shows the contract after you process the price changes using prospective accounting. You can see the new allocated amounts for each open obligation.

Contract After Processing Price Change Using Prospective Accounting
In the case of immaterial price changes or price changes due to indexation, the revenue reallocation impacts only current and future periods. Revenue that has been recognized until the contract revision date is not be impacted.
Steps to Enable
You don't need to do anything to enable this feature.
Tips And Considerations
- This feature is supported only for third-party sources.
- This feature is applicable only to over-time performance obligations (obligations with a satisfaction measurement model of Period).
- Prospective accounting is supported only for over-time performance obligations with satisfaction plan of Daily rates partial periods.
- If any of the performance obligations of the customer contract are identified through a performance obligation template, then the price change is considered to be a material change (retrospective accounting).
- If the price change is for only part of the service period, you must split the revenue line into two lines. This revises the original line with the revised plan dates (and existing unit selling price) and sends a new line for the remaining period (with new unit selling price). This new line must be sent along with the Add-to contract attributes so that the line is added to the same customer contract.
This table shows the attributes and expected values to be sent in case of a revision line to trigger prospective accounting:
| Attribute | Expected Value | Comments |
|---|---|---|
| Quantity | Revised line quantity | Applicable where service duration is not used and the revised unit selling price is applicable for a revised service duration. Since the service duration is not a separate attribute, any change in the service duration is factored into the line quantity. |
| Unit Selling Price | Revised unit selling price of the line | |
| Service Duration | Revised service duration | Applicable when the revised unit selling price is applicable for a specified service duration. |
| Line Amount | Revised line amount | |
| Plan Start Date | Revised plan start date | |
| Plan End Date | Revised plan end date | |
| Immaterial Change Option | Immaterial | |
| Contract Revision Date | 1. Plan start date 2. Plan end date (only when the plan end date is revised) |
This table shows the attributes and expected values to be sent in the case of a new line (created as a result of a price change to the original revenue line) to trigger prospective accounting:
| Attribute | Expected Value |
|---|---|
| Quantity | Quantity of the new line |
| Unit Selling Price | Unit selling price of the new line |
| Service Duration | Service duration of the new line |
| Line Amount | Line amount of the new line |
| Plan Start Date | Plan start date of the new line |
| Plan End Date | Plan end date of the new line |
| Add to Existing Contract | Y |
| Action Code for Adding New Line to Existing Contract | CREATE NEW PO |
| Immaterial Change Option | Immaterial |
| Contract Revision Date | Plan Start Date |
Key Resources
- Refer to the Revenue Management documentation for further information on processing immaterial changes and how to import revenue data using the Revenue Basis Data Import file-based data import template.
Access Requirements
No new role access is needed to use this feature.
Asset and Lease Management
Assets
Capitalization Threshold in Foreign Currency
The capitalization thresholds can now be entered in any currency other than the ledger currency of the asset book. This helps create a uniform capitalization threshold across various geographies and asset books, without the need to adjust the threshold amount due to fluctuations in the currency rates.
You can enforce the capitalization threshold limit automatically for all of your asset additions in any currency other than the ledger currency of the asset.When invoices are transferred from payables or assets are loaded from the Mass Additions File-Based Data Import template into the corporate book, the Prepare Asset Transaction Data process determines whether the asset should be expensed or capitalized based upon the specified threshold values in the ledger currency. The application calculates the capitalization threshold amount in ledger currency using conversion rate type and the conversion rate on the date placed in service.
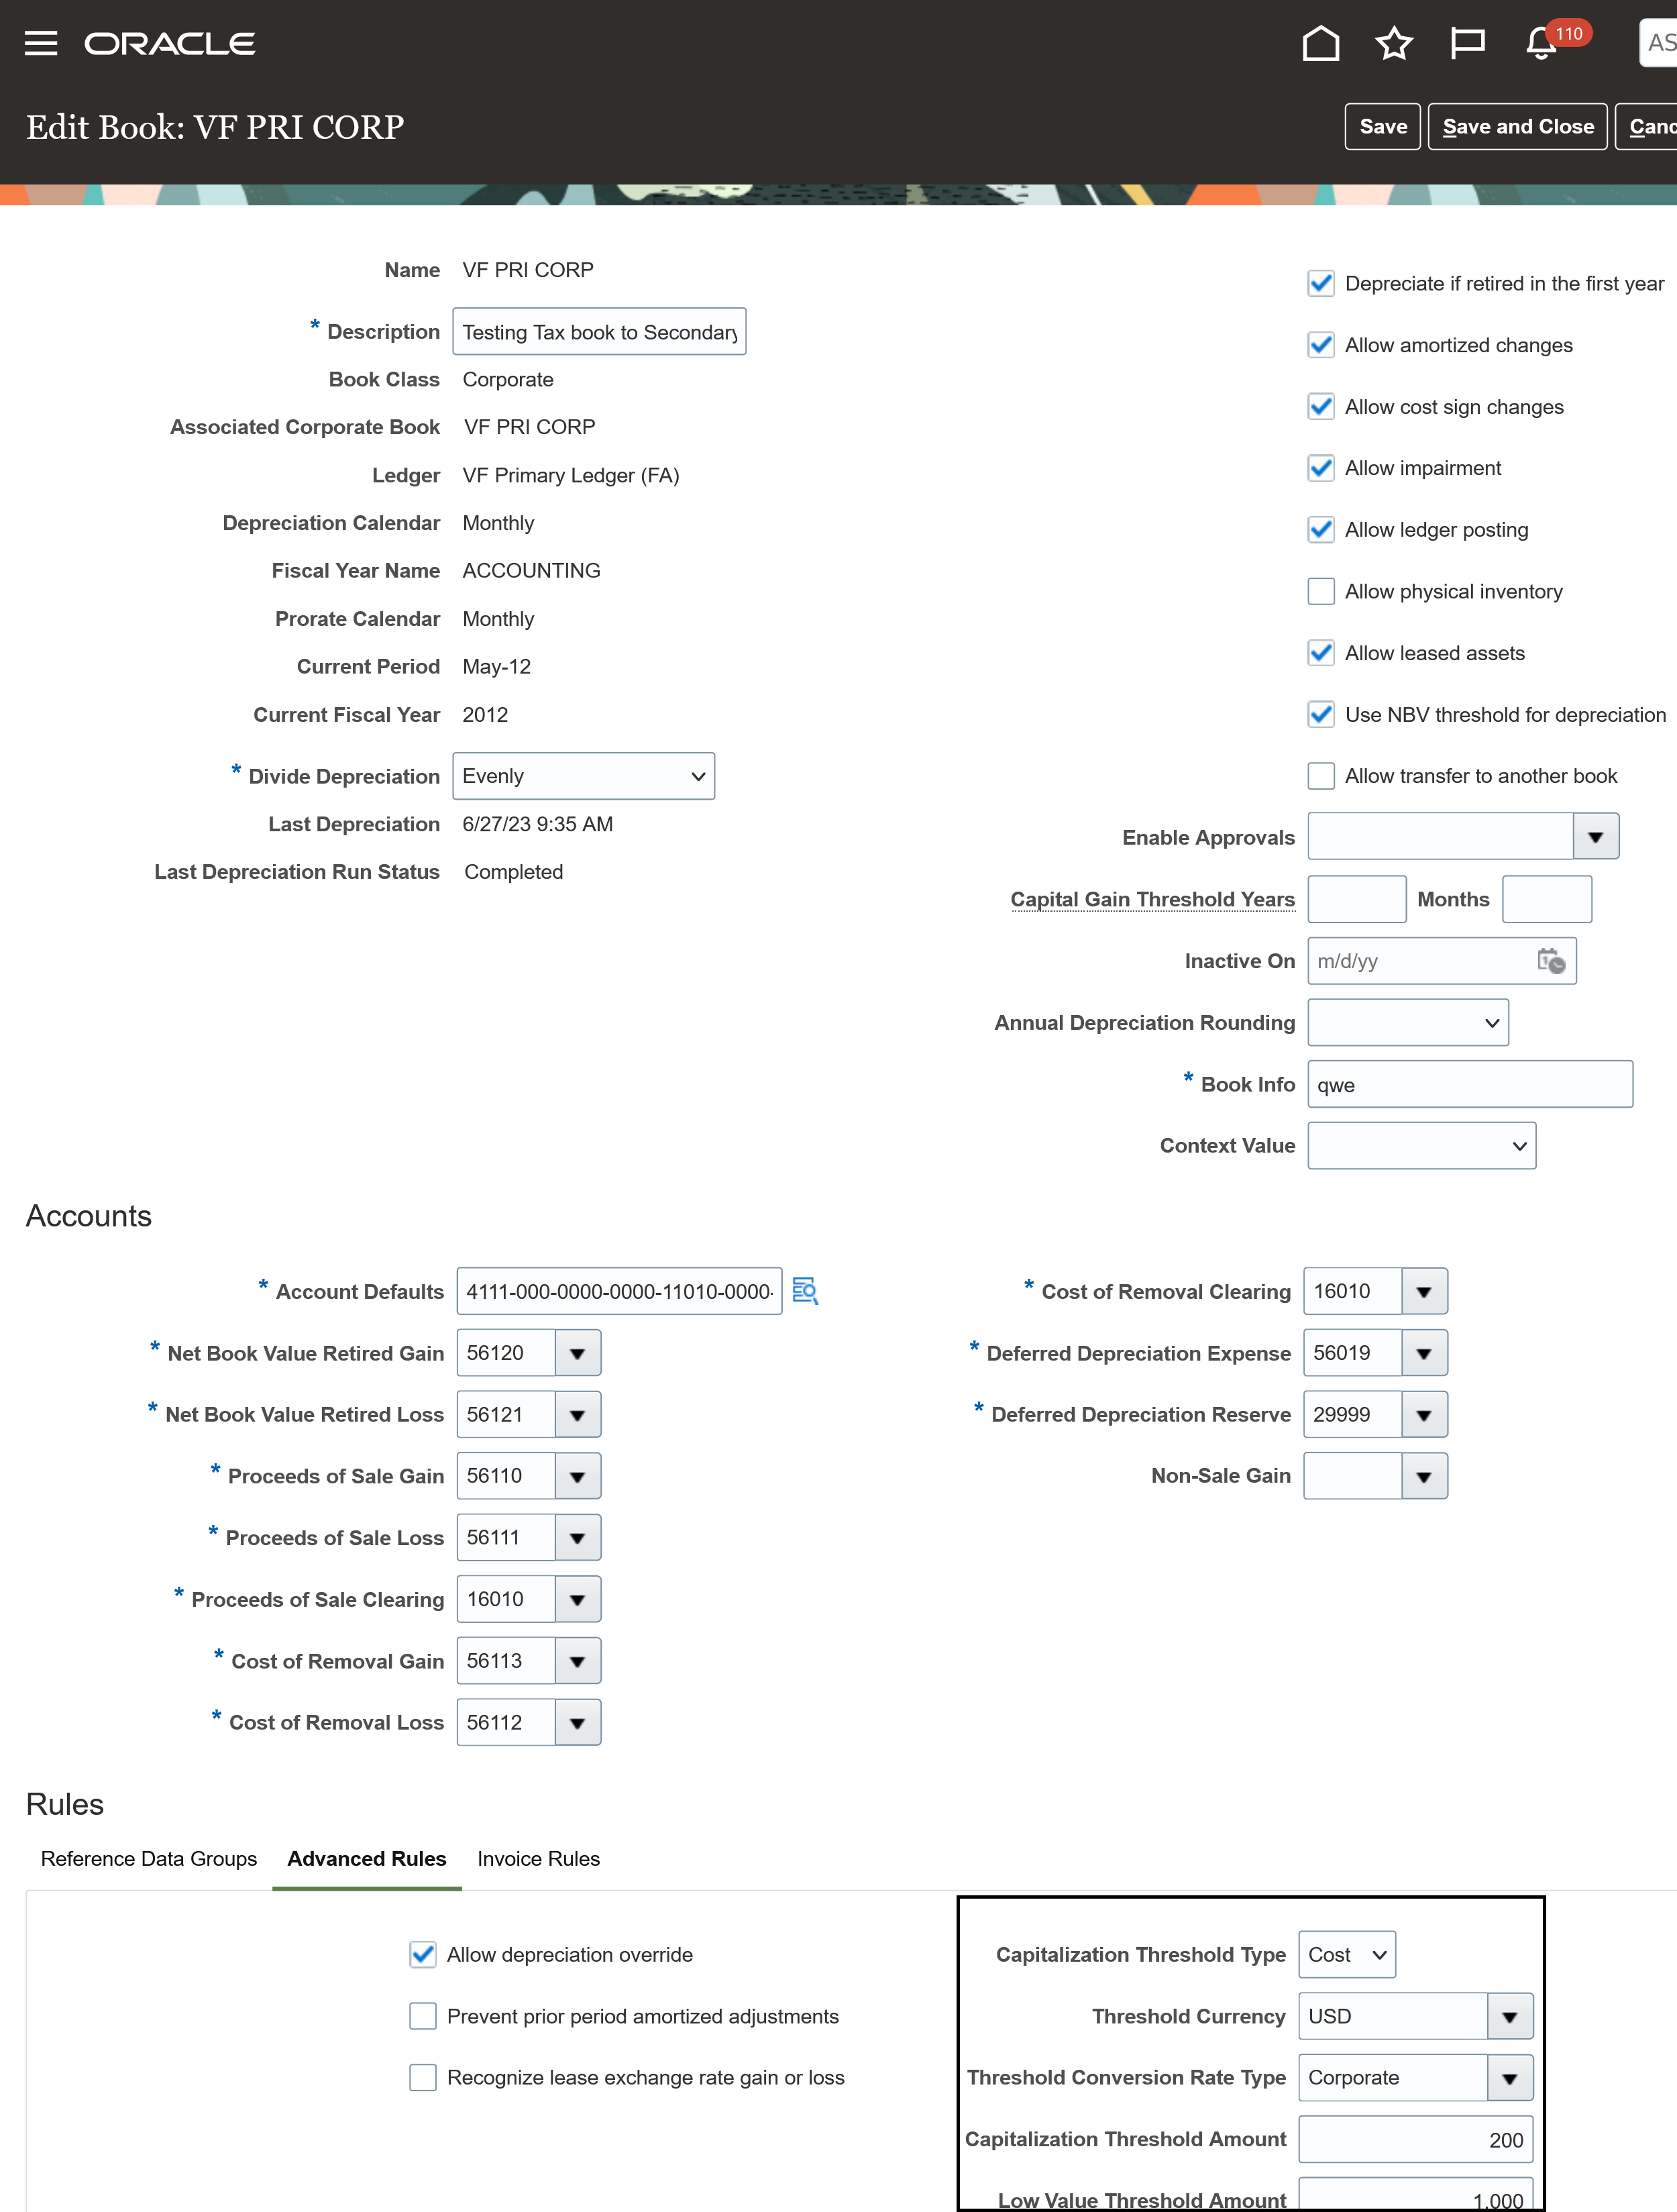
Capitalization Threshold Limit Settings in Edit Asset Book Page
Business benefits includes:
- Ensures that assets are capitalized after capitalization threshold validation using global currency across all asset books.
- Eliminates the need to adjust the threshold amount due to the fluctuations in the currency rates.
Steps to Enable
Use the Opt In UI to enable this feature. For instructions, refer to the Optional Uptake of New Features section of this document.
- Offering: Financials
- Use the opt-in for Capitalization Threshold in Foreign Currency feature in Financials to enable this feature.
- Setup and Maintenance > Financials > Change Feature Opt In > Fixed Assets> Edit Feature >Capitalization Threshold in Foreign Currency.
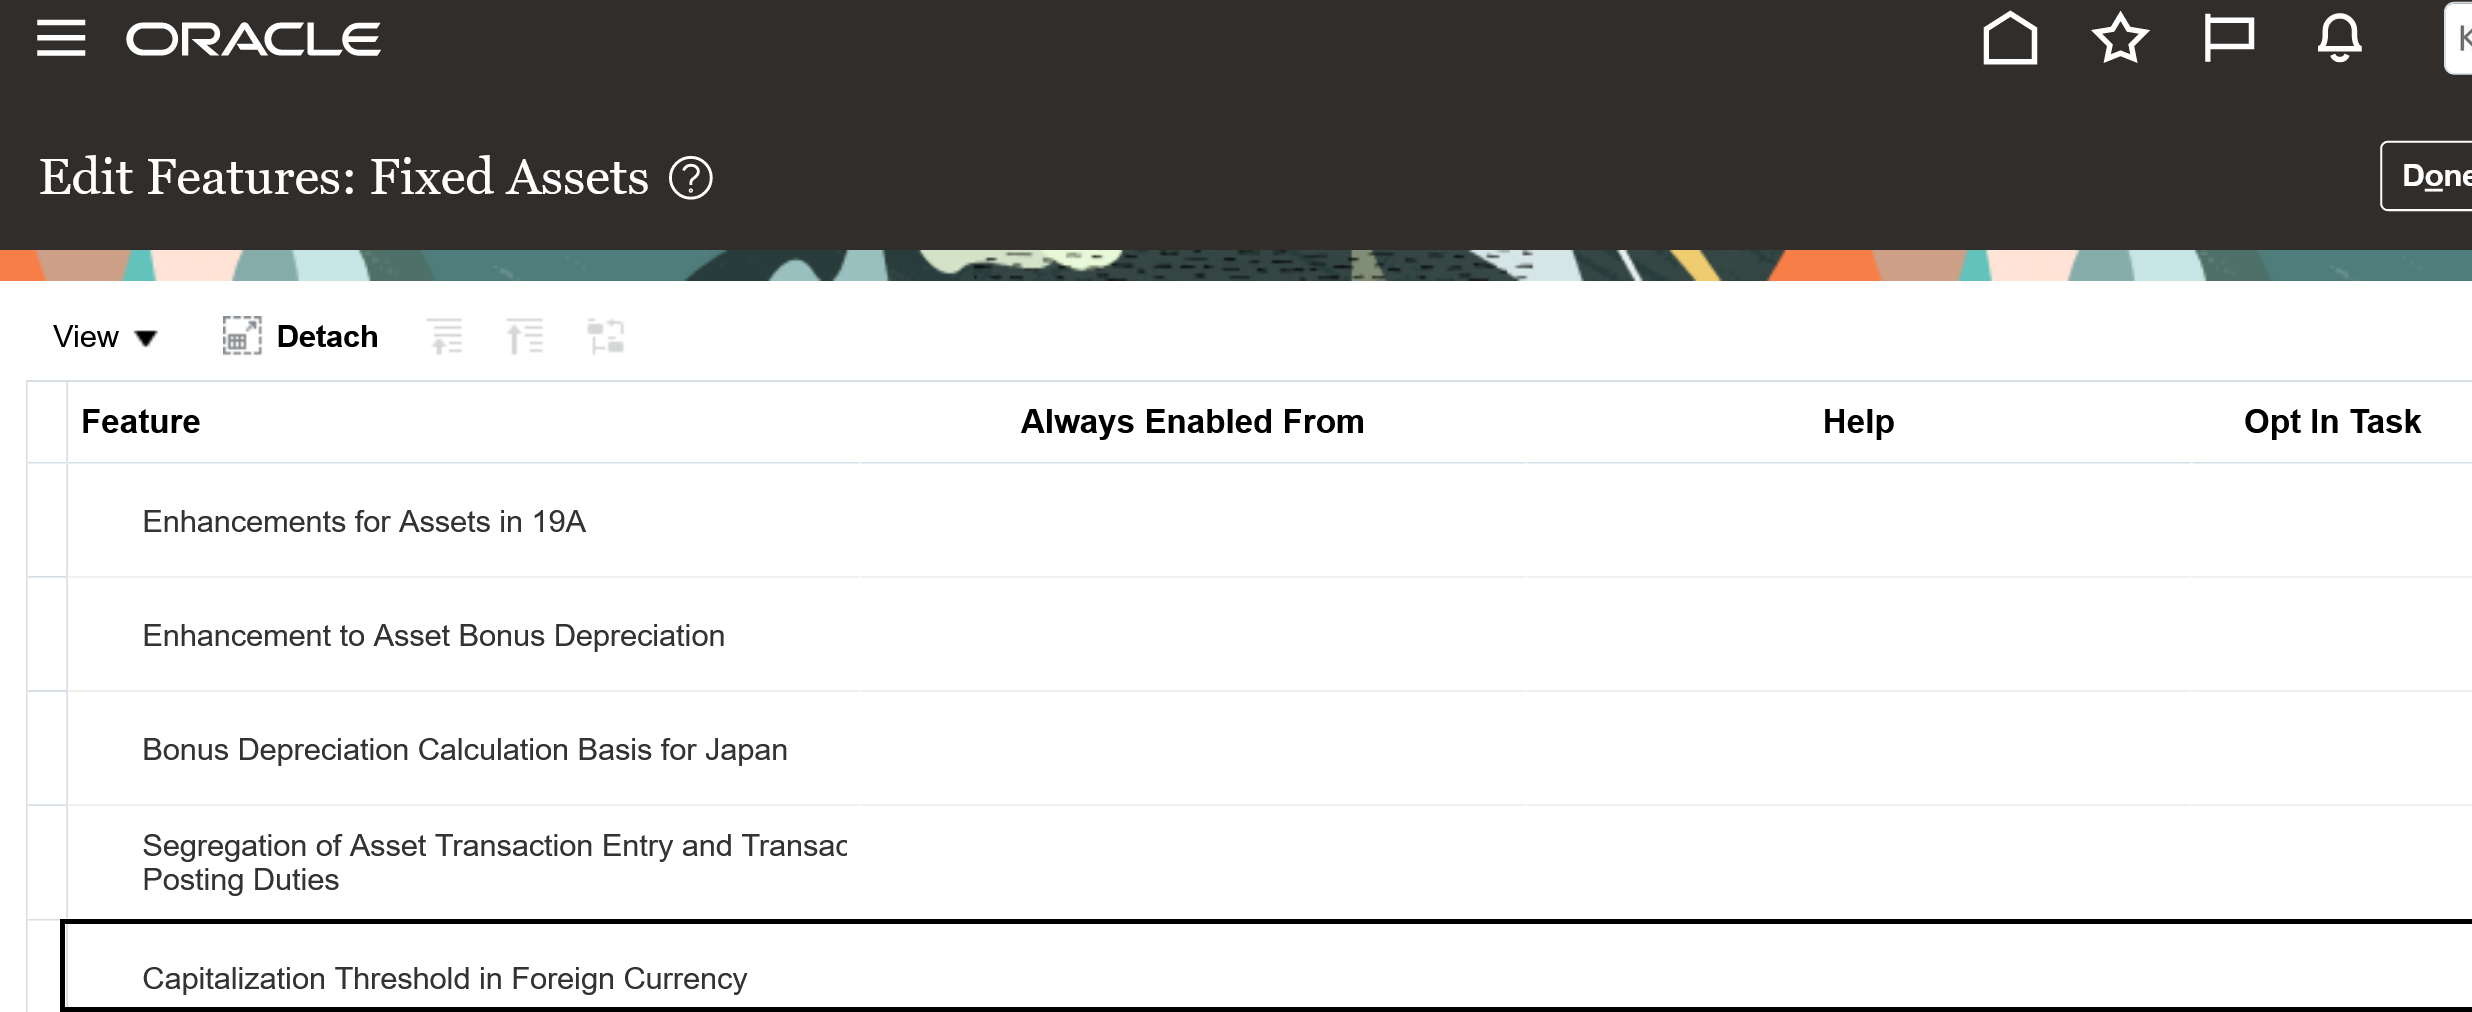
Tips And Considerations
The capitalization threshold limit specified in the Edit Asset Book page validates the threshold for all assets in all categories in a currency other than the ledger currency. To override threshold validation for the functional currency, specify the threshold limit in the Edit Categories page.
Key Resources
- Refer document on Enabling capitalization threshold
- Capitalization and Low Value Asset Threshold (Doc ID 2411399.1)
Access Requirements
No new privileges are required to access the Capitalization Threshold in Foreign Currency feature.
Segregation of Asset Transaction Entry and Transaction Posting Duties
Segregate the duties for users who enter and prepare asset transactions and users who review and post the transactions. This helps enforce the internal control requirement that users who review and post asset transactions are different from those who create the transactions.
When you segregate duties, two unique users with a custom job role assigned to each user are required for each transaction.
- Transaction Preparer User can:
- Create all the asset transactions, including Addition, Adjustment, Transfer and Retirement in draft and set the status to Review but can't post transactions.
- The Submit button is disabled for the user.
- Transaction Reviewer User can:
- Review transactions in Edit mode and post all the asset transactions, including Addition, Adjustment, Transfer and Retirement, but cannot Create or Edit the transactions.
- Send a transaction back to the preparer if it requires corrections by changing the queue status to New.
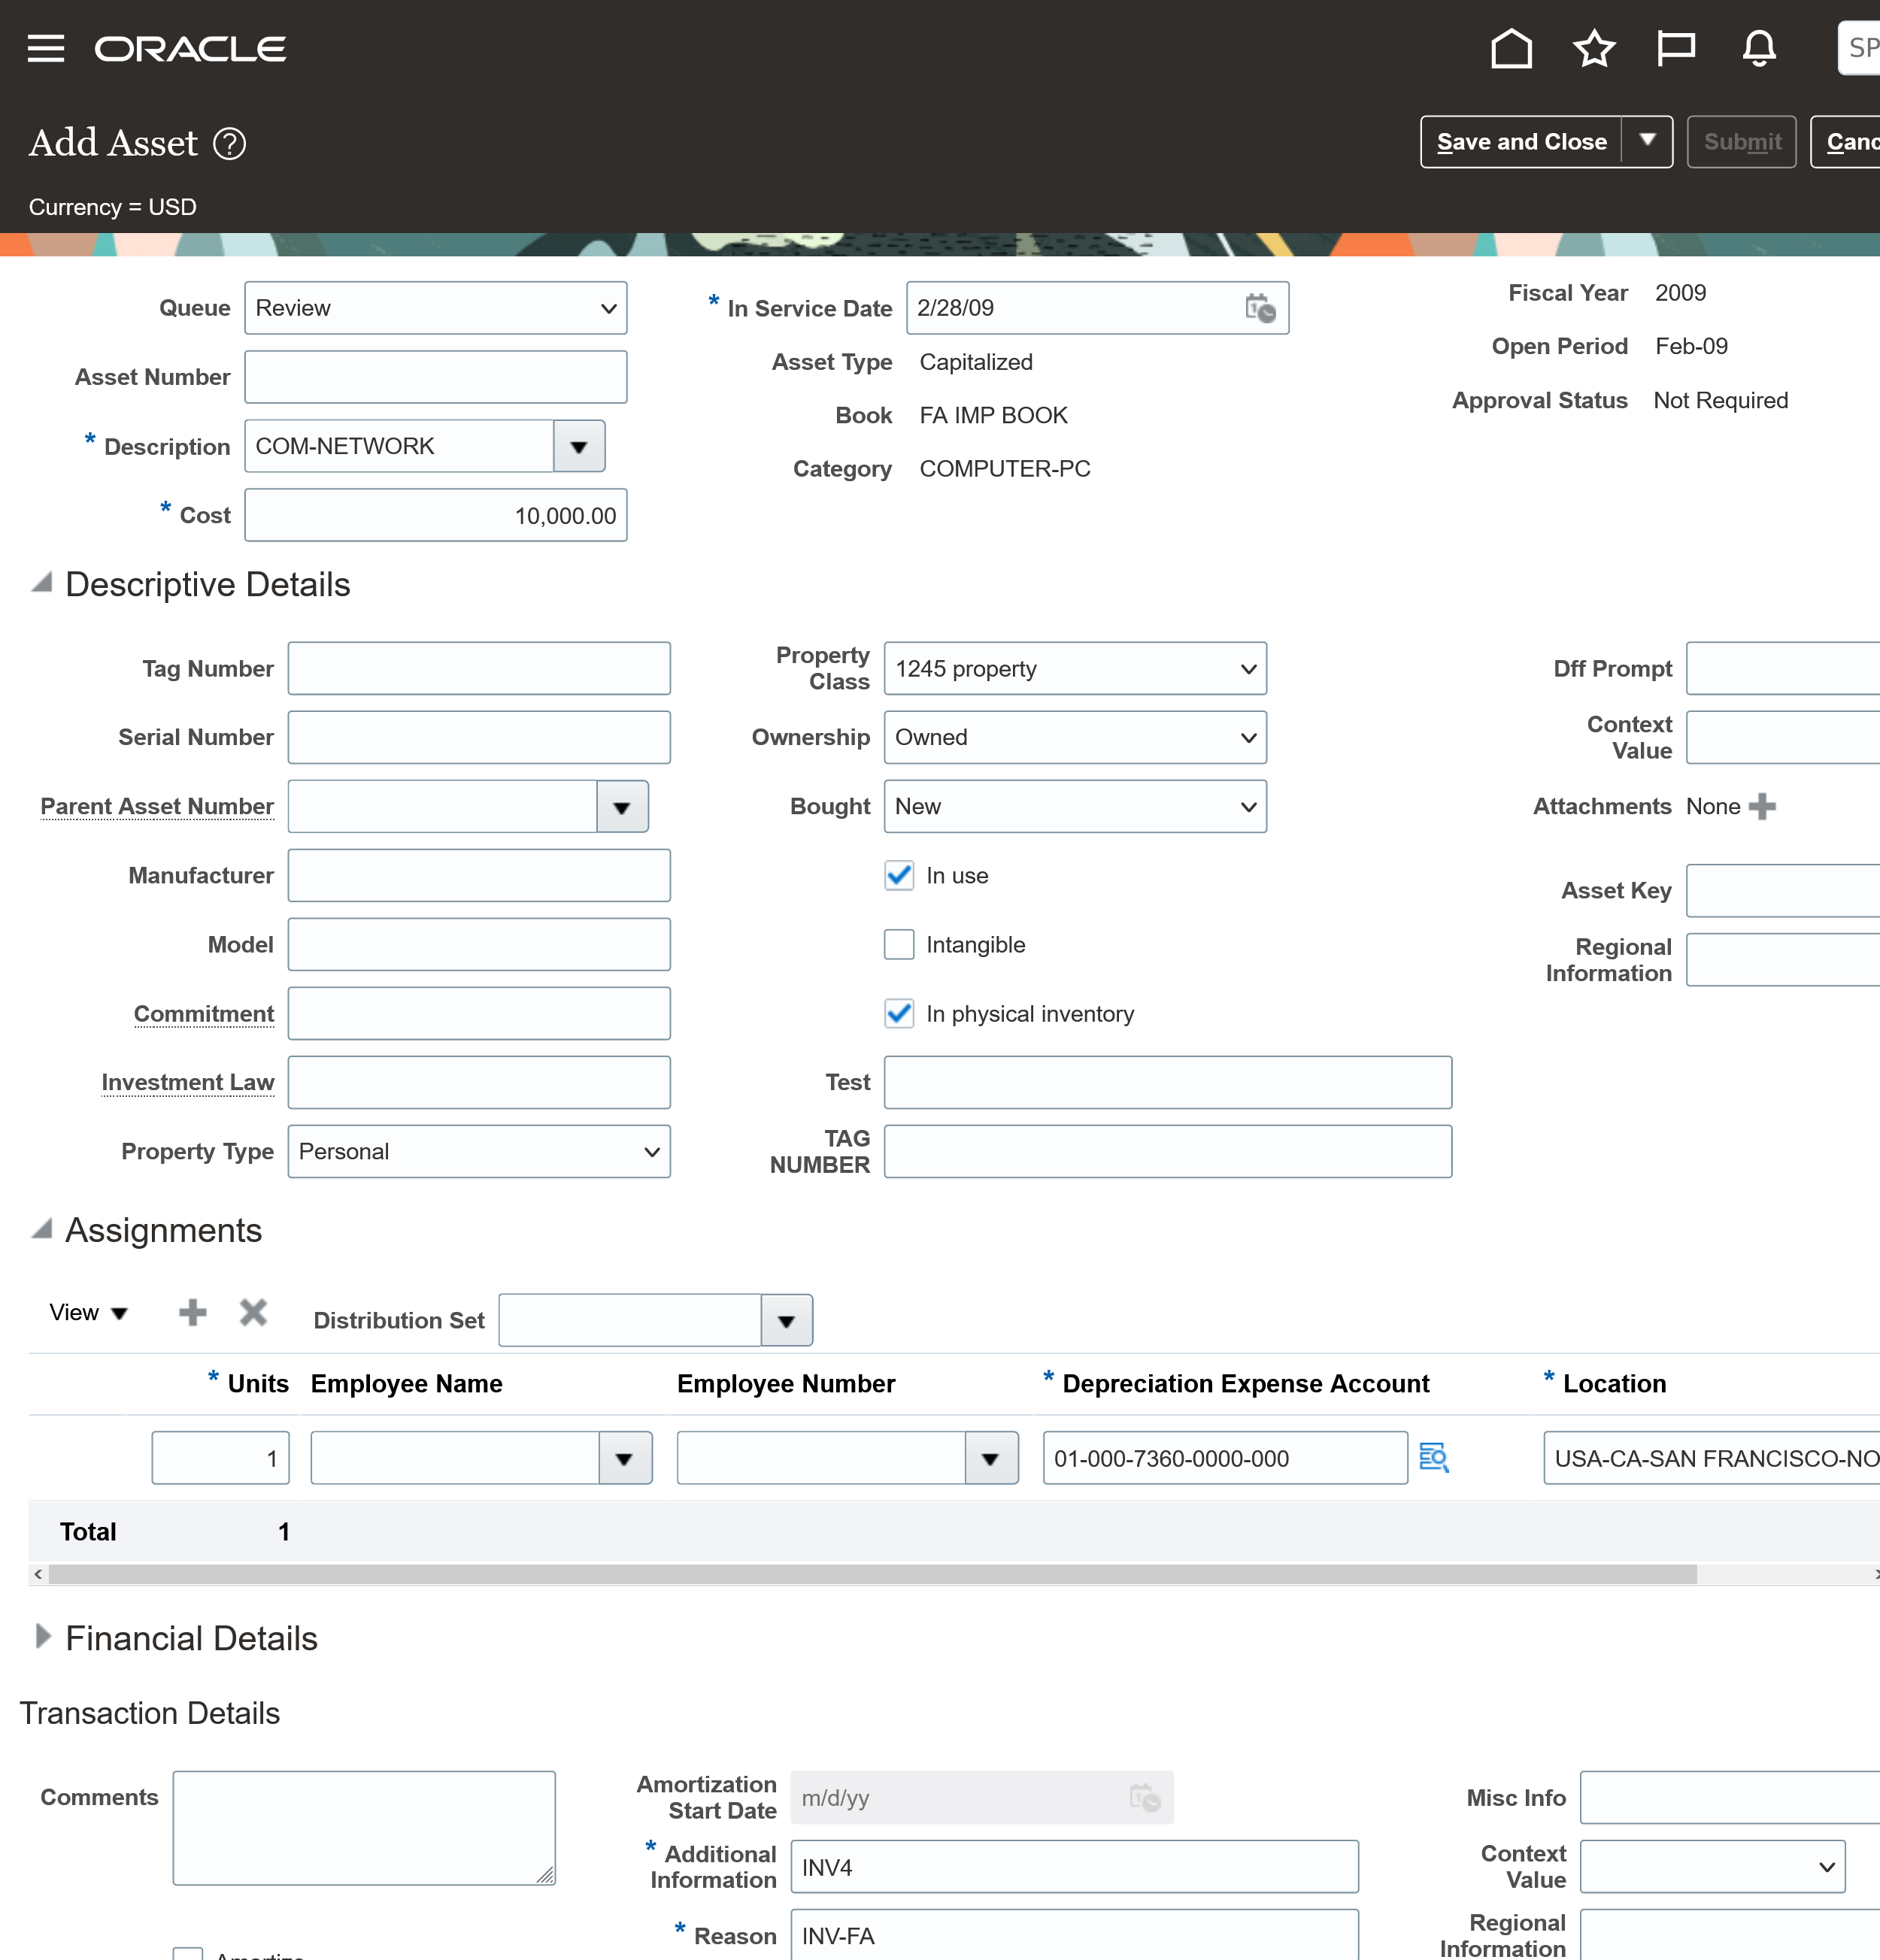
Asset Addition by 'Transaction Preparer'
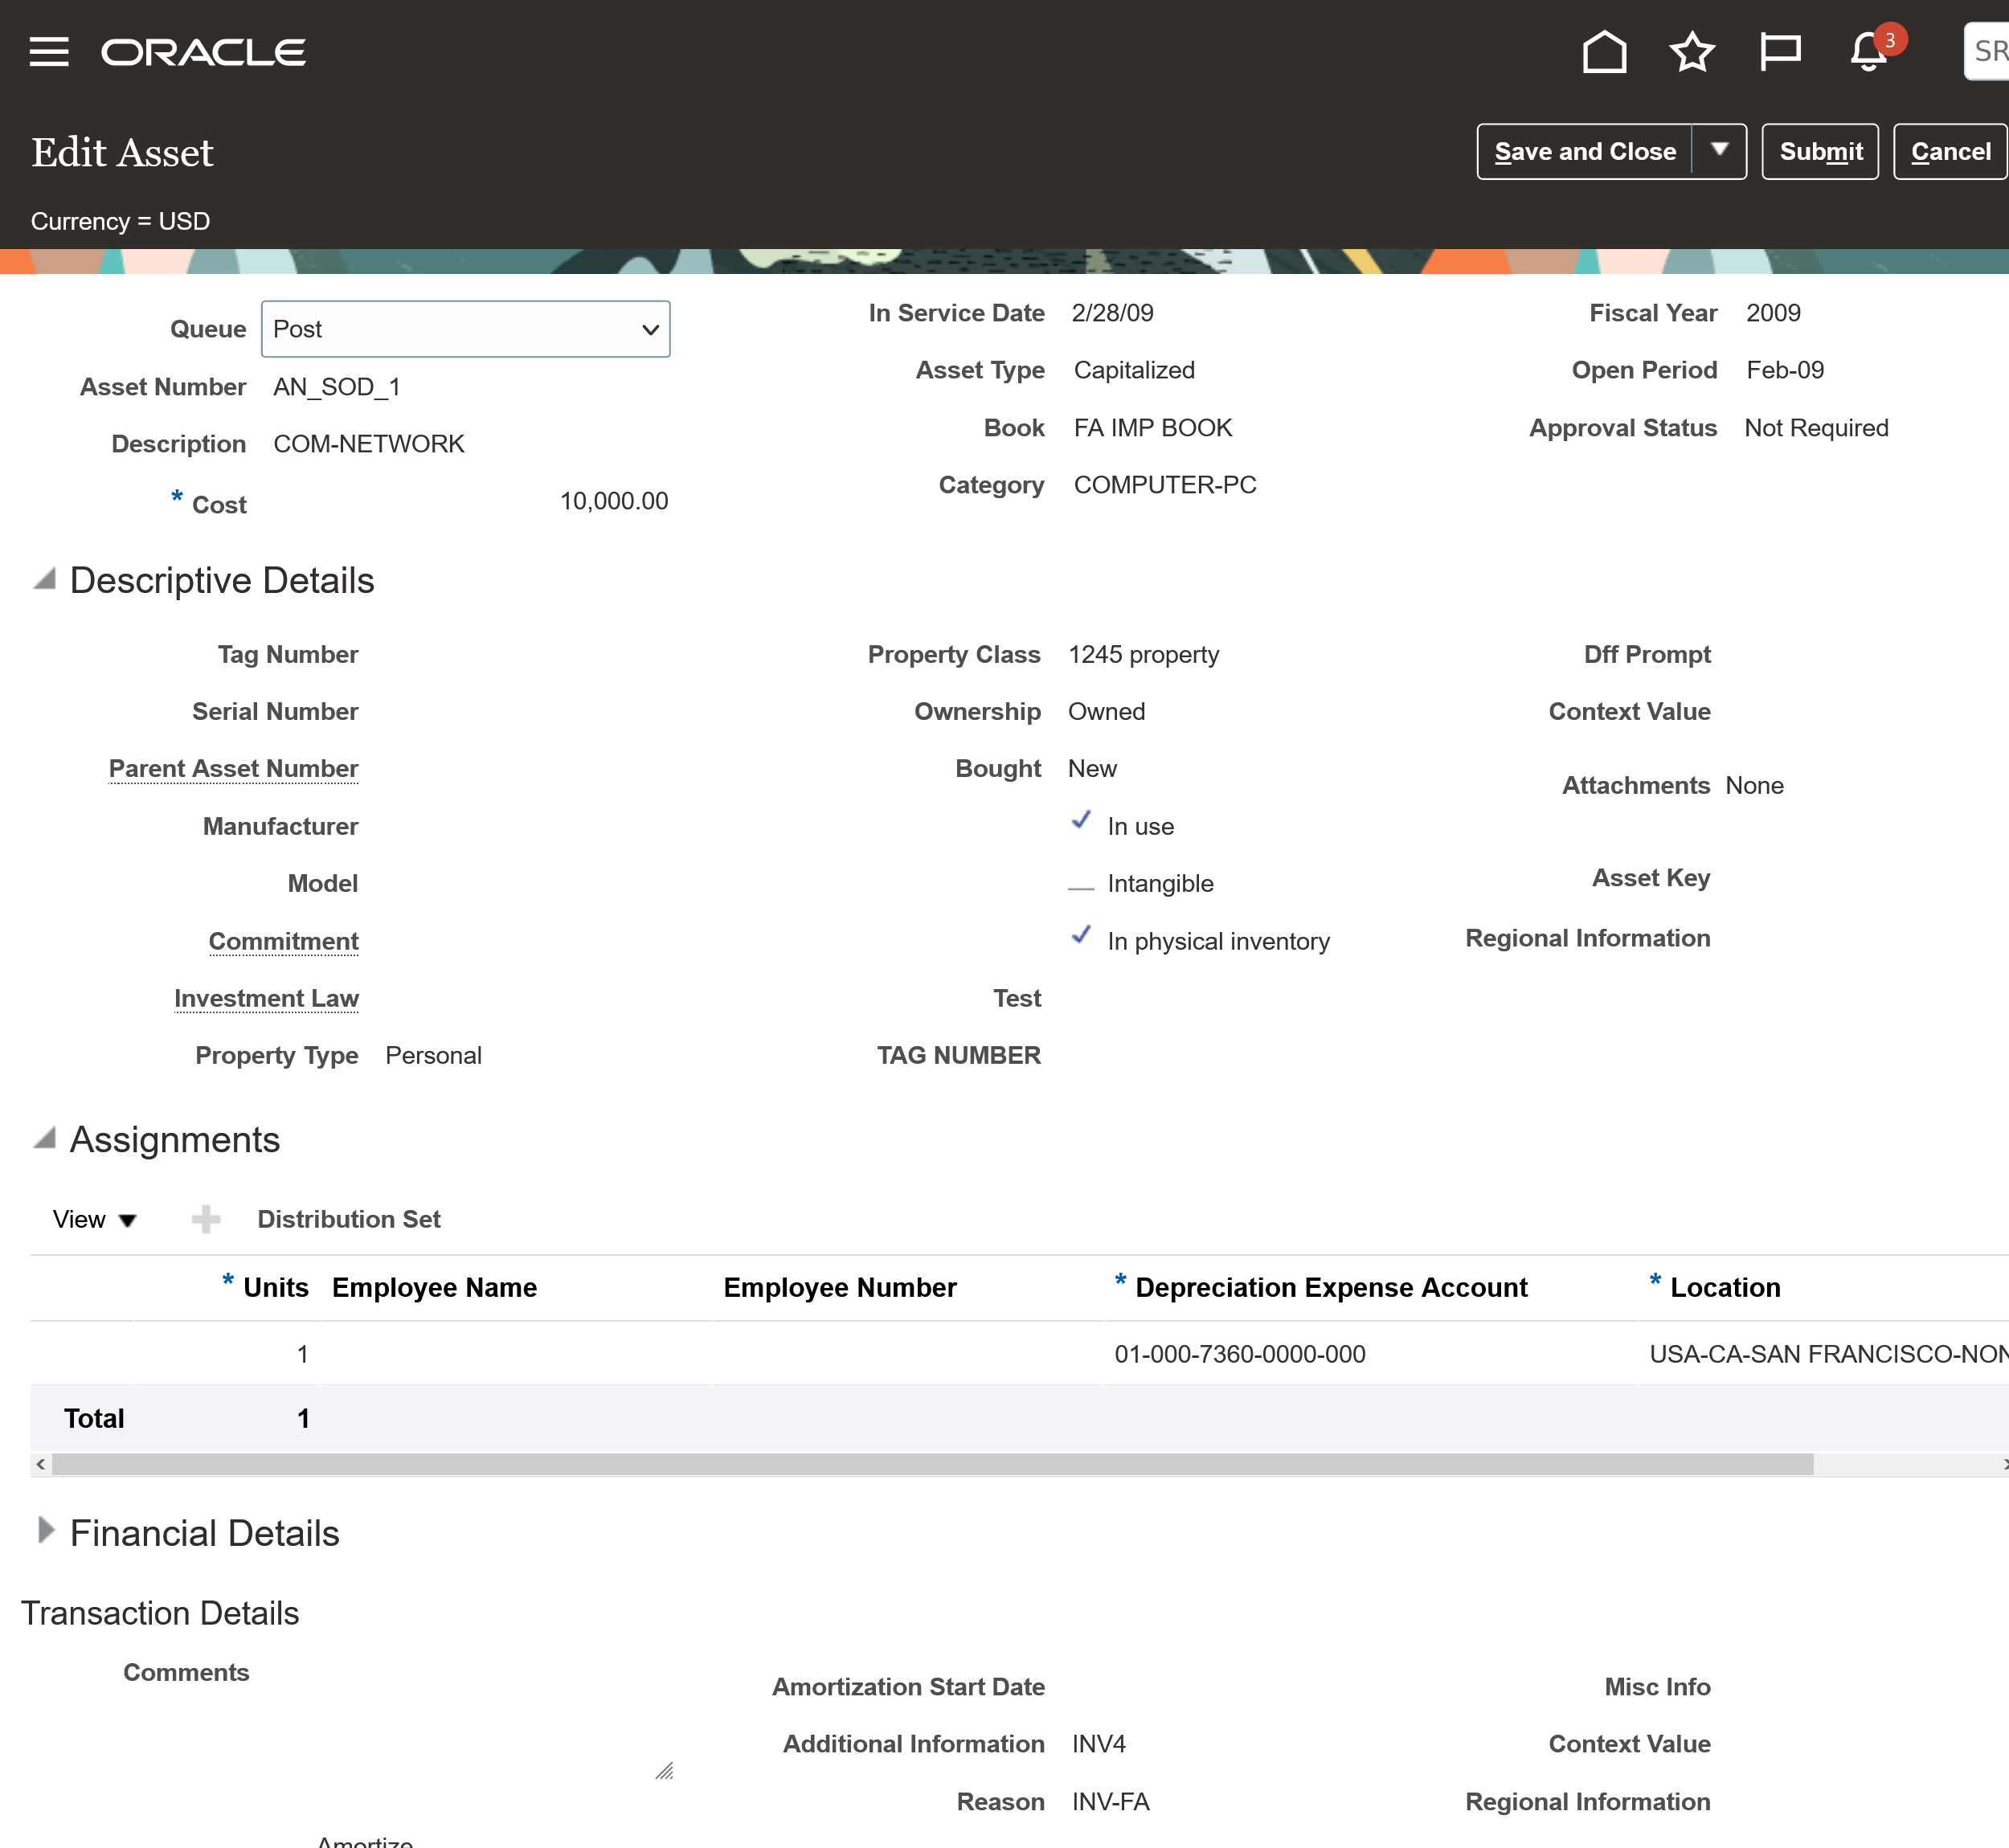
Edit Asset by the 'Transaction Reviewer'
Business benefits include:
- Enforces the internal control requiring one user to create a transaction and a different user to review and post the transaction.
- Eliminates errors when recording transactions because they're prepared and reviewed by two different users.
- Ensures transactions are verified and reviewed before they're posted.
- Adheres to compliance and better accountability and recording of the audit trail.
- Ensures efficiency in recording transactions because the segregation of duties is at the user level and not at the asset book level.
Steps to Enable
- Use the Opt in to enable this feature. For instructions, refer to the Optional Uptake of New Features section of this document.
- Offering: Financials
- Use the opt-in for Segregation of Asset Transaction Entry and Transaction Posting Duties in Fixed Assets to enable this feature.
- Setup and Maintenance -> Financials -> Change Feature Opt in -> Financials -> Edit Feature -> Segregation of Asset Transaction Entry and Transaction Posting Duties.
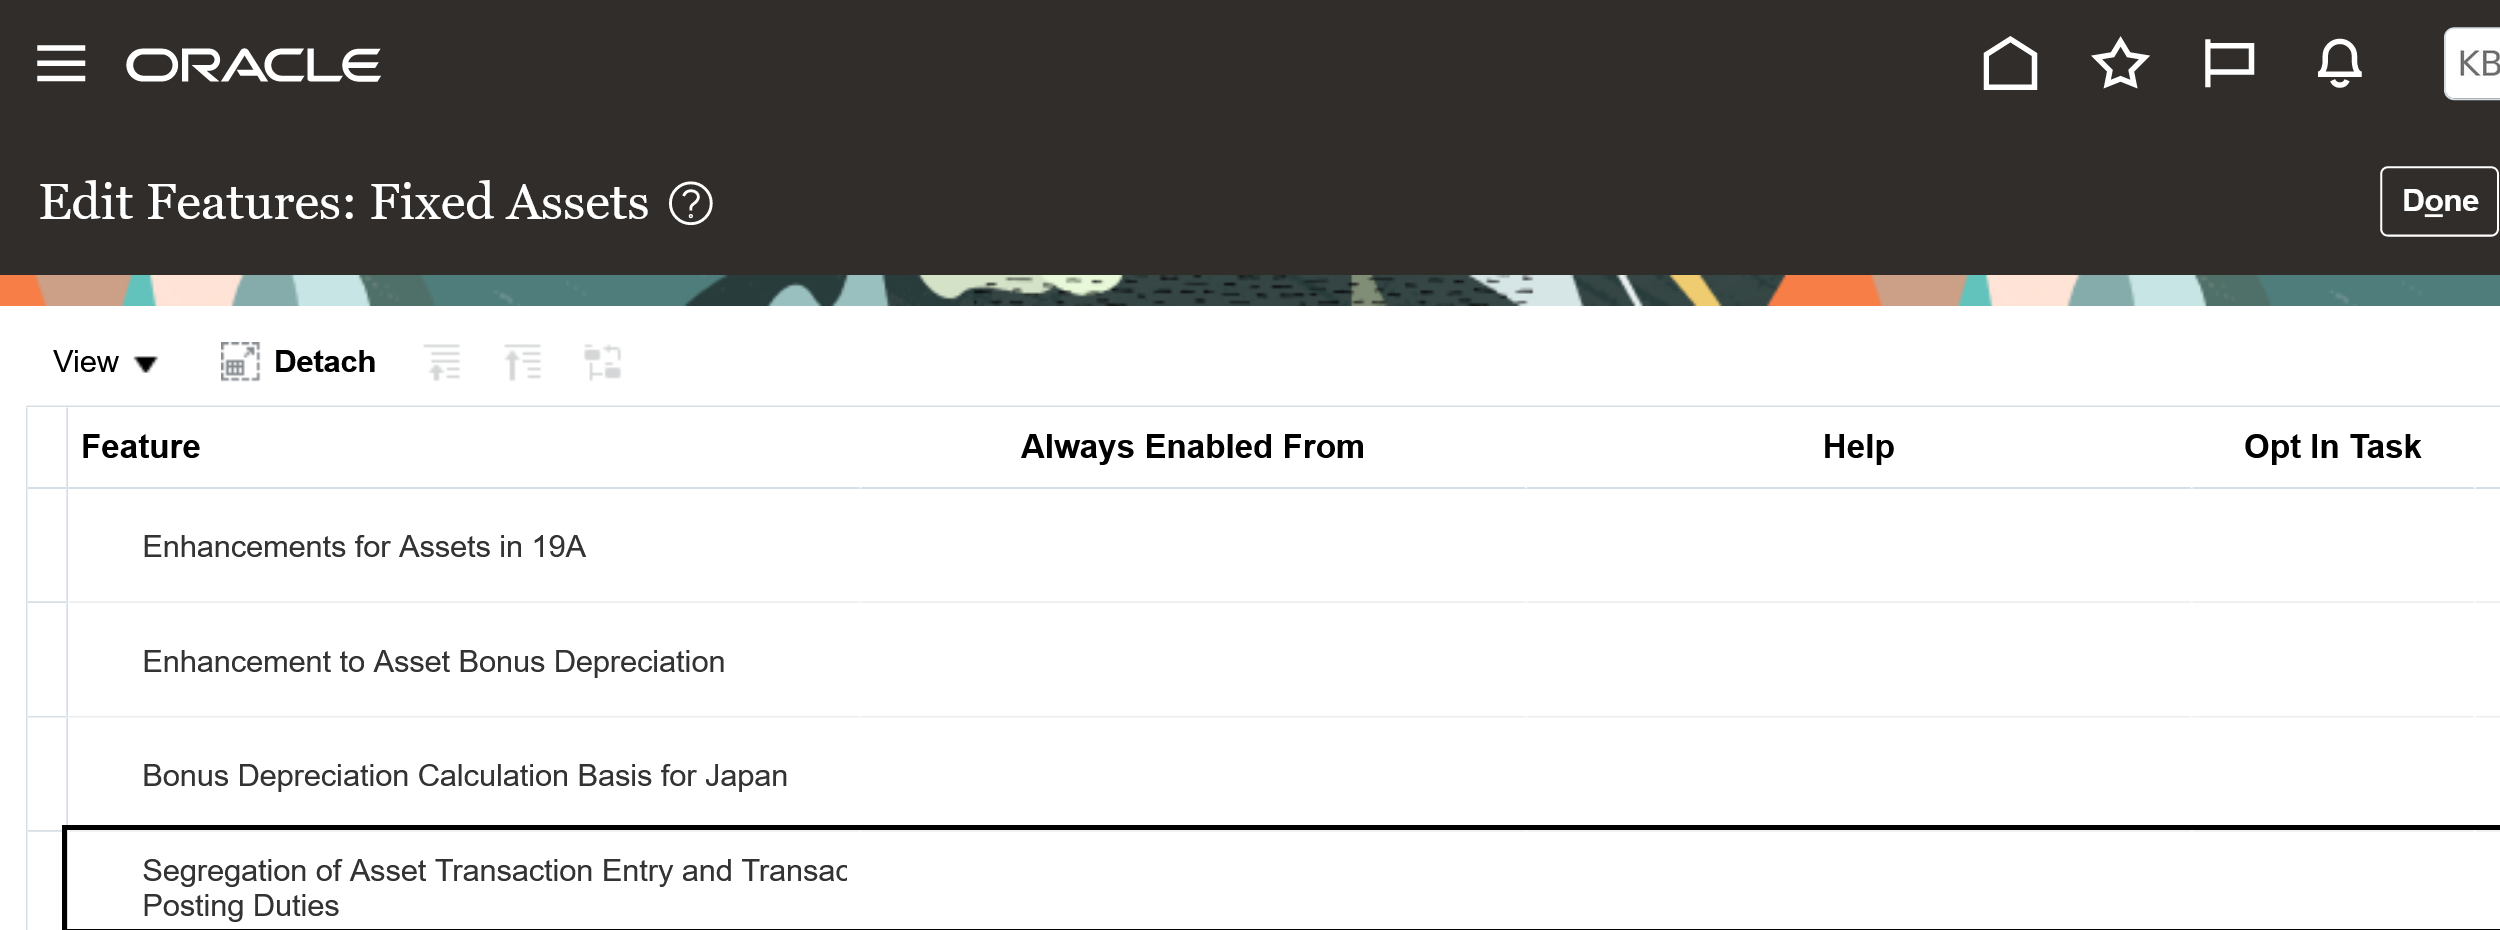
- Roles for the Transaction Preparer
- Create a custom job role by copying the predefined 'Asset Accounting Manager' job role. (ORA_FA_ASSET_ACCOUNTING_MANAGER_JOB)
- Delete the predefined duty role 'Fixed Asset Transaction Management' from the copied custom job role.
- Create the 'Custom Asset Transaction Entry Duty' custom duty role by copying the predefined Fixed Asset Transaction Management duty role. (ORA_FA_FIXED_ASSET_TRANSACTION_MANAGEMENT_DUTY)
- Add the custom duty role ‘Custom Asset Transaction Entry Duty’ to the custom job role.
- Remove the following functional privileges for the Transaction Preparer user to disable to post privileges:
- Post Fixed Asset Online Transactions (FA_POST_FIXED_ASSET_ONLINE_TRANSACTIONS)
- Post Mass Fixed Asset Financial Transactions (FA_POST_MASS_FIXED_ASSET_FINANCIAL_TRANSACTIONS)
- Post Mass Fixed Asset Retirement (FA_POST_MASS_FIXED_ASSET_RETIREMENT)
- Post Mass Additions (FA_POST_MASS_ADDITIONS)
- Post Mass Fixed Asset Assignment (FA_POST_MASS_FIXED_ASSET_ASSIGNMENT)
- Roles for the Transaction Reviewer
- Create a custom job role by copying the predefined 'Asset Accounting Manager' job role. (ORA_FA_ASSET_ACCOUNTING_MANAGER_JOB)
- Create a custom duty role called 'Custom Asset Transaction Review Duty'.
- Add the custom duty role 'Custom Asset Transaction Review Duty' to the custom job role.
- Add the following functional privileges for the Transaction Reviewer.
- View Fixed Asset Addition (FA_VIEW_FIXED_ASSET_ADDITION_PRIV)
- View Fixed Asset Adjustment (FA_VIEW_FIXED_ASSET_ADJUSTMENT_PRIV)
- View Fixed Asset Transfer (FA_VIEW_FIXED_ASSET_TRANSFER_PRIV)
- View Fixed Asset Retirement FA_VIEW_FIXED_ASSET_RETIREMENT_PRIV)
Tips And Considerations
After you enable this feature using opt-in,Segregation of Duties with transaction preparer and reviewer apply only to transactions performed using the Add Asset, Adjust Asset, Transfer Asset and Retire Asset pages.
Key Resources
- Refer to Segregation of Transaction Entry and Posting Duties in the Implementing Assets guide on Oracle Help Center.
- How to create custom role and privileges
Lease Accounting
Lease Amendments for Scope Increases at Standalone Price
Amend leases to add new lease components where the lease payments for the additional right of use are commensurate with the standalone price for the increase in scope. Lease administrators can then amortize the newly added assets and associated payments over the asset life starting from the amendment commencement date. These newly added lease components are accounted as a lease in themselves, and their present values and interest amounts are calculated using discount rates as of the amendment commencement date. Changes to existing lease components, their associated payments and payment increases are not allowed when performing an amendment for scope increase at a standalone price,
The following screenshots describe the process of amending a lease to account for scope increase at the standalone price.
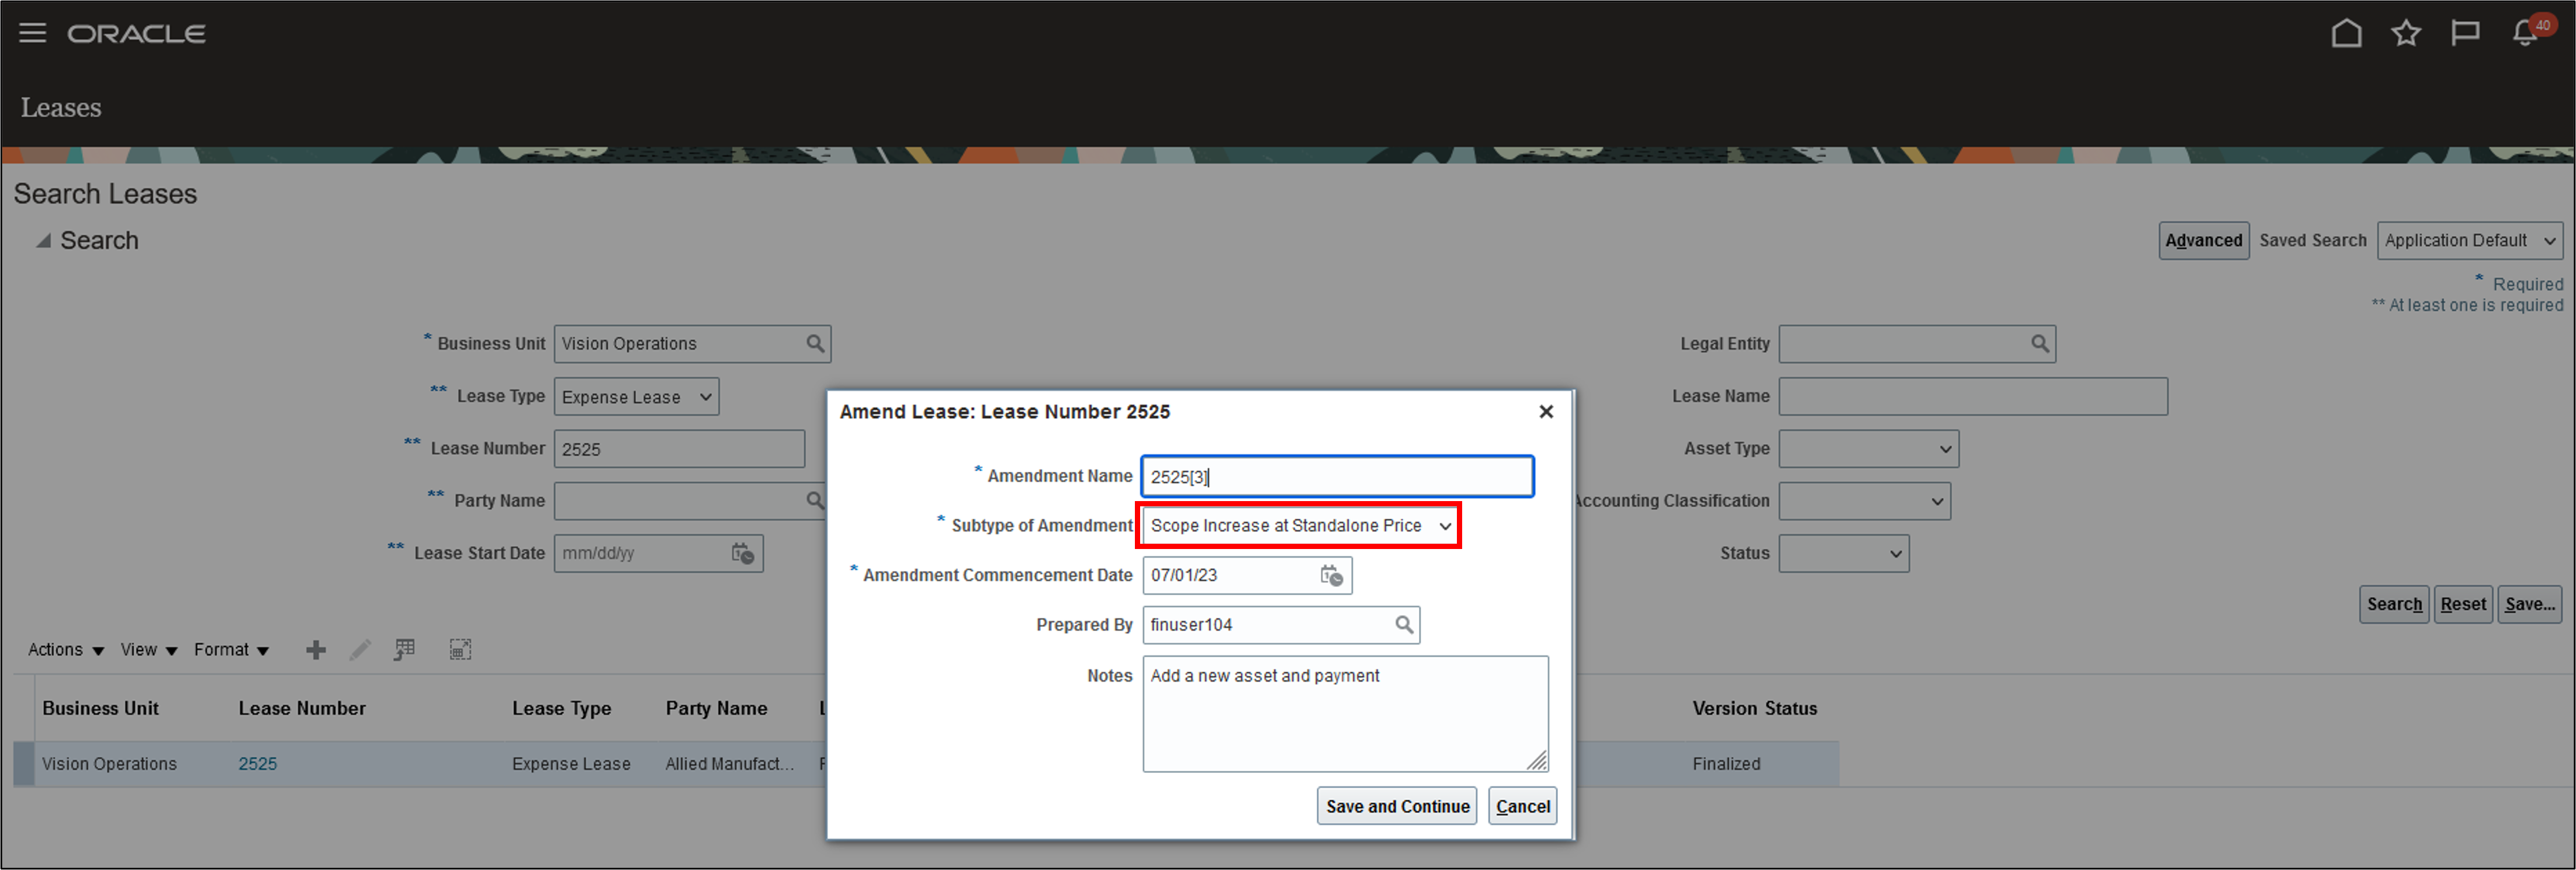
Create Amendment Page

Create Asset Page
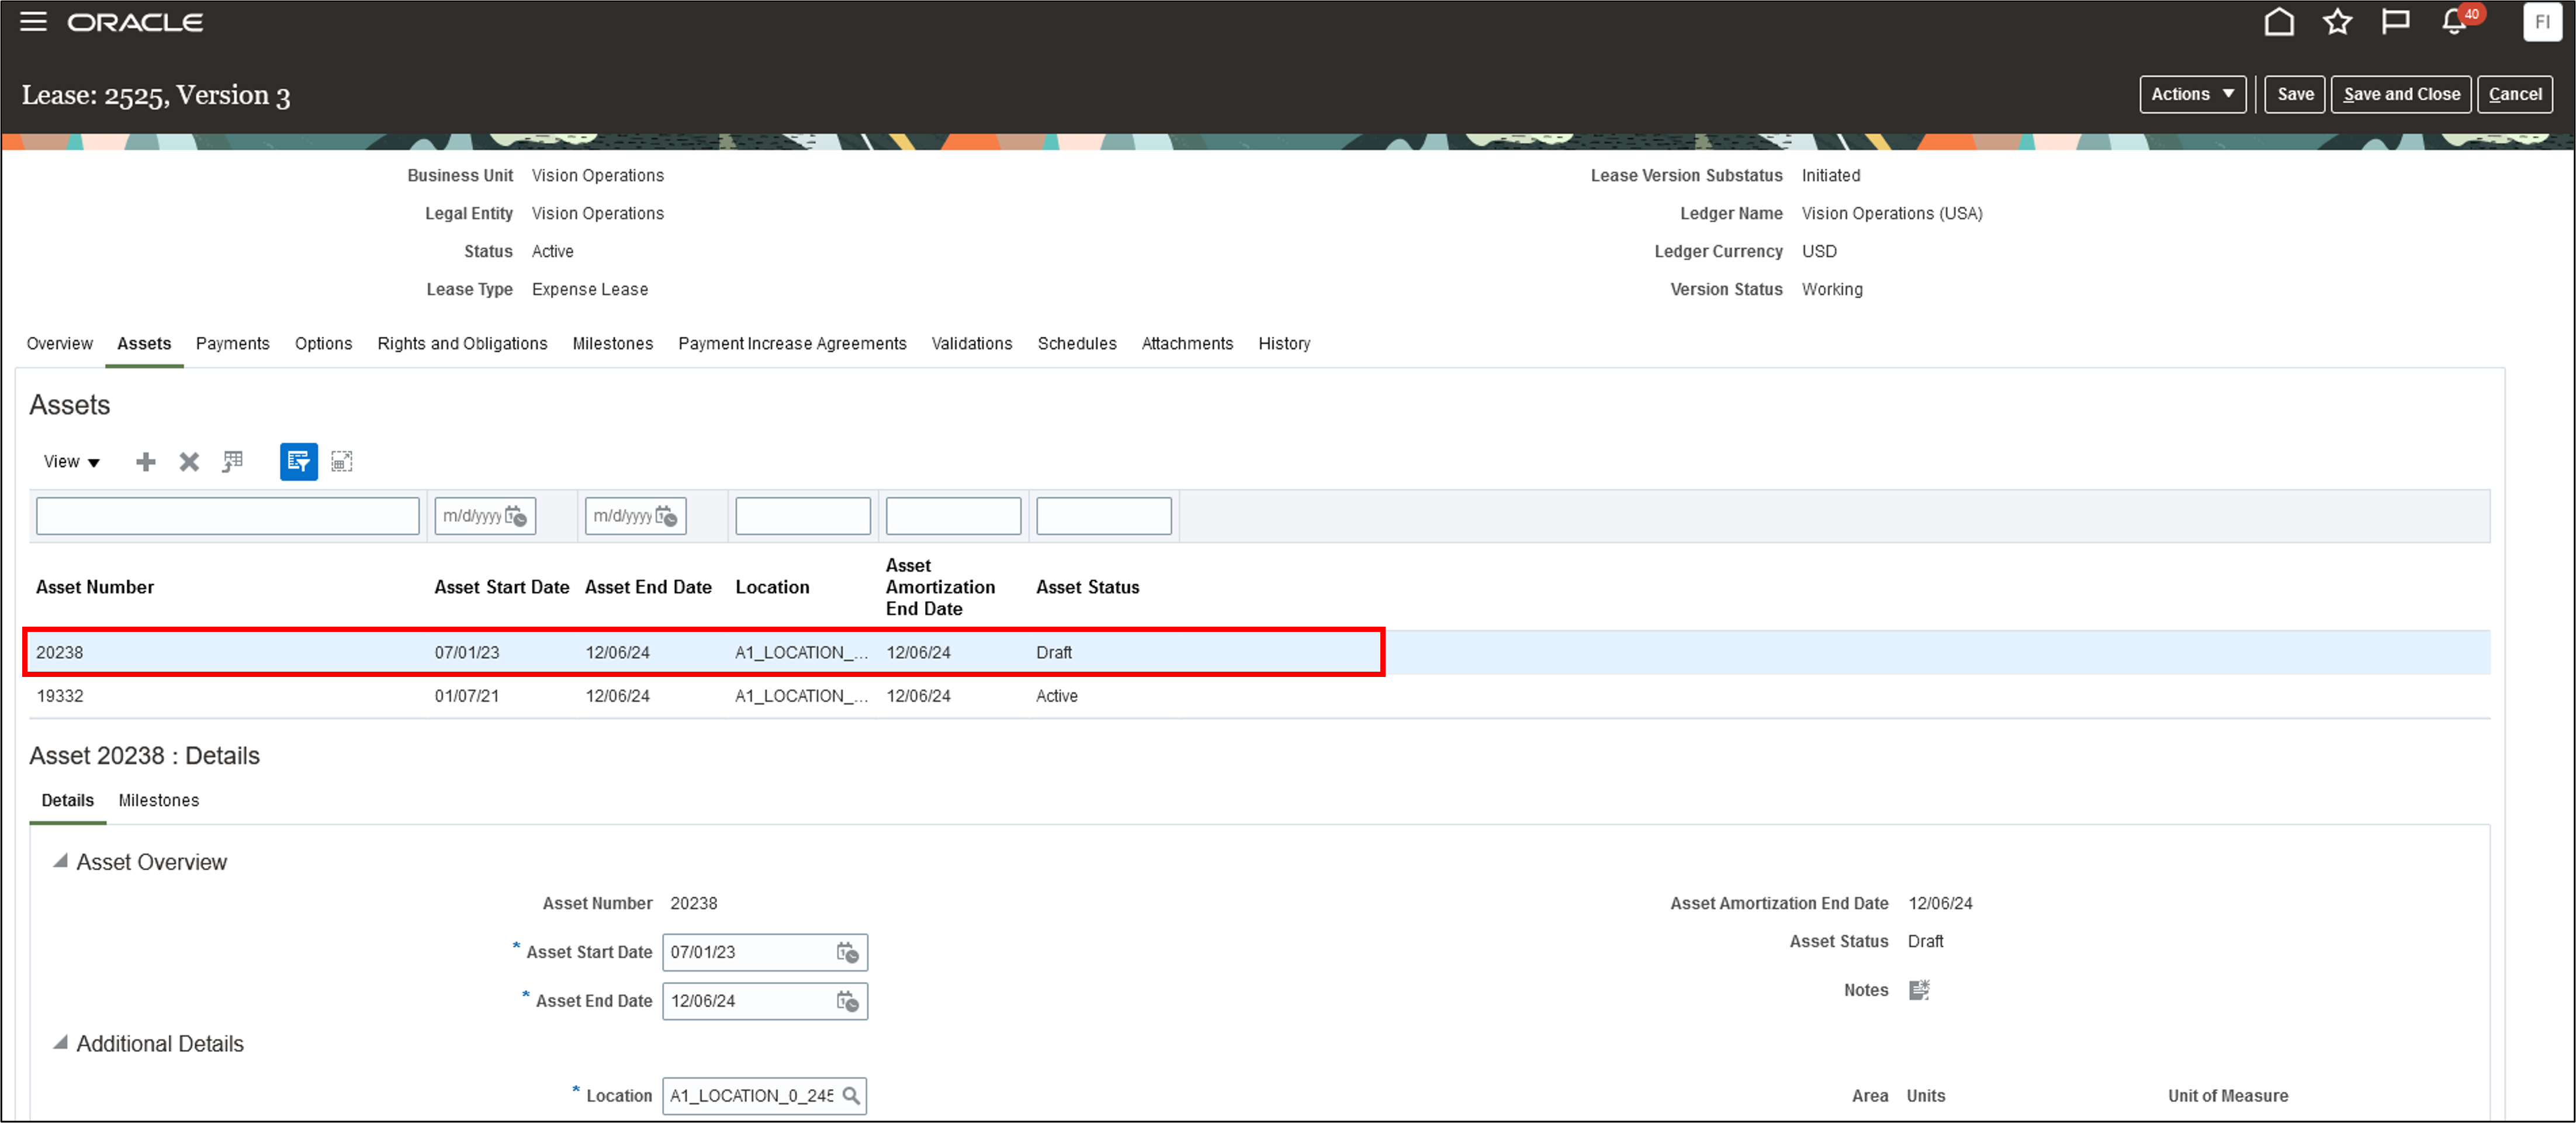
Asset Details Page
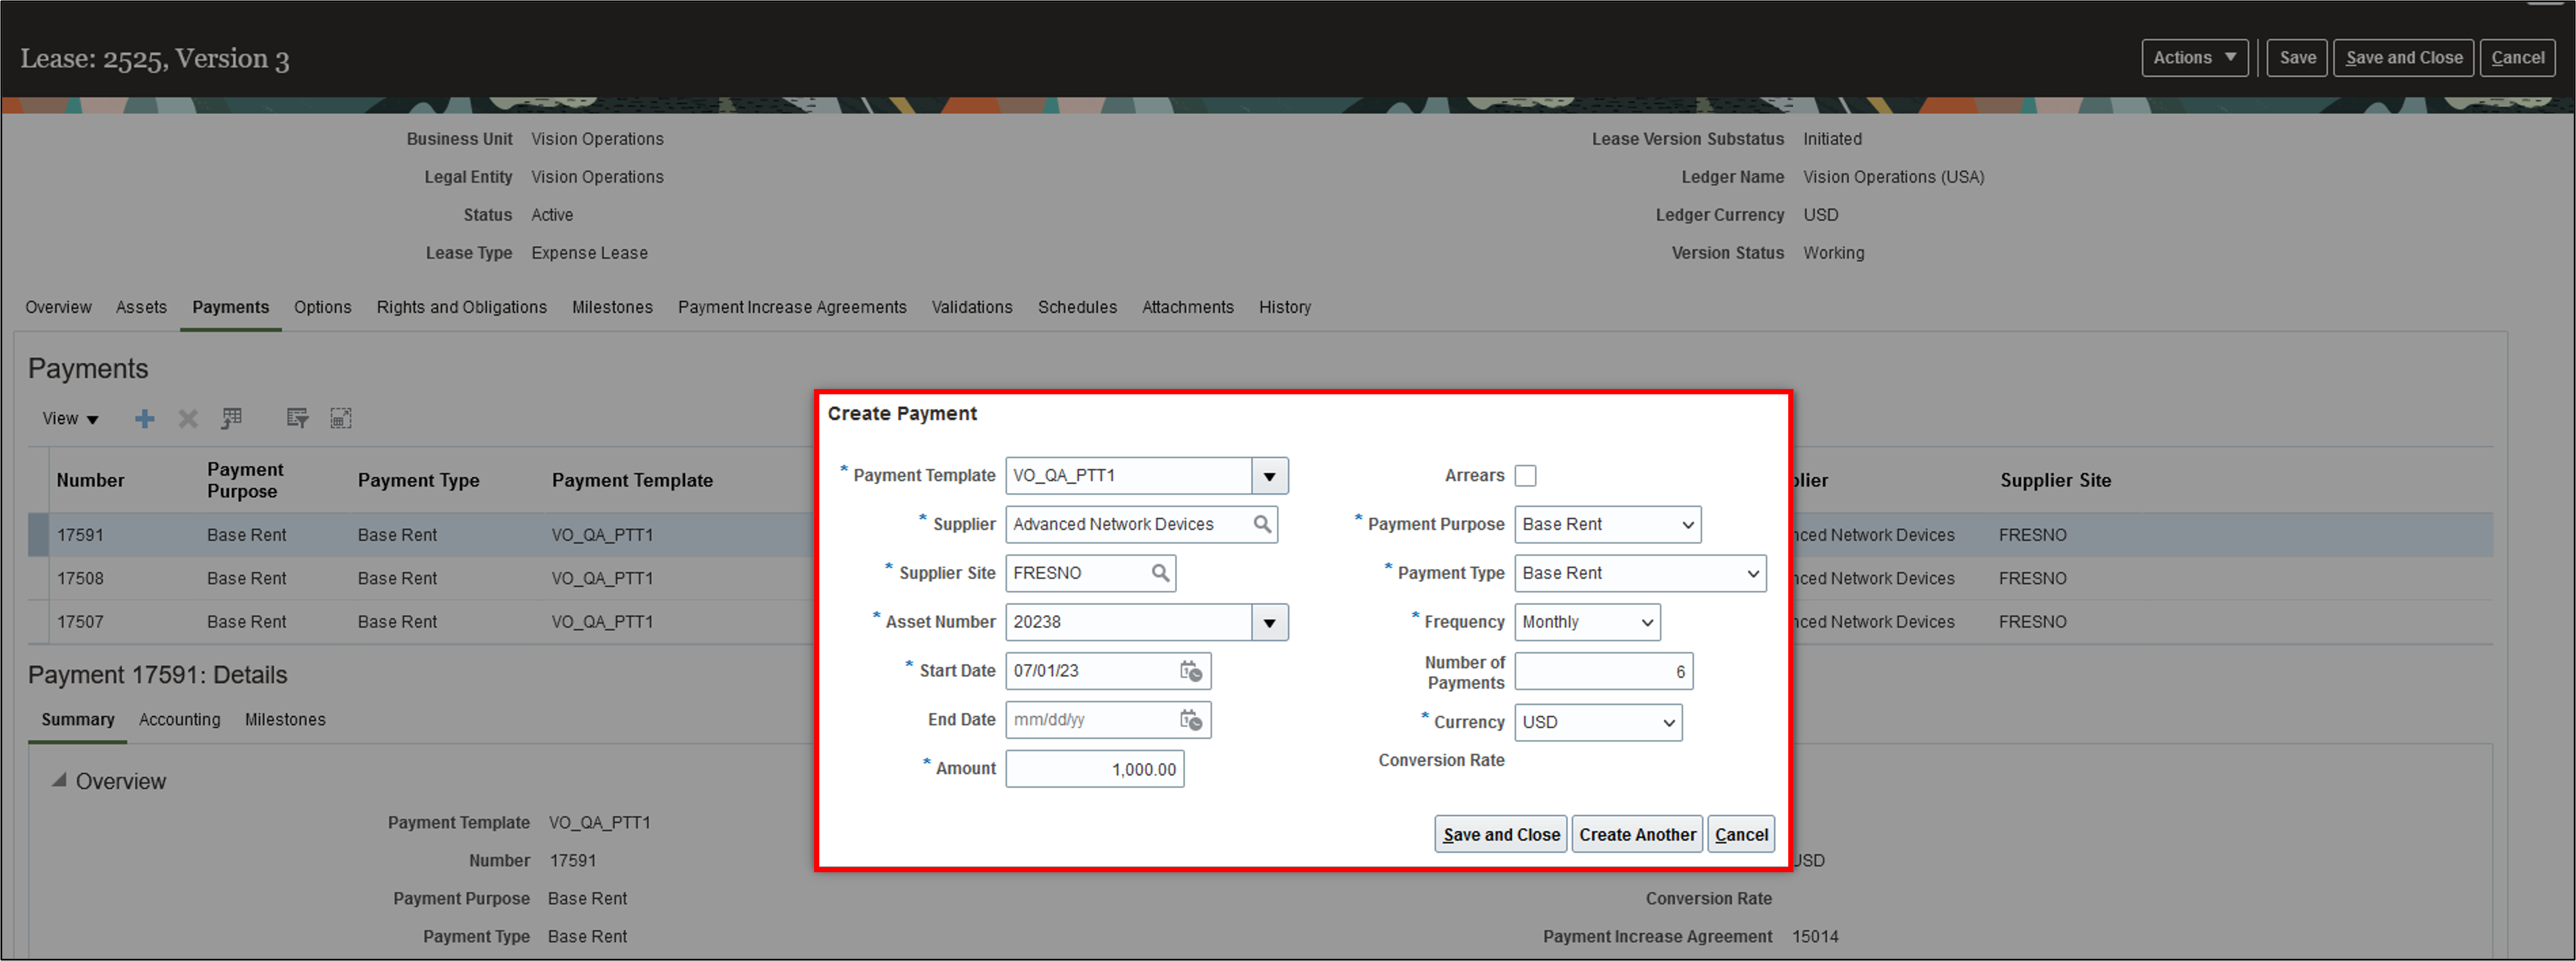
Create Payment Page
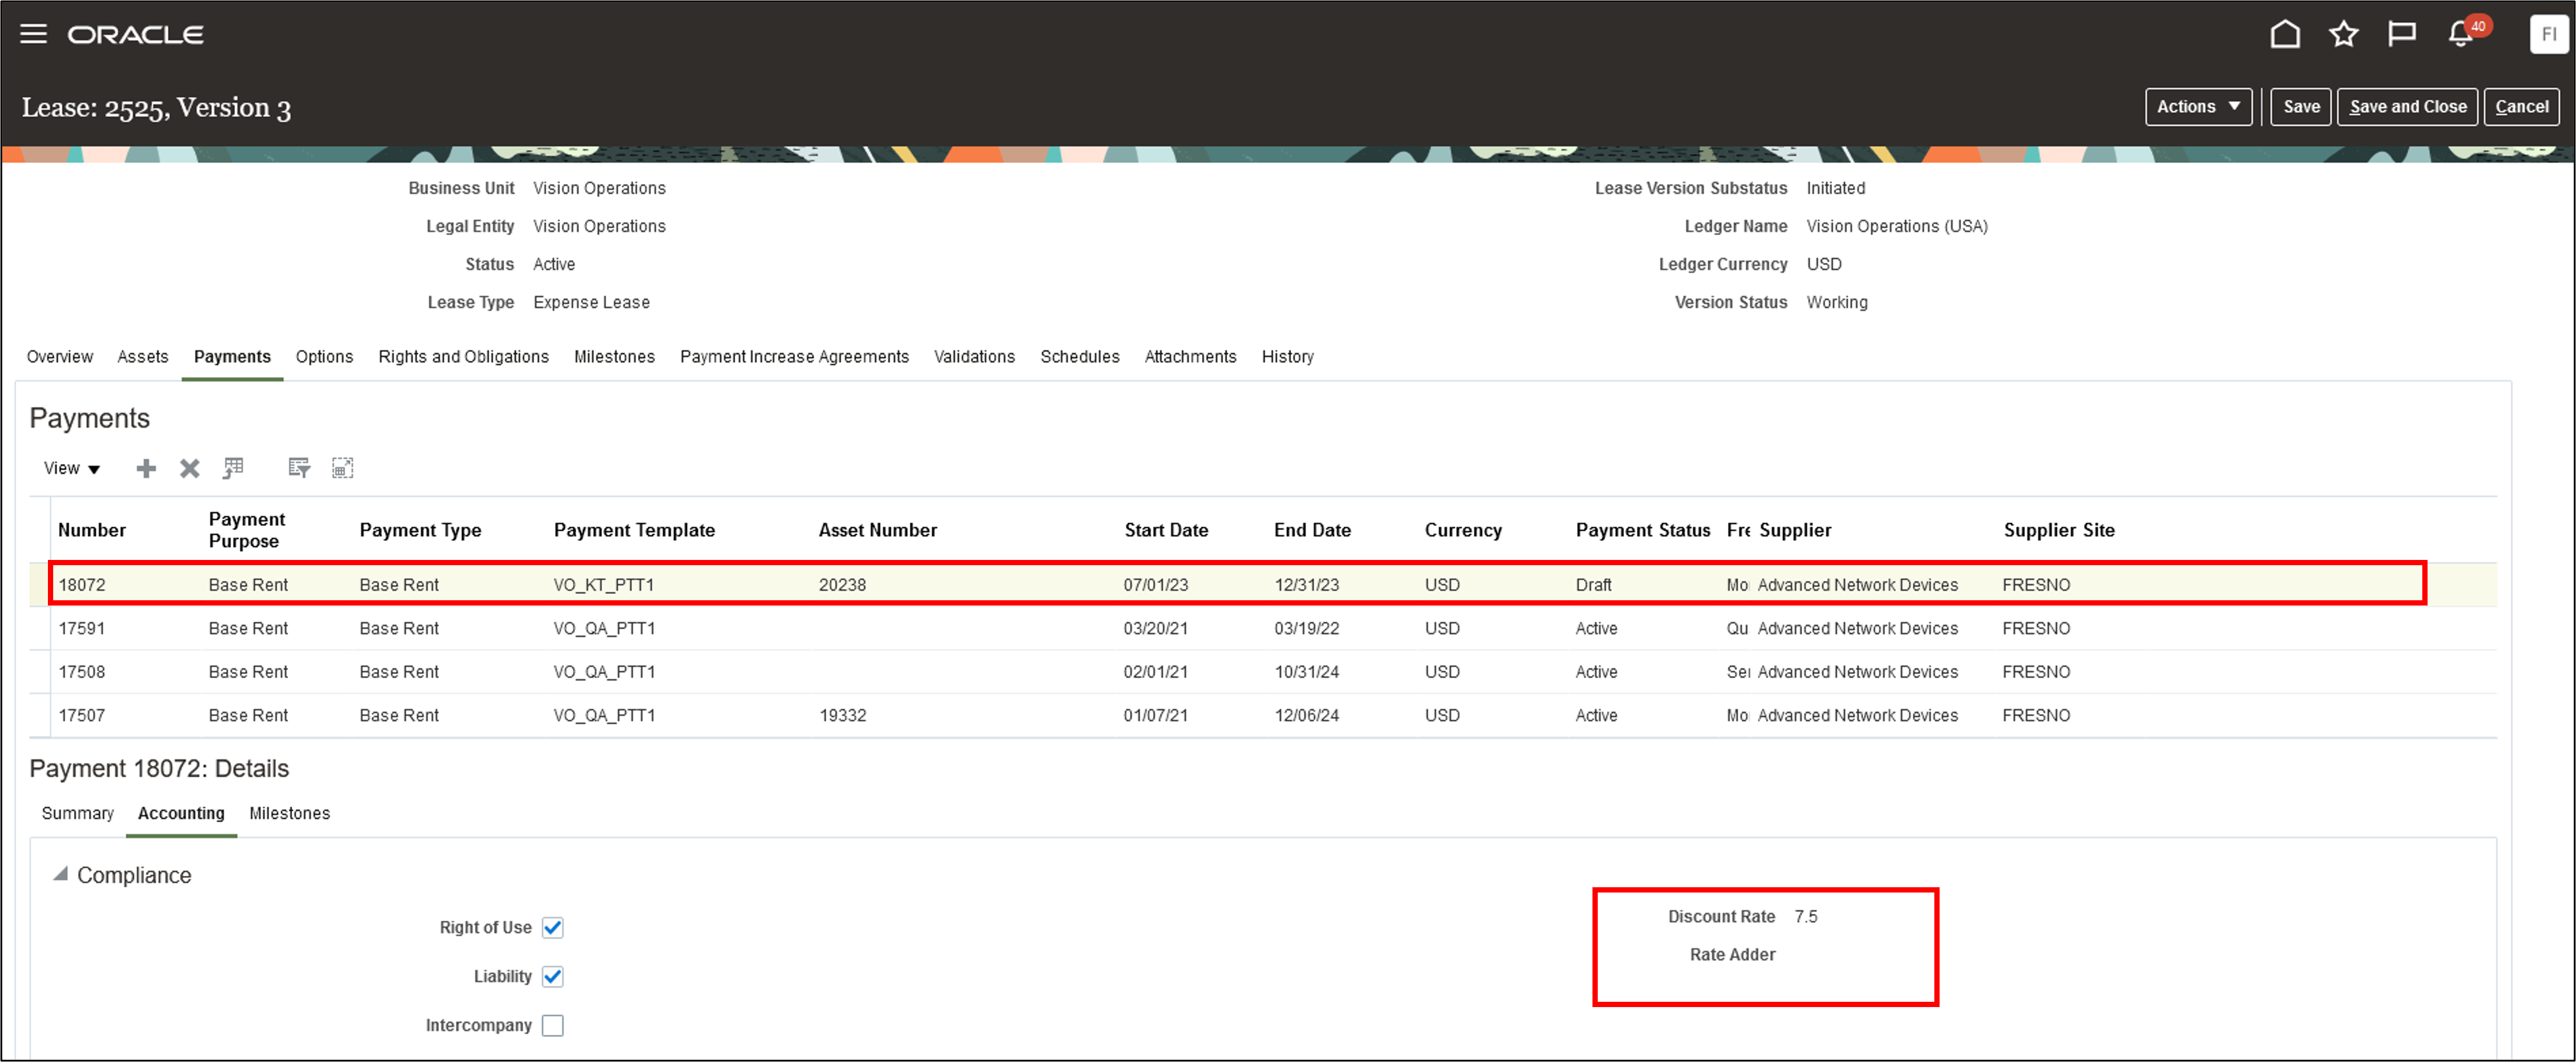
Payment Details Page
Business benefits include:
- Simplify compliance with IFRS 16 and ASC 842 lease accounting for scope increase amendments at the standalone price.
- Increase operational efficiency by managing new lease components as a separate lease within the same lease.
Steps to Enable
Use the Opt In UI to enable this feature. For instructions, refer to the Optional Uptake of New Features section of this document.
Offering: Financials No Longer Optional From: Update 24B
Access Requirements
You do not need any new role or privilege access to set up and use this feature.
Lease Invoice Improvements for Payment Processing
Assign ship-to locations to expense lease invoices created in Payables for periodic payments to lessors and other parties associated with leases.The asset location from the lease will be interfaced to Payables as the invoice line ship-to location for payments associated to the asset. Payments defined at lease level will continue to have the invoice line ship-to location derived from supplier site setups in Payables.
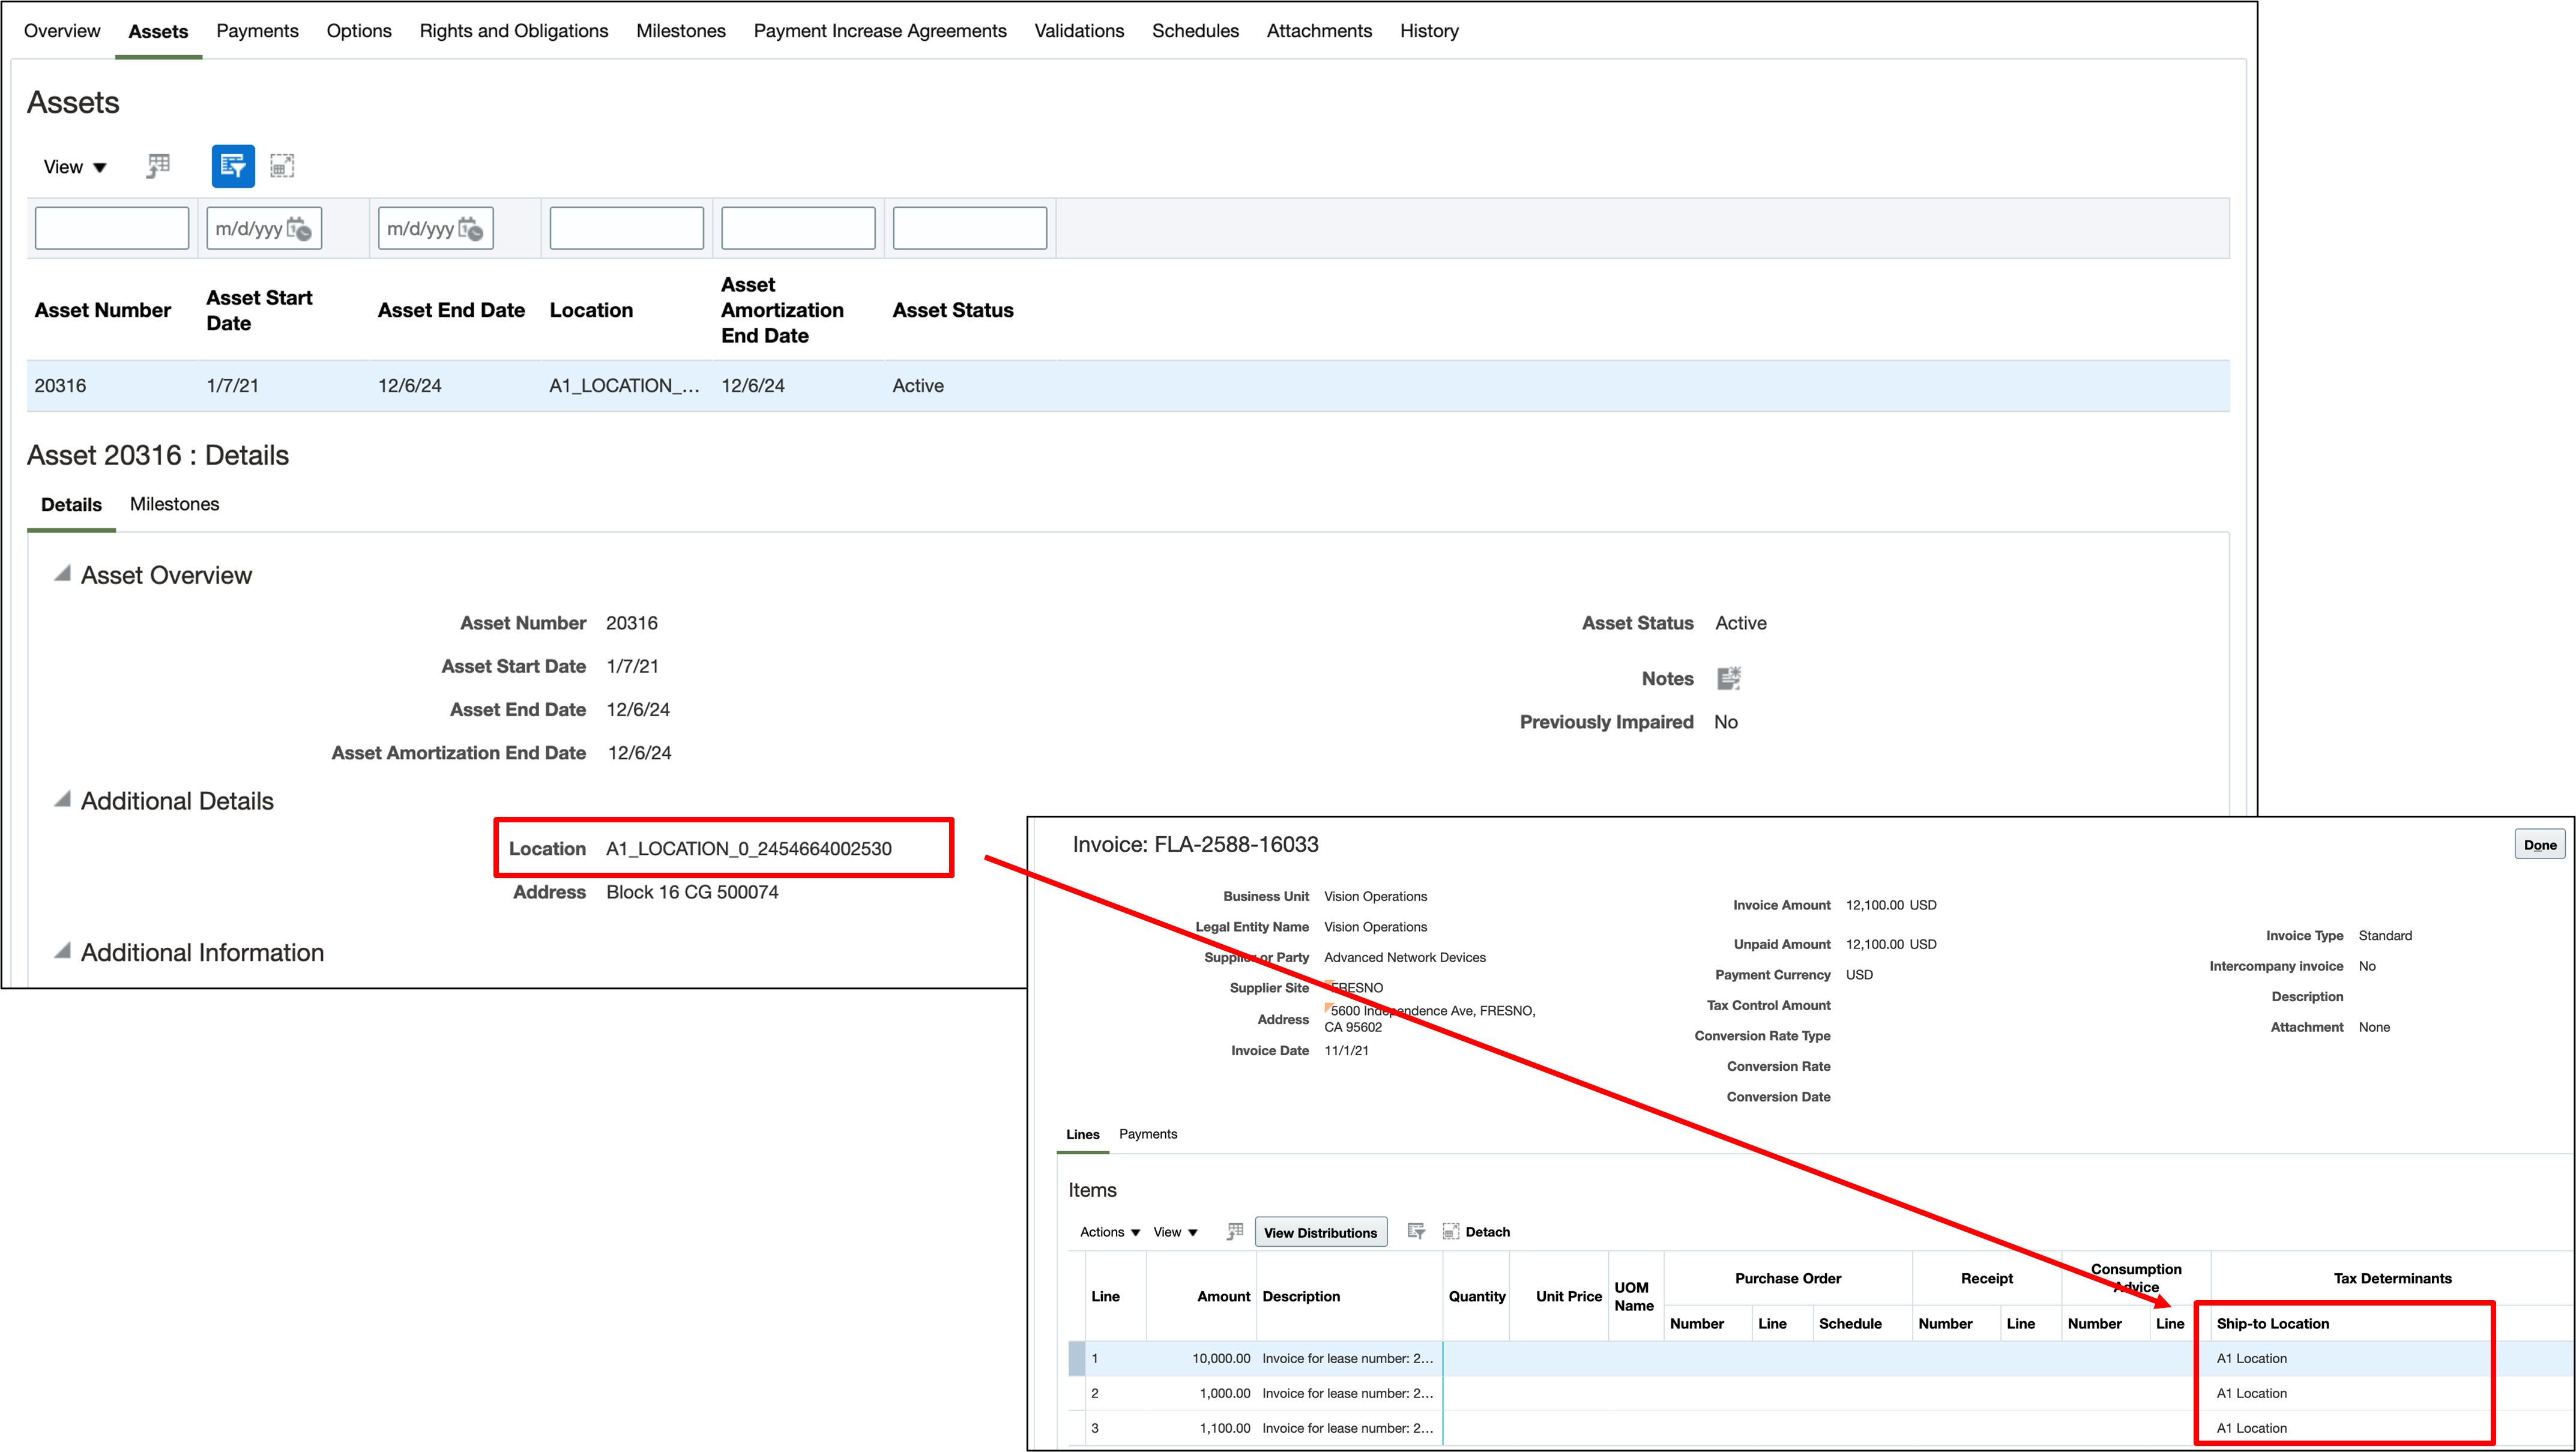
Asset Ship-to location assignment to Payables Invoices
Assign lease, asset, and payment details such as lease number, payment number and purpose, asset number, and location to invoice line descriptions for expense lease invoices created in Payables. Users can view the lease, asset, and payment details on invoice line descriptions in Payables as shown below.
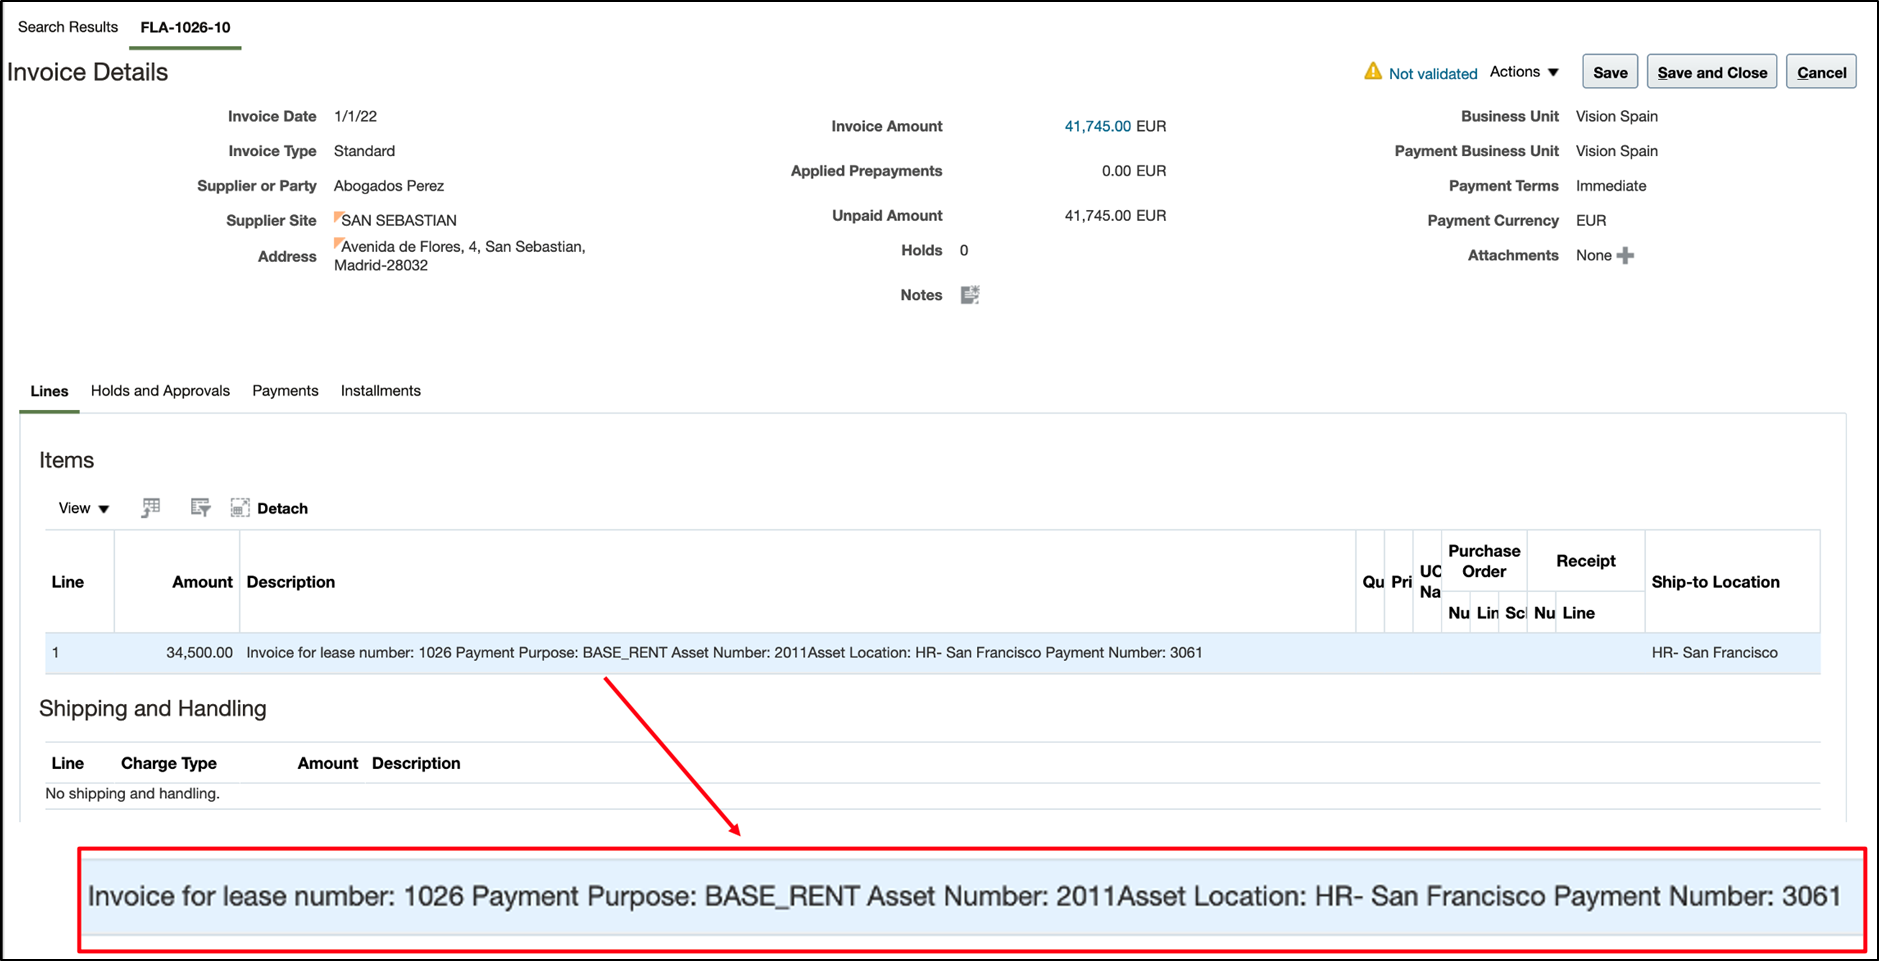
Payables Invoice Line Descriptions for Lease Invoices
Business benefits include:
- Simplify tax compliance by using the lease asset location to derive location-based taxes in Payables.
- Improve controls and ensure timely payments to suppliers with visibility into lease and asset details on Payables invoice lines.
Steps to Enable
Use the Opt In UI to enable this feature. For instructions, refer to the Optional Uptake of New Features section of this document.
Offering: Financials
Access Requirements
You do not need any new role or privilege access to set up and use this feature.
Lease Type-Based Data Access for Lease Contracts
Secure the lease contracts by lease type. This security feature allows users to add additional data security policies to limit the view, creation, and update of lease contracts based on the lease type.
The following screenshots describe creating a data security policy to manage access to lease contracts based on the lease type.
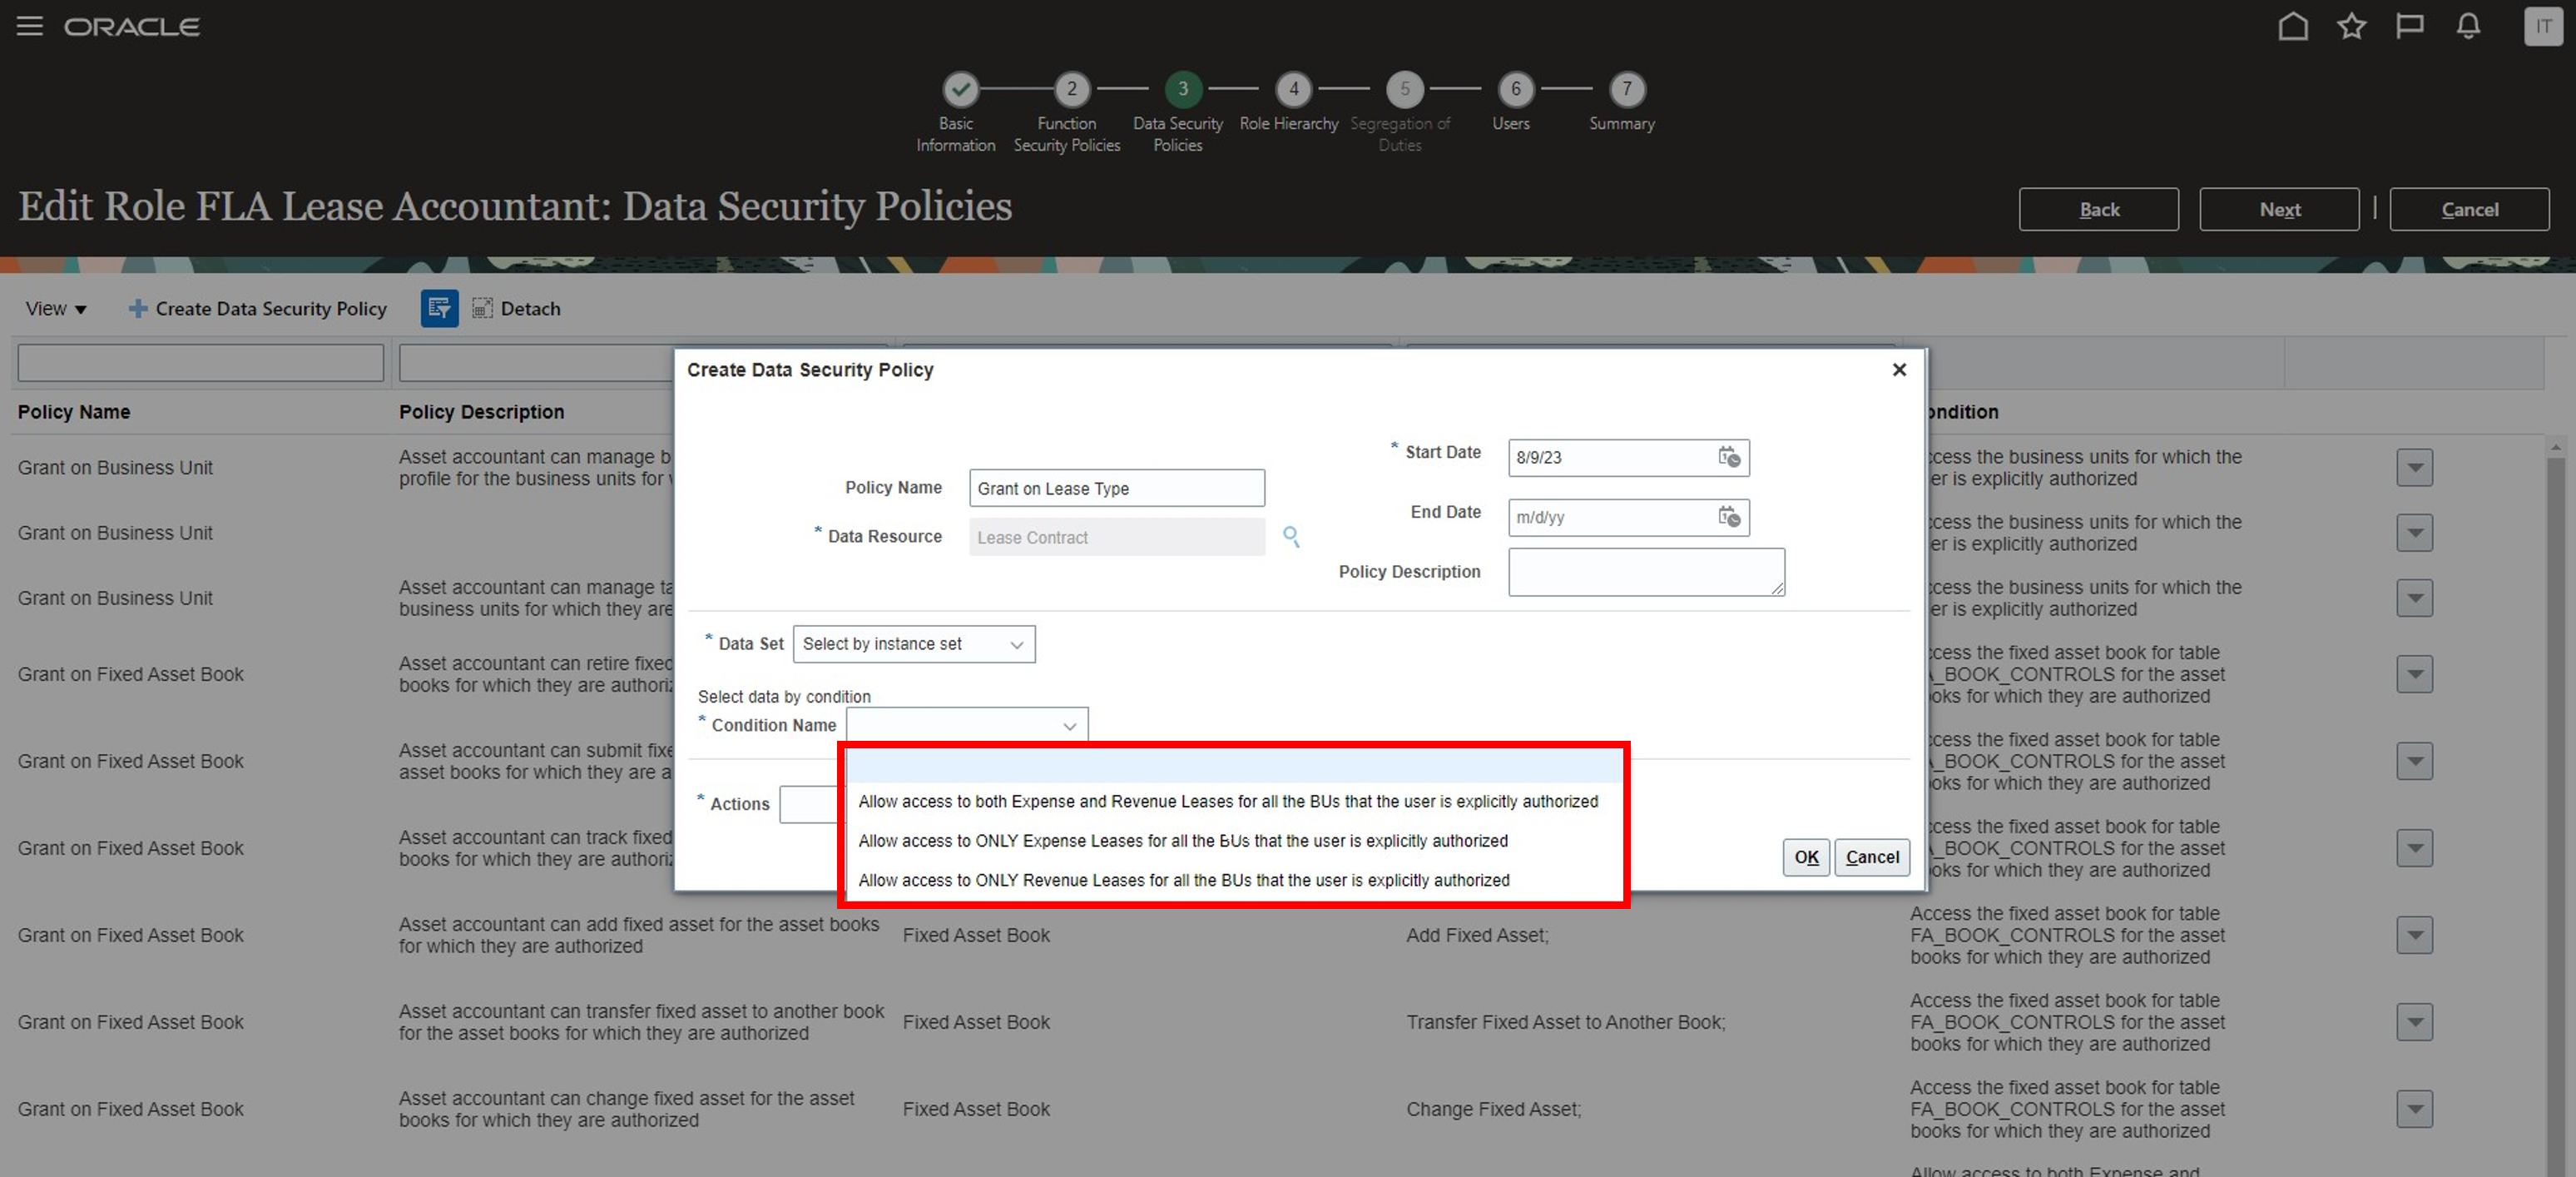
Create Data Security Policy Page - Add Condition
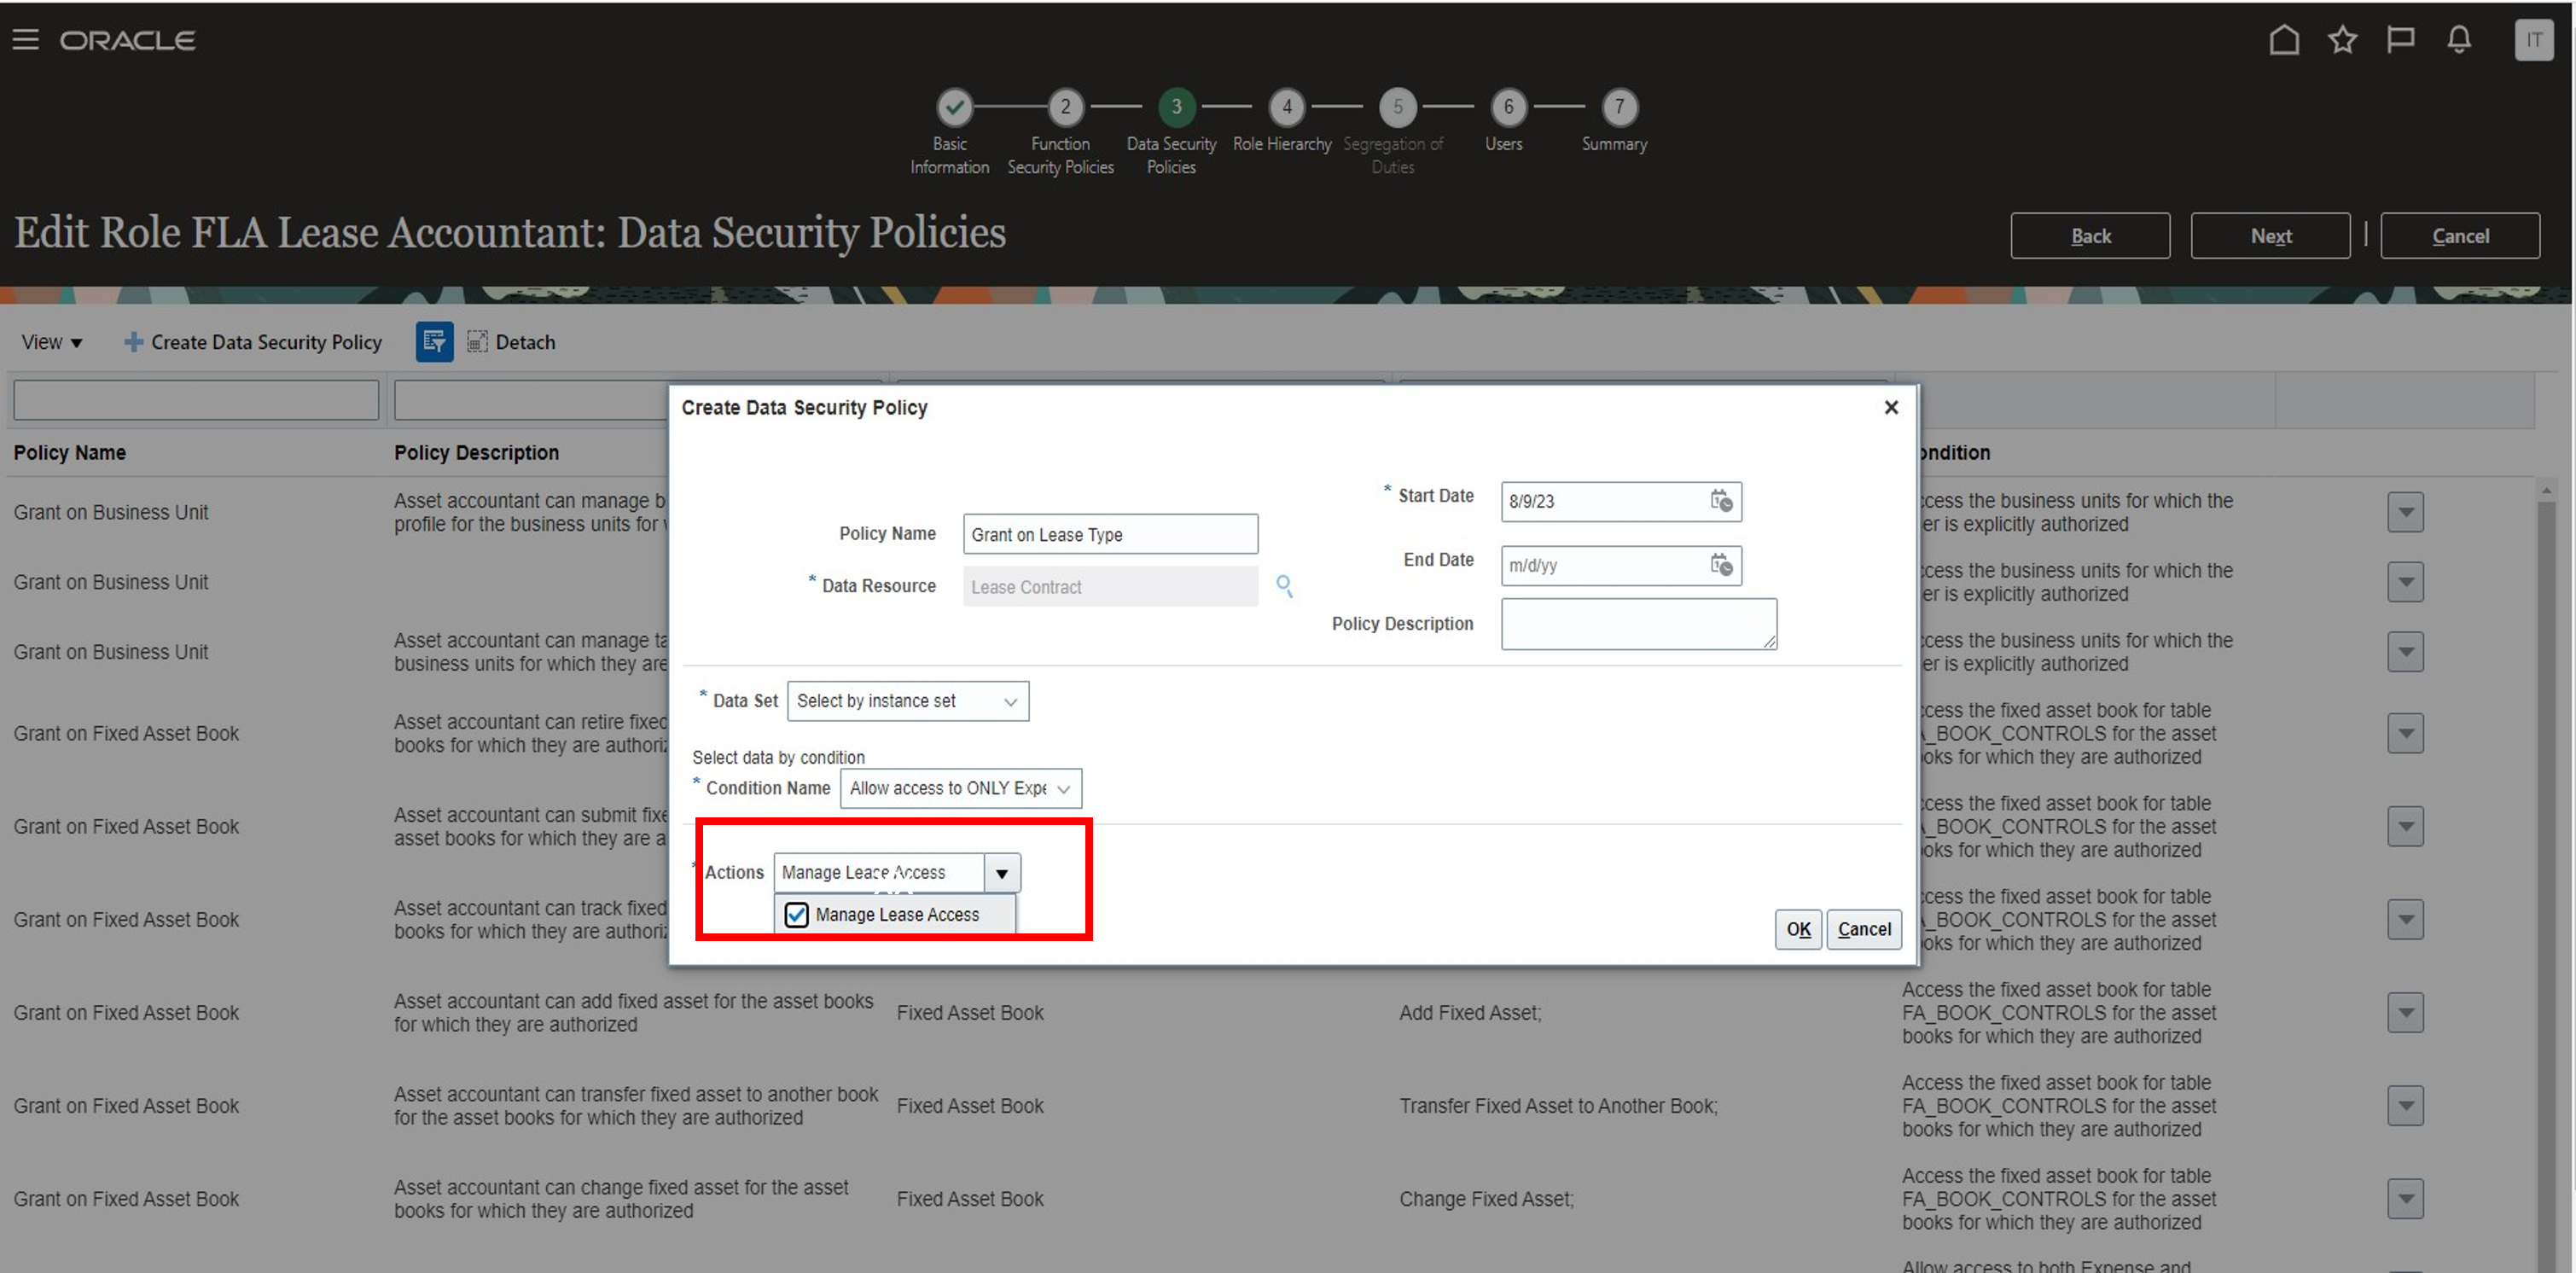
Create Data Security Policy Page - Add Action
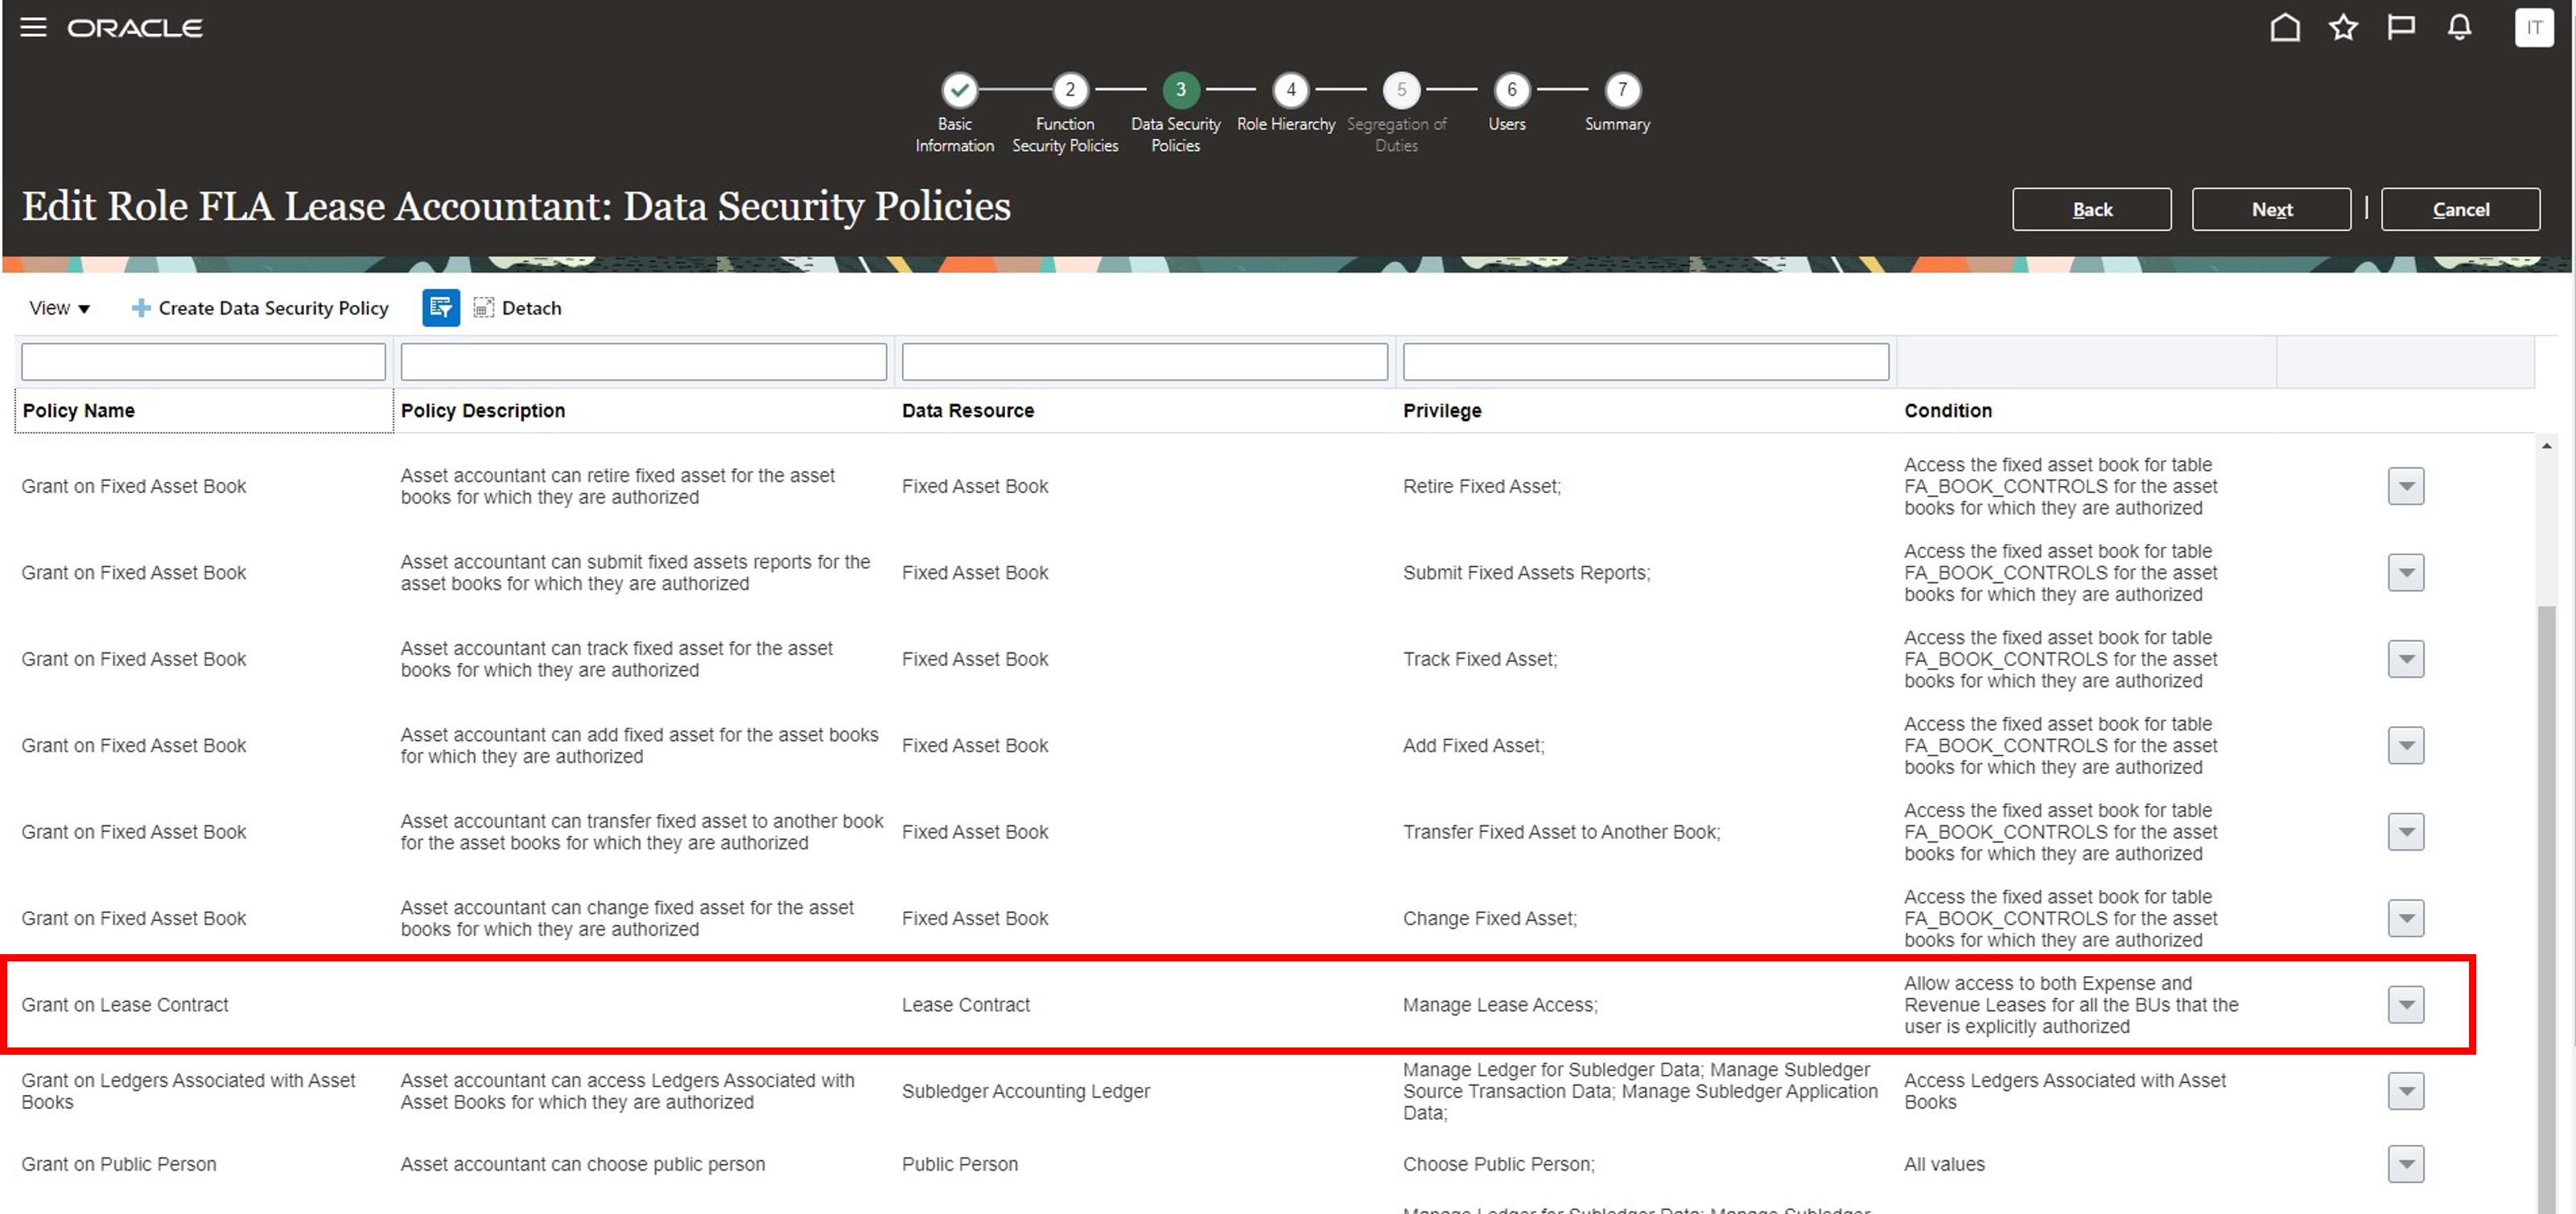
Data Security Policy Summary Page
Business benefits include:
- Improve security and increase control of lease administration operations by limiting access to authorized users.
Steps to Enable
Use the Opt In UI to enable this feature. For instructions, refer to the Optional Uptake of New Features section of this document.
Offering: Financials
Tips And Considerations
Data Security Considerations:
If you opt into secure lease contracts by lease type, then the following data security policies should be entered for your roles in the security console:
From Data Security Policies > Create Data Security Policy:
- Policy Name: Grant on Business Unit
Database Resource: Business Unit
Security Business Object: FUN_ALL_BUSINESS_UNITS_V
Dataset: Select by Instance Set
Condition Name: Access the Business Units for which the user is explicitly authorized
Privilege: Manage Lease Contract Data
- Policy Name: Grant on Lease Contract
Database Resource: Lease
Security Business Object: FLA_LEASES_ALL
Dataset: Select by Instance Set
Condition Name: Select one condition from below options:
- Access Expense and Revenue Leases in the Business Units for which the user is explicitly authorized
- Access Only Expense Leases in the Business Units for which the user is explicitly authorized
- Access Only Revenue Leases in the Business Units for which the user is explicitly authorized
Privilege: Manage Lease Contract Data by Lease
Access Requirements
You do not need any new role or privilege access to set up and use this feature.
Revenue Lease Amendments
Perform amendments to revenue lease contracts, such as changing payment amounts or the term of the contract. Amendments to a contract entail creating a new version of the contract, adjusting accounted transactions and balances for the contract, and maintaining an audit of the changes. Additionally, perform nonfinancial changes to update attributes that do not require adjustments to accounted transactions and balances. Process lease expiration to close out revenue lease contracts that have reached the end of their life.
The following screenshots describe creating an amendment for a revenue lease contract and viewing the history of past amendments.
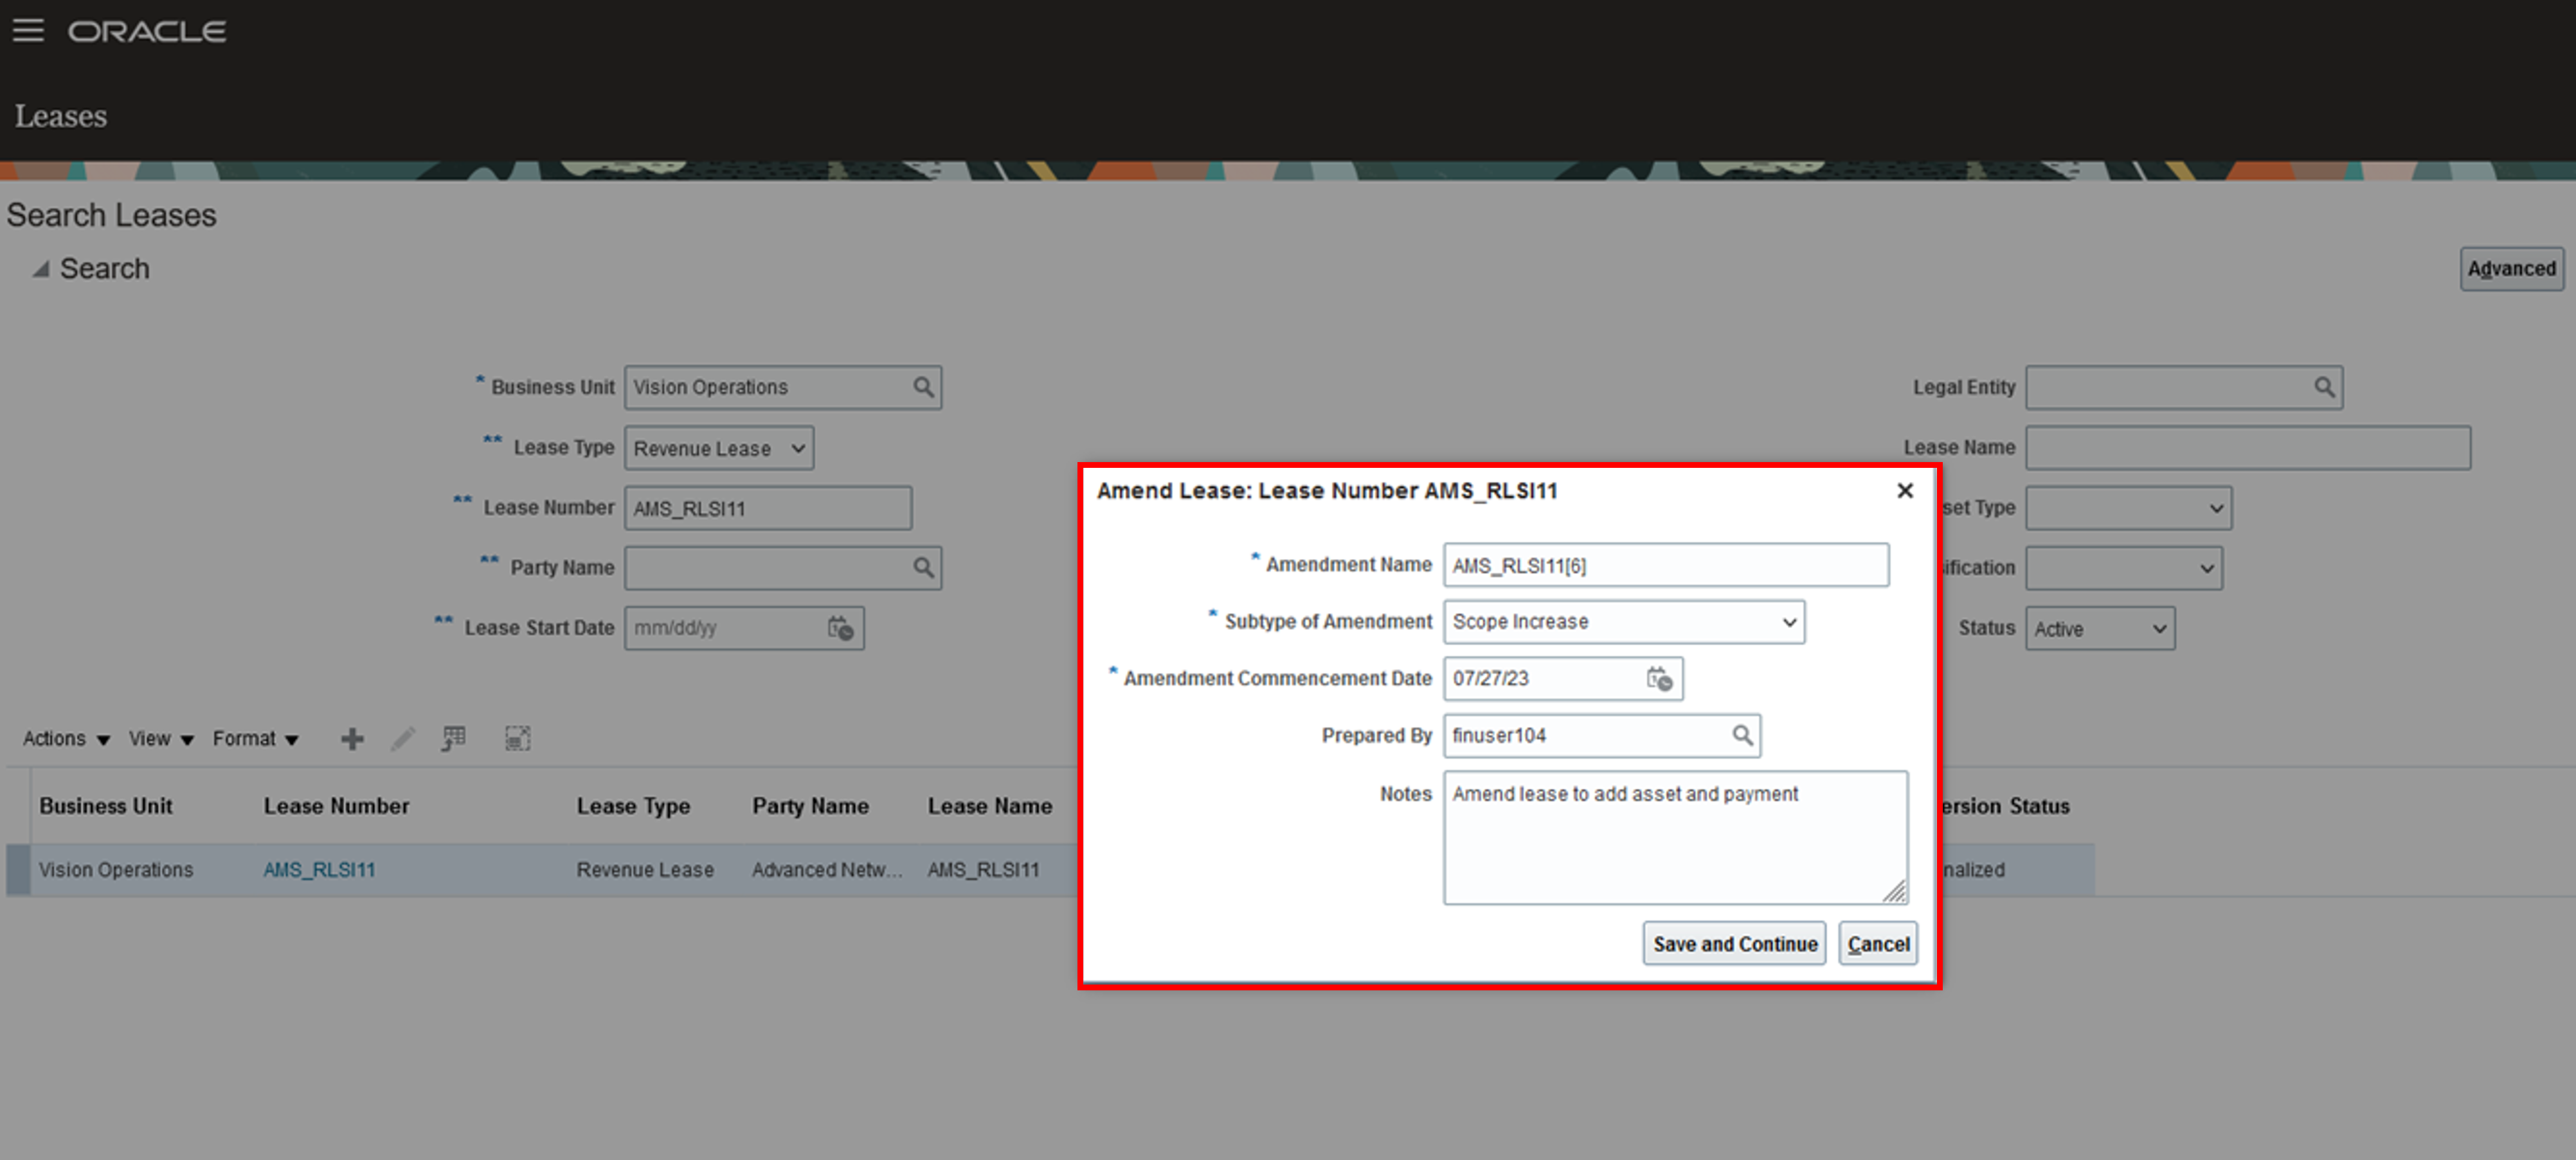
Create Amendment Page
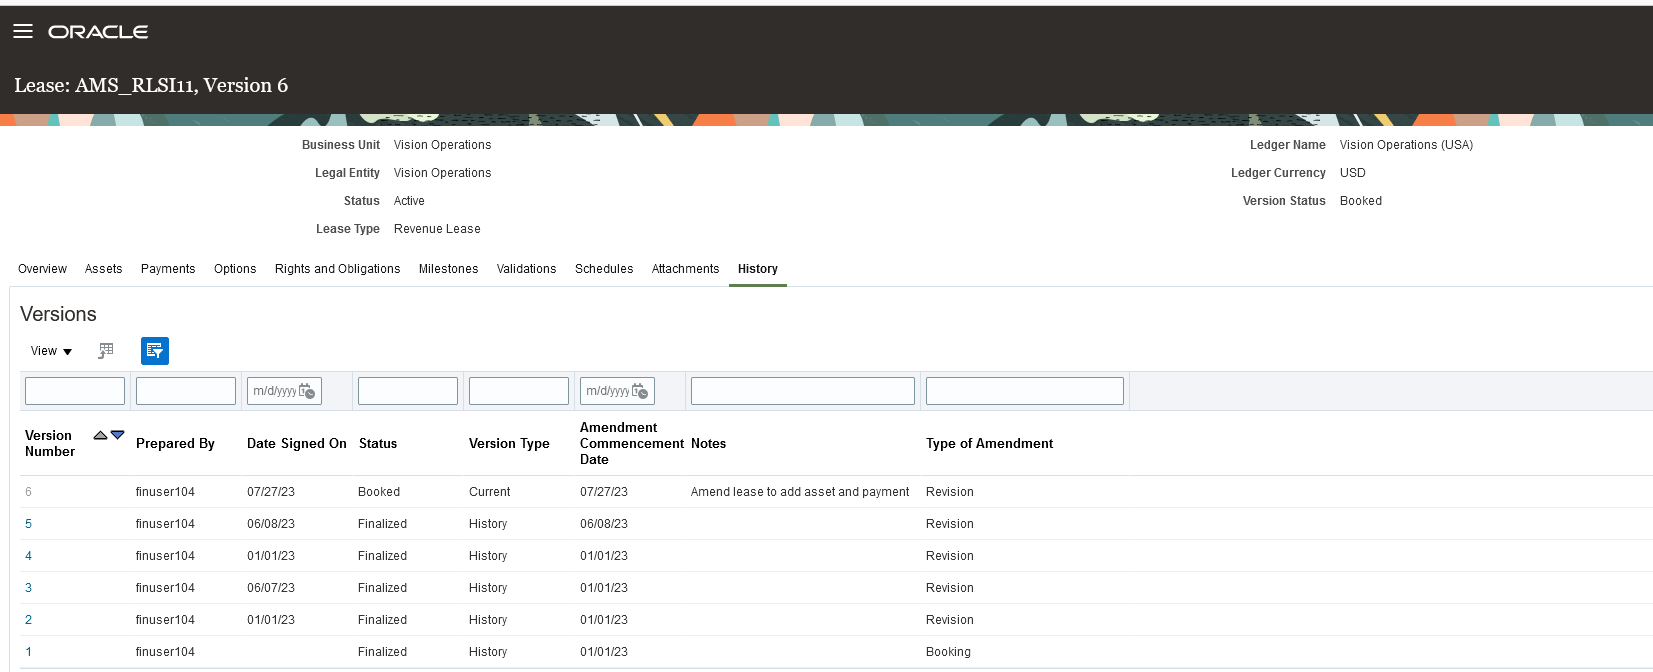
Amendment History Page
Business benefits include:
- Improve operational efficiency with streamlined lease amendments and terminations.
- Reduce time and effort through the automated expiration of leases.
- Improve controls with a complete audit history of lease amendments and access to prior lease versions.
- Automate accounting for adjustments to billing and accruals.
Steps to Enable
Use the Opt In UI to enable this feature. For instructions, refer to the Optional Uptake of New Features section of this document.
Offering: Financials No Longer Optional From: Update 24B
Access Requirements
You do not need any new role or privilege access to set up and use this feature.
Region and Country-Specific Features
Brazil
Receivables Collection Document Support for Brazilian Central Bank Instant Payment System
Use the Brazilian Pix instant payment system to process Receivables collection documents for Brazil.
When enabled, Receivables collection documents for Brazil make use of the Brazilian banking model, which supports the instant payment system enhancement in conjunction with standard collection document processing.
The bank processes the remittance file that is enabled for Pix using both the current collection document system and the instant payment system. The bank then returns an occurrence file with the standard collection document confirmation and the instant payment system QR code.
To set up Receivables collection documents for Pix processing:
- Add the instant payment system identification to your company bank account.
- Enable instant payment system processing in the global receipt method used to process collections.
In the Manage Bank Accounts page select one of the available Pix Key Types:
- Taxpayer ID
- E-mail Address
- Mobile Phone Number
- Random Key
Enter the Pix Key once a Pix Key Type is selected.
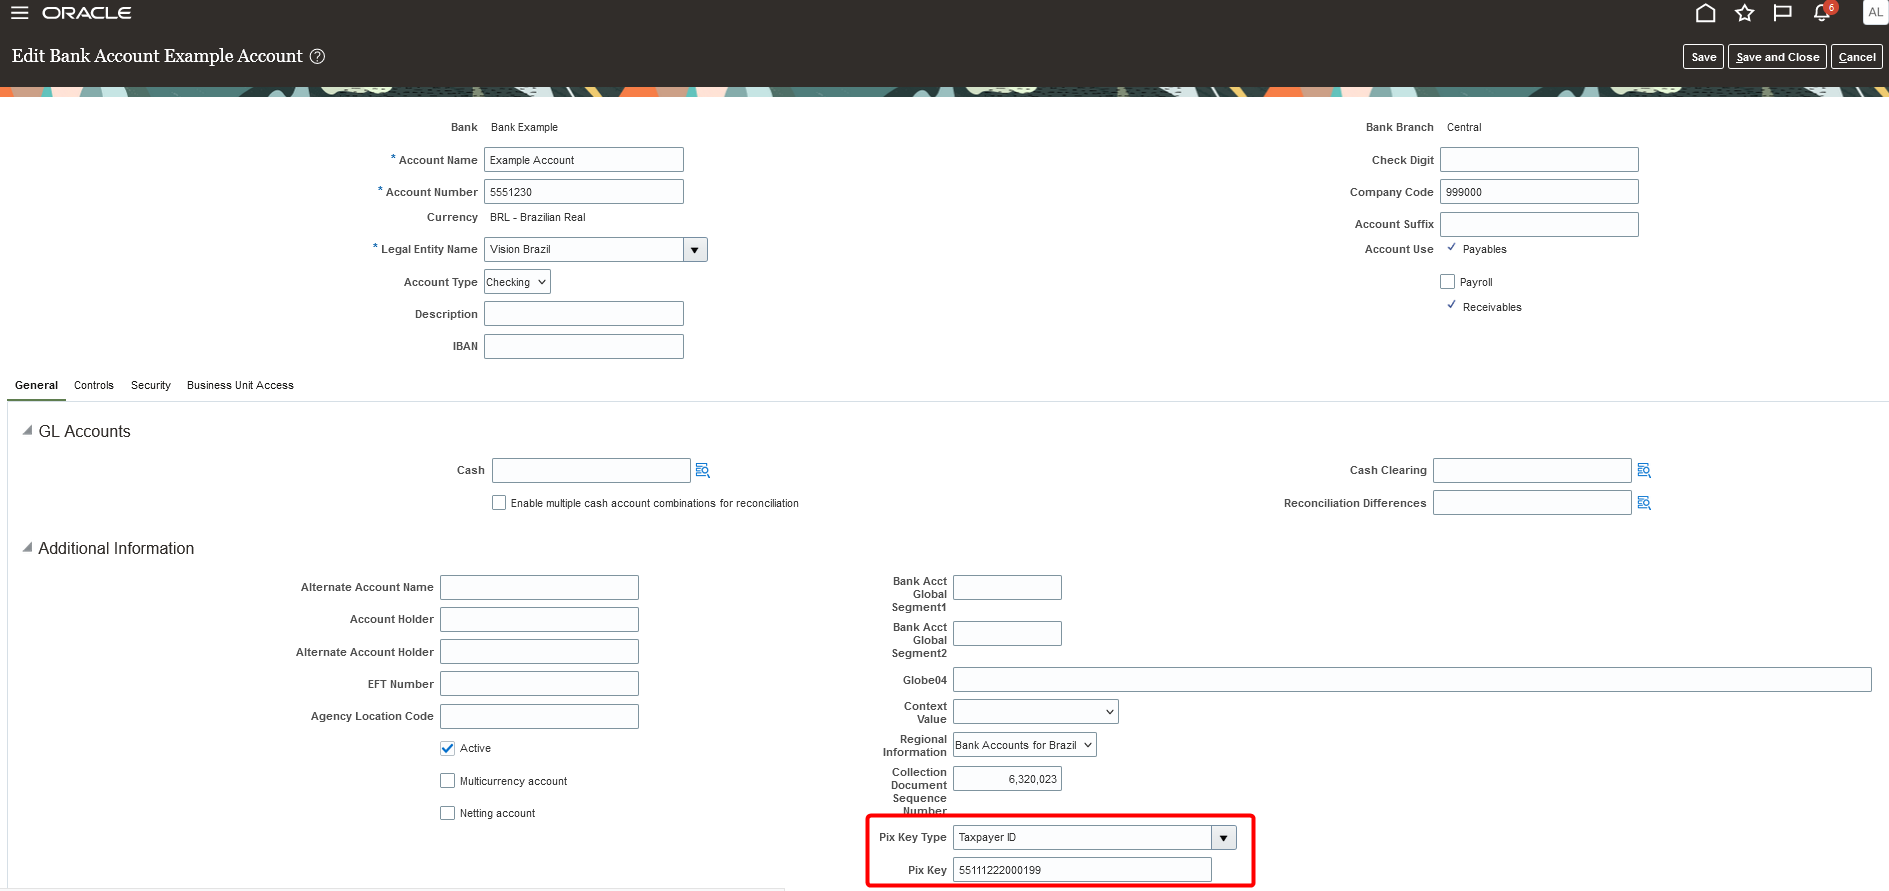
Bank Account Page
Enable Pix Processing on the Global Receipt Method page to indicate to the bank the collection documents included in a remittance batch will use the hybrid model and will also be processed in the instant payment system.
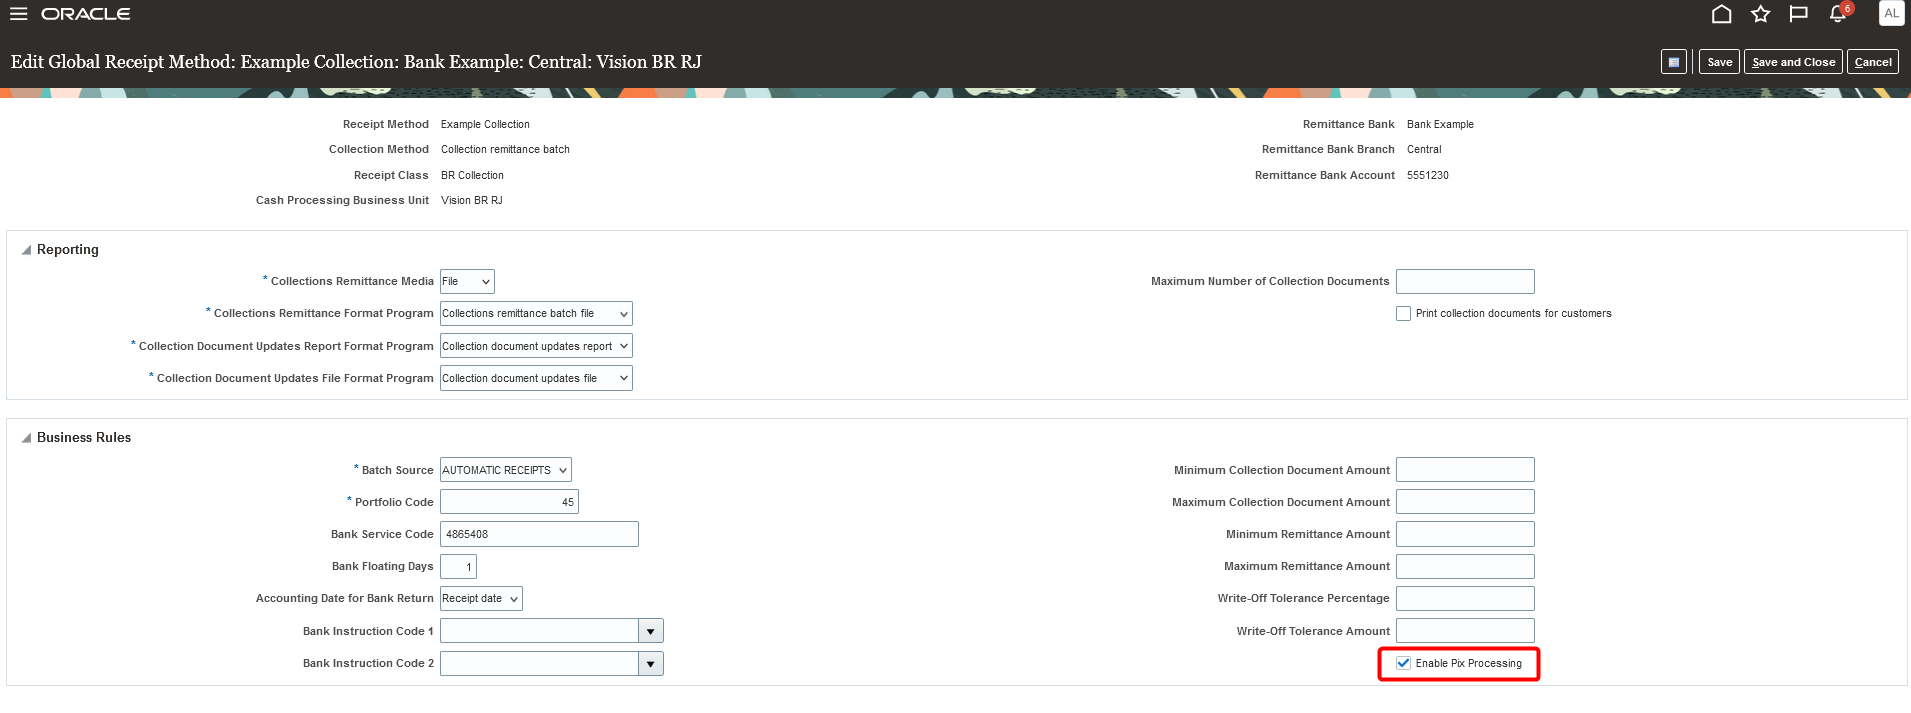
Global Receipt Method Page
Receivables collection document processing, including remittance batch creation and occurrence return, remains unchanged. The differences are in the Receivables bank file layout and the Import Bank Returns for Customer Payments FBDI, with additional columns related to instant payments.
For more information about the Receivables collection documents for Brazil, see Sales Invoice and Customer Receipt Enhancements for Brazil
For more information about the Import Bank Returns for Customer Payments FBDI, see Receivables Bank Returns Data Upload Interface
Business benefits include:
- Provides customers with additional payment flexibility.
- Incorporates both standard collection document processing and instant payment processing.
- Enables simple adoption to the Pix instant payment system while using existing bank file exchange infrastructure.
Steps to Enable
You don't need to do anything to enable this feature.
Spain
Legislative Update for Online VAT Reporting for Spain
Use new tags and values in Online VAT Reporting for Spain related to customers, agreements, and legal representative information.
This feature allows the Tax Authority to accept the tax information of an 'Uncertified Client' with 07 code and the customer details can be updated after the customer is certified.
You can use new tags and values in Online VAT Reporting for Spain related to customers, agreements, and legal representative information. This feature allows you to select the 07 code from the Customer Code field that was missing from the SII XML Online VAT Reporting for Spain after the latest changes in the legislation.
The 'numregistroacuerdofacturacion' (Billing agreement number) that the customer has with a third party and the local tax authority is required for these reports:
- Issued Invoices
- Received Invoices
- Investment Goods (Refer Annual Online VAT Reporting for Spain)
- Selected Intra EU Transactions Register
The Customer Code field includes a new code: 07 that indicates 'Uncertified Client.' When the customer is uncertified, the Company sends this code to the Tax Authority so that the customer can be certified in the future. The Tax Authority accepts the tax information with errors, allowing you to update the customer details in a future without any changes. This code was not available previously.
Steps to Enable
You don't need to do anything to enable this feature.