
This document will continue to evolve as existing sections change and new information is added. All updates appear in the following table:
| Date | Product | Feature | Notes |
|---|---|---|---|
| 07 JUN 2021 | Intellgent Advisor | Enhanced Configurability Using Interview Extensions | Updated document. Delivered feature in update 21B. |
| 07 JUN 2021 | Intelligent Advisor | Share Rates and Rules Across Projects Via Independent Decision Services | Updated document. Delivered feature in update 21B. |
| 21 MAY 2021 | Created initial document. |
This guide outlines the information you need to know about new or improved functionality in Oracle B2C Service and describes any tasks you might need to perform for the update. Each section includes a brief description of the feature, the steps you need to take to enable to begin using the feature, any tips or considerations that you should keep in mind, and the resources available to help you.
For a listing of hardware and software requirements for Oracle products, log in to our support site and access Answer ID 31.
Security & New Features
We would like to remind you if your system has modified security structures you may need to advise your security administrator of new features.
Give Us Feedback
We welcome your comments and suggestions to improve the content. Please send us your feedback.
Column Definitions:
Report = New or modified, Oracle-delivered, ready to run reports.
UI or Process-Based: Small Scale = These UI or process-based features are typically comprised of minor field, validation, or program changes. Therefore, the potential impact to users is minimal.
UI or Process-Based: Larger Scale* = These UI or process-based features have more complex designs. Therefore, the potential impact to users is higher.
Features Delivered Disabled = Action is needed BEFORE these features can be used by END USERS. These features are delivered disabled and you choose if and when to enable them. For example, a) new or expanded BI subject areas need to first be incorporated into reports, b) Integration is required to utilize new web services, or c) features must be assigned to user roles before they can be accessed.
| Ready for Use by End Users Reports plus Small Scale UI or Process-Based new features will have minimal user impact after an update. Therefore, customer acceptance testing should focus on the Larger Scale UI or Process-Based* new features. |
Customer Must Take Action before Use by End Users Not disruptive as action is required to make these features ready to use. As you selectively choose to leverage, you set your test and roll out timing. |
|||||
|---|---|---|---|---|---|---|
| Feature |
Report |
UI or |
UI or |
|
||
Intra Chat: Agent Browser UI Inlay for Employee to Employee Collaboration |
||||||
Authorization Headers on Interview Extension Data Connection Requests |
||||||
Enhanced Intelligent Advisor Integration with Oracle Digital Assistant |
||||||
Share Rates and Rules Across Projects Via Independent Decision Services |
||||||
Set Related Answer Types in Widgets and Set Notification Frequency in Customer Portal |
||||||
Preview Articles as Shown in Customer Portal Directly from Authoring |
||||||
The Agent Action Center now displays to users upon login. The Action Center presents functionality directly to the user upon login that was previously only accessible through the global header. Recent Items, Quick Create Notification and Open Tabs are easily accessible in the displayed panels of the action center. The Action Center includes an extended search bar at the top adding new conversational intelligence for creating objects like incidents, contacts and etc.

Action Center
The Agent Action Center reflects the latest user experience available for Oracle CX applications and aligns the UX more closely with other Oracle applications. The Action center increases agent efficiency by displaying common functions at the forefront of the user experience.
Steps to Enable
You don't need to do anything to enable this feature.
Intra Chat: Agent Browser UI Inlay for Employee to Employee Collaboration
Intra Chat is an inlay that is inside the Agent Browser UI and used for employee to employee collaboration. An agent can send a message or question through the Intra Chat Inlay and the message will then be routed through a chat queue using business rules. A chat agent or supervisor will see a chat notification to accept the chat and can answer or collaborate with the agent who asked the question, using the Engagement Panel.
The agent asking the question does not need to be a chat agent to access Intra Chat. The employee answering or accepting the chat from Intra Chat does need to be a chat agent.
TO USE INTRA CHAT
After the Intra Chat inlay is enabled, a new Intra Chat icon with a question mark will display in the Global Header next to the chat toolbar. When clicked, the Intra Chat Inlay will load at the bottom right hand corner of the Agent Browser UI.
To hide the Intra Chat Inlay, the agent can simply click on the toggle again and the inlay will hide. This will save real estate on the Agent Browser UI when the inlay is not in use.
Contact Match
If the Staff Account of the agent who is using the Intra Chat Inlay does not have an email address, the agent will be asked to enter their email address before they can utilize Intra Chat. The email will be cached for the browser session.
As with any other incoming chat, the system will do a contact match using the email address to confirm if the contact already exists. If a contact is not created with that email address, a new contact will be created and the contact type will be the value created in the Steps to Enable section.
Accepting a Chat from Intra Chat
After a question or topic is added to the Subject field, the agent clicks on Start Chat. The message will be routed through a chat queue that was set up in the Steps to Enable section. A chat agent or supervisor will then receive a notification of an incoming chat.
Intra Chat provides a facilitating infrastructure for employees working on a common task to help one another. In addition, persistent questions can be analyzed to develop strategies to deflect the same question being asked in the future.
Steps to Enable
- To set up the Inlay; Oracle Service Cloud (B2C Service) customers must set the configuration setting OIT_CORS_ALLOWLIST properly to ensure the Inlays are approved to interact with your site. Note that prior to B2C version 20D, this configuration setting is labeled as OIT_CORS_WHITELIST. For testing purposes, you can set a value of .* which allows any site to utilize the Inlays. However, this value is not recommended for production. The recommended value for this configuration setting is a regular expression list of all approved domains that can access your inlays separated by a pipe character (e.g. | ). Documentation on inlays can be found here.
- In the B2C Service .NET client, create two custom configs that will need to be created by the administrator.
- CUSTOM_CFG_CHAT_INTRACHAT_ACCESS :
- Type Text.
- Value is the Profile ID in which the administrator wants to give Intra Chat access to. It can be multiple Profile IDs that are comma separated.
- CUSTOM_CFG_CHAT_INTRACHAT_EMPLOYEE :
- Type Text.
- Recommended Value: IntraChat.
- This will be a new ContactType and can be configured in the Customizable Menu.
- CUSTOM_CFG_CHAT_INTRACHAT_ACCESS :
- A new Contact Type must also be created and it needs to have the same value as the CUSTOM_CFG_CHAT_INTRACHAT_EMPLOYEE.
- The chat initiate from the Intra Chat will route to any Chat Agent who is logged-in to the Chat and meet the criteria provided in the Business rule if the customer has set any such business rule.
Tips And Considerations
- A new contact type is needed because it will be the key to use business rules to route the Intra Chat through the chat server.
- A new contact type can also be used to distinguish the chats that are sent though the Intra Chat verses those sent by a customer on the end user pages.
- It is recommended to create a custom report using the contact contact type field to report on Intra Chat data.
Key Resources
- Documentation on inlays can be found here.
- Documentation on how to create custom configs can be found here.
- Documentation on creating Customizable Menu with Contact Type can be found here.
- Documentation on how to create business rule can be found here.
- Documentation on how to create a custom report here.
Role Information
- Admin will set the custom configs for access, reporting, and routing.
- An Agent can access Intra Chat to send a question or message that will be routed to the Engagement Panel.
- A Chat Agent, Supervisor, or Manager will accept a chat and can answer the question from Intra Chat Inlay using the Engagement Panel.
A 'Redwood' theme is available to users in the preferences menu. The theme includes new icons in the header, sidebar, top level record tabs, and chat controls along with a dark textured Redwood background, a larger Quick Search area and discoverable scrollbars within workspaces.

Redwood Theme
Watch a Demo
The Redwood theme reflects the latest user experience available for Oracle CX applications and aligns the UX more closely with other Oracle applications.
Steps to Enable
You don't need to do anything to enable this feature.
Tips And Considerations
- Users can apply the Redwood theme to their instance of B2C Service using the 'preferences' menu.
- There are no functional changes that occur when using the Redwood theme.
- Any custom logos, favicons, background images, or avatars that have been created for use with existing dark themes will be honored in the Redwood theme.
- Some workspace controls are updated in the Redwood theme including date/time fields, buttons, and yes/no switches.
- A browser refresh is required when switching between one of the four existing themes and the Redwood theme.
Key Resources
- Watch Redwood Theme Demo
Workspace Rules for Agent Insights
Workspace Rules can be configured to conditionally display Agent Insights.

Insights Sidebar and Card
Agent Insights are displayed as cards in the side panel adjacent to the incident workspace. Insights provide administrators the ability to direct agent activities to ensure process adherence, facilitate training, and improve customer satisfaction.
Users can accept, dismiss, or ignore Insights. When accepted, the card executes a named event which can be leveraged as a trigger for Scripts, Workspace Rules, or Workflow to automate user activities like sending responses, updating fields, changing workspaces, etc.
Steps to Enable
- Open an incident workspace the Workspace Designer
- Select 'Rules' from the designer Ribbon
- Select 'Add Rule'
- Configure rule triggers
- Under 'Actions' select 'Show an Insight'
- Enter the Title, Message, and Named Event. The Named Event should be configured as a trigger for existing Scripts, Workflows or Workspace Rules.
- Select a priority (top or bottom of list)
- Save the workspace and preview on the Agent Browser UI
- Trigger the new rule and observe the Agent Insights side panel card appear
- Select the checkmark on the card
- The card will execute the named event and trigger the connected Workflow or Workspace Rules

Workspace Rule Designer
Tips And Considerations
- Insights are supported for incident workspaces on the Agent Browser UI
- Multiple rules can be configured to show Insights Cards
Key Resources
Service Usage Metrics: Sessions by Interface
Service Usage Metrics reporting lets users track their usage from the Agent Browser UI. Sessions have been available as monthly and daily usage summaries. The ability to filter the Session data by Interface has been added to allow more granular insights into usage. Session reports default to all interfaces. User can select their Logged In interface or any interface associated with the site.
This functionality can be accessed in the filter section of the Search area.

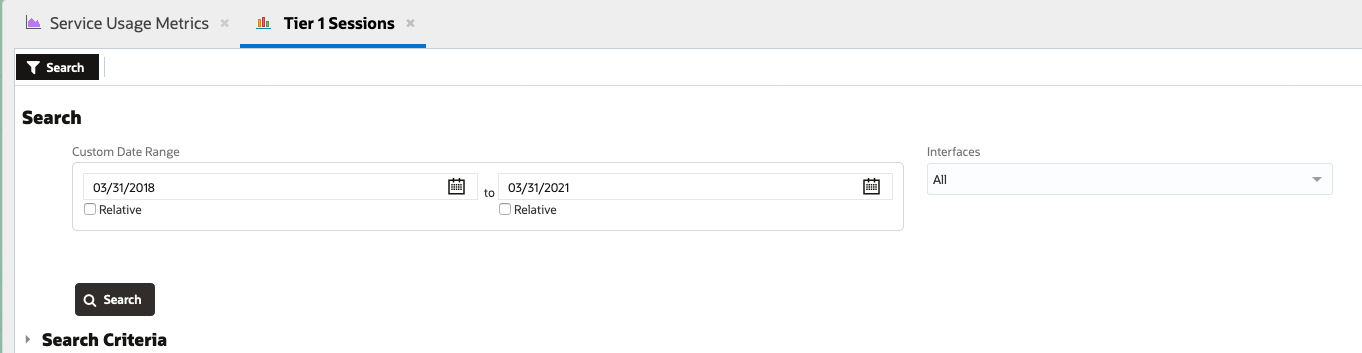
This feature allows greater visibility to allow better insight into how sessions are used.
Steps to Enable
You don't need to do anything to enable this feature.
Tips And Considerations
- Service Usage Metrics can be enable for profiles as described in the documentation and adding the Service Usage Metrics component to the Navigation Set.
- Service Usage Metrics requires B2C Service 20B or greater.
Key Resources
Chat in Browser UI: Asynchronous Chat
Agents handling Oracle Messaging chats within the Browser UI, can easily send responses to customers, at any time, by re-engaging in the conversation from within the incident workspace.
Agents can now:
- Continue the conversation asynchronously
- Serve the customer within their channel of choice
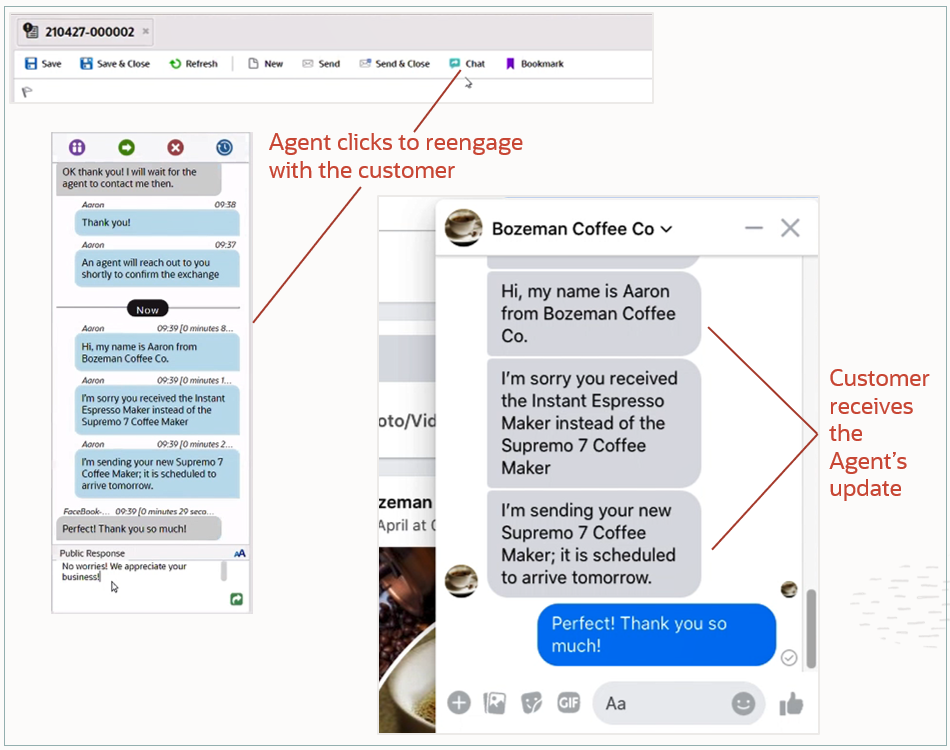
Asynchronous Chat: Example of the Agent & Customer Experience for 21B
This new feature
- Is especially helpful for longer running service issues when agents need to update customers outside of a traditional live chat interaction
- Improves the customer's experience by aligning with modern messaging expectations
- Provides a modern messaging experience for Agents
Steps to Enable
Requirements to implement Asynchronous Chat:
- B2C Chat
- Oracle Messaging
- Agent Browser User Interface
- CX Site: 20C+
- Chat Service: 21B+
- Engagement Panel version: 11+
- Incident workspace contains the “Chat” ribbon bar button
Tips And Considerations
The Agent's experience is handled through Oracle Messaging. In order for this feature to work, Oracle Messaging must be in place on your company's social media pages.
Role Information
- Chat Agents
Text Input Support for Routing Guidance
Oracle Messaging can now support answers to routing questions provided by end users through text input. This enhances the Routing Question feature by providing the ability to accept free form text input in addition to pre-configured answer options, and is available to all configured messaging channels supported by Oracle Messaging.
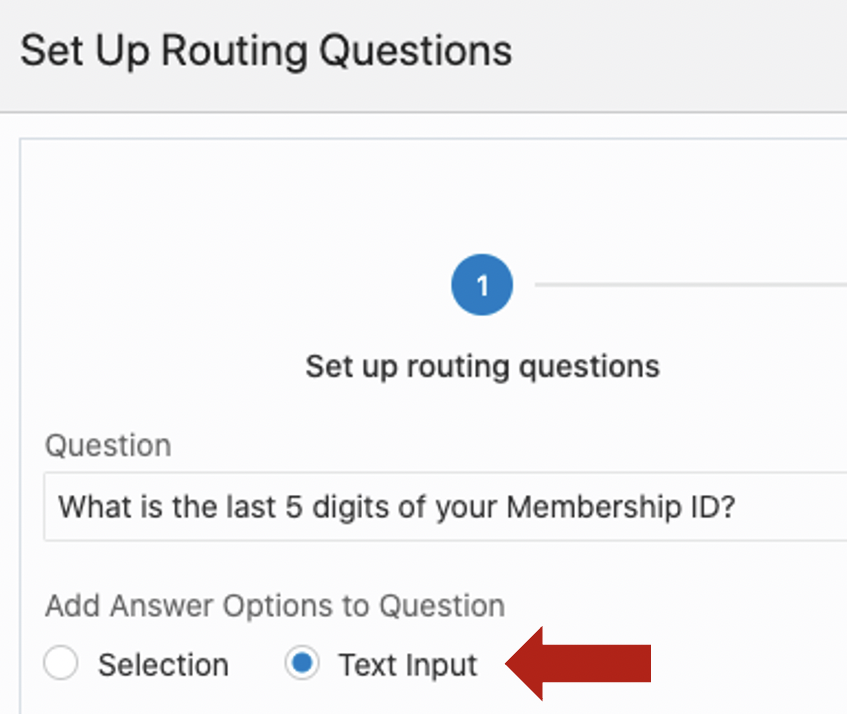
Text Input Support for Routing Guidance
By providing the ability to accept end user input to routing questions, contact centers are able to collect information such as Membership ID and Product Serial Number that could not be collected previously through pre-configured answer options prior to creating an engagement. Having this information at the start of an engagement gives greater context to the customer's request and allow service agents to speed up service resolution time, elevating the overall service experience for the customer.
Steps to Enable
You don't need to do anything to enable this feature.
Tips And Considerations
When defining the routing questions, it is important to keep in mind that customers reaching out to the contact center via messaging channels are likely to do so via their mobile device. The following factors are worth considering when defining routing questions:
- The number of answers that are presented to the customer (3-5 answers for the customer to choose will be a good starting point)
- The number of questions presented to the customer (We suggest no more than 3 questions to be asked before routing the request to queue)
Key Resources
Role Information
- Chat Agent
- Supervisor Agent
Extension Manager enables Admins and BUI extension developers to manage all aspects of an extension deployed on the site.
BUI extensions can be managed on the Agent Browser UI
Steps to Enable
You don't need to do anything to enable this feature.
Authorization Headers on Interview Extension Data Connection Requests
In 21A monthly update 2, system integrators can now set Authorization headers on interview extension data connection requests.
This allows an existing user token known in the client to be passed through to a back-end API.
Steps to Enable
You don't need to do anything to enable this feature.
Tips And Considerations
To pass an Authorization header via the headers property in your fetch request, you need to leave the Use HTTP basic authentication check box unselected in your interview extension connection.
Key Resources
Role Information
- System Integrator
Enhanced Configurability Using Interview Extensions
Intelligent Advisor’s existing suite of interview extensions has been further extended to include progressive reveal of questions and custom event handling.
These features enable users to further tailor the look and feel to match their organization's brand, and confidently embed Intelligent Advisor interviews in larger experiences.
Steps to Enable
You don't need to do anything to enable this feature.
Tips And Considerations
The new customVisibility interview extension makes it possible to selectively hide interview controls. This is primarily intended for creating progressive reveal interviews, but potentially has other use cases. The new getValueText control object method returns the natural language text value for input controls. For example, you could use it to display the value text on the screen after a question has been answered.
An interview extension can also now send a custom event, and a customer using the JavaScript interview embedding API can receive these custom events and handle them as required in the interview.
Key Resources
For more information on hiding interview controls using interview extensions, see:
- customVisibility extension
- control object: kind, getLabelId() and getValueText()
- interview object: getControls()
For more information on triggering custom events in related applications, see:
- interview object: sendCustomEvent(event)
- JavaScript object parameters: onCustomEvent(event)
Role Information
- Interview designer
Enhanced Intelligent Advisor Integration with Oracle Digital Assistant
In 21A monthly update 2, the System.IntelligentAdvisor component in Digital Assistant has numerous enhancements.
The following features are now supported:
- Attachments on web channels
- Reference tags in explanations
- Display of images in toggle buttons in rich UI channels (except for Slack)
- Sliders in text channels
- Display values that don't match option values
Steps to Enable
You don't need to do anything to enable this feature.
Tips And Considerations
Integrating your skill with an Intelligent Advisor interview is a three-step process.
- Add an Intelligent Advisor service integration.
- (Optional but highly recommended) Create a "conversational" variation of the interview.
- Add a System.IntelligentAdvisor component to your skill's dialog flow.
Key Resources
- Integrate with Oracle Digital Assistant in the Intelligent Advisor Documentation Library
- Intelligent Advisor in the Using Oracle Digital Assistant guide
Role Information
- System Integrator
Share Rates and Rules Across Projects Via Independent Decision Services
References to Intelligent Advisor decision services can now be added from any Policy Modeling project to calculate certain data values. The decision service is called both when debugging and after the project is deployed.
This functionality allows business users to define shared lookup tables and rules in decision service projects for reuse in different Policy Modeling projects, without needing a desktop application install. The shared data and logic can then be instantly updated for multiple projects without redeploying them from Policy Modeling. Because decision services have clearly defined contracts, and those contracts can be made read-only to rule authors, the ability to allow non-experts to update reference data held in decision services is made a more reliable process. Runtime caching of rule results ensures high performance, particularly for projects with large volumes of reference data rules.
Steps to Enable
You don't need to do anything to enable this feature.
Tips And Considerations
A decision service reference is defined in Policy Modeling and is used to link a decision service to a Policy Modeling project. Authoring a reference involves mapping Policy Modeling attributes to the decision service inputs and outputs.
A Policy Modeling project using references can be tested in the usual ways using the Debugger and test cases, and the decision services will be invoked as required.
Key Resources
Role Information
- Hub Author - Creates the decision service in Intelligent Advisor Hub
- Manager - Deploys the decision service project
- Policy Modeling Author - Creates the project in Policy Modeling referencing the decision service
Prior to this release, authors were only able to forward answers as an email. That meant if they needed to get an answer version draft approved from someone that doesn't log into the authoring console, i.e. legal, marketing, HR, etc., they would need to copy the content into an email manually.
Using answer version forward, authors can forward a draft answer version to approvers without leaving the authoring console.
Answer version forward works the same as answer forward, but will forward the answer version that is open.
Answer version forward improves author efficiency and reduces potential for human error from copy and pasting.
Steps to Enable
You don't need to do anything to enable this feature.
Set Related Answer Types in Widgets and Set Notification Frequency in Customer Portal
Administrators can configure the types of related answers that will display in knowledge widgets in Customer Portal. You can choose to display either or both types of related answers:
- Manual links are links to answers that were added by authors.
- Learned links are generated by machine learning based on the users’ browsing behavior.
The default setting displays both types of links.
Customer Portal end users can choose how often they will be notified about changes to articles that they have subscribed to.

Set Notification Frequency
Setting related answer types and enabling users to set subscription notification frequency improves users’ experience and productivity by emphasizing the most relevant related knowledge and by letting them control the amount of email they get from the application.
Steps to Enable
You don't need to do anything to enable this feature.
Tips And Considerations
Administrators and customer portal developers can configure the related answer links on the answer detail page (answer_view.php) using the display_link_type parameter. You can set the value of this parameter to both, learned, or manual. Both is the default.
Key Resources
- See the "Implement Knowledge Advanced on Customer Portal" chapter in the Implementing Knowledge Advanced guide.
Role Information
- Administrators and customer portal developers can configure related answers. End users can set their subscription notification frequency.
Preview Articles as Shown in Customer Portal Directly from Authoring
Authors can preview an article directly from the authoring application. Styles and formatting in customer portal sites differ from those that authors see when creating and editing articles. Additionally, different interfaces can use different sets of styles and formats. The article preview shows how the article will display in the customer portal for the interface they have selected. They can preview an article in any of the interfaces that it is associated to.

Preview an Article
Authors can easily see an accurate article rendering of the article prior to publishing. This enables them to address style and formatting issues early in the process, which improves increases productivity and improves knowledge base quality.
Steps to Enable
You don't need to do anything to enable this feature.
Tips And Considerations
- When authors preview an article, they view it in the context of their authoring privileges (user groups, etc). Visibility of every other answer is determined by their privileges as a user in customer portal.
- If an author takes an action, such as clicking a link or refreshing the page, the article renders as a customer portal page, and the authors' view is based on their customer portal privileges.
Key Resources
- See the "Author Content" chapter of the Using Knowledge Advanced guide.
Role Information
- Knowledge base authors can use the article preview feature.
Enhanced Business Rules: Support for Accounts and Assets
You can now create business rules on Accounts and Assets object with the Enhanced Business Rules framework in the Agent Browser UI. The following set of actions are supported for these objects: Set Field, Call Function, Transition State and Continue, Transition State and Stop and Stop Processing Rules.
The Enhanced Business Rules Engine:
- Makes creating business rules easier
- Lets you filter on fields and values in rules to make searching easier
- Gives access to related objects and attributes when you define rules
- Lets you export the business rules for ease of reading and sharing
Steps to Enable
You can only access this feature on the Agent Browser UI.
Do this for each profile that needs to add and edit business rules:
- Add the Rules component to the navigation set.
- Select the Rules View and Rules Edit checkboxes in the administrative permissions.
Incident Thread Orientation Options
A thread orientation option is available under the ellipsis menu in the thread editor to toggle between 'left' and 'top' positions for draft thread entries.
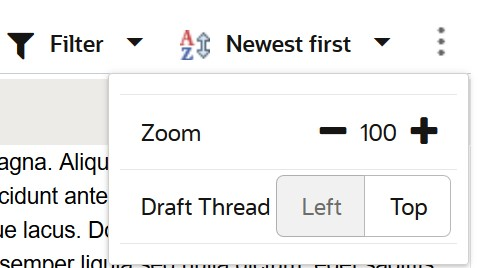
Thread Orientation Options
Watch a Demo
B2C Service users can personalize their own thread orientation to maximize their efficiency when creating incident threads.
Steps to Enable
You don't need to do anything to enable this feature.
Tips And Considerations
- The thread orientation setting is controlled by individual users and will persist until manually changed by the user.
- If there is not enough horizontal space on the user's computer or device, the orientation buttons will be disabled and the thread will use the 'top' thread orientation.
- This feature is available in the 3.21.04.03 Browser UI version, available to non-production sites on April 8, 2021 and production sites on April 15, 2021.
Key Resources
Inside Labels for Browser UI Workspaces
Agent Browser UI workspaces support inside label positions.
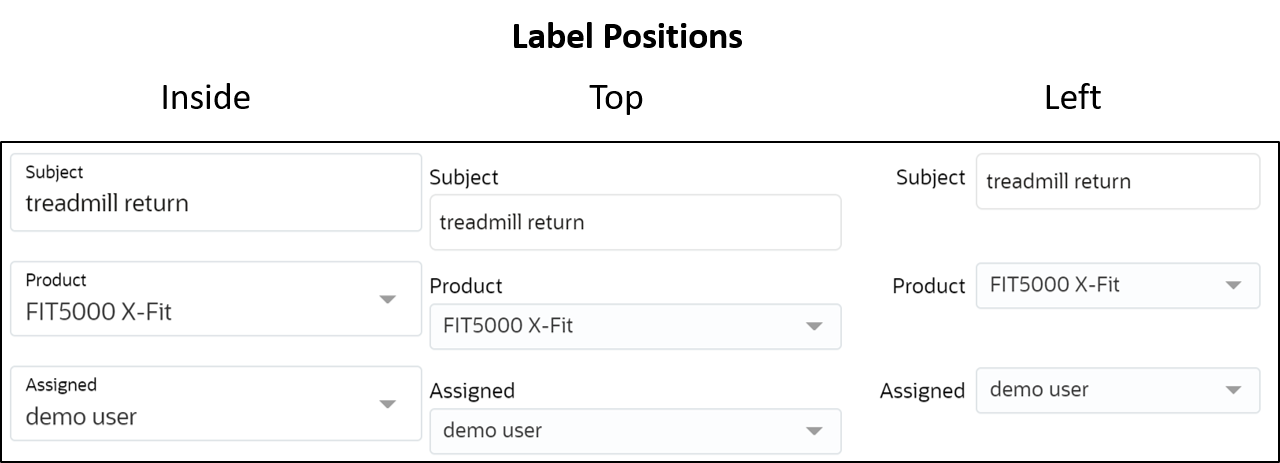
Field Label Positions
Watch a Demo
The inside field label position modernizes the look and feel of workspace layouts and aligns with other enterprise class applications.
Steps to Enable
- Open a workspace in the Workspace Designer.
- Select a field.
- In the 'Label' options under the 'Design' tab in the ribbon, select 'Inside'.
- Save and preview the workspace in Browser UI. Note that the field is represented with the label inside the field container, rather than adjacent to it.
Tips And Considerations
- The inside field label position is only supported for Browser UI.
- Inside Labels requires B2C Service 21A or greater.
Key Resources
- Watch Inside Field Labels Demo
Workspace Rules: Request Insights
Workspace Rules can be configured to conditionally request Insights which display in the Agent Insights side panel on the Agent Browser UI.
Agent Insights provide additional context and suggested actions for users when viewing incident records. Insights can be triggered under certain conditions like when a field changes, a named event fires, or when the incident record is saved without closing.
Steps to Enable
- Open an incident workspace the Workspace Designer
- Select 'Rules' from the Designer Ribbon
- Select 'Add Rule'
- Configure rule triggers
- Under 'Actions' select 'Request Insights'
- Save the workspace and preview on the Agent Browser UI
- Trigger the new rule and observe the Agent Insights side panel card appears with Insight cards that match the new incident record data.
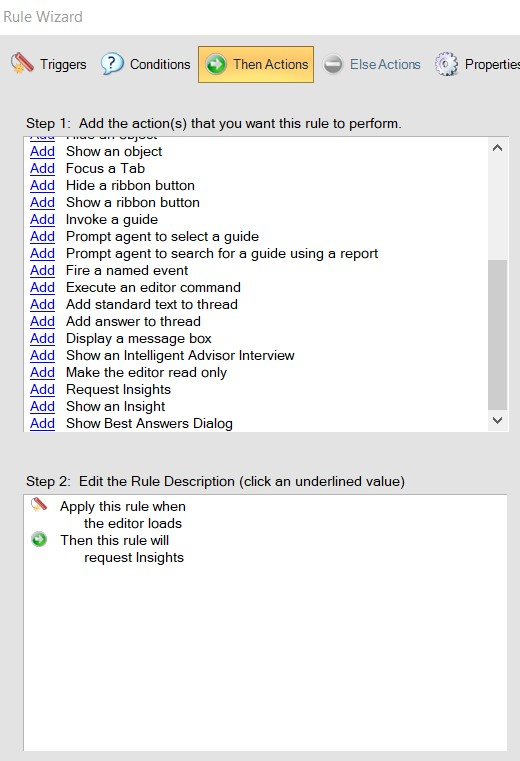
Workspace Rule Designer
Tips And Considerations
- The Request Insights action relies on the configuration of Agent Insights endpoints which are on Controlled Availability. Contact Oracle for enablement.
- This workspace rule is most useful when incident record data has changed and new Insights can leverage the data to return different Insights.
- This workspace rule action is only supported in incident workspaces on the Agent Browser UI.
Workspace Rules: Show Intelligent Advisor Interview
Workspace Rules can be configured to show Intelligent Advisor Interviews on the Agent Browser UI.
Launch Intelligent Advisor based on workspace rule conditions for personalized advice and decisioning.
Steps to Enable
- Open an incident workspace in the Workspace Designer.
- Select 'Rules' from ribbon.
- Create new rule.
- Select a trigger (ex. 'The Editor Loads').
- Select action 'Show Intelligent Advisor Interview.'
- Enter 'Locale' and 'Policy.'
- Save and preview workspace on the Agent Browser UI.
- Note that the Intelligent Advisor interview appears when the trigger condition is met.

Workspace Rules Wizard
Tips And Considerations
- This workspace rule action is only supported on the Agent Browser UI.
- The workspace rule action requires Intelligent Advisor license and an available Interview.
- The browser must allow popups.
Key Resources
- Intelligent Advisor documentation