
This document will continue to evolve as existing sections change and new information is added. All updates appear in the following table:
| Date | Product | Feature | Notes |
|---|---|---|---|
| 08 JUL 2022 | Created initial document. |
 HAVE AN IDEA?
We’re here and we’re listening. If you have a suggestion on how to make our cloud services even better then go ahead and tell us. There are several ways to submit your ideas, for example, through the Ideas Lab on Oracle Customer Connect. Wherever you see this icon after the feature name it means we delivered one of your ideas.
GIVE US FEEDBACK
We welcome your comments and suggestions to improve the content. Please send us your feedback at owms-cloud-comms_us@oracle.com.
DISCLAIMER
The information contained in this document may include statements about Oracle’s product development plans. Many factors can materially affect Oracle’s product development plans and the nature and timing of future product releases. Accordingly, this Information is provided to you solely for information only, is not a commitment to deliver any material, code, or functionality, and should not be relied upon in making purchasing decisions. The development, release, and timing of any features or functionality described remains at the sole discretion of Oracle.
This information may not be incorporated into any contractual agreement with Oracle or its subsidiaries or affiliates. Oracle specifically disclaims any liability with respect to this information. Refer to the Legal Notices and Terms of Use for further information.
Column Definitions:
Report = New or modified, Oracle-delivered, ready to run reports.
UI or Process-Based: Small Scale = These UI or process-based features are typically comprised of minor field, validation, or program changes. Therefore, the potential impact to users is minimal.
UI or Process-Based: Larger Scale* = These UI or process-based features have more complex designs. Therefore, the potential impact to users is higher.
Features Delivered Disabled = Action is needed BEFORE these features can be used by END USERS. These features are delivered disabled and you choose if and when to enable them. For example, a) new or expanded BI subject areas need to first be incorporated into reports, b) Integration is required to utilize new web services, or c) features must be assigned to user roles before they can be accessed.
| Ready for Use by End Users Reports plus Small Scale UI or Process-Based new features will have minimal user impact after an update. Therefore, customer acceptance testing should focus on the Larger Scale UI or Process-Based* new features. |
Customer Must Take Action before Use by End Users Not disruptive as action is required to make these features ready to use. As you selectively choose to leverage, you set your test and roll out timing. |
|||||
|---|---|---|---|---|---|---|
| Feature |
Report |
UI or |
UI or |
|
||
Manage Dimension, Volume, and Weight UOM for Companies and Facilities |
||||||
Support for Primary UOM and Dimension, Volume, and Weight UOMs in Interfaces |
||||||
Inventory History Transaction Support for Movement Request Status Changes |
||||||
Pack All SKU Quantities Into an Outbound LPN Using RF Repack Outbound LPN |
||||||
Pre-Built Integration Mappings for Receipt Confirmations of Serialized Items |
||||||
Enhancements to Pre-Built Integration Mappings for Customer Returns (RMAs) |
||||||
Manage User-Configurable Units of Measure
Warehouse Management provides the capability to track units of measure beyond discrete units, packs, and cases. Inventory can now be tracked in user-defined units of measure belonging to different UOMs which are part of a different Unit of Measure Class.
Unit of Measure (UOM) is extremely important in inventory management as it quantifies inventory items in terms that all parties can understand. If two parties are transacting on an inventory item, UOM defines how much and in what unit the quantity is expected. Also, UOMs need to be standardized among various stakeholders, especially across countries, because the standard of measuring, for example, kilograms or kilometer for one stakeholder may be read as pounds or miles to another stalk holder.
UOM CLASS
UOM class is a new entity added to WMS which helps in grouping different UOMs. In order to better track inventory, a new UOM Class UI has been added.
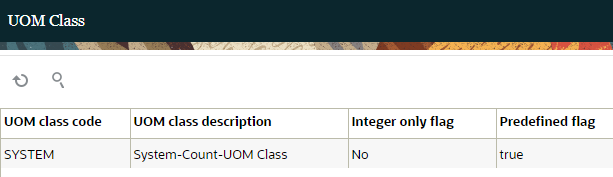
UOM Class UI
The addition of UOM Class entity provides groupings for UOMs, which allows you to group UOMs together in a same Class.
For example, a length class could contain centimeters, meters, or feet. Or a volume class, could contain cubic meters, or cubic feet.
NOTE: The System Class code indicates UOM codes that already existed in Warehouse Management prior to 22C. System class codes are not editable and you can’t add additional UOM codes to this class code.
UOM UI
The Unit of Measure (UOM) UI gives you the flexibility to configure other UOMs in addition to the existing supported system class UOMs (cubed, cases, packs, pallets, LPNs, and units.)
The UOM UI allows you to group and view additional UOMs that belong together in the same UOM Class. In the following example, you can see all of the different UOM codes (measurement categories) that have been grouped as MASS:
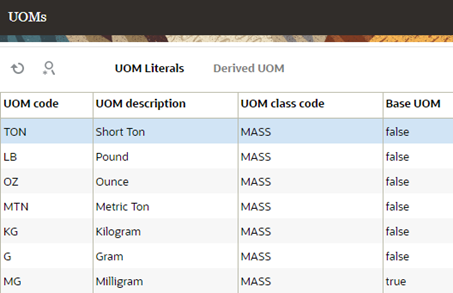
UOM UI
UOM LITERALS BUTTON
When translating UOM for different languages, the UOM code displayed can vary from one language to other.To accommodate these variations, UOM attributes are now translated and you can now view UOMs per their selected default language. This will help with ease of use because you can make UI names specific to your language.
For additional detail about using and configuring UOM in WMS, see Configuring UOM in the Implementation and Configuration Guide.
Steps to Enable
You don't need to do anything to enable this feature.
Key Resources
Manage Dimension, Volume, and Weight UOM for Companies and Facilities
Apart from associating UOM for Inventory/Shipped Qty/ Order Qty quantity based on assigning the primary UOM to item and item facility, there are other fields like Weights/Volume/Dimensions associated with LPN or Pallet (like LPN Weight, LPN Volume etc), or item/locations/LPN types. These fields should also be qualified with the appropriate UOMs for weight, volume and dimensions. To facilitate this, all Weight/Volume/Dimension fields can be qualified with a UOM defined at the Parent company level. You can also define these at the facility level.
As companies can operate with multiple facilities in different geographical locations, each facility may want to define different UOM for Weight/Volume/Dimension class. Defining UOM at the facility level provides more definition and consistency across multiple companies and facilities.
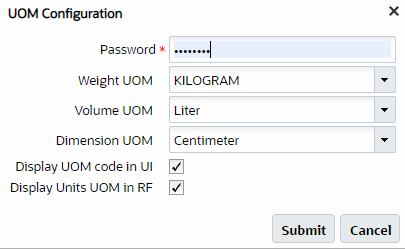
UOM Configuration
NOTE: UOM values defined at the facility level take precedence over company UOM
A new action button UOM Configuration is now available in the Facility UI.
From the UOM Configuration UI, you can select multiple facilities and click on the Configure UOM link to define UOMs across facilities at a single instance for all WMS Managed Facilities.
Steps to Enable
The following group permissions are required to access UOM Configuration for Management, Supervisor, Employee and Guard roles:
- facility / can configure facility wt volume dim UOM
- facility / change WMS Managed Flag
Key Resources
You now can define the Primary UOM for an Item in the Item UI. By defining UOM at the item level, you can more clearly distinguish UOM properties for inventory in the warehouse. By defining primary UOM for an item, you can receive better context of the quantity with respect to Inventory, Shipment details or, Order details.
NOTE: Upon upgrade, the default primary UOM of the item will be tagged as "Units". Existing customers upon upgrade will not be able to replace the UOM for items where some transaction has occurred, for brand new items we can associate UOMs to value other than "Units".
PRIMARY UOM IN ITEM FACILITY
For scenarios where customers are operating facilities across various geographies, the Primary UOM populated in the Item Facility will override the value stored in the Item UI. For example, if your facility is located in the UK, you may need to see weighted tracked items UOM in Kilograms instead of Pounds. All transactions and inventory values associated to the item will be displayed as per the UOM associated to the item facility.
PACK UOM AND CASE UOM - ITEM DETAIL UI
We have added two new columns to the Item Detail UI, Pack_UOM and Case_UOM. You can configure these values to any UOM_Code that has the IsPackage UOM Flag value set to "yes". Typically, you should set the Is_Package UOM Flag value to yes for UOMs that are used to depict different names for Packs or Cases.
In the Item Detail UI, if the Primary Item UOM is units, and the Pack and Case UOM is enabled only if the standard pack/case is greater than 0. If the Primary UOM is a value other than units, (for example dozens) the user will be able to see UOMs from the same UOM class in the Pack/Case UOM drop-down option which has IS_PACKAGE flag set to “yes”.
Please note UOM_Code configured in Pack_UOM or Case_UOM will be displayed to the user while performing operations (Receiving, Picking etc) in terms of Packs or Cases. Also, the Pack UoM and Case UoM can be updated for an item through the Item UI or Item interface APIs. Refer to item/item_facility interfaces in the interface specification documents.
NOTE: At this point, User Configurable UOMs and Primary UOM for Items are available for new customers starting their implementation. Warehouse Management customers using Oracle Fusion Cloud Supply Chain Management should align the Primary UOM for Items with the Primary UOM of an Item in Fusion Cloud SCM Product Definition. For existing Warehouse Management customers, a replacement UOM Interface utility is planned for an upcoming product update to allow customers to populate Primary UOM for existing items.
Steps to Enable
You don't need to do anything to enable this feature.
Key Resources
Display and Transact UOM in WMS
DISPLAY AND TRANSACT ITEM'S PRIMARY UOM IN WMS UI
WMS UI screens now display quantity columns along with the associated UOM. This helps user to identity the UOM type and reduces errors during any given transaction. Users can also enable/disable displaying the UOM code associated to the quantity via company settings.
In this example, you can see that the quantities are appended with the corresponding primary UOM of the item. You can also see that the weight is appended with the corresponding UOM from the company/facility UOM configuration.
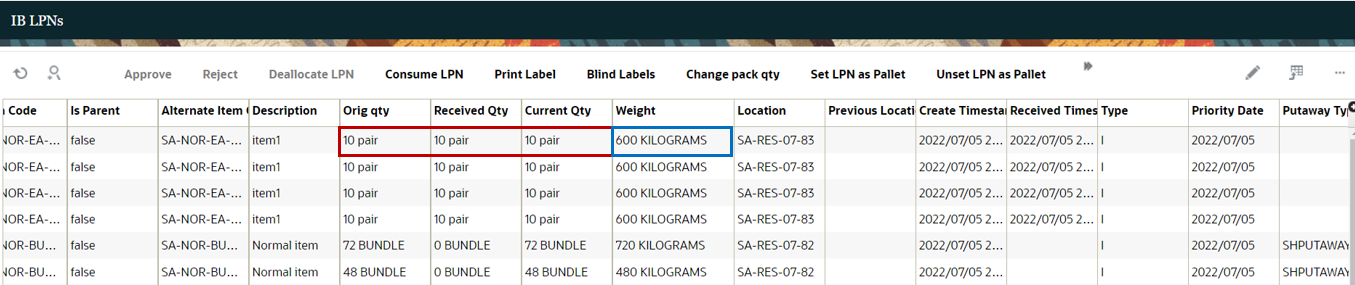
Primary UOM
NOTE: Previously, some weight/volume/dimension columns (like unit_wt, unit_vol, lpn_wt) were sortable. Now users will not be able to sort in the Web UI using these columns.
UOM CODE IN POP-UP SCREENS
Certain pop-up screens have been modified to include the UOM code. In the following example, if you are modifying an Inbound LPN, as a user, you can more easily see the UOM associated with each Inbound LPN.
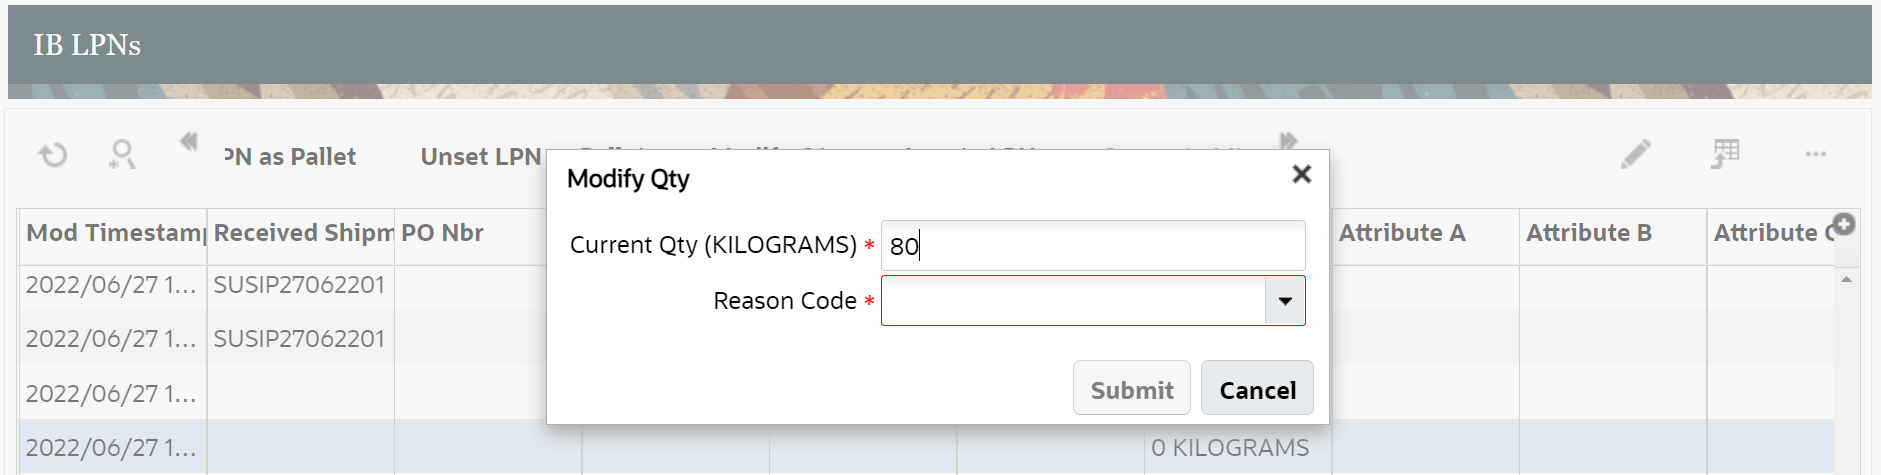
Modify Quantity
DISPLAY AND TRANSACT ITEM'S PRIMARY UOM IN RF TRANSACTIONS
Explicitly displaying the UOM after the quantity transacted throughout WMS RF screens in the user’s language reduces user errors and allows new users to work with UOM in WMS more efficiently. The WMS RF screens now displays quantity column along with associated UOM. This helps users to identity the UoM and thereby reduce causing any error during the transaction.
Users can also enable/disable displaying the UOM code associated to the quantity via company settings.
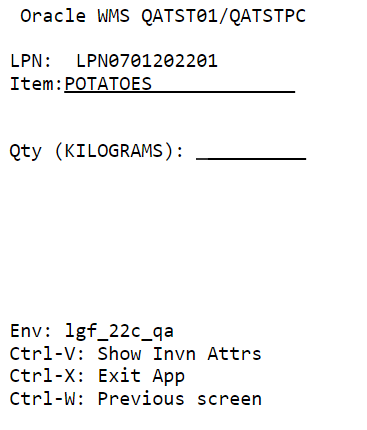
UOM Quantity
PRIMARY UOM SUPPORT IN WEB REPORTS GEN 2
To assist customers operating facilities across various geographies, Web Reports has been enhanced to accommodate UOM at the company and facility level so that generated reports now display the converted weight, volume, dimension, and quantity fields values for various entities.
PRIMARY UOM SUPPORT IN LABEL DESIGNER
Now, you will be able to append the UOM code in label designer. This will allow you to print the information in the labels and provide more visual clarity for your users.
Steps to Enable
You don't need to do anything to enable this feature.
Key Resources
Support for Primary UOM and Dimension, Volume, and Weight UOMs in Interfaces
The WMS Interfaces now include the Primary UOM and Dimension, Volume, and Weight UOMs.
INPUT INTERFACE
To assist you in transacting in terms of UOM, you can define and send inventory with different UOMs in Warehouse Management via interface files. Warehouse Management reads the UOMs that are interfaced and converts them into respective UOM tracked in WMS.
A new field is uom_code is introduced in the input interface file at the detail level where you can send the quantity UoM.The supported UoM is applicable for following input interface files:
- Purchase Order
- Inbound Shipment
- Order
- Item Prepack
- Work Order
- Location
- Outbound load
- Planned OB load
For more information, refer to the Interface Specifications or Implementation and Configuration Guide.
OUTPUT INTERFACE
You have an option to define the UOM for an item at the Facility/Company level, irrespective of the interfaced UOM. The UOM fields are applicable for following output interface files:
- Wave Pick Information (WOA) Interface
- Order Outbound Load Export File (PLS)
- Shipped Load File (SLS) Interface
- Pallet Shipping Info File (PLI)
- OBLPN Shipping Info File (OLO)
- Inventory History (IHT) Interface
- TO_MHE_DISTRIBUTION_INFO"
- Standard Inventory Summary
- Customer Inventory Summary
- Shipment Verification (SVS) Interface
- Outbound Manifest File (SLS)
- Container Outbound Load Export File (LLS)
- TO_MHE_IBLPN_INFO"
NOTE: The Weight, Volume, and Dimension is shared in terms of facility UOM configuration and Qty fields will be shared in terms of primary UOM if configured on the item's facility primary UOM. The host system using this information doesn't need to depend on any other source to know the UOM information associated with the output file but can directly be consumed from the output file.
A new qty_uom_code field is added to export the value based on the Primary UOM from the respective item facility. If the primary UOM on the item facility is not defined, then the Primary UOM from the respective item is populated.
Steps to Enable
You don't need to do anything to enable this feature.
Key Resources
Back Slash Support for WMS Label Designer
Previously, when printing labels, the ZPL printer would occasionally convert backslashes in labels to different characters. WMS Label Designer has been enhanced so that you can now include a backslash "\" in your text fields and they will always appear on labels as-is.
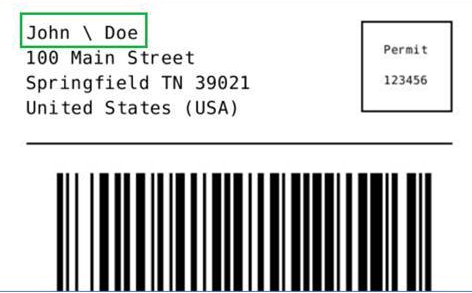
Back Slash
For example, some users could have items that include a backslash in the recipient address. Now your label accurately displays the backslash in the recipient address.
Steps to Enable
You don't need to do anything to enable this feature.
Key Resources
Announce Important Product Changes to Users in Popup UI
An Announcements pop-up feature is available in the Oracle Fusion Cloud Warehouse Management web UI. The pop-up feature displays important announcements related to functionality, such as ‘Deprecation of Legacy APIs'. The pop-up window is displayed the first time you log in to WMS. After you upgrade, the pop-up will occur once in the test environment and in the production environment.
Initial pop-up message:
“Reminder: You can view announcements on the MOS Info Center Page.”
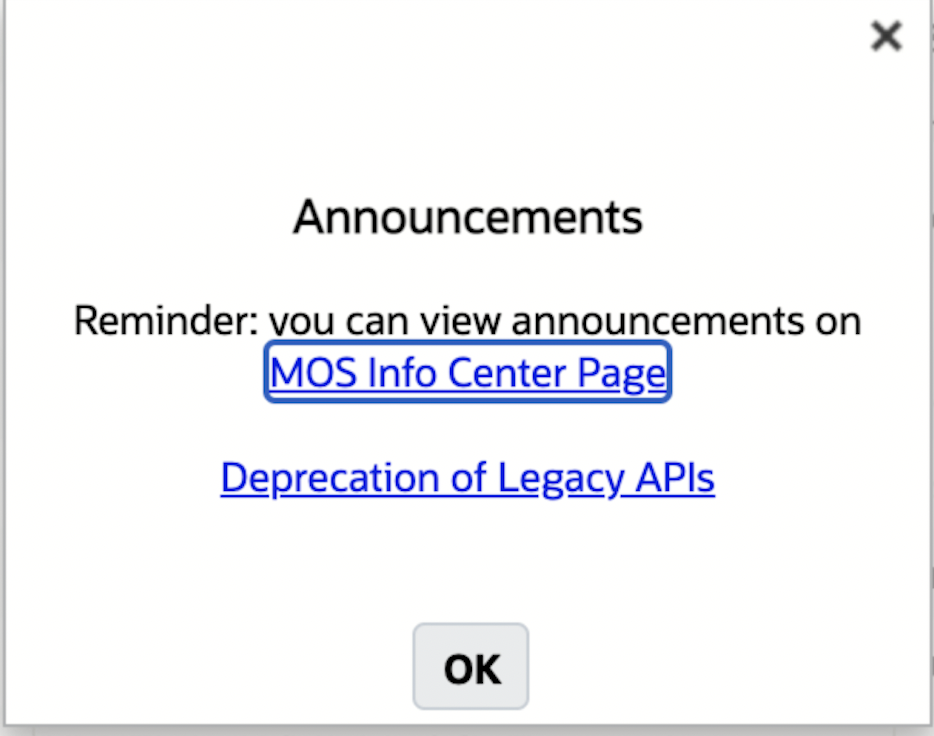
Announcement Pop-Up Window
A URL in the pop-up will direct you to the My Oracle Support (MOS) Info Center Page, or wherever the announcement URL is located.
NOTE: After the initial pop-up announcement, a new pop-up window message will appear only when a new announcement is available/necessary.
The pop-up window feature serves as a reminder for you about special announcements that need attention or action.
Steps to Enable
You don't need to do anything to enable this feature.
Key Resources
Capture and Display Images of LPN in Inbound LPN Inquiry UI
You can now store assets such as images in Oracle Content and Experience Cloud (OCE). This new feature leverages the power of OCE for scenarios where having a photograph is useful. With the image display support added to the Inbound (IB) LPN Inquiry view, you have the option to view the images of damaged IBLPNs and report the same to vendors as required.
Images are tagged with the WMS facility name and IBLPN number that serve as unique identifiers for each image. Multiple images of the same IBLPN are allowed in this view.
Two new action buttons have been added to the IBLPN Inquiry UI that enable you to upload and view images as required.

Capture and Display Image
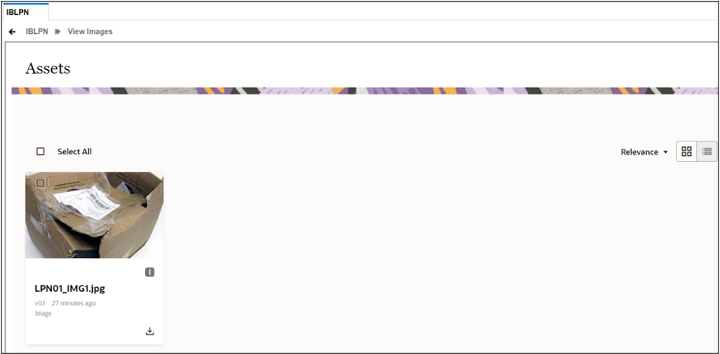
Captured Image
A standalone module has also been added to WMS to open OCE as an embedded view within WMS. This view allows you to search for images related to any WMS entity.
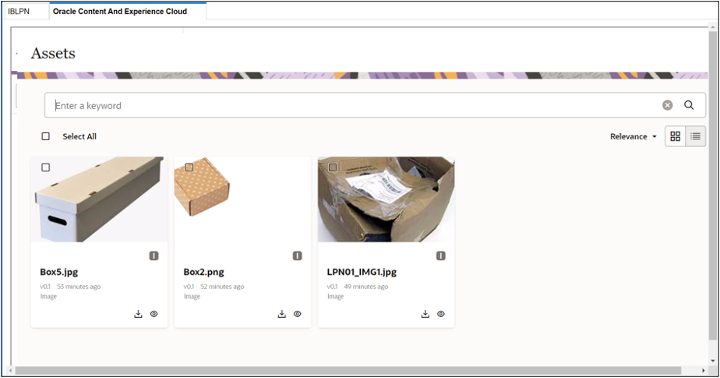
Standalone Module
Images are stored within repositories in OCE. One repository and one secure channel are created in OCE per WMS company. Each repository is published to its corresponding secure channel. Access to this repository and channel is provided to a single WMS user per company. This user, (also referred to as an OCE Admin User) is configured on the IDCS instance that is associated with your OCE instance. The OCE Admin User can in return grant access to other WMS users that need to view or upload images through WMS.
Steps to Enable
Multiple steps are involved to enable integration between WMS and OCE. At a high level, the following configurations are required:
- Create an application in your OCE instance that represents integration with WMS.
- Create one OCE Admin user per WMS company in the IDCS instance that is associated with your OCE instance.
- Use the configuration details for the application (created in step 1) and OCE Admin User (created in step 2) within WMS to initialize the setup with OCE
NOTE: Every company within a WMS customer instance needs to be initialized with OCE.
Key Resources
Update Movement Request Using a REST API
You now have the option to update and edit the already existing Movement Request Header and line details at certain stages of the operation using the Update action code. You can do this via the Input interface and also through the InitStageInterfaceAPI.
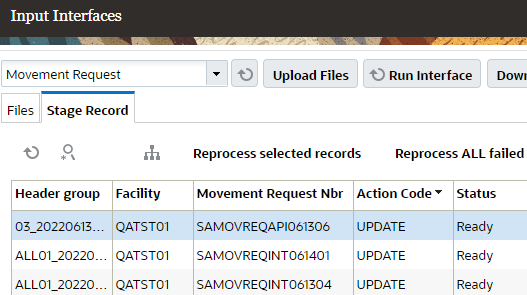
Input Interface
NOTE: Movement Request detail updates are allowed even if the movement request is partially allocated or allocated. You will be able to add line to movement request which has been allocated or change attributes of a movement request line which is not allocated. Reduction is allowed so that required quantity does not go below the allocated quantity.
CHANGES TO STAGE INTERFACE UI FOR MOVEMENT REQUEST ENTITY
The following enhancements are made for the Movement Request Entity:
- An additional Error String (Err Str) field is added in the Movement Request Detail at the Stage Interface Level. This field describes the reason for the failure of the record.
- If there are multiple details for a Movement Request, the system now displays the status of the record and continues to process all the stage records until the end of the interface, even if there are one or more error or failed record in the movement request details. This change allows you to view all the status and error condition at once of all the record for that particular movement record.
Steps to Enable
Review the REST service definition in the REST API guides, available from the Oracle Help Center > your apps service area of interest > REST API. If you're new to Oracle's REST services you may want to begin with the Quick Start section.
Key Resources
Pick and Issue Items on Movement Request Leveraging Auto-Consume Flow While Preventing Overallocation
Warehouse Management has been enhanced to support the Auto-Consume (Pick and Issue) flow as part of movement request activities. The following flow diagrams illustrate the two flows supported in Warehouse Management:
PICK AND MOVE FLOW (EXISTING)
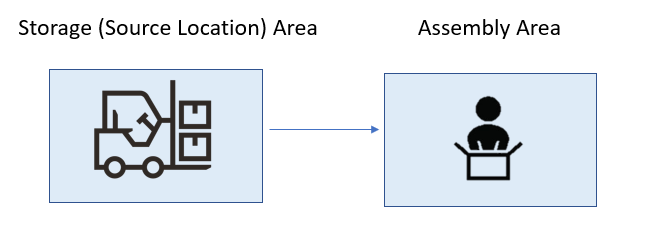
In the Pick and Move flow, Warehouse Management moves inventory from the storage area (source location) to the supply (destination) area.
In this scenario, the Auto Consume Flag is set to No.
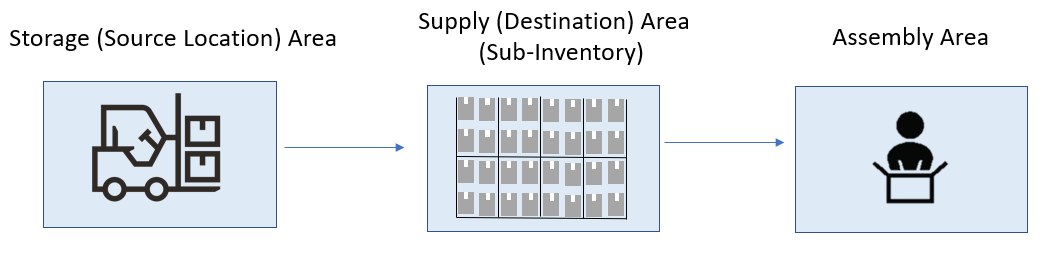
Pick and Move Flow
PICK AND ISSUE FLOW (NEW)
New in 22C, the Pick and Issue (Auto consume) flow is supported in Warehouse Management, where material is taken directly from the source location and issuing the material out of the warehouse.
Pick and Issue Flow
In this scenario, during replenishment, if the Auto Consume Flag on the movement request in WMS is set to Yes, Warehouse Management will auto consume the inventory/ As soon as the material is delivered to the assembly area, material is directed from the Warehouse Management four wall purview.
NOTE: If you are using Auto Consume functionality, you cannot use Round Up One UOM functionality (I.e. If a Movement Request detail has auto_consume flag set to yes, during replenishment application will not overallocate based on Round Up One UOM flag configured at replenishment rule level.)
Steps to Enable
Depending on how the movement request is created, the Auto Consume flag should be set to "yes" on Movement Request Detail either via interfaces or through the UI.
Key Resources
Inventory History Transaction Support for Movement Request Status Changes
Warehouse Management now includes Inventory History Transactions (IHTs) to support the following flows:
- Pick and Move
- Pick and Issue
The IHTs will contain the movement request information such as numbers that will help users to know which material got delivered against which movement request. The following table shows the corresponding IHTs for the following movement request actions:
| IHT | Movement Request Action |
|---|---|
| IHT 87 | Signifies and depicts the material delivered to Destination Location. When replenishment or movement of inventory is happening based on movement request, upon delivery of the material to destination location, you will see IHT-87 with details pertaining to movement request. |
| IHT 91 | When Auto Consume flag is set to “yes”, once the delivery of the material is completed, we also deduct the inventory as part of replenishment process. To depict the reduction of inventory happening due to auto consume flag set to yes, IHT-91 will be created. |
For more details on the Movement Request-related Inventory History Transactions, see the Interface Specifications and Trigger Points documents.
Steps to Enable
You don't need to do anything to enable this feature.
Key Resources
Print Labels During RF Direct Allocation
Printing labels using RF Direct Allocations is now easier. A new screen parameter “Print-Label” and a new hot key “Ctrl+P: Label Printer” have been added to RF Direct Allocation. This is great for scenarios where you have a mobile printer close by. You can easily print OBLPN labels and have them readily available to use.
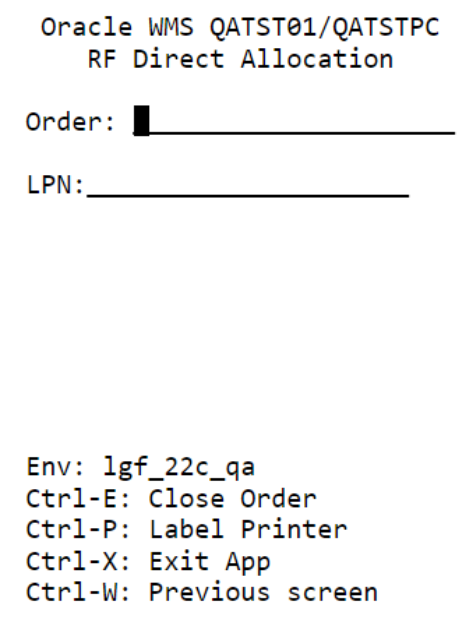
Printing Label in RF Direct Allocation
| Fields | Values |
|---|---|
| Parameter Name | Print-Label |
| Parameter Type | Selection |
| Parameter Options | OBLPN Label - The system prints the OBLPN shipping label. OBLPN Content Label - The system prints the OBLPN Content label. Both – The system prints both OBLPN shipping label and content label None / Blank - The system will not print a label - Default |
| Default Options | No |
NOTE: The new hotkey will only display if the screen parameter “Print-Label” is configured.
Steps to Enable
Configure screen Parameter “Print-Label”.
Key Resources
Pack All SKU Quantities Into an Outbound LPN Using RF Repack Outbound LPN
You can now pack all the inventory for a particular SKU into an outbound LPN with the help of the newly introduced screen parameter “qty-entry-mode” in RF Repack OBLPN. After scanning the SKU, you have an option to enter the quantity indicating the quantity to be moved to the final container.
In 22C, the following enhancements are made:
- To honor the UOM, the field “From LPN Units left” is now changed to “From LPN Qty Left” and is applicable for both sku-scan and sku-qty mode.
- A new parameter qty-entry-mode now provides you with the parameter choice SKU-QTY where you can enter the quantity of the inventory for a particular SKU.
NOTE: When the parameter is set as "None" or "SKU-Scan", the system prompts you to scan the SKUs.

RF Repack Outbound LPN
- The following fields are made available during the Repack OBLPN transaction irrespective of the modes:
- Qty to Pack - Displays the quantities left to be packed for the particular SKU scanned.
- Qty (UOM_CODE) - Define the UoM type:
- You can enter Qty = or < the expected Qty.
- If you enter Qty = Expected Qty, then the prompt returns to SKU Scan.
- If you enter Qty < Expected Qty, then the value of Qty to Pack field is reduced and the prompt remains in Qty prompt screen.
Steps to Enable
You don't need to do anything to enable this feature.
Key Resources
Prompt for Batch Selection in RF Pack NC
A new RF parameter, “Select Batch” has been added to save you time and energy during picking and packing. During RF Pack NC (rf.outbound.cwrfpackncoblpn), after you scan an item, instead of the system asking you to scan a batch, you will be prompted to a new pop-up screen where you can see the available batches in the location for that SKU. This feature will be helpful for customers who do not have batch number barcoded and batch numbers are just mentioned in textual format.
NOTE: If the location only contains one batch, the SYSTEM DOES NOT PROMPT FOR BATCH.
If you pick a partial quantity, you will be prompted for the SKU, and the next screen should show the quantity left that needs to be picked.

Batch Selection
Steps to Enable
To enable RF prompting of batch selection, set the “Select Batch” screen parameter to Yes (and the existing screen parameter “item-barcode-scan” to Prompt SKU/Scan Each SKU.)
Key Resources
Warehouse Workforce Management
Clock In - Clock Out for Users Using a REST API
The Clock In/ Clock Out Rest API allows you to post clock data for a single or multiple users in a single payload. The API supports data for the facility, break and work area clock in/out.
With REST API support added for Clock-in/Clock-out, you have the benefit of directly integrating your time management system with WFM. And, real-time clock-in/clock-out information is posted on WFM as and when you swipe/scan your cards on entering/exiting the facility during break time.
The added advantage for you is that you start the tasks immediately upon arrival into the facility, instead of manually having to clock into various entities.
API URL:
POST ..lgfapi/v10/stage_track_record/clock_inout/
Request Parameters:
| Name | Required | Type | Default | Description |
|---|---|---|---|---|
| facility_code | X | String | Facility code | |
| univ_id_1 |
X | String | WMS user with Unique Employee ID (cw_user.univ_id_1) |
|
| cico_ts |
X | DateTime | Clock in/out date time |
|
| cico_type |
X | String | Valid Values: F1 through F6 |
|
| originating_system |
X | String | Valid Values: M and S |
|
| work_area |
C | String | Should be populated if cico_type = F5 or F6 |
|
| break | C | String | Should be populated if cico_type = F2 or F3 |
Request Body Example:
{
"message_id": 12345,
"async_flg": false,
"cico_data": [{
"facility_code": "FAC",
"univ_id_1": "user1",
"cico_ts": "20220505063027",
"cico_type": "F5",
"originating_system": "M",
"work_area": "WA001"
}]
}
Steps to Enable
You don't need to do anything to enable this feature.
Key Resources
Support UOM in Predefined Integration Mappings
Earlier, the integration layer was converting units to Eaches whenever a shipment confirmation or receipt confirmation OIC layer was interacting with the Inventory Management Cloud. This conversion of Units to Eaches was hardcoded in the integration layer.
From 22C onwards, to support UOM weight, volume, and quantity, you can now remove the hard-coded values when communicating with Inventory Management Cloud.
HANDLING UOM QUANTITY IN OIC
A new integration consider_qty_uom_from_property flag is introduced in the OIC layer providing you with an option to convert Units to Each or not. By default, consider_uom_property_for_units flag is set to Yes.
Let’s say, when the flag consider_uom_property_for_units is set to Yes, for an existing prebuilt Integration with an existing item:
- If the shipped quantity is sent with UOM of “Units” in shipment confirmation payload, then OIC interacts UOM in “Each” to Fusion.
- If the shipped quantity is sent with UOM of anything other than “Units” in the shipment confirmation payload, then OIC interacts UOM as that UOM to Inventory Management Cloud. For example, if the item is a bulk item used in manufacturing and its Primary UOM is a weight or volume like grams, kilograms, ounces, liters, etc., as opposed to a unit-based Primary UOM like Each then G, Kgs, OZ, L, etc. would be interfaced to Inventory Management Cloud.
When consider_uom_property_for_units is set to No, the UOM is interfaced as-is to Inventory Management Cloud.
For example:
- If the shipped qty is sent with UOM of “Kgs” in the shipment confirmation payload, the OIC interacts UOM as “Kgs” to Fusion.
- If the shipped qty is sent with UOM of “Units” in the shipment confirmation payload, then the OIC interacts UOM as "Units" to Fusion. In this case, Fusion needs to set up UOM as "Units".
HANDLING UOM WEIGHT AND VOLUME IN OIC
Earlier, the UOM in Shipment Confirmation was hardcoded with Weight UOM as "Pounds" and Volume UOM as "Cubic-Feet". From 22C onwards, you can now configure Weight and Volume UOM. A new integration consider_wt_vol_uom_from_property flag is introduced in the OIC layer providing you a flexible option to remove the hardcoding values of converting convert Weight UOM as "Pounds" and Volume UOM as "Cubic-Feet".
If the consider_wt_vol_uom_from_property = Yes/blank,
- The OIC layer interacts with Inventory Management Cloud with Weight and Volume UOM in Pounds and Cubic Feet, even though the shipment confirmation payload does not have Weight/Volume UOM Populated.
NOTE: If customers have not configured Weight/Volume UOM at the facility level, then we recommend to set the integration property to “Yes”.
If the consider_wt_vol_uom_from_property = No, then:
- The OIC Layer will pick the Weight and Volume UOM from the Shipment Confirmation Payload.
- If the weight and volume UOM in shipment confirmation is in Kgs and Yards, then the system picks the UOM from the Ship Confirmation Payload and interacts in Kgs and Yards to Fusion. In this case, the Shipment Confirmation is mapped to OBLPN Weight UOM Code, Volume UOM Code, Stop Weight, Stop Volume.
Steps to Enable
You don't need to do anything to enable this feature.
Key Resources
Pre-Built Integration Mappings for Receipt Confirmations of Serialized Items
Previously, in 22B, multiple payloads were sent in a serial number when the receipt confirmation was sent with an LPN containing multiple serial numbers.
Now in 22C, the system consolidates the serial number into a single payload via Putaway.
Steps to Enable
You don't need to do anything to enable this feature.
Key Resources
Enhancements to Pre-Built Integration Mappings for Customer Returns (RMAs)
INCREASED FIELD LENGTH IN THE INVENTORY MODULE
The field length of the "receipt advice line" has been increased to 40 in the IB Shipment Detail and IB Shipment Serial Number interface and UI.
| Previous Length | Current Length |
|---|---|
| 30 | 40 |
The length is increased in both the Stage Table and Main Table for the IB Shipment Detail and the IB Shipment serial number.
RECEIPT CONFIRMATION CHANGES FOR RMA AS IB SHIPMENT
In 22B, Receipt Confirmation for RMA’s was supported via Purchase Orders. Now, in 22C, new mappings are added to support Receipt Confirmation for RMAs as IB Shipments and to support serial number attributes.
For more information, please refer to the Oracle Warehouse Management Cloud to Oracle Fusion Inventory Management Cloud Integration Guide.
Steps to Enable
You don't need to do anything to enable this feature.
Key Resources
IMPORTANT Actions and Considerations
DEPRECATION OF LEGACY APIS
Warehouse Management Cloud has deprecated several legacy APIs that no longer comply with the overall strategy to develop REST APIs. See the Deprecation of Legacy APIs document for more details about the legacy APIs that were deprecated in the 22B release.