
Using Oracle ADF Faces in Existing JSF Applications
Learn how to integrate Oracle ADF Faces into existing JSF projects and take advantage of the rich UI components provided by that framework
by Andrei Cioroianu
Developer: J2EE
JavaServer Faces (JSF) is a very useful standard framework (JSR-127) for Java developers because it defines an API and a basic set of tags for building Web-based user interfaces. Oracle Application Development Framework (ADF) Faces, based on the JSF framework, adds many new UI components and simplifies Web application development.
This article shows how to modify JSF pages in an existing application to use Oracle ADF Faces (hereafter referred to simply as ADF Faces), and explains the benefits of this new UI framework. You'll find out how to add ADF Faces to existing JSF projects, and how to enhance your Web applications by using the rich UI components provided by ADF Faces. You'll also see how Oracle JDeveloper can make your work much easier.
Downloads for this article
Getting Started [Basic Setup]
This article is organized into two distinct parts or phases. The first part runs through editing various examples, showing you how to change several sample files to use ADF Faces rather than JSF, and points out some of the differences between JSF and ADF Faces.
The second half steps you through deploying and testing out the samples. To run the examples presented in this article, you'll need J2SE 1.4 (or later), an application server that supports Servlets 2.3 and JSP 1.2 (or later), an implementation of JSF 1.1, ADF Faces EA13 (or later), JSTL 1.0 (or later), a database server that supports JDBC, and Oracle TopLink.
Rather than installing and configuring all these software components, you can use Oracle JDeveloper 10.1.3, which is bundled with J2SE; OC4J (Oracle Containers for J2EE, a J2EE 1.4 compliant application server that implements Servlets 2.4 and JSP 2.0, in addition to all the other J2EE 1.4 standards); JSF; JSTL; and Oracle TopLink. Oracle JDeveloper supports ADF Faces through a separate bundle that must be installed using the "Check for Updates..." wizard of the Help menu. Furthermore, Oracle JDeveloper works very well with the Oracle Database.
In either case, you'll need to download the libraries and other files if you don't have them already installed and configured.
About the Sample Application
The application discussed in this article is based on the example from a previous article, " Building Database-driven Applications with JSF". The sample Web application presented in that article queries and updates a relational database (using TopLink or JDBC). In this article, we'll step-through modifying that application's JSF-based user interface so that it uses ADF Faces instead. (It may help you to review "Building Database-driven Applications with JSF " before you attempt to work through this project.)
ADF Faces builds on JSF, which means you'll need both of these technologies available if you want to step through the sample code in this article, so before you get started, download, install, and configure the libraries as needed (see " Resources "), starting with the setting up the ADF Faces Framework.
Server-side Setup for ADF Faces Framework
To use ADF Faces, you need an implementation of the JSF 1.1 specification, such as Sun's Reference Implementation (RI) or Apache's MyFaces . (Although you can use ADF Faces in conjunction with other components from Oracle's ADF (Application Development Framework), no other part of ADF is requiredyou can use ADF Faces standalone, as you'll see as you step through the example discussed in this article.)
ADF Faces and JSF can be deployed in any application server that supports Servlets 2.3 and JSP 1.2 (or later). The examples in this article have been tested with Oracle Containers for J2EE (OC4J) 10g and Tomcat 5.0, using the JSF 1.1 RI and ADF Faces EA13. (To use different early adopter release of ADF Faces, replace the EA13 string in the <%@taglib%> directives in all JSP pages.)
As with JSF, ADF Faces also provides a public API that you can use in your Java classes and two JSP tag libraries (HTML and Core) for your Web pages. In addition, ADF Faces comes with a set of resources (images, JavaScripts, and CSS files) that are used internally by the UI components
Adding the ADF Faces Libraries and Files to the Development Environment
You can obtain the ADF Faces framework from the Oracle Technology Network (OTN) Web site as a .zip archive that contains the tag libraries, documentation, and a Web application example.
You'll find the .jar files ( adf-faces-api-ea13.jar, adf-faces-impl-ea13.jar and share-1_1_18.jar ) in the lib directory. Copy these .jar files in the lib directory of your Web application. In addition, you'll find a .zip file ( adf-faces-install-ea13.zip ) that contains images, JavaScripts and CSS files. You must unzip the adf-faces-install-ea13.zip file in the main directory of your Web application.
You can also download an ADF Faces bundle for JDeveloper 10.1.3. After installing the bundle as described in a separate OTN article (see Resources ), you can add the ADF Faces libraries to an existing JDeveloper project with a few mouse clicks:
Tip: You can use "The Check for Updates" wizard to download and install ADF Faces in Oracle JDeveloper 10.1.3. (See article for more details oracle.com/technology/products/jdev/101/howtos/checkupd/updatecenter.html )
- 1.Right-click a project in the "Applications" navigator.
- 2.Click the "Project Properties" option of the project's popup menu.
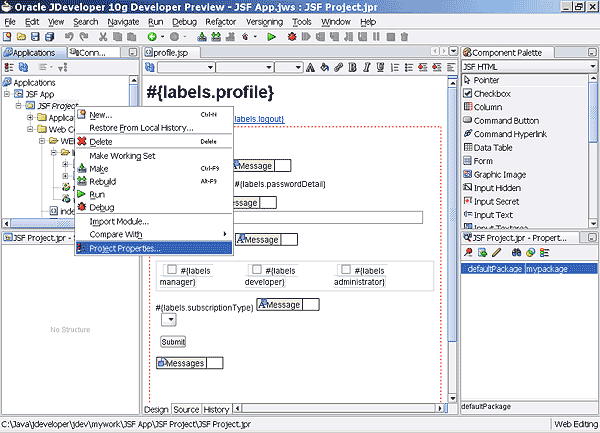
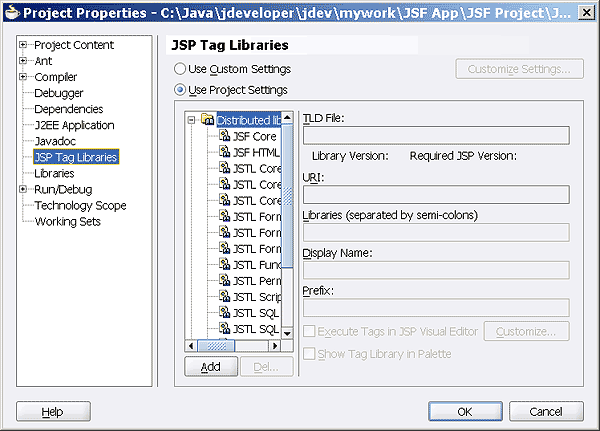
- 3.Select "JSP Tag Libraries" in the left panel of the "Project Properties" window and select "Distributed Libraries" in the right panel.
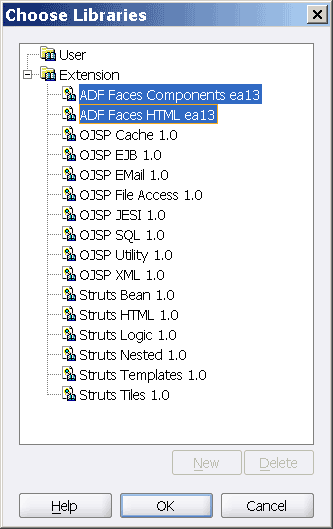
- 4.Click the "Add" button, which opens a window titled "Choose Libraries."
- 5.Select the ADF Faces tag libraries in "Choose Libraries" and click OK.
When the "Project Properties" window redisplays, ADF Faces should be listed in "Distributed Libraries."
Click OK to save the change.


Configuring the Application Server to Support the ADF Faces Framework
Before you can run any JSF application on the J2EE application server, you must configure the web.xml application descriptor to include the FacesServlet :
<servlet>
<servlet-name>FacesServlet</servlet-name>
<servlet-class>javax.faces.webapp.FacesServlet</servlet-class>
<load-on-startup>1</load-on-startup>
</servlet>

<servlet-mapping>
<servlet-name>FacesServlet</servlet-name>
<url-pattern>/faces/*</url-pattern>
</servlet-mapping>

<servlet-mapping>
<servlet-name>FacesServlet</servlet-name>
<url-pattern>*.faces</url-pattern>
</servlet-mapping>
In addition, to use ADF Faces on top of the JSF Servlet, you must configure a filter that is mapped to the FacesServlet (also in the web.xml file):
<filter>
<filter-name>AdfFacesFilter</filter-name>
<filter-class>
oracle.adf.view.faces.webapp.AdfFacesFilter
</filter-class>
</filter>

<filter-mapping>
<filter-name>AdfFacesFilter</filter-name>
<servlet-name>FacesServlet</servlet-name>
</filter-mapping>
In addition to the web.xml deployment descriptor changes you must make for ADF Faces, you must provide a separate deployment descriptor ( adf-faces-config.xml) that specifies any additional ADF Faces configuration parameters, such as accessibility-mode and look-and-feel. Here's an example:
<?xml version="1.0"?>
<adf-faces-config
xmlns="http://xmlns.oracle.com/adf/view/faces/config">
<debug-output>true</debug-output>
<accessibility-mode>
#{prefs.proxy.accessibilityMode}
</accessibility-mode>
<look-and-feel>
#{prefs.proxy.lookAndFeel}
</look-and-feel>
</adf-faces-config>
However, note that all of this work is done for you when you download and install the ADF Faces plug-in .
Changing Existing JSF Pages to Use ADF Faces
With some notion as to the basic setup, let's get started going through some actual code. In my previous OTN article (see article "Building Database-driven Applications with JSF"), I presented a Web application that queried and updated a relational database, using TopLink or JDBC. The JSF-based user interface of that application is modified here to use ADF Faces. Each JSF page is updated in several steps:
- Importing the ADF Faces tag libraries
- Using the HTML tags of ADF Faces
- Renaming JSF tags and some of their attributes
- Using the panel tags of ADF Faces
a) Importing the ADF Faces Tag Libraries
ADF Faces defines two tag librariesCore and HTML. The Core library contains UI components: buttons, input fields, lists, menus, tables, trees, panels, and many others. The HTML library consists of several tags that can be used to generate the <html>, <head> and<body> tags of a Web page and other HTML-related things such as frames and tables. These two libraries must be imported in any page that uses them with the <%@taglib%> directive:
<%@ taglib prefix="af"
uri="http://xmlns.oracle.com/adf/faces/EA13" %>
<%@ taglib prefix="afh"
uri="http://xmlns.oracle.com/adf/faces/EA13/html" %>
Oracle JDeveloper automatically inserts the two <%@taglib%> directives when you add an ADF Faces component to an existing JSF page (using the Component Palette), or when you convert a JSF tag into an ADF Faces tag (using the JDeveloper's wizards presented later in this section). .
b) Using the HTML Tags of ADF Faces
The <afh:html>, <afh:head> and <afh:body> tags of ADF Faces generate the corresponding HTML elements plus several other things such as the document's <title> element and the style sheets for the ADF Faces components. Here is a template for a typical JSF page that uses ADF Faces:
<%@ taglib prefix="af"
 uri="http://xmlns.oracle.com/adf/faces/EA13" %>
 <%@ taglib prefix="afh"
 uri="http://xmlns.oracle.com/adf/faces/EA13/html" %>
 <f:view>
 <f:loadBundle var="labels" basename="..."/>
 <afh:html>
 <afh:head title="#{labels...}"/>
 <afh:body>
 ...
 </afh:body>
 </afh:html>
 </f:view>
If necessary, you can code the <html>, <head> and <body> tags in the JSF page without any help from ADF Faces, but then you'll have to include an <af:styleSheet> component in the HTML header.
c) Renaming JSF Tags and Some of Their Attributes
ADF Faces offers a set of tags that are similar to the standard JSF tags and many other tags that have no JSF equivalent. You can mix the JSF and ADF Faces tags in the same page because all UI components are based on the same API defined by the JSF standard. When adding ADF Faces to an existing JSF application, you should rename the JSF tags that have ADF Faces equivalents to ensure a consistent look-and-feel and to benefit from other features, such as client-side validation. The ADF Faces tags also help you to reduce the lines of code. For example, a single ADF Faces tag (such as <af:inputText> ) can render an input component, a label and an error message:
<af:inputText id="email" required="true"
 validator="#{subscriber.emailValidator}"
 label="#{labels.email}"
 value="#{subscriber.email}"
 columns="40" maximumLength="80">
 <f:validateLength minimum="1" maximum="80"/>
 </af:inputText>
With JSF, you need three tags ( <h:outputLabel>, <h:message> and <h:inputText> ) to do the same thing:
<h:outputLabel for="email"
 value="#{labels.email}"/>
 <h:message for="email" styleClass="message"/>
 <br>
 <h:inputText id="email" required="true"
 validator="#{subscriber.emailValidator}"
 value="#{subscriber.email}"
 size="40" maxlength="80">
 <f:validateLength minimum="1" maximum="80"/>
 </h:inputText>
Note that the <af:inputText> tag can be used to display single-line, multi-line and password fields, while JSF provides three different tags for these types of components: <h:inputText>, <h:inputTextarea> and <h:inputSecret> . The <af:inputText> tag of ADF Faces has two attributes named rows and secret that will determine the type of the field. For example, you can render a password field with the following code:
<af:inputText id="password" secret="true" required="true"
 label="#{labels.password}"
 value="#{subscriber.password}"
 columns="10" maximumLength="20">
 <f:validateLength minimum="6" maximum="20"/>
 </af:inputText>
The ADF Faces documentation (see Resources) specifies all differences that exist between the JSF tags and their ADF Faces equivalents. In many cases, you just have to replace the h prefix with af and possibly rename some of the attributes. Sometimes, you have to rename the tag too. For example, you'll use <af:goLink> instead of <h:outputLink> and <af:selectOneChoice> instead of <h:selectOneMenu>:
<af:selectOneChoice id="subscriptionType"
 label="#{labels.subscriptionType}"
 value="#{subscriber.subscriptionType}"
 required="true">
 <f:validateLongRange minimum="1" maximum="3"/>
 <af:selectItem label="#{labels.daily}"
 value="#{subscriber.dailyConst}"/>
 <af:selectItem label="#{labels.weekly}"
 value="#{subscriber.weeklyConst}"/>
 <af:selectItem label="#{labels.monthly}"
 value="#{subscriber.monthlyConst}"/>
 </af:selectOneChoice>
When you use JDeveloper to do all this, you can use wizards to rename the tags:
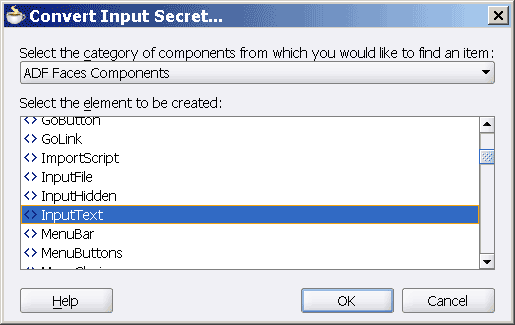
- 1.Right-click a JSF component in the Design view of the Web page.
- 2.Click the first option of the popup menu (Convert ...)

- 3.In the "Convert ..." window select the "ADF Faces Components" library.
- 4.Select the ADF Faces component that you want to use instead of the JSF component and click OK.
If some of the attributes of the JSF tags aren't supported by the selected ADF Faces component, JDeveloper will remove those attributes and will notify you.
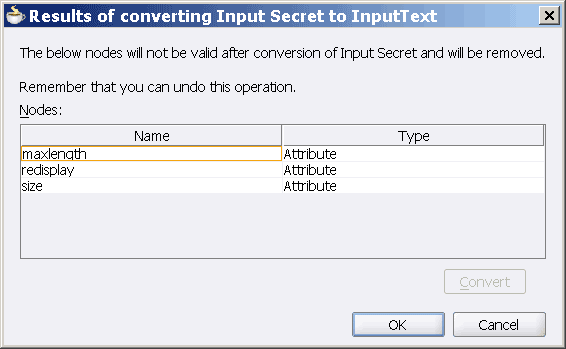
- 5.Rename any removed attributes (according to the instructions in the ADF Faces documentation , and (using JDeveloper's Property Inspector), add them back in.


d) Using the Panel Tags of ADF Faces
The JSF tags <h:panelGrid> and <h:panelGroup> can be used to arrange UI components in HTML tables. However, the ADF Faces framework provides a much richer set of panels. For example, the <af:panelPage> tag lays out an entire Web page that can have many sections (called 'facets'). The example application uses this tag only to show a title for each page. Another useful tag is <af:panelForm>, which arranges the labels and the input components in a table with two columns:

The JSF panel ( <h:panelGrid> ) is still useful to generate a table that groups related components, such as a set of radio buttons, and you can attach a label to the group of components with <af:panelLabelAndMessage> :
<af:panelLabelAndMessage label="#{labels.newsletters}">
 <h:panelGrid id="newsletters"
 columns="3" border="0" cellspacing="5">
 <af:selectBooleanCheckbox id="manager"
 text="#{labels.manager}"
 value="#{subscriber.manager}"/>
 <af:selectBooleanCheckbox id="developer"
 text="#{labels.developer}"
 value="#{subscriber.developer}"/>
 <af:selectBooleanCheckbox id="administrator"
 text="#{labels.administrator}"
 value="#{subscriber.administrator}"/>
 </h:panelGrid>
 </af:panelLabelAndMessage>
If a form has multiple buttons, you should place them within an <af:panelButtonBar> . The <af:commandButton> tag of ADF Faces uses a text attribute instead of the value attribute of the equivalent JSF tag ( <h:commandButton> ):
<af:panelButtonBar>
 <af:commandButton id="command"
 text="#{labels.unsubscribe}"
 action="#{subscriber.unsubscribeAction}"/>
 <af:commandButton id="cancel"
 text="#{labels.cancel}"
 action="#{subscriber.cancelAction}"/>
 </af:panelButtonBar>
The <af:panelGroup> tag is useful to group a few links that must be separated:
<af:panelGroup>
 <f:facet name="separator">
 <af:objectSpacer width="10" height="1"/>
 </f:facet>
 <af:goLink destination="unsubscribe.faces"
 text="#{labels.unsubscribe}"/>
 <af:goLink destination="logout.faces"
 text="#{labels.logout}"/>
 </af:panelGroup>
Enhancing the Web Application with Rich UI Components
The following example shows how to use several ADF Faces components together when building a Web table that allows the user to view and update a table of a database. You'll learn how to implement the typical table-related features required in a real Web application: presentation, sorting, refreshing, single and multiple-row selection. If you use the JSF tags, all these features require a lot of manual coding. ADF Faces does most of this work automatically and you just have to enable the features that you need by setting an attribute or adding a few lines of code.
Using the Table Component of ADF Faces
The JSF application presented in "Building Database-driven Applications with JSF" has a page named list.jsp that queries a database with the <sql:query> tag of JSTL, as shown here:
<sql:query var="subscriberList" scope="request">
SELECT * FROM subscribers ORDER BY subscriberEmail
</sql:query>
(Note that embedding queries inline in this way is fine for prototyping, but for production applications, you should not do it this way, for security reasons. In addition, using a robust middle-tier, such as EJB 3.0 or Oracle Toplink is recommended for production deployments.)
The <sql:query> tag creates a JSP variable ( subscriberList ) that holds the result set. This variable must be wrapped with a JSF data model in order to be used by an ADF Faces component:
<jsp:useBean id="tableModel" scope="request"
class="javax.faces.model.ResultDataModel"/>
<c:set target="${tableModel}" property="wrappedData"
value="${subscriberList}"/>
The <af:table> and <af:column> tags provided by ADF Faces are similar to the <h:dataTable> and <h:column> tags of JSF, but the table component of ADF Faces offers many additional features such as banding, paging, sorting, and row selection. The banding feature is enabled very easily using two attributes ( banding and bandingInterval ):
<af:table id="table" var="row" value="#{tableModel}"
banding="row" bandingInterval="1">

<af:column>
<f:facet name="header">
<af:outputText value="#{labels.email}"/>
</f:facet>
<af:outputText value="#{row.subscriberEmail}"/>
</af:column>

...

</af:table>
Using the ADF Faces APIs in Backing Beans
Table paging could be enabled very easily in the previous example, with the rows attribute, but it is not efficient to re-query the database for each page of the table, which happens when you use the JSTL tag. Therefore, this article adds a JavaBean ( ListBean ) that manages the table model and accesses the database using DAO methods only when it's necessary. The new bean is configured in the faces-config.xml file:
<managed-bean><br>
<managed-bean-name>list</managed-bean-name>
<managed-bean-class>adfdb.view.ListBean</managed-bean-class>
<managed-bean-scope>session</managed-bean-scope>
</managed-bean>
The ListBean class has two properties ( table and tableModel ):
package adfdb.view;
 ...
 import oracle.adf.view.faces.component.UIXTable;
 import oracle.adf.view.faces.model.SortableModel;
 ...
 public class ListBean implements java.io.Serializable {
 private UIXTable table;
 private SortableModel tableModel;

 public UIXTable getTable() {
 return table;
 }

 public void setTable(UIXTable table) {
 this.table = table;
 }

 public synchronized SortableModel getTableModel() {
 if (tableModel == null)
 refreshAction();
 return tableModel;
 }

 public synchronized void setTableModel(
 SortableModel tableModel) {
 this.tableModel = tableModel;
 }
 ...
 }
The UIXTable class is the base abstraction for the table components provided by ADF Faces and SortableModel is a JSF data model for the ADF Faces table components. The getTableModel() method calls refreshAction() , which retrieves all subscribers from the database using the selectAll() DAO method. The refreshAction() method creates a ListDataModel and then a SortableModel:
package adfdb.view;
 ...
 import adfdb.model.ModelUtils;
 import adfdb.model.err.ListException;
 import oracle.adf.view.faces.model.SortableModel;
 import javax.faces.model.ListDataModel;
 import java.util.List;
 ...
 public class ListBean implements java.io.Serializable {
 ...
 public synchronized String refreshAction() {
 try {
 List list = ModelUtils.getSubscriberDAO().selectAll();
 ListDataModel listModel = new ListDataModel(list);
 tableModel = new SortableModel(listModel);
 if (table != null)
 table.setFirst(0);
 } catch (ListException x) {
 ViewUtils.addExceptionMessage(x);
 }
 return null;
 }
 ...
 }
The deleteAction() method obtains all selected rows of a table component and collects them in a list that is passed to a delete() method, which is defined by the SubscriberDAO interface and is implemented by the TopLinkSubscriberDAO and JDBCSubscriberDAO classes. The selected rows are deleted from the database and then the data model object is recreated with refreshAction():
package adfdb.view;
 ...
 import adfdb.model.Subscriber;
 import adfdb.model.ModelUtils;
 import adfdb.model.err.UnsubscribeException;
 import java.util.Iterator;
 import java.util.List;
 import java.util.LinkedList;
 import java.util.Set;
 ...
 public class ListBean implements java.io.Serializable {
 ...
 public String deleteAction() {
 try {
 List list = new LinkedList();
 Set selection = table.getSelectionState().getKeySet();
 Iterator iterator = selection.iterator();
 while (iterator.hasNext()) {
 String rowKey = (String) iterator.next();
 table.setRowKey(rowKey);
 Subscriber subscriber
 = (Subscriber) table.getRowData();
 list.add(subscriber);
 }
 table.getSelectionState().clear();
 ModelUtils.getSubscriberDAO().delete(list);
 refreshAction();
 } catch (UnsubscribeException x) {
 ViewUtils.addExceptionMessage(x);
 }
 return null;
 }
 ...
 }
The last JSF action implemented by ListBean is profileAction() . This method is executed when the user selects a single row, clicking a link. The properties of the selectedSubscriber are copied in the subscriber bean with ModelUtils.copy():
package adfdb.view;
 ...
 import adfdb.model.Subscriber;
 import adfdb.model.ModelUtils;
 ...
 public class ListBean implements java.io.Serializable {
 ...
 public String profileAction() {
 SubscriberBean subscriber
 = (SubscriberBean) ViewUtils.eval("#{subscriber}");
 Subscriber selectedSubscriber
 = (Subscriber) ViewUtils.eval("#{selectedSubscriber}");
 ModelUtils.copy(selectedSubscriber, subscriber);
 subscriber.setLoggedIn(true);
 return "profile";
 }
 ...
 }
The profileAction() returns the profile outcome to navigate from list2.jsp to profile.jsp according to the following rule defined in faces-config.xml:
<navigation-rule>
<from-view-id>/list2.jsp</from-view-id>
<navigation-case>
<from-outcome>profile</from-outcome>
<to-view-id>/profile.jsp</to-view-id>
</navigation-case>
</navigation-rule>
Binding the ADF Faces Table to the Backing Bean
The list2.jsp page contains a table component that shows only 5 rows at a time, allowing the user to browse through the table's contents. The value and binding attributes specify the tableModel and table properties of the ListBean:
<af:table id="table" var="row"
 value="#{list.tableModel}"
 binding="#{list.table}"
 rows="5" banding="row"
 bandingInterval="1">
 ...
 </af:table>
A facet named actions contains a button for refreshing the table model:
<af:table...>
 ...
 <f:facet name="actions">
 <af:commandButton id="refresh"
 text="#{labels.refresh}"
 action="#{list.refreshAction}"/>
 </f:facet>
 ...
 </af:table>
Another facet named selection contains a <af:tableSelectMany> component that renders one checkbox for each row. The user will be able to select multiple rows and delete them from the database, using a Delete button:
<af:table ...>
 ...
 <f:facet name="selection">
 <af:tableSelectMany>
 <af:commandButton id="delete"
 text="#{labels.delete}"
 action="#{list.deleteAction}"/>
 </af:tableSelectMany>
 </f:facet>
 ...
 </af:table>
All table columns are represented by an <af:column> component that contains a header facet and an <af:outputText value="#{row...}"/> component. Some of the columns have two attributes ( sortProperty and sortable ) so that the user can sort the table by clicking the headers of the columns. In addition, the email column contains an <af:commandLink> that lets the user view the profile of each subscriber. The <af:setActionListener> component sets a variable named selectedSubscriber when the user clicks the link:
<af:table ...>
 ...
 <af:column sortProperty="email" sortable="true">
 <f:facet name="header">
 <af:outputText value="#{labels.email}"/>
 </f:facet>
 <af:commandLink action="#{list.profileAction}">
 <af:outputText value="#{row.email}"/>
 <af:setActionListener from="#{row}"
 to="#{sessionScope.selectedSubscriber}"/>
 </af:commandLink>
 </af:column>
 ...
 </af:table>
Here is a screenshot of the table produced by the list2.jsp page:

Testing the Web Application with Oracle JDeveloper
After making all these changes, it's time to test out the application and see what we've accomplished. As mentioned up front, at the beginning of this article, you need quite a bit of software infrastructure on which to deploy the sample application, but you can do it all in the context of Oracle JDeveloper. At this point, if you haven't downloaded the source code for the back-end application, download it now to get started.
Step 1: Obtaining the Source Code
The downloadable archive that accompanies the article (see Resources ) contains the Java source code and a couple of SQL scripts in a directory named src . The web directory groups the JSP pages and the Web configuration files. You don't need to compile the Java code since the .class files are already placed in jsfadf_src/web/adfdb/WEB-INF/classes , where you'll also find the XML files for TopLink. (If you want to modify the object model, see "Building Database-driven Applications with JSF" for detailed instructions for recreating the TopLink files.
The Web application has two DAO implementations for accessing the database: one based on TopLink and the other using JDBC. You can select the DAO implementation that you want to use by modifying the ModelResources.properties file from jsfadf_src\web\adfdb\WEB-INF\classes\adfdb\model\res . This file contains a DAO key that accepts two values: adfdb.model.dao.TopLinkSubscriberDAO or adfdb.model.dao.JDBCSubscriberDAO .
Step 2: Creating a Web Project
Launch JDeveloper and make sure that the ADF Faces bundle is installed properly. If you select About in the Help menu, you should see ADF Faces in the Extensions tab:

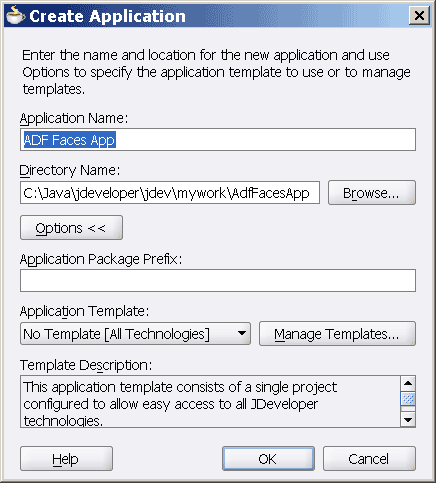
Use the New option of the File menu to create a new application:

Provide a name for your application, such as "ADF Faces App," select a directory, and click OK:
Provide a name and a directory for a project and click OK:

JDeveloper will create a directory named AdfFacesApp with an ADFDB subdirectory in JDEVELOPER_HOME/jdev/mywork (where JDEVELOPER_HOME is the directory where you installed JDeveloper).
Step 3: Configuring the Web Project
Right-click the "ADFDB Project" in the "Applications" navigator and click the "Project Properties" option of the project's popup menu. Select "JSP Tag Libraries" in the left panel of the "Project Properties" window and select "Distributed Libraries" in the right panel:

Click the "Add" button, and select the ADF Faces, JSF and JSTL tag libraries in "Choose Libraries" and click OK:

When you return to the "Project Properties" window, click "Libraries" in the left panel. You should see there the ADF Faces, JSF and JSTL runtime libraries since you added the corresponding tag libraries:

Click the "Add Library..." button, select the JSP Runtime and TopLink libraries, and click OK:

Click OK when you return to "Project Properties." Since the project uses JSP libraries, JDeveloper will create a public_html directory with a WEB-INF subdirectory in JDEVELOPER_HOME/jdev/mywork/AdfFacesApp/ADFDB.
Step 4: Copying the Web Pages
Copy the contents of the example Web application from jsfadf_src/web/adfdb to JDEVELOPER_HOME/jdev/mywork/AdfFacesApp/ADFDB/public_html . Don't worry about the web.xml and faces-config.xmlfiles created by JDeveloper in WEB-INF. These two files should be overridden by the web.xml and faces-config.xml files of the Web application.
Unzip the adf-faces-install-ea13.zip file of ADF Faces and move the resulted adf directory intoJDEVELOPER_HOME/jdev/mywork/AdfFacesApp/ADFDB/public_html.
Go back to JDevelop and select the Refresh option of the View menu. You should see the content of the Web application in JDeveloper:

You could use a similar operation to import the Java files into the JDeveloper application. The Import option of the File menu also lets you create projects from an existing source:

Step 5: Configuring the Data Source
Before running the application, you must configure a data source and create a table. Make sure that your database server is started, then select the Connections navigator, right-click Database and click "New Database Connection..."

Click Next to skip the Welcome page and enter Oracle in the "Connection Name" field:

Enter the user name and password that are accepted by the database server for an existing database:

Provide the connection parameters:

Click the "Test Connection" button to see if the connection works well and then click Next and Finish:

When you run the Web application, JDeveloper will configure a data source named OracleDS.
Step 6: Creating the Table
Now you must create a table that is used by the Web application. Right-click Oracle in the Connections navigator and then click "SQL Worksheet." Paste the SQL statement from jsfadf_src/src/sql/create.sql and click "Execute SQL Statement" (the first icon of the toolbar):

(If you've enabled SQL*Plus in JDeveloper and the .sql file is part of your project, you can execute the script from within JDeveloper, by simply right-clicking on the .sql file from within the navigator.)
Step 7: Running the Application
Go back to the Applications navigator, right-click index.jsp and click Run.

The index.jsp page redirects the browser to the Login form:

Click the "Subscribe" link and register a few users. Then go back to the login page and click "View All Subscribers" to see the table component. In a real application, the subscriber list should be protected by a password, but this is just a prototype and the security constrains haven't been added in order to make the testing easier. As an exercise, you could try to improve the usability of the application, using menus and other ADF Faces components.
Summary
JSF and ADF Faces is a very powerful combination. The JSF standard defines the infrastructure for building component-based Web interfaces, but keep in mind that JSF was not intended to be a complete solution, which gives tool vendors and open-source developers the opportunity to build component libraries. To date, ADF Faces is the most impressive JSF-based framework, providing rich UI components, support for file uploading, client-side validation, and many other useful functions. Oracle JDeveloper offers a visual development environment for the ADF Faces and JSF frameworks, simplifying many tasks and increasing your productivity. This article has shown how to integrate ADF Faces into existing JSF projects with the help of Oracle JDeveloper.
Resources
Framework next steps:
- Download the source code of this article's example Web application
Additional Information on Frameworks:
Building Database-driven Applications with JSF
Develop JSF-based Web applications that update and query a relational database using Oracle TopLink and JSTL's SQL tags
JavaServer Faces (JSF) provides a powerful new framework for creating Web GUIs.
Oracle ADF Faces Components brings a library of reuse to JavaServer Faces.
Andrei Cioroianu ( devtools@devsphere.com ) is the founder of Devsphere , a provider of Java frameworks, XML consulting, and Web development services. Cioroianu has written many Java articles published by Oracle Technology Network, ONJava , JavaWorld , and Java Developer's Journal . He also coauthored the books Java XML Programmer's Reference and Professional Java XML (both from Wrox Press).