
Using and hacking Subclipse - the Subversion plugin for Eclipse
by Eugene Kuleshov
11/30/2005
Abstract
Subversion (SVN) is a version control system that is a compelling replacement for CVS. It supports several important features missing in CVS, such as versioned renames, directories, and metadata; and atomic commits and remote access over HTTP/HTTPS. Many open-source projects, including projects hosted on BEA's dev2dev CodeShare site, use Subversion as a version control system. There is a short guide on how to set up a command-line SVN client and Tortiose SVN for Windows for CodeShare. However, it would make sense to work with Subversion repositories right from your IDE.
This article describes how to use Subversion with the Eclipse IDE. In particular, it examines the installation and use of the Subclipse plug-in. Along the way, I also show you how to use the resulting configuration to modify or extend the Subclipse plug-in itself.
Installing Subclipse
The best way to install Subclipse is to use the Eclipse Update Manager. In Eclipse 3.1 it is located under the Help -> Software Updates -> Find and Install... menu. Select Search for new features to install, and add New Remote Site using
http://subclipse.tigris.org/update as the URL.
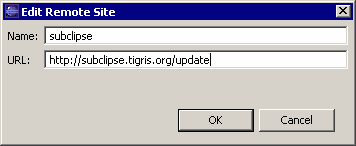
Figure 1. Install Subclipse using the Eclipse Update Manager.
After scanning for updates, you'll see a list of available features. Subclipse 0.9.33 was the latest update at the time I wrote this article.

Figure 2. Select the latest update of Subclipse.
On the next screens you will be asked to accept the license and to choose an installation location. I recommend that you don't install new plug-ins (including Subclipse) into the default Eclipse installation directory. It is better to put these plug-ins into an external extension location. This makes it easier to manually uninstall these features if needed, and also makes possible the sharing of plug-ins between multiple Eclipse installations, such as release, early access stable (M1, M2, and so on) and integration IDE builds.
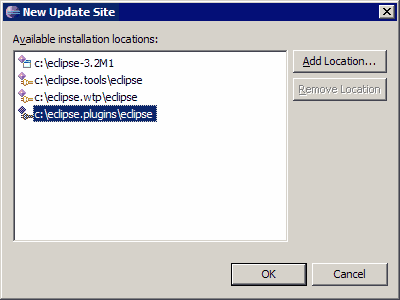
Figure 3. Choose an installation location.
At this point the Update Manager downloads and installs the selected features and asks you to restart Eclipse.
Once Eclipse has restarted, you'll see a new section for SVN in the Preferences dialog as well as additional views for Subversion activities. These views can be added to the Java Perspective using the Window -> Show View -> Other... menu.
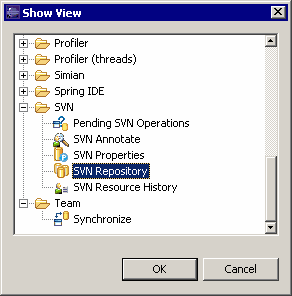
Figure 4. Add views for Subversion activities.
I usually add the SVN Repository view to Quick Views and SVN Resource History to one of the tab groups at the bottom of the work area in a Java Perspective. By doing this, they're both nearby and available during development activities. This also makes it convenient to use drag-and-drop to run some tasks like "get resource history" (from the resource-oriented views such as Navigator, Package Explorer, SVN Repository, and Synchronize to the SVN Resource History view).
Configuring an SVN Interface in Subclipse
You can configure Subversion servers to use one of the following protocols:
- The
svnprotocol is a lightweight, stateful protocol used by standalone Subversion servers (svnserve). The secure version,svn+ssh, uses ssh-based tunneling. - The
httpprotocol is based on a WebDAV extension and usually is deployed as a module on Apache HTTP server. The secure version useshttps, and this is the protocol used by the Subclipse installation on dev2dev CodeShare. - The
fileprotocol is used to access locally available Subversion repositories (for example, one on the shared drive) and is the least efficient option.
Subclipse uses special adapter abstractions to work with the above protocols. One of the following adapters can be selected in plug-in properties at the Window -> Preferences -> Team -> SVN dialog.

Figure 5. Select an adapter.
Each adapter has its own advantages:
- JavaSVN is the only entirely Java-based Subclipse client, and is enabled by default. Note that JavaSVN does not support the
file:///protocol. - JavaHL is a thin wrapper around the native Subclipse API. This adapter is prebuilt for Win32 platforms but has to be built manually on all others (unless your Unix distribution includes it).
- The command-line adapter should be used only if JavaHL can't be installed, and your Subclipse repository uses the
file:///protocol.
In most cases you can stay with JavaSVN and choose the JavaHL or command-line adapter only when needed. Links in the Resources section can help to resolve specific cases, such as configuring an HTTP proxy, SSL client certificates, and so on.