As described in the security overview topic, access rights in OEDQ are controlled via groups. Permissions for applications, and project and functional point access are assigned to groups. Users belong to groups, and inherit their permissions from the groups to which they belong.
Several default groups with pre-configured permissions are provided with a new installation of OEDQ. These are detailed below (see Default groups and permissions). It is also possible to create new groups and to assign permissions to those groups.
If you have configured OEDQ to integrate with Active Directory (see Integrating OEDQ with Active Directory or another LDAP server),you must also map the external user groups, defined in the LDAP directory, onto the OEDQ user groups.
This topic describes:
It also provides a table showing the default user groups and the permissions assigned to them that are created in a new OEDQ installation.
Generally speaking, a user group should correspond to a role that an individual might have as a user of your OEDQ implementation. You may wish to maintain many groups with a small number of permissions each, or it may be simpler to use a small number of groups, each with a larger range of permissions.
Next, click on the Groups button at the bottom of the page:

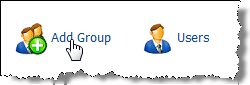
The Groups page lists all the groups that are currently defined, along with their associated permissions. Scroll to the bottom of the page to find the Add Group button:
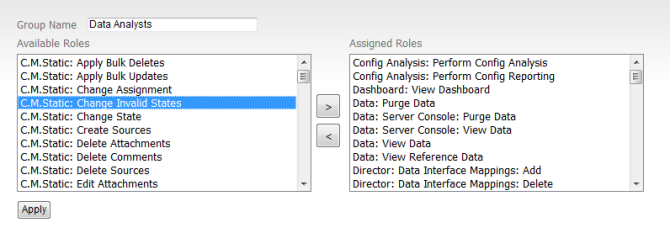
The Add Group page allows you to define a name for your new group, and add functional permissions to it from a list:

A full list of functional permissions supplied with OEDQ can be found in the Functional permissions topic. To associate a permission with the group, click on it to select it in the left hand list and then press the right-arrow button to move the selected permission (or permissions) to the right hand list. You can select multiple permissions at once by holding down the Ctrl button on your keyboard as you click on the permission names.
To remove a permission from a group, select it in the right hand list and press the left-arrow button to return it to the left hand list.
Once you have made the changes you require, press the 'Apply' button to save them.
To edit a group, navigate to the Groups page as described in Creating user groups. Click on the name of the group you want to edit:
The Edit Group page will appear, populated with the details of the group you have selected:
You can rename the group and change its associated permissions on this page as described in Creating user groups above. Press the 'Apply' button to save your changes when you have finished.
A full list of functional permissions supplied with OEDQ can be found in the Functional permissions topic.
To delete a group, navigate to the Groups page as described in Creating user groups. Click on the delete button next to the name of the group you want to delete:

You will be prompted to confirm the deletion before it is finalized.
On a new installation of OEDQ, the following groups and permissions are created by default. Note that upgrades from previous versions will preserve the configuration of groups and users before the upgrade, meaning these groups may not exist.
|
Group |
Summary |
Functional |
Application |
|
|---|---|---|---|---|
|
Administrators |
Power users with all functional and administrative privileges |
All
|
All |
|
|
Data Stewards |
Users with review access to Director and Dashboard, with permission to review all results, resolve issues, and make manual match and merged output decisions, but without permission to create or change any processing logic |
Config Analysis: Perform Config Analysis Config Analysis: Perform Config Reporting Dashboard: View Dashboard Director: Note: Add Director: Note: Delete Director: Note: Modify |
Director Match Review Issue Management Case Management |
|
|
Executives |
Users with access to Dashboard results only |
Dashboard: View Dashboard |
None (Dashboard only) |
|
|
Match Reviewers |
Users with access to the Match Review application, the Case Management application and Dashboard only |
C.M.Static: Change Assignment C.M.Static: Change State C.M.Static: Edit Case C.M.Static: Edit User Filters C.M.Static: View Cases C.M.Static: View Unassigned Cases Dashboard: View Dashboard |
Match Review Issue Management Case Management |
|
|
Review Managers |
Users with access to the Case Management application, with permission to configure case management and perform bulk edits on cases and alerts. |
C.M.Static: Apply Bulk Updates C.M.Static: Change Assignment C.M.Static: Change Invalid States C.M.Static: Change State C.M.Static: Delete Attachments C.M.Static: Delete Comments C.M.Static: Edit Case C.M.Static: Edit Global Filters C.M.Static: Edit State Expiry Time C.M.Static: Edit Supplementary Data C.M.Static: Edit User Filters C.M.Static: Restrict Attachments C.M.Static: Restrict Cases C.M.Static: Restrict Comments C.M.Static: View Cases C.M.Static: View Cases Assigned To Others C.M.Static: View Unassigned Cases Dashboard: View Dashboard |
Case Management |
|
|
Data Analysts |
Users with permission to create and modify processing logic in Director, but with no administration privileges |
Config Analysis: Perform Config Analysis Config Analysis: Perform Config Reporting Dashboard: View Dashboard Data: Server Console: View: Data Data: View Data Data: View Reference Data Director: Data Interface Mappings: Add Director: Data Interface Mappings: Delete Director: Data Interface Mappings: Modify Director: Data Interface: Add Director: Data Interface: Delete Director: Data Interface: Modify Director: Data Store: Add Director: Data Store: Delete Director: Data Store: Modify Director: Export: Add Director: Export: Delete Director: Export: Modify Director: External Tasks: Add Director: External Tasks: Delete Director: External Tasks: Modify Director: Job: Add Director: Job: Cancel Director: Job: Delete Director: Job: Execute Director: Job: Modify Director: Note: Add Director: Note: Delete Director: Note: Modify Director: Package Director: Process: Add Director: Process: Delete Director: Process: Modify Director: Project: Modify Director: Published Process: Add Director: Published Process: Modify Director: ReferenceData: Add Director: ReferenceData: Delete Director: ReferenceData: Modify Director: Result Book Export: Add Director: Result Book Export: Delete Director: Result Book Export: Modify Director: Result Book: Add Director: Result Book: Delete Director: Result Book: Modify Director: Snapshot: Add Director: Snapshot: Delete Director: Snapshot: Modify Director: Staged Data: Add Director: Staged Data: Delete Director: Staged Data: Modify Director: Web Service: Add Director: Web Service: Delete Director: Web Service: Modify Issue Management: Administer Issues Server Console: Server Console: Job: Execute |
Director Match Review Issue Management Web Service Tester Case Management |
Once an OEDQ server has been configured to connect to an LDAP server, an External Groups link appears on the User Administration pages:

This lists all the groups available in the configured realm(s). Internal OEDQ groups are assigned to external groups to pass the associated permissions through to the users.
Click on an external group name to assign internal OEDQ groups to it. Assigning an internal group to an external group automatically grants all users in the external group the complete set of permissions allocated to the internal group.
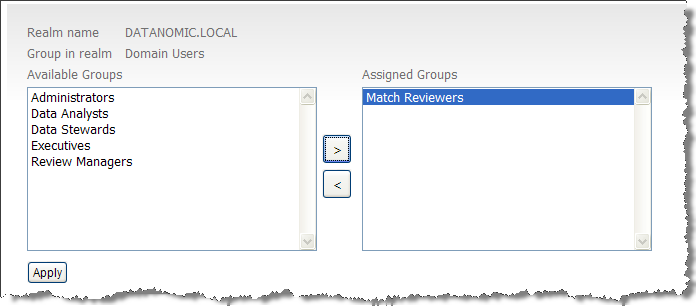
For example, the following screenshot shows the standard internal group 'Match Reviewers' being assigned to the external group 'Domain Users'. All users in the Domain Users group will now be granted the Match Reviewer permissions:
It may be useful and desirable to create some external groups on the domain that can be mapped precisely to internal OEDQ groups, to ensure optimal permission assignment.
Note: In installations with a large number of external user groups, the optional groupsearchfilter can be used to narrow down the results returned. For further information, see Filtering the external group list.
Oracle ® Enterprise Data Quality Help version 9.0
Copyright ©
2006,2012, Oracle and/or its affiliates. All rights reserved.