
Case sources are configured from the Case Source tab in the Advanced Options for the match processor.
To configure the case sources for a processor, open the processor from the canvas, click on the Advanced Options link and navigate to the Case Source tab:
On this screen, you can:
If any case sources have already been defined, they will be available for selection in the drop down box at the top of the tab. If there is already a case source that is appropriate for your processor in the list, select it here:
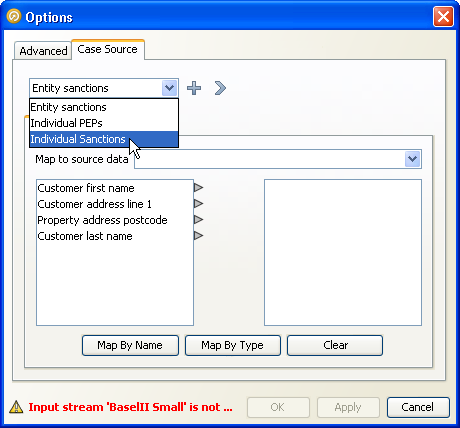
To create a new case source, click on the '+' sign next to the main drop down box. This will launch the case source wizard. There are several stages to creating a new case source, including:
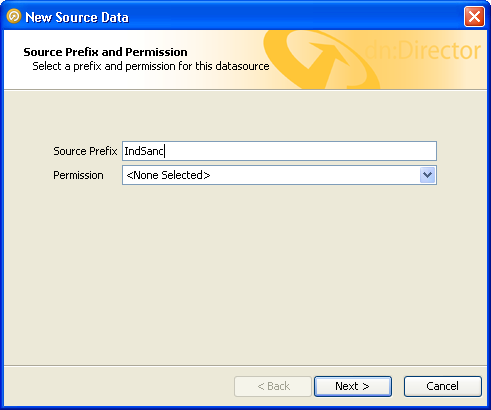
The first screen in the wizard allows you to define a prefix and select a permission for the case source. The prefix will be used to generate an identifier for all cases and alerts generated using this case source. The permission will restrict access to cases and alerts generated using this case source to users who have also been granted the same permission.
Enter a prefix, and select the appropriate permission, if required, and press 'Next':
The second screen allows you to select the workflows that will be used to define the case and alert lifecycles:
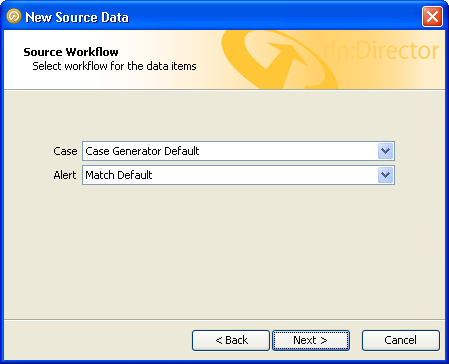
Select the workflows you wish to use and click 'Next'. The most appropriate default workflow to use for cases is the Case Generator Default workflow, and for alerts it is the Match Default workflow.
The third screen allows you to map the states defined in the alert workflow to the internal states used by case management:
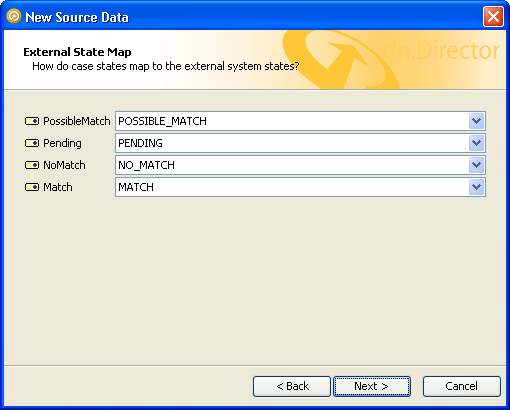
For each of the listed workflow states, select the internal state which best describes it from the corresponding drop-down box, and click 'Next'.
When you create a new case source, each of the input data streams belonging to the match processor will be automatically displayed at this point. It is also possible to add or delete data streams using the '+' and '-' buttons respectively:

You can also define the order in which the data streams are listed by using the up and down arrows.
|
Note: The order of the data streams has a significant effect on the alert keys that will be generated for this case source. The data columns used for the alert keys are added into the alert key in the order defined by this list. If you wish to have a consistent structure across your alert keys, you should order the data streams carefully. For example, if you wish to ensure that the alert key always contains the contriburtion from the working data before the watch list data, the data stream for the working data should precede the watch list data in the data stream list. |
A data source should be defined for each data stream. For each data source, you must:
Double click on the name of the data stream to open the data source wizard and start configuring a corresponding data source.
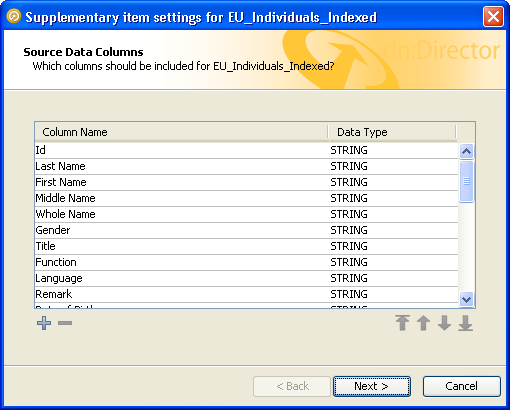
This screen allows you to define the columns that will be included in the data source. When defining a new data source, this list will be populated automatically with all the data columns present in the input data stream. You can remove any columns that you do not wish to include in the review process by using the '-' button, or manually add extra columns using the '+' button.
The names of the data columns can be edited for downstream readability by double-clicking on the existing name and entering a new one.
The order in which the columns will appear in the data source can also be changed by using the arrow buttons under the lower right-hand edge of the list.
When the columns are defined and ordered to your liking, click 'Next'.
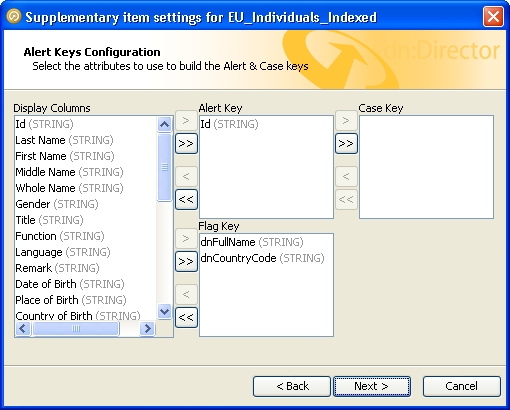
This screen allows you to specify which columns from this data source contribute to the various keys used by the case source. Remember that other data sources may also contribute columns to each key. This screen only displays the columns from the data source that is currently being defined.
Move columns from the Display Columns list into the Alert Key and Flag Key lists by means of the arrow buttons between the lists. Single-arrow buttons move the selected columns, whereas the double-arrow buttons move the whole list in a single operation.
The case key is defined as a subset of the alert key. Copy columns from the alert key list into the case key list by using the arrow buttons between the two lists, as described above.
It is not necessary for a data source to contribute columns to every key. The case key, in particular, is frequently made up of columns from only one data source. For example, if the match process is comparing a list of your customer data against one or more lists of reference data, a common approach would be to define a case key which represents a single row from your customer data input stream. Reference data columns would not typically be used in the case key, but would be used in the alert key.
When your keys have been configured correctly, click 'Next'.
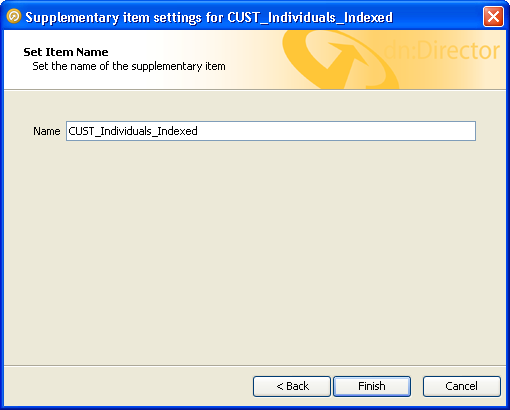
Finally, you must supply a name for your data source. By default, this will be the same as the name of the input data stream used to create the data source. You may wish to change this to a more readable name, or to indicate the specific use of this data source. This may be used to distinguish between multiple data sources which have been derived from the same data stream.
Enter the name for your data source, and click 'Finish'.
To change the configuration of a case source, select it from the drop-down box on the case source tab in the Advanced Options screen, and press the '>' button. The steps for changing the configuration of an existing source are the same as those for creating a new one, as described in Creating a new case source.
Once you have selected or configured a case source for your match processor, you need to map the fields from each input data stream to the columns in the appropriate data source.
Each input data stream is represented on the case source tab by a sub-tab. The left hand pane of the sub-tab will contain a list of all the fields present in the input data stream. Above the pane is a drop-down box labeled 'Map to source data'. This drop-down box will include all the data sources configured for this case source:
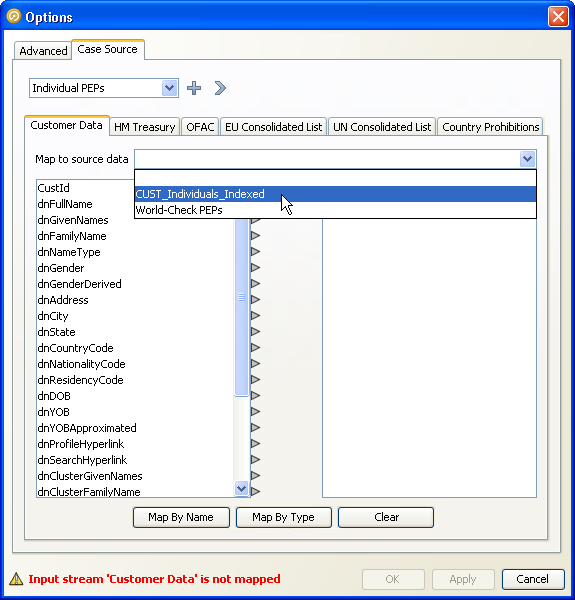
Select a data source configuration from the drop-down box at the top of the sub-tab. The right-hand pane will be populated with a list containing all the columns defined for the selected data source. Columns in the data source which form part of the case key are labeled with [ C ]. Those which form part of the alert key are labeled with [ A ], and those which are part of the flag key are labeled with [ F ].
Map the fields from the left hand list to those in the right by clicking on the arrow next to the left hand item and dragging to the arrow next to the corresponding right hand item:

Alternatively, click either 'Map By Name' or 'Map By Type' to perform automatic mapping.
'Map By Name' will map fields which have the same name and type to each other. The name mapping is not case sensitive.
'Map By Type' is designed to provide a short-cut for data sources which publish all the input fields, in order. As such, it maps each input field to the output field in the corresponding position, as long as both fields have the same data type. If you carry out automatic mapping by type, you may wish to check the mappings and correct any that are not appropriate for your data source.
You can clear all the mappings for a data stream by pressing the 'Clear' button.
Oracle ® Enterprise Data Quality Help version 9.0
Copyright ©
2006,2011 Oracle and/or its affiliates. All rights reserved.