Installing Oracle Identity Federation (OIF)
Purpose
In this tutorial, you learn how to verify prerequisites and install the Oracle Identity Federation software. You also learn how to add users to the LDAP-enabled Oracle Internet Directory (OID) that is installed as part of installing OIF. These sample users will be used in later OIF exercises. Configuration is not covered in this OBE.
Time to Complete
Approximately 1 hour.
Overview
OIF is a Java-based application that requires installation and configuration of several prerequisite services. Some of the prerequisites are packaged separately (for example, the database and WebLogic Server) and are assumed to already be installed and configured, while other prerequisite software is packaged together with OIF in the Oracle Identity Management Suite (for example, Oracle Internet Directory (OID) and Oracle Virtual Directory (OVD)) and will be installed at this time. There are typically two halves (aspects) to OIF: the Identity Provider (IdP) and the Service Provider (SP). You will verify the install of the separate software prerequisites and install the executables for OIF for both halves on two different computers.
Scenario
Employees at your company utilize a Web-based application that runs on a separate server in a separate company. For purposes of naming, assume that your company is MyCorp and the application is a life insurance benefits package hosted by MyLife Inc. The security for the benefits application requires authentication for a group of users that is not necessarily the same users that would be locally known on the application server. You must install OIF on both your computer and the insurance company's computer. Your computer will be the Identity Provider and the insurance company will be the Service Provider.
Software and Hardware Requirements
The following is a list of hardware and software requirements:
- Two PCs with at least 3 GB of RAM each
- Oracle Database 11g version 11.1.0 or greater
- Oracle WebLogic Server 11g version 10.3.1 or greater
- Oracle Identity Management Suite 11g version 11.1.1.1.0 or greater. Don't confuse Oracle Identity Management (a suite) with Oracle Identity Manager (a single product).
Prerequisites
Before starting this tutorial, you should:
. |
Verify that the operating system is configured with hardnofiles and softnofiles at least 4096 |
|---|---|
. |
Install and configure the database |
. |
Install WebLogic Server (it does not need to be configured) |
. |
Stage Oracle Identity Management software Disk 1 on the PCs or on a network-accesible directory |
Verifying Prerequisites are Operational
The prerequisites for this OBE are the same as the prerequisites for the OIF product itself. To verify that the prerequisite software has already been installed and configured correctly, perform the following steps:
. |
Verify that Oracle Database is running on the first computer hostidp.example.com. From a terminal window, type: sqlplus / as sysdba select * from v$instance; exit lsnrctl status exit What you are looking for is the database hostname, port, and Service ID (SID). In this example, the hostname is hostidp.example.com, the port is 1521, and the service ID is orcl.example.com. If the database is installed properly and started, then the results should look similar to this:
[oracle@hostidp bin]$ sqlplus / as sysdba

SQL*Plus: Release 11.2.0.1.0 Production on Fri Aug 28 09:59:55 2009
Copyright (c) 1982, 2009, Oracle.  All rights reserved.

Connected to:
Oracle Database 11g Enterprise Edition Release 11.2.0.1.0 - Production
With the Partitioning, OLAP, Data Mining and Real Application Testing options

SQL> select * from v$instance;

INSTANCE_NUMBER INSTANCE_NAME
--------------- ----------------
HOST_NAME
----------------------------------------------------------------
VERSION           STARTUP_T STATUS       PAR    THREAD# ARCHIVE LOG_SWITCH_WAIT
----------------- --------- ------------ --- ---------- ------- ---------------
LOGINS     SHU DATABASE_STATUS   INSTANCE_ROLE      ACTIVE_ST BLO
---------- --- ----------------- ------------------ --------- ---
              1 orcl
hostidp.example.com
11.2.0.1.0        25-AUG-09 OPEN         NO           1 STOPPED
ALLOWED    NO  ACTIVE            PRIMARY_INSTANCE   NORMAL    NO

SQL> exit
Disconnected from Oracle Database 11g Enterprise Edition Release 11.2.0.1.0 - Production
With the Partitioning, OLAP, Data Mining and Real Application Testing options
[oracle@hostidp bin]$ lsnrctl status

LSNRCTL for Linux: Version 11.2.0.1.0 - Production on 28-AUG-2009 10:02:06
Copyright (c) 1991, 2009, Oracle.  All rights reserved.
Welcome to LSNRCTL, type "help" for information.

Connecting to (DESCRIPTION=(ADDRESS=(PROTOCOL=IPC)(KEY=EXTPROC1521)))
STATUS of the LISTENER
------------------------
Alias                     LISTENER
Version                   TNSLSNR for Linux: Version 11.2.0.1.0 - Production
Start Date                25-AUG-2009 17:01:24
Uptime                    2 days 17 hr. 1 min. 16 sec
Trace Level               off
Security                  ON: Local OS Authentication
SNMP                      OFF
Listener Parameter File   /u01/app/oracle/product/11.1.0/db_1/network/admin/listener.ora
Listener Log File         /u01/app/oracle/diag/tnslsnr/hostidp/listener/alert/log.xml
Listening Endpoints Summary...
  (DESCRIPTION=(ADDRESS=(PROTOCOL=ipc)(KEY=EXTPROC1521)))
  (DESCRIPTION=(ADDRESS=(PROTOCOL=tcp)(HOST=hostidp.example.com)(PORT=1521)))
Services Summary...
Service "orcl.example.com" has 1 instance(s).
  Instance "orcl", status READY, has 1 handler(s) for this service...
Service "orclXDB.example.com" has 1 instance(s).
  Instance "orcl", status READY, has 1 handler(s) for this service...
The command completed successfully
LSNRCTL> exit
If the database is not started, then in sqlplus issue the startup command. It is assumed that the password for the database system and sys users is Welcome1. If the listener is not started, then in lsnrctl issue the start command.
|
|---|---|
. |
Verify that Oracle WebLogic Server (WLS) is installed properly. From a terminal window, type: cd /u01/app/oracle/product/11.1.0/fmw/wlserver_10.3/server/bin source ./setWLSEnv.sh env | grep HOME The location of your wlserver_10.3 directory may be different. The setWLSEnv script causes the WebLogic Server PATH and CLASSPATH environment variables to be set. The env command will display the other environment variables that should look similar to this: BEA_HOME=/u01/app/oracle/product/11.1.0/fmw ANT_HOME=/u01/app/oracle/product/11.1.0/fmw/modules/org.apache.ant_1.7.0 JAVA_HOME=/u01/app/oracle/product/11.1.0/fmw/jrockit_160_05_R27.6.2-20 HOME=/home/oracle POINTBASE_HOME=/u01/app/oracle/product/11.1.0/fmw/wlserver_10.3/common/eval/pointbase WL_HOME=/u01/app/oracle/product/11.1.0/fmw/wlserver_10.3 ORACLE_HOME=/u01/app/oracle/product/11.1.0/db_1 If WebLogic Server is not installed, then run wls1031_win32.exe or wls1031_ccjk_linux32.bin or wls1031_linux32.bin to install the software.
|
. |
Repeat steps 1-2 for the next computer. You verified that the first computer hostidp.example.com is ready for the OIF install, do the same thing for the second computer: hostsp.example.com.
|
Installing OIF Using the Oracle Identity Management Installer
You will need to install and configure the software on two computers: the Identity Provider (hostidp.example.com) and the Service Provider (hostsp.example.com). To do the installation and configuration on the first computer (hostidp or simply IdP), perform steps 1 through 20 which installs all of the Oracle Identity Management software, including in particular OIF and OID. After the first computer (IdP) is installed, then you do the same install process again for the second computer, so step 21 is to repeat all of steps 1 through 20 again but this time installing the Oracle Identity Management software for the second computer (hostsp or simply SP). When you go through the steps, be mindful of the naming conventions where you substitute "_XX" with "_IDP" for the first computer (Identity Provider) and where you substitute "_XX" with "_SP" for the second computer (Service Provider).
For purposes of the demonstration, it is convenient to make all of the passwords the same, for example Welcome1. This satisfies the password complexity requirement of mixed-case letters and a number. In the real world you would not have all of the passwords be the same.
. |
Start the Universal Installer. OIF is installed as part of the larger Oracle Identity Management install.
Navigate to the directory where the software is staged and type ./runInstaller.
|
|---|---|
. |
Step 1: Welcome. Click Next to continue.
There is nothing to configure on this panel. As you proceed through the steps, the highlighted ball and text on the left panel will reflect your position within the Installer. Note the running elapsed time in the lower right corner of the window. The step numbering for the tutorial is different than the step numbering of the install because there are steps before and after the install. Also, looking at the "Step X of Y" in the title bar of the installer, the "Y" changes depending on the options you have selected.
|
. |
Step 2: Select Installation Type. Select Install and Configure. Click Next.
You can accomplish the same thing by installing only software here and then later coming back and running the config wizard.
|
. |
Step 3: Prerequisite Checks. Click Next.
There is nothing to configure on this panel. If a prerequisite was not met, then expand the [+] to see the specific error message and suggested action to correct it. If several things are wrong, it stops on the first one and will not proceed to catch the later problems.
|
. |
Step 4: Select Domain. Select Create new Domain. Enter a User Name of weblogic, and a password of Welcome1. For the Domain Name, append a suffix of _IDP for the first computer, and a suffix of _SP for the second computer. Click Next.
Since this is a new domain, it is obviously not running (yet). In fact, nothing needs to be running at this time from the WebLogic perspective. If you try to Extend an Existing Domain, the domain must have JRF configured first, such as would be the case if the domain supported SOA. Also extending an existing domain does not extend for Enterprise Manager 11g FMW Control support as well, though EM is installed. You have to go back a second time and extend the extension for Enterprise Manager 11g FMW Control support.
|
. |
Step 5: Specify Installation Location. For Oracle Middleware Home Location (assuming Linux), enter /u01/app/oracle/product/11.1.0/fmw. For Oracle Home Directory and for Oracle Instance Name, append a suffix of _IDP for the first computer, and a suffix of _SP for the second computer. Click Next.
Note the naming convention restrictions in the bottom of the panel. The instance name also becomes a directory under Middleware Home.
|
. |
Step 6: Specify Security Updates. Deselect "I wish to receive security updates..." Click Next.
In real life you would want to fill out the email and password fields.
There is a warning that an opt-out of security updates is usually a bad idea. Click Yes to acknowledge.
|
. |
Step 7: Configure Components. Click Next.
Since you want all of these items installed and configured, leave the defaults. If you already had an LDAP-enabled directory such as Microsoft Active Directory installed, then you might deselect some of the Directory components.
|
. |
Step 8: Configure Ports. Click Next.
Leave the default of Auto Port Configuration. You can view the ports that are chosen by looking at the optional summary file after the install is completed in Step 19.
|
. |
Step 9: Specify Oracle Virtual Directory Information. Accept the defaults for LDAP Name Space and Administrator User Name. Enter a password of Welcome1 in the two Password fields. Click Next.
Notice the Administrator User Name is not just orcladmin, but cn=orcladmin. This becomes important later when you sign on to the LDAP browser. Both OVD and OID are installed by default. OVD is independent of OID, and OID is independent of OVD. For example, you could configure three Microsoft Active Directories and make one virtual directory from them with OVD and never use OID. Similarly, you could have three separate OID instances that are never combined into a virtual directory. In this scenario, you will use OID but not use OVD.
|
. |
Step 10: Specify Schema Database. Click Create Schema. This will change the panel's fields.
An existing schema might be there from a previous install of Oracle Identity Management, or from Repository Creation Utility (RCU) in support of SOA.
Enter a Create Schema Connect String of hostXX.example.com:1521:orcl.example.com where XX is idp for the first computer and sp for the second computer. Enter a User Name of system and the database password for system (in this example, Welcome1). Click Next.
When warned about the database version, click Ignore to ignore the fact that 11.2.0.1.0 is already "equal to or higher than 11.1.0.7."
|
. |
Step 11: Enter OID Passwords. Enter Welcome1 in all of the Password fields. Click Next.
In real life you would not have every single password be the same. For OBEs, that makes life simpler but slightly unrealistic.
|
. |
Step 12: Create Oracle Internet Directory. Enter Welcome1 in all of the Password fields. Click Next.
"dc=" in the realm stands for domain component, which is derived from the host name domain (it does not include the hostidp nor hostsp part.)
|
. |
Step 13: Specify OIF Details. Enter Welcome1 in all of the Password fields. Append _IDP to the end of the Server ID as shown in the red box. Click Next.
The next time through these steps you will append _SP to the Server ID.
|
. |
Step 14: Select OIF Advanced Flow Attributes. Accept all of the defaults. Click Next.
The advantage of a non-memory store such as file or RDBMS is permanence in case of a power outage. The advantage to a memory store is speed. You can change this later.
|
. |
Step 15: Installation Summary. No need to do anything on this panel. Click Install.
If you were going to repeat this installation on this or another PC, you might want to save the Response File. To re-run the installation/configuration on this PC, use the Response File; to run this install/configure on another PC, you might have to change the host names.
|
. |
Step 16: Installation Progress. No need to do anything on this panel. Sit back and watch!
Make a note of the time (in the lower right corner of the panel) when this phase starts. Typical machines will take about ten minutes (more or less) for this phase to complete. You can monitor the progress bar as it approaches 100%. It is common for the progress to pause for several minutes without moving when it reaches 98% as it applies a large patch.
In a command window, switch to the root user and run the script oracleRoot.sh. su - root /u01/app/oracle/product/11.1.0/fmw/Oracle_IDM1_IDP/oracleRoot.sh exit This script is only applicable for UNIX, not for Windows. You must log in as the root user because the script creates files, edits files, and changes the permissions of certain Oracle executable files in the /usr/local/bin/ directory. There is no feedback. The script completes very quickly and simply returns to the command prompt. Note: Make sure you exit back into the regular user! Do not remain as root. After the script completes, click OK.
|
. |
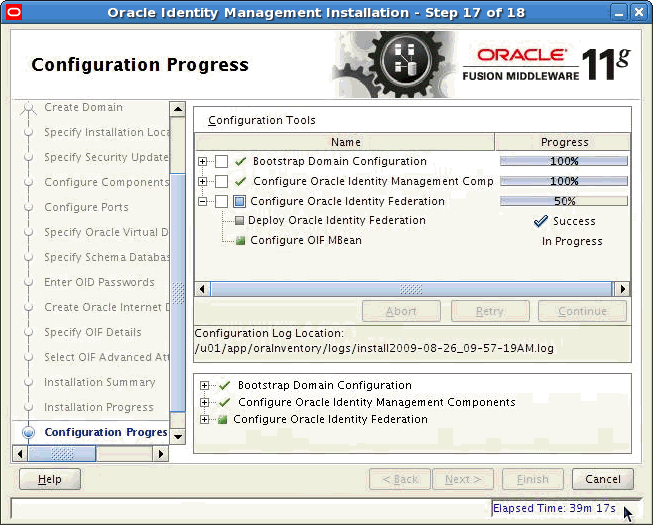
Step 17: Configuration Progress. No need to do anything on this panel. Sit back and watch!
Make a note of the time (in the lower right corner of the panel) when this phase starts. Typical machines will take about twenty minutes (more or less) for this phase to complete. You can monitor the progress bars as they approach 100%.
There is nothing to do for this step except wait. When it is done it automatically proceeds to Step 18. If there were a problem in this phase, there would be a red X instead of a green check next to the failing item. You would have to drill down by expanding the plusses [+] next to the red X to find the actual step that failed. An explanation as to why it failed and possible steps to correct the problem would display in the lower box. If a step fails, then the rest of the configuration is halted. If the problem can be fixed on the spot (for example, an "Out of Disk Space" error can be fixed by freeing up disk space) then click Retry. If the error cannot be fixed easily, then click Abort.
|
. |
Step 18: Installation Complete. Click Save to save a text file with a report of the ports that were chosen for the installation.
The Save is optional, but it is a good idea. You can save it to any location on the target machine. Click Finish to complete and close the Installation wizard.
|
. |
Verify that the installation works. In a terminal window, type the following commands in the appropriate directories:
source ./setWLSEnv.sh
opmnctl status -l
java -version
java weblogic.WLST
  connect('weblogic','Welcome1','t3://localhost:7001')
  exit()
The responses should look similar to the following:
[oracle@hostidp bin]$ pwd
/u01/app/oracle/product/11.1.0/fmw/wlserver_10.3/server/bin
[oracle@hostidp bin]$ source ./setWLSEnv.sh
CLASSPATH=...
PATH=...
Your environment has been set.
[oracle@hostidp bin]$ $MW_HOME/asinst_1_IDP/bin/opmnctl status -l

Processes in Instance: asinst_1_IDP
---------------+---------------+--------+---------+------------+----------+-----------+-----------
ias-component  | process-type  |    pid | status  |        uid |  memused |    uptime | ports
---------------+---------------+--------+---------+------------+----------+-----------+-----------
ovd1           | OVD           |  12502 | Alive   | 1163405213 |   724816 |  49:50:00 | ldaps:7501,ldap:6501,https:8899
oid1           | oidldapd      |  12985 | Alive   | 1163405215 |   113360 |  49:49:58 | N/A
oid1           | oidldapd      |  12671 | Alive   | 1163405214 |    54120 |  49:49:59 | N/A
oid1           | oidmon        |  12501 | Alive   | 1163405212 |    46948 |  49:50:00 | LDAPS:3131,LDAP:3060
EMAGENT        | EMAGENT       |  12497 | Alive   | 1163405211 |     4488 |  49:50:00 | N/A

[oracle@hostidp bin]$ java -version
java version "1.6.0_05"
Java(TM) SE Runtime Environment (build 1.6.0_05-b13)
BEA JRockit(R) (build R27.6.2-20_o-108500-1.6.0_05-20090120-1115-linux-ia32, compiled mode)

[oracle@hostidp bin]$ java weblogic.WLST
Initializing WebLogic Scripting Tool (WLST) ...
Welcome to WebLogic Server Administration Scripting Shell
Type help() for help on available commands

wls:/offline> connect('weblogic','Welcome1','t3://localhost:7001')
Connecting to t3://localhost:7001 with userid weblogic ...
Successfully connected to Admin Server 'AdminServer' that belongs to domain 'IDMDomain_IDP'.
Warning: An insecure protocol was used to connect to the server. To ensure on-the-wire security, the SSL port or Admin port should be used instead.

wls:/IDMDomain_IDP/serverConfig> exit()
Exiting WebLogic Scripting Tool.
[oracle@hostidp bin]$
What you are looking for is for the setWLSEnv.sh to successfully set the FMW environment, in particular the $JAVA_HOME, $CLASSPATH, and $MW_HOME.
The opmnctl status should return Alive for every component. The java version should be BEA JRockit.
The weblogic.WLST (WebLogic Scripting Tool) should show Successfully connected to Admin Server.
The next topic will further exercise the OIF components.
|
. |
Repeat all of the above steps for the Service Provider (SP) computer. Repeat steps 1 through 20 but be mindful to replace any occurrence of "IDP" with "SP", in particular on steps 5, 6, 11, and 14 in both host names and in service names. It is possible to run the install/configure on both the SP and IdP computers in parallel since they are independent at this time, which will save about half an hour of wait time, but it is more confusing to do both simultaneously. If you can keep it straight, go for it.
|


Adding Users to OID
An Identity Management product is only interesting if you have some identities to manage! You need to populate the LDAP-based directory with sample people. There are many ways you can do this: using LDIF text to bulk-load entries, using another non-Oracle directory such as Microsoft Active Directory, or adding the entries manually. You are going to manually add people to both the IdP and SP local directories using Oracle Internet Directory (OID) Data Browsers. To make it easy to remember, the people added to the Identity Provider all start with the initial I: Ira and Isabella. The people added to the Service Provider all start with the initial S: Steve and Sue. And finally the user Bob is added to both the IdP and SP local directories.
To add users to OID, perform the following steps:
Adding Users to Identity Provider (IdP) Local OID
. |
Start the Enterprise Manager 11g FMW Control web application on the Identity Provider. Don't confuse this Enterprise Manager (usually port:7001) with the Database Enterprise Manager (usually port:1158). From a browser (it need not be on the IdP computer), go to http://hostidp.example.com:7001/em in a tab. (You will start another tab for the Service Provider shortly.)
Sign on with the username of weblogic and the password you are using for this demonstration, for example Welcome1. The password will display as dots. Click Login.
|
|---|---|
. |
Verify that everything is running as indicated by green up-arrows in the Status columns.
The layout and content of the Home page is quite customizable. Panels can be moved and shrunk. Shown is the default view with most collapsible items (indicated by a plus in a box) already expanded (indicated by a minus in a box).
|
. |
Open an OID Data Browser for the IdP computer. On the left navigation panel, expand the [+] next to Identity and Access, then click oid1 > Directory Services Manager > Data Browser.
Even though you are using a Web browser that supports opening windows in tabs, this Data Browser will open a separate window.
|
. |
Sign in to the Directory Services Manager with a User Name of cn=orcladmin (you need to preface the User Name with "cn=") and a password of Welcome1.
Make sure you are adding the users to the correct computer: hostidp. Click Connect.
|
. |
Expand the Data Tree down to the Users level. Keep clicking on the [+] icons from dc=com > dc=example > cn=Users.
You should now see orcladmin and PUBLIC.
|
. |
Create a new user like orcladmin.
Right-click on cn=orcladmin and select Create Like. You could use Create, but then you would have to add many fields that are already present on orcladmin, so this is faster.
|
. |
Click Next to accept the default Entry Properties.
Describing the Object Class choices in an LDAP-based directory is beyond the scope of this OBE.
|
. |
In Mandatory Properties, enter Isabella in the cn field and sn field. Select cn from the Relative Distinguished Name pull-down menu. Click Next.
Remember by convention for this OBE all of the users on the IdP start with "I": Isabella and Ira; all of the users on the SP start with "S": Steve and Sue; and Bob is on both the IdP and the SP.
|
. |
For Status, click Finish.
There is still more to do for this user, for example there is no password yet, so it is not really "finished" finished, just this part is finished.
|
. |
In the Data Tree, click cn=Isabella.
Make sure you are looking at the Attributes tab.
|
. |
Scroll down to Optional Attributes. Click on the green plus just below the subtitle Optional Attributes to add items.
Even though the user orcladmin has a password, when you make another user using Create Like it does not include a password, so that password attribute must be added.
|
. |
Select userPassword.
Click > Move.
userPassword should now be moved into the Shown Attributes column. Click Add Attributes.
|
. |
Change all the occurrences of orcladmin to Isabella. Enter Welcome1 in the userPassword field. Click Apply.
In some cases, depending on the order you do these steps, you may see an error message about duplicate passwords. If you see this error, then put in a password of Welcome2, then Apply, then change it back to Welcome1 and Apply again.
|
. |
Do the same thing repeating steps 6 through 13 creating users Ira and Bob.
You should now see the three users you added.
|
. |
Close the Data Browser for the IdP. Click on the [X] at the top of the panel.
Instead of closing, it is possible to Create a New Connection from this Data Browser to multiple hosts, but it is easier just to close it here and open it from the SP host. If you were creating users for dozens of hosts over and over again, then it might make sense to create other connections.
|


Adding Users to Service Provider (SP) Local OID
. |
Create users for the SP as well. The steps are identical for this SP computer as they were for the IdP. On the browser, open a tab to the SP computer http://hostsp:7001/em, User Name weblogic, Password Welcome1, click Login, then click oid1 > Directory Services Manager > Data Browser.
Sign in to the Directory Services Manager with a User Name of cn=orcladmin (you need to preface the User Name with "cn=") and a password of Welcome1. Click Connect.
|
|---|---|
. |
Repeat the same steps 6 through 13 from Adding Users to Identity Provider (IdP) Local OID, but this time for the SP for users Steve, Sue and Bob.
When complete, you should see the three users you added to the SP as shown in the red box. Close the Data Browser.
|


Testing Default OIF Installation
To make sure that the users were added successfully from the Data Browser, they should be visible from the OIF console. To view the users from the OIF portion of Enterprise Manager 11g FMW Control, perform the following steps:
. |
Navigate to OIF Identities. From either computer, navigate to OIF(11.1.1.1.0) > Oracle Identity Federation > Administration > Identities.
Whichever computer you do first, do the other one next.
|
|---|---|
. |
Display Local Users. Click the Local Users tab. Click Search with no values.
You should see the users you have added. Repeat this with the other computer.
|


Summary
The computer at MyCorp (hostidp.example.com) and the computer at MyLife (hostsp.example.com) now both have OIF installed on the Oracle Identity Management platform. In addition, sample users have been added to both systems to test future federations. The configuration will be performed later.
In this tutorial, you have learned how to:
- Verify the prerequisite environment to install Oracle Identity Federation (OIF)
- Install OIF as part of Oracle Identity Management Suite
- Configure sample users in Oracle Internet Directory (OID)
Resources
- Oracle Fusion Middleware Administrator's Guide for Oracle Identity Federation 11g Release 1 (11.1.1)
- Oracle Identity Federation 11g
- The OBEs listed are follow-on courses you may wish to take. They should be completed in the following order after completing this OBE:
- OBE Transient and Mapping Federations with Oracle Identity Federation
- OBE Linking Federations with Oracle Identity Federation
- OBE Role-based Federations with Oracle Identity Federation
- To learn more about Oracle Identity Management, refer to additional OBEs on the OTN Web site.
Credits
- Lead Curriculum Developer: Steve Friedberg
- Product Manager: Sophia Maler
- Other Contributors: Vinaye Misra, Reviewer
![]()
|
|
About
Oracle | |