 |
||
Linking Federations with Oracle Identity Federation (OIF)
Purpose
In this tutorial, you learn how to configure a linked federation across security domains between one Service Provider and one Identity Provider.
Time to Complete
Approximately 1 hour.
Overview
OIF supports several different use cases for federations. Previous OBEs covered configuring transient federations (one-sided) and mapped federations (two-sided).
A mapped federation has the same person (let's say Jane Smith) with mostly identical directory schemas existing in two places: the SP and the IdP.
The map is on an identical field in the SP and IdP, for example SP email jsmith@mycorp.com = IdP email jsmith@mycorp.com.
This proves that Jane-SP is the same person as Jane-IdP.
A linked federation is similar to a mapped federation, but is different in that the schemas are mostly (perhaps even entirely) different on the SP and the IdP,
yet Jane is the same person. Perhaps on the SP she is known as Jane Smith by her maiden name and known as Jane Brown by her married name on the IdP. But what remains unchanged?
Her Social Security Number. But to complicate matters, the Social Security Number is stored on the SP as ssn and the Social Security Number is stored as socsecnum on the IdP
(in other words, the field names in the two schemas are different). So the linking maps the two schema field names (known in federation terms as "attributes") together.
The data needs to match: Jane's Social Security Number 123-45-6789 is the same in both attributes even though their names are different.
Once two people are matched in both directories with the same value (they are in fact the same person), then the federation is established.
Scenario
Background: Your company's users have access to a Web-based application that runs on a separate server in a separate company. Your company and the other company are considered separate security domains. For purposes of naming, assume that your company is MyCorp and the application is a life insurance benefits package hosted by MyLife Inc. You must configure OIF on both your company's computer and the insurance company's computer to provide security for the benefits application. The benefits application requires authentication for a group of users at your company that is not necessarily the same users that would be known locally on the application server at the insurance company. Your company's computer will be the Identity Provider (IdP) and the insurance company's computer will be the Service Provider (SP).
A person that needs to use the application exists on both systems with different attributes. His name is James but his friends call him Jim. His cell phone is the constant, and that same number is recorded in both the SP and the IdP, but the field names for the cell number are different for the SP and IdP. You will configure a linked federation based on the cell phone number.
Hardware and Software Requirements
The following is a list of hardware and software requirements:
- Two PCs with at least 3 GB of RAM each. For this example, the PCs will be referred to as hostsp (the Service Provider) and hostidp (the Identity Provider).
- Oracle Database 11g version 11.1.0 or greater
- Oracle WebLogic Server 11g version 10.3.1 or greater
- Oracle Identity Management Suite 11g version 11.1.1.1.0 or greater
- Oracle Identity Federation configured as per the OBE Installing Oracle Identity Federation
Prerequisites
Before starting this tutorial, you should:
. |
Verify that OIF is installed and configured as per the OBE Installing Oracle Identity Federation |
|---|---|
. |
Verify that OIF partners are registered and configured as per the OBE Transient and Mapping Federations with Oracle Identity Federation |
Verifying the OIF Environment
To verify that the OIF environment is installed and configured properly, and that all services are started, perform the following steps:
. |
Open a Web browser session for both the Identity Provider (IdP) and the Service Provider (SP) simultaneously. The use of tabs on a Web browser will make it easier to keep the changes to both systems in sync with each other. In the first Web browser tab, go to URL http://hostsp:7001/em to run the Enterprise Manager 11g Fusion Middleware Control. Log in to Enterprise Manager for the Service Provider with a User Name of weblogic and a password of Welcome1. The password will display as a series of dots. Click Login.
Don't confuse this Enterprise Manager (usually port:7001) with the Database Enterprise Manager (usually port:1158).
|
|---|---|
. |
In the next Web browser tab, go to URL http://hostidp:7001/em and log in to the Enterprise Manager for the Identity Provider with a User Name of weblogic and a password of Welcome1.
You will notice that the Farm name has a suffix of SP for the Service Provider and IDP for the Identity Provider. The Farm name appears on many of the screens.
|
. |
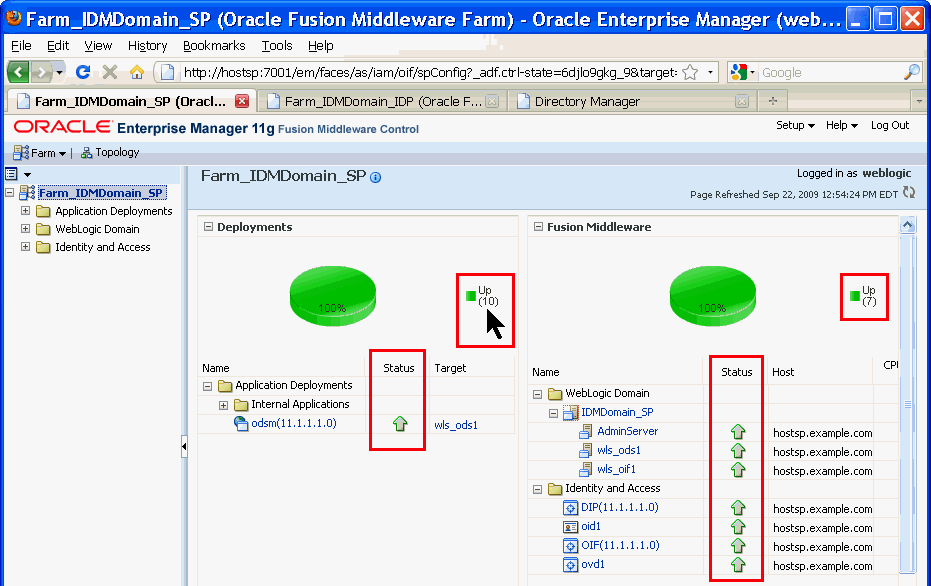
Looking at the home page for each of the Farm tabs, verify that the Status of all the subsystems is a green Up arrow.
If the Status is not Up, then you may need to (re)start the subsystem(s).
|
Adding Users to the Directories
There is a single person known formally as James and known informally as Jim, but it is the same person. Jim has an account on the Identity Provider, and all of his information (name, email, and so on) all says "Jim" except for his mobile number which is 123-456-7890, and his password which is Welcome1. James has an account on the Service Provider, and all of his information (name, email, and so on) all says "James" except for his telephone number which is the same 123-456-7890, and his password which is Welcome1. In other words, the two accounts have nothing in common except the cell phone, and even that field is known as "mobile" on one system and "telephoneNumber" on the other. (While the passwords happen to be the same, they don't need to be. They match simply so that you can remember all the passwords for this example.) To add Jim and James (the same person) to the two directories, perform the following steps:
Adding User Jim to the Identity Provider (IdP)
As stated in the previous paragraph, the users are being added to the Oracle Internet Directory (OID) associated with the Identity Provider, not to the IdP itself. In a larger environment, the OID would probably be on a separate host from the IdP. The IdP has a configuration parameter that points to its OID's URL. So, while technically inaccurate, as a shorthand the directions will say to "add the user to the IdP" when it is really adding to the OID for the IdP.
. |
On the IdP, start the OID Data Browser.
In the left navigation menu, click on
|
|---|---|
. |
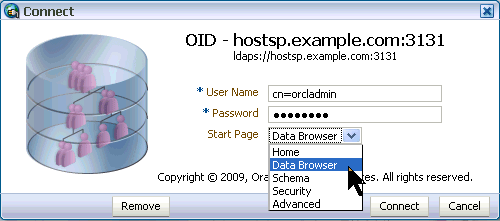
Connect to the OID Data Browser.
Enter the following information in the Connect dialog box:
|
. |
Expand the Data Tree until the user orcladmin is showing.
On the left side, click the
|
. |
Create a new user like orcladmin.
Right-click on orcladmin, select Create Like.
|
. |
Accept the default Entry Properties.
Click Next.
|
. |
Enter Jim in the Mandatory Properties.
Enter the following information in the New Entry dialog box:
|
. |
Accept the default Status.
Click Finish.
|
. |
Add Optional Attributes to Jim.
Click the
|
. |
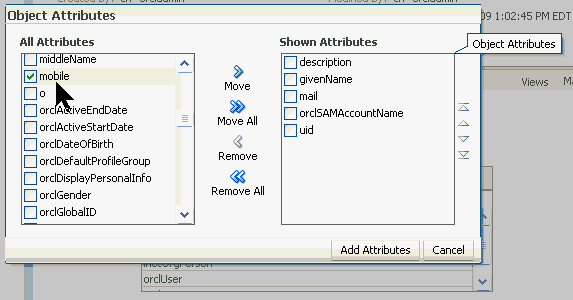
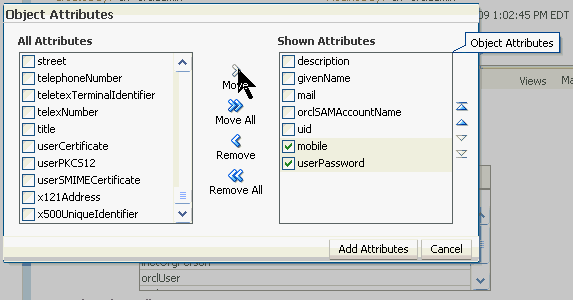
Add mobile and userPassword attributes.
Select mobile from the list of All Attributes. Notice that Jim's phone is referred to as "mobile" as opposed to "telephoneNumber" or anything else. Scroll down and select userPassword as well (not shown).
Click Move to move the two selected attributes from the left to the right under Shown Attributes. Click Add Attributes.
|
. |
Change the values from "orcladmin" to Jim as appropriate. Add the phone and password values.
Enter the following information in the Optional Attributes section:
Depending on when you click Apply, you may see the following error. If you do, then click OK to dismiss the error, change the userPassword to Welcome2, click Apply, then change it back to Welcome1 and click Apply again.
|
. |
You are done adding Jim to the Identity Provider. Close the connection to the Data Browser.
Do not close the Web browser, just close the Data Browser. Click the blue X as shown under the mouse pointer.
|
Adding User James to the Service Provider (SP)
These are basically the same steps to add the user James to the Service Provider. The major difference is that the phone is known as "telephoneNumber" rather than "mobile."
. |
On the SP tab, open an OID Data Browser.
In the left navigation menu, click on
|
|---|---|
. |
Connect to the OID Data Browser.
Enter the following information in the Connect dialog box:
|
. |
Expand the Data Tree until the user orcladmin is showing.
On the left side, click the
|
. |
Accept the default Entry Properties.
Click Next.
|
. |
Enter James in the Mandatory Properties.
Enter the following information in the New Entry dialog box:
|
. |
Accept the default Status.
Click Finish.
|
. |
Add Optional Attributes to James.
Click the
|
. |
Add telephoneNumber and userPassword attributes.
Select telephoneNumber and userPassword from the list of All Attributes. Notice that James' phone is referred to as "telephoneNumber" as opposed to "mobile" or anything else. The opposite is true of Jim.
Click Move to move the two selected attributes from the left to the right under Shown Attributes. Click Add Attributes.
|
. |
Change the values from "orcladmin" to James as appropriate. Add the phone and password values.
Enter the following information in the Optional Attributes section:
|
. |
You are done adding James to the Service Provider. Close the connection to the Data Browser.
Do not close the Web browser, just close the Data Browser. Click the X.
|
Verifying Users via the Enterprise Manager
. |
Go to the Service Provider Identities configuration page.
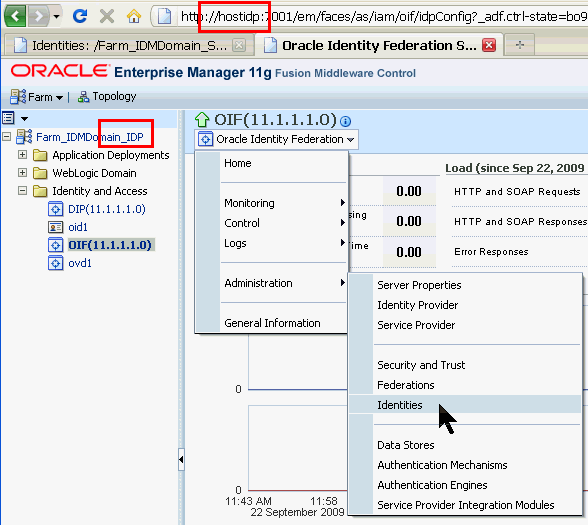
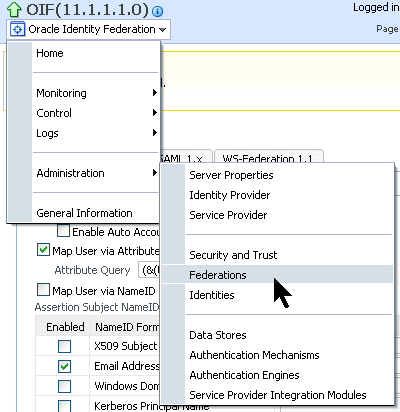
On the tab connected to the Service Provider Enterprise Manager, on the left, click OIF(11.1.1.1.0). (You may have timed out. If so, log back in.) On the pull-down on the right, navigate to Oracle Identity Federation > Administration > Identities.
|
|---|---|
. |
Search for local users on the SP.
Click the Local Users tab. With Search Value blank, click Search. This will display all local users stored in the SP LDAP-based Directory.
|
. |
You should see a display similar to this:
Make sure that James is in the SP Identities and that Jim is not. (This is easy to remember: James has an "S" in it for Service, and Jim has an "I" in it for Identity.)
|
. |
Do the same thing for the Identity Provider.
On the tab connected to the Identity Provider Enterprise Manager, on the left, click OIF(11.1.1.1.0). (You may have timed out. If so, log back in.) On the pull-down on the right, navigate to Oracle Identity Federation > Administration > Identities.
|
. |
Search for local users on the IdP.
Click the Local Users tab. With Search Value blank, click Search. This will display all local users stored in the IdP LDAP-based Directory.
|
. |
You should see a display similar to this:
Make sure that Jim is in the IdP Identities and that James is not. (This is easy to remember: James has an "S" in it for Service, and Jim has an "I" in it for Identity.)
|
Configuring the Identity Provider (IdP) for Linked Federations
A linked federation identifies two fields, one on the SP and one on the IdP, with different field names that contain the same data. In this case, mobile on the IdP and telephoneNumber on the SP both contain a unique identifier 123-456-7890 for the single person known as both Jim and James. For the test, both mobile and telephoneNumber will be linked together and referred to as cell. Very simply, the two users match if mobile=cell=telephoneNumber.
To configure the linked federation on the IdP side, perform the following steps:
. |
On the IdP Enterprise Manager, go to the Identity Provider configuration page.
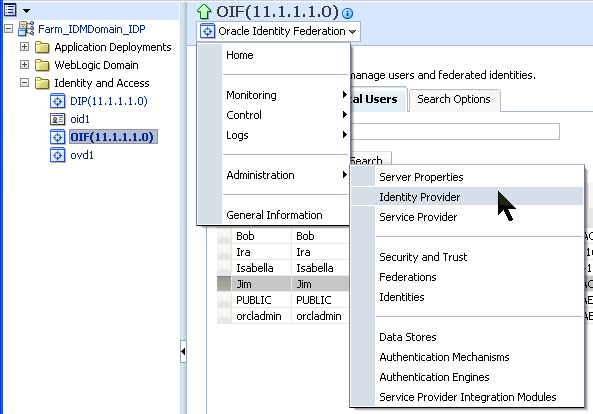
You should still be in the IdP's Enterprise Manager OIF section from the previous step. From the pull-down at the top, navigate to Oracle Identity Federation > Administration > Identity Provider.
|
|---|---|
. |
On the Common tab, deselect "Reauthenticate when Missing User Session Attributes."
Leave all the other values as they are.
|
. |
Click Apply.
The Confirmation should indicate that the "Changes have been applied."
|
. |
Click the SAML 2.0 tab.
Notice that in the past the map Default was the Email Address (mail) field. Enabling a field makes the Default radio button selectable.
Enable Unspecified, make it Default, and map it to an attribute of mobile in User Attribute Mapping.
|
. |
Click Apply.
The Confirmation should indicate that the "Changes have been applied."
|
. |
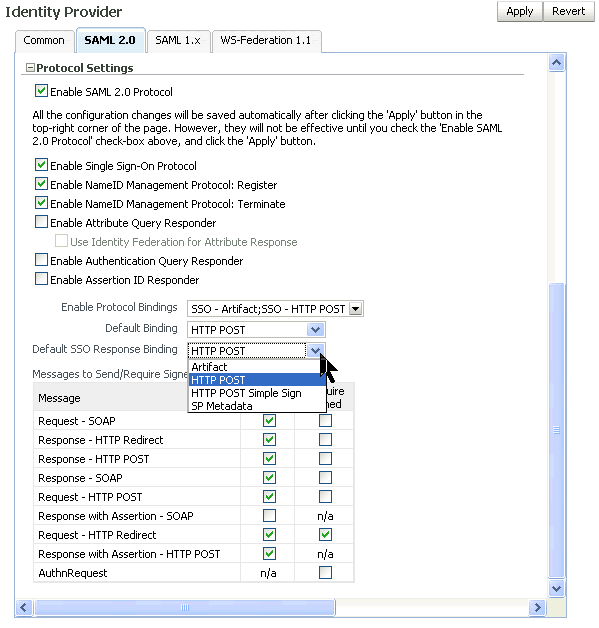
(Optional) Scroll down and set the default binding type to HTTP POST.
On the SSO Test page for each user, you had been specifiying HTTP POST as the binding type each time you ran a test. If you set the defaults here, then you won't need to specify any overrides on the SSO test page in the future. Change the Default Binding and the Default SSO Response Binding to HTTP POST.
|
. |
Click Apply.
The Confirmation should indicate that the "Changes have been applied."
|
. |
From the pull-down at the top, navigate to Oracle Identity Federation > Administration > Federations.
|
. |
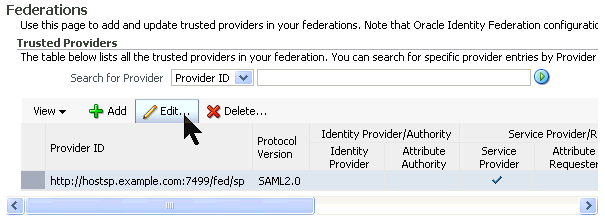
Edit the SP.
Select the (only) Provider ID by clicking on the SP URL. Click Edit.
|
. |
On the Oracle Identity Federation Settings tab, select "Enable Attributes in Single Sign-on (SSO)."
Notice that Unspecified is selected (enabled). Remember that Unspecified is mapped to "mobile."
|
. |
Click Apply.
The Confirmation should indicate that the "Changes have been applied to http://hostsp." Even though you are configuring on the IdP, the changes are being applied to the SP.
|
. |
Click Edit.
|
. |
On the Name Mappings tab, click Add.
There should not be any mappings listed yet.
|
. |
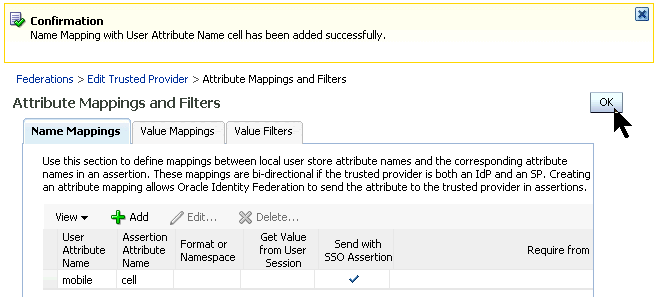
Map mobile to cell.
Enter the following information in the Add Attribute Name Mapping section:
|
. |
The mapping should look like the screen shot below.
If you can't see all six columns, drag the column dividers to change the widths. Click OK.
|
Configuring the Service Provider (SP) for Linked Federations
A linked federation identifies two fields, one on the SP and one on the IdP, with different field names that contain the same data. In this case, mobile and telephoneNumber both contain a unique identifier 123-456-7890 for the single person known as both Jim and James. For the test, both mobile and telephoneNumber will be linked together and referred to as cell. The IdP was configured in the previous section. To configure the linked federation on the SP side, perform the following steps:
. |
On the SP Enterprise Manager, go to the Service Provider configuration page.
From the pull-down at the top, navigate to Oracle Identity Federation > Administration > Service Provider.
|
|---|---|
. |
On the Common tab, in Assertion Settings, select "Map Assertion to User Account."
Optionally, in Protocol Settings, select the Default SSO Identity Provider from the pull-down menu. There should only be one IdP to choose from. If you set it here as a default, then you will not have to specify it again at the SSO Web Test page.
|
. |
Click Apply.
The Confirmation should indicate that the "Changes have been applied."
|
. |
On the SAML 2.0 tab, in the Assertion Settings, configure the following Assertion Settings:
Enter the Attribute Query to link telephoneNumber to cell.
The Attribute Query is case-sensitive: (&(telephoneNumber=%cell%))Remember that telephoneNumber exists in the SP LDAP schema, and cell does not exist anywhere except in OIF configuration as a tag for telephoneNumber. Since you are not using the NameID, none of the Assertion Subject NameID Formats will be used, so it does not matter if any are checked or not.
|
. |
Click Apply.
The Confirmation should indicate that the "Changes have been applied."
|
. |
Navigate to Oracle Identity Federation > Administration > Federations.
|
. |
In the list of Trusted Providers, select the IdP and click Edit.
There should only be one IdP to select. Even in real world scenarios, it may be common to have multiple SPs, but typically only one IdP. Click the URL to select the Provider. The dark gray box to the left of the provider's URL is the indication that it has been selected (there is no check).
|
. |
Click the Oracle Identity Federation Settings tab. Select "Enable Attributes in Single Sign-on (SSO)."
When you configured the IdP, you had to click Edit to map the mobile to cell attributes. You don't do that for the SP side. Notice that the Unspecified attribute in particular is enabled, that is the attribute that contains the mobile field passed in as "cell." On the SP side, the mapping is accomplished by the Attribute Query, not the Edit here.
|
. |
Click Apply.
The Confirmation should indicate that the "Changes have been applied to http://hostidp." Notice that from the SP you are making changes about the hostidp, not on the hostidp.
|
Logging in to Test Linked Federations
The user will try to log on to the SP as an ID known to the SP (James), but that user is known by another ID (Jim) on the IdP. The two IDs (really the same user/person) are linked by a common unique cell phone (123-456-7890). To test the linked federation, perform the following steps:
. |
On a separate Web browser, start the Test SP SSO page. This Test SSO browser should be on a PC that is neither the IdP nor the SP, but a separate PC to guarantee that there is no "leakage" of security and authentication. Set the values as shown and click Start SSO.
The reason you should use a separate browser is that you will need to close the browser (not just the tab, the whole browser) in between experiments to clear the session cookies. Go to http://hostsp.example.com:7499/fed/user/testspsso (this should be book-marked from previous exercises). If you did not set the defaults during the optional parts of the configuration, use the pull-down menu to select hostidp.example.com:7499/fed/idp as the IdP Provider ID. Set both Authn Request Binding and SSO Response Binding to HTTP POST. Select Allow Federation Creation. The Name ID Format is not being used, so it does not matter what that is set to. Click Start SSO.
|
|---|---|
. |
Log in as User Name Bob with a Password of Welcome1. Click Sign In.
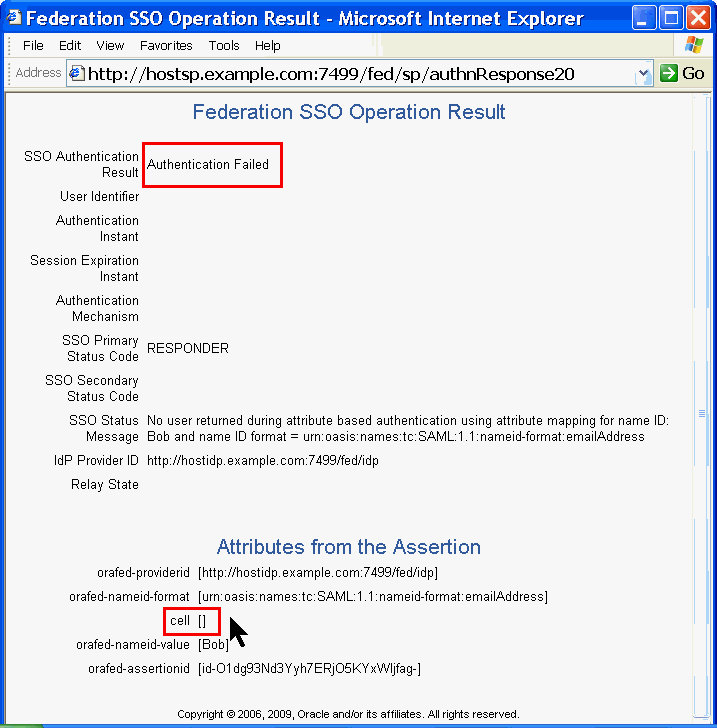
Even though this worked in the past, this will fail now. Bob exists on both the IdP and the SP, and both IDs have the email in common, but OIF is no longer looking for a match on email. Now OIF is looking on a match on "cell" or really that mobile=telephoneNumber. Bob has null in both mobile and telephoneNumber. Remember back from SQL101 that two null values compared to each other are not equal, the test result is null. You cannot say that mobile equals null, you can only say that mobile is null. In any case, mobile is not equal to telephoneNumber for Bob(IdP) and Bob(SP), so there is no match.
|
. |
Close the whole browser to clear the failed session cookies.
The value for cell is null.
|
. |
Re-open the browser and set up the test in the same way you did for Bob.
Just to prove that Name ID Format is not being used, you can set it to anything you like. Click Start SSO.
|
. |
Log in as User Name Jim with a Password of Welcome1.
The reason you pick Jim instead of James is that even you you want to use an application on the SP, and the user is known as James on the SP, the authentication is asserted by the IdP who knows him as Jim.
|
. |
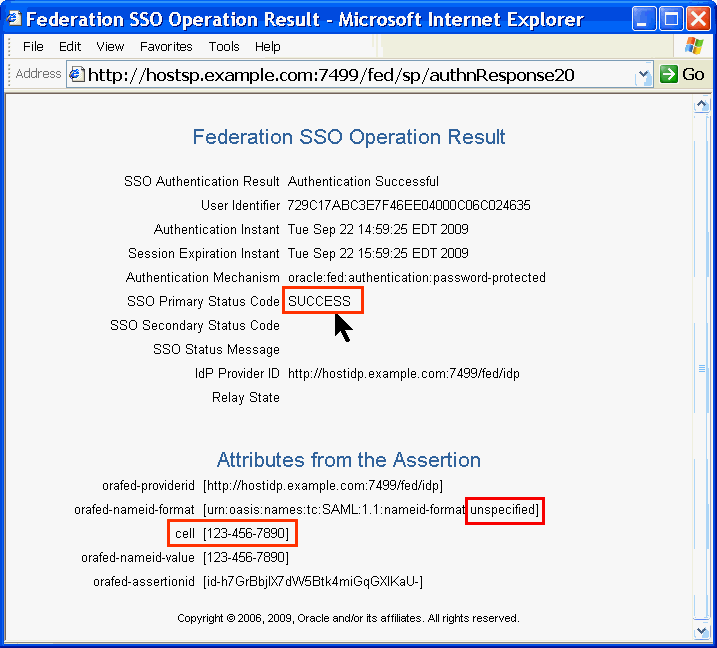
Note the Status Code of SUCCESS.
The reason it succeeded is that the attribute named "unspecified" contained the mobile field with a value of 123-456-7890, which matched the telephoneNumber field. OIF refers to that linking by the name "cell," a name you made up, even though the attribute cell does not appear in either LDAP schema.
|
Summary
The two computers at MyCorp and MyLife trust each other and can establish federations. These federations allow the employees at MyCorp to access the life insurance benefits application hosted at MyLife. The security can be based on two IDs (one on the SP and one on the IdP) linked to each other. Users on the SP need not match users on the IdP only based on email, they could match on any arbitrary field. The two fields that match need not have the same name in each schema.
In this tutorial, you have learned how to:
- Configure the IdP and SP for linked federations
- Pick two arbitrary fields (mobile and telephoneNumber) as the basis for the linking
- Assign an arbitrary name (cell) to represent the linked federation
Resources
- Oracle Fusion Middleware Administrator's Guide for Oracle Identity Federation 11g Release 1 (11.1.1)
- Oracle Identity Federation 11g
- The OBE listed is a follow-on course you may wish to take after completing this OBE: Role-based Federations with Oracle Identity Federation
- To learn more about Oracle Identity Management, refer to additional OBEs on the OTN Web site.
Credits
- Lead Curriculum Developer: Steve Friedberg
- Product Manager: Sophia Maler
- Other Contributors: Vinaye Misra, Reviewer
![]()
|
|
About
Oracle | |



![[+]](images/plus.gif) to expand Identity and Access. Click oid1.
This causes the pull-down on the right to display Oracle Internet Directory.
Navigate to Oracle Internet Directory > Directory Services Manager > Data Browser.
Alternatively you may have a Data Browser bookmarked in your Web browser as
to expand Identity and Access. Click oid1.
This causes the pull-down on the right to display Oracle Internet Directory.
Navigate to Oracle Internet Directory > Directory Services Manager > Data Browser.
Alternatively you may have a Data Browser bookmarked in your Web browser as 


