
This document will continue to evolve as existing sections change and new information is added. All updates appear in the following table:
| Date | Module | Feature | Notes |
|---|---|---|---|
| 30 AUG 2023 | Transportation and Global Trade Platform | Enhanced Workbench | Updated document. Added additional setup details for Shipment Timeline feature. |
| 30 JUN 2023 | Created initial document. |
 HAVE AN IDEA?
We’re here and we’re listening. If you have a suggestion on how to make our cloud services even better then go ahead and tell us. There are several ways to submit your ideas, for example, through the Ideas Lab on Oracle Customer Connect. Wherever you see this icon after the feature name it means we delivered one of your ideas.
GIVE US FEEDBACK
We welcome your comments and suggestions to improve the content. Please send us your feedback at otm-doc_us@oracle.com.
DISCLAIMER
The information contained in this document may include statements about Oracle’s product development plans. Many factors can materially affect Oracle’s product development plans and the nature and timing of future product releases. Accordingly, this Information is provided to you solely for information only, is not a commitment to deliver any material, code, or functionality, and should not be relied upon in making purchasing decisions. The development, release, and timing of any features or functionality described remains at the sole discretion of Oracle.
This information may not be incorporated into any contractual agreement with Oracle or its subsidiaries or affiliates. Oracle specifically disclaims any liability with respect to this information. Refer to the Legal Notices and Terms of Use for further information.
This section gives you information to help you plan, deploy, and validate your update. We make frequent additions to this document, so don’t forget to check back and get the latest information before your update starts.
Review the Release Notes
The Release Notes identify required actions, known issues, corrections, new parameters and properties, renamed properties, and deprecated items.
Read the Documentation
The documentation library contains the release notes, the online help, the implementation guides, the API guides, preparation and testing recommendations, and links to other resources.
Read On My Oracle Support
Use the following resources to prepare for and validate your Oracle Engagement Cloud update.
- Doc ID 2174060.2: Information Center: Oracle Transportation Management. This document aggregates publications as well as describing documentation, support, and integration options.
- Doc ID 796594.1: Oracle Transportation and Global Trade Management Documentation and Training Resources. Describes the published documentation available. Use this document to ensure that you leverage all existing resources to learn about, install, implement, and use this product.
- Doc ID 2195580.1: Oracle Cloud Applications - Transportation and Global Trade Management Cloud: Get Started with Your Implementation. Begin with this document to start your implementation.
- Doc ID 2095528.1: Oracle Cloud Applications - Transportation and Global Trade Management Cloud: Quarterly Update Planning. Describes standard quarterly update policies and practices.
- Doc ID 2096782.1: Oracle Cloud Applications - Transportation and Global Trade Management Cloud: Quarterly Update Planning FAQs. Helps with the understanding of the upgrade process.
- Doc ID 2095509.1: Oracle Cloud Applications - Transportation and Global Trade Management Cloud: Environment Refresh Policy. Describes how to prepare for and request an environment refresh.
Column Definitions:
Report = New or modified, Oracle-delivered, ready to run reports.
UI or Process-Based: Small Scale = These UI or process-based features are typically comprised of minor field, validation, or program changes. Therefore, the potential impact to users is minimal.
UI or Process-Based: Larger Scale* = These UI or process-based features have more complex designs. Therefore, the potential impact to users is higher.
Features Delivered Disabled = Action is needed BEFORE these features can be used by END USERS. These features are delivered disabled and you choose if and when to enable them. For example, a) new or expanded BI subject areas need to first be incorporated into reports, b) Integration is required to utilize new web services, or c) features must be assigned to user roles before they can be accessed.
Transportation and Global Trade Platform
Improvements to Enhanced Workbench
This feature provides a set of new capabilities and features for the Enhanced Workbench. Improvements have been provided in several areas, including:
- Multiple Parents Selected Show All Details
- Favorites for Enhanced Workbench Layouts
- Personalization - Browser Based
- Table Parameters - Delete and Edit Show/Hide and New Look
- Drag/Select Text - Copy and Paste Table Text Option
- GTM - Work Queue Available
- Improve Focus Highlight Selected - Table, Gantt, Map
- Gantt - Drag and Drop - Shipment Stop Table to Appointment Gantt and Shipment Table to Driver Gantt
- Appointment Gantt - General Usability Improvements
- New Component Type – Shipment Timeline
- ALK - Map Move Order Drag and Drop
Multiple Parent Select Show All Details - Tables
This feature, when configured, will show all the Detail records for a Parent record grouped by the Parent record's ID when (multiple) Parent records are selected. You will find this feature extremely useful in any scenario where the task to be accomplished requires viewing and performing actions on a set of Detail records related to multiple Parents and having a reference to the Parent and their Detail records is beneficial.
In the example below, two Parent shipment records are selected, with this feature configured, the eight related Detailed Order Release records are displayed - grouped by their Parent records as shown below.
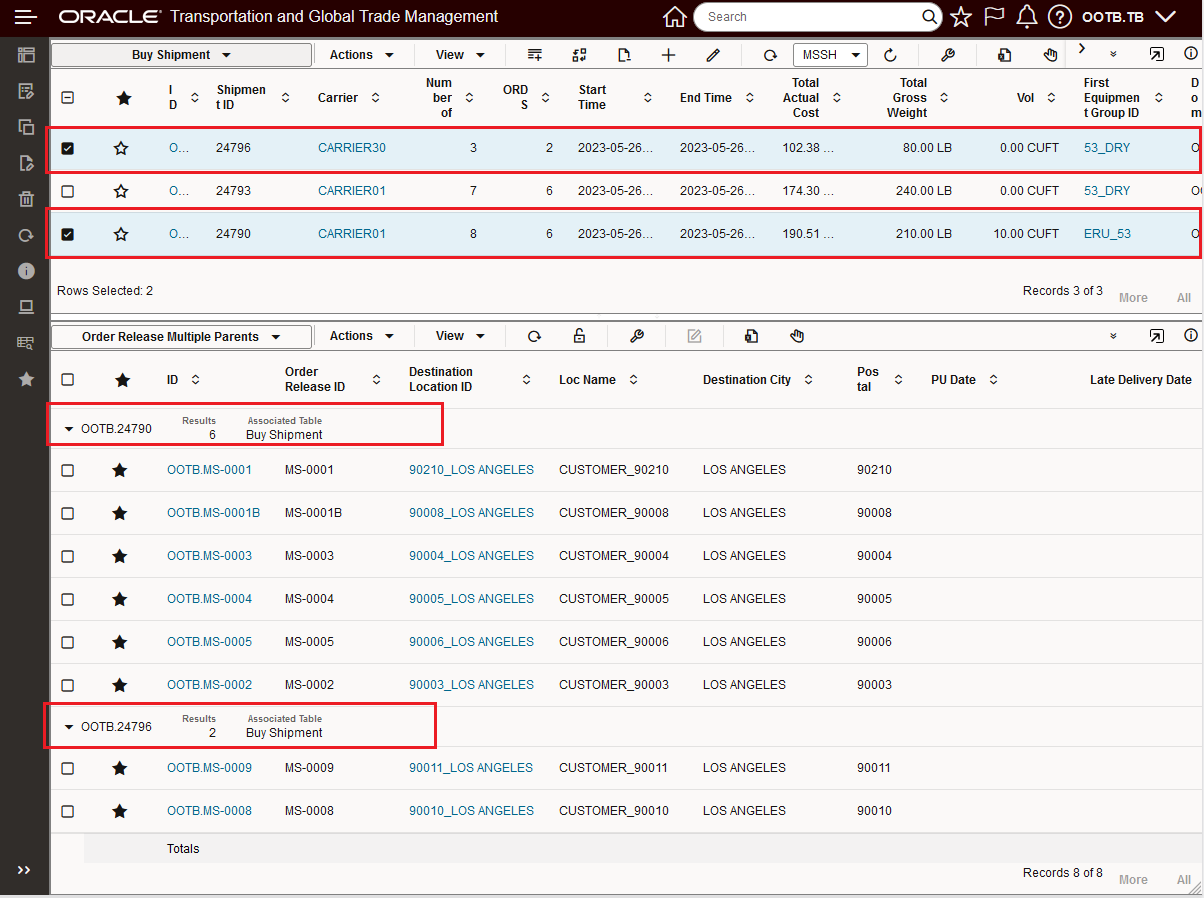
Multiple Parent Shipment Records With Order Release Details Grouped By Parent
The view below is the same, but in this case the Detailed records are collapsed, in the collapsed view note you see the reference for the Parent and a count for the number of Detail records in this case six Detail records for Parent 24790 and two Detail records for Parent 24796.

Multiple Parent Shipment Records Details Collapsed
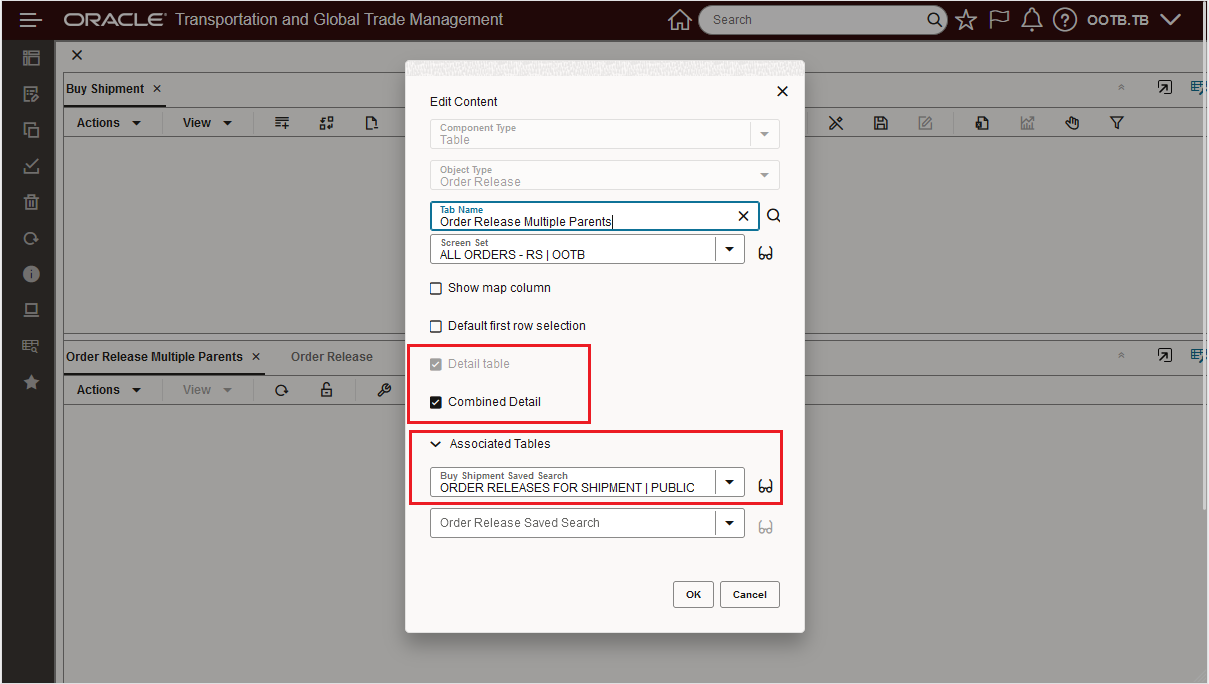
The setup up for this example is below. The Detail Table Combined Details option supports the Multiple Parent view shown above. Note that the original Detail Table view is still supported.
Multiple Parent Setup
Favorites for Enhanced Workbench Layouts - Enhanced Workbench Infrastructure
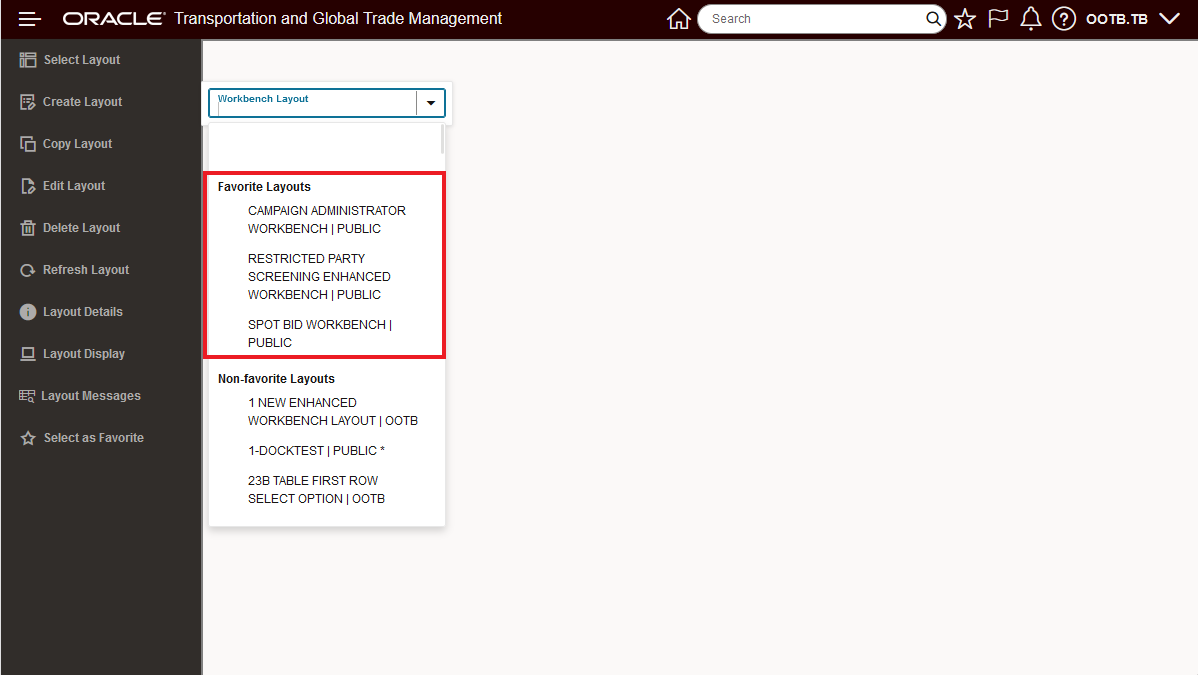
This feature extends the Favorites concept available on many objects in the system to the Enhanced Workbenches, you can now tag your Enhanced Workbenches as Favorites and use the Favorites designation and grouping to easily select your Favorite Enhanced Workbench from either the Workbench Layouts or from the Favorites Menu.
In the example below - the Workbench Layout dropdown now provides two groupings - Favorite Layouts - which lists the Enhanced Workbenches tagged as Favorites alphabetically and then all the rest of the Workbench Layouts are grouped under the Non-favorite Layout grouping - again, in alphabetical order.
Workbench Layout Dropdown With Favorites
As shown below, you can also use the Favorites icon on the Global Header to navigate to the Enhanced Workbenches you have tagged as Favorites.
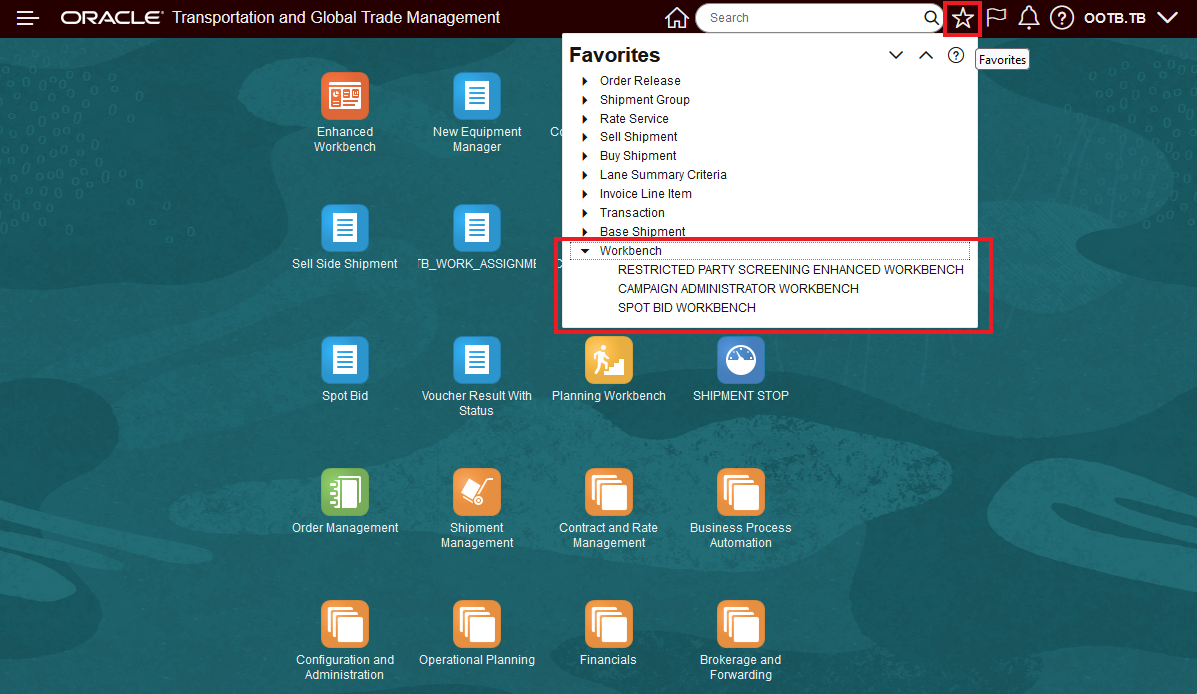
Favorites
Selecting an Enhanced Workbench to be a Favorite can be accomplished using the Enhanced Workbench Menu or in the Workbench Manager.
In the example below the Restricted Party Screening Enhanced Workbench has been selected as a Favorite, this is accomplished by selecting the Favorites star icon as shown.
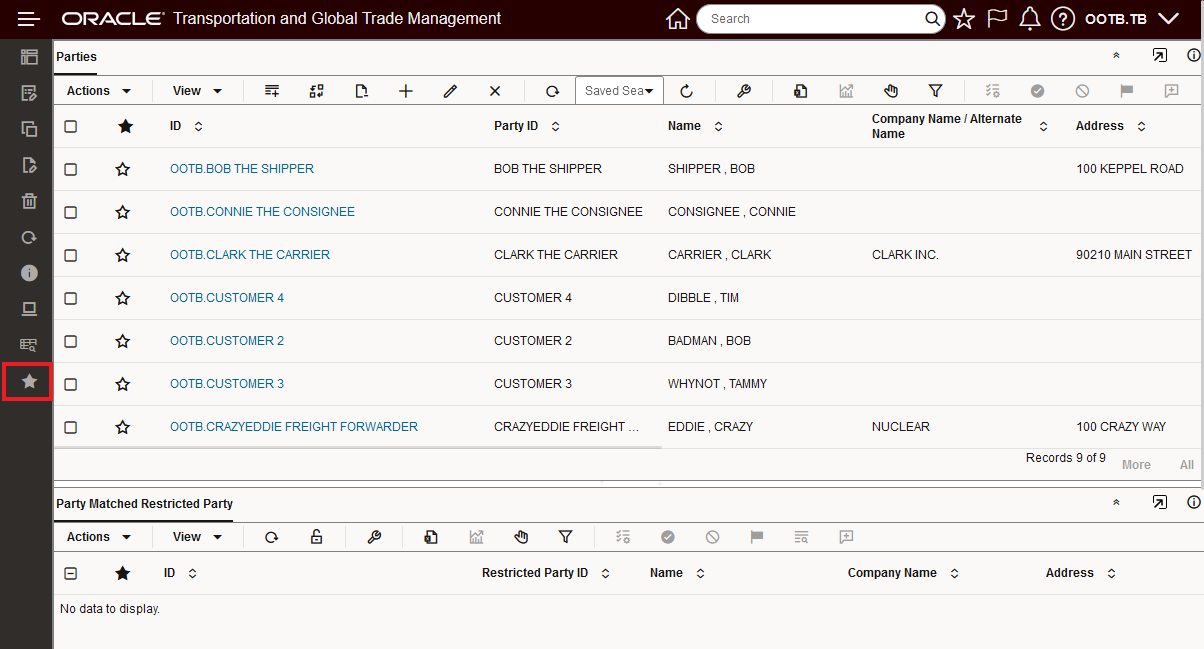
Workbench Manager
In the example below the Workbench Manager is used to select the Enhanced Workbenches as Favorites.

Workbench Manager - Favorites
Like other objects, you can also perform a search for your Favorites in the Workbench Manager Finder.

Workbench Manager - Find Favorites
Personalization - Browser Based - Enhanced Workbench Infrastructure
This feature provides you with the ability to personalize your Enhanced Workbench for the attributes listed below. This personalization is stored in the browser and as such will be available until your browser is refreshed - for example - the browsers cache is cleared, or the computer is restarted.
Attributes that can be personalized:
- Splitter position
- Disclosed tab per pane
- Width of columns on table
- Show/Hide columns on the table
- Column rearrangement on the table
As originally configured, the Enhanced Workbench below has the following layout.
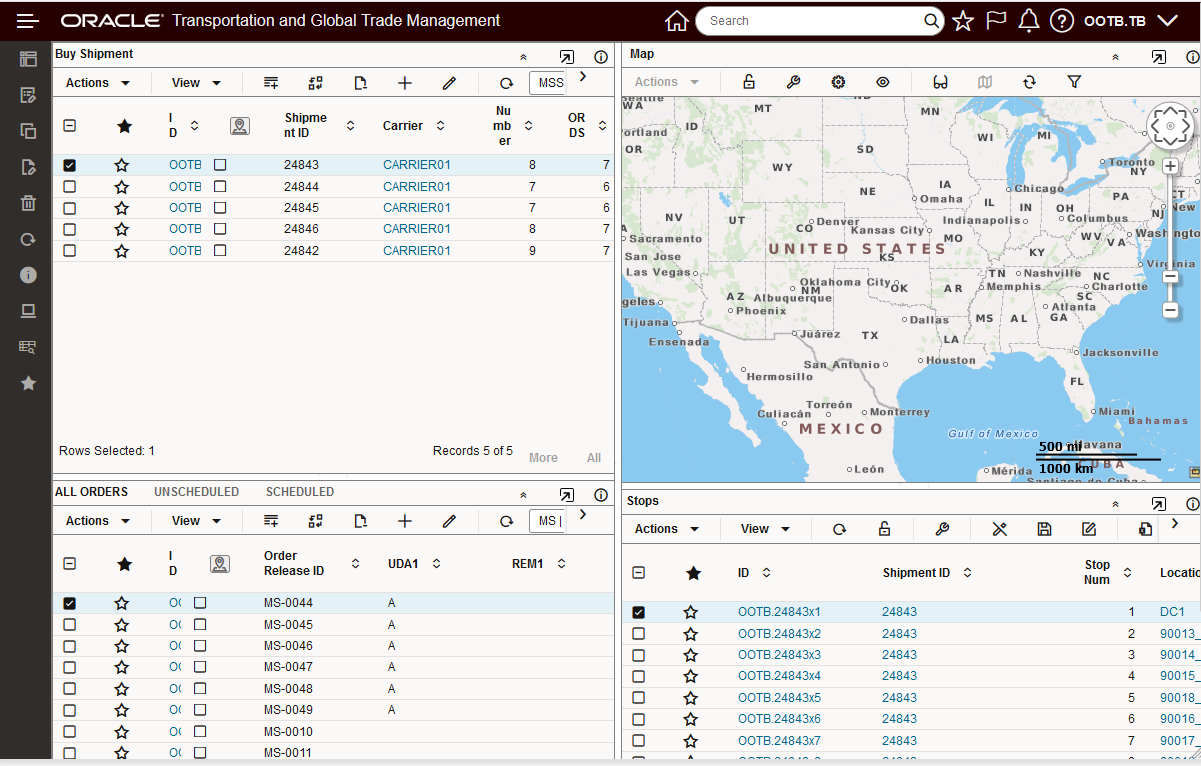
Workbench as Configured
Below is the same Enhanced Workbench after it has been Personalized.
- Splitter positions changed
- SCHEDULED Tab is now the initial focus v ALL ORDERS
- Column widths changed
- Columns hidden
- Columns rearranged
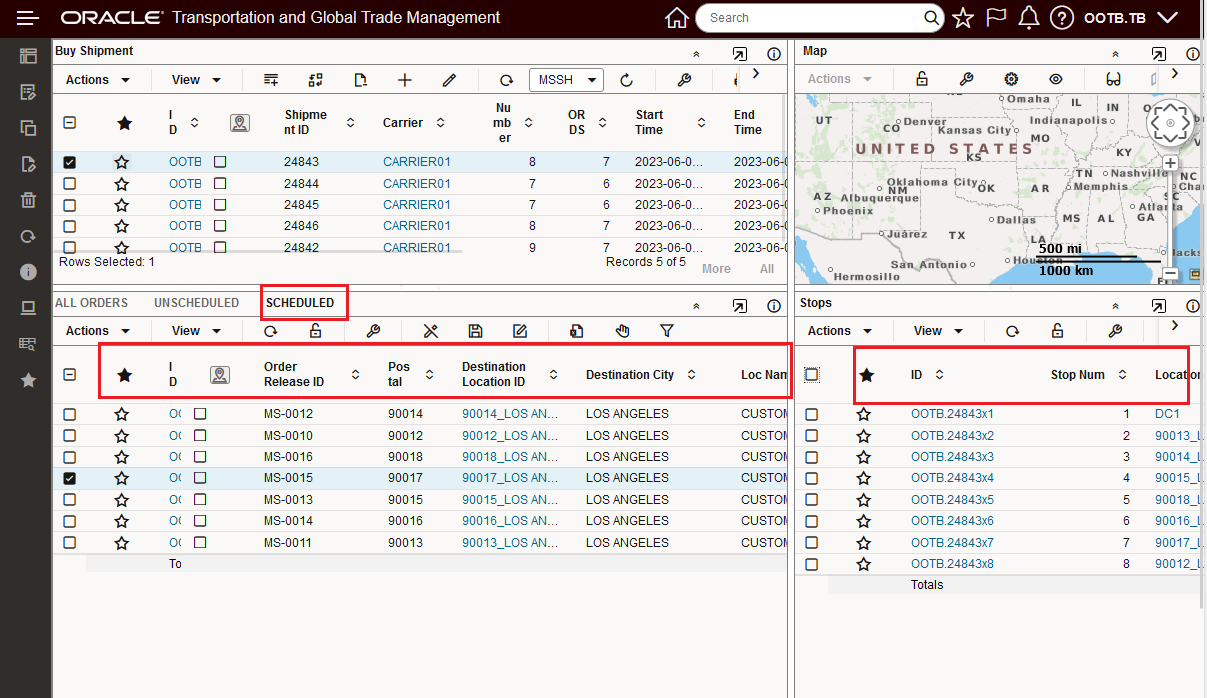
Personalized
After logging out and logging back in, the Personalizations are retained for the Enhanced Workbench.
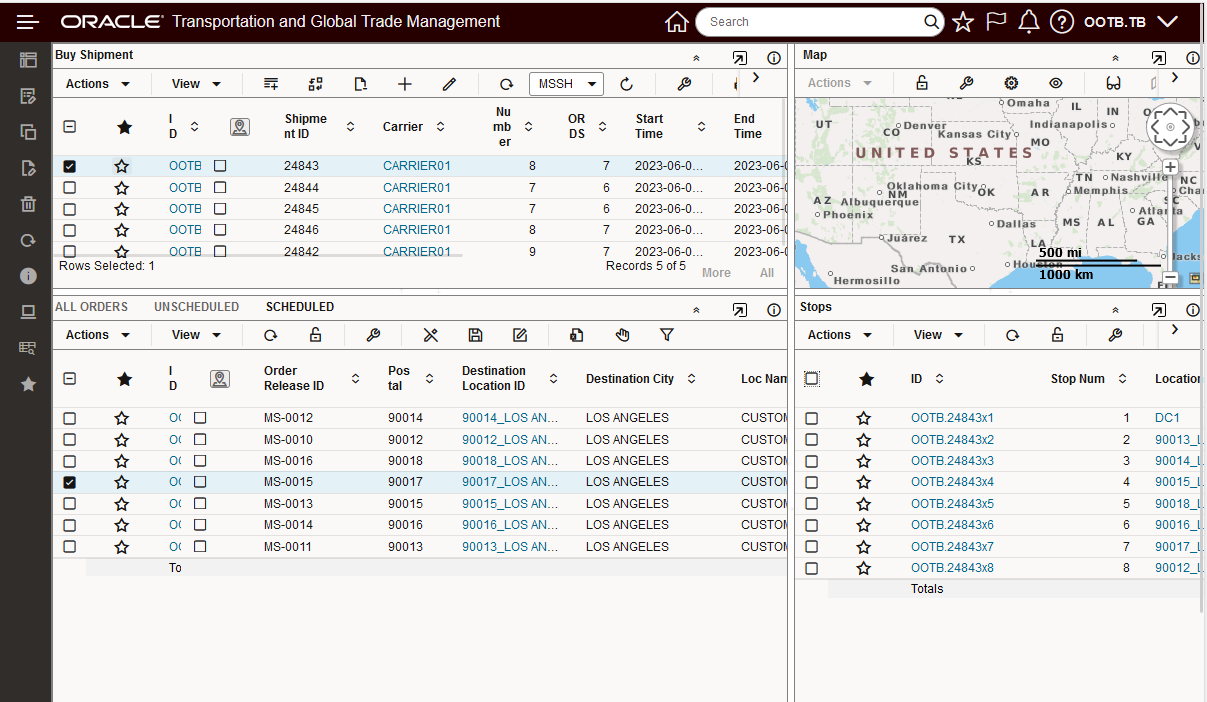
Personalizations Retained
Personalization Summary:
- User + Browser specific
- Saved to the user’s browser
- Default behavior – No Additional Step to Enable
Personalization is lost when
- Layout is edited
- Screen Set associated with the table is modified
- Browser is updated/cache cleared
Personalization Includes:
- Panel Splitter Positions
- Disclosed/Open Tab per Panel
- Table Column Widths
- Table Column Order/Position
- Table Columns Hidden/Show
Table Parameters - Table Toolbar Icon Management - Delete and Edit Show/Hide and Table Parameters New Look
You now have the option of configuring your tables using the Table Parameters to Show/Hide the Edit and/or Delete icons this is in addition to the other Show/Hide Toolbar Icons provided as shown below. The Show/Hide for the Edit and/or Delete icons adds the configuration option to the Table Parameters - you still have the option to configure Edit/Delete via the Screen Set.
In addition, as part of this feature the Table Parameters UI has also been updated with a new look and feel.
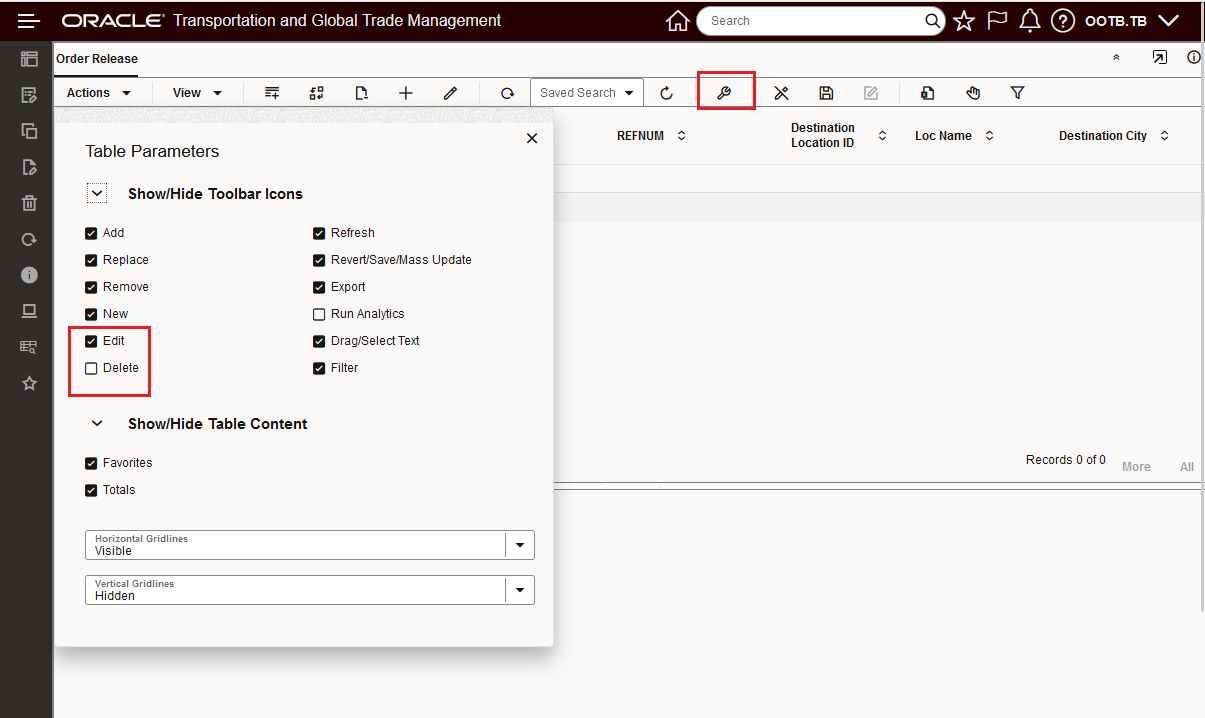
Table Property Addition - Show/Hide Toolbar Icons Delete and Edit - Default - Edit Show, Delete Hide
Edit and Delete both set to Show.
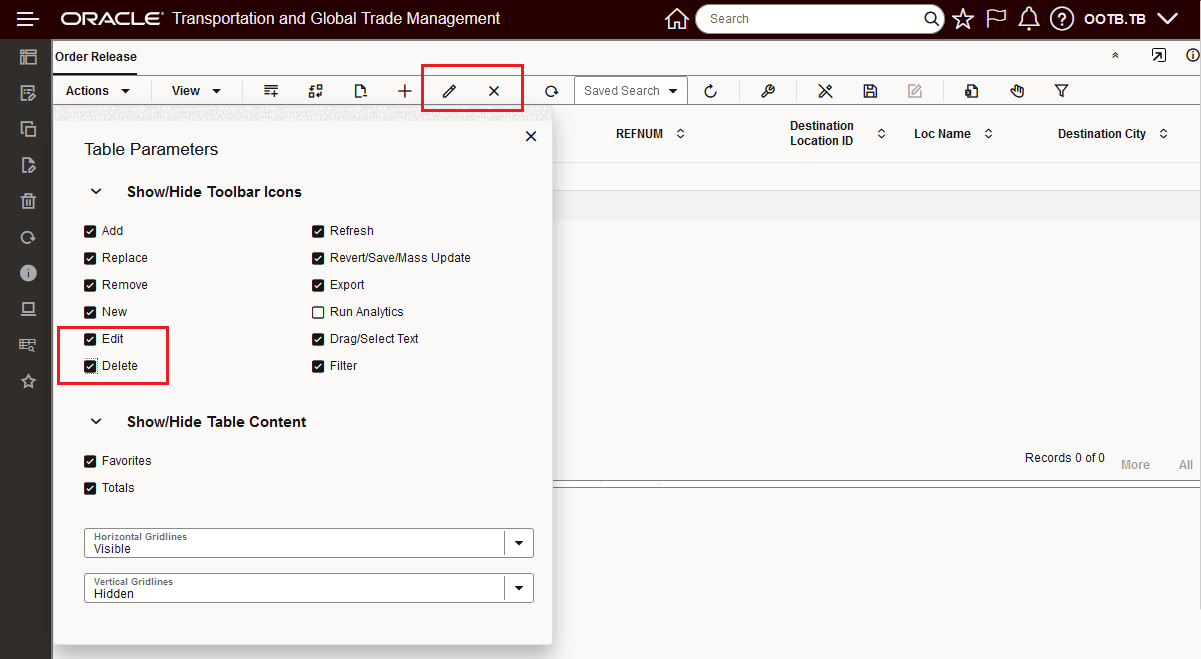
Show Both Edit and Delete
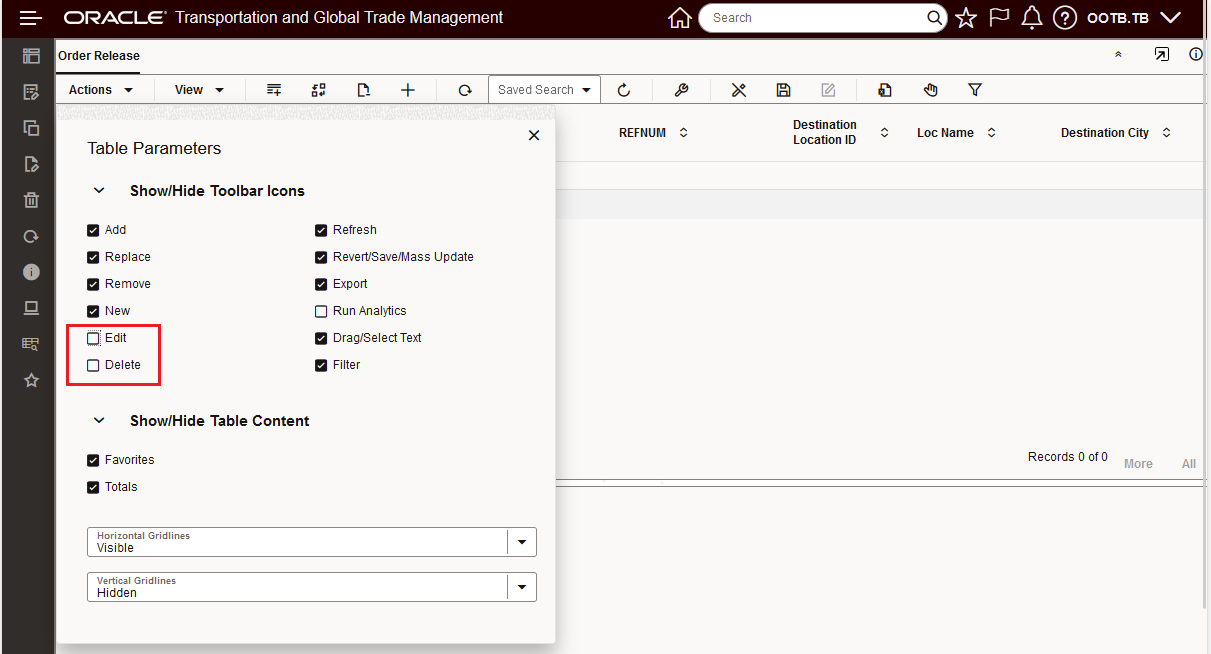
Both Edit and Delete Hidden
Drag/Select Text - Copy and Paste Table Text Option
This feature allows you to Toggle between having the Left Mouse button initiate a Drag and Drop action or having the Left Mouse button support the ability to Select Text for you to Copy and Paste. The Table Parameter Drag/Select Text controls this feature.
By default the Parameter is set to Drag and Drop mode, but you can toggle to Select Text mode by selecting the Drag/Select Text icon as shown below.
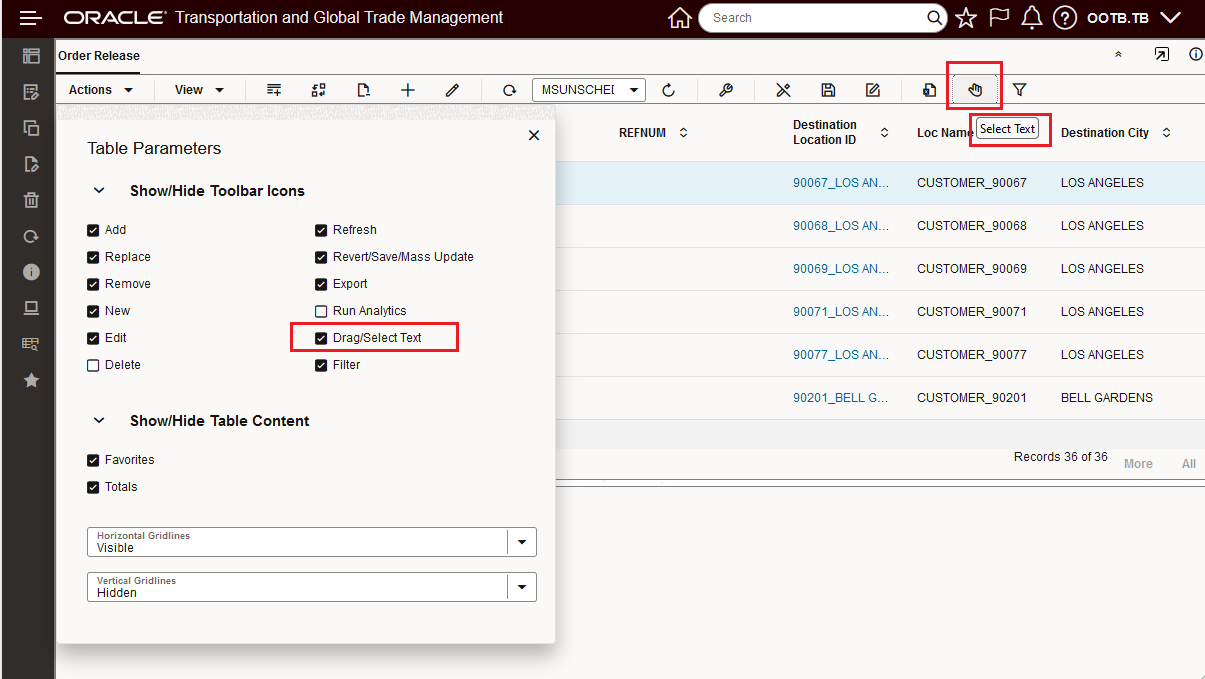
Drag/Select Text
In the image below, the Drag/Select Text parameter is setup for the Select Text mode - allowing you to select text and cut and paste.
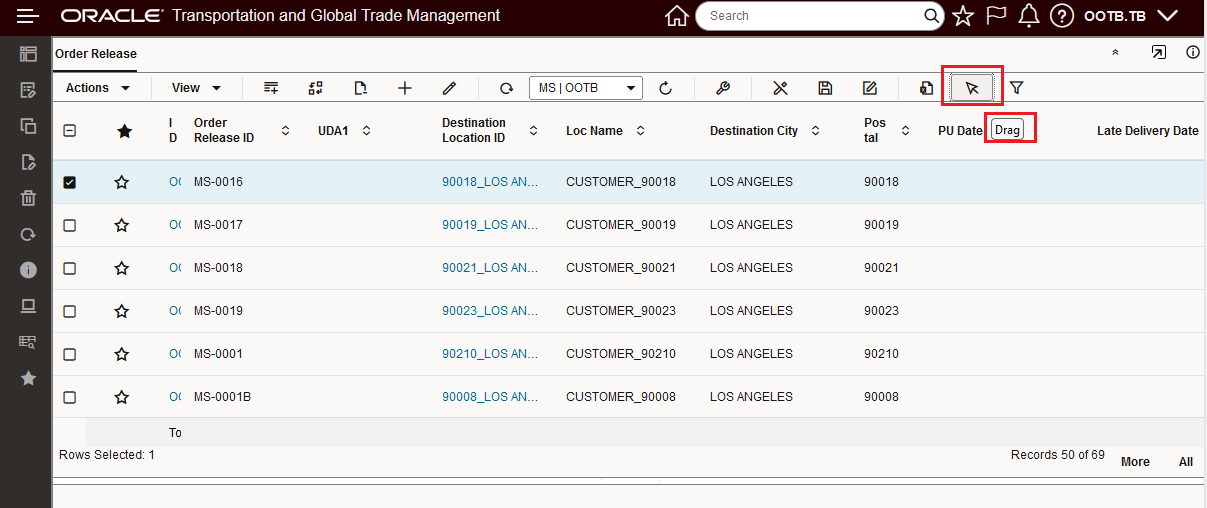
Select Text - Note Drag is the Toggle Option for Select Text
With the left Mouse Button in Select Text mode, for this example, the Destination Location ID is selected, then doing CTRL-C copies the select text.

Select Text
Then the selected text from above can be pasted into a field, for this example the UDA 1 field is used to paste the copy issued above into the field via paste/CTRL-V.
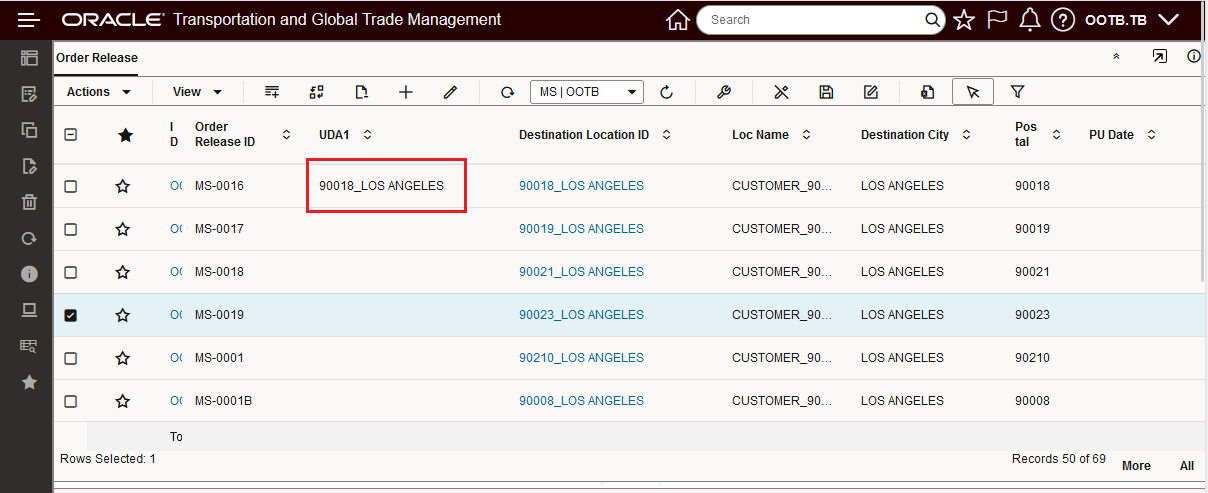
Paste
GTM - Work Queue Available
This feature enables you to use work queues with the Enhanced Workbench. You can configure the following objects to use Work Queues with the Enhanced Workbench:
- Contacts
- Parties
- Items
- Trade Transaction Lines
For more information see the GTM What's New Feature - WORK QUEUE AVAILABLE IN ENHANCED WORKBENCH
Highlight Selected Table, Gantt, Maps
This feature improves the highlighting done across components (Table, Map, Gantts) for selected objects. In the example below, the selected shipment is highlighted in both the Gantt and the Map. The improved highlighting is provided for the Shipment, Driver, and Work Assignment Gantt.

Improved Highlighting Across Components Table, Gantt, Map
Drag and Drop - Shipment Stop Table to Appointment Gantt and Shipment Table to Driver Gantt
This feature provides you with a Drag and Drop experience for your Shipment Table to Driver Gantt and your Shipment Stop to Appointment Gantt tasks.
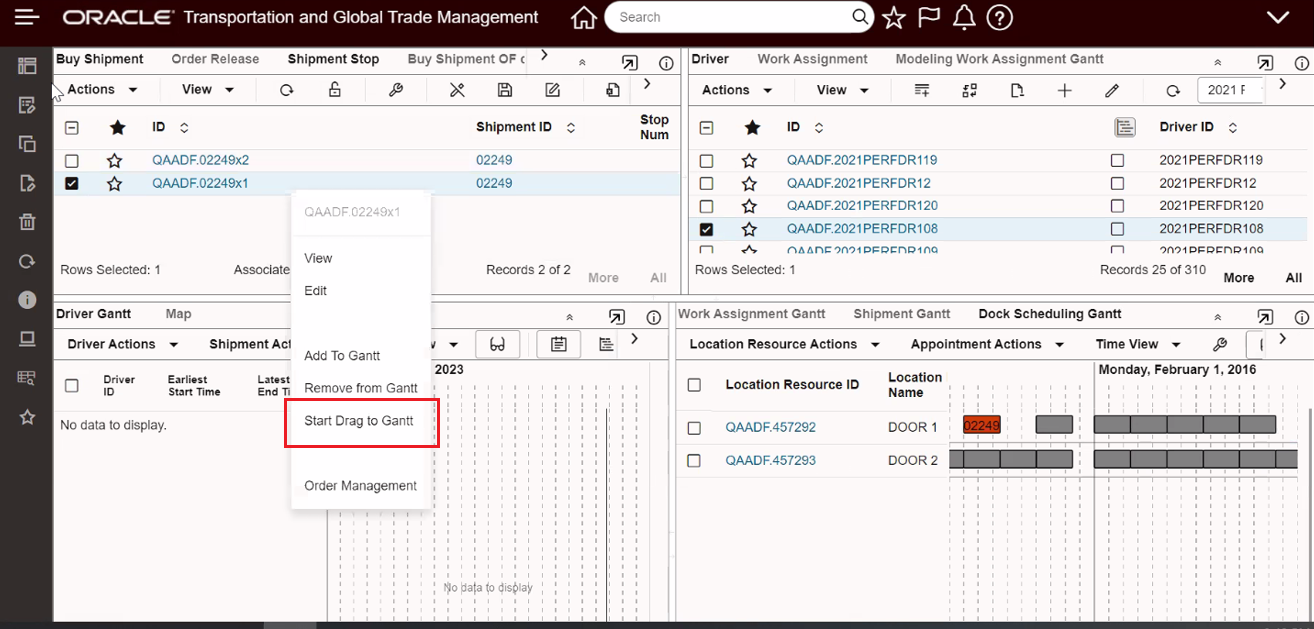
In the example below - a Shipment is selected in the Shipment Table, then via a Right Click, the Action menu is invoked - selecting the action Start Drag to Gantt initiates the Drag and Drop process for the selected Shipment. Once initiated, the interaction follows the normal Drag and Drop operation - select and Drag the selected Shipment using the Left mouse, and then Drop the Shipment on the Driver who you wish to assign the shipment to.

Shipment Table to Driver Gantt - Start Drag to Gantt
The Drag initiated above for Shipment 02131 was dropped on the Driver 2021PERFDR109 with a 9:17 Start Time.

Drop Shipment on Selected Driver in Driver Gantt
In the example below, a Shipment Stop appointment is scheduled using Drag and Drop. Again, the Shipment Stop is selected and the process initiated by selecting the Shipment Stop in the Shipment Stop Table using a Right Mouse Click, then selecting the Start Drag to Gantt action, and then Dragging to and then Dropping the Shipment Stop (with Left Mouse) to the desired appointment slot on the Appointment Gantt.
Select the Shipment Stop From Shipment Stop Table Start Drag to Appointment Gantt
The Shipment Stop is dropped at the desired Slot and Time - for the selected Location Resource.
Drop Shipment Stop on Selected Appointment Slot
Appointment Gantt - General Usability Improvements
This feature provides some usability improvements for the Appointment Gantt.
- The Screen Set columns is now being honored in the Location Resource table portion of the Appointment Gantt. This includes honoring the following settings from the Screen Set:
- GID column width
- Sort Order
- Columns width
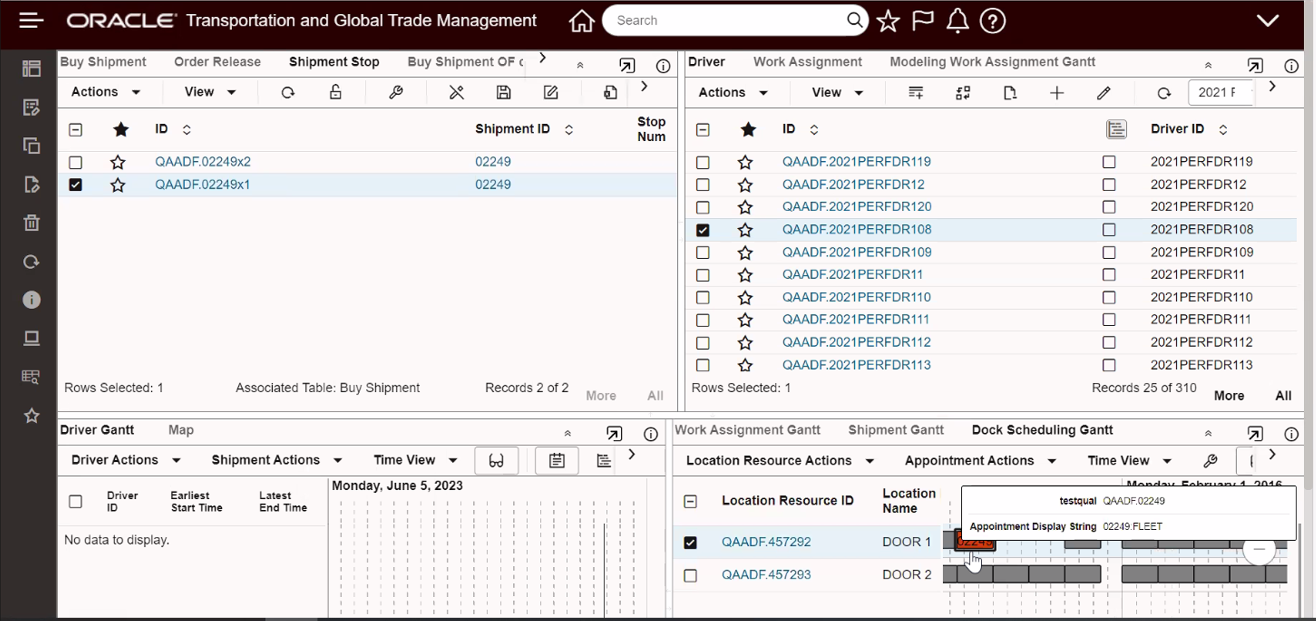
- The Appointment Display String is now being honored.
Other Improvements
Shipment and Order Release pseudo fields are now editable in Enhanced Workbench, providing you with equivalent behavior between the Shipment/Order Release screen set usage in the Finder and the Enhanced Workbench.
New Component Type – Shipment Timeline
This feature provides you with a new Component Type - Shipment Timeline, that can be used to display the Events for a Buy Shipment on a Timeline.
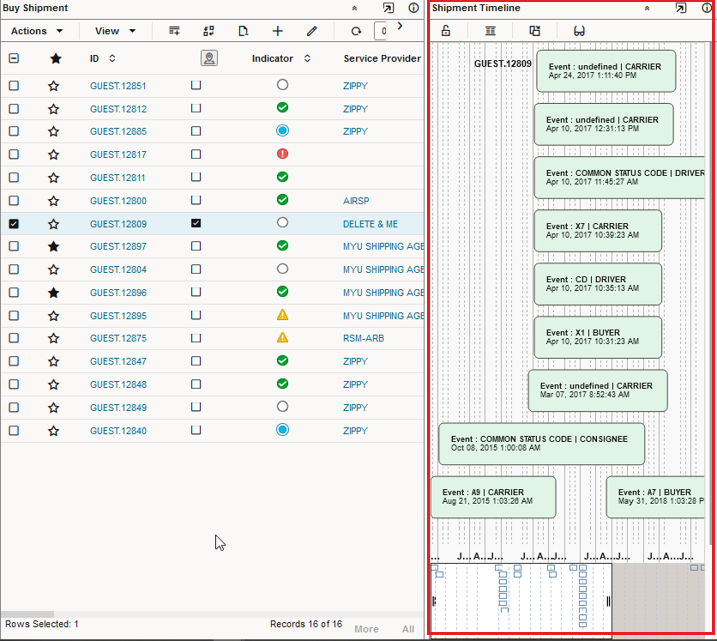
Shipment Timeline
To add the Shipment Timeline to your Enhanced Workbench you will need to:
- First - Add the Buy Shipment Table to the desired workbench:
- Component Type = Table
- Object = Buy Shipment
- Then - Add the Shipment Timeline to the Enhanced Workbench:
- Component Type = Shipment Timeline
- Associated Table = Buy Shipment - the Buy Shipment will be available in the Associated Table drop down list assuming that you added the Buy Shipment to the Enhanced Workbench first.
- Save the Workbench.
- Once setup correctly - the Shipment Timeline will show the Tracking Events for the highlighted Buy Shipment in the Enhanced Workbench.
ALK - Map Move Order Drag and Drop
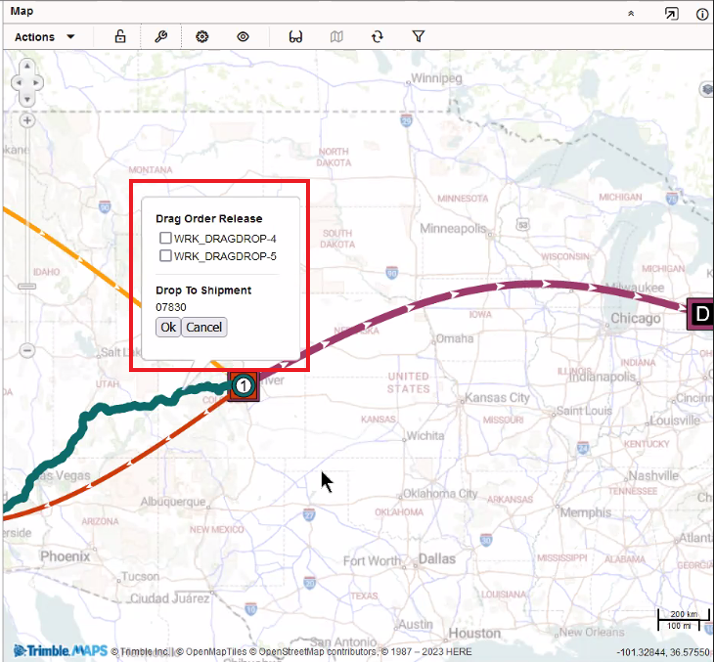
This feature provides - for the ALK/Trimble Map - the ability use a map based drag and drop action to move an order or orders to a shipment.
You initiate the drag and drop action by selecting the order to move with the right mouse. In the example below, order MS-0045 has been selected.
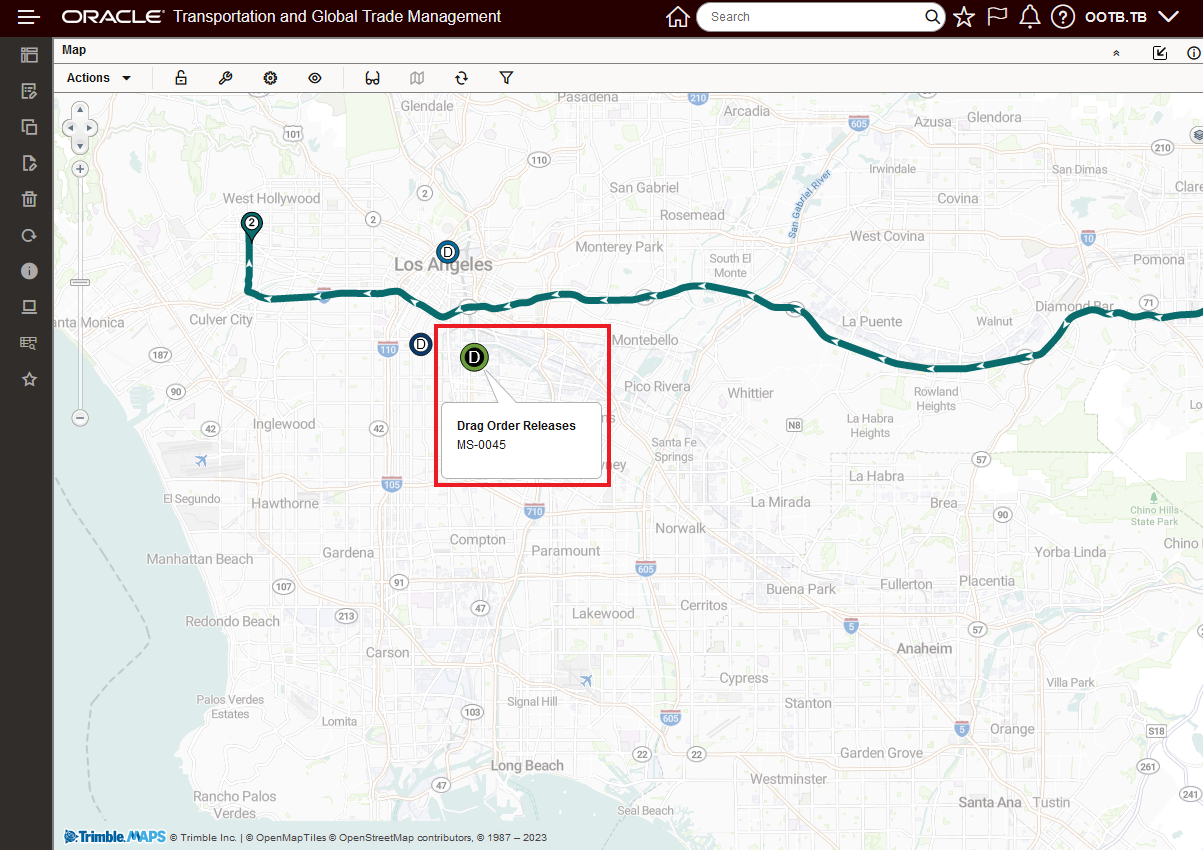
ALK/Trimble Map Drag and Drop Move Order - Select
The selected order is then dragged to the desired target shipment. In the example below, the order is being moved to shipment 24324.

ALK/Trimble Map Drag and Drop Move Order - Drag to Shipment
Before committing the move, the final input is to confirm the move. In this case move order release MS-0045 to shipment 24324.
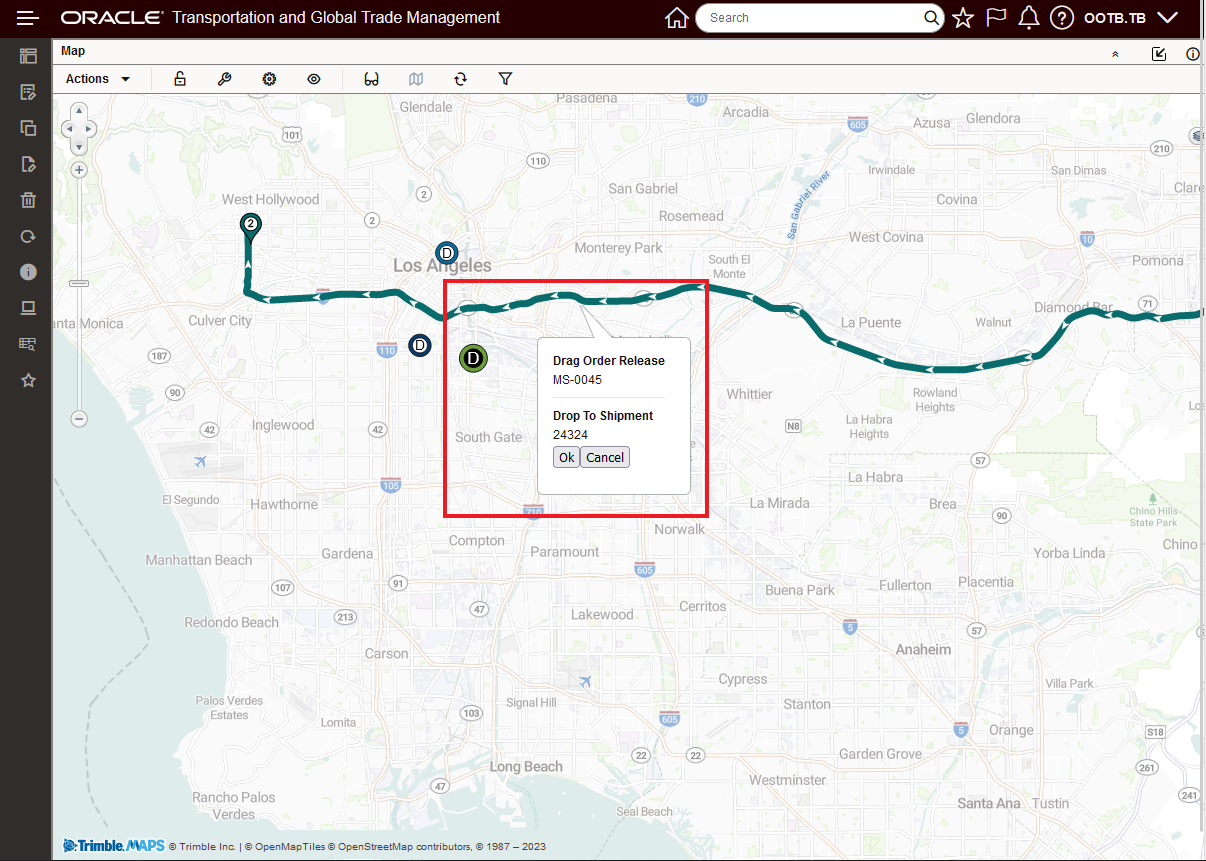
ALK/Trimble Map Drag and Drop Move Order - Confirm Move
Then the result of the move is shown after the map refreshes - as shown below - order MS-0045 is now stop 2 on shipment 24324.
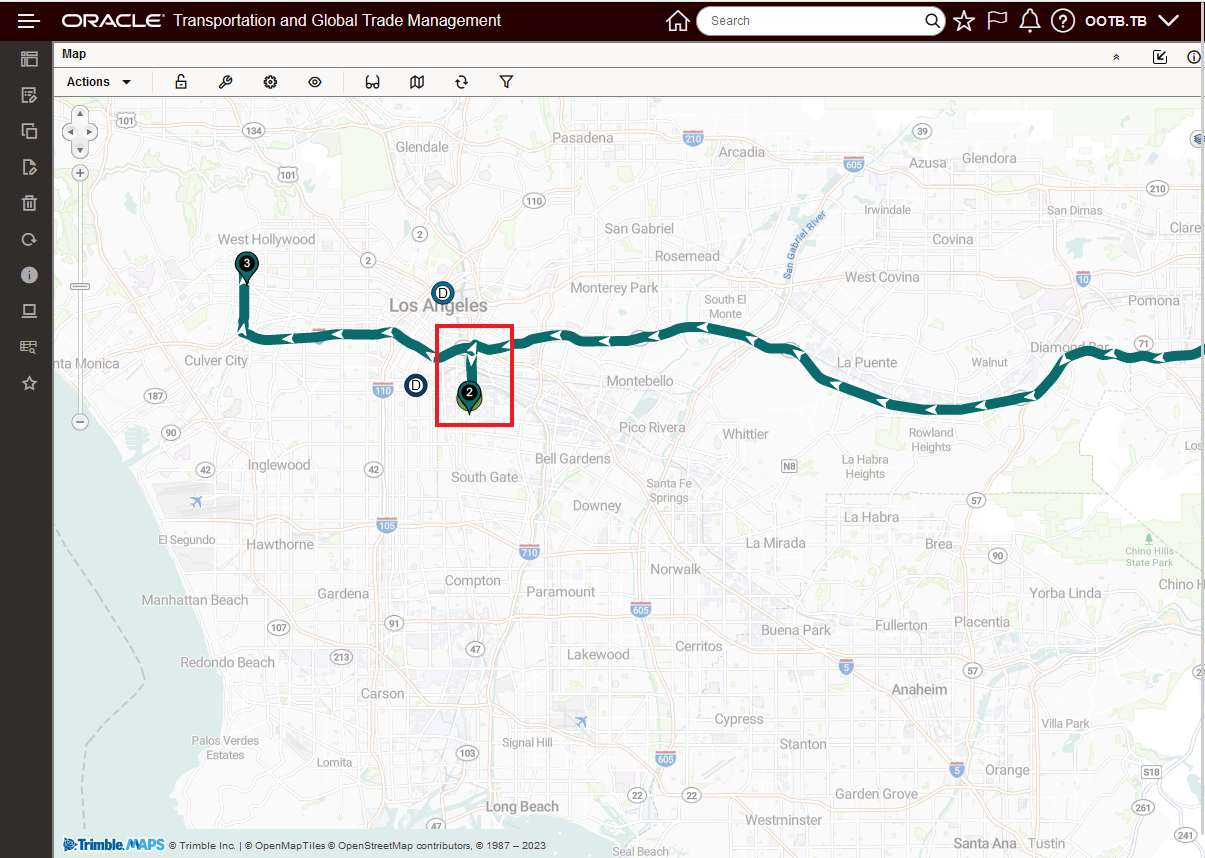
ALK/Trimble Map Drag and Drop Move Order - Move Complete
The drag and drop action also supports the option for multi-select - in the example below, two orders have been selected for the move action.
ALK/Trimble Map Drag and Drop Move Order - Multi-Select Move
This feature provides additional features and usability improvements for the Enhanced Workbench - giving you more options for implementing Enhanced Workbenches to support more use cases and users.
Steps to Enable
You don't need to do anything to enable this feature.
Tips And Considerations
NOTE: The legacy Workbench developed using Oracle Application Development Framework - ADF, has been deprecated and the supporting code for the ADF based Workbenches is scheduled to be removed from the application in an upcoming release. If you have not done so already - you should move to the new Enhanced Workbenches as soon as possible to avoid any issues.
The Enhanced Workbench relies on REST calls to access data, due to the current security infrastructure, the following additional setup is required.
- For users with any role other than ADMIN and DEFAULT the following Access Controls are necessary and can be added to the User Role or directly to the User:
- REST – Workbench
- Workbench – Create
- This is required only for Add/Delete
- Can also revoke the ability to Add/Delete
Manager Layout Enabled Actions: Add Document, Copy Document, Link Document
This feature provides you with new manager layout enabled document actions - Add Document, Copy Document and Link Document.
The original compound document action - Add Document (which supported New, Copy, and Link as options) has been deprecated and will be removed from the application in an upcoming update.
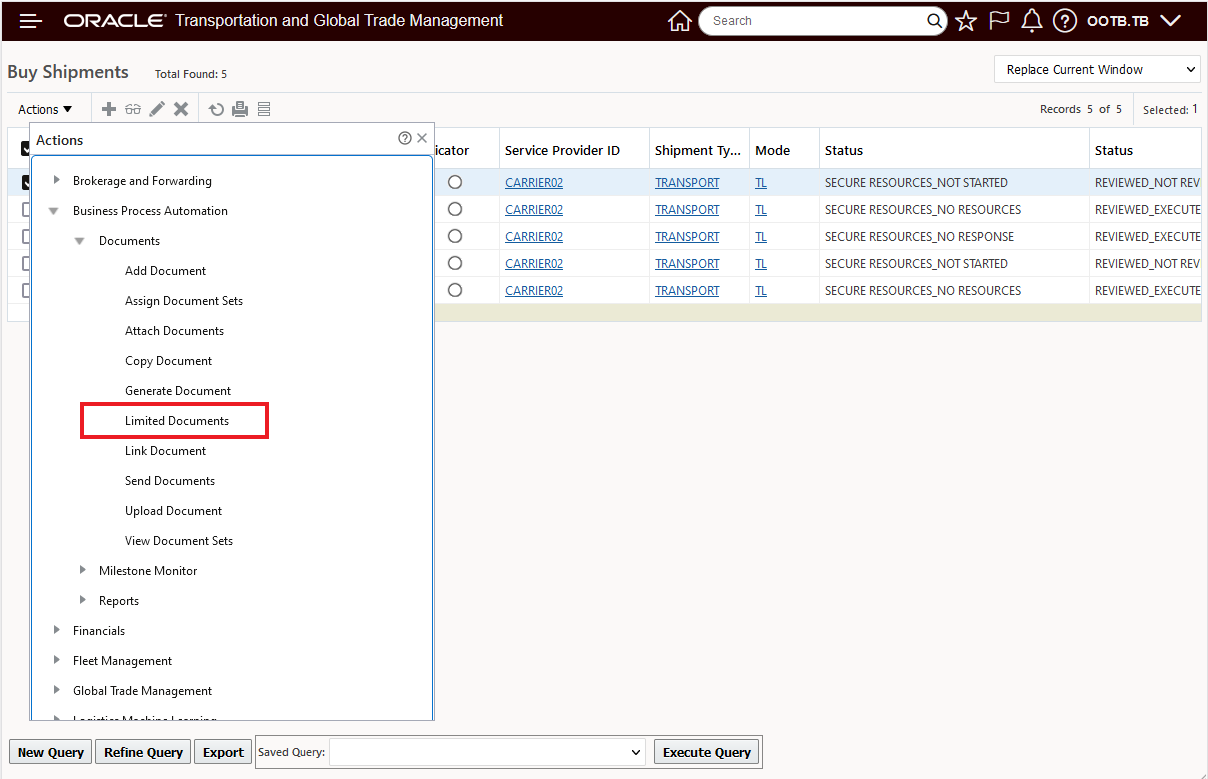
The new menu for the Documents actions is below, Add Document (replaces the old Add Document action), Copy Document and Link Document are now individual actions.

Documents Menu
Copy Document
With the individual actions for each of the document actions - each action is now designed for the action being run. In the Copy Document action - the action has a single input - the Document to be copied.
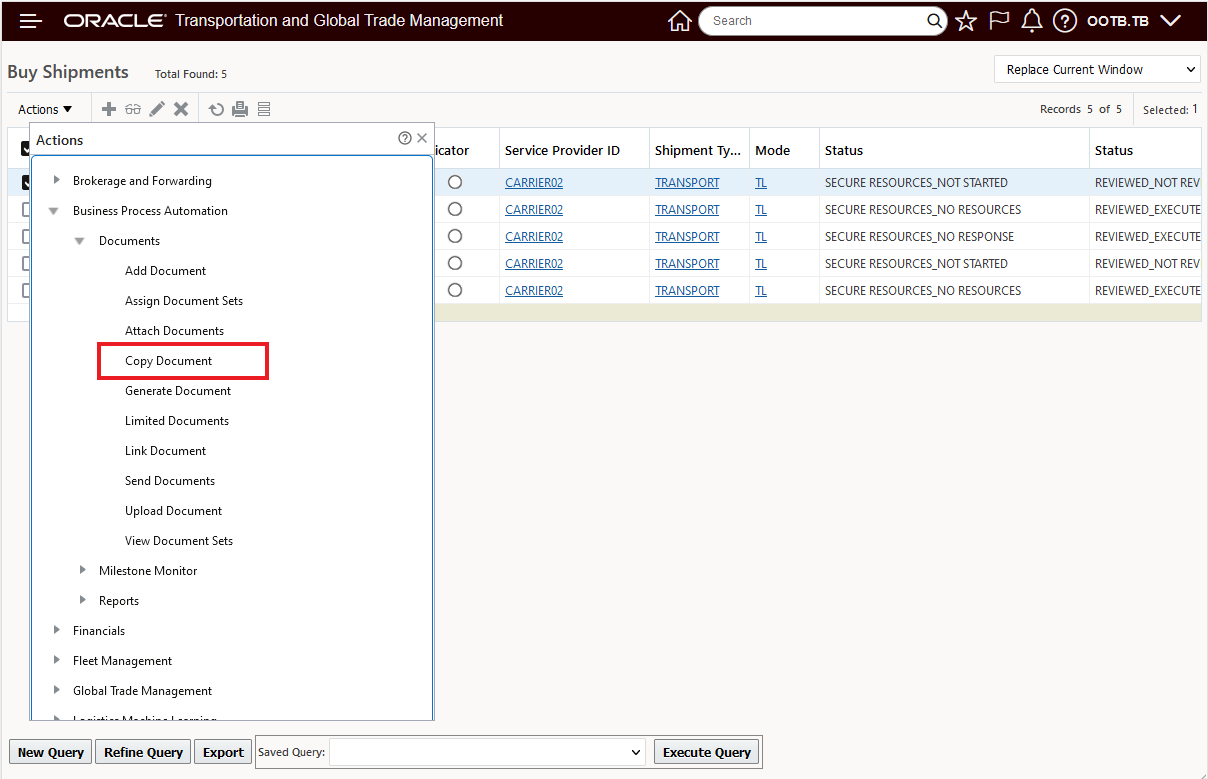
Below is the Copy Document action input, it's limited to specifying the Document to copy.
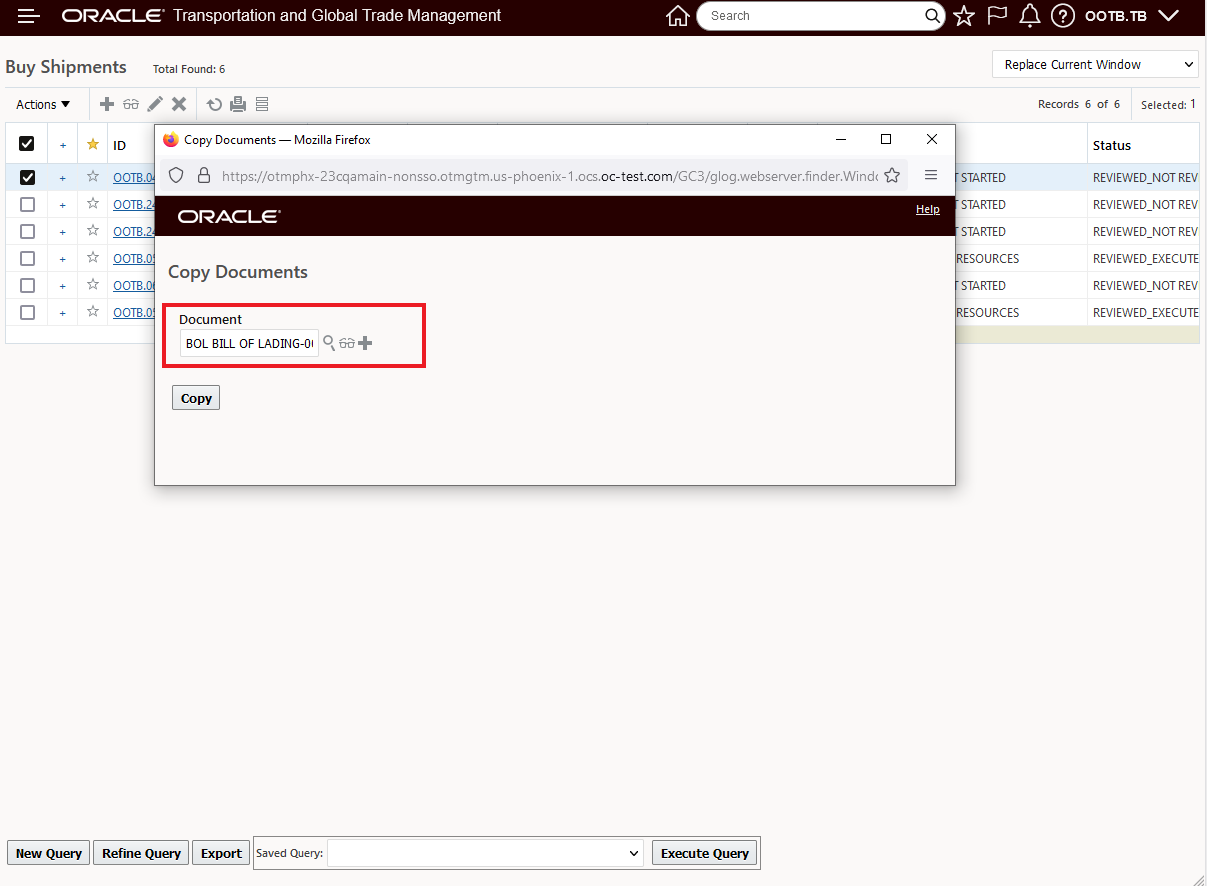
Copy Document Action Input
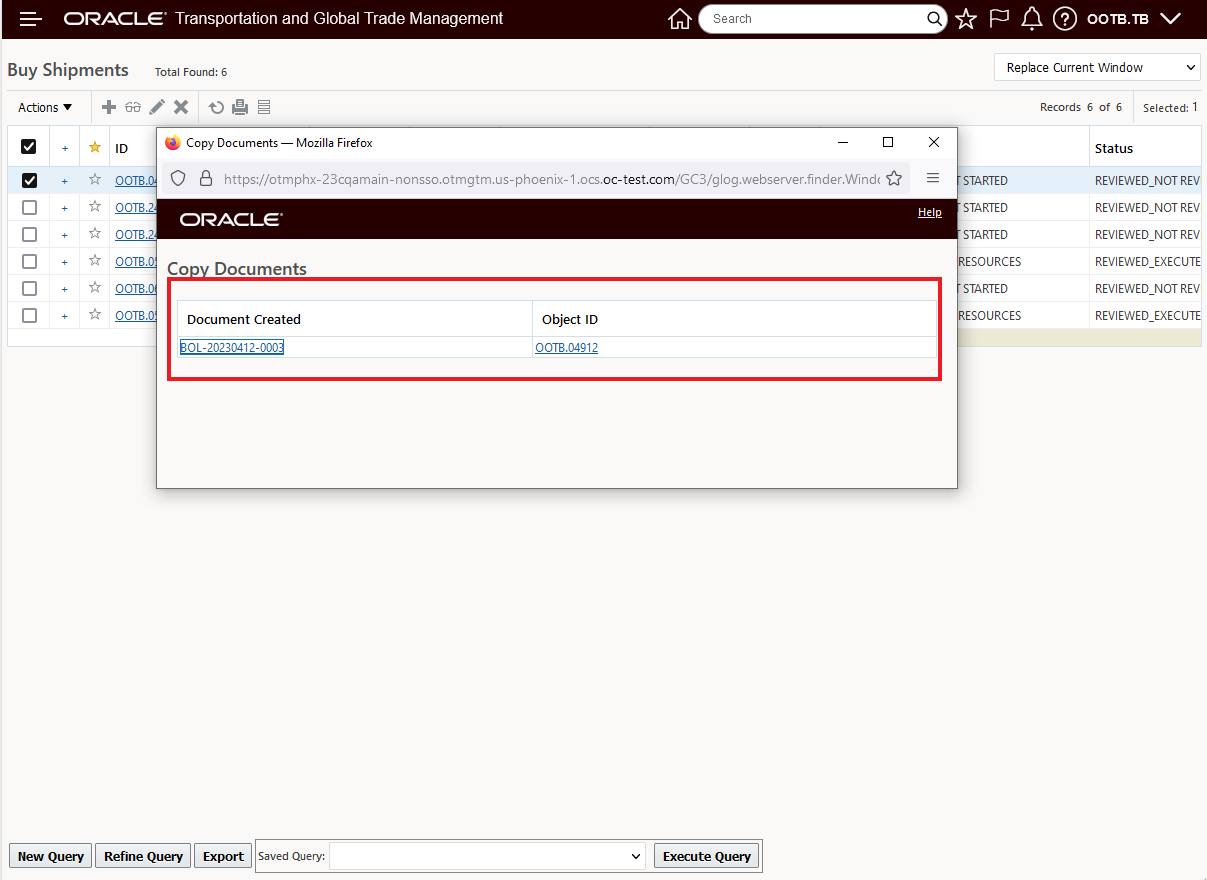
Copy Document Result
Link Document
Like the Copy Document action, the Linked Document action is also tailored to the action's requirements.
Linked Document Action
The Linked Document action has a single input - the Document to be linked.
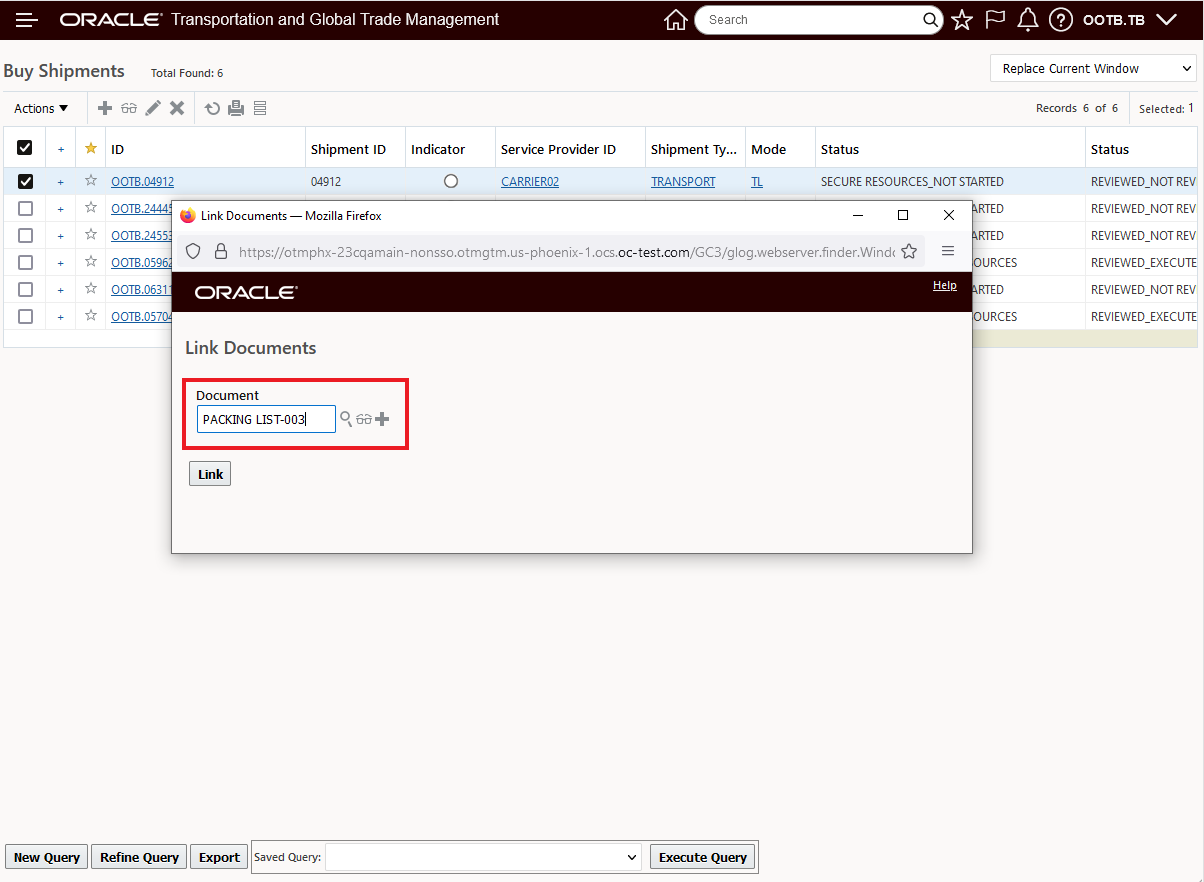
Linked Document Action Input
Add Document
For the Add Document action there are more inputs related to the action - and as such - there are opportunities to take advantage of the Manager Layout enabled capabilities to set defaults (like Document Type), hide fields, move fields and make fields read only etc.
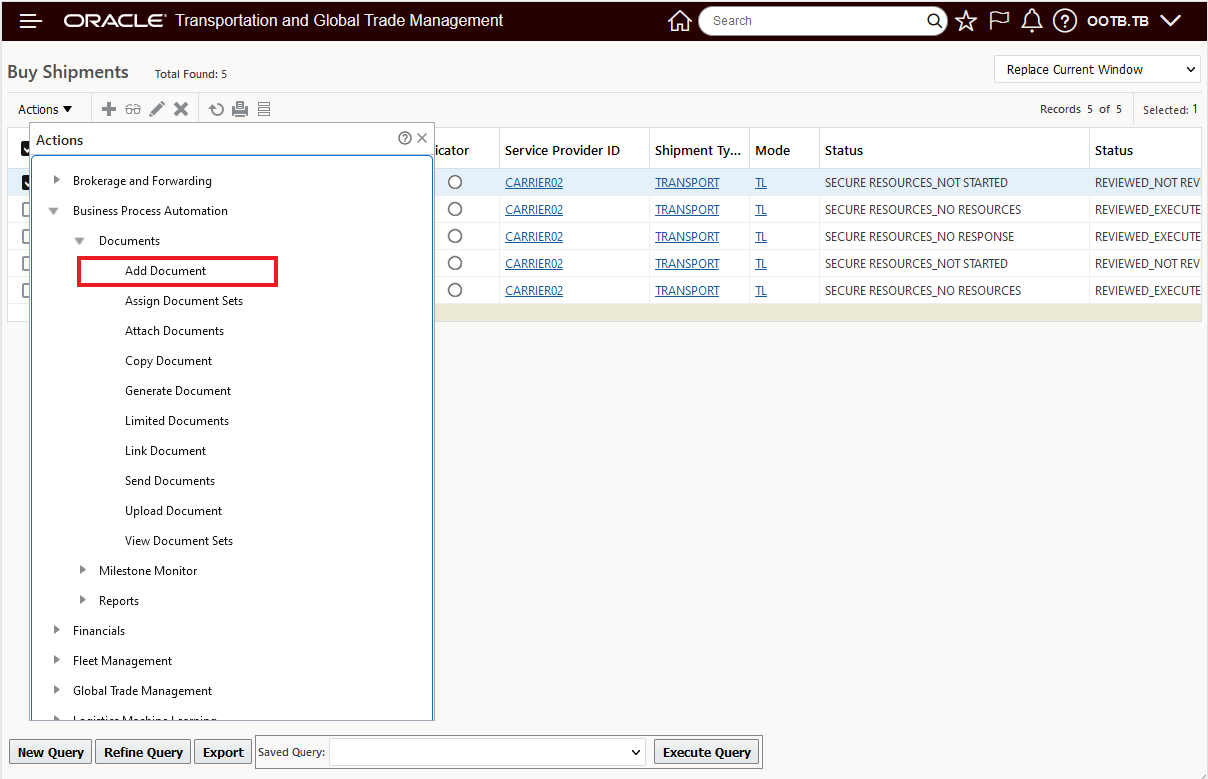
Add Document Action
Below is the standard New Document action input,
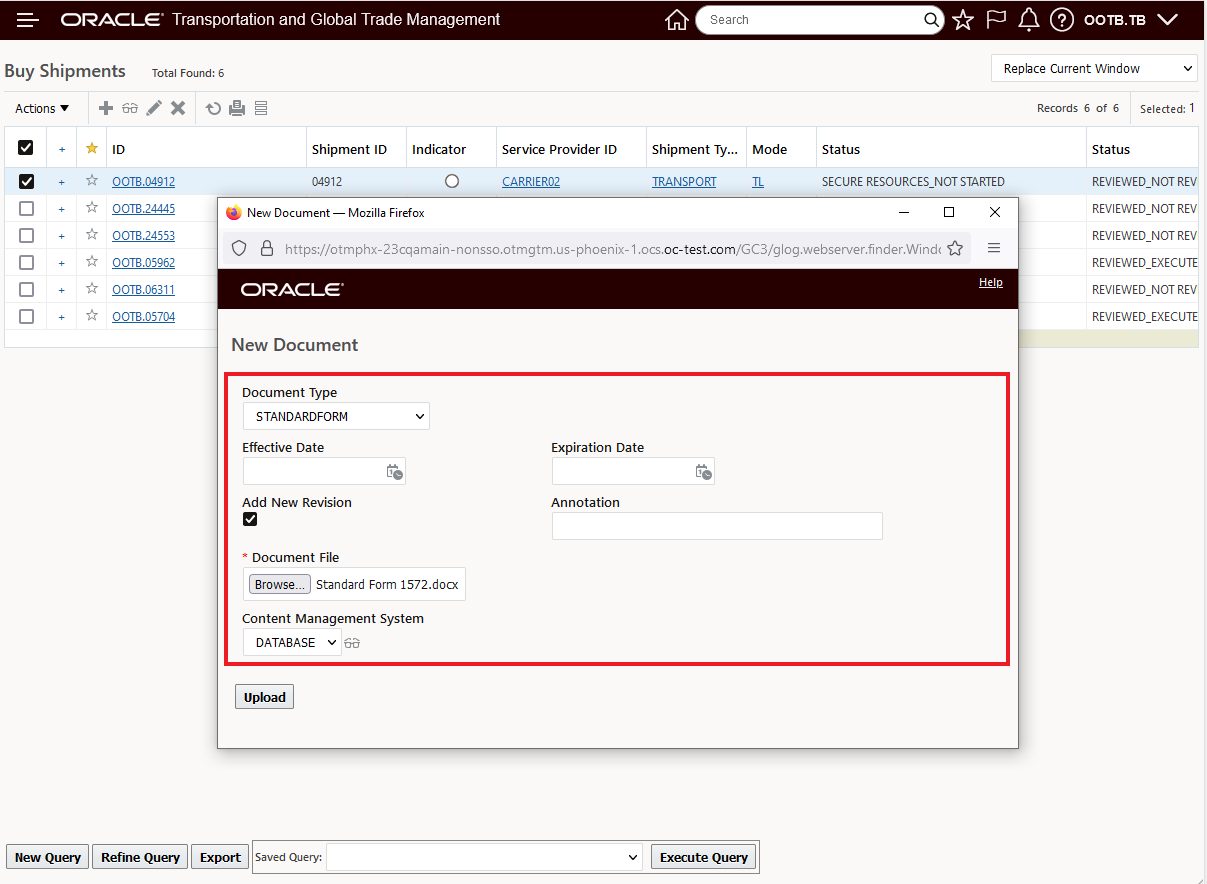
Copy Document Action Input
The New Document action result is below.
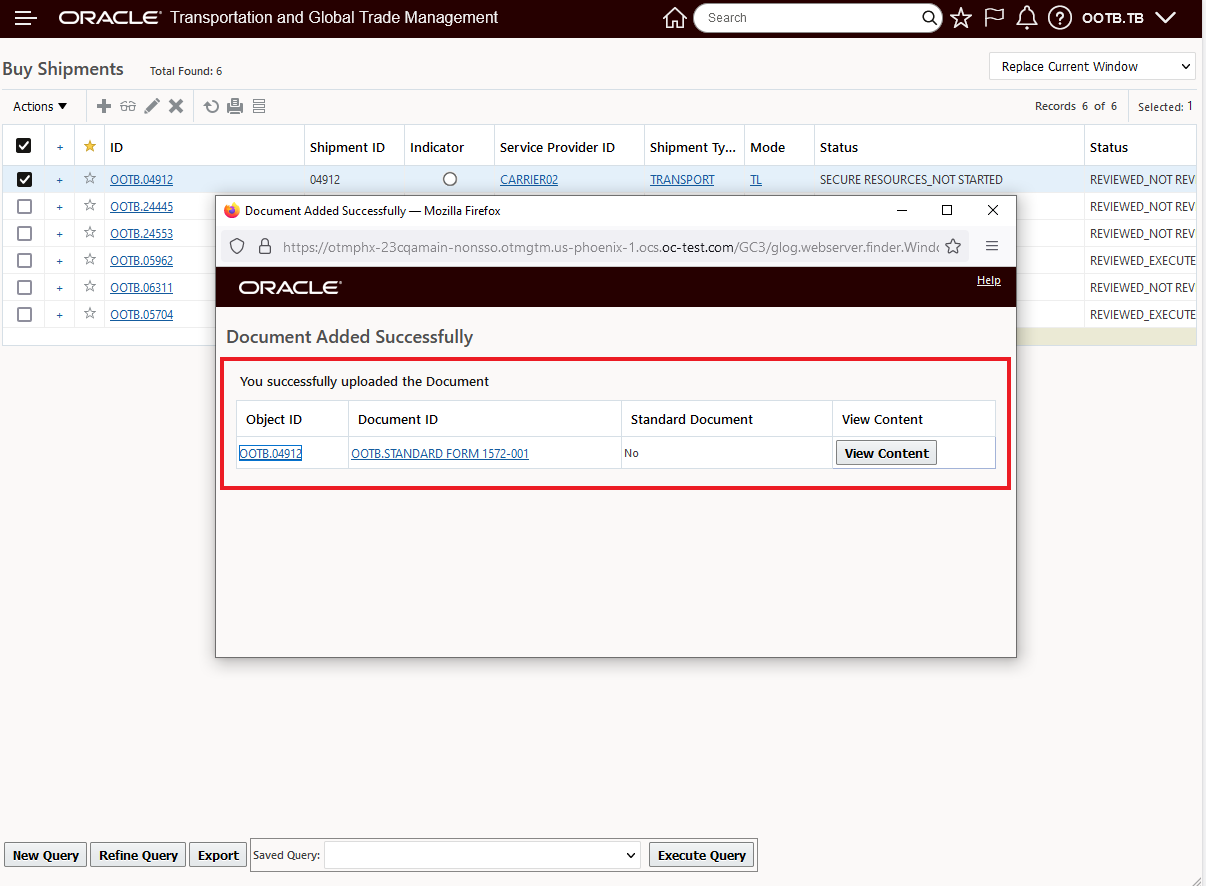
Add Document Action Result
In the example below, the Add Document action has been configured using Manager Layout capabilities. In this example, the fields Effective Date, Expiration Date, Add New Revision and Annotation are hidden.
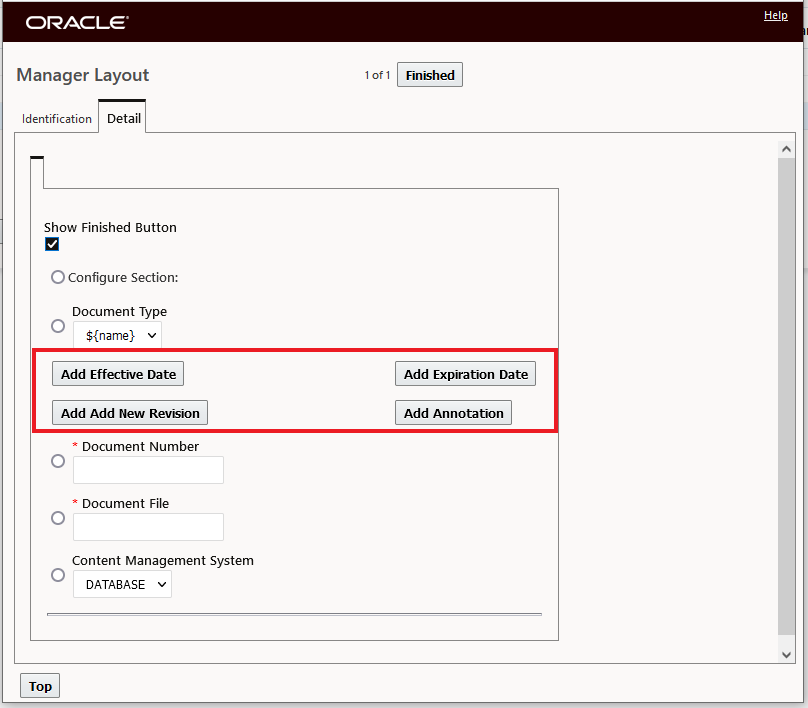
New Document Action - Manager Layout Configuration Change
Below is the Add Document action with the fields Effective Date, Expiration Date, Add New Revision and Annotation hidden.
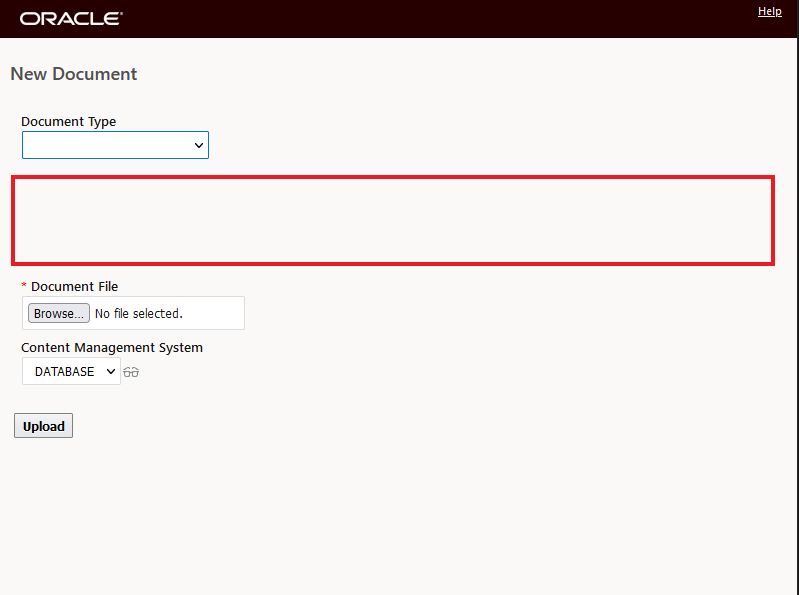
Add Document Action - Configured Action Input Screen
The Manager Layout enabled actions - Copy Document, Link Document and New Document, simplify the inputs by limiting the inputs to each of the actions and provide options to further improve usability by configuring the options using Manager Layout capabilities - i.e. hide unnecessary fields, set defaults etc.
Steps to Enable
To take advantage of the manager layout enabled capabilities provided by the new manager layout enabled actions Copy Document, Link Document and Add Document, you will need to copy the Public Manager Layouts for the action you want to configure, then with the copied version of the Manager Layout you can configure the layout as desired, - hide fields, set defaults, move fields, change labels etc. The Manager Layout functionality is accessed via Configuration and Administration > User Configuration > Manager Layout. After the Manager Layout for the Action is configured you will need to add the configured action to the desired screen set.
Tips And Considerations
NOTE: The Link Document action is not yet available for both the GTM Declaration and GTM Item Origin objects. This is consistent with the capabilities that were available previously for these objects using the now deprecated compound Add Document action, i.e., for these objects, the Link Document option/action was never implemented.
NOTE: You can add the legacy compound action Add Document - renamed to Add Document(Deprecated) to your action menu if there is a reason to do so.
To add back the deprecated Add Document action to your menu, you would need to go to the appropriate non-Public screen set and add the Add Document(Deprecated) to the object's action menus as shown below.
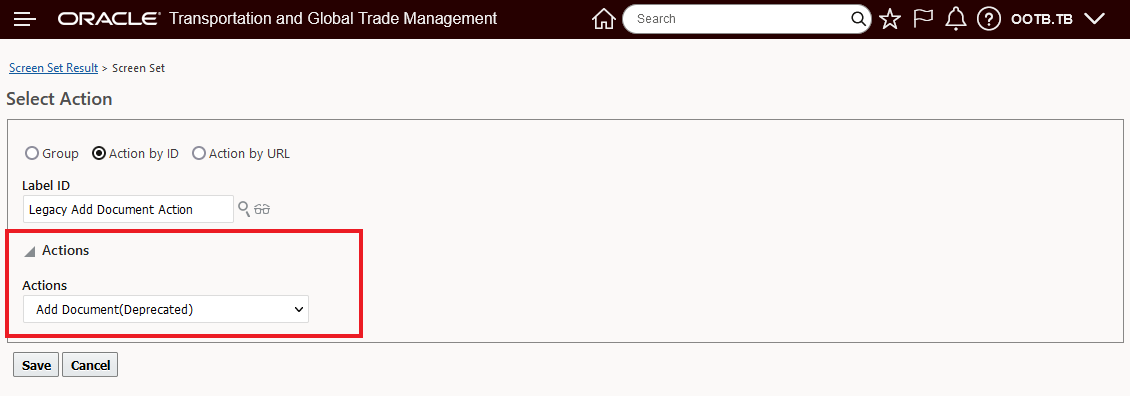
Add Document(Deprecated) Action - Legacy Add Document Compound Action
Data Export REST API - Updated Limits When Run Synchronously
This feature establishes a more restrictive limit for the Data Export REST API when run Synchronously. The Synchronous mode is intended to be used with a single table and with limited volumes. The general usage of the Data Export REST API is intended for Asynchronous processing.
- The more restrictive limits for Synchronous processing are now:
- Time: 30 seconds
- Size: 1MB
The new limits are intended to avoid performance issues related to running the Data Export API Synchronously.
Steps to Enable
You don't need to do anything to enable this feature.
Tips And Considerations
The limits for Asynchronous time and message size are:
- Time: 180 seconds
- Size: 1 GB
Enable Update Operations for External Statuses
This Optional Feature, Enable Update Operations for External Statuses, when enabled, adds REST Services support for Create, Update and Delete for the External Status and Status Values for the business objects listed below.
External Status and Status Value Create, Update and Delete supported objects
- Contact
- Driver
- Order Base
- Claim
- Consol
- Document
- Equipment
- GTM Campaign
- GTM License
- GTM Transaction
- Invoice
- Item
- Location
- Order Movement
- Order Release
- Power Unit
- Quote
- Shipment Equipment
- Shipment
- Tender Collaboration
- Voucher
- Work Invoice
For Create, Update and Delete a check will be done on the Status Type to confirm that it is an External Status Type. Internal Status Types will be treated as a read-only and will be skipped for Create, Update and Delete operations.
Allows for easy update/setting of External Status Types and Values on the supported objects.
Steps to Enable
You don't need to do anything to enable this feature.
Tips And Considerations
To take advantage of this feature, the External Status Types and Values must exists before they can be added to a new object.
Usability, Performance And Stability
The Property Tree provides you (the DBA.ADMIN user) with a logically grouped view into the many properties available within the system. The Property Tree provides you with a vastly improved approach for identifying and understanding the configuration options available using the properties available in the system.
The Property Tree view is available via Configuration and Administration > Property Management > Property Tree.
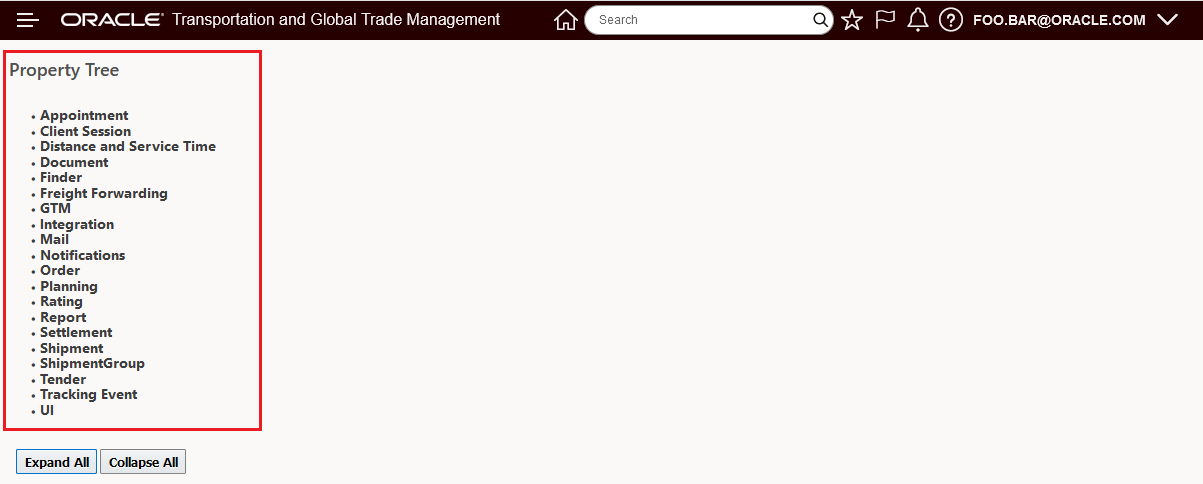
Property Tree Collapsed View
For this update additional Property Tree entries have been provided for:
- Client Sessions
- Finder
- Notifications
- Order
- Planning
- UI
The additional Property Tree entry - Client Session is shown below.
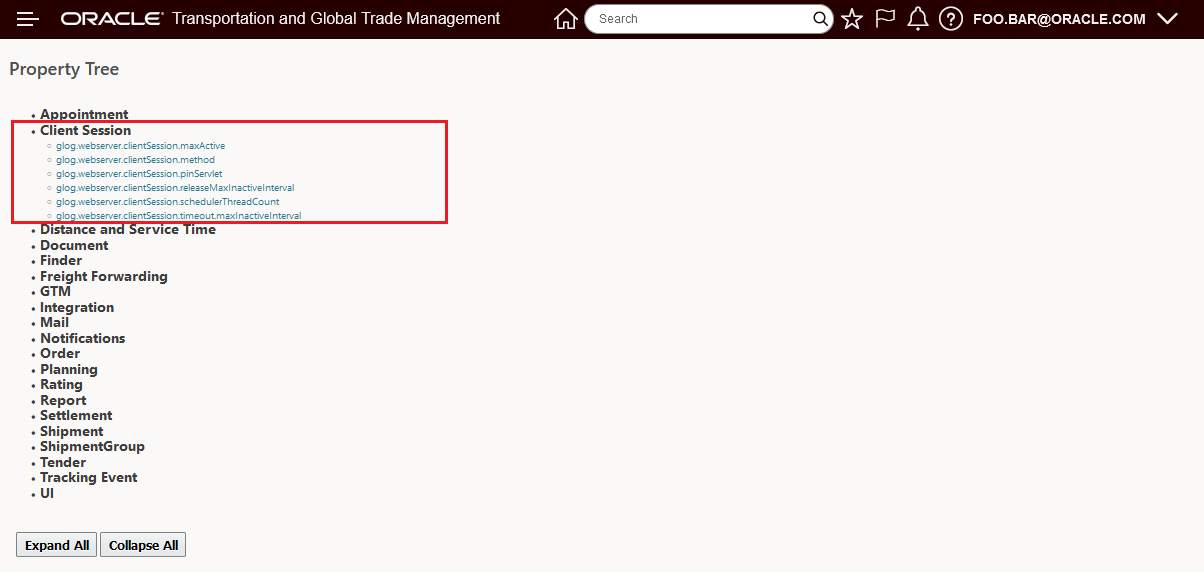
Client Sessions
The additional Property Tree entry - Finder is shown below.
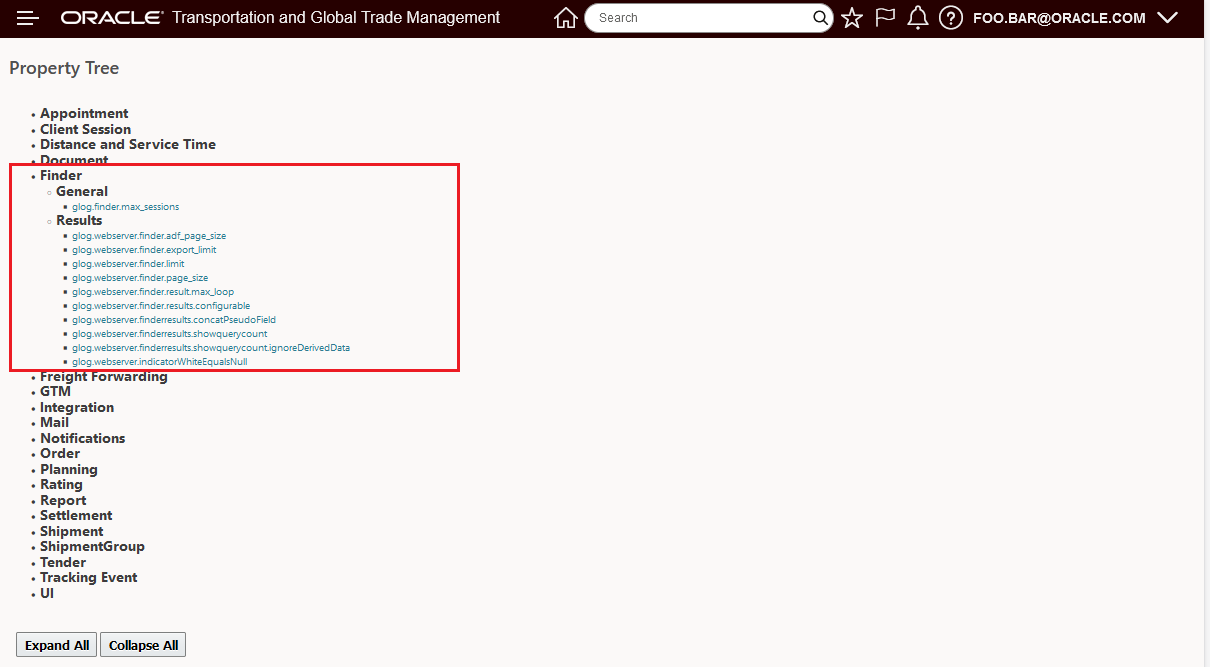
Finder
The additional Property Tree entry - Notifications is shown below.
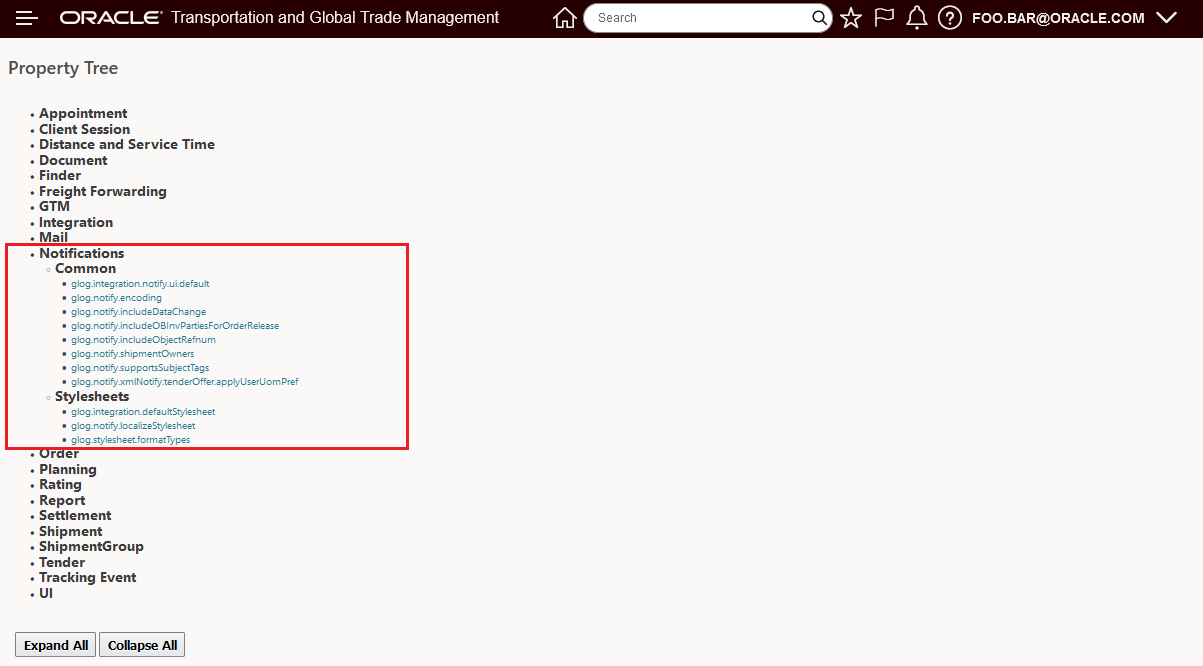
Notifications
The additional Property Tree entry - Order is shown below.
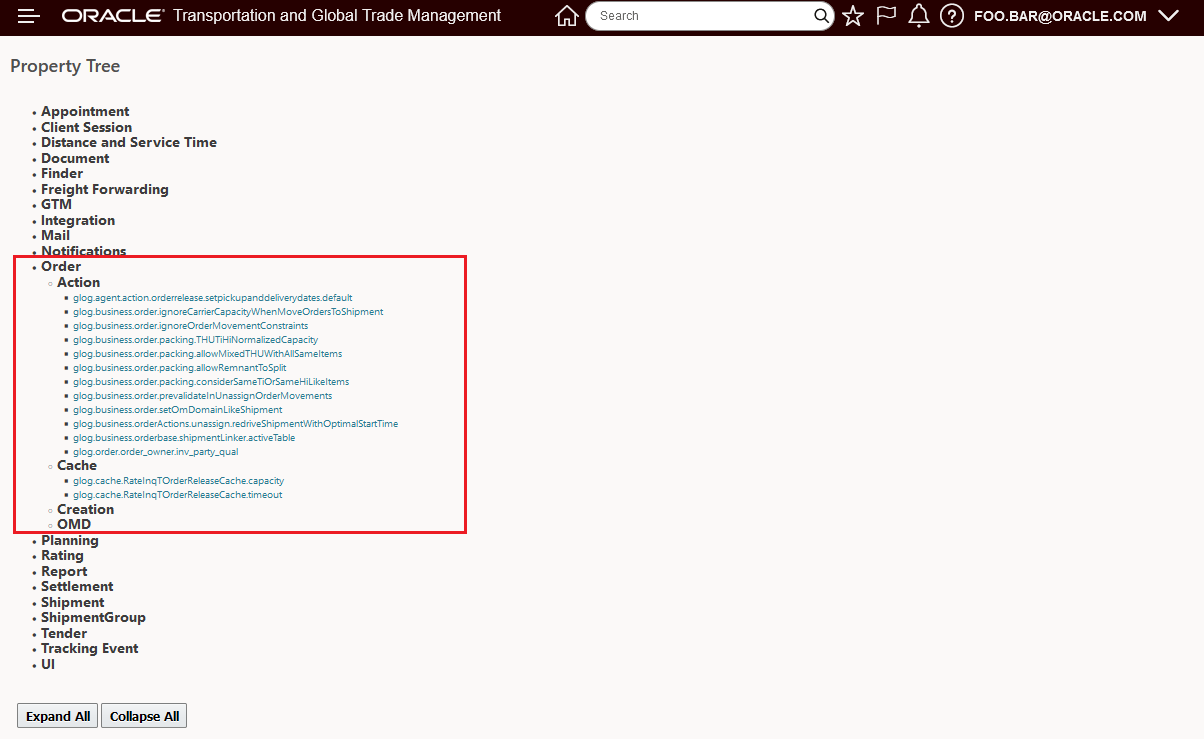
Order
The additional Property Tree entry - Planning is shown below. Note that the coverage for Planning is fairly extensive - so only the 2nd level view is expanded.
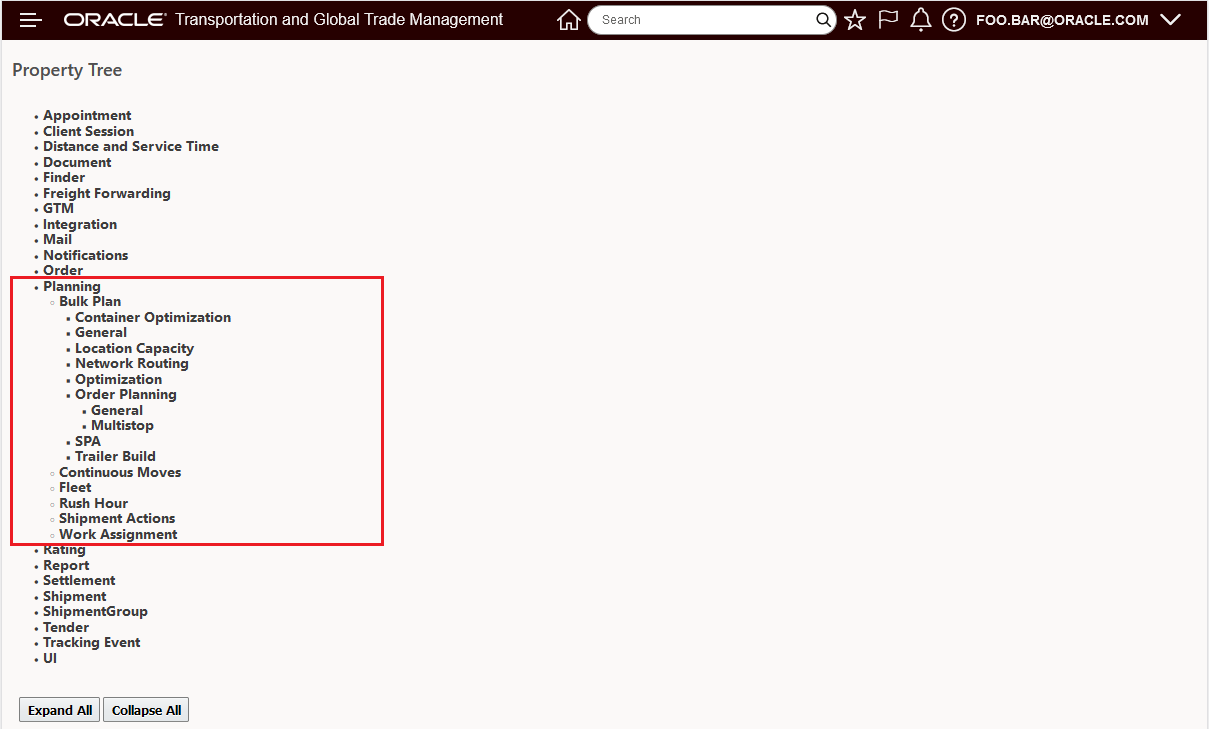
Planning - Sub-level Expanded
The additional Property Tree entry - UI is shown below.
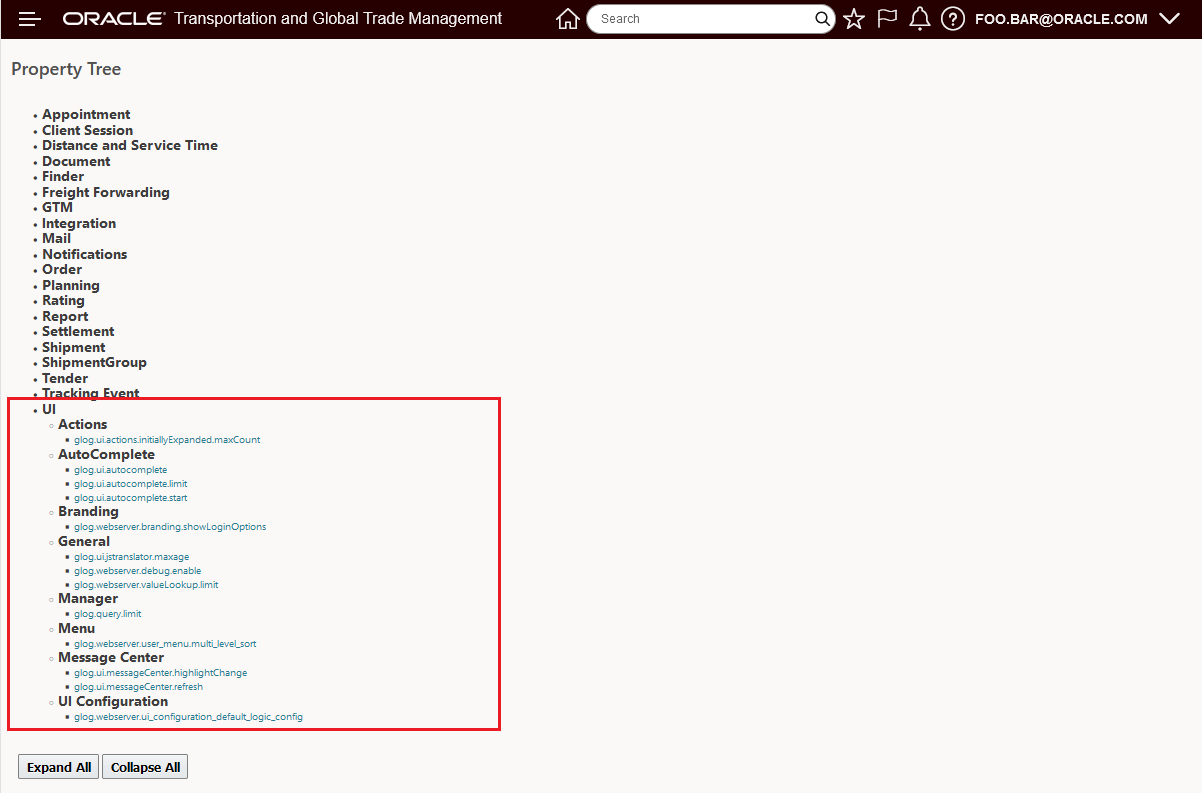
UI
This feature improves visibility to and the understanding of the many available properties in the system.
Steps to Enable
You don't need to do anything to enable this feature.
Tips And Considerations
Only the DBA.ADMIN user can access and use the Property Tree page.
The Property Tree is meant to provide visibility to the more functional properties provided with the application.
UI Infrastructure Usability Improvements
This feature provides a number of UI usability improvements including:
Define Workbench Layouts for Business Monitor Queries (Optional)
In the example below the Business Monitor Query ACCEPTED SHIPMENTS has been configured with the Workbench Layout option configured.

Business Monitor Query Setup with Workbench Layout
With the configuration above, the ACCEPTED SHIPMENTS Business Monitor now includes the icon link to the Workbench Layout associated with the query.
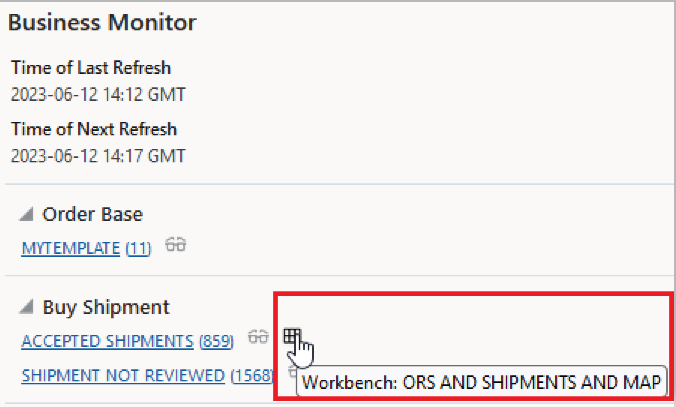
Business Monitor Query with Workbench Layout
The Link ACCEPTED SHIPMENTS will - as usual - Show Result Count and open the search results using the defined Screen Set. The Link to the Workbench will provide more context and information.
Disable Saved Query Edit in a Screen Set
This feature provides you with the option to setup your Screen Sets to allow or not allow access to editing the Saved Query on a Screen Set.
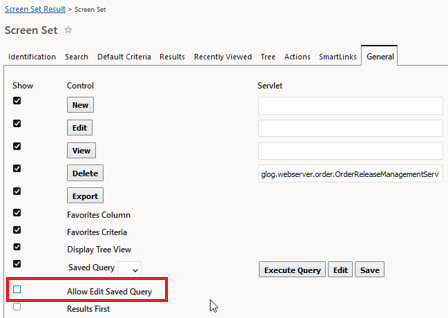
Screen Set Allow Edit Saved Query
The default - unchecked - is to allow for the edit - as shown below - current behavior.

Saved Query Edit Allowed
Selecting the Allow Edit Saved Query will hide/disable the Edit for Saved Queries as shown below.

“One Of” Search Supports Both Comma and Space Separated Lists as Inputs
This feature allows you to define your input list for your One Of searches as accepting Commas or Spaces or just Commas- previous behavior.
The option is available in the UI CONFIGURATION Logic Configuration as shown below. ONE OF SEARCH INCLUDE SPACE - the Default is Commas only, setting the parameter to TRUE allows Spaces or Commas.
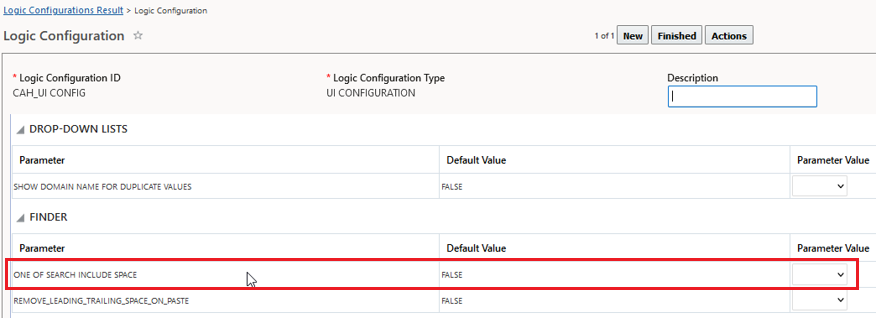
Spaces or Commas
Remove Leading/Trailing Spaces on Paste in Search Criteria
This feature - when configured - removes leading and following spaces for your Search Criteria that you pasted into the finder.
The parameter REMOVE LEADING TRAILING SPACE ON PASTE , controls this option - the default setting is FALSE - spaces are not removed.

Remove Leading Trailing Spaces
When set to TRUE, spaces are stripped when pasted into Search criteria fields. When set to FALSE spaces will remain and be considered as part of that Search criteria
This feature provides options to improve UI Usability.
Steps to Enable
You don't need to do anything to enable this feature.
Domain Settings - Purge Only (No Archive)
This feature is provided to accommodate restrictions related to data retention, with this feature you have the ability to delete data marked for Purge without Archiving the data first - either by domain or for all domains.

Domain Settings
You can select the Purge Only (No Archive) check box to have a domain's data not be archived when it is cyclically purged. In order to use this check box, you must work with Oracle Support. Oracle Support can set the purge capabilities two ways after you contact them.
- The first setting Support can make is to enable non-archiving purging by domain. When set that way, when you select the Purge Only (No Archive) check box, the purge will not archive data. With this setup you have domain level control for whether or not there is no archive when purging.
- The second setting enables the non-archiving purge for ALL domains. In this scenario, the Purge Only (No Archive) check box is NOT functional on the Domain Settings page, since the Support setting applies to all domains. Data in all domains will be purged without archiving.

Error Message
NOTE: If you select this check box, domain data will be completely lost when the two-year purge starts. See the "Purge Only Option" section of the Administration Guide for details.
This feature accommodates restrictions related to data retention; you can now Purge data without Archiving - which eliminates the issue of retaining data for longer than intended in an Archive schema.
Steps to Enable
This feature requires a Change Request (CR) be submitted to enable this feature.
Tips And Considerations
NOTE: Once enabled, with the No Archive option (either by domain or for all domains) - domain data will be completely lost when the two-year purge starts.
Key Resources
- See the "Purge Only Option" section of the Administration Guide for details.
Improve DirLoadServlet Performance
This Optional Feature, when enabled, will improve the performance of updates through DirLoadServlet.
Feature provides will improve system performance for updates running through the DirLoadServlet.
Steps to Enable
You don't need to do anything to enable this feature.
Transportation Management (Base)
This feature provides several improvements to the Spot Bid Tender UI and process.
- The tender email notification sent to your Service Providers can be configured so that the URL embedded in the email will open the Spot Bid Manager for Spot Bid Tenders while all other tender types will continue to link to the Online Booking/Tendering screen.
- The Spot Bid Tender Response screen has been expanded to include additional information about the shipment's origin destination country and along with additional shipment quantity information. In addition, the Ship Units grid has also been added to the Spot Bid Tender Response screen, providing information about ship unit level weights, volume, counts and commodity information.
- A new parameter - FALLBACK RATE RECORD FOR SPOT BID SPOT RATE - has been provided to support the scenario where your Spot Rated Spot Tender shipment is declined/withdrawn and the shipment ends up without an assigned Rate Record - the parameter provides a fallback rate record to support this situation.
Tender Email Links to Spot Bid Tender Screen
When the property glog.tender.spotbid.useNewSpotBidManagerForEmailURL is set to true, the URL link provided in the tender notification email will redirect to the Spot Bid screen instead of the Online Booking/Tendering screen for Spot Bid Tenders.

Property Tree
In the example below, with the property set to the default value, false, the URL Respond Via the Web link provided for this Spot Bid Tender will take you to the Online Booking/Tendering screen.
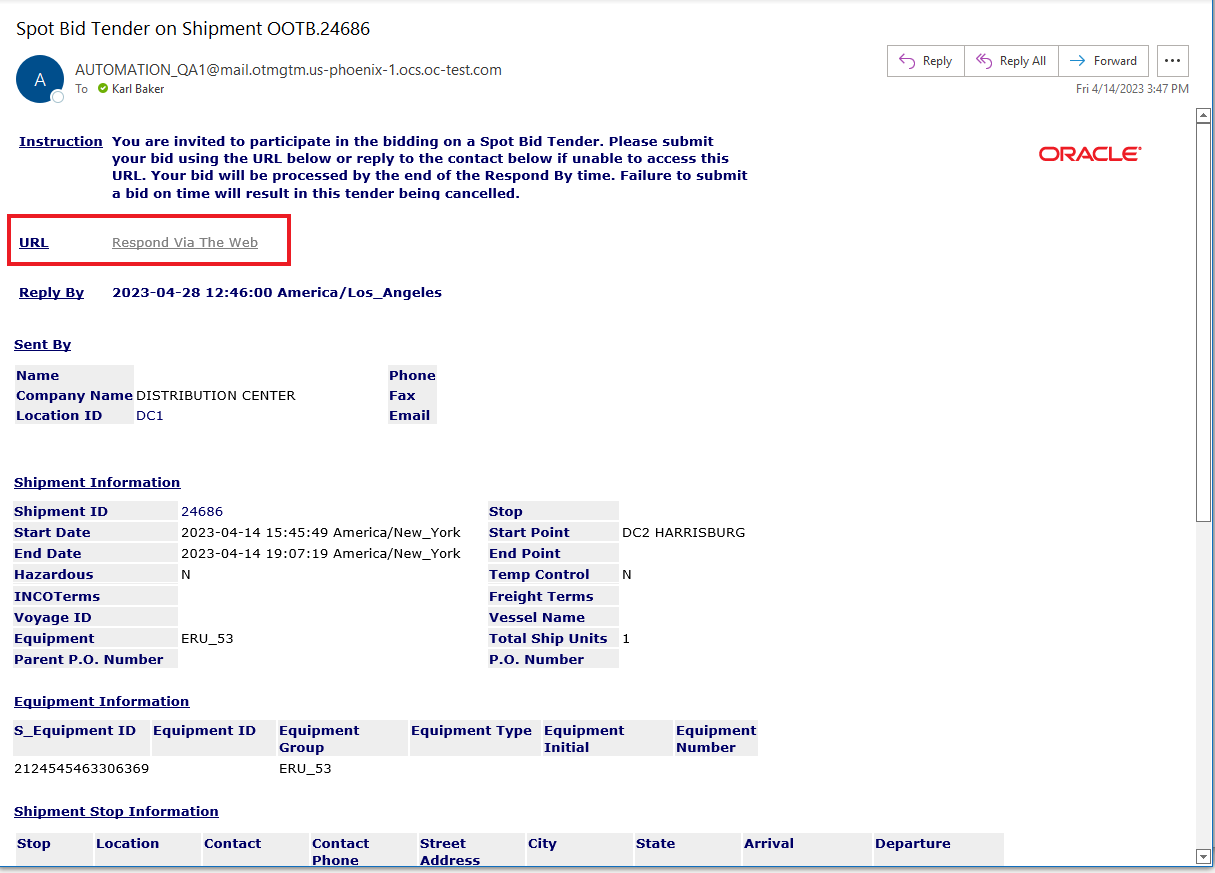
Email Link
When the URL Respond Via Web link is selected, you will be taken to the Online Booking/Tendering screen as shown below, while you can respond to all Tender Types using Online Booking/Tendering screen, the Spot Bid Tender screen has been purpose built for handling the specialized requirements of the Spot Bid Tender process.
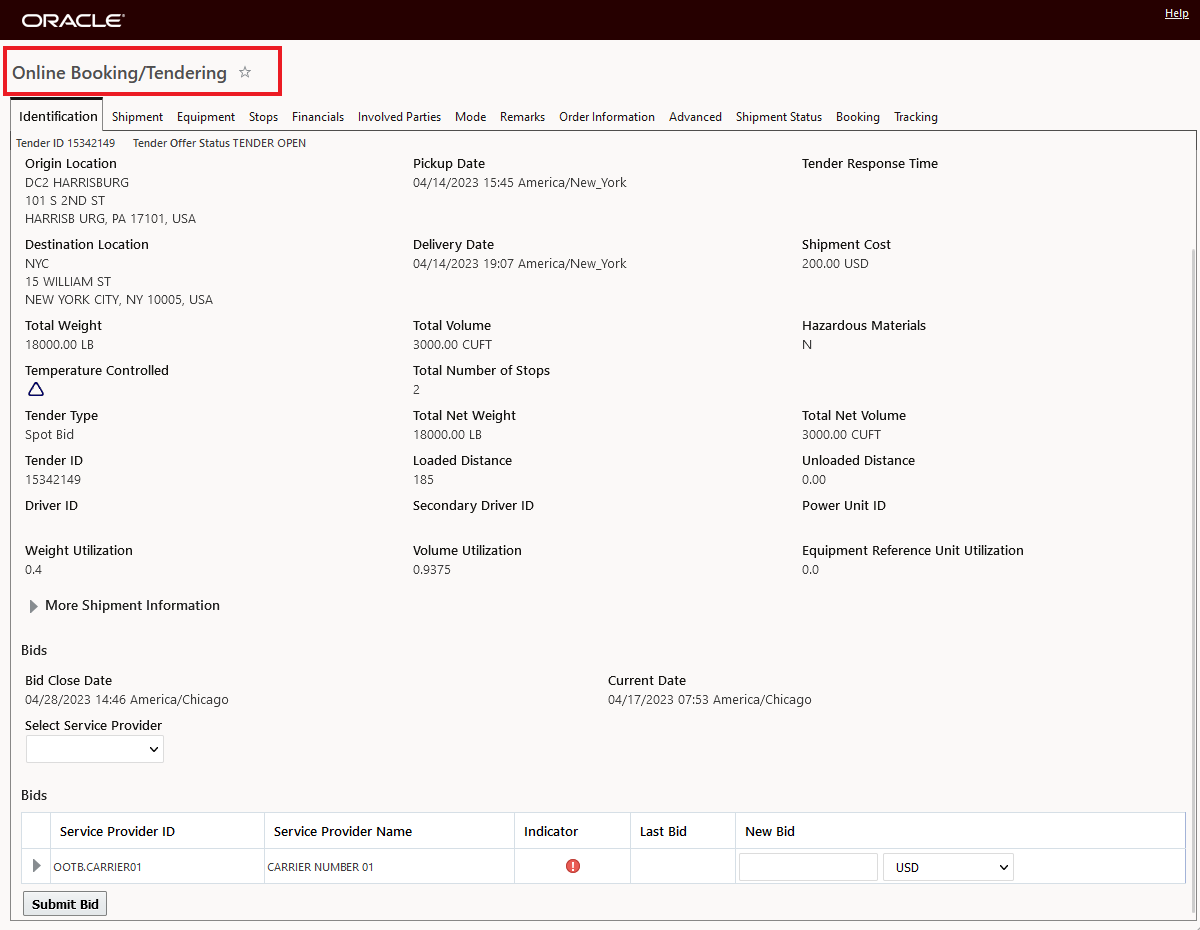
Online Booking/Tendering Screen
When the property glog.tender.spotbid.useNewSpotBidManagerForEmailURL is set to true, the URL Respond Via Web link provided in Spot Bid Tender email notification will redirect you to the Spot Bid screen as shown below. As noted, while the Online Booking/Tendering screen supports responding to all Tender Types, the specialized Spot Bid Tender screen is specifically designed to support the Spot Bid Tender Response/tender process.

Spot Bid Tender Screen
Highlighted below are the improvements made to the Spot Bid Tender Response screen.
On the Spot Bid Tender Response Screen, the following fields are provided:
- Total Weight
- Total Volume
- Total Ship Unit Count
- Origin Country Code
- Destination Country Code

Spot Bid Tender Response Screen Fields Added
The Origin Country Code and Destination Country Code have been added to the Spot Bid Tender Response finder, as shown below.

Finder Fields Added
The fields Total Ship Unit Count, Origin Country Code, and Destination Country Code have been added to the finder results - as shown below.

Finder Results Fields Added
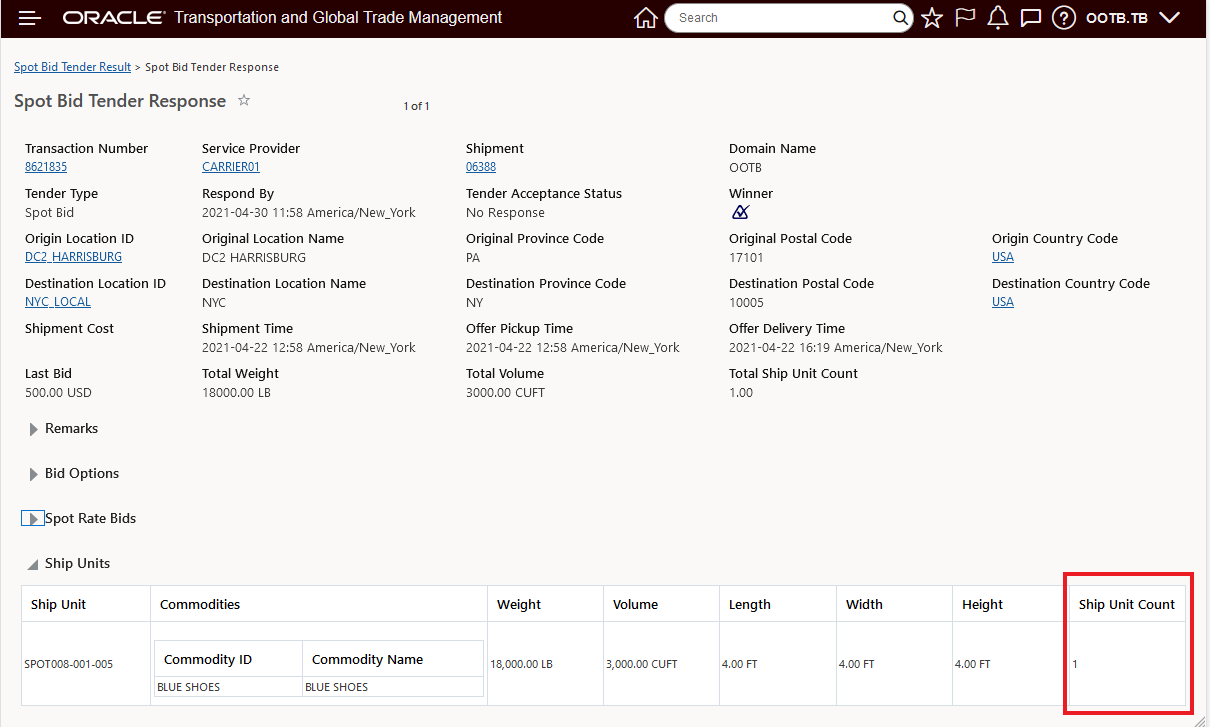
Below is the expanded view for the added Ship Units grid. The Ship Unit grid has been added to both view and edit screens of Spot Bid Tender Response. The grid contains Ship Unit ID, Commodity ID(Item ID) and Commodity Name(Item Name), Weight, Volume, Length, Width, Height, and Ship Unit Count.
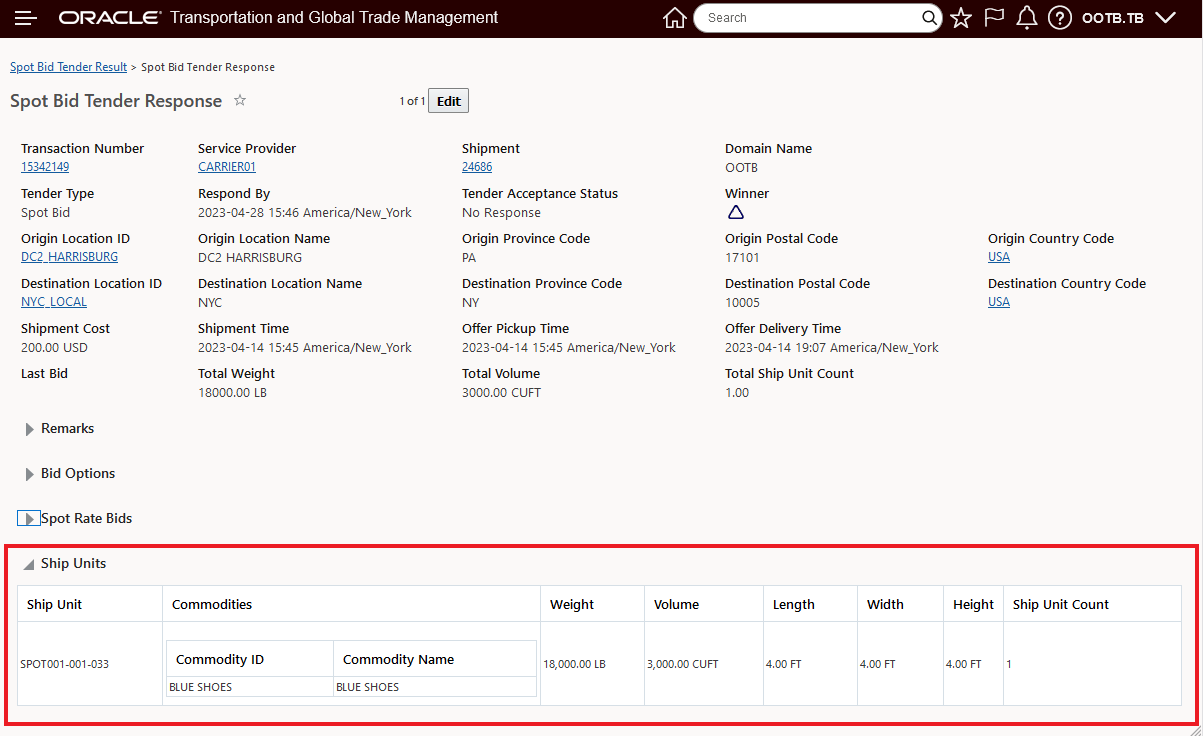
Ship Units Grid - View Screen
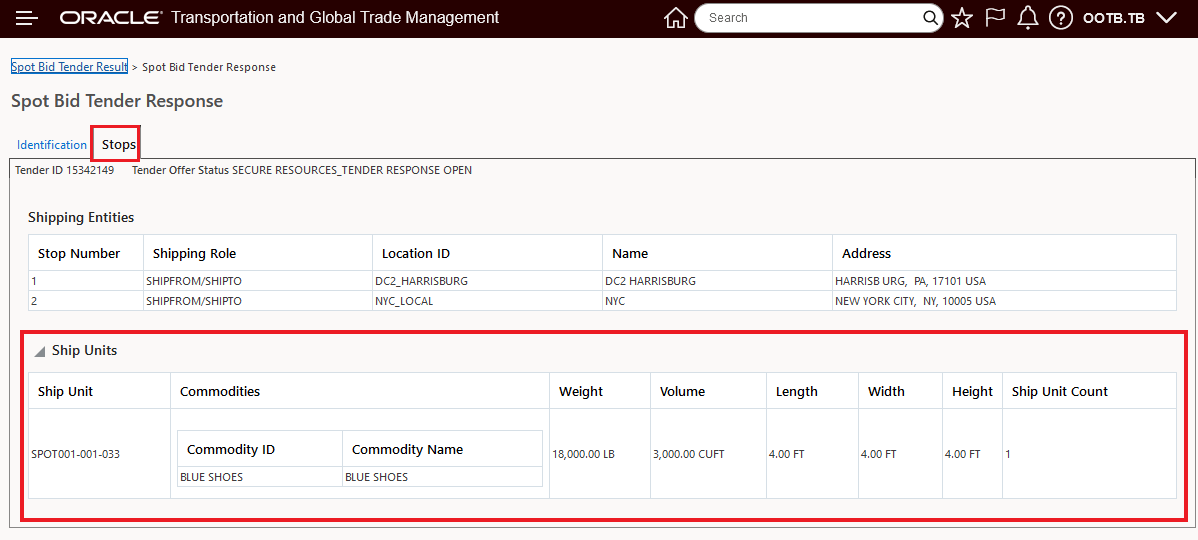
Ship Units Grid - Edit - Stops Tab
While the grid provides the same information that is shown on the Online Booking/Tendering screens, the source for the information provided on the Spot Bid Tender Response screen is different. For the Ship Unit grid on the Spot Bid Tender Response screen, the information is provided using the same process used to provide this information on the shipment managers. The implication is that the information is consistent between the two managers and the same query limits apply. If any of the query limits are exceeded the Ship Units grid will not be populated and an error message explaining the issue will be displayed - as shown below. In the example below, you can view the ship units by selecting the View Ship Units button.
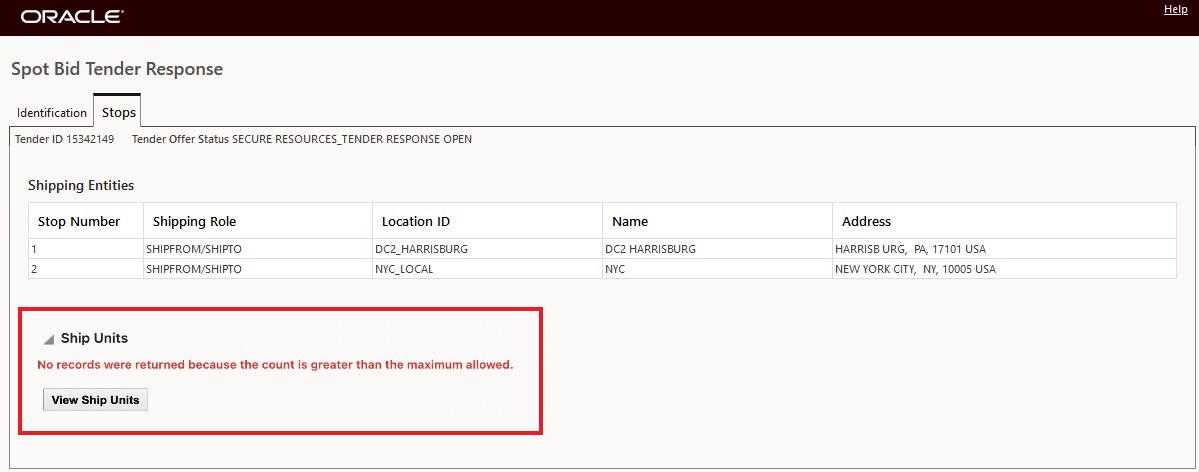
Query Limit Exceeded
New Parameter Fallback Rate Record For Spot Bid Spot Rate
This improvement provides you with a new Collaboration parameter - FALLBACK RATE RECORD FOR SPOT BID SPOT RATE - which will support the scenario where your Spot Rated Spot Tender shipment is declined/withdrawn and the shipment ends up without an assigned Rate Record. The FALLBACK RATE RECORD FOR SPOT BID SPOT RATE parameter provides you with the ability to specify, for this case, the fallback rate record to use in this situation. Note that the DEFAULT value for this parameter is only a place holder i.e., there is no "default" rate record provided - you will need to select an existing rate record to enable/use this new functionality.
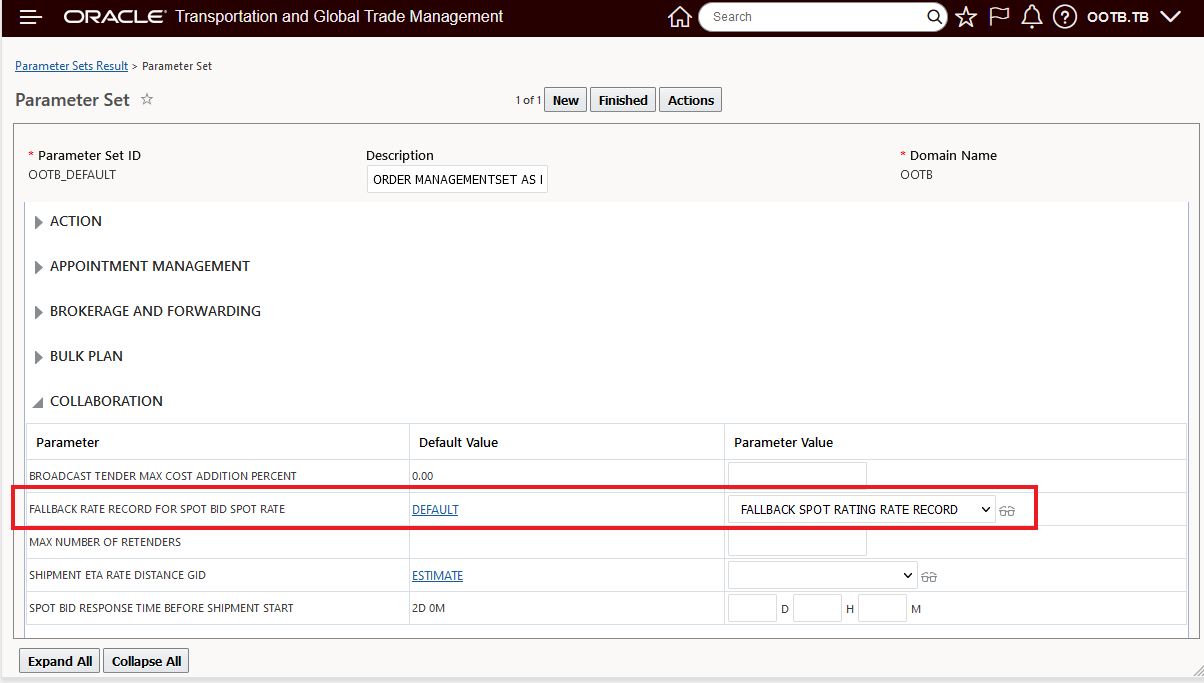
Parameter - Fallback Rate Record For Spot Bid Spot Rate
This feature continues the innovation and improved usability of the rich set of Spot Bid Tender capabiliies provided by the system.
Steps to Enable
As noted, you will need to set the property glog.tender.spotbid.useNewSpotBidManagerForEmailURL to true if you want to have the URL Respond Via the Web link direct the Service Provider to the Spot Bid Tender instead of the Online Booking/Tendering screen for your Spot Bid Tenders.
In addition, if you would like to have the URL Respond Via the Web link go to a configured version of the Online Booking/Tendering or Spot Bid Tender Screen, you will need to configure the Manage User Access to point to your configure screen set(s). Navigate to Manage User Access - Configuration and Administration > User Configuration > Manage User Access and configure and assign your configured screens sets.
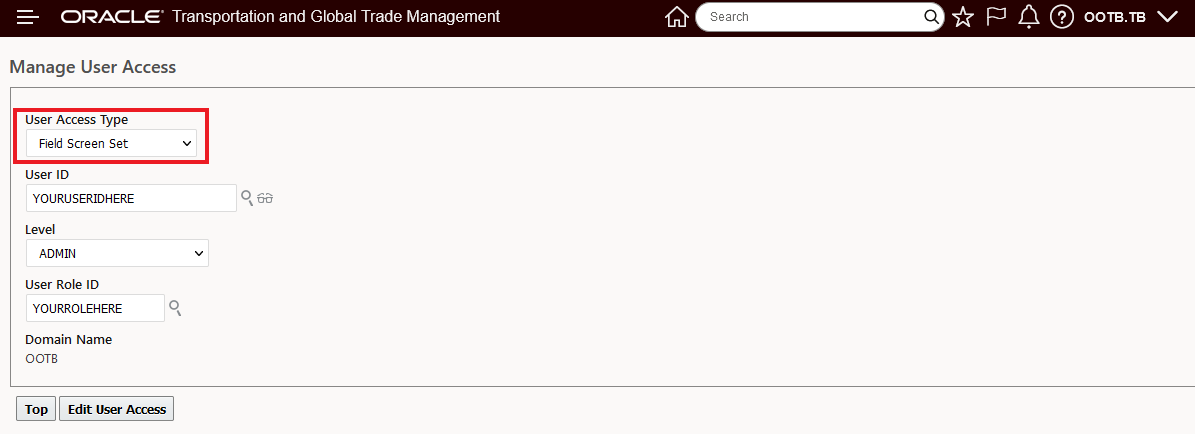
Manage User Access - Field Screen Set
Configure and assign your screen set(s) to the appropriate Query ID - (SPOT_BID_SERPROV, SERVPROV_TENDER_COLLAB). Once complete, for the users configured - the URL Respond Via Web link will go to the configured version of the Online Booking/Tendering or Spot Bid Tender Screen.

Configure and Assign Screen Sets to Query IDs
Tips And Considerations
The view limits for Stops, Ship Unit and Shi Unit Line are controlled by the three properties below,
- glog.query.limit.glog.server.query.shipment.ShipmentStopDQuery(default 100)
- glog.query.limit.glog.server.query.shipment.SShipUnitQuery(default 100)
- glog.query.limit.glog.server.query.shipment.SShipUnitLineQuery(default 100)
Step Tender - Consider Service Provider Operational Hours
This feature extends the Step Tender logic to consider the Service Provider's Operational Hours, the hours they are available to review and Accept/Decline tender offers. To support the consideration of the Service Provider's operational hours, this feature provides a number of new capabilities and parameters that will allow you to configure a duration/amount of time to wait for the Service Provider to respond for Step Tenders when the tenders are transmitted to the Service Provider after working hours. The feature also provides an option to skip the wait period in the situation where a sufficient percentage (but not all) of the defined Step Tender Time (time provided for the Service Provider's step) was provided to the Service Provider within their working hours time window.
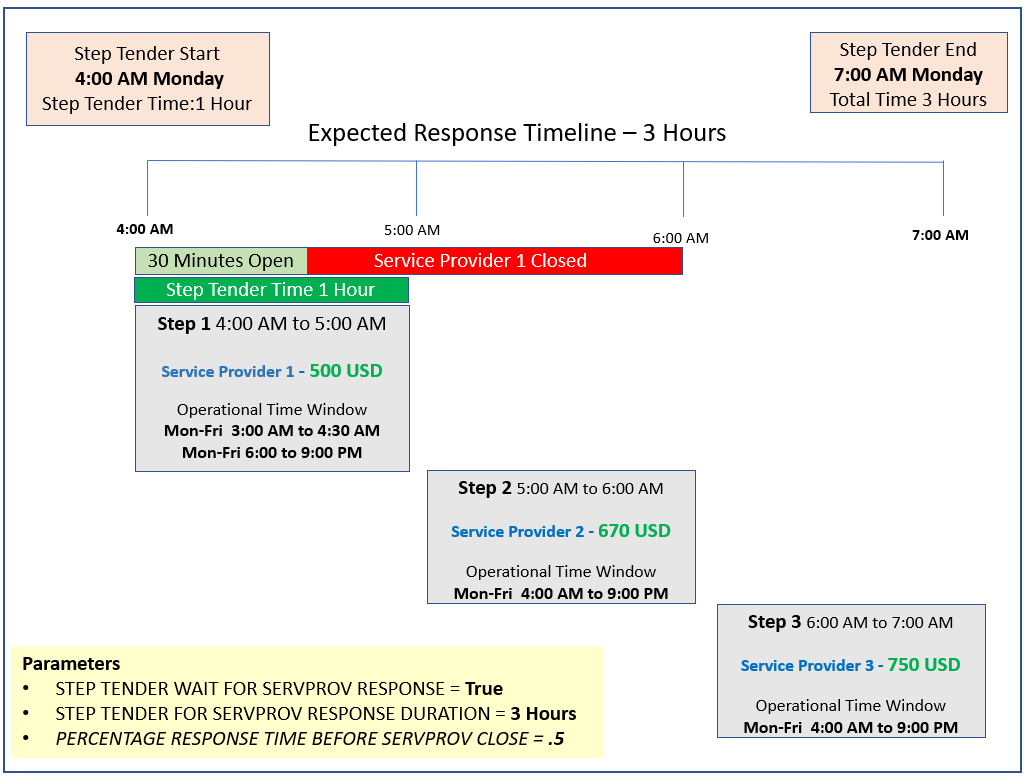
The scenario below highlights the business reason and benefits of the new functionality. In the scenario below, there are three Service Providers that are available on the lane to cover a Step Tendered shipment. Service Provider 1, will charge 500.00 USD for shipments on this lane, and their Operational Calendar is from 6:00 AM to 9:00 PM. The second Service Provider on this lane is Service Provider 2, Service Provider 2 charges 670.00 USD to take a shipment on this lane - Service Provider 2's Operational Calendar is from 5:00 AM to 9:00 PM. Then the last Service Provider available to take shipments on this lane is Service Provider 3, Service Provider 3 will charge 750.00 USD to take a shipment on this lane and their Operational Calendar is from 4:00 AM to 9:00 PM.
In this example, you kick-off the Step Tender at 4:00 AM - and the first step goes to Service Provider 1 - the lowest cost Service Provider. For one hour (4:00 AM to 5:00 AM) during this first step Service Provider 1 has exclusive rights to Accept the tender - unfortunately - while Service Provider is the least expensive Service Provider on the lane - they are closed from 4:00 AM to 6:00 AM. By the time Service Provider 1 is open for business (at 6:00 AM), Service Provider 2 (cost of 670 USD) has had an hour to respond to the tender. Then, at 6:00 AM, the 3rd Step is sent out adding Service Provider 3 (cost of 750). If, in this scenario, the tender could have waited for Service Provider 1 to open, the possibilities of having the lowest cost Service Provider on the lane Accept the tender is increased. This feature provides that additional wait time option - providing additional time for a Service Provider - who is closed for business - to open and respond to their available Step Tenders.
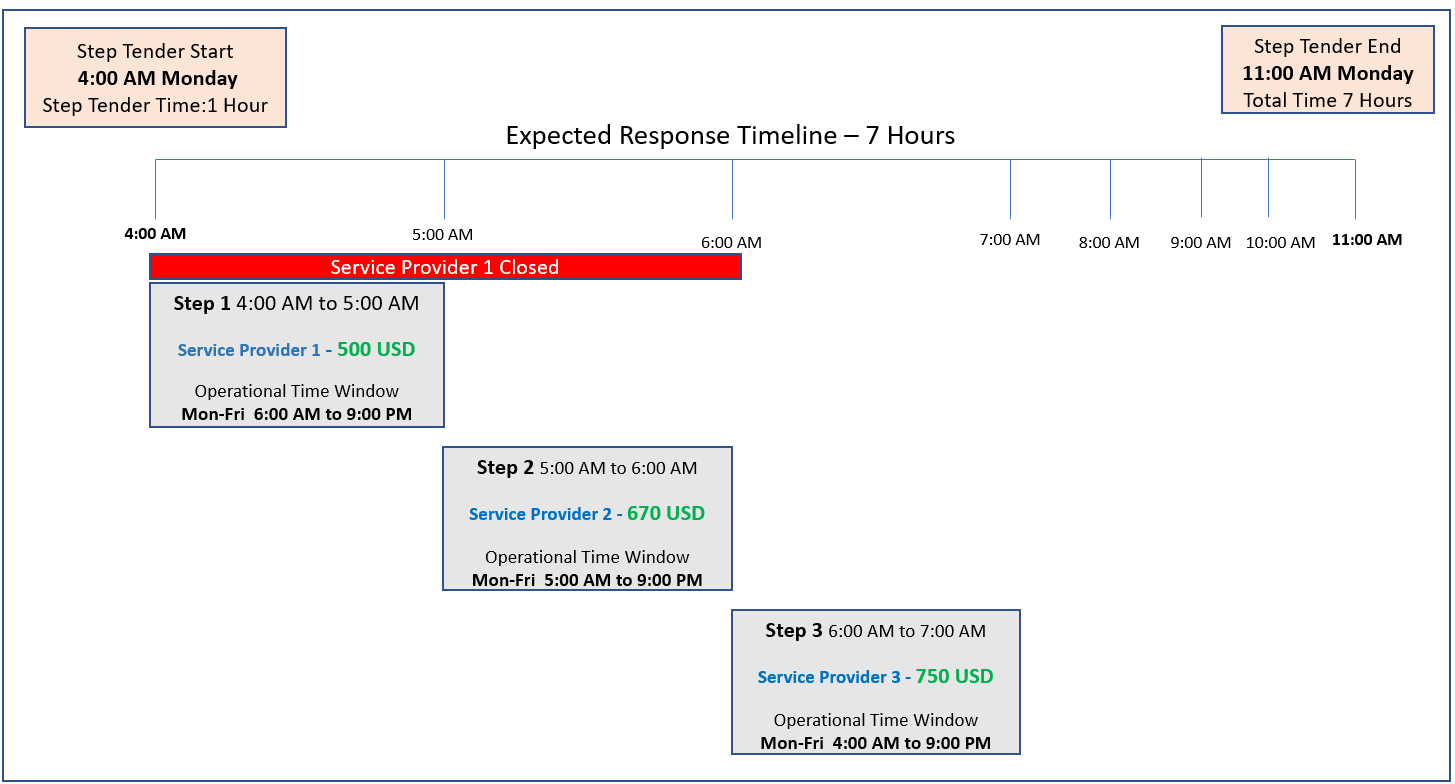
Scenario Example
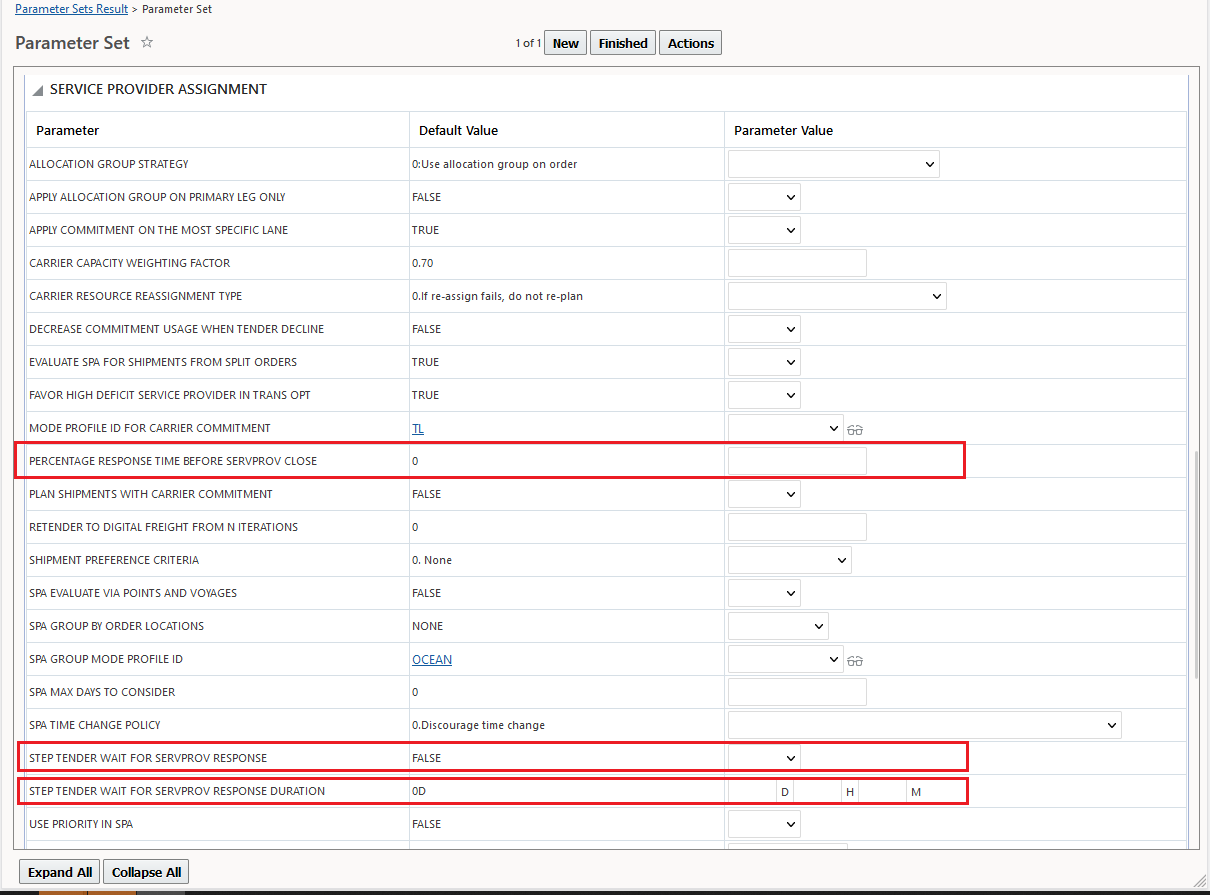
The parameters highlighted and explained below provide you with the option of extending the Step Tender time for a Service Provider to "wait" for the Service Provider to be opened for their Step in a Step Tender.
STEP TENDER WAIT FOR SERVPROV RESPONSE
- This parameter controls whether you wish to wait for the Service Provider to respond if they receive a Step Tender offer during non-working hours. The Default value is False - previous behavior.
Assuming STEP TENDER WAIT FOR SERVPROV RESPONSE is True then:
STEP TENDER WAIT FOR SERVPROV RESPONSE DURATION
- This parameter sets the amount of time that you will wait/extend the Step Tender offer to wait for the Service Provider's calendar to open - defined as Days, Hours, Minutes.
PERCENTAGE RESPONSE TIME BEFORE SERVPROV CLOSE
- This parameter is used in the case where the Step Tender for the Service Provider is received when the Service Providers calendar is open - but - the Step Tender Time can not be completed with-in the open working hours of the Service Provider. This parameter allows you to set a percentage that indicates that there is no need to wait additional time for the Service Providers calendar to open again - the assumption here is that the time provided in the open calendar was sufficient and the Step Tender process can continue without waiting. This parameter accepts values between 0 and 1.
Parameters
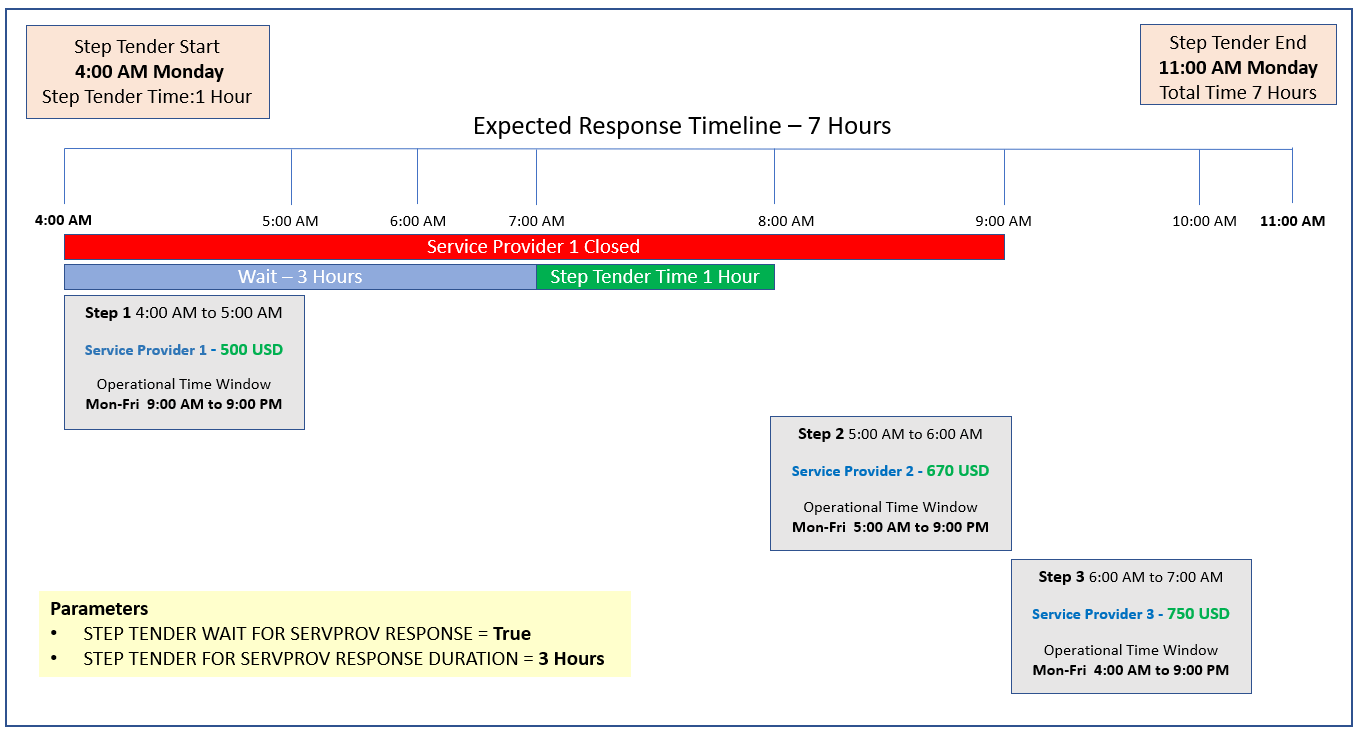
In the example below (same as above), where Service Provider 1 is open from 6:00 AM to 9:00 PM - and the Step Tender is sent at 4:00 AM, setting the two parameters STEP TENDER WAIT FOR SERVPROV RESPONSE to True and the parameter STEP TENDER WAIT FOR SERVPROV RESPONSE DURATION set to 3 hours the new logic provides the solution below, where, as before, Service Provider 1 receives the tender at 4:00 AM - but with the new logic and parameters configured as above, the Step Tender now "waits" 2 hours for Service Provider 1's calendar to open and then Service Provider 1 has the Step Tender Time of 1 hour to accept/decline the tender before the next Service Provider is added to the Step Tender at 7:00 AM. This scenrio is an ideal case, some of the corner cases are provided in the Tips and Considerations section.
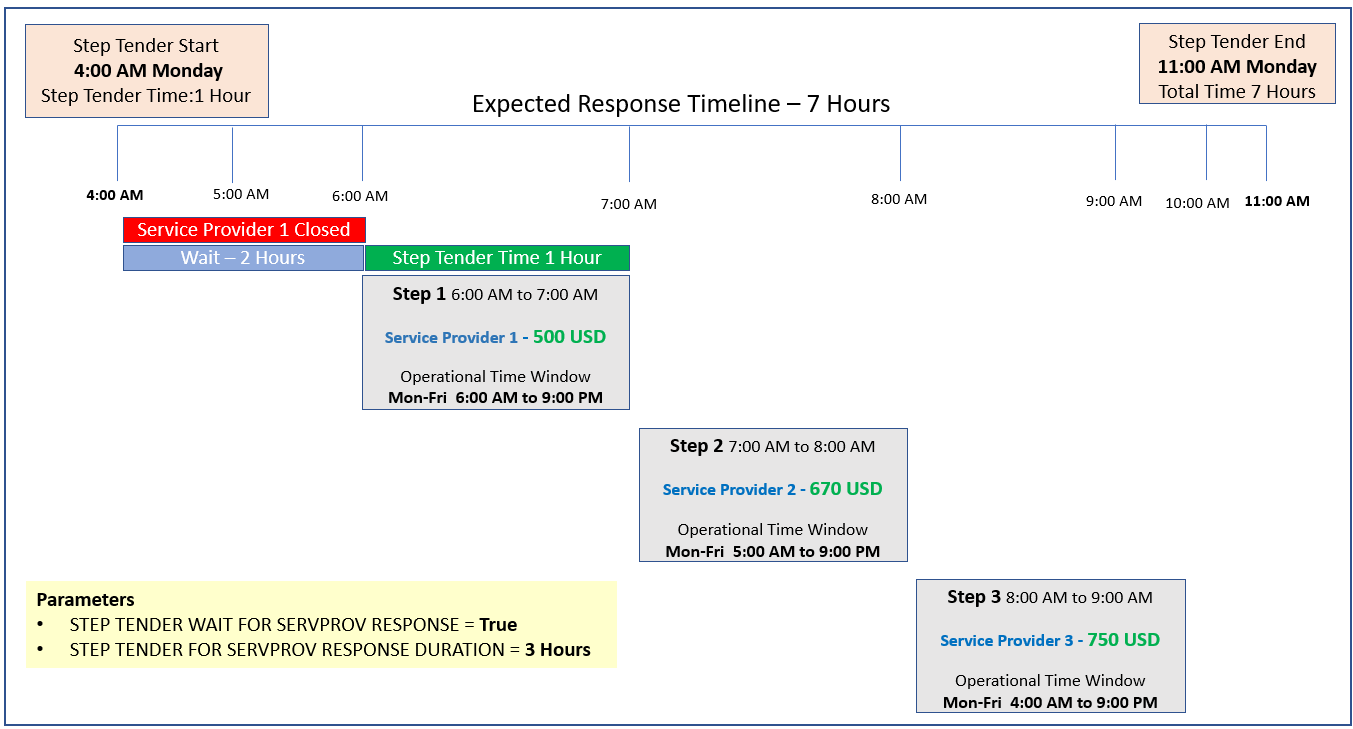
New Parameter Usage
The parameter PERCENTAGE RESPONSE TIME BEFORE SERVPROV CLOSE - allows you to define a percentage of step time completed in working hours that is sufficient so that there is no need to consider waiting for the calendar to open. In the example below, Service Provider 1 is open from 3:00 AM to 4:30 AM and then again at 6:00 AM to 9:00 PM. With the PERCENTAGE RESPONSE TIME BEFORE SERVPROV CLOSE set to .5 and given a Step Tender Time of 1 hour, if there is 30 minutes of open time available, then there is no need to wait for the Calendar to open at 6:00 AM. In this example, the Step Tender is received at 4:00 AM the Service Provider has 30 Minutes before their calendar closes, based on the PERCENTAGE RESPONSE TIME BEFORE SERVPROV CLOSE set to .5 this is enough time and there is no need to add wait time. If PERCENTAGE RESPONSE TIME BEFORE SERVPROV CLOSE had been set to a value greater than .5, say .7 then there would not have been sufficient time available . This parameter helps to avoid situations where unnecessary wait time is added for Service Providers who received a Step Tender during their open hours.
Percentage Response Time Before Close
This feature provides you with the option to consider potentially lower cost Service Providers in a Step Tender offer - who - due to their working hours would have missed the opportunity to participate if the Step Tender offer timing did not consider the Service Providers working hours.
Steps to Enable
This feature is delivered with the default settings supporting the existing behavior - if you wish to take advantage of this new capability - assume you have working calendars setup for your Service Providers - you will also need to set the desired values for one or both of the provided parameters -
STEP TENDER WAIT FOR SERVPROV RESPONSE - Default is FALSE
STEP TENDER WAIT FOR SERVPROV RESPONSE DURATION Default is 0D
PERCENTAGE RESPONSE TIME BEFORE SERVPROV CLOSE - Default is 0 - value between 0 and 1 -
Tips And Considerations
Some corner cases
Case 1 -> The Service Provider is closed for a time that's longer than the specified STEP TENDER WAIT FOR SERVPROV RESPONSE DURATION. For Example - the Step Tender is sent at 4:00 AM, the STEP TENDER WAIT FOR SERVPROV RESPONSE DURATION = 3 hours, but the Service Provider in the step will not be open for 5 hours or until 9:00 AM. In this case, the logic will take the minimum of either a. the tender received time (4:00 AM) to the Service Providers calendar open time (9:00 AM) so 5 hours or b. the wait time - in this case 3 hours, so in this example the wait time of 3 hours would be used.
With this case - as shown below, Service Provider 1 will get the tender at 4:00 AM, the logic waits for 3 hours until 7:00 AM, then the Step for Service Provider 1 runs for the Step Tender Time of 1 Hour till 8:00 AM (even though Service Provider 1 is still closed) and then the Step Tender will be sent to the next service provider, Service Provider 2 at 8:00 AM.
Calendar Closed Longer Than Step Tender Wait Duration
Case 2 -> The service provider is closed beyond the Expected Response time, in this case, waiting does not help. In the example below, the Service Provider is closed until 9:00 AM and the Expected Response Time for the Step Tender is 8:00 AM. In this situation, the logic will not consider the STEP TENDER WAIT FOR SERVPROV RESPONSE DURATION value (3 hours) and will do the Step Tender to the next service provider, Service Provider 2, after the Step Tender Time (1 hour) has passed for the first Step with the closed Service Provider 1.

Waiting Does Not Help
Ship Unit Count Added to Spot Bid Tender Screen
This feature adds the Ship Unit Count to the Ship Units section of the Spot Bid Tender screen. This is in addition to the other Ship Unit information provided - Commodity ID, Commodity Name, Weight, Volume, Length, Width and Height.
Ship Unit Count Added
This enhancement provides additional information about the Ship Units on the shipment to help Service Providers and Planners make more informed decisions.
Steps to Enable
You don't need to do anything to enable this feature.
Tips And Considerations
Note that this feature was originally delivered in a 21A weekly.
Assign Document Sets - Agent Action
This feature provides you with the option of using an Agent Action to assign your Document Sets to the set of enabled objects.
Objects supported:
- Shipment (Buy/Sell)
- Shipment Stop
- Shipment Group
- Invoice
- Bill
- Order Release
For the supported objects above, you can configure an Automation Agent to automatically assign your Document Sets using the Assign Document Sets Agent Action.
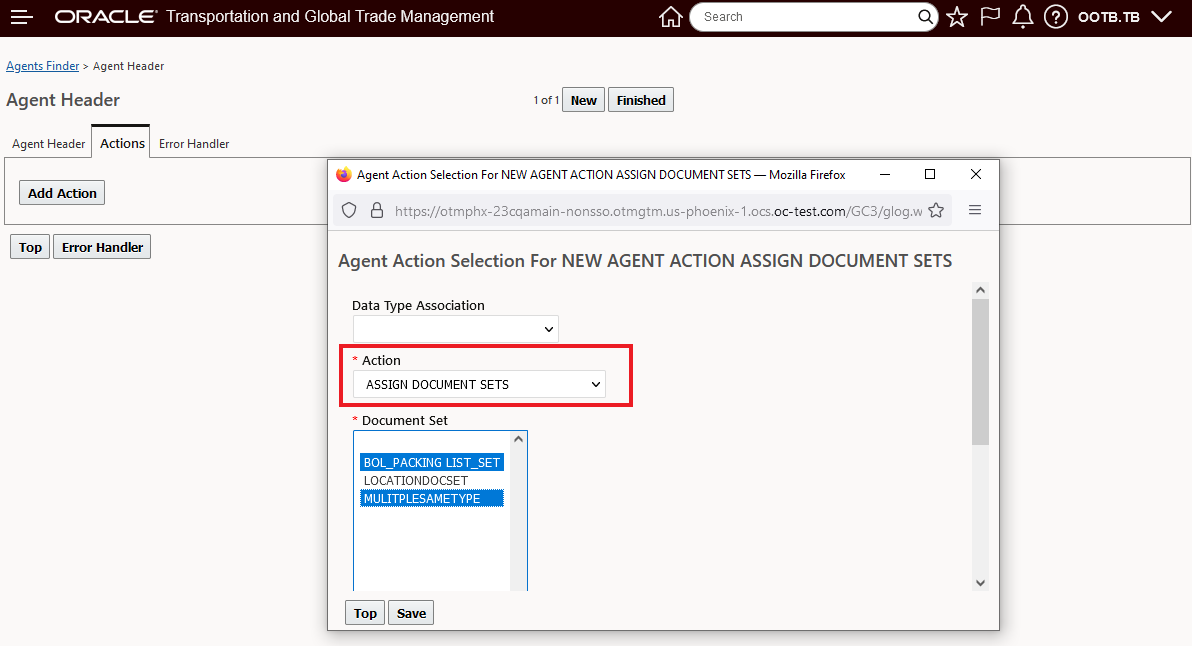
Assign Document Sets Agent Action
This feature provides the option to automate the assignment of Document Sets to the supported set of objects.
Steps to Enable
You don't need to do anything to enable this feature.
This feature provides you with several Dock Scheduling usability improvements.
- The scheduled appointment details are now provided in the action confirmation message for the Dock Scheduling actions Schedule Appointment, Adjust Appointment and Reschedule Appointment.
- The action Remove Appointments is now available on the Shipment Stop.
- A more informative message is now provided to you when an attempt is made to schedule an appointment for a stop where an appointment already exists.
Schedule Appointment Results
In the example below, the Schedule Appointment Result is demonstrated for the Schedule Appointment and Adjust Appointment Time actions. The Schedule Appointment Results is also provided for the Schedule Partial Stop Appointment action.
The Schedule Appointment Result provides you with the following scheduled appointment details:
- Appointment ID
- Confirmation Number
- Location ID
- Stop Number
- Appointment Start Time
- Appointment End Time
- Pickup Appointment
- Delivery Appointment
- Appointment Duration
- Resource Type ID
- Location Resource Name
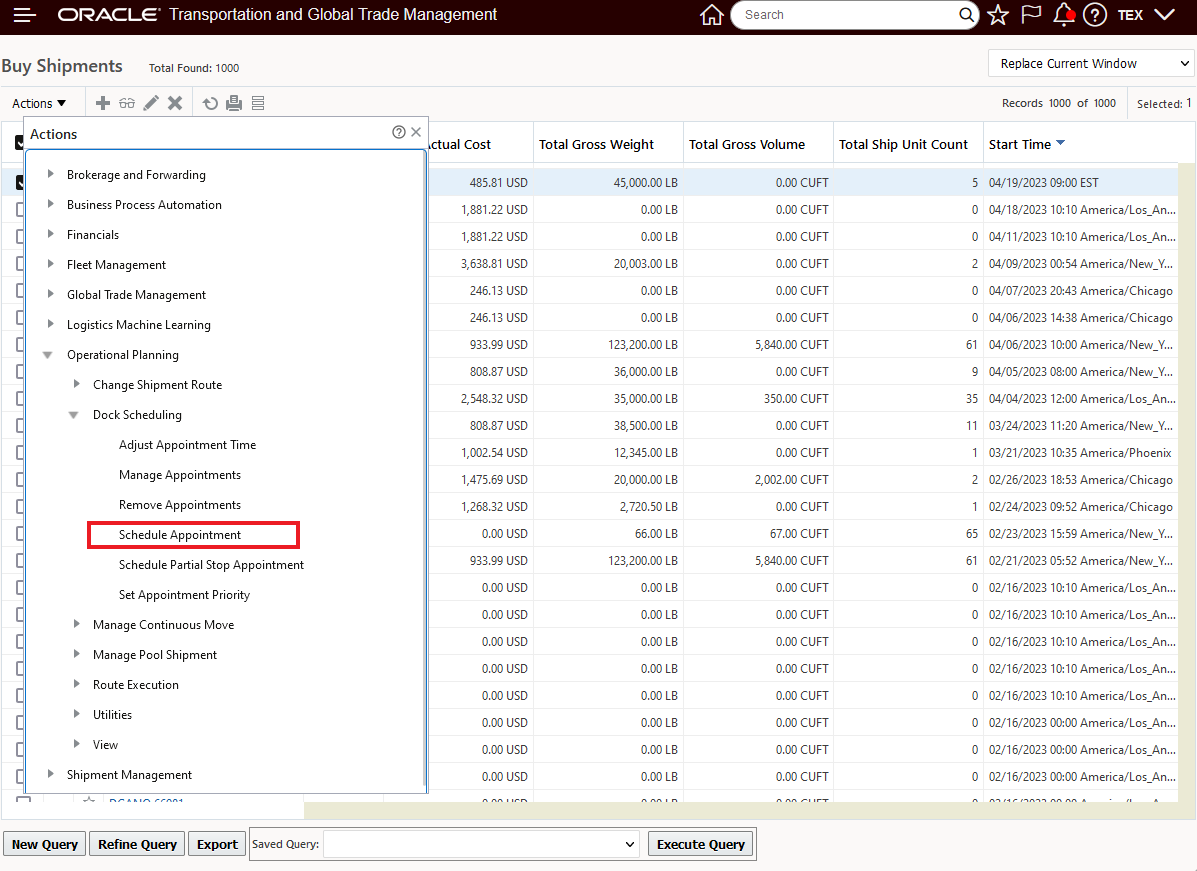
Schedule Appointment Action
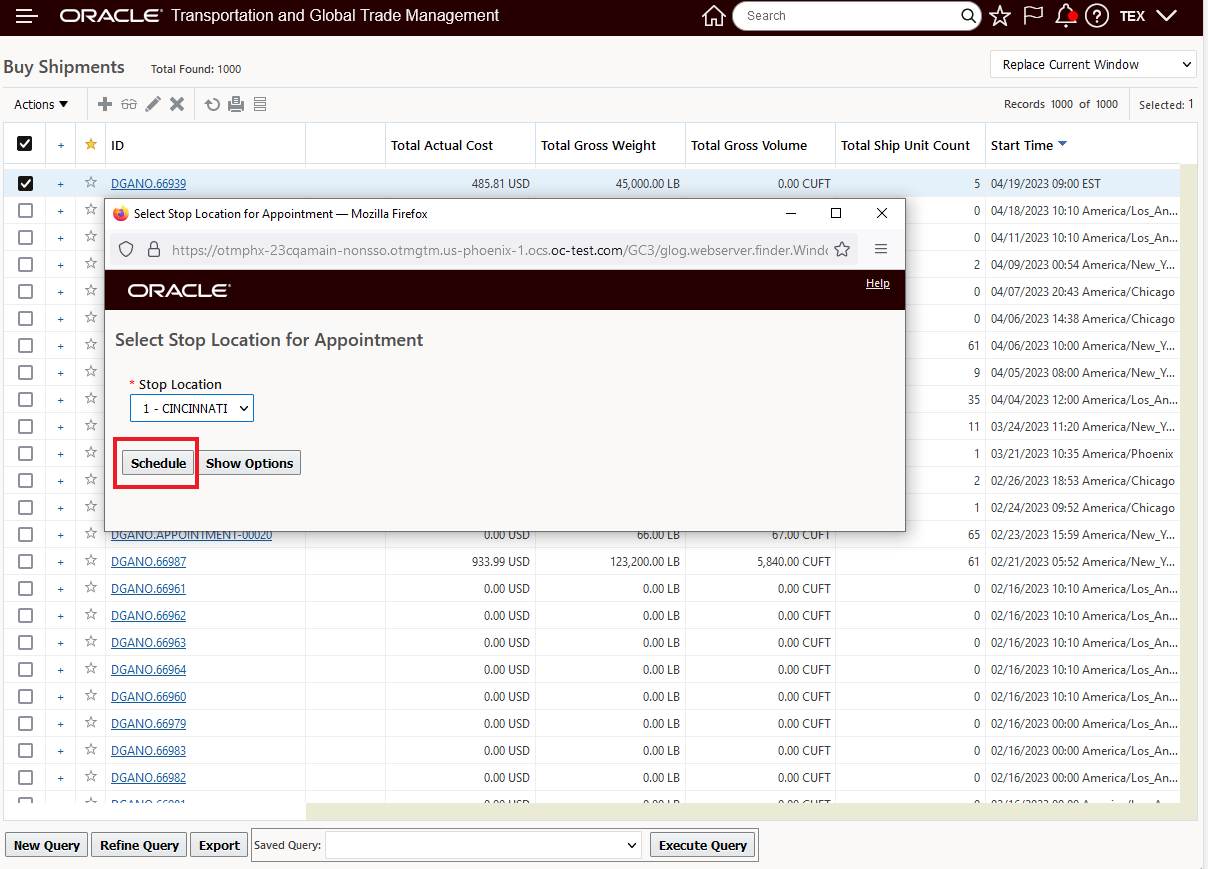
Schedule Appointment
Below is the result of steps above - note that the result provided provides you with a comprehensive summary of the Schedule Appointment action.

Schedule Appointment Action - Scheduled Appointment Result
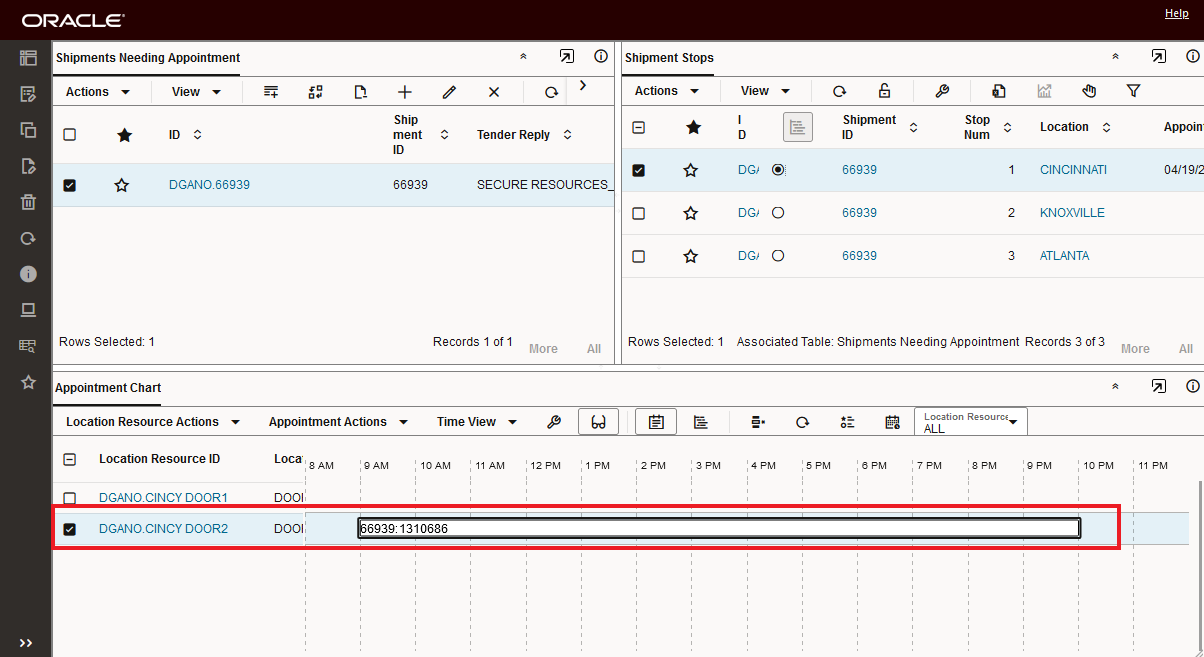
Below is the Manage Appointment view for the scheduled appointment.

Schedule Appointment Manage Appointment View
The same information is also provided when the Adjust Appointment Time action is run. In the example below, the appointment above is moved from Door1 to Door2.

Adjust Appointment Time Action - Appointment Result
Adjust Appointment Time - Manage Appointment View
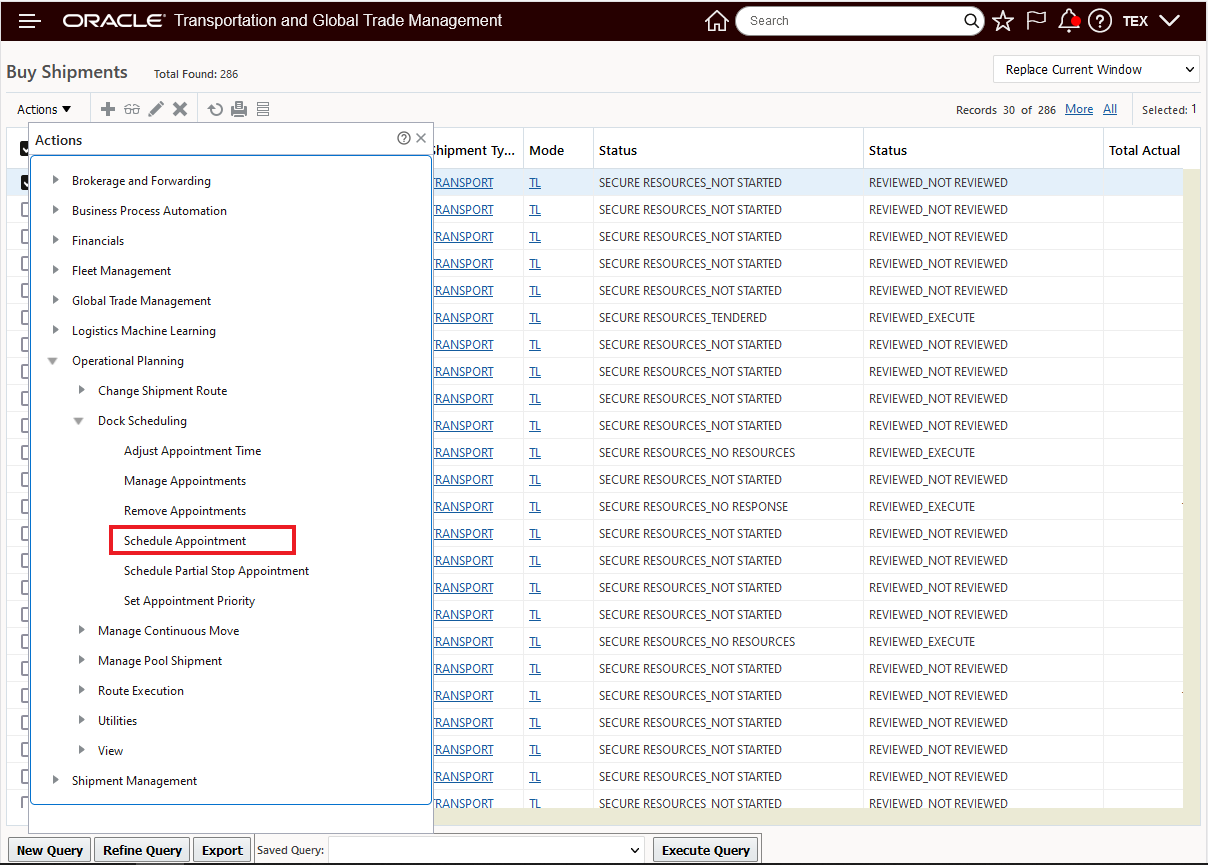
Remove Appointments
The Remove Appointments Action is now provided on the Shipment Stop level. In the examples below the Remove Appointments Action is shown for both the Enhanced Workbench and on the Shipment Stop Finder Results.

Remove Appointments Shipment Stop Enhanced Workbench
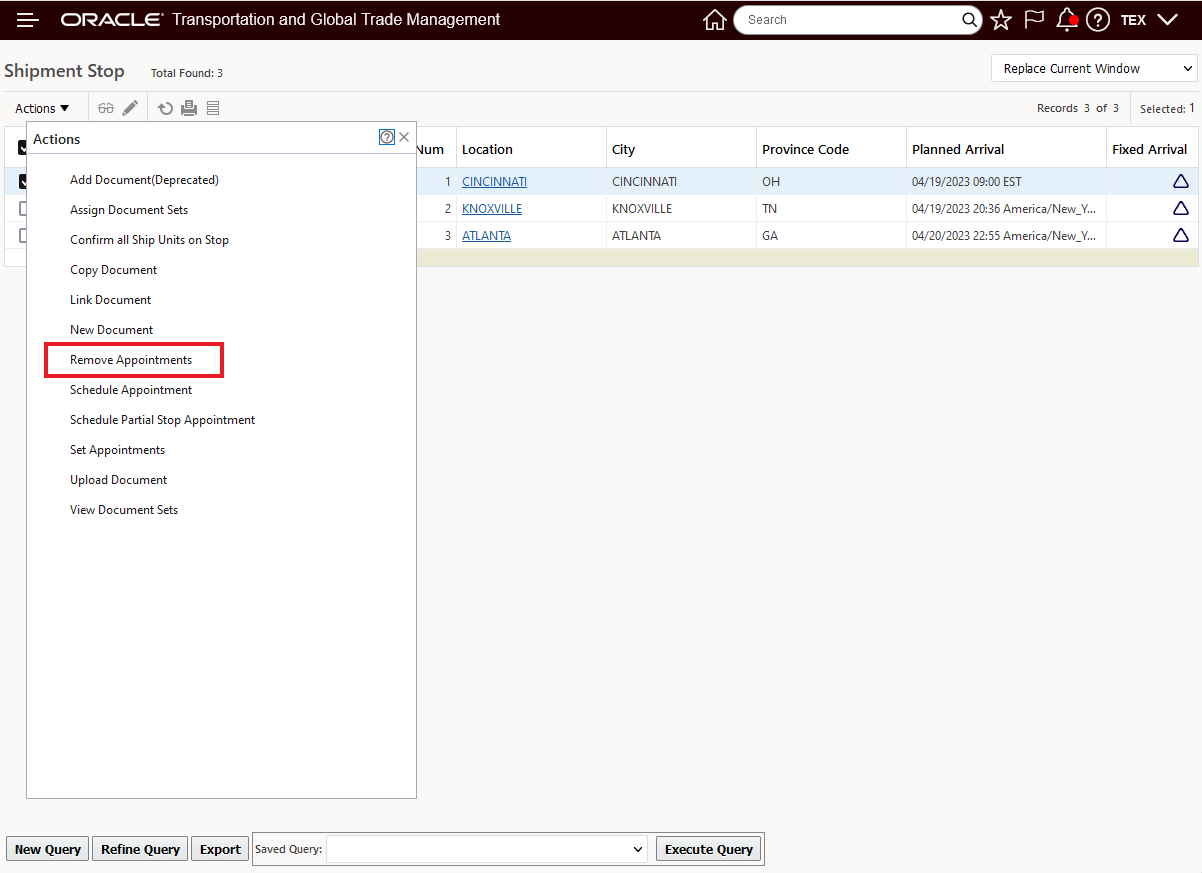
Remove Appointments Shipment Stop Manager
When the Remove Appointments action is run successfully the confirmation message below is displayed.
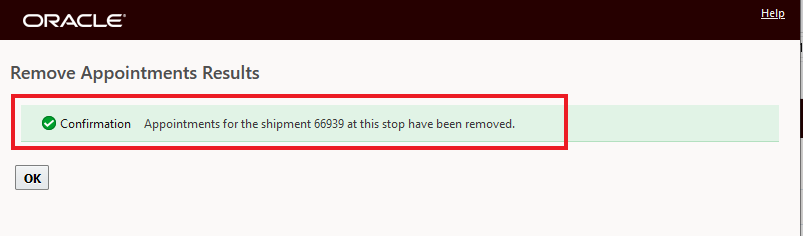
Remove Appointments Confirmation
Appointment Already Scheduled Message
Below is an example of the new message which appears in the case where an appointment is scheduled for a stop that already has an appointment scheduled.
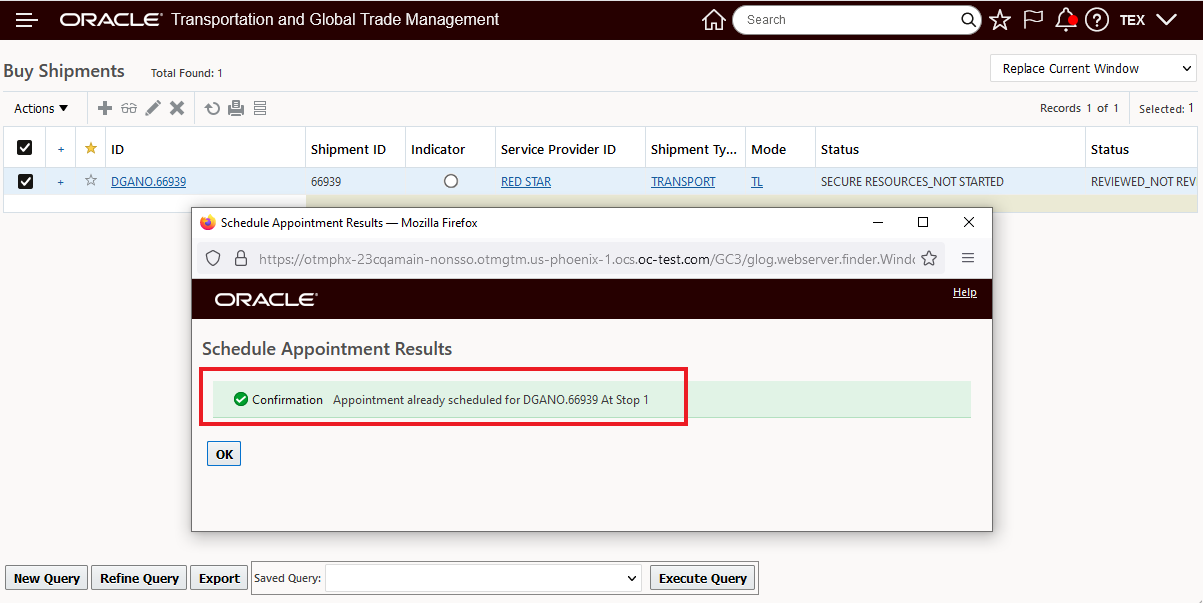
New Information Message
This feature provides a number of usability enhancements, reducing drill-downs and providing information and actions for more immediate use.
Steps to Enable
You don't need to do anything to enable this feature.
Tips And Considerations
NOTE: The steps demonstrated for the new results is a change in behavior from previous versions. Previously the steps below would have been performed and the deprecated Dock Manager would have been used to View the results of the Schedule Appointment or Adjust Appointment Time actions. The new approach provides all the information about an appointment immediately after the actions are run. If necessary the Manage Appointment action can be used to view the appointments with the context of the Appointment Gantt. To demonstrate the previous behavior, the same actions will be run showing the deprecated the Dock Manager and the limited information provided in the action result confirmation message(s).
As was the case above, the process starts by running the Schedule Appointment Action.
Schedule Appointment
The second step, as before - is the select the option to Schedule the appointment.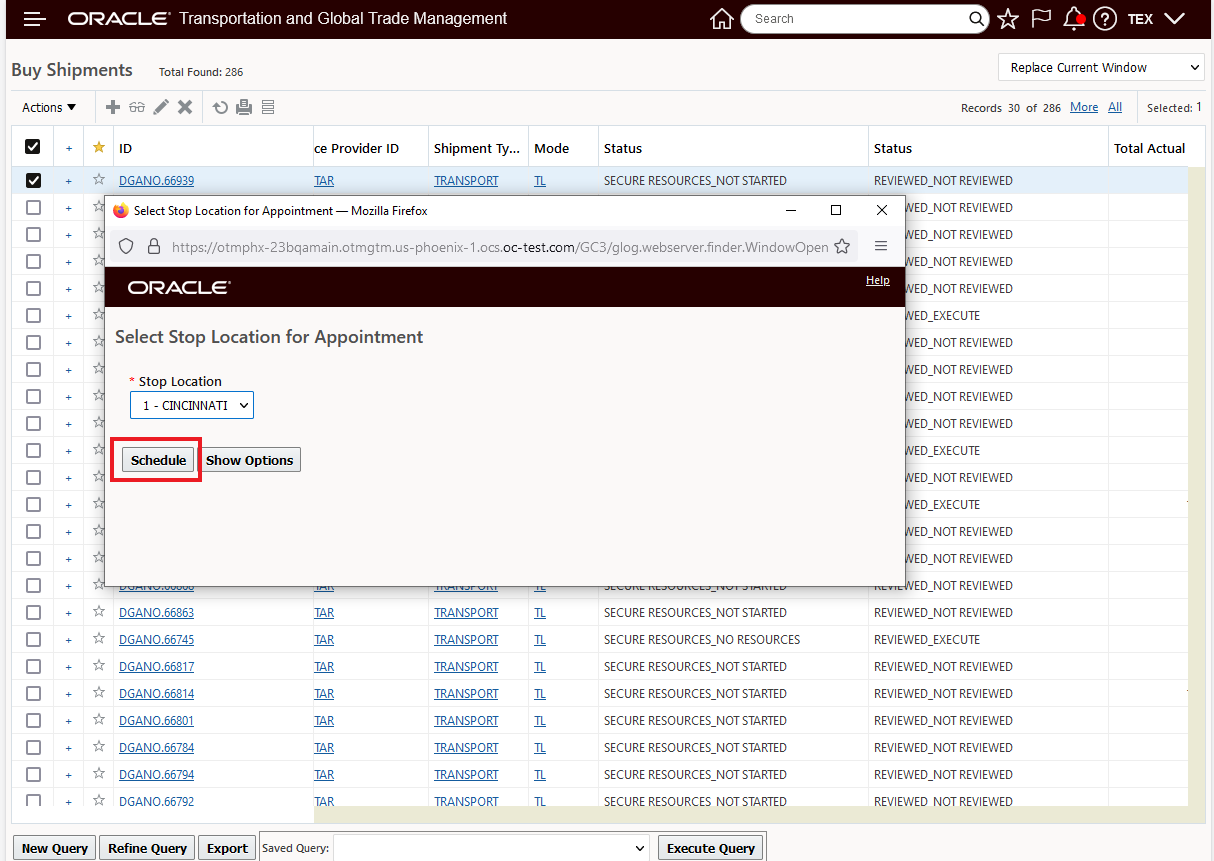
Schedule Appointment
The result for the Schedule step above - with the old behavior results in a standard confirmation message for the action, to obtain any information about the actions result - you need to select the View Appointment option.

Confirmation Message
.When you run the View Appointment option, the deprecated Dock Manager is opened for the location. With the previous result, you were required to hunt around in the Dock Manager to determine the result of the Scheduled Appointment Action.
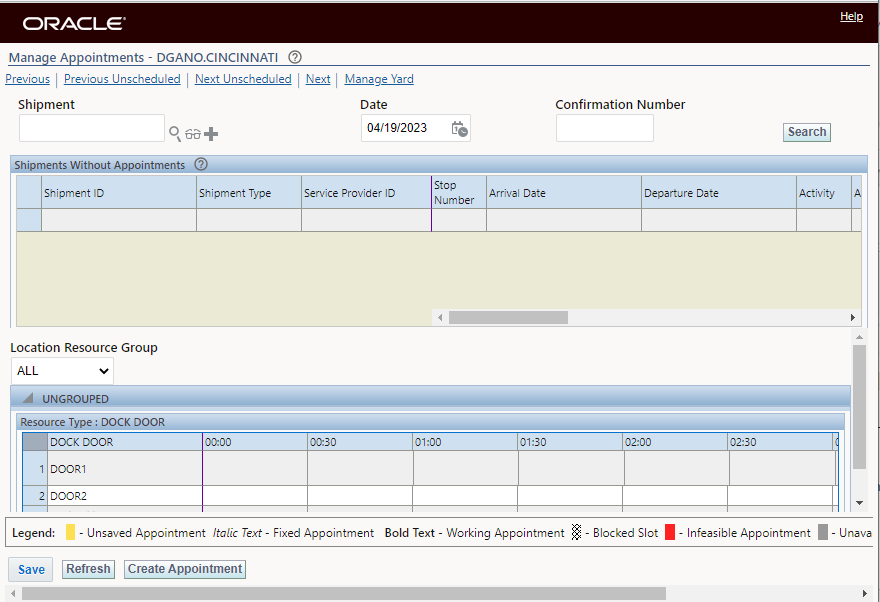
Initial Dock Manager View - No View To The Result
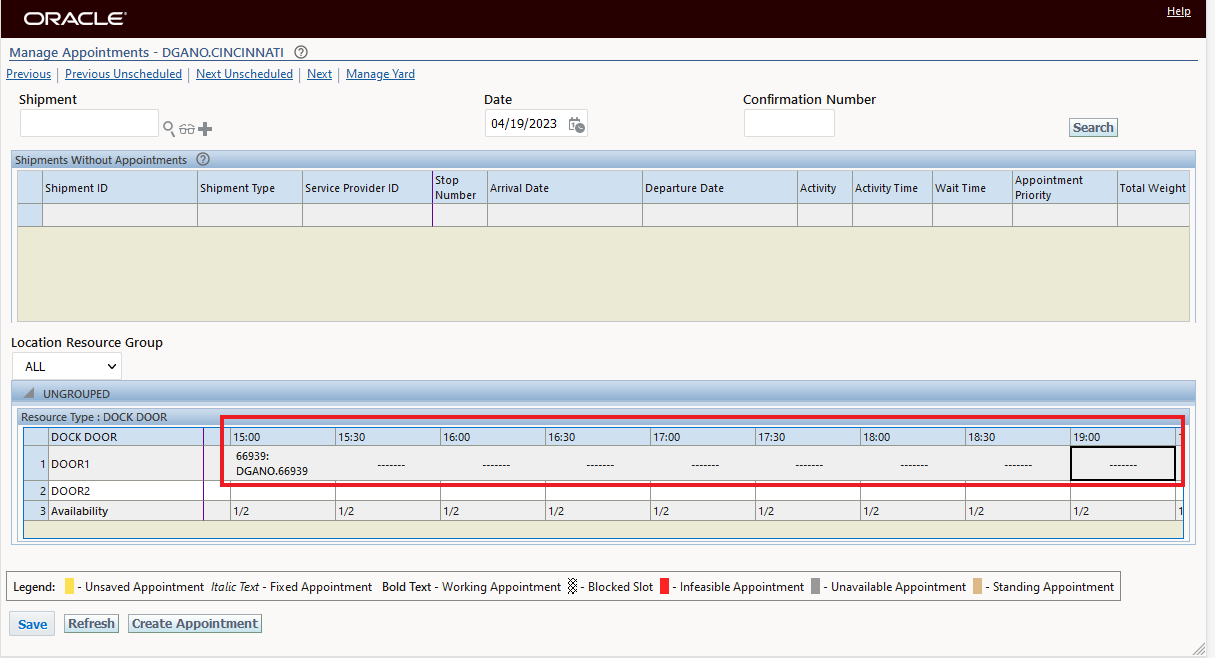
Located Scheduled Appointment
Ship Unit Line User Defined Attributes Added
This feature extends the Ship Unit Line object to include the standard set of User Defined Attribute fields including - 20 Text fields, 10 Number fields, 10 Date fields. The additional fields are available for you to configure your screensets and manager layouts and are included in the related APIs.
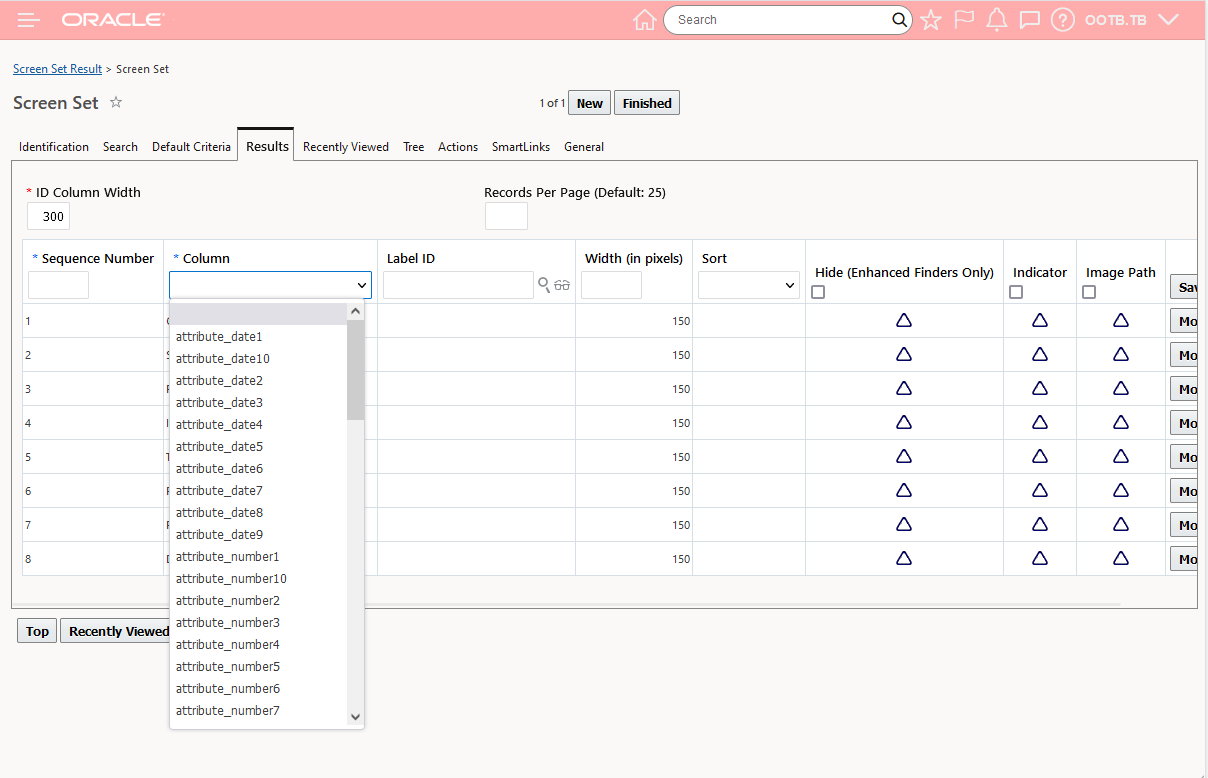
Ship Unit Line Finder Result Configuration
Provides additional flexibility and the ability to add implementation specific details to the Ship Unit Line.
Steps to Enable
To provide visibility to the newly added fields you will need to modify and or create new screen sets.
Special Service ID Added to Order Release Finder
This feature extends the Finder fields for the Order Release to include Special Service.
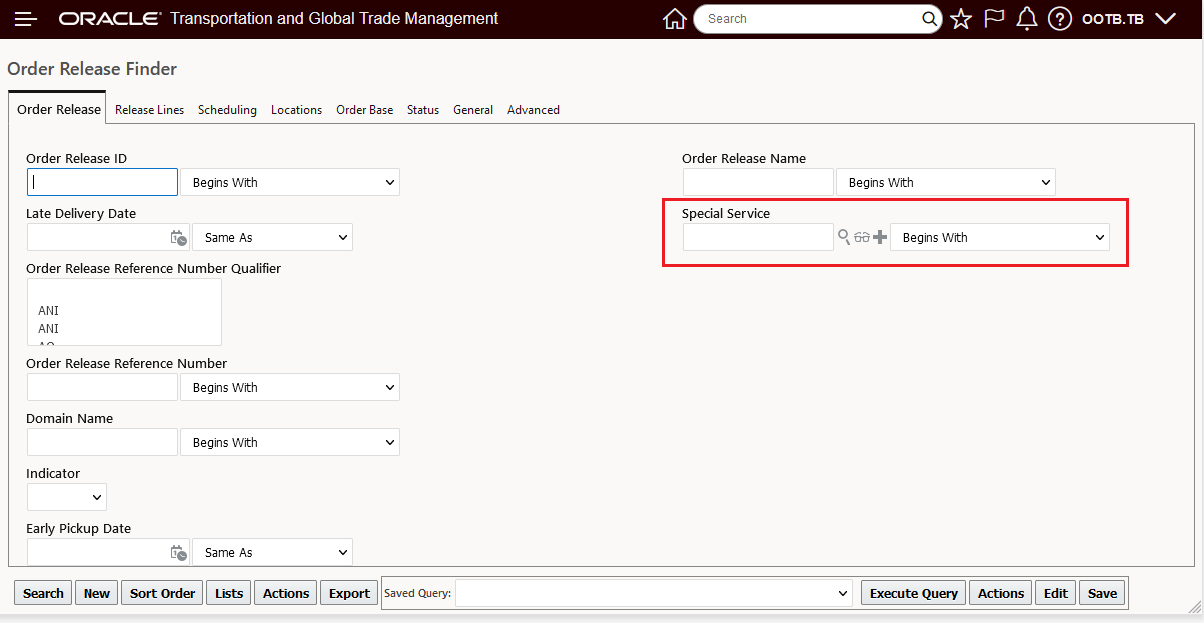
Special Service ID added to Finder
Extends the fields you can use to search for your Order Releases.
Steps to Enable
You will need to add the Special Service field to your Order Release Finder as shown below.

Add Special Service ID to Order Release Finder
Order Base Line Finder Result Package Item Description
This feature provides you with the option to add the Packaged Item Description to Order Base Line Screen Set Results.
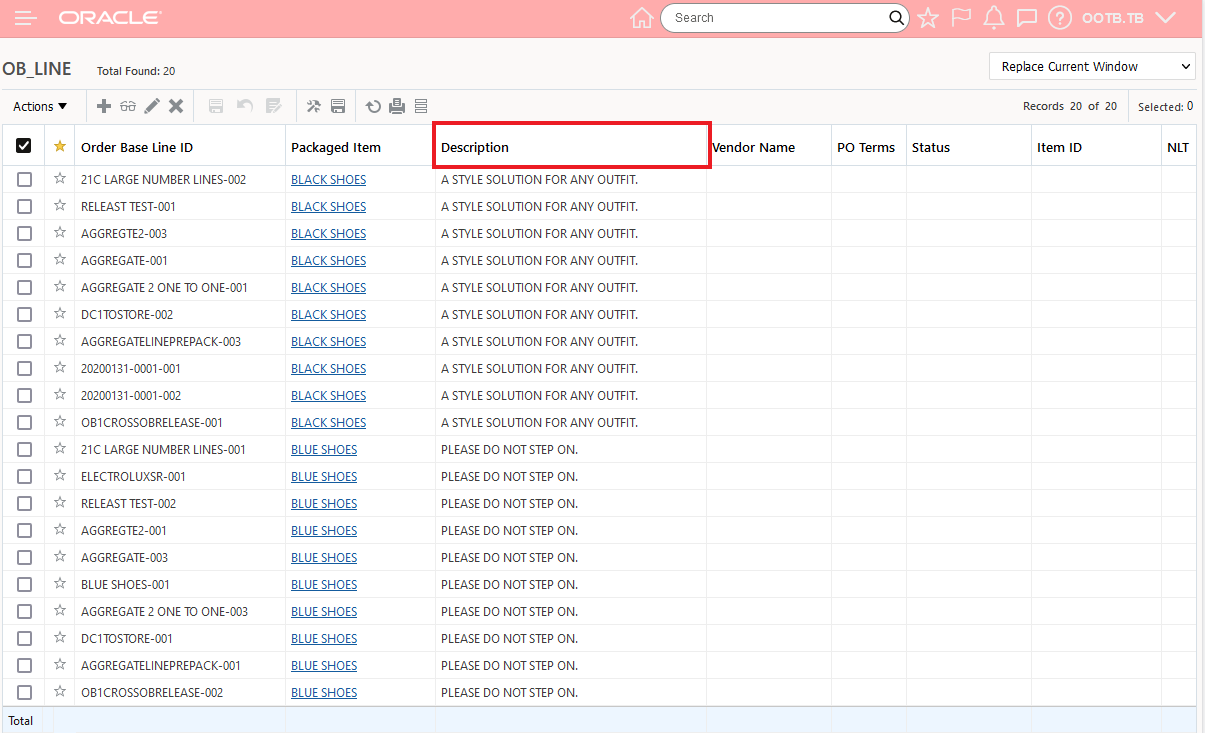
Packaged Item Description - Order Base Line Finder Results
This usability feature provides you more information about the Packaged Item on your Order Base Line.
Steps to Enable
The Packaged Item Description Field needs to be added to your Order Base Line Finder Results.
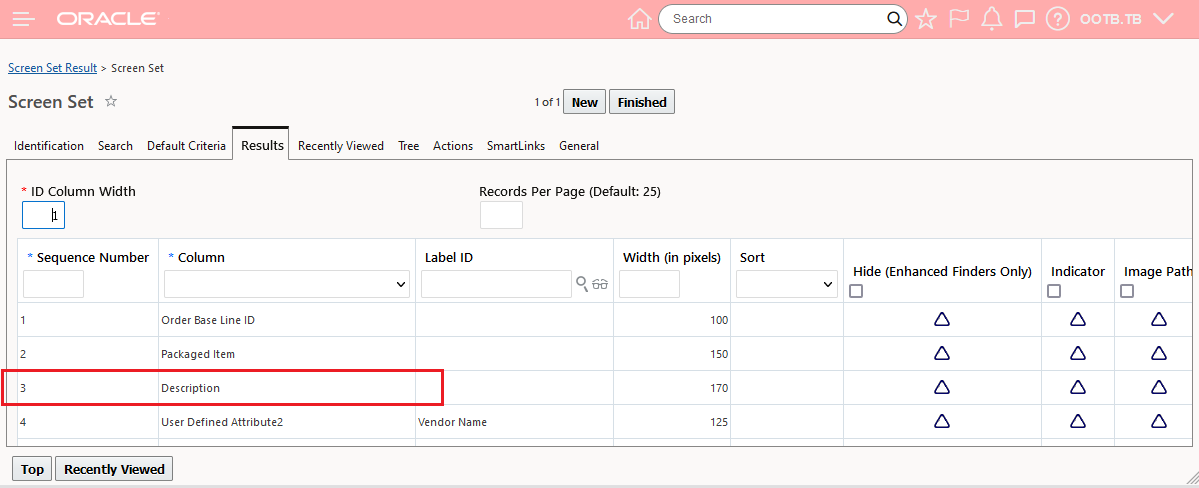
Packaged Item Description - Finder Results
Order Base Line Packing Action Enhancement
This feature provides you with a set of usability improvements for the Order Base Line Packing action allowing you to configure the releasing process and map the entered data from the release process to the generated order release. .
The changes below can be seen by navigating to Order Management > Purchase Order > Order Base Line > Actions > Order Management > Change Order > Order Base Line Packing. When the action is run, the improved UIs below are provided.
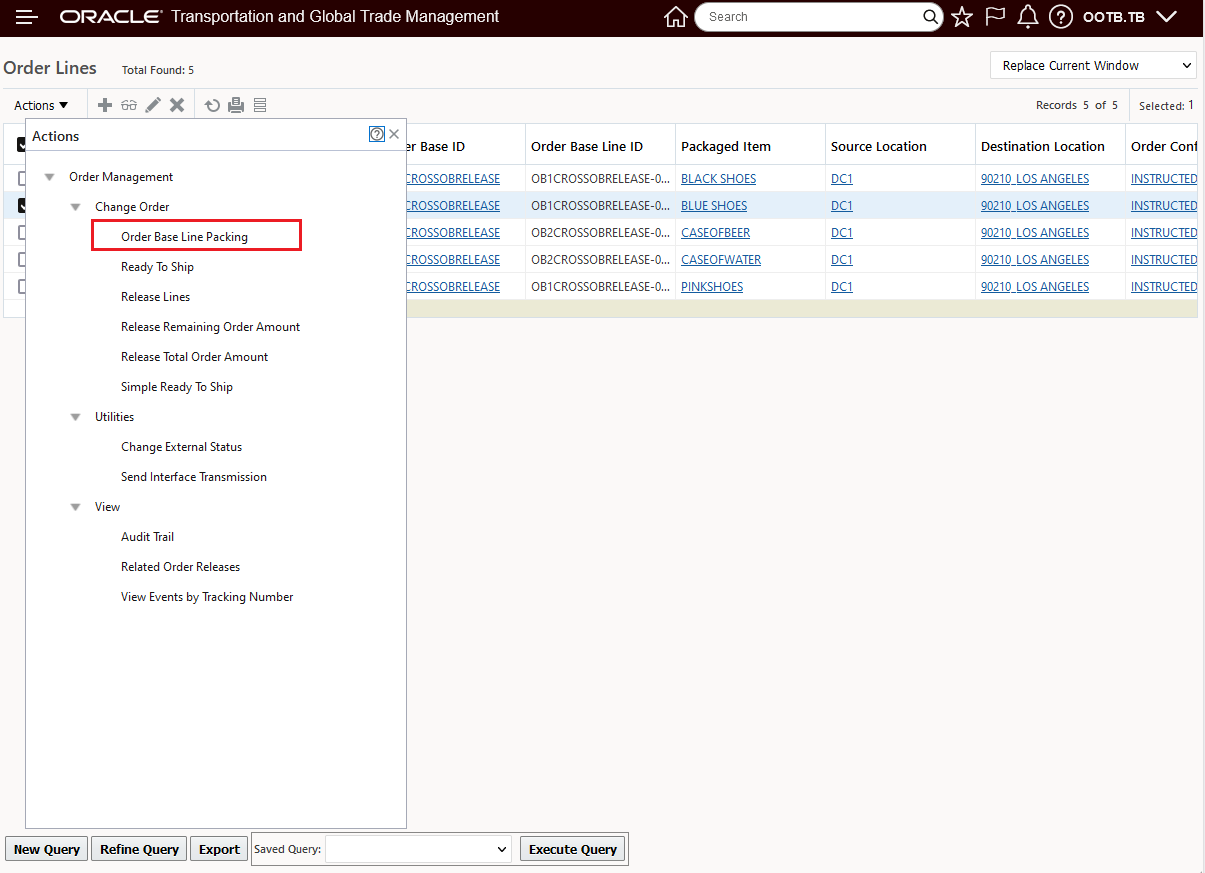
Order Base Line Packing Action
Highlighted below are the improvements provided in the Order Base Line Packing screen, specifically the Line Items grid has been expanded to include the Package Item Description, Order Base ID and Order Base Line ID. 
Order Base Line Improvements - Line Items Grid
On the Order Base Line Packing Detail screen (below), the improvements include visibility to the Ship Unit Count and all four Tag fields. In addition, a new section has been added to the screen to support providing access to a selected set of User Defined Attribute fields. The Attributes section provides you with access to five attributes of each type, you have the option of hiding/removing the Attribute section from the UI.
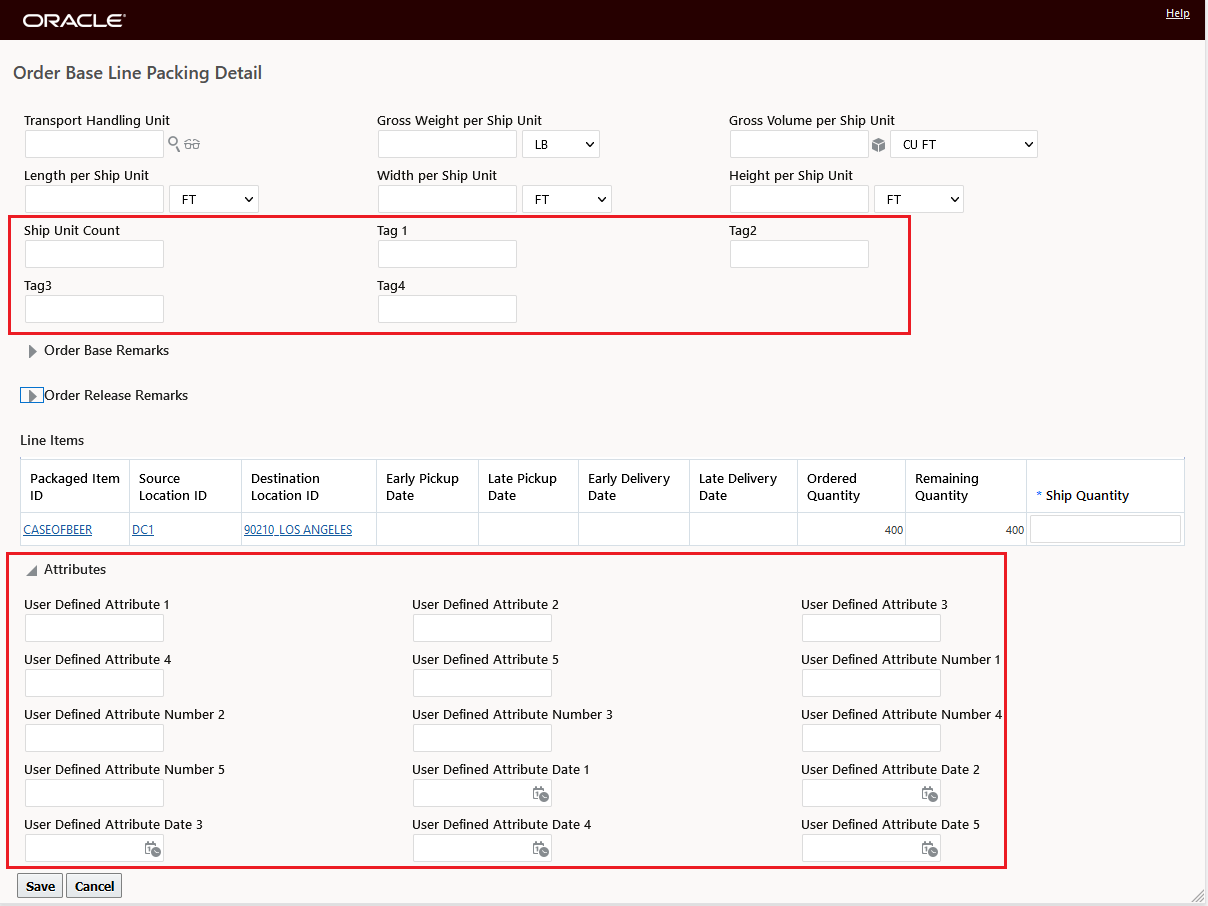
Order Base Line Packing Detail
Data Configuration Association Type - Order Base to Order Release
A new Data Configuration Association Type - Order Base to Order Release - provides you with the option of mapping from Header to Header or from the Ship Unit Release Instruction so the Order Release Ship Unit.
For the Data Configuration Association Type of Order Base to Order Release - you have two Association options - Header - Header and Ship Unit Release Instructions - Ship Unit.
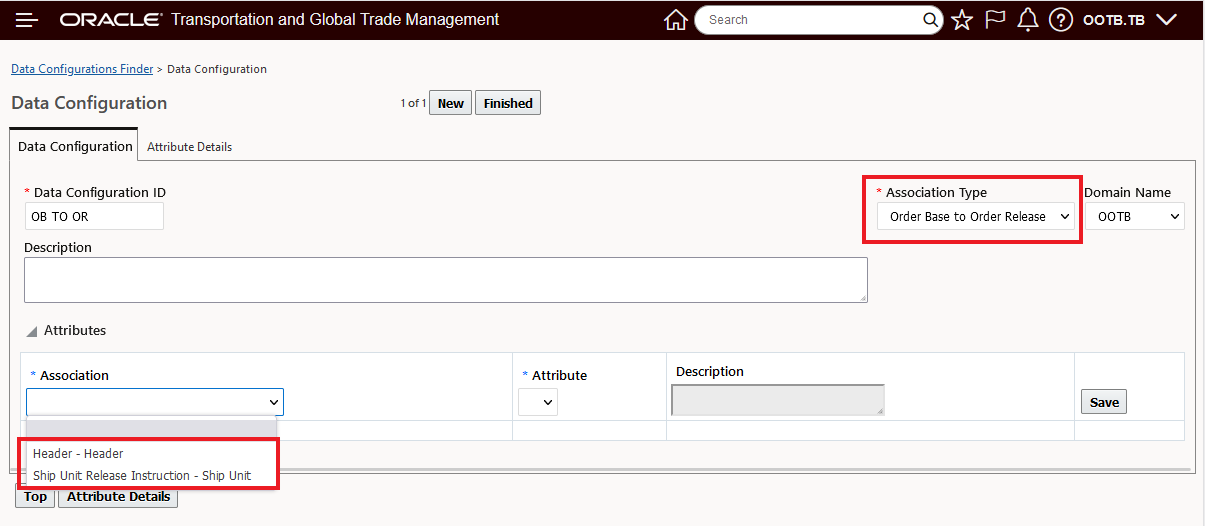
Order Base to Order Release Data Configuration
The Header - Header Association provides you with the option of mapping the Order Base Type to the Order Release Type.
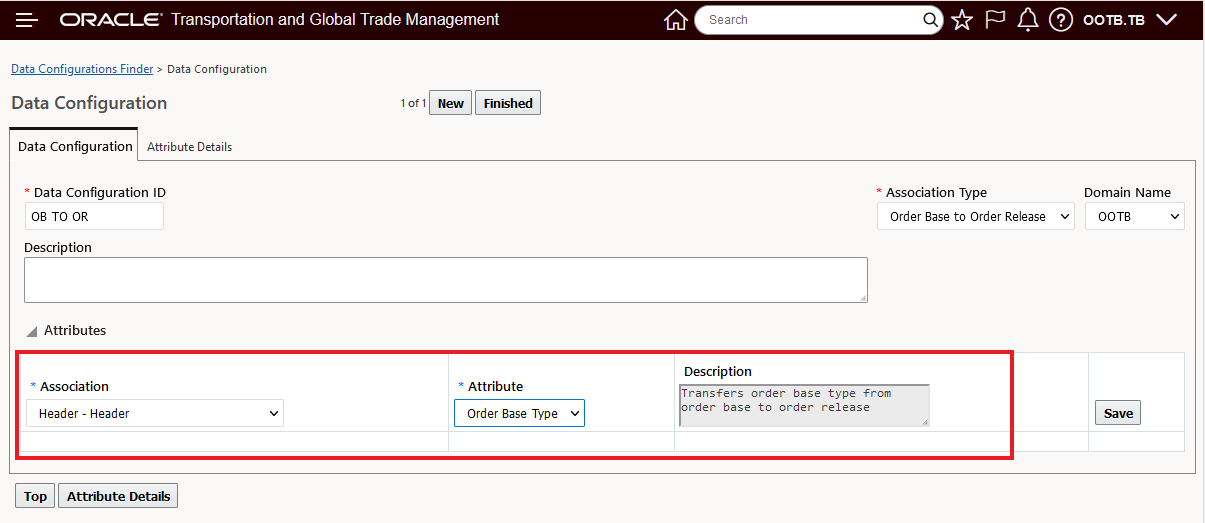
Header - Header Option
The Ship Unit Release Instruction - Ship Unit Association option provides three different Attribute mapping options for the User Defined Fields/Flex Fields - Date, Number or String.
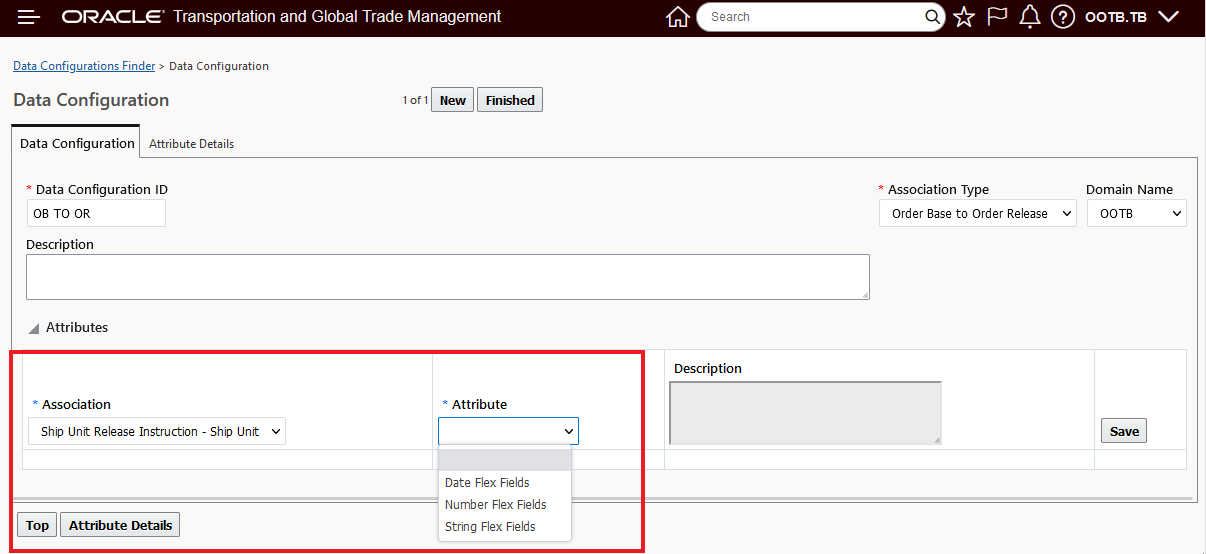
Ship Unit Release Instruction - Ship Unit Options
In the example below all four association attributes have been selected for the two Associations.
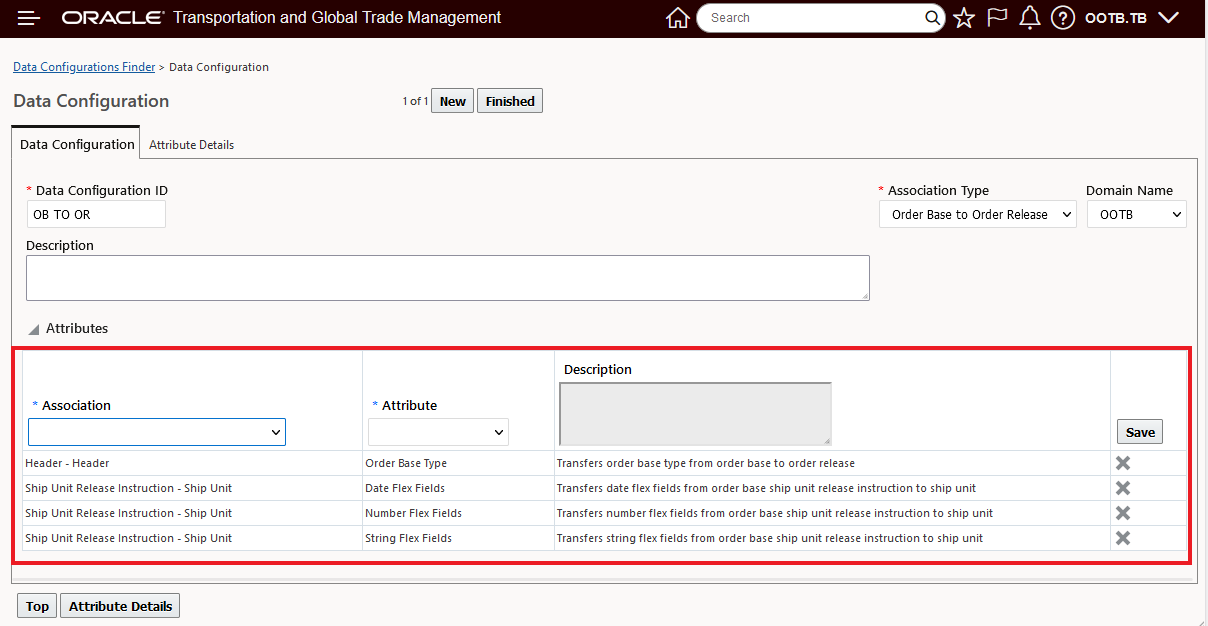
All Associations and Attributes selected
The options for mapping- across the various Associations and Attributes are highlighted below. Note that the Header - Header option only supports mapping the Order Base Type to the Order Release Release Attribute, as such there are no detail options provided.
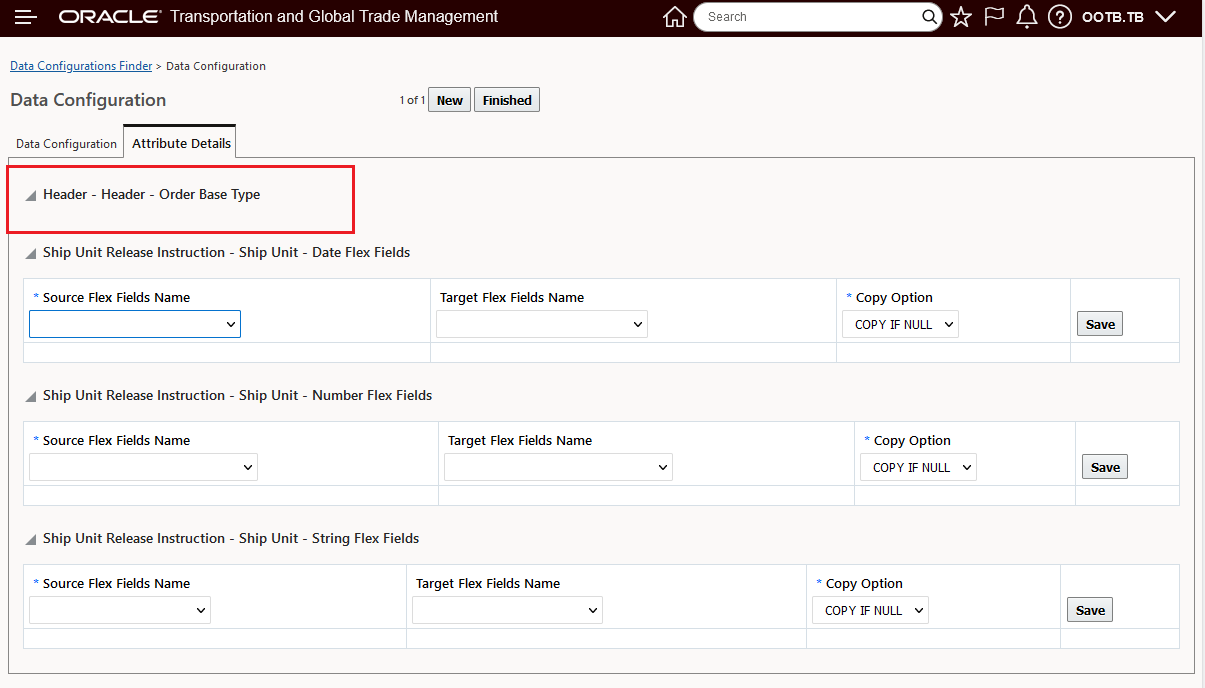
Attribute Details
Below are the options for mapping the Date Flex Fields. You can map any Date Flex Field Source to a desired Target and you can map to the same field multiple times. For each mapping you have different Copy Options - you can Copy If Null, Overwrite and Append.
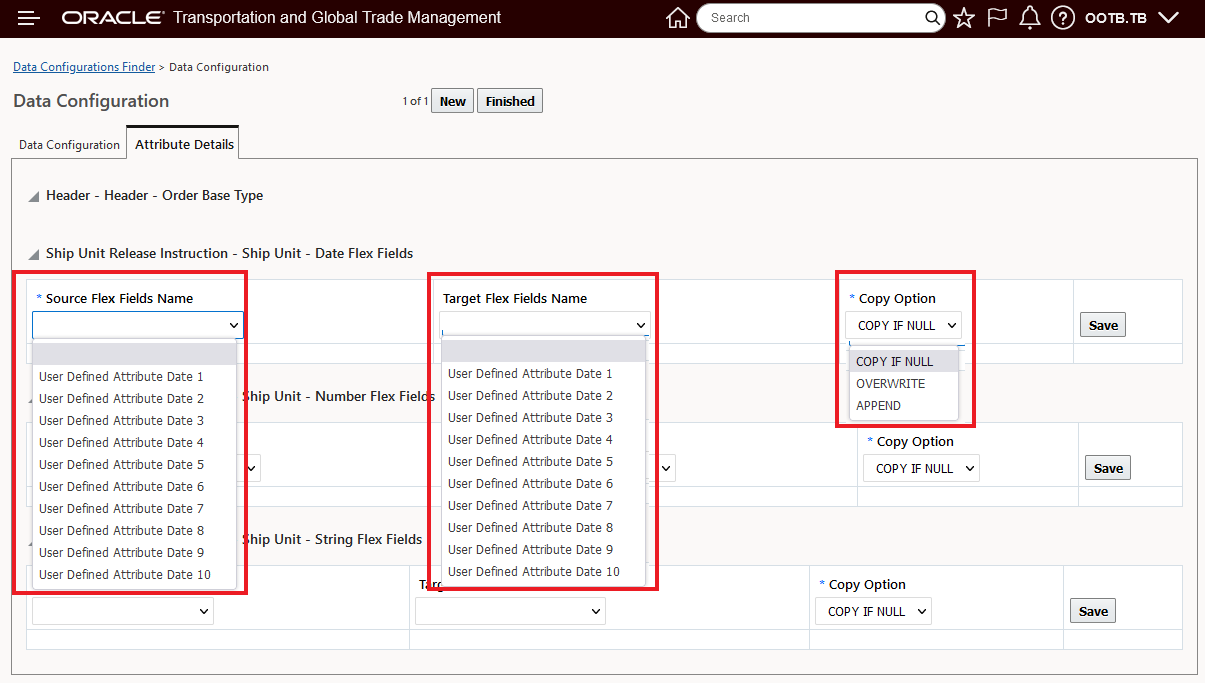
Date Flex Fields Mapping
Below are the options for mapping the Number Flex Fields. You can map any Number Flex Field Source to a desired Target and you can map to the same field multiple times. For each mapping you have different Copy Options - you can Copy If Null, Overwrite and Append.
Note the additional option in the Target Mapping of the Priority Field - you have the option of mapping from a selected Flex Field to the Order Release Priority field using this option.
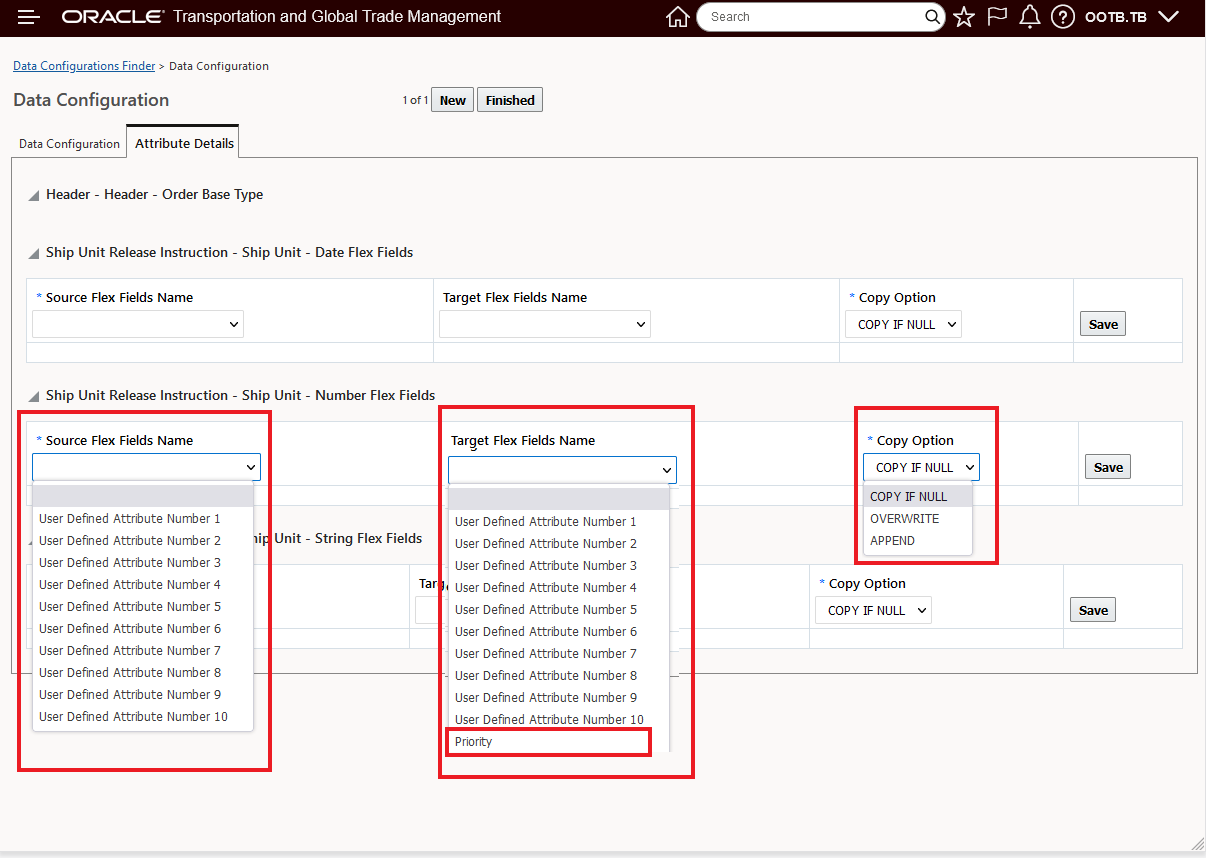
Number Flex Field Mapping
Below are the mapping options for the String Flex Fields. Note that in addition to mapping to the 20 User Defined Attribute fields - you also have the opportunity to map the source User Defined Attribute String field to the Order Release fields - Splittable, Count Splittable, Flex Commodity Qualifier and Flex Commodity Code.
Note that the mappings to "real" Order Release fields requires - for the mapping to work - that the values being mapped are supported/valid for the fields set as the targets.
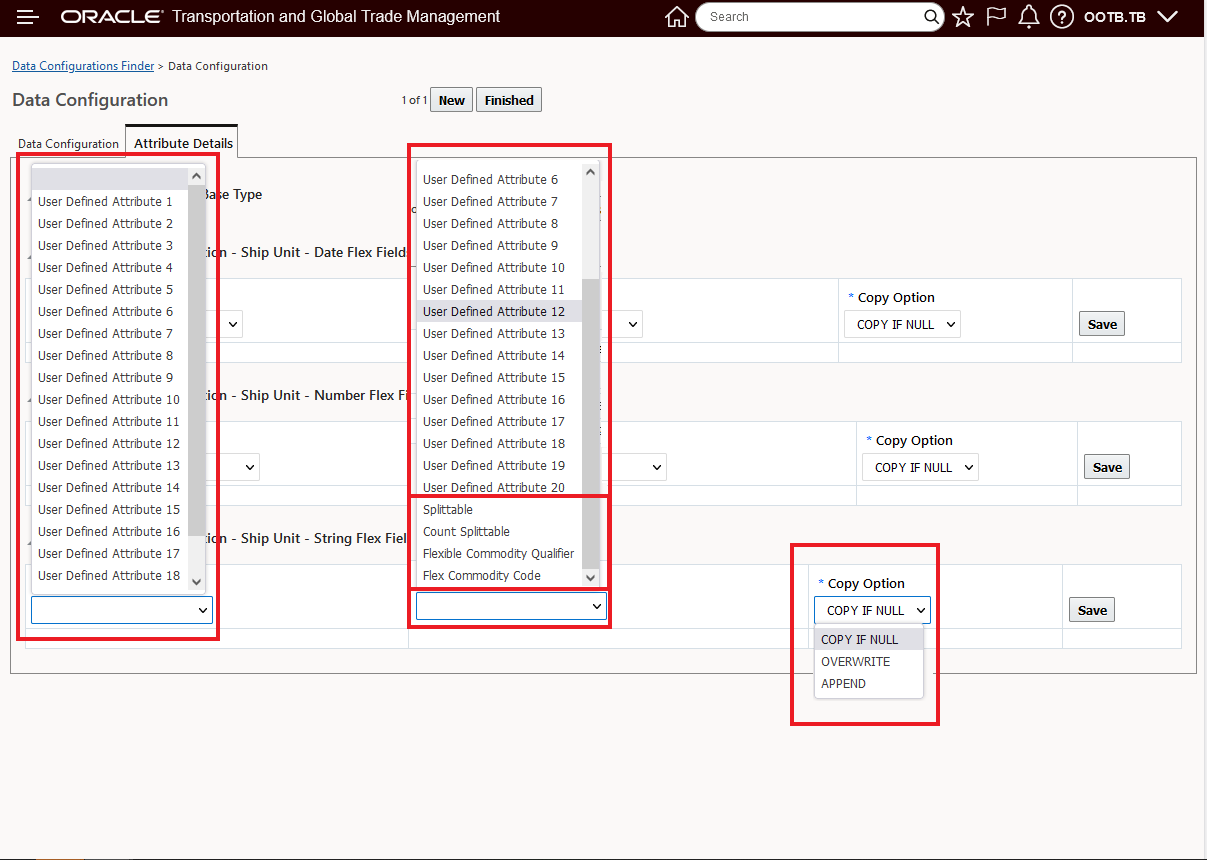
String Flex Field Mapping
Below is an example (View) of a completed Data Configuration for the Order Base to Order Release options.
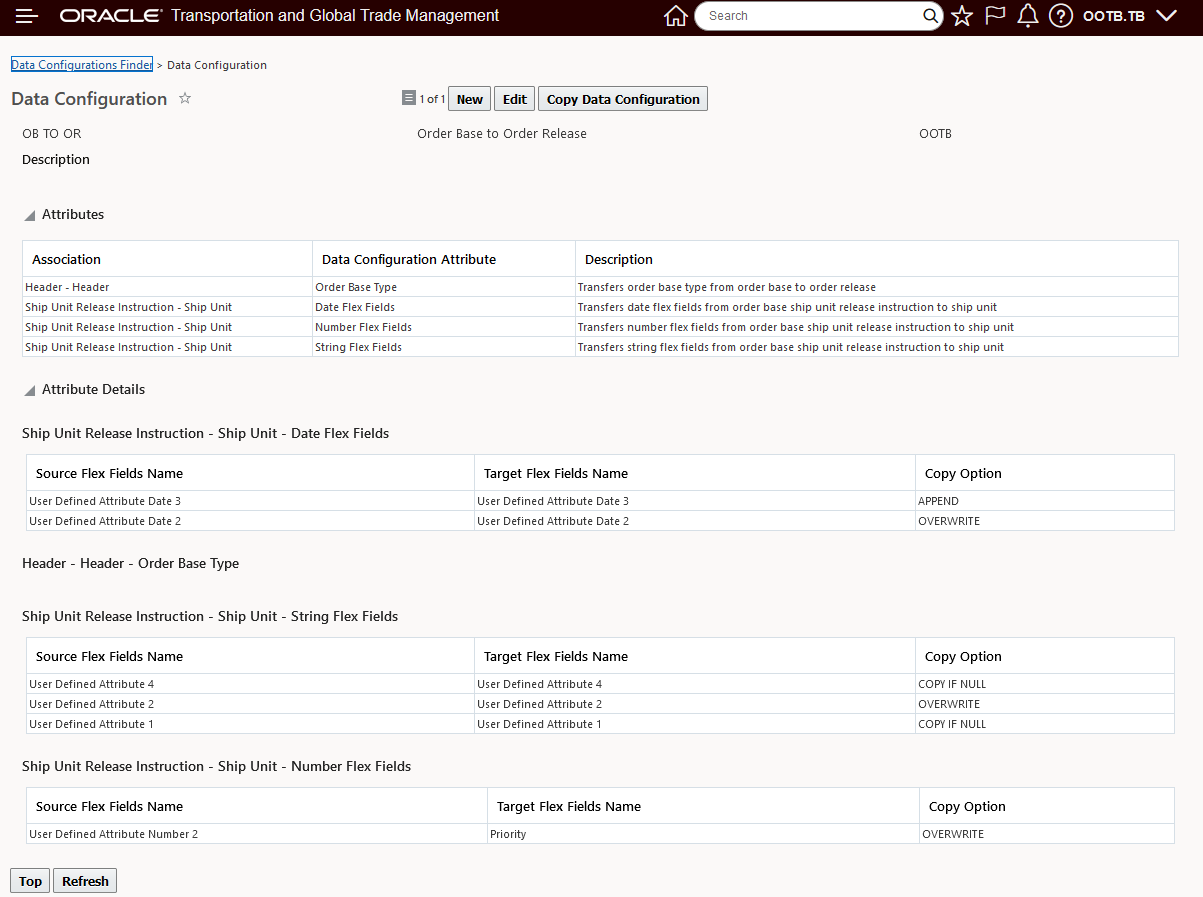
Example
To use the Data Configuration with the Order Base Line Packing action - the Data Configuration must be specified in the Order Management Parameter - Data Configuration For Order Base Line Packing - as highlighted below.
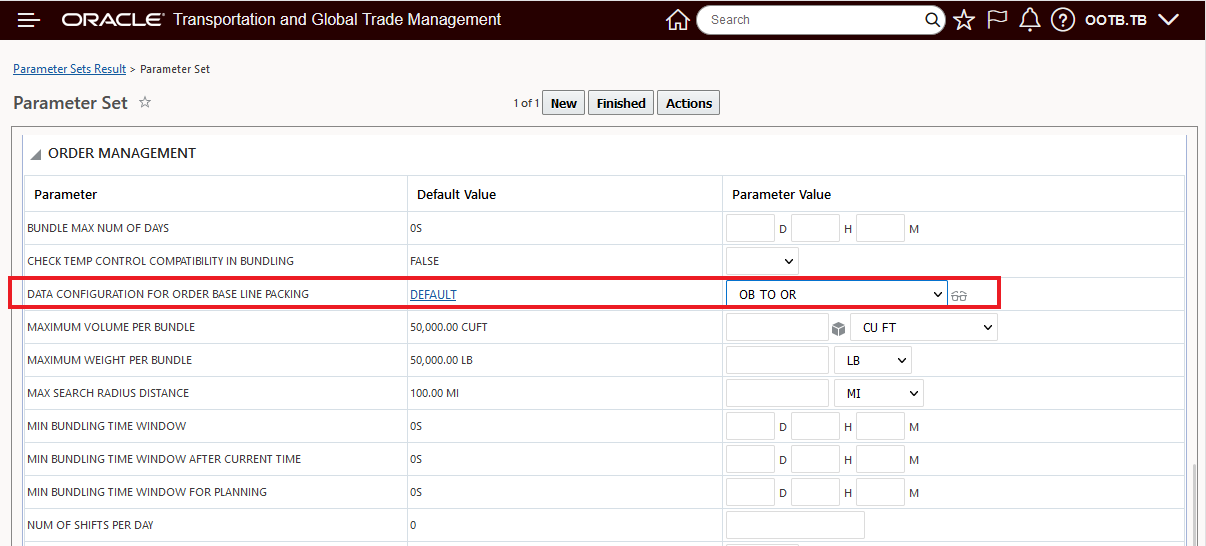
Planning Parameter
This feature provides you more information to better support your Order Base Line Releasing process.
Steps to Enable
To take advantage of this feature you will need to:
- Create a new Data Configuration with the Association Type of Order Base to Order Release
- Select the desired Association option - Header - Header and/or Ship Unit Release Instructions - Ship Unit
- Configure the Attribute details for each of the Associations selected.
- Configure the Order Management Planning Parameter - Data Configuration For Order Base Line Packing - to use the desired Data Configuration.
Tips And Considerations
The Order Base Line Packing action is used to specify packing information for order base lines from multiple order bases. When you complete this action, there will be one order release with multiple ship units containing ship unit lines from multiple order base lines. Note: This action only works for order configurations where the releasing logic is set to "One Ship Unit for All Lines". The public order configuration "Instructed Prepack" which has the Releasing Logic set to "One Ship Unit for All Lines" has been provided for you. It is recommended that you use this order configuration if you are using the "Order Base Line Packing" action and Simple Ready to Ship.
Order Release Screen Set - Stuffing Destuffing Location Information Added
This feature adds twenty additional fields to the Order Base and Order Release screen set that you can configure to provide location address information for your Order Base and Order Release assigned Stuffing and Destuffing Locations.
In the example below, the Order Release is assigned both a Stuffing and Destuffing location.

Order Release Stuffing Destuffing Locations
The locations information for the assigned Stuffing and Destuffing Locations is below.

Stuffing Location
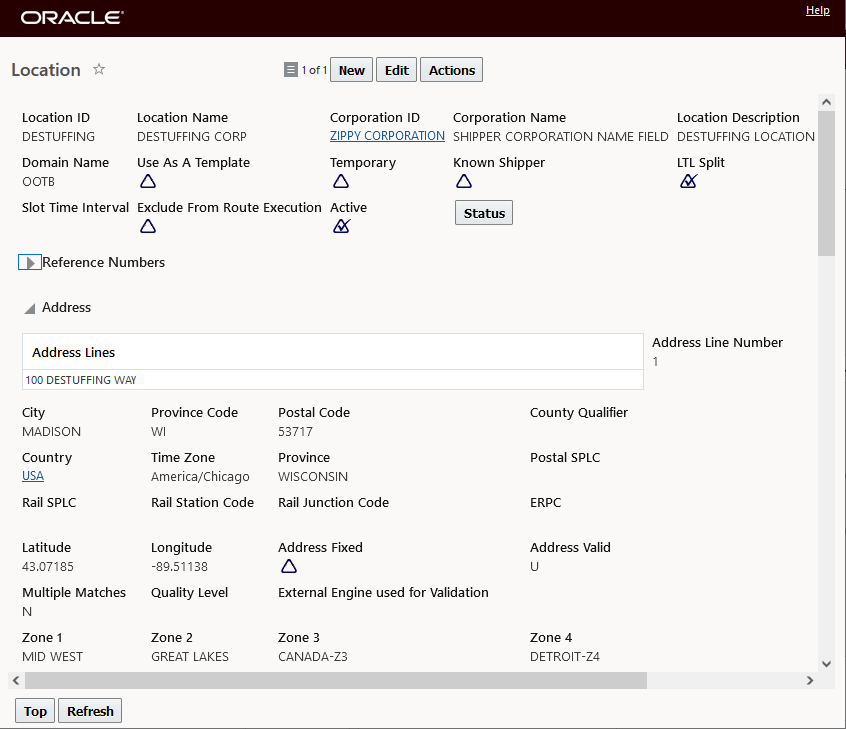
Destuffing Location
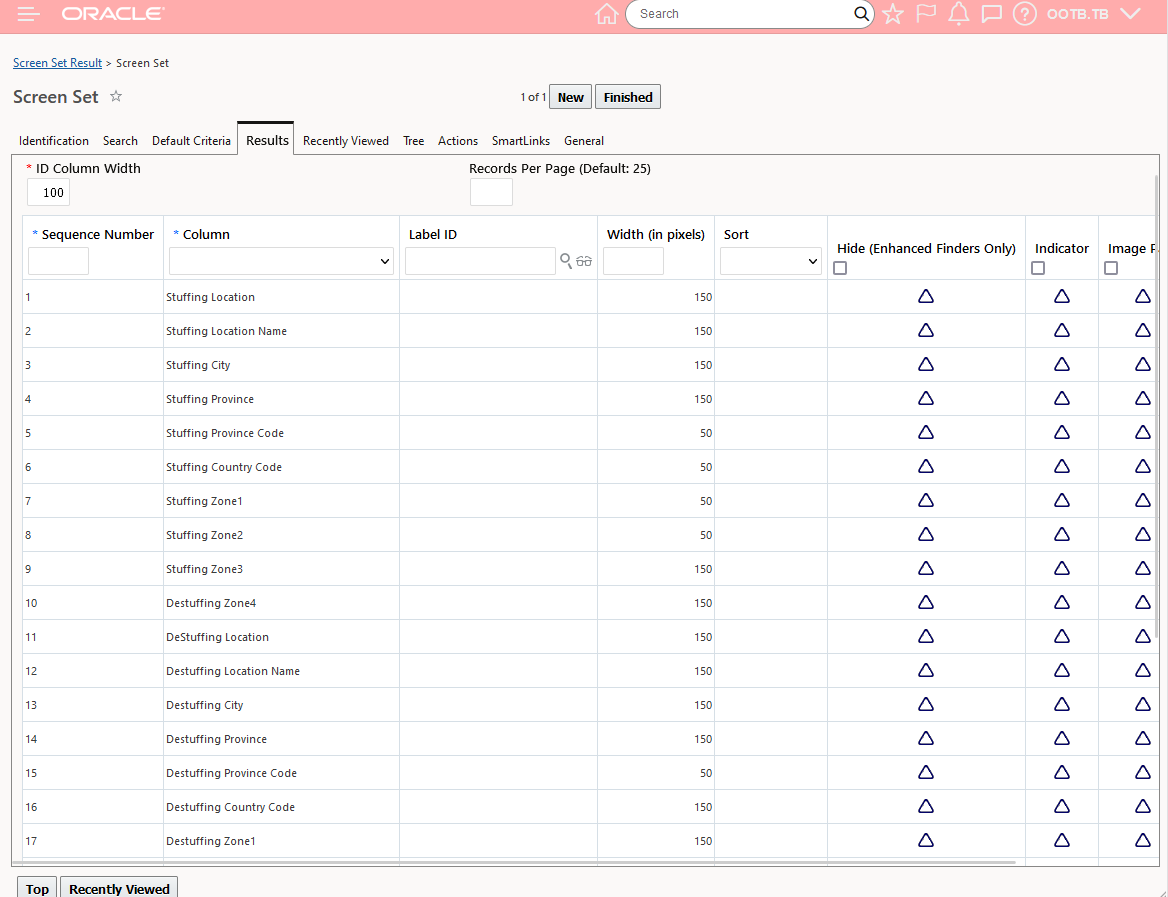
Using this feature, you can now configure your Order Release Screen Set - as shown below, to include Location information for both the Order Release's assigned Stuffing and Destuffing Locations.
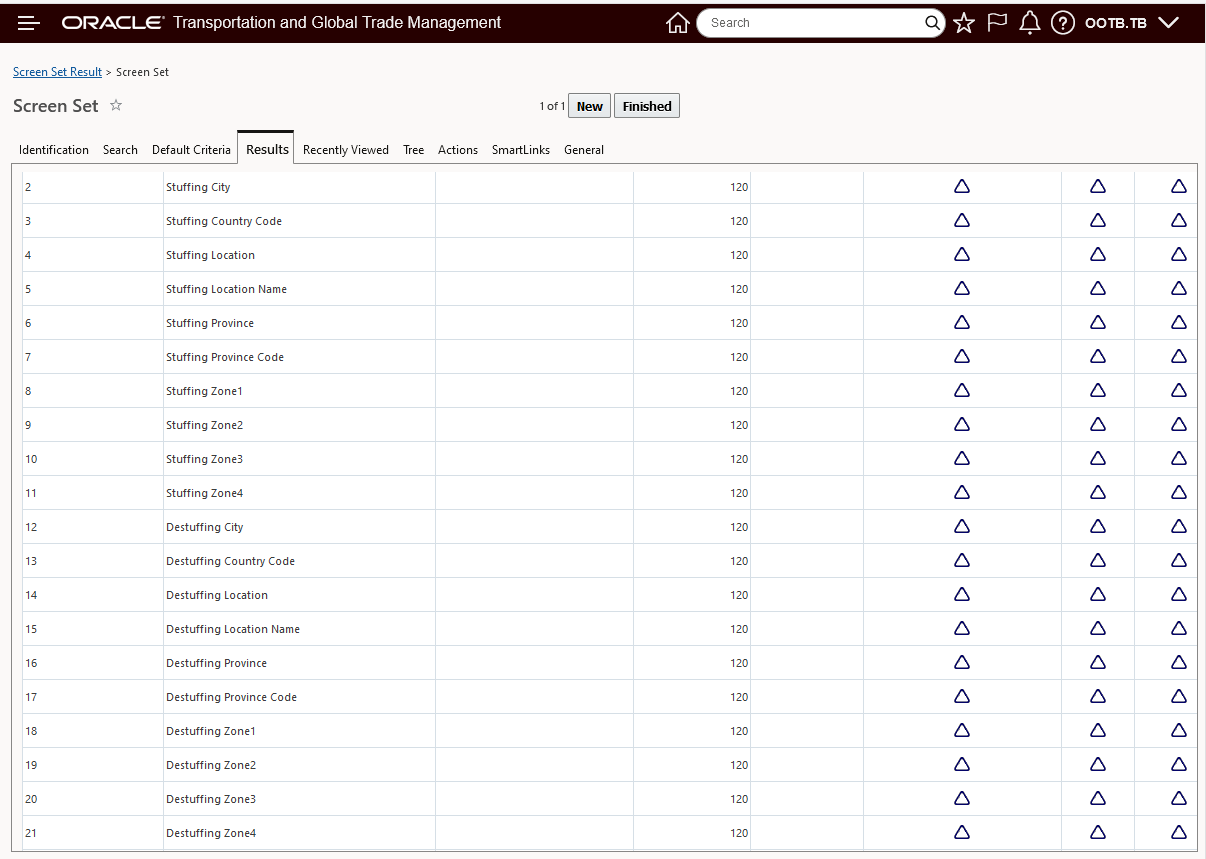
Stuffing Destuffing Location Columns Added to Order Release Screen Set
The Screen Set above provides the following Finder Results.
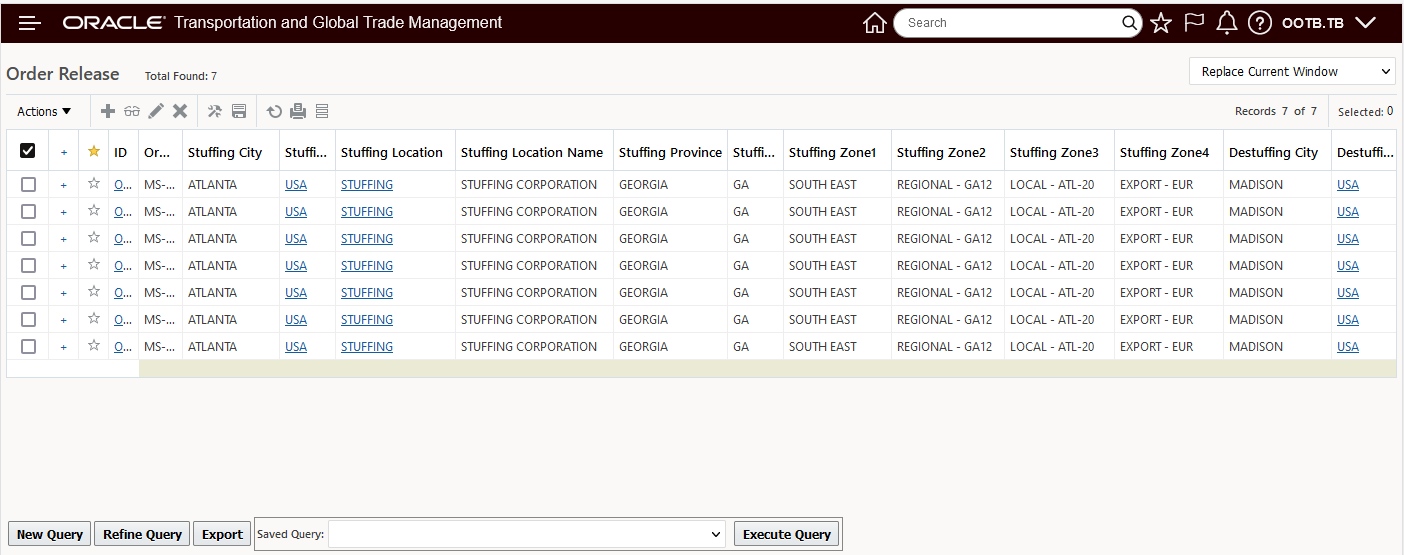
Finder Results With Stuffing Destuffing Columns
Location information for Stuffing and Destuffing are also available for Order Base.
Stuffing Destuffing Location Info Order Base Finder Results
This feature simplifies navigation by providing visibility to your Order Release's Stuffing and Destuffing Location address information directly on the Order Release's Finder Results.
Steps to Enable
To take advantage of this feature you will need to modify or create a new Order Release Screen Set and included the desired Stuffing Destuffing Location fields.
Mobile Application Enhancements
This feature provides a list of new features and improvements to the new Mobile Application. Unless specifically mentioned - these enhancements are provided for both Flows - Driver and Service Provider.
The highlights include the following enhancements:
Open In Maps - Use Mobile Devices Default Map
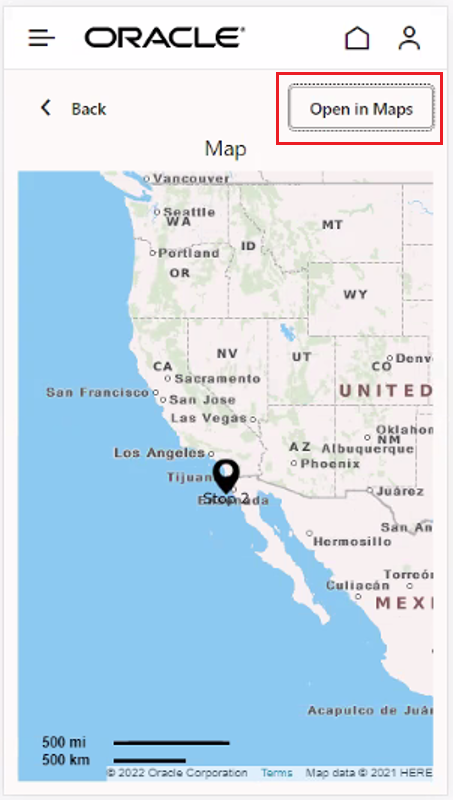
The Open in Maps button, added to the map page view will, depending on the platform the mobile app is running on, open the platform's native map application. For Android, Google Maps will be invoked and for IOS the Apple Maps will be invoked.
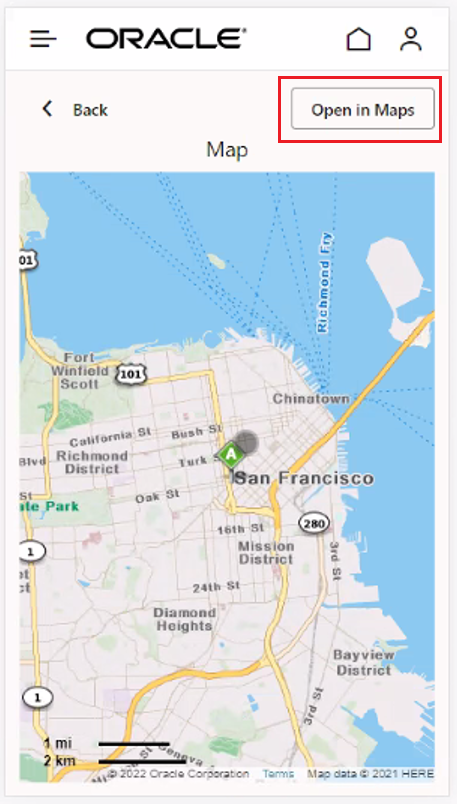
Open in Maps
In the example below - Google Maps will be opened when the Open in Map option is selected.
Open in Maps - Latitude Longitude Coordinates
Below is the Google Map view after the Open in Maps options is selected.
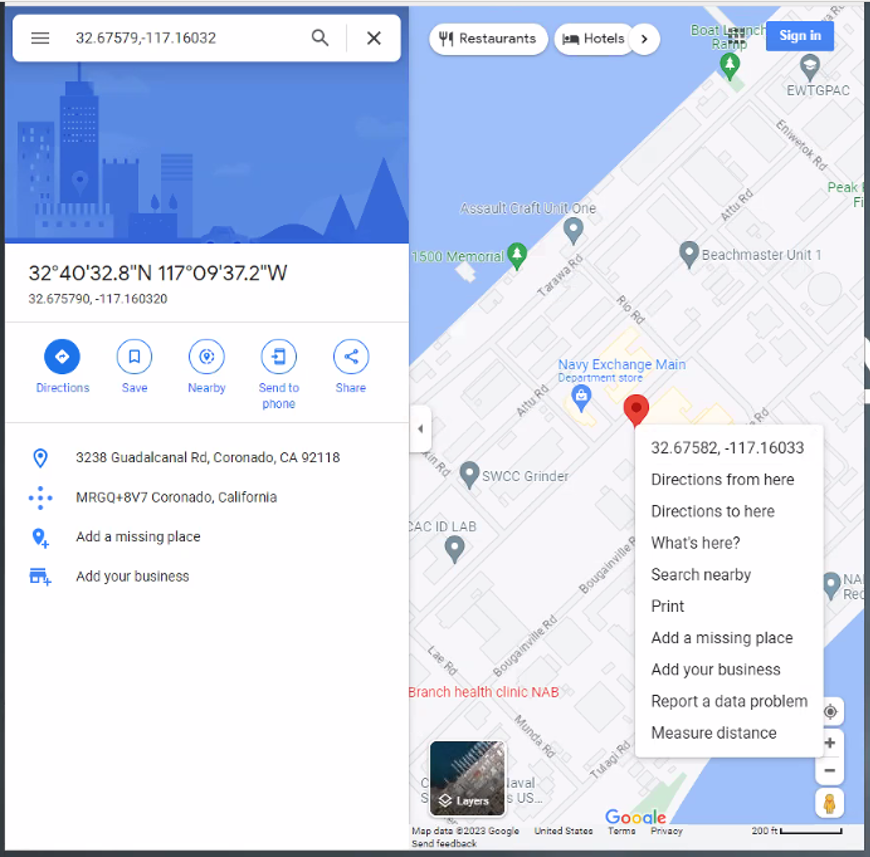
Google Map View
By default, if latitude and longitude are available for a stop, the latitude and longitude will used to plot the location on the map.If latitude and longitude are not available, then the location attributes for the stop - like street address, city, state etc. will be used to show location on the map.
Define Stop Type Label On Mobile
This feature provides you with the opportunity to use translation values to define your stop types on the Mobile Application. The option is configured within the Mobile Layout, by default the translations are not used and the Stop Type values of P, D, PD, NFR and T are used.
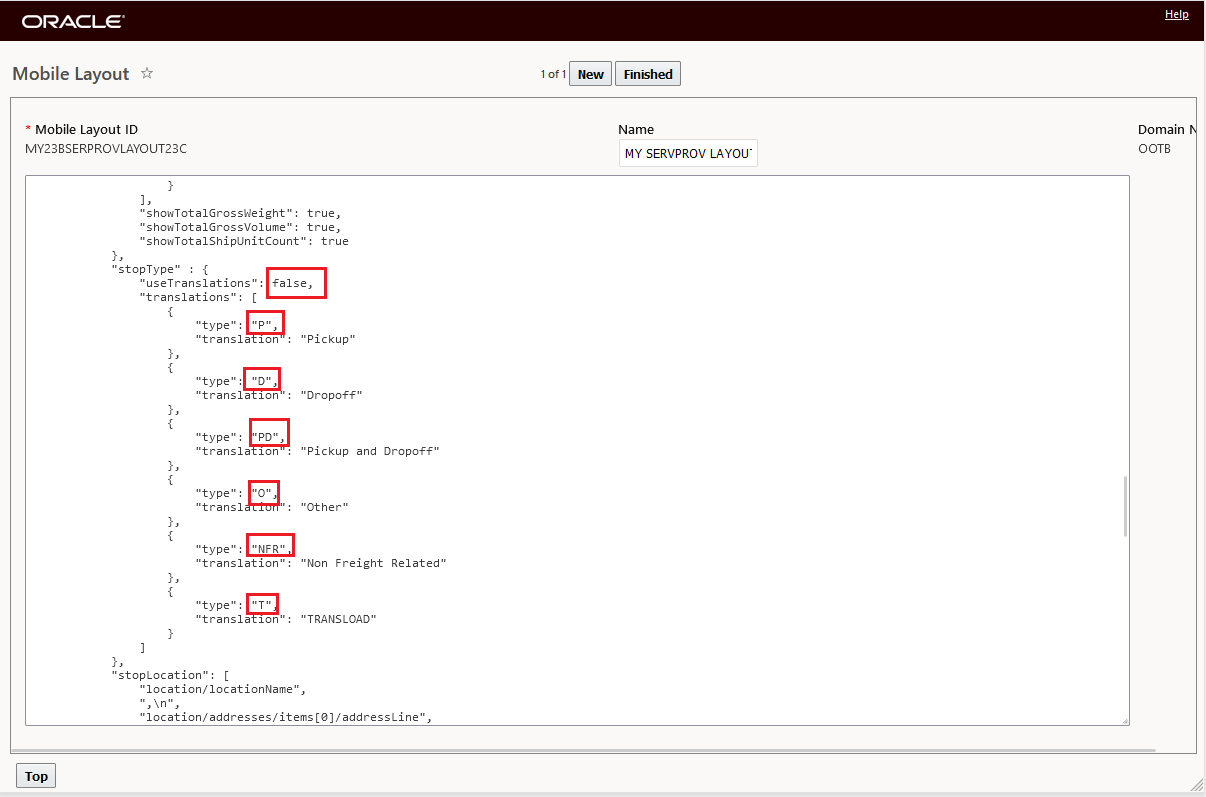
Mobile Flow Stop Type Default useTranslations = false
When the useTranslations parameter is set to true, the translation values are used. By default the Mobile Layout provides standard set of translations for the Stop Type - but you can change them if you would like to see different values.
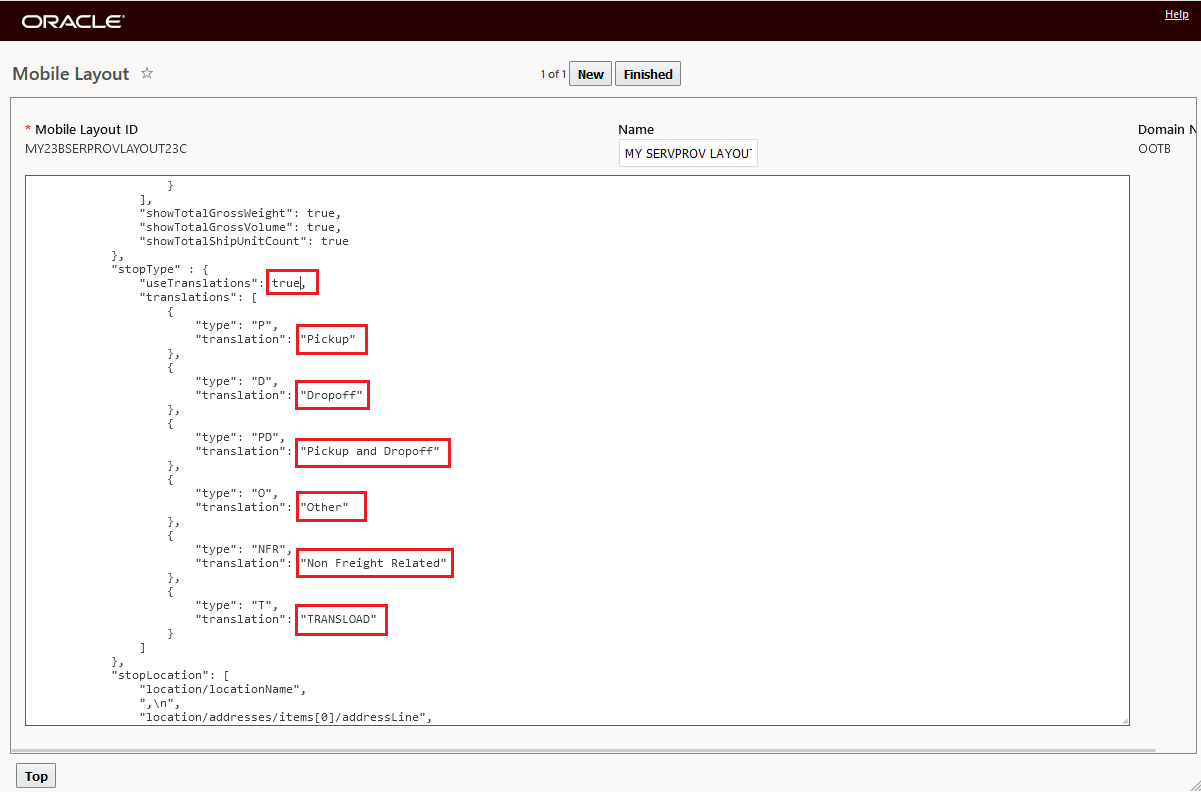
Mobile Flow Stop Type Default useTranslations = true
Below is an example of the Stop Type Pickup and Dropoff with the useTranslations set to true.
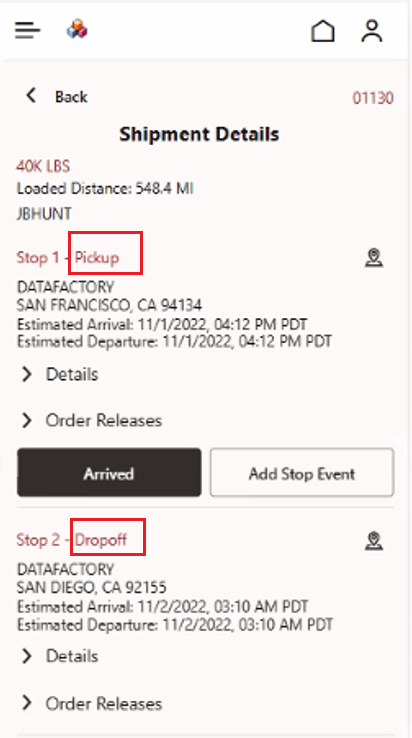
Stop Type useTranslations
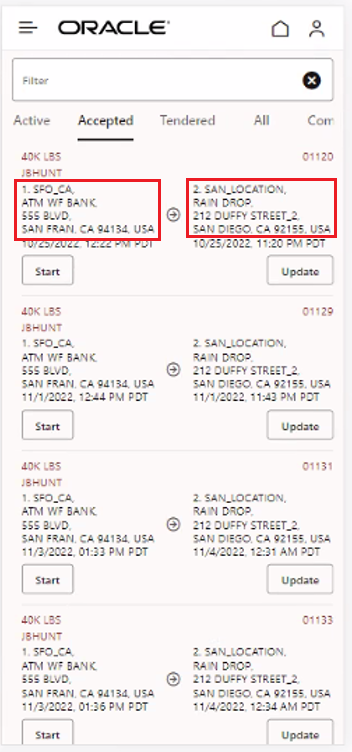
Show Shipment Reference Numbers
This feature allows you to configure the application to show multiple Shipment Reference Number values in either a popup or an accordion display. The feature is turned off by default.

Show Shipment Reference Numbers
To show the Shipment Reference Numbers you will need to set the showShipmentRefnums parameter to true and you will also need to specify one ore more Qualifiers for which to show the Reference Number Values. By default popupEnabled is true - which show the Reference Number link which when you select it you will see a popup box with the selected Reference Numbers. You can also configure Reference Numbers to show in an accordion fashion - this can be accomplised by setting the popupEnabled parameter to false. If you would like the accordion to be expanded by default you can set expandAccordion to true.
Tender Update - Equipment Information- Service Provider Flow
This feature, for Accepted shipments, provides the option to update Equipment details.
Update button will be available on accepted shipments based on the property glog.tender.avoidPickupDateCheck. By default glog.tender.avoidPickupDateCheck is false.Update button should not be available if the above property is true.
When you select the Update button, the details page where Pickup Date ,Refnum and Equipment details can be provided.
A collapsible section for Equipment details has been added. The Equipment section shows read only information for the following fields:
- Shipment Equipment
- Equipment Index
- Equipment Group
- Equipment Type
- Equipment ID
Editable fields are shown in the below screenshot.
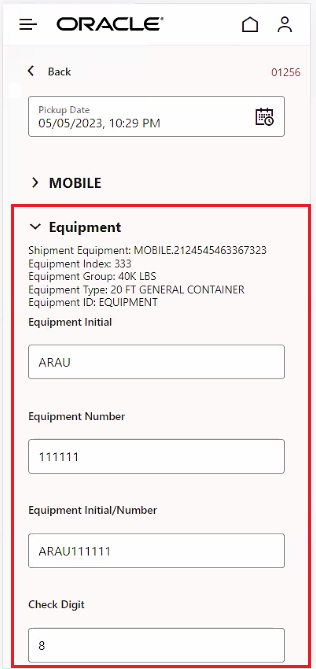
Equipment Information
The validation for the Equipment Initial and Number follow the standard validation in OTM. The assumption is SCAC then Number - so if you enter a value in the Equipment Initial/Number field (e.g BDKL123456), the letters will go to Equipment Initial and the number will go to Equipment Number.
Note - validation will be done for Check Digit field.
The screenshots below show messages for different cases of Check Digit validation.

Check Digit Field Validation Messages

Check Digit Field Validation Messages
Broadcast Tender Supported - Service Provider Flow
This feature extends the Tender Types supported by the Mobile App - Service Provider Flow - to include Broadcast Tenders.
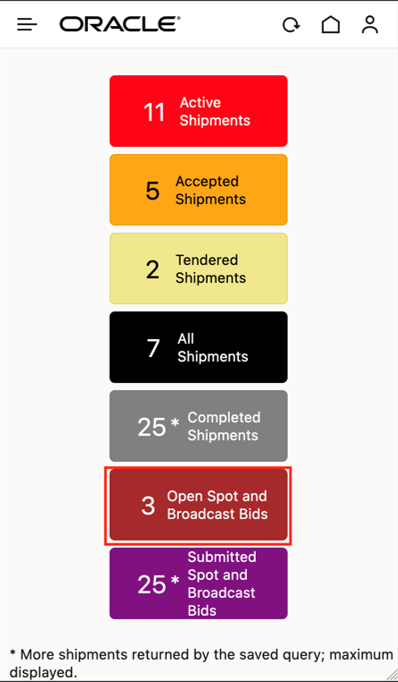
Open Tenders - Broadcast and Spot Supported
Both Open Tenders supported - Broadcast Tender and Spot bid - as noted below.
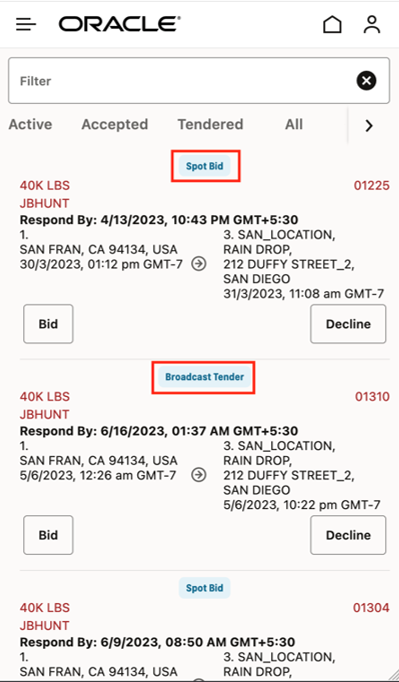
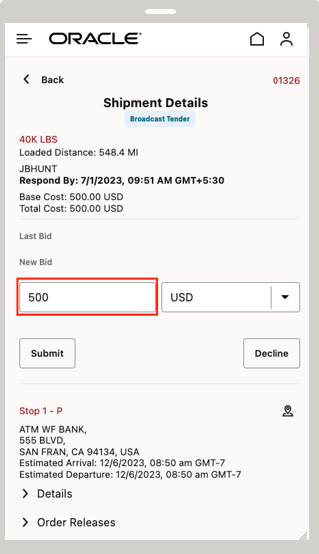
Broadcast tenders operate in one of two ways. One way - default - the expectation is that a bid is required when the Service Provider Accepts the Broadcast tender as shown below.
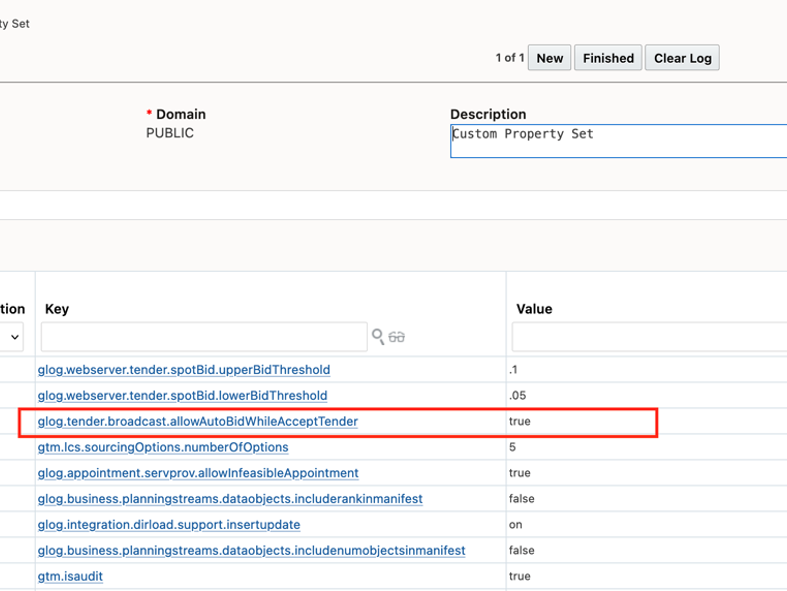
The property glog.tender.broadcast.allowAutoBidWhileAcceptTender allows for the accepting of a broadcast tender without needing to enter a new bid for the carrier. If the property is set to true and the service provider performs the Accept Tender action on the broadcast tender, the shipment will be accepted, and the shipment cost will be used as the bid amount. The default is false, the assumption is a bid will be provided. The example below is the default/bid expected/required.

Initiate Bid for Broadcast Tender - Bid Amount Required
The other option, is to have the property glog.tender.broadcast.allowAutoBidWhileAcceptTender set to true - in this case, when the service provider performs the Accept Tender action the shipment will be accepted and the shipment cost will be used as the bid amount. As shown below.
Property set to true
With the property set to true, the New Bid is auto populated.
Submit Bid Broadcast Tender - Bid Amount Auto Populated
Show Information From Order Release At Shipment Stop Detail Level
This feature expands the Mobile Layout to include the option to add Order Release Level information at the Shipment Stop Detail level.
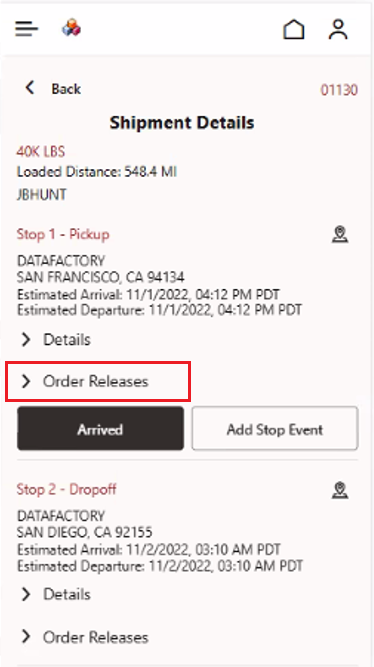
Shipment Stop Detail - Order Release
The Mobile Layout for the Order Release configuration is below.

Mobile Layout - Order Release at Shipment Stop Detail Level
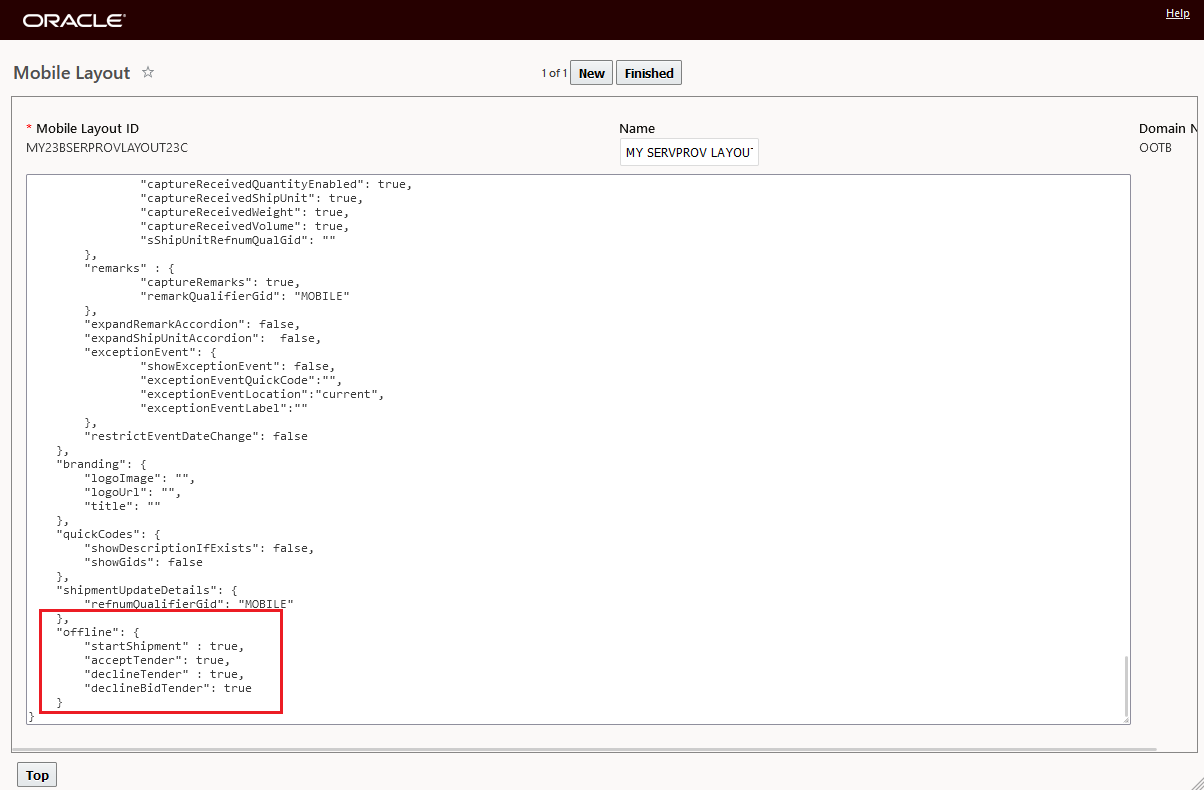
Offline Tender Response - Service Provider Flow
This feature expands the options for Offline response to include options for accepting, declining tenders and/or declining bid tenders (Spot, Broadcast).
The Offline options are controlled in the Mobile Layout. The Offline options include allowing for Shipment Start (default = false), Tender Accept (default = false), Tender Decline (default = false) and Bid Tender Decline (default = false).
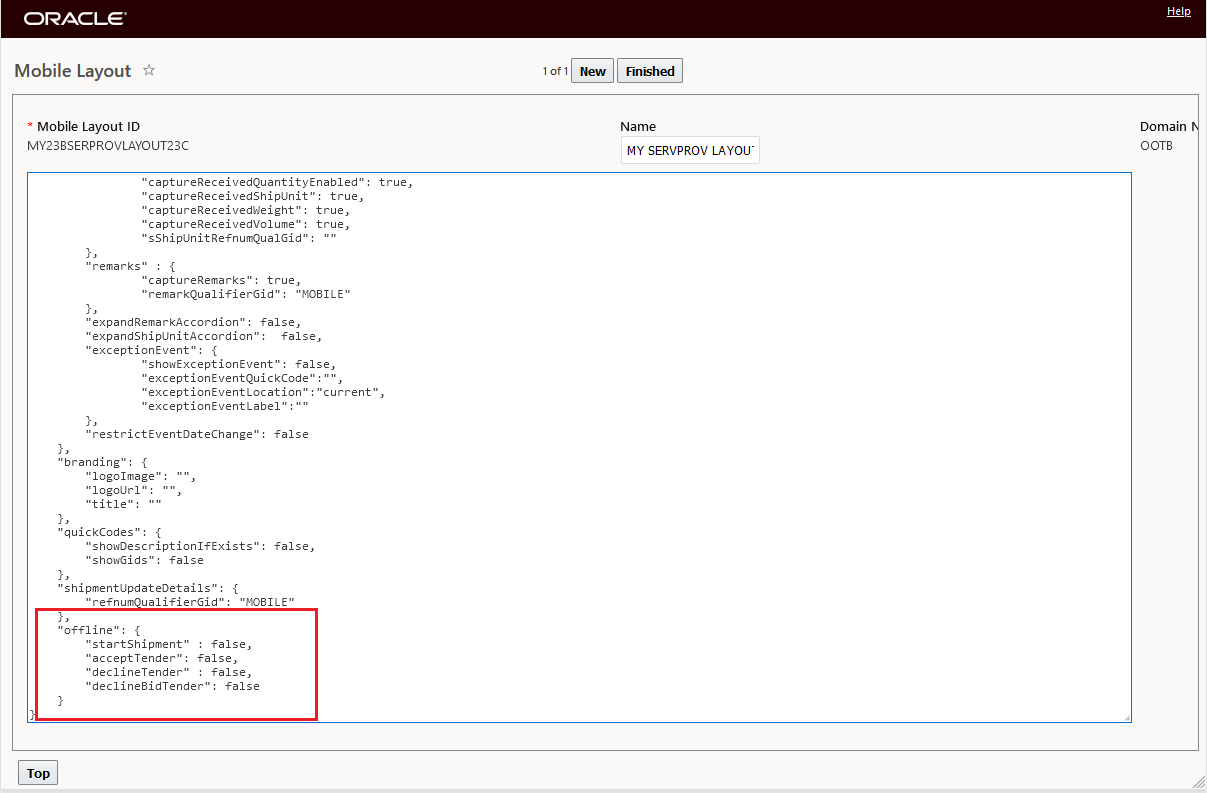
Offline Tender Mobile Layout Parameters
With the default setting for the offline parameters an attempt to do any of the actions while offline will result in a message being provided - as shown below for an attempted decline.
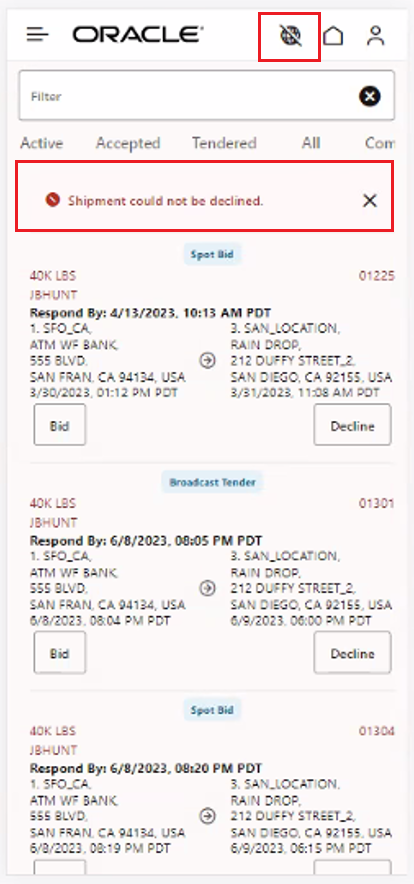
Not Allowed
In the scenario below - the Offline parameters have all be set to true.
Offline Tender Mobile Layout Parameters- Set to true
While Offline - with the offline parameters set to true - the following offline updates are supported.
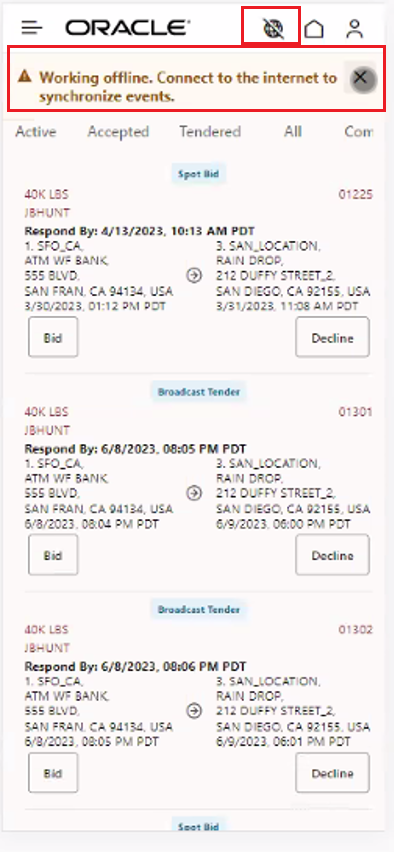
Mobile Application Offline
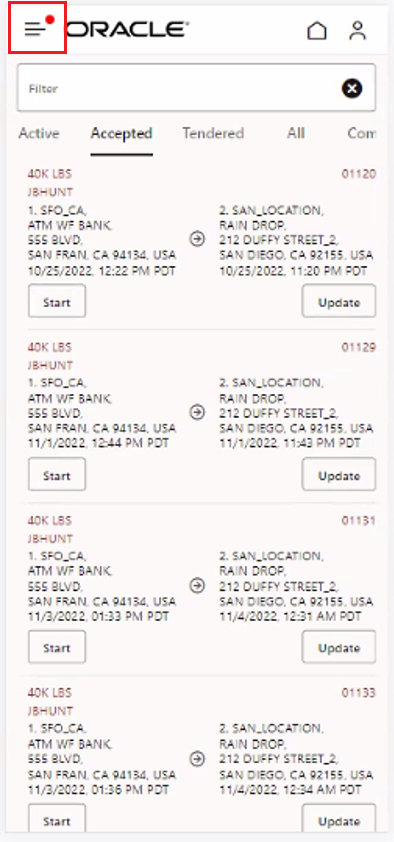
A shipment can be Started while offline - as shown below for 1307.
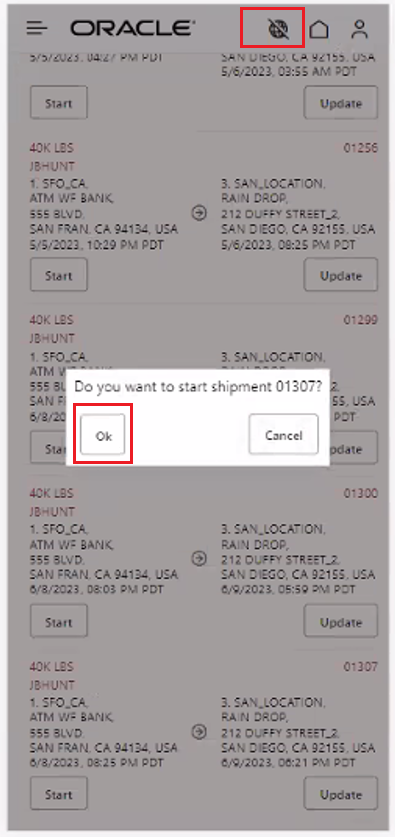
Start
A Tender can be Accepted while offline.
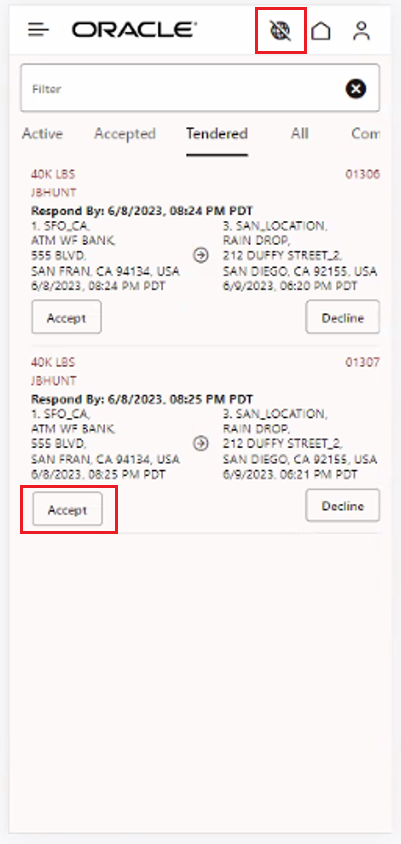
Accept
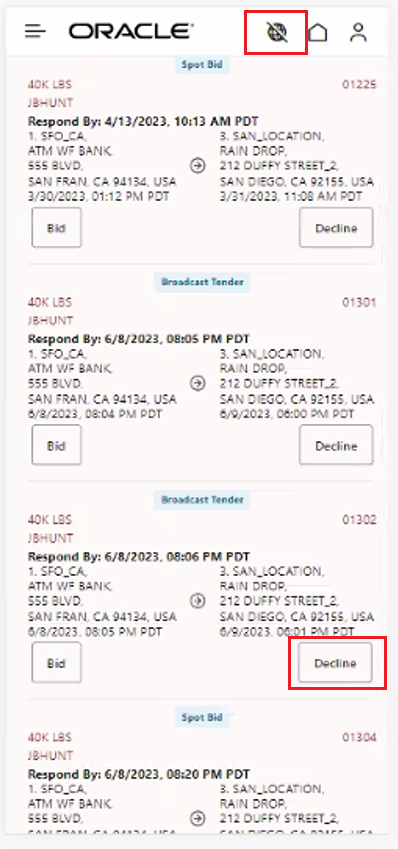
You can decline a Tender.
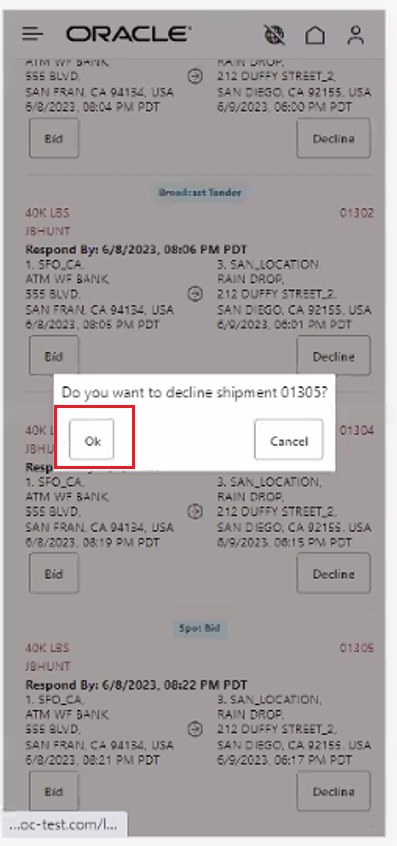
Decline
You can decline a Spot or Broadcast tender.
Decline Bid Tender
When the Mobile Application comes back online the processing results of the offline activity will be provided.
Back Online
Processing status.

Back Online Processing Status
Configure Source/Destination Address Information for Shipment List
This feature provides the ability to define the address details that are shown on the Shipment List so they can be consistent with what is shown on the Shipment Details.
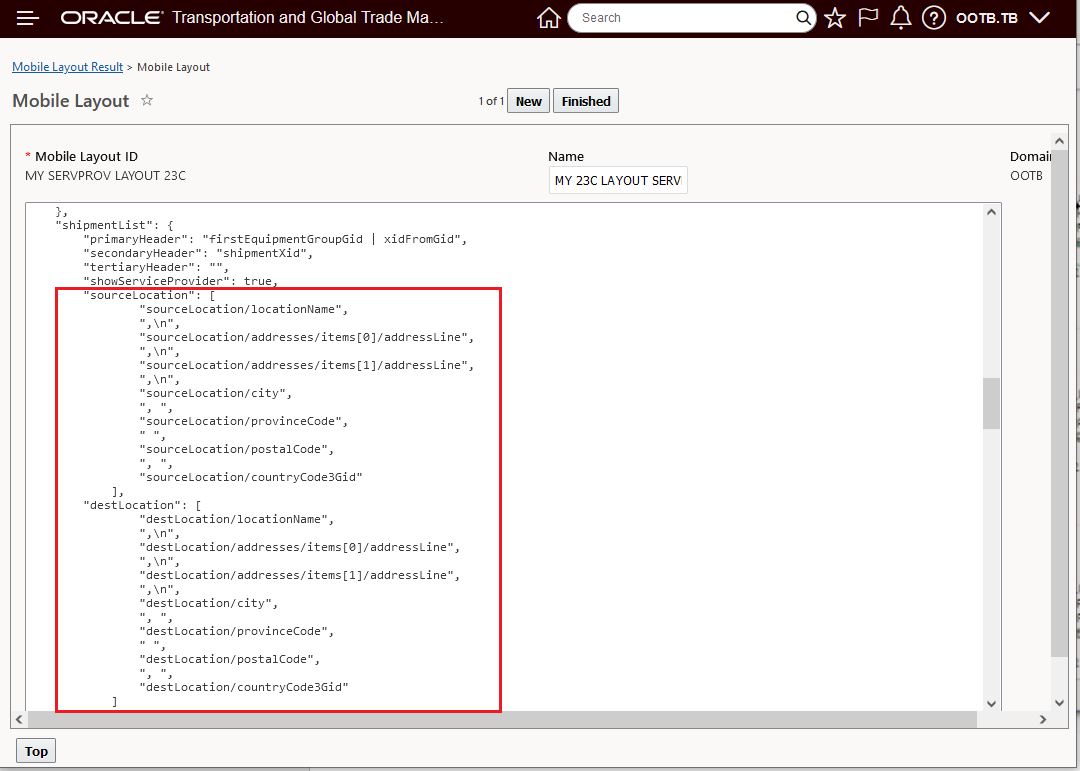
Mobile Layout Source Location Destination Location Shipment List Address Configuration
Source/Destination Address Shipment List
Restrict Event Date Change
This feature allows you to control the date/time entered with the tracking events.
The parameter "restrictEventDateChange" allows you to restrict entering event date based on the mobile date and time.The following parameter is available in the AddEvent section in Mobile Layout.
The possible values for "restrictEventDateChange" are:
- false - If it is false, there will be no restriction on event date.
- true - If it is true, the user cannot change the date and time from what is displayed.
- future - If it is future, the user cannot change the date and time to any future date and time but can change to past date and time.

Event Date - restrictEventDateChange = true
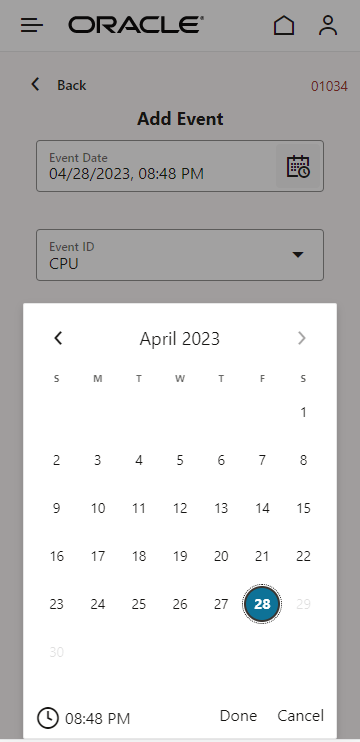
Event Date - restrictEventDateChange = future

Event Date - restrictEventDateChange Mobile Layout
Quick Code Droplist Configurable Options
This feature allows you to select whether to see the Xid (current functionality), Gid, or Description in the Quick Code droplists.
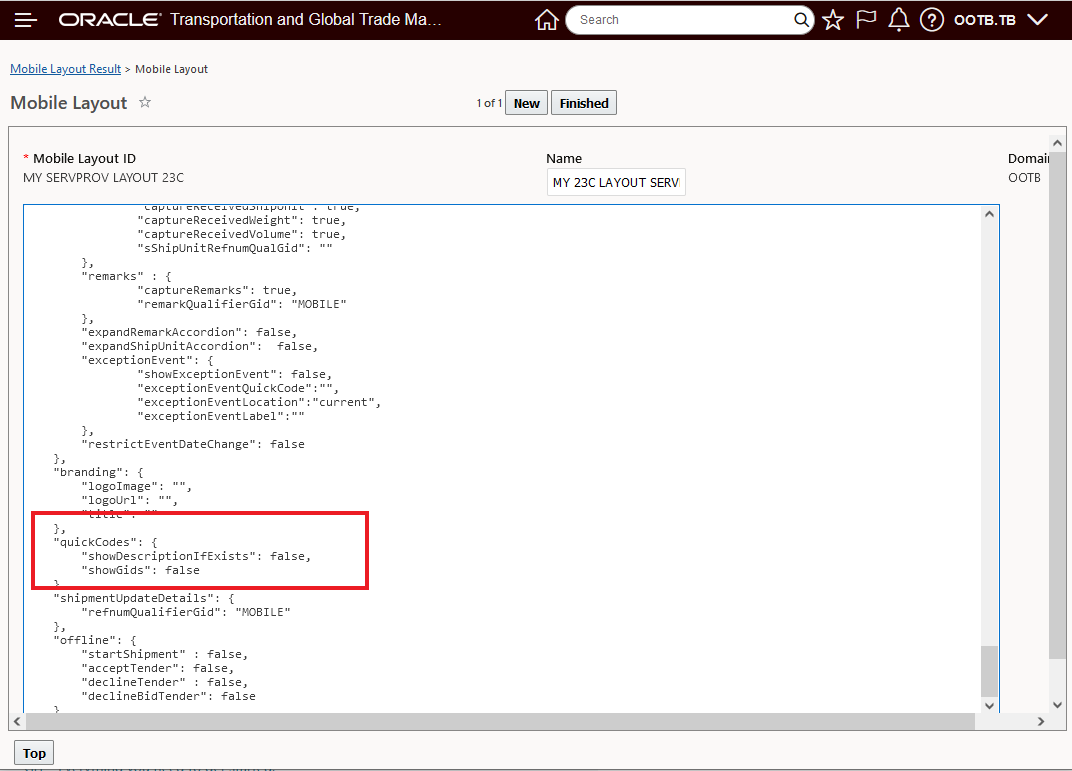
Mobile Layout Quick Codes
Both parameter values will default to false so that the Quickcode droplist shows Xids, as it does today. If you set the showGids to true the Gids will show in the droplist. If you set the showDescriptionIfExists to true the droplist will show the Description in the list or you can set both to true to see both - as shown below. Since Description is not a required field the application will show the Xid or Gid (depending on the value of showGids) for any Quick Code which has a null Description.
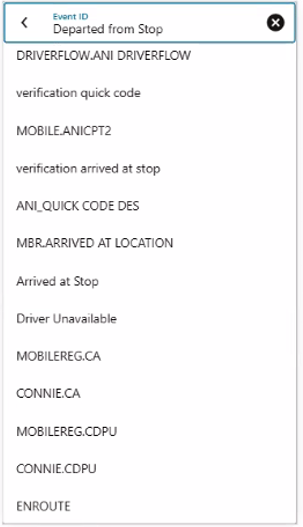
Quick Code GID and Description
Update Legal Phrasing On Mobile Application
Updates were made to the legal phrasing and version information provided with the Mobile App.
Updated Copyright and Version Information
These features improve usability and the configurability of the Mobile Application.
Steps to Enable
You don't need to do anything to enable this feature.
Tips And Considerations
All new implementations of Mobile functionality should be accomplished using the new PWA Mobile Application.
Any implementations using the MAF (Mobile Applications Framework) based Mobile App (iOS and Android Mobile Apps) should be re-implemented using the new PWA Mobile Application as soon as possible. Oracle's MAF (Mobile Applications Framework) products and support ends on June 30, 2023.
Change Voyage Schedule Shipment Action
This feature provides you with a new Change Voyage Schedule shipment action that allows you to change your shipment's assigned voyage schedule. Change Voyage Schedule supports both internally stored or externally provided voyage schedules.
The Change Voyage Schedule action is found by navigating to Shipment Management > Shipment Management > Buy Shipments > Actions > Shipment Management > Change Shipment Details > Change Voyage Schedule.
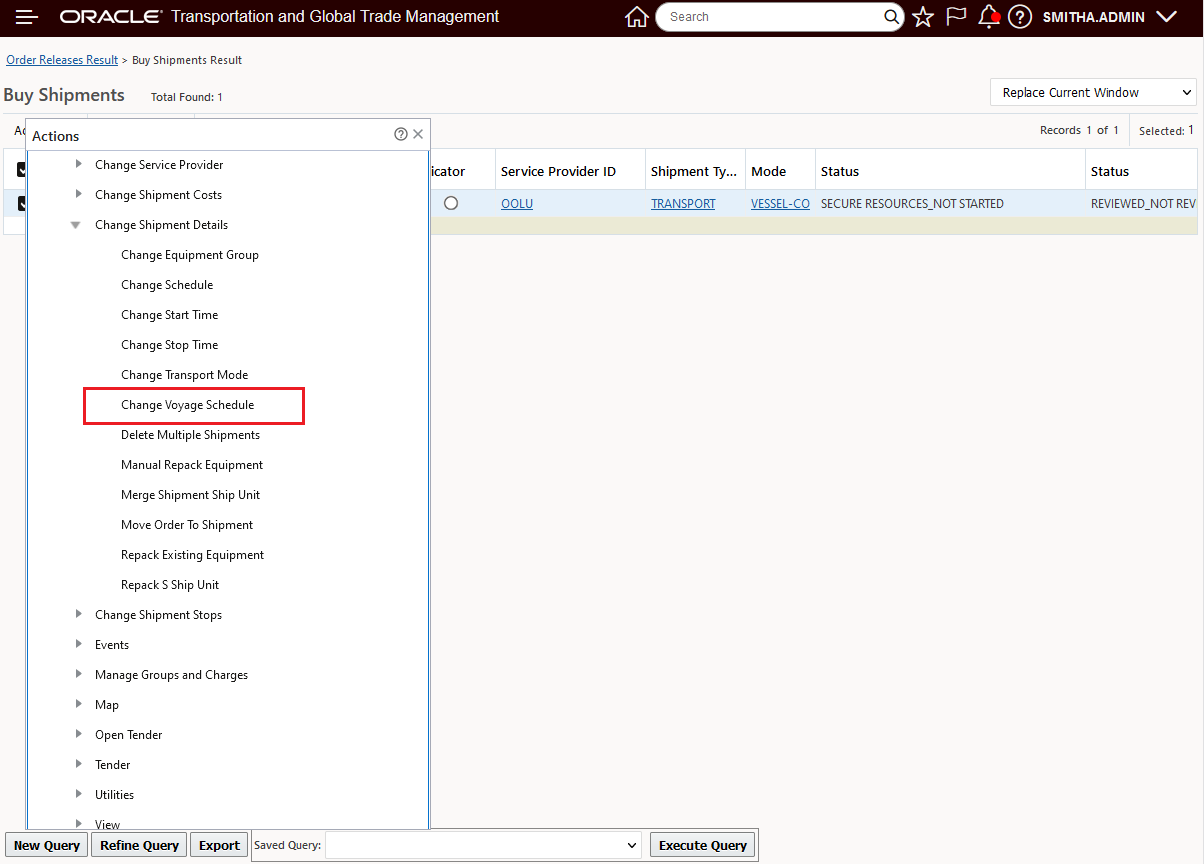
Change Voyage Schedule
The Change Voyage Schedule action retrieves schedules from either an internal or external source based on the Voyage Schedule parameters defined in the Parameter Set.
The Find Schedules step in the Change Voyage Schedule action, allows you to enter constraints and or change to a voyage with a different service provider.
The following are the inputs for the Find Schedules page:
- You can specify a new Voyage ID.
- You can enter a Service Provider Profile to show all voyages associated with the service providers in the profile.
- Review/change the Earliest Departure Time - this is the earliest date the new voyage can depart the port of load. This field is pre-populated with the earliest date of order movement on the shipment.
- Review/change the Latest Arrival Time is the latest date the new voyage can arrive at the port of discharge. This field is pre-populated with the latest delivery date of the order movement of the shipment.
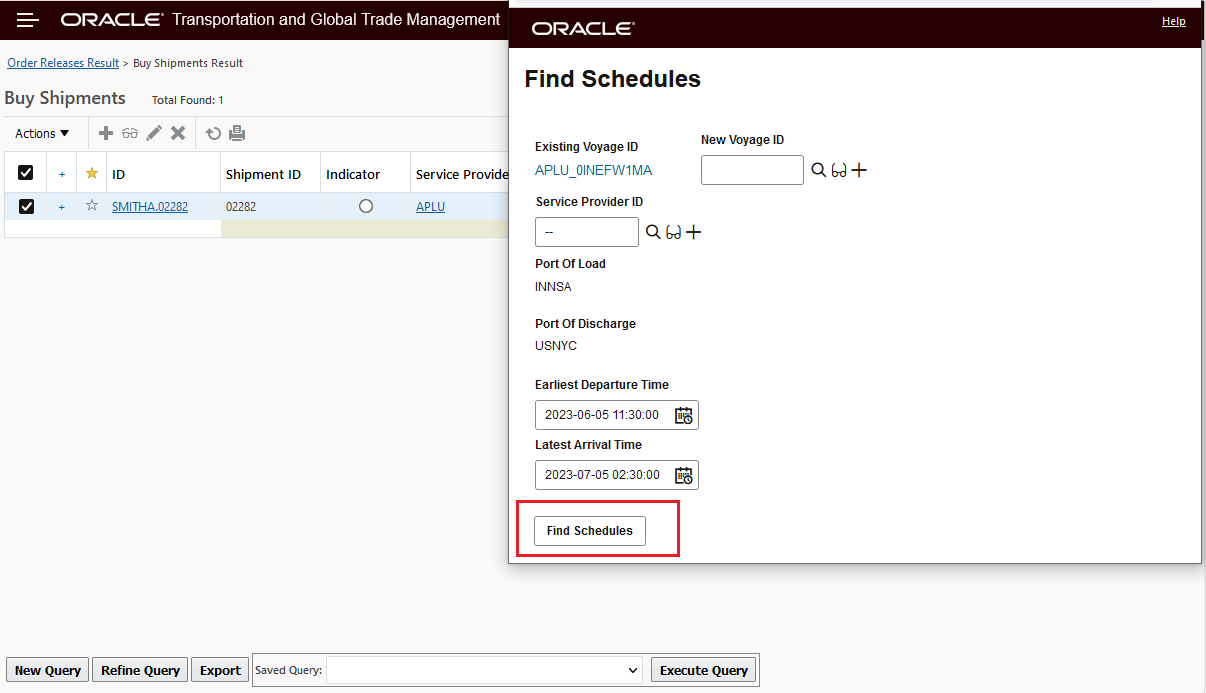
Change Voyage Schedule - Find
Based on the Find Schedules criteria, the Voyage Schedules options are returned. Note that the Voyage Schedules result page is similar to the result page of the Ask Voyage Schedule screen with the following additional options related to the Change Voyage Schedule action:
- The Redrive Downstream Shipments check box is selected by default. This option is used to redrive downstream shipments.
- You can select the Downstream Location Profile ID field that redrives downstream shipments only if the destination location of the current shipment belongs to the selected profile.
- The Redrive Upstream Shipments check box is selected by default. This option is used to redrive upstream shipments. OTM will neither redrive past tendered shipments nor their upstream shipments.
- You can select the Upstream Location Profile ID field that redrives upstream shipments only if the source location of the current shipment belongs to the selected profile.
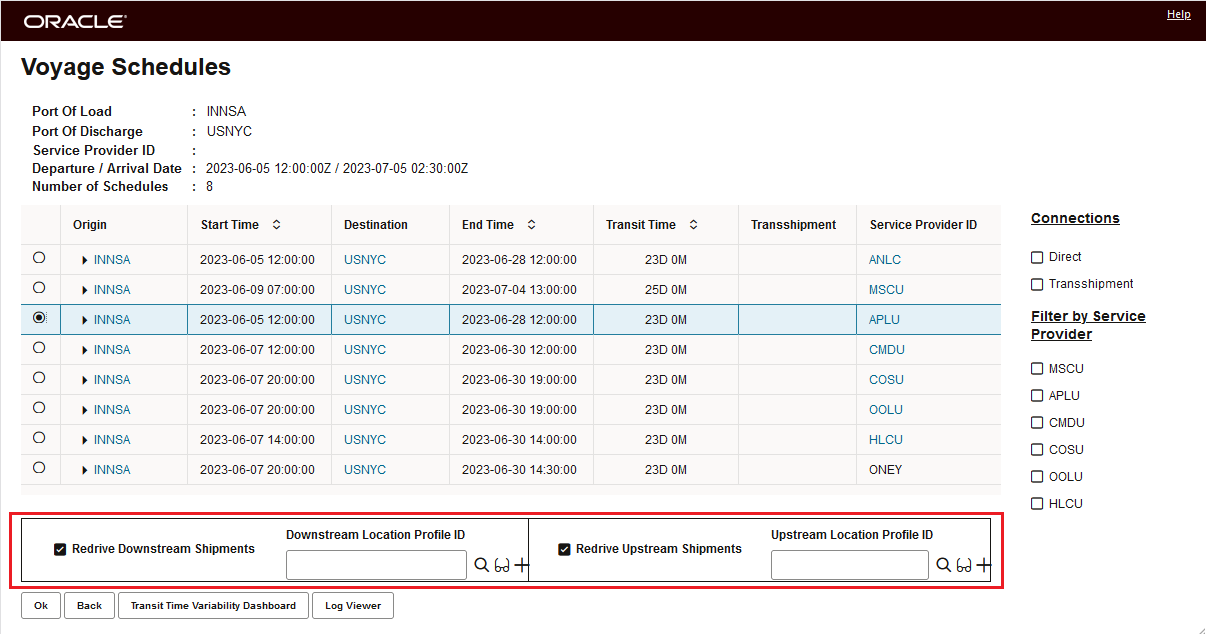
Change Voyage Schedules Voyage Schedule Options
The result of the Change Voyage Schedule action is below.
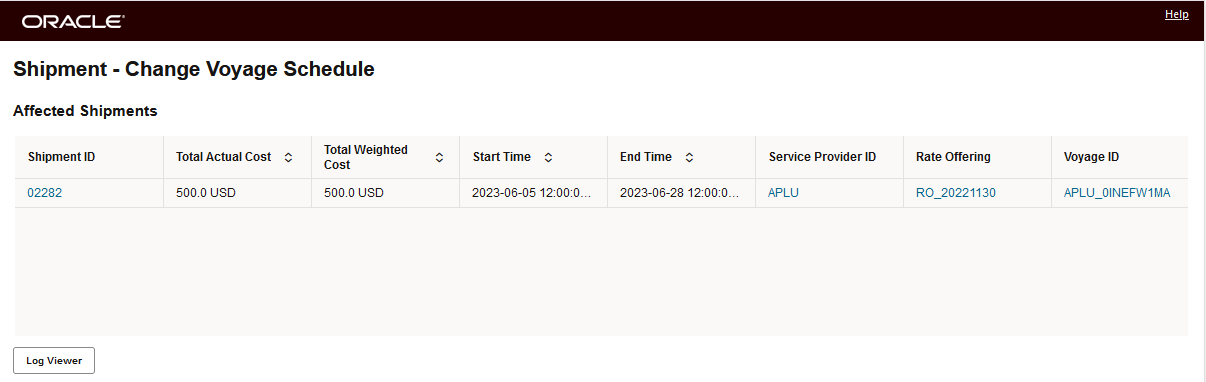
Change Voyage Schedule - Result
This feature extends OTM's support for and usage of external voyage schedules.
Steps to Enable
You don't need to do anything to enable this feature.
Tips And Considerations
The following validations occur when you select multiple shipments and perform the Change Voyage Schedule action:
- If you want to change voyage schedules for multiple shipments, the voyage ID and the service provider must be the same for all the selected shipments.
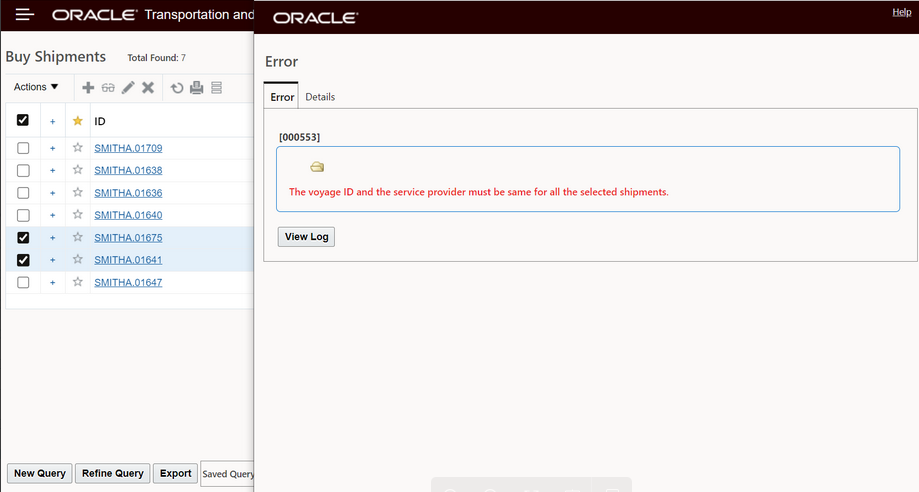
Error Message - Multi-select
- All selected shipments must have the same values for the fields: Source Location ID, Destination Location ID, Service Provider, and Rate Service.
Digital Freight Rates - Consider for Planning & Tender or Tendering Only
This feature provides you with more configuration options and controls for deciding how Digital Freight Brokers and the real-time pricing options provided by these services are used in the different phases of your transportation planning and execution process. With this feature you have the option to:
- Consider Digital Freight Broker Rates in both Planning (Bulk Planning and Rate Inquiry/RIQ) and in Tendering for both Ordinary and Step tendering.
- Only consider your Digital Freight Rates in the Tendering process (so not considered in planning) - with additional options to control when the Digital Freight Rates (Freight Broker Service Providers) are considered in the Tendering Process:
- Only consider tendering the shipment to the Digital Freight Broker after X number non Digital Freight Rate Service Providers (contract Service Providers) have declined the Shipment
And/or
- Comparing the Digital Freight Rate Service Provider's provided cost to the Shipment's Planned Cost. The comparison options include - Planned Cost to the Digital Freight Brokers cost with a % threshold above (Planned Cost of 100.00 USD, threshold of 10% - tender if cost is 110.00 USD or less) or based on an absolute amount (tender if cost is less than 112.00 USD) - whichever is less.
The primary control for this feature is provided on the Rate Offering that is configured for your Digital Freight Broker Service Provider. In the example below, the default setup, the Digital Freight Rates cost option is not selected. With this setup the Digital Freight Broker Service Provider will be considered in both the Planning of the shipment (Bulking Planning and RIQ) and Tendering.
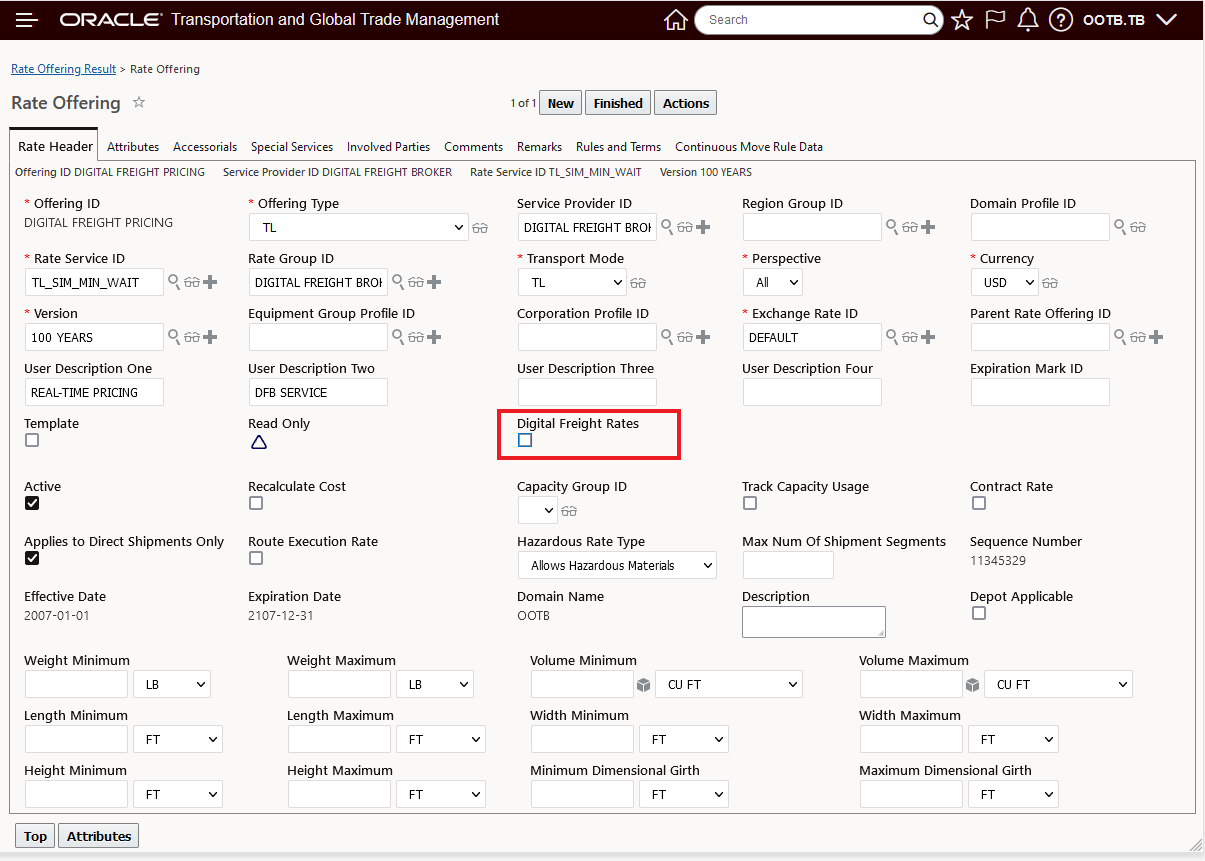
Rate Offering Digital Freight Rates Not Selected
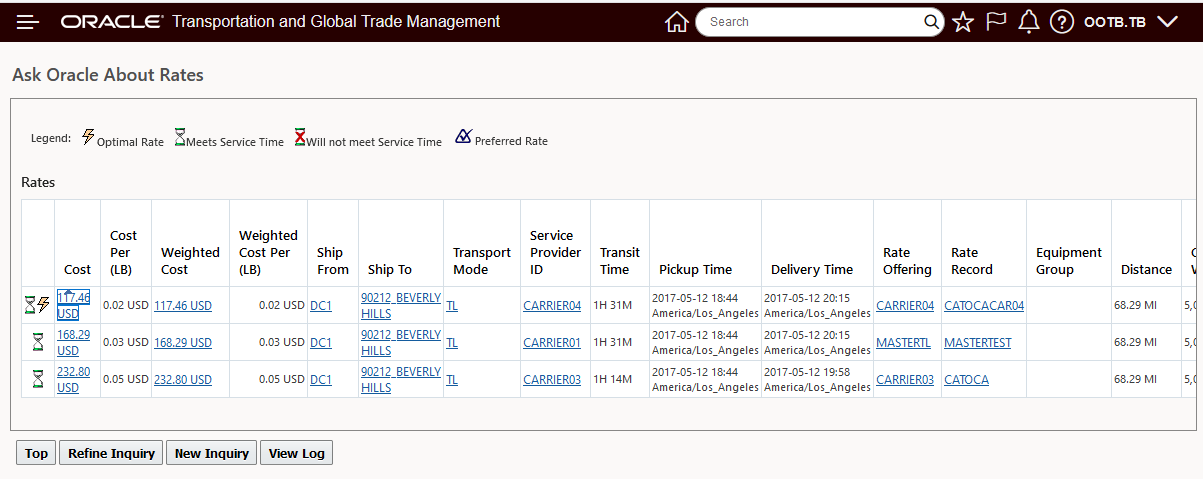
In the Rate Inquiry below, the Digital Freight Broker Service Provider is the least expensive option for the lane being queried.

Digital Freight Broker - RIQ
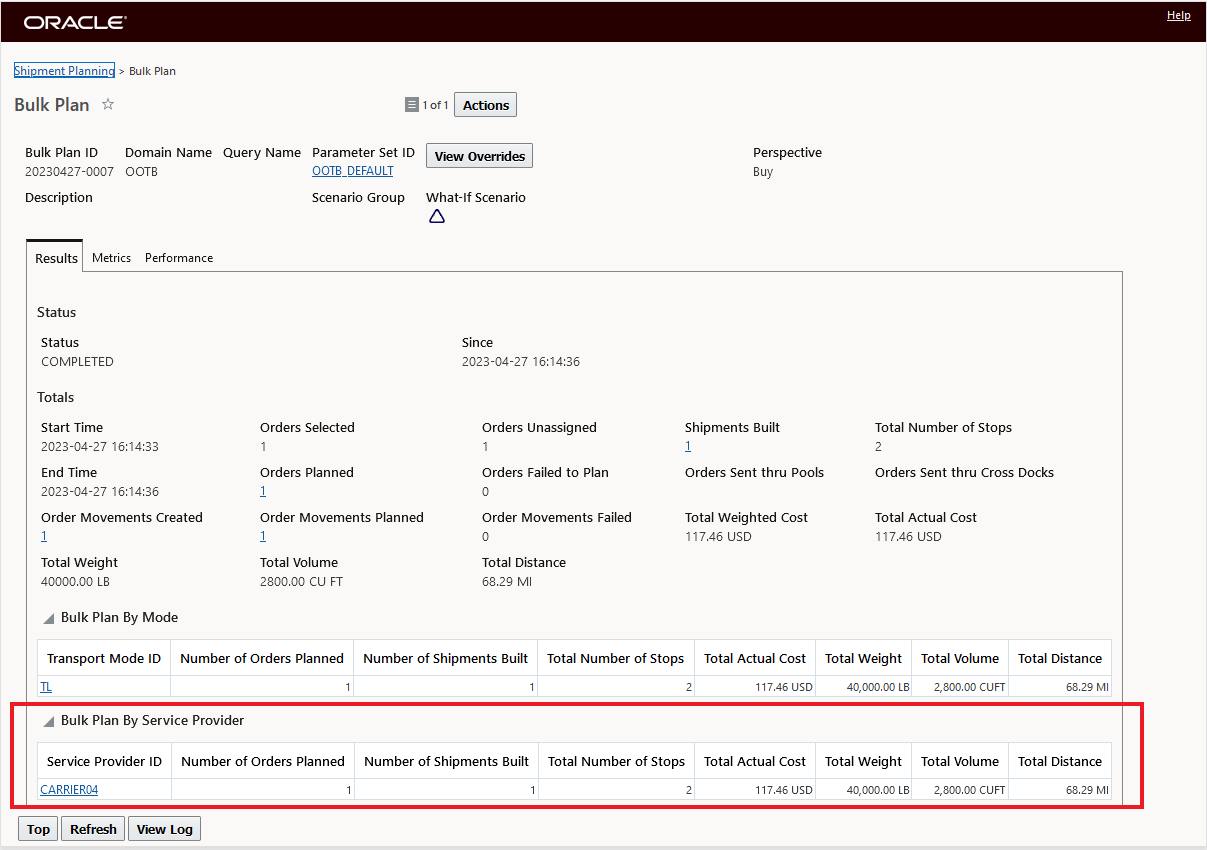
When an order is planned for the same lane as above, the Digital Freight Broker and the real-time pricing is considered - and in this case - the Digital Freight Broker is the least cost, feasible option - and that is the solution provided by Bulk Planning.
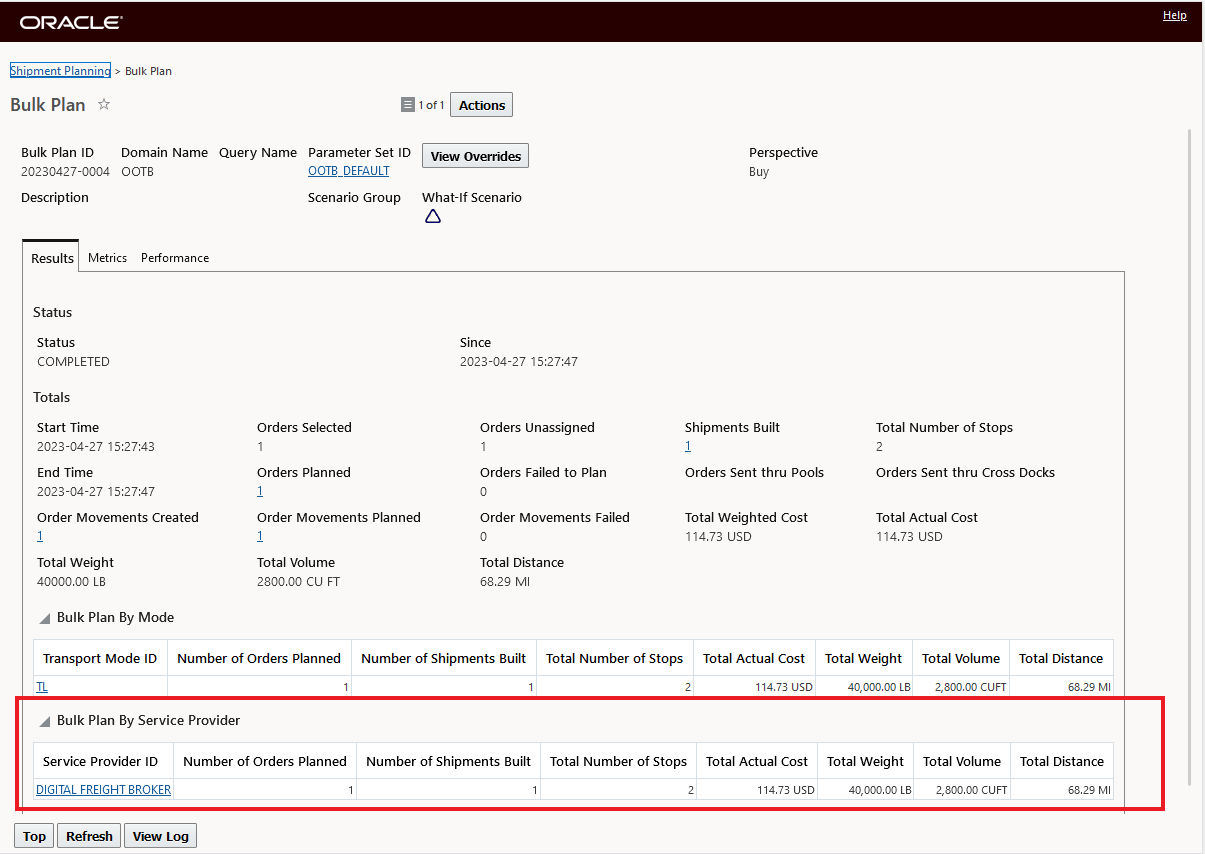
Digital Freight Broker - Lowest Cost Solution
In the examples below, the Digital Freight Broker Service Provider's Rate Offering is now configured so that the Digital Freight Broker pricing options are only considered in Tendering - this is accomplished by selecting the Digital Freight Rates option on the Rate Offering. With the Digital Freight Rates option selected, the Digital Freight Broker rates will no longer be considered in Planning or RIQ.
Note that once the Digital Freight Rates option is selected, you have some additional options that can be set - Digital Freight Rate Threshold (%) and the Absolute Cost For Digital Freight Rates value. The usage of the Digital Freight Rate Threshold (%) and the Absolute Cost For Digital Freight Rates value will be explained in a bit.

Digital Freight Rates Selected
The RIQ search results below - using the same search as above, shows that the Digital Freight Broker is no longer an option. Selecting the Digital Freight Rates option on the Rate Offering indicates that this Rate Offering option is no long an option for Planning or RIQ and is now only used for Tendering.
Digital Freight Broker No Longer an Option
When the same order from the example above is Bulk Planned - Carrier04 is now the selected Service Provider since the cheaper Digital Freight Broker option is no longer considered in Planning.
Planning Without Digital Freight Broker Considered
To configure a Digital Freight Broker Service Provider for Tender only usage, in addition to checking the Digital Freight Rates option on the Rate Offering for the Service Provider, you will also need to set the Service Provider Assignment parameter - RETENDER TO DIGITAL FREIGHT FROM N ITERATIONS to a value greater than 0. The RETENDER TO DIGITAL FREIGHT FROM N ITERATIONS parameter determines from which tender iteration the Digital Freight Rates Service Provider will be considered to receive a Tender. By default, the parameter is set to 0 - as shown below - when the parameter is set to 0 or blank, the Digital Freight Rates will not be considered in the tender process, setting this parameter to a value greater than 0 will allow for Digital Freight Broker and the Digital Freight Rates to be considered in the Tender process.
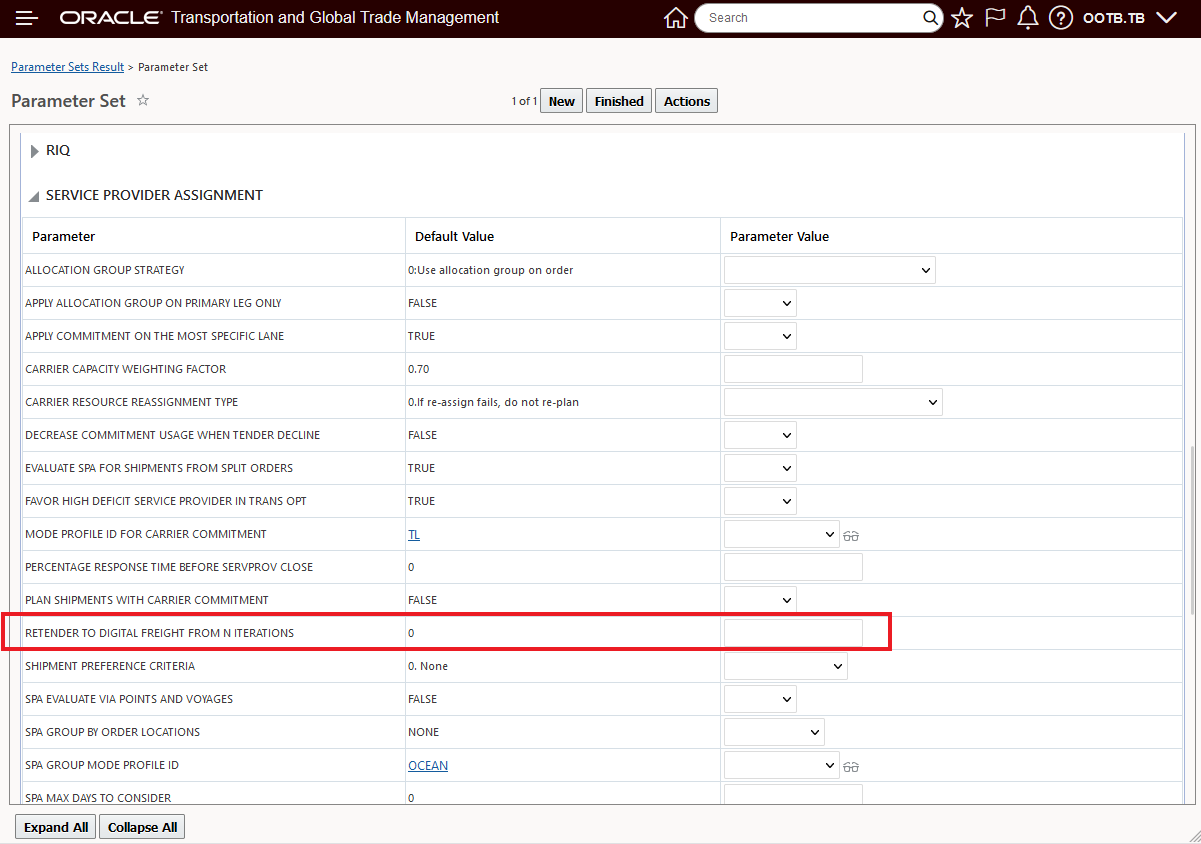
RETENDER TO DIGITAL FREIGHT FROM N ITERATIONS
If the - RETENDER TO DIGITAL FREIGHT FROM N ITERATIONS - is set to 3 and given the different cost options shown below, the Digital Freight Broker and the Digital Freight Rates will not be considered until after the three higher priced contract rate Service Providers are tendered to and decline the tender.
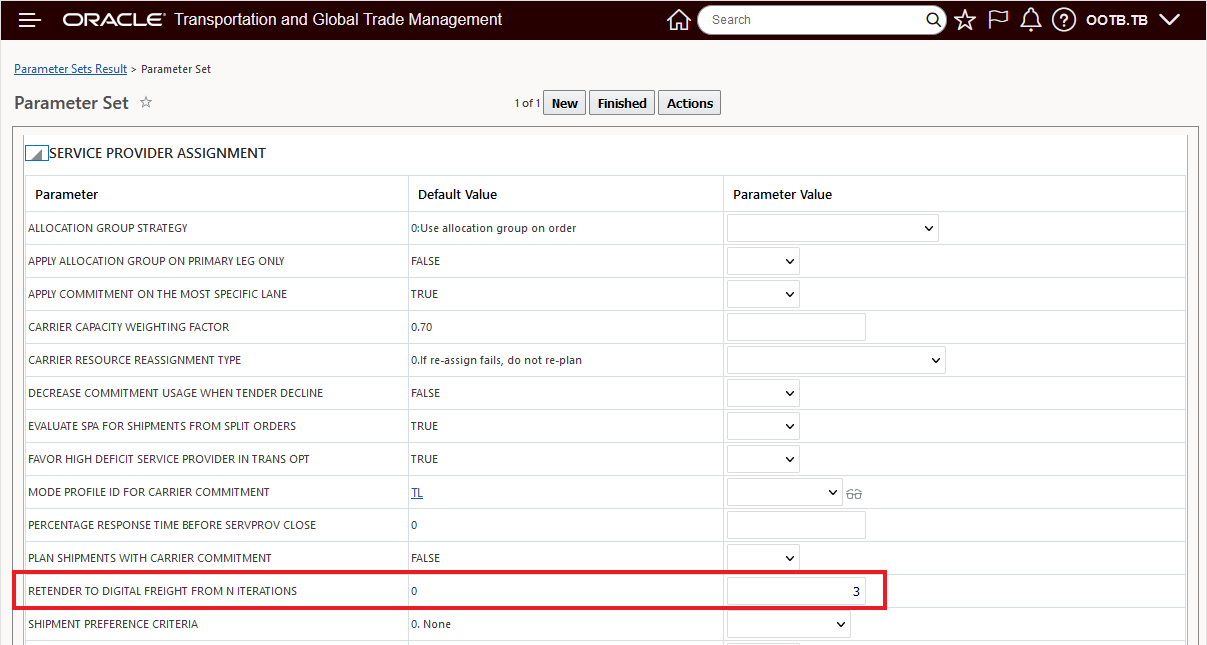
RETENDER TO DIGITAL FREIGHT FROM N ITERATIONS = 3

Service Provider Cost Options
In the scenario below, the Tender process will go from Carrier04 to Carrier01 to Carrier03 then to the Digital Freight Broker - based the RETENDER TO DIGITAL FREIGHT FROM N ITERATIONS being set to 3, the Digital Freight Broker will only be tendered to after the first 3 contact/non-Digital Freight Rate carriers decline the tender offer.

Initial Tender to Carrier04

Carrier04 Decline
Retender to the next Service Provider in the chain Carrier01.
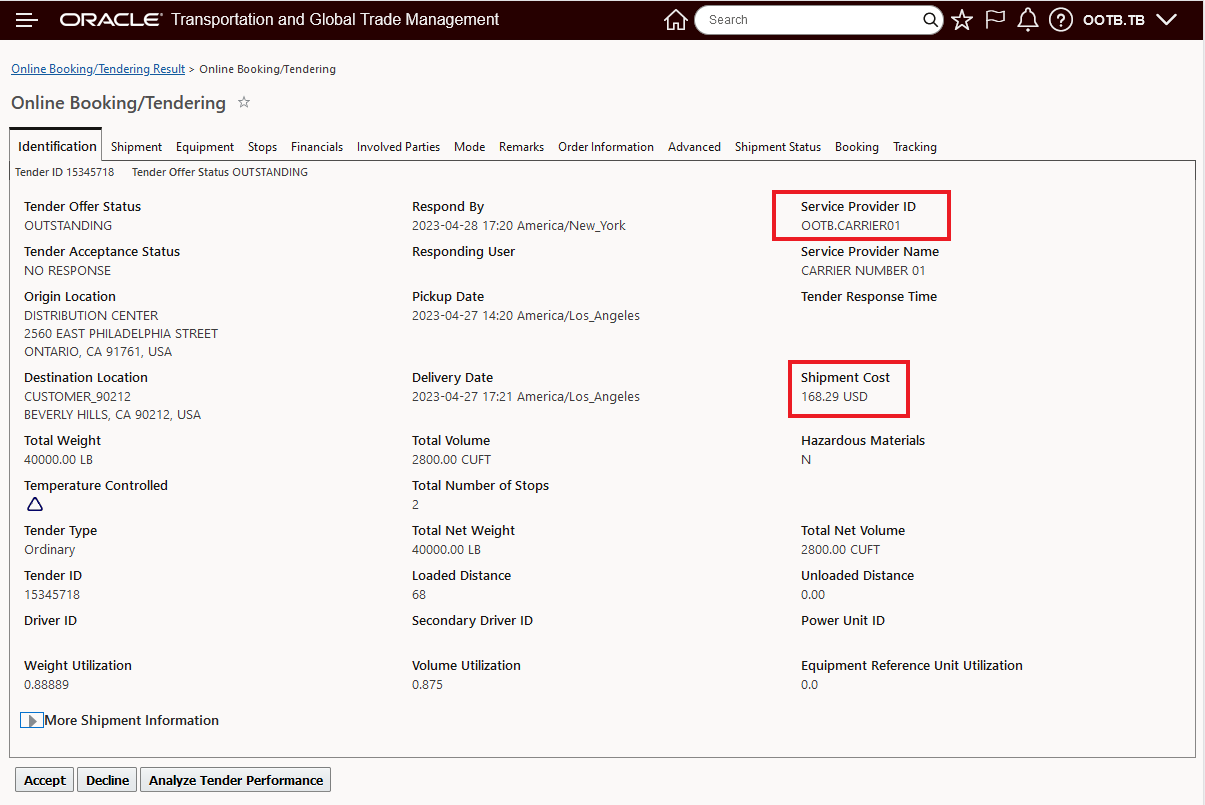
Re-tender to Carrier01
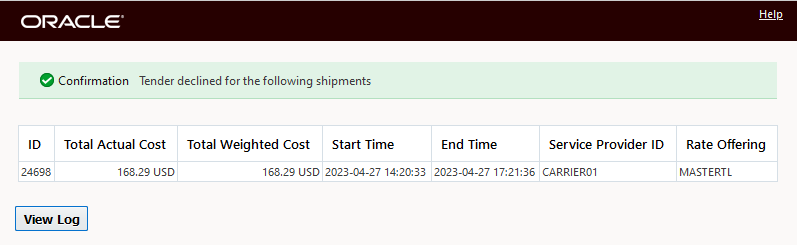
Carrier01 Decline
Retender to the third Service Provider in the chain Carrier03.

Retender to Carrier03
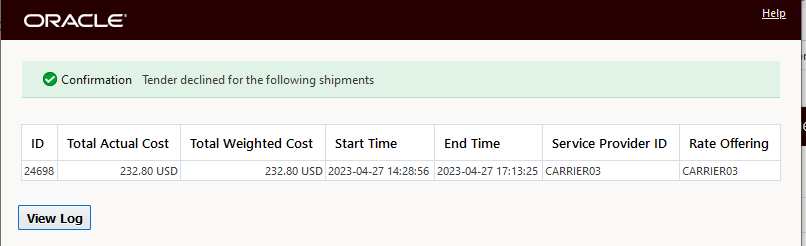
Carrier03 Decline
Then, after the three non-Digital Freight Rate Service Providers are Tendered to/after 3 iterations - the Digital Freight Broker is tendered to.
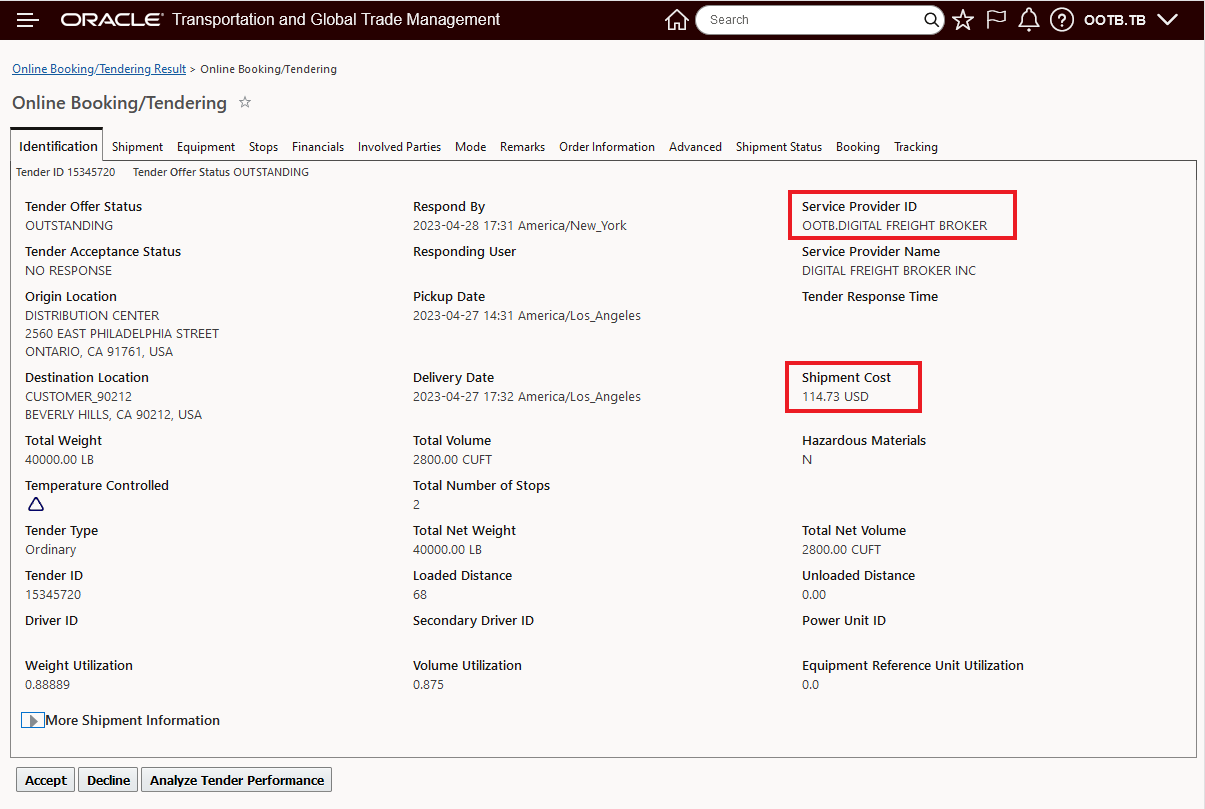
Retender to Digital Freight Broker
Digital Freight Rates - Digital Freight Rate Threshold (%) and Absolute Cost For Digital Freight Rates
In the example below, the usage of the Digital Freight Rate Threshold (%) and the Absolute Cost For Digital Freight Rates will be demonstrated.
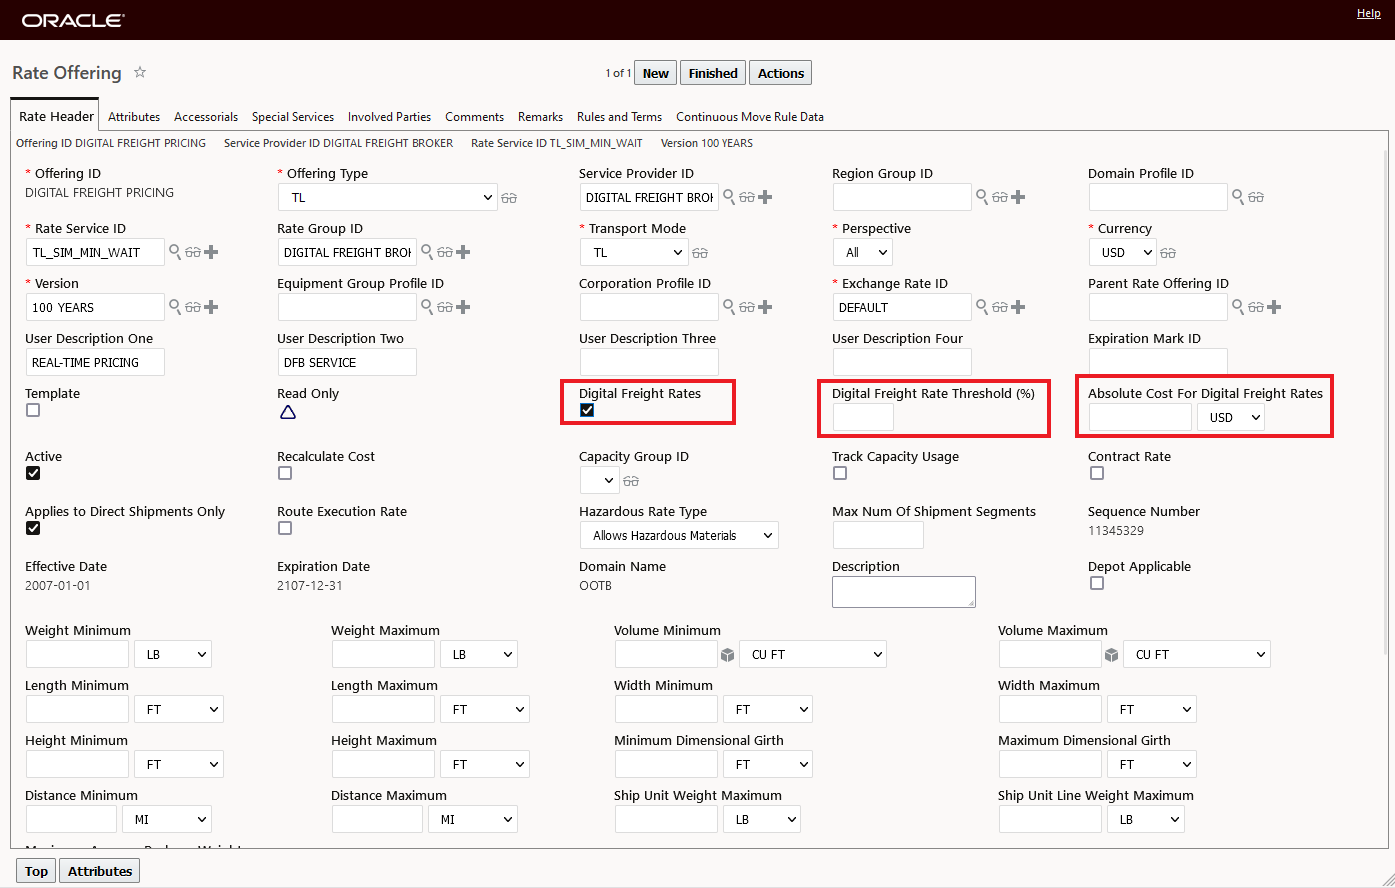
Digital Freight Rates - Digital Freight Rate Threshold (%) and Absolute Cost For Digital Freight Rates
The Digital Freight Rate Threshold (%) is used to set a threshold for the Digital Freight Rates usage when tendering/retendering a shipment. The threshold is based on the shipment's Planned Shipment Cost. When the Digital Freight Rates cost is above the calculated threshold value, the Service Provider and the Digital Freight Rates Rate Offering will not be considered for tendering.
The Absolute Cost For Digital Freight Rates is used to set the absolute cost value above which the Service Provider and the Digital Freight Rates Rate Offering will not be considered for tendering.
For this example, the Planned Shipment Cost is 100.00 USD, and the Digital Freight Rates Rate Offering is configured with a Digital Freight Rate Threshold (%) of 60% - meaning for a Planned Shipment Cost of up to 160.00 USD (planned cost + 60% of planned cost) the Digital Freight Rates and Service Provider will be consider for Tendering - above 160.00 USD the Digital Freight Broker will not be considered/will be skipped.
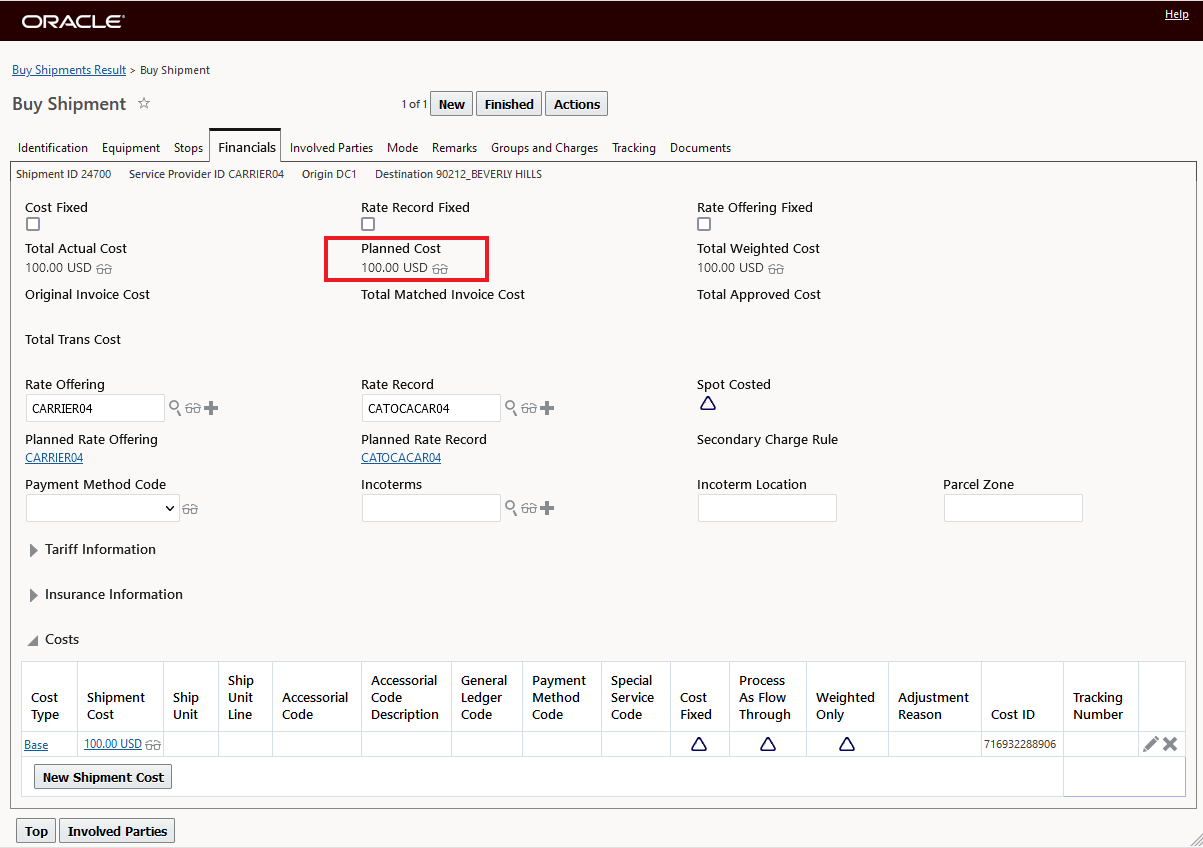
Planned Shipment Cost
Below is the setup for the Rate Offering - Digital Freight Rates flag is selected (meaning this Rate Offering is only considered for tendering) and the Digital Freight Rate Threshold (%) is set to 60%.
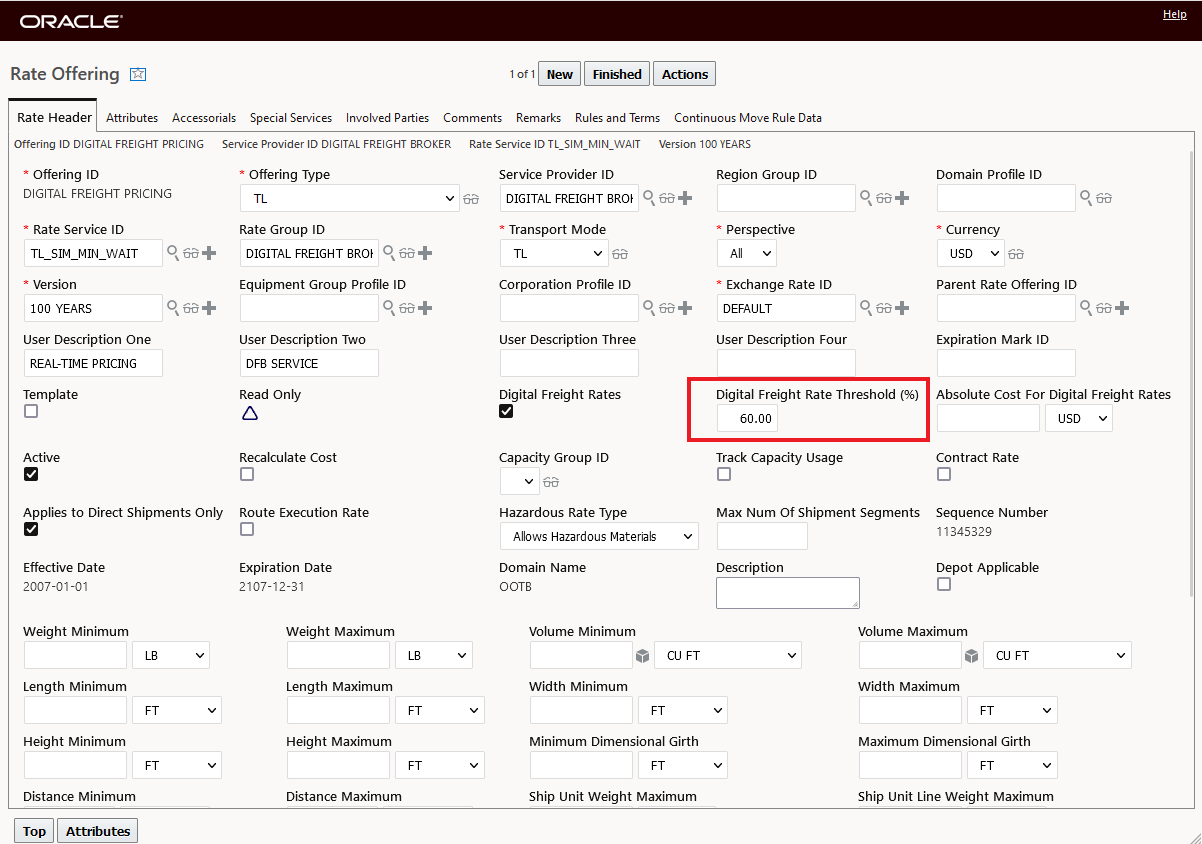
Digital Freight Rate - Digital Freight Rate Threshold (%) Set
With the rates available on the lane as shown below. The cost for the Digital Freight Broker Rate Offering is 170.00 USD - which is above the cost allowed with the Digital Freight Rate Threshold (%) of 60%. In this case, the Digital Freight Broker will not be considered when tendering the shipment.

Cost Options
When the cost is above the threshold and with the RETENDER TO DIGITAL FREIGHT FROM N ITERATIONS = 1 (shown below), when the lowest cost Service Provider Declines the shipment, the Digital Freight Broker will be skipped and the shipment will be re-tendered to in this example, Service Provider Carrier03.
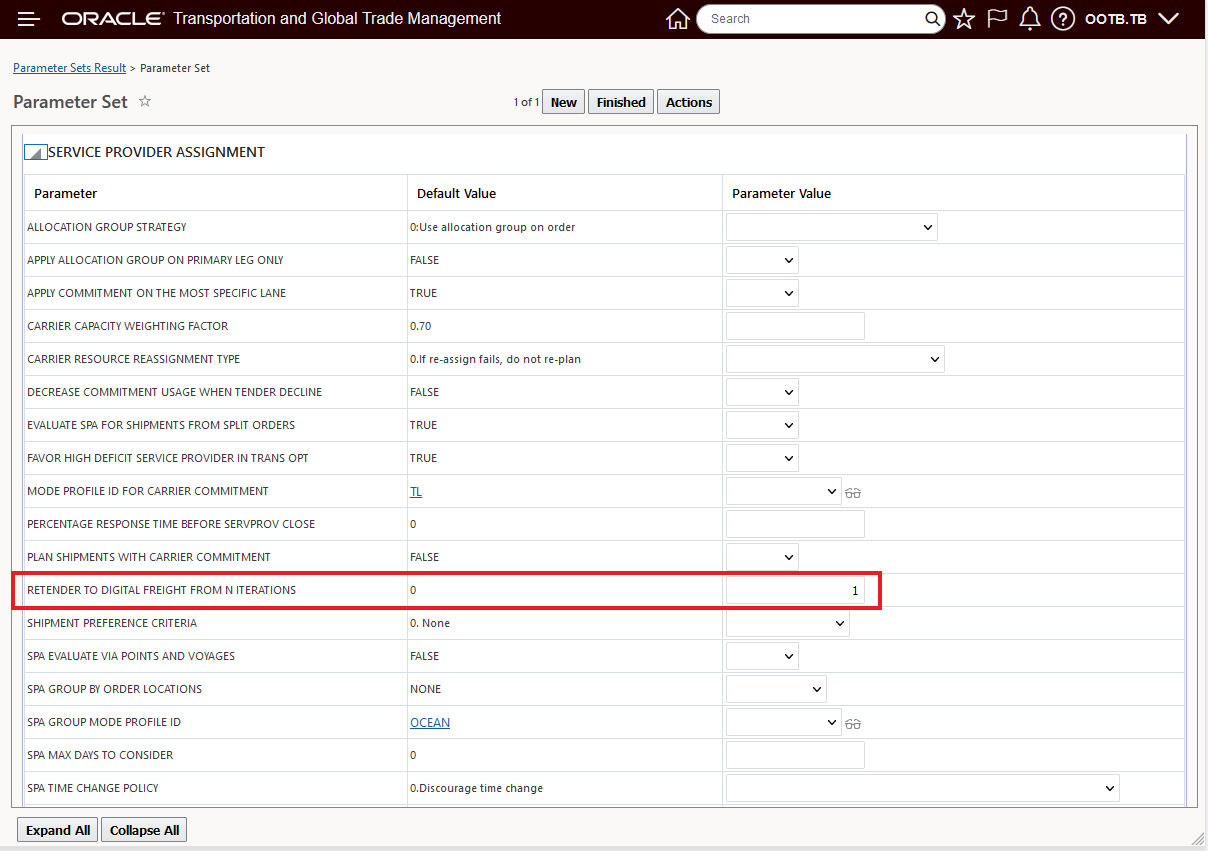
RETENDER TO DIGITAL FREIGHT FROM N ITERATIONS = 1
The first tender is sent to Service Provider Carrier04 as shown below.
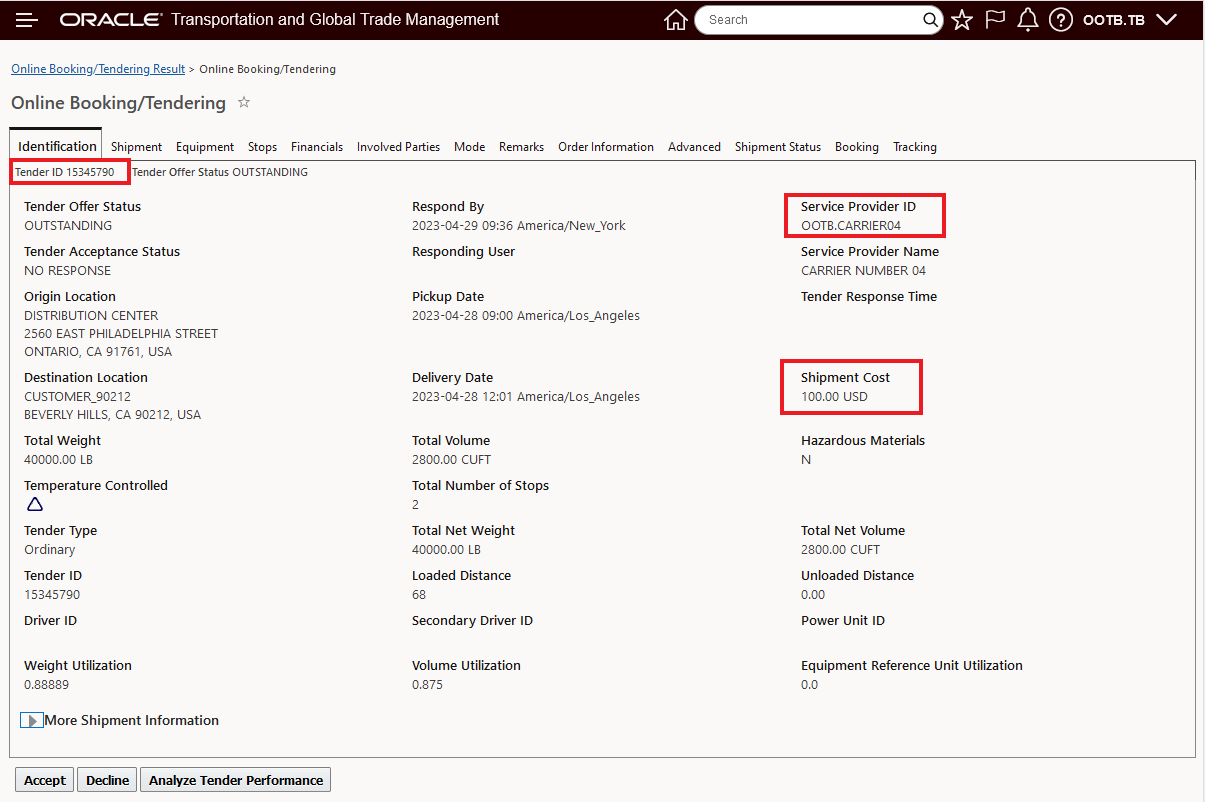
First Tender in the Series
When the first Service Provider - Carrier04 Declines the shipment - the Retender is sent to Service Provider Carrier03 - the lower cost Digital Freight Broker Service Provider is skipped since the cost for the shipment using the Digital Freight Broker is 170.00 and the 60% threshold only allows for the Digital Freight Broker to be considered - in this case - based on the Planned Cost of 100.00 USD - if the Digital Freight Broker cost is 160.00 USD or less.

Retender to Carrier03
In the Digital Freight Rates setup below, the Digital Freight Rate Threshold (%) is set to 80% and the Absolute Cost For Digital Freight Rates set to 150.00 USD. Given the same Service Provider cost options above - the Digital Freight Broker Service Provider will not be retendered to based on the Absolute Cost For Digital Freight Rates set to 150.00 USD - the Digital Freight Rate Threshold (%) at 80% will pass, given a Digital Freight Rates cost of 170.00 USD, but the Absolute Cost For Digital Freight Rates will fail.
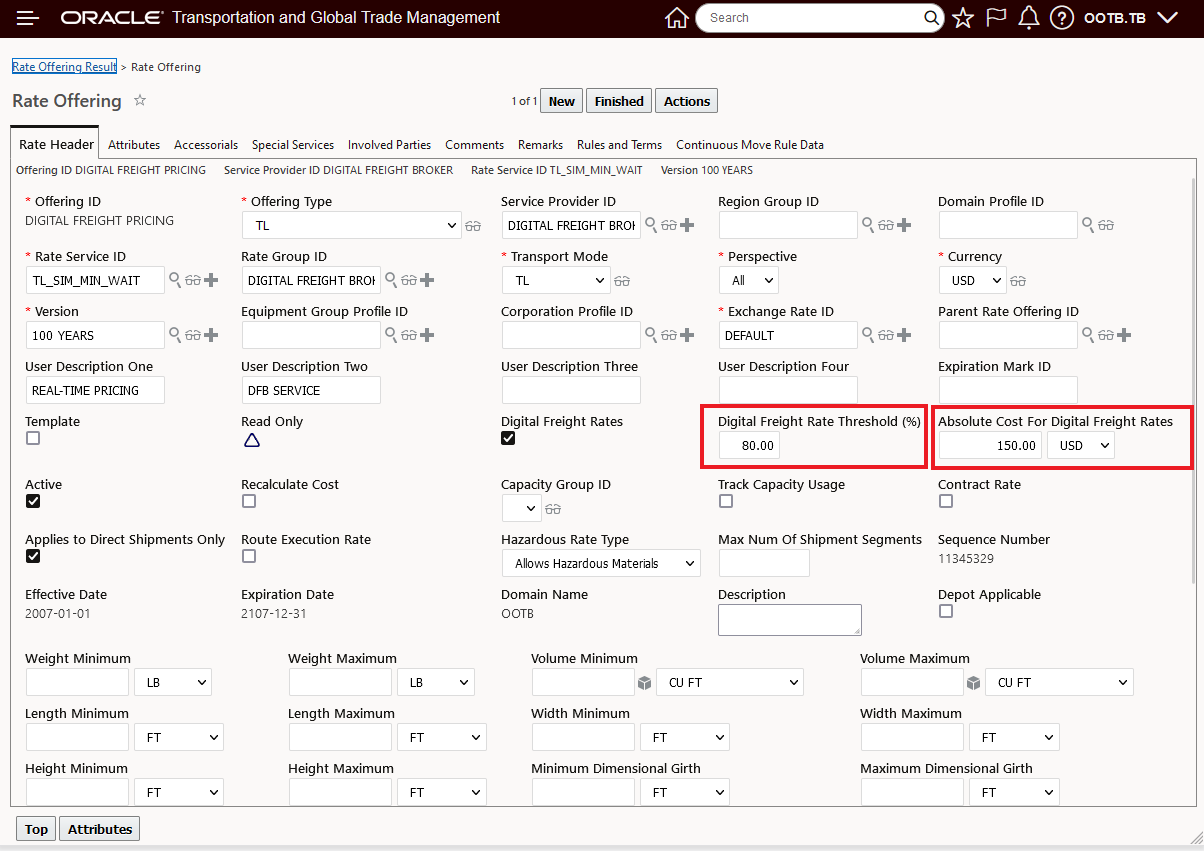
Digital Freight Rates - Digital Freight Rate Threshold (%) - 80% and Absolute Cost For Digital Freight Rates - 150.00 USD
This feature provides you with controls/guardrails for how you engage real-time pricing options provided by Digital Freight Broker services.
Steps to Enable
To take advantage of this feature you will need to configure the options as explained above in the Description.
Key Resources
- More information about Digital Freight Brokers:
- Uber Freight - https://www.oracle.com/customers/uber-freight/
- Loadsmart - https://loadsmart.com/integrations/oracle/
- Convoy - https://convoy.com/freight-services/tms-integrations/oracle/
Data Staging for Digital Freight Broker Integration - Uber Freight
This feature provides various Staged Data and External Rating Engine Webservices changes that will simplify the mapping to the Digital Freight Broker service provided by Uber Freight and can apply to other External Rating Engine usages.
Items include:
- Shipment Reference Number Qualifiers
- EXTERNAL_CUSTOMER_ID - defined Reference Number for Customer ID - hierarchy - check for Reference Number on shipment, then check for Ref Number on order release, then check source stop location.
- EXTERNAL_QUOTE_TYPE - defined Reference Number that can be returned by an External Rating Engine and added to shipment and then provided in the shipment tender as a reference.
- External Rating Engine Fieldset
- UBER_FREIGHT
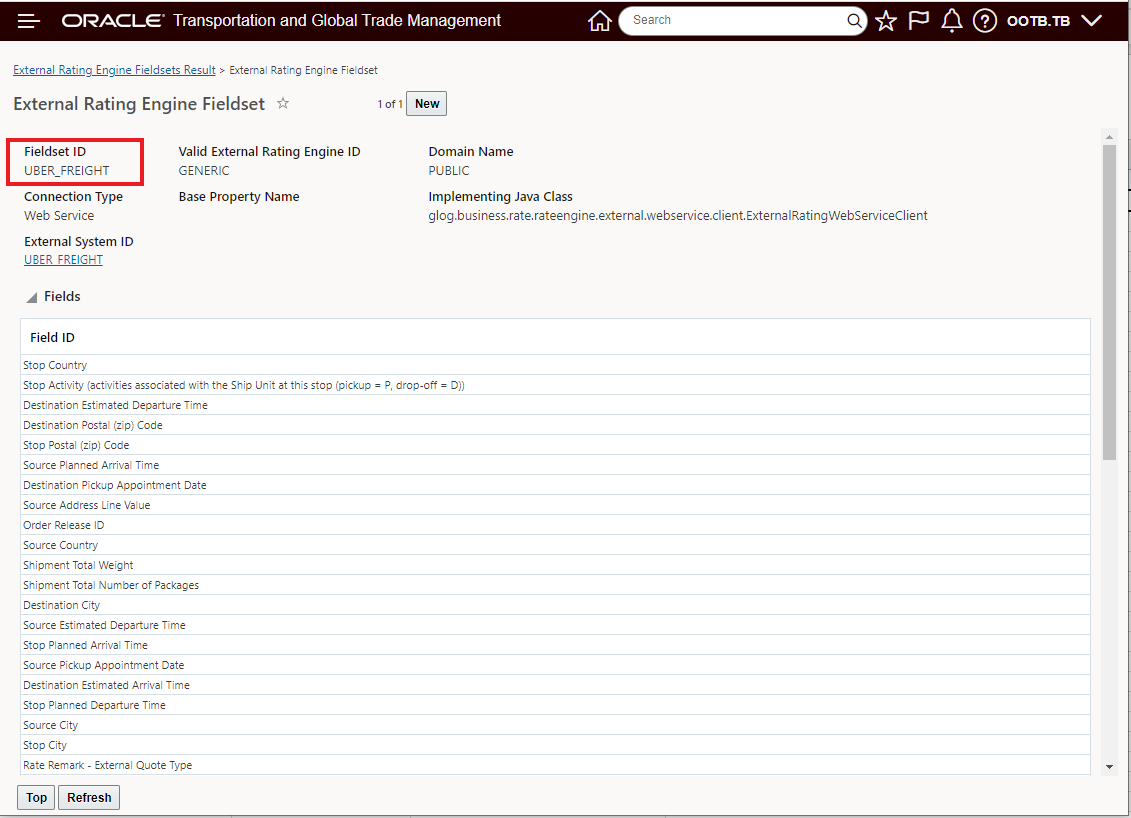
Uber Freight External Rating Engine Fieldset
- New RBIs :
- For Appointment:
- Source Pickup Appointment Date
- Source Delivery Appointment Date
- Destination Pickup Appointment Date
- Destination Delivery Appointment Date
- Stop Pickup Appointment Date
- Stop Delivery Appointment Date
- For SCAC from servprov (Shipment.SCAC)
- For Quote_type (Shipment.Quote_type)
- For customer ID (Shipment.Account_Number)
- For Appointment:
- Added properties to select qualifiers - glog.RatingEngine.CustomerID.refnumQual and glog.RatingEngine.ExternalQuoteType.remarkQual
- Updated External Rating Engine Web Services Response
This feature will simplify and reduce the time required for on-boarding Digital Freight Broker services
Steps to Enable
You don't need to do anything to enable this feature.
Key Resources
- https://www.uberfreight.com/
Integration - REST Services & XML API
REST API Support for Commodity Power Data
This feature expands the REST service provided to include CRUD operations support for the Commodity Power Data object.
This change provides you with the opportunity to bulk load your commodity records using REST services.
Steps to Enable
You don't need to do anything to enable this feature.
REST Services Supported Custom Actions
This feature provides you with an additional set of REST services supported Custom Actions.
The addition Custom Actions areas covered are:
- Order Release
- Allocate Cost
- Calculate Best Direct Cost
- Shipment Management
- Edit Service Provider and Cost
- Change Service Provider
- Invoice
- Auto Approve Adjusted Costs
Extends the option for initiating Custom Actions to include external systems via REST Services.
Steps to Enable
You don't need to do anything to enable this feature.
Key Resources
- For more information about Custom Actions - refer to the REST API for Fusion Cloud Transportation and Global Trade Management Business Object Resources Guide:
- Order Release -> Customs Actions
- Shipments -> Custom Actions
- Invoice -> Custom Actions.
REST Services Delete Order Release with Foreign Key
This feature supports the ability to delete an Order Release that is on a Shipment. Previously attempting to delete an Order Release on a Shipment would result in a foreign key error.
With this feature you can now, with Asynchronous Processing, invoke the Delete Agent (pre-persist) that will run the action to delete the Order Release.
Allows for asynchronous order deletes for orders with a foreign key.
Steps to Enable
The ORDER RELEASE - DELETE agent must be on.
Send Integration Agent Action for Order Movement
This feature adds the Send Integration Agent Action to the Order Movement object.
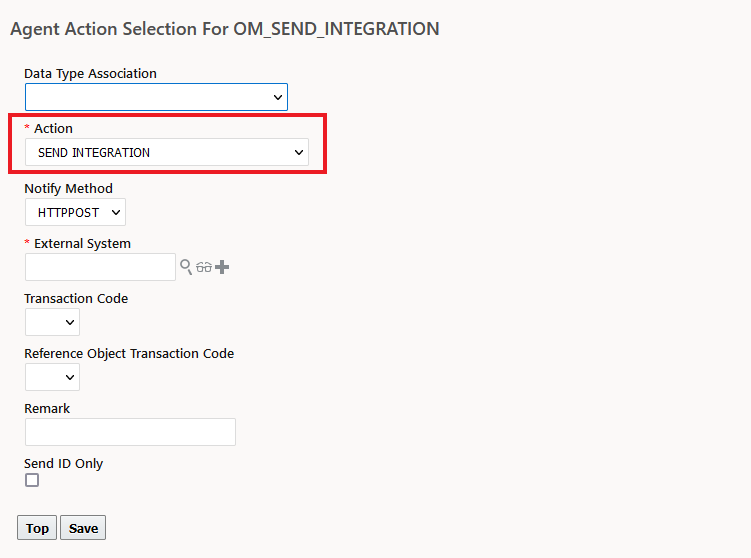
Order Movement Agent Action - Send Integration
Provides the option to automate the process of sending Order Movement XML integration.
Steps to Enable
You don't need to do anything to enable this feature.
Support for Unit Break Based Rating for Rate Record Template
This features extends the Sourcing Rate Record Template options to include Rate Unit Break Profile based rates. The unit break based rates supported include rate breaks based on Shipment Total Weight and Shipment Total Distance.
In the example below, the template used to generate the Carrier Response Template (CRT) is a Unit Break Based rate where the breaks are based on Shipment Total Weight
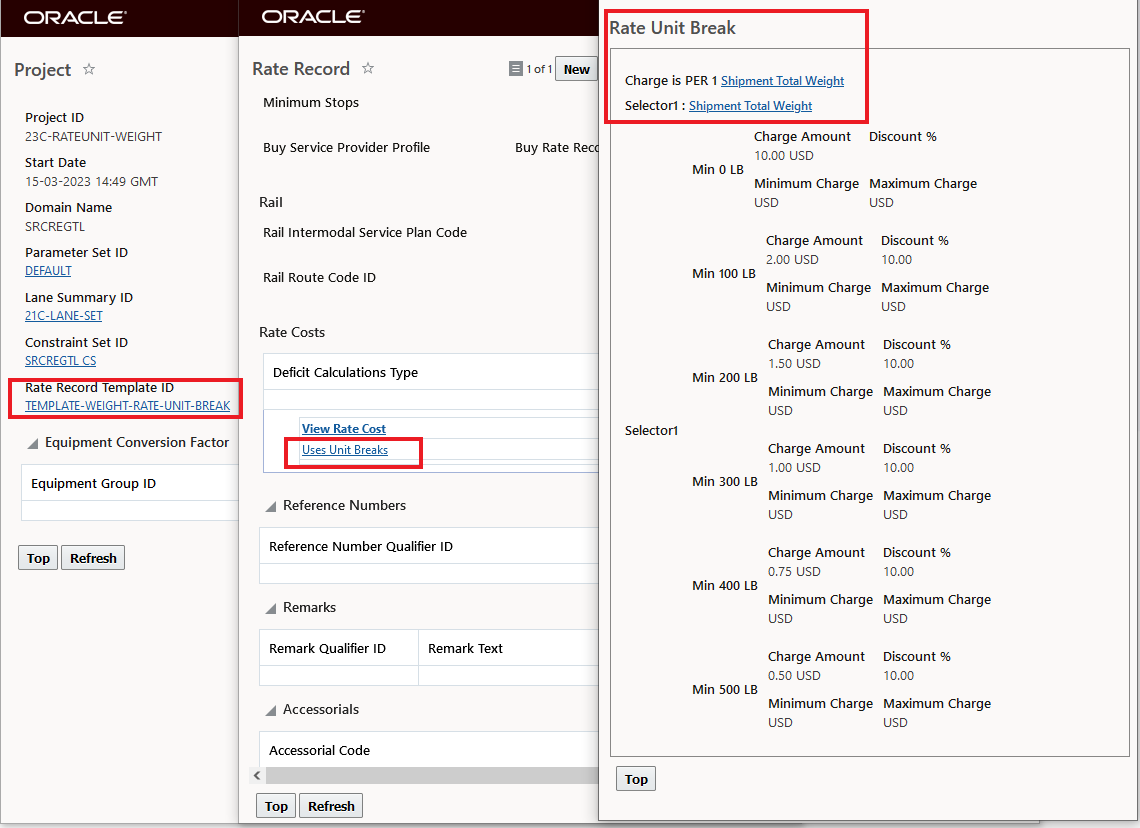
Carrier Response Template Rate Break Based
The generated Carrier Response Template is below, this allows the Service Providers to provide Bid Responses providing rates by Rate Break.
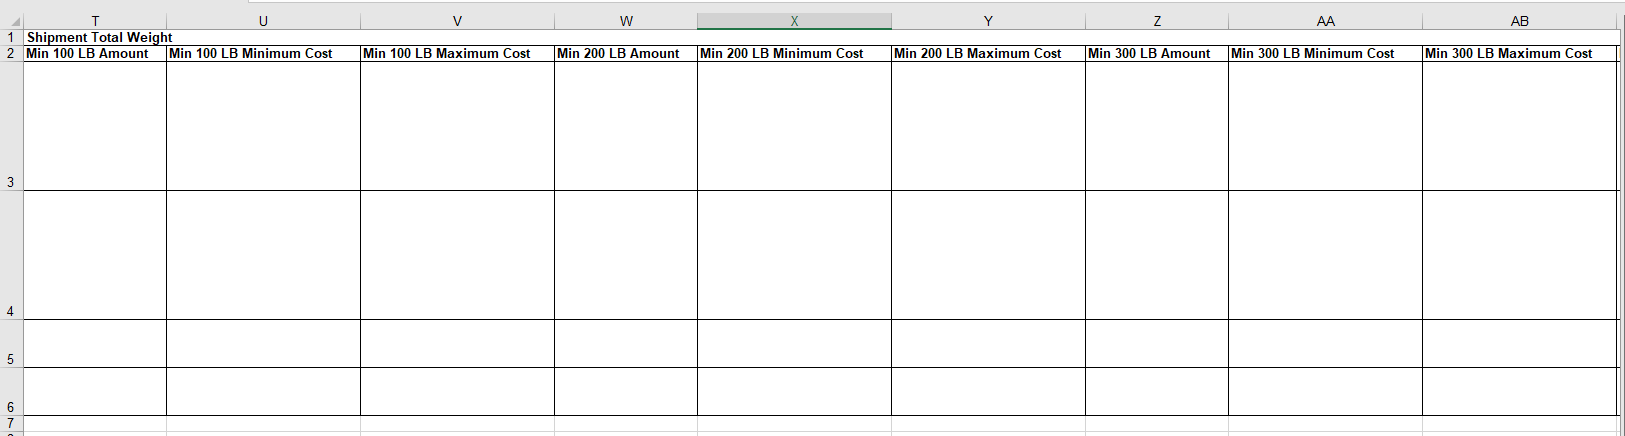
Carrier Response Template Rate Break Based
The Bid Manager Biddable Rate Attributes is shown below.
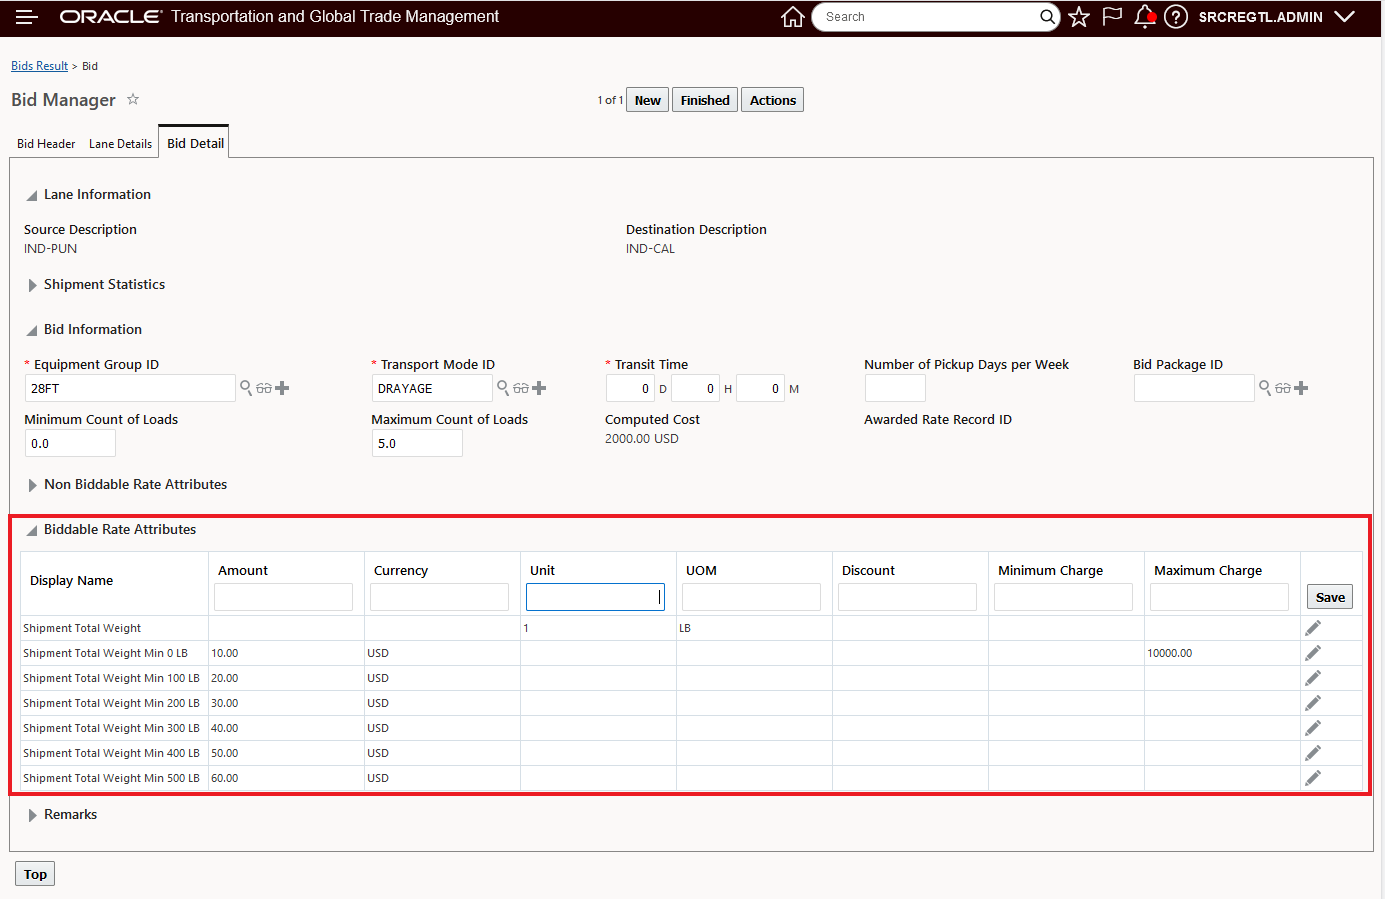
Biddable Attributes View
This feature expands the types of rates and rating supported by Sourcing allowing for a wider variety of bid templates and responses.
Steps to Enable
No steps will be required to use this new functionality if you already have Rate Records with Rate Unit Break Profiles that can be used as your template. If, however, you do not have these Rate Records with the Rate Unit Break Profiles defined, you will need to create the supported Rate Records and Rate Unit Break Profiles to take advantage of this new functionality.
Enable XLSX File Format in Sourcing Spreadsheets
This optional feature, when enabled, upgrades the spreadsheet format used for Sourcing to the XSLX format from the older XSL format.
Upgrades the format used in Sourcing - for the CRT spreadsheets - generated and loaded by the Sourcing Module - to the newer XLSX format.
Steps to Enable
You don't need to do anything to enable this feature.
Tips And Considerations
You will want to coordinate the enabling of this Optional Feature and the move to the XLSX file format so that your Bid Project and all of the required Carrier Response Templates can all be generated using the XLSX file format - you will not be able to mix file formats.
Freight Payment, Billing, and Claims
Agent Action - Add to Consolidated Invoice or Bill
This feature provides you with two Automation Agent Actions - Add to Consolidated Invoice and Add to Consolidated Bill that support the creation of Consolidated Invoices and Consolidated Bills as well as supporting the adding of additional Invoices and Bills to an existing Consolidated Invoices or Consolidated Bill.
In the example below - the Add to Consolidated Invoice Agent Action is used to explain the setup and usage.
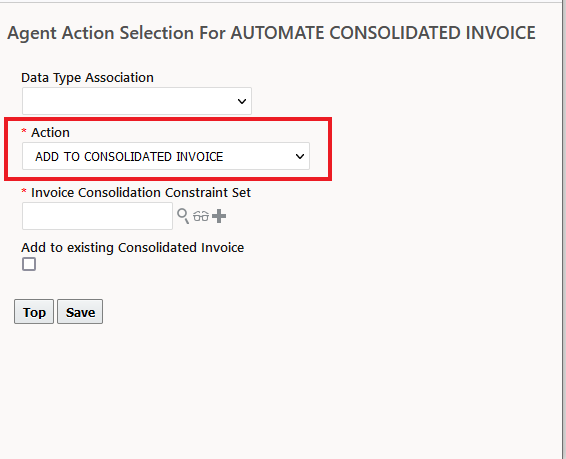
Add to Consolidated Invoice Agent Action
The required Invoice Consolidation Constraint Set allows you to configure the match criteria used when evaluating the addition of an Invoice or Bill to an existing Consolidated Invoice or Consolidated Bill.
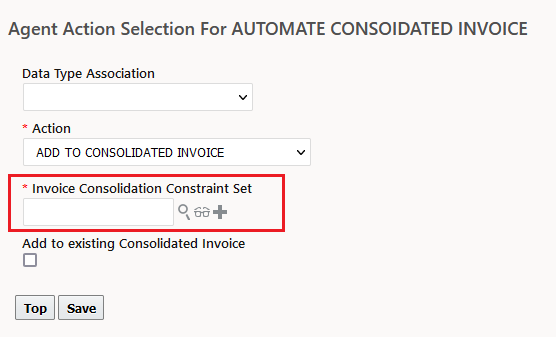
Invoice Consolidated Constraint Set
The match criteria, specified on the Constraint Set Details includes the following:
- Date – which matches the Invoice or Bill based on the value of the selected Date Matching Pattern.
- Matching Pattern:
- Daily - matches based on the Invoice Date/specified day - so invoices with the same Invoice Date are candidates
- Monthly - matches based on the Invoice Date month - so invoices with an Invoice Date within the same month are candidates
- Weekly - matches based on the Invoice Date week - so invoices in the same week are candidates.
- There is additional criteria for First Day of Week - Note: The field First Day of Week is only considered when you select the Matching Pattern field as Weekly.
- Matching Pattern:
- Invoices and Bill on the same date - assuming all other constraints are met will be added to a Consolidated Invoice/Bill for the same date.
- Refnum - which matches the Invoice or Bill based on the values of the selected Refnum Qualifiers provided on the invoices or bills. You can specify multiple Refnum Qualifier matches.
- Involved Party Qualifier - which matches the Invoice or Bill based on values of the selected Involved Party Qualifiers that are provided on the Invoices or Bills. You can specify multiple Involved Party Qualifiers.
- Service Provider – which is a mandatory match constraint – and matches the Invoice or Bill based on Service Provider.
The Constraint Set is defined in three tabs. The first tab - Constraint Set - provides the ID Constraint Set Type - in this case - Invoice - Consolidation or Bill - Consolidation and a description..
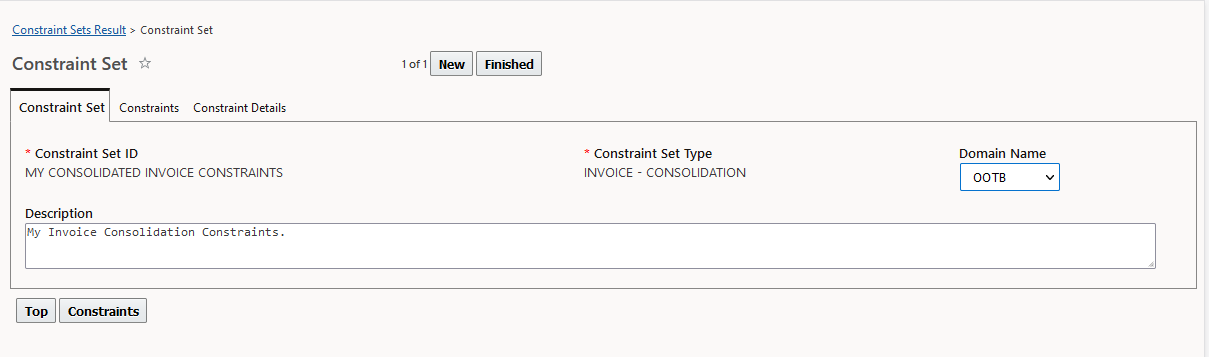
Constraint Set Header
In the second tab, Constraints, you select the Constraint ID used to define the match criteria. Note that Service Provider is required/not optional.
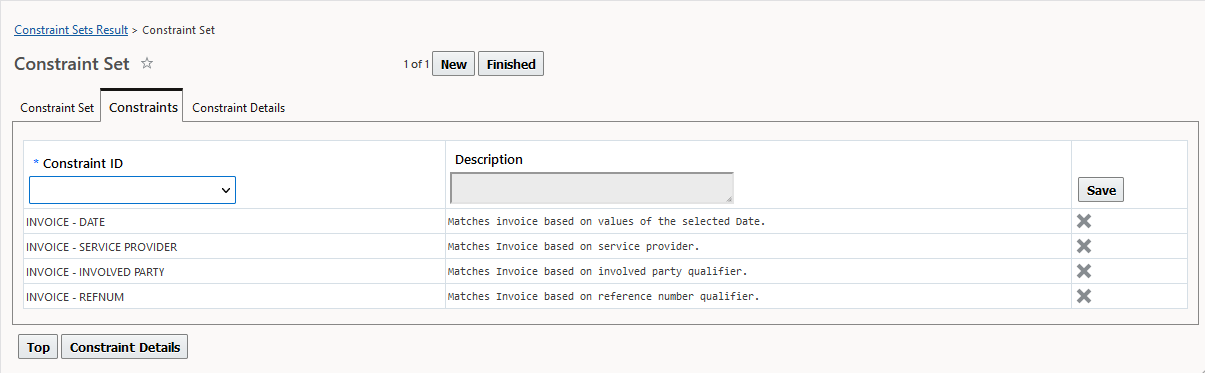
Constraint Set - Constraints Tab
In the Constraint Details tab, you define the values for the Constraints selected in the Constraints tab.
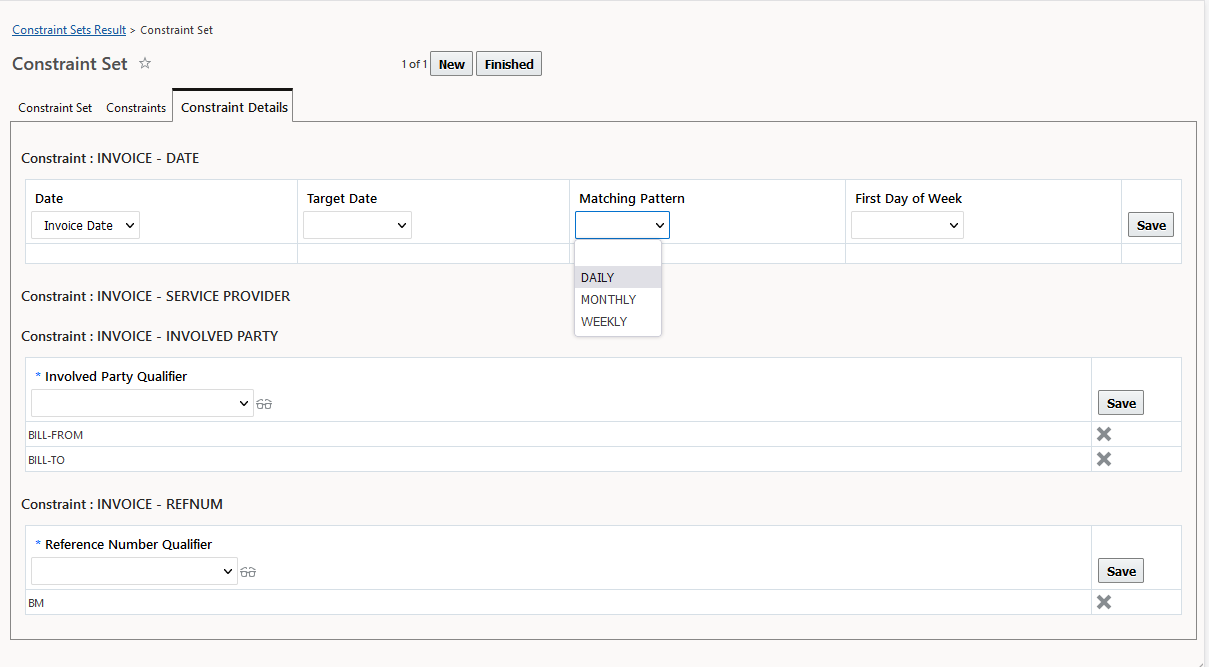
Constraint Set - Constraints Details Tab
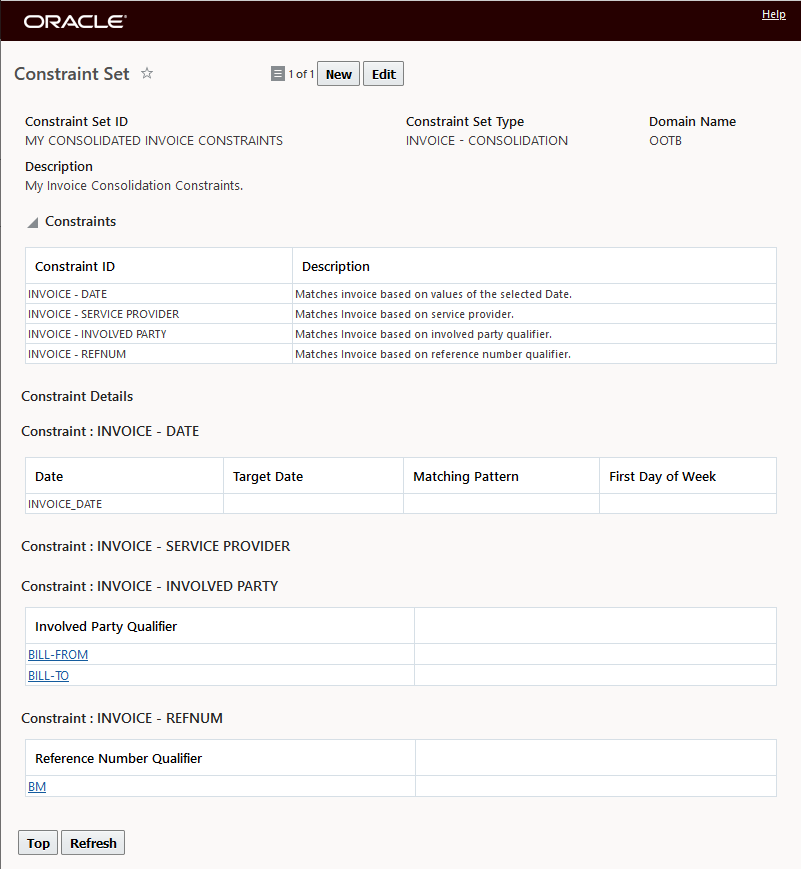
Invoice Constraint Set
Below are the same constraints established for the Add to Consolidated Bill.
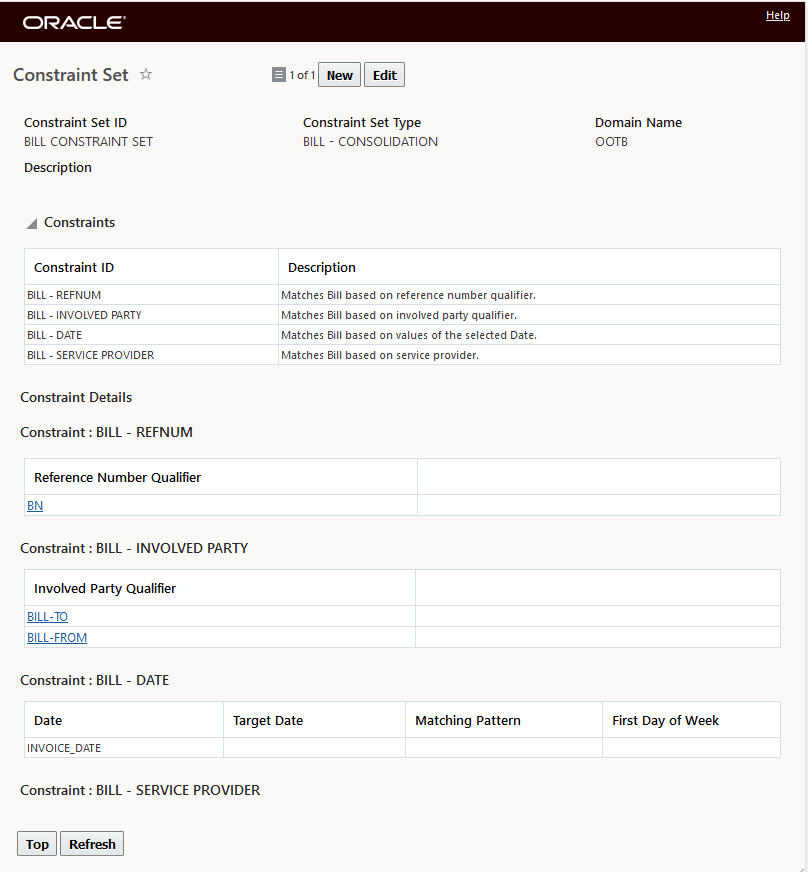
Bill Constraint Set
The Add to existing Consolidated Invoice (or Bill) checkbox will add an Invoice or Bill to an existing Consolidated Invoice or Bill with the same constraint set. If there are no existing Invoices or Bills with the same constraint set, the system will create a new Consolidated Invoice or Bill.
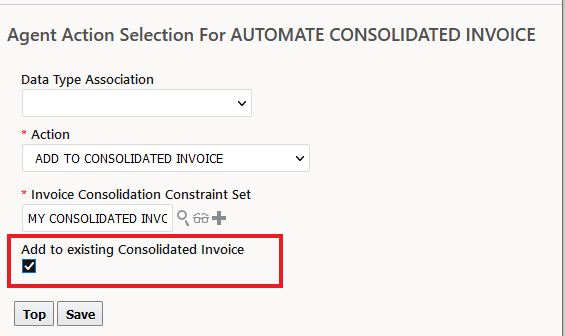
Add to existing Consolidated Invoice/Bill
In the example below - a Standard Invoice is evaluated and is converted to a Child Invoice and added to a Consolidated invoice. Previously, this step would have required you to select the Standard Invoice or Standard Invoices and then run the action Create Consolidated Invoice to create the Consolidated Invoice.
Before the Agent Action Add To Consolidated Invoice runs, the original invoice is a Standard Invoice and not associated with a Parent Invoice.
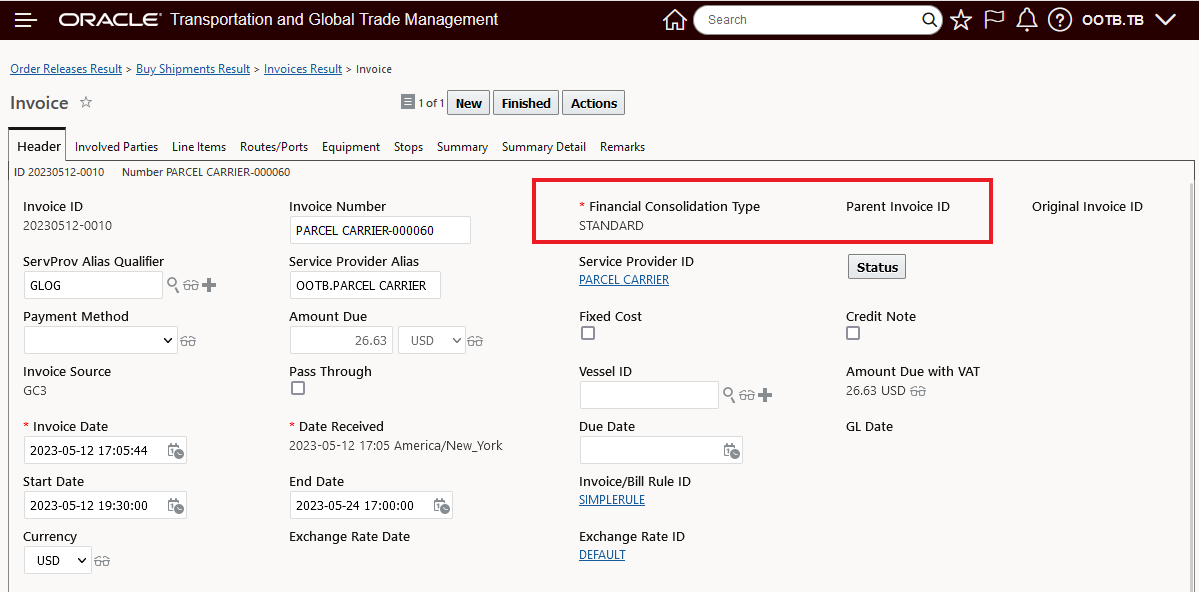
Standard Invoice Before Agent Action Runs
When the Agent Action runs, the Standard Invoice is converted to a Child Invoice and is now associated with a Consolidated Invoice - i.e., has a Parent Invoice. The Agent Action, after running, has created the consolidated invoice and added the first child invoice.
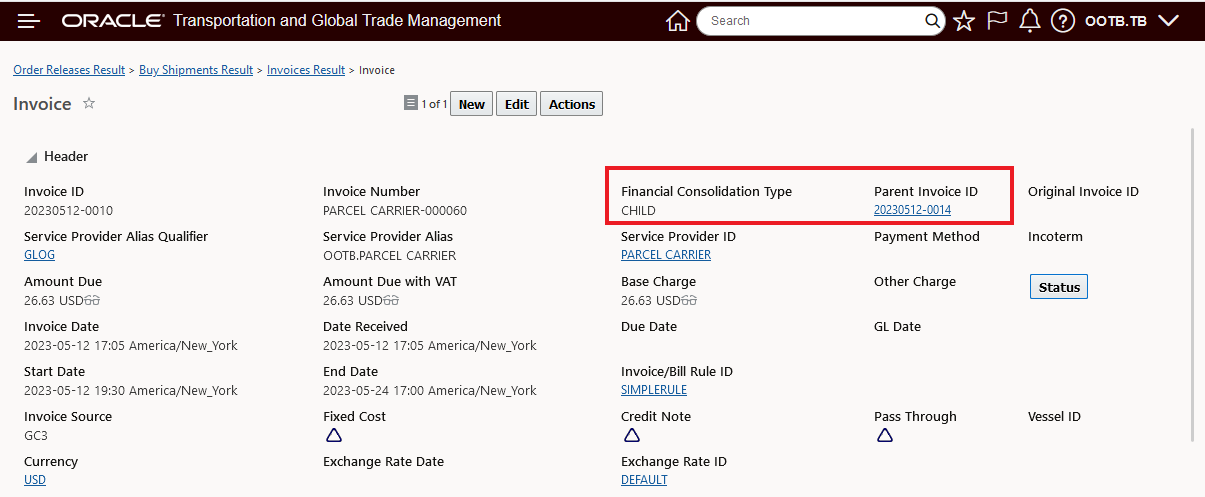
Standard Invoice After Agent Action Runs
A second Standard Invoice comes in with all the matching/constraint criteria defined in the Agent's Invoice Consolidation Constraint Set - when the Agent Action is run for this Standard Invoice, it will be matched and added to the existing Consolidated Invoice as shown below.
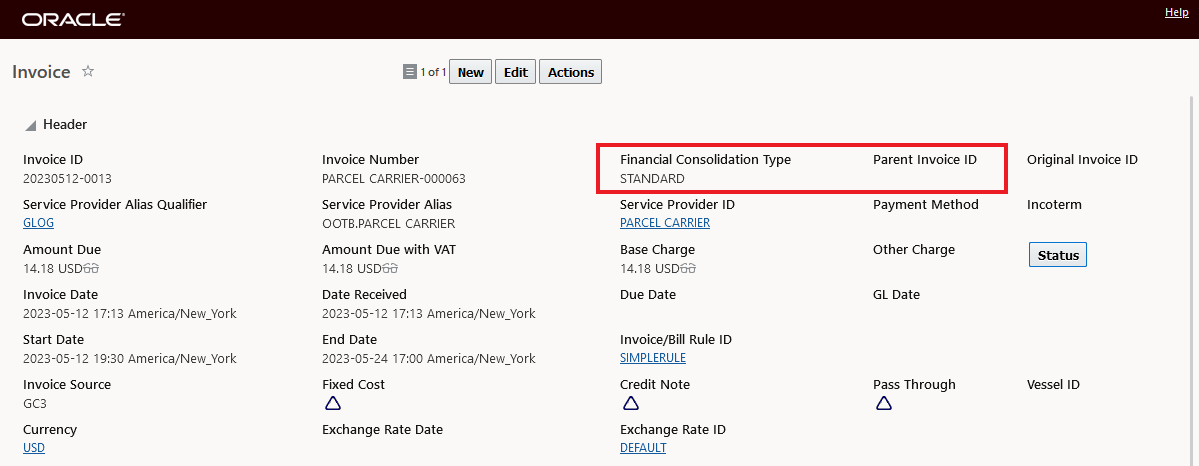
Standard Invoice 2 Before Agent Action Runs
After the Agent Action runs, the second invoice is now added to the Consolidated invoice (20230510-0014 - total amount due is now 40.18 USD - 26.63 USD plus 14.18 USD) and the second invoice is now a Child invoice. Also note that the Consolidated Constraint Set indicates the constraint set used for determining the invoices to match and add to the Consolidated Invoice.
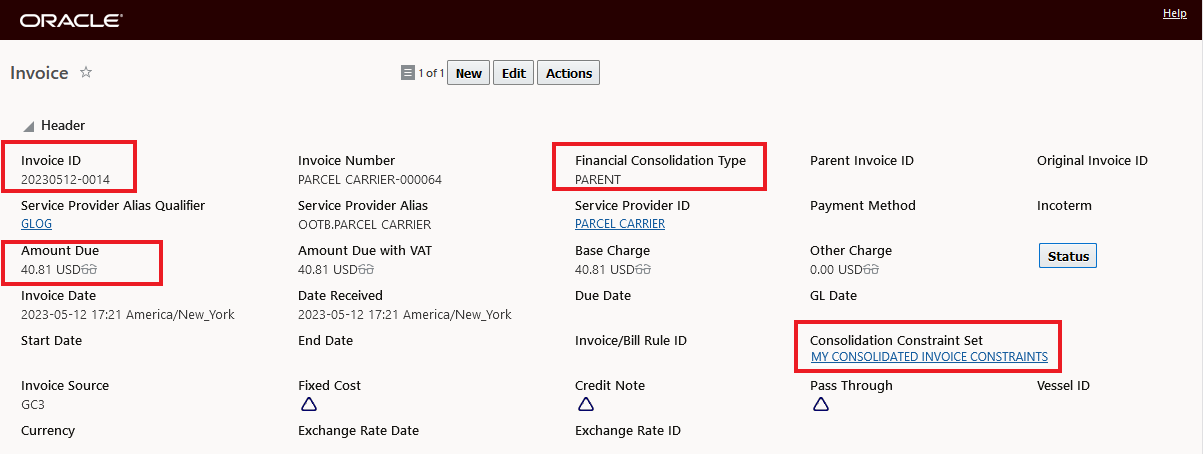
Consolidated Invoice
The second invoice after being added to the Consolidated Invoice.

Standard Invoice 2 After Agent Action Runs
This feature automates the manual steps required previously to create and add to a Consolidated Invoice or Consolidated Bill.
Steps to Enable
- You will need to create or modify an Agent to include the new Agent Action - Add to Consolidated Invoice and Add to Consolidated Bill.
- You will need to configure the Agent to include the appropriate Invoice or Bill Consolidation Constraint Set.
Transportation Operational Planning
Saving Parameter Overrides for Bulk Plan
This Optional Feature, when enabled, saves the overrides defined in the Planning Parameter for each Bulk Plan so that the specific overrides used in a Bulk Plan run can be reviewed/understood after the plan has run. This feature will help with solution analysis and support.
This feature is designed to help in the analysis and diagnosis of your Bulk Planning runs.
Steps to Enable
You don't need to do anything to enable this feature.
Disband Partially Planned Order Releases
This feature provides you with the ability to prevent your Bulk Plans, using Network Routing, from resulting in partially planned Order Releases. A partially planned Order Release can occur in scenarios where a leg in an Order's routing path does not have sufficient capacity to route the Order Release - in this case the Bulk Plan can leave the successfully planned Order Movements on their planned shipments - while leaving the one constrained Order Movement unplanned resulting in a Partially Planned Order Release i.e., not all Order Movements are on a shipment.
To take advantage of this new functionality you will need to set the Network Routing logic parameter HANDLE PARTLY PLANNED ORDERS to your preferred setting:
Possible values are:
- Allow Partly Planned Orders (default)
- Disband All Related Shipments (new functionality)
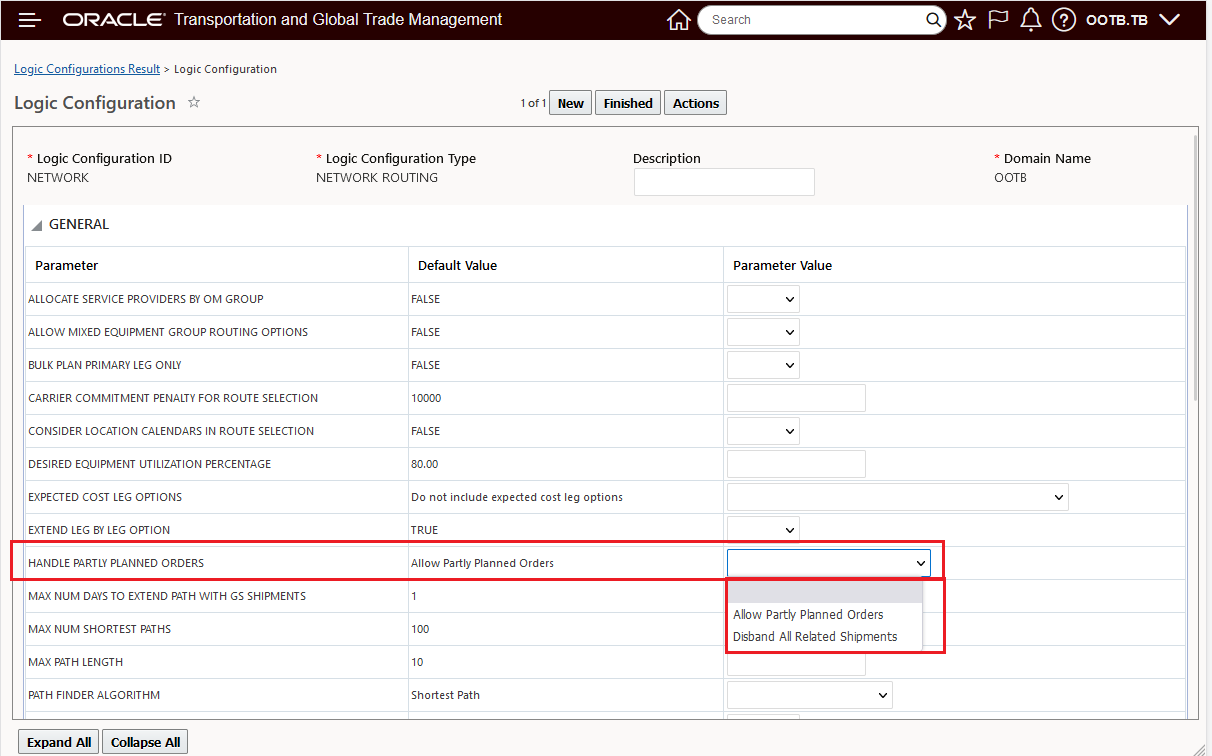
Network Routing - Handle Partly Planned Orders
Use cases supported include:
- Single order release bulk plan. If the order release would have been partly planned, then it will simply fail planning.
- Order A is bulk planned onto a 3-leg itinerary. The OM for leg 3 fails to plan. Order A will fail the bulk plan.
- Multi-order bulk plan where orders are expected to travel independently of each other. Any order release that would have been partly planned will fail. Other orders will plan successfully.
- Orders A, B, C each fill a truck, so they cannot travel together. They are bulk planned onto a 3-leg itinerary. The OM for A on leg 3 fails to plan. Order A will fail the bulk plan. However, orders B and C will successfully plan.
- Multi-order bulk plan where all orders are expected to travel together. If any of the order releases ends up partly planned, all the orders will fail.
- Orders A, B, C can fit onto the same truck, so they should travel together. However, the OM for A on leg 3 fails to plan. All three orders will fail the bulk plan.
- Multi-order bulk plan where sets of orders are expected to travel together (for example, orders are packed into several containers, each container is reused across legs to go from source to destination). If any order in a set of orders is partly planned, all the orders in that set will fail.
- Two orders can fit in the same container. Orders A, B, C, D are bulk planned onto a 3-leg itinerary where all legs share the same equipment. Orders A and B are planned together, and orders C and D are planned together. However, the OMs for A and B on leg 3 fail to plan. Orders A and B will fail the bulk plan, but orders C and D will successfully plan.
This feature improves the decision support workflow for planners after the planning process is complete by providing a solution where orders are either completely planned - source to destination or unscheduled - and clearly require intervention.
Steps to Enable
To take advantage of this new functionality you will need to set the Network Routing logic parameter HANDLE PARTLY PLANNED ORDERS to your preferred setting:
Possible values are:
- Allow Partly Planned Orders (default)
- Disband All Related Shipments (new functionality)
Tips And Considerations
When the parameter Handle Partly Planned Orders is set to Disband All Related Shipments the result will be:
- Any order that would have been partly planned will fail planning
- Any other order that was to have been planned with the partly planned order will also fail planning (even if it would have been fully planned).
- For these orders that fail planning:
- they will go into PLANNING - FAILED status
- no order movements will be created (including network routable OMs)
Logic coverage:
- The new logic works for simple itineraries and itineraries with routing networks.
- The new logic works with Logistic Network Modeling.
- The new logic works with bulk plan partitioning.
- This new logic is only for order release bulk plan with Network Routing.
Bulk Planning Day - Start and End
This feature provides you with the option of - when running a Bulk Plan, to set a Start and End date and time for the shipments that will be created as part of the plan. This feature is meant to support scenarios where your Plan day is prior to the actual shipment start day, a typical example being plan today for tomorrow - or plan today/Friday for Monday.
In the example below, seven Order Releases with no Pickup or Delivery times will be planned. In the first run no Planning Day Start Time will be specified and all the orders will be planned today/when the Bulk Plan was run. In the second run, the same Order Releases will be planned - but in this case the Planning Day Start Time will be set for June 5th at 8:00 AM.
For the first Bulk Plan, the option to specify a Planning Day Start Time is left blank.
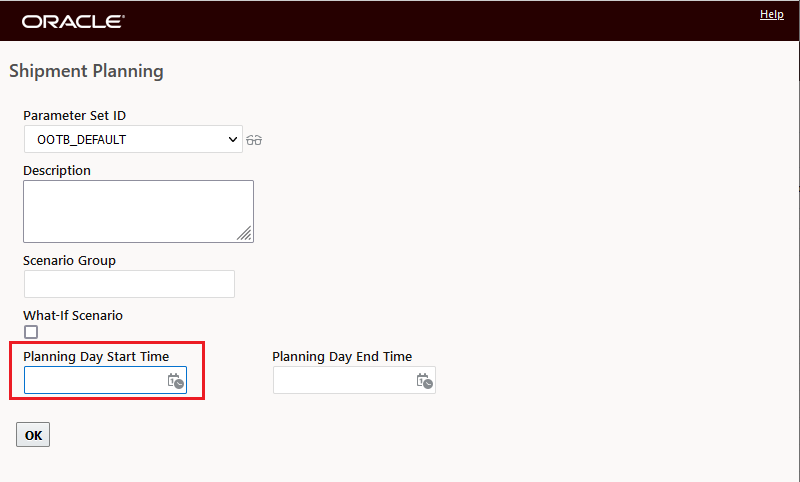
Bulk Plan Start Time Blank
In this case - the shipments below are generated, all with a start time of now/when the Bulk Plan was run.
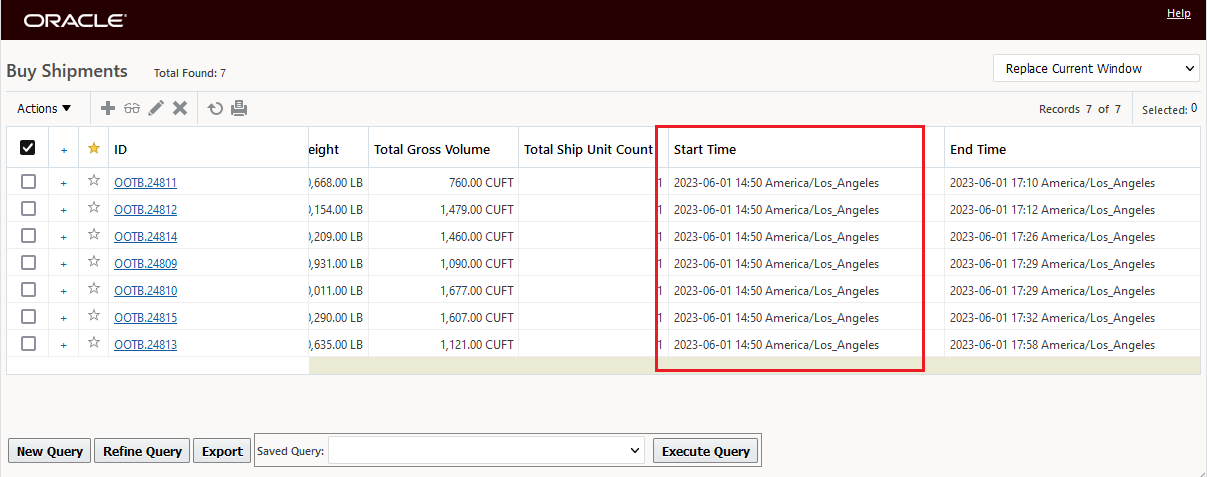
Shipments Planned With No Planning Day Start Time
In the example below, the same Order Releases are Bulk Planned, but in this case the Planning Day Start Time is specified - June 5th at 8:00 AM.
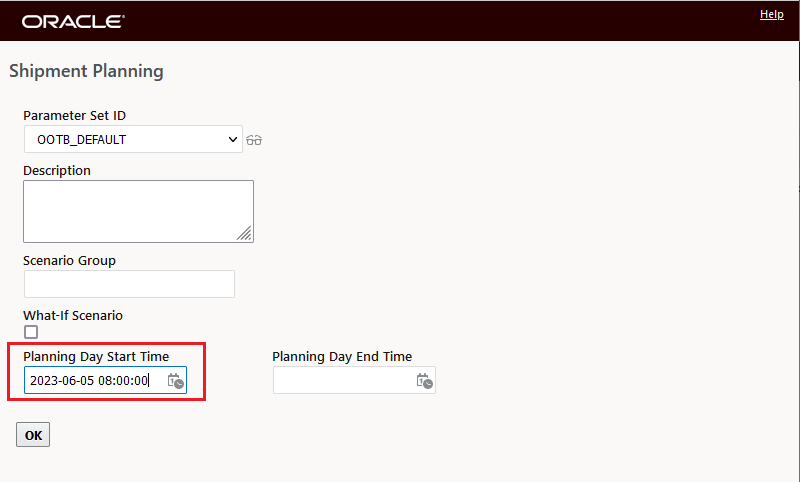
Planning Day Start Specified
Below are the resulting shipments with the Planning Day Start Time provided. In this case all the shipments start on June 5th at 9:00 AM - which is the earliest time they can start since the location calendar does not start before 9:00 AM on June 5th.

Shipments Planned With Planning Day Start Time
Planning Day End Time - this allows you to set a window or end time for planning a set of order releases. In the example below, there are two order releases, one has a pickup day for Monday and another has a pickup day of Thursday. The planning, in this case, is only meant to be for three days out - so Monday, Tuesday and Wednesday - Thursday's orders should not/do not need to be planned yet and can be left out of the plan. The Planning Day window allows you to set up this range.

Order Releases With Early Pickup Dates
When the Order Releases above are Bulk Planned with no Planning Day Start or End specified the shipments below are created, one shipment starts on June 5th at 9:00 AM - based on Early Pickup Date of June 5th at 08:00 AM - starting at 9:00 AM due to the Location Calendar. The second shipment starts on June 8th at 9:00 AM - again, based on the Early Pickup Date of Thursday June 8th at 8:00 AM.

Shipments Planned With No Planning Day Start or End Time
Now - the same set of Order Releases will be Bulk Planned with the Planning Day Start June 5th at 800 AM and Planning Day End Time June 7th at 6:30 PM as shown below.
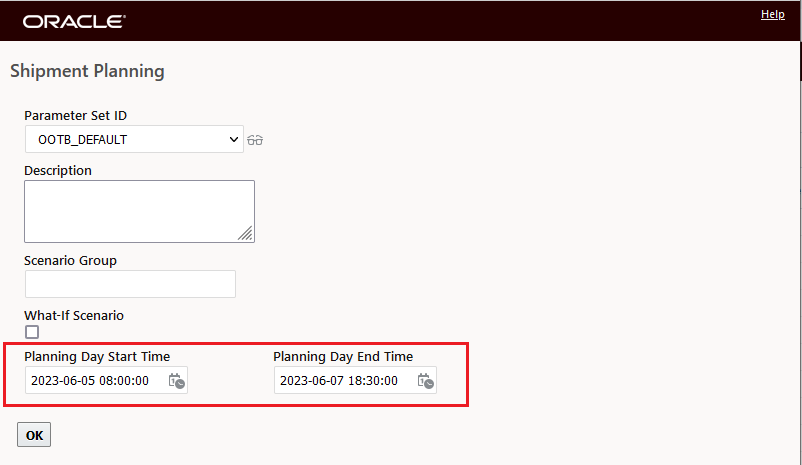
Planning Day Start and End Specified
As expected, the Bulk Plan results, given the Planning Day Start and End times above, shows that only one Order Release was planned onto one shipment and one Order Release was not planned - the Order Release for Thursday.

Bulk Plan Results
Below is the shipment planned in the Bulk Plan above- again - the shipment start is June 5th at 9:00 AM, as expected.
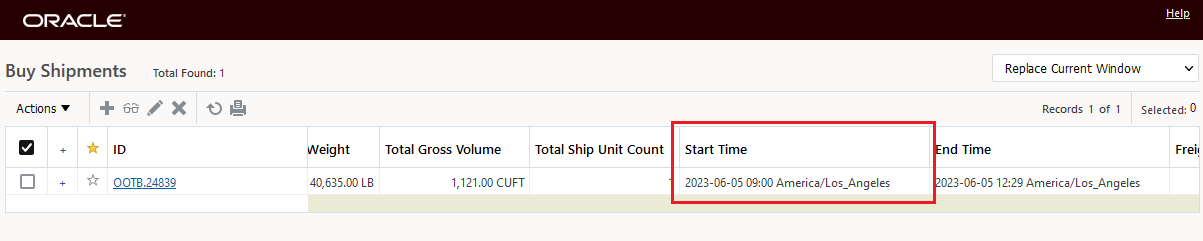
Shipments Planned With Planning Day Start and End Time
In the example below - the Planning Day End Time will be used. In this case, the Early Pickup Time for the Order that is within the planning window is June 6 at 10:00 AM
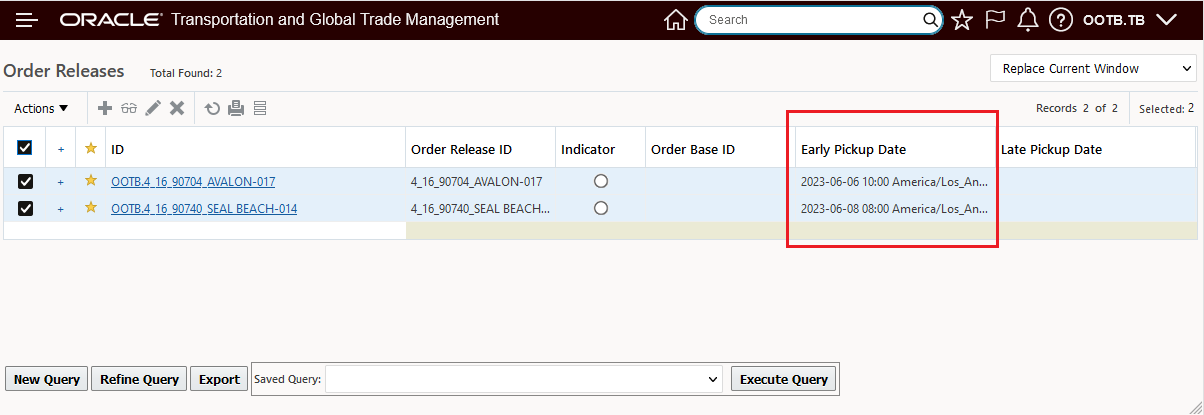
Order Releases For Planning Day End Time Only
The Bulk Plan specification for the Planning Day End time is below.
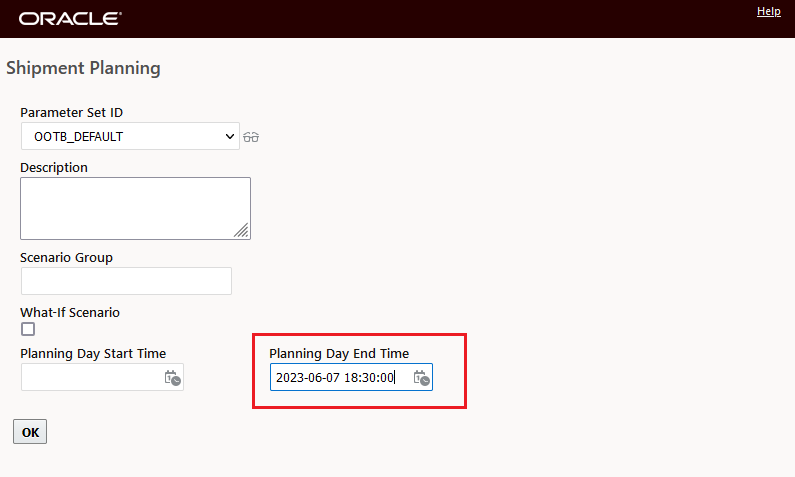
Bulk Plan With Planning Day End Time Only
Bulk Plan results for this run - as expected - one Order Release Planned one unplanned.
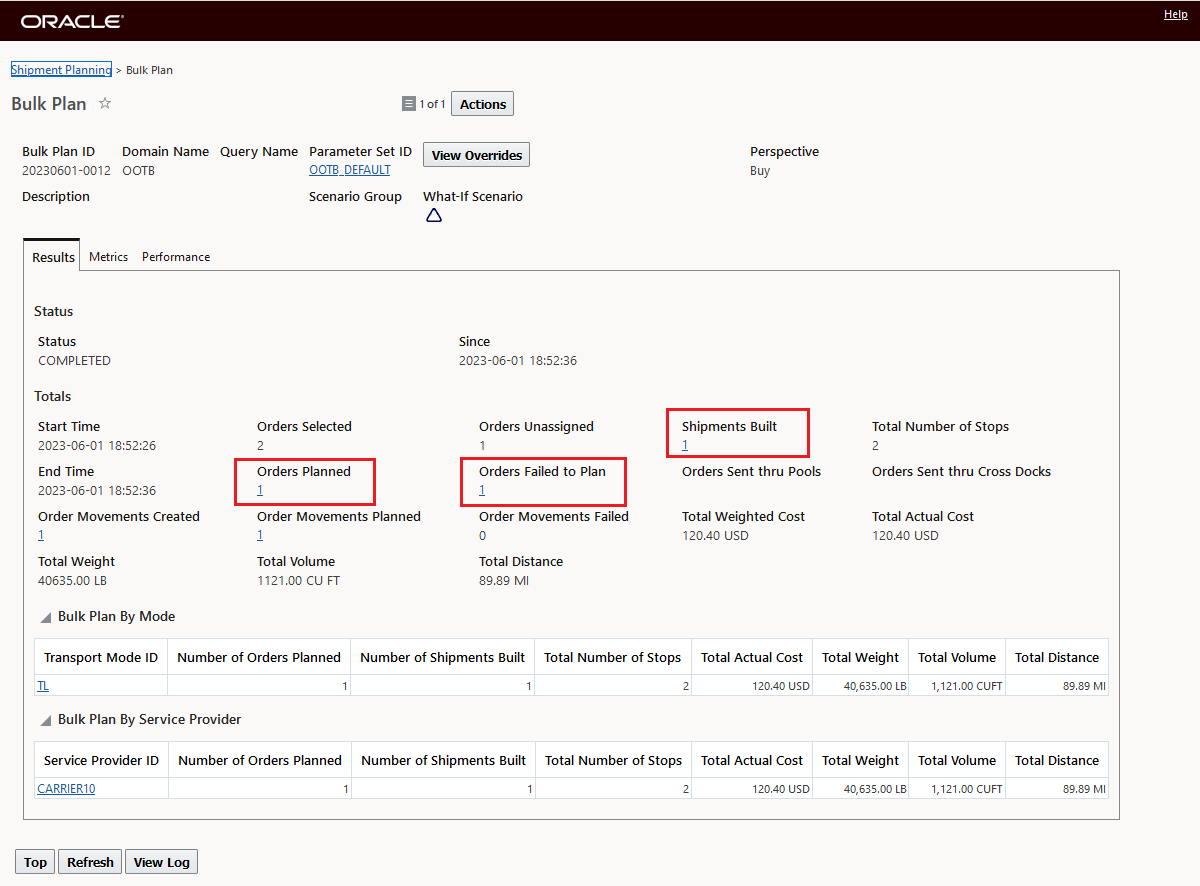
Bulk Plan Results With Planning Day End Time Only
Below is the shipment planned.
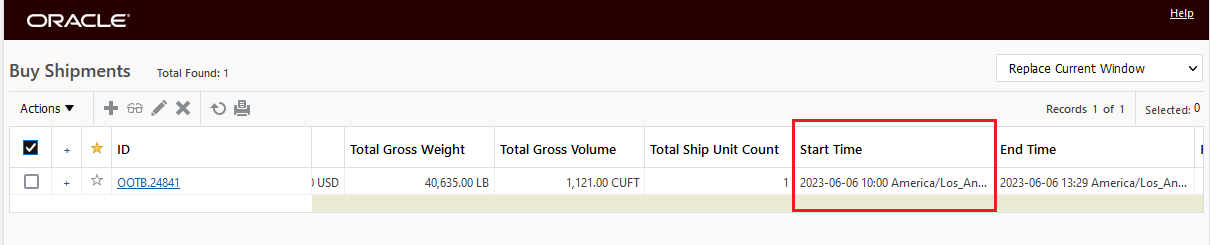
Shipment Planned
This feature simplifies considerably the setup required for aligning your planning activities with the shipments created in operations where the planning activity is done on a day or days prior to the actual shipment execution/shipment start.
Steps to Enable
You don't need to do anything to enable this feature.
This feature provides you with the option - for your Order Release planning and using Network Routing to run a Bulk Plan - where OTM will generate all the Order Movements for your Order Release(s), but will only create shipment(s) on the primary leg.
In the example below, the Order Release follows a classic Dray, Ocean (Primary), Dray 3 leg path. When the new Network Routing Logic Configuration General Parameter - BULK PLAN PRIMARY LEG ONLY - is set to True, OTM will generate the Order Movements for all three legs, but will only create a shipment for the Primary leg - in this case the Ocean leg.
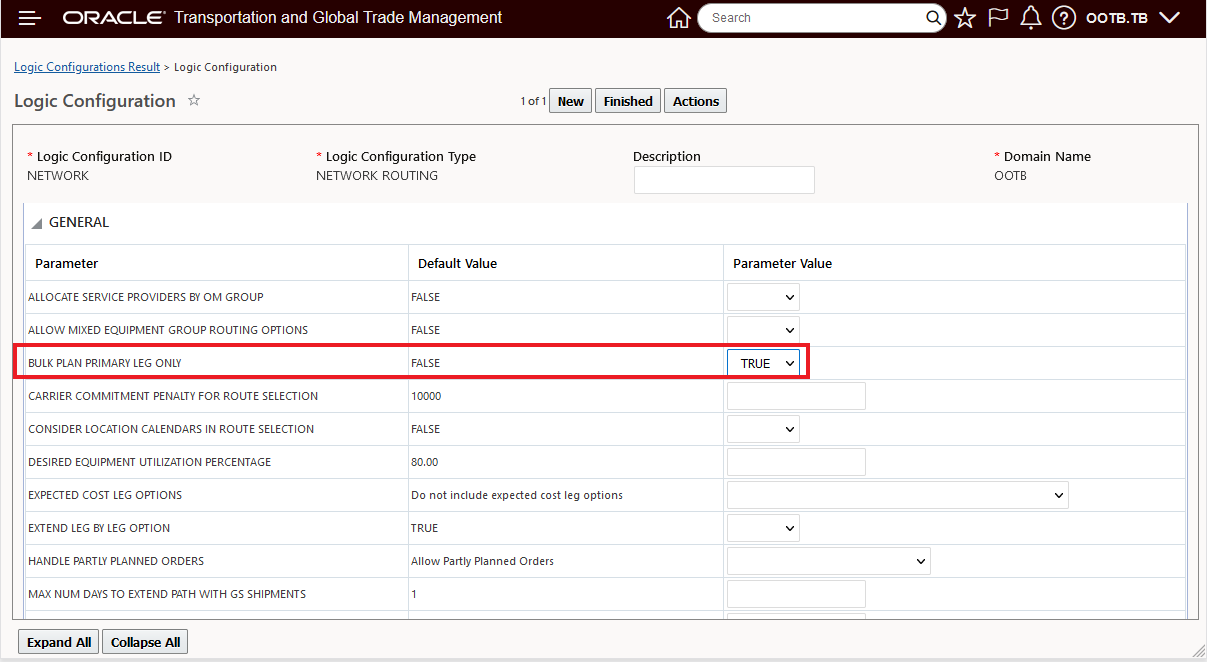
BULK PLAN ON PRIMARY LEG ONLY
When the order is bulk planned with a three leg itinerary as described above, the Bulk Plan results will be - as shown below - 3 Order Movements are created, and just 1 shipment is created on the Primary Leg/the Ocean Leg.

Bulk Plan Results
Below are the Relate Order Movements for the Order Release. The Order Movement between the port of USNYC and BEANR is the Order Movement on the Primary Leg/the Order Movement that is on a shipment, the other two Order Movements are unscheduled.
Below is the Related Buy Shipment.
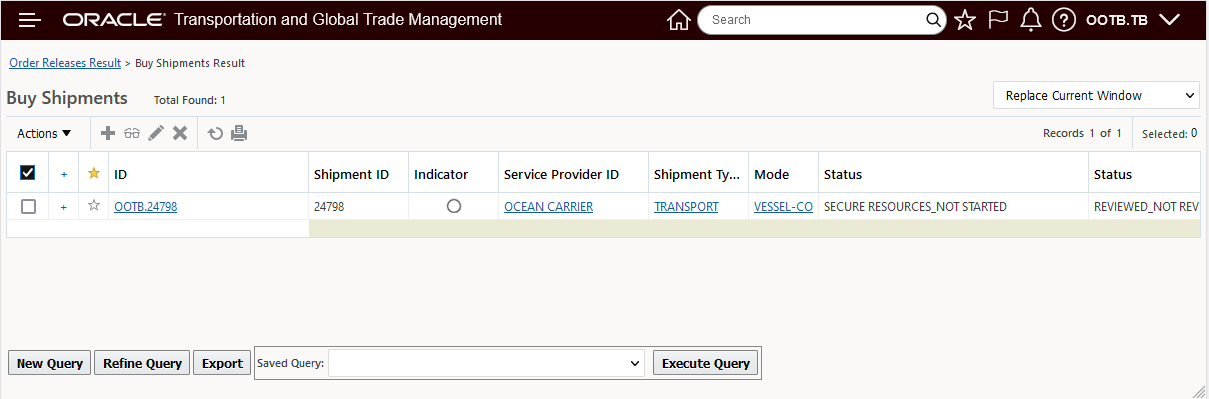
Primary Leg Buy Shipment
This feature will allow you to automate the generation of the Primary Leg Only shipment building process.
Steps to Enable
To take advantage of this new functionality you must:
- Set the Network Routing Logic Configuration General Parameter - BULK PLAN PRIMARY LEG ONLY - to True,
- Set the Parameter Set Multi-Tier Parameter - ORDER ROUTING METHOD - to Network Routing.
Select Most Utilized Metric (Weight/Volume) for Resources
This feature provides a consistent view to the most utilized metric in situations where the two Logic Configuration Container Optimization Metrics for Volume and Weight are set to True and there is no cost difference to guide the most utilized selection.
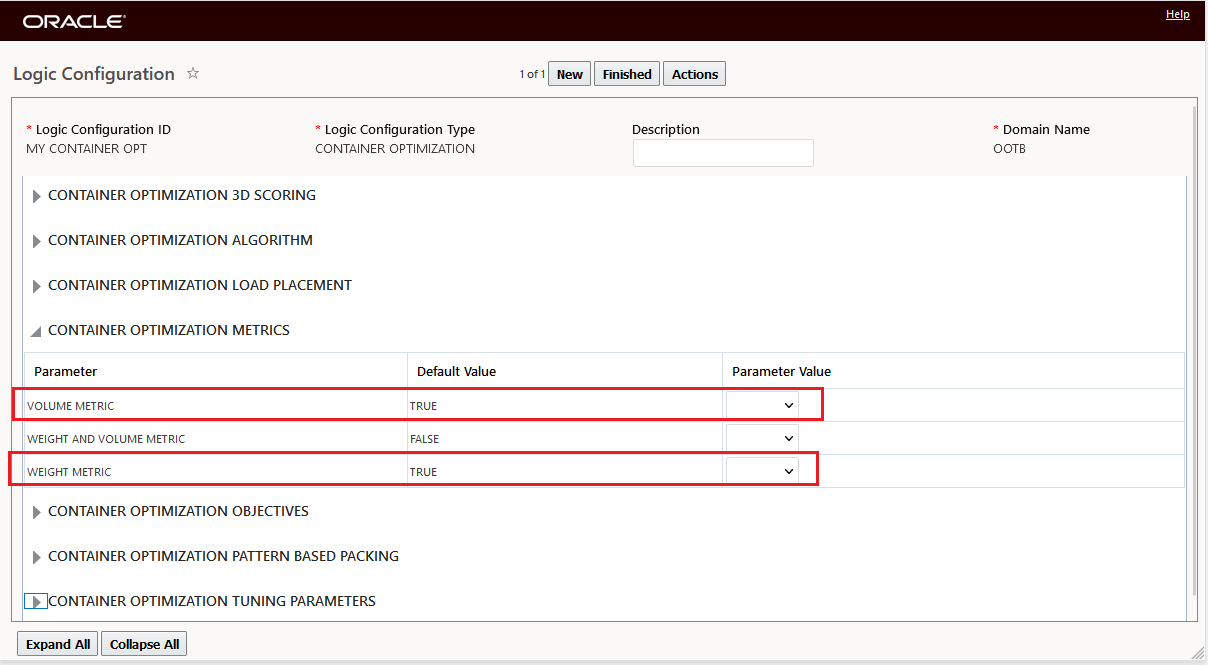
Logic Configuration Container Optimization Container Optimization Metrics
This feature provides a more consistent and meaningful result for showing utilization in the situation where both the Volume and Weight metric are to be considered.
Steps to Enable
You don't need to do anything to enable this feature.
Tips And Considerations
Conopt results will now be sorted based on the most utilized metric - either by volume or weight - if both the VOLUME METRIC and WEIGHT METRIC are set to True.
The Property glog.business.equipment.packByMaxWgtVolUtilization has been added to control this behavior. The default value of this property is True (on).When set to false, the previous behavior will take effect.
NOTE: The default value for this property glog.business.equipment.packByMaxWgtVolUtilization is True - which is the new behavior.
Multi-stop Logic - Favor Combined Inbound/Outbound Shipments with Delivery/Pickup Stops
This feature provides you with a new Logic Configuration - Multistop parameter - MULTISTOP COMBINE INBOUND AND OUTBOUND SHIPMENTS - that provides a way for you to favor the building of multi-stop shipments so that the multi-stop logic favors combining inbound (A -> B) and outbound (B -> A) shipments together. This feature is focused on supporting scenarios where your stops may involve doing both a delivery and a pickup activity (PD stops) at the same location. This capability and parameter build on previously released multi-stop parameters and capabilities.
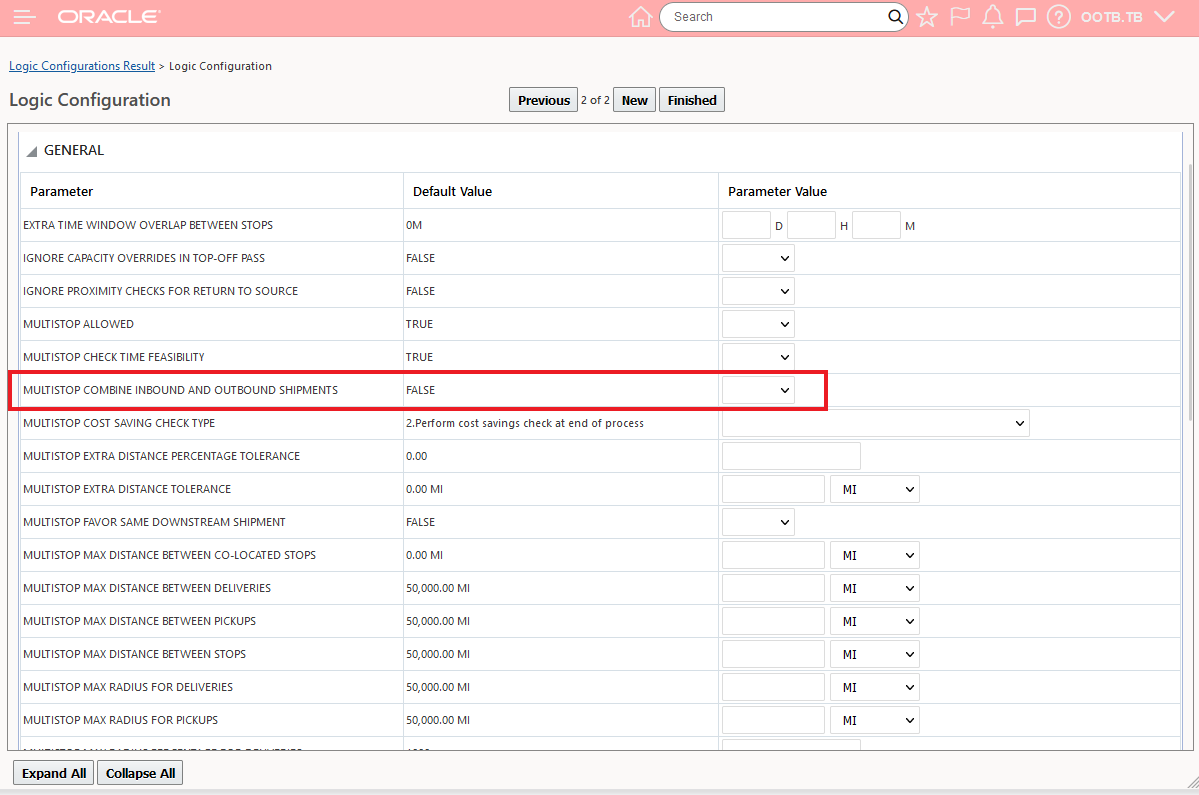
Logic Configuration - Multi-stop Parameter - MULTISTOP COMBINE INBOUND AND OUTBOUND SHIPMENTS
This feature is focused on supporting scenarios where your stops may involve doing both a delivery and a pickup activity (PD stops) at the same location. This capability and parameter build on previously released multi-stop parameters and capabilities.
Steps to Enable
To take advantage of this feature the following parameter needs to be set: MULTISTOP COMBINE INBOUND AND OUTBOUND SHIPMENTS = true
Tips And Considerations
This new feature should be beneficial in situations where your stops involve delivering and picking up at your stops - for example - dropping off a full item and picking up an empty item at the same stop. With this feature enabled, planning will treat the PD stop together - previously - if you emptied the equipment with the delivery at the location, the pickup would be considered a separate segment - requiring the use of multi-segment logic. With this feature the PD stop on the shipment is no longer split into separate segments and is solved together.
Via Point Stops from Rate Record for Lookup Rate Service Added to Shipment
This feature provides you with the option of having the VIA Points defined on your Rate Records be incorporated into the planned shipment as additional Shipment Stops. This new capability is provided using the parameter ADD RATE VIA POINTS AS STOPS. When this property is set to true, the application will add the Port of Load and the Port of Discharge stops from the Rate Record as stops on the Shipment. The additional VIA points will be added if doing so can be done without making the Shipment time infeasible.
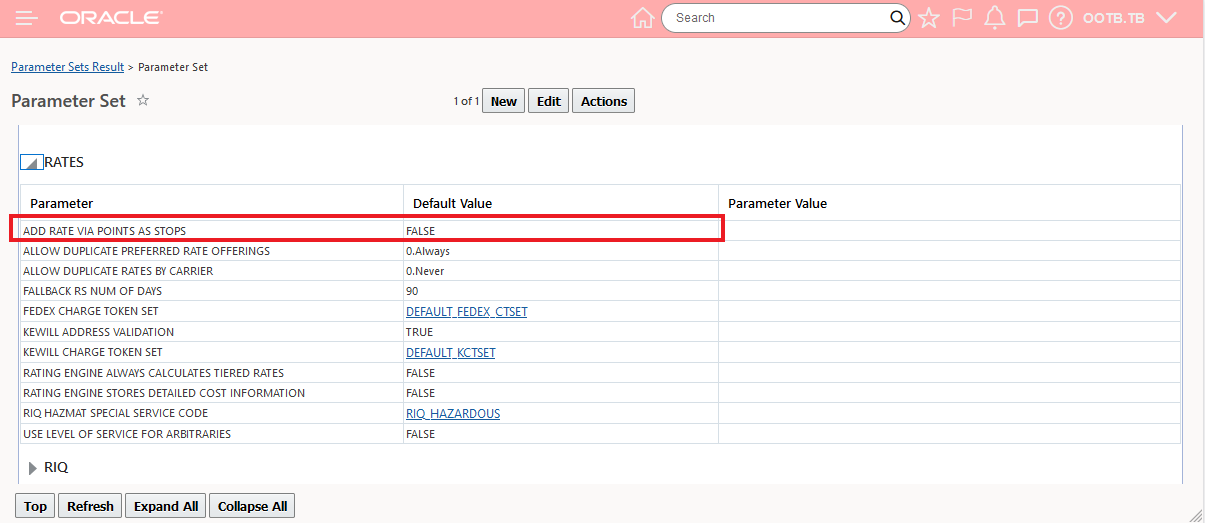
Add Rate Via Point As Stop Parameter
This feature provides visibility to the Via Stops used to create a shipment by adding the Via Stops from the Rate Record used to create your Door-to-Door shipment providing improved visibility to the intermediate stops involved in your Door-to-Door shipping scenario.
Steps to Enable
You don't need to do anything to enable this feature.
Tips And Considerations
Requirements for using this new feature
- This feature only works for the LOOKUP rate service.
- The LOOKUP rate service must have all options available:
- Source to POL
- POL to POD
- POD to Destination
- The LOOKUP rate service must have all options available:
Previously - as a Door-to-Door setup only Source to Destination would have been required - to use this feature all stop to stop options must have a Lookup value.
- If the necessary LOOKUP entries are not available, the shipment cannot use this rate
Restrictions
VIA points can be added as shipment stops only if the following conditions are satisfied:
- It is not a multi-leg scenario.
- The Rate Service must be of type "LOOKUP".
- If there are multiple port of load/port of discharge defined on the rate record, the first alphabetic ones are picked to be added as stops.
- If the order has a port of load/port of discharge already constrained, then that must be considered.
Detachable Ground Schedules - Service Provider Profile
This feature provides the option for you to define the Service Provider(s) for your Detachable Trip Ground Schedules as a Service Provider Profile. When a Detachable Trip Ground Schedule is defined with a Service Provider Profile versus a single Service Provider, the assignment of the Service Provider will be handled as part of the Release Ground Schedule instance process - when the Detachable Trip Ground Schedule is Released, at that point, the lowest cost Service Provider in the assigned Service Provider Profile will be assigned. Once assigned - for your Detachable Ground Schedules only - the actions Change Service Provider and Choose Least Cost will only consider Service Providers in the Service Provider Profile assigned to the Detachable Trip Grounds Schedule that the shipment was released from.
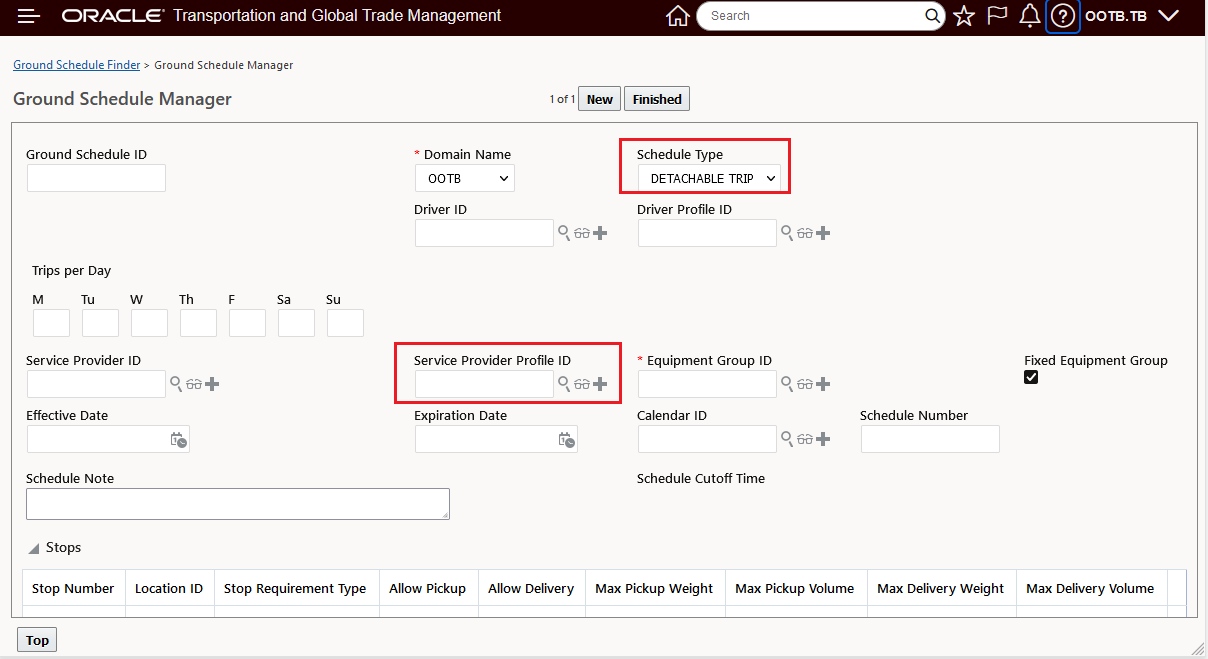
Detachable Trip - Service Provider Profile
This feature provides additional flexibility in the assignment of the Service Provider to your Detachable Ground Schedule Instance/shipment as well as providing additional controls for changing the Assigned Service provider - for your Detachable Ground Schedules.
Steps to Enable
You don't need to do anything to enable this feature.
Tips And Considerations
For Detachable trips, the system does not allow you to specify both Service Provider and Service Provider Profile ID.
NOTE: Service Provider Profile ID is not applicable for Static and Dynamic trips.
Consider Available Ground Schedules in Planning
This feature enhances the Network Routing Path Finder Algorithm - Shortest Path to consider all available Ground Schedules. Previously, the Path Finder Algorithm - Shortest Path logic assumed the usage of the same Ground Schedule for the orders on a leg versus considering all the available Grounds schedules. With this feature, the Path Finder Algorithm - Shortest Path now will consider all available Ground Schedules, avoiding more expensive options following a different route.
This feature improves solution quality in situations where you are using Network Routing and your Network Routing Path Finder Algorithm is set to the default value - Shortest Path and your network involves legs where you have multiple Ground Schedule options.
Steps to Enable
You don't need to do anything to enable this feature.
Tips And Considerations
You can control the time window for the Ground Schedule Shipments to consider for the path creation with the Network Routing Logic Configuration parameter - MAX NUMBER OF DAYS FOR PATH CREATION WITH GROUND SCHEDULE SHIPMENTS - the default is 1 day.
This feature supports the definition of a daily capacity - Tactical Capacity - to support those scenarios where a predictable recurring capacity definition is not practical. With Tactical Capacity, you can define your service provider's capacity for a particular day based on their current capacity availability. Previously, supporting a daily capacity required you to adjust/set your Capacity Limit on a daily basis considering both the accumulated Usage plus the new/available capacity.
Tactical Capacity can be accessed via Operational Planning > Capacity Management > Tactical Capacity.
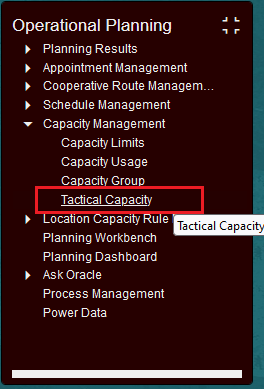
Tactical Capacity
In the example below, the Service Provider's Tactical Capacity will be defined for Friday June 30th.
The Tactical Capacity entry screen requires a minimal amount of data entry - you will need to provide a Capacity Limit ID for the date to be considered, the Active flag will need to be checked, the Date for the capacity being defined needs to be provided and the Limit.
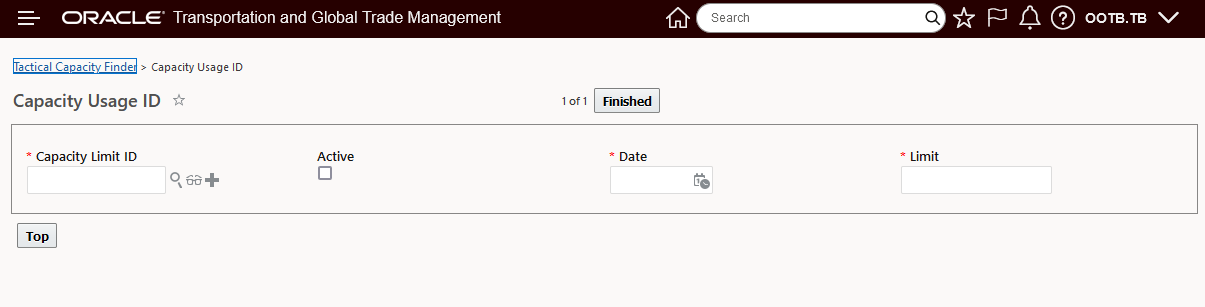
Tactical Capacity
You will need to create a Capacity Limit record for the date your Tactical Capacity is being defined. Much of the information on the Capacity Limit will rely on base data defined previously - like Capacity Group, Equipment Type and Lane. The Tactical Capacity items on your Capacity Limit entry will be the Capacity Limit ID for this Tactical Capacity entry, the Effective Date for the Capacity Limit, and for Tactical Capacity, you will create your Capacity Limit record selecting the new No Capacity Usage option.
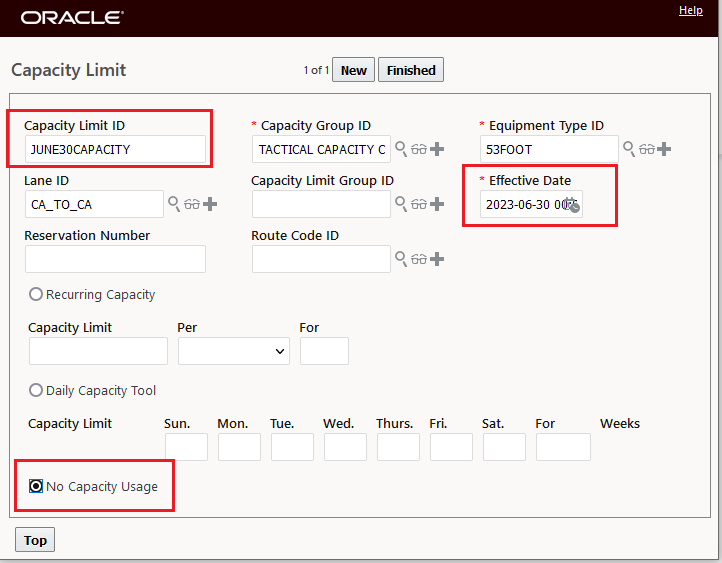
Capacity Limit Setup for Tactical Capacity
After setting up the Capacity Limit, the remaining items for defining the Tactical Capacity are checking the Active check box, specifying the Date for the capacity - in this example June 30th 2023 - and then defining the Limit, in this example 3.
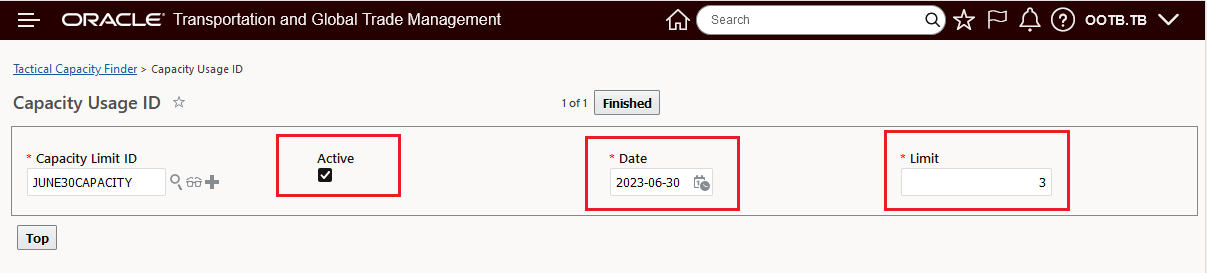
Tactical Capacity
The result of the Tactical Capacity setup above is that Service Provider Carrier20 has 3 53 Foot Equipment on the CA_to_CA lane for June 30th. Given the four orders below that must ship on June 30th each requiring their own shipment - only 3 of the 4 orders are planned - as expected.

Order Releases - Three Planned, One Failed
In the example below, there are 6 orders to plan - the four above that must be shipped on June 30th and with the Tactical Capacity available set at 3 and then an additional two orders that must be shipped on July 3rd where the Tactical Capacity is set to 1 as shown below.
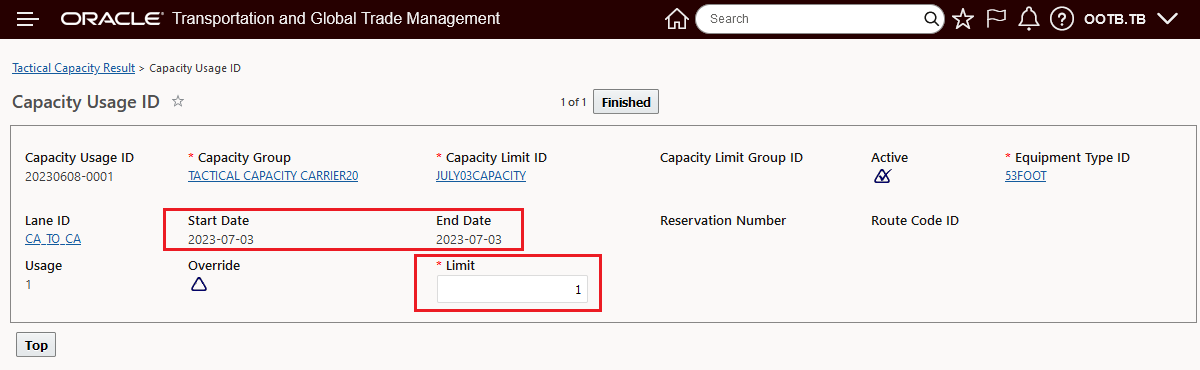
Tactical Capacity Setup July 3rd
With Tactical Capacity defined as above for June 30th and July 3rd, and given the six orders below - four must ship on June 30th and two must ship on July 3rd. Two orders fail to plan - one on June 30th - where the Tactical Capacity limit is 3 and one on July 3rd will fail, since the Tactical Capacity is set to 1.
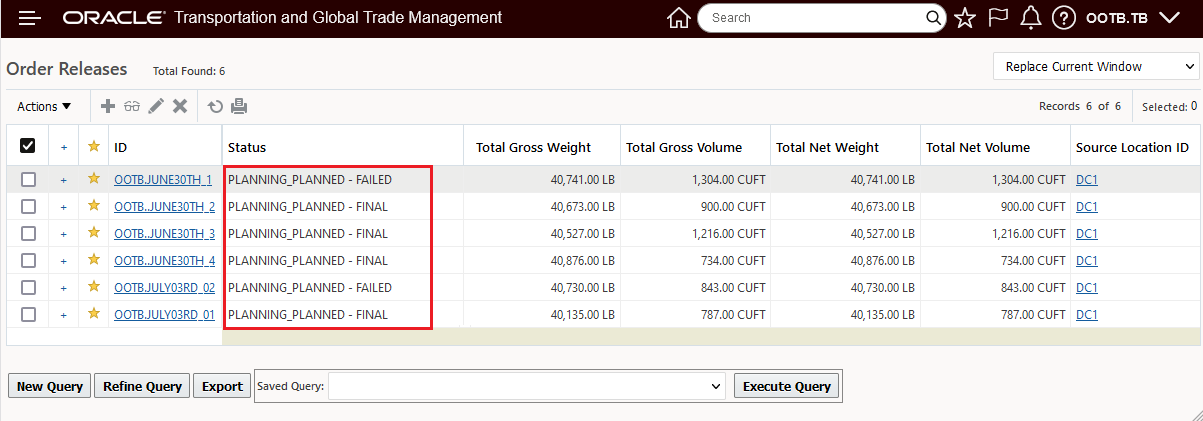
Planning Result With Tactical Capacity Defined for June 30th and July 3rd
This feature allows for the management of your Service Provider Capacity on a daily/by date basis - verses assuming a recurring capacity. The Tactical Capacity provides you with a more operational method of updating Service Provider capacity based on their current available capacity for a day/date.
Steps to Enable
You will need to create a new Capacity Limit(s) to manage your Tactical Capacity Usage setup. The steps required are below.
- Navigate to Tactical Capacity via Operational Planning > Capacity Management > Tactical Capacity.
- Create a new Tactical Capacity record.
- Create a Capacity Limit record for the date your Tactical Capacity is being defined. Much of the information on the Capacity Limit will rely on base data defined previously - like Capacity Group, Equipment Type and Lane. The Tactical Capacity items on your Capacity Limit entry will be the Capacity Limit ID for this Tactical Capacity entry, the Effective Date for the Capacity Limit, and for Tactical Capacity, you will create your Capacity Limit record selecting the No Capacity Limit Usage option.
- After setting up the Capacity Limit, the remaining items for defining the Tactical Capacity are checking the Active check box, specifying the Date for the capacity and then defining the Limit.
Pattern Based Load Configuration - Allow the Stacking of Multiple Cylindrical Ship Units with Same Diameter
This feature enhances the Pattern Based Load Configuration (PBLC) algorithm to support the stacking of cylindrical ship units when the required constraints are met.
The constraints required to use the enhanced cylinder packing algorithm are:
- Only for cylindrical ship units.
- Ship units should have the same diameter.
- Ship units have the same Load Configuration Setup.
- The Load configuration Setup should be defined with pattern based loading STANDING NESTED.
The Container Optimization Logic Configuration parameter USE ENHANCED CYLINDER PACKER must be set to TRUE - default is FALSE.
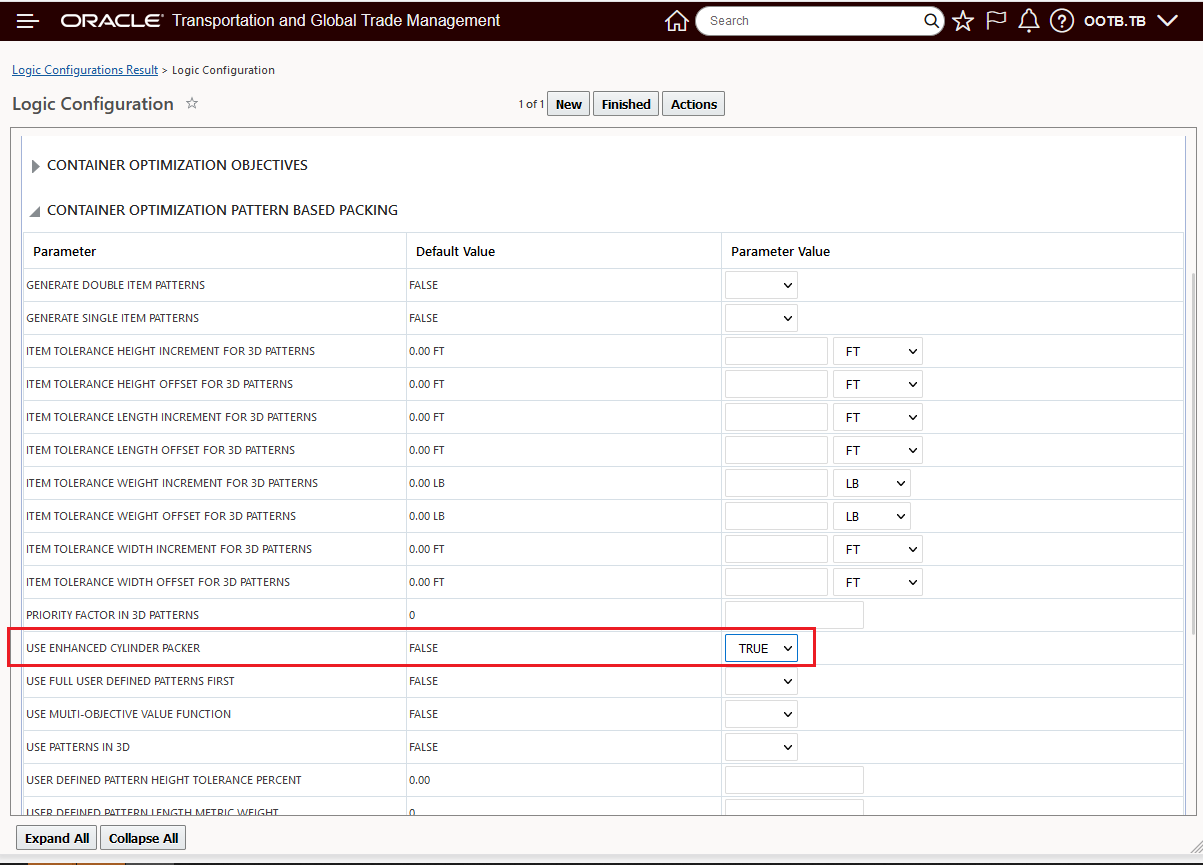
Use Enhanced Cylinder Packing
In the examples below - side by side examples - the benefit of the enhanced cylinder packer option is clear.
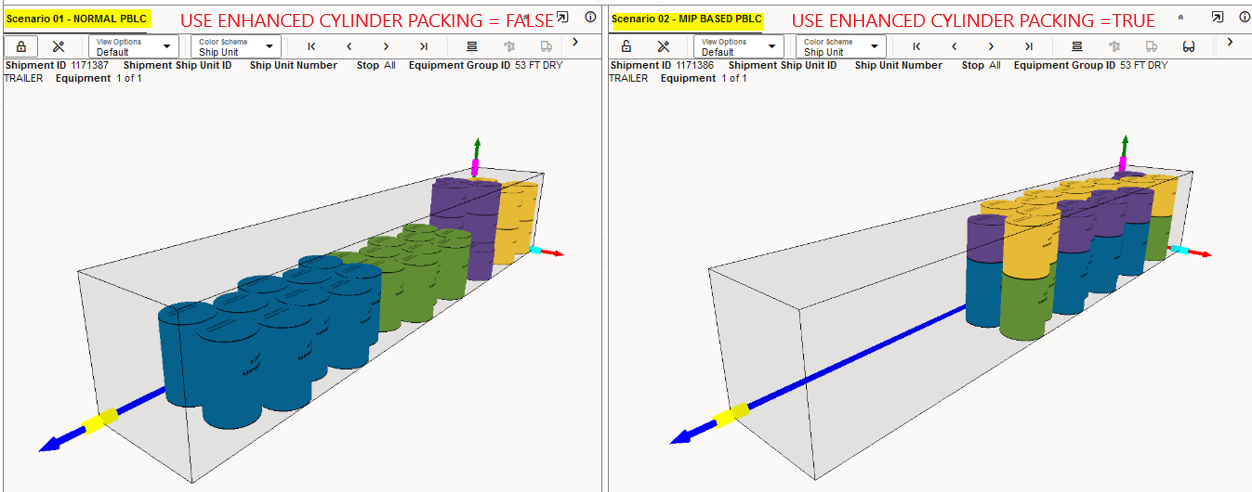
Use Enhanced Cylinder Packer
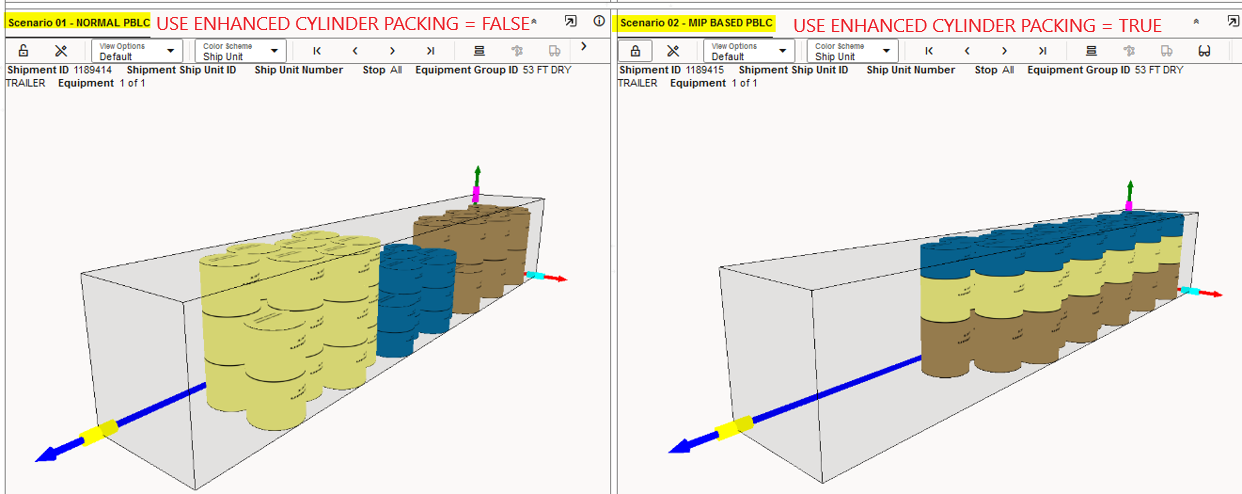
Use Enhanced Cylinder Packer
The enhanced PBLC algorithm will provide improved loading solutions in scenarios where the constraints required to use the enhanced algorithm are satisfied.
Steps to Enable
Constraints required to use the enhanced cylinder packer algorithm must be satisfied:
- Only for cylindrical ship units.
- Ship units should have the same diameter.
- Ship units have the same Load Configuration Setup.
- The Load configuration Setup should be defined with pattern based loading STANDING NESTED.
The Container Optimization Logic Configuration parameter USE ENHANCED CYLINDER PACKER must be set to TRUE - default is FALSE.
Work Assignment Consolidation - Column Generation Option
This feature provides you with a new Resource Scheduler Work Assignment consolidation algorithm option - Column Generation. The Column Generation option will offer an improved solution for most Work Assignment problems. The Column Generation solution will be particularly beneficial when solving problems that are more involved - for example - problems with a variety of location calendars, different order time window constraints, and involve Resource Schedules with calendars that have a variety of start and end times, and for problems where the Resource Schedules have a variety of different Duration times.
The Column Generation option - given the more constrained problem described above - will improve the solution quality by looking to improve both the number of shipments assigned to the available Resource Schedule Instances, as well as improving the utilization of the available instances (using the duration available) and providing a better match of the must-go-early shipments with the available early resources.
In the example below, the same problem is solved using the Sequential Savings Work Assignment logic and then the same problem is solved using the Column Generation option.
The current Sequential Savings algorithm creates Work Assignments using a Cost/Distance Based Savings Algorithm approach. This algorithm, while very good, can provide less than optimal results by relying too much on the cost and distance savings identified when deciding which shipments to assign to a Work Assignment. The example below demonstrates the issue. In this example, the Sequential Savings algorithm puts together the two longest shipments available and assigns these shipments to the resource with a 12H 30M duration available. The longest shipment assignment uses only 9H 46M of the 12H 30M available duration and as such does not leave room for adding additional shipments..
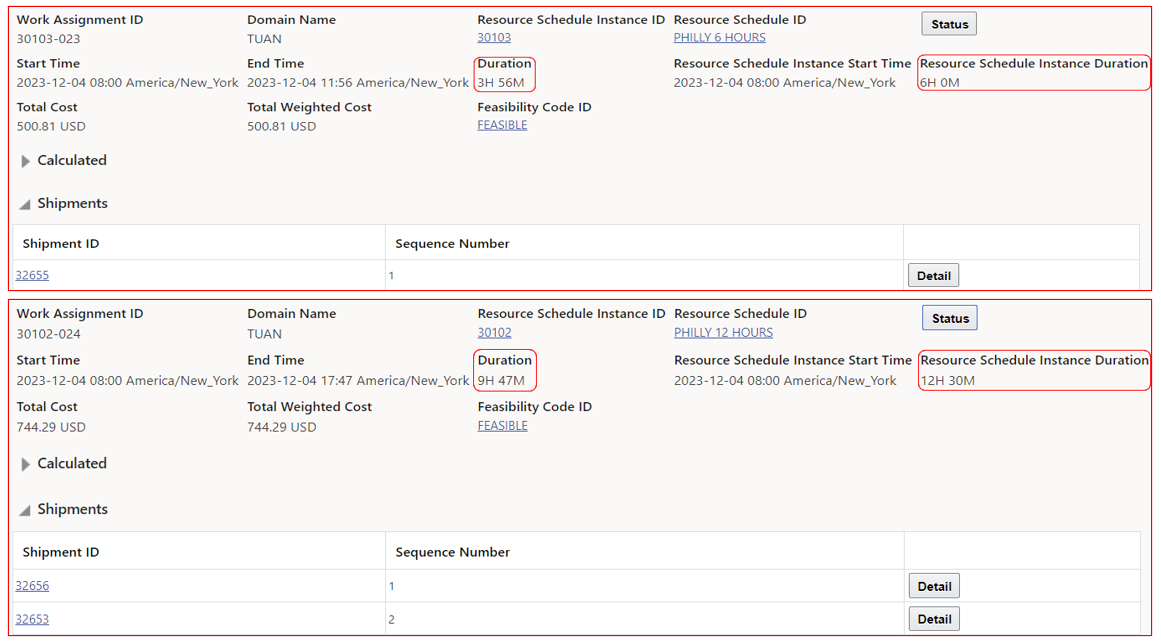
Sequential Savings Result
Below is the same problem solved using the Column Generation option. Again, two Work Assignments are generated but in this case the algorithm was able to assign three Shipments (32651, 32649 and 3265)) to the longer Work Assignment - which in this case provided a used duration of 12H 3M vs the used duration in the Sequential Savings solution of 9H 46M. The used Duration Capacity for the Column Generation option is 17 hours 40 minutes, while the used Duration Capacity for the Sequential Savings algorithm is only 13H 43M.
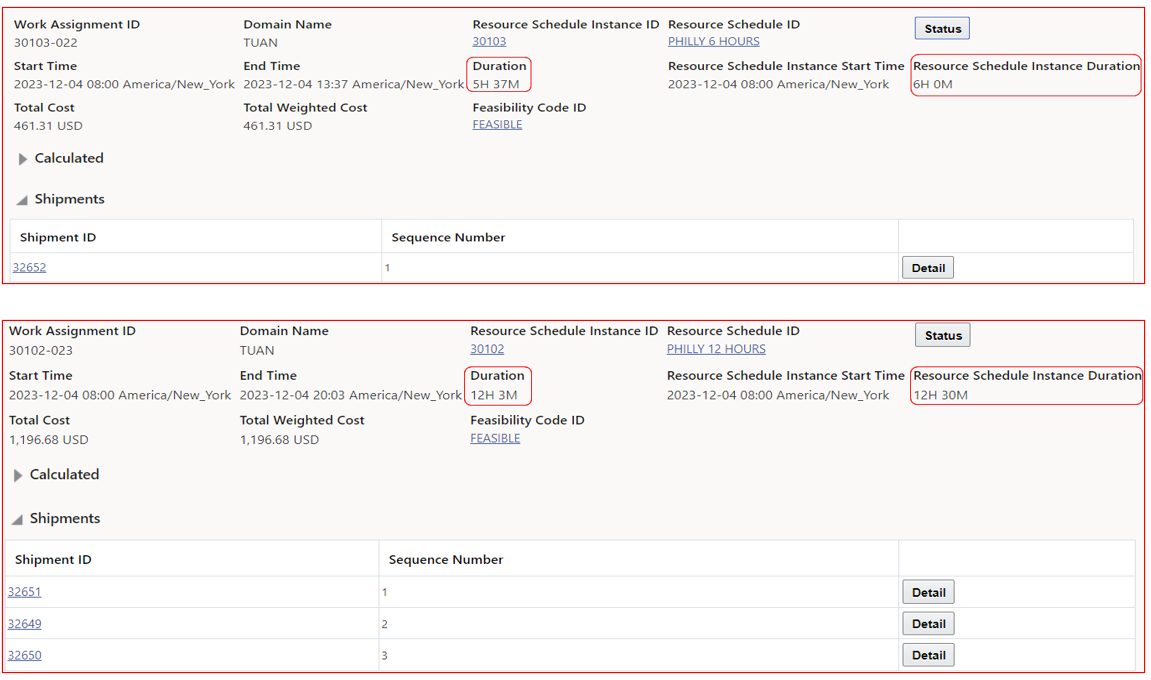 The
The
Column Generation
The Column Generation Option provides improved solution quality/utilization of your available Resource Schedule Instances as part of the Work Assignment planning process.
Steps to Enable
To take advantage of this feature the parameter WA CONSOLIDATION ALGORITHM TYPE in the RESOURCE SCHEDULER CONSOLIDATION section of the Resource Schedule Logic Configuration should be set to the Column Generation option. The default is set to the current Sequential Savings option. You may also want to adjust the WA NUMBER OF COLUMN GENERATION ITERATIONS - this parameters defines the number of iterations to solve the problem when using the Column Generation algorithm. This parameter can be used to help reduce the run time of the algorithm. The parameter WA PENALTY COST OF UNUSED RESOURCE can be used penalize the cost of unused resources. If you want all the resources to be used for more balanced workload, then this needs to be set to a high value.
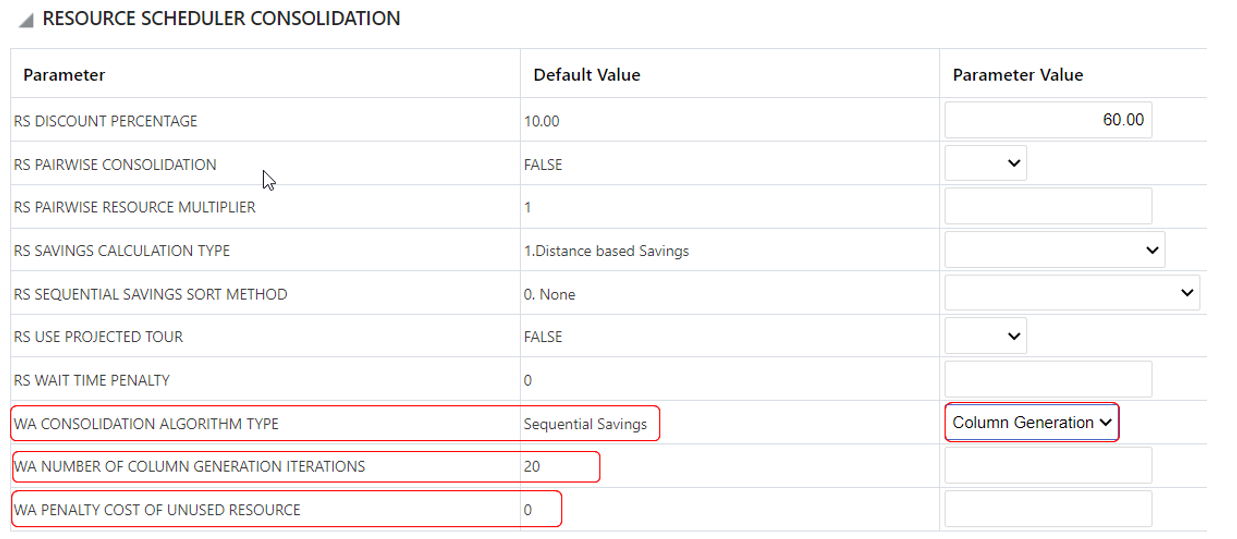
Work Assignment Resource Scheduler Parameters
Tips And Considerations
We suggest trying the Column Generation option to see if the solution provided is an improvement over the Sequential Savings solution.
Driver Shift Honor Both Calendar Start and End Window
This feature extends the Driver Assignment Logic to consider - for Shift Based drivers - that the shipment being assigned falls within the Driver's Shift - i.e., falls within the defined Start and End Calendar window for the Driver. Previously, only the Start window was checked. With this feature, the shipment must fall within the Start and End times defined on the calendar.
This feature avoids the situation where Driver Assignments extend the Driver's workday beyond the configured Driver Calendar end time.
Steps to Enable
A new planning parameter was added to allow a driver calendar to be checked against an entire shipment (start and end) instead of just checking the start time of the shipment.The new parameter is CHECK DRIVER CALENDAR FOR SHIPMENT START ONLY is found in the FLEET MANAGEMENT section of the planning parameter set.
The default value is True which will result in the previous behavior i.e., the assignment of a shipment to a driver is feasible if the start time of the shipment falls within an open window of the driver calendar.
A setting of False will invoke the new functionality. With this setting the assignment of a shipment to a driver is feasible if the entire duration of the shipment falls within the driver calendar window.
Work Assignment Gantt Available for Modeling Work Assignments
This feature provides you with the option to configure the Work Assignment Gantt to display your Logistic Network Modeling generated Work Assignments. You will find this capability beneficial in reviewing the timeline and sequencing of your Logistics Network Generated Work Assignment.
The configuration for displaying Modeling Work Assignments (or Work Assignments) is handled in the configuration of the Work Assignment Gantt. When you configure the Work Assignment Gantt, you now have the option to use the Gantt for Work Assignments (Work Assignment Gantt option) which is the original usage or you can select the Modeling Work Assignment Gantt option to have Work Assignment Gantt display Modeling Work Assignments..
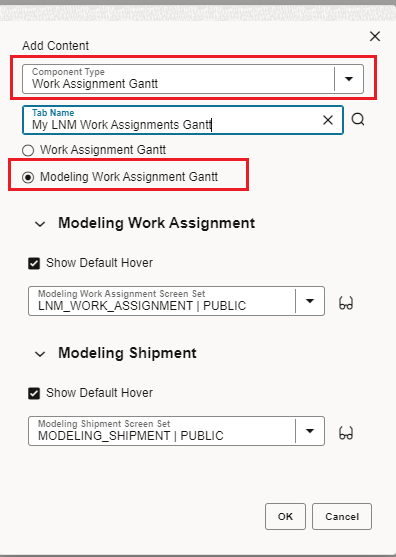
Configure Workbench Gantt fo Modeling Work Assignments
Below is an example of the Work Assignment Gantt configured to show Modeling Work Assignments.
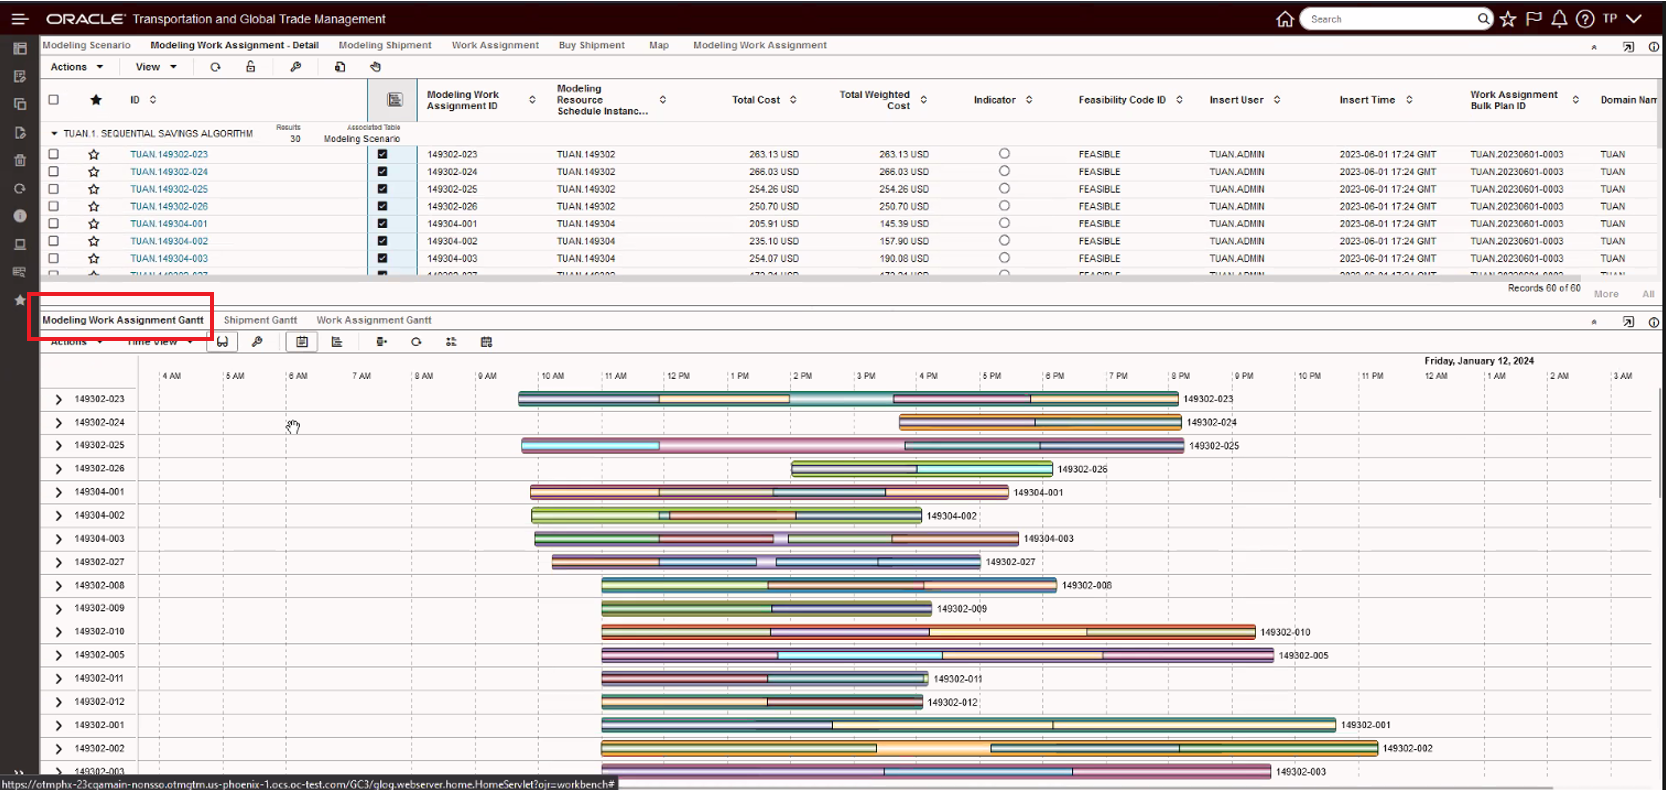
Modeling Work Assignment Gantt
This feature provides an improved visualization of the timing and sequencing of the shipments planned by LNM as part of a Work Assignment Simulation.
Steps to Enable
You will need to modify and/or create an Enhanced Workbench and incorporate the Work Assignment Gantt component into your Logistics Network Modeling Workbench.