
- Revision History
- Overview
- Update Tasks
- Feature Summary
- Transportation and Global Trade Platform
-
- Architecture
- User Interface Refresh
-
- Accessibility - Keyboard Navigation
- Accessibility - Skip Navigation Menu
- Accessibility - Validate Usage of Color
- Accessibility - Screen Reader
- Accessibility - Documentation
- User Experience - General - New Indicators
- Home Experience Improvements - Default Colors and Theme Management Enhancements
- Manager Layout - Support Removal of Reference Number Grid
- Screen Set Result Improvements
- Item Unified UI
-
- Workbench
-
- Workbench - Additional GTM Objects Supported in the Workbench
- Workbench - Additional OTM Objects Supported in the Workbench
- Workbench - Export to Excel Support for Workbench Tables
- Workbench - Layout Messages
- Workbench - Splitter Configuration - Split Existing Region
- Workbench - Layout Display Format
- Workbench - Manager Layout a Region
- Workbench - Selected Rows Totals for Workbench Tables
- Workbench - Mass Update Support for Workbench Tables
- Workbench - Multiple Masters to One Detail Table
- Workbench - View Only Access
- Workbench - Refresh All
- Workbench - Refresh After Action
- Workbench - Refresh Detail Tables When Master Table is Refreshed
- Workbench - Saved Query No Longer Runs During Creation or Edit of a Workbench Table
-
- Other Improvements
- Oracle Transportation Management (Base)
- External Distance Engine and Map Enhancements
-
- Simplified External Distance Engine Configuration UI
- Screen Set - Configure Map Hover Fields
- Workbench Map - Expose Vendor Map Controls
- Workbench - Configure Map Hover Text in Screen Set
- Workbench Map - Support Multiple Maps in Workbench Layout
- Workbench Map - External Distance Engine and Map - Consider Traffic Between Stops
- Workbench Map - Consider Hazmat for Each Pair of Stops
- Workbench Map - Lock Zoom Level and Lock View on Map
- Workbench Map - Additional HERE Supported Parameters
- Workbench Map - ALK Rail Routes
- Workbench Map - Additional ALK Supported Parameters
- Workbench Map - Map Filters
- External Distance Engine and External Service Engine Consider Equipment Restrictions
- Transportation Operational Planning
-
- Clustering Merge Algorithm
- Multi-Stop Consolidation for Co-Located Stops
- Load Configuration - Scoring Algorithm Load Bearing
- Consider Service Provider Capacity Across Days
- Honor Location Inactive Flag for Intermediate Locations in Network Routing
- Rule 11 and Network Routing
- Tracking Event Ahead/Late Calculation Based on ETA
- Ability to Turn Off Rating Within Network Routing
- Center of Gravity Out of Bounds Reporting
- Top-Off Orders
- Out of Gauge Load Building
- Network Routing - Allow Order to Start and End at Through Point
- Network Routing - Cross Leg Consolidation
-
- Oracle Fleet Management
-
- Combination Equipment Group Usability - Return Set Scenario
- Stand Alone Work Assignment Process
- Solution Quality Improvement for Round-Trip Shipment Sequence vs. One-Way Shipment Sequences
- Estimate Hours of Service When Tracking Events Are Received
- Combination Equipment Group Usability - Support Multi-Stop Scenarios
-
- Freight Payment, Billing, and Claims
- Logistics Network Modeling
- Global Trade Management (Base)
-
- Flex Fields for Grouping and Aggregating Data
- Copy Flex Fields Using Data Configuration
- Report to Show License Assignment and Balances
- Display Stoplight for Restricted Party Screening on Transaction and Declaration
- Shipment Group View Related Trade Transaction SmartLink
- Approve or Decline Classification at the Classification Type/Code Level on an Item
- Customs Description for Classification Code on Item
- Workbench - Work Queue Support
- GTM How To/Configuration Topic - Supplier Solicitation
- GTM How To/Configuration Topic - Product Classification Process
- Review Match Factor Action to Use Inverse Index
- Rename Tariff Preference Types to Trade Preferences
- Track Supplier Information
- Accessibility Improvement for Party Screening Results
- SmartLinks Between Product Classification Type and Trade Programs
- SmartLinks Between Product Classification Code and Tariff Rates
- GTM How To/Configuration Topic - License Screening Enhancements
- AES Enhancements
- Order Release to Trade Transaction
- Campaign Management
- Determine Trade Program Eligibility and Qualification Based on Item Origin
- Specify Item Type
- Rename Trade Item to Item
- Origin Management
- Party Site
- Tariff Rate Management
- Trading Partner Item
-
- Trade Compliance
- Trade Agreements
- Global Trade Intelligence (GTI)
This document will continue to evolve as existing sections change and new information is added. All updates appear in the following table:
| Date | Feature | Notes |
|---|---|---|
| 17 SEP 2019 | Display Stoplight for Restricted Party Screening on Transaction and Declaration | Updated document. Revised feature information. |
| 17 SEP 2019 | User Interface Refresh | Updated document. Revised feature information. |
| 19 APR 2019 | Agent Logging and Statistics | Updated document. Delivered feature in 19B. |
| 28 MAR 2019 | Invoice Adjustment Cost Behavior Enhancement | Updated document. Delivered feature in 19B. |
| 08 MAR 2019 | Created initial document. |
This guide outlines the information you need to know about new or improved functionality in Oracle Transportation & Global Trade Management Cloud Update 19B. Each section includes a brief description of the feature, the steps you need to take to enable or begin using the feature, any tips or considerations that you should keep in mind, and the resources available to help you.
Give Us Feedback
We welcome your comments and suggestions to improve the content. Please send us your feedback at otm-doc_us@oracle.com. Please indicate you are inquiring or providing feedback regarding the Oracle Transportation & Global Trade Management What’s New in Update 19B.
This section gives you information to help you plan, deploy, and validate your update. We make frequent additions to this document, so don’t forget to check back and get the latest information before your update starts.
Use the following resources to prepare for and validate your Oracle Engagement Cloud update.
On My Oracle Support Read:
- Doc ID 2508854.1
- Oracle Cloud Applications - Transportation and Global Trade Management Cloud: Quarterly Updates - Preparation and Testing Recommendations
- Doc ID 2095528.1
- Oracle Cloud Applications - Transportation and Global Trade Management Cloud: Quarterly Update Planning
- Doc ID 2096782.1
- Oracle Cloud Applications - Transportation and Global Trade Management Cloud: Quarterly Update Planning FAQs
- Doc ID 2098110.1
- Oracle Cloud Applications - Transportation and Global Trade Management Cloud: Update Policy
Column Definitions:
Report = New or modified, Oracle-delivered, ready to run reports.
UI or Process-Based: Small Scale = These UI or process-based features are typically comprised of minor field, validation, or program changes. Therefore, the potential impact to users is minimal.
UI or Process-Based: Larger Scale* = These UI or process-based features have more complex designs. Therefore, the potential impact to users is higher.
Customer Action Required = You MUST take action before these features can be used by END USERS. These features are delivered disabled and you choose if and when to enable them. For example, a) new or expanded BI subject areas need to first be incorporated into reports, b) Integration is required to utilize new web services, or c) features must be assigned to user roles before they can be accessed.
Transportation and Global Trade Platform
This feature provides you with the next chapter in Oracle's adoption of REST APIs. This REST Services feature provides you with an additional set of REST resources and supported operations as well as a completely revamped and enhanced REST API Documentation is on docs.oracle.com.
RESOURCES AND THE OPERATIONS SUPPORTED
| Resource |
Operations |
| Appointment |
GET |
| Bill |
GET |
| Claim |
POST, GET, PATCH, DELETE |
| Consol |
POST, GET, PATCH, DELETE |
| Contact |
POST, GET, PATCH, DELETE |
| Contact (Trade Parties) |
POST, GET, PATCH, DELETE |
| Corporation |
POST, GET, PATCH, DELETE |
| Driver |
POST, GET, PATCH, DELETE |
| PowerUnit |
POST, GET, PATCH, DELETE |
| Equipment |
POST, GET, PATCH, DELETE |
| EquipmentGroup |
POST, GET, PATCH, DELETE |
| EquipmentType |
POST, GET, PATCH, DELETE |
| GtmShipment |
POST, GET, PATCH, DELETE |
| GtmTransaction |
POST, GET, PATCH, DELETE |
| GtmLicense |
POST, GET, PATCH, DELETE |
| Invoice |
GET |
| PackagedItem |
POST, GET, PATCH, DELETE |
| Item |
POST, GET, PATCH, DELETE |
| Itinerary |
POST, GET, PATCH, DELETE |
| Location |
POST, GET, PATCH, DELETE |
| Order |
GET |
| OrLine |
GET |
| OrderBase |
GET |
| OrderMovement |
GET |
| Quote |
POST, GET, PATCH, DELETE |
| ServiceProvider |
GET, PATCH |
| Shipment |
GET, POST |
| SellSideShipment |
GET, POST |
| Voucher |
GET |
| Voyage |
GET |
| WorkInvoice |
GET |
| GtmCampaign |
POST, GET, PATCH, DELETE |
NEW DOCUMENTATION
The new REST API documentation provides you with comprehensive documentation for each resource and operation available in a standard Swagger format. The documentation provides proper request, response syntax, examples, and detailed field level description of all the REST API resources.

REST API Documentation
Steps to Enable
Review the REST service definition in the REST API guides, available from the Oracle Help Center > your apps service area of interest > REST API. If you're new to Oracle's REST services you may want to begin with the Quick Start section.
Tips And Considerations
PRIMARY KEY ATTRIBUTES
Almost all resources in OTM/GTM use a Unique Global Identifier, or 'GID', as the primary key for records in the database. The GID value is a concatenation of an External Identifier, or XID, and a Domain Name. Sub-resources can also have their own GID field as well as their parent GID field. Prior to this update, the data returned for a specific resource request contained all GID, XID and Domain Name attributes which meant that there was a level of redundancy between those values, and most of the sub-resources returned since the parent GID was repeated in each sub-resource even though the parent GID is implicit within the enclosing context.
NOTE: Starting with this update, the desire is to hide primary key values for requested resources and hide parent primary keys in sub-resources. However, due to backward compatibility requirements the default REST API configuration will still return all attributes. To enable the preferred approach (hide primary key values for requested resources and hide parent primary keys in sub-resources) please set the following configuration properties:-glog.fusion.cil.restapi.config.hidePks=trueglog.fusion.cil.restapi.config.hideParentPks=true It is highly recommended to use the property configurations as soon as backward compatibility is no longer an issue. It is likely that at some point in a future update that these property settings will be the default.
DOCUMENTATION
The old REST API Getting Started Guide has been replaced by the new interactive REST API Guide.
Key Resources
The old REST API Getting Started Guide has been replaced by the new interactive REST API Guide.
Default Notify Stylesheets Available as Public Content
This feature provides you with the default notify stylesheets loaded as PUBLIC content. This allows you to more easily download, edit and upload the notification stylesheets.

Default Notify Stylesheet Content
Steps to Enable
You don't need to do anything to enable this feature.
Tips And Considerations
The new content can be found at Business Process Automation > Power Data > Event Management > Stylesheet Profiles
Export File Usability Improvements
For users involved in the export of data either as a CSV export, DBML export or using the Perform Integration Command to obtain the outbound transmission for a specific object this feature provides a number of usability improvements. You now have the option to save File on Local so the output can be saved locally, and a new browser text panel and Copy Text option has been provided which provides a cleaner view to the export values rendered on your browser.
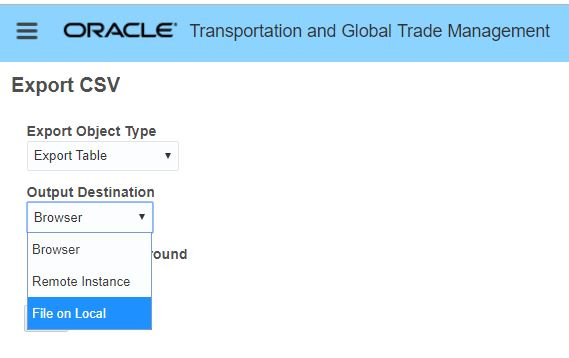
File on Local Export Option

Browser Based View and Copy Text Option
Steps to Enable
You don't need to do anything to enable this feature.
Tips And Considerations
If the text displayed in the browser is very large, it is recommended that you use "File to Local" as Output versus using "Copy Text". The 'Browser" as Output Destination should be used primarily when the goal is to get a glance at the data.
This feature provides you with enhanced agent and agent action logging and statistics. With each agent/agent action execution the agent initiation, completion, error messages or customer specified log instructions are now captured.
In addition, cumulative statistics for each agent/agent action are also captured including the average and maximum time for agent/agent action completion. With this enhancement agent logging will generate a log entry even if the agent fails and rolls back.
Four new tables collect agent and agent action information:
- AGENT_LOG - a log of each agent execution. Each record represents an agent initiation, completion, error or customer-specified log instruction.
- AGENT_ACTION_LOG - a log of each agent action execution. Each record represents an action initiation, completion or error.
- AGENT_STATS - cumulative statistics for each agent. This includes average and maximum time for agent completion.
- AGENT_ACTION_STATS - cumulative statistics for each agent action. This includes average and maximum values for queue time, execution time and completion time.
AGENT_LOG Content
The following fields are tracked in the agent log:
- LOG_SEQUENCE - a unique sequenced ID for the log record. Log search results are sorted by this sequence in ascending order. This allows agent log statements to be viewed chronologically.
- AGENT_RUN_SEQUENCE - a unique ID for the execution instance of the agent. Each time an agent is run, it generates a run sequence. This allows log statements for a particular run to be logically grouped together.
- PARENT_AGENT_RUN_SEQUENCE - if an agent execution was triggered by activity from another agent (e.g. the RAISE EVENT agent action or a mod lifetime event after modifying data), this holds the execution ID of the parent agent.
- AGENT_GID - the agent ID
- STATE - the type of log message, usually reflecting agent state:
- STARTED - the first agent action has been published.
- NOTE - a user LOG action has specified an informational message
- WARNING - a user LOG action has specified a warning message
- ERROR - either an exception occurred during an agent action, a RAISE ERROR action was run or a user LOG action has specified an error message
- COMPLETED - the last agent action has completed.
- TIME - the UTC time for the log event
- LOG_PROCESS_ID - a link to the System Log process ID for the agent's execution instance. Note that process IDs are not guaranteed to be unique outside of a 24 hour period. Searches should include agent start time and process ID.
- APP_MACHINE_GID - the server the agent ran on. This is to allow for System log retrieval.
- LIFETIME_EVENT - the agent event that triggered the agent execution
- AGENT_DATA_QUERY_TYPE_GID - the data query type of the business object triggering the agent execution
- AGENT_BUSINESS_OBJECT - the ID of the business object triggering the agent execution
- RUN_TIME - for COMPLETED records, the time spent on agent execution. Note that this could be derived by subtracting the STARTED TIME from the COMPLETED TIME. This column is de-normalized to simplify searching for long agents in OTM finders.
- NOTES - for records created by the LOG agent action, any notes specified by the user
- ERROR_AGENT_ACTION_GID - for ERROR records caused by an agent action, the action that failed
- ERROR_CAUSE - for records created by the RAISE ERROR agent action, the error message specified in the action; for agent action exceptions, the first line of the exception
- ERROR_OBJECT - the business object that caused the error. This may differ from AGENT_BUSINESS_OBJECT if the error occurred in a DTA or FOR loop.
AGENT_ACTION_LOG Content
The following fields are tracked in the agent action log:
- LOG_SEQUENCE - a unique sequence ID for the log record. Log search results are sorted by this sequence in ascending order. This allows agent action log statements to be viewed chronologically.
- ACTION_RUN_SEQUENCE - a unique ID for the execution instance of the action. Each time the action is run, it generates a run sequence.
- AGENT_RUN_SEQUENCE - a link back to the execution instance of the agent that invoked the action
- AGENT_GID - the agent ID
- ACTION_FLOW - the agent block holding the action (Norm or Error)
- ACTION_SEQUENCE - the sequence # of the action in the action flow of the agent. Note that (AGENT_GID, ACTION_FLOW, ACTION_SEQUENCE) uniquely identify the action within the AGENT_ACTION_DETAILS table. If, however, the agent is modified after the log record is written, this identification may no longer be accurate.
- STATE - the type of log message, reflecting action state:
- STARTED - the action has begun execution
- ERROR - the action threw an exception
- COMPLETED - the action (and any triggered work) has completed
- TIME - the UTC time for the log event
- LOG_PROCESS_ID - a link to the System Log process ID for the action's execution instance
- APP_MACHINE_GID - the server the action ran on
- AGENT_DATA_QUERY_TYPE_GID - the data query type of the business object triggering the agent execution
- AGENT_BUSINESS_OBJECT - the ID of the business object triggering the agent execution
- AGENT_ACTION_GID - the agent action ID
- ACTION_DATA_QUERY_TYPE_GID - the data query type of the business object processed by the action. This may differ from AGENT_DATA_QUERY_TYPE_GID if in a DTA or FOR loop.
- ACTION_BUSINESS_OBJECT - the ID of the business object processed by the action. This may differ from AGENT_DATA_QUERY_TYPE_GID if in a DTA or FOR loop.
- RUN_TIME - for COMPLETED records, the time between the start of action execution and the completion of all related activity
- ERROR_MSG - for records created by the RAISE ERROR agent action, the error message specified in the action; for action exceptions, the first line of the exception
AGENT_STATS Content
- AGENT_GID - the agent ID
- NUM_RUNS - # of times the agent has been run since the SINCE date
- TOTAL_TIME = cumulative execution time, measured from the first action publish to the last action completion
- AVG_TIME = average execution time. This de-normalized field is provided for finder queries and sorting.
- MAX_TIME = maximum execution time
- SINCE = date the statistics were last reset
AGENT_ACTION_STATS Content
- AGENT_GID - the action's agent ID
- ACTION_FLOW - the agent block holding the action (Norm or Error)
- ACTION_SEQUENCE - the sequence # of the action in the action flow of the agent. Note that (AGENT_GID, ACTION_FLOW, ACTION_SEQUENCE) is a foreign key into the AGENT_ACTION_DETAILS table.
- NUM_WAITS - # of times the action has been published since the SINCE date
- TOTAL_WAIT_TIME = cumulative waiting time, measured from the publish to the beginning of execution
- AVG_WAIT_TIME = average waiting time
- MAX_WAIT_TIME = maximum waiting time
- NUM_EXECS - # of times the action has been executed since the SINCE date
- TOTAL_EXEC_TIME - cumulative execution time, measured from the beginning of execution to action termination (i.e. does not include completion due to published topics)
- AVG_EXEC_TIME= average execution time
- MAX_EXEC_TIME = maximum execution time
- NUM_RUNS - # of times the action has run to completion since the SINCE date
- TOTAL_RUN_TIME - cumulative run time, measured from the the publish to action completion
- AVG_RUN_TIME = average run time
- MAX_RUN_TIME = maximum run time
- SINCE = date the statistics were last reset
VIEWING THE AGENT AND AGENT ACTION LOGS FROM OTM
Agent and Agent Action log records can be accessed from OTM via any Process Management menu.

Agent Logs
The Agent link brings up a Finder for AGENT_LOG records.

View Agent Log Finder
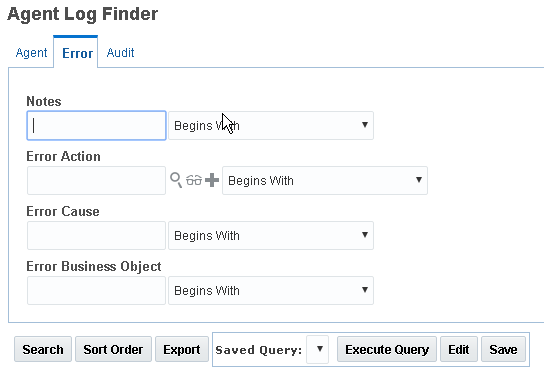
View Agent Log Finder Error Tab
Note that the finder assumes that the Agent and Application Server exist in the database. To search for old data after agent deletion, customers cannot use these criteria.
On the finder result page, two smartlinks are available for Agent Log records:
- Action Log - displays all Agent Action Log records related to the run instance of the current agent.
- System Log - display all System Log records from the time of the Agent Log record, using the System Log ID of the record and retrieving lines from the specified Application Server. Note that system logs will cycle frequently so this information is likely to be unavailable for historical analysis.
Viewing Agent Action Log
The Agent Actions link brings up a Finder for AGENT_ACTION_LOG records.
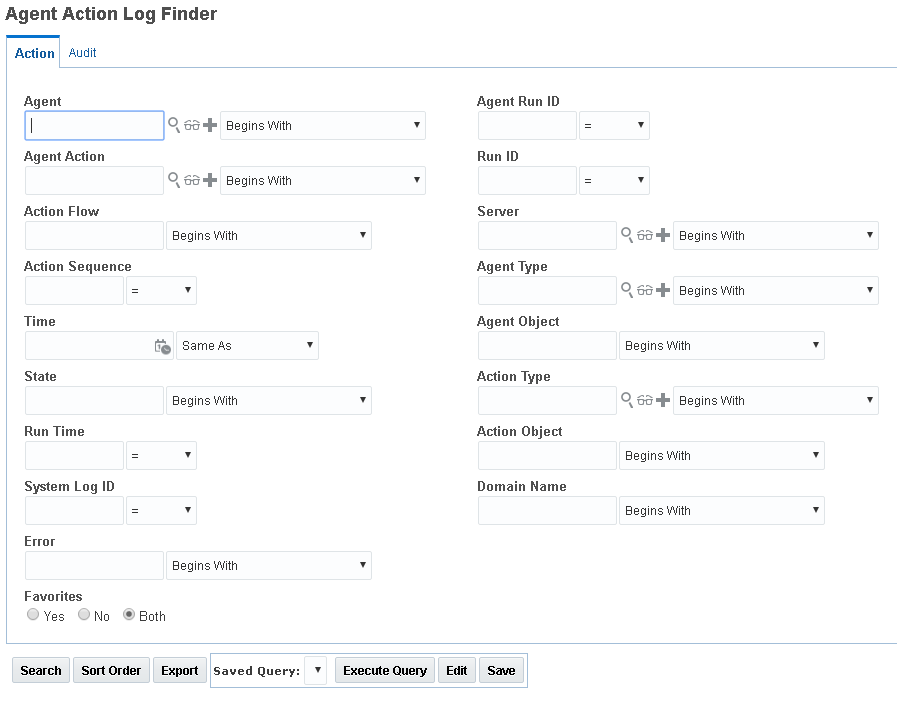
Agent Action Finder
Note that the finder assumes that the Agent and Application Server exist in the database. To search for old data after agent deletion, customers cannot use these criteria.
On the finder results page, there is one smart link: AgentLog. This brings up all agent log records for the agent run sequence that ran the action.
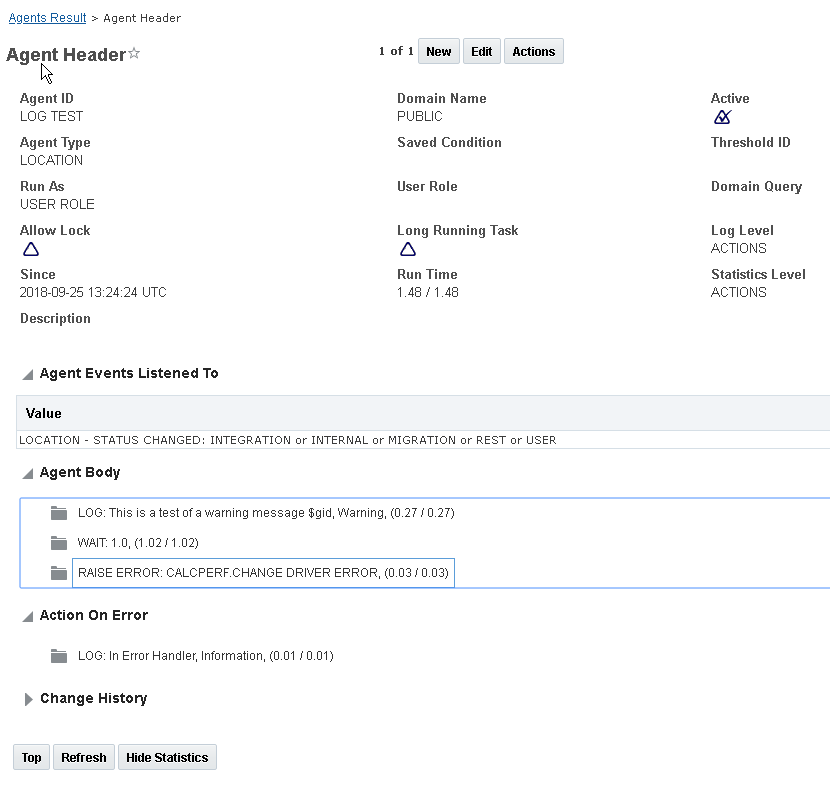
Viewing Agent and Agent Action Statistics
Agent and Agent Action statistics can be viewed directly on the Agent viewer or Agent manager. E.g.:
Steps to Enable
CONTROLLING AGENT LOGGING AND STATISTICS GATHERING
Agent logging and statistics can be controlled globally or per-agent. The following properties control default behavior for all agents:
- glog.agent.defaultLogLevel = [NONE| AGENT |ACTIONS] - the default logging for agents that don't explicitly set their logging in AGENT.LOG_LEVEL
- NONE = no agent logging is performed. There should be no performance overhead for agent logging when it is turned off.
- AGENT = agent activity is logged. This includes only AGENT_LOG records.
- ACTIONS = agent and agent action activity is logged. This includes both AGENT_LOG and AGENT_ACTION_LOG records.
- glog.agent.defaultStatsLevel = [NONE | AGENT | ACTIONS] - the default statistics collection for agents that don't explicit set their statistics collection in AGENT.STATS_LEVEL
- NONE = no agent statistics are collected. There should be no performance overhead for statistics collection when it is turned off.
- AGENT = agent statistics are collected. This includes inserts/updates to the AGENT_STATS records.
- ACTIONS = agent and agent action statistics are collected. This includes inserts/updates to both AGENT_STATS and AGENT_ACTION_STATS records
On the agent header, these defaults can be overridden for a specific agent:

Agent Header
ADDING CUSTOM LOG RECORDS
Customers can add information to the agent and agent action logs via the LOG agent action. This action has been updated to:
- allow a message to be written to the System Log, the Agent Aog or both
- assign a severity to the logged message
- assign a specific Log ID to messages written to the System Log.
By using the ASSIGN VARIABLE action with the LOG action, customers can add the result of ad-hoc queries to agent logs.
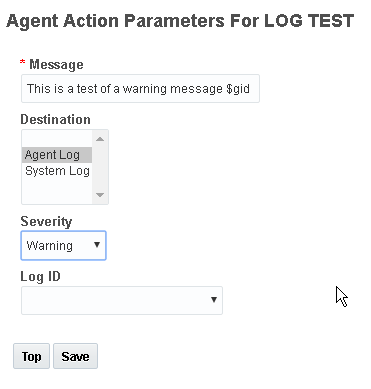
Agent Actions Parameters
Note that only the Message field is required. The following defaults are used if selection is not explicitly made:
- Destination = System Log
- Severity = Information
- Log ID = Workflow
Thus, the action is backward compatible with v18 AGENT_ACTION_DETAILS records. No data migration is needed.
Tips And Considerations
VIEW AGENT LOG FINDER ERROR TAB
- Note that the finder assumes that the Agent and Application Server exist in the database. To search for old data after agent deletion, customers cannot use these criteria.
VIEWING AGENT ACTION STATISTICS
- If the Agent statistics level is AGENT or ACTIONS, the agent header will show the average and maximum Run Time since the Since date. This run time is measured from the publish of the first agent action to the agent process' completion. Note that it does not include the time to evaluate any agent saved condition. If the Agent statistics level is ACTIONS, each action will show the average and maximum completion time for that action. This time is measured from the time the action begins execution to the completion of the action process.
- A new action on the Agent finder / manager, Reset Statistics, allows agent statistics to be reset. This can be used to test agent performance under a particular scenario (which may have its control flow path).
- Unlike the Agent Log, Agent and Action Statistics are tied to an existing agent and/or agent action via foreign keys. Any modification of an agent (including a change in log or statistics level) will reset the statistics.
The UI changes covered in this section may require modification to your existing UI automated test fixtures if the automated testing tool being used is dependent on the previous UI’s behavior and backend code.
Specifically, for this update - the improvements made to support Accessibility could require a modification to your existing automated UI test scripts.
For example:
- Buttons of all XSL pages now have a button tag
- The "Main" Buttons of all JXPS pages now have a button tag
- Tabbing behavior has been modified:
- All the tabs on JSP pages (ex. edit manager layouts) and XSL pages (ex. Finder criteria) now have one tab stop
- Arrow keys are now used to navigate between tabs
- The Unified Global Header tab stop on the search icon (magnifying glass) has been removed
- Finder Results table navigation:
- Now supports use of arrow keys
- Corrected and made consistent tab sequence for toolbar icons and links
Accessibility - Keyboard Navigation
Using only the keyboard you can navigate OTM and GTM without a mouse. You can use the tab key to navigate most of the application and shift + tab keys to navigate backwards.
Here are some of the areas where improvements were made:
- Eliminated any keyboard traps to make sure you don't get stuck when navigating the application.
- Make it easier for you to jump between sections/tabs
- Key various keyboard keys to navigate the application.
Here is a summary of the keyboard navigation for a few areas of the application.
NAVIGATOR MENU
The first level menu groups are always expanded and cannot be collapsed.
- Move to the next first level menu group - Tab key
- Move to the previous first level menu group - Shift + Tab key
- Move up to the previous item in a menu group - Up arrow
- Move down to the next item in a menu group - Down arrow
- Expand a menu group - Right arrow
- Collapse a menu group - Left arrow
- When selected on a menu link, opens the page - Enter
GLOBAL HEADER
- Use tab or Shift + tab keys to navigate the Global Header functions
SPRINGBOARD MENU
- Move to the left through the menu groups or links at the same level - Left arrow
- Move to the right through the menu groups or links at the same level - Right arrow
- Close a menu group and places the focus back on the higher level menu group - Up arrow
- Open a menu group and places the focus on the first item in the next level menu group - Down arrow
- When selected on a menu link, opens the page - Enter
FINDER CRITERIA
- Use tab or Shift + tab keys to navigate the fields on the Finder Criteria page.
FINDER RESULTS
- The body of the results table is a single tab stop.
- Use Tab to access the table.
- Use the left, right, up and down arrow keys to move around within the table.
Steps to Enable
You don't need to do anything to enable this feature.
Accessibility - Skip Navigation Menu
On all pages with the Unified Global Header, the first tab stop on the OTM/GTM page opens a skip navigation list that allows you to skip the global header and jump straight to the main page or other components of the page. Also, press ALT + 1 to access skip navigation at any time. The menu varies based on where you are in the application.
If you are on the home screen/springboard the Skip Navigation menu is the following:

- Skip to Content allows you to jump to the Springboard
- Skip to Search allows you to jump to the search field in the toolbar
- Skip to Footer allows you to jump to the last icon available in the Springboard or to the bottom section of the page
If you are on a page within the application where tabs are found (Search Criteria and Manager Layout) you can navigate the tabs using the Skip Nav menu.

When you are on the Tab option you see all of the available tabs:

The Skip Navigation menu always has a Home option, this allows you to return to the Springboard.
Steps to Enable
You don't need to do anything to enable this feature.
Accessibility - Validate Usage of Color
When considering accessibility, it is important to not convey information to the user using color alone. Any pages that were previously using color alone are now using another conveyance as well, take the following two areas as examples:
- Mass Update in the legacy finder showed the saving of the objects to you as green when successful and red when unsuccessful, now indicators are included as well to more vividly convey this success or failure to you.
- Links are displayed in underlined text as well as being light blue.
Steps to Enable
You don't need to do anything to enable this feature.
This feature provides you with a screen readable navigation path through OTM and GTM. Screen readers convert digital text to synthesized speech and are used to help people who are blind or who have low vision to use information technology with the same level of independence and privacy as anyone else. Screen readers depend on a consistent UI format and layout to provide a usable and seamless navigation process.
To improve the OTM and GTM screen reader navigation experience the following improvements were made:
- Table Format
- Add proper headings and alternative labels to allow the screen reader to successfully read a finder results table to the end user
- Add Roles
- To allow the user to take advantage of additional benefits of using a screen reader proper roles need to be assigned to various areas of the application
- Buttons should have role of Buttons
- Menus should have the role of menu
- Sections/Headings
- Verify all types of fields have the proper sections/headings to insure the screen reader can navigate properly
- Alternative Text
- Add additional text for certain areas to be read by the screen reader including images
Steps to Enable
You don't need to do anything to enable this feature.
A new topic, Accessibility Features Guide, has been added to OTM/GTM online help. This guide outlines how to navigate OTM/GTM without the use of a mouse or with a screen reader.
Topics covered include:
Keyboard Controls across the application including:
- Springboard
- Navigator Menu
- Finder Results Pages
- Inline Edit
- Tree Control
- Automation Agent Actions or Error Handler
Skip Repeated Navigation:
- On all pages with the Unified Global Header, the first tab stop on the OTM/GTM page opens a skip navigation list that allows you to skip the global header and jump straight to the main page.
Steps to Enable
You don't need to do anything to enable this feature.
User Experience - General - New Indicators
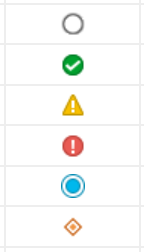
Two new indicators have been added to the list of options within OTM and GTM, blue and orange, also the previous indicators have been updated.
The new indicators are:
Steps to Enable
You don't need to do anything to enable this feature.
Home Experience Improvements - Default Colors and Theme Management Enhancements
NEW DEFAULT COLORS
Default colors for the OTM/GTM header and springboard have been changed to light sky blue background with dark gray font and header icons as seen in the below image.

THEME MANAGEMENT ENHANCEMENTS - NEW COLOR SETTINGS
New features have been added to Theme Management to allow you to manage your home experience font and icon colors. New fields added include:
- Main Font Color - The font color used for the top level springboard menu items. This color is also used for third level springboard menu items.
- Springboard Submenu Font Color - The font color used for the second level springboard menu items.
- Springboard Submenu Background Color - The background color used for the second level springboard menu items. The default is white.
- Header Icon Color - The color used for the Unified Global Header icons.
- Header Background Color - The color used as the background color for the Unified Global Header.
THEME MANAGEMENT ENHANCEMENTS - COLOR SCHEMES
Select a Color Scheme to see/choose a pre-selected grouping of colors and images to use as the basis for your theme. There are several color schemes available by default:
- Autumn Red
- Crisp Green
- Dark Blue
- Dark Gray
- Midnight Blue
- Sky Blue (Default): this is the default color scheme automatically used by OTM/GTM.
Steps to Enable
You don't need to do anything to enable this feature.
Manager Layout - Support Removal of Reference Number Grid
The list of objects below support moving or hiding/removing the Reference Number Grid from the Manager Layout.
This allows you to:
- Move this grid to another tab
- Remove the grid from your Manager Layout
Here is a list of objects that support this feature when configuring their Manager Layout:
OTM OBJECTS
- Driver
- Freight Forwarding
- Invoice
- Invoice Line
- Item
- Item Qualification
- Item Remarks
- Location
- Order Base
- Order Base Line
- Order Base Ship Unit
- Order Release
- Order Release Line
- Order Release Ship Unit
- Packaged Item
- Power Unit
- Rapid Order
- Ready to Ship OB Line
- Ready to Ship OB Ship Unit
- Release Instructions
- Ship Unit Line
- Shipment
- Shipment Actuals
- Shipment Ship Unit
- Shipment Ship Unit Line
- Shipment Stop
GTM OBJECTS
- Bond
- Campaign
- Campaign Line
- Compliance Rule
- Contact
- License
- License Line
- Location
- Registration
- Shipment
- Shipment Line
- Structure
- Structure Component
- Trade Agreement
- Transaction
- Transaction Line
Steps to Enable
To remove or move a reference number grid from a supported manager layout you should follow the steps used to modify manager layouts.
- Go to the Manager Layout manager found in Configuration and Administration > User Configuration > Manager Layout.
- Select the supported manager.
- Then select the Detail tab.
- In the Manager Layout Detail page you can configure the manager including modifying or deleting Reference Number Grids.

Remove Move Reference Number Grid in Manager Layout
Tips And Considerations
The primary reason to remove this grid is if you have grid flattened one or more reference numbers into fields on your Manager Layout and don't want them to display in this grid as well.
Screen Set Result Improvements
Screen Set Result Improvements include the following:
- Show multiple values for a single remark or reference number qualifier in the Finder Results in a comma separated string
- Reference Numbers and Remarks can display as active links in the finder results
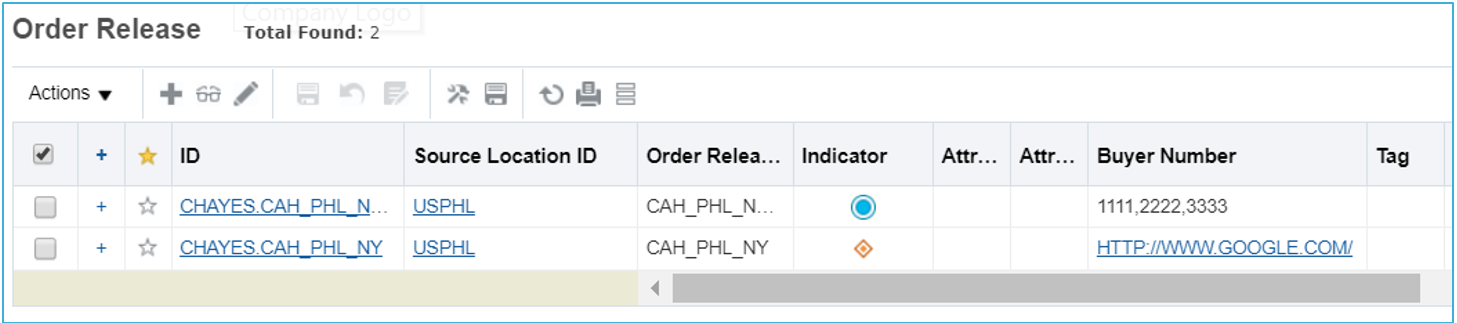
Here's a screen shot displaying both of these changes:
- You'll notice the first Order Release has multiple values for the Buyer Number reference number qualifier and they are displayed here in a comma separated string
- You'll notice the second Order Release has a link displayed for the Buyer Number, you can click this active link directly from these finder results. This is configured in screen set results using the "Display as Link" setting.
Steps to Enable
Setting up Reference Numbers and Remarks so they can display as active links is is configured in screen set results using the "Display as Link" setting.
This feature provides one user interface for Item across both OTM and GTM. The unified item includes all the information applicable to a user’s transportation or trade needs. The new unified item can be accessed from the same OTM menu and GTM menu as in previous releases. In addition, the Trade Item in GTM has been renamed to Item.
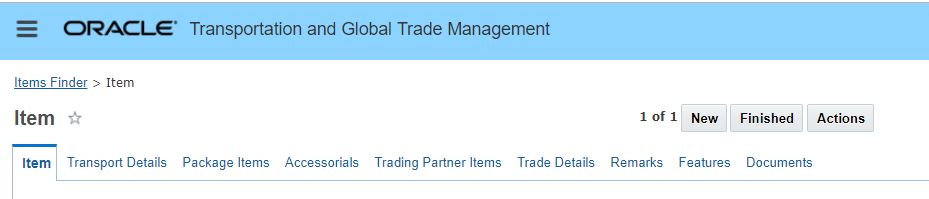
Unified Item - Tabs
Steps to Enable
You don't need to do anything to enable this feature.
Tips And Considerations
This is the new default Item Manager for both OTM and GTM.
Your previously configured Item Managers are still fully supported.
Workbench - Additional GTM Objects Supported in the Workbench
This feature provides additional GTM workbench table supported objects. With these added objects, along with the long list of already supported objects, the Workbench should become the first place you go for configuring any work environment that involves relating multiple objects and components together in one view.
Additional GTM objects available for adding as a table include:
- Campaigns
- Campaign Lines
- Campaign Line Documents
Steps to Enable
You don't need to do anything to enable this feature.
Workbench - Additional OTM Objects Supported in the Workbench
When adding a table to the workbench, the following are now available:
- Claims
- Shipment Cost Object
- Work Assignment Bulk Plan
Steps to Enable
You don't need to do anything to enable this feature.
Workbench - Export to Excel Support for Workbench Tables
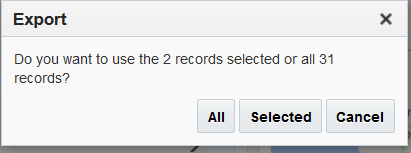
A new icon/button is available on the workbench table toolbar to allow you to export to excel directly from a workbench table. This functionality lets you export the selected rows or all of the table rows to Excel.

Export
Steps to Enable
- For the workbench table you want to export records from select the Export icon to initiate the process. You will be given the option - in the next step to export all the records or only your selected records.

- Select the option to export either all the records in the table or the selected records.
- Wait for the file to export and download the file.
- Open the exported xls file.
The Messages icon appears on a Workbench Layout only when an error or informational message is available. Upon hovering over the icon, a tool tip displays the number of new messages (# Messages). If you click the icon, you see a window displaying the messages in detail. The information provided in a message includes:
- Date: Displays the date and time at which the message occurred. This will be the server date and time.
- Tab Name: Displays the name of the Workbench tab that generated the message.
- Workbench Message: Displays the message generated by the Workbench.
- Map Vendor Message: Displays the map vendor specific message if there is one.

After reviewing these messages you can export or clear the messages. The Messages icon continues to display on the workbench layout toolbar until the messages have been cleared.
Steps to Enable
You don't need to do anything to enable this feature.
Workbench - Splitter Configuration - Split Existing Region
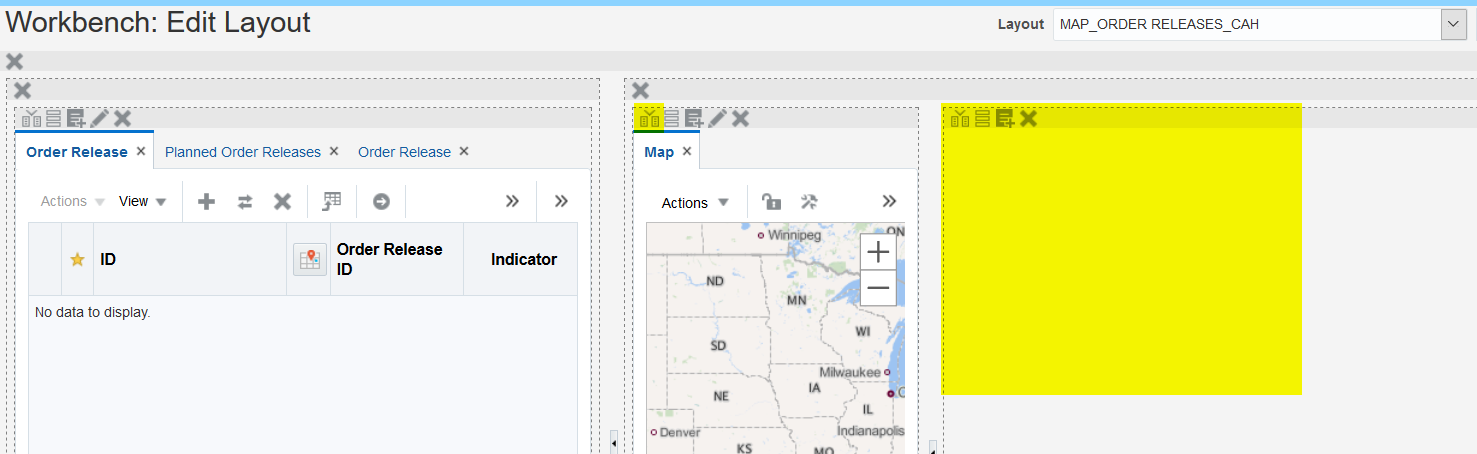
In prior releases, in order to add a new split region (both horizontal and vertical) on a region that already has content, you must delete the tabs first and then add the split and recreate the tabs. In this release, the split vertically and split horizontally buttons are available in the region even when there is already content.
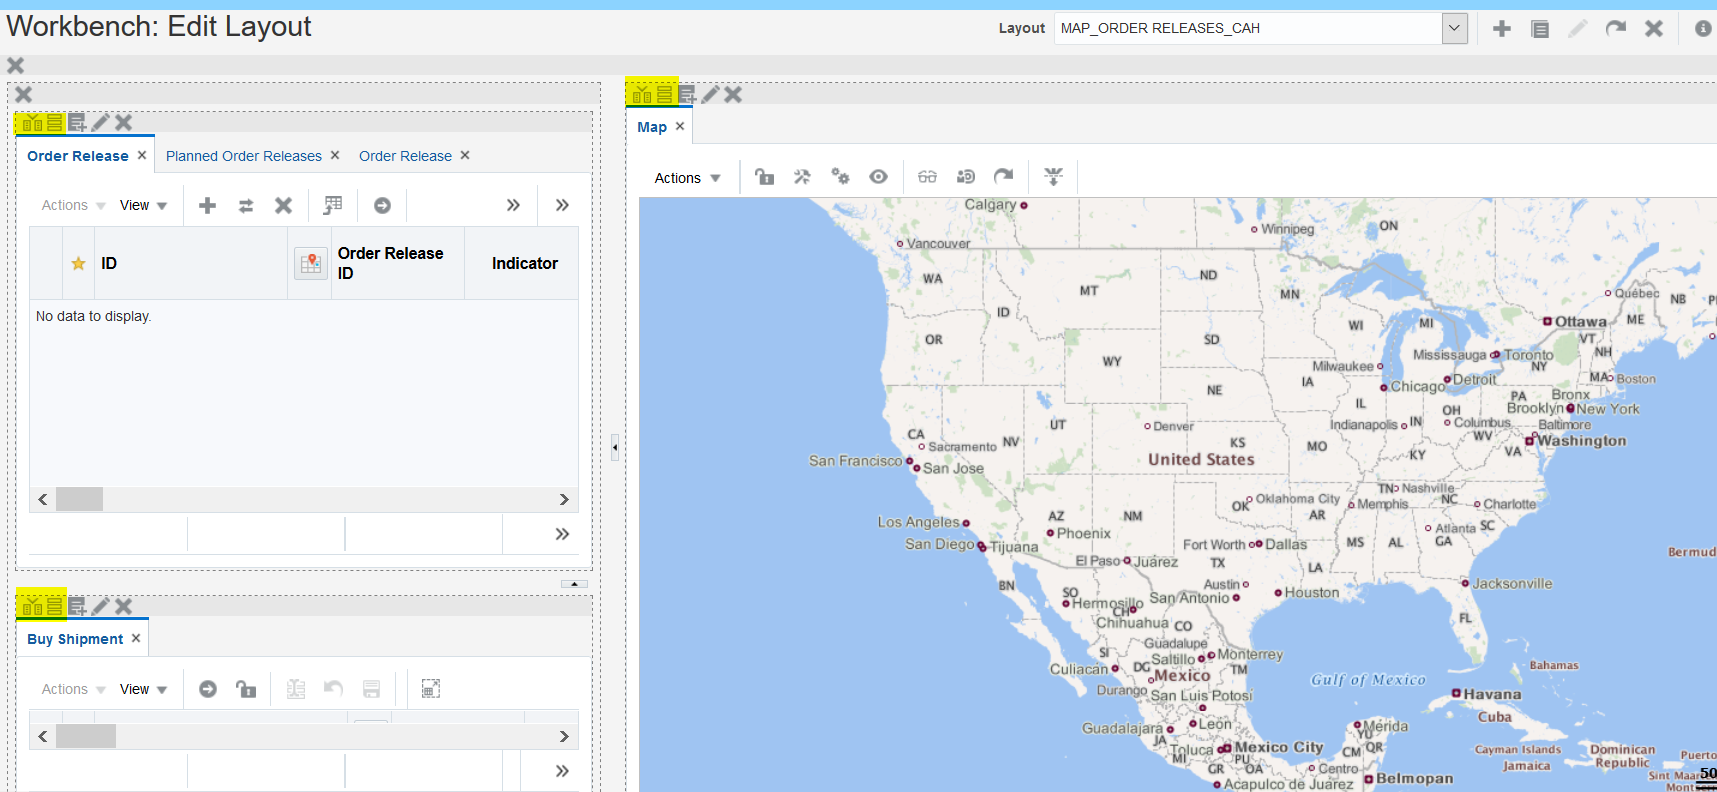
Upon performing the split function, the first pane contains the contents of the original and the second one is empty and available for you to add content. In this example, the map pane was split horizontally and the original map is on the left and the new pane is on the right.
To reverse the split operation, you can delete the empty region using the delete button that is available in the pane.
Steps to Enable
You don't need to do anything to enable this feature.
Workbench - Layout Display Format
Use the Layout Display function to reduce white space and make your current layout more compact. This is especially useful for large layouts.
The layout display options are:
- Default: select for the largest font and spacing
.
Default Largest Font
- Compact: select for medium font and spacing.

Compact Medium Size Font
- Super Compact: select for the smallest font and spacing
.
Super Compact Smallest Size Font
Steps to Enable
You can assign a layout format to a specific workbench layout when you create, copy, or edit a layout using Create/Copy/Edit Layout.
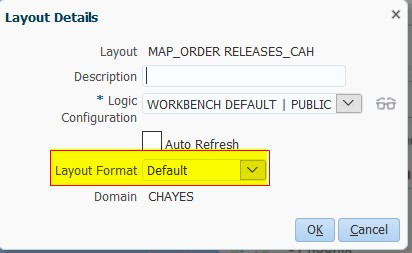
Set Layout Format
The layout format specified by clicking Layout Display overrides the layout format selected when the layout was created/edited.
Workbench - Manager Layout a Region
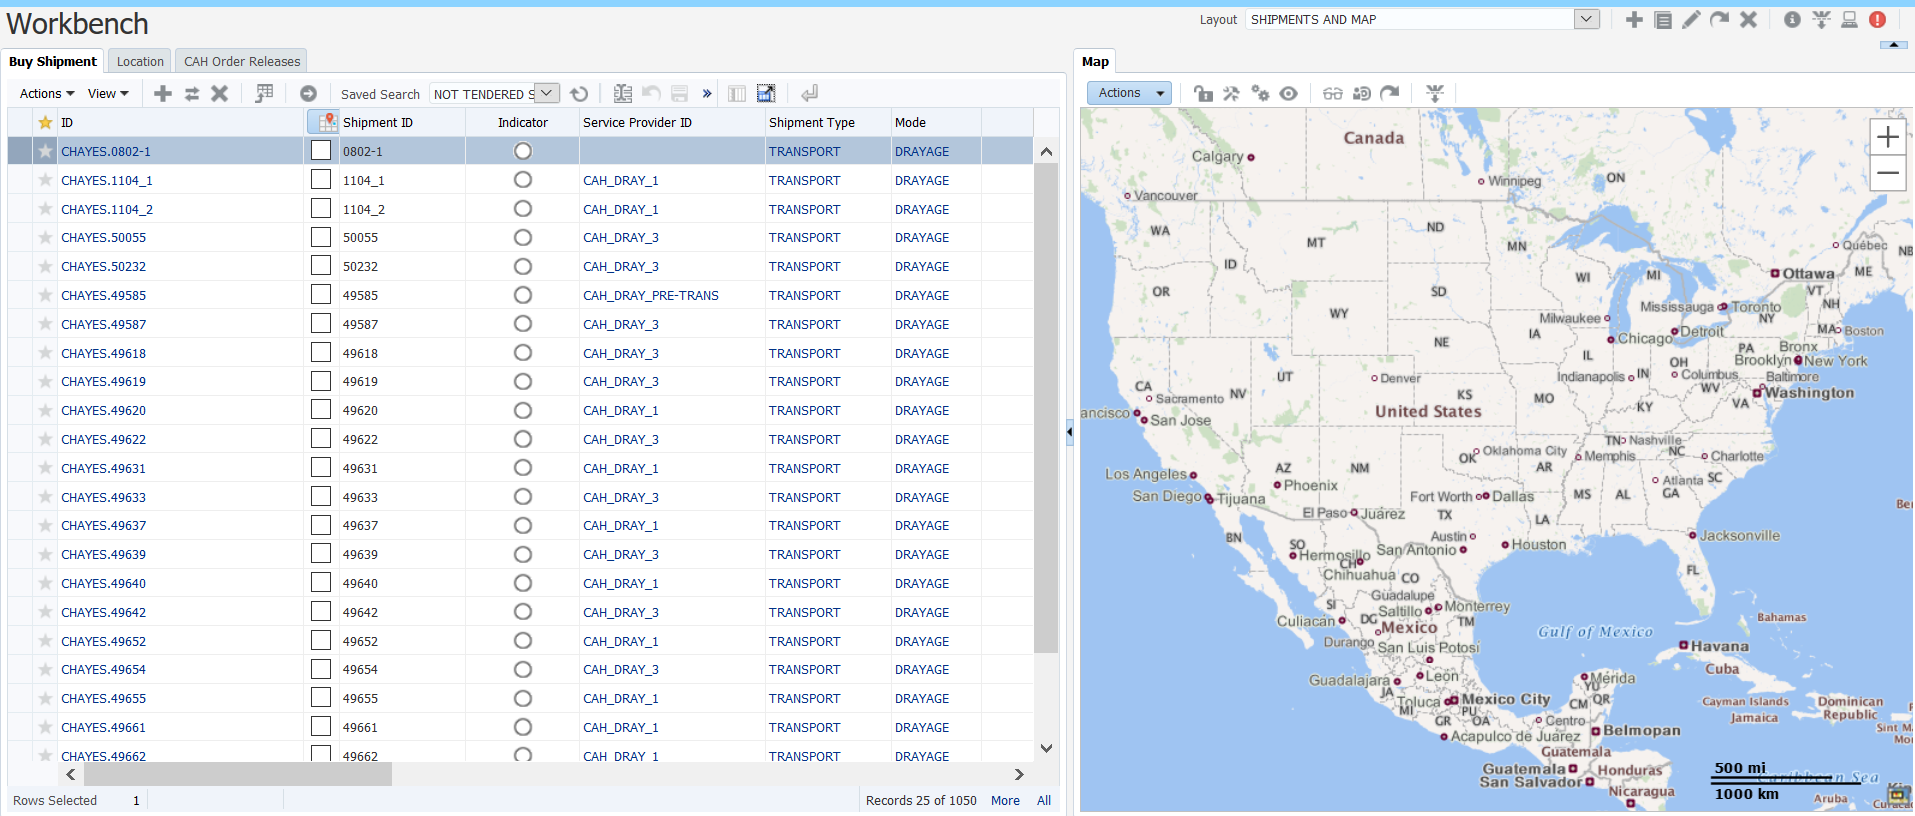
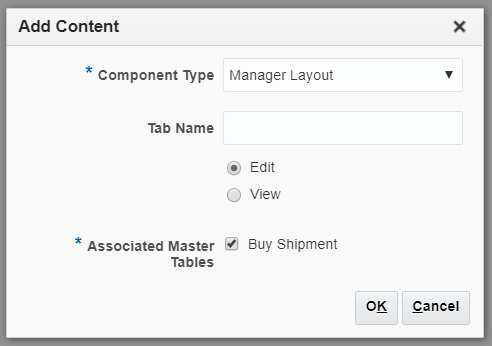
You can configure a Workbench Layout with a View and/or Edit Manager Layout as a detail region of a Workbench. There is a new option of Manager Layout when adding a region to a Workbench Layout.
When adding a Manager Layout to a Workbench, you need to specify:
- Tab Name
- Indicate if the Edit or View manager layout is to occupy this region
- The Associated Master Table, the manager layout used is the one that is associated with the master table's screen set (it's configured in the general tab of the screen set).
Here is an example of a Workbench Layout with an Edit Manager Layout:

Here is an example of a Workbench Layout with a View Manager Layout:

As with most detail regions within a Workbench Layout, there is a Lock/Unlock function on the region.
- Click the Lock View icon to lock that manager layout and keep the results; then, if you click another row in the master table the results displayed in the manager layout do not change.
- This is useful, for example, when you have a shipment master table and a shipment manager layout since it allows you to select a shipment to view and then lock the manager layout. With the shipment manager layout locked, you can click around in the shipment table and the manager layout will not change.
Steps to Enable
You don't need to do anything to enable this feature.
Tips And Considerations
It is important to keep in mind that it is suggested to use simplified/configured Manager Layouts where possible since the default/PUBLIC Manager Layouts have a vast amount of data displayed and could be overwhelming when displayed within a Workbench Layout.
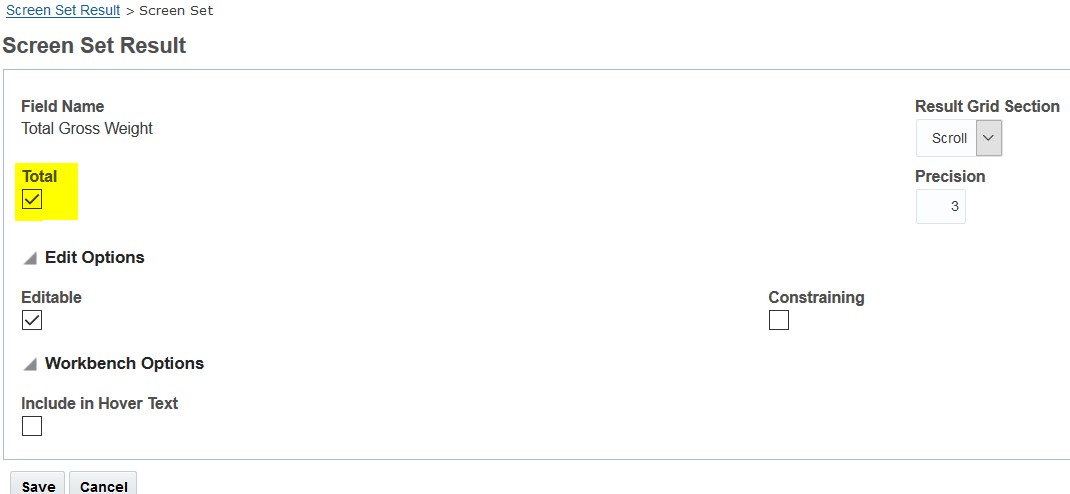
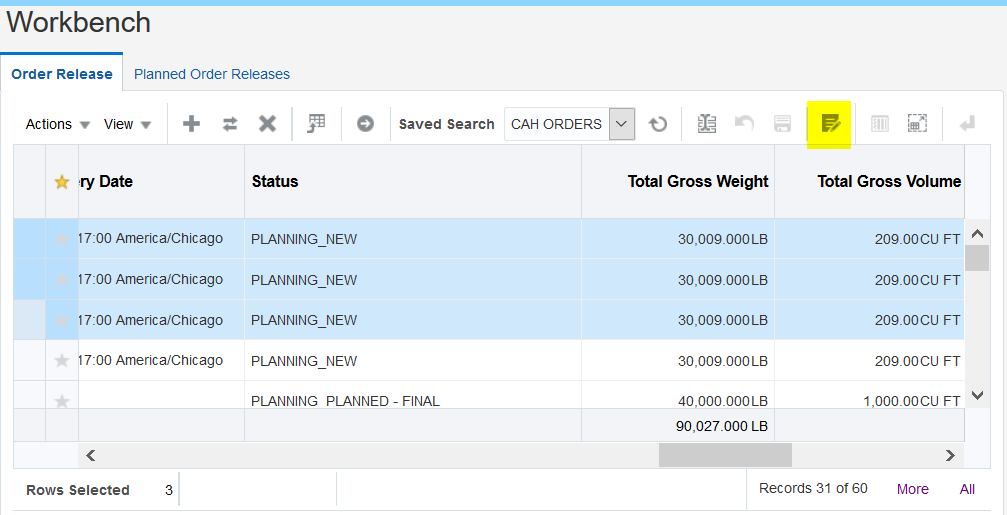
Workbench - Selected Rows Totals for Workbench Tables
If a screen set result column is configured to total, the total will be shown in the workbench table for the selected rows. The total is displayed at the bottom of the table.
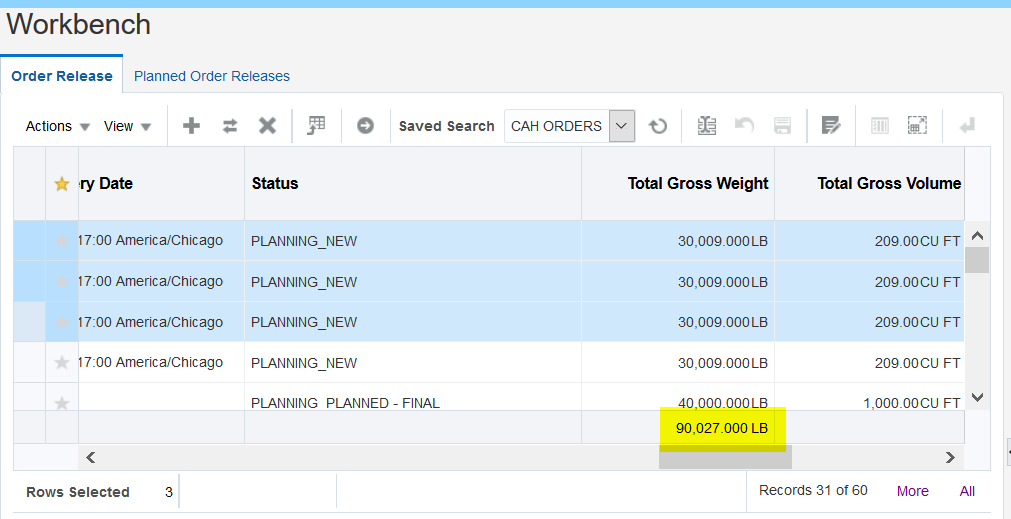
Total Display
Steps to Enable
Configure the relevant result columns in the screen set to total, then use that screen set when configuring your workbench table.
Here's an example of a screen set result column being set to total, this setting is available via the "more" button in the screen set results configuration.
Workbench - Mass Update Support for Workbench Tables
When a result column is configured as editable within a screen set column, it is available for mass update. A new function has been added to the workbench table and is visible when a screen set used for the workbench table has columns that are configured as editable.
This allows you to make the same edit to multiple records at the same time.
Steps to Enable
- To initiate a mass update, select the records in the table and then click the mass update icon:
- A popup will display where you can make your changes
- Save your changes
- This functions the same way that it does in finders except you do not get the confirmation popup.
Workbench - Multiple Masters to One Detail Table
When configuring a table in a Workbench, if it's configured as a detail table you now have the ability to select one or more master tables. Previously only one master table was available to be selected, for example Shipments in Planning status and Shipments in Execution status can both be master tables for one Shipment Stop detail table.
Steps to Enable
- Configure a workbench table
- Designate the table to be a Detail table
- Specify a saved search for each of the desired master tables, any master tables without a saved search populated will not be masters for this detail table. The saved search is used to establish the relationship between the detail and it's master(s).

User Access has been enhanced to allow users to be limited to view only access for selected workbench layouts. If a user has view only access to a Workbench Layout they will not be able to edit or delete the layout.

Steps to Enable
An administrator with User Access permissions can configure which users have access to specific Workbench Layouts and in this release can indicate if access should be limited to "View Only" access by setting the flag accordingly next to the Workbench Layout in the User Access Manager.
The OTM data displayed in a workbench layout can often become stagnant because other OTM users or backend processes might have modified the data. To refresh the data, you now have 2 options, auto refresh or manual refresh all, to refresh each (non-child) component in the layout. A refresh all process (either manual or automatic) retrieves the latest data for the existing objects on each non-child component, selection may not be retained because the selected object might no longer exist.
There are 2 new Refresh All functions available for your workbench.
- Auto Refresh - An ADMIN user (a user with the ADMIN role) can configure a workbench layout to refresh automatically after a set duration (between 5 and 120 minutes), this is suitable for monitoring data with minimal intervention. This setting is available when creating the layout or available in layout details when editing the layout.

- Refresh All Data (button/icon) on the Toolbar - You can initiate the workbench refresh directly within your workbench using the new "Refresh All Data" icon/button on the workbench layout toolbar.
Steps to Enable
REFRESH ALL - AUTO
An ADMIN user (a user with the ADMIN role) can configure a workbench layout to refresh automatically after a set duration (between 5 and 120 minutes). This setting is available when creating the layout or available in layout details when editing the layout. When the duration passes a Refresh All will initiate and will do a complete refresh for the entire workbench including a re-querying of the data displayed.
Setting a workbench layout to auto refresh can be done when creating the workbench layout or via the layout details icon on the layout toolbar.
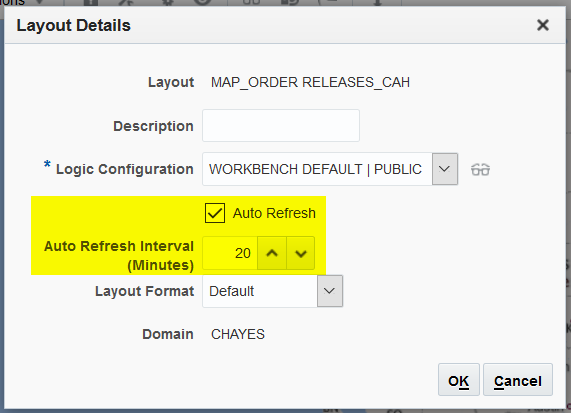
If a workbench is set to auto refresh a calendar icon will be evident at the top of the workbench layout. Upon hovering over this icon the user can see the time of last refresh and the time of next refresh.

REFRESH ALL - MANUAL
You can initiate the workbench refresh directly within your workbench using the new refresh all icon/button on the workbench layout toolbar.

Refresh all will do a complete refresh for the entire workbench including a re-querying of the data displayed. If a manual refresh is performed on a workbench layout that is configured for auto refresh, the auto refresh timer is reset. For example, if your auto refresh interval is 20 minutes and the last refresh time is 9:00, you manually refreshed the layout at 9:15, then the next refresh time would be updated to 9:35 (20 minutes after your manual refresh).
Tips And Considerations
A couple of important things to consider when using either the manual refresh all function or the auto refresh capability:
- The Refresh All function (either manual or auto) should not be run if a component is in Inline Edit mode. If a change has been made to the data but not yet saved, the change will be lost upon refresh.
- Refresh all will do a complete refresh for the entire workbench including a re-querying of the data displayed.
- If a manual refresh is performed on a workbench layout that is configured for auto refresh, the auto refresh timer is reset. For example, if your auto refresh interval is 20 minutes and the last refresh time is 9:00, you manually refreshed the layout at 9:15, then the next refresh time would be updated to 9:35 (20 minutes after your manual refresh).
Workbench - Refresh After Action
Upon the completion of an action on an object within a Workbench a refresh is automatically sent back to the workbench to allow the display of updated data where possible. Most actions are supported, however, more complex actions are excluded, including but not limited to the following:
- Work Assignment Actions
- Add Shipment
- Remove Shipment
Steps to Enable
You don't need to do anything to enable this feature.
Workbench - Refresh Detail Tables When Master Table is Refreshed
When a Master table record is refreshed or selected, the Detail table records are re-queried as there may be a change in the records. The re-queried data is made available in the detail table.
Steps to Enable
You don't need to do anything to enable this feature.
Workbench - Saved Query No Longer Runs During Creation or Edit of a Workbench Table
To speed up the creation of Workbench Layouts, the Saved Query will not be run during Workbench table creation or edit.
Steps to Enable
You don't need to do anything to enable this feature.
Tips And Considerations
While the saved query no longer runs automatically during creation or edit - you do have the option of manually running the saved query when creating or editing a workbench.
Document Management - Add Document Multi-Select Document Option
This feature provides you with an expanded set of document capabilities for the OTM Shipment, GTM Campaign, and GTM Campaign Line managers. The new capability allows you to perform a multi-select to create, link or copy your documents across multiple objects to better support common business relationships where a single document can be related to multiple selections. For example you can now copy a standard certification to a set of shipments or upload a single Certificate Of Origin for multiple Campaign Lines.
The Add Document action capabilities include:
- Create As New - allows you to add a new document to one or more selected objects in your finder results.
- Create As Link - allows you to link a selected/existing document to one or more of your selected finder results.
- Create As Copy - allows you to copy a selected/existing document to one or more of your selected finder results.
Other capabilities provided with this feature include:
- Document Used As designation. The possible Used As options are:
- Individual (I) - used to identify a stand alone document that was created as an individual document. The document will retain it's Used As Individual designation even if it is subsequently linked to other documents or copied.
- Linked (L) - linked documents are documents that are linked directly to other documents. The linked from document will be identified on the linked document through the Related Document ID. In addition, any document that is generated from a Document Type where the Consolidated flag has been selected will have the Used As designation of Linked and the Related Document ID for these documents will link to the Consolidated Document.
- Consolidated (C) – a consolidated document is a cross reference document that is used to provide a cross reference link for those documents that are generated with data coming from many objects e.g., a quarterly shipment summary document that summaries the activities of many shipments, or a summary document that is generated across many campaign lines. The generation of the consolidated document is triggered by having the Consolidated flag checked on the documents related Document Type. For Consolidated documents - there will be one consolidated document that will be generated, then for each object there will be a linking document assigned that references, by way of the Related Document ID, the consolidated document. Note that each object owns their link document, but the Consolidated document itself is not related to any single object it only exists to create the cross reference between all the involved objects.
- Template (T) – identifies a document that represents a blank form that the user can download and fill out and then upload as a completed document. A template document can be attached to a document type and the template can be downloaded when that document type is selected.
- Document Context Qualifier ID and Value - allows the you to create your own unique identifier qualifier value for your documents.
- Document Effective Date and Expiration Date.
Steps to Enable
You don't need to do anything to enable this feature.
Tips And Considerations
The new Business Process Automation> Documents> Add option supports the same functionality (and more) that is provided by the Attach Documents, Generate Document and Upload Document actions - where the new Add option is available you can reduce the number of actions provided to you users to help avoid confusion.
Query Based Dynamic Drop List for Reports
This feature provides you with the ability to create a SQL query that can be used to generate a drop list of values for your reports - this will allow you to restrict the parameter values used for generating your reports.
Steps to Enable
A text area is available when defining the report parameter where a SQL query can be written which will be executed and will generate a drop list based on the output of the query entered.
Under Business Process Automation>Power Data>Document Generation>Reports
- Create a report parameter of the type 'Dynamic List'
- Enter an SQL query for the parameter
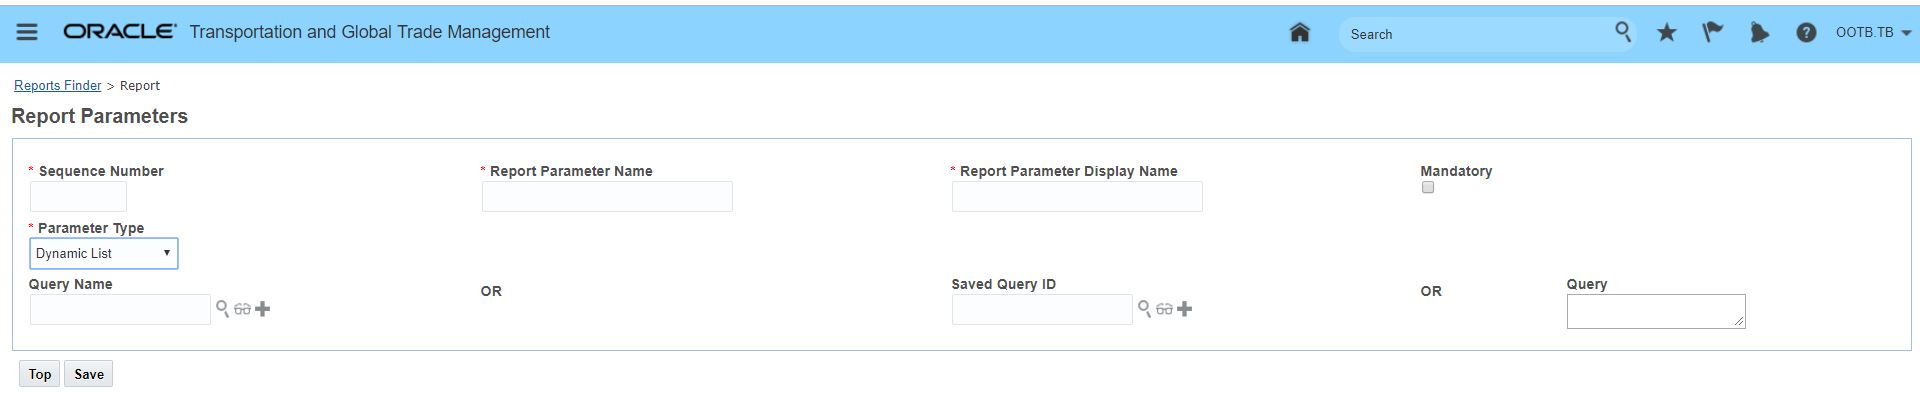
Dynamic List Input
Running the report will generate a drop list based on the SQL query entered.
Support for Document Context as Pseudo Field
This feature provides you with the option to use the Document Context field as a Pseudo Field providing you with all the configuration options that Pseudo Fields provide. For example, you can configure a pseudo for the Document Context Qualifier = Document Revision add that pseudo field to your finder and then easily search for documents that do or do not have revisions.
Document Context Pseudo Field
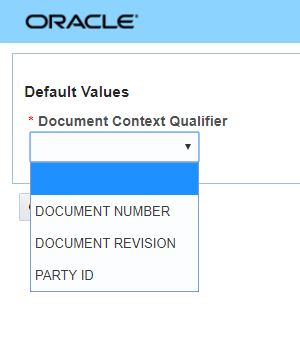
Pseudo Field for Document Context
Steps to Enable
This feature is enabled by following the standard Screen Set Manager steps used for any other Pseudo Field.
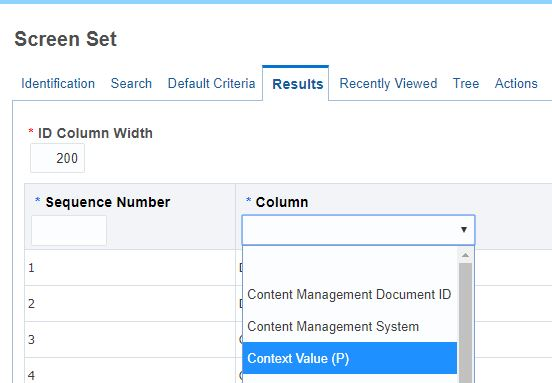
- Go to Configuration and Administration > User Configuration > Screen Set Manager and copy the Public Document screen set.
- Go to the Results tab. Use this page to configure the columns that appear on the Results page of the business object assigned to this screen set. Enter an ID column width which consistently appears as the first column on all Results pages.
- The Document Context field is identified as a Pseudo and is marked with the letter P.
- Add the Document Context field to your results.
- Select the Document Context Qualifier to use for the field.
Oracle Transportation Management (Base)
Multi-Threading for Rating Engine
This feature provides you with the option to multi-thread your rating engine calls - either for internal OTM rates or for external rating engine calls. The ability to multi-thread the rating engine calls will provide - in most situations - an improvement in the rating performance of OTM in the areas where rating is called including: Rate Inquiry (aka RIQ), Bulk Planning or actions that involve rating.
Steps to Enable
The initial thread count/the default value is 1 - which means the rate record evaluation will be performed in sequence.
If you are noticing a large Backlog and a high (average) Queue Size then it is suggested to increase the number of threads in a step of 2. The recommended approach is to increase the thread count in a batch of 2 checking the throughput (Backlog and Queue Size) after each new setting.
You can change/tune and review the impact of different settings batch thread settings through the Event Queues page. Note that changing the settings in the Event Queue is a temporary change that will be lost when the server is restarted. Once the desired thread setting has been determined - the approach is to set the thread group before starting the server.
The Event Queues page can be accessed via Configuration and Administration > Technical Support > Diagnostics and Tools > EventManagement > Event Queues.
You must be logged into OTM as DBA.ADMIN to access the Event Queues page.
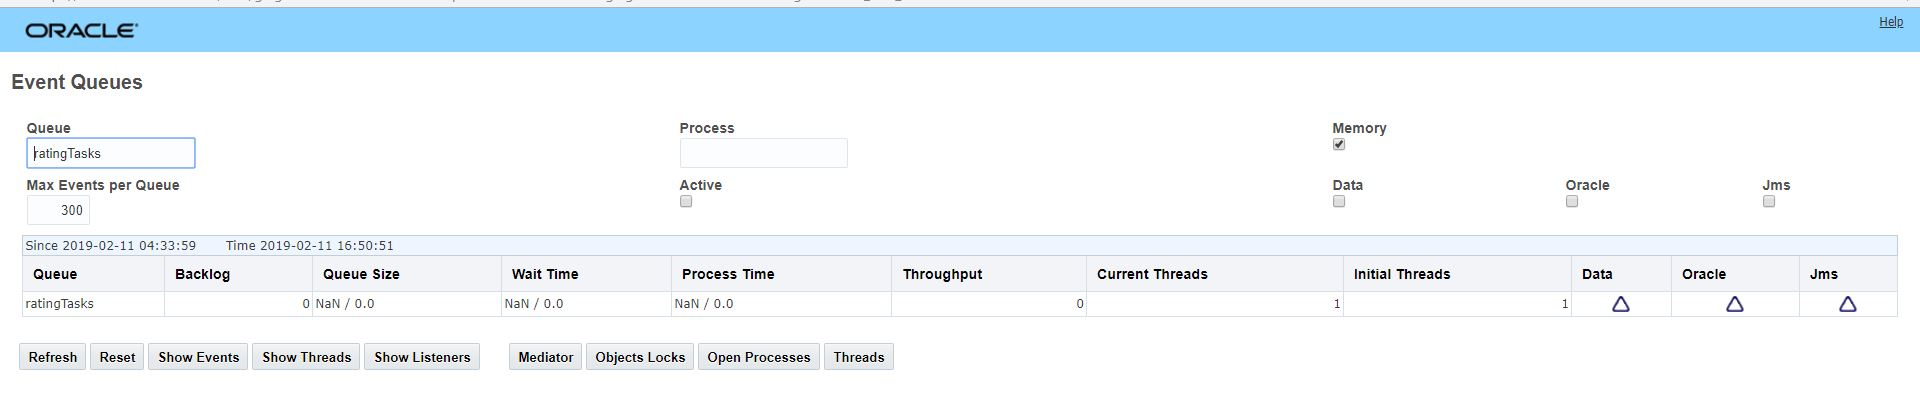
Event Queue Rating Tasks
Key Resources
For more information on the effective use of multi-threading with OTM/GTM:
- Review the Help topic 'Multi-threading Logic in OTM',
- Review the ‘Workflow Thread Tuning’ section of the Cloud Getting Started Guide: https://docs.oracle.com/cd/E60665_01/otmcs_gs/OTMCG/OTMCG.pdf
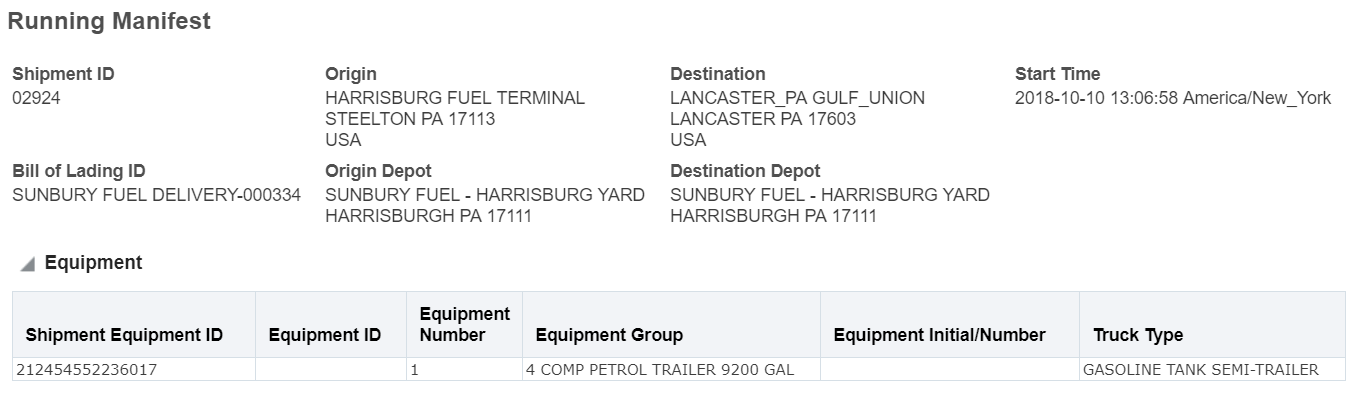
This feature provides you with a shipment action to generate a running or rolling manifest view of your shipments. The running manifest provides stop level detail from stop to stop capturing the details of the freight being transported.
The Running Manifest action is accessed via Shipment Management > Shipment Management > Buy Shipments > Actions > Shipment Management > View > Running Manifest.
THE EXAMPLE BELOW IS FOR A MULTI-STOP SHIPMENT WITH A MULTI-COMPARTMENT TRUCK
Header
The header provides the basic shipment information about the geography, reference numbers, and equipment. The equipment section provides the only reference to the Shipment-Equipment ID since the equipment will subsequently be referenced by a sequence number. The equipment information also includes the number painted on the actual truck and the type of truck, if this has been configured.
Running Manifest Header
STOP TO STOP DETAIL
The result screen is then segmented by the stop to stop details. These sections can be expanded to provide the information between the stops.
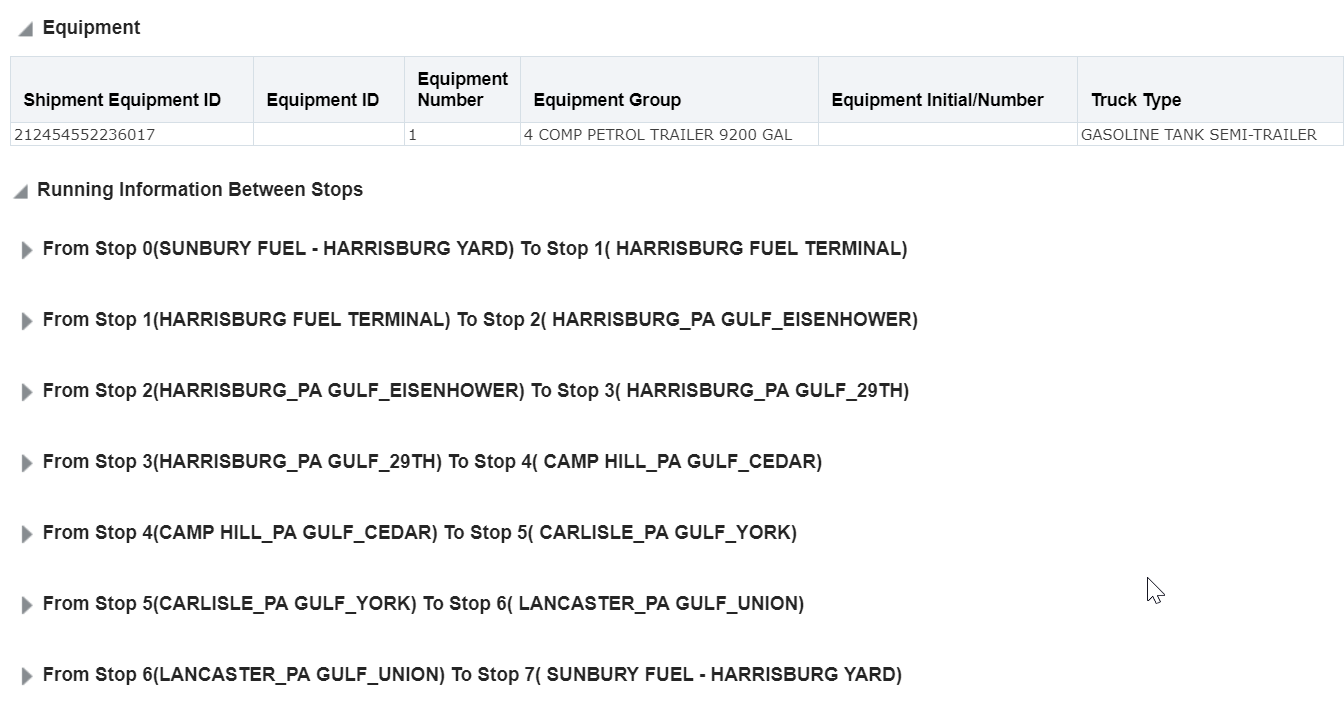
Running Manifest Stops
The expanded sections are each arranged to provide a header which explains the details associated with the next stop. There is also a detailed listing of each ship unit on board between those stops. There are also 2 sections that show summaries of the equipment and compartments in terms of utilization. Each section needs to be expanded to show the details.

Running Manifest Stop 1 to Stop 2 Details
Expanding the Ship Unit details will provide information on the freight that is being carried between stops. This is organized by equipment, compartment and stop number. This allows the user to understand the inventory on board and where is is destined. For those users who know how to properly ship bulk, the ship unit count will be of great utility to the clients. This report intends to have commercial purpose in the fact that it contains details about the quantities and weights.
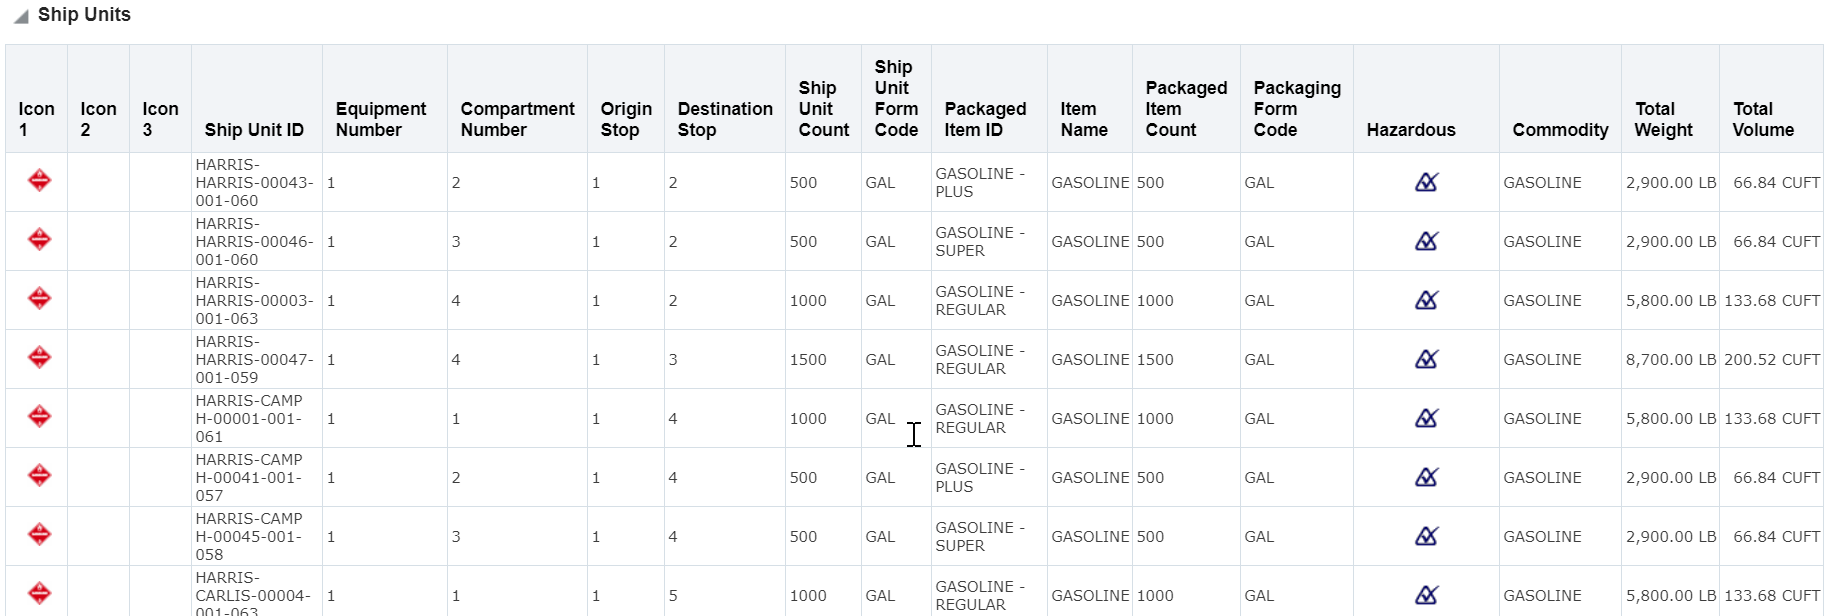
Ship Units - Stop 1 to Stop 2 (Partial List)
Steps to Enable
You don't need to do anything to enable this feature.
Tips And Considerations
You must set the parameter RUN HAZMAT QUALIFICATION PROCESS to true to view the Hazmat Icons on the Running Manifest.
Addition Release Method Order Configuration Options
This feature provides you with two additional order release line level fields that you can use to define your order configurations.
The added order configuration options are
- Order Release Line Weight
- Order Release Line Volume
Both fields support three values:
- NEVER,
- IF NULL (default value),
- ALWAYS.

Order Release Line Weight and Volume Options
Steps to Enable
You don't need to do anything to enable this feature.
Tips And Considerations
The following properties are deprecated:
- glog.business.order.orLineVolumeCalcType
- glog.order.line.alwaysRecalcWeightVolume
Documents Actions Added to Tracking Events, Document Element Added to Shipment Status Interface
This feature provides you with Document Management capabilities that you can use with your Tracking Events (ShipmentStatus).
Tracking Events now support all of the standard Business Process Automation Document Management actions:
- Attach Documents
- Generate Documents
- Limited Documents
- Upload Documents
In addition, the Document element has been added to the ShipmentStatus (aka as Tracking Event) interface - this gives you the ability to load documents directly from within the ShipmentStatus interface versus having to load your documents using the Document interface.
Steps to Enable
You don't need to do anything to enable this feature.
Key Resources
- Review the Integration Guide on the Oracle Help Center for more information regarding OTM/GTM's integration capabilities: https://docs.oracle.com/cloud/latest/otmcs_gs/docs.htm
External Distance Engine and Map Enhancements
Simplified External Distance Engine Configuration UI
The configuration of the External Distance and External Service Engines was confusing at best since the user was responsible to assure that the configured attributes were compatible with the engine. This process has been re-designed to be more user friendly with only the compatible attributes being available on the UI, depending on the engine that was selected.
The UI supports supports HERE, ALK, and Oracle Spatial engines.
When the user selects an External Engine Type, the UI will only display the attributes associated with the selected External Engine Type. The code will also fill in the correct Java Class.
We have also provided a way to turn off the Cache and this is a new option.
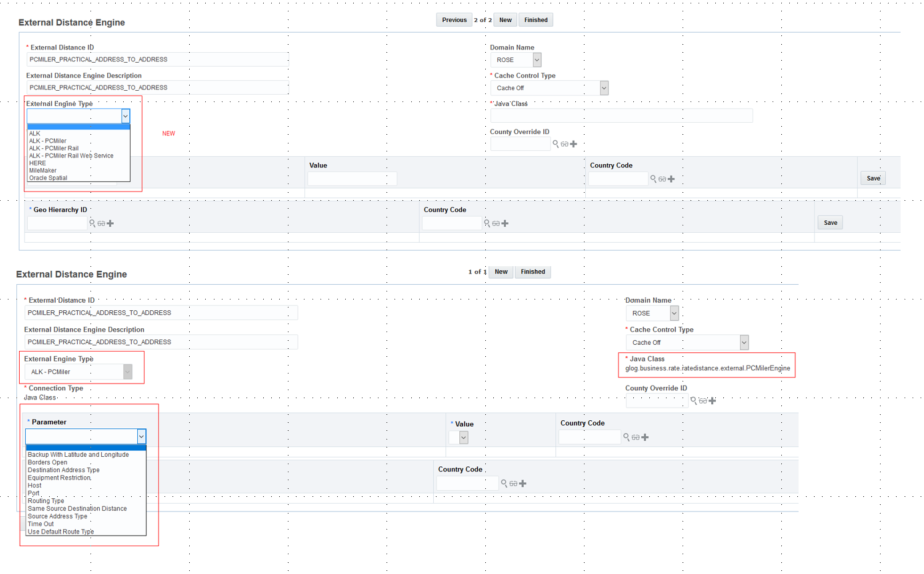
Simplified Engine Configuration
The HERE engine has been updated with new parameters as well. Additionally, the user will be able to fix the limited weight by configuring it on EDE/ESE else it will be dynamically calculated. This Limited Weight is an additional Parameter that is only used when the user would like to set a fixed Limited Weight and should not be confused with the dynamically calculated method which does not require the parameter.
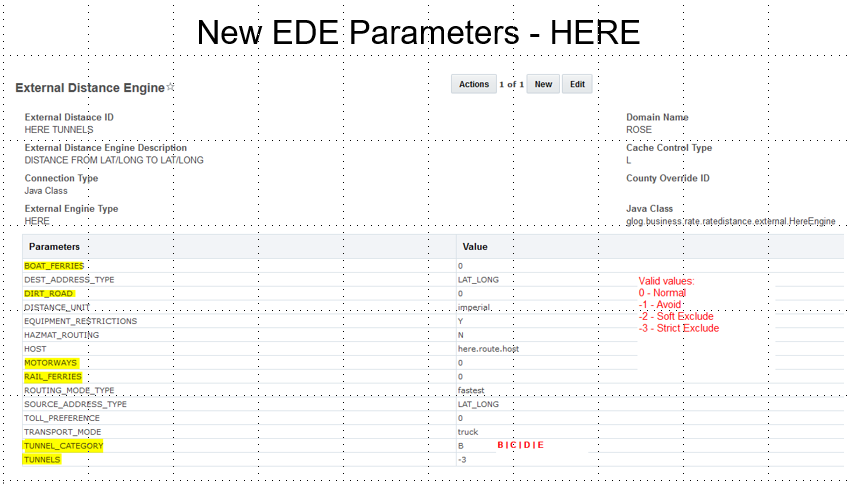
New Here Parameters
The ALK Engine has been updated with new parameters as well.
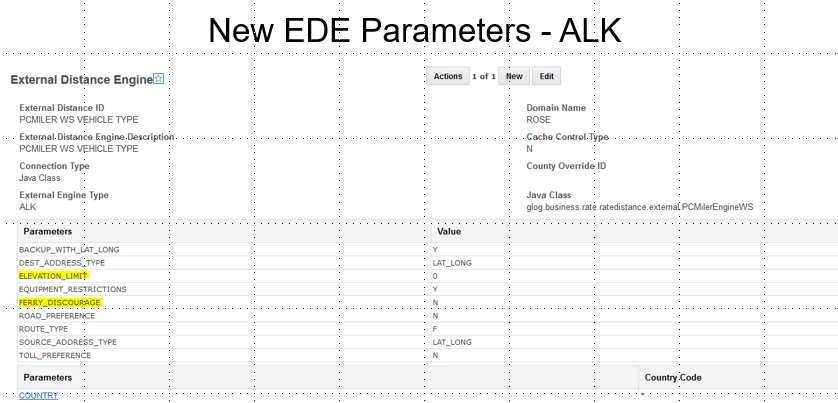
New ALK Parameters
Steps to Enable
This feature is all about configuration of the external engines. What is specified for the EDE (External Distance Engine) also applies for the ESE (External Service Engine).
The user is directed through the setup with a "smart" UI. First the user selects the engine to be used. The options that are available are based on that engine. The user does not have to remember the Java Class either. This is done for the user.
Tips And Considerations
It was decided to provide logic for specific engines based on the attributes that they supported. This way a user would not be able to specify an incompatible attribute nor an incompatible value where there is a specified list of values.
The down side of this is that any new engine must be on-boarded in the same manner. Since it is rare to find new vendors for such extensive applications, it is unlikely that they will be timing issues once a new product is announced.
It was decided that the benefits of the ease of use far outweighed any considerations for generic solutions.
Vendor solutions are expensive so it is also likely that an implementation may only go with one vendor, but OTM can handle multiple engine configurations. It is common that users will have more than one engine configuration for the same vendor so that is why the effort was made to simplify the configuration.
Screen Set - Configure Map Hover Fields
The "Include in Hover" setting in the Screen Set results has been enhanced to be used for configuring map hover as well as Gantt hover in a Workbench Layout.
Steps to Enable
Use the "Include in Hover" setting in the Screen Set to configure your map hover fields in the Workbench Layout.
Workbench Map - Expose Vendor Map Controls
Using the "Controls" function on the Workbench Map, you see a list of vendor-specific controls that you can add to the map. The list of controls varies depending on the map vendor selected. Select a control from the list to display it on the map. Select the control a second time to remove it from the map.
NOTE: The functionality of each control is determined by the map vendor.
HERE MAP
Configurable Controls:
- Zoom to Area
- Overview Map
- Measure Distance
ALK MAP
Configurable Controls:
- Mouse Coordinates
- Overview Map
- Navigation Toolbar
- Geolocation Toolbar
ORACLE ELOCATION MAP
Configurable Controls:
- Magnify Area
- Toolbar
Steps to Enable
You don't need to do anything to enable this feature.
Workbench - Configure Map Hover Text in Screen Set
Hover Text Configuration in Screen Set is now used for both map and Gantt hover. To allow these screen sets to be assigned to a Workbench Map a new section is available when configuring a map region in a Workbench Layout to indicate the screen sets that should be used for each object. Some default content is included in the hover, for example Order Release data is shown in a Shipment hover but the object's data relies on Screen Set configuration.
In each section there is a Show Default Hover check box. This check box controls which default fields are shown in the map hover text pop-up. This check box is selected by default. To remove the default hover fields deselect this check box.

Steps to Enable
- If you want to change which fields appear by default in the map hover text, expand the Hover Screen Sets section.
- Select user-defined screen sets for one or more objects for which you want to change the hover text.
- A Hover Screen Set controls the fields which appear in the hovering pop-up window when you click the Show Details Hover icon on the map.
- Within the Hover Screen Sets section, you can select the screen sets for various objects supported by the map component
- To configure the fields displayed in the hovering pop-up window on the screen set, select the Include in Hover Text option for fields in the Results tab via the More button.
- Once expanded, the Hover Screen Sets section is grouped as follows:
- Shipment: includes shipment-related objects such as buy shipment and shipment stop as well as logistics network modeling related objects such as modeling shipment and modeling shipment stop.
- Order: includes order-related objects such as order movement and order release.
- Driver: includes the driver object.
- Network: includes network-related objects such as location, network leg, region, and region details.
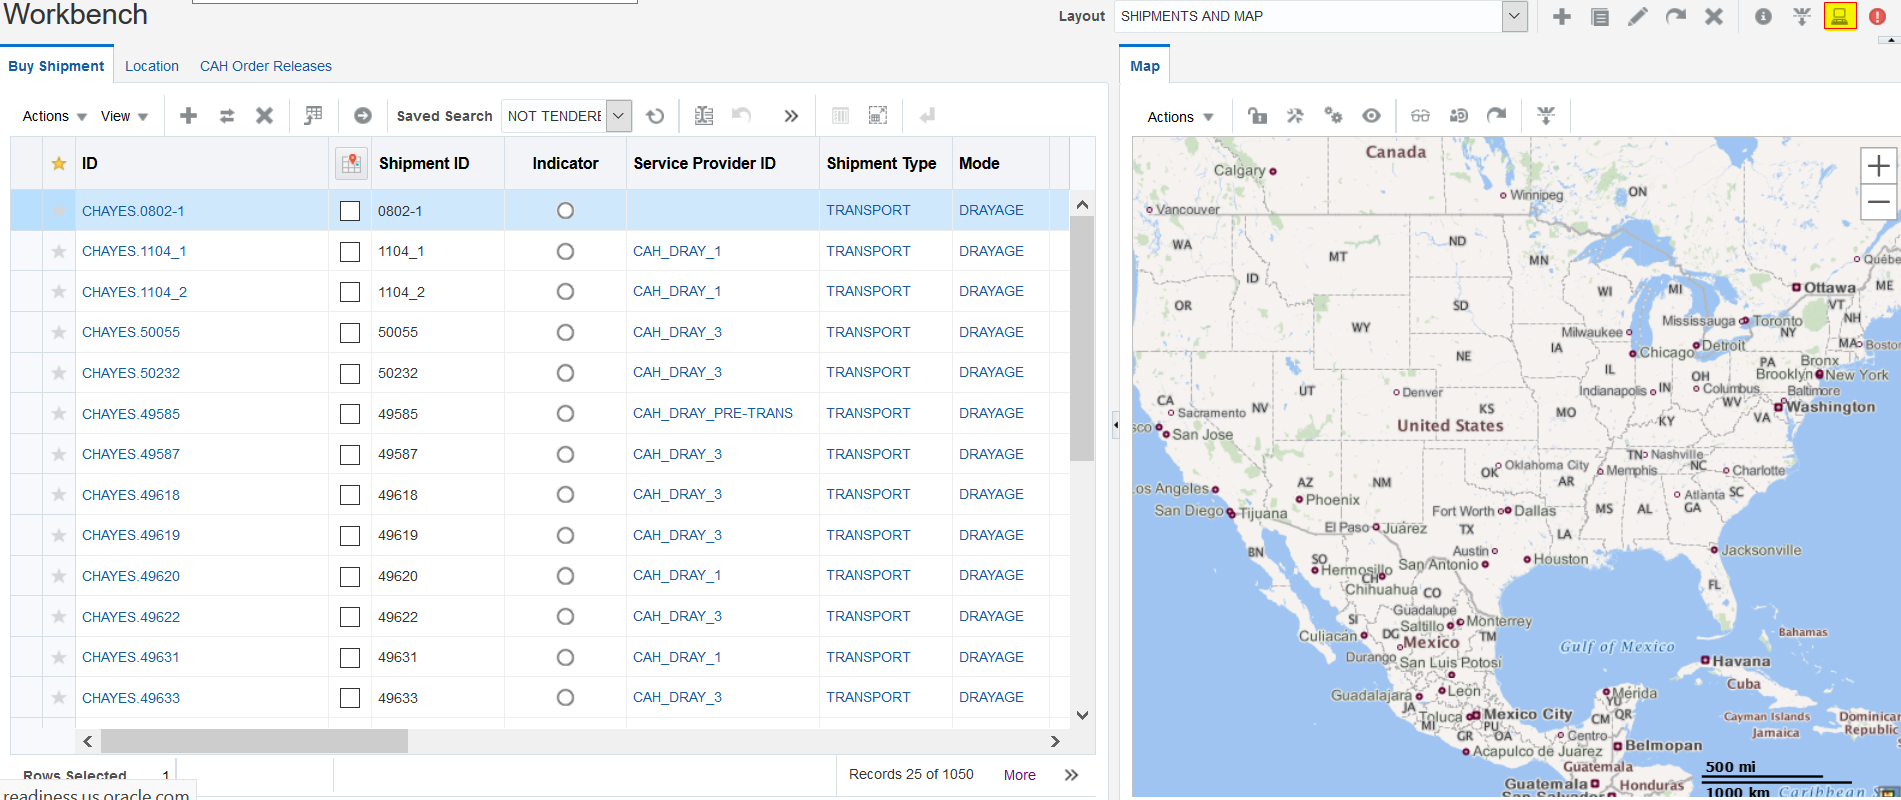
Workbench Map - Support Multiple Maps in Workbench Layout
A Workbench Layout now supports having multiple map regions. The "add to map" function in the Workbench Table adds the objects to all of the maps within the Workbench Layout. Using this along with the Map Filters feature allows you to display different data in your multiple maps. For example, you can map all of the shipments from a shipment table, and use the Map Filter to show TL shipments on one map and LTL shipments on the other.

Steps to Enable
The additional map regions can be added following the steps used to add a single map region in previous releases.
Workbench Map - External Distance Engine and Map - Consider Traffic Between Stops
Previous implementation provided the departure time of only the origin to the map vendor (ALK or Here) to calculate the route based on historic traffic conditions. This change allows the logic to consider the estimated departure times at all stops and pass them on to the vendors.
New logic parameter USE TRAFFIC PER STOP is added to control the use of traffic per stop pair.
- User can still use the existing USE TRAFFIC parameter if the idea is to use historic traffic, but not at each stop.
- If the new parameter is turned on, the planned departure time of each stop will be calculated and the origin stop departure time of each stop pair will be passed on to the vendors.eg if the shipment contains 3 stops;A-B-C .This contains 2 stop pairs .A-B and B-C. For the first pair the departure time of A will be passed and for the second the departure time of B will be provided.
- If both USE TRAFFIC and USE TRAFFIC PER STOP are turned on USE TRAFFIC PER STOP will take precedence.
Steps to Enable
You don't need to do anything to enable this feature.
Workbench Map - Consider Hazmat for Each Pair of Stops
This feature expands the Workbench Map functionality to consider Hazmat between each pair of shipment stops. In past releases, multi-stop shipments were plotted similar to 2 stop shipments with HAZMAT and resulted in sub-optimal routing since the route was decided by the most hazardous item on the shipment. With the implementation at stop pair, the route will be calculated on the hazmat items specific to the stop pair.
- If hazmat is present, always consider stop pair level routing
- Hazmat Items are identified as relevant to a pair of shipment stops and pass them on to Here or ALK when calculating route.
- Both adding a route to map and show driving directions will be affected when HAZMAT is present.
- Total distance and total time taken will be calculated individually for each segment of the route.
Steps to Enable
Previous functionality of external distance engine parameters for HAZMAT on Map didn't vary based on the number of stops on the shipment. This feature expands the functionality to consider Hazmat between each pair of shipment stops. In past releases, multi-stop shipments were plotted similar to 2 stop shipments with HAZMAT and resulted in sub-optimal routing since the route was decided by the most hazardous item on the shipment. With the implementation at stop pair, the route will be calculated on the hazmat items specific to the stop pair.
- If hazmat is present, always consider stop pair level routing
- Hazmat Items are identified as relevant to a pair of shipment stops and pass them on to Here or ALK when calculating route.
- Both adding a route to map and show driving directions will be affected when HAZMAT is present.
- Total distance and total time taken will be calculated individually for each segment of the route.
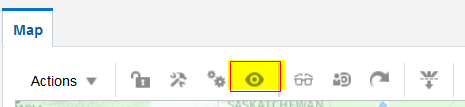
Workbench Map - Lock Zoom Level and Lock View on Map
This feature provides you with two new lock functions on the Workbench Map toolbar. The new lock functions improve the usability of the map display by allowing you to control the view and zoom more directly.
LOCK ZOOM LEVEL
- Click the Lock Zoom Level icon to lock that map's zoom level and maintain the current zoom view of the map.
- For example, if you select shipment A which starts and ends on the west coast of the US and you click the Lock Zoom Level icon, the map will stay zoomed into that shipment. Next, if you select a second shipment, shipment B which starts and ends on the east coast of the US, the map will not redraw to show that shipment. Instead the map zoom will remain on shipment A which starts and ends on the west coast of the US.
- If you manually zoom in or out using the mouse or map controls, the zoom level icon is automatically unlocked.
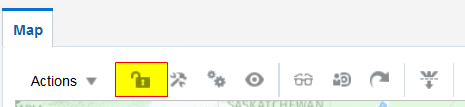
LOCK VIEW
- Click the Lock View icon to lock that map and keep the current items on the map; then, if you click another object such as a shipment or order release to be added to the map, the map does not change.
- This is useful when you have two maps, because you can add a shipment to the map and then lock that map. With one map locked, you can add a second shipment to the second map.
Steps to Enable
By default, the Lock Zoom Level icon is shown as unlocked. When you click the Lock Zoom Level icon to lock a map, the icon is shown as locked.
- Click the Lock Zoom Level icon to lock that map's zoom level and maintain the current zoom view of the map.
- For example, if you select shipment A which starts and ends on the west coast of the US and you click the Lock Zoom Level icon, the map will stay zoomed into that shipment.
- Next, if you select a second shipment, shipment B which starts and ends on the east coast of the US, the map will not redraw to show that shipment. Instead the map zoom will remain on shipment A which starts and ends on the west coast of the US.
- If you manually zoom in or out using the mouse or map controls, the zoom level icon is automatically unlocked.
Workbench Map - Additional HERE Supported Parameters
A set of additional HERE parameters that you can take advantage of in your HERE Workbench map..
BOAT_FERRIES
- 0 - Normal
- 1 - Avoid
- 2 - Soft Exclude
- 3 - Strict Exclude
MOTORWAYS
- If you specify motorway:-2, OTM will exclude motorways (highways) from the route calculation if it is possible to find a route that avoids them. Otherwise, the route calculation will include motorways.
- Valid values are:
- 0 - Normal
- -1 - Avoid
- -2 - Soft Exclude
- -3 - Strict Exclude
TUNNELS
- 0 - Normal
- 1 - Avoid
- 2 - Soft Exclude
- 3 - Strict Exclude
RAIL_FERRIES
- 0 - Normal
- 1 - Avoid
- 2 - Soft Exclude
- 3 - Strict Exclude
DIRT_ROAD
- 0 - Normal
- 1 - Avoid
- 2 - Soft Exclude
- 3 - Strict Exclude
FIXED_LIMITED_WEIGHT
- If this is set, OTM will use the weight here rather than the OTM shipment calculation.
- Values entered must be in tons.
- For example, if the shipment limit is 8 tons then the parameter must be set to 8.
TUNNEL_CATEGORY
- Truck routing only, specifies the tunnel category to restrict certain route links. The route will pass only through tunnels of a less strict category.
- The HAZMAT_ROUTING parameter needs to be set to Y for the routing engine to calculate the value for tunnel category. See the HAZMAT_ROUTING parameter details as well.
- The valid values are B, C, D and E with B being the least restrictive.
EQUIPMENT_RESTRICTIONS
- This is used to ensure proper street level routing.
- OTM needs to send equipment dimensions (length, width and height) for the EDE to use.
- Correct dimensions are needed for street level directions for tunnel and overhead height, bridge weight restrictions and so on.
- Equipment dimensions include the length, width and height of the total equipment. For this, set this to Y (on).
- Restrictions will not be used if the parameter is set to N (the default).
Steps to Enable
You don't need to do anything to enable this feature.
Workbench Map - ALK Rail Routes
A new MAP SHIPMENT LINE STYLE is available for RAIL. If RAIL is specified, the shipments have sufficient rail related details and ALK Rail is configured properly the actual rail routing is displayed on the map for all rail shipments.
- RAIL is for use with ALK only. A separate license is required for ALK RAIL.
- ALK's RAIL routing api is called for a RAIL shipment only if the RAIL mode's line style is set to RAIL.
To plot rail shipments ALK's api needs these parameters for each stop location.
- Format - Station format type
- Name - Station name or code
- Railroad - Standard Carrier Alpha Code
The following maps the above parameters to the corresponding OTM object from which the values can be retrieved.
- railroad = BuyShipment - > Mode -> Air/Rail Route Code - > Rail Route Code ID - > Carrier SCAC (from the list of Sequences)
- When Rail Route Code has more than one sequence with the "Rail Junction Code" then all the intermediate junctions are used for fetching the routes between the stop location.
- Rail junctions Carrier SCAC code comes from the next sequence's SCAC code.
- format = ALK takes in five parameters but OTM supports the following 4 parameters.
- name = The actual value retrieved from OTM objects.
| Format | Description | OTM Object Value | Notes |
|---|---|---|---|
| 1 | SPLC 9-digit numeric Standard Point Location Code | LOCATION -> Rail SPLC | Append required zeros to the end of the actual required value of 9 digits |
| 2 | FSAC | Not supported | |
| 3 | StationState Station name and State abbreviation | LOCATION -> Rail Station Code -> Rail Station Code,Province Code | Rail Station Code, Province Code. |
| 4 | ERPC ERPC or 3-3-3 alpha code and State abbreviation - separated by a space or a comma | LOCATION -> ERPC | This is archaic and rarely if ever used. It would be a substitute for the SPLC or STATION. |
| 5 | Rule 260 Junction Code 5-character alpha code for Junctions | LOCATION -> Rail Junction Code | Only used for junctions, Use RAIL marker to differentiate from stops. |
Since there could be multiple format values available for a specific location, the preferred order in which we pass in these format values are based on Location Role of that location.
- Location Role = Ship from /Ship to
- Rail SPLC or Rail Station Code(Rail Station Code,Province Code) or ERPC
- Location Role = Rail Junction
- Rail Junction Code
Steps to Enable
You don't need to do anything to enable this feature.
Workbench Map - Additional ALK Supported Parameters
Two new parameters are available to help refine how shipments are mapped in a workbench when using ALK.
FERRY_DISCOURAGE
Indicates whether to discourage the use of ferries when creating the route. Default: false
ELEVATION_LIMIT
- Indicates the elevation limit when generating a route.
- Elevation unit can be either meters or feet and is determined by the Distance Units parameter. Miles = feet, Kilometers = meters.
- Limit will be ignored if either a routing is deemed impractical with the limit, or a stop is located at an elevation higher than the limit.
- The default is null.
EQUIPMENT_RESTRICTIONS
- This is used to ensure proper street level routing.
- OTM needs to send equipment dimensions (length, width and height) for the EDE to use.
- Correct dimensions are needed for street level directions for tunnel and overhead height, bridge weight restrictions and so on.
- Equipment dimensions include the length, width and height of the total equipment. For this, set this to Y (on).
- Restrictions will not be used if the parameter is set to N (the default).
Steps to Enable
You don't need to do anything to enable this feature.
Use the Map Filters hovering popup to specify criteria by which to limit the objects that display on the map. The objects you can filter are shipments, modeling scenarios, or a combination of both.
Shipments and Scenarios can be filtered on the map. For example, you can map all of the shipments displayed in the buy shipment table and then use the map filters to control which shipments are displayed on the map such as, you can select a transport mode of LTL to limit the shipments on the map to only be LTL shipments.
Shipment Filtering Criteria:
- Transport Mode
- Service Provider
- Equipment Group
- Rate Offering
- Total Weight - Between a Low/High value
- Total Volume - Between a Low/High value
- Total Ship Unit Count - Between a Low/High value
- Number of Stops - Between a Low/High value

Scenario Filtering Criteria:
- Modeling Scenario ID
- Scenario Name
- Scenario Number

There is also a Manage Map Filters function available in the Workbench Layout toolbar (using the same icon).

. 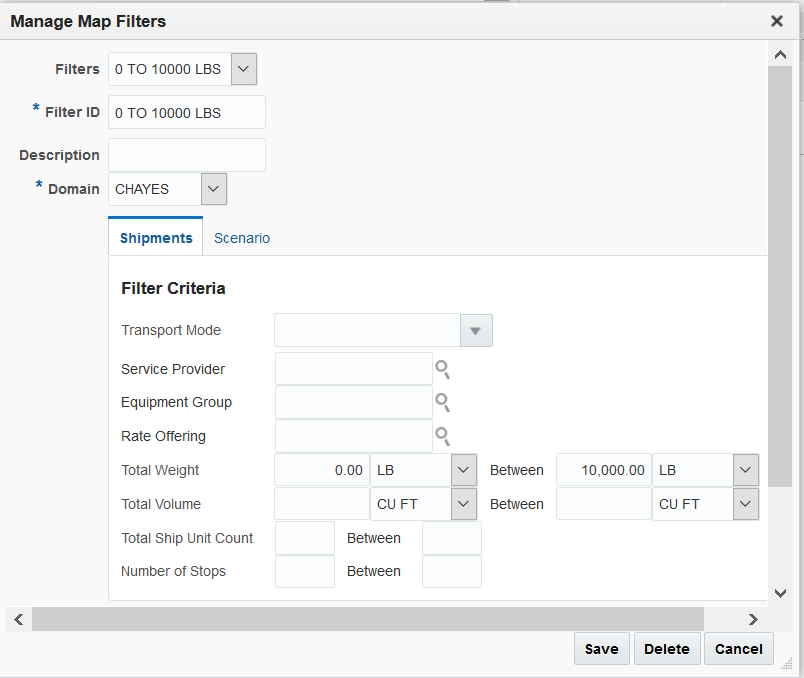
This allows you to create, edit, or delete layout filters.
Once a Map Filter is saved, you can assign it to a specific map when you add a map to a workbench layout or edit an existing map region. If a map has a Map Filter assigned, the mapping criteria is applied automatically when the workbench layout opens.
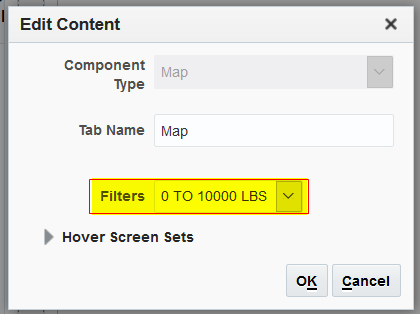
Steps to Enable
To use a Map Filter within a Workbench Layout follow the below steps.
- Select an existing layout with a Buy Shipment or Modeling Scenario tables and a map.
- Click the (Map Filters) icon in the map toolbar.
- In the popup select the criteria you want to limit the objects to be mapped by, such as you can specify a weight range to limit the shipments to those of a certain weight.

- Click the Apply button.
- The map will refresh and display only the objects that meet the specified criteria. The Shipment # of # section is refreshed to display the number of shipments that meet the mapping criteria and
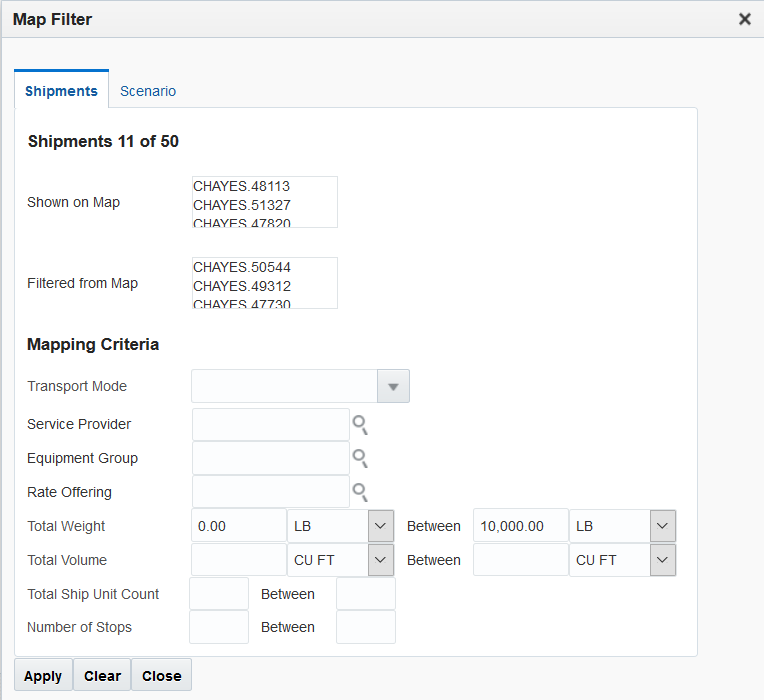
-
the Modeling Scenarios section is also refreshed.
External Distance Engine and External Service Engine Consider Equipment Restrictions
This enhancement provides you with all the tools you need to classify equipment based on general characteristics so that OTM can properly calculate external dimensions and weights. Significant factors are the need to include tractors if required for trailers, and the dimension calculations depending on the existence of a roof, or the ability to overhang the equipment. The external engines each have different attributes to pass in the information in the API and part of the work was to add mapping capabilities.
The first step is to provide an attribute for the Equipment Group for the TRUCK TYPE. This only applicable to truck equipment and is designed to categorize the general type of the equipment that is based on certain characteristics. The trailer types are not user configurable as are the drop downs for the characteristics like roof type. These values are used INTERNALLY in the code so that cannot be user defined. In general, all equipment will fall into these categories.
The user is able to create their own TRUCK TYPE and define the related attributes. This also helps to define the Equipment Group.
Trailer Type is used to describe the various generic ways that equipment is combined. This is primarily used to calculate the vehicle length including the tractor.
- Self Contained is a vehicle with a motor. It is NOT a trailer. It does not need a tractor.
- Semi-trailer is a trailer with a king pin and rear axles. This trailer requires equipment with a fifth wheel hitch to pull it.
- Pony Trailer is a trailer that requires a pulling vehicle with a bumper style hitch.
- Drawbar Trailer is a trailer that contains a rotating, hitch equipped equipment under the front king pin, commonly called a dolly. It also requires a bumper style hitch.
- B-Train Leader is a unique semi-trailer that comes equipped with a rear extension that includes a fifth wheel hitch for pulling another trailer.
- Dromedary is a type of tractor that has a cargo carrying space between the cab and the fifth wheel hitch. It can also be loaded with freight.
Each of these types of equipment can be categorized by the roof type and by the ability to have freight extend beyond the equipment.
Roof Type is used to describe the characteristics necessary to correctly calculate the height.
- Closed - This fixes the height as the configured external height of the Equipment Group.
- Flatbed - This assumes that there is no height of the cargo area and that the max height of the cargo is added to the floor height to determine the external height.
- Open Top - Open top equipment has a side height and there is a calculation based on the flatbed and based on the side height. We take the max for the external height.
Overhang permitted is the ability to allow freight to extend beyond the basic defined equipment.
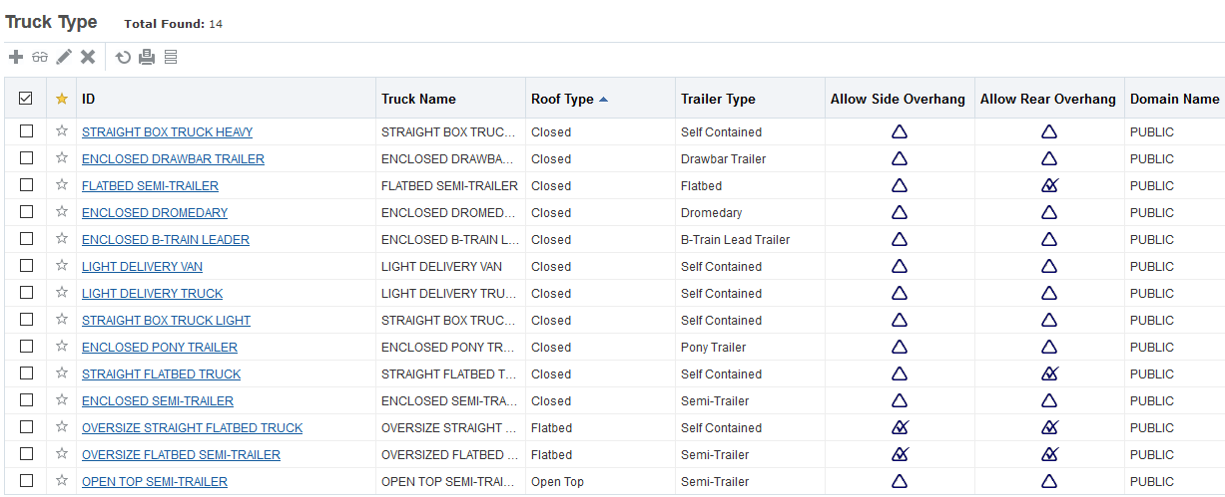
Truck Type Table
PULLING LENGTH
The length of the equipment, except for the self contained will not represent the actual length of the equipment. HERE wants the total length while ALK wants the trailer length. While the equipment length is easy, the total length represents a challenge since the equipment with a king pin and 5th wheel will overlap, hence the definition of pulling length.
The power unit now has 2 critical attributes. TARE WEIGHT and PULLING LENGTH.
BE SURE to configure your favorite tractor as the Power Unit to Use with the Parameter DEFAULT POWER UNIT FOR LENGTH CALULATION.
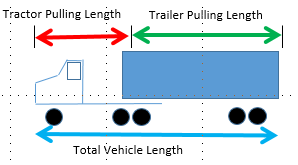
Pulling Length
EDE MAPPING
The concept of a "generic API" for the EDE and ESE is not possible because each vendor approaches the attributes quite differently. In order to provide a robust connection, a mapping table was required. The column for vehicle type is our internal column. One vendor call this a vehicle type and the other call it a mode. The mapping is done internally. This table allows the user to specify the category of the vehicle for the purposes of input to the EDE. When combined with weight, the vendor software will sue different velocities for the vehicles. This is a very important consideration.
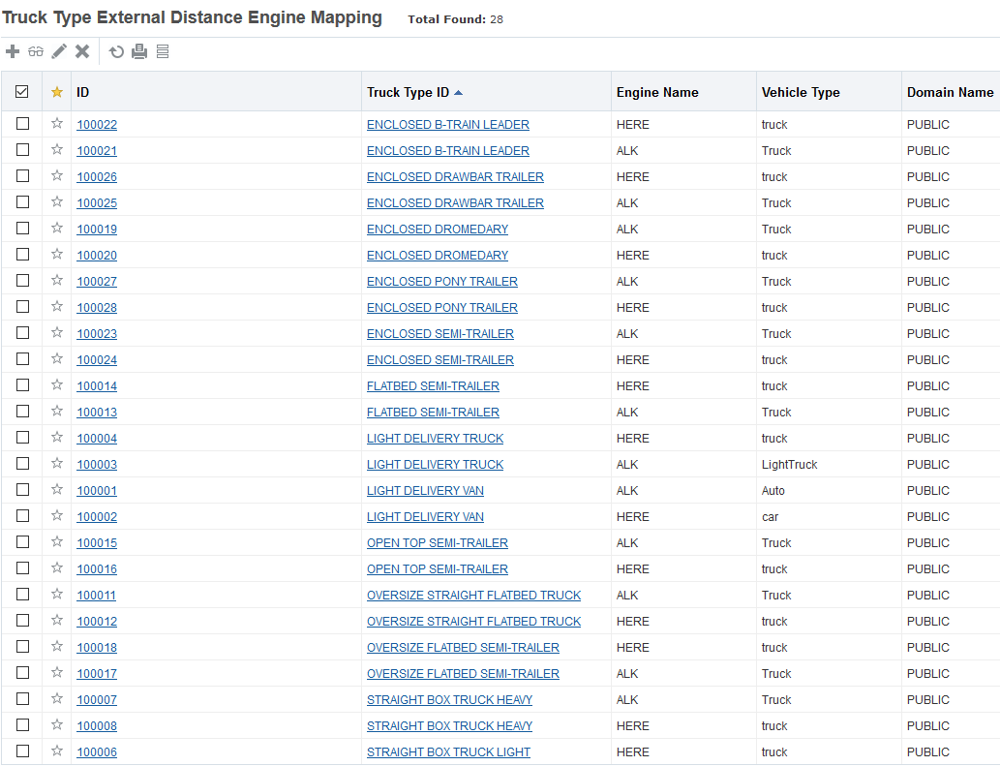
Truck Type EDE Mapping
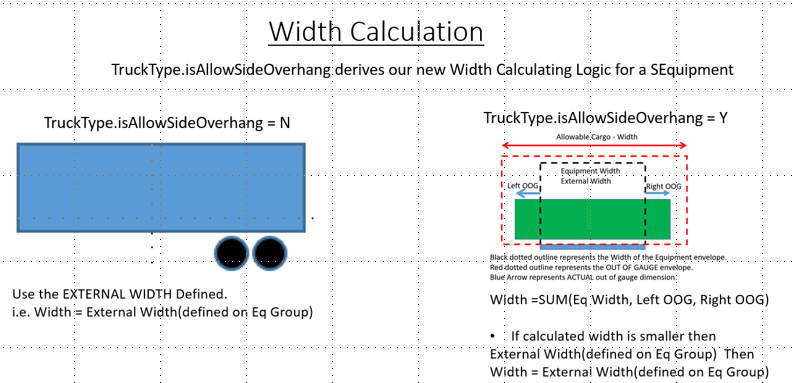
Width Calculation
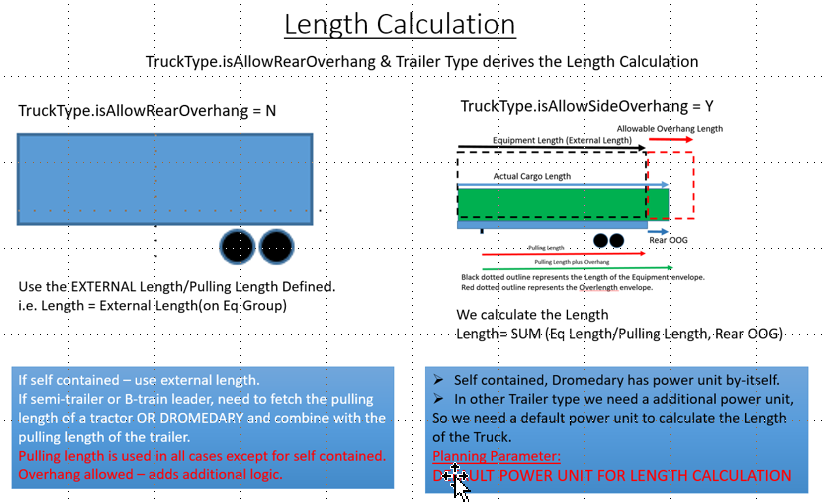
Length Calculation
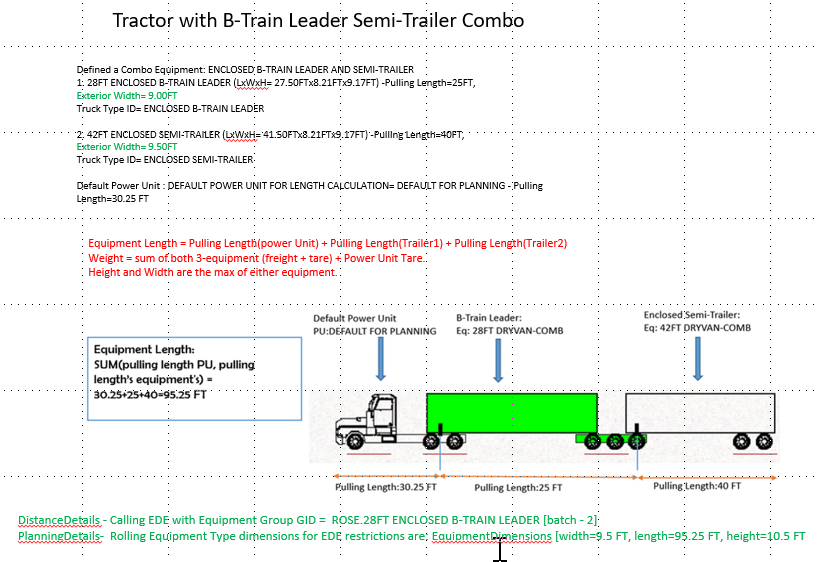
Combo Length Calculation
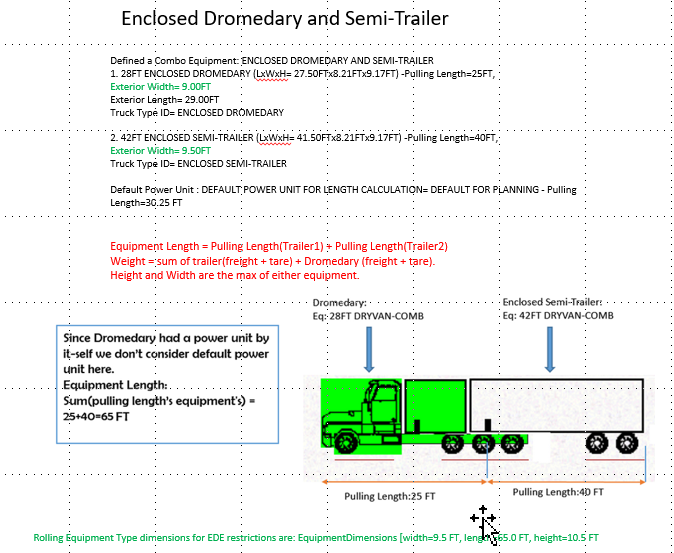
Dromedary Length Calculation
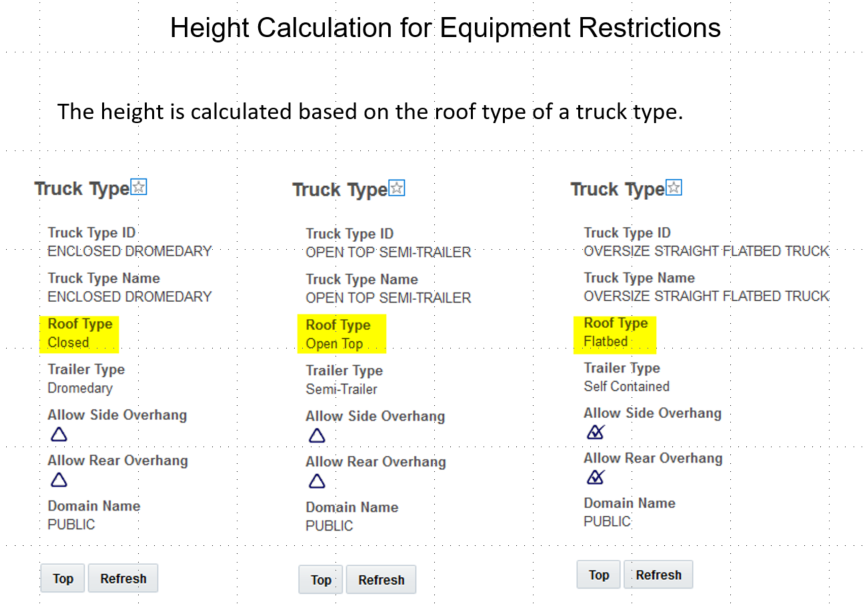
Height Calculation
Running Dimensions are persisted at the stop level as they will likely change between stops. The EDE is called for distance between stops and will use the running dimensions and weights between those stops.

Persist Running Dimensions
Steps to Enable
There are several steps to configure this feature.
The logic is invoked when the Equipment Restrictions is set to Y on the external engine.
There are 2 tables that must be configured first.
- TRUCK TYPE - This is used to define the characteristics of the vehicle.
- TRUCK TYPE EXTERNAL DISTANCE ENGINE MAPPING - This is used to convert the truck type into a value that the engine will recognize.
The equipment group must be configured with the proper data.
- TRUCK TYPE
- PULLING LENGTH
- TARE WEIGHT
- EXTERNAL DIMENSIONS
- FLOOR HEIGHT
You must select your standard tractor or power unit with the parameter.
The power unit must have TARE WEIGHT and PULLING LENGTH
Transportation Operational Planning
This feature provides you with a consolidation algorithm (Clustering Merge) that is designed to quickly generate shipments with a high number of stops. The Clustering Merge algorithm uses the Sweep method to slice a radial area of destinations around a common source to generate multi-stop shipments.
The Clustering Merge algorithm is appropriate for the following kinds of scenarios:
- Single-pickup with a high number of delivery stops
- Consolidation is constrained by the capacity of a single equipment group
OVERVIEW OF THE CLUSTERING MERGE ALGORITHM
- Create Clusters (using Sweep Algorithm)
- Determine the initial sweep angle from the single pickup location
- Sweep un-clustered direct shipments clockwise until the equipment capacity is exhausted
- Create a cluster with the swept direct shipments.
- Continue until all direct shipments are in clusters.
- Create consolidated shipments:
- Create a single shipment (single-pick/multi-drop) from the direct shipments in the cluster
- Sequence the stops
- Determine feasibility
- If not feasible, use the fallback consolidation algorithm to consolidate the direct shipments in the cluster.
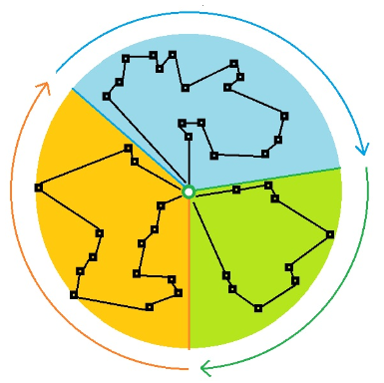
Clustering - Shipments in Each Cluster
Steps to Enable
- Set your MULTISTOP CONSOLIDATION ALGORITHM TYPE to 7.Clustering Merge
- The MULTISTOP CONSOLIDATION ALGORITHM TYPE option is found in the Logic Configuration Type = MULTISTOP in the MULTISTOP CONSOLIDATION Group
- Fallback Consolidation:
- The particular consolidation algorithm used as the fallback is determined by the new property: glog.business.consolidation.multistop.fallbackMergeAlgorithm
- By default, this is set to "0" (Concurrent Savings). The other option is "1" (Sequential Savings).
Tips And Considerations
The Clustering Merge algorithm is intended for solving outbound routing and scheduling problems where the following conditions exists:
- The shipments being planned originate from a single pickup location.
- The product being shipped is similar (cases of soda, cases of beer etc) and the definition of a "full" shipment is based on filling a piece of equipment considering either weight, volume, or ERUs vs being constrained or considered complete based on hitting a driver's available hours of service limit (HOS).
- Stop density is high and the shipments being created are considered local/regional shipments where the pickup and delivery activities can all be completed in a day.
In this version:
- The initial sweep angle is due south (i.e., "six o'clock").
- The equipment capacity is determine from the smallest available equipment group.
- Equipment capacity is checked for weight, volume, and ERU. Load Config logic is not used in the algorithm to determine equipment capacity..
Fallback Consolidation:
- It is possible that the consolidation logic will be unable to create a single shipment for the cluster (i.e., "clustering failure"). If that happens, then a "fallback" consolidation algorithm is used to create shipments for the cluster. (Most likely, this fallback algorithm will create multiple shipments for the cluster.)
- The particular consolidation algorithm used as the fallback is determined by the new property:
- glog.business.consolidation.multistop.fallbackMergeAlgorithm
- By default, this is set to "0" (Concurrent Savings). The other option is "1" (Sequential Savings).
NOTE: Users are encouraged to use the Clustering Merge algorithm for scenarios where clustering failure is unlikely.
CLUSTERING MERGE SPECIFIC CONSIDERATIONS/USAGE QUALIFICATIONS
- Clustering Merge only supports scenarios where there is a single source and multiple destinations.
- Clustering Merge does not support cases where the consolidation decisions depend upon a range of different equipment group capacities.
- Clustering Merge does not consider load configuration logic when determine equipment capacity.
- Clustering Merge does not check hours of service during the consolidation step and assume a "full" shipment is based on equipment capacity (weight, volume and ERUs).
- Clustering Merge assumes that any order consolidation will not be made infeasible by any of these constraints:
- time window constraints,
- commodity constraints,
- order constraints (e.g., service provider, equipment group), or other non-capacity constraints.
- Clustering Merge does not considering order priority.
Multi-Stop Consolidation for Co-Located Stops
This feature provides a way to configure OTM's planning logic to understand co-located stops - (unique locations that are located near each other - like in an office building/mall or campus) and plan those stops together so that a single truck/shipment services the identified set/sets of co-located stops.
Multi-stop logic was enhanced to recognize and consolidate the pickup and delivery stops that are close to each other so to avoid having more than 1 shipment service the area. The area is defined by a radius and the intent is that the radius is small. Examples of co-located stops are multiple stops within a large building, the same location with multiple IDs, and locations within a very short distance of each other. This “business rule” is stronger than the economics that would likely perform this function since not all rates are designed to support this policy. The process is designed to work like a “first pass” with the multi-stop
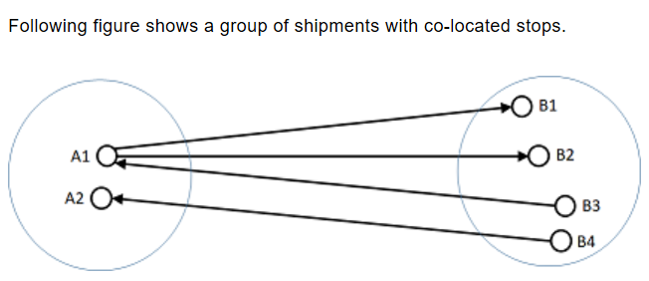
Co-Located Example
Business Rules to Comply With
- Avoid repeat visits with multiple shipments to either the same location or to locations nearby.
- Idea is that one shipment, if possible, should handle all the work.
- Applies to pickups or deliveries from locations that are defined as co-located.
Examples:
- A large building or complex with 1 area for shipping.
- Multiple tenants with the same or similar addresses.
- Same company with different IDs.
- Locations within a defined narrow radius
- Across the street
- Next door
- Rural areas – radius may be increased
- Capture locations in same village.
- Idea is to define the radius as small as possible
- Given Urban or Rural examples.
- Avoid temptation to make the radius too large.
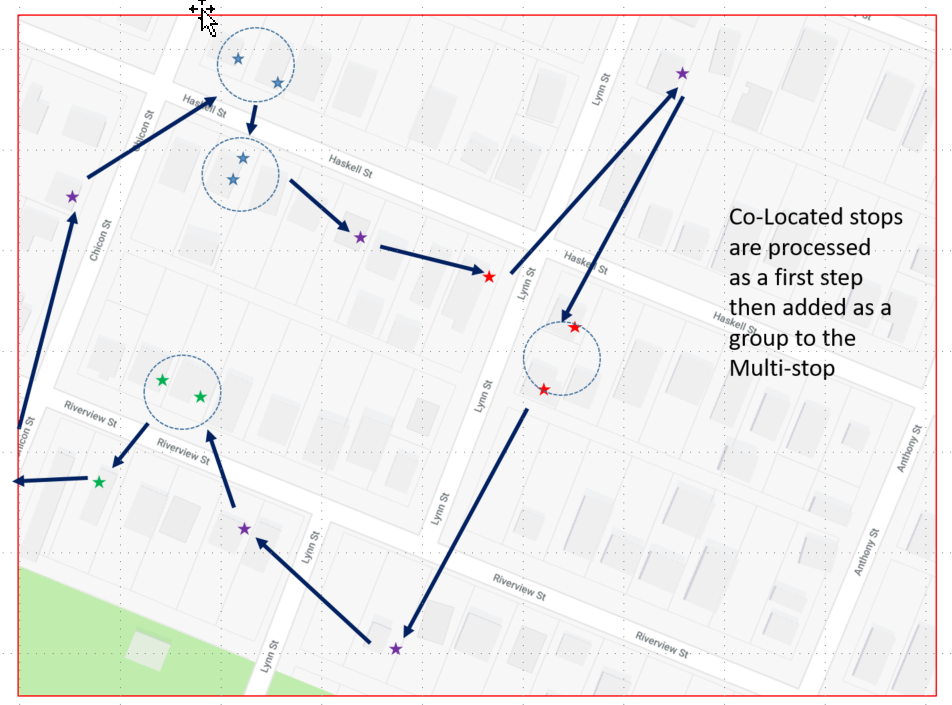
Co-Located City Example
Steps to Enable
To use this feature you will need to provide a value for the MAX DISTANCE BETWEEN CO-LOCATED STOPS parameter which is in the Logic Configuration Type = MULTISTOP under the General group. The default value of this parameter is 0, and the new co-located multistop logic is NOT used in this case.
This parameter specifies the maximum distance within which two locations can be considered co-located.
- Group input shipments with co-located stops and perform group-wise multi-stop consolidation first: In this step we will first create groups of input shipments with co-located stops. To be able to do this, a new multi-stop logic parameter MAX DISTANCE BETWEEN CO-LOCATED STOPS will be introduced.
- If the value of this parameter is set to 1 mile, Shipment 1 (S1 -> D1) and Shipment 2 (S2 -> D2) will be put in the same group if one of following 2 conditions are true.
- Distance between S1 and S2 is less than 1 mile, and distance between D1 and D2 is less than 1 mile
- Distance between S1 and D2 is less than 1 mile, and distance between D1 and S2 is less than 1 mile
- Group co-located stops in sequencing: Again, based on the value of the parameter MAX DISTANCE BETWEEN CO-LOCATED STOPS, we will group stops that are co-located. Then we have following 2 options for generating stop sequences that would have co-located stops in succession.
- Generate new stop-sequences by treating co-located stop groups as one stop
- Generate new stop sequences by moving co-located stops close to each other in current sequences
Tips And Considerations
This is NOT a clustering mechanism. It is intended for very small radius.
One should be using LAT and LON for their distance calculations. One should validate the LAT and LON of the location and be careful NOT to be using the LAT and LON of the postal code or the zip code.
Load Configuration - Scoring Algorithm Load Bearing
This enhancement allows the load bearing capacities of the freight to be considered during the “look ahead” process used with the 3D Scoring Mechanism process. The additional criterion encourages OTM to put the strong (high load bearing weight) in the stacking layers, and place the weak (low load bearing weight) in the topmost layers. The goal is to encourage placements that reduce the number of fragmented spaces.
The following criterion have been introduced for scoring placement combinations in 3D load configuration:
- Put boxes to eliminate fragment spaces : This criterion encourages placement that reduce the number of fragment spaces, give rise to less constraint for further placement.
- Consider load bearing abilities during evaluation: This criterion encourages the algorithm to put strong ship units with high load bearing weight capacity lower in the stacking layers, and put weaker ship units that have lower load bearing weight capacity in the topmost layers.
The new load bearing parameters available include:
- MIN WEIGHT FOR SPACE DEFRAGMENTATION CRITERIA : Integer - Default - 10
- MAX WEIGHT FOR SPACE DEFRAGMENTATION CRITERIA : Integer - Default - 100
- MIN WEIGHT FOR LOAD BEARING CRITERIA : Integer - Default - 10
- MAX WEIGHT FOR LOAD BEARING CRITERIA : Integer - Default - 100
LOAD BEARING EXAMPLE
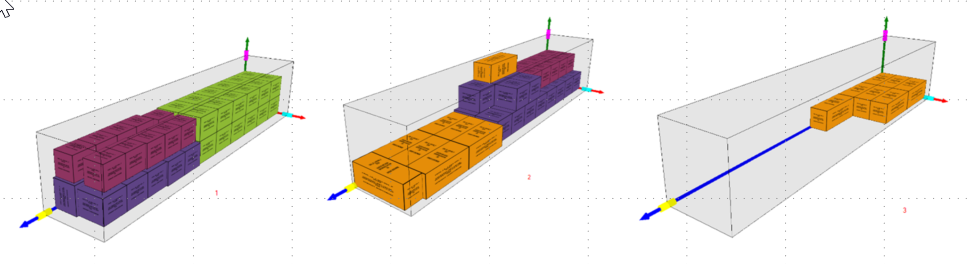
With Scoring Turned Off
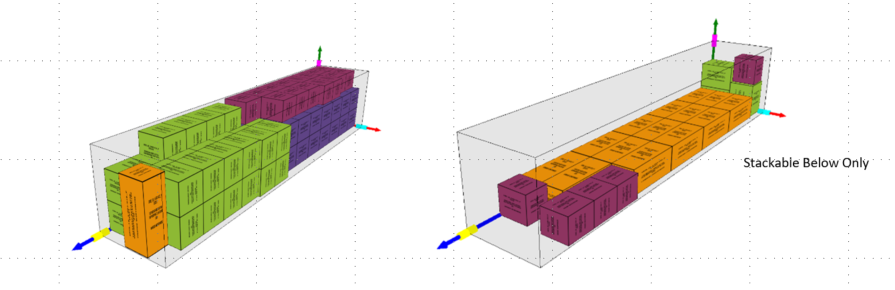
With Scoring Turned On and the New Parameters in Use
Steps to Enable
There are many tuning parameters related to the use of 3D Scoring. To turn on this functionality and use the default settings provided you will need to turn on the 3D Scoring functionality by setting the parameter CONSIDER SCORING LOGIC IN 3D PLACEMENT to TRUE. This parameter is located in the Logic Configuration Type = CONTAINER OPTIMIZATION and is in the CONTAINER OPTIMIZATION 3D SCORING group.
Tips And Considerations
3D Based Load Configuration with 3D Scoring involves taking advantage of some extremely advanced planning features. The setup and tuning of this feature should be only done by a user with significant OTM planning logic experience.
Consider Service Provider Capacity Across Days
This feature provides you with the ability to configure a policy that will allow OTM to consider using capacity limit capacities that are available on different days. With this feature, you have configuration capabilities that will allow you to encourage or discourage the use of capacity on different days – for both cost based decisions as well as priority based decisions.
Shippers who would like to take advantage of lower cost carriers with limited capacity and still manage the priority of the shipments (High, Medium, Low) now have a place to configure a policy on how to configure the delay to shipping based on priority and how long of a delay is allowed.
New Parameters
- SPA MAX DAYS TO CONSIDER
- This parameter determines how many extra possible start days OTM will consider for each shipment that is subject to capacity limits.
- SPA TIME CHANGE POLICY
- This parameter allows you to configure your policy for changing a shipment's start date in order to take advantage of (future) capacity.
- For example, given a service provider with the least expensive rate on a lane and a capacity of one truck per day. Assuming that today's capacity has already been used, and there is another shipment that could be assigned to the least cost service provider if the service provider had capacity - does it make sense to change the start date of today's shipment to tomorrow - assuming that the change is feasible - to use tomorrow's capacity - or does "delaying" the start time by a day add an unacceptable service time failure risk by eliminating the available slack time in the shipment timing?
- The available SPA TIME CHANGE POLICY options are:
- 3. Encourage Time Change.
- 2. Discourage Time Change For High & Medium Priority Shipments'
- 1. Discourage Time Change For High Priority Shipments'
- 0. Discourage Time Change
- This parameter allows you to configure your policy for changing a shipment's start date in order to take advantage of (future) capacity.
Steps to Enable
Assuming that you are already planning with capacity limits - to extend capacity limits to consider using capacity availability on different days you will want to configure the following parameters which can be found in the Service Provider Assignment group:
- SPA MAX DAYS TO CONSIDER
- This parameter determines how many extra possible start days OTM will consider for each shipment, subject to capacity limits. When using this parameter, it is best to set this no larger than needed, as it can have a performance impact. For example, if two extra days is sufficient to find the right resources, then there is no reason to set it higher than 2.
- The default is "0" (zero). See the Service Provider Assignment and Resource Management topic, Service Provider Assignment Time Window Functionality section, for more details.
- SPA TIME CHANGE POLICY
- This parameter provides priority level control about whether OTM should discourage delaying the shipment start date in order to take advantage of a cheap but capacity-limited service provider. For example, there is a cheap carrier that has only one truck per day. Should I delay my shipment departure to tomorrow to get the cheap truck, or should I let it ship today on an expensive truck? The options are:
- '0. Discourage Time Change',
- '1. Discourage Time Change For High Priority Shipments',
- '2. Discourage Time Change For High & Medium Priority Shipments',
- '3. Encourage Time Change'.
- This parameter provides priority level control about whether OTM should discourage delaying the shipment start date in order to take advantage of a cheap but capacity-limited service provider. For example, there is a cheap carrier that has only one truck per day. Should I delay my shipment departure to tomorrow to get the cheap truck, or should I let it ship today on an expensive truck? The options are:
Tips And Considerations
SPA MAX DAYS TO CONSIDER - When using this parameter, it is best to set this no larger than needed, as it can have a performance impact. For example, if two extra days is sufficient to find the right resources, then there is no reason to set it higher than 2.
Honor Location Inactive Flag for Intermediate Locations in Network Routing
This feature provides you the ability to use the property glog.business.location.inactiveLocationSetting to configure OTM to prevent locations that are inactive (active flag unchecked) from being used as intermediate locations (e.g. cross docks) when Network Routing is enabled, or as arbitrary via points (Port-of-Load or Port-of-Discharge) regardless of the Order Routing Method.
Steps to Enable
Property Settings for glog.business.location.inactiveLocationSetting:
- 0 (default for upgrading clients): inactive locations can be used as throughpoints/via points
- 1 (default for new clients): inactive locations cannot be used as throughpoints in Network Routing nor as via points (Network Routing or Cost-based Routing)
- The default in glog.base.properties is 1 (inactive locations cannot be used as throughpoints in Network Routing etc.
Existing clients will want to set the glog.business.location.inactiveLocationSetting to 1 to take advantage of the new capability.
Tips And Considerations
The Honor Location Inactive Flag only works for the Order Routing Method of Network Routing, the feature is not supported using the Order Routing Method of Cost-Based Routing, nor will it work with legacy Pool-XDock logic.
This feature provides you the ability to configure OTM to support Rule 11 planning with Network Routing. This includes Bulk Planning, Network Rate and Route in RIQ and Show Network Routing Options.
Rule 11 governs what rail shipments can be built (for which rail carriers) on consecutive legs of a multi-leg itinerary. If a rail shipment is arriving at a rail hub using a certain rate record, the subsequent rail shipment coming out of that hub is allowed to use only certain rate records based on the configuration of a combo route code and the beyond flags on the rates. In other words, for consecutive rail shipments, only certain combinations of rate records are allowed to "link up" together. The combo route code signifies that a valid interchange between carriers exists at that junction. The rate records contain a route code and flags "For Beyond" and "From Beyond". This signifies that the rates are qualified to be used in combination with other rates in the overall trip. The logic checks to see that the rate into the hub has the FOR BEYOND flag checked and that the rate from the hub has the FROM BEYOND flag checked. The rules about which rate records are allowed to link up are specified in the ROUTE_CODE_COMBINATION and ROUTE_CODE_COMBINATION_D tables ("combo tables").
RULE 11 EXAMPLE

The Rule 11 Route code logic in the Network Routing Logic provides the checking that is necessary to only permit valid combinations of rates across junctions. Without this checking, behavior would be like that of ordinary routing logic that favors the cheapest combinations. It also assigns the Combination Route Code to each shipment as this route code is required for tender. In Rule-11, only the first shipment is tendered but both are required for settlement.
Shipment Attributes for Rule 11 to be checked to assure that each shipment is a valid shipment.
- Route Codes.
- Local - Each Shipment should have the route code from the Rate Record
- Combo – this should be the same on all rule-11 shipments
- Reference Numbers
- BM – Bill of Lading Number - This must be the same on all rule-11 shipments for the same order.
- Next Rule-11 Shipment
- Previous Rule-11 Shipment
- Tender Instruction
- Each shipment will have a tender instruction that matches the leg that was used to build the shipment.
Steps to Enable
You don't need to do anything to enable this feature.
Tips And Considerations
The Rule11 logic is built into the planning logic and only invoked under the conditions where it is needed. This logic has existed in the non-network process but was only recently added to the Network Routing process for both building shipments and for the Network Rate & Route RIQ.
It should be noted that for NR R&R RIQ, the user does NOT need to have the itineraries configured for Network Routing.
It should also be noted that for NR R&R RIQ, the user does NOT have to specify a PPS that contains the NR logic as the option to select NR R&R RIQ will automatically invoke NR logic as does SNRO, which is a shipment building action.
Tracking Event Ahead/Late Calculation Based on ETA
As a shipment progresses, the ETA (Estimated Time of Arrival) may vary. This information is critical management information. This enhancement is developed to be used within the context of a Tracking Event Agent that listens for events that are provided by an external system. These events provide an ETA and this is compared to the Planned Arrival Time. Based on the difference and based on user configured criteria, the Tracking Event Indicator can be colored based on the degree of tardiness. Standard workflow logic can also be used to send notifications when appropriate.
This feature provides you with the to set indicators based on the Tracking Event Ahead – Late Calculation Based on ETA
This enhancement contains saved queries and is provided within in context of a sample agent that sets the Tracking Event indicator color depending on how late an arrival is.
- Concept of Ahead/Late is introduced.
All shipments, when planned will have a planned arrival time.
As shipments progress, the vendor will provide the event data at specified points along the route.
- Will provide a record of each event by event code, location, time.
- Will also provide an ETA (Estimated Time of Arrival)
User will want to establish the criteria as to how late an arrival is using the Planned Arrival Time and the ETA from Each Event and visually set the indicator on the Tracking Event (Red, Yellow, Green).
- Will send notifications when certain criteria are met.
Configuration and Setup
- Criteria to find the stop that matches the ETA
- Based on the information provided in the event - mandatory - is always provided - car destination
- Only one shipment within a rule-11 will have a stop that shares the same SPLC code.
- Standard Rule-11 matching uses the Bill of Lading Number
- Only one shipment will contain the car destination.

Ahead or Late for a Set of Rule 11 Multi-Leg Shipments
ETA time is given based on the car destination
Event data always contains the SPLC of the car destination (195249)
Agent Variable: Fetch the planned arrival time at the car destination
Based on 1) Common Ref Number 2) Car Destination SPLC - only 1 stop on 1 shipment will match
Calculate the “Ahead / Late time” and set the indicators.
The enhancement will provide a sample Agent with the agent actions and the related saved queries. The user should use this as a template to add these steps to their agents. This is the logic that is used to configure the agent.
- Assign the Agent variable for $SHIPMENT_PLANNED_ARRIVAL_TIME
- The SQL will fetch that time from the associated shipment.
- Assign the Agent variable $CAR_DEST_ETA
- The SQL will fetch that time from the Tracking Event
- The user will make an IF statement with a saved condition
- The saved condition will be used to determine the ahead/late time condition
- The user will then use an agent action to set the indicator color.
- The user will make IF/ELSE logic to set all 3 colors.
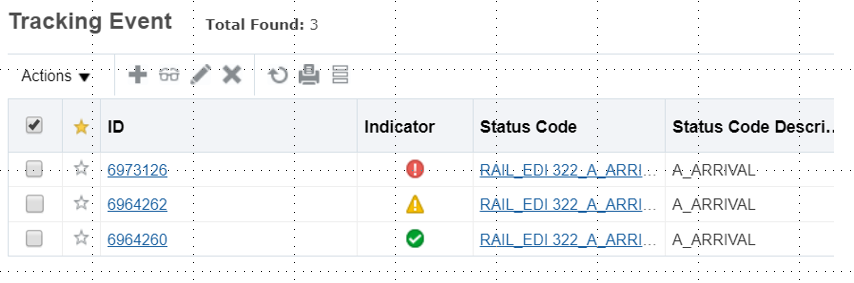
Ahead or Late Results
The reason why this is an agent type of configuration is that the user can set the criteria for any number of categories and not be limited to 3. Then the agent can be configured through IF / ELSE logic to send notifications or to set Shipment Indicators as well as Tracking Event indicators depending on the severity OR the event status value.
Steps to Enable
Agent Logic To Set Indicator Color
- Assign the Agent variable for $SHIPMENT_PLANNED_ARRIVAL_TIME
- The SQL will fetch that time from the associated shipment.
- Assign the Agent variable $CAR_DEST_ETA
- The SQL will fetch that time from the Tracking Event
- The user will make an IF statement with a saved condition
- The saved condition will be used to determine the ahead/late time condition
- The user will then use an agent action to set the indicator color.
- The user will make IF/ELSE logic to set all 3 colors.
- The user will also set the criteria to notify.
This series of actions can be added to other agents if desired.
Tips And Considerations
Caveat is that the vendor will provide the ETA.
Caveat is that we currently have it set up to use the SPLC for rail.
This is clearly designed for the user to "build it themselves" because that allows the user to specify the criteria for the seriousness of the delay and the level of notifications.
Ability to Turn Off Rating Within Network Routing
This feature provides you with a Network Routing logic parameter (ROUTING SOLUTION METHOD) which allows you to configure the level of network routing logic used when solving your network routing problems. The ability to configure the Network Routing logic used for your scenarios provides you with the opportunity to reduce run-time for scenarios where route optimization (determining the path through the network) does not require full network routing optimization. A good example where this parameter can be used effectively is in any bulk plan planning scenarios where network routing logic is required, but where there are no network routing decisions to be made - e.g,, a single leg network that uses Work Assignment logic.
The Network Routing logic parameter ROUTING SOLUTION METHOD can have one of three values:
- Optimize (the default) - Rate the network and go through the Network Routing optimization.
- Simple Solve With Rating - Rate the network, but do not optimize.
- Simple Solve With No Rating - Do not rate the network, and do not optimize. The logic will create a single NRLegOption for each NRLeg, with a container cost = 1 (or the Leg Estimated Cost, if any).
Steps to Enable
By default the ROUTING SOLUTION METHOD is set to Optimize.
To select a different value you will need to
- Go to the Logic Configuration Type = NETWORK ROUTING.
- Locate the parameter ROUTING SOLUTION METHOD - which can be found in the General group.
- Select one of the desired options:
- Optimize (the default)
- Simple Solve With Rating
- Simple Solve With No Rating
Center of Gravity Out of Bounds Reporting
This feature provides you with the ability to generate a notification for "out of bounds" situations related to center of gravity. This evaluation and notification is accomplished using 3-D load configuration and the agent action EVALUATE CENTER OF GRAVITY.
Based on ship unit length, width, height and coordinate information, the EVALUATE CENTER OF GRAVITY agent, when configured, will do the following:
- Read the Center of Gravity values in each axis for the freight from the s_equipment where the 3-D has persisted them.
- Send notifications based on thresholds that the user sets when configuring the EVALUATE CENTER OF GRAVITY agent action
- The action behaves like an IF statement. If the center of gravity is out of the defined threshold, only then are the child actions triggered.
The EVALUATE CENTER OF GRAVITY agent action thresholds are:
- Offset threshold from center to rear of equipment (along z-axis)
- Offset threshold from center to front of equipment (along z-axis)
- Offset threshold from center to right side of equipment (along x-axis)
- Offset threshold from center to left side of equipment (along x-axis)
- Maximum height above ground level allowed (along y-axis)
- Minimum height allowed (along y-axis)
- Weight Utilization Factor (0-1)
The Utilization factor is provided to prevent false alarms when shipments are partially loaded. The packing algorithm always starts in the front so loads will naturally be "un-balanced" so the length threshold will always be violated. The utilization factor allows only "full" shipments to receive the evaluation for notification.
As part of the enhancement, the 3-D logic will populate s_equipment fields below.
S_equipment fields populated by Evaluate Center of Gravity Agent:
- Freight Center of Gravity Length
- Freight Center of Gravity Width
- Freight Center of Gravity Height
Steps to Enable
- Use 3-D Load configuration. The EVALUATE CENTER OF GRAVITY agent action depends on having the length, width, height and origin coordinates (lower left hand corner coordinate) for each ship unit on a shipment to perform the required calculations. To provide this information you must use one of the 3-D load configuration engines.
- Create an agent and configure the agent action EVALUATE CENTER OF GRAVITY. EVALUATE CENTER OF GRAVITY parameters:
- Weight Utilization Factor (0-1)
- Minimum height allowed (along y-axis)
- Maximum height above ground level allowed (along y-axis)
- Offset threshold from center to left side of equipment (along x-axis)
- Offset threshold from center to right side of equipment (along x-axis)
- Offset threshold from center to front of equipment (along z-axis)
- Offset threshold from center to rear of equipment (along z-axis)
Tips And Considerations
CONSIDERATIONS
- This enhancement uses “moment calculations” to determine the Center of Gravity (C of G) of the cargo based on the placement of the freight by 3-D Load Configuration. The standard 3-D populates this information on the shipment-equipment and an agent action is configured to allow the user to set the threshold in each axis of the Center of Gravity so that an alert can be issued to review the shipment.
- Only the freight (cargo) Center of Gravity is evaluated and this calculation is only done using 3-D placement.
- This new capability is also useful for the evaluation of multi-stop shipments where there is no re-use of equipment capacity. The solution supports scenarios with multiple pickups preceding multiple deliveries the center of gravity solution does not support interleaved pickup and delivery multi-stop scenarios. Note that if the center of gravity feature is being used with a multi-stop scenario you can re-sequence stops to balance the shipment. An action must be run to re-pack the shipment and then the EVALUATE CENTER OF GRAVITY agent can be re-run to re-calculate the center of gravity.
CENTER OF GRAVITY CALCULATION LOGIC (How the moments are calculated.)
- Obtain the center of gravity dimensions based on the lower left corner of the object - for perfect cuboids, this is half of each dimension. For each cuboid object, the assumption is that the center of gravity is at the geometric center.
- Obtain the starting point of the cuboid relative to the “packing envelope” of the Equipment Group/Equipment Origin.
- Calculate the “adjusted” center of gravity of the cuboid based on the Equipment Origin.
- For each dimension, calculate the “weighted average” of weight times the distance to the plane of the desired axis.
- Divide by the total weight and that is the point of the C of G relative to that axis.
- Augment the center of gravity for Height with the Floor Height of the Equipment
This feature provides you with the ability to use OTM's planning logic to fill available capacity on a shipment with product from a designated Top-off order. When configured, the process works in two steps:
- Step 1 involves building the best shipment considering the regular (or non-Top-off) orders;
- Step 2 involves using the designated Top-off order to fill any remaining capacity in the shipment coming out of Step 1.
The top-off concept works for any industry where the shipper has the option to top-off or fill a shipment with additional product after all the orders placed by the customer are planned.
For example, a shipper supplying seasonal products to a DIY retailer will often have the option to add additional product to their shipments if the customer's orders do not fill the capacity of the shipment already planned for that customer. Given a DIY retailer order for 42 pallets of black mulch and a shipment with the capacity to hold 44 pallets - the mulch supplier has the option to fill or top-off the shipment with two additional pallets to make a full shipment even though the retailer did not order them.
Steps to Enable
GENERAL TOP-OFF SCENARIO SETUP
- You need to create a Top-off order. A Top-off order is an order release where you have checked the Top-off Order flag on the order release.
- You need to turn the USE CONOPT MERGE IN TOP-OFF PASS parameter to TRUE.
- This parameter can be found in the MULTISTOP Logic Configuration Type and is in the General Parameter Group.
- The multi-stop logic parameter USE CONOPT MERGE IN TOP-OFF PASS provides an option to use the Conopt Merge algorithm for shipment consolidation in the top-off pass. The main objective in the top-off pass is utilize the equipment as much as possible by filling the shipment with Top-off order freight.
TOP-OFF AT THE PORT
This feature also supports a unique use case where the topping off opportunity occurs because the legal capacity of the truck increases in the middle of a shipment. In this scenario, the shipment starts out with a street legal limit of 40 units, but the shipment's destination is in an area (most likely a port) where the street legal capacity increases to 50 units - so once the truck enters this area the available capacity increases by 10 units and thus can be used for a Top-off. In this case OTM needs to understand the increased capacity of the equipment once the shipment is in this area. This is accomplished in a straightforward and intuitive way.
- As above the USE CONOPT MERGE IN TOP-OFF PASS parameter must be set to TRUE.
- For the equipment groups involved you will need to configure your Capacity Override to be the lower legal limit for the equipment group(s) involved and then the capacity of your equipment group(s) should be set to the higher capacity limit associated with the special area where the higher capacity is allowed. Using my example above the Capacity Override for my equipment group would be 10 units, my equipment group capacity would be 50 units.
- To effectively use that additional capacity in the Top-off planning step you will need to set the IGNORE CAPACITY OVERRIDES IN TOP-OFF PASS parameter to TRUE.
- This parameter can be found in the MULTISTOP Logic Configuration Type and is in the General Parameter Group.
- This parameter allows planning to ignore the weight capacity override in the second step which is where the Top Off orders are used to fill the equipment to its stated capacity. The use of the override allows the placement of a lower limit for the core orders. For example, if the container can hold 50,000 lbs on the ocean leg but only 40,000 lbs on the highway, the equipment capacity is configured as 50,000 lbs. The leg, which has an override of 40,000 lbs will limit packing. This new parameter will only tke effect in the second step and ignore the capacity for that step. The override is not always needed when there are orders that are designated to be planned onto one equipment where the core order will not fill the equipment. The top off order will do that in the second pass. This can happen where customers will provide an order that they know will not fill a truck and then will designate an item to fill the remaining space.
Tips And Considerations
OTM works by splitting off entire ship units but is not able to count split individual ship units. In addition, this feature only works for weight, volume and ERU. You cannot use this functionality with 3-D packing in this release.
This feature allows loads to be packed that are wider and longer than the defined base equipment. The old solution was to just extend the equipment but that did not allow for any metrics for how far out of gauge that the load was. This new capability models an oversized compartment placed on top of the truck and allows for the balancing of the load.
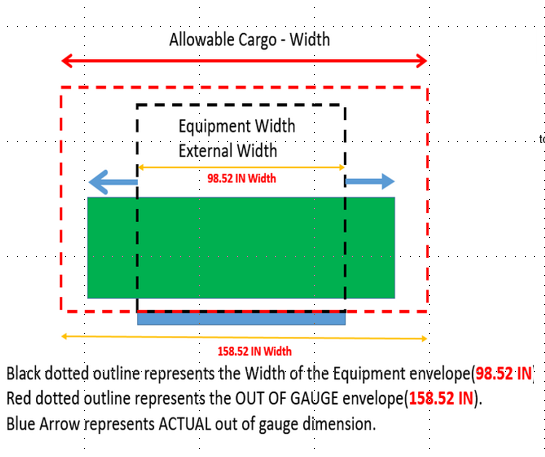
Out of Gauge Diagram
The 3-D packing always starts in the lower left front corner and this point is the origin for all equipment dimensions. Any compartment will also start here too since negative coordinates are not allowed. An adjustment factor was developed to allow the oversized compartment to be shifted to center that compartment with respect to the equipment.
There is another step to be taken. With this feature, it is advised to create a User Defined Pattern since it is likely that the load will be one large item or a few items. The UD Pattern allows the load to be centered in the compartment or to be shifted as desired. The significance of this is that the OOG statistics are based on the item that is packed and not the compartment. This means that the item does not have to consume the entire compartment. So OOG is now based on what is packed and the OOG is based on the base equipment dimensions.
OOG dimensions are kept in memory to be applied to the calculations for the EDE.
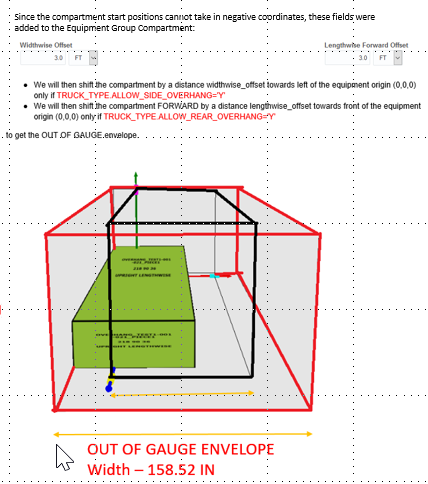
Adjustment for Starting Point
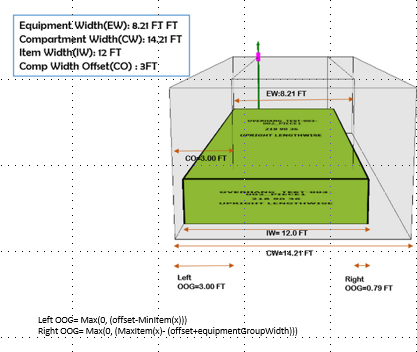
Example
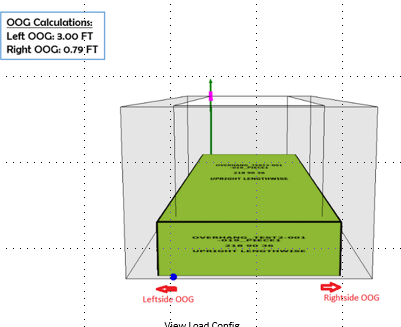
Load Adjusted
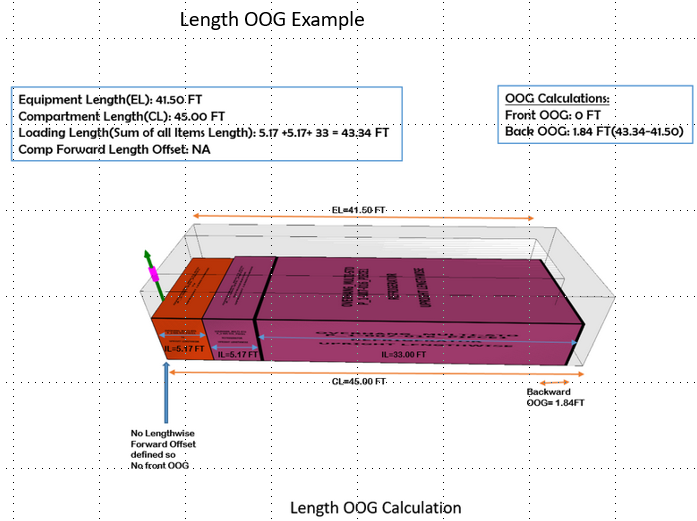
Length Example
Out of Gauge information is persisted to the stop with the other running information.

Out Of Gauge Data on Shipment Stop
Steps to Enable
Only a very accomplished user of 3-D should attempt to use this feature.
One must first define an equipment such as a flatbed trailer. This is because oversized loads will extend beyond the walls.
The OTM packing logic will ALWAYS respect the boundary of the container being packed, therefore it is necessary to provide a compartment above an equipment so that the width of the equipment will be preserved AND that we can calculate an overhang.
The second caveat is that the origin of the equipment (0,0,0) is the common reference point. if you place an oversized compartment on the equipment, their lower left hand corners would coincide. Therefore we have developed OFFSETS to allow the user to display the compartment as it would be visualized on the equipment.
The third caveat is that the load to be packed is ALWAYS started in the lower left hand corner. In UD patterns, we have allowed the load to start in other positions such as being centered.
The end result is that one will be able to define an equipment setup and a load configuration that allows the load to be centered on the equipment as it should be and not to violate any of the existing OTM packing paradigms. This is very important that this enhancement be compatible.
The amount of the overhang is now persisted to the stop with the other running information.
Tips And Considerations
Please review the steps to configure. This use of this capability requires a skilled user for 3-D, Equipment setup, and User Defined Patterns.
We were asked why wouldn't we just allow the item to overhang? The answer is that a change like that would violate the packing boundary logic for 3-D and that change would not be trivial. This approach is much cleaner, although complicated.
Network Routing - Allow Order to Start and End at Through Point
This is an enhancement to Network Routing that allows an order to start or end at a node or hub point. Prior to this, a parallel leg was needed. The benefit of the new code is that the order from the x-dock is now considered as a part of the consolidation on the leg and this influences the cost of that leg. Now the combined weight is part of the economic decision. Before this enhancement, the Order Movements from each leg were only combined in shipment building based on the Leg Consolidation Group. It was like solving two separate NR problems and then creating the OMs, which were combined in the shipment building stage. The benefit is that this enhancement simplifies the setup and provides a better solution because the true capacity utilization of the leg is recognized.
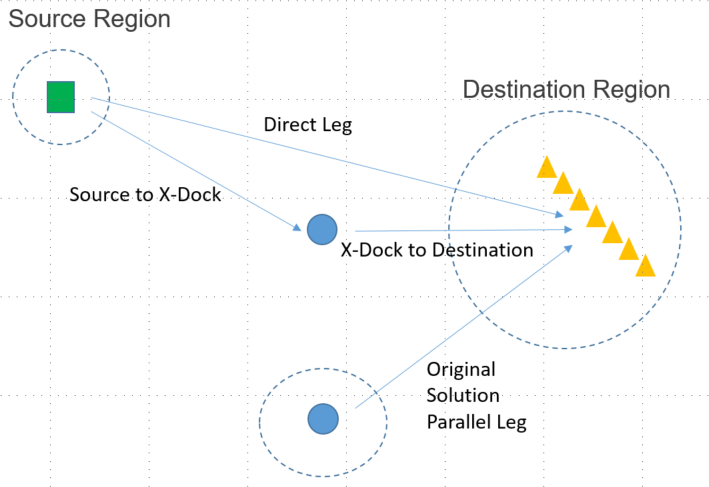
Originate at Throughpoint
This is an example of a Network Detail with four legs. The last one is no longer needed.

Example of Network
Steps to Enable
This feature is invoked through the configuration of the Network. Prior to the enhancement, the user was encouraged to set up separate, independent, parallel legs to start from a hub or to terminate at a hub. These are no longer required.
Tips And Considerations
NOTE: You must constrain the order with an itinerary in order to use this feature.
Network Routing - Cross Leg Consolidation
This feature provides you with improved the network route optimization logic that considers cross-leg consolidated routing options in the routing decision step.
In Network Routing, when multiple network legs have the same leg consolidation group, OTM can consolidate the shipments that have been created on separate legs. Leg consolidation groups allows OTM to consolidate orders across multiple legs to save costs. This feature extends this capability so that OTM considers these cross-leg consolidation opportunities options while making the network routing decision (which involves the generation of the order movements that are then built in to shipments). With this new capability OTM can take full advantage of possible cross-leg consolidation options in shipment building.
SET TO TRUE
- New logic config parameter for Network Routing: USE LEG CONSOLIDATION GROUPS IN ROUTE SELECTION
- Parameter: ALLOW DIFF ORIG LEG GID OMS CONSOLIDATE
- Logic config parameter for Network Routing: PERFORM DYNAMIC CLUSTER LOGIC FOR SOURCE REGIONS / PERFORM DYNAMIC CLUSTER LOGIC FOR DEST REGIONS
EXAMPLE 1
As shown in the following figure, we use in this case, a 4-leg network to plan orders originating in the state of Ohio and going to either New York City or Philadelphia areas. Notice that orders going to Philadelphia area have only one route through the cross-dock location in Philadelphia. New York City area orders however can go direct or through the Philadelphia cross-dock location. Legs 1 and 2 have the same leg consolidation group. This means that shipments on these legs can be consolidated together as a multi-stop shipment if it is cheaper to do so.

Cross Leg Consolidation Example 1
In this network, suppose we will plan two orders; Order 1 (NEO-SD1-0001) from Cleveland to New York City, and Order 2 (NEO-SD2-002) from Cleveland to Philadelphia. On all network legs, consider only one equipment group that has sufficient capacity to carry both the orders together. In this case, the optimal planning solution should have a total cost of $2,100 with the following 2 shipments: (1) Shipment 1: CLEVELAND -> PHILADELPHIA-XDOCK ->NEW YORK CITY, and (2) Shipment 2: PHILADELPHIA-XDOCK -> PHILADELPHIA. This can be achieved if the orders are routed the that way.
However, with the old logic, planning resulted in a total cost of $3,100 with the following three shipments: (1) Shipment 1: CLEVELAND -> PHILADELPHIA-XDOCK , (2) Shipment 2: PHILADELPHIA-XDOCK -> NEW YORK CITY, and (3) Shipment 3: PHILADELPHIA-XDOCK -> PHILADELPHIA. The orders are currently routed in that manner.
- Take current same-leg consolidated shipment options for all the legs under the same leg consolidation group, and combine options only if they are created on different network legs and contain non-overlapping orders. In the given example, PRIOR to the enhancement Dynamic Clustering logic (at source) created the following consolidated shipment options on Legs 1 and 2.
CLEVELAND -> NEW YORK CITY (Order 1)
CLEVELAND -> PHILADELPHIA-XDOCK (Order 1, Order 2)
- With our enhanced changes, we will obtain the following consolidated shipment options in Dynamic Clustering.
CLEVELAND -> NEW YORK CITY (Order 1)
CLEVELAND -> PHILADELPHIA-XDOCK (Order 1, Order 2)
CLEVELAND -> PHILADELPHIA-XDOCK -> NEW YORK CITY (Order 1, Order 2)
EXAMPLE 2
Orders:
3 orders to NYC region
3 Orders to DC region
Suppose one shipment can take only 2 orders.
Planning with old logic: Total cost = $8,000
Shipment 1: to NYC region with 2 orders ($2,000)
Shipment 2: to DC region with 2 DC orders ($2,000)
Shipment 3: to NYC region with 1 NYC order ($2,000)
Shipment 4: to DC region with 1 DC order ($2,000)
Planning with new logic: Total cost = $7,000
Shipment 1: to NYC region with 2 NYC orders ($2,000)
Shipment 2: to DC region with 2 DC orders ($2,000)
Shipment 3: multistop to PHILLY x-dock and WILMINGTON x-dock, and with 1 NYC order and 1 DC order ($2,000)
Shipment 4: from PHILLY x-dock to NYC region with 1 order ($500)
Shipment 5: from WILMINGTON x-dock to DC region with 1 order ($500)
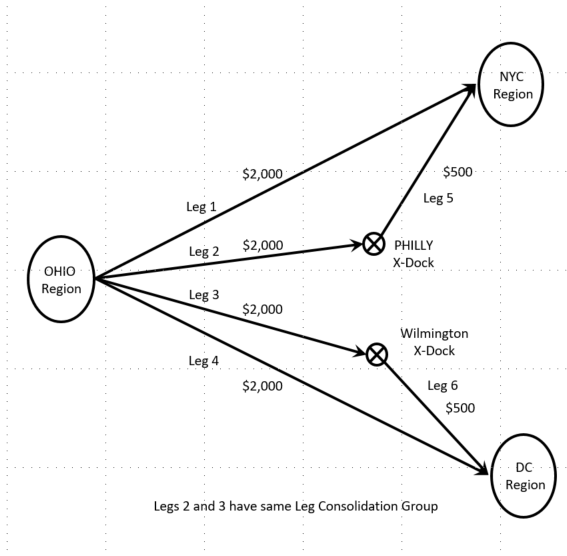
Cross Leg Consolidation Example 2
Steps to Enable
To use this enhancement, the following parameters need to be set to true.
- New logic config parameter for Network Routing: USE LEG CONSOLIDATION GROUPS IN ROUTE SELECTION
- Parameter: ALLOW DIFF ORIG LEG GID OMS CONSOLIDATE
- Logic config parameter for Network Routing: PERFORM DYNAMIC CLUSTER LOGIC FOR SOURCE REGIONS / PERFORM DYNAMIC CLUSTER LOGIC FOR DEST REGIONS
It is assumed that the problem being solved is like one on the description section where there is the classical scenario through a hub or direct AND that the user is utilizing Network Routing.
Tips And Considerations
Since the routing decision is economic, it helps that the rates are compatible with the problem to be solved.
The adjacent legs where the consolidation can happen must be configured with the same Leg Consolidation Group.
Combination Equipment Group Usability - Return Set Scenario
This feature is meant to simplify the manual actions required for the combination equipment group (a shipment with 2 or more pieces of equipment) out, and combination equipment group back, scenario. At its essence, this feature allows for the creation of an empty 'return' shipment where there is otherwise no freight to get the driver back to their domicile. This is accomplished via a new shipment agent action "REVERSE REPOSITION EQUIPMENT".
Specific use case - one of many - single driver does all 4 shipments
- Shipment 1 - Line haul, DC- "A" to Location "B" with combination equipment equipment group out with two loaded trailers Equipment Group 1 (48 foot) Equipment Group 2 (pup) Structurally, the shipment has two S_Equipments.
- Shipment 2 - At Location "B" - drop Trailer 1 Equipment Group 1 (48 foot) and then have another shipment - shipment 2 from Location B delivering to all the locations in Equipment Group 2 (pup) the return back to Location B
- Shipment - 3 Then from Location B - Swap Equipment Group 2 with Equipment Group 1 (48 foot) make deliveries return to Location B.
- Shipment 4 - [This is the shipment created from this feature,] At Location B - hook up empty Equipment Group 2 (pup) with empty equipment group 1 (48 foot) and return to DCA with combo equipment group of empty equipment. Structurally, the shipment has two S_Equipments.
There are many variants on this scenario - the underlying goal is to simplify the creation of shipment 4, the return shipment with the combo equipment with two equipment groups. In the above scenario, shipments 1,2 and 3 are freight-related and are, accordingly, natively created by OTM planning. This enhancement addresses the need for the 4th shipment where there is no freight, but the driver must return home, and with the same, or similar equipment, that they left their domicile with to maintain equipment balancing.
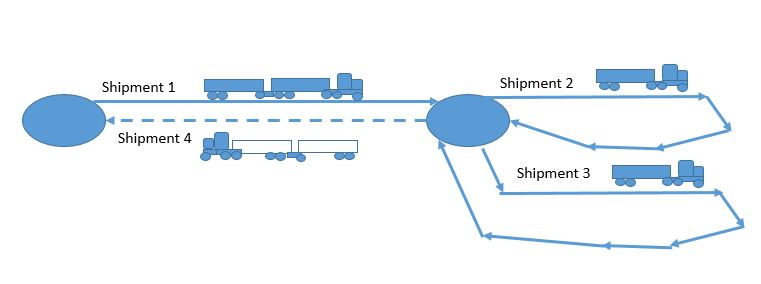
Combination Equipment Group Return Scenario
Other use cases include variations on whether the exact same equipment is used as on the line haul out and the return leg or other, similar equipment with different ID's. It is also possible that the work assignment is built for both, one, or even neither of the 'local delivery' shipments (#2 and #3 from out scenario above). It is primarily the stand-alone work assignment building logic, or manual driver assignment that is intended to 'stich together' shipments 1,2,3 with shipment 4, in our scenario.
While it is the traditional planning engine that is responsible for creating all freighted shipments, it is the agent logic, that happens after bulk plan shipment building, that creates shipment 4 in our scenario above. If work assignment logic is enabled in bulk planning, OTM planning will create shipment 1, 2, and 3, but it will be the agent action that creates shipment 4. It will also be possible, and generally recommended, to initially build the freighted shipments in planning without work assignment logic enabled, then have the agent action create the return shipment, and then, run stand-alone work assignment building which in turn, will output all 4 shipments (or at least shipments 1 and 4) planned into a single work assignment.
It is worth mentioning that the creation of the return shipment is effectively a mirror image of the input shipment from the agent action. In many ways this new agent action is similar to the empty reposition equipment action previously delivered, So, shipment 4 in our scenario, will have the same service provider, Equipment Group/ Combo Equipment Group, and have reversed source and destination from the outbound line haul shipment (shipment 1 in our scenario). Also, the return shipment will be created with a start time immediately after the end time of the outbound line haul shipment. Subsequent shipment insertions, into work assignments and/or driver assignment(s) will allow for the return shipment to be re-driven to slide forward to accommodate these other potentially inserted shipments, such as shipment 2 and or 3 in our scenario.
Steps to Enable
You must configure the shipment agent "Reverse Reposition Equipment"
An agent saved query will be required to decide which shipments the agent is to run against, (shipment #1 in our scenario) and, at least as important, which shipments to exclude shipments 2 and 3 in our scenario.
Tips And Considerations
Deciding the saved query criteria for the agent will be important. To model our scenario, at a minimum, the criteria should include that the source shipment for the agent, should only be run against shipment with combo equipment groups, and contain freight. It may also be helpful to add a certain minimum distance to the agents' saved query as well. Individual implementations of this will likely vary.
It will likely also be helpful to use the rate basis item Shipment Bobtail Distance as a penalty, even as a weighted cost if required, to dissuade work assignment building, or optimize driver assignment, from sending the driver directly back to the domicile without appending the return shipment. In this way, by making bobtail less appealing, the fleet planning assignments will naturally consider appending the return shipment as a more attractive option.
The 'stitching together' of the set of shipments (1,2,3 and 4 -in our example) must be done either manually, or in a batch process. As a batch process this can be accomplished by using either stand-alone work assignment building, also available in this update, or with optimize driver assignments. Note that either of these functionalities will accomplish that stitching. Also, using the driver assignment to assign all 4 shipments together, will of course stich these 4 shipments together. Note that until one of these three actions have been undertaken, there will be no inherent relationship between shipment 4 and the freighted shipments 1-3 from our scenario.
It is also worth noting that while this feature was added with combo equipment groups in mind, there is nothing, other than the saved query definition, that will prevent this action from running against shipments with single/ conventional equipment groups.
Stand Alone Work Assignment Process
This feature will allow for the Work Assignment Process to be run separately from the Bulk Plan. Previously automated work assignment creation was done exclusively within bulk planning. This feature will allow the user to select a set of pre-built shipments, to consider for stringing, using work assignment logic, as a separate stand alone process.
This new functionality will allow users to select shipments from, potentially multiple, previously run, bulk plans to submit for work assignment creation. This will allow clients that wish to use the bulk plan to make the fleet versus common carrier decision, to do so, and to then only select those fleet shipments for submission into work assignment creation. Clients that wish to intercede between shipment creation, and work assignment building, can now do so.
Also, as a result of this feature, there is a new work assignment building planning results screen, that will provide uses the ability to monitor stand-alone and in-the-bulk-plan work assignment plans, terminate stand-alone work assignment plans, and review rich captured metrics about each stand-alone work assignment plan.
Steps to Enable
Prior to this update, work assignments were created in one of two ways:
- Manual action: the 'Create Work Assignment' action allows user to create work assignments by manually selecting the shipments to add to it.
Or,
- In bulk plan: the user could enable the fleet aware bulk plan functionality and run bulk plan. This would then create optimized work assignments -a set of shipments strung together meant for a single resource, from a given location, for a defined amount of time) for the selected order releases.
As a result of this feature, OTM has been enhanced with a third way. A new action 'Optimized work assignments' on the buy shipment manager UI has been added which provides users the ability to create work assignments from already planned shipments.
Within OTM the new process is as follows:
- From the OTM shipment manager, the user will select multiple shipments and run the action: optimize work assignments
- On the action input screen, the user provides Parameter set ID to be used to execute this action, and optionally adds a description.
- This action will utilize the RESOURCE SCHEDULER CONFIG ID configured in the selected parameter set to create resource schedule instances (RSIs) -if they are not already created, and to continue with work assignment building.
- Using these RSIs work assignments will be created based on the constraints specified on the RSI's, for the given shipments.
- On the resulting page, OTM will create an work assignment planning results page.
- Additionally, the work assignment planning results page can be viewed independently, similar to bulk plan results, once the plan has been started.
- (Independent Navigation to the work assignment planning results :Fleet Management -> Planning Results -> Work Assignment Planning)
- Additionally, the work assignment planning results page can be viewed independently, similar to bulk plan results, once the plan has been started.
Users can invoke the optimize work assignment functionality from two different places.
- Shipment management -> Buy Shipment -> Actions -> Fleet management -> Manage Work Assignment -> Optimize Work Assignments
- Fleet management -> Process management -> Optimize Work Assignments -this allows them to be scheduled etc
Lastly, it is now possible to terminate a long-running work assignment bulk plan. This can be accomplished from the work assignment bulk plan screen.
A work assignment bulk plan results page is always created. This is true whether the user uses standard bulk plan to created them or if they use this feature. In regular bulk plan of orders, when create work assignment is enabled, OTM will generate work assignments generate at the end of bulk plan. At this time, OTM will create a work assignment bulk plan results page to collect all the work assignments created from that bulk plan and the results page from this standard bulk plan.

The following are the values from the planning result page:
Shipment Details:
- Start time of the planning
- End time of the planning
- Number of shipments selected
- Number of shipments assignable
- Number of shipments assigned
- Number of shipments failed
Distance and Duration:
- Total slack duration
- Total rest duration
- Total transit duration
- Total transit distance
Resources:
- Number of Resource schedule instances Available
- Number of Resource schedule instances Newly Generated
Work Assignments:
- Number of WA created
- Maximum Shipments
- Minimum Shipments
- Average Shipments
Costs before Work Assignment:
- Total weighted cost of assigned shipments before assign
- Total actual cost of assigned shipments before assign
Costs after Work Assignment:
- Total weighted cost of assigned shipments after assign
- Total actual cost of assigned shipments after assign
The following fields are calculated:
- Resource schedule instances Available. This is the number of resource instances created + number of resource instances pulled in from db
- Resource schedule instances Newly Generated = number of resource instances created during planning.
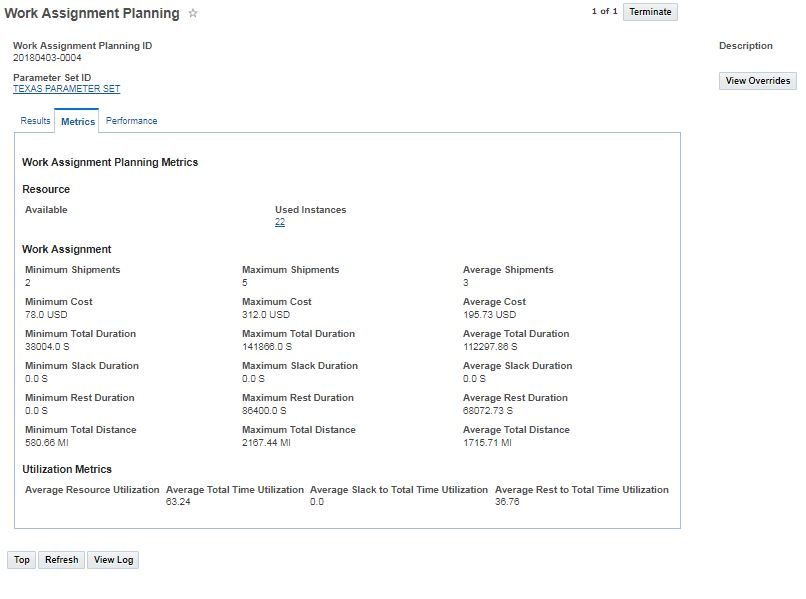
From the Work Assignment Planning Metrics tab:
Resource
- Available
- Used
Work Assignment
- Minimum Shipments
- Maximum Shipments
- Average Shipments
- Minimum Cost
- Maximum Cost
- Average Cost
- Minimum Total Duration
- Maximum Total Duration
- Average Total Duration
- Minimum Slack Duration
- Maximum Slack Duration
- Average Slack Duration
- Minimum Rest Duration
- Maximum Rest Duration
- Average Rest Duration
- Minimum Total Distance
- Maximum Total Distance
- Average Total Distance
- Average Resource Utilization
- Average Total Time Utilization
- Average Slack to Total Time Utilization
- Average Rest to Total Time Utilization
Tips And Considerations
NOTE: The Shipments transport mode should match with RS mode, those shipments that do not match will not be considered in work assignment creation and their count will not be included in the shipments assignable values on the result page.
Shipments that are not considered as part of this action are:
- Sell Shipments
- Shipments with different RS mode
- Consol shipments.
- CM shipments
- Shipment Schedule Type is specified and it's not 'GROUND SERVICE', or Schedule Type is 'DETACHABLE TRIP' and shipment status value is 'RESERVATION_OPEN'.
- Buy shipments that have a driver already assigned.
All these shipments will not be part of work assignment and all the other valid shipments count will be displayed under shipments assignable.
As the user selects buy shipments as input for the work assignment creation, some of these shipments may already be a part of existing work assignments.
- Any shipments that exists on an existing work assignment are eligible for re planning in a new work assignment build.
- If however, the W/A status is is WA_DRIVER_ASSIGNMENT_ASSIGNED, any and all shipments from that work assignment will be excluded from the work assignment build.
- If all shipments from a given existing work assignment are included, the entire work assignment is disbanded prior to new work assignments being built.
- If one, or some, but not all shipments from a given work assignment are included in a new work assignment build, the original work assignment will remain, be re-driven, and the selected shipments from that work assignment will be removed from that work assignment prior to new work assignments being built.
Solution Quality Improvement for Round-Trip Shipment Sequence vs. One-Way Shipment Sequences
This feature provides the user with a new sequencing configuration option that performs a more thorough analysis of a common carrier (one-way) shipment sequence vs a fleet (round-trip) sequences inside of the multi-stop logic for planning environments where a fleet vs common carrier decision needs to be performed during bulk planning. Within the Multi-Stop Sequencing, OTM will new evaluate multiple, multi-stop sequence options; those appropriate for Fleet (pedal shaped) rates (with depots etc.) and those more appropriate for common carrier rates (no depots). As service provider assignment happens, the more appropriate sequence is chosen.
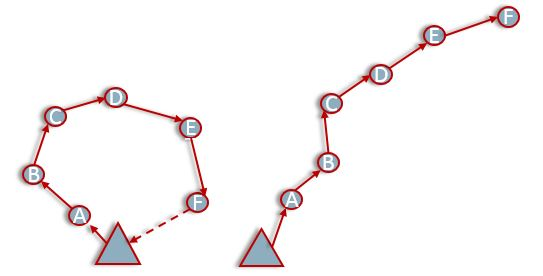
This enhancement addresses the proper sequencing of stops during multi-stop shipment creation. The goal of this enhancement is to allow the best “round-trip” fleet rate to be considered for a stop sequence that minimizes distance inclusive of depot stops, as well as the best “straight line” common carrier rate to be considered for a stop sequence that minimizes distance exclusive of depot stops. These two potential stop sequence solutions can then be compared to allow the selection of the best overall rate offering/stop sequence combo. In this way round-trip aware shipments, or those with depots, can be properly contrasted with common carrier-type shipment stop sequences, where returning back to a depot is not a consideration.
The previous algorithm combined shipments by generating the best stop sequences of the combined shipments and choosing the best sequence that is found to be feasible via various checks, rating, and driving processes. The new approach will be more rate centric. For a set of shipments being combined, it will generate a list of applicable rates. These will be gathered and evaluated. Each applicable rate will go through a combining process that is similar to the current process (determine best sequences and find best sequence that is feasible for various checks, rating and driving). The best solution from across all rate solutions will then be chosen. Crucially, the consideration of depot profiles within the combination logic will now be dependent upon the depot applicable status of the rate.
Note that only the depot applicable attribute of the rate geo (actually the rate offering associated with the rate record) is considered within this new multi-stop logic. This allows runtime improvement by sequencing the shipment stops for only one rate that is depot applicable and one rate that is not depot applicable, instead of going through the stop sequencing logic for every possible rate. The assignment of a rate to the resulting shipment stop sequence is not restricted to just the rate that was used to determine the stop sequence. Opening the rating process to all rates allows just two passes through the sequencing logic, one pass using the depot profile and one pass without the depot profile.
A new Multistop Logic Config parameter was introduced (MULTISTOP USE RATE CENTRIC SEQUENCING). When true the multi-stop logic will loop thru each rate that is compatible with the shipments being merged. Stop sequencing will behave differently for a rate that is depot applicable than it will for a rate that is not depot applicable. The new rate centric sequencing applies to 3opt, 2opt, and MIP sequencers.
The existing MULTISTOP MAXIMUM NUMBER OF SEQUENCES parameter will be applied to the sequencing processing for each rate geo, not across all rate collectively.
Special consideration will be given to the MULTISTOP START OR END AT DEPOT REWARD and MULTISTOP USE RETURN MILES IN SEQUENCING LOGIC parameters. When the rate is determined to be depot applicable, then these parameters will be considered, otherwise they will be treated as False.
Steps to Enable
To enable this functionality, within the Multistop Logic configuration:
MULTISTOP USE RATE CENTRIC SEQUENCING must be set to "True"
The existing MULTISTOP MAXIMUM NUMBER OF SEQUENCES parameter will be applied to the sequencing processing for each rate geo, not across all rate collectively.
Special consideration will be given to the MULTISTOP START OR END AT DEPOT REWARD and MULTISTOP USE RETURN MILES IN SEQUENCING LOGIC parameters. When the rate is determined to be depot applicable, then these parameters will be considered, otherwise they will be treated as False.
When using this functionality a depot profile should exist and parameters should indicate that depots should be used. The Rate Offering Depot Applicable flag must be set to True (Checked) in order to distinguish between rates that are depot/ meant for the fleet, and those that are not/ meant for common carriers.
Tips And Considerations
The data should create a multi-stop shipment using depot stops during sequencing, so stops fit a petal route.
Estimate Hours of Service When Tracking Events Are Received
Previously, for a Fleet trip, where a driver is assigned, when OTM receives tracking event, it expects that the TE also contains the HOS state - hours remaining or hours consumed. If this information is not provided, OTM makes an obtuse assumption and treats the driver as having fresh HOS, for all related shipments. So OTM would have thought the Driver will have all his hours despite the fact that we had known shipment information we could interpret to make more informed HOS computations. Because, OTM often already contains information, current and previous shipment assignments, as well as potentially recently captured HOS information, this can be leveraged to interpret more information about the drivers' current HOS state. This then allows for more accurate HOS calculations.
As as result of this feature, when OTM receives a CAT/ CAL (current available time/ current available location) -which can be [shipment] stop related or it may not, OTM will go back to the most recent NAT/ NAL (next available time/ next available location) time for that driver, and drive forward from there/ then. Further, OTM will use known shipment data to further inform this HOS calculation.
This new functionality drives forward from the most recent known NAT NAL information or known shipment information. As information, inside the inner workings of OTM, this information comes from the most recent record that has been inserted into the DRIVER_ASSIGNMENT table. Events that insert records into that table are; assignment of a shipment, completion of a shipment with a tracking event indicating it, or a Next Available Time (NAT) Next Available Location (NAL) override entry -either from the UI or via tracking event.
By way of example if a driver had a NAT/ NAL of say Tuesday February 26th at 8:00 am representing the start of his shift, at Philadelphia, PA USA. Let's assume that after a shipment assignment for that day, that driver with fresh hours, picked up a load at stop 1 at 9:00 am and began doing their work. Let's say that at 12:30 pm, 3.5 hours of driving later, the driver arrives at the second stop, in Scranton, PA, USA. At which point, they submit a tracking event to OTM indicating that they arrived at stop 2 at 12:30. Let's assume that this tracking event does not contain any hour remaining/ hours consumed information.
Previously OTM's driving forward HOS calculations from stop 2 for this driver would assume the driver had fresh hours at stop 2, simply because OTM did not receive any hours consumed or hours remaining information on the tracking event. As a result of this feature, OTM will now go back to the most recent, non-current shipment record, in the DRIVER_ASSIGNMENT table (Tuesday February 26th at 8:00 am in this case) and drive forward from there to obtain it's HOS calculation. Note that in this scenario, the most recent, non current shipment HOS record was Tuesday February 26th at 8:00 am yet the driver actually started at 9:00 am with 3.5 hours of driving. OTM HOS calculation, will actually use the shipment start time to estimate the drivers' consumed/ remaining hours. So the drivers hours consumed, in this case, will be 3.5 hours, not 4.5 hours. OTM will now perform HOS re-dives for downstream shipment stops and even future shipment assignments with this more accurate HOS information.
NOTE: There will be no behavioral change in OTM HOS calculation if the users continue to enter tracking events with hour remaining hours information. It will, however, make HOS calculations inherently better and more informed for those users that do not submit CAT CAL tracking events that include hours remaining information.
Steps to Enable
You don't need to do anything to enable this feature.
Tips And Considerations
If users wish to prevent this new behavior from happening, submitting Current Available Time (CAT) Current Available Location (CAL) tracking events with hours remaining or hours consumed information will continue to work as it has.
Combination Equipment Group Usability - Support Multi-Stop Scenarios
This feature provides you with additional planning logic that will consider combo equipment for multi-stop shipments.
There are three use cases using LIFO (last in, first out) multi-stop shipment:
- Single pick, multiple drops: Pick-> Drop -> Drop ->Drop etc.,
- Multiple picks with a single drop: Pick-> Pick-> Pick-> Drop
- Multiple picks and multiple drops: Pick-> Pick-> Pick-> Drop-> Drop ->Drop etc.
It is a combination of the freight-related stops and special services that determine where equipment is either picked up (using the special service PICKLOADED), or dropped off, (using the special service DROPLOADED). There is also a scenario using non-LIFO. These scenarios are explained in further detail in the new feature summary.
Steps to Enable
Note that the behaviors of OTM described in the 3 outlined use-cases are all within the context of a bulk plan.
SINGLE PICKUP, MULTIPLE DROP-OFFS
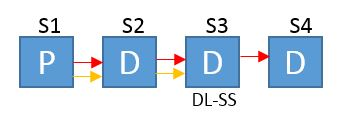
Example: P(1) --> D(2) --> D(3) [drop equipment 1 at this stop] --> D(4)
In this use-case, let's assume we have a set of s ship units for each drop off stop (each P/D pair). Suppose Stop 3 has a DROPLOADED special service, other drop-off stops don't have such special service (in which case, OTM will assume they are LIVE UNLOAD) Now from the last drop-off stop calculating backwards, OTM finds the next stop with DROPLOADED special service, (stop 3 three in this case). Now, all S ship units for stop 4 are sent to conopt along with, all the child equipments groups (as defined on the combination equipment definition) Conopt will then pack the s ship units to one or more child equipment and return back to the solve. For the next stop, moving backwards, stop 3, OTM finds that it has the DROPLOADED special service. Now OTM will send the s ship units that are dropped at these stops (i.e. dropped off at stop 2 and 3) as packing items, and the child equipment groups that were not yet used, to conopt. Conopt will pack the s ship units to these child equipment, and then return. Planning will continue this way until all the s ship units are packed.
MULTIPLE PICK UPS, SINGLE DROP
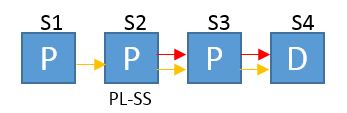
Example: Multiple pickups and single drop-off P(1) --> P(2) [pickup equipment 2 at this stop] --> P(3) ---> D(4)
In this case, OTM would have a set of s ship units for each pickup stop and one delivery stop. Suppose in the case, Stop 2 has a PICKLOADED special service, and the other pickup stops don't have such special service (which again, indicates that they are LIVE LOAD). Now from first pickup stop forward, OTM finds the next stop with PICKLOADED special service, in this case it is stop 2, now OTM sends the s ship units that are picked up at all the stops from first stop to the pick loaded stop(exclusively), in this case Stop 1 as the packing item, all the child equipments groups as the packing resource to conopt. Conopt will pack the s ship units to one or more child equipment and the return the result back to planning. Next, from stop 2 forward, OTM finds the next stop with PICKLOADED special service, or there if any exist for remaining pickup stop(s) -none do in this case.Next, OTM will send the s ship units that are picked up at these stops (i.e. pickup at 3) as packing items, and the child equipment groups that was not used yet as packing resource to conopt. Conopt will pack the s ship units to these child equipment, and then return that result to planning. OTM continues this until all the s ship units are packed.
MULTIPLE PICKUPS, MULTIPLE DROP OFFS
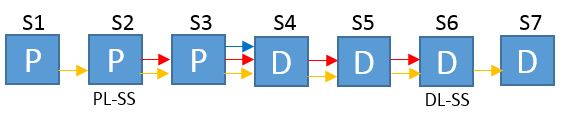
Example: Multiple pickup and multiple drop-off P (1) ---> P(2) (PICKLOADED)---> P(3) ----> D(4) --> D(5) --> D(6) (DROPLOADED) --> D(7)
The packing of combo equipment will happen in the following fashion: From first pickup stop forward to the first stop with PICKLOADED special service (exclusive), if such PICKLOADED stop does not exist it will be the last pickup stop, collect all the s ship units that are picked up are these stops, OTM does the following: ----- from last stop going backward, find the previous drop-off stop with DROPLOADED (exclusive), if such drop-off stop does not exist it will be the first drop-off stop, send the s ship units that are dropped off at all these stops as packing items and all child equipment of the combo as packing resources and send all of these to conopt, one or more child equipment will be packed and be returned to planning. It may be the case that one or more s ship unit cane not be packed stop the process. If there are unpacked s ship units, for the DROPLOADED stop in the above step going backward,find the previous drop-off stop with DROPLOADED (exclusive), if such drop-off stop does not exist it will be the first drop-off stop, send the s ship units that are dropped off at all these stops as packing items and remaining child equipment of the combo as packing resources and send to conopt, one or more child equipment will be packed and conopt will return a result to planning, again, it is possible that some s ship units can not be packed stop the process. OTM will repeat these step until all the s ship unit is packed. going forward to the next pickup with PICKLOADED special service (exclusive), if such PICKLOADED stop does not exist it will be the last pickup stop, collect all the s ship units that are picked up at these stops and repeat the above two steps tp pack the s ship units into remaining child equipment. repeat above 2 steps until all pickup stops are processed, either all s ship units are packed or there is no solution.
For the above example, the packing process happens in the following fashion for a combo equipment with 3 child equipment: SSU1: pickup at stop1, drop off at stop 7 SSU2: pickup at stop 2, drop off at stop 6 SSU3: pickup at stop 2, drop off at stop 5 SSU4: pickup at stop 3, drop off at stop 4 Now, for first stop to first PICKLOADED stop (2, exclusive), we have SSUI, we will pack this SSU: From last stop to its previous DROPLOADED stop(6) exclusive, we have SSU1 drop at stop as the packing item and all child equipment ('CE'): CE1, CE2 and CE3 as packing resource and send them to conopt, suppose OTM packed SSU1 into CE1, going forward, we don't have PICKLOADED stops, so it will be the last pickup stop, we have , SSU2, SSU3, SSU4 that are picked up at these stops, OTM will pack this SSU use the remaining child equipment CE2, CE3: From last stop to its previous DROPLOADED stop(6) exclusive, SSU2, SSU3, SSU4 are not dropped off at stop 7 There are unpacked s ship unit SSU2, SSU3, SSU4, from the DROPLOADED stop (6) above going backward OTM does not see DROPLOADED, so it will find the first drop-off stop, SSU2, SSU3, SSU4 drop at these stops, OTM would then send SSU2, SSU3, SSU4 as packing items and remaining child equipment CE2, CE3 as packing resources to conopt, supposed these SSU2, SSU3, SSU4is packed into CE2, CE3.
Child equipment groups are sent into conopt based on their sequence no, in the case of LIFO multistop, tSShipUnitGroups are sent into conopt based on their pickup stops numbers. TSShipUnits that are picked up early will be packed into the child equipment with lower sequence number. Given LIFO, child equipment picked up early will be dropped off later.
For NON-LIFO cases, we also send the TSShipUnitGroups based on their pickup stop numbers, the earlier they are picked up, they are sent to conopt earlier to be packed into child equipment with lower sequence number. But the child equipment picked up early may be dropped off early as well.
Tips And Considerations
PLANNING PARAMETER
A new planning parameter: CHECK STOP SPECIAL SERVICE IN EQUIPMENT PACKING was added, default to false.
- When this parameter is false, the equipment packing logic will remain as is, i.e., equipment packing will not happen for combo equipment when it is multistep shipments and packing for single equipment remains unchanged.
- When this parameter is true, the logic of packing multistep LIFO shipments Into combo equipment described above will be invoked. If a pickup stop has PICKLOADED special service, it is considered pick loaded. Otherwise if it has LOAD or no LOAD/PICKLOADED, it is considered live load. If a drop-off stop has DROPLOADED special service, it is considered drop loaded, otherwise if it has UNLOAD or no UNLOAD/DROPLOADED special service it is considered live unload. We talked about how the special service and SSUs pickup/dropped at different locations can make a multistop shipment not feasible to be packed into a combo equipment. This can also happen when packing into a regular equipment. For example, P ---> P( -PICKLOADED)------> D, this is invalid shipment for a regular equipment group because the second pickup stop is a PICKLOADED, we need one equipment for stop 1, and another equipment for stop. We need a combo equipment for this shipment.
ONE THING TO NOTE: PICKLOADED special service is ignored if it is on a drop-off stop, DROPLOADED special service is ignored if it is on a pickup stop from combination equipment packing perspective.
Current multistop logic does not form a multistop shipment with 2 or more that have 2 pickup stops with PICKLOADED special service or 2 or more than 2 drop-off stops with DROPLOADED special service when parameter CHECK STOP SPECIAL SERVICE IN EQUIPMENT PACKING is set to false.
Freight Payment, Billing, and Claims
Invoice Adjustment Cost Behavior Enhancement
This feature provides you with a new property that allows you to control how OTM processes invoice adjustments. Using the new property glog.invoice.adjustments.createNewInvoiceForAdjustments you can now support the following scenarios.
With glog.invoice.adjustments.createNewInvoiceForAdjustments=true (default):
- Given an adjustment to an Approved Invoice the adjustment amount will be captured in a new invoice.
- Given an adjustment to an Unapproved Invoice the adjustment amount will be added to the existing invoice as a invoice line.
With glog.invoice.adjustments.createNewInvoiceForAdjustments=false:
- Given an adjustment to an Approved Invoice the adjustment amount will be added to the existing invoice as a new invoice line.
Steps to Enable
You don't need to do anything to enable this feature.
Tips And Considerations
The property default for glog.invoice.adjustments.createNewInvoiceForAdjustments=true (default):
- Given an adjustment to an Approved Invoice the adjustment amount will be captured in a new invoice.
- Given an adjustment to an Unapproved Invoice the adjustment amount will be added to the existing invoice as a invoice line.
INTRODUCTION
Stay ahead of the game with Oracle Logistics Network Modeling Cloud (LNM), a simple and convenient way to perform strategic and tactical analyses of your transportation network using real-world operational data. Whether you are determining the impact of routing via a cross-dock vs direct, quantifying potential savings with adjusting shipping and receiving hours at the distribution center, or trying to understand the impact of an increase in rates to your transportation budget, LNM is an intuitive tool that allows you to perform detailed what-if scenarios within the context of your operational environment, offering a richer and more accurate set of results.
OVERVIEW
Supply chains and their associated logistics networks are becoming increasingly complex as we respond to business challenges such as globalization, omnichannel fulfillment, supply chain risk mitigation, and mergers and acquisitions. Many companies deploy point-based solutions that only solve specific operational issues, generating data that can be difficult to effectively consolidate and analyze from an overall network perspective. In this new demand-driven environment, strategic and tactical analysis is essential in creating a robust, resilient, and profitable logistics network.
Supply chain managers constantly deal with change and disruption. Some situations where they would like to determine the impact of a planned change include:
- Adding a customer or supplier to an existing network
- Forecasting the impact of changing volumes to transportation operations
- Determining the best course of action when an unplanned disruption occurs, such as the loss of a key supplier or a port strike
- Changing existing network design or transportation policies to improve operations
Current applications that are available to perform such analysis often prove inadequate as they typically utilize simplified models of the logistics network, and operate on estimated aggregate costs using historical data. The optimization and planning algorithms used in the analysis can also be different from your actual transportation operations, and usually results in policies that cannot be implemented because they do not translate effectively to real-world conditions.
Oracle Logistics Network Modeling Cloud provides a simple, intuitive and convenient way to perform strategic and tactical analyses of your transportation network using real-world operational data – all within the context of your operational environment. LNM allows you to perform detailed what-if scenario analysis using the operational details of your existing transportation network. It uses the same rules, policies, and planning algorithms that you normally employ in your transportation operations. This leads to highly accurate results that show the actual impact of the changes to your operations. Since everything is in the context of your actual operational network, identified changes and responses can be easily deployed as needed.
SCENARIO MANAGEMENT
Logistics Network Modeling Cloud allows you to quickly define the different scenarios you wish to analyze in the context of your current operational environment. Multiple types of analyses can be performed simultaneously as independent projects. Each project can contain multiple different scenarios to capture specific variations of data, rules, and policy changes that you may want to compare. All changes are isolated to the particular scenario and do not impact the actual operational data in any way.LNM makes it easy to analyze the results and compare the different scenarios side-by-side. The Scenario Analysis Workbench is a multi-pane configurable view that provides an easy way to view the resulting shipment plan, drill to the associated details, or view them on the Map.
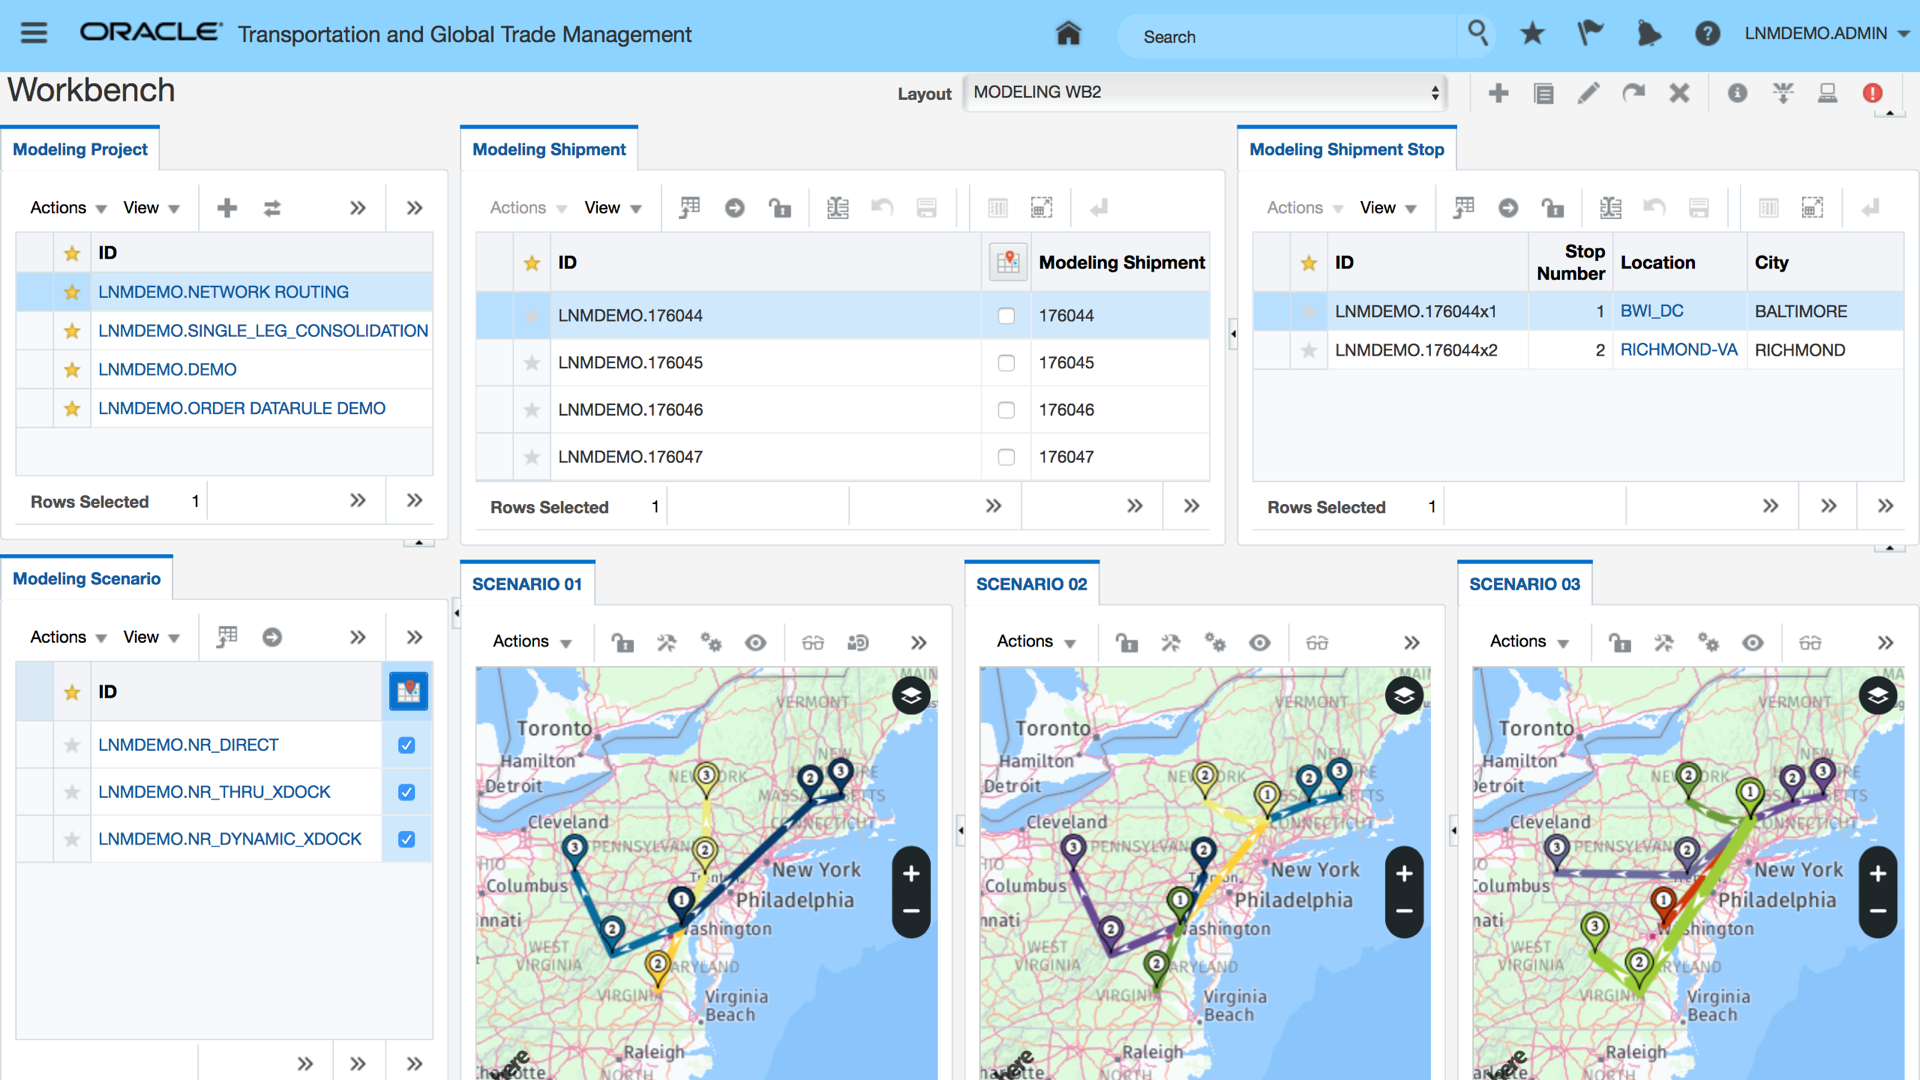
Scenario Analysis Workbench
The Scenario Analytics Dashboard is another useful view that allows you to compare scenarios using multiple common metrics across many dimensions such as cost, utilization, etc. You can define your own custom metrics and visualizations, and compare multiple scenarios using the actual shipment data. By using the same metrics you use to measure your operational performance, you’ll be able to understand the impact of potential changes and determine the best response
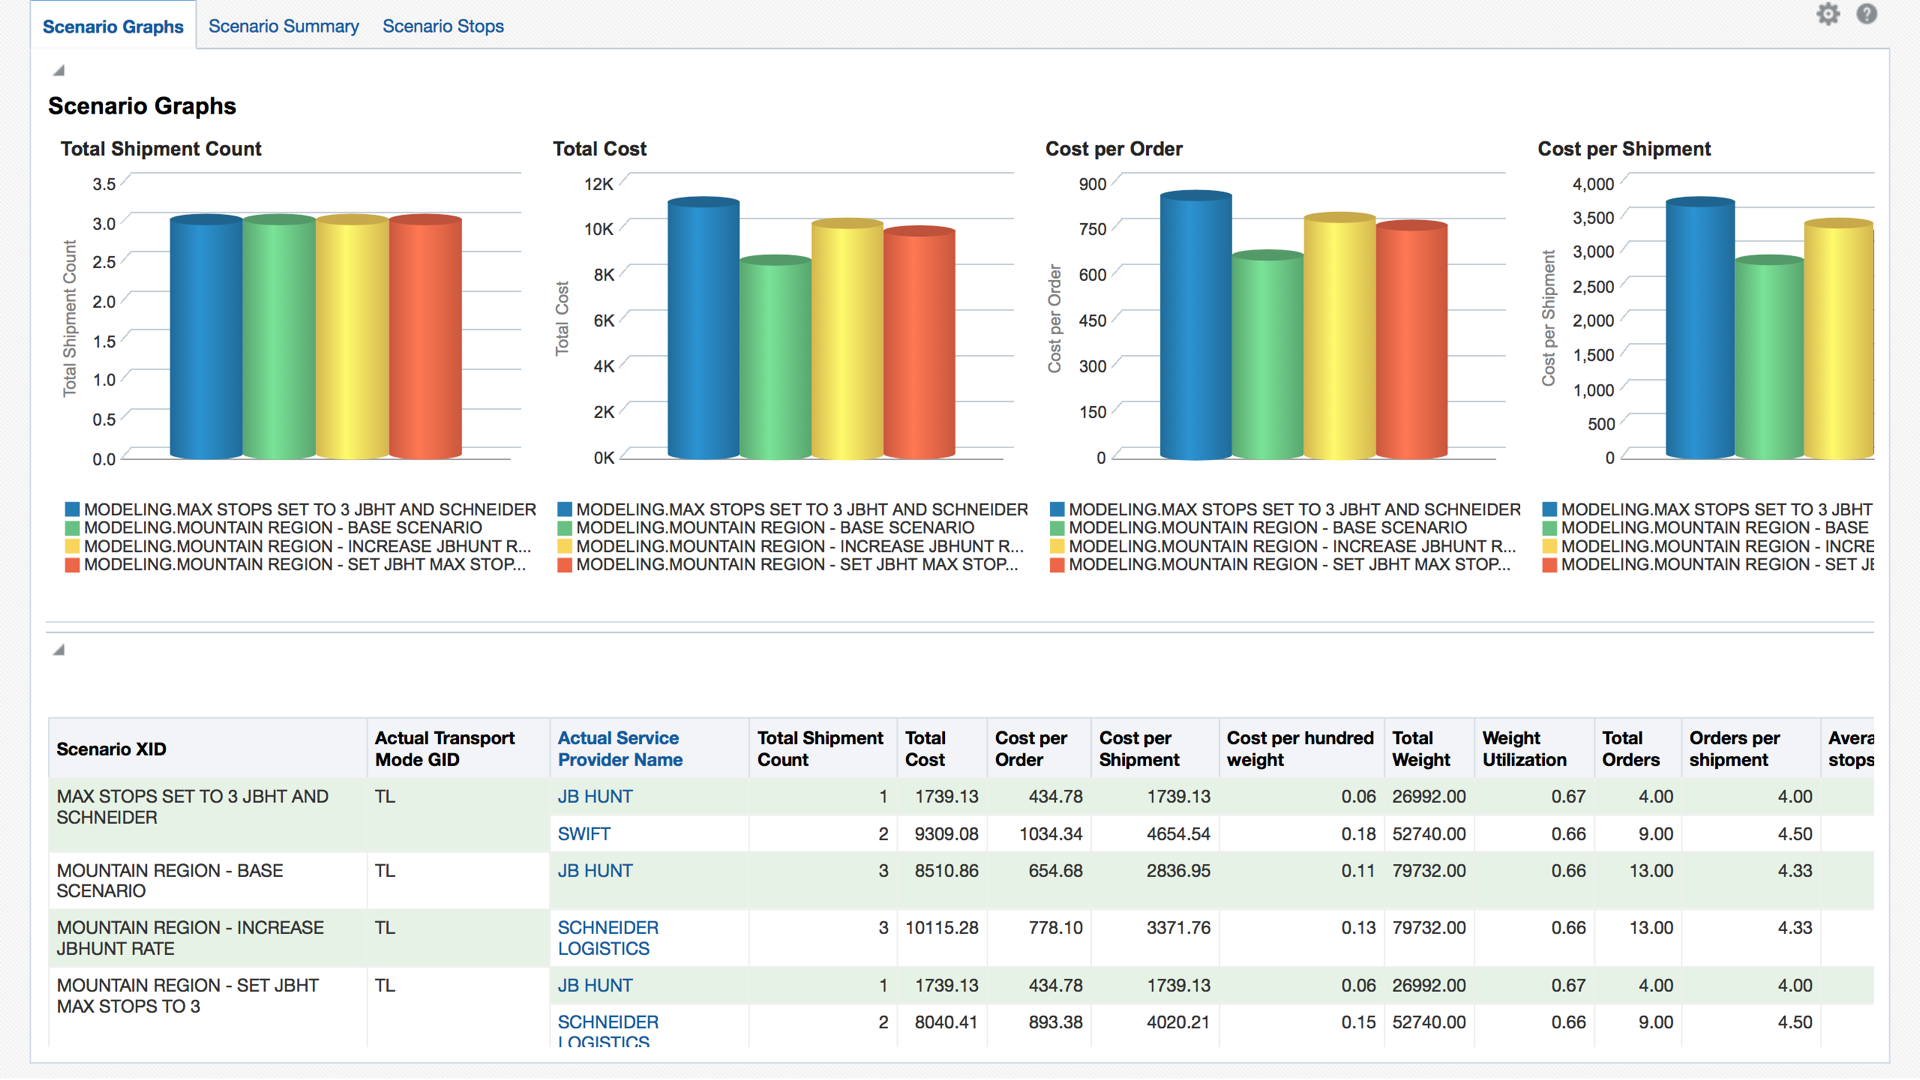
Scenario Analytics Dashboard
When analyzing the scenarios, Oracle Logistics Network Monitoring Cloud performs the same planning steps that you would in your operational plans, and uses your actual operational data to produce results showing you the impact to your operations. There are no approximations or aggregations of any kind, and your actual operational data is used, overlaid with the changes specific to the scenario. Your daily operational planning is performed to determine the impact to your operations.
The key capabilities of Oracle Logistics Network Modeling Cloud include:
- Support for both strategic and tactical scenarios. Users can model and analyze quick-running tactical what-if scenarios right in their operational environments to optimize operations. A separate modeling environment can be employed for longer running strategic analyses ensuring no impact to operations from these performance-intensive analyses, if desired.
- Specify key criteria such as order sets, time duration, etc., to constrain and shape the analysis to better reflect real-world operational conditions.
- Use actual operational data, overlay changes and add additional data, as needed, to analyze scenarios as accurately as possible.
- Replicate operational planning processes exactly, including the ability to run multiple linked daily/weekly plans in sequence or in parallel.
- Use advanced visualizations capabilities in Oracle Transportation Management Cloud to view and analyze the shipment plan details, including stop-level details, for each scenario. Compare scenario results side-by-side.
- Use packaged and custom key performance metrics and associated dashboards that support a variety of slice-and-dice, drill-down and ad-hoc query mechanisms to better understand and compare multiple scenarios side-by-side. LNM’s analytical capabilities are delivered using Oracle’s best-in-class business intelligence technology.
- Store scenario analyses for future reference. This allows for past analyses to be referenced and utilized when similar risks or scenarios arise elsewhere in the network, allowing for continuous learning and improvement of strategies.
STRATEGIC SCENARIO MANAGEMENT
Strategic scenario management allows you to optimize your logistics operations long term. It typically involves modeling changes in key business conditions and then analyzing the impact to the logistics network over a longer period. Resulting policies may require a network configuration change or a response strategy that could have a high impact to the network. But this often leads to significant and high-value changes resulting in considerable savings.
Examples of strategic scenario analysis include:
- Logistics Network Disruptions
- Freight Cost Changes
- Carrier/Service Provider Risk Management
- Supplier/Vendor Risk Management
- Logistics Network Route Evaluation
- Logistics Network Design
- Sustainability Evaluation
- Cost-to-Serve and Profitability Analysis (e.g. adding new customers, new divisions, new lines-of-business, and new geographies to existing logistics networks)
TACTICAL SCENARIO MANAGEMENT
Tactical scenario management involves analyzing different options to determine the optimal approach to fulfill the current operational demand and to improve your current network. Typically, operational systems present the user with a single shipment plan based on a single objective – usually to minimize costs. Oracle Logistics Network Modeling Cloud allows analysis, within the context of the daily business process, of different logistics strategies simultaneously for the same operational data to determine what the best strategy is today. This provides a new way to optimize operations that is simply not available from other systems. Executing the resulting solution typically requires little to no network change while providing significant savings over current operations.
Examples of operational scenario management include:
- Logistics constraint analysis (can constraints be relaxed to achieve a better solution?)
- Algorithm choice/setting analysis (which setting works best for today’s orders?)
- Operational network analysis (are non-traditional routes, modes, carriers applicable today?)
- Transportation policy changes (can you relax time-windows? Can you batch orders differently?)
RAPID TIME TO VALUE
Since LNM is already available in your Oracle Transportation Management Cloud environment, there is no additional setup or integration needed to immediately use its capabilities. It uses the same entities and concepts as OTM and is intuitive and easy to use, requiring no special training.
The ability to perform strategic and tactical scenario analyses using real-world operational data can lead to significant savings. Being able to model the impact of potential changes to your logistics network using actual operational data, and determine the optimal response allows you to ensure that your network is always operating at its best and ensures that you meet your service levels most efficiently.
Since LNM is an intrinsic part of OTM, you can quickly analyze and easily implement changes to your network settings, design and policies. This leads to a resilient supply chain that can easily adapt to the constant change you face. You can easily perform supply chain risk analyses, such as Network Disruption Risk or Supplier Change Risk, and ensure that you are always prepared with the optimal response plan for each possible risk.
Steps to Enable
CONFIGURATION
LNM can be run in a number of different configurations. How and where you choose to run LNM will be mostly determined by the types of modeling you intend to do. Below are just a few options you might consider for running LNM:
- Run LNM on the same Production or Test instances you run OTM – either in a separate LNM domain (with no access to your operational data) or in a separate domain with read access to your existing operational data.
- This is a good option if you plan to use LNM to do quick daily simulations of today's or yesterday's operation.
- Run LNM on a separate test instance – typically this setup will involve performing a Production to Test (PtT) move of your production data to your LNM instance.
- This is a good option if you intend to use LNM for more involved projects that involve large amounts of data and require the running of a large number of bulk plans. For example, running a project that involves a daily bulk plan simulation run covering a year’s worth of order data.
LNM USAGE OVERVIEW
Using LNM involves three basic steps - Setup, Solve, and Analyze.
- Setup
- Define your Modeling Project and the Modeling Project Level Data that will be used for all the related Modeling Scenarios.
- Define the various Modeling Scenarios related to your project.
- For each Modeling Scenario define and configure the data source and any data changes required to model the scenarios.
- Solve
- Run Bulk Plans for all of the Modeling Scenarios in your Project.
- Analyze
- Compare Modeling Scenario Bulk Plan Results.
- Perform Workbench Review of your Modeling Project and the related Modeling Scenarios.
- Analyze your Modeling Project using - Logistics Network Modeling Intelligence
- Move (Modeling Project) Data to Analytics
- Build Ad Hoc Reports and Dashboards
- Analyze Results
STEPS TO ENABLE OVERVIEW AND EXAMPLE
Before you start working with LNM it's important to clarify the intention of your project and the different modeling scenarios you wish to compare. Mapping out your project, the various scenarios and any related data, parameters, data modifications will help streamline the setup required in LNM.
For this example the LNM project is designed to compare the cost of sourcing a representative set of daily order releases from two different distribution center locations - DC1 which is located in Ontario CA USA and DC2 - located in Compton CA USA. The two DC operations are roughly 50 miles away from each other and are both viable locations for this DC. The goal is to model and compare the different transportation cost - in terms of miles, hours and dollars - associated with servicing the representative set of orders from these two source locations.
Setup - Involves setting up the Modeling Project and related Modeling Scenarios.
Modeling Project and Modeling Scenarios - Once you have defined your project objective, the first step is to create your Modeling Project. The Modeling Project describes the overall project and links to the different Modeling Scenarios you want to compare within your Modeling Project. The Modeling Project object allows you to define defaults that can be used for all of the related Modeling Scenarios - this can help to simplify your Modeling Scenario setup.
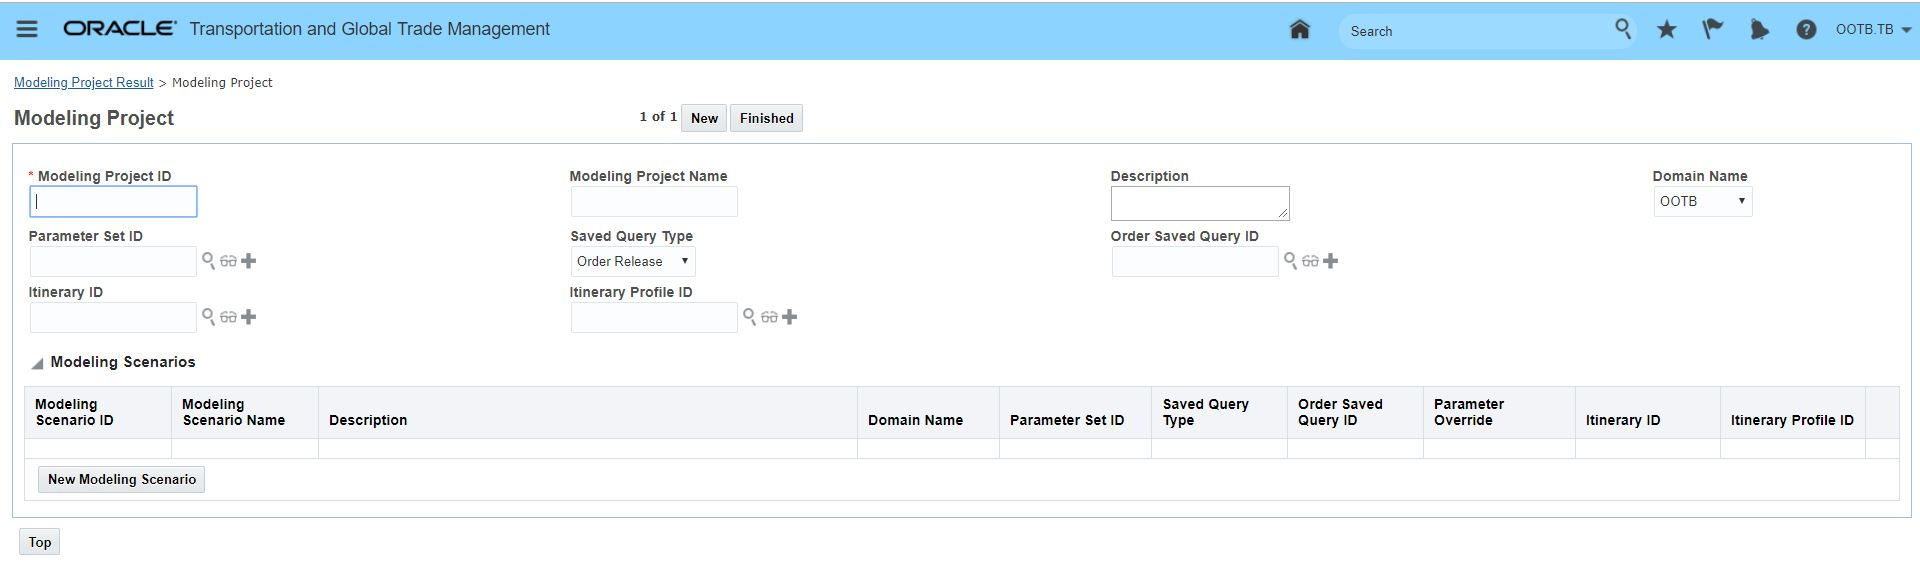
Modeling Project
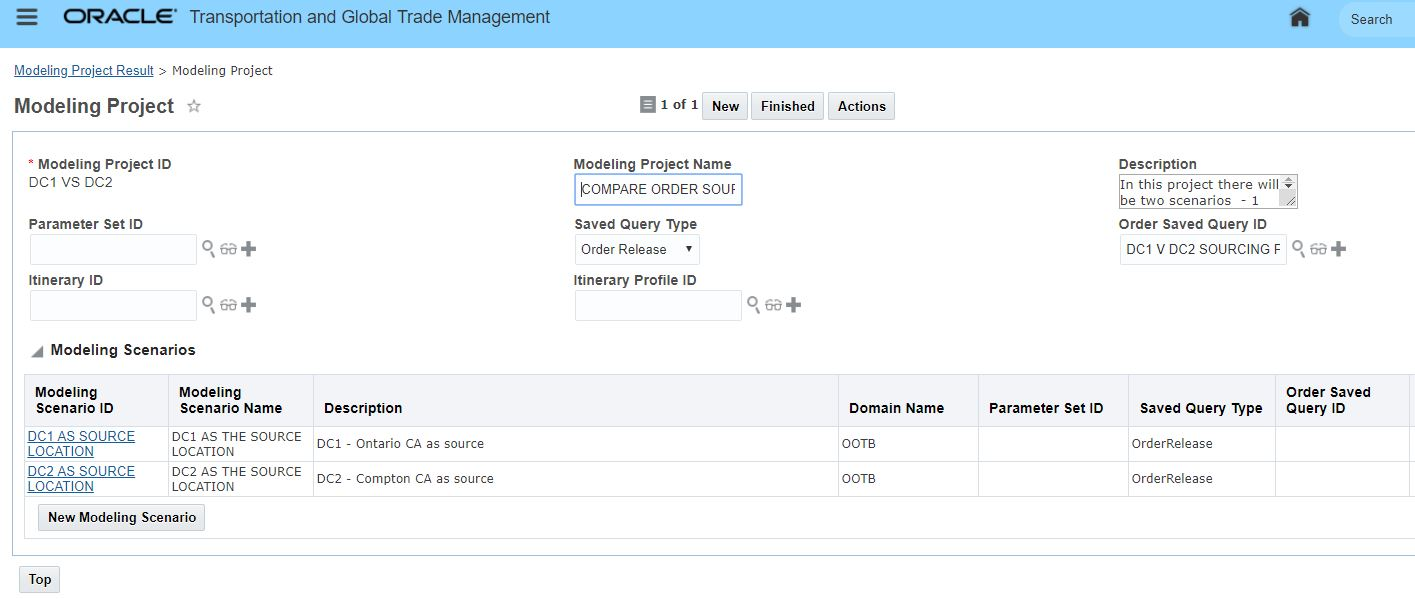
Example Modeling Project - DC1 v DC2
Modeling Project Input
- Modeling Project ID - Add a meaningful Modeling Project ID for your project - there is a strong possibility that you will generate many projects - with slightly different objectives - having a good way to identify and differentiate between your many projects based on the ID will become very beneficial.
- Modeling Project ID = DC1 VS DC2
- Modeling Project Name - Provide a name for your project.
- Modeling Project Name = COMPARE ORDER SOURCING FROM DC1 V DC2 - like the ID - the more descriptive the better.
- Description - Provide a good description that captures the purpose of this project and the scenarios involved.
- Description = In this project there will be two scenarios - one Modeling Scenario using DC1 as the source location and a second scenario using DC2 as the source location. The same set of orders will be used for both scenarios.
- Parameter Set ID - Allows you to set a Parameter Set ID at the project level to be used by all of the related scenarios.
- Parameter Set ID = Null - In this project the default parameter set will be used - so no default required.
- Saved Query Type and "Order Saved Query ID"- allows you to select a different set of order releases (or order movements) to be used in all of your project scenarios.
- For this project all of the Modeling Scenarios will run against the same order release saved query.
- Saved Query Type = Order Release
- Order Saved Query ID = DC1 V DC2 SOURCING PROJECT.
- Itinerary ID and Itinerary Profile ID - allows you to set the default values at the project level for the Itinerary or Itinerary Profile that will be used by all your project's Modeling Scenarios.
- In this project all available itineraries will be considered - so no default used/required.
Modeling Scenario - Create the Modeling Scenarios for your Project. LNM provides you with a number of extremely power data selection, data change and Bulk Plan simulation tools that you can use to configure your Modeling Scenarios. The six major capabilities you have at your disposal to configure your Modeling Scenarios are:
- Saved Query Type/Order Saved Query - this feature allows you to easily select a different set of orders to consider in each of your Modeling Scenarios.
- Parameter set, Itinerary or Itinerary profile - setting different values for anyone of these fields allows you to easily consider different options in each of your Modeling Scenarios.
- For example - by simple changing the Itineraries to consider in each Modeling Scenario you can model different modes options, different equipment group options or different network options.
- Parameter Overrides - this feature allows to set different parameter values for each of your Modeling Scenarios without having to create different Planning Parameter Sets or Logic Configurations to model the different settings.
- For example - you can run multiple Modeling Scenarios using the same base Parameter Set but in one scenario you an override the default value of the HOLD AS LATE AS POSSIBLE parameter to see which value provide the best result.
- Scenario Data Changes - this feature allows you to alter a specific value in your Modeling Scenarios.
- For example - you can run different Modeling Scenarios where you change the number of Stops Included In a Rate.
- Data Rule/Data Rule Instance - Data Rule/Data Rule Instances allow you to do a virtual mass updates to your data. Data Rules allow you to set values, increase values, decrease values or clear values in your data.
- For example - you can use a data rule set the locations on a set or order releases or increase or decrease the weight and volume on a set of orders.
- Bulk Plan Specification - a Bulk Plan Specification provides you with the ability to run multiple bulk plans, all within the context of one Modeling Scenario. With this feature you can simulate the running of Bulk Plans starting at different times of the day, or you can simulate the running of Bulk Plans based on different order grouping options (like group by source or destination location) or based on different saved queries or you can combined a set of these capabilities to define the Bulk Plans to run based on time of day, by saved query and by groups.
- For example - you can setup a Bulk Plan Specification that allows you to run different Bulk Plans in one Modeling Scenario where each Bulk Plan Specification runs a different Bulk Plan based on a different Order Saved Query where the different saved queries simulate the running of a days' worth of orders but split up into 3 separate regional Bulk Plans. This scenario can then be compared to another Modeling Scenario where the same set of orders are setup using a Bulk Plan Specification so there are 2 Bulk Plans vs 3.
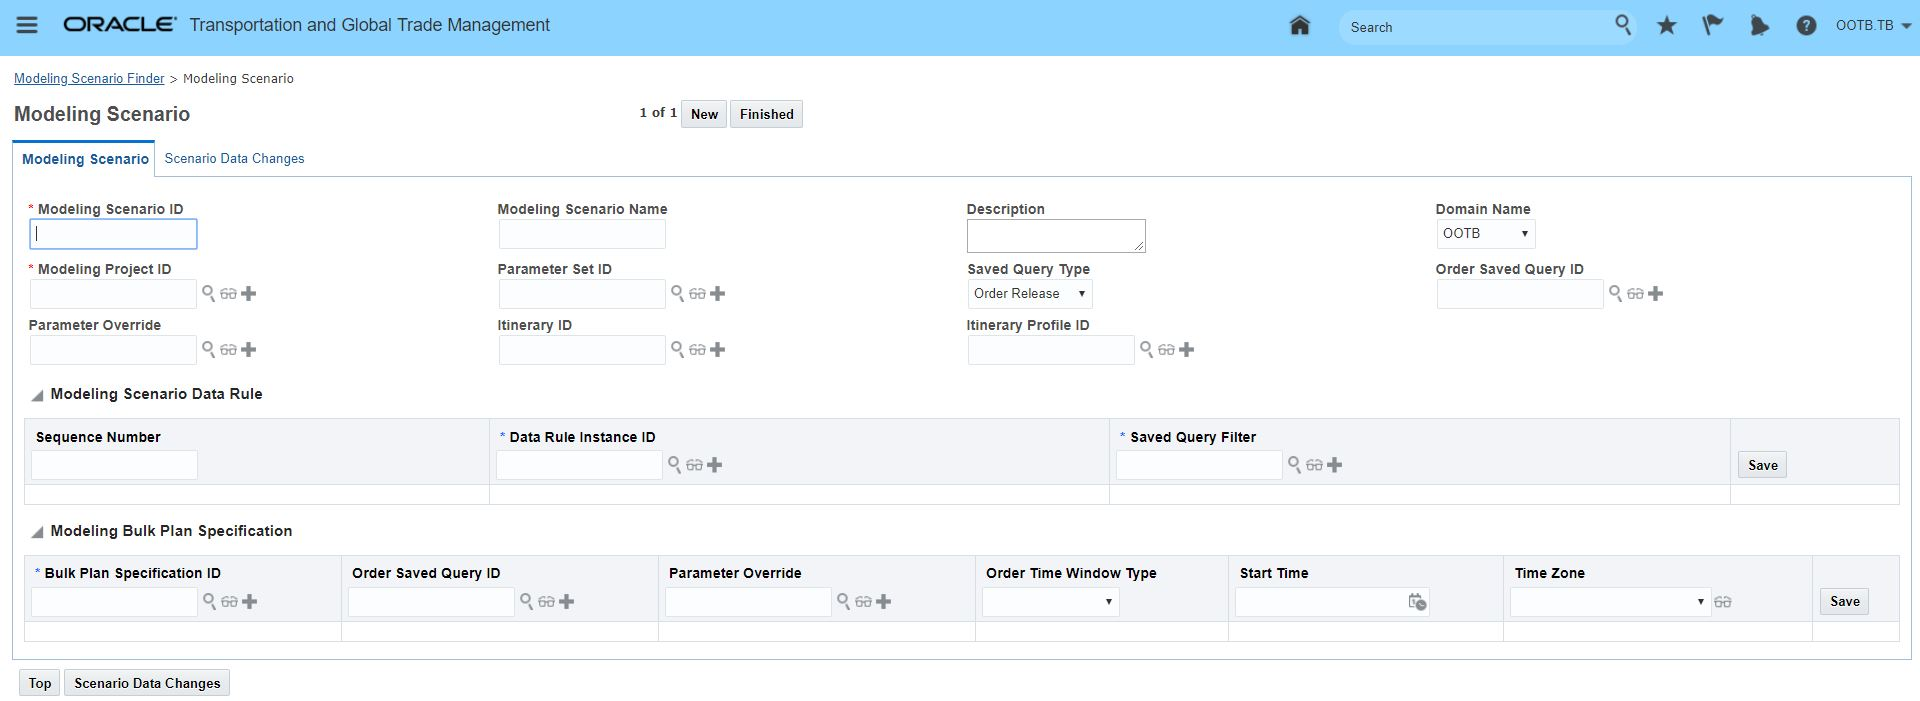
Scenario UI
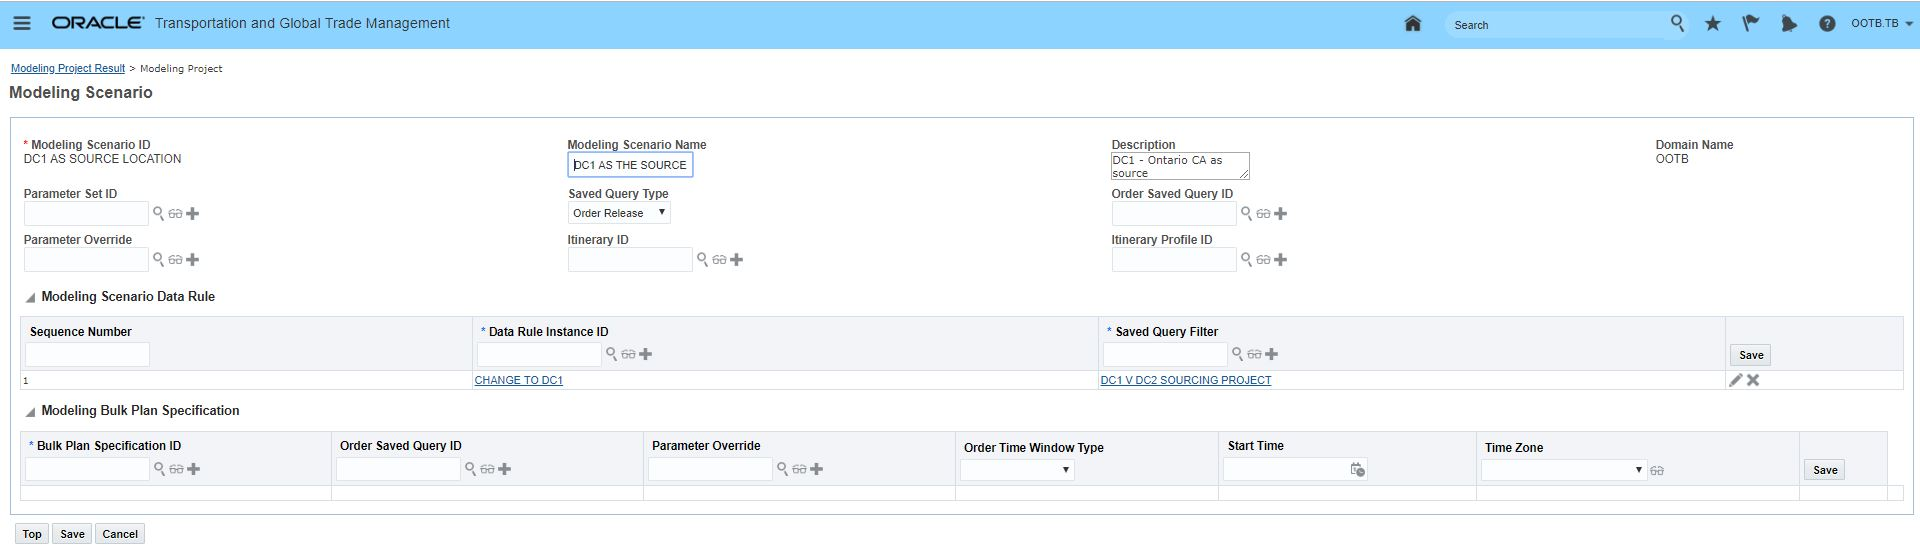
Example Modeling Scenario For DC1
Modeling Scenario Input
- Modeling Scenario ID - provide a meaningful modeling scenario id.
- Modeling Scenario ID = DC1 AS SOURCE LOCATION For this example there are 2 scenarios 1 for each of the source locations.
- Provide a Modeling Scenario Name.
- Modeling Scenario Name =DC1 AS THE SOURCE LOCATION
- Provide a good description that captures the purpose of this project.
- Description = DC1 - Ontario CA as source
- Modeling Project ID - this is the Modeling Project ID that this Modeling Scenario is related to - when you create your modeling scenarios within a project the related Modeling Project ID will be the default value, if you create your Modeling Scenarios in the Modeling Scenario UI you will need to provide the related Modeling Project ID.
- Modeling Project ID = DC1 VS DC2
- Parameter Set ID - allows you to vary the Parameter Set used in the simulation by Project Scenario.
- Parameter Set ID = Null - In this example the default Parameter Set/same Parameter Set will be used for both Scenarios - so no entry is required
- Saved Query Type" and "Order Saved Query ID" - allows you to select a different set of order releases (or order movements) for your scenarios.
- In this Project the orders to be used for both scenarios are the same and was set at the project level.
- The fields for Itinerary ID and Itinerary Profile ID allow you to set the Scenario level options.
- Itinerary ID and Itinerary Profile ID = Null - In this case no limitations are restrictions are being placed on the Project or Scenarios - standard planning logic will be used.
- Parameter Override - allows you to select the parameter (either based on logic configuration or the parameter set) and override the existing value with the values entered here. Parameters entered here will take precedence over the parameters defined on the Parameter Set (on the scenario) during the Scenario Bulk Plan.
- Parameter Override = Null - No overrides are used in this example.
- Modeling Scenario Data Rule and Data Rule Instance - Data Rules are an extremely powerful LNM capability - with a Modeling Data Rule and Data Rule Instance you are able to modify data for your Modeling Scenarios without actually changing any base data. When a scenario is run, the changes defined in the Data Rule/Data Rule Instance are applied in-memory for the data provided by the Saved Query Filter defined for the Data Rule Instance. The Data Rule/Data Rule Instance makes it extremely easy to create many different data configurations against a base set of data without forcing the user to generate data sets that represent the different scenarios that need to be considered. The list of available Data Rule objects includes: Capacity Usage, Itinerary, Itinerary Leg, Location, Order Movement, Order Release, Rate Geo, Rate Offering, Rate Quality, Routing Network, Routing Network Detail, Routing Network Leg.
- For this project there will be one Modeling Scenario Data Rule with two Data Rule Instances. The Modeling Data Rule is configured to allow for the definition of Source Location on the Order Release, the two Data Rule Instances - one per scenario - will be used to set the source location of the Order Releases to the "DC1" for the DC1 AS SOURCE LOCATION Modeling Scenario and the second Data Rule Instance will be used to set the Order Release source location to "DC2 for the second Modeling Scenario.


Data Rule
Modeling Scenario Date Rule and Data Rule Instance - the Modeling Scenario Data Rule allows you to establish the definition of the elements that will be configurable in the Date Rule Instance. The Data Rule Instance defines the changes you wish to make to the base data as part of a specific scenario. The additional level of configurability provided by the Modeling Scenario Data Rule will allow your LNM Super User to define the available Data Rules that your LNM modeling users can then use to configure their Data Rule Instances on their Modeling Scenarios. By predefining the Data Rules, the options and decisions required by the LNM users when setting up their various scenarios can be greatly simplified.
- Sequence Number - defines the sequence in which the data rule instances are applied on the scenario data during the execution of the scenario bulk plan.
- Sequence Number = 1 - only 1 Data Rule Instance
- Data Rule Instance ID - a data rule instance is one component of data rules. You create a Data Rule Instance using a data rule definition as a basis. Data Rule instances are then assigned to a scenario to perform data changes for that scenario.
- Data Rule Instance ID = CHANGE TO DC1 - Data Rule Instance this Modeling Scenario
- Defining a Data Rule Instance
- Enter a unique Data Rule Instance ID.
- CHANGE TO DC1
- Enter a Description of the Data Rule Instance.
- Change source location to DC1
- Enter a Data Rule Definition ID - this links the Instance to a previously Defined Data Rule.
- CHANGE SOURCE LOCATION
- The Table Name will be populated based on the object defined in the data rule definition.
- ORDER_RELEASE
- A Rule Group provides you with an optional way to group rules, which can be used to retrieve records in the finder.
- Null
- Enter the data rule instance parameters:
- Enter the Parameter Name. The Column Name will display.
- DC CHANGE
- SOURCE_LOCATION_GID
- Enter the Operand. The operand tells OTM how to modify the column value. Operands are pre-defined and public. The list of available operand values varies based on the Column Type (String, Date, UOM). For example, for String/Gid, the public operands are CLEAR, SET, PREPEND, APPEND. The CLEAR operand will not be shown for any non-nullable columns in the user interface.
- SET
- Enter a Value. The value fields are populated based on the operand. For a "Clear" operand, a value is not expected so the Value field is hidden when "Clear" operand is selected, for all other operands. A formula is associated with each operand and is defined in the LNM_OPERAND table. For example, an operand INCREASE BY DAYS is available when the column type is a DATE/TIME and the expected value is a number.
- OOTB.DC1
- Enter the Parameter Name. The Column Name will display.
- Enter a unique Data Rule Instance ID.
- Defining a Data Rule Instance
- Data Rule Instance ID = CHANGE TO DC1 - Data Rule Instance this Modeling Scenario
- Saved Query Filter - a Saved Query Filter ID which returns the list of objects on which the data rules defined on the instance will be applied.
- DC1 V DC2 SOURCING PROJECT

DC2 Scenario
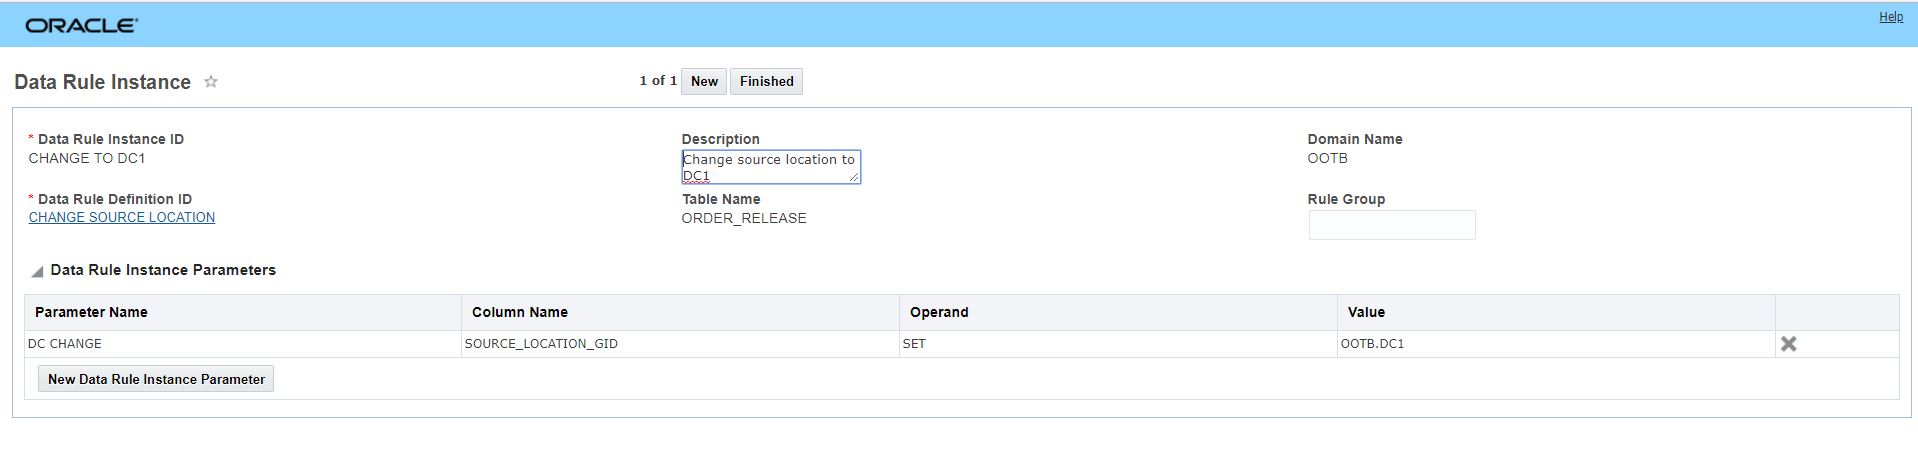
Modeling Scenario Data Rule Instance DC1

Modeling Scenario Data Rule Instance DC2
The setup for the second scenario in this project is exactly the same as the steps above for the first scenario with the only difference being that the source location specified on the Data Rule Instance assigned to the second scenario will be DC2 instead of DC1.
Solve - Once the Modeling Project and Modeling Scenarios have been setup the next step is to run a Scenario Bulk Plan for all the Modeling Scenarios in your project.
Scenario Bulk Plan - Running the Scenario Bulk Plan action from the project will allow you to kickoff Bulk Plan runs for all (or some) of the scenarios in the project.
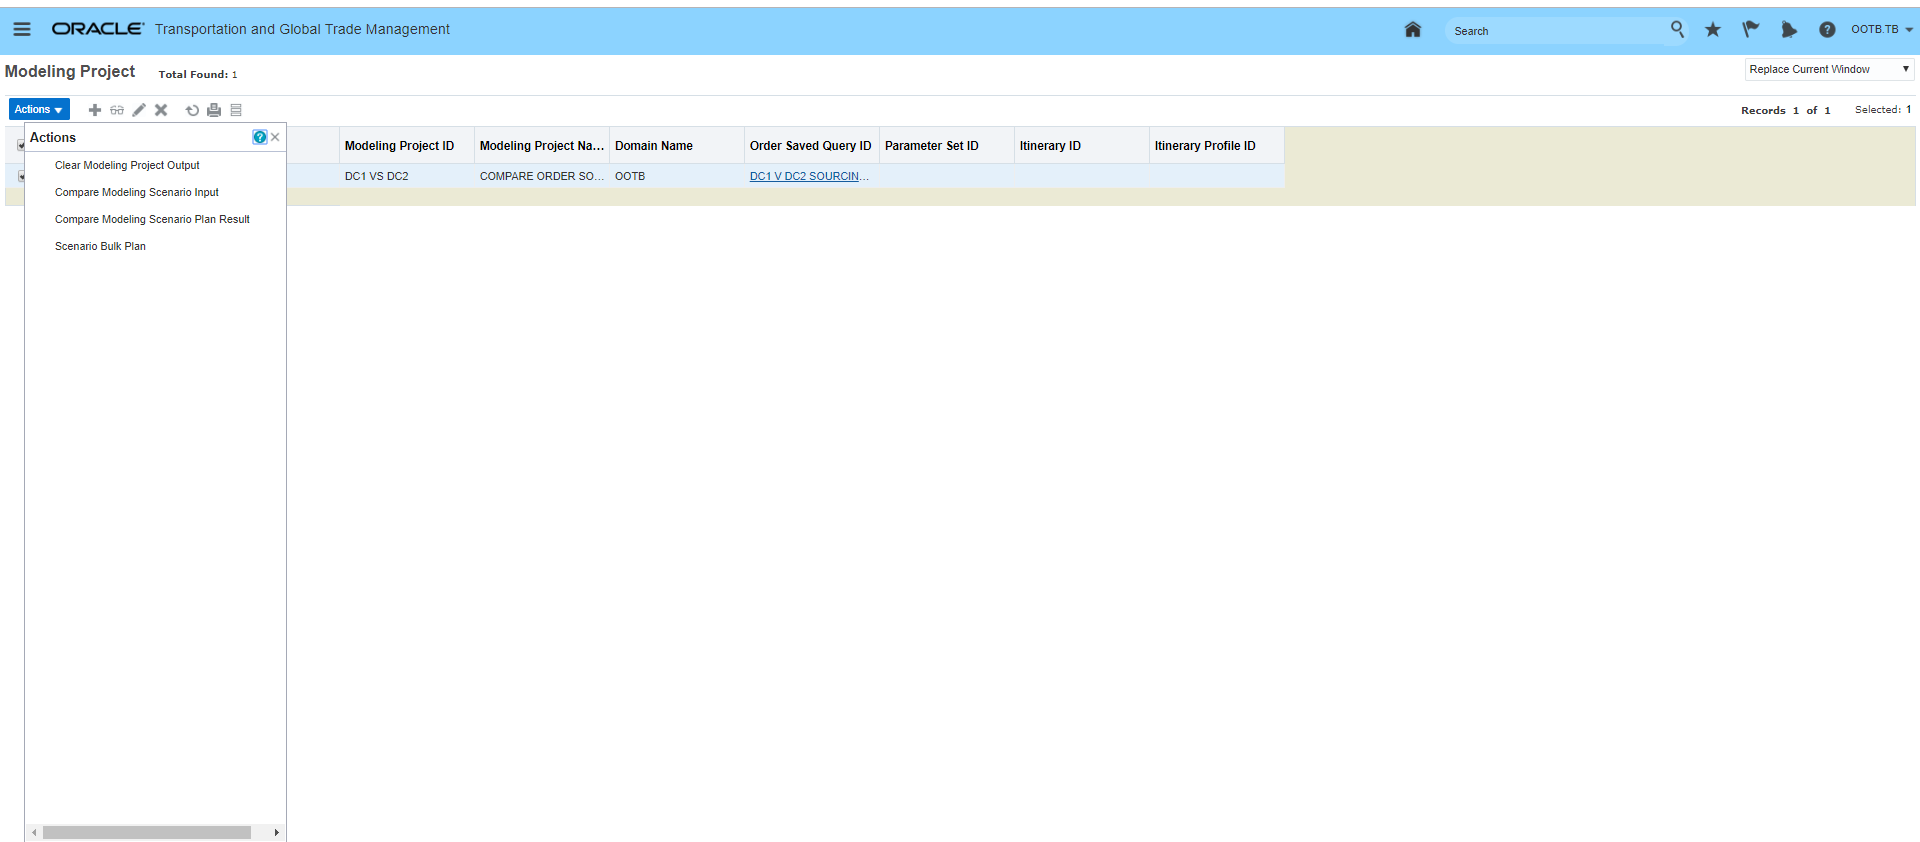
Scenario Bulk Plan

Scenario Bulk Plan
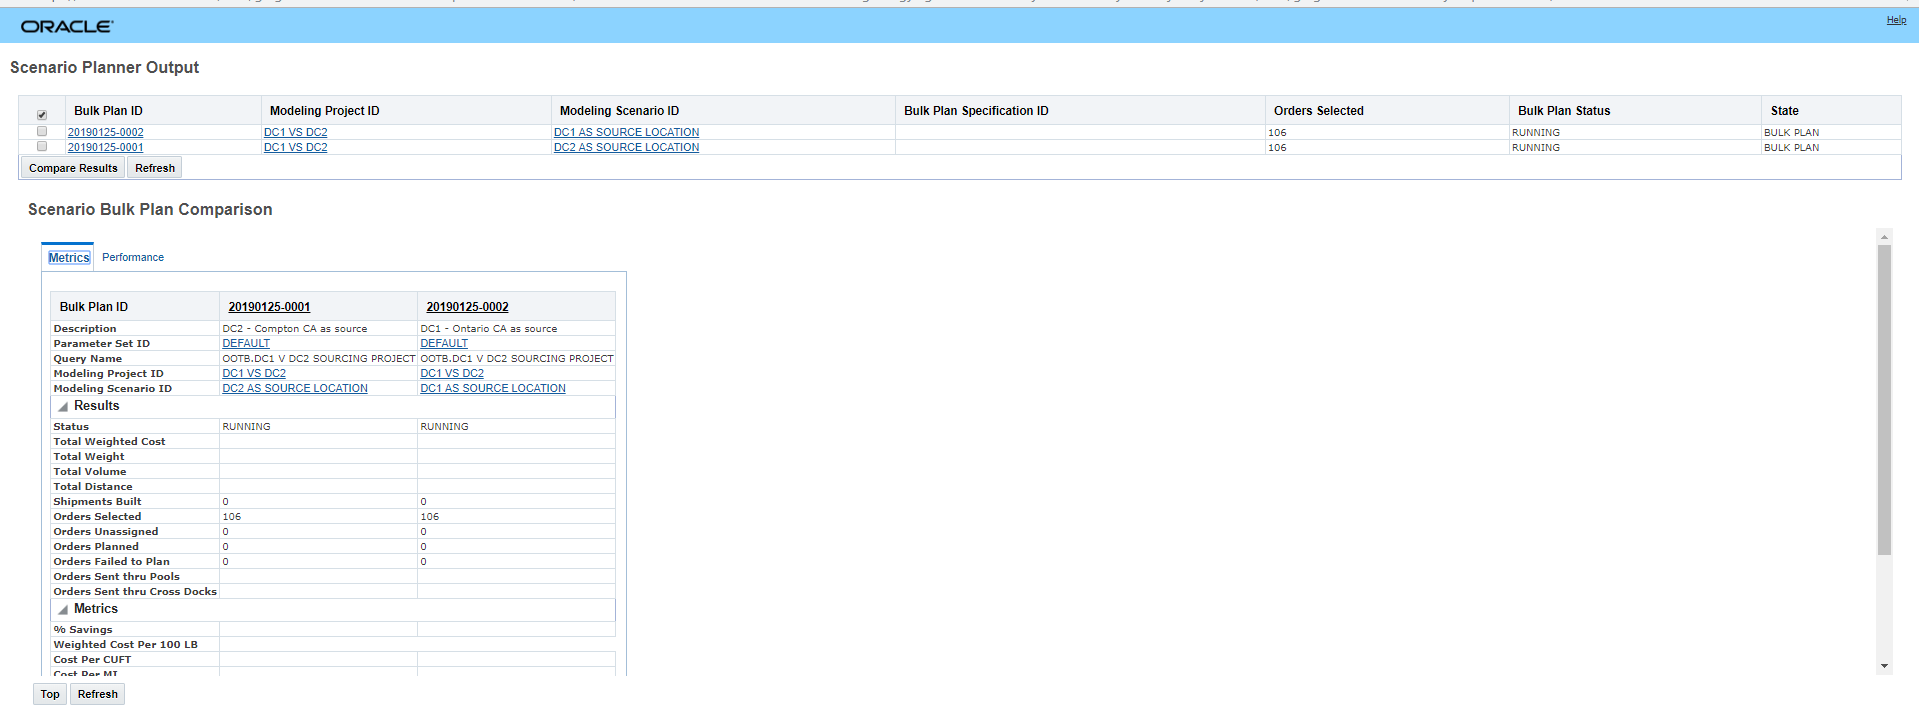
Scenario Bulk Plans Running
- Scenario Bulk Plan Output – As the Bulk Plans are running for your project the Scenario Bulk Plan Output screen provides you with visibility into the status of each of the scenario bulk plans as they are running.
Analyze - Once the Scenario Bulk Plans for your project are complete the next, and final step, is to analyze the results. LNM provides you with a number of powerful tools to interpret the results of your modeling simulations.
The key analysis tools available include:
- Comparing the Modeling Scenario Bulk Plan Results - provides a quick overview of the key scenario metrics - total cost, number of miles, number of shipments etc.
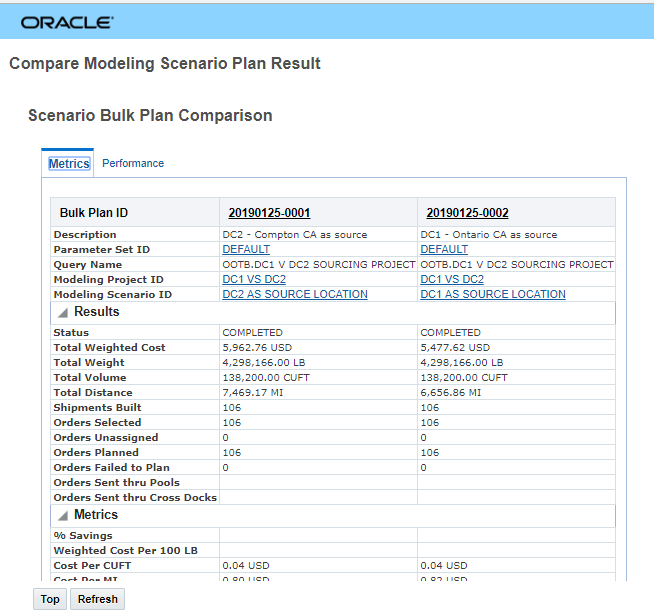
Scenario Bulk Plan Compare
- Perform Workbench Review - review the solution in a Workbench to do side-by-side detailed solution analysis of the Modeling Scenarios - review the shipments at a detailed level - using table views for the LNM shipment data or geographically on Modeling Scenario specific map displays.
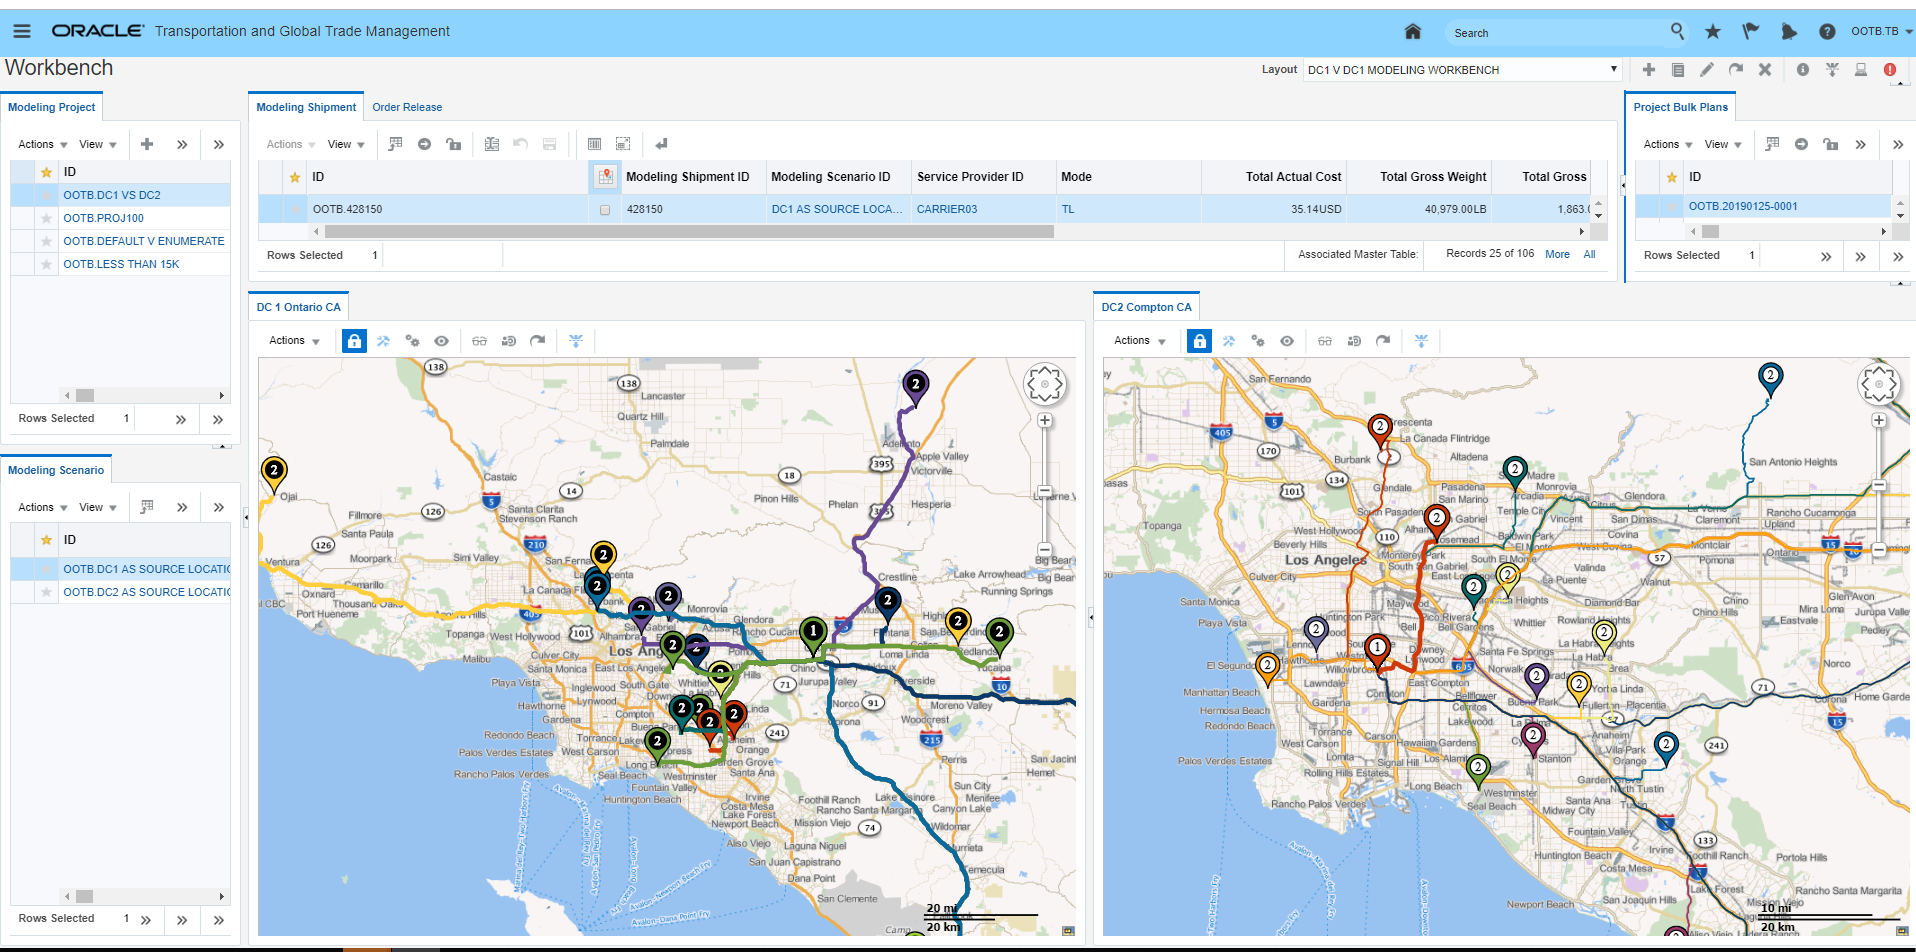
Scenario Workbench Analysis - Side-by-Side Modeling Scenario Map View
- Logistics Network Modeling Intelligence - Move Data to Analytics
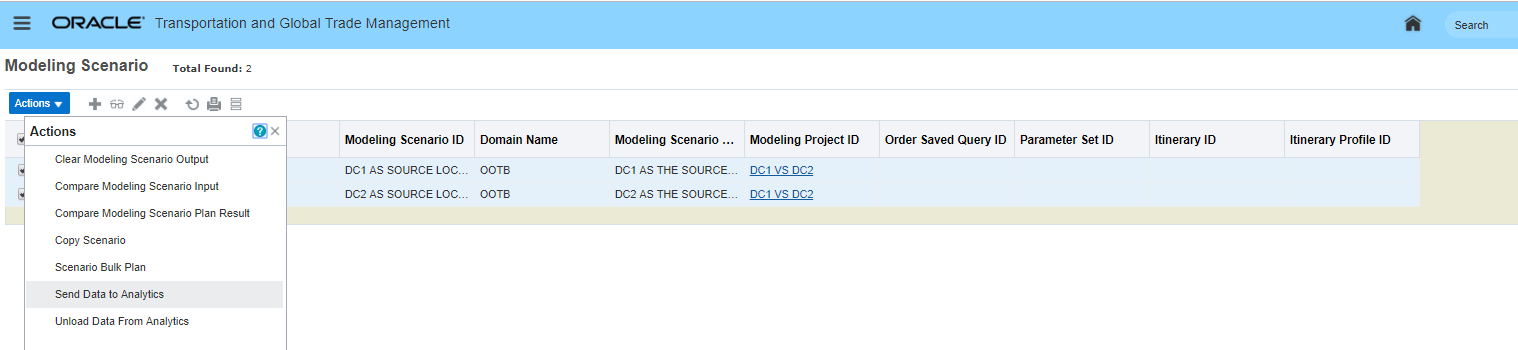
Move Data to Analytics
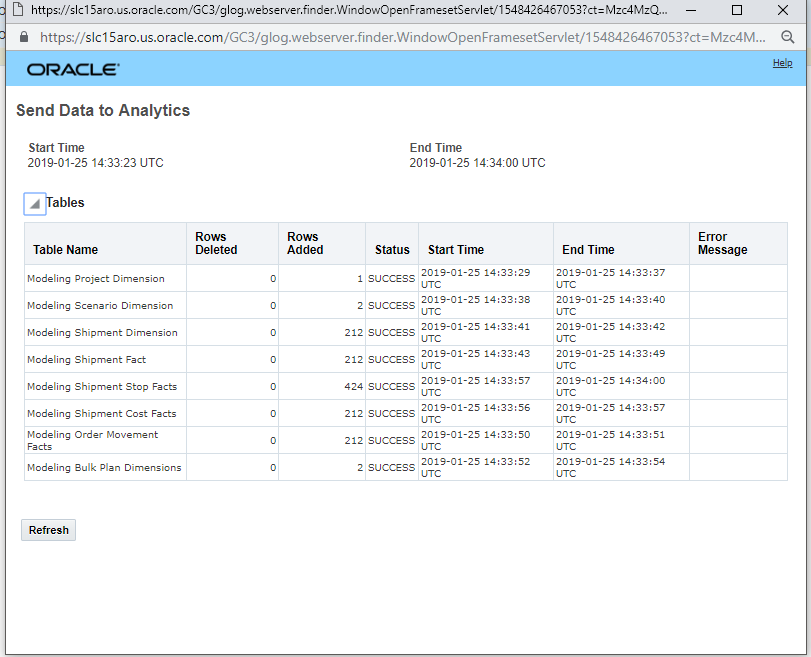
Moved Data to Analytics - Tables Moved
- Logistics Network Modeling Intelligence - Analyze Results create Ad Hoc Query and dashboards and reports to analyze your project(s) and scenario(s)
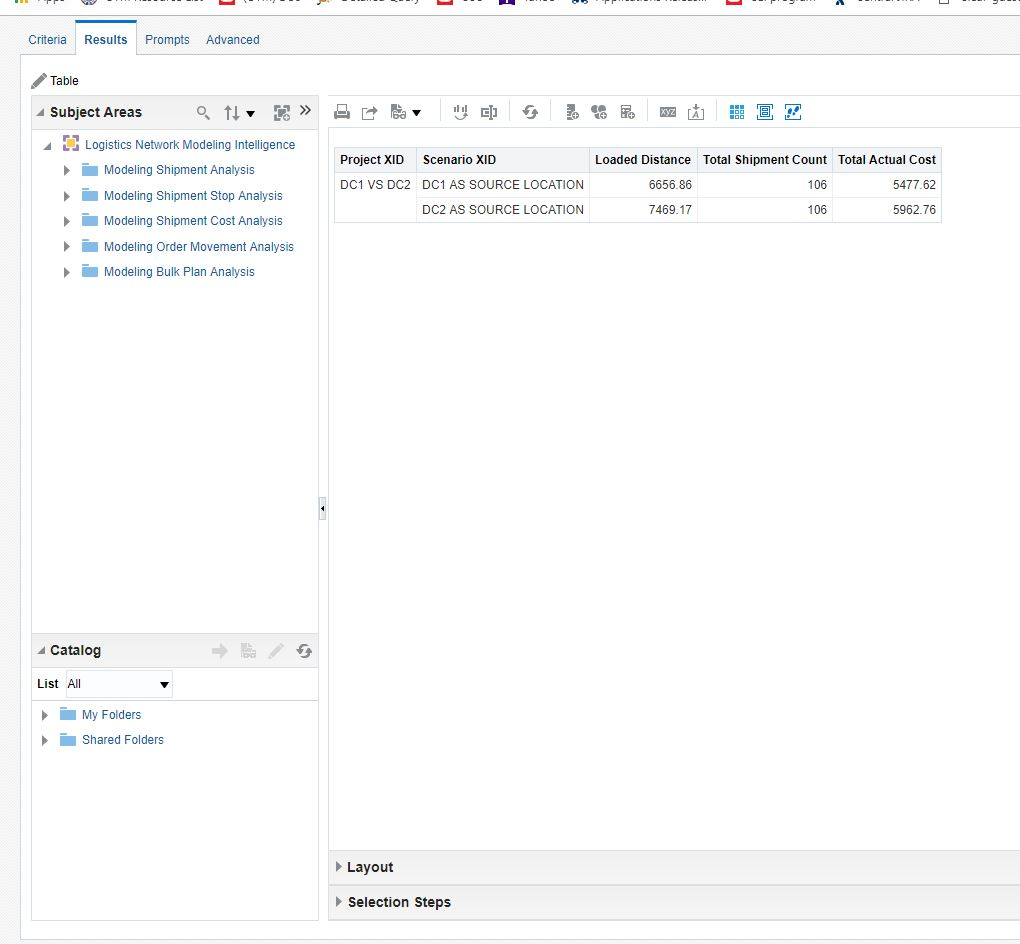
Ad Hoc Query with Logistics Network Modeling Intelligence

Dashboard
Global Trade Management (Base)
Flex Fields for Grouping and Aggregating Data
This feature provides you with the ability to include flex fields (data, number, string) when defining the attributes used in your Logic Configuration's Constraint Sets.
The flex field option is available for the following Constraint Sets:
- Aggregation
- Grouping
Steps to Enable
The standard steps required for defining a Logic Configuration and Constraint Sets are required to take advantage of this feature.
- Add a new GTM Declaration Logic Configuration
- Enter a Logic Configuration ID
- Add a new Aggregation and/or Grouping Constraint Set
- Add a Constraint Set ID
- Select Constraint Set Type
- Declaration-Line Aggregation
- Declaration-Line Grouping
- Select one of the Flex Field options:
- Date Flex Field
- Number Flex Field
- String Flex Field
- Then based on the option selected above define your Constraint Details:
- Date Flex Fields
- Number Flex Fields
- String Flex Fields
Copy Flex Fields Using Data Configuration
This feature provides you with the ability to include flex fields (date, number, string) when defining the attributes used in your Data Configuration.
The flex field option is available for the following Data Configuration Association Types:
- Transaction to Declaration
- Shipment to Transaction
- Order Release to Trade Transaction
Steps to Enable
The standard steps required for defining Data Configuration are required to take advantage of this feature.
- Add a new Data Configuration
- Add a Data Configuration ID
- Select one of these three Association Types:
- Transaction to Declaration
- Shipment to Transaction
- Order Release to Trade Transaction
- Select Association:
- Header-Header
- Line-Line
- Select one of the Flex Field options:
- Date Flex Field
- Number Flex Field
- String Flex Field
- Then based on the option selected above define your Attribute Details:
- Source Flex Fields Name
- Target Flex Fields Name
- Copy Option
- COPY IF NULL
- OVERWRITE
Tips And Considerations
The following steps are required/should be considered when setting up the corresponding Manager Layout:
- Flex fields should be defined and included in a screen set
- The Manager Layout ID assigned to this screen set will be used to display the business objects related to this screen set.
Report to Show License Assignment and Balances
This feature provides you with the ability to see how a license line has been used by trade transactions and direct adjustments.
The report is accessed via Business Process Automation > Reporting > Report Manager > License Assignment Report.
You will be prompted to enter parameters such as the License Line ID, the Start and End Date and the Delivery Report Format (e.g. PDF, CSV). The system will use these parameters to limit the range of data to be included in the report.
Specifically, the following information is provided on the report:
- License Identification
- License ID
- License Category, Type and Code
- Jurisdiction and Regime
- Effective Date
- License Line Identification
- License Line ID
- Line Type
- Line Description
- Authorized Quantity
- Authorized Value
- Opening Quantity and Value Balances
- For each trade transaction line or adjustment, the following information is provided
- Date
- User
- Document (Transaction Line or Adjustment)
- Quantity
- Quantity Balance
- Value
- Value Balance
Steps to Enable
You don't need to do anything to enable this feature.
Display Stoplight for Restricted Party Screening on Transaction and Declaration
This feature provides you with the ability to visualize the Restricted Party List Screening (RPLS) Status of the involved parties in a trade transaction using an indicator. The application picks the RPLS status from the party master and reflects it with different indicators.
The spotlight has the following predefined indicators:
- White solid circle: RPLS_NOT STARTED. The RPLS process hasn't been executed on the party.
- Yellow triangle with an exclamation symbol inside: Status is either RPLS_REQUIRES REVIEW or RPLS_ESCALATED
- RPLS_REQUIRES REVIEW: The RPLS has been executed on the party and there is a potential match.
- RPLS_ESCALATED: The RPLS has been executed on the party and one or more denied parties are set as Escalated Match.
- Red circle with an exclamation symbol inside: RPLS_FAILED. The RPLS has been executed on the party and there is a confirmed/verified match.
-
Green circle with a check symbol inside: RPLS_PASSED. The RPLS has been executed on the party and either no matches were found or matches were found and all were marked as 'Not a Match'.
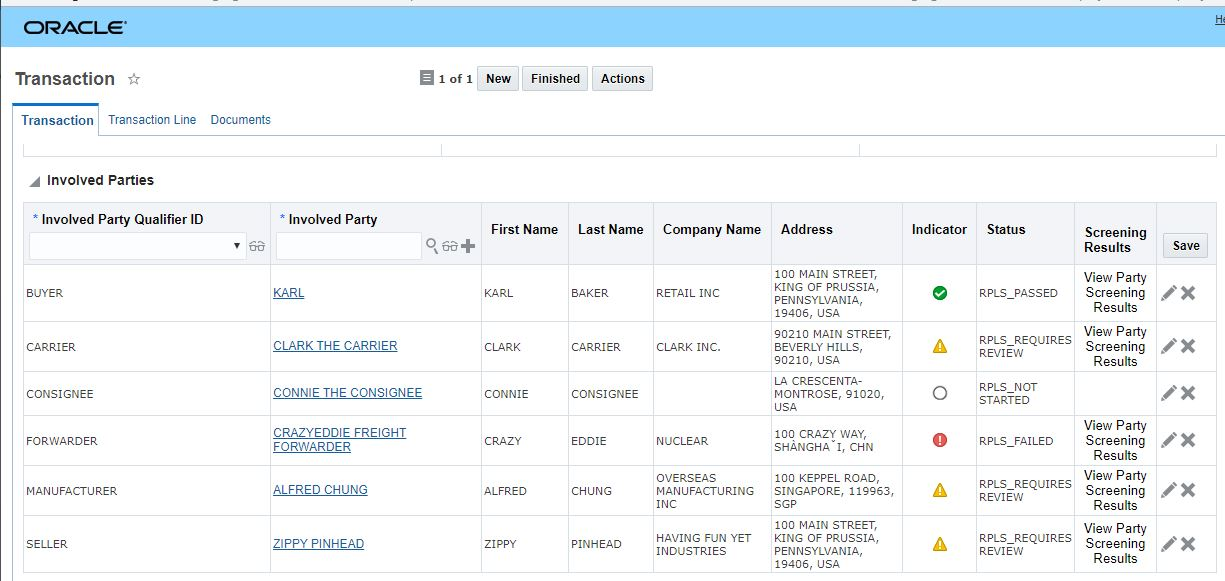
Stoplight Indicator
Steps to Enable
You don't need to do anything to enable this feature.
Shipment Group View Related Trade Transaction SmartLink
This feature enables you to view the trade transactions related to a shipment group.
From the shipment group, you can use the SmartLink ‘View Related Trade Transactions’ to view the related trade transactions.
Steps to Enable
You don't need to do anything to enable this feature.
Tips And Considerations
You can use standard Screen Set Manager: SmartLinks functionality to remove the View Trade Transaction smart link from the Shipment Group manager.
Approve or Decline Classification at the Classification Type/Code Level on an Item
This feature provides you with the option to filter your Approve or Decline Product Classification item action to only a specified product classification type. When you run the Approve or Decline Product Classification action on the item, you now have the option to specify the Product Classification Type ID for which you want to update the classification status. This enhancement allows the user to focus their activities on just the Product Classification Type ID they wish to update.
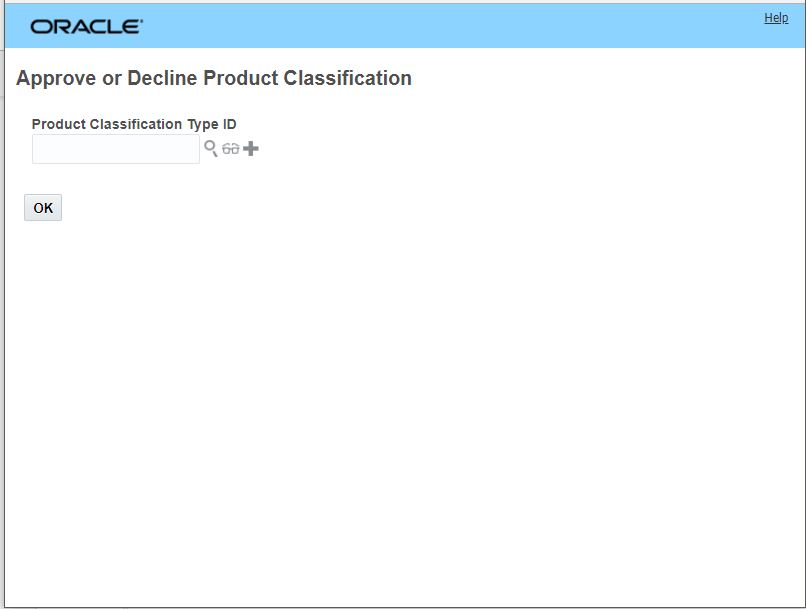
Approve or Decline Product Classification with Product Classification Type ID Filter
Steps to Enable
You don't need to do anything to enable this feature.
Tips And Considerations
If you do not specify a Product Classification Type ID and hit OK, then the previous behavior will be provided i.e., all the current Product Classification Types and Codes for the Item will be displayed.
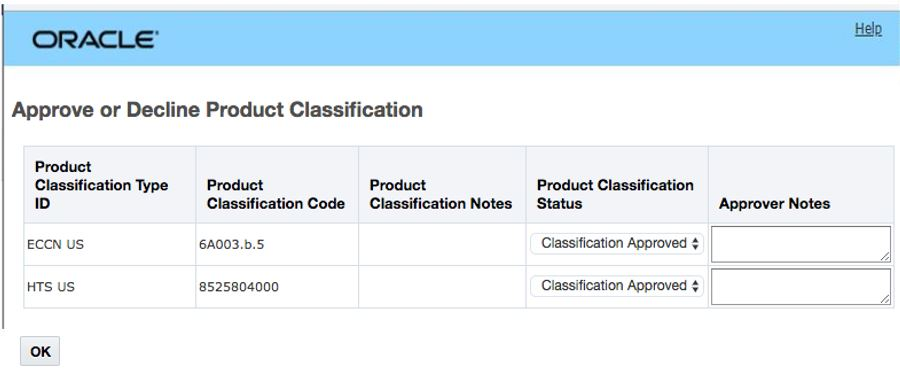
No Product Classification Specified
Customs Description for Classification Code on Item
This feature provides the ability to add a customs description for each product classification code defined on the Item. Since customs organizations may have different requirements for how the description should appear, you can define a different customs description for each product classification type and code you have defined. The Customs Description field appears in the Product Classifications grid on the Trade Details tab of the Item. You can then use this description on your documentation.
Steps to Enable
You don't need to do anything to enable this feature.
Workbench - Work Queue Support
This feature provides specific actions and capabilities equivalent for the Work Queue concept in Advance Layout. Work queues enable you to assign records to a user in a workbench for a certain period of time or until a user logs out of GTM. With these new capabilities, you can use the workbench to configure a work environment tailored to the needs or your users. Work Queue is available for certain objects in GTM. You can create a workbench with an associated work queue for the following objects:
- Item
- Trade Item Structure
- Trade Item Structure Component
- Party
- Trade Transaction
- Trade Transaction Line
- Customs Shipment (Declaration)
- Customs Shipment Line (Declaration Line)
- Contact
In addition, you can now configure a workbench for your restricted party list screening work queue. The capabilities specifically support:
- Work Queue for parties that require RPLS review
- Work Queue for parties that are under review and have been escalated
The capabilities provided by object include:
- For the Contact Object
- Requires Review, Passed, Failed, Escalated, and Add Comment
- For the Party Matched Restricted party object
- Potential Match, Not a Match, Verified Match, Escalated, Review Match Factor, and Add Comment
Steps to Enable
The following steps are required to take advantage of this feature.
- Add a new GTM Work Queue Configuration
- Add a Work Queue ID (e.g.: PARTY_WQ_REQUIRES REVIEW_WORK_QUEUE)
- Select the Object Type 'CONTACT'
- Define the Filter Limit (e.g.: 10). It will indicate the number to records to be assigned to each user
- Select the Saved Query. There are two public Saved Queries provided by the system
- PARTY_WQ_REQUIRES REVIEW. This is a saved query for the parties that require RPLS review
- PARTY_WQ_ESCALATED. This is a saved query for the parties that are under review and have been escalated
- Define the Assignment Duration (e.g.: 5M). It indicates the time the records will kept assigned to a user
- Define the Domain Name. (e.g.: DOMAIN1)
- Add a new Workbench
- Add a new layout clicking the Create (+) icon
- Enter the Layout ID (e.g.: WORK_QUEUE_WORKBENCH_LAYOUT)
- Enter a Description
- Select the public Logic Configuration WORKBENCH DEFAULT PUBLIC
- Select the Layout Format (e.g.: Default)
- Select the Domain (e.g.: DOMAIN1)
- Complete the process clicking the OK button
- Select the Split-Horizontally or Split-Vertically icon depending on whether you want to split the screen. (For the sake of this example select the horizontal layout)
- Add the content for the top part of the screen
- Select the Content icon
- Select Component Type 'table'
- Select Object Type 'Contact'
- Select the Tab Name (e.g.: Parties To Be Reviewed)
- Select the Screen Set. There is a public screen set GTM_CONTACT_SCREENING_BOARD PUBLIC that you can use for this purpose
- Keep the checkbox unchecked
- Select Population Method 'Work Queue'
- Select Default Work Queue (e.g.:PARTY_WQ_REQUIRES REVIEW_WORK_QUEUE)
- Complete the process clicking the OK button
- Then select the Work Queue PARTY_WQ_REQUIRES REVIEW_WORK_QUEUE at the top of the screen. The application will bring the information of the parties based on the work queue
- Select the Content icon
- Add the content for the bottom part of the workbench
- Select Component Type 'table'
- Select Object Type 'Party Matched Restricted Party'
- Select the Tab Name (e.g.: Restricted Parties Potential Matches)
- Select the Screen Set. There is a public screen set GTM_PARTY_SCREENING PUBLIC that you can use for this purpose
- Check the Detail table check box
- Select Parties To Be Reviewed Saved Search PARTY SCREENING MATCH QUERY PUBLIC. This is a public query.
- Finalize the definition of the layout by clicking the DONE button at the right top of the screen. The application will populate the information on the screen
- Add a new layout clicking the Create (+) icon
Tips And Considerations
The system will assign the quantity of records for the time indicated in the work queue parameters (e.g.: 10 records for 5 minutes). If the user comes back to a record that has passed the time threshold and tries to run an action on it, the system will throw an error indicating the user no longer holds the record.
When the user tries to run an action on a restricted party that is not in the current content version the system will throw an error indicating the Restricted Party is invalid.
GTM How To/Configuration Topic - Supplier Solicitation
This feature provides a GTM How To/Configuration Topic that covers Supplier Solicitation. This How To topic will provide you with the information you need to properly use Campaign Management and Supplier Solicitation in GTM.
Topics covered include:
- About Supplier Solicitation - Introduction to the campaign management and supplier solicitation process in GTM
- Supplier Solicitation: Business Process - Details around the business process for supplier solicitation
- Supplier Solicitation: Configuration Steps - Steps to configure GTM for campaign management and supplier solicitation
- Supplier Solicitation: Process Steps - Information on the major steps in the campaign management and supplier solicitation process
Steps to Enable
You don't need to do anything to enable this feature.
Tips And Considerations
If you plan to have your suppliers use the supplier portal to manage and respond to a solicitation, review the Supplier Access Configuration details section of Configuration Steps to configure supplier access.
GTM How To/Configuration Topic - Product Classification Process
This feature provides you with a new GTM How To/Configuration topic 'Product Classification Process' that covers product classification. This How To topic will provide you with the information you need to properly use Product Classification in GTM.
Topics covered include:
- About Product Classification: Introduction to the product classification process in GTM
- Product Classification: Basic Setup - Information about basic setup elements such as Product Classification Type, Product Classification Code, and Product Classification Hierarchy Code
- Classification Research: Setup and Process - Details about setting up and using Classification Research to lookup classification data
- Translation Lookup: Setup and Process - Details about setting up and using Translation Lookup to translation a classification code from one product classification type to another
- Item Classification: Setup and Process - Information on the setup and actions available for classification of items
- Multiple Product Classification Codes - Details about when you can assign multiple classification codes for a specific product classification type
- Assign 6 or 8 Digit HTS Codes - Information around assigning 6 or 8 digit harmonized schedule codes to items, item structures, trade transactions and declarations
- Process Management - Details around the options available in process management
Steps to Enable
You don't need to do anything to enable this feature.
Review Match Factor Action to Use Inverse Index
This feature provides you with the ability to use Inverse Index when executing the Review Match Factor Action on a Party.
Specifically, the following has been added:
- New option supported:
- Service Preference including Inverse Index as a service parameter
Steps to Enable
The standard steps required for defining a Service Configuration are required to take advantage of this feature.
- Add a new Service Configuration
- Add a Service Configuration ID
- Select the Domain Name
- Select the Service Preference details
- Select Restricted Party Screening Service
- Add the Service Preference Configuration, including parameters such as:
- dataVersionList (e.g.: dataVersionList=null)
- dataSource (e.g: dataSource=null)
- matchEngine (e.g.: matchEngine=InverseIndex)
- threshold (e.g.: threshold=0.5)
- excludeWords (e.g: excludeWords=null)
- listCode (e.g.: listCode=null)
- screeningFieldParameter (e.g; screeningFieldParameter=RPLS.SERVPARA-INVERSEINDEX)
The complete Service Preference Configurations considering the previous parameters would be: dataVersionList=null, dataSource=null, matchEngine=InverseIndex, threshold=0.5, excludeWords=null, listCode=null, screeningFieldParameter=RPLS.SERVPARA-INVERSEINDEX
When executing the Review Match Factor on a Party, you will be able to select the Service Preference that includes the Inverse Index as a parameter.
Tips And Considerations
Companies might have to tune the threshold and weightages for the service parameters on the Service Preference Configuration according with their business needs.
Rename Tariff Preference Types to Trade Preferences
This feature provides a name change of the GTM Tariff Preference Types to Trade Preferences. In addition, this information can now be downloaded from a third-party data content provider.
Steps to Enable
You don't need to do anything to enable this feature.
To better support Origin Management, new capability in the Item Origin table has been added to GTM on the Item. Your supplier information should now be tracked using the Item Origins grid that has been added to the Item.
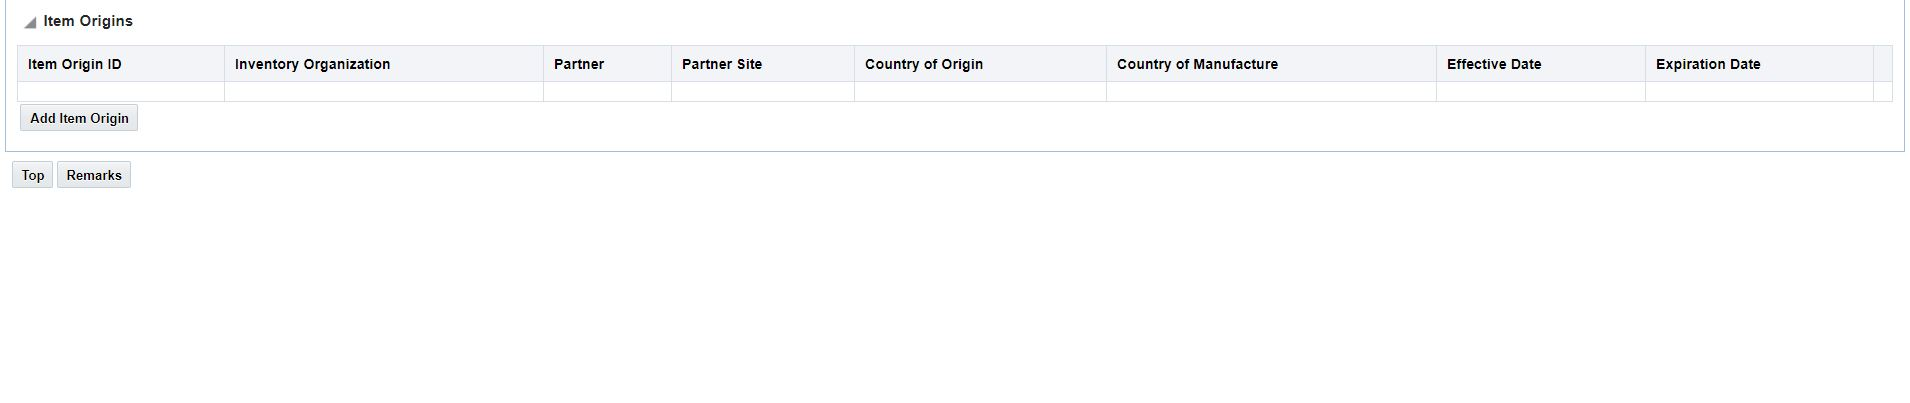
Item Origin Grid
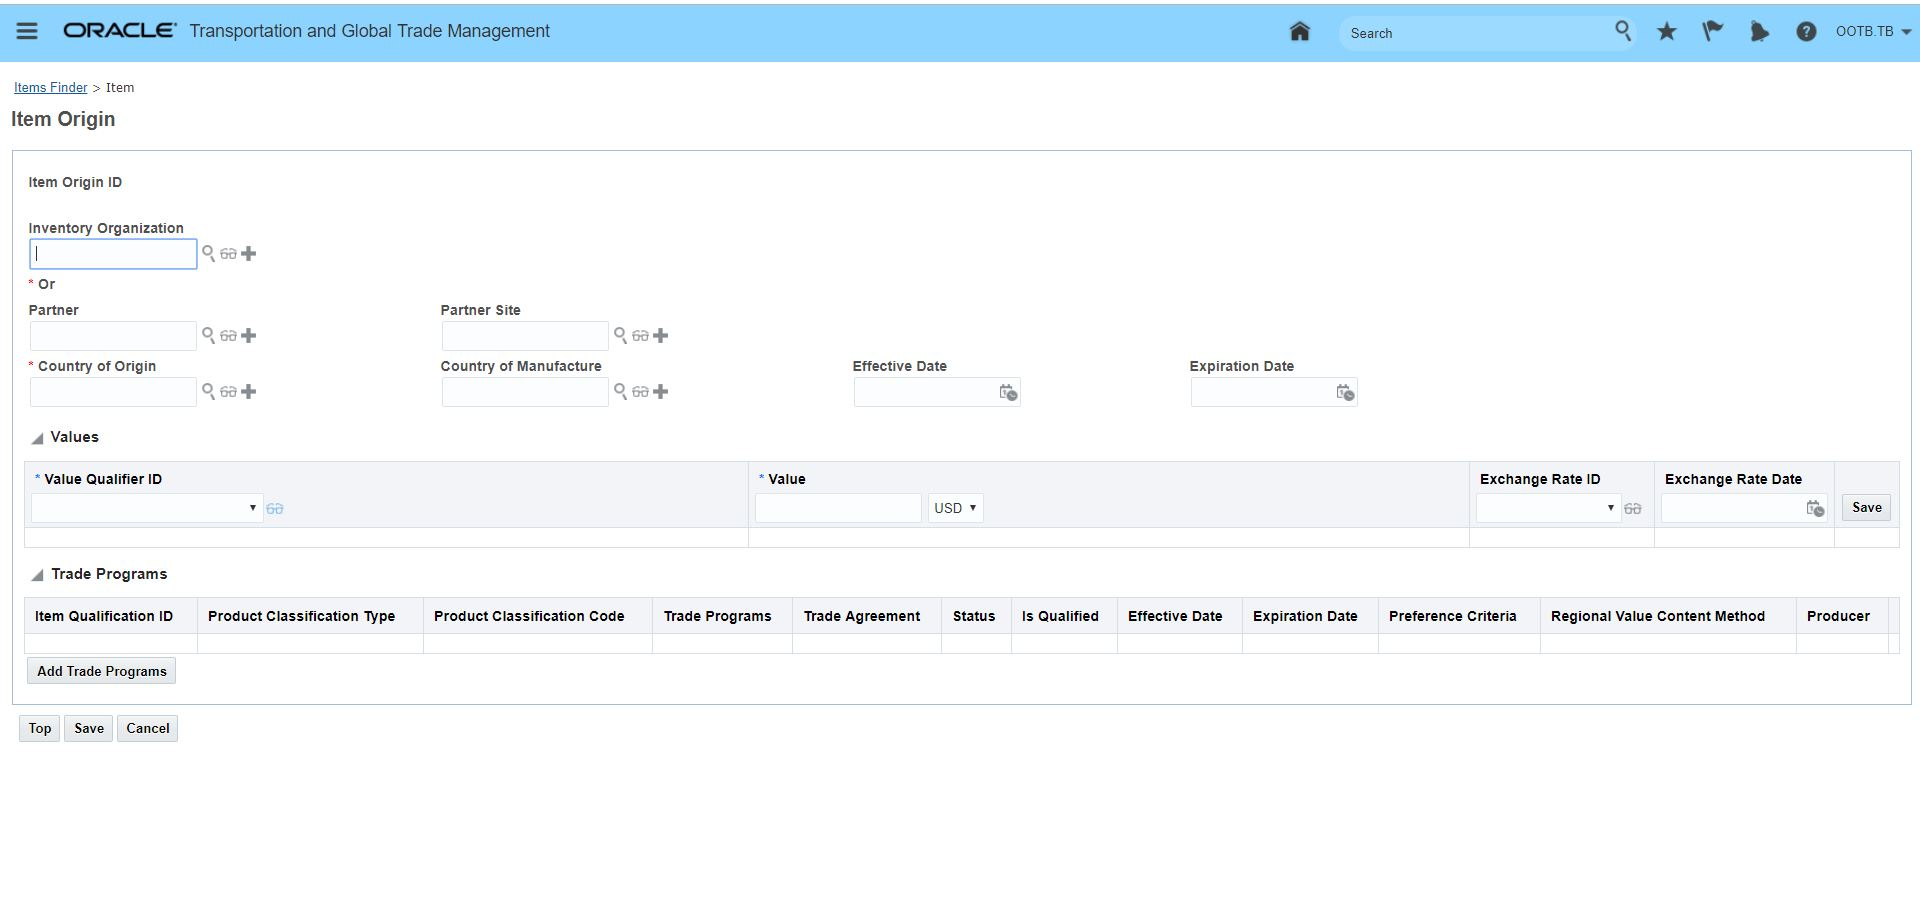
Item Origin Detail
Steps to Enable
You don't need to do anything to enable this feature.
Tips And Considerations
The Suppliers grid on the Item has been deprecated and will be removed in a future release.
Accessibility Improvement for Party Screening Results
This feature provides the ability to view party screening results with bold and underlined text in addition to the existing highlighting. This enables colorblind users to easily see the details of a restricted party match to a party. The bold and underlined text can be seen in various areas of the product including:
- The Review Screening Results action from the Parties action menu
- Within the details of the View Party Screening Results link associated with involved parties on the Trade Transaction and Declaration
Steps to Enable
You don't need to do anything to enable this feature.
SmartLinks Between Product Classification Type and Trade Programs
This feature enables you to view the trade programs related to product classification types.
From product classification type, you can use the SmartLink ‘View Related Trade Programs’ to view all trade programs related to a particular product classification type.
Steps to Enable
You don't need to do anything to enable this feature.
SmartLinks Between Product Classification Code and Tariff Rates
This feature enables you to view the tariff rates related to product classification codes.
From the product classification code, you can use the SmartLink ‘Related Tariff Rates’ to view all tariff rates related to a particular product classification code.
Steps to Enable
You don't need to do anything to enable this feature.
GTM How To/Configuration Topic - License Screening Enhancements
This feature provides an enhance to the License Management How To topic. In addition, the name of the topic has been changed from 'License Management' to 'License Screening'. Improvements have been made across the How To topic, which includes the following details:
- About License Screening - Introduction to the license management and license screening process in GTM
- License Screening Business Process - Information on the business process for license screening
- License Screening Configuration Steps - Steps to configure GTM for license management and license screening
- License Screening Process Steps - Details on the major steps in the license screening process
Steps to Enable
You don't need to do anything to enable this feature.
This feature provides enhancements to the AES Filing capability. Based on regulatory changes, the AES Template related to the X12.601 Customs & Border Protection (CBP) - Export Shipment Information specification has been updated as follows:
- Support regulatory changes for 9X515 codes - ECCN US codes beginning with 9A515, 9B515, and 9C515 are now treated similar to the Series 600 codes in the X107 element
- Enable EIN (Employer Identification Number) to be used as Filer Type ID - The ISA05 element supports EIN as well as DUNS
Steps to Enable
You don't need to do anything to enable this feature.
Order Release to Trade Transaction
This feature provides you with a flexible and more configurable approach for handling OTM Order Release to GTM Trade Transaction processing. The new approach supports flexible qualifier mapping and the ability to propagate changes from the OTM Order Release to the GTM Trade Transaction.
Specifically, the following has been added:
- New option supported:
- OTM Order Release to GTM Trade Transaction
- You can:
- Create a new GTM Trade Transaction from an OTM Order Release
- Propagate changes from an OTM Order Release to existing GTM Trade Transaction
- Remove an OTM Order Release from an existing GTM Trade Transaction
Steps to Enable
The standard steps required for defining a Data Configuration are required to take advantage of this feature.
- Add a new Data Configuration
- Add a Data Configuration ID
- Select the 'Order Release to Transaction' Association Type
- Select Association:
- Header-Header
- Line-Line
- Select one of the Field options:
- Date Flex Field
- Involved Parties
- Number Flex Field
- Quantities
- Reference Numbers
- Remarks
- String Flex Field
- Values
- Then based on the option selected above define your Attribute Details:
- Source Fields Name
- Target Fields Name
- Copy Option
- COPY IF NULL
- OVERWRITE
The standard steps required for executing Actions are necessary to run this process.
- Create or select an existing Order Release
- From the Actions Menu, select one of the options under Global Trade Management:
- Build Trade Transaction
- Propagate Changes to Trade Transaction
- Remove from Trade Transaction
- Enter or search for the right Data Configuration
Tips And Considerations
This feature differs from the -OTM Shipment to GTM Trade Transaction- feature in that it does not require to setup Data Configuration Rules. The application will ask directly for the Data Configuration at the time of executing the process.
This feature enables you to manage campaigns and solicit documents and other information from your trading partners. You can collect information from many suppliers simultaneously. As a campaign administrator, you can:
- Define the details of the campaign including parameters for administering a campaign, documents you want to request, and processing details such as data configuration and logic configuration
- Initiate a campaign for collecting documents and data including qualification information
- Notify trading partners when they need to respond to a campaign
- Monitor a campaign and review responses from your trading partners
- Approve or decline a submission from a trading partner
- Copy data from the campaign line to the item origin on the item upon approval
As a trading partner such as a supplier, you can:
- Receive notification that you are part of a campaign
- Review your campaign lines and update the origin data, qualifications, and requested documents
- Respond to a campaign
The data that a campaign administrator can set up includes:
- Data Configuration – determines which data to copy among GTM objects. For example, when a supplier responds to a campaign in the campaign line, they will provide important information like country of origin and a Certificate of Origin document that you want to copy back to the item origin on the item
- When creating a campaign, you can use the Association Type = Partner Item to Campaign to copy information from your Item or Partner Item to your Campaign Line.
- When approving a campaign, you can use the Association Type = Campaign Line to Item to copy information from your Campaign Line to your Item.
- Logic Configuration – defines the details of the campaign workflow configuration. The Logic Configuration Type you want to use is GTM CAMPAIGN CONFIGURATION and include details such as:
- General – specify the involved party qualifiers to be used for various stakeholders such as the owner contact, receiving contact, and sending legal entity. You can also specify whether the qualification details should be displayed to the trading partner.
- Campaign Creation – specify information to be used when a campaign is created including the data configuration and business number generator for the campaign ID.
- Campaign Notification – specify regulation references and whether you want to send a document template with the notification.
- Campaign Approval – specify information to be used when a campaign is approved including the data configuration.
To create a campaign, use the ‘Create Campaign’ action on a trading partner item. When you create a campaign, certain information must be specified and is then copied onto the Campaign including:
- Campaign Type – specify the type of campaign being created. Since logic configuration is identified in the campaign type, this required field helps to drive the workflow of the campaign.
- Product Classification Type – specify the product classification type for which you are creating a campaign.
- Campaign Administrator – identify the person who is managing the campaign.
- Reminder Duration – this field is reserved for future use.
- Effective and Expiration Date – enables you to specify the start and end dates of a campaign.
- Purpose – enter details regarding the purpose of the campaign.
- Trade Agreement – specify if the campaign is to solicit information related to a trade agreement.
- Required Documents – specify if the campaign is to solicit specific documents from trading partners.
You can manage a campaign from the Campaign Manager. Each campaign will include information such as:
- Campaign Type
- Effective and Expiration Date
- Reminder Duration (reserved for future use)
- Perspective
- Product Classification Type
- Trade Agreement
- Involved Parties
- Reference Numbers, Remarks and Flex Fields
Each Campaign Line specifies basic item information for a particular trading partner and stores the response. The campaign line includes information such as:
- Trading Partner Item
- Party Site
- Product Classification Type/Code
- Trade Agreement
- Origin details like Country of Origin plus Origin Effective/Expiration Date
- Qualifications details like Preference Criteria, Regional Value Content Method, and Producer
- Values
- Involved Parties
- Reference Numbers, Remarks, and Flex Fields
- Documents and Notes
There are certain actions a Campaign Administrator may use to manage a campaign. A campaign administrator can:
- Add or manage documents
- Approve a campaign
- Send notification to trading partners
- Set the campaign status
The Campaign Line Manager is available which enables you to trigger actions that are specific to a campaign line including:
- Add or manage documents
- Approve or decline a campaign line
- Respond to a campaign line or a partner submission
- Set the campaign line status
You can also create a workbench to enable users to easily manage the details of a Campaign and its associated Campaign Lines. Saved queries have been provided to easily create a workbench for Campaign and Campaign Line.
Once a campaign is created, a supplier or other trading partners can see campaign lines specific to their trading partner items and party sites. GTM can notify a supplier when campaign lines are available. The notification includes:
- Instructions to complete the required data and whether they need to provide a certificate or other documents
- A link to the campaign
- A deadline for submitting responses
A supplier portal is available which helps a supplier or trading partner to provide the information requested. Configuration is required for the supplier portal. The supplier portal enables:
- Visibility and edit capability for supplier-specific item data
- Ability to upload documents
When logged into the supplier portal, a supplier has the ability to view both campaign and campaign line information. In the Campaign Line, the trading partner or supplier can add or update certain information such as:
- Country of Origin plus Origin Effective/Expiration Dates
- Qualification details including whether it qualifies, Preference Criteria, Regional Value Content Method, Producer, and Qualification Effective/Expiration Dates
- Values
- Involved Parties
- Reference Numbers, Remarks and Flex Fields
- Notes
If a certificate or document is required, the supplier can use the Add Document action on the campaign line. Once all the data and documents have been added to the campaign line, the supplier can use the Respond to Campaign Line action to send the information back to the campaign administrator for review and approval.
Steps to Enable
GTM has reused the existing service provider portal that is managed via the SERVPROV domain. To use the supplier portal, you need to perform certain configuration steps including:
- VPD Profile
- Access Control
- User Roles
- User Menu and Access
Tips And Considerations
- The reminder functionality is currently inactive. The Reminder Duration field, which appears on the Campaign header and the Create Campaign action, is reserved for future use.
- As part of the Create Campaign action, the supplier contact is not copied to the campaign line. The recommended workaround is to use a Direct SQL agent action to copy this information at the time of campaign creation.
Key Resources
For more details on setting up the supplier portal, please see the ‘Supplier Access Configuration’ page in Help.
Determine Trade Program Eligibility and Qualification Based on Item Origin
This feature enables you to manage your item origin eligibility details and to identify opportunities for reduced duties and taxes. This capability enables you to manage this information for items that you buy as well as items that you sell.
For an item, you can run the Tariff Eligibility Screening action from the Item manager to determine if your item, based on the associated item origin data, can take advantage of trade programs. When you trigger this manual action, GTM displays all potential trade agreements that match the criteria.
Once you have determined which item origins are eligible to use trade programs, you can determine which trade programs for which your items qualify. To determine qualification, certain criteria must be considered such as:
- Are the rules of origin met for the trade program?
- What is the regional value content method (RVC) being used?
- Is there a tariff shift?
- Are there de minimus rules that apply?
Within the item, you can see the item origin details on the Trade Details tab. Within each item origin, you can determine if your company qualifies for the trade programs listed. You can mark each trade program for which your company qualifies and set a status. GTM ships with an out of the box status that is set for each trade program associated with an item origin.
The trade program information is assigned to the appropriate item origin and includes supporting information such as:
- Product Classification Type and Code – defines the product classification type and code for this particular item origin/trade program pairing.
- Trade Program – specifies the trade program for a particular item origin.
- Trade Agreement – if a trade agreement is associated with the trade program, it will be displayed.
- Status – displays the status of a particular item origin/trade program pairing. GTM ships with the following out of the box statuses:
- ELIGIBLE
- DISCONTINUED
- QUALIFIED
- NOT QUALIFIED
- Is Qualified flag – specifies if the item origin qualifies for a particular trade program.
- Effective and Expiration Date – enables you to specify the start and end dates of the qualification details.
- Preference Criteria – defines the origin criteria that is used to determine that a good qualifies for a trade program.
- Regional Value Content Method – specifies the regional value content method used to determine if an item origin qualifies for a trade program. This is part of a trade program's rules of origin.
- Producer – identifies whether the supplier is producer of the goods such as the manufacturer.
Steps to Enable
You don't need to do anything to enable this feature.
Tips And Considerations
- There are two ways to populate the Item Origin information in the Item:
- Manually via the UI
- Trigger the Tariff Eligibility Screening action on the Item
- Item Origin information must be present on the item prior to triggering the Tariff Eligibility Screening action.
- Trade programs must be present on the item origin before qualification can be performed.
- Qualification details can be added by a campaign administrator or a trading partner such as a supplier or partner.
To support customers with varied global trade processes that depend on whether an Item is purchased or manufactured, Item Type is being introduced. This feature provides a new data element on the Item for identifying the Item Type as defined in the ERP. Examples of Item Types are Purchased Item, Manufactured Item or Service Item. This provides users with consistency across the Oracle product suite and informs a user's decision in the information to track for Country of Origin.
Steps to Enable
You don't need to do anything to enable this feature.
This feature provides a name change of the GTM Trade Item to Item to align with the unified OTM and GTM Item manager that has been introduced.
Steps to Enable
You don't need to do anything to enable this feature.
This feature provides enhanced support for Origin Management capabilities on the Item. On the new Trade Details tab of the Item, you can see an Item Origins grid. You can differentiate your item origins by inventory organizations, partners and/or partner sites. Also, if you do not need to track item origin at a detailed level, you can continue to use the item level Default County of Origin on the Trade Details tab.
You can create and manage the item origin details such as:
- Inventory Organization, Partner and Partner Site – enables you to track your item origin at an inventory organization level or at a partner/partner site level.
- Country of Origin – specify the country of origin for a particular Item Origin.
- Country of Manufacture – specify the country of manufacture for a particular Item Origin.
- Effective and Expiration Date – enables you to specify the start and end dates of an item origin.
- Values – specify value information such as purchase price for a particular Item Origin.
- Flex Fields – Use the standard flex field capability to model your company’s specific needs such as tracking origin by serial number, a range of serial numbers, lot number, and so on.
- Trade Programs – Once you determine if your item origin is eligible for a trade program, the trade program grid is populated. In addition, you can mark the Is Qualified checkbox to indicate that the item origin qualifies for a particular trade program.
Steps to Enable
You don't need to do anything to enable this feature.
Tips And Considerations
There are two ways to populate the Origin Management information on the Item:
- Manually enter Item Origin data via the UI
- Collect origin data from a partner using a campaign and supplier solicitation. The origin data is entered by a supplier on a campaign line. The origin information for a particular supplier and trading partner item can then be copied back to the item from the campaign line.
NOTE: Due to the introduction of Item Origin, the Suppliers grid on the Item has been deprecated from the Item and will be removed in a future release.
This feature enhances the Party functionality to include definition of Party Sites. You have the ability to associate party sites to a parent party at the time of creation.
Party Sites are defined as branches or offices of a Party type Organization. A Party Site links together a Party and a Location.
Steps to Enable
Adding a Party Site involves:
- Entering an ID for the party site in the Party Site ID field.
- Enter a party site name in the Party Site Name field.
- Entering the party ID of an existing party in the Party field related to the Party Site.
- Enter the location ID of an existing location related to the Party Site.
Tips And Considerations
No enhancements have been made to the EBS-GTM Integration.
This feature provides the ability to download duty, tax, and trade program information from third party data content providers. This information is stored in GTM and can be used to support tariff eligibility and qualification of your items. Since duties and taxes are tied to specific HS codes, the tariff rates you download are associated with the existing GTM Product Classification Type and Product Classification Code objects. The existing data download process has been extended to support this data. Once set up, you can download the following information from third party data content providers:
- Trade Preferences – Used to model the tariff treatment of the goods. Only certain regimes such as the European Union support this data. Examples include “reduced import duty rates under the GSP” or “under arrangements with ACP countries”. In previous versions of GTM, trade preference was populated by the user. You can now download this data from a third party data content provider. This is an existing data structure that was previously named Tariff Preference Types.
- Trade Program Types – Enables you to model broad types of tariff rates such as General, Special, Import Control, and so on.
- Trade Programs – Model the different programs that define tariff rates such as General Rate, GSP-A Rate, Caribbean Base Economic Recovery Act Rate, and so on. Included in the Trade Program is a list of Member Nations. By default, trade programs are not linked to Trade Agreements in GTM. But you can add this information within a Trade Program.
- Tariff Rates – Defines the actual tariff rate associated with a product classification type/code and a trade program.
The following figure shows the relationship between tariff data in GTM:
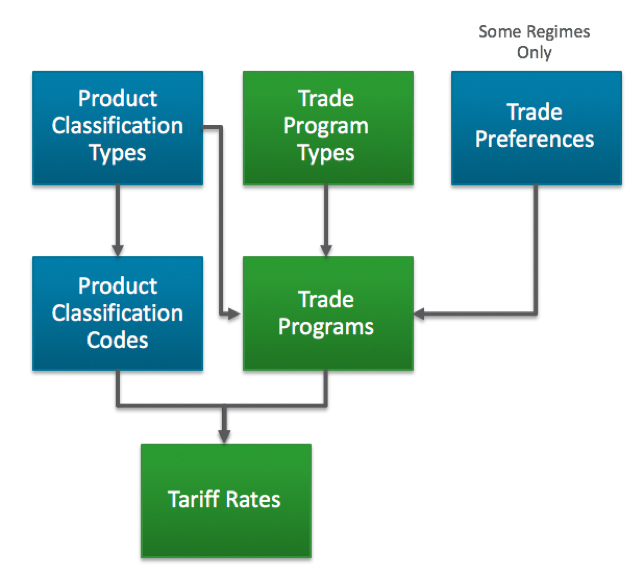
Relationship of Tariff Data in GTM
Steps to Enable
You don't need to do anything to enable this feature.
Tips And Considerations
- The existing product classification data download has been extended to include the tariff data. Please check with your content provider to see if there are certain steps you need to take to consume the enhanced tariff information.
- The following existing functionality continues to use a real-time external call to third party data content providers to obtain the duty and tax information:
- Landed Cost Simulator
- Estimate Duties & Taxes action on Trade Transaction and Declaration
- View Duties and Taxes action on Product Classification Code
This feature enables you to manage the details of an item for a particular supplier or customer in a new object called Trading Partner Item. You can then add a Trading Partner Item to your Item so that you can easily see an Item and all of the Trading Partner Items associated with it.
You can create and manage your trading partner items including details such as:
- Trading Partner Type – enables you to specify the type of trading partner such as Suppler or Customer.
- Trading Partner – identifies the ID and details of the trading partner associated with the trading partner item.
- Trading Partner Identifier – specifies the identifier of the trading partner item in the external system of the partner.
- Trading Partner Name – specifies the name of the trading partner item in the external system of the partner.
- Effective and Expiration Date – enables you to specify the start and end dates of a trading partner item.
- Remark, Reference Number, and Flex Fields – use remarks, reference numbers, and the standard flex field capability to model additional information related to trading partner items.
There are certain manual actions you can trigger against your trading partner items including:
- Copy Trading Partner Item
- Create Campaign
- Document-based actions such as Generate Document and Upload Document
- Utilities such as Send Interface Transmission, Set Image, and Set Indicator
Steps to Enable
You don't need to do anything to enable this feature.
Support Automated Exceptions to Other Types of Controls
This feature enables you to automatically release a Control Category = OTHER. When you use GTM to model transactional 'holds' that are not based on license requirements, you can automatically release those holds by creating a compliance rule with a Control Category = OTHER_EXCEPTION. The transaction line will show the details of a hold for 'Other' reasons in the Other Control Screening Results grid on the transaction line. You can also use this capability with declarations.
Steps to Enable
You don't need to do anything to enable this feature.
GTM is introducing Trade Agreements as a new area in the product. Trade Agreements and other supporting information enables you to proactively leverage the trade agreements your business can take advantage of to reduce duties and taxes. There are many Trade Agreements in effect globally, each with different parameters but all following a similar structure.
To be able to take advantage of the duties and taxes associated with a Trade Agreement, companies must:
- Follow Rules of Origin to qualify goods for participation in a specific program
- Produce Certificates of Origin and provide to them to your customers
- Collect Certificates of Origin from your suppliers and stored them for future use
- Declare the intent to use a trade agreement during the import entry process and send the appropriate certificates of origin to the local customs agency
In GTM, users can take advantage of the Trade Agreement capability including:
- Download and store duties, taxes, trade programs and other information from third party data content providers
- Manage trade agreement information
- Perform trade agreement eligibility screening and qualification on your items
- Create a campaign which enables you to solicit qualification data, documents and other information from suppliers to support the use of trade programs
- Suppliers and other users can respond to a campaign they have received
This feature provides the ability to manage the details of your trade agreements in GTM. You can create and manage the trade agreements your company uses and the supporting data such as:
- Trade Agreement Type – enables you to group your trade agreements. For example, you may want to group your trade agreements into preferential (ie. free trade or reduced trade) and non-preferential trade agreements or some other grouping that makes sense to you.
- Short Name – enables you to specify the acronym or short name by which a trade agreement is known. For example, the North American Free Trade Agreement has a short name of NAFTA.
- Active flag – indicates if a trade agreement is currently in use.
- Effective and Expiration Date – enables you to specify the start and end dates of a trade agreement.\\Data Version – specify the version of the trade agreement where applicable.
- Member Nations – define the member nations participating in a trade agreement using the existing region capability.
- Remarks, Reference Numbers and Flex Fields – use remarks, reference numbers, and the standard flex field capability to model additional information related to trade agreements.
Steps to Enable
You don't need to do anything to enable this feature.
SmartLinks on Trade Agreements
This feature enables you to view data related to your trade agreements.
From the trade agreement, SmartLinks are available which enable you to:
- View Related Trade Programs - this SmartLink enables you to view all trade programs related to a particular trade agreement.
- View Related Campaigns - this SmartLink enables you to view all campaigns related to a particular trade agreement.
Steps to Enable
You don't need to do anything to enable this feature.
Global Trade Intelligence (GTI)
License and License Line Facts and Dimensions Available
This feature provides two new Analysis folders in Global Trade Intelligence. The License Analysis and License Line Analysis folders enable you to create your own reports based on license and license line data.
The License Analysis facts include License Count. The License Analysis dimensions include date, involved party, and detailed dimensions including regime, compliance data, location, reference number, and user-defined code.
The License Line Analysis facts include License Line Count, Authorized Quantity/Value, Available Quantity/Value, Reserved Quantity/Value, and Used Quantity/Value. The License Line Analysis dimensions include date, domain, and detailed dimensions including regime, compliance data, product, remark, and reference number.
Steps to Enable
You don't need to do anything to enable this feature.
New Count and Cost Facts Available
This feature provides additional columns to the Global Trade Intelligence product.
- The new count-based facts are:
- Trade Transaction Analysis > Trade Transaction Facts: The Ordered Count fact and the Shipped Count fact enables users to create reports based on ordered data and shipped data on trade transactions.
- Declaration Analysis > Declaration Facts: The Ordered Count fact and the Shipped Count fact enables users to create reports based on ordered data and shipped data on declarations
- The new cost-based facts are:
- Trade Transaction Line Analysis > Trade Transaction Line Facts: The Billed Amount Base fact enables users to create reports based on billed amount on trade transaction lines.
- Declaration Line Analysis > Declaration Line Facts: The Billed Amount Base fact enables users to create reports based on billed amount on declaration lines.
Steps to Enable
You don't need to do anything to enable this feature.
---