
This document will continue to evolve as existing sections change and new information is added. All updates appear in the following table:
| Date | Feature | Notes |
|---|---|---|
| 10 FEB 2021 | Select HTML Attribute Generation Options for Commerce Actions | Updated document. Revised information. |
| 26 JUN 2020 | General Site Password Options | Updated document. Delivered feature in update 20B. |
| 26 JUN 2020 | Post-Upgrade Considerations | Updated document. Revised information. |
| 08 MAY 2020 | Created initial document. |
Oracle Configure, Price, and Quote (CPQ) Cloud enables companies to streamline the entire opportunity-to- quote-to-order process, including product selection, configuration, pricing, quoting, ordering, and approval workflows. CPQ Cloud provides a flexible, scalable, enterprise-ready solution ideal for companies of all sizes that sell products and services across direct, indirect, and e-commerce sales channels.
This guide outlines the information you need to know about new or improved functionality in Oracle CPQ 20B and describes any tasks you might need to perform for the update. Each section includes a brief description of the feature, the steps you need to take to enable or begin using the feature, any tips or considerations that you should keep in mind, and the resources available to help you.
Key Resources
Refer to CPQ Cloud Administration Online Help for detailed descriptions and instructions.
Security & New Features
If your system has modified security structures you may need to advise your security administrator of new features you would like to implement.
Give Us Feedback
We welcome your comments and suggestions to improve the content. Please send us your feedback at cpqcloud_documentation_us_grp@oracle.com.
Column Definitions:
Features Delivered Enabled
Report = New or modified, Oracle-delivered, ready to run reports.
UI or Process-Based: Small Scale = These UI or process-based features are typically comprised of minor field, validation, or program changes. Therefore, the potential impact to users is minimal.
UI or Process-Based: Larger Scale* = These UI or process-based features have more complex designs. Therefore, the potential impact to users is higher.
Features Delivered Disabled = Action is needed BEFORE these features can be used by END USERS. These features are delivered disabled and you choose if and when to enable them. For example, a) new or expanded BI subject areas need to first be incorporated into reports, b) Integration is required to utilize new web services, or c) features must be assigned to user roles before they can be accessed.
| Ready for Use by End Users Reports plus Small Scale UI or Process-Based new features will have minimal user impact after an update. Therefore, customer acceptance testing should focus on the Larger Scale UI or Process-Based* new features. |
Action is Needed BEFORE Use by End Users Not disruptive as action is required to make these features ready to use. As you selectively choose to leverage, you set your test and roll out timing. |
|||||
|---|---|---|---|---|---|---|
| Feature |
Report |
UI or |
UI or |
|
||
Select HTML Attribute Generation Options for Commerce Actions |
||||||
Show Run-Time Breakdown of Commerce Action Performance Analysis |
||||||
Allow Multiple XML Controller Files for Upload Using FTP Automation |
||||||
The following Administration feature is available in Oracle CPQ 20B.
Oracle 20B supports a new user account lockout feature. This feature allows administrators to specify an amount of time an account login is automatically locked after the number of invalid login attempts is exceeded. Once the lockout time has passed, the user account login is automatically unlocked and available for user login. This feature provides enhanced site-level user account login security.
Steps to Enable
To set the account password lockout time for user logins, complete the following steps:
- Navigate to the Admin Home page.
- Under General, click General Site Options. The Options – General page opens.
- Within the Options – Password section, enter a value in the Number of Login Attempts field. This value specifies the number of login attempts allowed before locking a user account.
IMPORTANT: If the Number of Login Attempts is set to 0, users will have infinite login attempts and the Account Lockout Time feature is not active.
- Enter the value in the Account Lockout Time field to specify the number of minutes an account is automatically locked after the number of invalid login attempts is exceeded.
Tips And Considerations
- If you do not want to automatically unlock user account logins after a set amount of time, set the Account Lockout Time value to 0 minutes. The account login will remain locked until an administrator unlocks that account login.
- During the account lockout time, administrators can reset an account login password. The user can then immediately log in to their account with the new password.
Key Resources
Refer to Oracle CPQ Security Guide for detailed descriptions and best practices.
The following Commerce features and enhancements are available in Oracle CPQ 20B.
- Select HTML Attribute Generation Options for Commerce Actions
- Show Run-Time Breakdown of Commerce Action Performance Analysis
- Support New Commerce Process System Attributes
Select HTML Attribute Generation Options for Commerce Actions
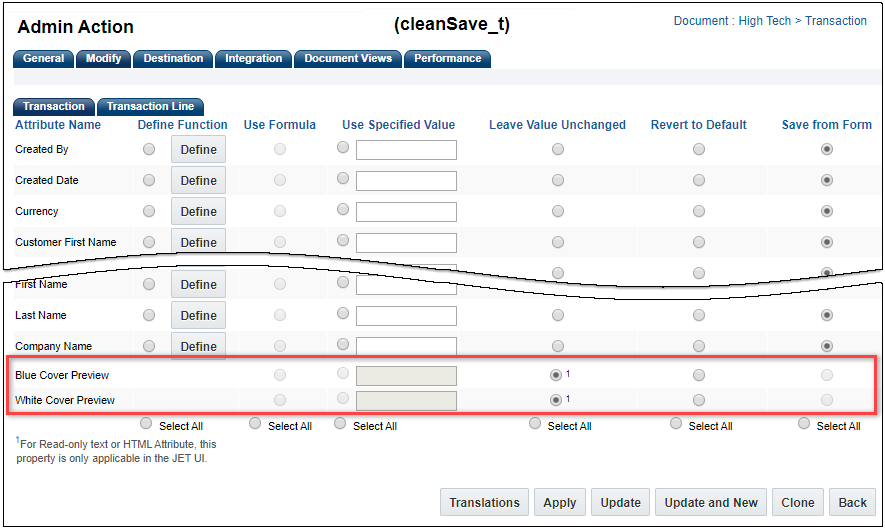
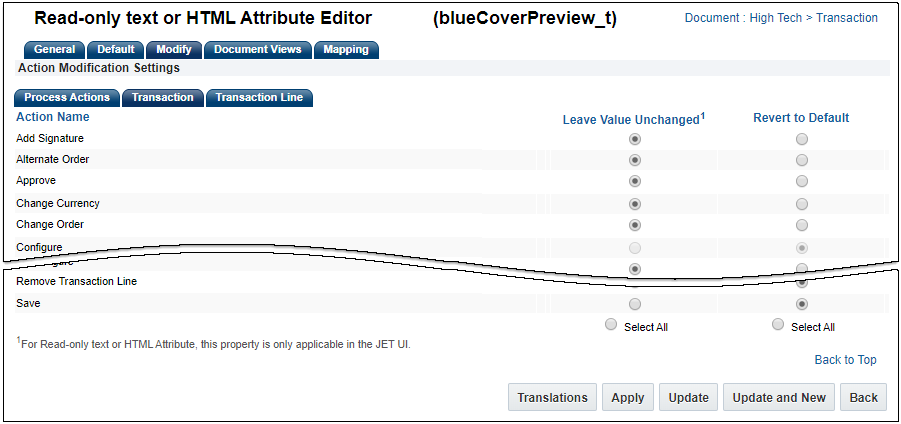
In prior releases, HTML attributes were always implicitly set to the Revert to Default option for Commerce modify actions. As such, all HTML attributes were re-rendered on every modify action. To improve page render performance, Oracle CPQ 20B allows the administrator to specify whether a modify action should re-render a specific HTML attribute (Revert to Default) or leave its value unchanged (Leave Value Unchanged).
As this option was not available prior to 20B, existing HTML attributes will continue to be set to Revert to Default for all modify actions after the environment is upgraded to Oracle CPQ 20B. To take advantage of better page performance and to avoid migration issues, administrators must change this setting to Leave Value Unchanged for specific HTML attributes and modify actions. When the user clicks a specific action, this will eliminate the regeneration of the HTML attribute, resulting in better page performance.
HTML attributes that are defined in 20B and beyond will default to the Leave Value Unchanged option.
Steps to Enable
When you upgrade to Oracle CPQ 20B your existing HTML attributes will remain set to Revert to Default. To exclude HTML attribute generation for existing attributes, administrators must set the attribute value to Leave Value Unchanged using one of the following procedures:
- Set HTML Attribute Generation Behavior for a Commerce Action
- Set HTML Attribute Generation Behavior for All Commerce Actions
Set HTML Attribute Generation Behavior for a Commerce Action
To set HTML attribute behavior for a specific action, perform the following steps:
-
Navigate to the Action List page:
Admin > Commerce and Documents > Process Definition > Documents > Actions
-
Click on the name of the applicable action.
-
Select the Modify tab.
-
Set the HTML attribute behavior for this action:
-
Select Leave Value Unchanged to disable HTML rendering.
-
Select Revert to Default to enable HTML rendering.
-
-
Click Apply or Update to save changes.
Set HTML Attribute Generation Behavior for All Commerce Actions
To set a HTML attribute's behavior for all actions, perform the following steps:
-
Navigate to the Attribute List page:
Admin > Commerce and Documents > Process Definition > Documents > Attributes
-
Click on the name of the applicable HTML attribute.
-
Select the Modify tab.
-
Set the HTML attribute behavior for the applicable actions:
-
Select Leave Value Unchanged to disable HTML rendering.
-
Select Revert to Default to enable HTML rendering.
-
-
Click Apply or Update to save changes.
Tips And Considerations
The Commerce process must be deployed to make changes visible to the end user.
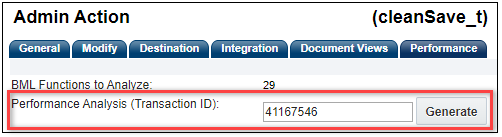
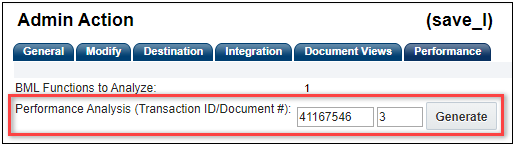
Show Run-Time Breakdown of Commerce Action Performance Analysis
Commerce action performance analysis was introduced in Oracle CPQ 19A to help customers identify potential performance hindrances. Beginning in Oracle CPQ 20B, the performance analysis will include the run-time for the action's BML, including the library functions and select BML functions for the specified transaction or transaction line. The performance analysis shows elapsed time for processing-intensive elements of a Commerce action's BML. This feature allows the administrator to troubleshoot common performance complaints, such as "the system is slow when I save my quote". This feature can also be used to benchmark BML performance before and after implementing a script change.
To view the performance analysis for a Commerce action, perform the following steps:
-
Navigate to the Actions List page:
Admin > Commerce and Documents > Process Definition > Documents > Actions
-
Click on the name of the applicable action.
-
Select the Performance tab.
-
Perform one of the following:
-
For main document actions, enter the Transaction ID.
-
-
For sub-documents, enter the Transaction ID and Document #.
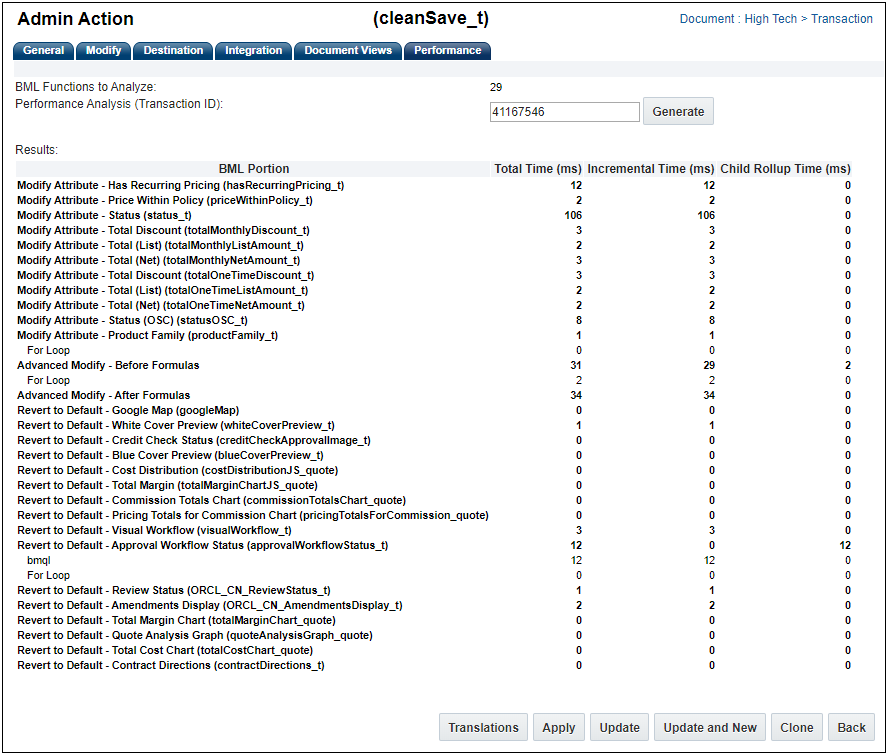
-
Click Generate.
The performance analysis operation includes BML functions in Advanced Modify Before and After Formulas, Advanced Validation, Modify options, Destination options, and BML integrations. Upon execution, the Commerce action Performance tab displays the following times for associated BML loops, BMQL, URL data calls, library calls, and JSON parsing.
-
Total Time: Total time taken, in milliseconds, to execute the nested BML, including any time spent executing BML items that have their own entries.
-
Incremental Time: Time taken, in milliseconds, to execute the nested BML, excluding time spent executing BML items that have their own entries.
-
Child Rollup Time: Total combined time taken, in milliseconds, for all BML items called from this BML item.

Steps to Enable
You don't need to do anything to enable this feature.
Tips And Considerations
-
Actions that do not have BML functions will not show the Performance tab.
-
The run-time breakdowns are specific to BML functions and do not reflect non-BML execution times.
-
Generating a Performance Analysis does not save changes to the quote.
-
The external integrations defined in the Integration tab are not executed when generating a Performance Analysis, but calls from other BML using the urldata functions will execute and may modify external systems.
Support New Commerce Process System Attributes
Oracle CPQ 20B introduces two new Commerce system attributes:
- _system_process_name to indicate the current Commerce Process variable name.
- _system_subscription_order_enabled to indicate if Subscription Ordering, also known as Asset Based Ordering, is enabled or disabled.
These attributes are supported for Commerce BML functions, including:
- Attribute defaults
- Actions
- Library functions
- Rules
- Advanced Default
- Auto-Update
Additionally, _subscription_order_enabled is available in the Utility BML library to apply conditional logic to Subscription Ordering.
Steps to Enable
You don't need to do anything to enable this feature.
The following Data Table feature is available in Oracle CPQ 20B.
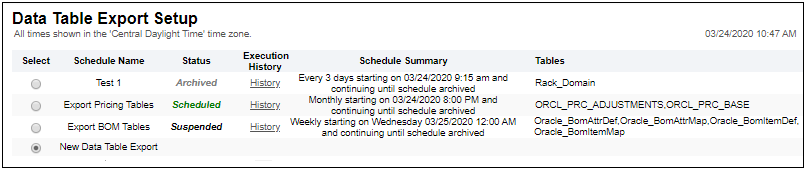
Oracle CPQ introduces the Data Table Export Scheduler to automate the export of data tables to an SFTP server. The ongoing scheduled exports provide historical data that can be used for audit and compliance purposes. Administrators can identify data tables to export and schedule the periodicity, start time, and an optional termination date. Upon completion of a scheduled export, an email notification is sent to the email address associated with CPQ site SuperUser login. Notifications are sent for success or failure of the entire export, as well as partial exports. The email includes a success or failure status and the details regarding the export.
Oracle CPQ 20B adds a new integration type to the Integration Center called Data Table Export Scheduler. This integration defines the SFTP connection and scheduling details for data table exports.
Set Up a Data Table Export Scheduler Integration
To create a Data Table Export Scheduler integration within Oracle CPQ, complete the following steps:
-
Navigate to the Integration Center page.
Admin Home > Integration Platform > Integration Center
-
Click Create Integration.
-
Select Data Table Export Scheduler from the Type menu.
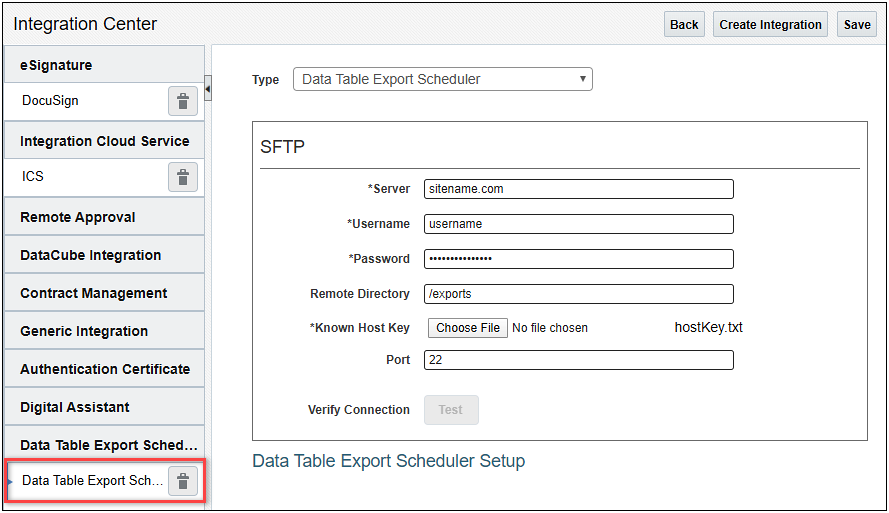
-
Enter the Server name of the SSH server where data table exports are sent.
-
Enter the login Username and Password to use when connecting to the SSH server.
-
Enter the Remote Directory where data table exports are sent.
-
Click Choose File to navigate and select the Known Host Key file.
-
Enter the Port number to use when connecting to the SSH server.
-
Click Save.
-
Click Test to verify your connection.
Schedule a Data Table Export
To schedule a data table export within Oracle CPQ, complete the following steps:
-
Navigate to the Integration Center page.
Admin Home > Integration Platform > Integration Center
-
Select the Data Table Export Scheduler Integration.
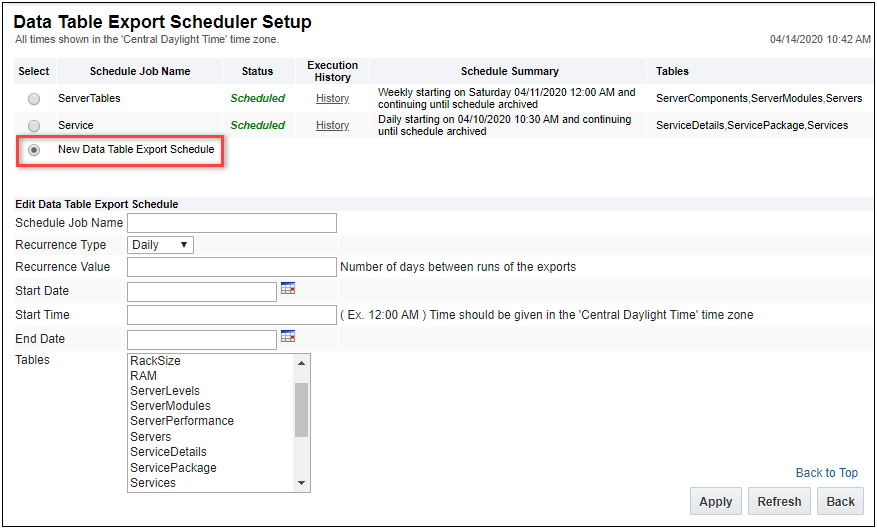
-
Click Data Table Export Scheduler Setup.
-
Select the New Data Table Export Schedule option, which is located at the bottom of the scheduled exports list. You can also select a scheduled export to view the export parameters.
-
Enter the Schedule Job Name.
-
Select Daily, Weekly, or Monthly Recurrence Type
-
For Daily recurrence types, enter the Recurrence Value.
-
Enter the Start Date.
-
For weekly recurrences, the export occurs on the same weekday as the start date.
-
For monthly recurrences, the export occurs on the same day of the month as the start date.
IMPORTANT: If a monthly export start date is scheduled at the end of the month and that day is invalid for any future months, the export will be executed on the last day of the month.
For example, If Start Date for monthly export is set to January 31, the export will be executed on the 28th or 29th day of February; and on the 30th day of April, June, September, and November.
This behavior is different from other monthly recurring jobs that will not run in months where the specified day does not exist.
-
Enter the Start Time.
IMPORTANT:
Imports are executed sequentially. When several large exports are scheduled to run at the same time, some of these exports may not execute at the exact specified time.
The Start Time references the system time, which is displayed at the top of the page. This may be different from the user's profile time preference.
-
(Optional) Enter an End Date.
-
Select the Tables to be included in the export.
IMPORTANT: When all table entries are selected, the selection is interpreted as "select all current deployed tables", not a specified list of tables that were available when the schedule was created.
-
Click Apply.
IMPORTANT: Before a scheduled job has run its first export, it can be removed from the list by archiving it.After the first job has run, the job will be marked as archived, not deleted.
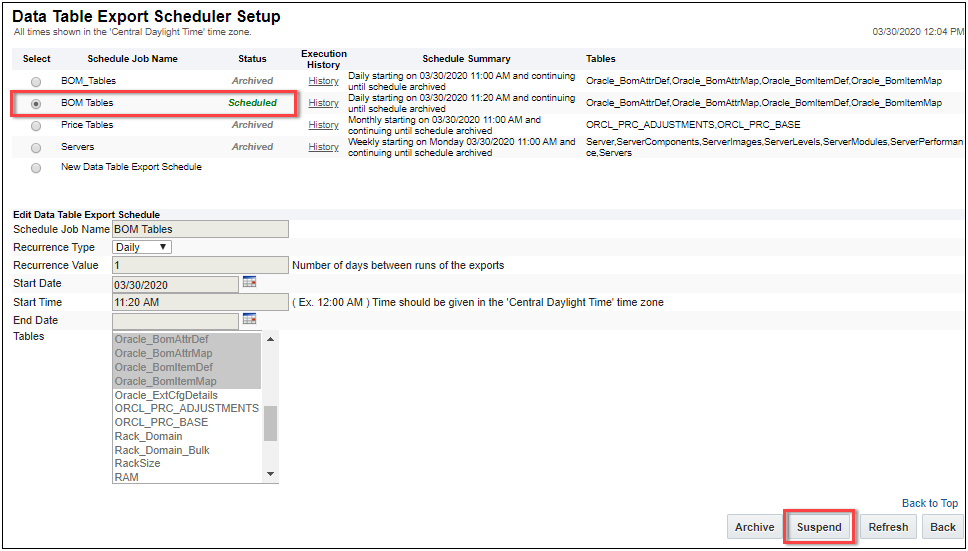
Suspend a Data Table Export
To suspend a scheduled data table export, complete the following steps:
-
Navigate to the Integration Center page.
Admin Home > Integration Platform > Integration Center
-
Select the Data Table Export Scheduler integration.
-
Click Data Table Export Scheduler Setup.
-
Select a Scheduled export, and then click Suspend.

Resume a Data Table Export
To resume a suspended data table export, complete the following steps:
-
Navigate to the Integration Center page.
Admin Home > Integration Platform > Integration Center
-
Select the Data Table Export Scheduler integration.
-
Click Data Table Export Scheduler Setup.
-
Select a Suspended export, and then click Resume.

IMPORTANT: When a suspended export is resumed, the export will execute immediately if the date is past the originally scheduled time. For example, assume a monthly data table export, which is scheduled to run on August 15th, is suspended on August 10th.
- If the data table export is resumed on August 14th, the export will occur on August 15th.
- If the data table export is resumed on September 1st, the export will occur immediately. The next export will occur on September 15th.
Archive a Data Table Export
To archive a scheduled or suspended data table export, complete the following steps:
-
Navigate to the Integration Center page.
Admin Home > Integration Platform > Integration Center
-
Select the Data Table Export Scheduler integration.
-
Click Data Table Export Scheduler Setup.
-
Select a Scheduled or Suspended export, and then click Archive.
IMPORTANT: Archived data table export schedules are stored in history for 90 days. Archived data table export schedules with failures are stored indefinitely.
- If an export has never executed, archive will remove the data table export schedule from the system.
- If an export has executed, archive will store the data table export schedule in history for 90 days.
Scheduled Data Table Export Logs
The export logs show scheduled exports, status, schedule summary, and the tables included in the export.

Administrators can click on the History link to view the execution history for a specific scheduled export. The execution history lists the status, start time, end time, and the destination. The execution history displays up to 60 entries, and each export has two entries. Therefore, for daily exports the history will only display 30 days of execution history.
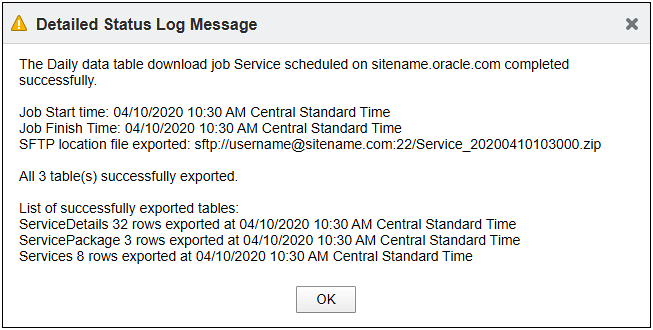
To view more details about a specific export, click on the "More information" icon.
Steps to Enable
A Data Table Export Scheduler Integration must be set up prior to scheduling an export.
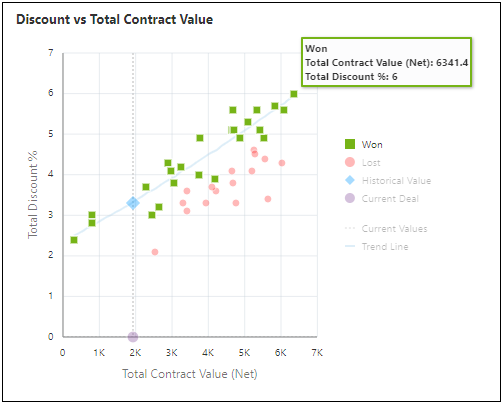
The following Deal Comparison Scatter Plot Analytic feature is available in Oracle CPQ 20B.
Display Transaction from Deal Comparison Scatter Plot
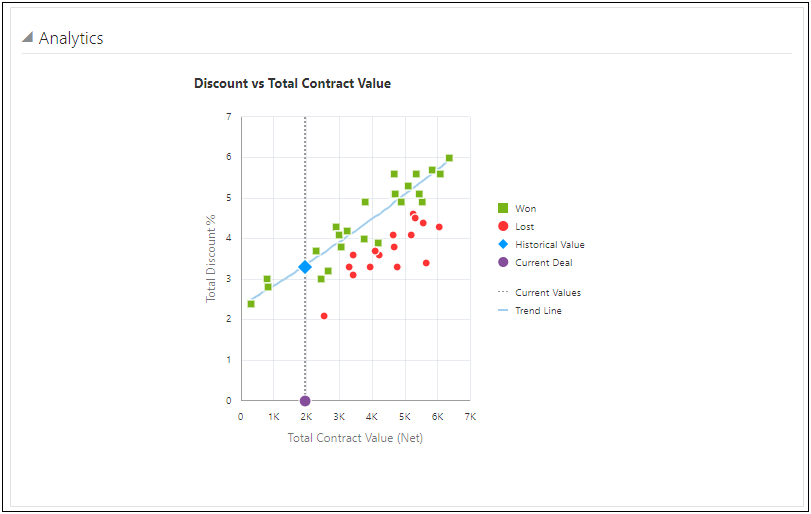
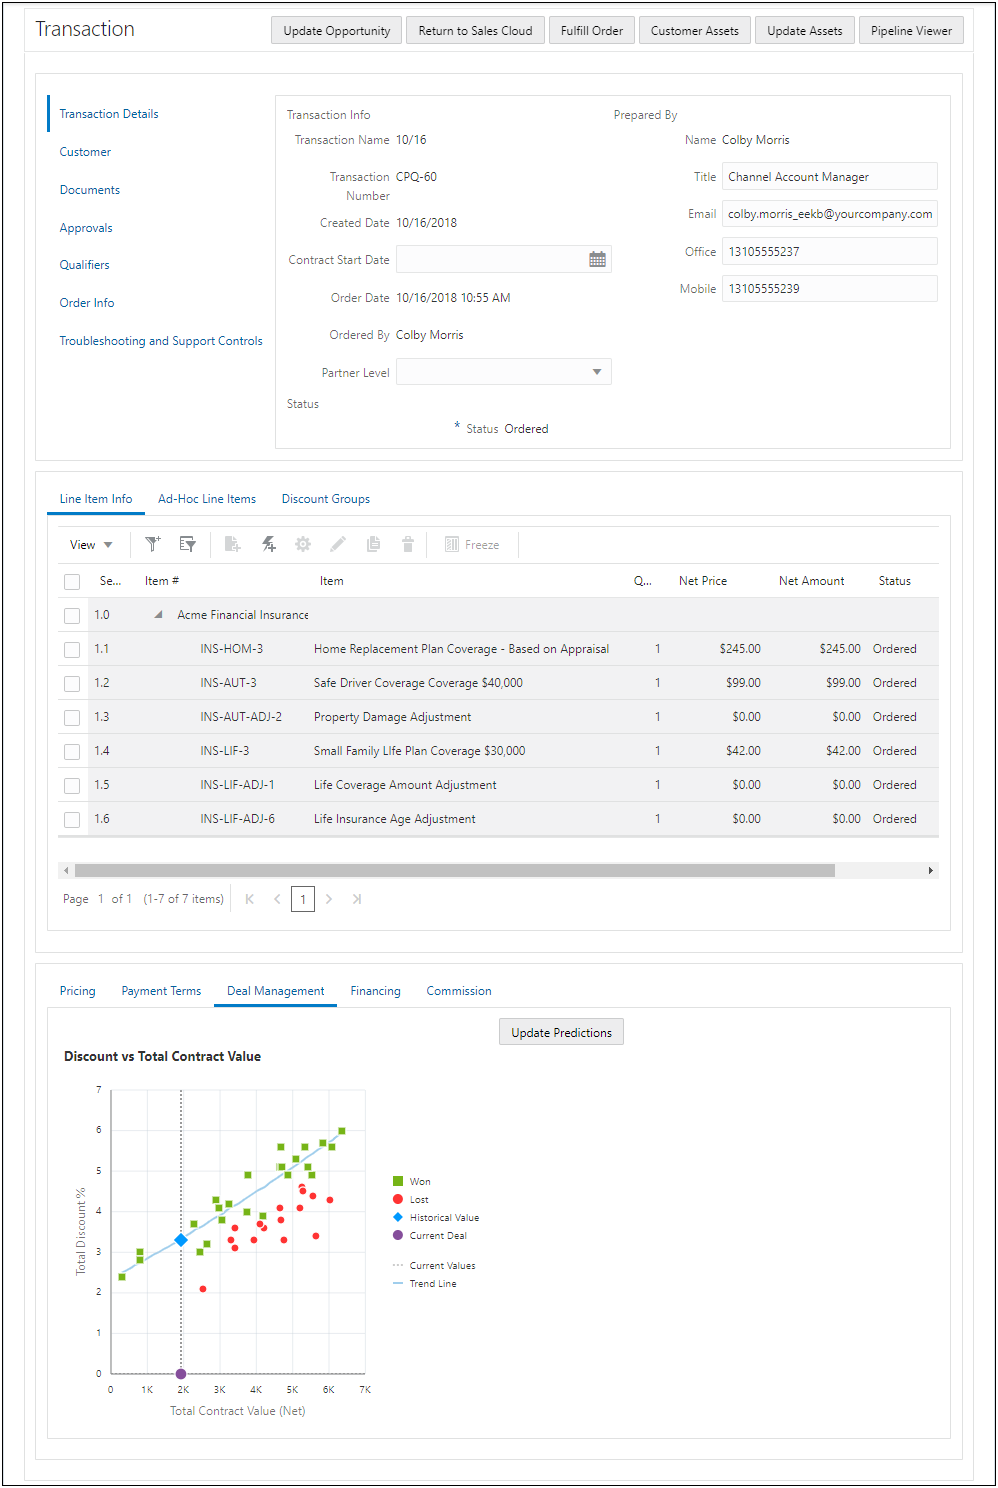
Oracle CPQ 20B enhances the value of the Deal Comparison Scatter Plot to enable users to more easily compare and analyze related transactions during their quoting process. Introduced by Oracle CPQ in 2017, the Deal Comparison Analytic displays data points for related or comparable deals in a scatter plot chart. Beginning in Oracle CPQ 20B, JET UI users can drill into a quote or quote line details from a data point displayed on the scatter plot analytic.
IMPORTANT: End users can only access the Transaction and Transaction Line details they have permission to view.
Sample Deal Comparison Scatter Plot
Steps to Enable
To view Transaction or Transaction Line details from a scatter plot, perform the following steps:
PREREQUISITE: Establish a scatter plot analytic for the Transaction or Transaction Line. Go to the Implementations > Deal Management > Deal Comparison Scatter Plot article within the Oracle CPQ Administration Online Help for instructions.
- Click on a Transaction or Transaction Line to view details.
- Open the Deal Management Analytics section of the Transaction or Transaction Line to display the scatter plot.
- (Optional) Hover over data points within the scatter plot to view data point summary information.
- Click on a data point to open a new tab containing either the Transaction or Transaction Line details specific to that data point.
IMPORTANT: A known browser issue prevents tool tips from displaying properly when accessing this feature using iOS Safari on an iPad. A tap gesture will launch the related Transaction, and the tool tip will display on return to the original Transaction. A long press gesture does not display the tool tip as expected.
Key Resources
Refer to the Deal Management article within the Oracle CPQ Administration Online Help for more information about scatter plot analytics.
FTP Automation and Bulk Upload Services
The following FTP Automation and Bulk Upload features are available in Oracle CPQ 20B.
- Allow Multiple XML Controller Files for Upload Using FTP Automation
- Import Migration Package Using FTP Automation
Allow Multiple XML Controller Files for Upload Using FTP Automation
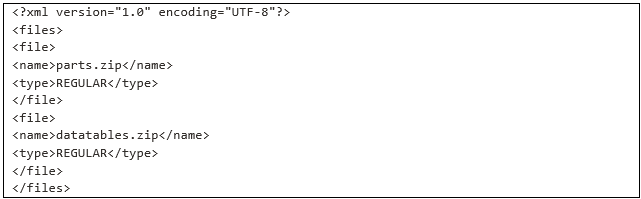
Oracle CPQ 20B provides for the upload of multiple XML controller files using FTP Automation. The controller XML files can reference multiple ZIP files. Each controller filename must include the prefix "upload_list" (e.g. upload_list1.xml, upload_list2.xml, upload_listA.xml). The XML controller files are processed one at a time in sequential order with the latest date/time controller XML file processed first. Once uploaded the file is deleted from the FTP folder. Bulk upload status is provided on an individual XML file basis as well as for completion of all the files in the FTP folder.
Controller File and ZIP File Processing Example
If there are two controller files:
- upload_list1.xml with last modified date of 3/26/2020
- upload_list2.xml with last modified date of 3/20/2020
If both these files are uploaded to the FTP folder, CPQ picks up both files and start processing upload_list1.xml file with 3/26/2020 date first and then upload_list2.xml with date 3/20/2020 next.
If in the interim upload_list3.xml with last modified date of 3/30/2020 is uploaded to the FTP folder, this file is picked up by the scheduler in the next processing cycle once the scheduling interval/wait time is completed.
If a controller upload_list.xml files contains references to multiple ZIP files, the ZIP files are processed in the order of their reference within the controller file. In the example below, parts.zip is processed first followed by datatables.zip.

Steps to Enable
To upload multiple XML controller files using FTP, perform the following steps:
PREREQUISITE: If you haven't done so already, log a Service Request on My Oracle Support for the creation of an FTP profile and its corresponding "automated" folder on the FTP server.
- Prepare the files that will be uploaded and place each file to be uploaded in a separate ZIP file.
- Prepare an XML controller file. Each controller filename must include the prefix "upload_list". For example: upload_list1.xml, upload_list2.xml, upload_listA.xml, etc.
The upload_list.xml file lists the ZIP files in the order to be processed. The following shows the XML format for the upload_list.xml file.

- Upload the ZIP files referenced in the upload_list.xml controller file.
- Upload the upload_list.xml controller file which contains the reference(s) to the ZIP file(s) from step 1.
- Repeat steps 2 through 4 for each XML controller file. Note that the XML controller files are processed one at a time in sequential order with the latest date/time controller XML file processed first.
When the import is complete, email notification is sent to the SuperUser for the site.
Import Migration Package Using FTP Automation
Migration packages are administrator-defined packages of components that can easily be moved from site to site without the administrator having to reselect components before each migration. Currently, migration packages and individual components of a migration package are imported into Oracle CPQ using the Import Package functionality of the Migration Center. In Oracle CPQ 20B this functionality is also supported using FTP Automation data transfer.
Steps to Enable
To import a migration package using FTP, perform the following steps:
PREREQUISITE: If you haven't done so already, log a Service Request on My Oracle Support for the creation of an FTP profile and its corresponding "automated" folder on the FTP server.
-
Prepare the migration package ZIP file that will be uploaded.
-
Prepare an XML controller file for the migration package ZIP file. The controller filename must include the prefix "upload_list".
The upload_list.xml file lists the migration ZIP file. The following shows the XML format for the migration package upload_list.xml file.
-
Upload the migration package ZIP file referenced in the migration package upload_list.xml controller file.
-
Upload the migration package upload_list.xml controller file.
-
Navigate to the Migration Logs to view the migration package status.
Admin Home > Utilities > Migration (Logs)
Tips And Considerations
- When uploading a migration package via FTP Automation, the following default values are set for the migration:
-
- The migration package Description is "Automatic Bulk Upload of migration package"
- The Send Notification is not set to send email notifications
- The Include Snapshot is not set to take a snapshot of the target site immediately before performing the migration
- Target process is set to Default Migration where a standard package migration is performed
- Cross Process Migration is not supported when uploading a migration package via FTP Automation.
- Unlike other FTP Automation features, which are manually operated via the Bulk Upload administration page, Import Migration Package continues to be accessible for manual operation via the Migration Center administration area.
JET Transaction User Interface
Oracle CPQ 20B provides several enhancements for the JET Transaction UI. This release delivers enhanced rendering performance and responsiveness, faster refresh of the line item grid while editing, smoother row selection and row edit modes, and significantly improved column resize and freeze.
The following JET UI enhancements are available in Oracle CPQ 20B.
-
Checkbox Selection for Line Items
-
Enhanced Context Menu Actions for Line Item Grid Columns
-
Expand and Collapse All Models in the Line Item Grid
-
Import Transaction Line Item Data from XLSX File
-
Progress Indicator During Queue Processing
Checkbox Selection for Line Items
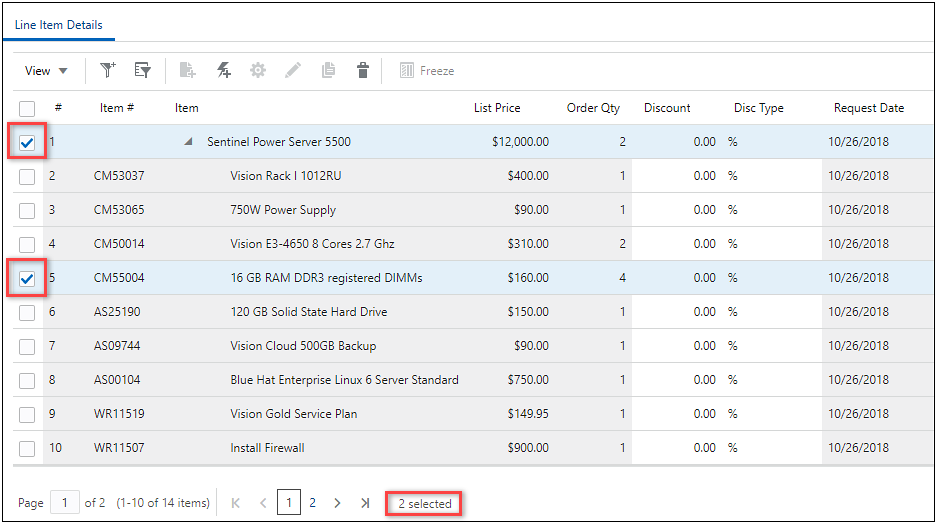
Oracle CPQ 20B delivers the highly requested Checkbox row selection for the JET Transaction UI Line Item Grid. In prior releases, selecting multiple line items was limited to the current page, and was not possible for users on touch-screen devices. Now with the selection checkboxes, displayed at the start of each line item row, selecting and deselecting lines is easier for all users. In addition, the Line Item Grid table footer indicates the number of currently selected rows.
For example, the following image displays a Line Item Grid with two rows selected. Note the number of items selected displays under the Line Item Grid.
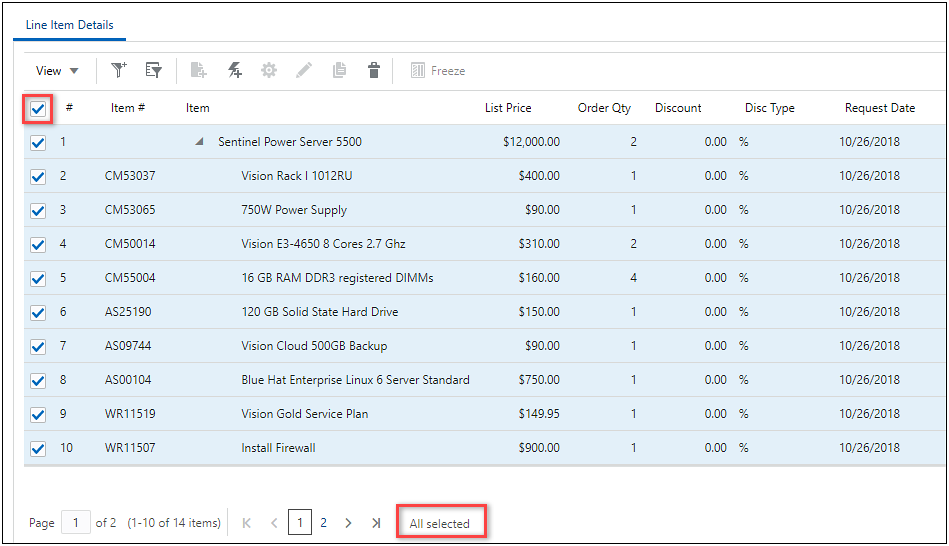
Users can also click the checkbox in the first column header to select or deselect all lines across all pages. In this example "All selected" displays under the Line Item Grid, indicating line items from all pages are selected.
Steps to Enable
You don't need to do anything to enable this feature.
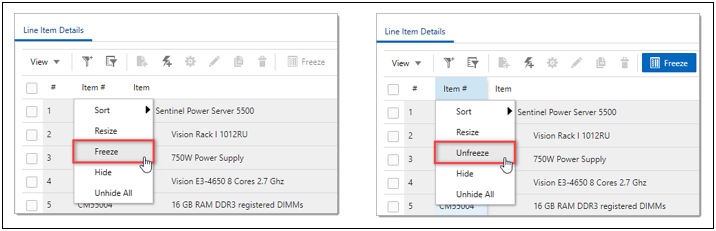
Enhanced Context Menu Actions for Line Item Grid Columns
Oracle CPQ 20B introduces new actions available from the context menu on the Line Item Grid column headers.
- To freeze a column, right-click on the column header and then select Freeze from the context menu.
- To unfreeze a column, right-click on a frozen column header and then select Unfreeze from the context menu.
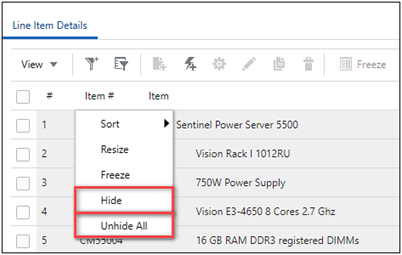
Users can also quickly Hide a column or Unhide All columns from the context menu.
Steps to Enable
You don't need to do anything to enable this feature.
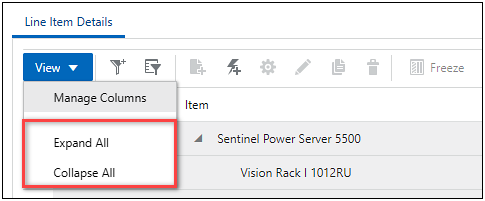
Expand and Collapse All Models in the Line Item Grid
In prior releases, each model or sub-model had to be individually expanded or collapsed. Oracle CPQ 20B adds two new actions available from the Line Item Grid's View menu to instantly Expand All or Collapse All models on the transaction. This functions across all pages of the Line Item Grid. Like all other View menu options, the expanded/collapsed state is also persistent for the user across sessions.
Steps to Enable
You don't need to do anything to enable this feature.
Import Transaction Line Item Data from XLSX File
Oracle CPQ 20A provided the ability to export line item data to a Microsoft Excel (XLSX) file on the user's local computer. With this file users can run formulas and calculations on the Transaction data quickly and easily.
Oracle CPQ 20B provides the additional ability to import line item data from a modified CPQ-exported Microsoft Excel (XLSX) file. This feature leverages Microsoft Excel with Oracle CPQ Commerce to add new or modify existing transaction line data. End users can perform analysis and approval activities before importing line item modifications into the CPQ Transaction. Independent line items or unconfigured Model line items can be added to the CPQ export XLSX file. The export XLSX file provides necessary identification data to determine modifications to a pre-existing CPQ Line Item.
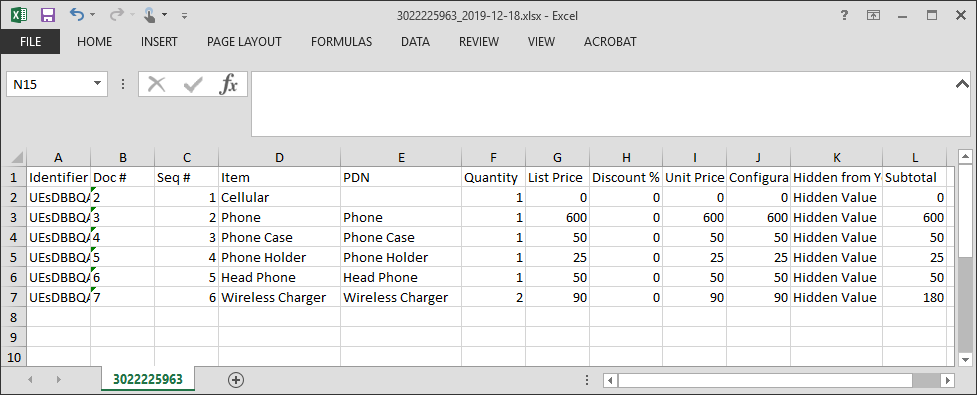
Line Item Data XLSX File
The exported XLSX file includes all the end user's accessible data from the Transaction's Line Item Grid as determined by their user access setup on the CPQ environment. If a Line Item Grid column is accessible to the user's participant profile in Steps Administration, but is hidden from the view through a Commerce hiding rule or a Line Item Grid view filter, that data is still exported. For details about how user access setup impacts export XSLX file content, see the Commerce Documents > JET Transaction UI > Export JET Transaction UI Line Item Grid to XLSX File Format article in the Oracle CPQ Administration Online Help.
Sample Export/Import Excel File
The XLSX filename includes the Transaction ID (bs_id) and date of the export request. For example, 3022225963_2019-12-18.xlsx. Within the XLSX file, the sheet name is the Transaction ID (bs_id).
The first row of the Excel sheet is a header row that provides the Line Item Grid column labels. Each subsequent row corresponds to a specific line item and the cells in the row contain the values for the labeled columns.
The first column of the Excel sheet is an "Identifier" column. This column provides encoded hierarchical information regarding Model and part relationships for the line items. This information is for internal use and should not be modified.
In the above example, column K is labeled "Hidden From You" with the row values showing "Hidden Value" to indicate this type of hidden data. However, if the end user's participant profile hides an attribute for the current step they are on, that information is not exported.
Import XLSX File Details and Helpful Hints
The following list defines the supported data modifications and helpful user hints when using this import feature.
- An exported line item data XLSX file with the Transaction's proper identification information is required for successful import.
- A Model configuration can be imported as an unconfigured Model. Multi-level items, such as mandatory line items or child items, are not supported for import. A Reconfigure action must be performed to configure the Model on the Transaction.
- Root-level parts can be added by import into a Transaction's Line Item Grid. When adding a new line item, the identifier column should be empty for that row in the XLSX file.
- Read-only field modifications are ignored on import.
- Only attributes that the end user has permissions to modify, according to their user profile, can be modified via XLSX file import.
- Advanced Modify for an Update Line Items action is ignored when executing the Import Line Items action.
- Modifying the sequence number and/or group sequence number of line item data is not supported.
- Excel may automatically adjust string values to be numeric values in the XLSX file causing the import to fail. For example, in CPQ a menu item label string value of "6" may be automatically adjusted in Excel to be a number value of "6.00". Oracle CPQ doesn't recognize "6.00" as a valid menu label value and fails the import. To avoid these types of issues, we recommend setting the data types and formatting of values in the XLSX file to match those defined within the Line Item Grid.
- For Multi-Select Menu attribute values, each separate value is expected to be separated by a new line. In Excel this is done by using Alt+Enter (PC) or Option+Enter (Mac) while editing a cell.
- If a row or multiple rows in the exported XLXS file are not being updated, the end user may delete those rows from the exported spreadsheet, make the necessary modifications to rows in the spreadsheet, and then import that spreadsheet to the Transaction. By doing this, only changes to those rows that are in the spreadsheet are made. However, it is necessary for the end user to ensure no empty rows are included between two populated rows.
- Import uses the current user's language when importing.
- Currency attributes are treated as float attribute types.
- The number of error messages to display in the JET Transaction UI defaults to 5. This default value can be modified by the administrator (Refer to Steps to Enable for instructions).
Import XLSX File Error and Warning Messages
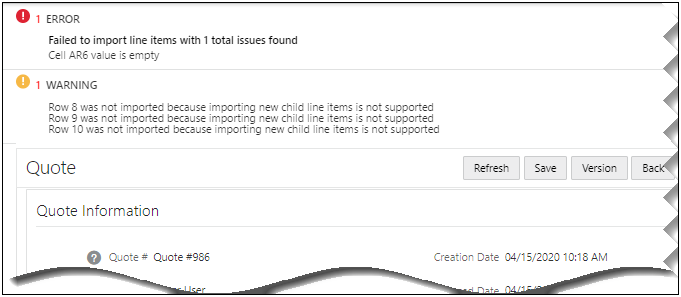
Validation of data provided in the XLSX import file occurs once the Import Line Items action is invoked. Error and warning messages, including a summary message with the total number of errors found, displays at the top of the Transaction page. There are two types of messages that may result from this validation:
- Error - An error message results when the data in the XLSX file is not able to be processed into the Transaction's Line Item Grid. If any error messages occur, the import fails and none of the line item data is imported. Error messages help the end user identify necessary changes required for successful import of the XLSX file. Common causes of error messages include:
- Transaction's Identification metadata in Column 1 is invalid
- Column labels are incorrect or invalid
- Cell values are an invalid data type or formatted incorrectly
- Cell value does not match user's current language or currency
- An empty cell in the XLSX file that clears an attribute value for an attribute that requires a value (e.g., a boolean attribute)
- Empty row between populated rows
- New part is not found in Parts List
- Warning – A warning message results when a modification in the XLSX import file is not supported by the import feature. The warning message includes the location of the unsupported modification and lets the end user know that the update was skipped during import. Warning messages do not prevent valid modifications in the XLSX file from being imported. Common causes of warning messages include:
- Multi-level Line Items are not supported for import
- The first worksheet in the XLSX file is empty
Sample Import Error and Warning Messages
Sample Use Case
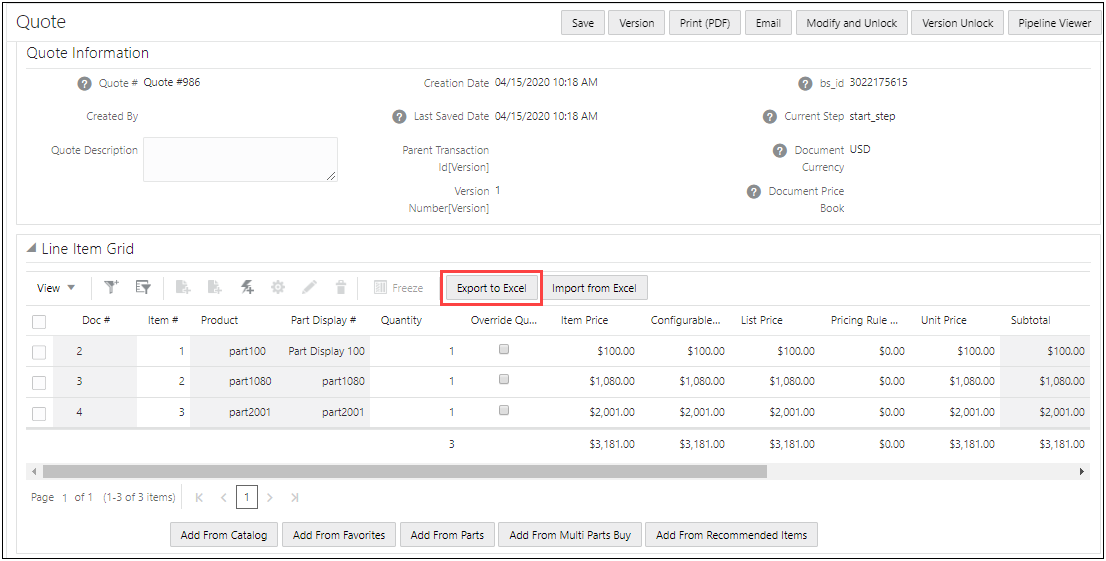
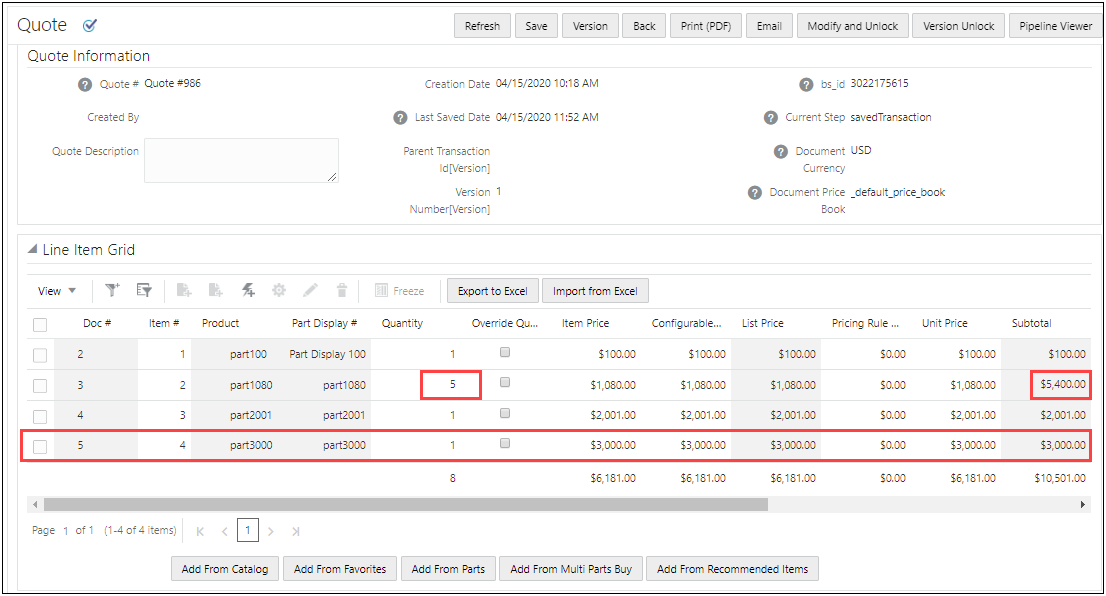
A sales manager wants to change a quantity of one of the line items and add a new line item to a Transaction.
- Navigate to the Transaction.
- Click Export to Excel action button to export the line item data to an XLSX file. The XLSX file is downloaded and can be saved to the sales manager's local drive.
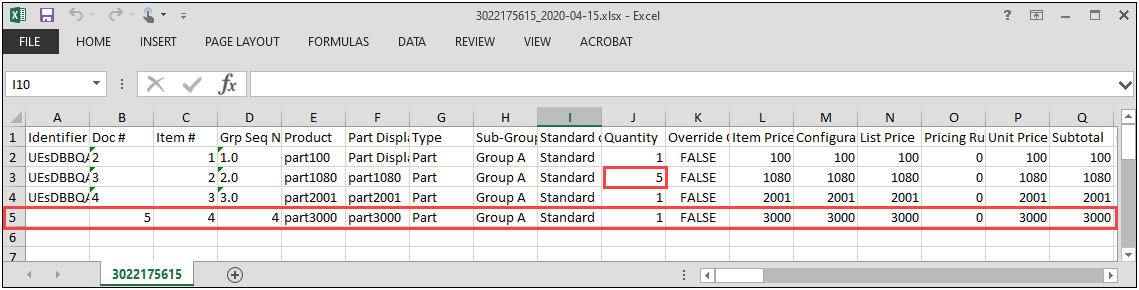
- Open XLSX file and modify file to change an existing line item quantity and add the new line item.
- Save the XLSX file.
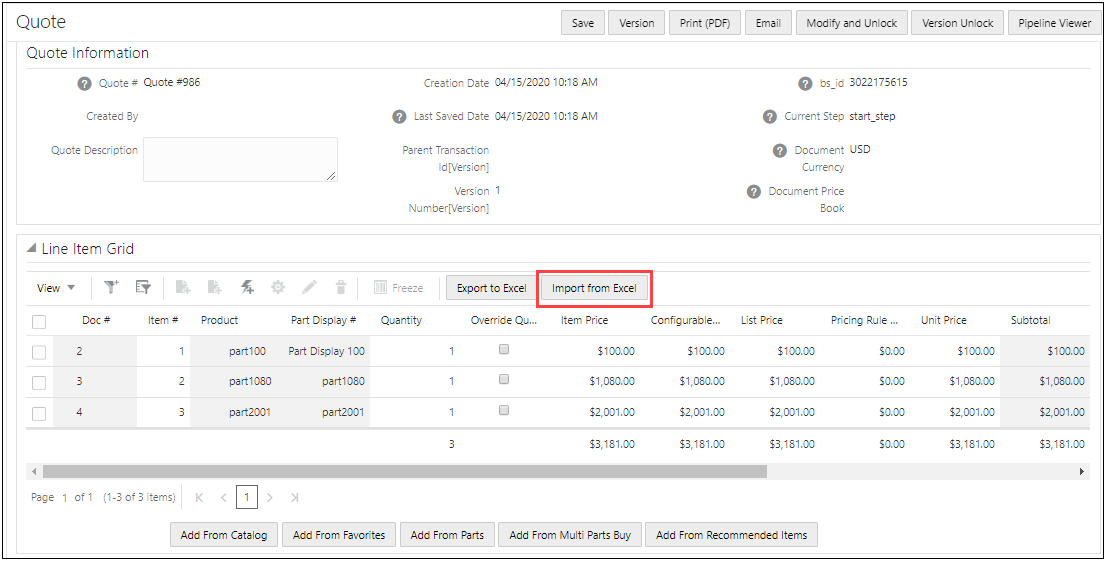
- Navigate to the same Transaction.
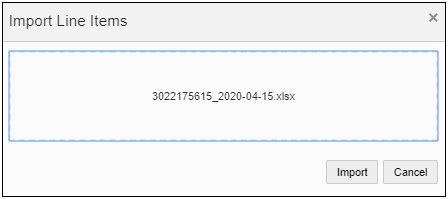
- Click Import from Excel action button. The Import Transaction Line Items window displays.
- Drag and drop the XLSX file into the file box or click in the box to navigate through the File Manager to upload the XLSX file.
- Click Import. The file is imported, validated for errors, updated accordingly, and modifications automatically saved to the Transaction.
Steps to Enable
To import a Transaction's Line Item Grid XLSX file, an administrator must perform the following steps:
-
Navigate to the Processes page.
Admin Home > Commerce and Documents > Process Definition
-
Select Documents from the Navigation drop-down for the applicable process, and click List. The Documents List page opens.
-
Select Actions from the Navigation drop-down for the Transaction, and click List. The Actions List page opens.
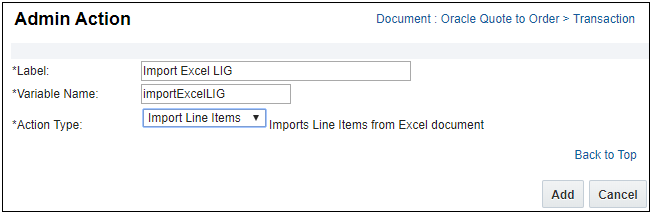
-
Click Add. The Admin Action page opens.
-
Enter the Label and Variable Name for the Action.
-
Select Import Line Items from the Action Type drop-down.
-
Click Add. The Action is added and the Admin Action tabs appear.
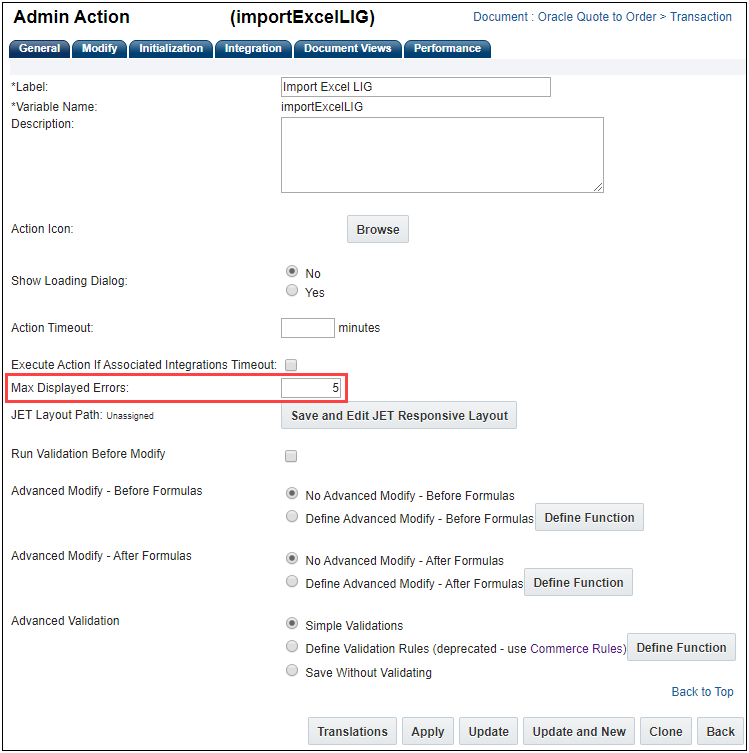
-
Review and update the settings within the Admin Action tabs. Refer to the Oracle CPQ Administration Online Help for detailed information.
IMPORTANT:
- The General tab provides the Max Displayed Errors field. This field designates the number of error messages to display in the JET Transaction UI. The default value is 5.
- When an existing line item is updated during import, the Modify tab settings are applied to the selected attributes for the Main document and Sub-Document.
- When a new line item is added during the import, the Initialization tab settings are applied to the line item.

- Click Apply or Update to save the settings.
- Once the Import Line Items Commerce action is created, administrators must add this action to an Action Bar in the JET Transaction Layout for end customer access. Refer to JET Responsive Layout Editor > Actions in Oracle CPQ Administration Online Help for details on adding an action to the JET layout.
Tips And Considerations
- Importing Transaction line item data from an XLSX file is not supported in Legacy UI.
- If Subscription Ordering (also called Asset Based Ordering) is enabled, administrators must ensure that ABO-based attributes on the Transaction Line Item Grid be marked as read-only in the Transaction Layout or in the user profile permissions.
- Care should be taken by the end user when importing a Transaction's Line Item Grid while the Transaction is in active Collaborative Quoting mode. The XLSX file is a snapshot of the Line Item Grid taken when the Export Line Items action is invoked. Changes to the Line Item Grid by a collaborator can make the import file information out of date.
- A maximum of 1000 rows can be imported at one time.
- When Price Books are enabled for a Transaction but it does not yet have a Price Book selected, the default Price Book is automatically selected when importing the Line Item data.
Progress Indicator During Queue Processing
Similar to the JET Configuration UI, the JET Transaction UI now displays a Progress Indicator in the page header. This provides an immediate visual indication that the user's action has had an effect. When the user performs an action, an animated icon displays beside the page title notifying the user that the action is in process.
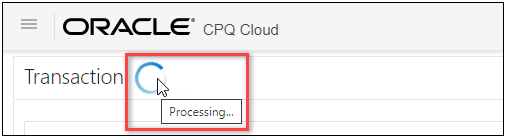
A tooltip note is available on this icon to provide more details.

Some or all actions may be temporarily disabled while the system is processing, but the user is able to continue working during this time. Once completed, the indicator changes to show that the processing is complete.
Steps to Enable
You don't need to do anything to enable this feature.
The following Performance Log features are available in Oracle CPQ 20B.
- Performance Log Enhancements
- Show Commerce Action Related Items in Performance Log
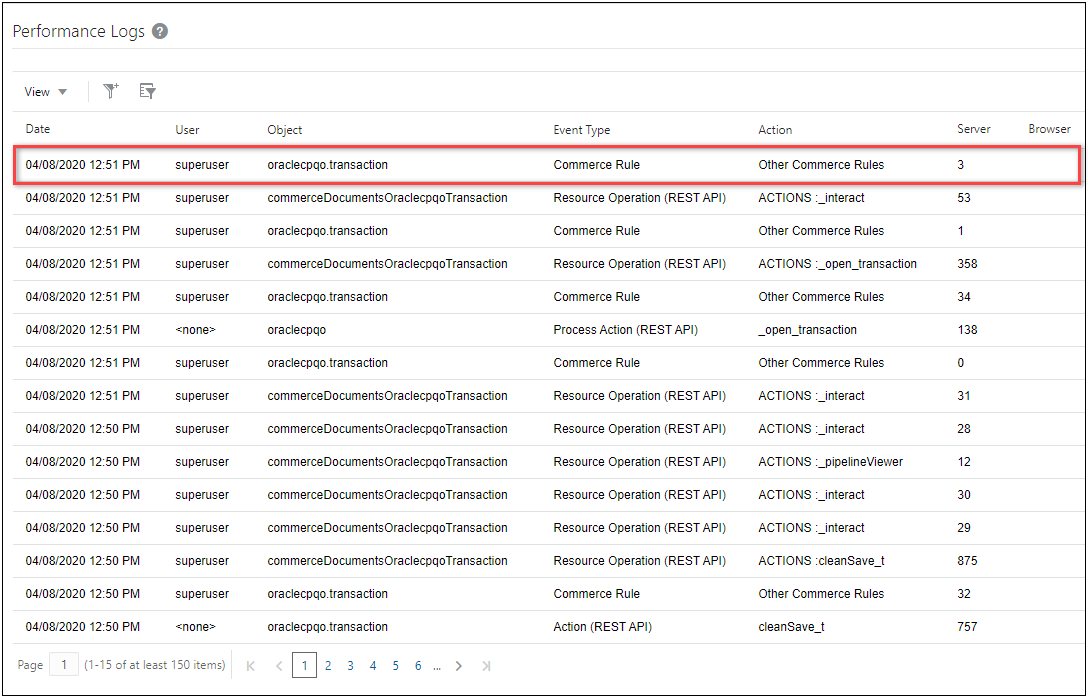
The Performance Logs page allows administrators to monitor and analyze the performance experienced by Oracle CPQ end users. The page leverages the Performance Logs REST API and the UI Designer to deliver improved access and usability to performance log data.
Oracle CPQ 20B introduces the following updates to significantly improve performance for large performance log data volumes:
- To improve the usability, the default sort order is now date descending (i.e. the latest entry displays first).
- The ability to sort is limited to the following essential columns:
- Date
- Server
- Browser
- ID
- Pagination only retrieves a subset of pages, therefore the total number of pages is no longer displayed and navigate to the last page is not available.
Steps to Enable
You don't need to do anything to enable this feature.
Tips And Considerations
The following Performance Log fields have been removed:
- User IP Address
- Created Date
- Modified Date
- Request ID
Show Commerce Action Related Items in Performance Log
Beginning in Oracle CPQ 20B, items related to an invoked action are now included in the Performance Logs. The action related items include the following:
- Hiding rules
- Validation
- Constraints
- Filters
- Formulas
- Auto-update Rule - Before Formulas
- Auto-update Rule - After Formulas
When a Commerce action has related items, a "Commerce Rule" event type entry is logged for the invoked action.

Steps to Enable
You don't need to do anything to enable this feature.
The following Migration Center feature is available in Oracle CPQ 20B.
Version Oracle CPQ Migration Packages
Beginning in Oracle CPQ 20B, administrators have more control to regulate package versions by using the new version icon to create incremental versions for selected migration packages. The new Version Package icon is located next to the Save Package icon.
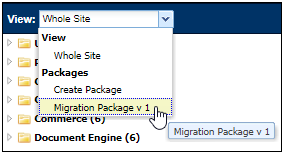
This Version Package icon is disabled when there are any unsaved selections on the selected migration package.
Steps to Enable
To create new migration package version, perform the following steps:
-
Navigate to the Migration Center.
Admin > Utilities > Migration
-
Select an existing package from the View drop-down.

-
Click the "Version Package" icon .

The version number auto-increments to the next available sequential number.
-
Select or deselect the checkboxes of the desired objects in the Contents pane or the Details pane.
-
Click the "Save Package" icon.
The following User Administration feature is available in Oracle CPQ 20B.
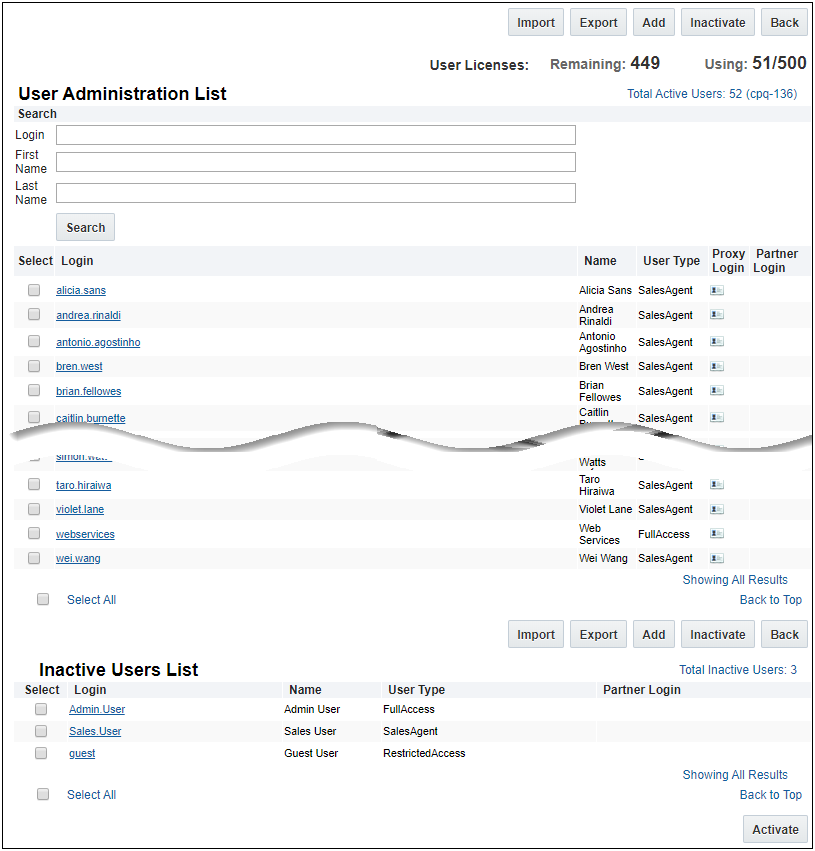
Search User Administration List
To make it easier to locate a specific user from the User Administration List page, Oracle CPQ 20B introduces the ability to search for a user. You can locate active and inactive users by searching on user Login, First Name, and/or Last Name.
Steps to Enable
To search for a specific user in the User Administration List, perform the following steps:
- Navigate to the Admin Home page.
- Select Internal Users in the Users section. The User Administration List page opens with a Search section.
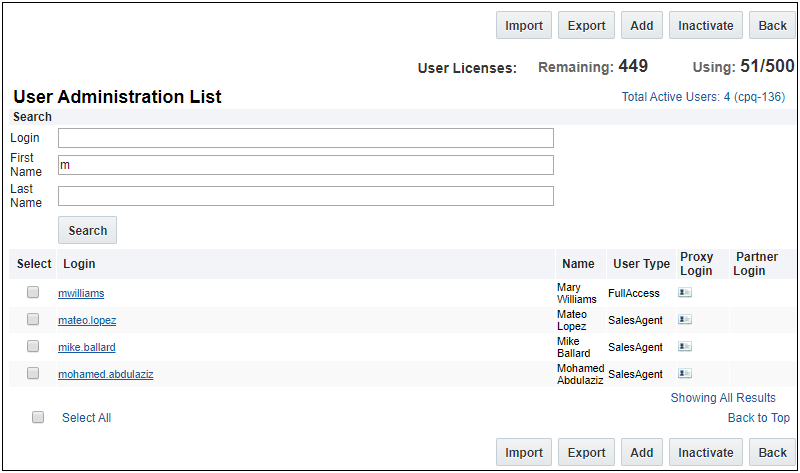
-
Enter all or part of the user information in the Login, First Name, or Last Name fields.
-
Click Search. The results of the search display.

The following Web Services features are available in Oracle CPQ 20B.
- Migration REST APIs
- Task REST API Updates
Oracle CPQ 20B provides the following Migration REST APIs to streamline the distribution and deployment of migration packages to different environments. Refer to REST API topics in Oracle CPQ Administration Online Help or REST API Services for Oracle CPQ in the Oracle Help Center for additional information and examples.
Get List of Migration Packages
Use this endpoint to retrieve a list of migration packages. The REST API returns the following items for each package: name, identifier, version, description, release date, date added, date modified, and dependencies.
-
Endpoint: /rest/v9/migrationPackages
-
Method: GET
Get Migration Package Properties
Use this endpoint to retrieve the properties for the specified migration package. The REST API returns the following items: name, identifier, version, description, release date, date added, date modified, and dependencies.
-
Endpoint: /rest/v9/migrationPackages/{identifier}
-
Method: GET
Import Migration Package
Use this endpoint to import and apply a migration package. Specify the file to import in the request body. The request can also contain a description, target process name, a notification email address, an option to include a snapshot, and the option to delete other versions of the package. The REST API returns the import task Id.
-
Endpoint: /rest/v9/migrationPackages/actions/import
-
Method: POST
A task is initiated when you import a migration package. After importing the migration package, you can view the status of the import and cancel the migration package, if required.
-
To view the status of the migration package import initiate the Get Task REST API using the task id from the Import Migration Package REST API response.
-
To cancel the migration package import initiate the Cancel Task REST API using the task id from the Import Migration Package REST API response.
Export Migration Package
Use this endpoint to export the specified migration package. Dependencies are included by default, but the request can contain an optional parameter to exclude dependencies. The REST API returns the export task Id.
-
Endpoint: /rest/v9/migrationPackages/{identifier}/actions/export
-
Method: POST
A task is initiated when you export a migration package and the migration package zip file will be associated with the task. After exporting the migration package, you can view the status of the export and download the exported migration package.
-
To view the status of the migration package export initiate the Get Task REST API using the task id from the Export Migration Package REST API response.
-
To download the exported migration package complete the following:
-
Initiate the Get Task File List REST API using the task id from the Export Migration Package REST API response.
-
Initiate the Download Task File REST API using the file name from the Get Task File List REST API.
Steps to Enable
Review the REST service definition in the REST API guides, available from the Oracle Help Center > your apps service area of interest > REST API. If you're new to Oracle's REST services you may want to begin with the Quick Start section.
Tips And Considerations
Refer to the Get List of Tasks REST API for instructions to view migration package status items.
Oracle CPQ 20B introduces new task categories to support migration services. In addition to new categories, there is a new endpoint and method for cancelling tasks.
Get List of Tasks
The Get List of Tasks REST API was introduced in Oracle CPQ 19D to retrieve data table status tasks. Oracle CPQ 20B adds the following categories to support migration tasks:
-
'51' Migration Package import tasks
-
'52' Migration Package export tasks
You can use the following category query to list migration tasks:
-
Endpoint: /rest/v9/tasks/?q={category:{$in:['51','52']}}
Cancel Task
IMPORTANT: The /tasks/{taskId}/actions/cancel endpoint is deprecated in Oracle CPQ 20B. Use the following endpoint to cancel tasks.
Oracle CPQ 20B introduces a new endpoint and method for cancelling tasks, such as deploying, exporting, and importing data tables. This endpoint also supports cancelling migration package imports. The request must contain the "Cancellation Requested" status. The REST API returns the id, date modified, name, category, status, execution time, and date added for the task being cancelled.
-
Endpoint: /rest/v9/tasks/{taskId}
-
Method: PATCH
-
Required Request Body Parameter: {"status": "Cancellation Requested"}
Steps to Enable
Review the REST service definition in the REST API guides, available from the Oracle Help Center > your apps service area of interest > REST API. If you're new to Oracle's REST services you may want to begin with the Quick Start section.
Modifications to Known Functionality
The following modifications to known functionality are available in 20B:
- To enhance Oracle CPQ security, the bulk upload services no longer support upload of custom XML files that contain <!DOCTYPE> tags. An attempt to upload a custom document type definition using the bulk uploader results in the following error message: Could not parse the Upload XML: DOCTYPE is disallowed when the feature "http://apache.org/xml/features/disallow-doctype-decl" set to true.
- Oracle CPQ 20B implements XML Translation Line Limits to prevent performance issues that could occur when generating XML for quotes with an extremely large number of transaction lines.
- The Deal Negotiation "Last Price Paid" functionality is now implemented using the Price Guidance feature. The attribute values for existing line items using the Last Price Paid object for Commerce transaction line Currency attributes will remain, but the attribute value will not be populated for new line items. Refer to the Price Guidance topic in Oracle CPQ Administration Online Help for an alternative solution for this functionality.
- Beginning in Oracle CPQ 21A, we will support the current REST version and the two previous REST versions. Older (three versions back and earlier) REST versions may continue to function; however, Oracle will not address new issues that arise. We recommend you plan for this transition.
- As previously announced, Oracle CPQ 20B supports Antenna House for XSL/XML formatting. We are no longer supporting Apache FOP. We recommend you plan for this transition prior to upgrading to 20B.
Custom JavaScript
If customers have added custom JavaScript that leverages the Document Object Model structure or specific elements, classes or IDs, this customization should be thoroughly tested and may require refactoring. For more information about custom JavaScript, go to Style & Templates > JET JavaScript Customization in the Oracle CPQ Administration Online Help.
Migration
When migrating directly from a source site or to a destination site using the Migration Center, both sites must use the same major update. The migration of content can only occur across minor updates within the same major update.
- “Major update” = Update 20B
- “Minor update” = Update 20B Patch 1
For Oracle CPQ 20B, migration packages from 19A and forward can be uploaded to the latest site version.
Resolved Known Issues
For information on bugs fixed in Update 20B, refer to the Oracle CPQ 20B Resolved Known Issues document available on My Oracle Support and the Oracle CPQ Administration Online Help.
Translation
For some system-defined messages and components, strings were removed and others added in Oracle CPQ 20B. If you have created your own implementation-specific translations of system-defined strings, some of these strings may no longer appear. Other strings may appear in English. The strings appearing in English are new and require translation.
Most of these messages and components are on the Administration side of Oracle CPQ, but you should review both your end user and administration pages before deploying your updated installation to confirm that all strings appear in the desired language.
Translation Status
Oracle CPQ supports the consumption of both single and multi-byte character sets. Submit a service request on My Oracle Support to enable your site for a new language.
For the following languages, a translation of the Oracle CPQ user interface is available for both the platform and the reference application:
- Chinese (Simplified) [China]
- Chinese (Traditional) [Taiwan]
- Czech [Czech Republic]
- Danish [Denmark]
- Dutch [Netherlands]
- English
- Finnish [Finland]
- French
- French [Canada]
- German
- Hungarian [Hungary]
- Italian
- Japanese [Japan]
- Korean [South Korea]
- Norwegian (Bokmål) [Norway]
- Polish [Poland]
- Portuguese [Brazil]
- Romanian [Romania]
- Russian [Russia]
- Spanish (Worldwide)
- Swedish [Sweden]
- Turkish [Turkey]
Upgrade and test all test instances on Oracle CPQ 20B before upgrading to production.
Browser Support
CPQ Cloud supports all browser versions that meet the criteria of the Oracle Software Web Browser Support Policy.
If you experience issues using a supported browser version, open a ticket on My Oracle Support to resolve the issue. If an issue arises when using a supported browser, use a certified browser version until the delivery of a fix. Certified browsers are selected based on current market share and thoroughly tested to work with the current version's standard functionality.
Certified Browsers
Windows
- Google Chrome 80.x
- Mozilla Firefox 74.x
- Internet Explorer 11.x (See note below)
IMPORTANT:
- In Oracle 20B, both the CPQ Administration and end user platforms are supported using Internet Explorer 11. However beginning with Oracle CPQ 20C, we are beginning our transition from Internet Explorer to Edge browser support. Therefore in CPQ 20C, Internet Explorer browser certification and support for the CPQ Administration platform will be discontinued and in CPQ 20D Internet Explorer browser certification and support for both CPQ Administration and end user platforms will be discontinued. In 20D, Oracle CPQ plans to support the latest version of Edge browser. We recommend you plan for this transition.
- Compatibility issues with the selected browsers may exist when sites contain additional JavaScript, alternate CSS, or other custom functionality. Customizations may require add-on work. Contact My Oracle Support to determine the availability of workarounds and minor fixes.
Salesforce Integration Support
Oracle officially supports version 8.1 and version 8.2 of the Oracle CPQ Connector for Salesforce. We also continue to support version 7.2 of the legacy Oracle CPQ Commerce Integration.
IMPORTANT:
- With the Spring 20 release, Salesforce is automatically enabling the new Salesforce Mobile App for all customers. There are potential compatibility issues between the new Salesforce Mobile App and the Oracle CPQ Mobile experience and at this time it is not supported. Users can continue to access Oracle CPQ from within Salesforce via mobile browsers.
- Previous versions of these packages are expected to continue to function; however Oracle will not address new issues that arise. We strongly encourage customers to upgrade to the latest supported version.
Training
Please refer to the release documentation for all versions between your current version and the version to which you are upgrading to see all new functionality, resolved known issues, and functional known issues.
Refer to the Oracle CPQ Administration Online Help to become familiar with the new features introduced in Oracle CPQ 20B. For additional help, see My Oracle Support.
Verify any information not explicitly mentioned in this document as supported by the software against the product help for Oracle CPQ 20B.
Additional Information
For more information on Oracle CPQ, visit the Oracle CPQ Cloud documentation site.
Disclaimer
The details in this document are provided for high-level informational purposes only and are not intended to function as a specification or to replace the Online Help. Upgrading to a subsequent release may require the re-deployment of Commerce Processes, Configuration, or global function settings. Modifications to integration XSL files or APIs may also be required.