
- Revision History
- Overview
- Feature Summary
-
- Agent Browser Analytics
- Agent Browser Console
- Agent Browser Workspaces
-
- Analytics Permissions Enhancements
- Add New Record from Add Existing Option
- Hide/Show Cc/Bcc Fields
- Incident Forward Configuration Option: Add Comments to Thread
- Service Usage Metrics: Phase Two
- Preview Workflow in Browser UI
- Thread Editor Default Font
- Vertical Thread Orientation
- Workflow Decision for Client Type
- Workflow Option to Open Element in Subtab
- Incident Field Support on Interaction WS
-
- Contact Center
- Digital Customer Service
- Intelligent Advisor
- Knowledge Management
- Platform
This document will continue to evolve as existing sections change and new information is added. All updates appear in the following table:
| Date | Product | Feature | Notes |
|---|---|---|---|
| 30 NOV 2020 | Intelligent Advisor | Disable Data Validation Logging in Hub | Updated document. Delivered feature in update 20D. |
| 20 NOV 2020 | Created initial document. |
This guide outlines the information you need to know about new or improved functionality in Oracle B2C Service and describes any tasks you might need to perform for the update. Each section includes a brief description of the feature, the steps you need to take to enable to begin using the feature, any tips or considerations that you should keep in mind, and the resources available to help you.
For a listing of hardware and software requirements for Oracle products, log in to our support site and access Answer ID 31.
Security & New Features
We would like to remind you if your system has modified security structures you may need to advise your security administrator of new features.
Give Us Feedback
We welcome your comments and suggestions to improve the content. Please send us your feedback.
Column Definitions:
Features Delivered Enabled
Report = New or modified, Oracle-delivered, ready to run reports.
UI or Process-Based: Small Scale = These UI or process-based features are typically comprised of minor field, validation, or program changes. Therefore, the potential impact to users is minimal.
UI or Process-Based: Larger Scale* = These UI or process-based features have more complex designs. Therefore, the potential impact to users is higher.
Features Delivered Disabled = Action is needed BEFORE these features can be used by END USERS. These features are delivered disabled and you choose if and when to enable them. For example, a) new or expanded BI subject areas need to first be incorporated into reports, b) Integration is required to utilize new web services, or c) features must be assigned to user roles before they can be accessed.
| Ready for Use by End Users Reports plus Small Scale UI or Process-Based new features will have minimal user impact after an update. Therefore, customer acceptance testing should focus on the Larger Scale UI or Process-Based* new features. |
Action is Needed BEFORE Use by End Users Not disruptive as action is required to make these features ready to use. As you selectively choose to leverage, you set your test and roll out timing. |
|||||
|---|---|---|---|---|---|---|
| Feature |
Report |
UI or |
UI or |
|
||
Incident Forward Configuration Option: Add Comments to Thread |
||||||
Use Article Quality Index Scores to Track Article Quality Over Time |
||||||
Analytics Mobile Responsiveness
Users can display Agent BUI through web devices that have a screen smaller than anticipated by administrators that may create reports with lots of data displayed. This feature will automatically adjust the report display to stack vertically in both reports and within workspaces to help the user visualize the data and scroll through records more efficiently.
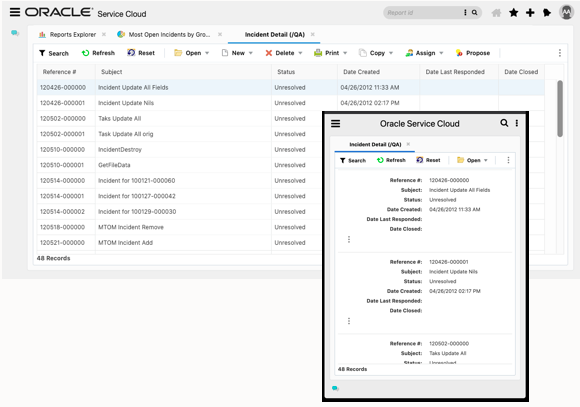
Report Views in Large and Small Screens
Automatically adjusts users view to help users view data in an easily scrollable view and help reduce administrative time to optimize reports and dashboards for small screens.
Steps to Enable
You don't need to do anything to enable this feature.
Tips And Considerations
- Graphing is supported.
- Slicing is supported but converted to links and represented at the top of the page.
Decimal Custom Attribute Field Type
Decimal Custom Attribute is now supported in B2C Service. This new custom attribute type can be created in the Object Designer.
Supported areas include: Workspaces, Workspace Rules, Analytics, Message Templates, Agent Desktop (.NET), Agent Browser UI, and any area custom attributes types such as integer, text, date, etc. are supported.
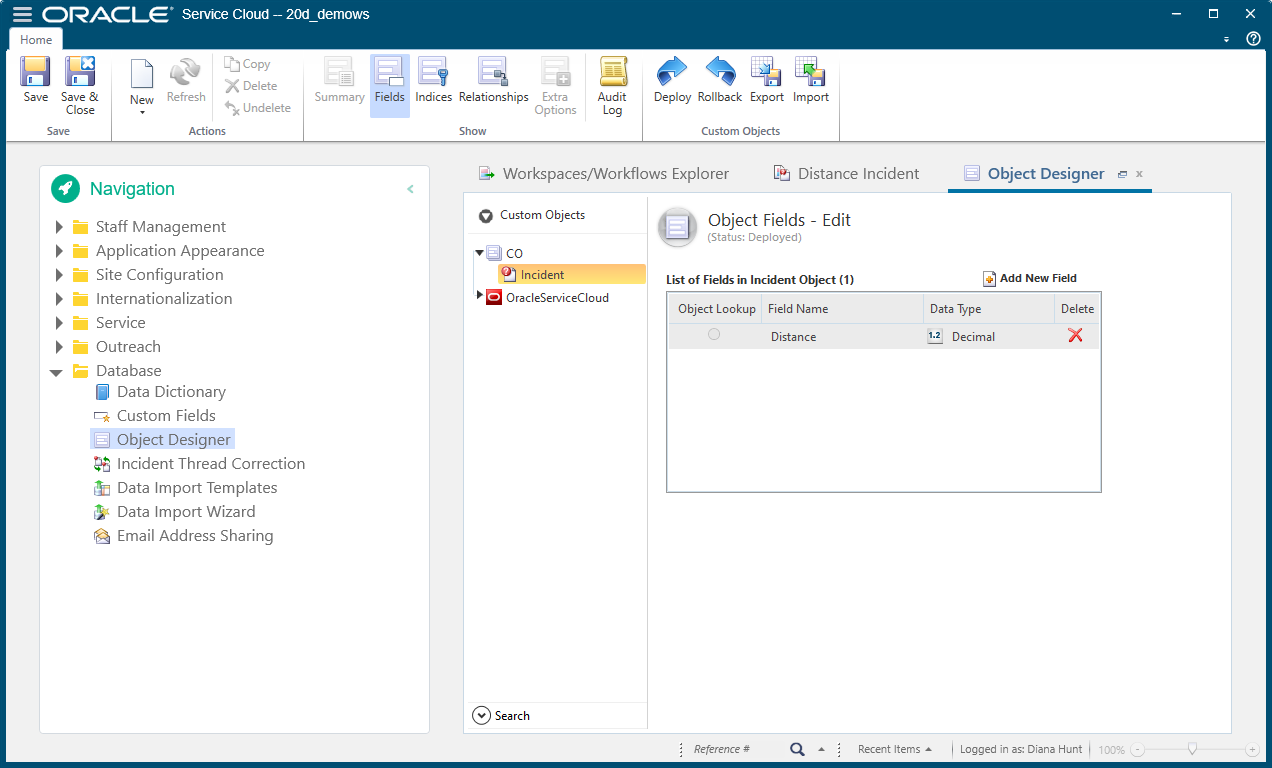
Decimal Custom Attribute Type on the Object Designer
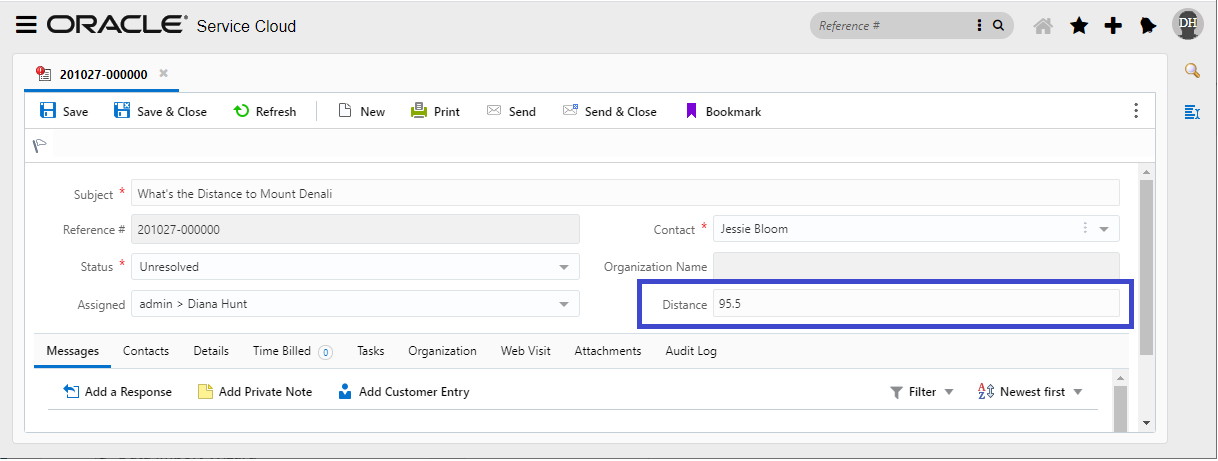
Decimal Custom Attribute Field shown on the Agent Browser UI
Customers can now create a custom decimal type field for any workspace and also report on it.
Steps to Enable
- From the Object Designer on the Service Console, open any object and select the Fields ribbon button on the Home tab.
- Click Add New Field and Select Decimal
- Complete these fields: Name, Package, and Decimal Field Settings
Tips And Considerations
The maximum places in the decimal number is 15.
- 0-5 decimal places on the right of the decimal
- 0-10 places on the left of the decimal.
Chat and Customer Portal do not support the Decimal Custom Attribute Type.
Role Information
- Administrators can create the decimal custom attribute.
- Agents can read and edit the decimal custom attribute field with the proper profile permissions.
Knowledge Management Usage Metrics
B2C Services customers whose agents access knowledge management primarily through Customer Portal need a reliable way to see the details of their site usage. This feature provides the daily usage of named users and connected users.
Customers now have an accurate, convenient, reliable, and secure way to obtain these usage details using the Agent Browser UI.
Steps to Enable
Setup is required to enable, but only if the customer (a) has a user-based license and (b) the users are using Customer Portal exclusively to access knowledge.
Administrators have the ability to configure who has access to the KM Usage Metrics data. They can enable profiles by adding the KM Usage Metrics component to Navigation Sets.
Steps to Enable are as follows:
- Open the Agent Console to edit Navigation Set
- Open or Create the applicable Navigation Set
- Select Navigation Folder to add KM Usage Metrics component.
- Find the KM Usage Metrics component either in the Common folder or by using the Find in list capability.
- Select the KM Usage Metric component.
- Click Add to associate the KM Usage Metrics component to the Navigation Set item.
- Save and Close
The KM Usage Metrics functionality is available using the Agent Browser Interface. It is not available in the Agent Console.
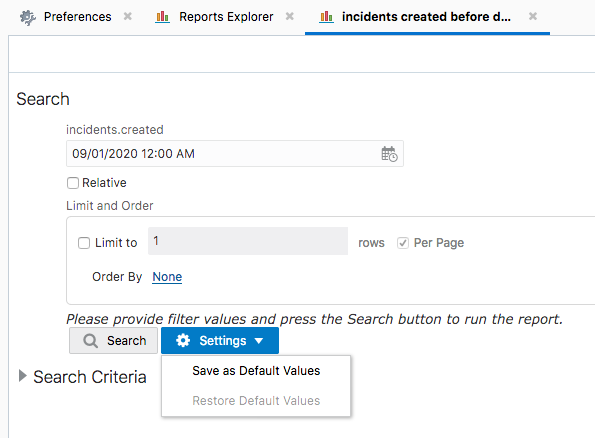
Agent Browser UI provides the ability for users to store Saved Default Filter Values and Saved Display and Data Settings. Each option offers the capability to store up to 10 personal configurations. These are a reminder of how those settings are stored.
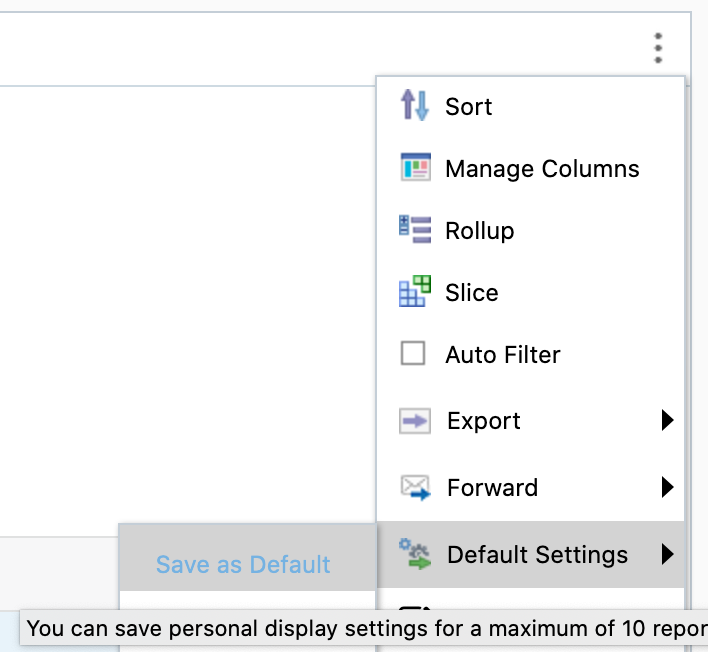
Saved Display and Data Settings
The Preference area can be accessed by going to your user icon in the upper right hand corner of Agent Browser UI.
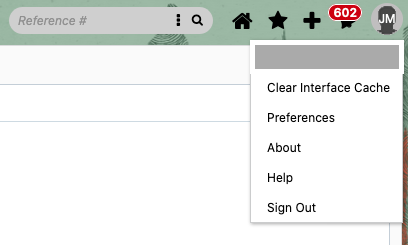
Preference Access
This will open Preferences and allow users to manage their personalizations by viewing and clearing a single, multiple or all report preferences.
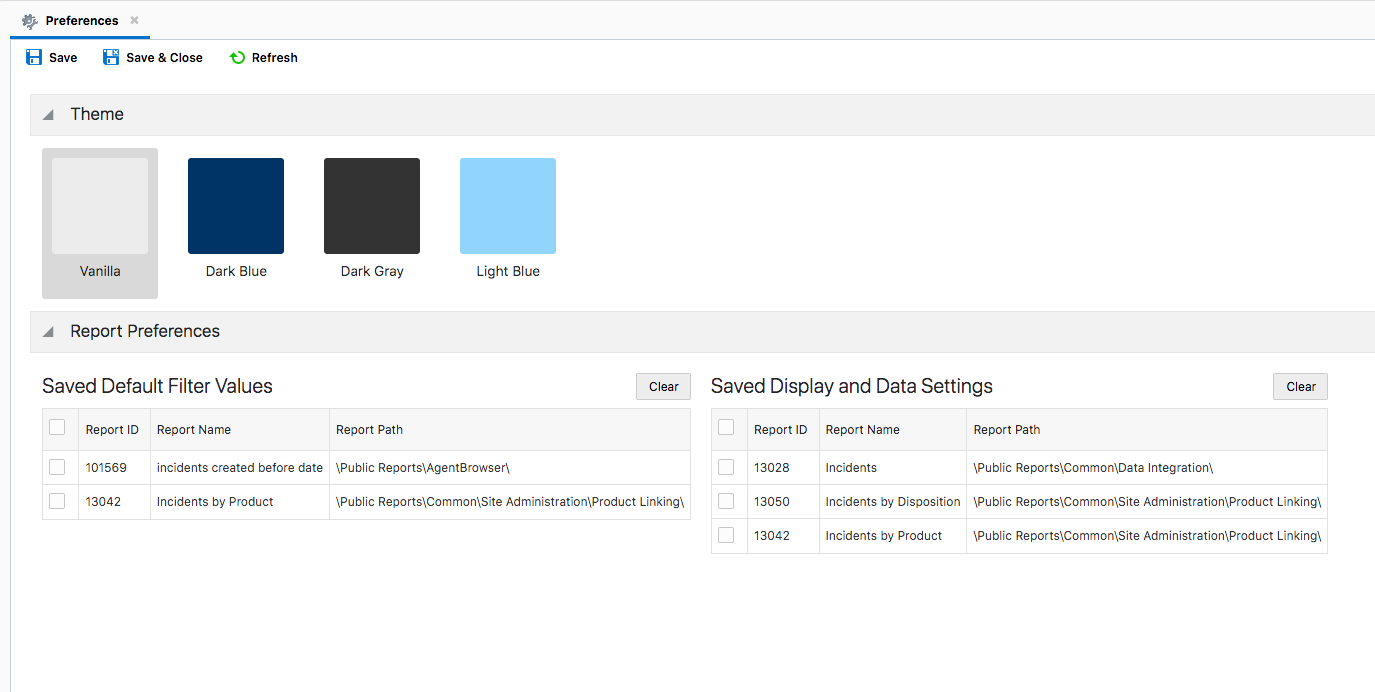
Report Preference View
This feature allows users to easily manage their saved personal settings for reports.
Steps to Enable
You don't need to do anything to enable this feature.
Role Information
- Report Preferences users
Administrators can use a custom configuration setting to define an avatar image for staff accounts. The configuration setting can be configured to call a 3rd party source and pass variables in the URL to return an image. The resulting image will take the place of the agent's initial in the upper right-hand corner in Browser UI.

Agent Avatar
An agent avatar creates a visually-rich experience and adds an element of personalization to the agent experience in Browser UI.
Steps to Enable
- Create a new text type custom configuration setting with key 'CUSTOM_CFG_BUI_AGENT_IMAGE_URL'
- For instructions on creating custom configuration verbs, see this link.
- Enter a URL into the key that calls an external source (ex. API, employee directory) containing images associated with user accounts.
- Optionally include one or more supported variables; note that MD5 is supported:
- $email_md5
- $acct_id
- $acct_id_md5
- $first_name
- $first_name_md5
- $last_name
- $last_name_md5
-
Save the configuration setting and log into Browser UI to see the avatar image.
Examples:
- https://oracle.com/avatars/$email/avatar.png
- https://oracle.com/avatars/test.account@oracle.com/avatar.png
- https://differenturl.com/getAvatar.php?NAME=$last_name_md5/$first_name_md5/avatar.png
- https://differenturl.com/getAvatar.php?NAME=098f6bcd4621d373cade4e832627b4f6/e268443e43d93dab7ebef303bbe9642f/avatar.png
- (Note: the IDs in the example above are the actual MD5 hash values for "test" and "account")
Tips And Considerations
- Configuration settings can be associated with one or more site interfaces.
- Images will be scaled to fit the allotted space (32px x 32px).
- A generic image icon will appear in the upper right-hand corner of Browser UI if an image does not exist.
- The default agent initials will be displayed where these configuration settings do not exist or if the URL cannot resolve.
- File size of hosted images should be minimized in order to maximize display performance.
- Another approach is to link to a single image to represent all users.
Analytics Permissions Enhancements
This enhancement allows for great granularity in permissions for Analytics Permission by allowing individual Profiles to be configured to use Custom Scripts or Report Schedules. This helps create profiles that will have the necessary permissions without additional permissions.
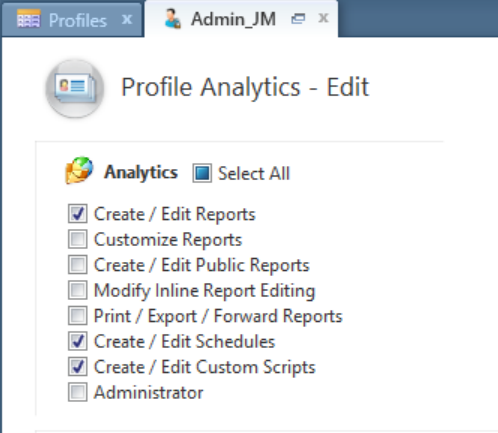
Profile Permission View
Newly created sites in 20D will require Profiles of Accounts accessing reports from the APIs to have permission to reports.
Allows greater security control by providing configuration:
- Control access to Custom Scripts
- Control access to Scheduling to limit the sending data from a report
- Enforce that Accounts on sites new on 20D to have Report permissions when using the API
Steps to Enable
You don't need to do anything to enable this feature.
Tips And Considerations
The Create / Edit Reports will be automatically enable when choosing either the Create / Edit Custom Scripts or Create / Edit Schedules.
Profiles on upgraded sites will automatically have these permissions enabled. There were included previously in Create / Edit Reports and can be manually removed from Profiles.
Role Information
- Administrator
Add New Record from Add Existing Option
Agent Browser UI users can add new records from workspace reports when attempting to add existing records.
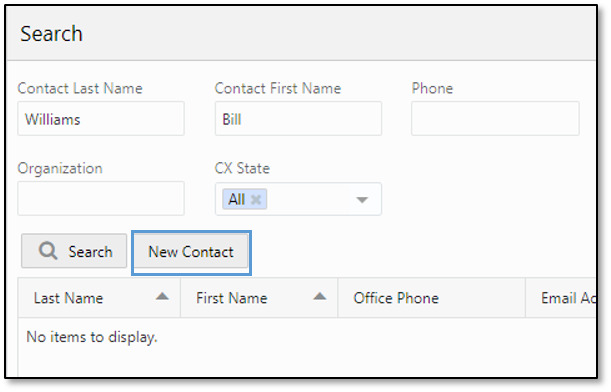
Add New Record from Add Existing Search
Users can save time by quickly adding new records from the 'add existing' menu when their search does not return the expected results.
Steps to Enable
You don't need to do anything to enable this feature.
Tips And Considerations
- When 'add new' is selected the search parameters from 'add existing' will be passed into the new record.
- This functionality is supported across standard and custom objects.
The ‘cc’ and ‘bcc’ fields on the thread control will be hidden by default and can be revealed by clicking on the new ‘Cc/Bcc’ link adjacent to the ‘To’ field. These fields are available when enabled in the incident workspace's Rich Text Thread Control.
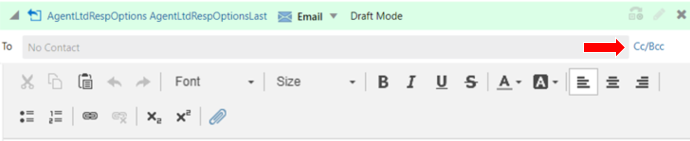
Default Thread Control (Cc/Bcc Fields Are Hidden)
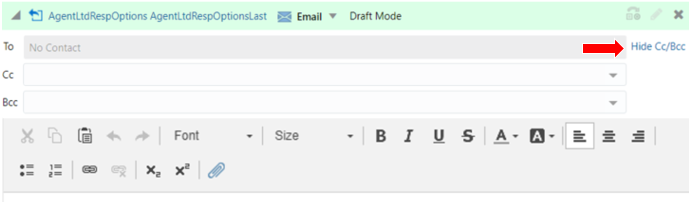
Thread Control with Bcc/Cc Fields Visible
The purpose of this change is to save vertical space within the thread control.
Steps to Enable
You don't need to do anything to enable this feature.
Incident Forward Configuration Option: Add Comments to Thread
Administrators can control whether comments entered in the incident forward dialog should be added to the incident thread as a private note, and whether agents should be allowed to disable this option when forwarding an incident.
Retain a comprehensive communication history in incident threads, including comments added by agents when forwarding incidents.
Steps to Enable
- Open an incident workspace in the Workspace Designer.
- Open the Ribbon Designer and right click on the forward button and select -Edit Button-.
- Select the option to -Add Comments to Thread- and -Allow Agent to Control Comments- (if desired).
- Save and close the workspace.
- Open an incident using this workspace on the Agent Browser UI and select the forward button.
- Note that the Forward Comments option can be de-selected (leave it selected).
- Enter a forward note and send.
- Note that the comments in the forward dialog are added to the incident thread.
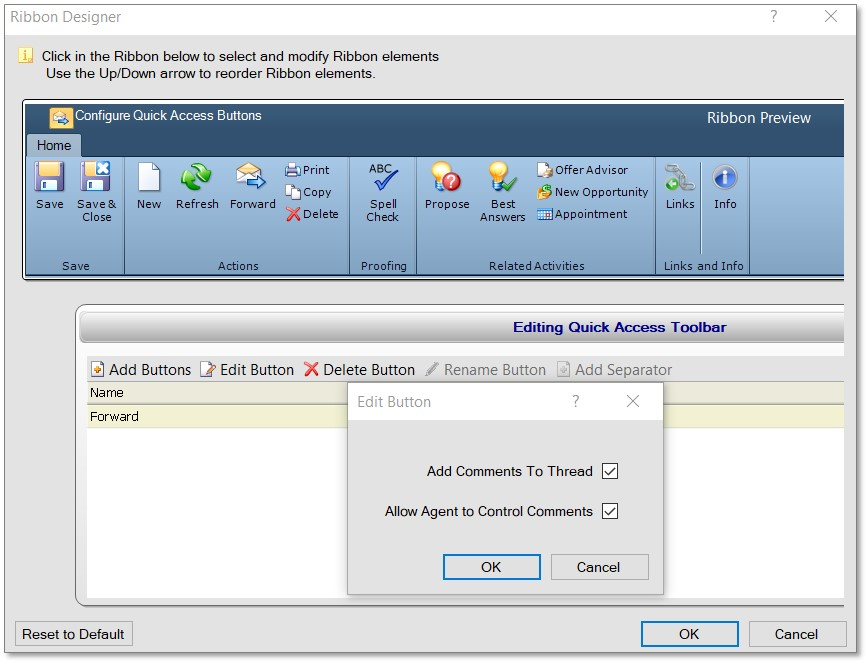
Forward Button Options
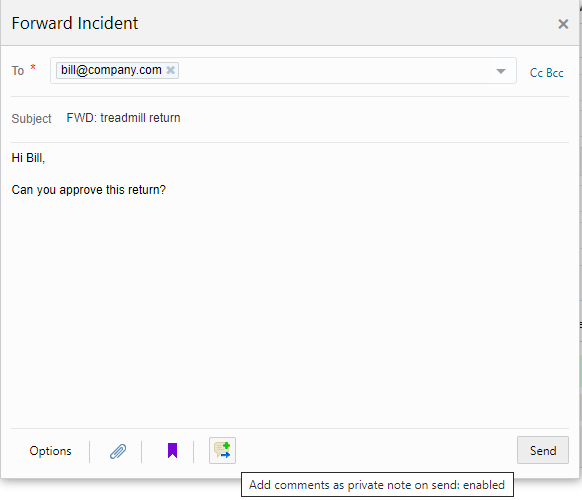
Forward Option (Agent Browser UI)
Tips And Considerations
This configuration is only supported on the Agent Browser UI.
Key Resources
Service Usage Metrics: Phase Two
Additional Seat types are supported in this release of Service Usage Metrics. New Seat types supported are:
- Connected Chat Users
- CoBrowse Named Users
- Video Chat Named Users
- Knowledge Named Users
- Knowledge Connected User Counts
The daily count of Deployed Custom Objects is also included in this release.
Provides better transparency for customers that want to keep track of their usage.
Steps to Enable
You don't need to do anything to enable this feature.
Tips And Considerations
Each type of user seat has been broken out into their own tile to allow users to go directly to the usage type they are interested in viewing.
These new seats will be added to the Service Usage Metrics landing page and tiles that apply to the site will be dynamically populated based on configuration. Reminder if you need to enable Service Usage Metrics, the user's profile needs to have the Administrator check box on their profile and add the Service Usage Metrics component to their Navigation Set.
Role Information
- Administrators
Preview Workflow in Browser UI
Workflow administrators can trigger a workflow preview in Browser UI using a new option on the Preview button in the Workflow Designer ribbon.
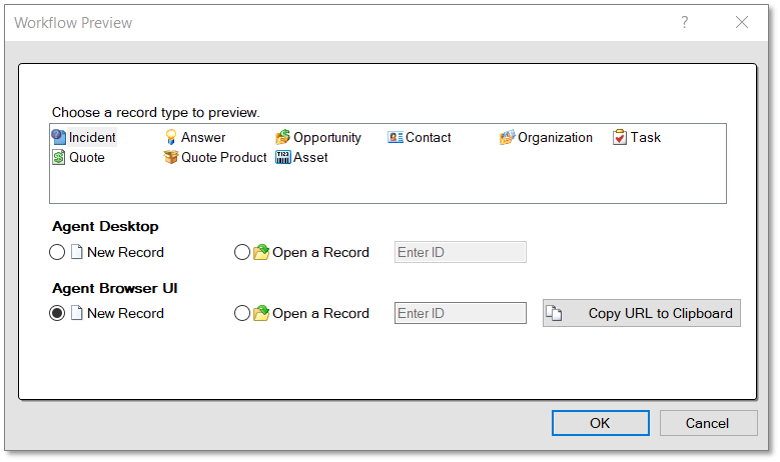
Workflow Preview Options
Administrators can reduce testing times and test on behalf of other staff accounts by launching a preview in a browser window directly from the Workflow Designer.
Steps to Enable
You don't need to do anything to enable this feature.
Tips And Considerations
- Preview options include opening a new or existing record. Administrators can also copy a preview URL to clipboard.
- Objects that aren't supported in Browser UI are not supported for preview (Quote, Quote Product)
- Previewing unsaved workflows is not supported in Agent Browser UI.
- It is possible to preview a workflow in Browser UI using a test account by authenticating into a Browser UI session with that account.
The default font configured for the Rich Text Thread Editor in the Workspace Designer is honored in the thread control in Browser UI.
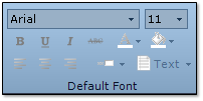
Workspace Designer
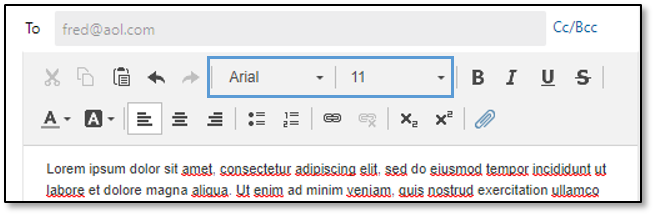
Default Font In Browser UI
This feature allows administrators to achieve a uniform font style and size for all thread entries and outbound communications from the thread editor.
Steps to Enable
You don't need to do anything to enable this feature.
Tips And Considerations
When Standard Text or Knowledge content is added to the thread, that content will conform to the thread editor default fonts unless that content has it's own font styling definition.
The Rich Text Thread Editor's option for vertical orientation is now supported in Browser UI. Thread controls with this setting will have two columns: uncommitted threads on the left side and committed threads on the right side. The columns have vertical scollbars if needed and a vertical splitter between the columns.
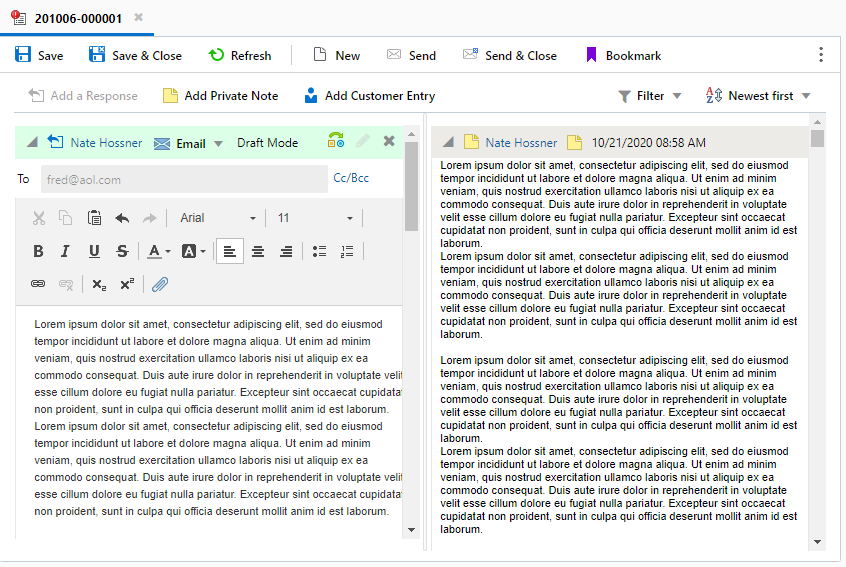
Vertical Thread Orientation
The vertical orientation allows users to compose new thread entries on the left half of the control while scrolling through existing threads on the right half. This makes it much easier to refer to communication history while composing a new message, making agents even more effective in their responses.
Steps to Enable
You don't need to do anything to enable this feature.
Tips And Considerations
- The thread orientation is defined in the Workspace Designer options for the Rich Text Thread Control.
- Because the vertical orientation option was not previously supported in Browser UI, any workspaces with that configuration rendered the thread control as 'horizontal'. Those same workspaces will render as the thread orientation as 'vertical' once Agent Browser UI is updated to release 3.20.10.15.
Workflow Decision for Client Type
Use a single workflow to load workspaces specifically designed for users on Agent Desktop, Agent Browser User Interface, or mobile.
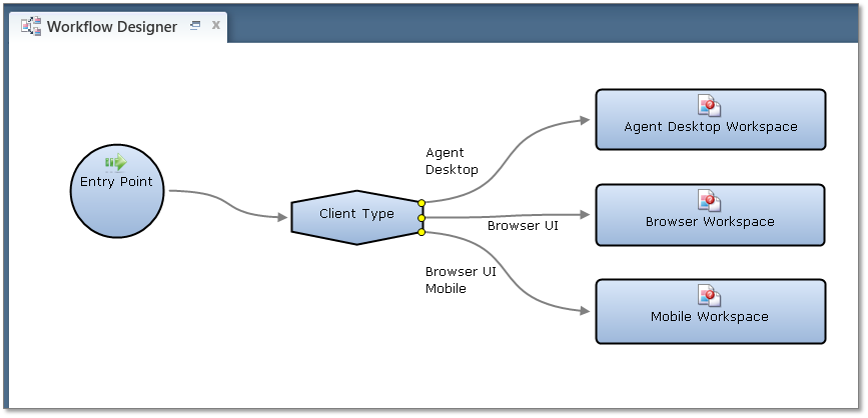
Administrators can use a single workflow to accommodate multiple device and client types which reduces complexity and administrative overhead.
Steps to Enable
- Open an existing Workflow or create a new Workflow.
- Select a Decision Element in the Workflow designer.
- Select the -Edit- button in the ribbon.
- Select the radio button option for -Multiple Value Decision-.
- Select the -Property or Field- called -Client Type-.
- Select one or more options from the -Equals- list (Agent Desktop, Browser UI, or Browser UI Mobile).
- Note that there are now 1-3 outbound connectors from the Decision Element based on the -Equals- Selection.
- Create additional workflow logic as needed from the new Decision Element connectors.
- Save the workflow and preview using different client types (Agent Desktop, Browser UI, or Browser UI Mobile) and note that the workflow branches based on the client type.
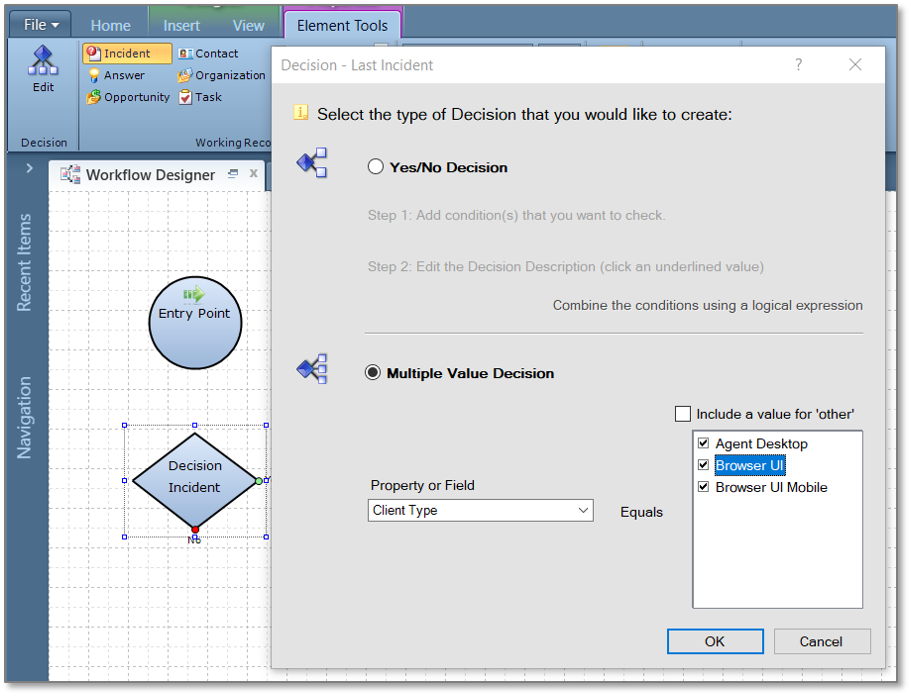
Decision Element Configuration Options

Decision Element with Three Options
Workflow Option to Open Element in Subtab
Workflow elements can be opened as a subtab rather than as an adjacent record.
Opening new records in a subtab creates a more intuitive experience for users who may be opening multiple records that should be logically grouped together.
Steps to Enable
- Select an element on the Workflow Designer.
- In the options menu, select -Open in Subtab- and -Focus Subtab-.
- Note that the element cannot have outgoing connectors.
- Save and preview the workflow.
- Note that the record designated to open in subtab will open under the parent record as a subtab instead of separately and adjacent to the existing record.
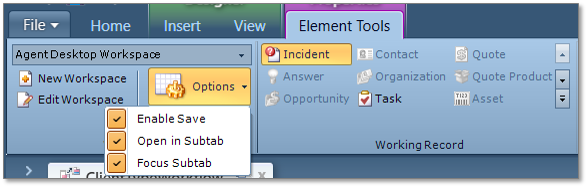
Element Options

Record with Two Sub Tabs
Tips And Considerations
- The -Focus Subtab- option is available if -Open in Subtab- is selected.
- Elements with -Focus Subtab- applied can not have outbound connectors.
- This setting is only supported on the Agent Browser UI.
Key Resources
Incident Field Support on Interaction WS
The Incident fields can now be added to the Interaction Workspace (IW) and supported in Agent Browser UI.

Incident Fields on IW
This allows for a more seamless transition for Agent Browser UI adoption.
Steps to Enable
- Open the (IW in the WS Designer.
- Select the Fields tab.
- Change the fields drop down to Incident Fields.
- Drag and drop the Incident Fields onto the IW.
- Save and add the WS to the desired Profile.
Tips And Considerations
This will require 20D .NET Agent Desktop.
End User Consent for Advanced Co-Browsing
This feature enables end users of Co-browse engagements to accept or decline an invitation from an agent to switch from page sharing to desktop sharing. Upon escalation from page sharing to desktop sharing, an invitation is sent to the end user with a prompt to accept or decline. Acceptance results in the process of enabling desktop sharing for the client's desktop, and declining results in the agent and end user simply continuing the existing page sharing session without enabling broader desktop sharing for the end user.
Steps:
- Agent and end user are on a page sharing session
- Agent initiates an escalation to Advanced Co-browsing (ACB) by clicking on the ACB icon for desktop sharing
- End user is prompted with a dialog box to accept or decline this invitation
- End user accepts
- This results in the end user's desktop being shared with the agent
- End user declines
- This results in the end user's desktop NOT being shared with the agent, but the agent and end user can continue on the existing page sharing session with no interruption.
With these enhancements, can now benefit from:
- Enhanced security for desktop sharing with consent exchange
- Acknowledgment of end user privacy and confidentiality policies in enabling or not enabling desktop sharing
Steps to Enable
You don't need to do anything to enable this feature.
Enhancements to B2C Service - CDM Integration
In this the third phase of the integration between B2C Service and CDM Cloud, the following enhancements are included:
- Capture and persist the relationship between original organizations and the organizations they supersede. Similarly, for contacts as well.
- Hide superseded organizations and contacts while creating incidents, tasks, assets etc.
- Pre-defined DLM policies to support an automatic purge of superseded organizations and contacts.
With these enhancements, customer can:
- When an organization or contact is tagged as superseded, it is (by default) hidden from search results, so that agents may not accidentally associate them with other objects such as incidents, assets, tasks etc. (Note: This behavior can be re-configured by customers to suit their business requirements.)
- Ready-to-go DLM policies help customers automatically purge superseded organizations and contacts after six months of inactivity. This helps manage duplicates in an automated fashion with minimal manual effort or intervention.
Steps to Enable
- Log in into B2C Service using the BUI client and as a user with Admin privileges.
NOTE: The setup cannot be performed through the .NET interface as the UI is available only for the BUI client.
- Navigate to the Integrations link. A UI page for configuring the integration will be displayed.
- Fill out all the fields on the page. Make sure that the first check box is checked. This enables the integration between B2C Service and CDM Cloud.
- Check or uncheck the other checkboxes as per your business requirement
- Click Activate.
Tips And Considerations
Perform these steps ONLY if you want an automatic purge of superseded organizations and/or superseded contacts. (Note: Both steps below are optional and can be done independently of each other.)
- Through the Agent Browser UI, navigate to the DLM policies page and enable the policies that auto-purge superseded organizations.
- Repeat the above action for superseded contacts.
Note also that the inactivity time period is 6 months by default. Customers can modify it to suit their business requirements.
Integration Between B2C Service and CDM Cloud (Phase 3)
Organizations and contacts are two of the key entities in B2C Service. Information and attributes about organization and contacts are persisted internally (rather than externally) within B2C Service. This multi-phase project envisages building out an integration between B2C Service and Oracle Customer Data Management (CDM), so that organizations and contacts from B2C Service can be propagated to CDM, where it can be cleansed, de-duped and sent back to B2C Service. B2C Service consumes the results of the data cleansing, including re-assigning artifacts associated with the merged (duplicate) object to the master (survivor) object.
In the first phase (20A), the integration was limited to supporting the consolidation of Contact, by moving sub-objects from duplicates to the original contact.
In the second phase (20B), the integration was further enhanced to support deduplication of organizations and some additional options on data synchronization and loading.
This is the third phase of the integration. In the current phase, the underlying schema has been enhanced to store the relationship between the original record (org or contact) and its identified duplicates. This enables our customers to configure/modify the behavior depending on whether the record (org or contact) is either a survivor or a victim. As an example, a customer who wants to automatically purge duplicates can define a report-based DLM policy to accomplish the same. (The report would use the newly-introduced relationship to identify the duplicates.)
Our customers would have the flexibility to tailor the behavior of B2C Service around whether or not an org or contact is a duplicate. Some examples:
- Define report-based DLM policies to automatically purge duplicate orgs or contacts (or both) that have not been updated for X days.
- Provide visibility to duplicate orgs or contacts for some or all of their agents (Note: By default, duplicates are hidden from all agents).
- Prevent duplicate orgs or contacts from being associated with some objects (example, incidents) while being allowed on other sub-objects (example, opportunities).
- Define business rules to modify the run-time behavior on duplicates.
Steps to Enable
You need to get the latest version of the PAR that contains the upgraded integration flows. Please contact your Oracle Account Manager to get the PAR file.
- Once you have the PAR file, store it on the local laptop or desktop.
- Login into the upgraded (20D) site of B2C Service using the Agent Browser UI and access the Configurator through Home --> Integrations (Note: Configurator not available on the .NET console client).
- Deactivate the integration.
- Select the latest PAR from your local desktop/laptop and fill in the other fields (as necessary) on the Configurator.
- Activate the integration. Confirm that the activation was successful.
- By default, post activation, organizations and contacts marked as duplicates will be hidden on B2C Service and not available for association with Incidents, Tasks, Notes etc.
Tips And Considerations
- Customers can always configure the behavior to make the duplicates visible to a sub-set of agents (if necessary)
- By default, duplicates are not deleted. Customers can define report-based DLM policies to delete the duplicates.
Rich Message Support for Facebook Messenger
Oracle Messaging can now support a richer messaging experience for Facebook Messenger by rendering rich UI controls to facilitate an interface where swiping and pointing are default, rather than typing. Any response delivered for Facebook Messenger through Oracle Messaging will be rendered with appropriate display options. In addition, if "DA as an Agent" is enabled, any Oracle Digital Assistant (ODA) response bound for Facebook Messenger will be rendered with appropriate display options as well.
This feature allows brands to provide a richer and more intuitive messaging experience for its customers. Rich message interfaces offer an interactive experience for the customer, which in turn drive greater engagement on the channel.
Steps to Enable
You don't need to do anything to enable this feature.
Tips And Considerations
This feature renders routing question options as "Quick Replies" in Facebook Messenger to allow customers to select the option rather than typing in the value associated with the option. To ensure the options are rendered as "Quick Replies", you shouldn't configure more than 12 options for a routing question.
Key Resources
Role Information
Roles that may use this feature:
- Chat Agent
- Supervisor Agent
Maximizing & Restoring Video Pane for Video Chat
This feature provides the ability for agents and end users to maximize their video pane while on a video chat engagement, as well as restore back to normal size at any time during the engagement. This flexibility of maximizing the video pane facilitates a more personalized and precise video engagement between agents and their end users. When the video pane is maximized, it will be rendered full screen, and when the size is restored it will be rendered back in the normal view within the BUI engagement panel.
Business benefits are as follows:
- Improved personalized and precision for video engagements
- Improved remote support experience
- Reduction in service time and cost
Steps to Enable
You don't need to do anything to enable this feature.
Disable Data Validation Logging in Hub
It is now possible to turn off and on data validation message logging for deployments on the Message log page in Intelligent Advisor Hub.
If the message log is being filled up with OPA-VAL-001 errors caused by expected end user data entry, then turning off the logging of these messages will enable users to see other log messages.
Steps to Enable
You don't need to do anything to enable this feature.
Tips And Considerations
The logging of data validation messages is turned on by default. To turn it off, you use the Stop logging data validation errors menu option on the Message log page in Intelligent Advisor Hub.
Key Resources
Role Information
- Hub Administrators
Interview Extension Data Connections
This enhancement allows developers to securely call out to a third party service using interview extensions. The interview extension data connection is managed in Intelligent Advisor Hub in the same way as other data connections, allowing access to be appropriately controlled per Hub and per workspace.
This enables third party data validation, identity checking and other services to be incorporated into advice experiences. The development lifecycle can be simplified by centrally managing the development/test/production connection details in each environment.
Steps to Enable
You don't need to do anything to enable this feature.
Tips And Considerations
The connection is invoked securely from JavaScript interview extensions, with a new fetch() method that passes the call request to the Intelligent Advisor server.
Key Resources
Role Information
- Developer
This feature set expands knowledge foundation browser UI support to include answer versioning features. Answer versioning was originally released in 2018 for .Net and it is now available on the Agent Browser UI.
Answer versioning features include:
- Drafting and publishing answer versions
- Side-by-side comparison of different versions of an answer
- Future date publishing
- Auditing answer versions
You can more easily track changes and identify the points in time when article content changed. You can also draft and edit content without disrupting access to public answers.
Steps to Enable
You don't need to do anything to enable this feature.
Tips And Considerations
To take full advantage of answer versioning features, update the answer workspace to include answer versioning fields and buttons.
Use Article Quality Index Scores to Track Article Quality Over Time
Knowledge Managers and coaches can use the Article Quality Index (AQI) score to measure and record the quality of each version of an article, and report on quality by article and by author to help ensure knowledge base quality.
You add an AQI score using the field in the authoring console. You can set a score and add details in a comment if needed. Each update to the article can result in a score change, and you can monitor articles' scores over time.
A new standard report shows AQI data and enables analysts to filter on date, author, group, AQI score, and more to pinpoint areas where content is improving or needs to improve.
Measuring and monitoring article quality helps managers and coaches to ensure that authors are creating high-quality knowledge base content, and also helps to identify and address problem areas.
Steps to Enable
You don't need to do anything to enable this feature.
Key Resources
- See the Author Content chapter in Using Knowledge Advanced, and Analyze Knowledge Advanced in Administering Knowledge Advanced.
- Also see the article Technique 5.10: Content Health Indicators, published by the Consortium for Service Innovation (TM).
Role Information
Knowledge Managers and coaches who have the Add AQI repository content privilege can set AQI scores. The privilege is set separately for each content type defined in the repository.
Data Lifecycle Management (DLM) Enhancements
Data lifecycle management enhancements include:
- Support purging of organization data via DLM policies (filter-based or report based)
- Support additional transaction types related to email forward/response/failure
- Ability to define purge policies on custom object related transactions
Customers using DLM can purge additional data from the transactions table to support compliance and purge organization data to help minimize operational database storage.
Steps to Enable
You don't need to do anything to enable this feature.
Key Resources
- DLM documentation: http://documentation.custhelp.com/euf/assets/devdocs/buiadmin/topicrefs/c_bui_Data_lifecycle_management.html
- DLM whitepaper: https://cx.rightnow.com/euf/assets/cc_resources/answerdocs/answer10440/DataVolume.pdf
- DLM knowledge articles:
- https://cx.rightnow.com/app/answers/detail/a_id/10293/
- https://cx.rightnow.com/app/answers/detail/a_id/10539/
Element Manager enhancements include:
- Export and import workflows with script
- Export/import of Custom Object specific Business Rules from Element Manager
- Export/import of chat business rules
Increased productivity with Element Manager supporting additional elements
Steps to Enable
You don't need to do anything to enable this feature.
Key Resources
- Element Manager Documentation
- Element Manager Current Capabilities
- Element Manager and Overwrite Capability
- Element Manager Blog
We continue to enhance the new Business Rules framework on Browser UI.
Enhancements in the rule runtime log include reporting the exact conditions that trigger THEN/ELSE actions in a rule to provide additional insight into which set of conditions caused a particular rule to trigger.
For rule auditing, we have added a complete audit log report to provide a holistic view of all the changes that were made in the rule base without having to manually find out the exact rule or rule group that was modified since the last deploy, in the past day or so, etc., Also the object level audit log report will report the exact changes that were made within the rule, rule group, and variable.
Makes it easier for administrators to manage complex rules with additional diagnostics information.
Steps to Enable
You don't need to do anything to enable this feature.