- Revision History
- Overview
- Update Tasks
- Optional Uptake of New Features (Opt In)
- Feature Summary
- Sales Automation Core Common
- Sales Automation Foundation Common
- Sales Force Automation
-
- Enterprise Contracts
- Next Gen Sales User Experience
-
- View Assets in Digital Sales
- Use Orchestration to Provide Salespeople with Best Practices for Lead Qualification and Processing
- View Team and Territories Associated with an Opportunity in Next Gen Sales
- Mark a Record as Favorite from Next Gen List Page
- View Records Grouped by Calendar and Fiscal Quarters in Next Gen List Page
- Open Any External URL Using Smart Actions
- View Timeline of Activities and Updates to Sales Records
-
Update 23A
Revision History
This document will continue to evolve as existing sections change and new information is added. All updates appear in the following table:
| Date | Module | Feature | Notes |
|---|---|---|---|
| 29 MAR 2024 | Redwood User Experience |
View Records Grouped by Calendar and Fiscal Quarters in Next Gen List Page | Updated document. Revised feature information. |
| 14 DEC 2022 | Created initial document. |
Overview
 HAVE AN IDEA?
We’re here and we’re listening. If you have a suggestion on how to make our cloud services even better then go ahead and tell us. There are several ways to submit your ideas, for example, through the Ideas Lab on Oracle Customer Connect. Wherever you see this icon after the feature name it means we delivered one of your ideas.
GIVE US FEEDBACK
We welcome your comments and suggestions to improve the content. Please send us your feedback at oracle_fusion_applications_help_ww_grp@oracle.com.
NOTE ABOUT DOCUMENTATION AVAILABILITY
Some of the documentation referenced in this article may not be available until after general availability of the release update on January 6, 2023. Check back after general availability for complete information.
DISCLAIMER
The information contained in this document may include statements about Oracle’s product development plans. Many factors can materially affect Oracle’s product development plans and the nature and timing of future product releases. Accordingly, this Information is provided to you solely for information only, is not a commitment to deliver any material, code, or functionality, and should not be relied upon in making purchasing decisions. The development, release, and timing of any features or functionality described remains at the sole discretion of Oracle.
This information may not be incorporated into any contractual agreement with Oracle or its subsidiaries or affiliates. Oracle specifically disclaims any liability with respect to this information. Refer to the Legal Notices and Terms of Use for further information.
Update Tasks
This section gives you information to help you plan, deploy, and validate your update. We make frequent additions to this document, so don’t forget to check back and get the latest information before your update starts.
Use the following resources to prepare for, deploy, and validate your update:
-
Read Prepare for your Quarterly Update (Doc ID 2445338.1) on My Oracle Support to learn how to prepare for and validate your quarterly update.
-
Publish or delete any in-progress sandboxes. Read the Overview of Sandboxes topic in the Configuring and Extending Applications guide for more information.
-
Review the latest Known Issues and Update Documents for this release (Doc ID 1603154.1) on My Oracle Support.
Optional Uptake of New Features (Opt In)
Oracle Cloud Applications delivers new updates every quarter. This means every three months you'll receive new functionality to help you efficiently and effectively manage your business. Some features are delivered Enabled meaning they are immediately available to end users. Other features are delivered Disabled meaning you have to take action to make available. Features delivered Disabled can be activated for end users by stepping through the following instructions using the following privileges:
- Review Applications Offering (ASM_REVIEW_APPLICATIONS_OFFERINGS_PRIV)
- Configure Oracle Fusion Applications Offering (ASM_CONFIGURE_OFFERING_PRIV)
Here’s how you opt in to new features:
- Click Navigator > My Enterprise > New Features.
- On the Features Overview page, select your offering to review new features specific to it. Or, you can leave the default selection All Enabled Offerings to review new features for all offerings.
- On the New Features tab, review the new features and check the opt-in status of the feature in the Enabled column. If a feature has already been enabled, you will see a check mark. Otherwise, you will see an icon to enable the feature.
- Click the icon in the Enabled column and complete the steps to enable the feature.
For more information and detailed instructions on opting in to new features for your offering, see Offering Configuration.
OPT IN EXPIRATION
Occasionally, features delivered Disabled via Opt In may be enabled automatically in a future update. This is known as an Opt In Expiration. If your cloud service has any Opt In Expirations you will see a related tab in this document. Click on that tab to see when the feature was originally delivered Disabled, and when the Opt In will expire, potentially automatically enabling the feature. You can also click here to see features with Opt In Expirations across all Oracle Cloud Applications.
Feature Summary
Column Definitions:
Report = New or modified, Oracle-delivered, ready to run reports.
UI or Process-Based: Small Scale = These UI or process-based features are typically comprised of minor field, validation, or program changes. Therefore, the potential impact to users is minimal.
UI or Process-Based: Larger Scale* = These UI or process-based features have more complex designs. Therefore, the potential impact to users is higher.
Features Delivered Disabled = Action is needed BEFORE these features can be used by END USERS. These features are delivered disabled and you choose if and when to enable them. For example, a) new or expanded BI subject areas need to first be incorporated into reports, b) Integration is required to utilize new web services, or c) features must be assigned to user roles before they can be accessed.
| Ready for Use by End Users Reports plus Small Scale UI or Process-Based new features will have minimal user impact after an update. Therefore, customer acceptance testing should focus on the Larger Scale UI or Process-Based* new features. |
Customer Must Take Action before Use by End Users Not disruptive as action is required to make these features ready to use. As you selectively choose to leverage, you set your test and roll out timing. |
|||||
|---|---|---|---|---|---|---|
| Feature |
Report |
UI or |
UI or |
|
||
Switch to New Rollups from the Existing Aggregate Fields of Workspace |
||||||
Configure Territory-Based Custom Object Security Using Access Groups |
||||||
Find Deleted Records in Sales and Fusion Service Using Deleted Records API |
||||||
Quick Facts Summarize Key Insights in Application Usage Insights Dashboard Pages |
||||||
Use Orchestration to Provide Salespeople with Best Practices for Lead Qualification and Processing |
||||||
View Team and Territories Associated with an Opportunity in Next Gen Sales |
||||||
View Records Grouped by Calendar and Fiscal Quarters in Next Gen List Page |
||||||
Sales Automation Core Common
CX Foundation
Capture Interactions in Activities
Salespeople can now log Interactions as part of Activities. They can log and view historical interactions and associate them with an activity. If there's an activity created to make a call or to send an email to a customer, the salespeople can capture corresponding details of the call or email interactions in the Interactions History subtab under the activity record.
This feature helps salespeople manually log interactions directly from activity records.
Steps to Enable
Use the Opt In UI to enable this feature. For instructions, refer to the Optional Uptake of New Features section of this document.
Offering: Sales
Prerequisites:
- Set the profile option, ORA_ZCA_ENABLE_TRACKING_INTERACTIONS, to Y at the Site level.
- The new privilege, ZCM_MANAGE_SALES_INTERACTIONS, must be assigned to the user.
Opt-In Instructions:
- Customers need to set the profile option, ORA_ZCA_ENABLE_INTERACTIONS_CALL_WRAP_UPS, to Y, so that call wrap-up tracking is enabled.
- Assign the privilege ZCM_MANAGE_INTERACTIONS to give access to manually log interactions from the Interactions history subtab from Activities.
- Once the customer sets the profile option to Y, it shouldn't be reverted back to the old model.
- For CX Sales users, when the profile option is enabled, the CX Sales web application should:
- In Workspace, the saved searches 'My Call Reports' should not be available from Activities
- In Workspace, 'Create Call Report' and 'Decline Call Report Creation' smart action in 'My Appointments' and 'My Calls to Log' saved search should be hidden
- In the 'My Activities' page, 'My Call Reports' list should be hidden
- Hide the 'Call Report' subtab in the Appointments/Tasks pages
- Hide 'Create Call Report' from the Actions menu in Appointments page
- Enable 'Log an Interaction' smart action in action menus on all objects that previously had 'Create Call Report'
- Enable 'Interactions History' subtab in Activities
- If the customer uses custom layouts, actions related to Call Reports should be updated to disable Call Report action
Steps to enable the Interactions History subtab:
One can view interactions history associated with their activities through the Edit Task: Interactions History subtab and Edit Appointment: Interactions History subtab.
The Interactions History subtab is hidden by default, but one can make it available to users through Application Composer.
Here's how to add the Interactions History subtab to the Edit Activity page.
- Sign in as a sales administrator or as a setup user.
- Activate a sandbox.
- Navigate to Application Composer, in the Configuration category.
- In the navigation tree, expand Standard Objects, expand Activities, and click Pages.
- Ensure that the Application Pages tab is selected.
- In the Details Page Layouts region, there are two options, one for Task and another for Appointment. Duplicate the standard layout by highlighting the standard layout and clicking the Duplicate icon.
- Type a new layout name and click Save and Edit.
The Details Layout page appears in the Task/Appointment section.
- On opening the new layout page, in the Subtabs Region, click the Hide, Show, or Reorder Subtabs icon.
The Configure Subtabs dialog box appears.
- Move Interactions History from the Available Subtabs to the Selected Subtabs window.
- Click OK.
- Click Save and Close.
- Click Done and ensure that the layout status for your user-defined layout is Active.
- Test the changes: Navigate to Sales > Activities as a user with access to the Activities pages, for example, as a salesperson. Edit a task or an appointment and ensure you can see the Interactions History sub-tab in the Edit Activity page.
- Publish the sandbox.
Tips And Considerations
Customers should go into the Smart Actions framework and disable all the Call Report actions and enable all the Log an Interaction actions manually. Same goes for Saved searches. Failing to do this will result in both call report and Interactions functionality not being available from the application.
Access Requirements
Sales Representative
CRM Common Components
Receive Email Notifications for Scheduled Jobs
If a scheduled job, such as Periodic Refresh, runs beyond a predefined threshold, then you get an email notification to inform you.
This helps you monitor jobs without having to sign into the application.
Steps to Enable
You don't need to do anything to enable this feature.
Key Resources
- See the "Workspace and Adaptive Search" chapter in the sales Implementation Reference guide.
Automatically Create Proposals from Opportunity Quotes
Proposals can automatically be generated from opportunity quotes by utilizing the power of routines that use configured rules. This extends the existing capability, which automatically creates a quote from an opportunity using routines.
Salespeople don't need to manually go through the process of generating a proposal. After the administrator sets up the routine rules on quote attributes and when the rule conditions are met, the proposal is automatically created and added to the quote. Salespeople can then view the proposal in CX Sales or Oracle Configure, Price, and Quote (Oracle CPQ) and take the next steps to close the deal. Salespeople are thus able to focus time on negotiating and closing deals with the customer, instead of spending time on manual nonvalue-added tasks, such as creating a proposal manually.
Steps to Enable
- Assign administrative privileges to an Oracle Configure, Price, and Quotes (Oracle CPQ) user to allow the automatic creation of a proposal from a quote.
- Set up the CX Sales to Oracle CPQ configuration. See the "CX Sales Configuration Steps" topic in the Integrating CX Sales with Oracle CPQ guide.
- Go to the Manage Oracle CX Sales to Oracle CPQ Cloud Integration page and complete these steps:
- Click the Set Up link under the Authorization column.
- Select oracle/wss_username_token_over_ssl_client_policy for Security Policy.
- Enter the user name and password for single sign-on.
- Set up routines on the Quote and Order object, select the Create Proposal action, and define the rules. See the "Overview of Routines" topic to learn more.
Key Resources
- See the "Enable Creating a Quote Automatically from an Opportunity" topic in the "Quotes and Orders" chapter in the sales Implementation Reference guide.
Access Requirements
- Sales Administrator for the setup and error handling.
- Salespeople and sales managers for using the proposals to move the deal to closure.
Enable User Context for Custom Objects
Administrators can now perform relevancy scoring calculations for custom objects. This allows for having relevancy-based saved searches in Adaptive Search, which helps to view the list of most relevant items from those custom objects in Workspace, Digital Sales, and CX Sales Mobile.
About 50 percent of Oracle customer data is built upon custom objects. This feature enhancement provides support for custom objects in User Context, thus providing better coverage of the feature in the product.
Steps to Enable
You don't need to do anything to enable this feature.
Tips And Considerations
This can be done only via REST APIs.
Access Requirements
- Administrator roles
Accounts and Contacts
Switch to New Rollups from the Existing Aggregate Fields of Workspace
Your users now get a more consistent user experience and improved performance because Workspace aggregate fields are now available as predefined rollups in the Rollups framework.
A standardized process to manage and calculate aggregated information ensures all metrics that are deployed across the application are consistent, accurate, and performant.
Steps to Enable
Here’s a summary of the privileges, setups, and tasks involved in setting up rollups for Sales:
- Add the Manage Rollup Metrics privilege to a copy of the Sales Administrator job role (ORA_ZBS_SALES_ADMINISTRATOR_JOB).
- Enable the Rollup Test Enabled profile option (ORA_ZCA_TEST_ROLLUPS), to display the Test tab on the Rollups setup page.
- Verify that these scheduled processes appear on the Scheduled Process page:
- Rollup Full Refresh
- Rollup Hierarchy Refresh
- Rollup Incremental Refresh
- Enable rollups for Adaptive Search. Let salespeople search accounts or contacts using rollups as search criteria.
Key Resources
- To learn how to implement rollups for your organization, see the "Rollups" chapter in the Implementing Sales guide.
Access Requirements
- Sales Administrator
Search
My Smart List Saved Searches Renamed to My List
The "My Smart List" saved searches are now renamed to "My List". For example, the My Smart List for accounts is now renamed to My List for Accounts, the My Smart List for leads is now called My List for Leads, and so on.
The My List saved search shows relevant results based on a user's activity, and it includes the most recently and frequently accessed records.
Steps to Enable
You don't need to do anything to enable this feature.
Key Resources
-
See the My Lists topic in the "Search" chapter of the Implementing Sales guide.
- See the "Workspace and Work Areas Search" chapter in the Using Sales guide.
Access Requirements
- Workspace and Adaptive Search users
Application Composer
Display Smart Actions Based on Signed-in User
Configure a smart action to check for the signed-in user before displaying at runtime. This is helpful if certain users don't need to see a smart action.
Create smart actions that can be displayed based on the signed-in user.
Steps to Enable
Leverage Application Composer to expose and adjust page layout and attributes. To learn more about extending your application using Application Composer, visit Oracle Help Center > your apps service area of interest > Books > Configuration and Extension.
To configure a smart action to check for the signed-in user, add this to the smart action condition:
$AssigneePartyId != :SIGNED_IN_USER
Key Resources
- See the "Overview of Smart Actions" topic in the "Add Objects and Fields" chapter of the Configuring Applications Using Application Composer guide.
Allow Indexing of Custom Fields Not Yet Indexed
In Application Composer, you can now edit an existing custom field and index it for better search results.
Administrators can now index previously created custom fields by editing them. This allows them to improve the search performance of the field, if required. Custom fields of type Number, Text, Currency, and Percentage can be edited to change a non-indexed field to an indexed field.
Steps to Enable
You don't need to do anything to enable this feature.
Access Requirements
- Sales Administrator
Allow Duplicate Records for Many-to-Many Relationships
Specify whether duplicate records are allowed for many-to-many relationships. Users might want to enter duplicate records due to their own business requirements.
Administrators can decide if duplicate records are allowed for many-to-many relationships.
Steps to Enable
Leverage Application Composer to expose and adjust page layout and attributes. To learn more about extending your application using Application Composer, visit Oracle Help Center > your apps service area of interest > Books > Configuration and Extension.
To enable duplicate records for many-to-many relationships, select the Allow duplicate records check box when creating or editing a many-to-many relationship in Application Composer.
Key Resources
- See the "Many-to-Many Relationships" topic in the "Add Objects and Fields" chapter of the Configuring Applications Using Application Composer guide.
Security
Configure Territory-Based Custom Object Security Using Access Groups
Enable territory-based access to custom objects using a Territory dynamic choice list field and access groups. Once a territory is selected, a territory team member as well as other members of the territory hierarchy can access custom object records.
Customers no longer need to create custom data security predicates to secure custom objects based on a Territory dynamic choice list field.
Steps to Enable
Leverage Application Composer to expose and adjust page layout and attributes. To learn more about extending your application using Application Composer, visit Oracle Help Center > your apps service area of interest > Books > Configuration and Extension.
To use territory-based custom object security, first enable access group security and then enable the Configure Territory for Access Group Security in Application Composer. You should then configure access groups in Sales and Service Access Management, via the Navigator. You must still configure functional security using the Roles table in Application Composer.
Key Resources
- See the "Enable Territory-Based Access to Custom Objects" topic in the "Add Objects and Fields" chapter in the Configuring Applications Using Application Composer guide.
Access Requirements
Sales Administrator
Import/Export Management
APIs
Find Deleted Records in Sales and Fusion Service Using Deleted Records API
You can now get a list of deleted object records in Sales and Fusion Service using the Deleted Records API, so that you can take appropriate actions in your application.
You can use this API to get the list of deleted object records if your integrated application needs the information.
Steps to Enable
Review the REST service definition in the REST API guides to leverage (available from the Oracle Help Center > your apps service area of interest > APIs & Schema). If you are new to Oracle's REST services you may want to begin with the Quick Start section.
Access Requirements
- Sales Administrator or Customer Relationship Management Application Administrator
- If you're going to use a custom role, make sure that your role has the View Deleted Object Records privilege.
Sales Automation Foundation Common
Sales Analytics
Include Manager Person Number in Reports
Manager Person Number has been added to Incentive Compensation subject areas. You can now include the person number for managers in reports at each level of the manager hierarchy.
Easily identify participant managers and manager hierarchy.
Steps to Enable
You don't need to do anything to enable this feature.
Key Resources
- See the Incentive Compensation related topics in the Subject Areas for Transactional Business Intelligence guide.
Access Requirements
- Compensation Administrator
- Compensation Manager
- Compensation Analyst
Quick Facts Summarize Key Insights in Application Usage Insights Dashboard Pages
Quick Facts provide key insight summaries at the top of dashboard pages in Application Usage Insights. The Quick Facts feature distills key insights provided by visualizations into easily consumable actionable conclusions.
Quick Facts consolidate detailed usage insights displayed on a dashboard page into a few summarized key performance indicators. These consolidated Quick Facts enable users to quickly understand usage trends and explore areas of interests.
Steps to Enable
You don't need to do anything to enable this feature.
Tips And Considerations
Quick Facts are the first thing users view on a dashboard page. Users see a quick overview of usage metrics pertinent for that page. This informs users of any trouble spots or other areas that need special attention. The user can then investigate by viewing more detailed individual visualizations on the page.
Key Resources
- See the "Application Usage Insights" section in the "Application Adoption and Usage Reporting" chapter in the Creating and Administering Analytics guide.
Access Requirements
- Sales Manager
- Sales Administrator
CX Sales Mobile
Scanned Typed Text Notes and Add Them to Sales Objects
While using their CX Sales Mobile app, salespeople can scan printed text with their camera and save the text as notes for accounts, contacts, opportunities and other sales objects.
Easily capture and convert typed text to notes which can then be used in search.
Steps to Enable
You don't need to do anything to enable this feature.
Tips And Considerations
Scanning multiple pages of documents, the app will append each page to the notes.
Receive Notifications on Mobile for Upcoming Appointments
Notify salespeople of their upcoming customer appointments, so they're always on time for their meetings.
Salespeople always know their upcoming appointments.
Steps to Enable
Leverage Application Composer to expose and adjust page layout and attributes. To learn more about extending your application using Application Composer, visit Oracle Help Center > your apps service area of interest > Books > Configuration and Extension.
- Create a publishable sandbox that includes Application Composer.
- Inside the sandbox, navigate to Application Composer.
- Under the Common Setup Menu, or on the Overview page, click Mobile Application Setup.
- Click the CX Sales Mobile Composer tab to open the CX Sales Mobile configuration tool.
- Click Settings in the CX Sales Mobile Composer.
- Expand Mobile Notification Settings under Notification Settings and click on the "Enable for Appointments" toggle.
- Select Assigned Regions and Assigned Roles to select the users that will receive the notifications.
- Click Save and publish the sandbox.
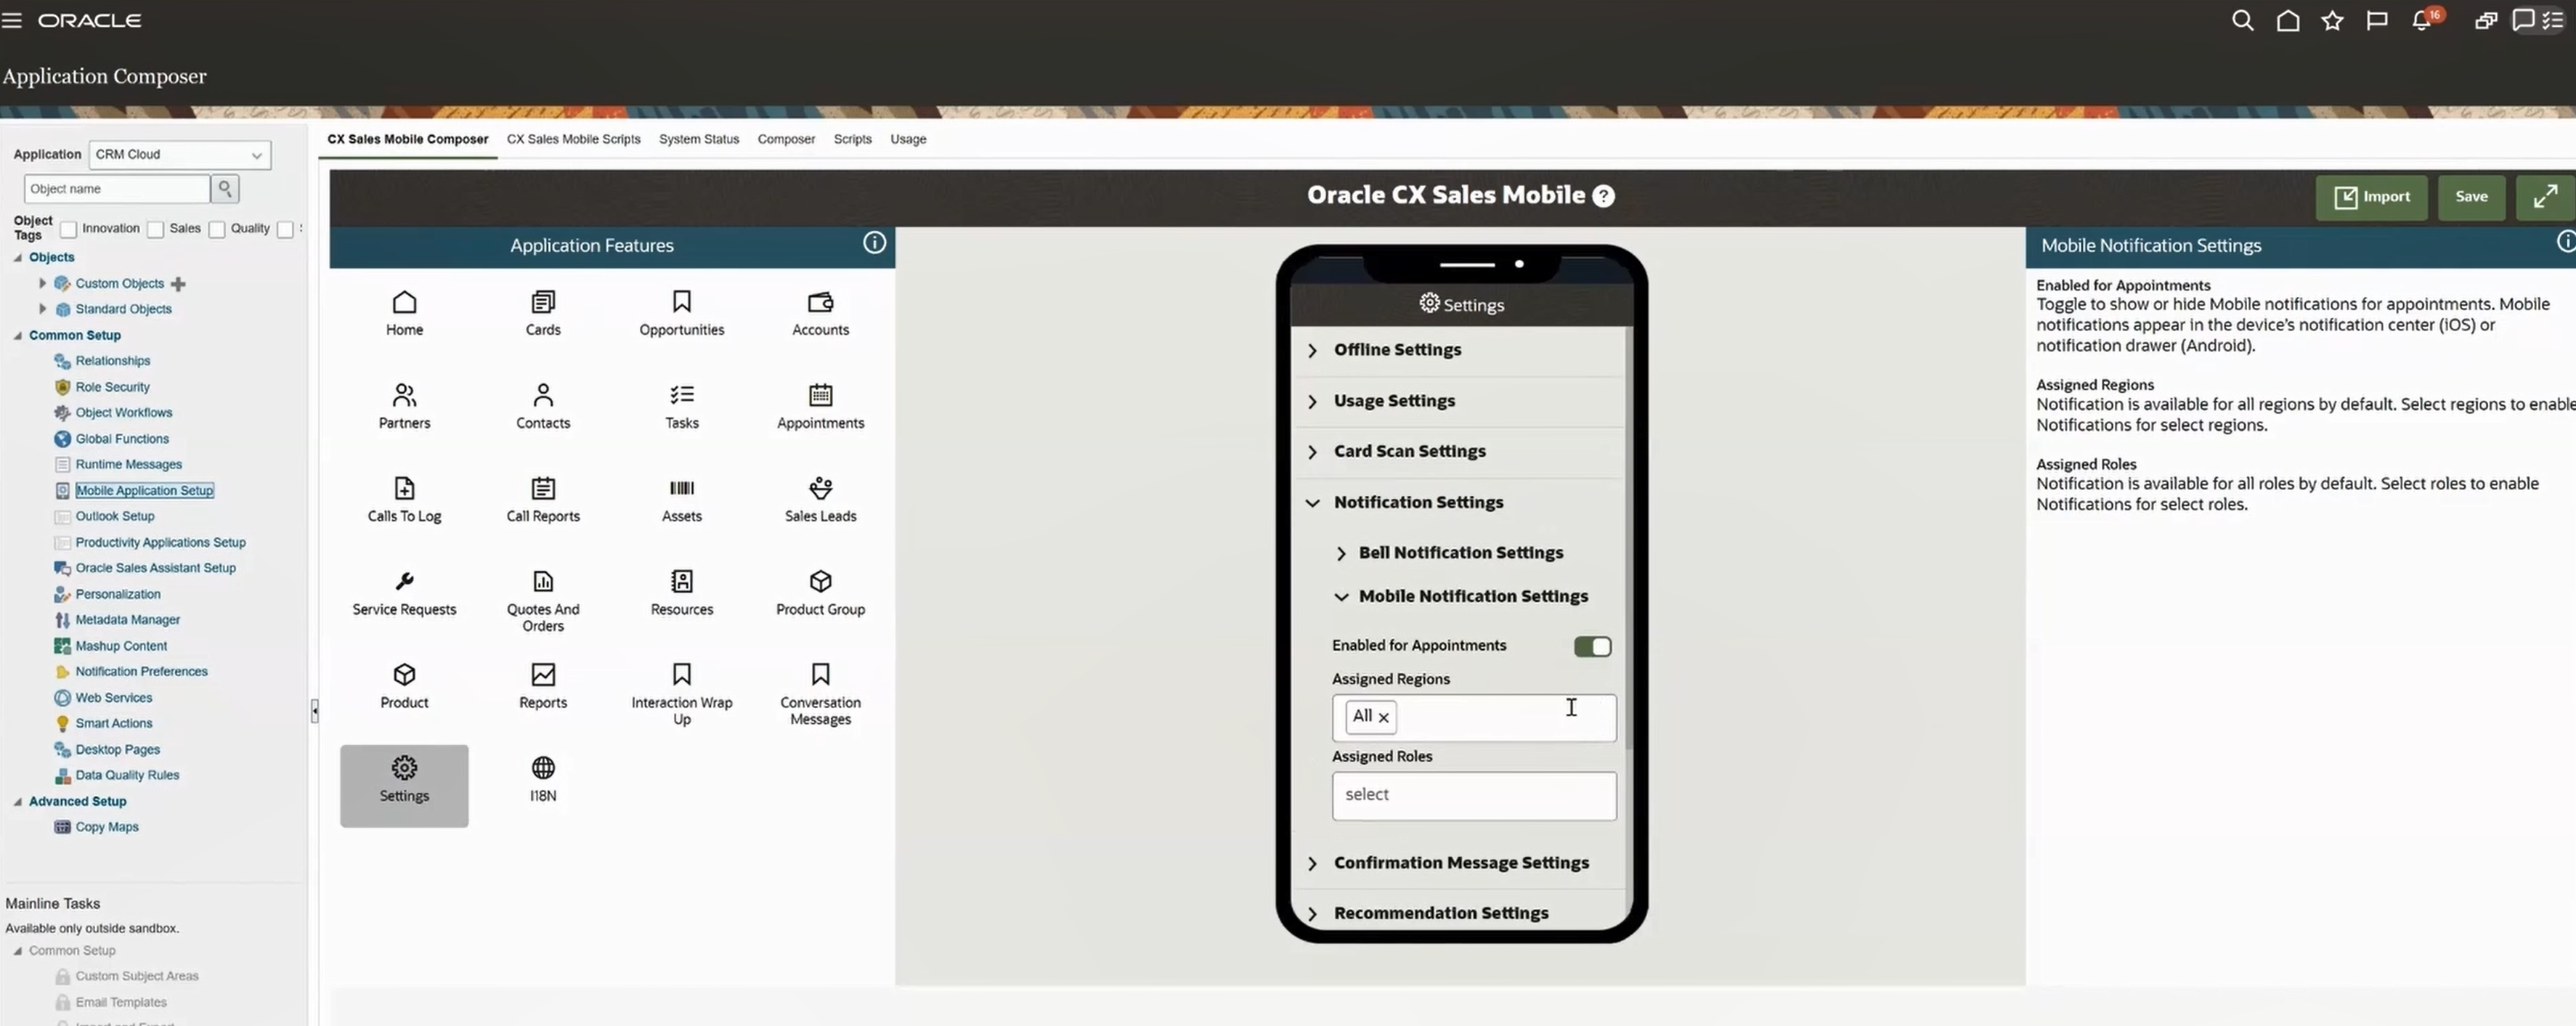
Mobile Notification Settings
Tips And Considerations
Salespeople can choose to not receive mobile notifications for their appointments by clicking Navigator Icon > Settings > Mobile Notifications in the CX Sale Mobile App and disabling the Appointments toggle.
Access Requirements
- Sales Administrator
- Sales Representative
Sales Force Automation
Enterprise Contracts
Price Sales Agreements Based on a Specific Date
When you author a sales agreement with a start date in the past or future, you may want to use the pricing as of that date. With the Price as of Date field, you can select a date in the future. The charges and adjustments that are effective on the date specified will be applied during pricing. If you don't enter a Price as of Date, the line will be priced based on the current date. This feature is applicable only when used with Oracle Fusion Pricing.
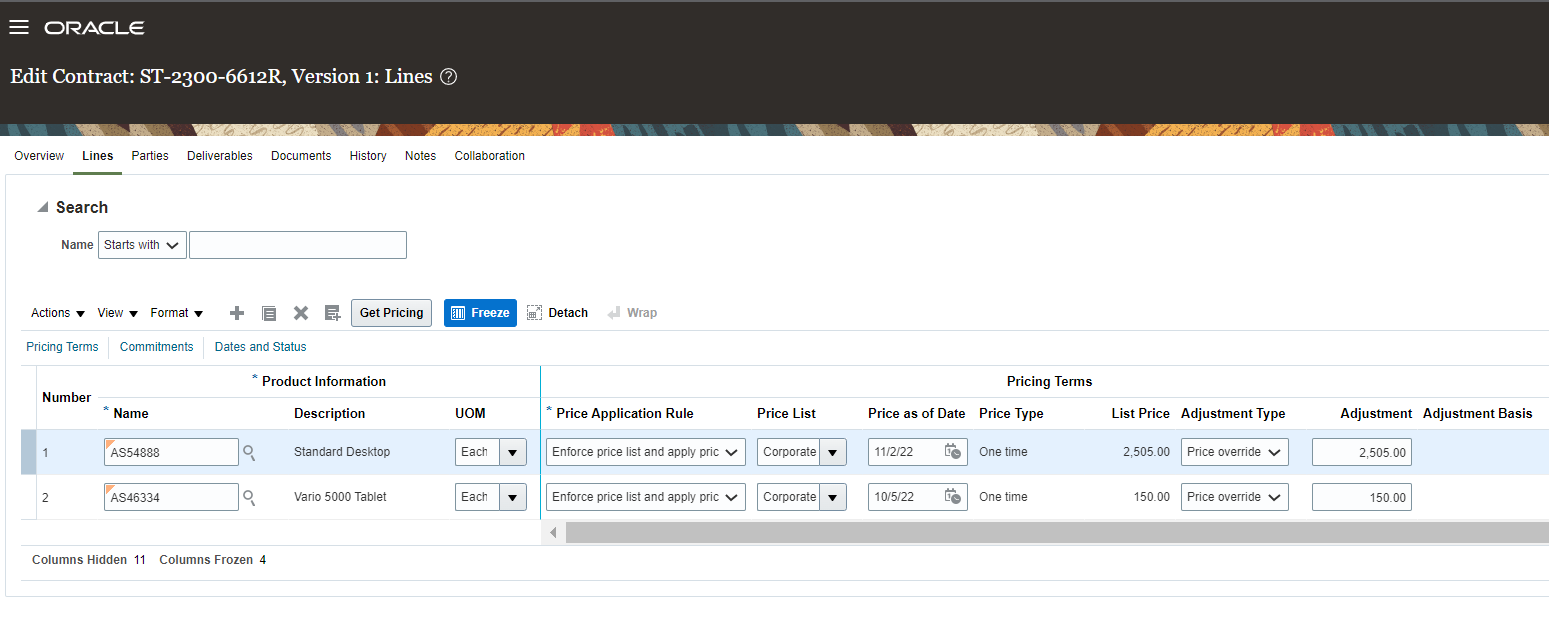
Price as of Date field in Contract Line
For example, if you're introducing new products in the future, you can add these to sales agreements in advance by entering a future Price as of Date. This helps avoid delays for your customers when the product launches.
Steps to Enable
You don't need to do anything to enable this feature.
Key Resources
- See the "Create a Sales Agreement Line" topic in the Using Customer Contracts guide.
Next Gen Sales User Experience
View Assets in Digital Sales
Assets are now available in Digital Sales, allowing salespeople to create, edit, and view assets. Asset information lets salespeople understand the products their customers own, which helps them with upsell and cross-sell opportunities.
It's easier to sell to existing customers than to acquire new customers from a time, effort, and money perspective. When salespeople have detailed information about the assets owned by their current customer base, then they can create new cross-sell and upsell opportunities with products that complement or replace existing products. New opportunities can also be created for similar customers based on the asset ownership customer demographics.
Steps to Enable
You don't need to do anything to enable this feature.
Access Requirements
- Sales Representative
Use Orchestration to Provide Salespeople with Best Practices for Lead Qualification and Processing
The Orchestration feature gives salespeople guidance when qualifying and processing leads.
This feature allows leads to use Orchestration to support a guided selling experience for SDRs/BDRs who qualify leads. This feature also lets users define leads cadences.
Steps to Enable
You don't need to do anything to enable this feature.
Tips And Considerations
The Leads object has dedicated actions that change the status of leads, so that they can be used in the orchestration steps that guide users to take actions at the right time.
Access Requirements
Sales Administrator (ORA_ZBS_SALES_ADMINISTRATOR_JOB)
The Sales Administrator can view, associate, create, update, run/schedule the ESS Jobs of the Sales Orchestration object, with these privileges:
- ZCA_VIEW_SALES_ORCHESTRATION
- ZCA_CREATE_SALES_ORCHESTRATION
- ZCA_UPDATE_SALES_ORCHESTRATION
- ZCA_DELETE_SALES_ORCHESTRATION
- ZCA_RUN_SALES_ORCHESTRATION_SCHEDULER
- ZCA_EXPORT_IMPORT_SALES_ORCHESTRATION
Sales Representative (ORA_ZBS_SALES_REPRESENTATIVE_JOB)
The Sales Representative can view, associate the Sales Orchestration to any object and take the object through different stages and steps of it, with this privilege:
- ZCA_VIEW_SALES_ORCHESTRATION
Sales Manager
The Sales Manager can view, associate the Sales Orchestration to any object and take the object through different stages and steps of it, with this privilege:
- ZCA_VIEW_SALES_ORCHESTRATION
Sales VP
Sales VP can view, associate the Sales Orchestration to any object and take the object through different stages and steps of it, with this privilege:
- ZCA_VIEW_SALES_ORCHESTRATION
Enterprise Scheduler Job Application Identity for CRM (FUSION_APPS_CRM_ESS_APPID)
The ESS APPID role can run the Sales Orchestration ESS Jobs. The ESS APPID role invokes Orchestration's REST WSs for signal enrichment and hence, it needs the GET access on the REST resources, with these privileges:
- ZCA_RUN_SALES_ORCHESTRATION_SCHEDULER
- ZCA_VIEW_SALES_ORCHESTRATION
View Team and Territories Associated with an Opportunity in Next Gen Sales
Sales users can view the team members and territories associated with an opportunity in Next Gen Sales.
A simpler and consistent way to view all the team members and territory team members that are associated with an opportunity is key for sales reps and sales mangers within Next Gen Sales.
Steps to Enable
You don't need to do anything to enable this feature.
Tips And Considerations
This feature replaces the existing opportunity team foldout panel and page. Any customizations on the original page will be lost. You may use Visual Builder Studio to customize the resource, opportunity team, and territories information shown in the new opportunity team foldout panel and page.
Access Requirements
- Sales Representative
- Sales Manager
- Sales Administrator
Mark a Record as Favorite from Next Gen List Page
You can mark or unmark a record as a Favorite from the List page in your Next Gen sales application.
This provides you with a quick and easy way to work with and access your favorite records.
Steps to Enable
You don't need to do anything to enable this feature.
Key Resources
- See the "The Basics" chapter in the Using Digital Sales guide.
View Records Grouped by Calendar and Fiscal Quarters in Next Gen List Page
In Next Gen list pages, you can view records grouped by calendar or fiscal quarters when performing a Group By filter search on a date field.
Group By on Fiscal Quarter can be really useful to have views like Opportunities closing in current and next fiscal quarters or Leads generated in previous quarter.
Steps to Enable
You don't need to do anything to enable this feature.
Key Resources
- See the "Search and Lists" chapter in the Using Digital Sales guide.
- Specific details in the Group and Summarize section of the guide
Access Requirements
Available to all roles.
Open Any External URL Using Smart Actions
You can open any external URL directly from list pages to a new browser tab. For example, if you have third-party software with details of an account's financial information, you can get access to that information directly from the Accounts list page.
To implement this feature, you first create an object function that returns the URL, and then create a Smart Action that's exposed on the list page. If you click Smart Action from the Accounts list page, then the corresponding URL opens the account's financials page in a new tab.
Steps to Enable
You don't need to do anything to enable this feature.
View Timeline of Activities and Updates to Sales Records
Provide salespeople with a consolidated view of all past phone, email, and other interactions in the Activity Stream. Salespeople can view upcoming and past activities related to that record in a contextual thread. The Activity Stream provides a chronological view of all the updates done to the sales record that salespeople can search and filter to easily access relevant entries. From the Activity Stream, they can drill into threaded conversations and activities to get more details. Salespeople see the same information on their mobile as they do in Digital Sales activities.
Sales Representatives can use the Activity Stream to :
- Drive informed conversations with customers with a consolidated view of all information related to the sales record
- Easily follow conversations, outcomes, and updated to the records from the related timeline
Steps to Enable
To enable Activity Stream in CX Sales Mobile follow these steps :
- Enable Oauth for CX Sales Mobile. See Enable Sales Representatives to stay signed into the application for details on how to enable Oauth.
- Configure Confidential Application in Oracle Identity Cloud Services
- Sign into CX Sales as CRM Application Administrator
- Click Navigator > My Enterprise > Setup and Maintenance work area.
- Click the Tasks > Review Topology > Diagnostic Test > Enterprise Application Configuration.
- In Enterprise Application drop down, search for Oracle SaaS and click OK.
- Click Run on Validate External Enterprise Application Endpoint URL.
- Copy External Endpoint URL and store the URL for use in future steps.
- Navigate to www.oracle.com > View Accounts and enter the name of relevant pod in the Cloud Account Name field.
- Sign into My Console in Identity Cloud Service.
- Click Next and enter your Identity Cloud Service password. See Oracle Identity Cloud Service - Get Started for more details.
- In the Identity Cloud Service console, expand the Navigation Drawer and then click Applications.
- Select the Confidential Application corresponding to CX Sales Mobile that was created in step 1.
- Click Configurations > Resources.
- In Secondary Audience enter External Endpoint URL from Step 2.5 and click Add.
- Enable Profile Option
- Sign into CX Sales as Sales Administrator.
- Click Navigator > My Enterprise > Setup and Maintenance work area.
- Click Tasks > Search. Search for Manage Administrator Profile Values task and open it.
- Search the Profile Option code as "ORA_ZCA_ENABLE_TRACKING_EMAIL_CONVERSATIONS".
- Change the profile value to "Yes".
- Click Save.
- Enable Activity Steam button in CX Sales Mobile Composer
- Click Navigator > Configuration > Sandboxes and create a publishable sandbox that includes Application Composer.
- Inside the sandbox, navigate to Application Composer.
- Under the Common Setup Menu, or on the Overview page, click Mobile Application Setup.
- Click the CX Sales Mobile Composer tab to open the CX Sales Mobile configuration tool.
- .In Application Features pane, click any of the following: Account, Contact, Opportunity, or Lead.
- Click Summary view and select or create a custom Page Layout. See Configure the Summary Page Layout for more details.
- Click View Activity Stream button below Aggregates section to show the button on the Summary Page Layout.
- Click Save.
- Test that the View Activity Stream button appears in the Account/Contact/Opportunity/Lead summary page. See Test your configurations for more details.
- Publish the sandbox.
Tips And Considerations
After enabling the Activity Stream for CX Sales Mobile, the View Activity Stream button is visible only after the user signs in to Mobile Application.for the second time.
Key Resources
- See Enable Sales Representatives to Stay Signed into the Application in the "Get Started" chapter in the Implementing Sales guide.
- See Configure the Summary Page Layout in the "CX Sales Mobile" chapter in the Implementing Sales guide.
- See Test Your Configurations in the "CX Sales Mobile" chapter in the Implementing Sales guide.
Access Requirements
- Sales Administrator
- CRM Application Administrator
- Sales Representative